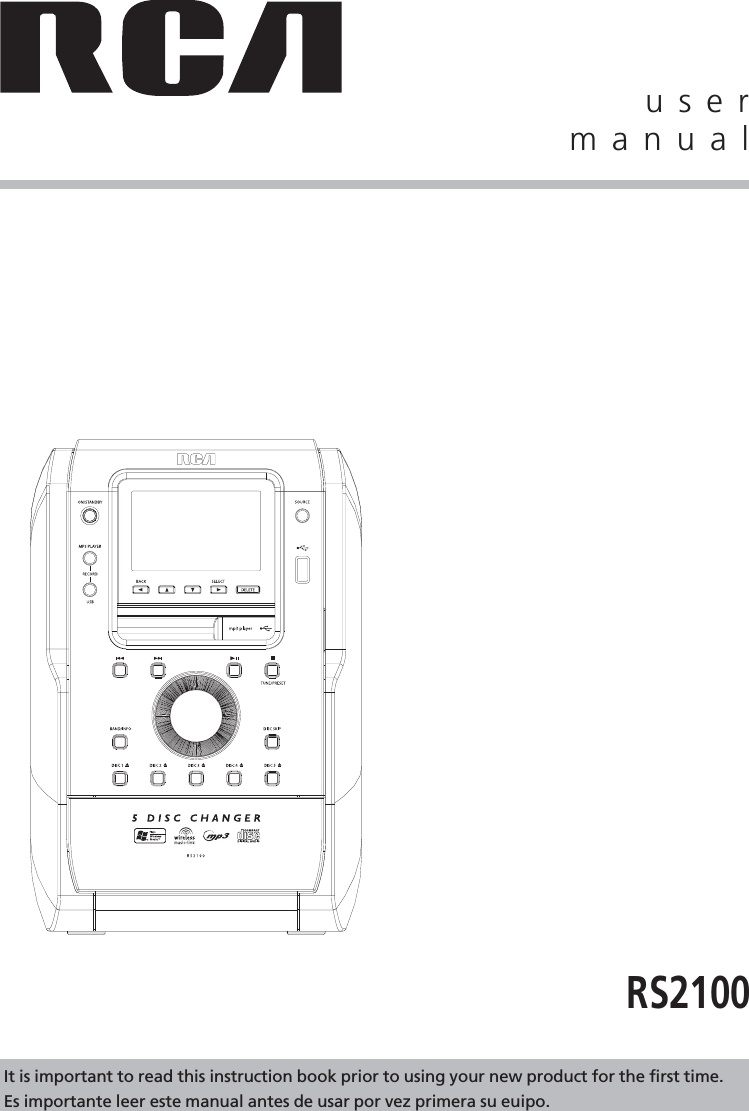
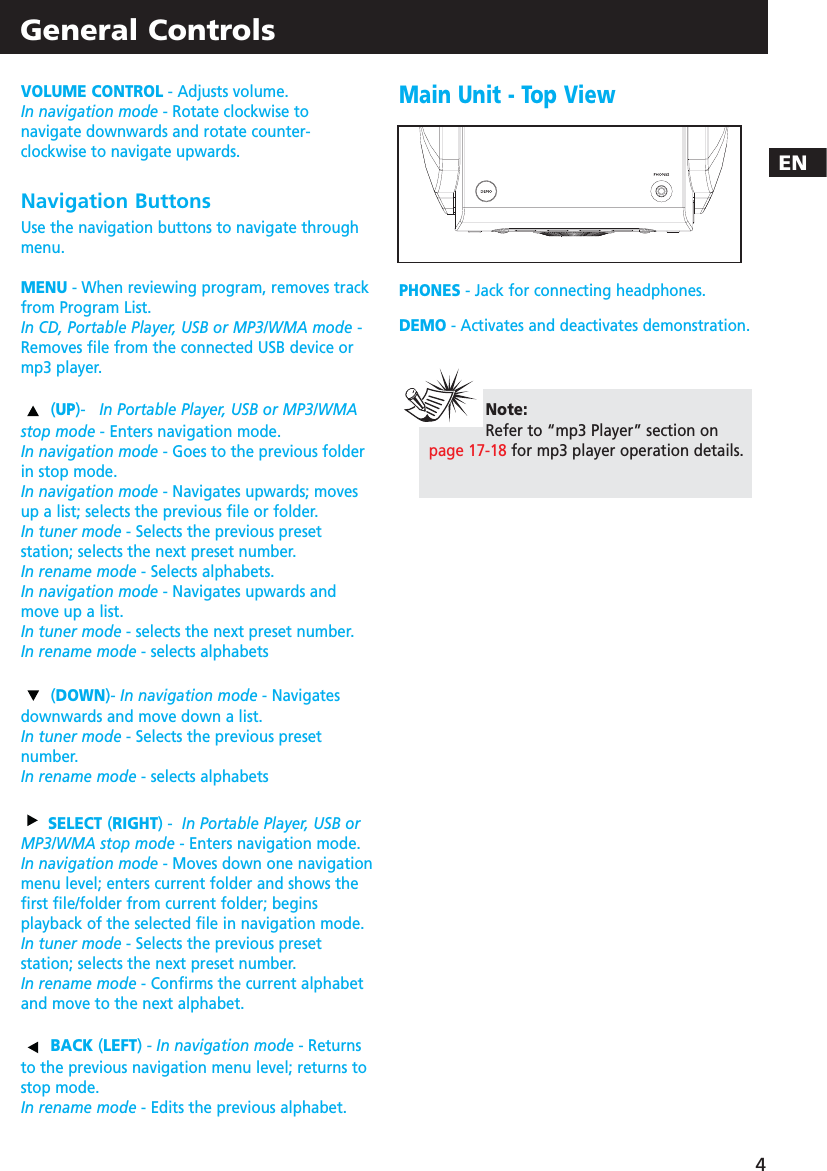
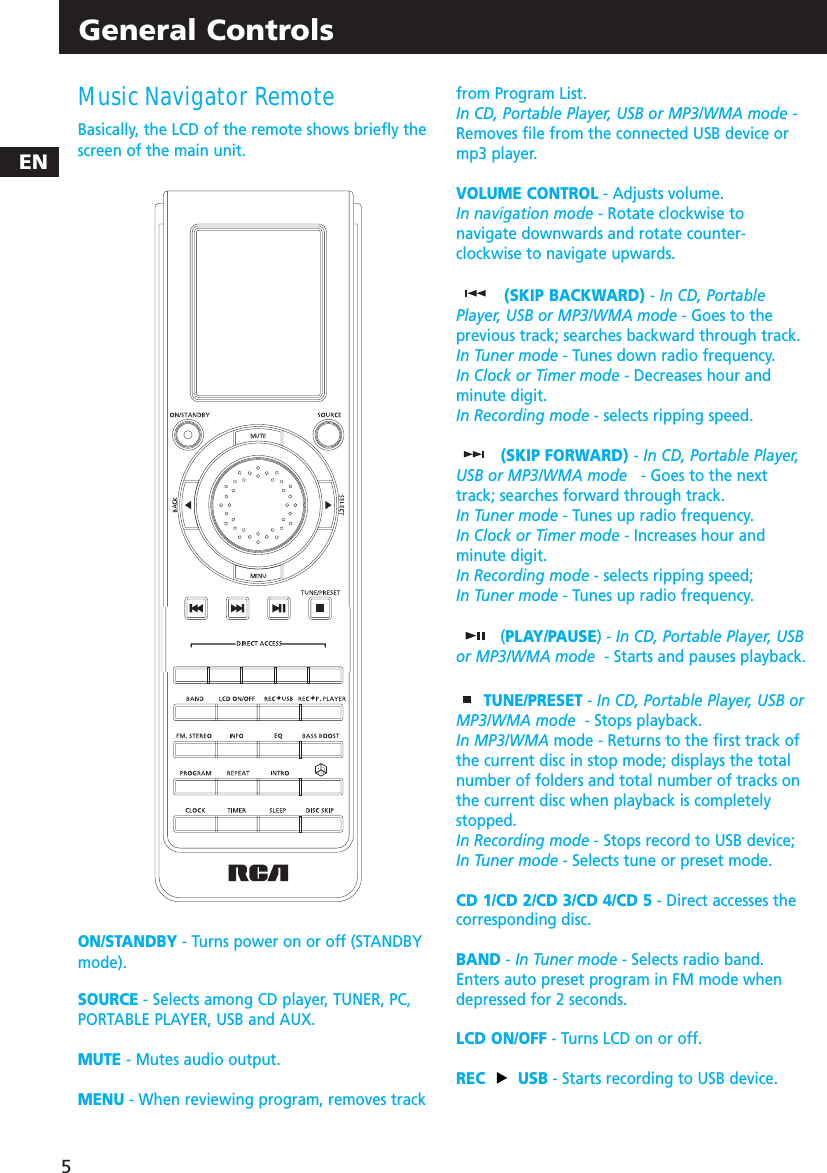
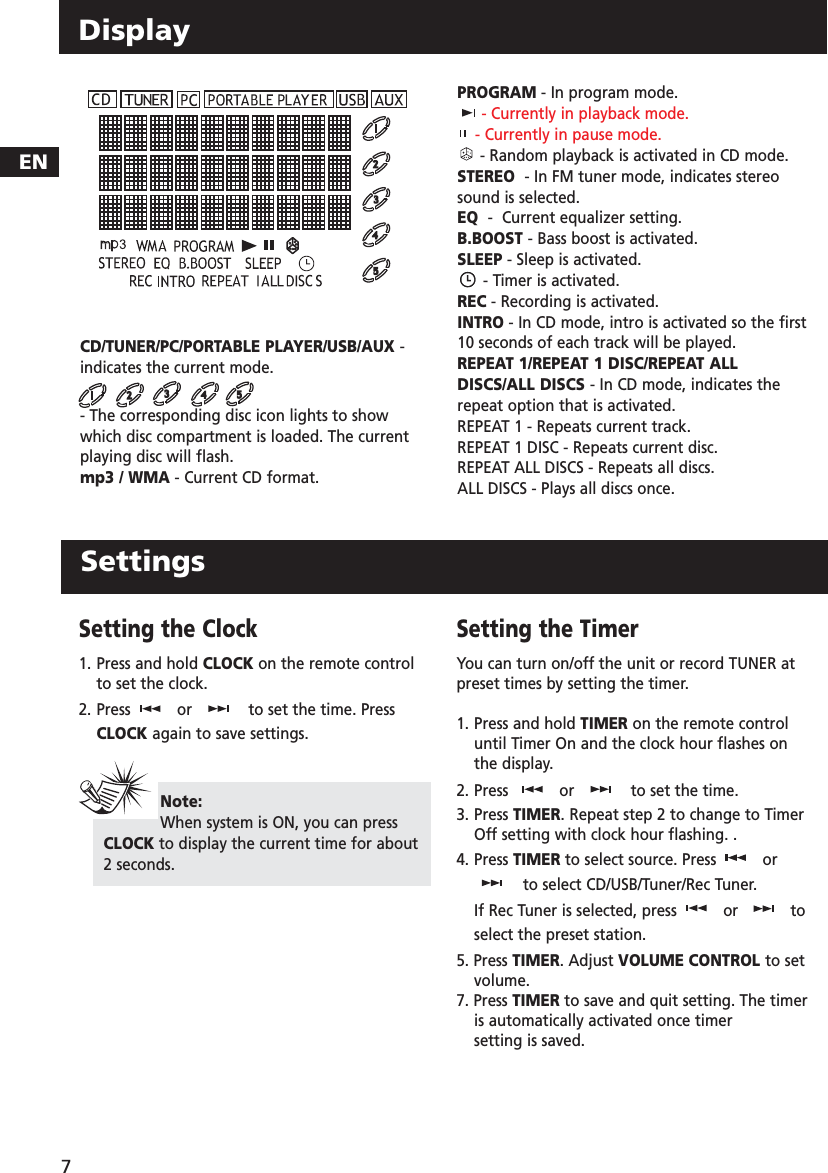
Technicolor Connected Home USA RS2100 2.4GHz Wireless Audio System, Main unit User Manual RS2100 EN 14 06 06

Technicolor Connected Home USA LLC 2.4GHz Wireless Audio System, Main unit RS2100 EN 14 06 06

user manual

RS2100usermanualIt is important to read this instruction book prior to using your new product for the first time.Es importante leer este manual antes de usar por vez primera su euipo.
FCC InformationENFCC InformationThis device complies with Part 15 of the FCC Rules.Operation is subject to the following two conditions: (1)This device may not cause harmful interference, and (2)this device must accept any interference received,including interference that may cause undesiredoperation.In accordance with FCC requirements, changes ormodifications not expressly approved by Thomson Inc.could void the user’s authority to operate this product.This device generates and uses radio frequency (RF)energy, and if not installed and used properly, thisequipment may cause interference to radio andtelevision reception.If this equipment does cause interference to radio ortelevision reception (which you can determine byunplugging the unit), try to correct the interference byone or more of the following measures:•   Re-orient the receiving antenna (that is, the antennafor the radio or television that is "receiving" theinterference).•   Move the unit away from the equipment that isreceiving interference.•   Plug the unit into a different wall outlet so that theunit and the equipment receiving interference are ondifferent branch circuits.If these measures do not eliminate the interference,please consult your dealer or an experiencedradio/television technician for additional suggestions.Also, the Federal Communications Commission hasprepared a helpful booklet, "How To Identify andResolve Radio TV Interference Problems." This bookletis available from the U.S. Government Printing Office,Washington, DC 20402. Please specify stock number004-000-00345-4 when ordering copies. This productcomplies with DHHS Rules 21 CFR Subchapter J.Applicable at the date of manufacture.For Your Safety The AC power plug is polarized(one blade is wider than the other)and only fits into AC power outletsone way. If the plug won’t go intothe outlet completely, turn theplug over and try to insert it theother way. If it still won’t fit,contact a qualified electrician to change the outlet, oruse a different one. Do not attempt to bypass this safetyfeature. CAUTION: TO PREVENT ELECTRIC SHOCK, MATCHWIDE BLADE OF PLUG TO WIDE SLOT, FULLY INSERT.Main plug is used as the disconnect device, it shallremain readily operable and should not be obstructedduring intended used.To be completely disconnected theapparatus from supply mains,the main plug of theapparatus shall be disconnected from the mains socketoutlet completely.Changes or modifications not expressly approved by theparty responsible for compliance could void the user’sauthority to operate the equipment.For mp3 player onlyRECORDHave a Blast- Just Not in YourEardrumsMake sure you turn down thevolume on the unit before you puton headphones. Increase the volumeto the desired level only afterheadphones are in place.This Class B digital apparatus complies withCanadian ICES-003.Cet appareil numérique de la class B est conforme àla norme du NMB-003 du CanadaRCARD2100Equipment tested for compliance as a complete unit
FCC InformationENThe descriptions and characteristics given in this document are given as a general indication and not as a guarantee.In order to provide the highest quality product possible, we reserve the right to make any improvement ormodification without prior notice.  The English version serves as the final reference  on all products and operationaldetails should any discrepancies arise in other languages.Technical specificationProduct: 5CD Audio System with mp3 PlayerBrand: RCAModel: RS2100(Audio System)/RD2100(mp3 player)Electrical Consumption:Power Supply:  120V~60HzPower consumption: 150 WattsIMPORTER Comercializadora Thomson de México, S.A. de C.V.Álvaro Obregón No. 151. Piso 13.Col. Roma. Delegación CuauhtémocC.P. 06700. México, D.F.Telefono: 52-55-11-020360RFC: CTM-980723-KS5For Your Records In the event that service should be required, you mayneed both the model number and the serial number.  Inthe space below, record the date and place of purchase,and the serial number:Model No. Remote Control No. Date of Purchase Place of Purchase Serial No.  Service Information This product should be serviced only by those speciallytrained in appropriate servicing techniques. Forinstructions on how to obtain service, refer to thewarranty included in this Guide.WARNING:  TO PREVENT FIRE OR ELECTRICAL SHOCK HAZARD, DO NOT EXPOSE THIS PRODUCTTO RAIN OR MOISTURE. SEE MARKING ON BOTTOM / BACK OF PRODUCTCAUTIONRISK OF ELECTRIC SHOCK            DO NOT OPENTHE EXCLAMATIONPOINT WITHIN THETRIANGLE IS AWARNING       SIGNALERTING YOU  OFIMPORTANTINSTRUCTIONSACCOMPANYINGTHE PRODUCT.THE LIGHTNINGFLASH AND ARROW-HEAD WITHIN THETRIANGLE IS AWARNING SIGNALERTING YOU OF"DANGEROUSVOLTAGE" INSIDETHE PRODUCT.CAUTION: TO REDUCE THERISK OF ELECTRIC SHOCK,DO NOT REMOVE COVER(OR BACK). NO USER-SERVICEABLE PARTS IN-SIDE. REFER SERVICINGTO  QUALIFIED SERVICE PERSONNEL.Portions based upon Microsoft Windows Media Technologies. Copyright © 1999 Microsoft Corporation. All RightsReserved. Microsoft, Windows Media, and the Windows Logo are trademarks or registered trademarks of MicrosoftCorporation in the United States and/or other countries.Main unitFCC ID:G95RS2100This device complies with part 15 of the FCC rules.Operation is subject to the following two conditions:(1) This device may not cause harmful interference,and(2) This device must accept any  interferencereceived, including interference that may cause undesiredoperation.Remote controllerFCC ID:G95RS2100AThis device complies with part 15 of the FCC rules.Operation is subject to the following two conditions:(1) This device may not cause harmful interference,and(2) This device must accept any  interferencereceived, including interference that may cause undesiredoperation.USB dongleFCC ID:G95RS2100BThis device complies with part 15 of the FCC rules.Operation is subject to the following two conditions:(1) This device may not cause harmful interference,and(2) This device must accept any  interferencereceived, including interference that may cause undesiredoperation.
Important Information Safety Precautions•  Never open the cabinet under any circumstances.  Any repairs or internal adjustments should be made only by a trained technician.•  Never operate this product with the cabinet removed.•Do not use your System immediately after transporting it from a cold place to a warm place, as condensation may cause the system to malfunction.•  Keep your unit away from humid areas and abnormally hot places.•  Do not touch the player with wet hands.  If any liquid enters the player cabinet, take the player to a trained technician for inspection.•  This compact disc player uses a laser to read the music on the disc.  The laser mechanism corresponds to the cartridge and stylus of a record player.  Although this product incorporates a laser pick-up lens, it is completely safe when operated according to directions.•  Discs rotate at high speed inside the player.  Do not use damaged, warped, or cracked discs.•  Do not touch the pick-up lens which is located inside the disc compartment. To keep dust from collecting on the pick-up lens, do not leave the compartment door open for an extended period of time.  If the lens becomes dirty, clean it with a soft brush, or use an air blower brush designed for camera lenses.•  The apparatus shall not be exposed to dripping or splashing and that no objects filled with liquids, such as vases, shall be placed on the apparatus.•Minimum distances around the apparatus for sufficient ventilation .•The ventilation should not be impeded by covering the ventilation opening with items, such as newspaper,table-cloths,curtains,etc.•No naked flame sources,such as lighted candles,should be placed on the apparatus.•Attention should be drawn to the environmental aspects of battery disposal .Precautions for the mp3 Player•  Do not use the unit immediately after transportation from a cold place to a warm place; condensation problem may result.•  Do not store the unit near fire, places with high temperature or in direct sunlight. •  Do not operate or store unit in places with frequent static electricity or electrical noise (e.g. speaker, TV set).•  Clean the unit with a soft cloth or a damp chamois leather. Never use solvents.•  The unit must only be opened by qualified personnel.Note: This unit may temporarily cease to functionif subjected to electrostatic disturbance. Toresume normal operation, it may benecessary to cycle the power off and back onor to remove and reinstall the batteries.EN
Important Information Important Battery Information•  Remove the batteries to avoid leakage if you do not use your remote control for more than one month.  •  Discard leaky batteries immediately as leaking batteries may cause skin burns or other personal injuries. Dispose of batteries in the proper manner, according to provincial and local regulations.  •  Any battery may leak electrolyte under the following circumstances:- if mixed with a different battery type,- if inserted incorrectly, - if all batteries are not replaced at the same time, - if disposed of in fire, or - if an attempt is made to charge a battery not intended to be recharged.Headset Safety•  Do not play your headset at  high volume.  Hearing experts warn against extended high-volume play. •  If you experience ringing in your ears, reduce volume or discontinue use. •  You should use with extreme caution or temporarily discontinue use in potentially  hazardous situations.Even if your headset is an open-air designed to let  you to hear outside sounds, do not turn up the  volume so high that you are unable to hear what is around you.Caution While DrivingUse of headphones while operating anautomobile or moving vehicle is notrecommended and is unlawful in some states andareas. Be careful and attentive on the road. Stopoperation of the unit if you find it disruptive ordistracting while driving.Please Respect the Environment! Before throwing any batteries away, consult your distributor who may be able to take them backfor specific recycling.Don’t InfringeThis product should only be used for the purposesfor which it is sold, that is, entertainment,violating no copyright law. Any attempts to usethis product for which it is not intended isunlawful and therefore not condoned byThomson.EN
ENTable of Contents1FCC InformationImportant InformationTable of Contents   . . . . . . . . . . . . . .1Getting Started  . . . . . . . . . . . . . . . 2Content of Box   . . . . . . . . . . . . . . . . . . . . . . . . . .2Connections of Antennas and Speakers  . . . . . 2General Controls . . . . . . . . . . . . . . . 3Main Unit    . . . . . . . . . . . . . . . . . . . . . . . . . . . . . .3Navigation Buttons   . . . . . . . . . . . . . . . . . . .4Music Navigator Remote  . . . . . . . . . . . . . . . . . .5Navigation Buttons   . . . . . . . . . . . . . . . . . . .5Display   . . . . . . . . . . . . . . . . . . . . . .7Settings  . . . . . . . . . . . . . . . . . . . . . . 7Setting the Clock and Timer   . . . . . . . . . . . . . . .7Sleep Mode . . . . . . . . . . . . . . . . . . . . . . . . . . . . . 8Sound Features   . . . . . . . . . . . . . . . .8Volume Control  . . . . . . . . . . . . . . . . . . . . . . . . . 8Bass Boost and Equalizer   . . . . . . . . . . . . . . . . .8Program Recording  . . . . . . . . . . . . . . . . . . . . . .8CD and mp3 Disc Playback  . . . . . . . 9Loading Discs   . . . . . . . . . . . . . . . . . . . . . . . . . .10Play/Pause/Stop Discs  . . . . . . . . . . . . . . . . . . . .10Skipping/Scanning Tracks   . . . . . . . . . . . . . . . .11USB and mp3 Playback . . . . . . . . . .11Connecting/Disconnecting USB device/mp3 player  to the Main Unit . . . . . . . . . . . . .11Selecting USB or mp3 player Mode  . . . . . . . .11USB/mp3 player Playback Features  . . . . . . . .12Memory Usage  . . . . . . . . . . . . . . . . . . . . . . . . .12Radio  . . . . . . . . . . . . . . . . . . . . . . . . . .12Selecting Tuner Band  . . . . . . . . . . . . . . . . . . . .12Tuning to a Station . . . . . . . . . . . . . . . . . . . . . .12Using Presets  . . . . . . . . . . . . . . . . . . . . . . . . . . .12Auto Preset Programming . . . . . . . . . . . . . . . .12Manually Setting Presets  . . . . . . . . . . . . . . . . .12Recording to the mp3 player   . . . .13Recording CD to mp3 player  . . . . . . . . . . . . . .13Recording Tuner/AUX to mp3 player  . . . . . . .13Program Recording  . . . . . . . . . . . . . . . . . . . . .13Recording to USB device  . . . . . . . . . . . . . . . . .14Deleting files from mp3 player/USB device . .14Wireless Musiclink  . . . . . . . . . . . . .??WAITING INFOAdvanced Playback Controls  . . . . .15Intro/ Repeat/Random  . . . . . . . . . . . . . . . . . . .15Setting Up a Program List  . . . . . . . . . . . . . . . .15Advanced Navigation Controls  . . .16Tips on Playback Sequence of Disc  . . . . . . . . .16mp3 Player  . . . . . . . . . . . . . . . . . . .17Turn On/Off the Player . . . . . . . . . . . . . . . . . . .17Playback Controls  . . . . . . . . . . . . . . . . . . . . . . .17Adjusting the Volume  . . . . . . . . . . . . . . . . . . .18Key Lock . . . . . . . . . . . . . . . . . . . . . . . . . . . . . . .18DSP  . . . . . . . . . . . . . . . . . . . . . . . . . . . . . . . . . . .18Play modes . . . . . . . . . . . . . . . . . . . . . . . . . . . . .18Frequently Asked Questions  . . . . . . . . . . . . . .18Troubleshooting Tips  . . . . . . . . . . .19Main Unit . . . . . . . . . . . . . . . . . . . . . . . . . . . . . .19mp3 Player . . . . . . . . . . . . . . . . . . . . . . . . . . . . .20Maintenance  . . . . . . . . . . . . . . . . .21Cleaning . . . . . . . . . . . . . . . . . . . . . . . . . . . . . . .21Handling CDs . . . . . . . . . . . . . . . . . . . . . . . . . . .21CD Lens Care  . . . . . . . . . . . . . . . . . . . . . . . . . . .21Technical Specification . . . . . . . . . . . . . . . . . . .21Warranty  . . . . . . . . . . . . . . . . . . . .22
ENGetting Started2Content of Box•one main unit (with 2 main speakers);•one remote control;•  one AM loop antennas;•  one mp3 Player;•  one set of earphones;•  one USB cable;•  one Wireless Music-link transceiver;•  one user manual;•  one safety leaflet;•  Owner registration Card.Connections of Antennas andSpeakers1. Wireless Music-link antenna.2. AM Loop antenna Jacks.3. FM Pigtail Antenna.4. AUX IN.5. Main Speaker Jacks. Using the FM and AM AntennasBefore you use your audio system, you’ll want tomake sure both the FM and AM antennas arepositioned properly.  Uncoil the FM antenna atthe back of the unit, making sure it is fullyextended (you may even want to tape it to thewall behind the unit if possible. The higher thebetter.) You’ll also need to connect the AMantenna loop to the back of the unit if you listento AM stations. Rotate the AM loop antenna forbetter reception.Connecting the SpeakersEach speaker has a black (negative) and a red (positive) jack.  When connecting the speakers,match the red wires to the red jacks and theblack wires to the black jacks.InstallationTo ensure sufficient ventilation, keep thespacings shown below free from other surfaces:Note: Make sure the tracks are encoded in mp3or Windows Media formats and supportedbitrates. Bitrates supported by the player:mp3  – 32 to 320kbpswma – 48 to 160kbpsWarning:Use of this product is for yourpersonal use only. Unauthorized recordingor duplication of copyrighted material mayinfringe upon the rights of third parties andmay be contrary to copyright laws.!  Release tab to lock wire inthe terminal.NOTE: Make sure the insulation is completely removed from theends of the speaker wires at all connection points.Speaker Wire ConnectionPush Speaker terminal tabdown to insert wire.4 inches4 inchesFront View        4 inches4 inches2 inchesSide View12345
ENGeneral ControlsMain Unit - Front ViewON/STANDBY - Turns power on or off (STANDBYmode).SOURCE - Selects among CD player, TUNER, PC,PORTABLE PLAYER, USB and AUX.RECORD MP3 PLAYER - Starts and stopsrecording to mp3 player.RECORD USB - Starts and stops recording to USBdevice.USB socket - Connects USB device.mp3 player -  Connects mp3 player.(SKIP BACKWARD) - In CD, PortablePlayer, USB or MP3/WMA mode - Goes to theprevious track; searches backward through track.In Tuner mode - Tunes down radio frequency.In Clock or Timer mode - Decreases hour andminute digit.(SKIP FORWARD) - In CD, Portable Player,USB or MP3/WMA mode - Goes to the nexttrack; searches forward through track.In Tuner mode - Tunes up radio frequency.In Clock or Timer mode - Increases hour andminute digit.In Tuner mode - Tunes up radio frequency.(PLAY/PAUSE) - In CD, Portable Player, USBor MP3/WMA mode - Starts and pauses playback./TUNE PRESET - In CD, Portable Player, USB orMP3/WMA mode - Stops playback.In MP3/WMA mode - Returns to the first track ofthe current disc in stop mode; displays the totalnumber of folders and total number of tracks onthe current disc when playback is completelystopped.In Recording mode - Stops record to USB device;In Tuner mode - Selects tune or preset mode.BAND/INFO - In CD mode - Selects displayoptions to show track elapse time, track remaintime or disc remain time. During recording,selects display options to show record time andremaining time.In Portable Player, USB or MP3/WMA mode -Shows ID3 tag.In Portable Player or USB mode - Shows memoryusage.In Tuner mode - Selects radio band. Enters autopreset program in FM mode when depressed for2 seconds.DISC SKIP - Skips to the next disc in CD mode.DISC 1 / DISC 2 / DISC 3 / DISC 4  /DISC 5  -  Opens or closes the correspondingdisc tray if no disc is loaded in the correspondingtray.Enters CD mode and plays the corresponding CDwhen disc is loaded in the corresponding tray.3Tips:In STANDBY mode, pressON/STANDBY to turn the system on in thepreviously used mode.  Press SOURCE toselect the corresponding mode. Look at thedisplay icons to identify the current mode.
ENGeneral Controls4VOLUME CONTROL - Adjusts volume.In navigation mode - Rotate clockwise tonavigate downwards and rotate counter-clockwise to navigate upwards.Navigation ButtonsUse the navigation buttons to navigate throughmenu.MENU - When reviewing program, removes trackfrom Program List.In CD, Portable Player, USB or MP3/WMA mode -Removes file from the connected USB device ormp3 player.(UP)-   In Portable Player, USB or MP3/WMAstop mode - Enters navigation mode.In navigation mode - Goes to the previous folderin stop mode.In navigation mode - Navigates upwards; movesup a list; selects the previous file or folder.In tuner mode - Selects the previous presetstation; selects the next preset number.In rename mode - Selects alphabets.In navigation mode - Navigates upwards andmove up a list.In tuner mode - selects the next preset number.In rename mode - selects alphabets(DOWN)- In navigation mode - Navigatesdownwards and move down a list.In tuner mode - Selects the previous presetnumber.In rename mode - selects alphabetsSELECT (RIGHT)-  In Portable Player, USB orMP3/WMA stop mode - Enters navigation mode.In navigation mode - Moves down one navigationmenu level; enters current folder and shows thefirst file/folder from current folder; beginsplayback of the selected file in navigation mode.In tuner mode - Selects the previous presetstation; selects the next preset number.In rename mode - Confirms the current alphabetand move to the next alphabet.BACK (LEFT)- In navigation mode - Returnsto the previous navigation menu level; returns tostop mode.In rename mode - Edits the previous alphabet.Main Unit - Top ViewPHONES - Jack for connecting headphones.DEMO - Activates and deactivates demonstration.Note:Refer to “mp3 Player” section onpage 17-18 for mp3 player operation details.
ENGeneral ControlsMusic Navigator RemoteBasically, the LCD of the remote shows briefly thescreen of the main unit.ON/STANDBY - Turns power on or off (STANDBYmode).SOURCE - Selects among CD player, TUNER, PC,PORTABLE PLAYER, USB and AUX.MUTE - Mutes audio output.MENU - When reviewing program, removes trackfrom Program List.In CD, Portable Player, USB or MP3/WMA mode -Removes file from the connected USB device ormp3 player.VOLUME CONTROL - Adjusts volume.In navigation mode - Rotate clockwise tonavigate downwards and rotate counter-clockwise to navigate upwards.(SKIP BACKWARD) - In CD, PortablePlayer, USB or MP3/WMA mode - Goes to theprevious track; searches backward through track.In Tuner mode - Tunes down radio frequency.In Clock or Timer mode - Decreases hour andminute digit.In Recording mode - selects ripping speed.(SKIP FORWARD) - In CD, Portable Player,USB or MP3/WMA mode - Goes to the nexttrack; searches forward through track.In Tuner mode - Tunes up radio frequency.In Clock or Timer mode - Increases hour andminute digit.In Recording mode - selects ripping speed;In Tuner mode - Tunes up radio frequency.(PLAY/PAUSE) - In CD, Portable Player, USBor MP3/WMA mode - Starts and pauses playback.TUNE/PRESET - In CD, Portable Player, USB orMP3/WMA mode - Stops playback.In MP3/WMA mode - Returns to the first track ofthe current disc in stop mode; displays the totalnumber of folders and total number of tracks onthe current disc when playback is completelystopped.In Recording mode - Stops record to USB device;In Tuner mode - Selects tune or preset mode.CD 1/CD 2/CD 3/CD 4/CD 5 - Direct accesses thecorresponding disc.BAND - In Tuner mode - Selects radio band.Enters auto preset program in FM mode whendepressed for 2 seconds.LCD ON/OFF - Turns LCD on or off.REC USB - Starts recording to USB device.5
ENGeneral Controls6REC P. PLAYER - Starts recording to mp3player.FM STEREO - Selects between stereo and monosound in FM tuner mode.INFO -  In CD mode - Selects display options toshow track elapse time, track remain time or discremain time. During recording, selects displayoptions to show record time and remaining time.In Portable Player, USB or MP3/WMA mode -Shows ID3 tag.In Portable Player or USB mode - Shows memoryusage.EQ - Selects equalizer presets.BASS BOOST - Turns on or off Bass Boost.PROGRAM - In CD / USB and Tuner mode - Entersprogram mode.REPEAT - In CD mode - Repeats a track, CD or allCDs. In Portable Player, USB or MP3/WMA mode -Selects repeat one file, repeat all files mode.INTRO - In CD, Portable Player, USB or MP3/WMAmode - Turns intro mode on or off to play thefirst 10 seconds of each track / file.- In CD, Portable Player, USB or MP3/WMAmode - Turns on/off random playback.CLOCK - Displays clock time. Press and hold toenter clock setting mode. TIMER - Enters timer setting mode.Activates and deactivates timer.SLEEP - Selects the time interval in minutesbefore the unit turns off.DISC SKIP - Skips to the next disc in CD mode.Navigation ButtonsSELECT (RIGHT)-  In Portable Player, USB orMP3/WMA stop mode - Enters navigation mode.In navigation mode - Moves down onenavigation menu level; enters current folder andshows the first file/folder from current folder;begins playback of the selected file in navigationmode.In tuner mode - Selects the previous presetstation; selects the next preset number.In rename mode - Confirms the current alphabetand move to the next alphabet.BACK (LEFT)- In navigation mode - Returnsto the previous navigation menu level; returns tostop mode.In rename mode - Edits the previous alphabet.Installing BatteriesThe remote control must be inserted with 2"AAA" or "UM-4" or "R03" batteries prior touse.  Follow the steps below to ensure correctinstallation.1.  Open the battery compartment door bypressing down on the tab and then lifting thedoor out.2.  Insert “AAA”(UM4) batteries in thecompartment.3.  Replace the battery compartment door inplace.
Setting the Clock1. Press and hold CLOCK on the remote controlto set the clock. 2. Press or to set the time. PressCLOCK again to save settings.Setting the TimerYou can turn on/off the unit or record TUNER atpreset times by setting the timer.1. Press and hold TIMER on the remote controluntil Timer On and the clock hour flashes onthe display.2. Press  or to set the time.3. Press TIMER.Repeat step 2 to change to TimerOff setting with clock hour flashing. .4. Press TIMER to select source. Press orto select CD/USB/Tuner/Rec Tuner.If Rec Tuner is selected, press or toselect the preset station.5. Press TIMER. Adjust VOLUME CONTROL to setvolume.7. Press TIMER to save and quit setting. The timeris automatically activated once timer setting is saved.ENDisplayCD/TUNER/PC/PORTABLE PLAYER/USB/AUX -indicates the current mode.- The corresponding disc icon lights to showwhich disc compartment is loaded. The currentplaying disc will flash.mp3 / WMA - Current CD format.PROGRAM - In program mode.- Currently in playback mode.- Currently in pause mode.- Random playback is activated in CD mode.STEREO  - In FM tuner mode, indicates stereosound is selected.EQ  -  Current equalizer setting.B.BOOST - Bass boost is activated.SLEEP - Sleep is activated.- Timer is activated.REC - Recording is activated.INTRO - In CD mode, intro is activated so the first10 seconds of each track will be played.REPEAT 1/REPEAT 1 DISC/REPEAT ALLDISCS/ALL DISCS - In CD mode, indicates therepeat option that is activated.REPEAT 1 - Repeats current track.REPEAT 1 DISC - Repeats current disc.REPEAT ALL DISCS - Repeats all discs.ALL DISCS - Plays all discs once.Note:When system is ON, you can pressCLOCK to display the current time for about2 seconds.7Settings
ENSettings8Activating the TimerPress and release TIMER to turn on/off the alarm.is displayed when timer is activated.Program RecordingWhen setting the Timer, select “Rec Tuner” as thesource to preset the unit to record radio at thepreset time. Make sure the mp3 player isconnected and have enough memory space.Sleep ModeYou can select the time interval before the unitturns off automatically. Press SLEEP to select among OFF, 120, 90, 60, 45,30, 15 and  5 minutes. SLEEP is displayed when sleep mode is activated.Viewing Remaining Sleep TimeWhen sleep is activated, press SLEEP once toview remaining sleep time.Adjusting Sleep TimePress SLEEP again when the remaining sleep timeis displayed to change sleep time.Tips:“Rec Tuner” setting is for ProgramRecording. For more information, seeparagraph below.Note:Sleep is automatically de-activatedwhen the unit is turned off.Volume ControlRotate the volume control on the main unit orpress VOL or  on the remote control toadjust volume level.Bass BoostPress BASS BOOST to turn on/off boosting thebass frequency. B.BOOST is displayed when it isactivated.Muting AudioPress MUTE on the remote control to cut thesound. MUTE flashes on the display.Using Preset Equalizer CurvesPress EQ to toggle among FLAT, ROCK, POP, JAZZ,CLASSIC and CUSTOM. EQ is displayed when EQ isactivated.Creating a Custom Curve1. Press EQ to select CUSTOM mode.2. While CUSTOM is displayed, press  orto cycle among displayed bass and treblerange levels.3. While BAS and TRE is displayed, adjust volume control to set the associated gain between -10 - +10.4.  Press EQ to exit.Sound Features
CD and mp3 Disc PlaybackEN9Important CD and mp3/WMAInformationThis unit is compatible withCD-RW/ CD-R discs for playback.CD-R / RW Notes on CD-R/RW Disc:•Do not affix any type of labels to either side (recordable or labeled side) of a CD-R/RW disc as this may result in the unitmalfunctioning.•  To avoid damages to the CD-R/RW disc, donot open the disc compartment door whilethe disc is being read.  •  Do not load an unrecorded CD-R/RW discinto the unit. This may take a longer timeto read the disc.• Playback capability for CD-RW discs mayvary due to variations in the quality of theCD-RW disc and the recorder used tocreate the disc.Notes on mp3/WMA Disc:•  Use .mp3 as the extension whenconverting audio files into mp3 for savingonto CD-R(W) or CD-ROM, e.g. Abc08.mp3. Do not use any other extension e.g. .doc,.pdf.  •  Do not use the .mp3 extension for othertext or non-audio data files as this mayresult in serious malfunction and harmfulnoise interference.•  For better quality in mp3/WMA discplayback, the CD quality should berecorded 128kbps or above.•  Disc data size > 650MB is notrecommended. •  Total files and folders in the disc shouldnot exceed 250, it also depends on thelength of the file/folder names.•  For mixed mode discs, only one mode willbe selected for playback depending on therecording format.•  To ensure good performance, wait untilthe disc changer completely reads the discbefore proceeding.•  mp3 files in CD ROM EXTRA format disc cannot be recognized.
EN10Loading Discs1. Press SOURCE repeatedly to select CD mode.2. Press DISC 1 /2 /3/ 4  /5  to openthe desired disc tray. (For example, press DISC1to open disc tray 1)3. Insert a disc with label face up. 4. Press DISC 1 /2 /3/ 4  /5  to closethe disc tray. (For example, press DISC 1 toclose disc tray 1)5. Repeat steps 2-4 to load discs in all the disctrays.A Solid disc tray icon lights on the displayindicating that the corresponding tray isoccupied. The current disc tray icon flashes on thedisplay.If the disc is a mp3 / WMA CD, the respectivemp3or WMA lights on the display.Play Discs• To play all discs in the disc trayPress  in stop mode to begin playback.• To play a specific disc in the disctrayPress CD 12/3/4/5 on the remote to play thecorresponding disc.• To play a specific track in the discPress  or to select the track andpress  to start playback.Pause DiscsPress  during playback to pause disc. Pressagain to resume.Play and load simultaneously:1. While a CD is playing, press DISC 1 /2 /3/ 4  /5  (except the current disc) toopen the desired disc tray. (For example, a CDis playing in disc tray 1, press DISC 2 /3/4  /5  to open the desired disc tray.)2. Load or change discs for the trays.3. Press DISC 1 /2 /3/ 4  /5  to closethe tray.Stop PlaybackDuring playback, press  to stop playback.The unit returns to navigation mode briefly(approx. 10 seconds) before entering stop mode.Selecting a DiscPress CD 12/3/4/5 to direct access thecorresponding disc or DISC SKIP on the remoteto skip discs.CD and mp3 Disc PlaybackAttention:Do not push to force closing of thetray during CD playback or tray opening.Note: Be sure to remove all discs from thedisc compartment before moving ortransporting the unit.Tips:In TUNER, PC, PORTABLE PLAYER,USB or AUX mode, the corresponding discwill start playback when DISC 1 /2 /3/ 4  /5  is pressed. If there is no discin the corresponding disc tray, the currentdisc will be set to the next occupied tray.Tips:In CD stop mode, press  to enternavigation mode and show disc menu.In CD navigation mode, press  to returnto stop mode.
Skipping Tracks•  Press   or to skip to the previousor next track. Scanning Tracks•Press and hold  or to searchthrough a CD while it is playing.Program PlaybackRefer to page 15 for details.CD and mp3 Disc PlaybackEN11The playback controls of USB devices and mp3player are basically the same. Connect the devicesfirst and then you can start playback.Connecting USB device to theMain UnitInsert the USB port of the USB device into theUSB connector of the main unit. Unplug thedevice to disconnect.Connecting the mp3 Player to theMain Unit1. Press and hold the lock button on the back ofthe player and push the USB connector outfrom the player.2. Insert the USB port of the mp3 player into theUSB connector for the player of the main unit.Disconnecting the mp3 playerfrom the Main UnitPress eject button on the right side of the unit todisconnect the player.Selecting USB or Portable PlayerModePress SOURCE repeatedly to select USB orPORTABLE PLAYER mode.USB / mp3 player PlaybackFeaturesStart and Pause PlaybackPress  to start and pause playback.USB and mp3 Player PlaybackInsert mp3 player hereInsertUSBdeviceheremp3playerejectbuttonSide ViewPress to disconnectplayer
EN12USB and mp3 Player PlaybackStop PlaybackPress  to stop playback. The unit entersnavigation mode for 10 seconds before enteringstop mode.Skipping Files•  Press  or to skip to the previousor next file. •Press and hold  or to searchthrough a file while it is playing.Memory UsagePress BAND/INFO on the main unit or INFO onthe remote control to view memory usage on theUSB device or the mp3 player.Tips:In CD stop mode, press  to enternavigation mode and show disc menu.In CD navigation mode, press  to returnto stop mode.RadioSelecting Tuner Band1. Press SOURCE to enter Tuner mode.2. Press BAND to select between FM or AM Radio band. Tuning to a StationPress  or to select frequencies. Pressand hold  or to scan frequencies.Using PresetsThe tuner can be in either TUNE or PRESET mode.• Press  TUNE/PRESET to toggle TUNE andPRESET mode.  •  Press   or to access the previousor next preset station. Auto Preset Programming (FM only)Press and hold the BAND button for 2 seconds toscan stations in FM band. The stations will thenbe stored as preset channels. A maximum of 32stations can be stored. Beware of your presetchannels being erased accidentally because thescanning and storing process is automatic uponpressing the button. You can stop the automaticscan by pressing any button, but the erasedstations cannot be recovered.Manually Setting Presets1. Press  TUNE/PRESET to enter TUNE mode.2. Press   or to access the desiredfrequency.3. Press the PROG button once and the mostrecently accessed program location flashes onthe display.4. If a different program location is preferred, press or to move to the desiredpreset number (1-32).5. Press PROG to store the selected frequency atthat preset.Suppressing Stereo SignalPress FM. STEREO to toggle between FM monoand stereo mode. STEREO is displayed in stereomode.Tips:Your audio system has 32 preset stations.Tips:Under PRESET mode, press  orcan only access the presetstations. Manually tuning is not accessible inthis mode.
Recording to the mp3 PlayerRecording to mp3 player or USB device arebasically the same. You can record CD, Tuner orAUX files to the mp3 player or USB device.Recording CD to mp3 Player1. Connect the mp3 player to the USB port, “USBConnected” will show on the display of theplayer.2. In CD stop mode or CD navigation mode, pressRECORD MP3 PLAYER on the main unit orpress REC P. PLAYER on the remotecontrol. The unit will start playback andrecording will begin. REC is displayed.3. Press  , press RECORD MP3 PLAYER on themain unit or press REC P. PLAYER on theremote control to stop recording.Example (Record one CD):??? Pls advice the control ???Example (Record all 5 CDs):In CD stop mode or CD navigation mode, pressRECORD MP3 PLAYER on the main unit or pressREC PLAYER on the remote control.The unitwill start playback and recording will begin. RECis displayed. (Make sure ALL DISCS mode isselected by pressing REPEAT repeatedly)Example (Record only selectedtracks from a CD):1. Create a CD program by following instructions under “Setting Up a CD Program” on page 19.2. In CD stop mode or CD pause mode, pressPROG and then  to enter programplayback mode. Playback and recording willbegin. PROGRAM and REC is displayed. 3. Press  , press RECORD MP3 PLAYER on themain unit or press REC P. PLAYER on theremote control to stop recording.Recording Tuner/AUX to mp3Player1. In Tuner or AUX mode, press RECORD MP3PLAYER on the main unit or press REC P.PLAYER on the remote control to start recording. Example:1. In Tuner mode, select the station to record(refer to page 12 for details).2. Press press RECORD MP3 PLAYER on the mainunit or press REC P. PLAYER on the remotecontrol to start recording.3. Press  , press RECORD MP3 PLAYER on themain unit or press REC P. PLAYER on theremote control to stop recording.Program RecordingRefers to ”Setting the Timer” on page 7.Tips:To view remaining time (Rem), pressBAND/INFO on the main unit or CDINFO on the remote in recording mode. 13ENNote:The encoding bitrate for tuner, CD and AUXsignal are as below:CD / Aux : 128 kbpsTuner : 96 kbpsTips:Recording stops automatically whenCD stops (For example: end of disc is reached).Tips:If CD playback is already started,recording will begin instantly whenRECORD MP3 PLAYER on the mainunit or press REC P. PLAYER on theremote control is pressed. If CD playback isstopped, playback and recording will startinstantly when RECORD MP3 PLAYER on themain unit or press REC P. PLAYER on theremote control is pressed.
Recording to the mp3 Player14ENRecording to USB DeviceFollow the steps of “Recording CD/Tuner/AUXto mp3 player” in the last section by pressingRECORD USB on the main unit or REC USBon the remote control instead of RECORD MP3PLAYER on the main unit or press REC P.PLAYER on the remote control.Deleting Files from mp3Player/USB device1. In navigation mode, select the file to delete using the navigation buttons. (Refer to“Navigation Buttons” on page 6 for details.)2. Press  DEL on the remote control.3. Rotate the Volume Control on the main unitor press  or  on the remote control toselect Yes to delete or No to cancel.4. Press  to confirm selection.Deleting All FilesIn navigation mode and mp3 stop mode, pressand hold DEL on the remote control to delete allthe files on the mp3 player or memory card.
ENAdvanced Playback Controls15In CD , USB and Portable Player mode, advancedplayback controls allow you to sample, repeatand random playback files, set up a Program List.In USB mode, allow you to rename tracks.Sampling TracksPress INTRO on the remote control to play thefirst 10 seconds of each track on the current disc,all discs in the tray, or turn intro mode off.  INTRO is displayed when sampling is activated.RepeatPress REPEAT on the remote control to togglerepeat options:Repeat the current track (REPEAT 1), Repeat current disc (REPEAT 1 DISC) , Repeat all discs (REPEAT ALL DISC), or Normal playback (ALL DISCS).Random PlaybackPress  on the remote control to turn on/offrandom playback.  is displayed when it isactivated.All the tracks on one disc will be shuffled andplayed once before shuffling and playing tracksfrom the next disc.Setting Up a Program List1. In navigation mode, press CD 1/2/3/4/5 on theremote control or DISC SKIP to select disc.2. Use the navigation buttons to select the track /file to add to Program List.3. ???Pls advice which button to addfiles???Playing a Program ListWhile in PROGRAM stop mode , press  .If you are not currently in program mode, pressPROG to enter program mode. Program playbackbegins automatically. PROGRAM is displayed.Display Program List1. While CD playback is stopped, press PROG to enter PROGRAM mode. Program playback begins automatically after entering program mode. To display program list, press  .2. Press  or  repeatedly to view each track assignment  in the program list.Deleting from Program List1. While in PROGRAM mode, press  or  toselect the program to delete. 2. Press MENU on the main unit.    3. Press  or  to select between No tocancel and Yes to confirm.4. Press   to confirm selection.Deleting the Entire Program List1. While in PROGRAM mode, press  or  toselect the program to delete. 2. Press and hold MENU on the main unit.3. Press  or  to select between No tocancel and Yes to confirm.4. Press   to confirm selection.Any rename function??Pls advice the controls?Tips:Random playback can be activatedsimultaneously with repeat 1 disc (randomlyplay tracks from one disc repeatedly) orrepeat all discs (randomly play tracks from alldiscs repeatedly).Note: You can create a program of up to32 tracks.
ENWireless Musiclink16Folder 1Folder 3Song 1.1.1Song 1.1.2Song 1.1.3Song 2.2Song 2.3Song 2.4Song 1.2.1.1Song 1.2.1.2Song 1.2.1.3Folder 1.2.1Song 2.1.1Song 2.1.2Folder 2.1Song 3.1Song 3.2Folder 1.1Folder 1.2Folder 2ABCDEFG345 678910111213LEVEL 1                            LEVEL 2                          LEVEL 3                             LEVEL 4 Song 4Song 5121415Note:•Folder playback sequence is indicated by the letters A to G.•Song playback sequence is indicated by the numbers (1 to 15) in front of the song name.Tips on Playback Sequence of Disc•  Check that the mp3/WMA disc is created with a single folder structure. Refer to thediagram below for playback sequence details on multi-level folder structure. •For example, folders and songs from level 2 are played before moving on to play folders and songs from level 3.Advanced Navigation ControlsWAITING INFO FOR WIRELESSMUSICLINK
ENmp3 Player 17Insert battery into the player1. Slide the battery door by following thedirection of arrow.2. Insert a “AAA”(UM4) battery with polarities corresponding to the indications in the compartment.  3. Replace the door to the battery compartment.General Controls- Press once to turns the unit on. In playmode, press once to starts and pause musicplayback. - In stop mode, press once to turn off theunit. Press once to stop music playback.- Skips to the previous song or thebeginning of the current song. Press and hold toscan backwards.-Skips to the next song. Press and hold toscan forward.LOCK - Slide the switch to lock or unlock the keysof the playerHeadphones Jack - Insert headphones here.- Use the USB port to connect to the AudioSystem. USB lock button - Press and hold and push theUSB connector out form the unit.VOLUME + / - - Increases and decreases thevolume level.M- Selects among playback options. (repeat one,repeat all, random playback, repeat randomplayback)DSP - Selects among DSP modes (Flat, Bass, Pop,Rock, Jazz)Display Overview1. Shows current volume level.2. The relative play mode indicator lights to show current selection.- repeat track- repeat all- random playback- repeat random playback3. is displayed when the key lock function is activated.  4.  shows the battery level.5. This section shows song information.The information in this section presumes you’vesuccessfully transferred files to the mp3 player,and you’re ready to play some music.Turn On/Off the mp3 playerPress   to turn the unit on/off. Playbackstarts automatically from the first track. Play / Pause•  Press  to start and pause playback ofselected track. Current track number, elapsedplayback time and track title show on display.Stop Playback•  During playback, press  to stop playback.The total number of tracks is display.•  Press  in stop mode to turn the unit off. Note: This unit may temporarily cease tofunction if subjected to electrostaticdisturbance. To resume normal operation, itmay be necessary to cycle the power offand back on or to remove and reinstall thebatteries.426153
mp3 Player 18Skipping Tracks•  Press  or to skip to the previous orthe next track.Scan Tracks•Press and hold  or to scanbackwards and forwards during playback.Adjusting the VolumePress VOLUME +/-  to adjust the volume.Key Lock•To avoid accidental key activation, slide the key lock switch to the left.  is displayed. •Slide to the switch to the right to unlock.DSPPress DSP repeatedly to select among DSP modes:FLAT > BASS > POP > ROCK > JAZZThe current selection shows briefly on the display.Play modesDuring playback, press Mrepeatedly to selectamong the following playback modes:Normal playback Repeat Track - Repeat All - Random Playback - Repeat Random Playback - Check for UpdatesVisit www.thomson-lyra.com for the latest newsand firmware upgrades for our Lyra Digital AudioPlayer. You must update your system after newdownloads have been made in order for the newapplications to be executed.Frequently Asked QuestionsYou can get FAQ information at www.thomson-lyra.comNote:If the elapsed time of the playing track isless than 0:04, pressing  once willreturn to previous track.If the elapsed time of the playing track ismore than 0:04, pressing  once willreturn to the beginning of the currenttrack.Note:When the unit is in off mode and the keylock switch is at the LOCK position, pressingthe  key will cause the display to showthe key lock icon for three seconds.
Troubleshooting TipsEN19Solution•  Check power cord for a secure connection.•  Unplug the unit for a moment, and then plug into power source again.•  Check the outlet by plugging in another device.•  Increase the volume setting.•  Check connection to speakers.•  Check that you have selected the appropriate function: CD, Tuner.•  Make sure mute is off.•  Make sure headphones are not plugged in.•  Check antenna connection.• Move antenna.•  Turn off nearby electrical  appliances, such as hair dryer, vacuum cleaner, microwave, fluorescent lights.•  Check that CD is in the tray.•  Check that CD label is facing up.•  Check that PAUSE mode is not on.•  Check that CD function is selected.•  Use CD lens cleaner.•  Clean the disc.•  Try another CD.ProblemSystem willnot turnonNo soundPoor radioreceptionCD doesnot playProblemCD sound skipsCD buttonwill notrespond, ordoes notchangediscs whenyou pressDISC SKIPRemotecontroldoes notworkSolution•  Clean the disc.•  Check disc for warping, scratches, or other damage.•  Check if something is causing the system to  vibrate. If so, move the system.•  Make sure the speakers are at least 3 feet away or on a different surface from the main unit.•  Switch to another function (Tuner) and then back to CD.•  Check that the batteries are properly installed.•  Replace weak batteries.•  Check the system is plugged into power source.•  Point the remote directly at the system’s front panel.•  Move closer to the system.•  Remove any obstacles between the remote and the system.Main Unit
EN20Troubleshooting TipsSolution•  Battery may be inserted incorrectly.•  Battery may be empty.•  Repeat or random function may be activated.•  There may be strong magnetic fields (e.g. too close to TV) near the unit.•  Low Battery level. Replace with new one.•  LOCK function may be activated.•  There may be no mp3 tracks in the card or internal memory.•  Memory Card may be damaged.•Make sure audio tracks are encoded in the mp3 or Windows Media formats at supported bitrates.Bitrates support by the player:mp3 – 32 to 320 kbpswma – 48 to 160 kbpsCheck the website and/orapplication help system of themusic download service providerfrom where the content waspurchased from for licenseacquisition details.  For more information on howlicense acquisition works, go towww.microsoft.com/windowsmedia/drm.ProblemThe playerdoes notturn onwhenPLAYbuttonpressed.Skippingtracks orbad soundquality?Cannotperformplayback?Cannotplaybacktracks onthe player.ProblemWhat doesthePlaysForSure logomean?USB displaydoes notappearwhenconnectedtocomputer.The playerdoes notrespond tokeyoperations?SolutionPlaysForSure is a new logoprogram from Microsoft®.Consumers can match thePlaysForSure logo on a largeselection of devices and onlinemusic stores. If you see the logo,you’ll know your digital mediawill play for sure.For more information on theMicrosoft PlaysForSure program,visit www.PlaysForSure.com.For more information on RCAPlaysForSure devices, visitwww.rca.com. •  Check connection between your unit and the computer. •  To reset the unit, turn the player off by removing the battery. Reinsert the battery properly and turn the player on again to resume normal operations.Note:This unit may temporarily ceaseto function if subjected to electrostaticdisturbance. To resume normal operation,it may be necessary to cycle the poweroff and back on or to remove andreinstall the batteries.mp3 Player
MaintenanceEN21Disconnect the audio system from the powersource before performing any maintenance.CleaningClean the exterior of the system using a soft dustcloth.CD PlayerCAUTION! This system operates with a laser. Itmust be opened by only a qualified technician.Handling CDs•  Do not touch the signal surfaces. Hold CDs by the edges, or by one edge and the hole. •Do not affix labels or adhesive tapes to the label surfaces. •Do not scratch or damage the label.  CDs rotate at high speeds inside the player. •Do not use damaged (cracked or warped) CDsCleaning CDs•  Dirty CDs can cause poor sound quality. Always keep CDs clean by wiping them gently with a  soft cloth from the inner edge toward the outer perimeter.• If a CD becomes dirty, wet a soft cloth  in water, wring it out well, wipe the dirt away gently, and then remove any water drops with a dry cloth.•  Do not use record cleaning sprays or antistatic agents on CDs. Also, never clean CDs with benzene, thinner, or other volatile solvents which may cause damage to disc surfaceCD Lens CareWhen your CD lens gets dirty it can also cause thesystem to output poor sound quality. To clean thelens you will need to purchase a CD lens cleanercan maintain the output sound quality of yoursystem. For instructions on cleaning the CD lens,refer to the ones accompanying the lens cleaner. Technical SpecificationPower supply: 120V~60Hz Dimensions ( H x W x D mm):Unit size - 280 x 187 x 310 Speaker  - 278 x 185 x 229CD player: Response curve (+/- 2dB): 60Hz to 5kHzRating Plate: Look for it at the back of the set.Maximum size of Mass Storage Class devicesupported: 20 GB
22ENLimited Warranty (U.S.)What your warranty covers:•   Defects in materials or workmanship.For how long after your purchase:•   One year from date of purchase for labor and parts•   Warranty period for rental units begins with the first rental or 45 days from date of shipment to the rental firm,whichever comes first.What we will do:•   Pay any Authorized RCA Audio Service Center the labor charges to repair your unit.•   Pay any Authorized RCA Audio Service Center for the new or, at our option, refurbished replacement partsrequired to repair your unit.How you get service:•   Take your unit to any Authorized RCA Audio Service Center.  To identify your nearest Authorized RCA AudioService Center, ask your dealer, look in the Yellow Pages, or call 1-800-336-1900.•  Show the Authorized Service Center Representative your evidence of purchase date or first rental.•   Pick up your unit when repairs are completed.•   Proof of purchase in the form of a bill of sale or receipted invoice which is evidence that the product is within thewarranty period must be presented to obtain warranty service.  For rental firms, proof of first rental is alsorequired.What your warranty does not cover:•   Customer instruction.  (Your Owner’s Manual describes how to install, adjust, and operate your unit. Any additionalinformation should be obtained from your dealer.)•   Installation and related adjustments.•   Signal reception problems not caused by your unit.•   Damage from misuse or neglect.•   Cleaning of audio heads.•   Batteries.•   A unit that has been modified or incorporated into other products or is used for institutional or other commercialpurposes.•   A unit purchased or serviced outside the U.S.A.•   Acts of nature, such as but not limited to lightning damage.Product Registration:•   Please complete and mail the Product Registration Card packed with your product.  It will make it easier to contactyou should it ever be necessary.  The return of the card is not required for warranty coverage.Limitation of Warranty:•   THE WARRANTY STATED ABOVE IS THE ONLY WARRANTY APPLICABLE TO THIS PRODUCT.  ALL OTHERWARRANTIES, EXPRESS OR IMPLIED (INCLUDING ALL IMPLIED WARRANTIES OF MERCHANTABILITY ORFITNESS FOR A PARTICULAR PURPOSE) ARE HEREBY DISCLAIMED.  NO VERBAL OR WRITTEN INFORMATIONGIVEN BY THOMSON INC., ITS AGENTS OR EMPLOYEES SHALL CREATE A GUARANTY OR IN ANY WAYINCREASE THE SCOPE OF THIS WARRANTY.  •   REPAIR OR REPLACEMENT AS PROVIDED UNDER THIS WARRANTY IS THE EXCLUSIVE REMEDY OF THECONSUMER.  THOMSON INC. SHALL NOT BE LIABLE FOR INCIDENTAL OR CONSEQUENTIAL DAMAGESRESULTING FROM THE USE OF THIS PRODUCT OR ARISING OUT OF ANY BREACH OF ANY EXPRESS ORIMPLIED WARRANTY ON THIS PRODUCT.  THIS DISCLAIMER OF WARRANTIES AND LIMITED WARRANTYARE GOVERNED BY THE LAWS OF THE STATE OF INDIANA.  EXCEPT TO THE EXTENT PROHIBITED BYAPPLICABLE LAW, ANY IMPLIED WARRANTY OF MERCHANTABILITY OR FITNESS FOR A PARTICULARPURPOSE ON THIS PRODUCT IS LIMITED TO THE APPLICABLE WARRANTY PERIOD SET FORTH ABOVE. How State Law relates to warranty:•   Some states do not allow the exclusion nor limitation of incidental or consequential damages, or limitations onhow long an implied warranty lasts, so the above limitations or exclusions may not apply to you.•   This warranty gives you specific legal rights, and you also may have other rights that vary from state to state.If you purchased your unit outside the United States:•   This warranty does not apply.  Contact your dealer for warranty information.Service calls which do not involve defective materials or workmanship are not covered by this warranty.Costs of such service calls are the sole responsibility of the purchaser.
Limited Warranty (Canada)What your warranty covers:•   Defects in materials or workmanship.For how long after your purchase:•   One year from date of purchase for labor and parts•   The warranty period for rental units begins with the first rental or 45 days from date of shipment to the rentalfirm, whichever comes first.What we will do:•   Pay any Authorized RCA Audio Service Center the labor charges to repair your unit.•   Pay any Authorized RCA Audio Service Center for the new or, at our option, refurbished replacement partsrequired to repair your unit.How you get service:•   Take your unit to any Authorized RCA Audio Service Center.  To identify your nearest Authorized RCA AudioService Center, ask your dealer, look in the Yellow Pages, or call 1-800-336-1900.•   Show the Authorized Service Center Representative your evidence of purchase date or first rental.•   Pick up your unit when repairs are completed.•   Proof of purchase in the form of a bill of sale or receipted invoice which is evidence that the product is within thewarranty period must be presented to obtain warranty service.  For rental firms, proof of first rental is alsorequired.What your warranty does not cover:•   Customer instruction.  (Your Owner’s Manual describes how to install, adjust, and operate your unit. Any additionalinformation should be obtained from your dealer.)•   Installation and related adjustments.•   Signal reception problems not caused by your unit.•   Damage from misuse or neglect.•   Cleaning of audio heads.•   Batteries.•   A unit that has been modified or incorporated into other products or is used for institutional or other commercialpurposes.•   A unit purchased or serviced outside Canada.•   Acts of nature, such as but not limited to lightning damage.Product Registration:•   Please complete and mail the Product Registration Card packed with your product.  It will make it easier to contactyou should it ever be necessary.  The return of the card is not required for warranty coverage.Limitation of Warranty:•   THE WARRANTY STATED ABOVE IS THE ONLY WARRANTY APPLICABLE TO THIS PRODUCT. NO VERBAL ORWRITTEN INFORMATION GIVEN BY THOMSON MULTIMEDIA LTD., ITS AGENTS OR EMPLOYEES SHALLCREATE A GUARANTY OR IN ANY WAY INCREASE THE SCOPE OF THIS WARRANTY.  •   REPAIR OR REPLACEMENT AS PROVIDED UNDER THIS WARRANTY IS THE EXCLUSIVE REMEDY OF THECONSUMER.  THOMSON MULTIMEDIA LTD. SHALL NOT BE LIABLE FOR INCIDENTAL OR CONSEQUENTIALDAMAGES RESULTING FROM THE USE OF THIS PRODUCT. EXCEPT TO THE EXTENT PROHIBITED BYAPPLICABLE PROVINCIAL LAW, ANY IMPLIED WARRANTY OF MERCHANTABILITY OR FITNESS FOR APARTICULAR PURPOSE ON THIS PRODUCT IS LIMITED TO THE APPLICABLE WARRANTY PERIOD SET FORTHABOVE. How Provincial Laws relates to warranty:•   This warranty gives you specific legal rights which are in addition to statutory warranties that may vary fromProvince to Province.If you purchased your unit outside Canada:•   This warranty does not apply.  Contact your dealer for warranty information.Service calls which do not involve defective materials or workmanship are not covered by this warranty.Costs of such service calls are the sole responsibility of the purchaser.EN23
EXPORTERThomson Inc.P. O. Box 1976Indianapolis,  IN  46206-1976© 2006 Thomson Inc.Trademark(s) ® RegisteredMarca(s) ® Registrada(s)Marque(s) ® Deposée(s)www.rca.comPrinted In China / Impreso  en China56280040 (EN/F/E)IMPORTADORComercializadora Thomson de México, S.A. de C.V.Álvaro Obregón No. 151. Piso 13.Col. Roma. Delegación CuauhtémocC.P. 06700. México, D.F.Telefono: 52-55-11-020360RFC: CTM-980723-KS5

Navigation menu