Technicolor Connected Home USA S25 MP3 Digital Player User Manual 0 S25 EN
Technicolor Connected Home USA LLC MP3 Digital Player 0 S25 EN
UserManual.wiki
>
Technicolor Connected Home USA
>
S25 User Manual
Manual
Navigation menu
Upload a User Manual
Namespaces
Wiki Guide
HTML
PDF
Info
Views
User Manual
Discussion / Help
Navigation
![6PLEASE READ AND SAVE FOR FUTURE REFERENCESome of the following information may notapply to your particular product; however, aswith any electronic product, precautionsshould be observed during handling and use.•Read these instructions.•Keep these instructions.•Heed all warnings.•Follow all instructions.•Do not use this apparatus near water.•Clean only with dry cloth.•Do not block any ventilation openings.Install in accordance with themanufacturer’s instructions.•Do not install near any heat sources such asradiators, heat registers, stoves, or otherapparatus (including amplifiers) thatproduce heat.•Do not defeat the safety purpose of thepolarized or grounding-type plug. Apolarized plug has two blades with onewider than the other. A grounding typeplug has two blades and a third groundingprong. The wide blade or the third prongis provided for your safety. If the providedplug does not fit into your outlet, consultan electrician for replacement of theobsolete outlet.•Protect the power cord from being walkedon or pinched particularly at plugs,convenience receptacles, and the pointwhere they exit from the apparatus.•Only use attachments/accessories specifiedby the manufacturer.•Use only with the cart, stand, tripod,bracket, or table specified by themanufacturer, or sold with the apparatus.When a cart is used, use caution whenmoving the cart/apparatus combination toavoid injury from tip-over.]Portable Cart Warning•Unplug this apparatus during lightningstorms or when unused for long periods oftime.•Refer all servicing to qualified servicepersonnel. Servicing is required when theapparatus has been damaged in any way,such as power-supply cord or plug isdamaged, liquid has been spilled or objectshave fallen into the apparatus, theapparatus has been exposed to rain ormoisture, does not operate normally, or hasbeen dropped.•ADDITIONAL SAFETY INFORMATION•Apparatus shall not be exposed to drippingor splashing and no objects filled withliquids, such as vases, shall be placed onthe apparatus.•Always leave sufficient space around theproduct for ventilation. Do not placeproduct in or on a bed, rug, in a bookcaseor cabinet that may prevent air flowthrough vent openings.•Do not place lighted candles, cigarettes,cigars, etc. on the product.•Connect power cord only to AC powersource as marked on the product.•Care should be taken so that objects donot fall into the product.•Do not attempt to disassemble the cabinet.This product does not contain customerserviceable components.•IF YOUR PRODUCT OPERATES ONBATTERIES, adhere to the followingprecautions:A. Any battery may leak electrolyte if mixedwith a different battery type, if insertedincorrectly, or if all batteries are notreplaced at the same time.B. Any battery may leak electrolyte orexplode if disposed of in fire or an attemptis made to charge a battery not intendedto be recharged.C. Discard leaky batteries immediately.Leaking batteries can cause skin burns orother personal injury. When discardingbatteries, be sure to dispose of them in theproper manner, according to your state/provincial and local regulations.Safety information](https://usermanual.wiki/Technicolor-Connected-Home-USA/S25/User-Guide-850728-Page-6.png)
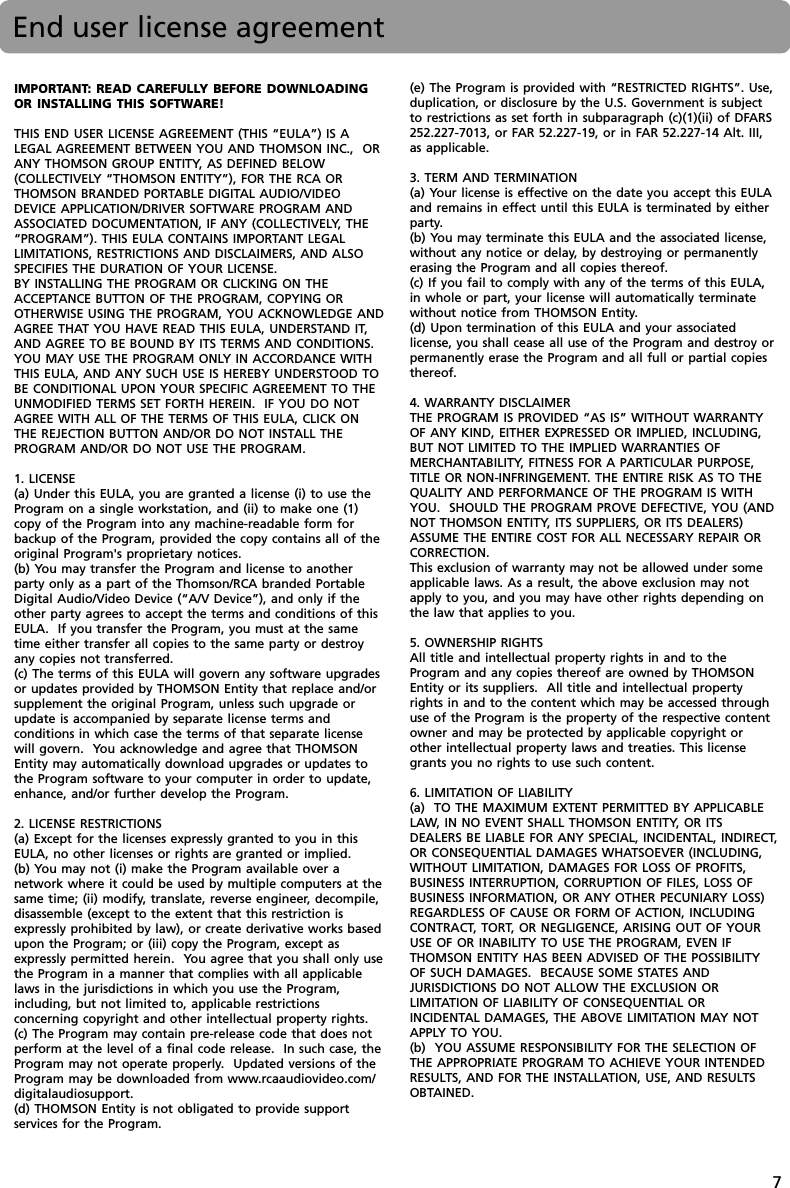


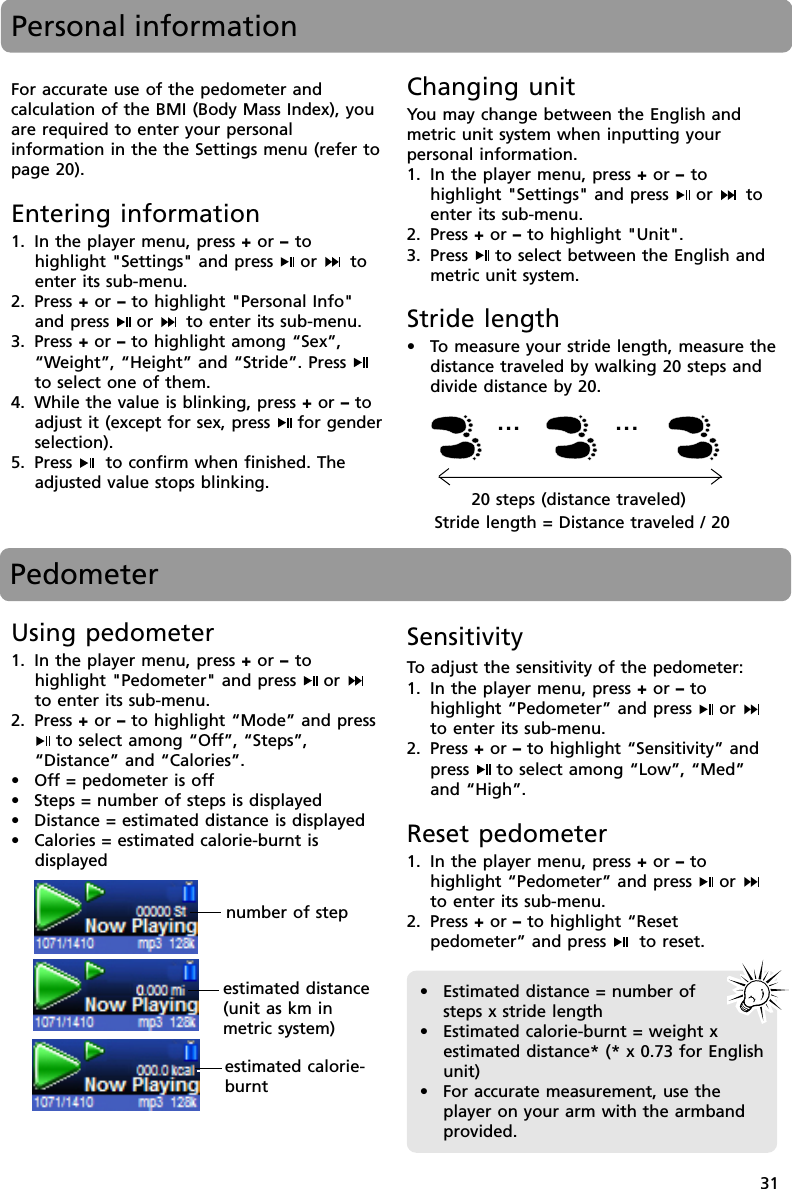
![33BMI (Body Mass Index)BMI is a measure which takes into account aperson’s weight and height to estimate totalbody fat in adults. It may vary depending onyour body type and composition. BMI iscalculated by the following formula:You should have entered your personalinformation before checking this index (referto Personal Information).Body weight (kg)[Body height (m)]2Body weight (lb)[Body height (inch)]2= 703 xBMI =Checking BMIIn the player menu, press + or – to highlight"BMI" and press or to check your BMI.HealthConditionUnderweightIdealOverweightObeseMalesLess than 20(<20)greater thanor equal to 20but less than25 (>=20 but<25)greater thanor equal to 25but less than30 (>=25 but<30)greater thanor equal to 30(>=30)FemalesLess than 18(<18)greater than orequal to 18but less than23 (>=18 but<23)greater than orequal to 23but less than30 (>=23 but<30)greater than orequal to 30(>=30)BMI is a general indicator of yourhealth. The information above is arough estimation only. To have a fullunderstanding of your health condition,consult with your doctor.My Selections >Pedometer >Stopwatch >BMI >Different BMI ranges correspond to differenthealth condition.](https://usermanual.wiki/Technicolor-Connected-Home-USA/S25/User-Guide-850728-Page-33.png)