Technicolor Delivery Technologies Belgium TG788VNV2 TG788vn v2 User Manual
Technicolor Delivery Technologies Belgium TG788vn v2
User Manual
SETUP AND USER GUIDE
MediaAccess TG788vn v2
SETUP AND USER GUIDE
MediaAccess TG788vn v2

Copyright
Copyright ©1999-2012 Technicolor. All rights reserved.
Distribution and copying of this document, use and communication of its contents is not permitted without written authorization from
Technicolor. The content of this document is furnished for informational use only, may be subject to change without notice, and should not
be construed as a commitment by Technicolor. Technicolor assumes no responsibility or liability for any errors or inaccuracies that may
appear in this document.
TECHNICOLOR WORLDWIDE HEADQUARTERS
1, rue Jeanne d’Arc
92443 Issy-les-Moulineaux
France
http://www.technicolor.com
Trademarks
The following trademarks may be used in this document:
AutoWAN sensing™ is a trademark of Technicolor.
Adobe®, the Adobe logo, Acrobat and Acrobat Reader are trademarks or registered trademarks of Adobe Systems, Incorporated,
registered in the United States and/or other countries.
Apple® and Mac OS® are registered trademarks of Apple Computer, Incorporated, registered in the United States and other countries.
Bluetooth® word mark and logos are owned by the Bluetooth SIG, Inc.
DECT™ is a trademark of ETSI.
DLNA® is a registered trademark, DLNA disc logo is a service mark, and DLNA Certified is a trademark of the Digital Living Network
Alliance. Digital Living Network Alliance is a service mark of the Digital Living Network Alliance.
Ethernet™ is a trademark of Xerox Corporation.
Microsoft®, MS-DOS®, Windows®, Windows NT® and Windows Vista® are either registered trademarks or trademarks of Microsoft
Corporation in the United States and/or other countries.
UNIX® is a registered trademark of UNIX System Laboratories, Incorporated.
UPnP™ is a certification mark of the UPnP™ Implementers Corporation.
Wi-Fi®, WMM® and the Wi-Fi logo are registered trademarks of the Wi-Fi Alliance®. Wi-Fi CERTIFIED, Wi-Fi ZONE, Wi-Fi
Protected Access, Wi-Fi Multimedia, Wi-Fi Protected Setup, WPA, WPA2 and their respective logos are trademarks of the Wi-Fi Alli-
ance®.
Other brands and product names may be trademarks or registered trademarks of their respective holders. All other logos, trademarks and
service marks are the property of their respective owners, where marked or not.
Document Information
Status: v1.0 (August 2012)
Reference: DMS-CTC-20120510-0000
Short Title: Setup and User Guide MediaAccess TG788vn v2 R10.5.x

i
CONTENTS
DMS-CTC-20120510-0000 v1.0
1 Getting Started......................................................................................................... 3
1.1 Features at a Glance................................................................................................................................. 4
1.2 Components...............................................................................................................................................5
1.2.1 Power............................................................................................................................................................................... 6
1.2.2 Local Network Connection............................................................................................................................................7
1.2.3 Broadband Connection................................................................................................................................................. 8
1.2.4 Voice Connection.......................................................................................................................................................... 9
1.2.5 Buttons........................................................................................................................................................................... 10
1.2.6 Status LEDs ................................................................................................................................................................... 11
1.3 Preparing for the Installation...................................................................................................................14
2 Guided Installation...................................................................................................15
3 Manual Installation...................................................................................................19
3.1 Connecting the MediaAccess Gateway to your Service Provider’s Network ................................. 20
3.2 Powering on the MediaAccess Gateway ..............................................................................................22
3.3 Connecting Your Network Devices to the MediaAccess Gateway ..................................................23
3.3.1 Setting up a Wireless Connection.............................................................................................................................. 24
3.3.2 Setting up a Wired Connection.................................................................................................................................. 25
3.4 Configure the MediaAccess Gateway ................................................................................................. 26
3.5 Setting Up the 3G Fall-Back WAN Connection..................................................................................27
3.5.1 Managing your Mobile Connection with the MediaAccess Gateway GUI.......................................................... 28
3.5.2 Inserting a Mobile USB Adapter................................................................................................................................ 29
4 Configuration Tools.................................................................................................31
4.1 MediaAccess Gateway GUI...................................................................................................................32
4.1.1 Access.............................................................................................................................................................................33
4.1.2 Components................................................................................................................................................................. 34
4.1.3 Protecting Access to the MediaAccess Gateway.................................................................................................... 36
4.2 Backing Up/Restoring your Configuration...........................................................................................37
4.3 Access From the Internet........................................................................................................................38
5 The MediaAccess Gateway Wireless Access Point ............................................... 39
5.1 Connecting Your Wireless Client via WPS .........................................................................................40
5.2 Connecting Your Wireless Client without WPS ................................................................................. 42
5.3 Connecting Your Wireless Client via QR Code..................................................................................43
5.4 Securing Your Wireless Connection..................................................................................................... 44
6 Telephony................................................................................................................ 47
6.1 Setting Up Your Telephone Network .................................................................................................. 48
6.1.1 Configuring the MediaAccess Gateway VoIP Service ...........................................................................................49
6.2 Address Book............................................................................................................................................51
6.3 Telephony Services..................................................................................................................................53
6.3.1 Activating a Telephony Service on your MediaAccess Gateway..........................................................................54
6.3.2 Common Telephony Services.................................................................................................................................... 55

ii
CONTENTS
DMS-CTC-20120510-0000 v1.0
6.4 Viewing Call Logs................................................................................................................................... 58
7 Saving Energy ......................................................................................................... 59
7.1 Code of Conduct....................................................................................................................................60
7.2 ECO Manager..........................................................................................................................................61
7.3 Manually Switching Off Services to Reduce Power ........................................................................... 62
8 Sharing Content...................................................................................................... 63
8.1 The Network File Server ........................................................................................................................ 65
8.2 The UPnP AV Media Server................................................................................................................. 68
8.2.1 Configuring the UPnP AV Media Server .................................................................................................................69
8.2.2 Using the UPnP AV Media Server ............................................................................................................................70
8.3 The FTP Server........................................................................................................................................72
8.4 Managing your Shared Content............................................................................................................ 74
8.5 Safely Removing your USB Storage Device.........................................................................................76
9 Network Services .....................................................................................................77
9.1 UPnP..........................................................................................................................................................78
9.1.1 Accessing Your MediaAccess Gateway via UPnP .................................................................................................. 79
9.1.2 Managing your Internet connection via UPnP.........................................................................................................80
9.1.3 Configuring UPnP on the MediaAccess Gateway.................................................................................................. 82
9.1.4 Installing UPnP on Windows XP................................................................................................................................ 83
9.2 Assigning a service (HTTP, FTP,...) to a Computer.......................................................................... 85
9.3 Dynamic DNS ..........................................................................................................................................87
9.4 Network Time Server.............................................................................................................................. 88
10 Internet Security.......................................................................................................91
10.1 Parental Control...................................................................................................................................... 92
10.1.1 Configuring Content-based Filtering........................................................................................................................94
10.1.2 Adding Rules for Address-Based Filtering................................................................................................................ 95
10.2 Firewall ......................................................................................................................................................97
10.3 Access Control........................................................................................................................................ 99
10.4 Wireless Time Control..........................................................................................................................101
11 Support...................................................................................................................103
11.1 Setup Troubleshooting......................................................................................................................... 104
11.2 General MediaAccess Gateway Troubleshooting.............................................................................105
11.3 Wired Connection Troubleshooting .................................................................................................. 106
11.4 Wireless Connection Troubleshooting................................................................................................107
11.5 Voice over IP Troubleshooting ........................................................................................................... 108
11.6 Content Sharing Troubleshooting.......................................................................................................109
11.7 Reset to Factory Defaults ..................................................................................................................... 110
1
ABOUT THIS SETUP AND USER GUIDE
DMS-CTC-20120510-0000 v1.0
About this Setup and User Guide
In this Setup and User Guide
The goal of this Setup and User Guide is to show you:
Set up your MediaAccess Gateway and local network
Configure and use the main features of your MediaAccess Gateway.
For more advanced scenarios and features visit the documentation pages on www.technicolor.com.
Used Symbols
Te r m i n o l o g y
Generally, the MediaAccess TG788vn v2 will be referred to as MediaAccess Gateway in this Setup and User Guide.
Typographical Conventions
Following typographical convention is used throughout this manual:
This sample text indicates a hyperlink to a Web site.
Example: For more information, visit us at www.technicolor.com.
This sample text indicates an internal link.
Example: If you want to know more about guide, see “About this Setup and User Guide” on page 1.
This sample text indicates an important content-related word.
Example: To enter the network, you must authenticate yourself.
This sample text indicates a GUI element (commands on menus and buttons, dialog box elements, file names, paths and
folders).
Example: On the File menu, click Open to open a file.
The danger symbol indicates that there may be a possibility of physical injury.
The warning symbol indicates that there may be a possibility of equipment damage.
The caution symbol indicates that there may be a possibility of service interruption.
The note symbol indicates that the text provides additional information about a topic.
3
1 GETTING STARTED
DMS-CTC-20120510-0000 v1.0
1 Getting Started
Introduction
This chapter gives you a brief overview of the main features and components of the MediaAccess Gateway. After this
chapter we will start with the installation.
Do not connect any cables to the MediaAccess Gateway until instructed to do so.

4
1GETTING START
ED
DMS-CTC-20120510-0000 v1.0
1.1 Features at a Glance
Introduction
This section provides a brief overview of the main features of your MediaAccess Gateway.
IPv6 Ready
Your MediaAccess Gateway is IPv6 ready. Internet Protocol version 6 (IPv6) is the next generation of Internet technologies
aiming to effectively support the ever-expanding Internet usage and functionality, and also to address security concerns that
exist in an IPv4 environment.
Internet connection features
Broadband Internet access via the integrated DSL modem.
The first chapters describe how to connect your MediaAccess Gateway to the Internet.
3G (Fall-back) High-speed Internet Access via the optional mobile USB adaptor.
For more information, see “3.5 Setting Up the 3G Fall-Back WAN Connection” on page 27.
Internet Security for your entire network.
For more information, see “10 Internet Security” on page 91.
Useful network tools like UPnP, Dynamic DNS and many more.
For more information, see “9 Network Services” on page 77.
Local networking features
Wired access for your local network devices via the Ethernet interface.
For more information, see “3.3 Connecting Your Network Devices to the MediaAccess Gateway” on page 23.
Wireless access for your local network devices via the integrated IEEE 802.11n wireless access point.
For more information, see “5 The MediaAccess Gateway Wireless Access Point” on page 39.
An Integrated Media Server allowing you to share your media with media players and other network devices. For more
information, see “8 Sharing Content” on page 63.
Telephony features
The MediaAccess Gateway offers Voice over IP (VoIP) connectivity for traditional phones and IP phones.
For more information see “6 Telephony” on page 47
ECO label
Technicolor’s ECO label guarantees you that the MediaAccess Gateway is able to reduce its power consumption to an
absolute minimum. For more information, see “7 Saving Energy” on page 59.
MediaAccess Gateway configuration tools
The MediaAccess Gateway Setup CD allows you to configure your MediaAccess Gateway and helps you to connect
your computers to the MediaAccess Gateway.
The MediaAccess Gateway GUI allows you to configure your MediaAccess Gateway via your web browser.
For more information, see “4.1 MediaAccess Gateway GUI” on page 32.
5
1 GETTING STARTED
DMS-CTC-20120510-0000 v1.0
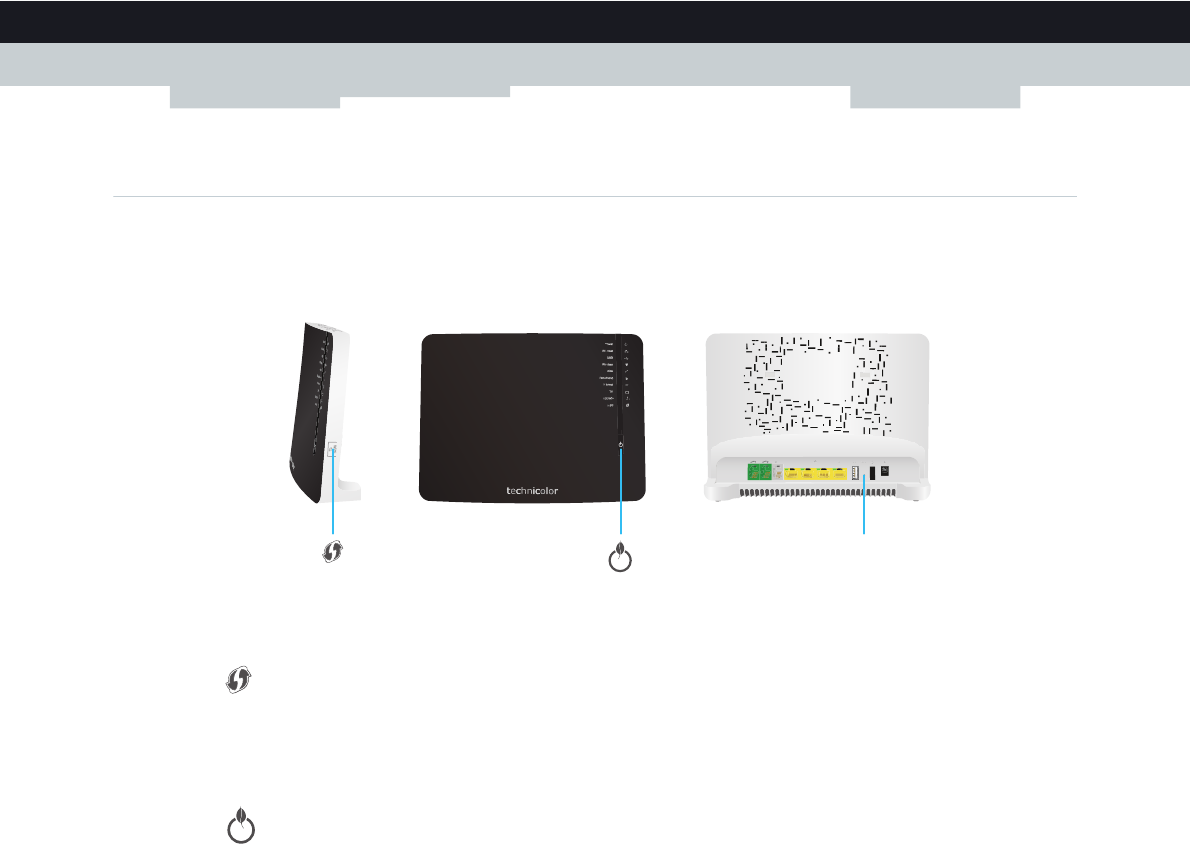
1.2 Components
Overview
This section provides an overview of the different components of the MediaAccess Gateway:
To p i c Page
1.2.1 Power 6
1.2.2 Local Network Connection 7
1.2.3 Broadband Connection 8
1.2.4 Voice Connection 9
1.2.5 Buttons 10
1.2.6 Status LEDs 11
6
1GETTING START
ED
DMS-CTC-20120510-0000 v1.0
1.2.1 Power
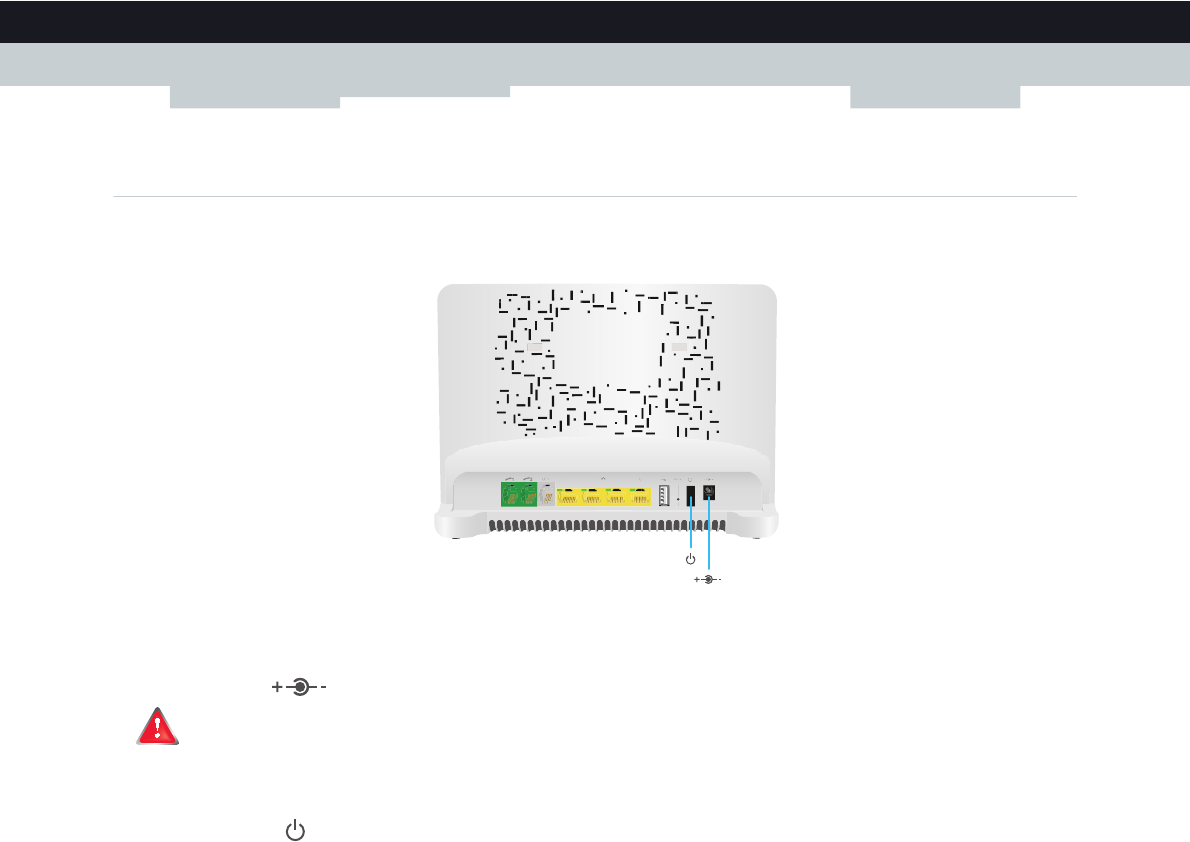
Overview
Power inlet
The power inlet () allows you to connect the power supply.
Power switch
The power switch () allows you to power on/off your MediaAccess Gateway.
Only use the power supply delivered with your MediaAccess Gateway.
7
1 GETTING STARTED
DMS-CTC-20120510-0000 v1.0
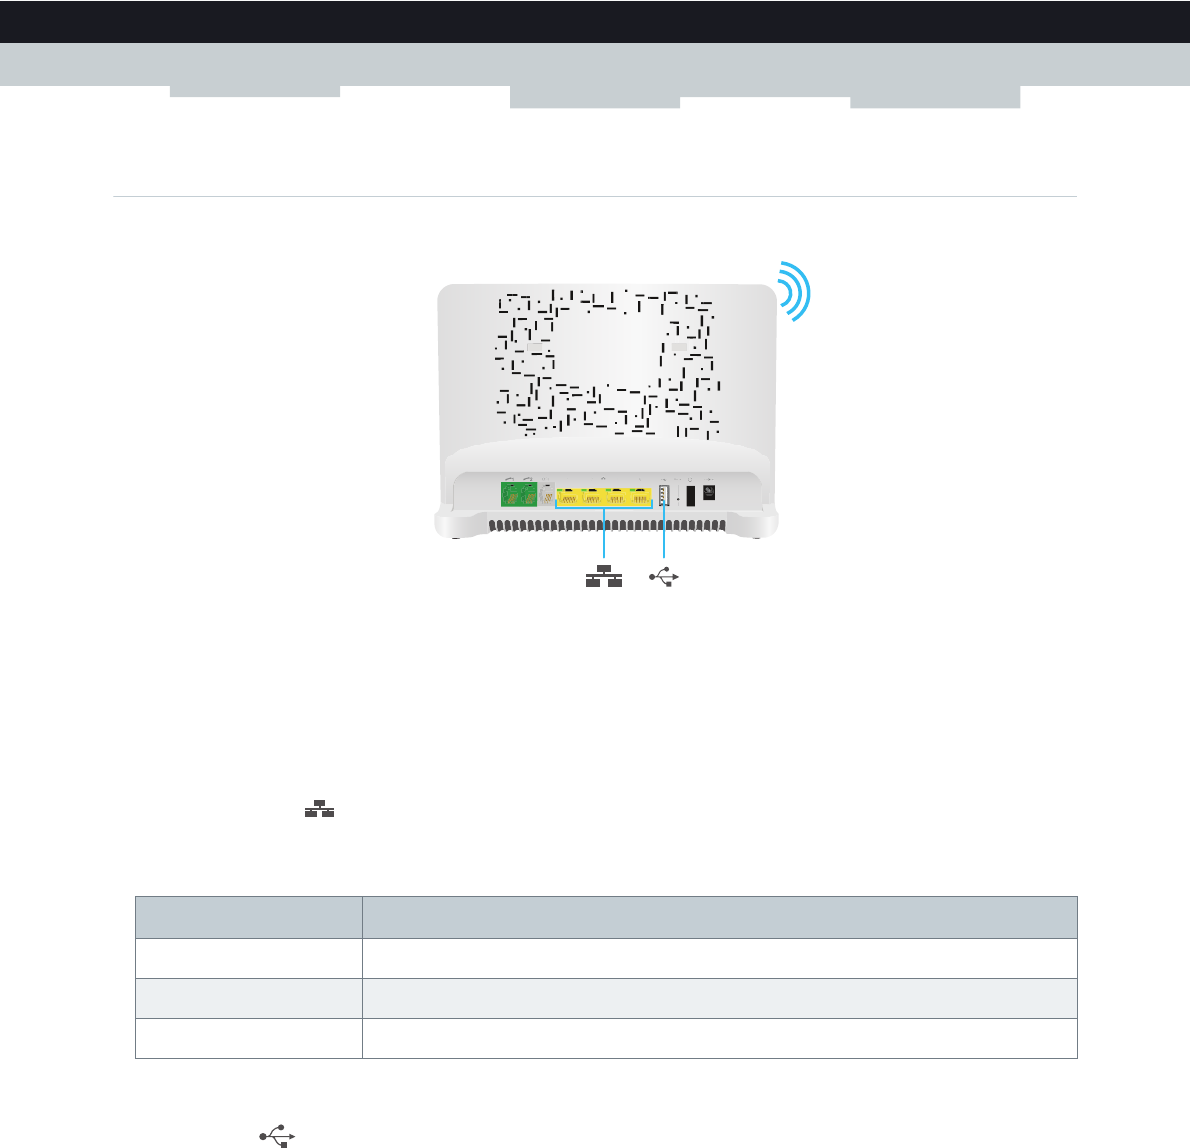
1.2.2 Local Network Connection
Overview
Wireless Access Point
The built-in WiFi-certified wireless access point provides wireless access to your WiFi-certified wireless clients.
For more information, see “5 The MediaAccess Gateway Wireless Access Point” on page 39.
Ethernet switch
The Ethernet switch () allows you to connect an Ethernet device (for example, a computer) to your local network. For
more information, see “3.3 Connecting Your Network Devices to the MediaAccess Gateway” on page 23.
A LED may be provided per Ethernet port to indicate link integrity (or activity).
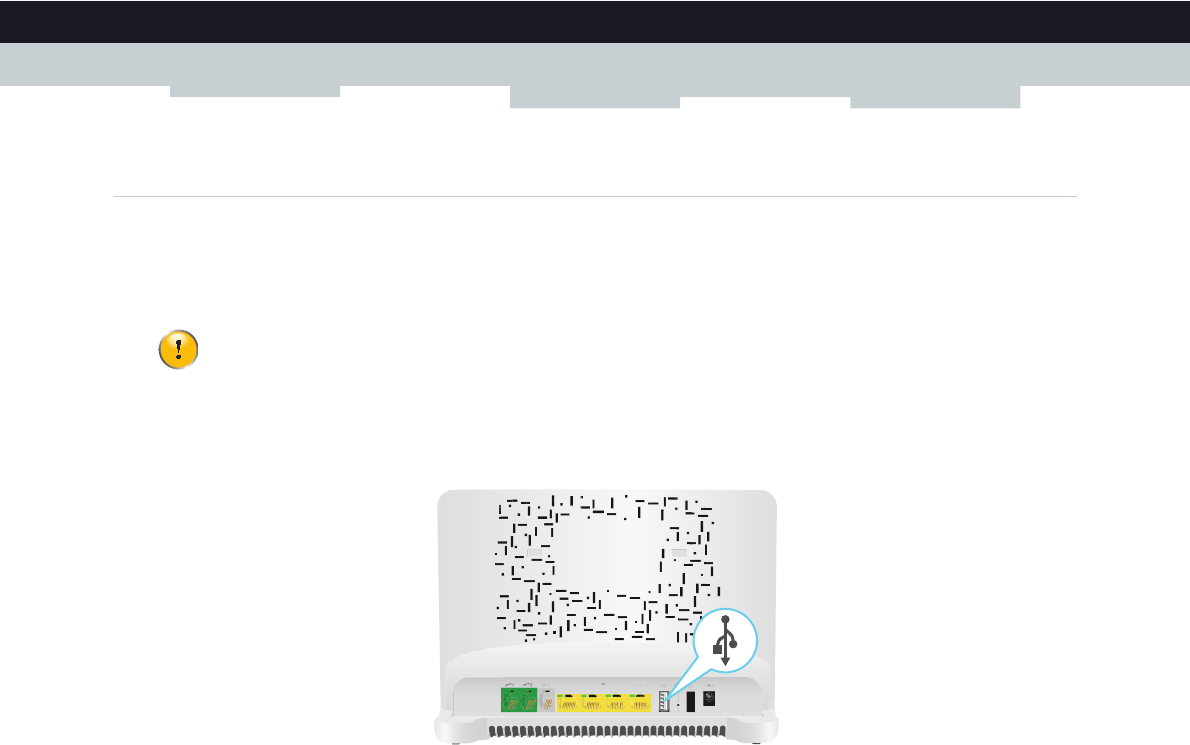
USB Port
The USB port () can be used to:
Connect a USB mass storage device to share your content (for example, music, movies,...):
On your local network via the Network File server or the UPnP AV Media Server.
On Internet via FTP.
For more information, see “8 Sharing Content” on page 63.
Connect a 3G mobile adaptor to set up a 3G connection that can work as a backup for your main Internet connection.
For more information, see “3.5 Setting Up the 3G Fall-Back WAN Connection” on page 27.
LED Status Description
Solid on Device connected.
Blinking Device connected and sending/receiving data.
Off No device connected.
9
1 GETTING STARTED
DMS-CTC-20120510-0000 v1.0
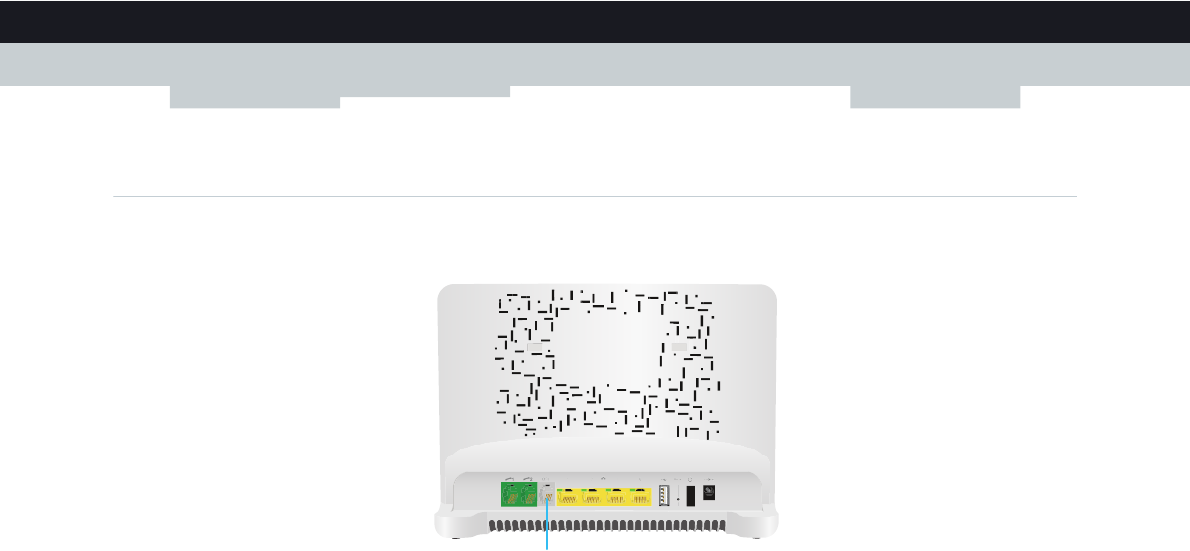
1.2.4 Voice Connection
Overview
Phone Port
The Phone ( ) port allows you to connect a traditional phone to your MediaAccess Gateway. This way you will be able to
make phone calls over the Internet and save on communication costs, especially for long-distance calls.
For more information, see “6.1 Setting Up Your Telephone Network” on page 48.
10
1GETTING START
ED
DMS-CTC-20120510-0000 v1.0
1.2.5 Buttons
Overview
WPS button
The WPS ( ) button allows you to add new wireless clients to your network in a swift and easy way, without the need to
enter any of your wireless settings manually.
For more information, see “5.1 Connecting Your Wireless Client via WPS” on page 40.
ECO button
The ECO ( ) button allows you to disable your wireless access point. You can do this when you do not have any devices
that are connected to the wireless access point. This allows you to save the energy that the MediaAccess Gateway would be
using for the wireless access point. For more information, see “ECO button” on page 62.
Reset button
The Reset button allows you to reset your MediaAccess Gateway to factory defaults.
For more information, see “11.7 Reset to Factory Defaults” on page 110.
Reset
11
1 GETTING STARTED
DMS-CTC-20120510-0000 v1.0
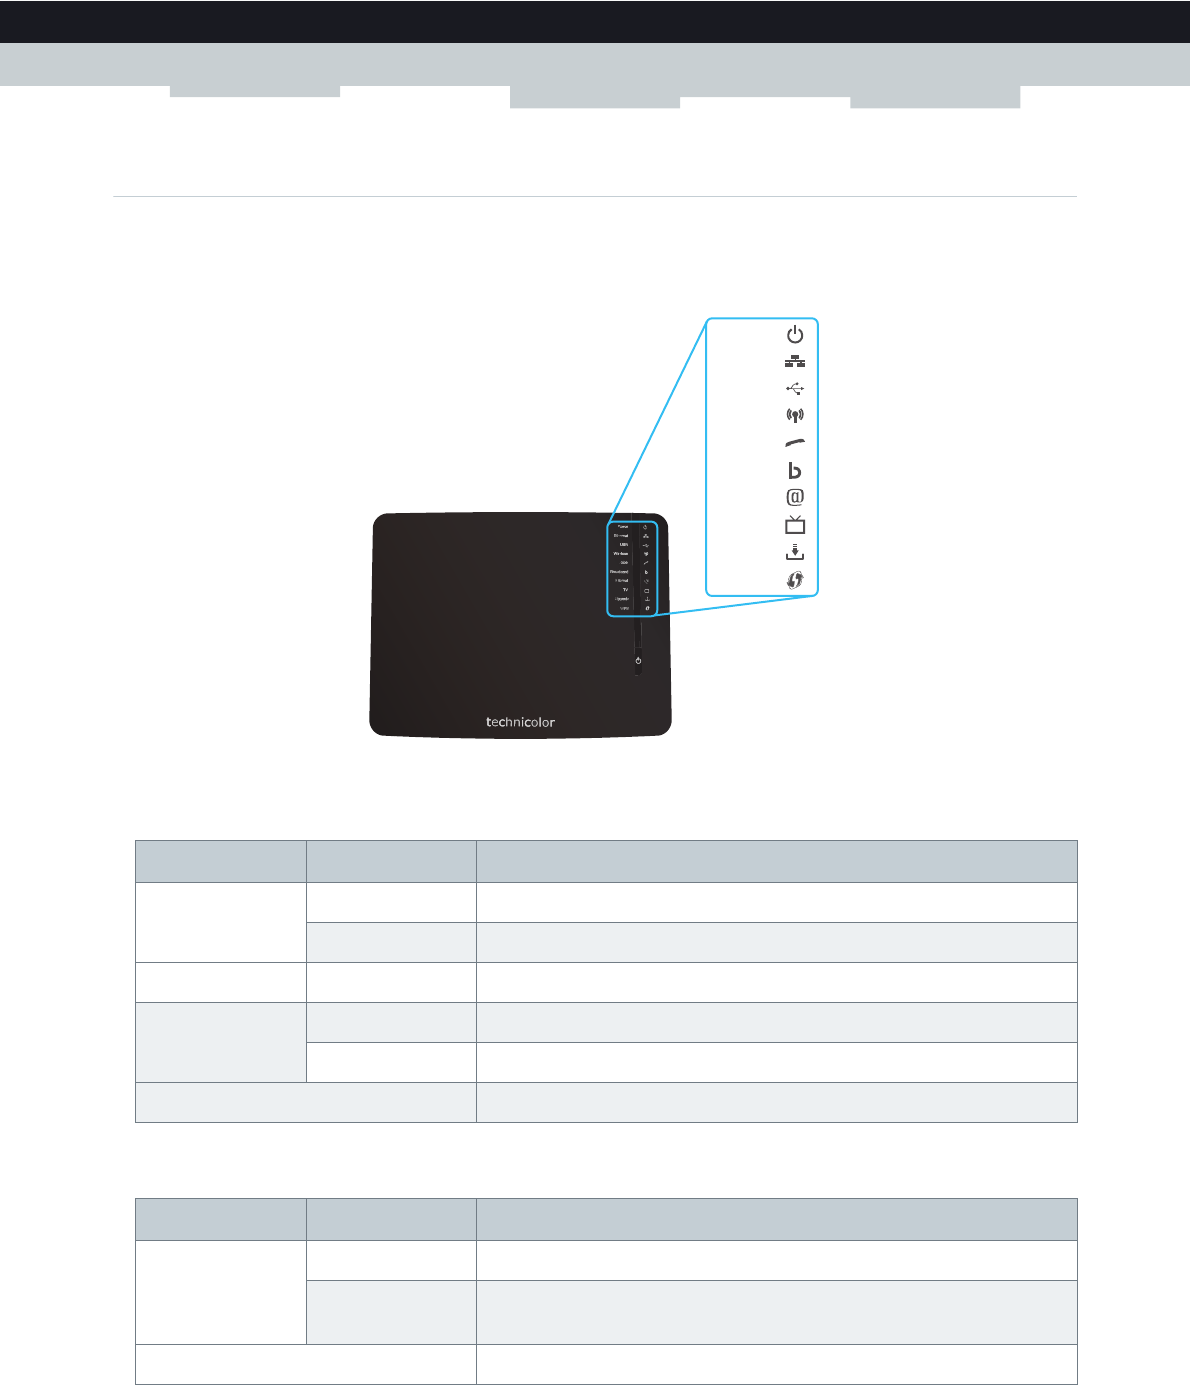
1.2.6 Status LEDs
Introduction
On the front panel of your MediaAccess Gateway, you can find a number of status LEDs, indicating the state of the device.
Power LED
Ethernet LED
Upgrade
Power
Ethernet
USB
Wireless
Voice
Broadband
Internet
TV
WPS
Colour State Description
Green Solid on Power on, normal operation
Blinking Bootloader active (during upgrade)
Red Solid on Power on, self-test failed, indicating device malfunction
Orange Solid on Bootloader selftest
Blinking Bootloader active (during upgrade)
Off The MediaAccess Gateway is powered off.
Colour State Description
Green Solid on Network device connected to the Ethernet switch.
Blinking Network device connected to the Ethernet switch and sending/receiving
data.
Off No Ethernet connection on your local network
12
1GETTING START
ED
DMS-CTC-20120510-0000 v1.0
USB LED
Wireless LED
Broadband LED
Internet LED
Colour State Description
Green Solid on Device(s) connected to the MediaAccess Gateway’s USB port
Off No device connected to the MediaAccess Gateway’s USB port
Colour State Description
Green Solid on No wireless activity, WPA2-PSK or WPA-PSK encryption
Blinking Wireless activity, WPA2-PSK or WPA-PSK encryption
Orange Solid on No wireless activity, WEP encryption
Blinking Wireless activity, WEP encryption
Red Solid on No wireless activity, no security
Blinking Wireless activity, no security
Red/green Toggling Wireless client registration phase
Off Wireless access point disabled
Colour State Description
Green Solid on DSL line synchronised
Blinking Trying to detect carrier signal or pending DSL line synchronisation
Off MediaAccess Gateway powered off.
Colour State Description
Green Solid on Connected to the Internet, no activity
Blinking Connected to the Internet, sending/receiving data
Red Solid on Failed to setup the Internet connection
Off No Internet connection
13
1 GETTING STARTED
DMS-CTC-20120510-0000 v1.0
TV LED
Phone LED
Upgrade LED
WPS LED
For more information about WPS, see “5.1 Connecting Your Wireless Client via WPS” on page 40.
Colour State Description
Green Solid on Set-Top Box (STB) connected to the MediaAccess Gateway
Blinking Unknown STB connected to the MediaAccess Gateway
Off No STB connected to the MediaAccess Gateway
Colour State Description
Green Solid on Registered at your VoIP provider, no activity.
Blinking Registered at your VoIP provider, activity.
Off Not registered to your VoIP provider.
Colour State Description
Blue Solid on Software upgrade ongoing
Off No software upgrade ongoing
Do not power off your MediaAccess Gateway or disconnect any cables as long as the Upgrade LED is on.
Interrupting the upgrade procedure may damage your MediaAccess Gateway.
Colour State Description
Green Solid On Client successfully registered via WPS
Orange Blinking WPS registration ongoing
Red Blinking Error occurred

14
1GETTING START
ED
DMS-CTC-20120510-0000 v1.0
1.3 Preparing for the Installation
DSL service requirements
Make sure that:
Your service provider activated the DSL service on your telephone line by your service provider.
You have the installation information (for example, user name, password, service profile,...) provided by your service
provider at hand.
Local connection requirements
Wireless connection
If you want to connect your computer using a wireless connection, your computer must be equipped with a WiFi-certified
wireless client adapter.
Wired connection
If you want to connect a computer using a wired connection, your computer must be equipped with an Ethernet Network
Interface Card (NIC).
Start with the installation
You are now ready to start with the installation of your MediaAccess Gateway.

15
2 GUIDED INSTALLATION
DMS-CTC-20120510-0000 v1.0
2 Guided Installation
Introduction
In the guided installation, the Setup wizard on the Setup CD will assist you with the installation of your MediaAccess
Gateway.
If you do not want to use the Setup CD or if the Setup CD is not included in your package, follow the installation procedure
described in “3 Manual Installation” on page 19.
Requirements
To use the guided installation you must comply with the following requirements:
Your computer must run one of the following operating systems:
Microsoft Windows 7 and higher
Microsoft Windows 7 x64 and higher
Microsoft Windows Vista and higher
Microsoft Windows XP Service Pack 2 (SP2) and higher
Mac OS X 10.6 (Snow Leopard)
Mac OS X 10.5 (Leopard)
Mac OS X 10.4 (Tiger)
You must have administrative rights on your computer.
If you do not comply with these requirements, use the “3 Manual Installation” on page 19.
Running the Setup wizard
To start the Setup wizard:
1Insert the Setup CD into your computer's CD- or DVD drive.
2If your computer runs:
Microsoft Windows: The Setup CD starts automatically.
If the Setup CD does not autostart, see “The Setup CD does not start automatically” on page 104.
Mac OS X: Double-click Menu in the window with the content of the Setup CD.
3Select the language of your choice and click OK.
4The Setup wizard will now guide you through the installation of your MediaAccess Gateway.

16
2 GUIDED INSTALLATION
DMS-CTC-20120510-0000 v1.0
5At the end of the installation, the following screen appears:
Select Go to the Technicolor Gateway web interface if you want to go to the MediaAccess Gateway GUI after closing
the wizard. On the MediaAccess Gateway GUI, you can configure all services of your MediaAccess Gateway.
6Click Finish.
7The CD menu appears.
CD Menu
On the CD Menu, you can click:
Initial Setup to connect your computer to the MediaAccess Gateway and configure your local network.
Reconfigure my Technicolor Gateway to fully reconfigure your MediaAccess Gateway.
Setup my computer to connect your computer to the MediaAccess Gateway network.
Documentation to view a list of the documentation that is available for your MediaAccess Gateway.
Visit technicolor.com to visit the online support sections.
If you reconfigure your MediaAccess Gateway via the CD menu, the MediaAccess Gateway will be reconfigured
from scratch. All your current settings will be lost. If you only want to make small changes to your configuration
(for example, changing the security), we recommended you to do this via the MediaAccess Gateway GUI. For
more information, see “4.1 MediaAccess Gateway GUI” on page 32.
Actual available items depend on the Setup CD delivered with your MediaAccess Gateway.

17
2 GUIDED INSTALLATION
DMS-CTC-20120510-0000 v1.0
In case of problems
If you encounter problems during this installation please refer to “11.1 Setup Troubleshooting” on page 104.
Backup your configuration
Once you successfully installed your MediaAccess Gateway, it is recommend to backup your configuration. This will allows
you to return to this configuration when needed (for example, after misconfiguration).
For more information, see “4.2 Backing Up/Restoring your Configuration” on page 37

19
3 MANUAL INSTALLATION
DMS-CTC-20120510-0000 v1.0
3 Manual Installation
Installation
This chapter will help you to manually install your MediaAccess Gateway.
Setting up your network
Proceed as follows:
1Connect your MediaAccess Gateway to your service provider’s network.
For more information, see “3.1 Connecting the MediaAccess Gateway to your Service Provider’s Network” on page 20.
2Power on the MediaAccess Gateway.
For more information, see “3.2 Powering on the MediaAccess Gateway” on page 22.
3Connect your computer to the MediaAccess Gateway.
For more information, see “3.3 Connecting Your Network Devices to the MediaAccess Gateway” on page 23.
4Configure your MediaAccess Gateway.
For more information, see “3.4 Configure the MediaAccess Gateway” on page 26.
5Connect your phones.
For more information, see “6 Telephony” on page 47.
6Share your content or media on your local network, continue with “8 Sharing Content” on page 63.
7If you purchased the mobile USB adapter, setup the 3G backup connection.
For more information, see “3.5 Setting Up the 3G Fall-Back WAN Connection” on page 27.
8Once you successfully installed your MediaAccess Gateway, it is recommend to backup your configuration. This will
allows you to return to this configuration when needed (for example, after misconfiguration). For more information, see
“4.2 Backing Up/Restoring your Configuration” on page 37.
20
3 MANUAL INSTALLATION
DMS-CTC-20120510-0000 v1.0
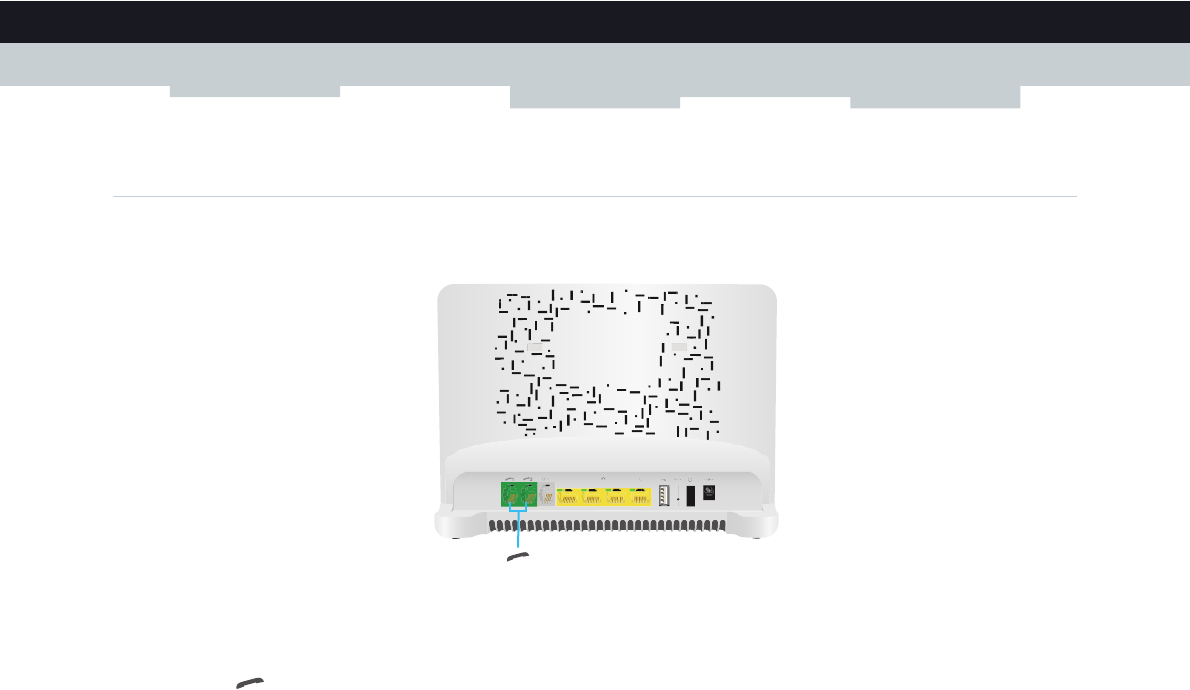
3.1 Connecting the MediaAccess Gateway to your Service
Provider’s Network
Introduction
This section helps you to connect the MediaAccess Gateway to your service provider’s network.
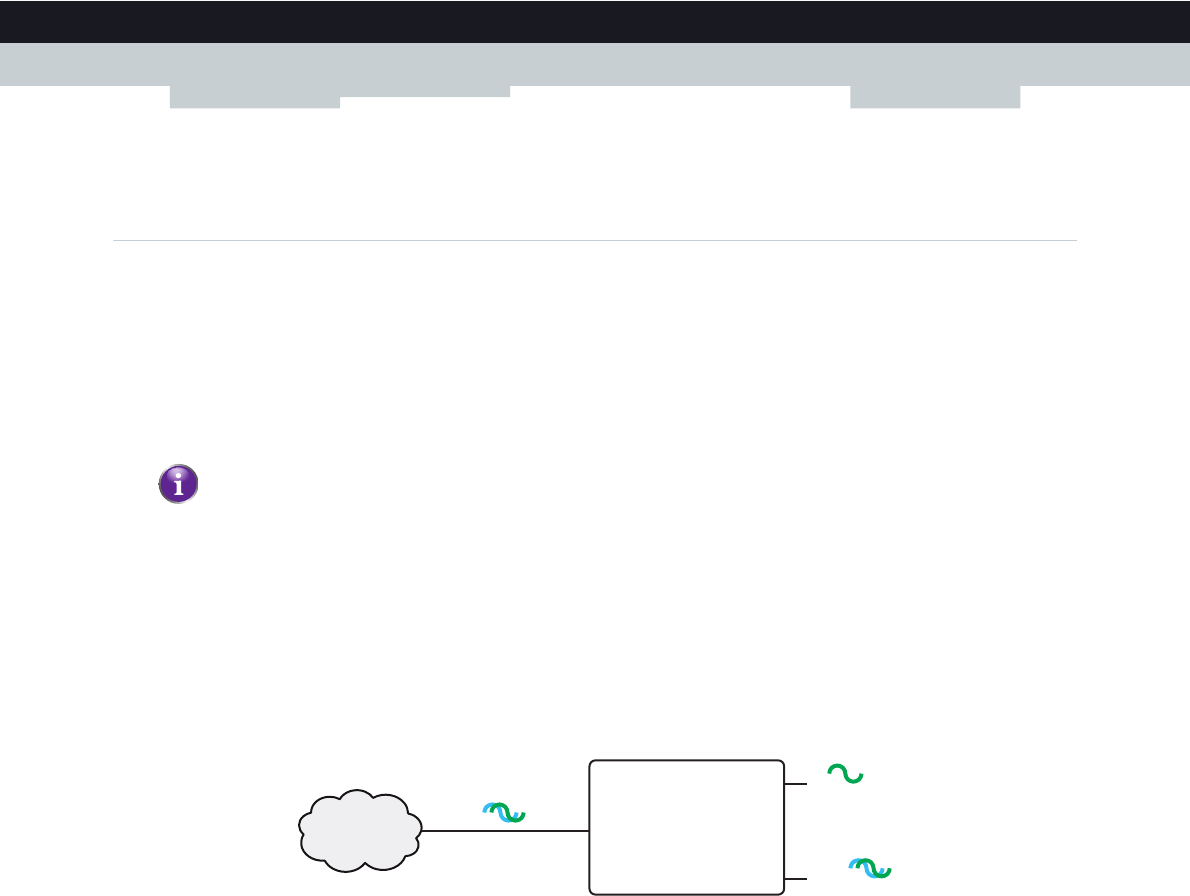
Signal arriving at your home
The Line signal that arrives at your home consists the following components:
A Phone signal carrying the traffic for telephony.
A DSL signal carrying the Internet traffic.
DSL Gateways have a built-in solution to remove the Phone component. No additional devices are needed, you can
connect them directly to the Line.
Telephones do not have this capability, so here you have to use a filter or splitter to remove the DSL signal.
What does a filter/splitter look like
A splitter/filter is a box that typically has the following connectors:
A Line input
This connector must be connected to the input signal that needs to be filtered.
A Phone/PSTN output
This connector offers filtered output signal. It only contains the Voice component and can only be used for connecting
phones.
A Modem/DSL output (optional)
This connector offers unfiltered output. It contains both the Phone and DSL signal and can be used to connect your
MediaAccess Gateway.
Connecting the cables
The procedure to be followed depends on the fact if this filter has been integrated into your MediaAccess Gateway or not.
Check the label of your MediaAccess Gateway. If the product name contains:
“wIF” (for example MediaAccess TG788vn v2 wIF) then your MediaAccess Gateway has an integrated filter. No external
filters are needed. Follow the steps described in “Scenario 2: A MediaAccess Gateway without integrated filter” on page 21.
No “wiF” (for example MediaAccess TG788vn v2) then your MediaAccess Gateway does not have an integrated filter.
Follow the steps described in “Scenario 2: A MediaAccess Gateway without integrated filter” on page 21.
This Phone signal is only used for communication over the traditional telephone network (PSTN). Voice over IP
communication will be carried by the DSL signal.
DSL + Voice
Voice
DSL + Voice
Service
Provider
Filter/Splitter
LINE
PHONE
MODEM

21
3 MANUAL INSTALLATION
DMS-CTC-20120510-0000 v1.0
Scenario 1: A MediaAccess Gateway with integrated filter
Proceed as follows:
1Take the DSL cable. This is the gray cable that is included in your box.
2Plug one end of the cable in the grey DSL port on the back of your MediaAccess Gateway.
3Plug the other end of the cable:
In the DSL/Modem output of your splitter/filter.
Directly into the telephone wall outlet if there is no splitter/filter between the network terminator and your local
phone network.
Scenario 2: A MediaAccess Gateway without integrated filter
Proceed as follows:
1Take the DSL cable. This is the grey cable that is included in your box.
2Plug one end of the cable in the grey DSL port on the back of your MediaAccess Gateway.
3Plug the other end of the cable into the DSL/MODEM output port of your filter/splitter.
DSL
DSL

22
3 MANUAL INSTALLATION
DMS-CTC-20120510-0000 v1.0
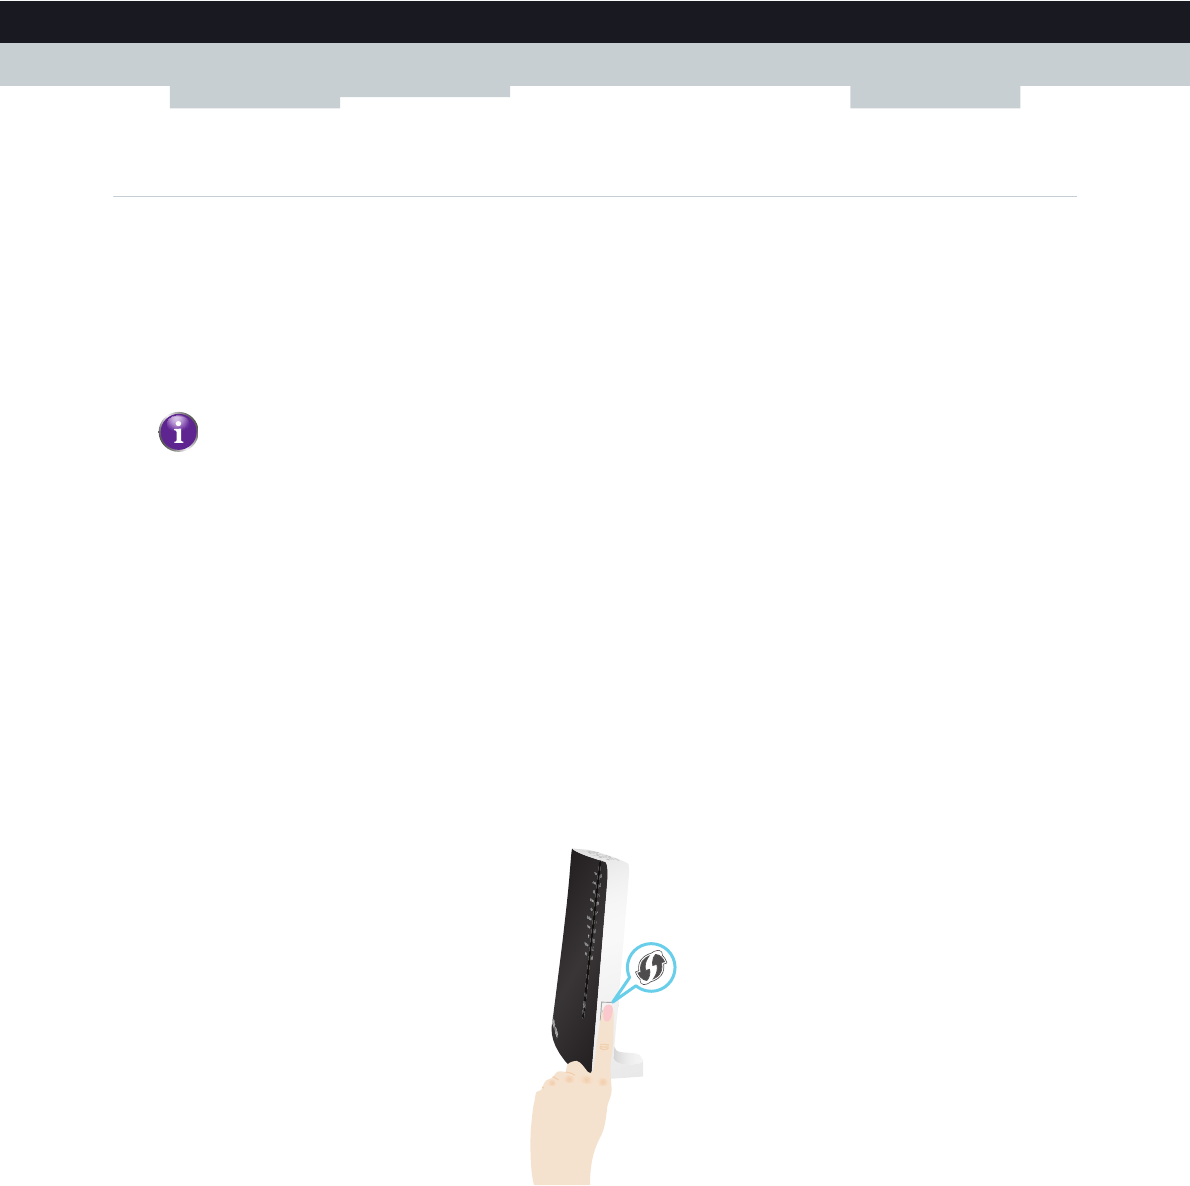
3.2 Powering on the MediaAccess Gateway
Procedure
Proceed as follows:
1Connect the power cord to the power port of the MediaAccess Gateway.
2Plug the other end of the power cord into an electrical outlet.
3Press the power button to turn on the MediaAccess Gateway.
4Wait at least two minutes to allow the MediaAccess Gateway to complete the start up phase.

23
3 MANUAL INSTALLATION
DMS-CTC-20120510-0000 v1.0
3.3 Connecting Your Network Devices to the MediaAccess
Gateway
Choose your connection method
To connect your device via:
A wireless connection, continue with “3.3.1 Setting up a Wireless Connection” on page 24.
A wired connection, continue with “3.3.2 Setting up a Wired Connection” on page 25.

24
3 MANUAL INSTALLATION
DMS-CTC-20120510-0000 v1.0
3.3.1 Setting up a Wireless Connection
The MediaAccess Gateway access point
Your MediaAccess Gateway is equipped with a wireless access point that supports the following standards:
IEEE 802.11n
IEEE 802.11g
IEEE 802.11b
Requirements
Your network device must be equipped with a WiFi-certified wireless client.
Connection speed
When setting up your wireless network, keep in mind that the following factors may have a negative impact on your wireless
connection speed:
The obstacles (walls, ceilings,...) between the wireless client and the access point.
Distance between the wireless client and the access point.
To fully benefit from the improved connection speed offered by the IEEE 802.11n standard, it is recommended to only
connect IEEE 802.11n wireless clients to your MediaAccess Gateway. Connecting older (for example, IEEE 802.11g)
wireless clients may also slow down connection speed of the IEEE 802.11n capable clients.
If you have problems with your wireless performance, see “Poor Wireless Connectivity or Range” on page 107.
To set up a wireless connections
For more information on how to setup a wireless connection between your network device and your MediaAccess Gateway,
see “5 The MediaAccess Gateway Wireless Access Point” on page 39.
25
3 MANUAL INSTALLATION
DMS-CTC-20120510-0000 v1.0
3.3.2 Setting up a Wired Connection
Requirements
Both your network device (for example, a computer, a gaming console,...) and MediaAccess Gateway must have a free
Ethernet port.
Your network device must be configured to obtain an IP address automatically. This is the default setting.
Ethernet cable
In your package, you will find a cable with yellow connectors. This is the Ethernet cable.
Procedure
Proceed as follows:
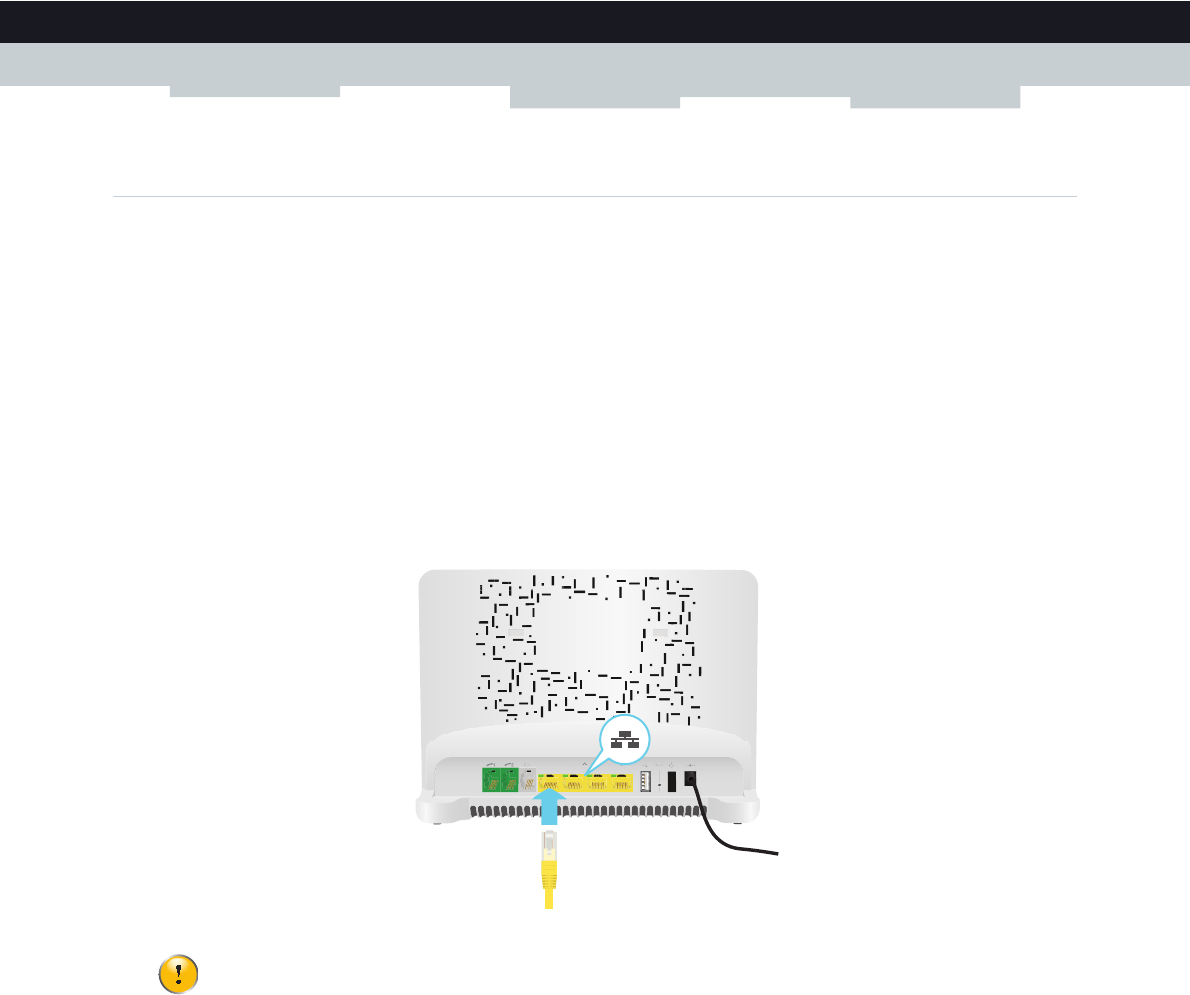
1Connect one end of the Ethernet cable to one of the yellow Ethernet ports of your MediaAccess Gateway:
2Connect the other end of the Ethernet cable to your network device.
3Your network device is now connected to your network. No additional configuration is needed unless specified by your
service provider.
The MediaAccess Gateway does not support Power over Ethernet (PoE). All network devices that are connected
to the MediaAccess Gateway must be powered by their own power source.
26
3 MANUAL INSTALLATION
DMS-CTC-20120510-0000 v1.0
3.4 Configure the MediaAccess Gateway
Introduction
If your service provider did not preconfigure your MediaAccess Gateway, you may have to configure the MediaAccess
Gateway via its Graphical User Interface (GUI).
Requirements
JavaScript must be enabled on your web browser (this is the default setting). For more information, consult the help of your
web browser.
Procedure
Proceed as follows:
1Open your web browser.
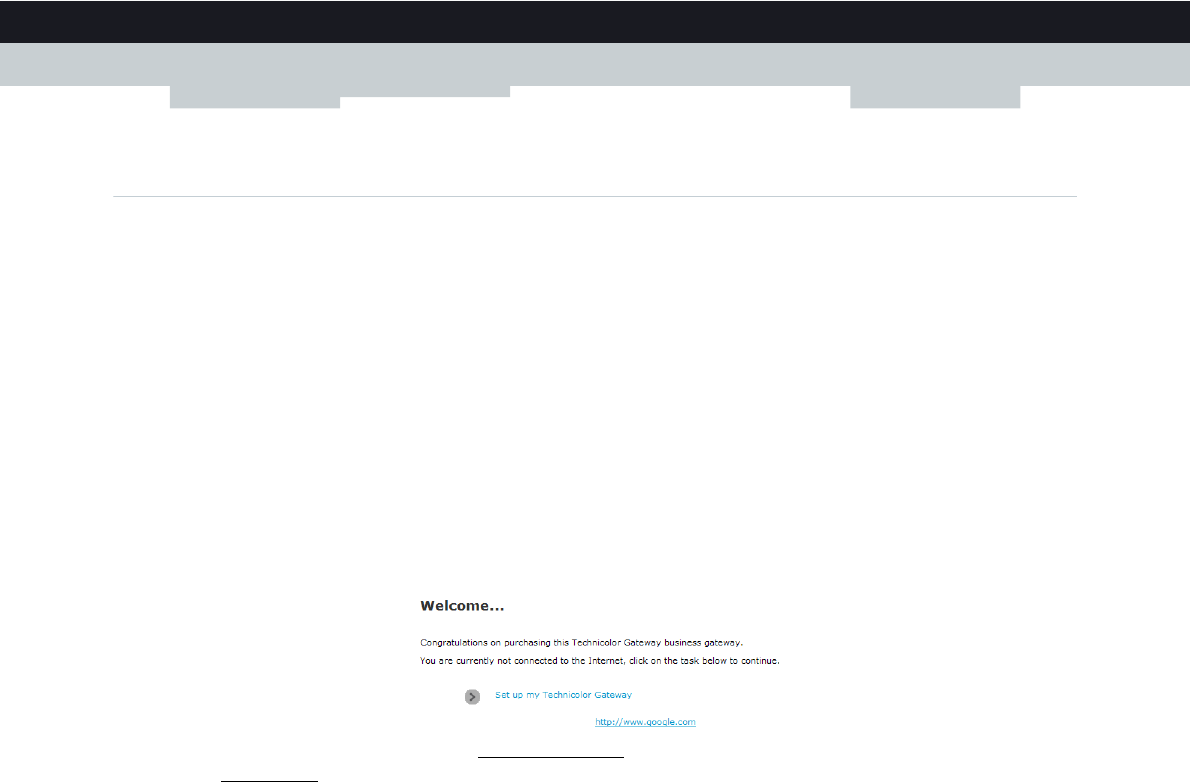
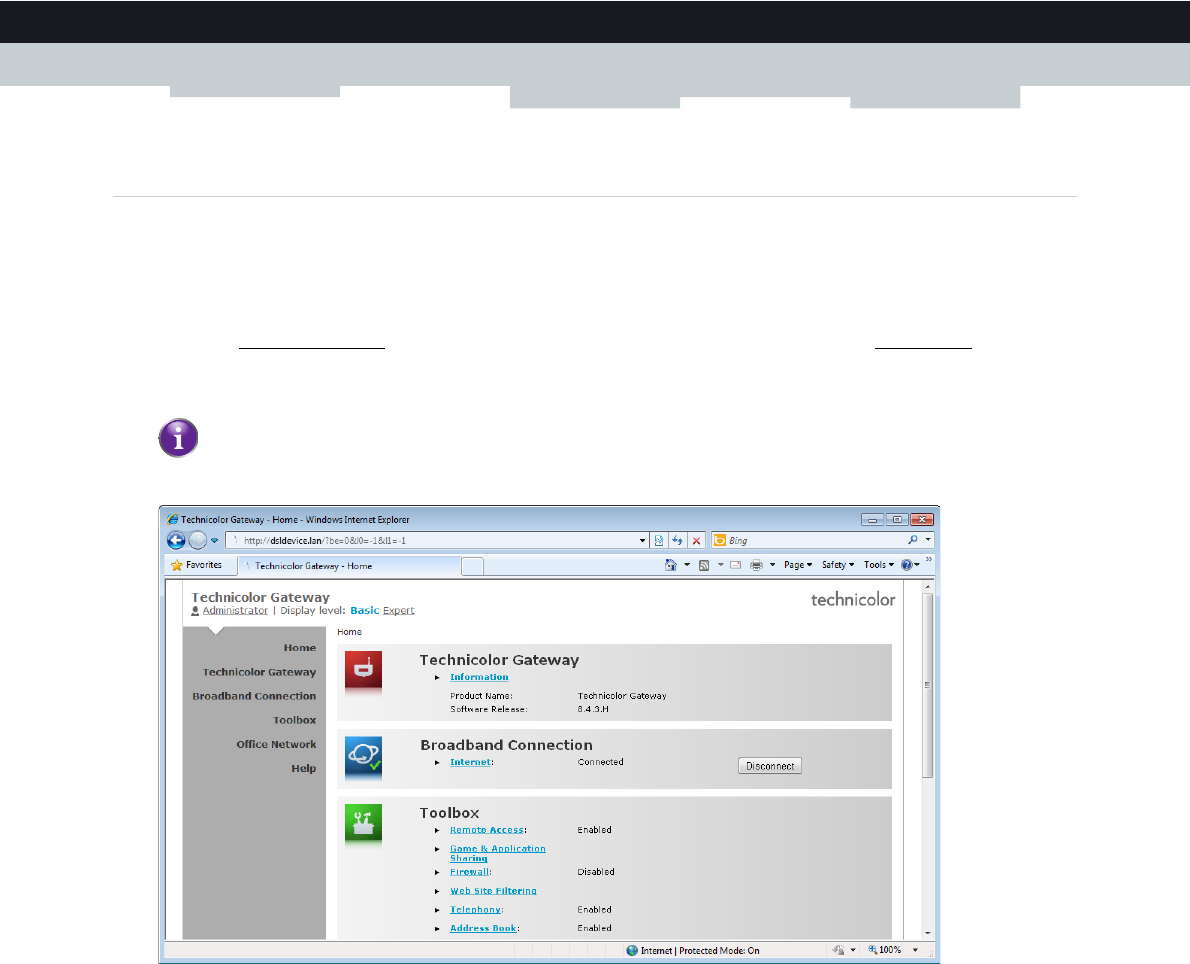
2The MediaAccess Gateway informs you that you have not yet configured your MediaAccess Gateway.
If this window does not appear, browse to http://dsldevice.lan or to the IP address of your MediaAccess Gateway (by
default: 192.168.1.254) and click Technicolor Gateway on the menu on the left-hand side.
3Click Setup my Technicolor Gateway.
4The Easy Setup wizard appears. This wizard will guide you through the configuration of your MediaAccess Gateway.
Click Next and follow the instructions.

27
3 MANUAL INSTALLATION
DMS-CTC-20120510-0000 v1.0
3.5 Setting Up the 3G Fall-Back WAN Connection
Introduction
Many SOHO (Small Offices, Home Offices) and SME (Small/Medium Enterprises) businesses choose DSL as their access
technology for a Wide Area Network (WAN) connection because this is typically cheaper than using leased lines. A dropout
of a DSL line can however have expensive consequences due to inaccessibility of the Internet and E-mail. Therefore backup
solutions are available that provide an alternative path when the DSL line is down.
For example it is possible to switch to 2G / 3G mobile access technologies such as GPRS, UMTS, HSDPA, HSUPA,
HSPA+, WIMAX and LTE when internet connectivity is not available via the main WAN connection. By plugging a mobile
USB adapter into one of the USB ports of your MediaAccess Gateway, IP connectivity via a 2G / 3G network becomes
possible.
3G is an umbrella-term to indicate the third generation mobile telephony technology. The services associated with 3G
provide the ability to transfer both voice data and non-voice data. 3G networks are the successors of the 2G networks, such
as the GSM networks and provide new services and higher data transfer speeds.
What do I need?
To start using 2G / 3G as a connection on the MediaAccess Gateway, you need:
A mobile USB adapter
A registered Security Identity Module (SIM) card.
Configure 2G / 3G as WAN connection
Proceed as follows:
1Configure your mobile connection.
For more information, see “3.5.1 Managing your Mobile Connection with the MediaAccess Gateway GUI” on page 28.
2Insert your mobile USB adapter.
For more information, see “3.5.2 Inserting a Mobile USB Adapter” on page 29.
3Now your mobile connection is up and ready to use.
Result
MediaAccess Gateway will automatically enable your 3G backup connection when both of the following conditions are met:
The main Internet connection has been unavailable for at least 60 seconds.
The MediaAccess Gateway received a request to access the Internet (for example, when browsing to an Internet web
site).
The MediaAccess Gateway will automatically disable the 3G connection in either of the following cases:
The main Internet connection is available again. In this case the MediaAccess Gateway switches back to the main Internet
connection.
No Internet traffic has been detected during the last 10 seconds. For example, you finished surfing the Internet.
Only use the mobile USB adapters provided by your service provider.
If you need to remove your mobile USB adapter, make sure the MediaAccess Gateway is powered off first.
28
3 MANUAL INSTALLATION
DMS-CTC-20120510-0000 v1.0
3.5.1 Managing your Mobile Connection with the
MediaAccess Gateway GUI
Introduction
You can view and manage the parameters of your mobile connection via the MediaAccess Gateway GUI.
Procedure
To manage your mobile USB connection via the MediaAccess Gateway GUI:
1Browse to the MediaAccess Gateway GUI.
For more information, see “4.1.1 Access” on page 33.
2On the Broadband Connection menu, click Internet Services.
3Click View more... for the mobile USB connection. The Overview page of the mobile USB connection is shown.
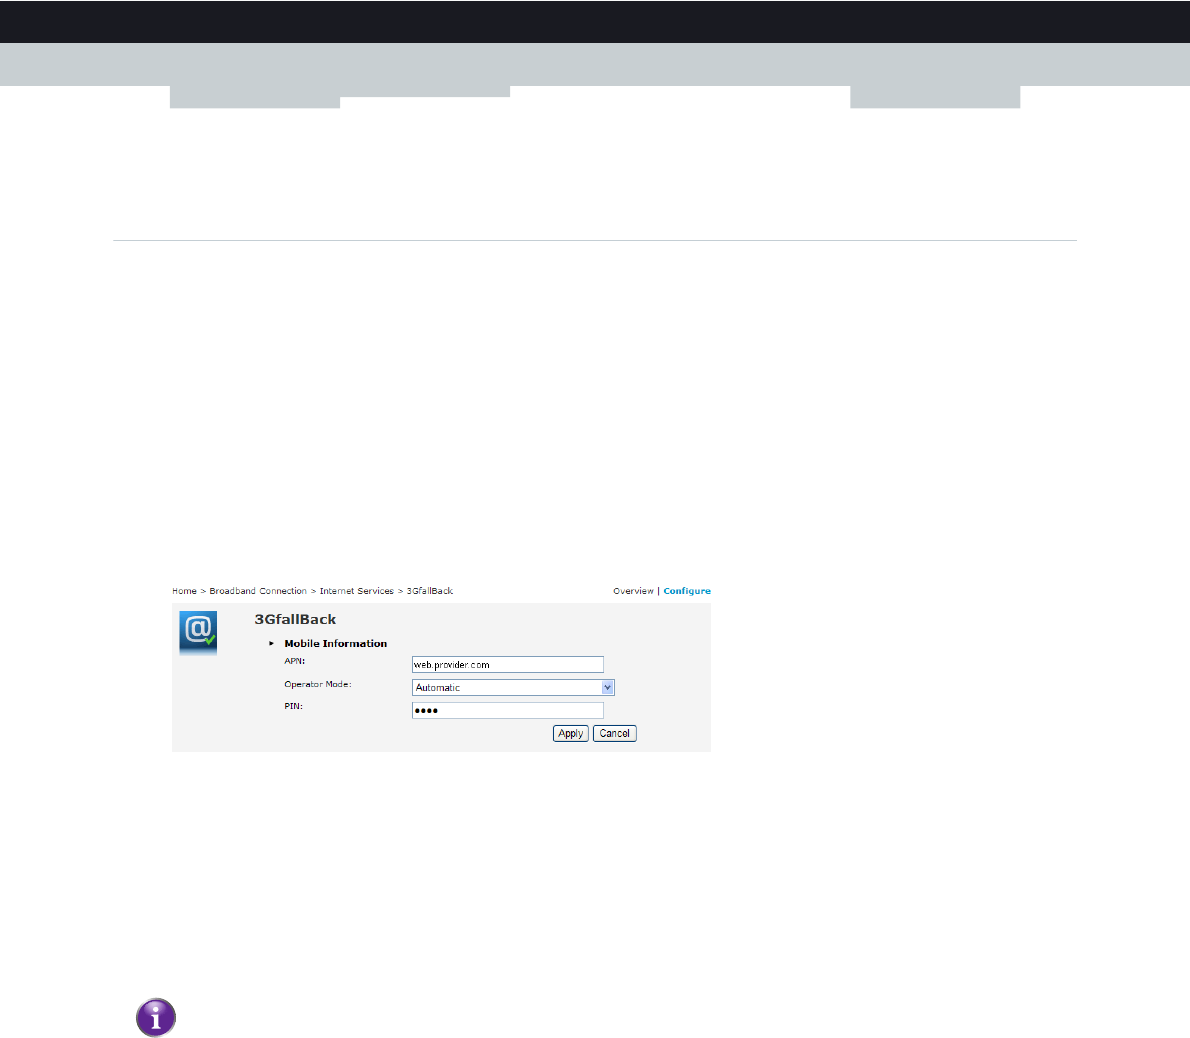
4In the location bar, click Configure. The Configure page of the mobile connection appears.
5Under Mobile Information, update the following fields if necessary:
APN:
The public APN used to access the Internet, or the private APN to access a local network.
Operator Mode:
2G / 3G / automatic (let the MediaAccess Gateway choose the best operator mode)
Pin:
The PIN code of your SIM card.
6Click Apply to apply your configuration changes.
Configuration changes via the MediaAccess Gateway GUI are automatically saved.
29
3 MANUAL INSTALLATION
DMS-CTC-20120510-0000 v1.0
3.5.2 Inserting a Mobile USB Adapter
Procedure
Once the mobile connection is configured you can proceed as follows to insert the mobile USB adapter:
1Power off the MediaAccess Gateway.
2Insert your SIM card into the mobile USB adapter.
3Plug the mobile USB adapter in (one of) the USB port(s) of your MediaAccess Gateway:
4Power on the MediaAccess Gateway.
If you do not power off the MediaAccess Gateway first, the mobile USB adapter will not be detected.

31
4 CONFIGURATION TOOLS
DMS-CTC-20120510-0000 v1.0
4 Configuration Tools
Configuration Tools
You can use the following tools to configure your MediaAccess Gateway:
The MediaAccess Gateway Setup CD allows you to configure your MediaAccess Gateway and helps you to connect
your computers to the MediaAccess Gateway. For more information, see “2 Guided Installation” on page 15.
The MediaAccess Gateway GUI allows you to configure your MediaAccess Gateway via your web browser.
For more information, see “4.1 MediaAccess Gateway GUI” on page 32.

32
4CONFIGURATIO
N TOOLS
DMS-CTC-20120510-0000 v1.0
4.1 MediaAccess Gateway GUI
Introduction
The MediaAccess Gateway Graphical User Interface (GUI) allows you to configure your MediaAccess Gateway using your
web browser.
Requirements
JavaScript must be enabled on your browser (this is the default setting). For more information, consult the help of your web
browser.
33
4 CONFIGURATION TOOLS
DMS-CTC-20120510-0000 v1.0
4.1.1 Access
Accessing the MediaAccess Gateway GUI
Proceed as follows:
1Open your web browser.
2Browse to http://dsldevice.lan or to the IP address of your MediaAccess Gateway (by default: 192.168.1.254).
3If you have protected your MediaAccess Gateway with a user name and password, the MediaAccess Gateway will
prompt you to enter these. Enter your user name and password and click OK.
4The MediaAccess Gateway GUI appears.
Access the MediaAccess Gateway via UPnP
You can also access the MediaAccess Gateway GUI using the Internet Gateway Device (IGD) icon if your computer runs
one of the following operating systems:
Microsoft Windows 7
Microsoft Windows Vista
Microsoft Windows XP
For more information, see “9.1 UPnP” on page 78.
Remote access
It is also possible to access the MediaAccess Gateway GUI from the Internet. For more information, see “4.3 Access From
the Internet” on page 38.
For more information, see “4.1.3 Protecting Access to the MediaAccess Gateway” on page 36.
34
4CONFIGURATIO
N TOOLS
DMS-CTC-20120510-0000 v1.0
4.1.2 Components
Overview
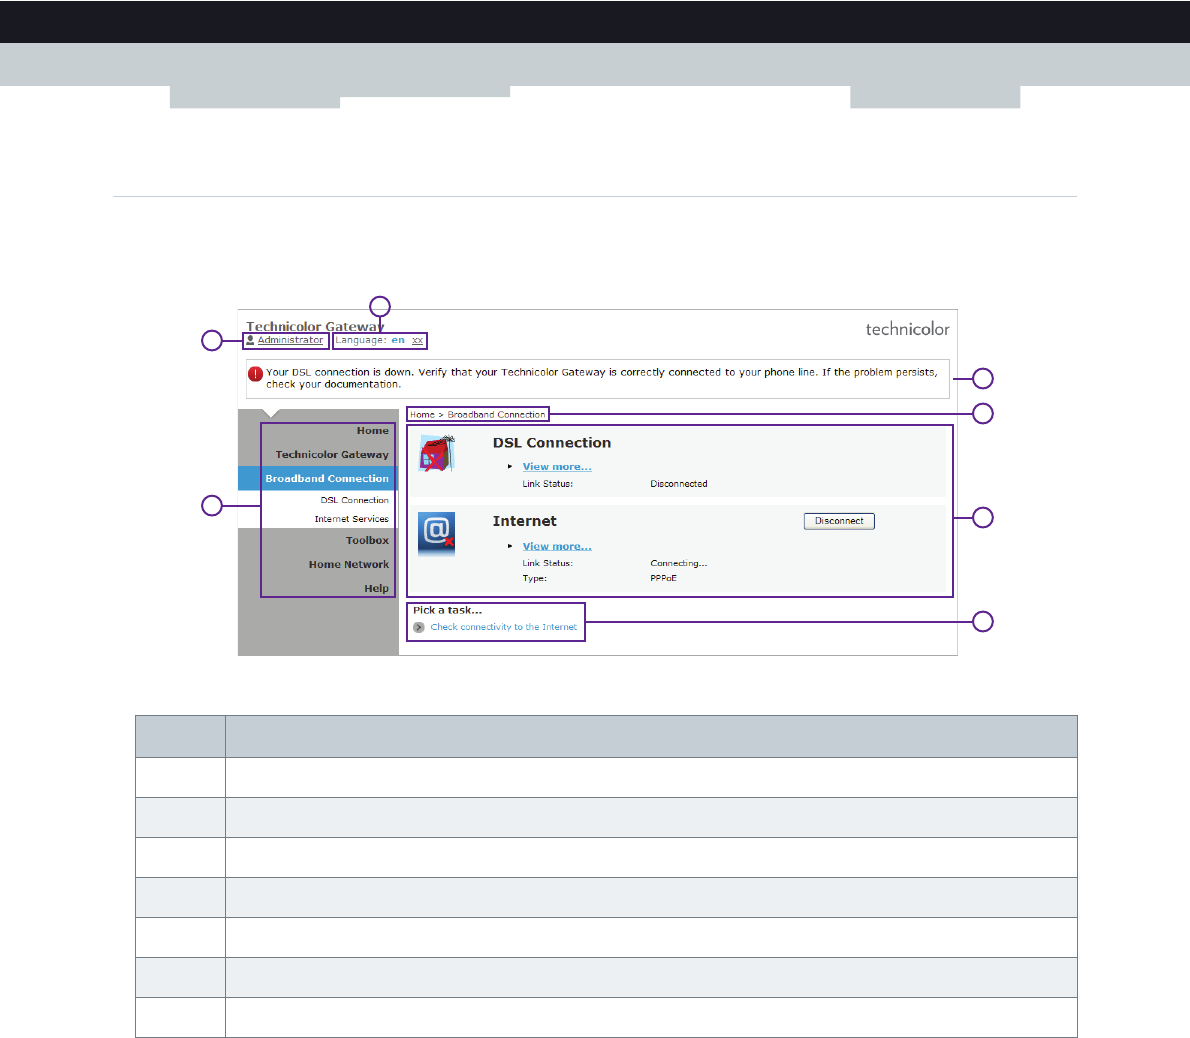
Depending on your user right and location on the GUI, the following components can be available:
Menu
The menu consists of the following menu items:
Home:
Allows you to go back to the MediaAccess Gateway home page.
Technicolor Gateway:
Provides basic information on the MediaAccess Gateway.
Broadband Connection:
Allows you to view/configure your broadband connections.
To o l b o x :
Allows you to configure the network services and security settings of your MediaAccess Gateway.
Home Network:
Allows you to manage your local network.
Help:
Allows you to view context-related help information.
Each of these items contain a number of sub-menu items.
Label Description
1Menu
2Login section
3Language bar
4Notification area
5Navigation bar
6Content pane
7Tasks pane
4
5
1
3
6
7
2
35
4 CONFIGURATION TOOLS
DMS-CTC-20120510-0000 v1.0
Login section
In the login section you can see the current user name.
By clicking the user name, you can:
Change your password.
Switch to another user.
Language bar
If more than one GUI language is available, a language bar is showed. This language bar allows you to change the language
of the MediaAccess Gateway GUI.
Notification area
The notification area displays:
Error messages, indicated by a red traffic light.
Warning messages, indicated by an orange traffic light.
Information messages, indicated by a green traffic light.
Navigation bar
The Navigation bar displays your current position in the MediaAccess Gateway GUI.
Some page are available in different configuration levels. These pages have additional links (for example, Overview,
Configure) in the right part of the navigation bar that allow you to switch between the configuration levels.
Content pane
The content pane displays the information and configurable items of the selected item.
Tasks pane
To allow a quick configuration of your MediaAccess Gateway, some pages may offer you a number of related tasks in the
Pick a task list. These tasks will guide you to the page where you can perform the selected task.
If none of these events occur, the notification is not shown.

36
4CONFIGURATIO
N TOOLS
DMS-CTC-20120510-0000 v1.0
4.1.3 Protecting Access to the MediaAccess Gateway
Introduction
To prevent that every user on your local network can access the MediaAccess Gateway, the MediaAccess Gateway is
secured with a user name and password.
Default user name
The default user name is Administrator.
Default password
The default password is either blank or the ACCESS KEY printed on the label of your MediaAccess Gateway. This
depends on the settings chosen by your Service Provider.
Protected items
The following items are protected by these is will secure access to:
The MediaAccess Gateway GUI.
The embedded FTP Server.
for more information, see “8.3 The FTP Server” on page 72.
How to change your password
Proceed as follows:
1On the Toolbox menu, click User Management.
2In the Pick a task list, click Change my password.
3Enter your new password and click OK.
4Your new password is now active. The next time that you log on to the MediaAccess Gateway GUI you will have to enter
this password.
It is recommended to change the default password settings.
Choose a password that your can easily remember or write it down. If you forget your password the only option is to
reset your MediaAccess Gateway. For more information, see “11.7 Reset to Factory Defaults” on page 110.
This password will also be used by the network file server and FTP server.
For more information about the network file server and FTP server, see “8 Sharing Content” on page 63
37
4 CONFIGURATION TOOLS
DMS-CTC-20120510-0000 v1.0
4.2 Backing Up/Restoring your Configuration
Introduction
Once you have configured your MediaAccess Gateway to your needs, it is recommended to backup your configuration for
later use. This way you can always return to your working configuration in case of problems.
Backing up your configuration
Proceed as follows:
1Browse to the MediaAccess Gateway GUI.
For more information, see “Accessing the MediaAccess Gateway GUI” on page 33.
2On the Technicolor Gateway menu, click Configuration.
3In the Pick a task list, click Save or Restore Configuration.
4Under Backup current configuration, click Backup Configuration Now.
5The MediaAccess Gateway prompts you to save your backup file.
6Save your file to a location of your choice.
Restoring your configuration
Proceed as follows:
1Browse to the MediaAccess Gateway GUI.
For more information, see “Accessing the MediaAccess Gateway GUI” on page 33.
2On the Technicolor Gateway menu, click Configuration.
3In the Pick a task list, click Save or Restore Configuration.
4Under Restore saved configuration, click Browse and open your backup file.
5The MediaAccess Gateway restores your configuration.
Do not edit the backup files, this may result in corrupt files making them worthless as configuration backup.
Backup files usually have.ini as extension.
38
4CONFIGURATIO
N TOOLS
DMS-CTC-20120510-0000 v1.0
4.3 Access From the Internet
Modes
To access your MediaAccess Gateway from the Internet, you can choose between two modes:
Permanent Mode (Remote Access):
The remote session ends when you disable remote assistance or after restarting your MediaAccess Gateway.
Temporary Mode (Remote Assistance):
The remote session ends when you disable remote assistance, after restarting your MediaAccess Gateway or after 20
minutes of inactivity.
To enable Remote Assistance / Remote Access.
To enable remote assistance/access:
1Browse to the MediaAccess Gateway GUI.
For more information, see “Accessing the MediaAccess Gateway GUI” on page 33.
2 Complete and check the following parameters:
Mode:
Select the mode that you want to use.
URL:
Contains the URL that must be used to access the MediaAccess Gateway from the Internet.
User name and Password:
Contains the user name and password are needed to access your MediaAccess Gateway remotely. If wanted you can
change the automatically generated password in the Password box.
3Click Enable Remote Assistance.
Accessing your MediaAccess Gateway from the Internet
Proceed as follows:
1Open your web browser.
2Type the URL that was listed in the URL field on the Remote Assistance page (for example https://141.11.249.150:51003).
3Enter the user name and password that you specified on the Remote Assistance page.
4The MediaAccess Gateway GUI appears.
It is now possible for a remote user to access your MediaAccess Gateway via the specified URL using the provided user
name and password.
Enabling remote assistance is only possible when you are connected to the Internet.
You can replace the IP address in this URL by the dynamic DNS host name if you enabled and configured
Dynamic DNS. For more information, see Dynamic DNS.
Example: https://141.11.249.150:51003 can be replaced by https://mygateway.dyndns.org:51003.

39
5 THE MEDIAACCESS GATEWAY WIRELESS ACCESS POINT
DMS-CTC-20120510-0000 v1.0
5 The MediaAccess Gateway Wireless Access Point
Introduction
This section will help you set up your wireless network.
What you need to set up a wireless network
To set up a wireless network, you need the following components:
A Wireless Access Point (already integrated into your MediaAccess Gateway)
A Wireless client the device that you want to connect (for example, a computer, smartphone, network printer,...)
Wireless Access Point
The wireless access point is the heart of your wireless network. The wireless access point:
Connects different wireless devices.
Secures the data sent over wireless connection.
The MediaAccess Gateway comes with an integrated wireless access point.
Wireless client
The wireless client allows you to connect a device, typically a computer, to a wireless access point. Both built-in and external
(for example via USB) clients are available.
Check the documentation of your computer if you are not sure if your computer is equipped with a wireless client.
Configuring your wireless clients
For more information on how to establish a wireless connection to the MediaAccess Gateway, see:
“5.1 Connecting Your Wireless Client via WPS” on page 40
“5.2 Connecting Your Wireless Client without WPS” on page 42
“5.3 Connecting Your Wireless Client via QR Code” on page 43
Secure your wireless connection!
When using an unsecured connection, everyone who is within the range of your MediaAccess Gateway can access your
network. If not:
People may use your connection to access the Internet.
Hackers may use your connection to commit computer crimes.
You can easily prevent this by securing your wireless access point. For more information, see “5.4 Securing Your Wireless
Connection” on page 44.
Devices like media players and smartphones may also have a built-in wireless client. Check the documentation of
your device for more information.
40
5 THE MEDIAACCESS GATEWAY WIRELESS ACCESS POINT
DMS-CTC-20120510-0000 v1.0
5.1 Connecting Your Wireless Client via WPS
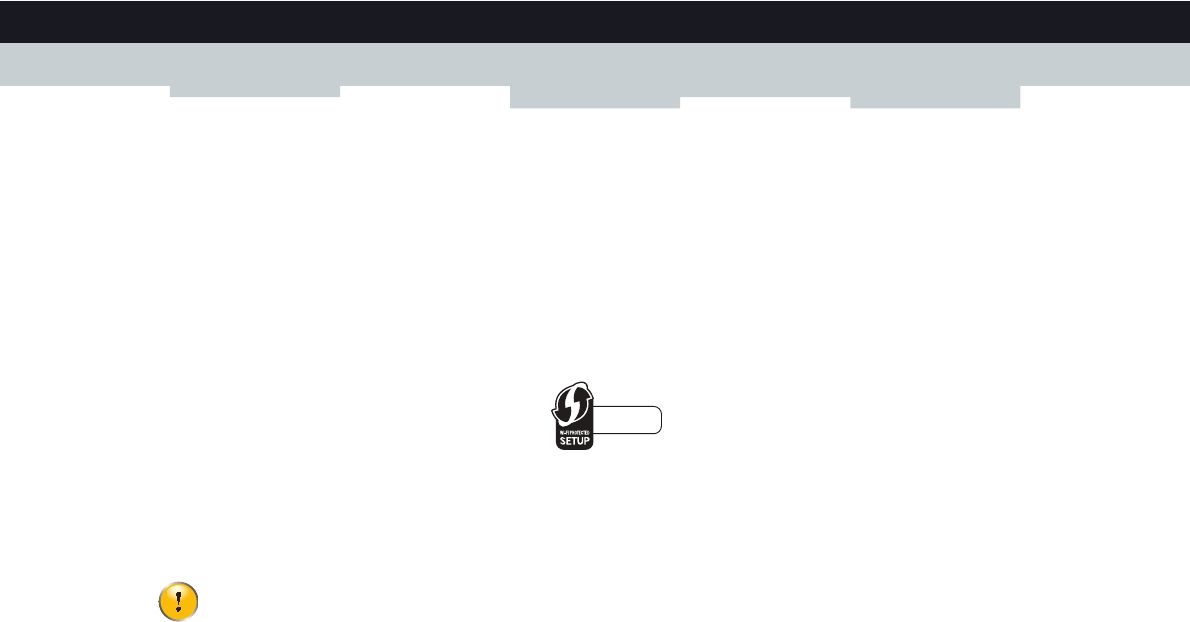
WPS
Wi-Fi Protected Setup (WPS) allows you to add new wireless clients to your local network in a swift and easy way, without
the need to enter any of your wireless settings (network name, wireless key, encryption type).
Requirements
Your wireless client must support WPS. Check the documentation of your wireless client for this.
Your MediaAccess Gateway must use WPA(2)-PSK encryption (default encryption) or no encryption. WPS with WEP
encryption is not possible.
WPS Methods
The following WPS methods are supported by your MediaAccess Gateway:
Push Button Configuration (PBC):
You have to put both your Wireless USB Adaptor and access point in registration mode.
PIN code entry:
You have to enter a PIN code on the Wireless Configuration Utility.
Procedure for PBC
Proceed as follows:
1Shortly press the WPS button on the MediaAccess Gateway:
2The WPS button LED starts blinking orange. This indicates that the MediaAccess Gateway is now searching for wireless
clients that are in registration mode. You now have two minutes to start WPS on your wireless client.
3Start WPS on your wireless client.
4The MediaAccess Gateway is now exchanging the security settings.
5At the end of the procedure the status of the WPS LED will change to either of the following:
Solid green
This indicates that you have successfully registered your wireless client. You are now connected to the MediaAccess
Gateway network.
Both Windows 7 and Windows Vista Service Pack 1 have native WPS support.
41
5 THE MEDIAACCESS GATEWAY WIRELESS ACCESS POINT
DMS-CTC-20120510-0000 v1.0
Blinking red
This indicates that the MediaAccess Gateway could not find your wireless client. Use the same procedure to try again
(you do not need to wait until the LED turns off).
Procedure for PIN code entry
Proceed as follows:
1Check the label on your MediaAccess Gateway and write down the following information:
The PIN code that is printed next to the WPS logo.
The Network Name.
This is the default network name (SSID). If you already configured a new network name, write down the new one.
2Go the WPS PIN code page of your wireless client.
3Enter the PIN code,
4Your wireless client may prompt you to select your access point. If this is the case, select the access point with the network
name that you wrote down.
Troubleshooting
If you are having trouble connecting your wireless client via WPS, this may be cause by one of the following reasons:
WPS can not be correctly executed:
Configure your wireless manually. For more information, see “5.2 Connecting Your Wireless Client without WPS” on
page 42.
Your wireless client is out of range:
If possible move your wireless client closer to your MediaAccess Gateway or use a wireless repeater to extend the range
of your wireless network.
Another device is interfering on the selected wireless channel:
Change the wireless channel of your MediaAccess Gateway. For more information, see “Change the wireless channel” on
page 107.
Do not include the hyphen when entering the PIN code. For example, if your PIN code is 1234-5678, then enter
12345678.
1234-5678
42
5 THE MEDIAACCESS GATEWAY WIRELESS ACCESS POINT
DMS-CTC-20120510-0000 v1.0
5.2 Connecting Your Wireless Client without WPS
Before you start
Before you can connect a wireless client (for example, a computer) to your wireless network you need to know the wireless
settings that are currently used by the MediaAccess Gateway, i.e.:
The Network Name (SSID)
The wireless key
What Network Name (SSID) is my MediaAccess Gateway using?
If you did not change the SSID, your MediaAccess Gateway uses the Network Name that is printed on the back panel label
of your MediaAccess Gateway.
What wireless key is my MediaAccess Gateway using?
If you did not change the security settings, no wireless key is used.
Forgot your wireless key?
If you have changed the wireless settings manually and you can’t remember your settings, try one of the following:
1Use a computer that is already connected to your network.
2Browse to the MediaAccess Gateway GUI.
For more information, see “Accessing the MediaAccess Gateway GUI” on page 33.
3On the Home Network menu, click Wireless.
4In the upper-right corner, click Details.
5Under:
Configuration, you can find the network name (SSID).
Security, you can find the encryption.
Connecting your wireless client
Configure your wireless client with the same wireless settings as your MediaAccess Gateway (network name and wireless
key). For more information, consult the documentation of your wireless client.
If your service provider did choose to use a default wireless key, use the Wireless Key that is printed on the bottom
panel label of your MediaAccess Gateway.
If none of your computers is connected yet, connect one with an Ethernet cable. For more information, see
“3.3.2 Setting up a Wired Connection” on page 25.
43
5 THE MEDIAACCESS GATEWAY WIRELESS ACCESS POINT
DMS-CTC-20120510-0000 v1.0
5.3 Connecting Your Wireless Client via QR Code
Introduction
The MediaAccess Gateway allows you to generate a Quick Response (QR) code that contains all wireless settings that are
needed to connect. You are then able to connect to the wireless network by scanning the generated code.
Target devices
This connection method is typically used for tablet computers and smartphones.
Requirements
Your wireless device must have:
A camera to scan the code.
An application (app) to interpret the QR code and connect to a wireless network.
For example: if you are using Android on your device, you could download Bar Code Scanner from Google Play.
Procedure
Proceed as follows:
1Browse to the MediaAccess Gateway GUI.
For more information, see “Accessing the MediaAccess Gateway GUI” on page 33.
2Under Home Network, click Wireless.
3Under Pick a Task, click Generate QR code image.
4The wireless QR code appears.
You can now:
Scan the code directly from your screen.
Print this page and scan the code from the paper version.
5Your QR code app shows you the wireless settings used by your MediaAccess Gateway and offers you to connect to its
wireless network. Connect to the network.
44
5 THE MEDIAACCESS GATEWAY WIRELESS ACCESS POINT
DMS-CTC-20120510-0000 v1.0
5.4 Securing Your Wireless Connection
Introduction
You can protect the wireless communication between the wireless clients and your MediaAccess Gateway with a wireless key.
This means that:
Only clients which use the correct Network Name (SSID) and wireless key can connect to your network.
All data passing through your wireless access point is secured and encrypted.
Encryption types
Over the years a number of encryption types have been developed. The list below gives you an overview of the supported
encryption types ordered by descending security level; you will find the highest level of security at the top of the list:
WPA-PSK Encryption:
The wireless connection is secured with a pre-shared key that has been defined by the user. Wireless clients must be
configured with this key before they can connect to the MediaAccess Gateway. The MediaAccess Gateway supports the
following WPA-PSK versions (ordered by descending security):
WPA2-PSK:
The most recent and most secure version of WPA-PSK. Choose this version if you are sure that all your wireless clients
support WPA2-PSK.
WPA-PSK + WPA2-PSK:
This is a mixed mode. In this mode WPA2-PSK, is the preferred encryption type but wireless clients do not support
WPA2-PSK, can still use WPA-PSK as encryption type. Choose this option if not all of your wireless clients support
WPA2-PSK or if you are not sure. Wireless clients that support WPA2-PSK will use WPA2-PSK, the others will use
WPA-PSK.
WPA-PSK:
The first version of WPA-PSK. Choose this option if you are sure that none of your wireless clients support
WPA2-PSK.
WEP Encryption:
The least safe encryption type used for wireless connections. Like WPA-PSK it uses a user-defined key, but WEP has
been proven to have security issues.
Configuration
Proceed as follows:
1Browse to the MediaAccess Gateway GUI.
For more information, see “Accessing the MediaAccess Gateway GUI” on page 33.
2Under Home Network, click Wireless.
3The Wireless Access Point page appears. In the upper-right corner, click Configure.
If you want to configure WPA2-PSK on the built-in wireless utility of Windows XP Service Pack 2 (SP2), you first
have to:
Upgrade your Windows XP to Service Pack 3.
- or -
Install the following update: http://support.microsoft.com/kb/917021.
Although the MediaAccess Gateway allows you to use WEP or no security, we strongly advise against using one
of them! Use WPA(2)-PSK instead.

45
5 THE MEDIAACCESS GATEWAY WIRELESS ACCESS POINT
DMS-CTC-20120510-0000 v1.0
4In the Security Mode list, select one of the following modes:
WPA-PSK
WPA2-PSK
WPA-PSK + WPA2-PSK
For more information, see “Encryption types” on page 44.
5In the WPA-PSK Encryption Key box, type a the key of your choice. The key must be in one of the following formats:
8 to 63 alphanumeric characters. For example: MyKey123
8 to 64 hexadecimal characters (characters from 0 to 9 and from A to F). For example: C54F48A5.
6Click Apply.
7Reconnect your wireless client(s) to the MediaAccess Gateway using these new security settings.
For more information, see “5.1 Connecting Your Wireless Client via WPS” on page 40 or “5.2 Connecting Your Wireless
Client without WPS” on page 42.
47
6 TELEPHONY
DMS-CTC-20120510-0000 v1.0
6 Telephony
Voice over IP (VoIP)
VoIP is a technology in which telephone calls are made over the Internet. This allows you to save on communication costs,
especially for long-distance calls.
The expensive solution
To be able to make your phone calls over the Internet you could either:
Buy an IP phone.
These IP phones are special phones that you can connect to your Internet Gateway.
Install VoIP software on your computer and make your phone calls via your computer.
The Technicolor solution
With the MediaAccess Gateway you can make both VoIP and traditional telephone calls using a traditional analogue phone.
If your MediaAccess Gateway is not powered, the traditional telephone network (if connected) will automatically selected.
This way you are still able to make emergency calls.
In this chapter
This chapter covers following topics:
To p i c Page
6.1 Setting Up Your Telephone Network 48
6.2 Address Book 51
6.3 Telephony Services 53
6.4 Viewing Call Logs 58

48
6 TELEPHONY
DMS-CTC-20120510-0000 v1.0
6.1 Setting Up Your Telephone Network
Procedure
To set up your telephone network, follow these steps:
1Connect your traditional phone(s), DECT base station or fax to the green Phone port(s) on the back panel of your
MediaAccess Gateway.
2Configure the VoIP service on your MediaAccess Gateway.
For more information, see “6.1.1 Configuring the MediaAccess Gateway VoIP Service” on page 49.

49
6 TELEPHONY
DMS-CTC-20120510-0000 v1.0
6.1.1 Configuring the MediaAccess Gateway VoIP Service
Introduction
If your VoIP service has not been configured yet, follow the instructions in this section.
How can I check if the VoIP service has already been configured?
If the Phone LED is:
Solid or blinking green then the VoIP service is configured correctly. No configuration is needed.
Off then telephony service is not configured (yet). Follow the instructions below.
Requirements
Your Internet connection must be up and running before you can configure Internet telephony.
Configuring the VoIP settings
Proceed as follows:
1Enter the proxy and registrar settings.
2Enter your VoIP account settings.
Enter the proxy and registrar settings
Proceed as follows:
1Browse to the MediaAccess Gateway GUI.
For more information, see “Accessing the MediaAccess Gateway GUI” on page 33.
2On the Toolbox menu, click Te l e p h o n y.
3In the Navigation bar, click Expert configure.
4Complete the following fields based on the settings provided by your VoIP provider:
Proxy:
Type the URL (for example: sip.provider.com) or IP address of the proxy.
Registrar:
Type the URL (for example: sip.provider.com) or IP address of the registrar.
Registrar Port and Proxy Port.
In most cases the default port (5060) will be used. Only change these values if your provider is using other port
numbers.
5Click Apply.
Enter your VoIP account settings
Proceed as follows:
1In the Navigation bar, click Configure.
2Under Service Configuration, select Enable Telephony.
3Under Te l e p h on e N u m be rs , complete the following fields:
SIP URI:
The Uniform Resource Identifier (URI) of your SIP account (for example: 035051979, john.doe,...). This is the
telephone number that people have to dial to call you.
Username:
The user name of your VoIP account (for example: 035051979, john.doe,...).

50
6 TELEPHONY
DMS-CTC-20120510-0000 v1.0
Password:
The password of your VoIP account.
Displayname:
The name that you want people to see on the display of their phone when you are calling.
Abbreviated number:
An internal number to call the phones associated with this VoIP account.
Port:
The phone port that you want to associate with this VoIP account. select
All to use this VoIP account for all connected phone.
Phone 1/2 to use this VoIP account for the phone connected to the Phone 1/2 port of your MediaAccess Gateway.
4Click Apply.
Verifying Telephone Connectivity
Proceed as follows to verify the voice connection:
1Make sure the MediaAccess Gateway is turned on.
2Make sure the Internet telephony service is enabled and configured. The Phone LED must be solid green.
3Pick up your phone, wait for the dialling tone, and dial the number.
Your VoIP provider may not support this feature.
51
6 TELEPHONY
DMS-CTC-20120510-0000 v1.0
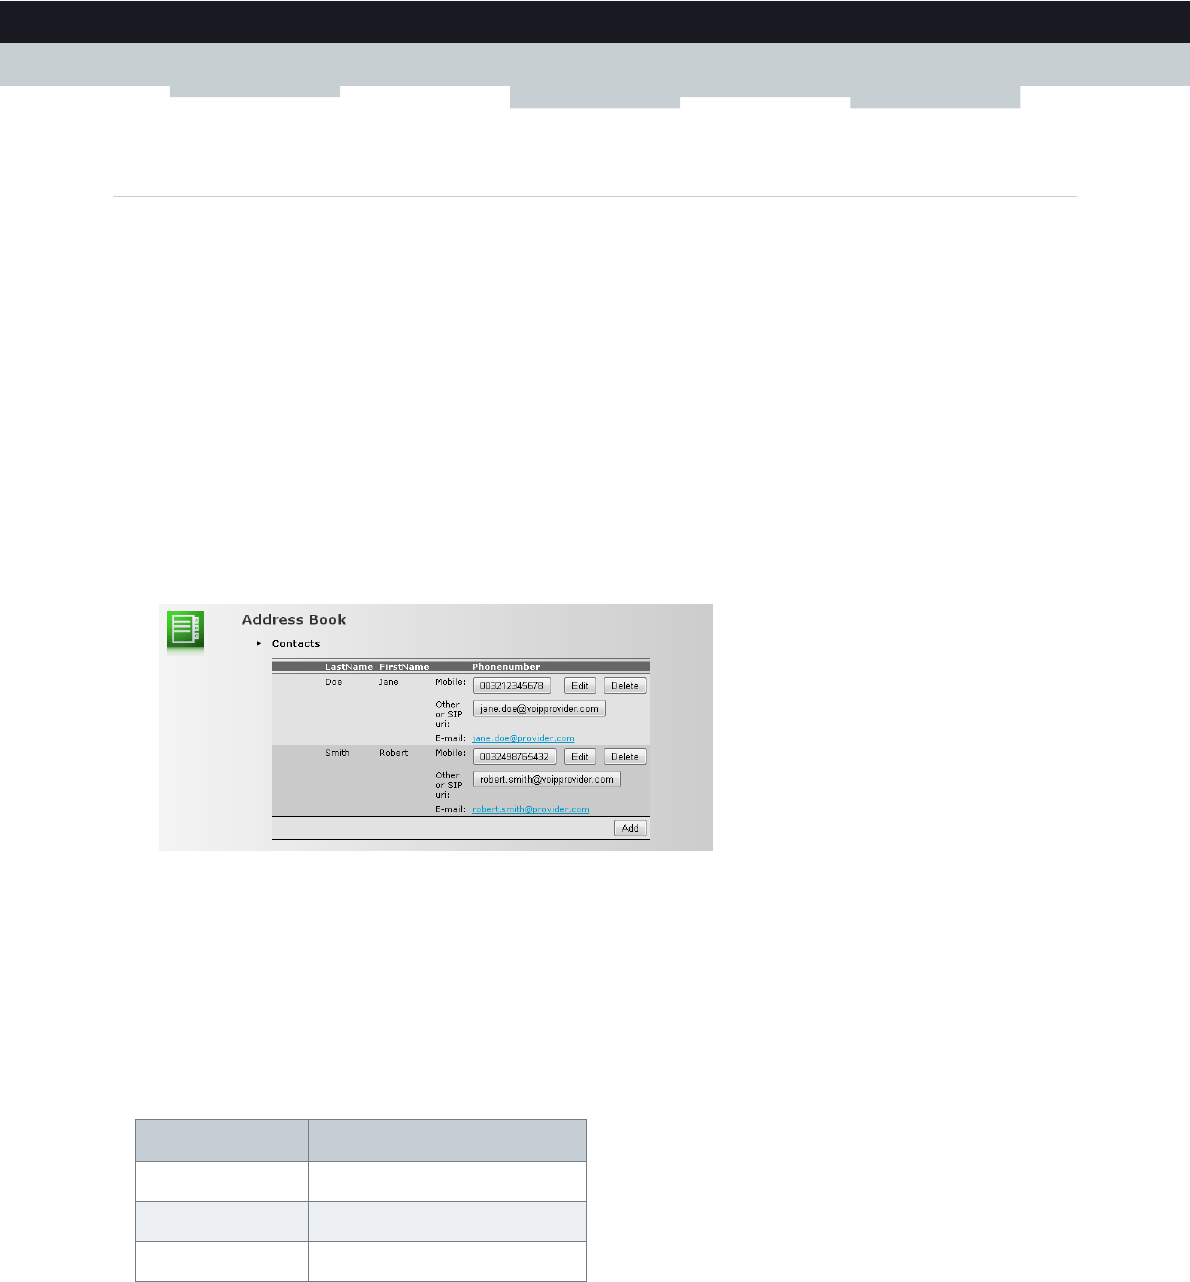
6.2 Address Book
Introduction
The Address Book page allows you to:
Store your contacts on the MediaAccess Gateway GUI.
Initiate a call or send a message by clicking the phone number or e-mail address in the contact details.
Everyone with access to the MediaAccess Gateway GUI can view and use the address book.
Accessing the Address Book page
Proceed as follows:
1Browse to the MediaAccess Gateway GUI.
For more information, see “Accessing the MediaAccess Gateway GUI” on page 33.
2On the Toolbox menu, click Address Book.
3The Address Book page appears.
For each contact, you can provide the following information:
Business: to make a call to the contact’s business telephone number
Home: to make a call to the contacts home telephone number
Mobile: to make a call to the contact’s mobile telephone number
Other or SIP uri: to make a call to the contact’s VoIP telephone number
E-mail to send an E-mail message to the contact with your e-mail client.
Managing contacts
All information provided per contact is optional except for the last and first name. The information can be updated or
completed at any time.
Click... To. . .
Add Add a contact
Edit Edit a contact
Delete Delete a contact
52
6 TELEPHONY
DMS-CTC-20120510-0000 v1.0
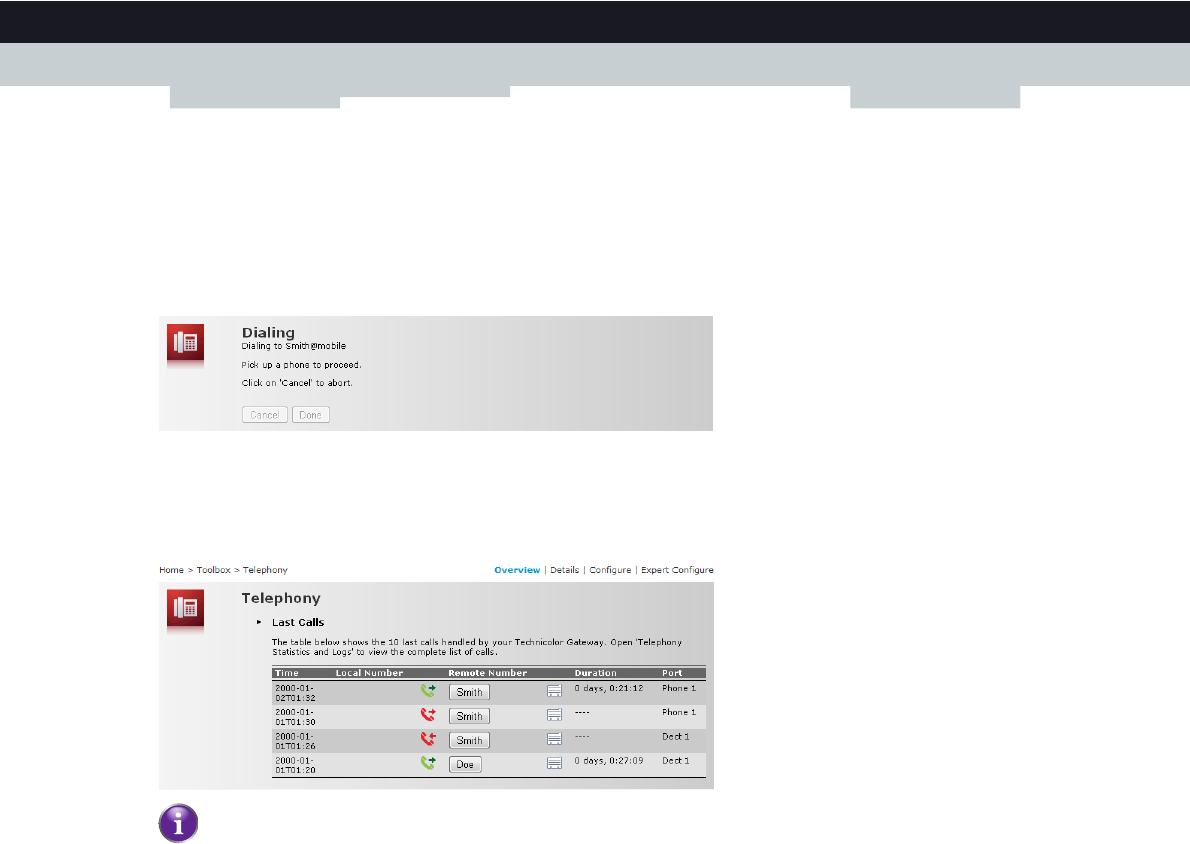
Making a phone call from the address book
Proceed as follows:
1Browse to the Address Book page.
2Click on the phone number of your contact.
3The following page appears:
4Pick up the phone.
5The MediaAccess Gateway is now initiating the call. Your contact’s phone is now ringing.
6At the end of the conversation, click Done to go to the Last Calls page. This page allows you to view the statistics of
your last calls (including the call that you just made).
You can use the buttons in the Remote Number column to make a new call to one of the contacts in your call log.
53
6 TELEPHONY
DMS-CTC-20120510-0000 v1.0
6.3 Telephony Services
Introduction
Telephony services add extra functionality to your phone. For example: putting a call on hold, transferring calls,...
Requirements
Before you can use a service, must both be:
1Supported by your service provider.
2Activated on your MediaAccess Gateway.
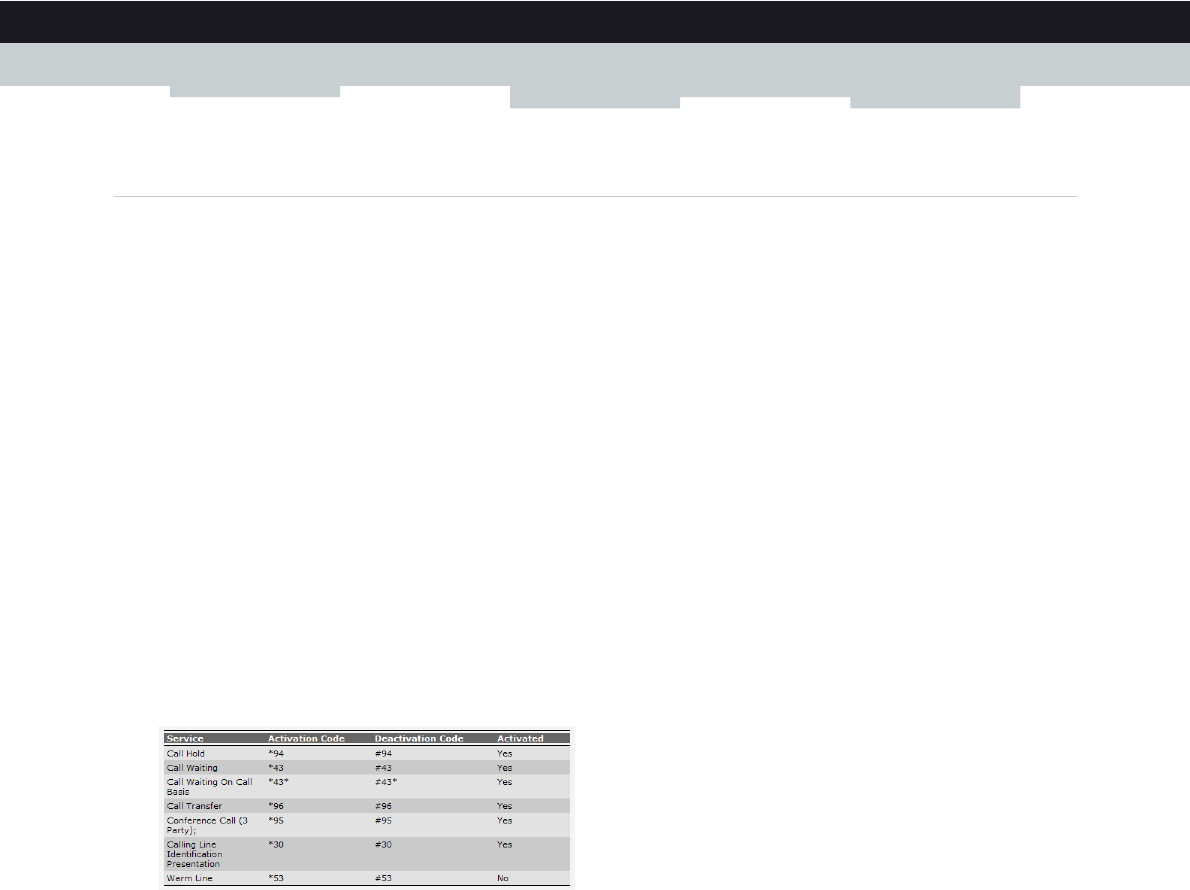
Checking if a telephone service is activated/supported
To check which services are supported or activated, proceed as follows:
1Browse to the MediaAccess Gateway GUI.
For more information, see “4.1 MediaAccess Gateway GUI” on page 32.
2On the Toolbox menu, click Te l e p h o n y.
3In the Navigation bar, click Configure.
4In the Pick a task list, click View Telephony Services.
5Under Te l e p h on y S er vi c e s, you can see the services that are supported by your provider.
In the Activated column, you can see if this service is also activated on the MediaAccess Gateway.
6To (de)activate a service, proceed with “6.3.1 Activating a Telephony Service on your MediaAccess Gateway” on page 54.
54
6 TELEPHONY
DMS-CTC-20120510-0000 v1.0
6.3.1 Activating a Telephony Service on your MediaAccess
Gateway
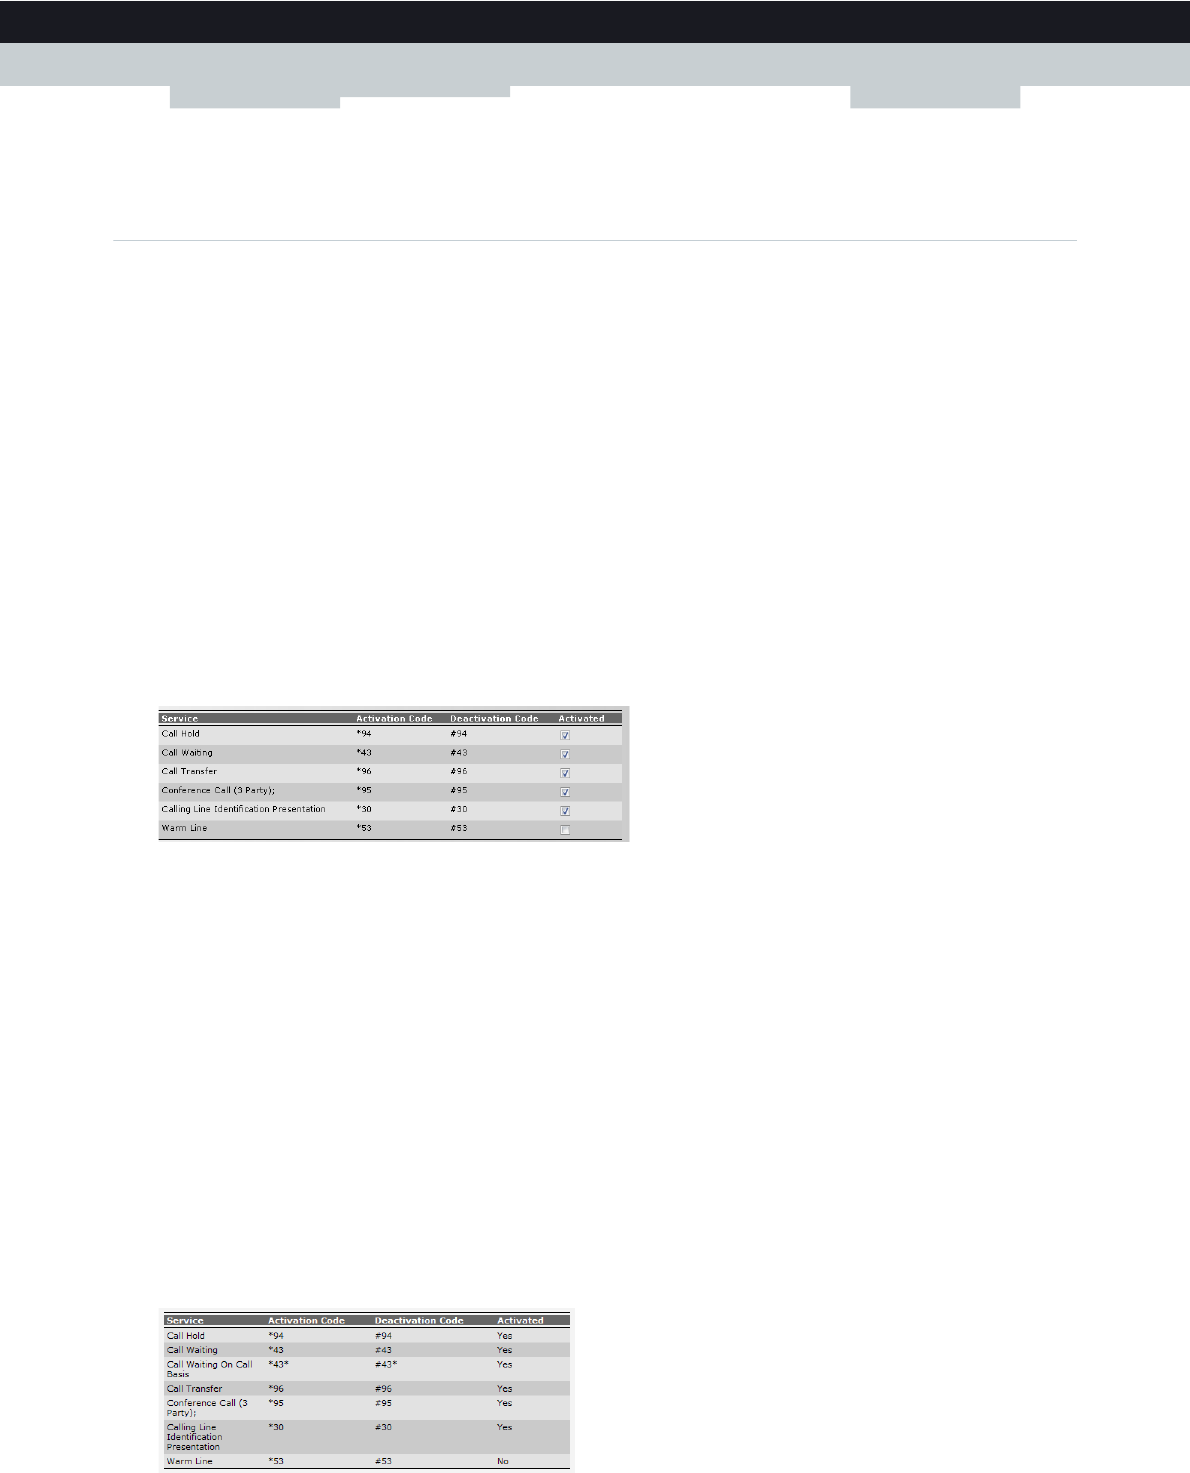
How can I (de)activate a service on my MediaAccess Gateway?
You can (de)activate services in two ways:
Via the MediaAccess Gateway GUI.
Via (de)activation codes on your phone.
Activating a Telephony Service via the MediaAccess Gateway GUI
Proceed as follows:
1Browse to the MediaAccess Gateway GUI.
For more information, see “4.1 MediaAccess Gateway GUI” on page 32.
2On the Toolbox menu, click Te l e p h o n y.
3In the Navigation bar, click Configure.
4In the Pick a task list, click View Telephony Services.
5In the Navigation bar, click Configure.
6Under Telephony services you can now activate or deactivate the services of your choice:
To :
Activate a service select the check box next to the service.
Deactivate a service clear the check box next to the service.
7Click Apply.
Activating a Telephony Service via Your Phone
To (de)activate one of the services just dial the corresponding code on your phone. For example, to activate Call Hold dial
*94; to deactivate the service dial #94.
To know which code to use:
1Browse to the MediaAccess Gateway GUI.
For more information, see “4.1 MediaAccess Gateway GUI” on page 32.
2On the Toolbox menu, click Te l e p h o n y.
3In the Navigation bar, click Configure.
4In the Pick a task list, click View Telephony Services.
5In the Te l ep h o n y S e r vi c e s table, you can find the activation and deactivation codes.
55
6 TELEPHONY
DMS-CTC-20120510-0000 v1.0
6.3.2 Common Telephony Services
Introduction
This section provides an overview of the functions that will be available if you activate one of the following services:
Call Hold service
Call Waiting service
Conference Call (3 Party) service
Call Transfer
For more information on the other services, please contact your service provider.
Call Hold service
If the Call Hold service is activated, you can use the following functions:
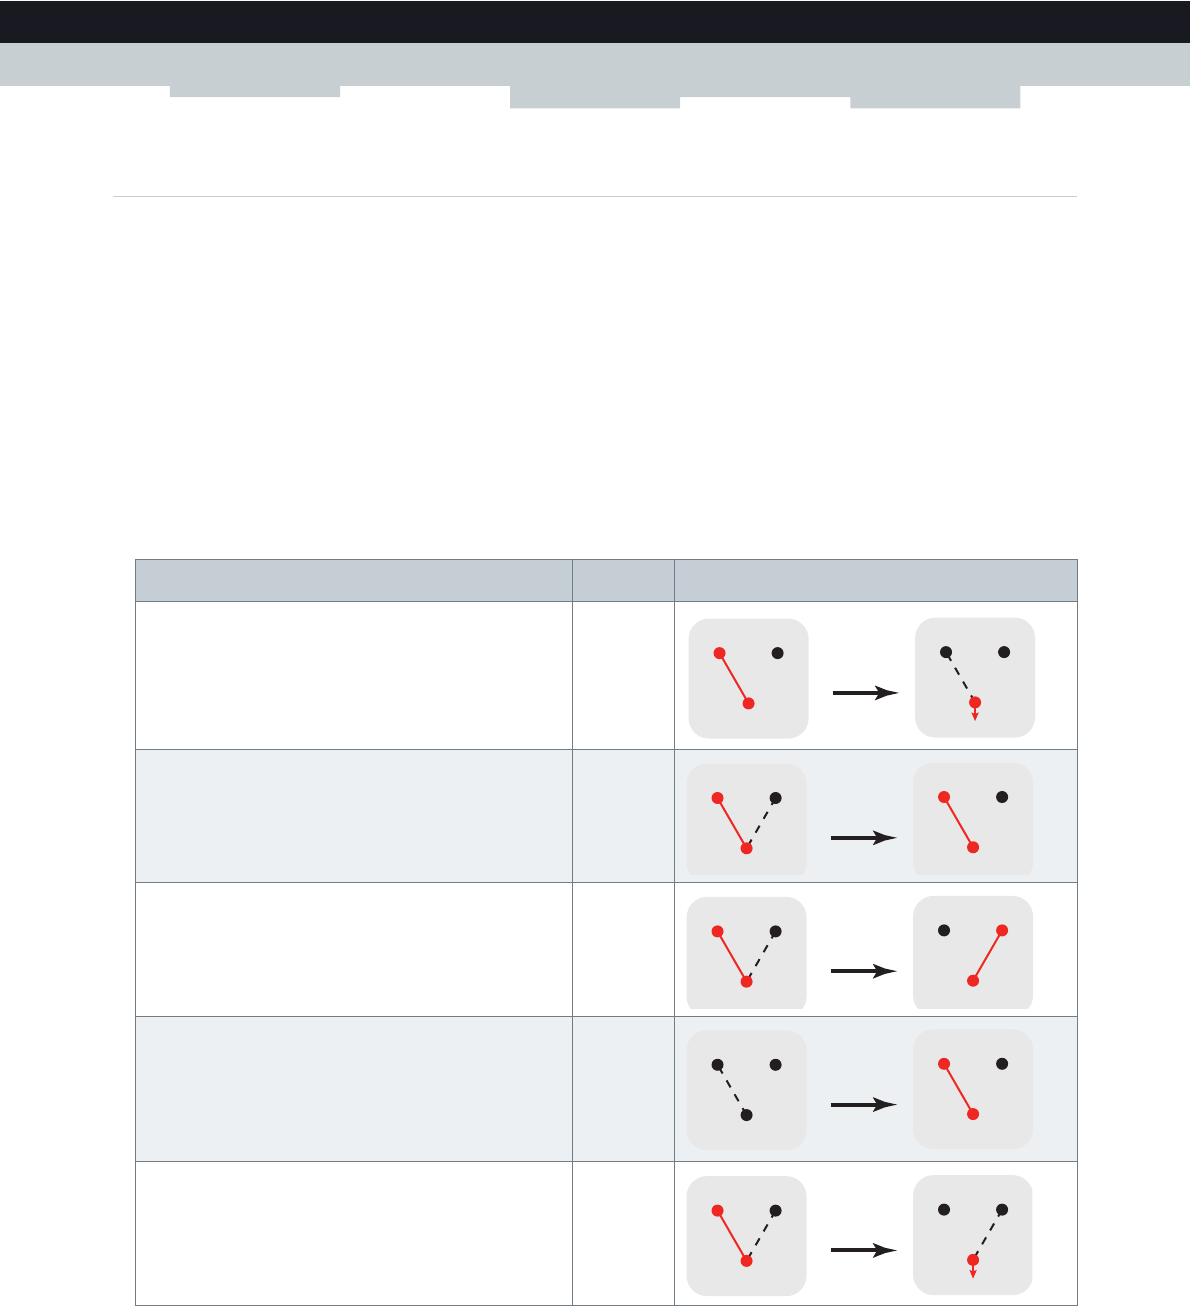
To. . . Press... Illustration
Put an active call on hold and enable a call set up (the
dial tone is generated)
R, 2
Terminate the call on hold R, 0
Terminate an active call and switch to the call on hold R, 1
Retrieve the call on hold (when there is no active call) R, 1
Terminate an active call and enables a call set up (the
dial tone is generated)
R, 9
BA
You
on hold
dial tone
BA
You
active
You press
R, 2
BA
You
active
BA
You
active on hold
You press
R, 0
BA
You
active
BA
You
active on hold
You press
R, 1
BA
You
active
BA
You
on hold
You press
R, 1
BA
You
dial tone
on hold
BA
You
active on hold
You press
R, 9
56
6 TELEPHONY
DMS-CTC-20120510-0000 v1.0
Call Waiting service
If the Call Waiting service is activated, you can use the following functions:
Conference Call (3 Party) service
If the Conference Call (3 Party) service is activated, you can use the following functions:
To. . . Press... Illustration
Terminate an active call and switch to an incoming call R, 1
Reject an incoming call R, 0
Switch between an active call and a call on hold R, 2
Switch between an active call and an incoming call R, 2
BA
You
active
BA
You
active incoming
You press
R, 1
BA
You
active
BA
You
active incoming
You press
R, 0
BA
You
on hold active
BA
You
active on hold
You press
R, 2
BA
You
on hold active
BA
You
active incoming
You press
R, 2
To. . . Press... Illustration
Establish a conference call (or 3 party connection) R, 3
During a conference call: put B and C on hold R, 2
During a conference call: retrieve B and C when they
are on hold
R, 3
BA
You
active active
BA
You
on hold active
You press
R, 3
BA
You
on hold on hold
BA
You
active active
You press
R, 2
BA
You
active active
BA
You
on hold on hold
You press
R, 3
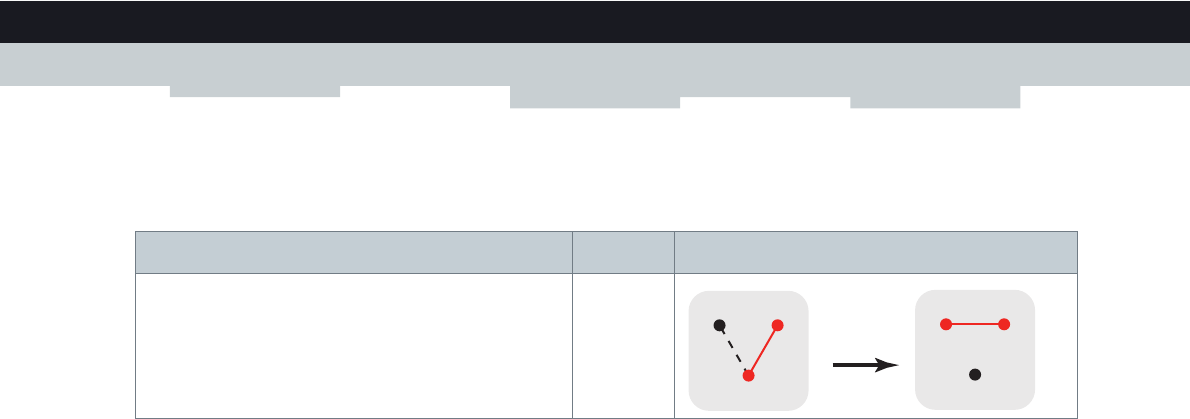
57
6 TELEPHONY
DMS-CTC-20120510-0000 v1.0
Call Transfer
If the Call Transfer service is activated, you can use the following functions:
To. . . Press... Illustration
Transfer a call R, 4
BA
You
active
BA
You
on hold active
You press
R, 4

58
6 TELEPHONY
DMS-CTC-20120510-0000 v1.0
6.4 Viewing Call Logs
Introduction
The Call Logs page on the MediaAccess Gateway GUI lists:
Successful incoming calls.
Missed incoming calls.
Successful outgoing calls.
Failed outgoing calls.
Viewing the telephony statistics
Proceed as follows:
1Browse to the MediaAccess Gateway GUI.
For more information, see “Accessing the MediaAccess Gateway GUI” on page 33.
2On the Toolbox menu, click Te l e p h o n y.
3The Te l e p h o n y page appears:
On this page you can see an overview of your last calls.
4To view more detailed statistics, click View telephony statistics and logs in the Pick a task list.
Used icons
The call logs use the following icons to illustrate the call type:
Calling a contact from the call log
You can immediately start a new call to one of these contacts by clicking the button in the Remote Number column.
Icon Ty p e
Successful outgoing phone call
Successful incoming call
Failed outgoing call
Failed incoming call

59
7 SAVING ENERGY
DMS-CTC-20120510-0000 v1.0
7 Saving Energy
Code of Conduct
To prove its commitment to protect the environment, Technicolor has signed the Code of Conduct, a global agreement to
reduce the power consumption of broadband access devices.
For more information, see “7.1 Code of Conduct” on page 60.
Technicolor power saving innovations
To further reduce the power consumption, Technicolor has developed the ECO Manager. This system constantly monitors
the services provided by the MediaAccess Gateway and automatically switches unused services to an ECO-friendly state.
For more information, see “7.2 ECO Manager” on page 61.
Next to this automated tool, you can also choose to manually disable services that you will not be using. For more
information, “7.3 Manually Switching Off Services to Reduce Power” on page 62.
60
7 SAVING ENERGY
DMS-CTC-20120510-0000 v1.0
7.1 Code of Conduct
Power states
Code of Conduct provides rules for the power consumption in:
Full power state:
This is the normal operation mode of the device, where all functionality is enabled.
Low power state:
When there is no user traffic on the device, the device should switch to low power mode. This is a state in which devices
are only allowed to use a limited amount of energy to be able to power its components and respond to user activity.
Example
Take the following example:
The user switches off his computer at 20:00.
There are no other devices connected to the MediaAccess Gateway.
The MediaAccess Gateway switches to low power mode. This results in a considerable drop in the overall power
consumption of the MediaAccess Gateway.
No user traffic
User traffic
Time
Power
Consumption
Full power limit
Low power limit
20:00
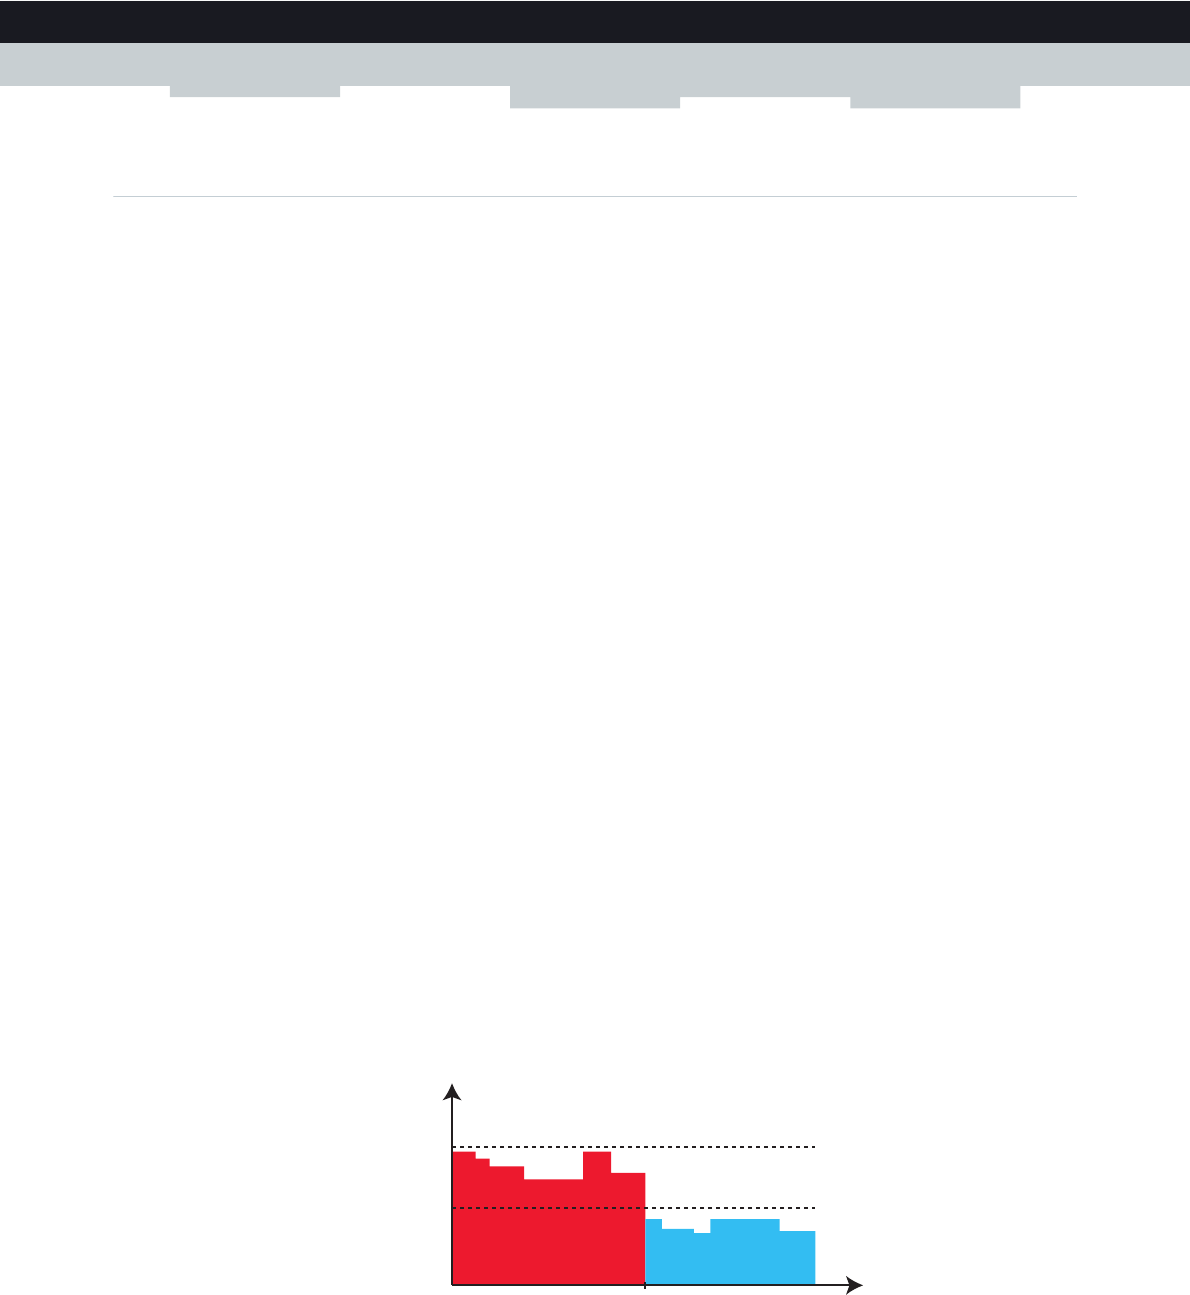
61
7 SAVING ENERGY
DMS-CTC-20120510-0000 v1.0
7.2 ECO Manager
Introduction
The MediaAccess Gateway constantly monitors the user activity and uses this information to optimise the power
consumption:
For example:
The MediaAccess Gateway reduces the clock frequency of the central processor when there is no or low user activity.
This lowered clock frequency will result in a lower power consumption of the MediaAccess Gateway.
Disable the USB port(s) when they are not used
Switch the wireless interface to power reduction mode.
Wireless access point power reduction mode
When the MediaAccess Gateway access point switches to power reduction mode, the access point is switched off and is
only power on periodically to be able to detect new clients. If new clients are detected the wireless access point is fully
powered again. This is only possible if there are no devices connected to the MediaAccess Gateway.
Power reduction is enabled by default, but it is possible to disable it via the MediaAccess Gateway GUI. To configure power
reduction:
1Browse to the MediaAccess Gateway GUI.
For more information, see “Accessing the MediaAccess Gateway GUI” on page 33.
2Under Home Network, click Wireless.
3In the Navigation bar, click Configure.
4Under Configuration:
Select Power Reduction Enabled to enable power reduction.
Clear Power Reduction Enabled to disable power reduction.
5Click Apply.
Example
If we use the same example as in the previous section, you can see that the MediaAccess Gateway is now able to further
reduce the power consumption in periods where less action is required from the MediaAccess Gateway.
No User Traffic
User Traffic
Time
20:00 Time
Power
Consumption
Full power limit
Low power limit
62
7 SAVING ENERGY
DMS-CTC-20120510-0000 v1.0
7.3 Manually Switching Off Services to Reduce Power
ECO button
If you are not using the wireless access point of your MediaAccess Gateway, you might consider to disable the wireless
access point permanently. This allows you to further reduce the power consumption.
To turn the wireless interface:
Off, press the ECO ( ) button until the Wireless LED is off.
On, press the ECO ( ) button until the Wireless LED is on.
Zero power consumption
If you will not be using your MediaAccess Gateway for a longer time (for example: you are going on holiday), you should
consider to turn off the MediaAccess Gateway. This way no energy will be consumed at all.
However, be aware that if you turn off the MediaAccess Gateway, all services provided by the MediaAccess Gateway that
require access to the Internet will not be available. For example:
You will not be able to browse to Internet websites, listen to radio streams etc.
No VoIP calls can be made/received
You will no longer be able to make or receive phone calls over the Internet. Your phone calls will automatically be done via
the traditional phone network (if available).
No Digital TV is provided
If your set-top box is connected to your MediaAccess Gateway, it will no longer be able to connect to the Internet, hence
not be able to service your TV set.
63
8 SHARING CONTENT
DMS-CTC-20120510-0000 v1.0
8 Sharing Content
Introduction
The MediaAccess Gateway allows you to share the content stored on your USB storage device with other users on your
network or even access this shared content from the Internet.
Features
The MediaAccess Gateway supports USB 2.0
The following file systems are supported:
NTFS (optional)
FAT32
FAT16
HFS+ (optional)
EXT2/EXT3 (optional)
You can connect up to five USB storage devices (via a USB hub).
Each USB storage device can have up to 10 partitions. If your device has more partitions the extra partitions will be
ignored.
Content Sharing Servers
The MediaAccess Gateway offers three types of services to share your content. The following table gives a you a brief
overview of the main functions:
Network File Server UPnP AV Media Server FTP Server
Function Store and access your data
on your local network.
Make media files available
for UPnP AV capable
devices like Media players,
Set-Top boxes from your
local network.
Store and access your data
from the Internet.
Access Read and write Read-only Read and write
Accessible from Local network Local network Internet and Local network
Type of content shared All files from all partitions
and disks that are
connected.
Media files (music, movies
and pictures) from all
partitions and disks that are
connected.
All files that are stored in
the Shared folder of the
managed partition.
For more information,
see...
“8.1 The Network File
Server” on page 65
“8.2 The UPnP AV Media
Server” on page 68
“8.3 The FTP Server” on
page 72
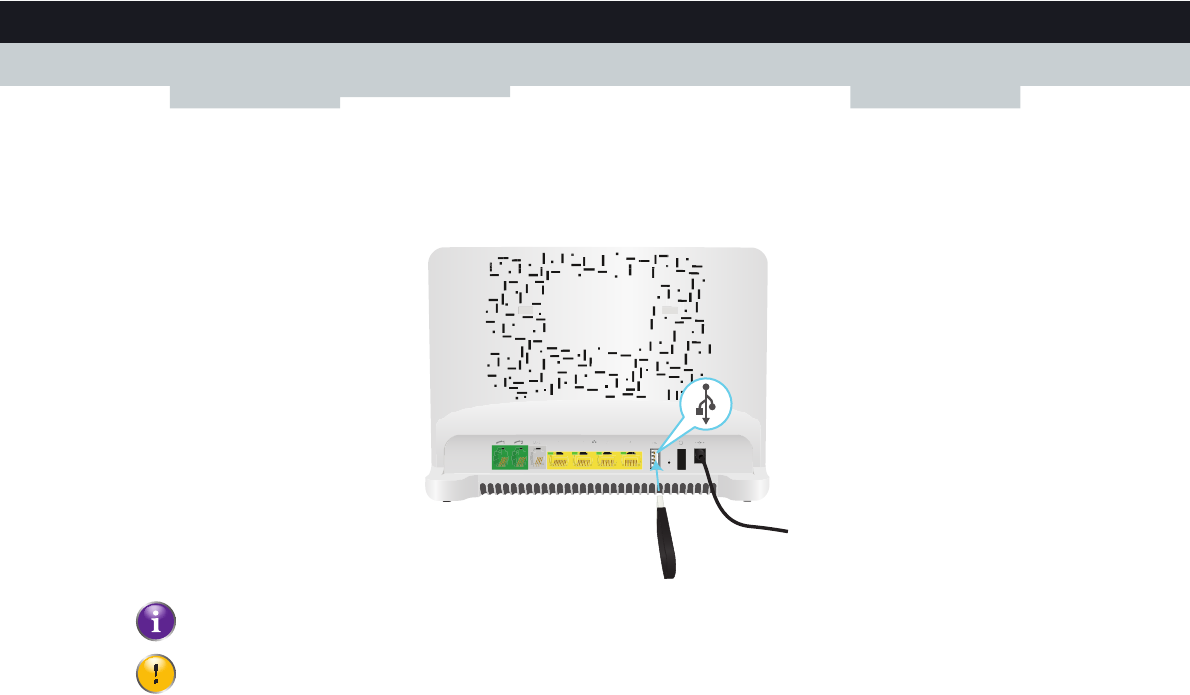
64
8 SHARING CONTENT
DMS-CTC-20120510-0000 v1.0
Configuration
All servers are enabled by default. The only thing that you need to do is to plug your USB memory stick or external hard
disk in (one of) the USB port(s) of your MediaAccess Gateway.
By using a USB hub, you can connect up to five USB mass storage devices to the MediaAccess Gateway.
Do not remove your USB storage device without stopping it first, otherwise data might be lost! For more
information, see “8.5 Safely Removing your USB Storage Device” on page 76.

65
8 SHARING CONTENT
DMS-CTC-20120510-0000 v1.0
8.1 The Network File Server
Introduction
The Network Server allows you to share the content on your USB storage device(s) with other devices that are connected to
your local network (mostly computers).
These devices have read and write access to this USB device(s).
Configuration
The Network File Server is enabled by default and ready for use.
To change the default settings, proceed as follows:
1Browse to the MediaAccess Gateway GUI.
For more information, see “Accessing the MediaAccess Gateway GUI” on page 33.
2On the Tools menu, click Content Sharing.
3In the Navigation bar, click Configure.
4Under Network File Server (Windows Networking), you can change the following settings:
Server Name:
Enter the name that you want to use to access the MediaAccess Gateway.
Server Description:
Add a short description for what kind of data is stored on the USB storage device.
Workgroup:
Enter the same workgroup as used by your computer(s).
Server Enabled:
Select this option to enable the Network File Server
5Click Apply.
6All users connected to the MediaAccess Gateway can now access the data on stored your USB storage device.
7If you want to limit the number of folders that can be accessed, continue with “8.4 Managing your Shared Content” on
page 74.
Accessing the shared content on Windows
Proceed as follows:
1Open Windows Explorer.
2In the address bar, type two backslashes followed by the name that you entered in the Server Name box (default:
\\Technicolor).
If you did not provide a server name, type \\192.168.1.253.
If you made changes to the DHCP settings, the IP address may diff. For more information, see “Getting the IP
address of your USB storage device” on page 109.
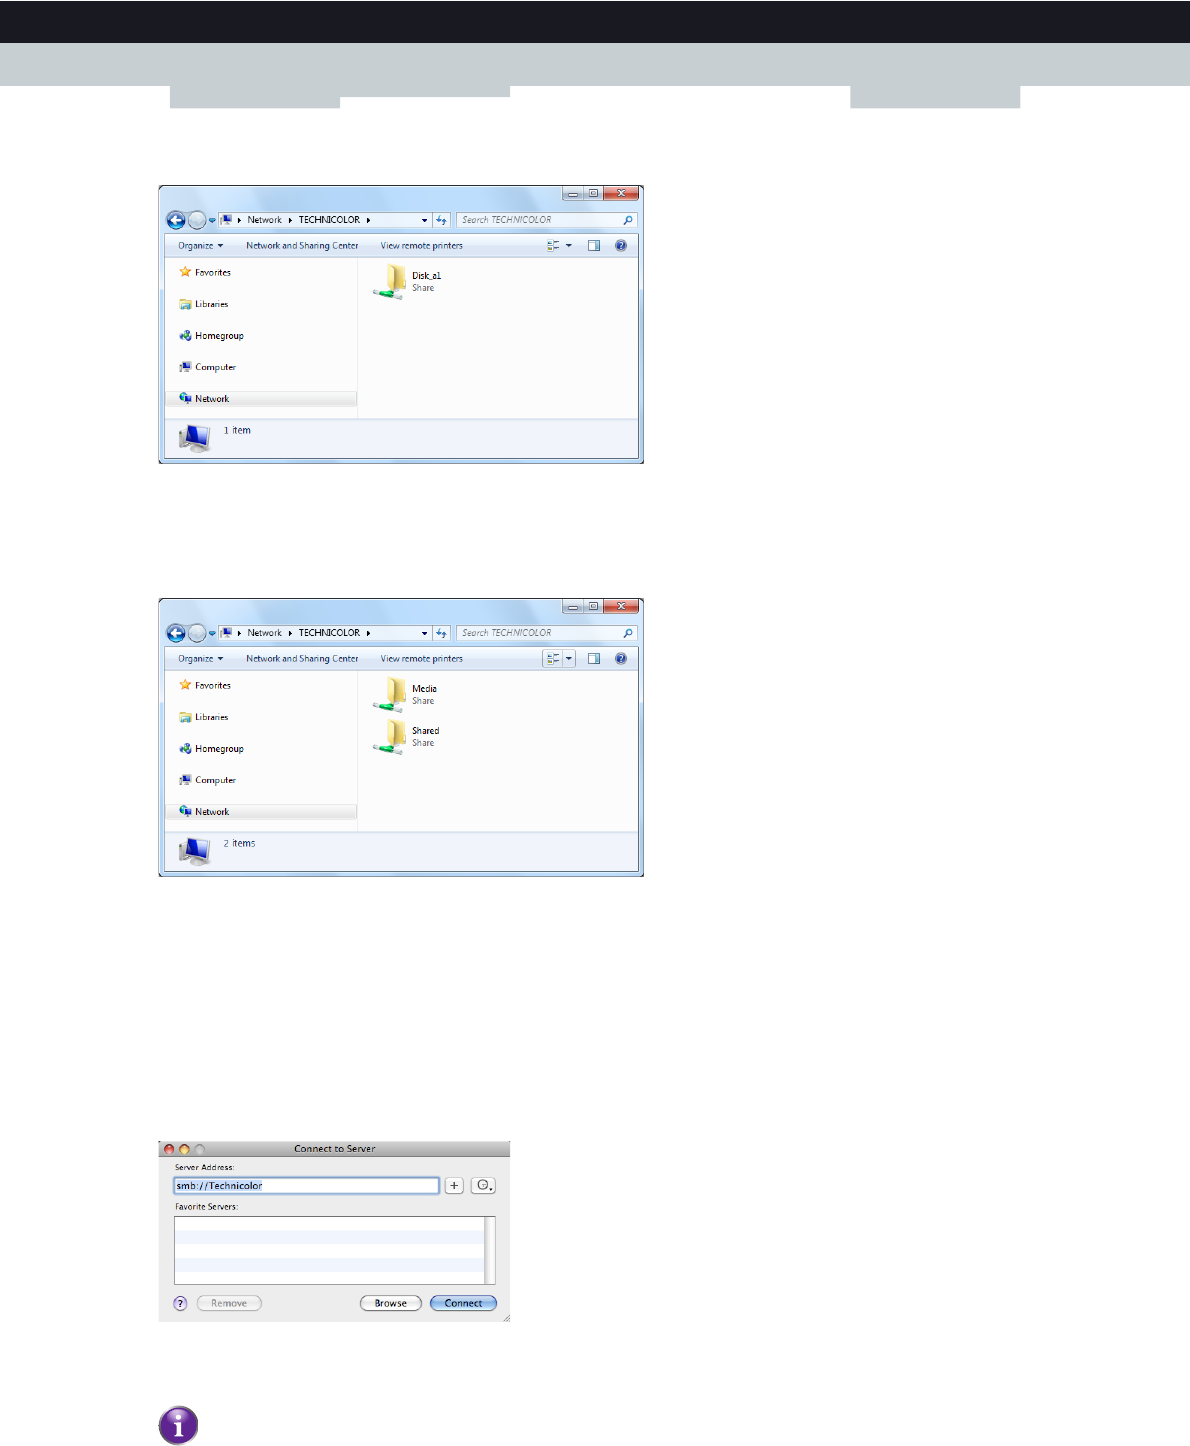
66
8 SHARING CONTENT
DMS-CTC-20120510-0000 v1.0
3An Explorer windows appears. The storage devices that are attached to your MediaAccess Gateway are listed as folders.
If the storage device has multiple partitions an index number will be added at the end (for example: Disk_a1 and
Disk_a2).
If multiple storage devices are inserted the first one is listed as Disk_a1, the second one as Disk_b1, and so on.
If the partition is a managed partition, only the Media and Shared folders of the managed partition are displayed:
For more information on managed partitions, see “8.4 Managing your Shared Content” on page 74.
4If you plan to frequently use this folder, it might be useful to map this folder as a network drive. For more information, see
the help of your operating system.
Accessing the shared content on Mac
Proceed as follows:
1On the Go menu, click Connect To Server.
2The Connect To Server window appears.
In the Server Address box, type smb://<server name>, where <server name> is the Server Name you assigned to your
USB storage device (default: smb://Technicolor).
If you did not provide a server name, type smb://192.168.1.253.
If you made changes to the DHCP settings, the IP address may diff. For more information, see “Getting the IP
address of your USB storage device” on page 109.
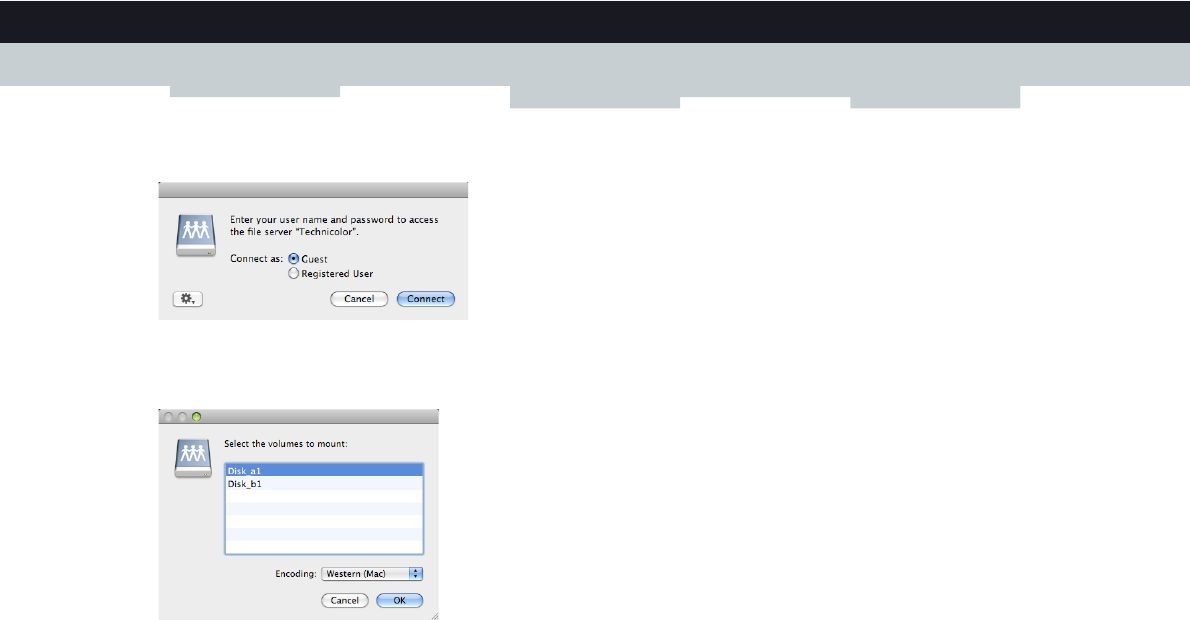
67
8 SHARING CONTENT
DMS-CTC-20120510-0000 v1.0
3The following window appears:
Select Guest and click Connect.
4If prompted, select the partition that you want to open and click OK:
5Your USB storage device is now mounted and is displayed on your desktop.
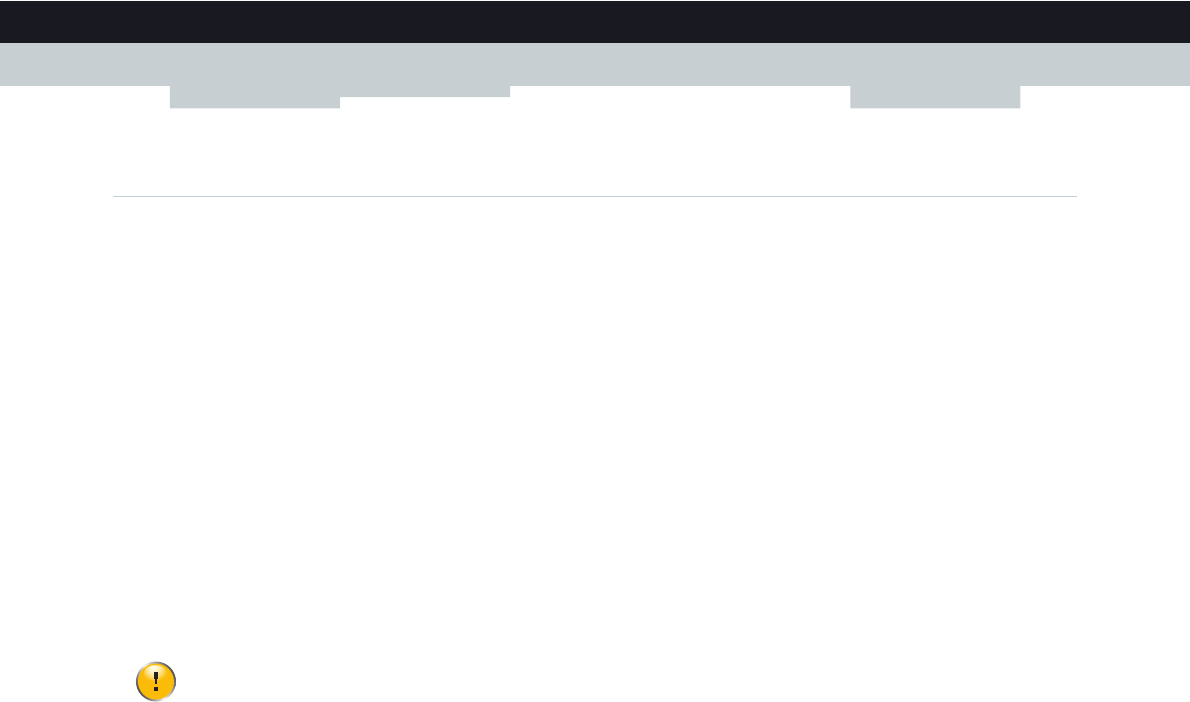
68
8 SHARING CONTENT
DMS-CTC-20120510-0000 v1.0
8.2 The UPnP AV Media Server
Introduction
Your MediaAccess Gateway has a built-in DLNA-certified UPnP AV media server. This section describes how to use and
configure this media server.
UPnP AV
UPnP AV (AV stands for Audio and Video) is a protocol especially designed to share media files on your local network.
DLNA-certified
The Digital Living Network Alliance (DLNA) is an organisation that imposes requirements to ensure the interoperatability
of your media devices and standardize the communication between them.
Buying a DLNA-certified device like the MediaAccess Gateway guarantees you that it will seamlessly integrate with your
other DLNA-certified devices.
To allow you to access your media in a quick and easy way, the MediaAccess Gateway scans your storage device for meta
data information (for example, title, artist, album) and stores it in a database. When you are looking for a file, the
MediaAccess Gateway can simply query the database instead of having to go through all the files.
UPnP AV network components
A UPnP AV network consists of the following components:
The UPnP AV server is directly connected to your media files and makes them available on the network. In your network
the MediaAccess Gateway will fulfil this role.
The UPnP AV client is a software application or hardware device that allows you to play or view the media files provided
by your UPnP AV media server.
This database will only be created if the following conditions are met:
Your disk or partition must have at least 250MB of free space
Your disk or partition must not be read-only.
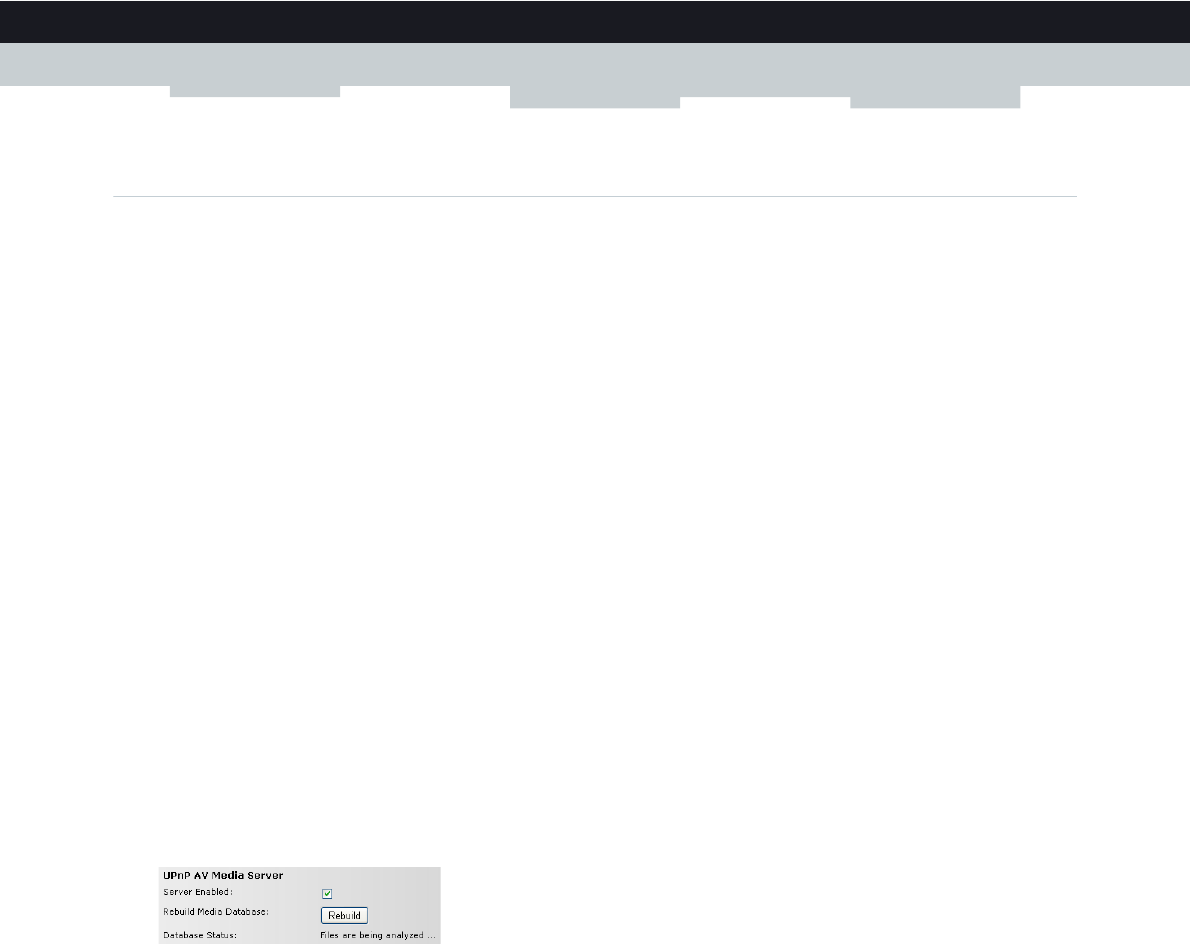
69
8 SHARING CONTENT
DMS-CTC-20120510-0000 v1.0
8.2.1 Configuring the UPnP AV Media Server
Introduction
The Network File Server is enabled by default and ready to use.
Enabling/disabling the UPnP AV Media Server
Proceed as follows:
1Browse to the MediaAccess Gateway GUI.
For more information, see “Accessing the MediaAccess Gateway GUI” on page 33.
2On the Tools menu, click Content Sharing.
3In the Navigation bar, click Configure.
4Under UPnP AV Media Server, click Server Enabled.
5Click Apply.
Media Database
When you plug in your USB storage device, the MediaAccess Gateway will automatically start building the media database.
This database contains all meta data of the media files stored on your USB storage device.
To view the status of the media database:
1Browse to the MediaAccess Gateway GUI.
For more information, see “Accessing the MediaAccess Gateway GUI” on page 33.
2On the Tools menu, click Content Sharing.
3In the Navigation bar, click Configure.
4Under UPnP AV Media Server, you can find the Database Status.
5If you want to rebuild the database, click Rebuild.
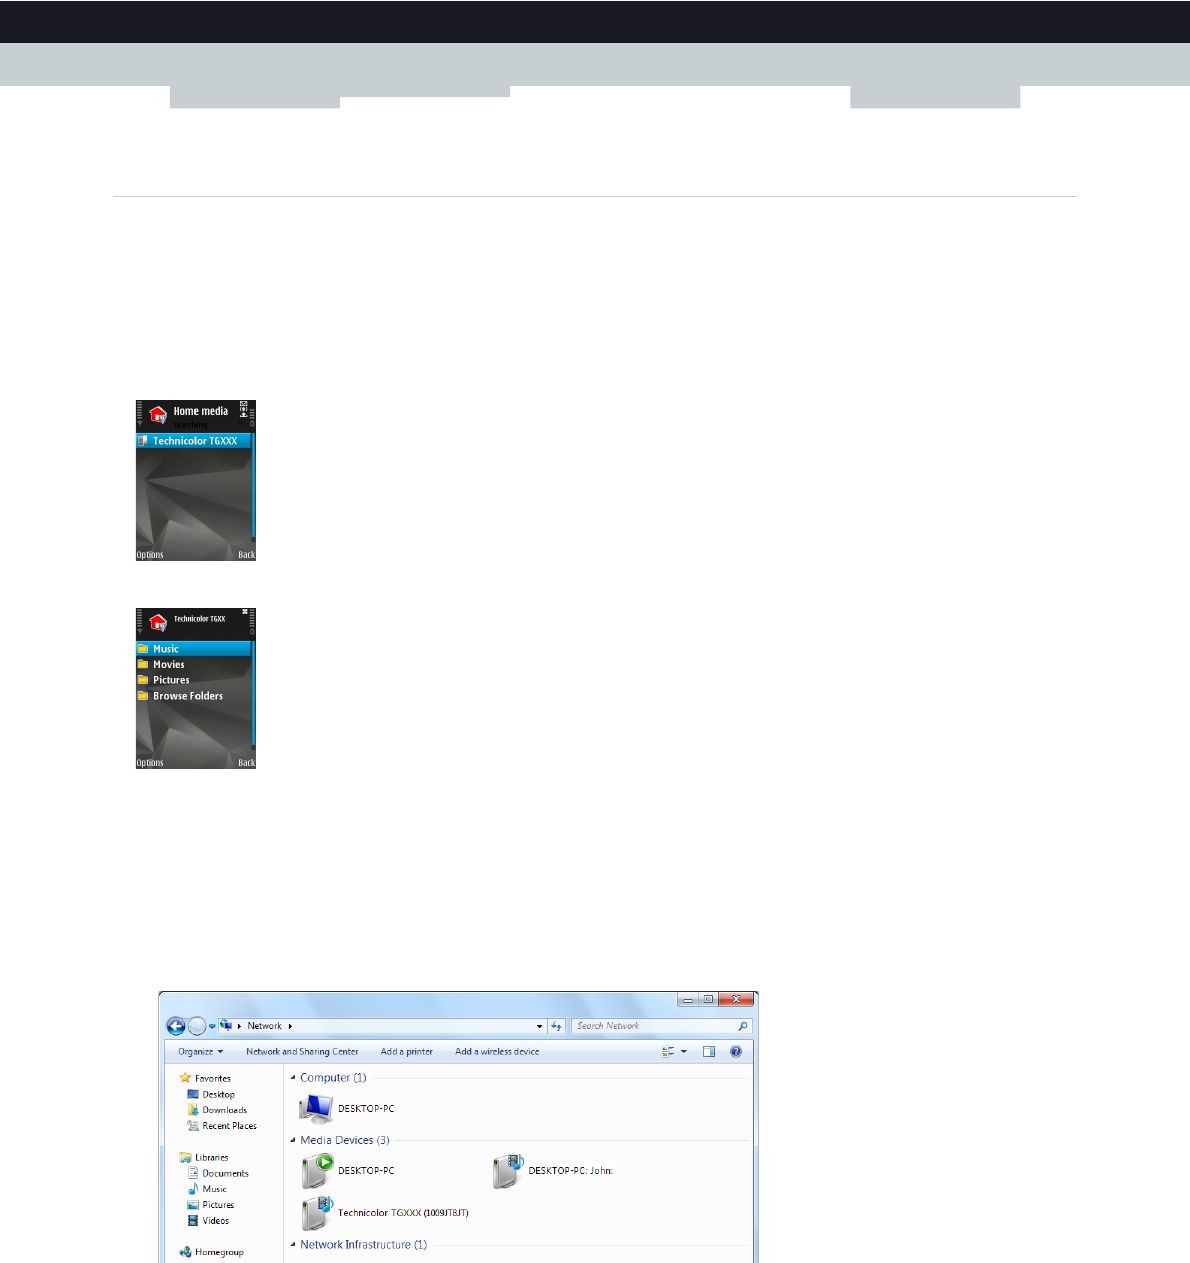
70
8 SHARING CONTENT
DMS-CTC-20120510-0000 v1.0
8.2.2 Using the UPnP AV Media Server
Introduction
The UPnP AV Media Server lists all audio, video and picture files located on the connected USB storage device. All UPnP
AV renderers (for example, a DLNA-certified Set-Top box) that are connected to your network are able to view this list and
play or view items from this list.
On your UPnP AV renderer, the MediaAccess Gateway’s UPnP AV media server will be listed as Technicolor TGXXX.
Below you can find a screenshot taken on a smartphone with a UPnP AV client.
Via this entry, you can browse to your media files.
Windows 7
Windows 7 has native support for UPnP AV. It automatically detects UPnP AV and makes your media files available for
playback on your Windows Media Player.
Proceed as follows:
1On the Windows Start menu, click Network.
2The Network window appears:
Under Media Devices you will find the MediaAccess Gateway’s UPnP AV Media Server (displayed as Technicolor
TGXXX).
3Double-click the MediaAccess Gateway’s UPnP AV Media Server to access your media files.

71
8 SHARING CONTENT
DMS-CTC-20120510-0000 v1.0
4Windows Media Player starts up.
Your MediaAccess Gateway’s UPnP AV Media Server is listed on the left. This entry allows you to browse to your media
files.

72
8 SHARING CONTENT
DMS-CTC-20120510-0000 v1.0
8.3 The FTP Server
Introduction
The MediaAccess Gateway allows you to access your shared content by FTP. This can be useful if you want to be able to
access your shared content from the Internet.
Via FTP you can download and upload all types of files both from your local network and the Internet.
Setting up the FTP server
Proceed as follows:
1Protect your account with a password.
2Enable the FTP Server and select the managed partition.
Protect your account with a password
If you did not yet configure your login to the MediaAccess Gateway GUI with a password:
1Browse to the MediaAccess Gateway GUI.
For more information, see “Accessing the MediaAccess Gateway GUI” on page 33.
2On the Toolbox menu, click User Management.
3In the Pick a task list, click Change my password.
4Leave the Old Password box empty.
5Type your new password both in the New Password box and Confirm New Password box.
Enable the FTP Server and select the managed partition
Proceed as follows:
1Browse to the MediaAccess Gateway GUI.
For more information, see “Accessing the MediaAccess Gateway GUI” on page 33.
2On the Tools menu, click Content Sharing.
3In the Navigation bar, click Configure.
4Under FTP Server, click Server Enabled.
5Under List of connected disks, click the radio button next to the partition to make it managed.
6The MediaAccess Gateway now creates a Media and Shared folder on the selected partition. The Shared folder will be
used as root location for FTP sessions.
7Click Apply.
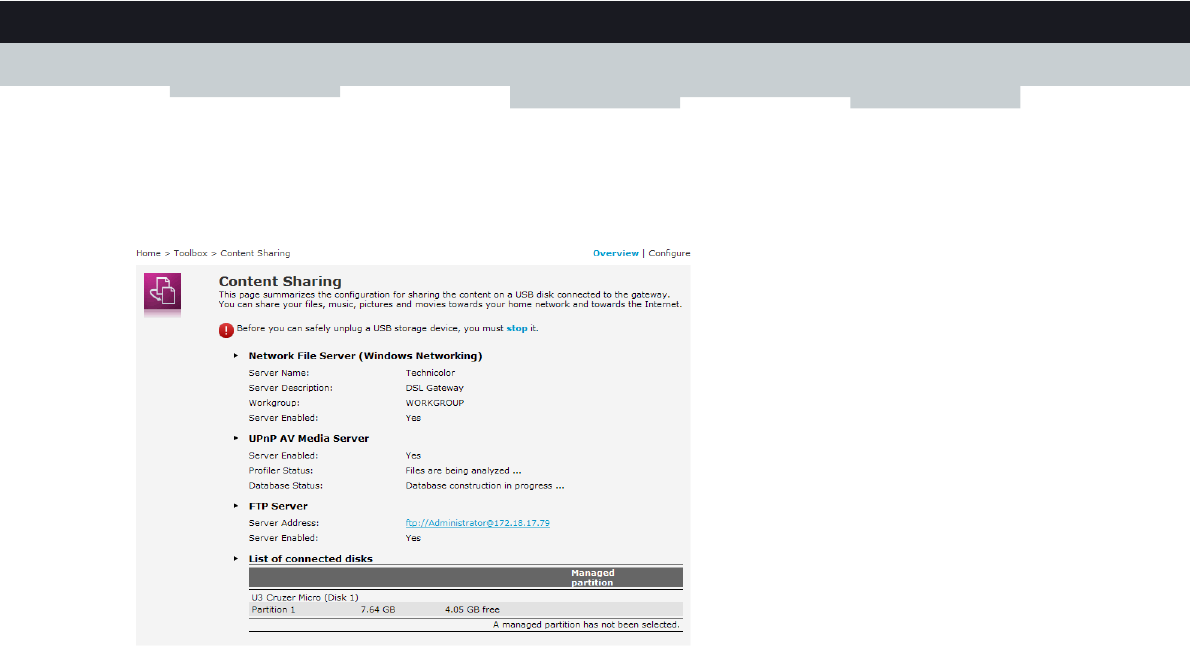
73
8 SHARING CONTENT
DMS-CTC-20120510-0000 v1.0
Result
The Shared folder and its subfolders are now accessible using FTP. The other folders are not accessible via FTP.
If you are connected to the Internet, the link to the FTP server is displayed under FTP Server:
On the MediaAccess Gateway network, you can also access the FTP server using its local address (192.168.1.253).
Additional configuration
Because most service providers use dynamic IP addresses, the IP address of your Internet connection may change
frequently. This implies that the link to the FTP server will also change every time the public IP changes. With Dynamic
DNS, you can assign a host name to the IP address (for example mygateway.dyndns.org). For more information, see
“9.3 Dynamic DNS” on page 87.
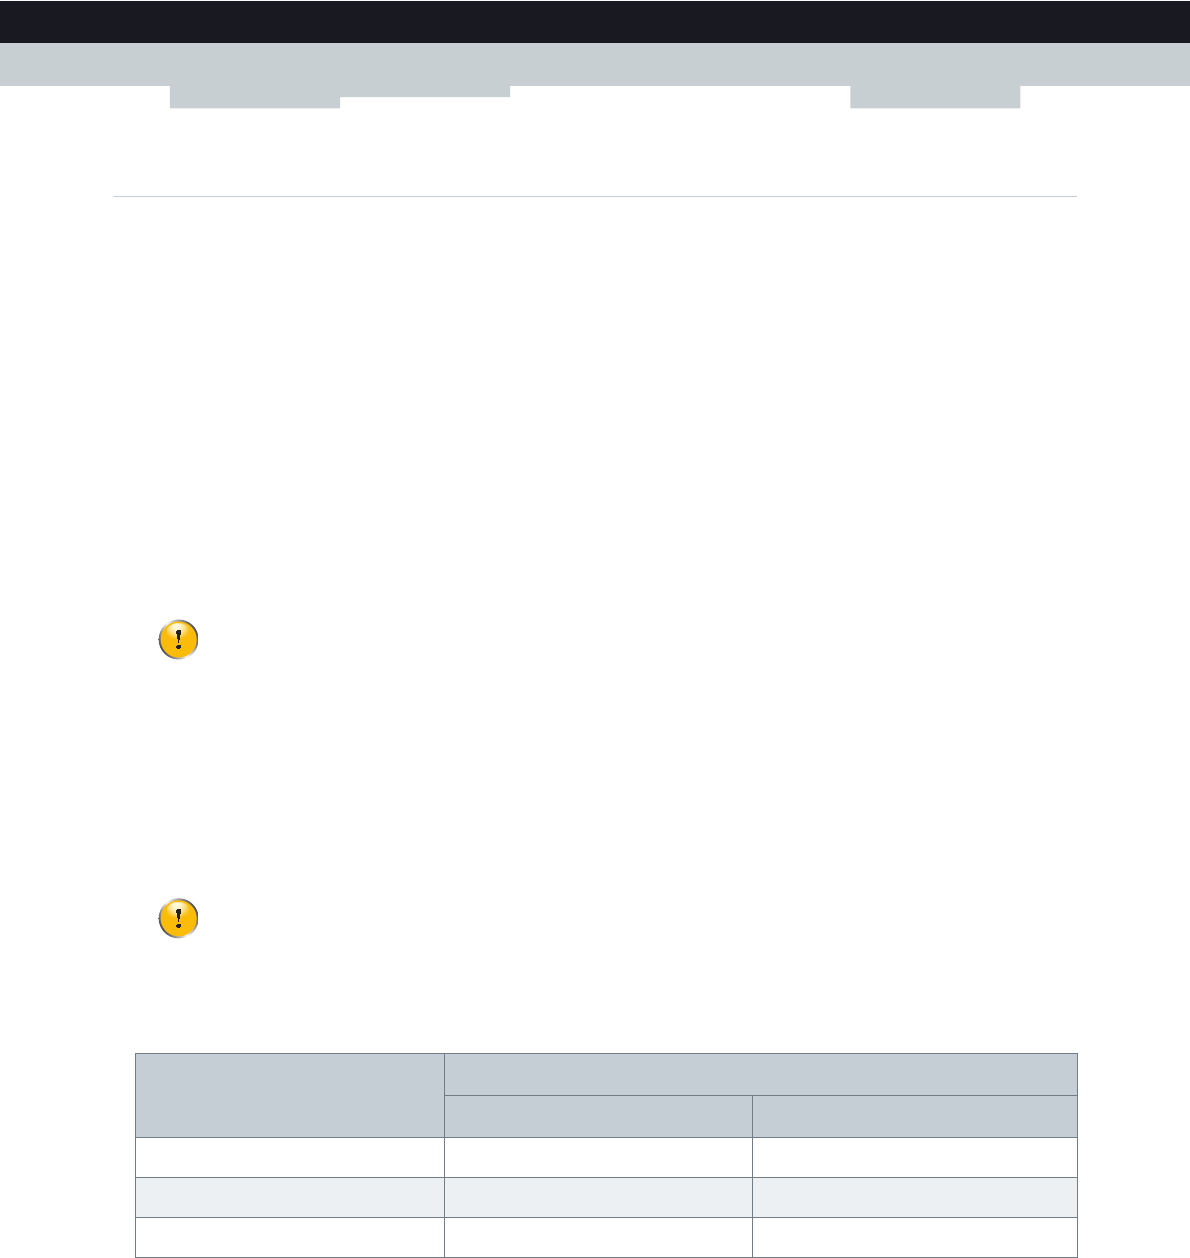
74
8 SHARING CONTENT
DMS-CTC-20120510-0000 v1.0
8.4 Managing your Shared Content
Managed Partition
If you select your drive or partition as managed partition, users only have access to the following folders:
Media
Shared
All other folders will be hidden from the user. These hidden folders are still on the USB storage device, but you can not
access them. If you connected more than one USB storage device, those devices will also be hidden.
Media folder
Use the Media folder to share your audio, video and picture files. This folder can only be accessed via the following servers:
The Network File Server
For more information, see “8.1 The Network File Server”.
UPnP AV Media Server.
For more information, see “8.2 The UPnP AV Media Server”.
Shared folder
The Shared folder is a folder to share files both on the local network and the Internet. This folder can only be accessed via
the following server:
The Network File Server
For more information, see “8.1 The Network File Server”.
FTP Server
For more information, see “8.3 The FTP Server”.
Ummanaged vs. managed
The following table compares the two modes:
Setting up the managed partition
Proceed as follows:
1Browse to the MediaAccess Gateway GUI.
For more information, see “Accessing the MediaAccess Gateway GUI” on page 33.
2On the Tools menu, click Content Sharing.
3In the Navigation bar, click Configure.
If your partition is managed, the UPnP AV server will only use the media files that are located in the Media folder.
The FTP Server can only be used with a managed partition.
Access via Accessible folders
Unmanaged Managed
Network File Server All Media and Shared folder.
UPnP AV Media Server All Media folder.
FTP Server Not available in this mode. Shared folder.

75
8 SHARING CONTENT
DMS-CTC-20120510-0000 v1.0
4Under List of connected disks, click the radio button next to the partition you want to configure as Managed Partition.
5Click Apply.
Result
The MediaAccess Gateway creates following folders:
Media:
Use this folder to share your media files with others users on your network. You can store your media files in following
subfolders:
Movies
Music
Pictures
Shared:
Use this folder to share your other data with other users on your network. Optionally, users can also access this folder
using FTP. For more information, see “8.3 The FTP Server” on page 72.
If the above folders already exist, the existing folders are used.

76
8 SHARING CONTENT
DMS-CTC-20120510-0000 v1.0
8.5 Safely Removing your USB Storage Device
Introduction
If you just unplug your USB storage device from the MediaAccess Gateway you may loose your data. To avoid this you must
first stop your USB storage device.
Stopping your USB storage device
Proceed as follows
1Browse to the MediaAccess Gateway GUI.
For more information, see “Accessing the MediaAccess Gateway GUI” on page 33.
2On the Toolbox menu, click Content Sharing.
3In the Navigation bar, click Configure.
4Click Stop.
5Unplug your USB storage device from the MediaAccess Gateway.
77
9 NETWORK SERVICES
DMS-CTC-20120510-0000 v1.0
9Network Services
In this chapter
In this chapter we will take a closer look at following features:
Feature availability
Depending on the configuration offered by your service provider, some features may not be available on your MediaAccess
Gateway. For more information, contact your service provider.
To p i c Page
9.1 UPnP 78
9.2 Assigning a service (HTTP, FTP,...) to a Computer 85
9.3 Dynamic DNS 87
“9.4 Network Time Server” on page 88 88

78
9NETWORK SERV
ICES
DMS-CTC-20120510-0000 v1.0
9.1 UPnP
Introduction
UPnP is designed to automate the installation and configuration of a (small) network as much as possible. This means that
UPnP-capable devices can join and leave a network without any effort of a network administrator.
Supported Operating Systems
The following operating systems support UPnP:
Windows 7
Windows Vista
Windows XP
UPnP and the MediaAccess Gateway
UPnP offers you the following functions:
You can access the MediaAccess Gateway GUI without having to remember the address of the MediaAccess Gateway.
For more information, see “9.1.1 Accessing Your MediaAccess Gateway via UPnP” on page 79.
If you are using a PPP connection to connect to the Internet, you can enable/disable your Internet connection without
having to open the MediaAccess Gateway GUI.
For more information, see “9.1.2 Managing your Internet connection via UPnP” on page 80.
You do not have to manually create port mappings to run services on a computer. The automatic port configuration
mechanism for UPnP-enabled games and applications will do this for you. If the application is UPnP-enabled, UPnP will
create these entries automatically. For more information, see “9.2 Assigning a service (HTTP, FTP,...) to a Computer” on
page 85.
If your computer is running Windows XP, you first have to install the UPnP component. For more information, see
“9.1.4 Installing UPnP on Windows XP” on page 83.
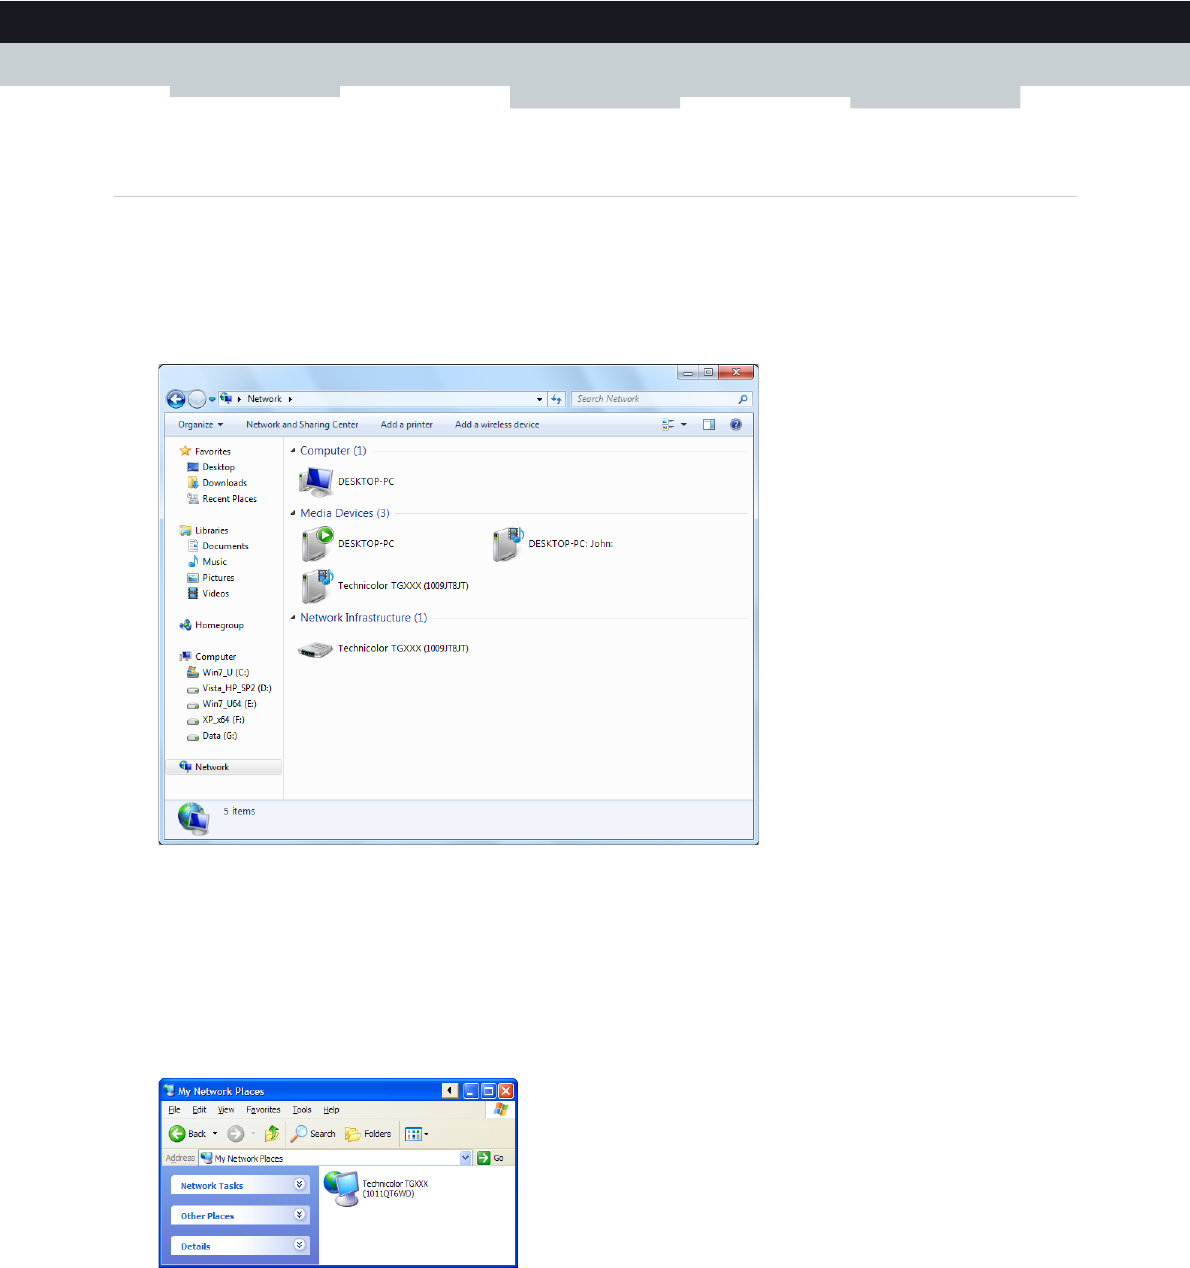
79
9 NETWORK SERVICES
DMS-CTC-20120510-0000 v1.0
9.1.1 Accessing Your MediaAccess Gateway via UPnP
Windows 7/Vista
If you computer runs Windows 7/Vista:
1On the Windows Start menu, click Network.
2The Network window appears:
3Right-click your MediaAccess Gateway (displayed as Technicolor TGXXX) and click View device web page.
4The MediaAccess Gateway GUI appears.
Windows XP
If you computer runs Windows XP:
1Go to My Network Places.
2The My Network Places window appears:
3Double-click your MediaAccess Gateway (displayed as Technicolor TGXXX).
4The MediaAccess Gateway GUI appears.
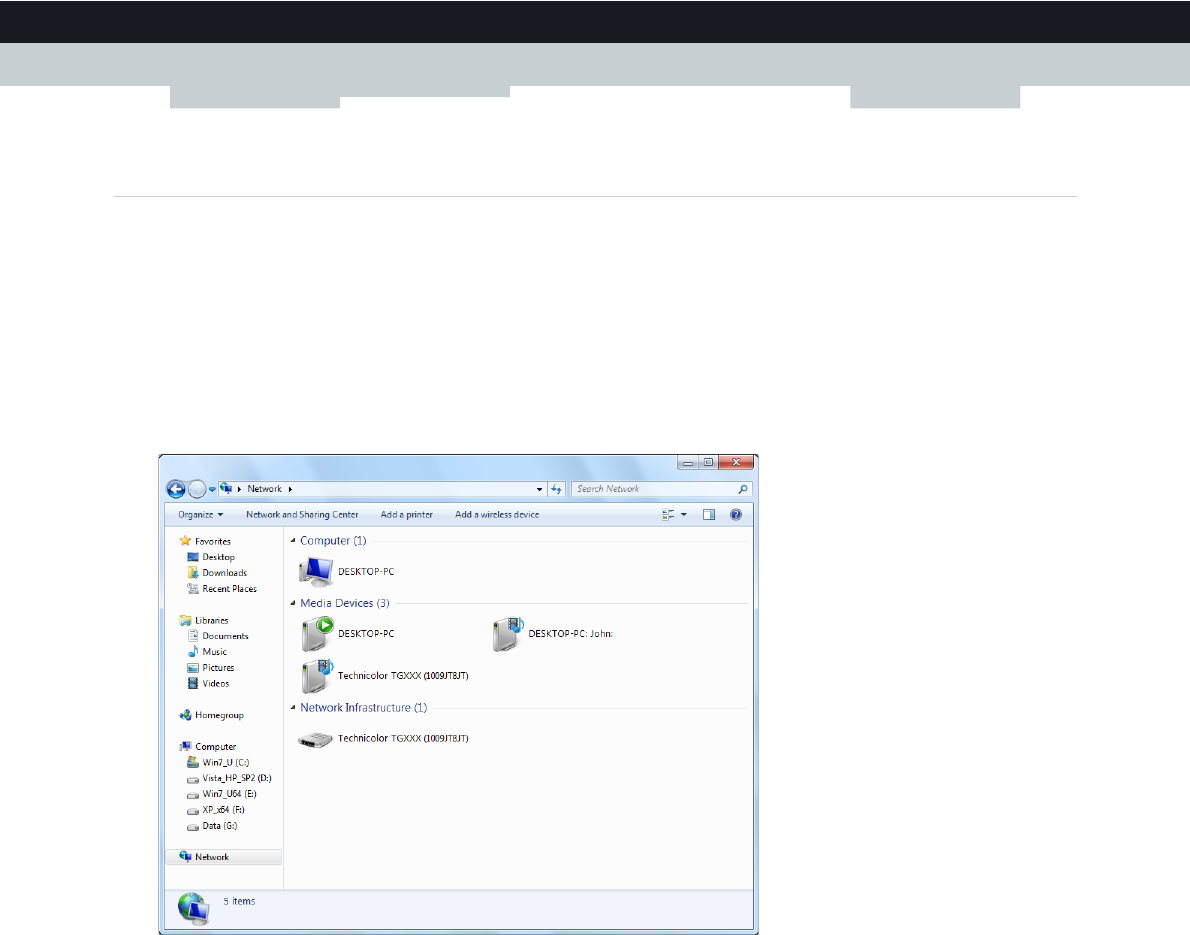
80
9NETWORK SERV
ICES
DMS-CTC-20120510-0000 v1.0
9.1.2 Managing your Internet connection via UPnP
Applicability
This section only applicable if you are using a PPP connection to the Internet.
Windows 7/Vista
If you computer runs Windows 7/Vista:
1On the Windows Start menu, click Network.
2The Network window appears:
3Right-click your MediaAccess Gateway (displayed as Technicolor TGXXX).
4If you are currently:
Connected to the Internet, click Disable to disconnect from the Internet.
Not connected to the Internet, click Enable to connect to the Internet.
Windows XP
Proceed as follows:
1On the Windows Start menu, click (Settings >) Control Panel.
2The Control Panel window appears.
Click (Network and Internet Connections) > Internet Connections.
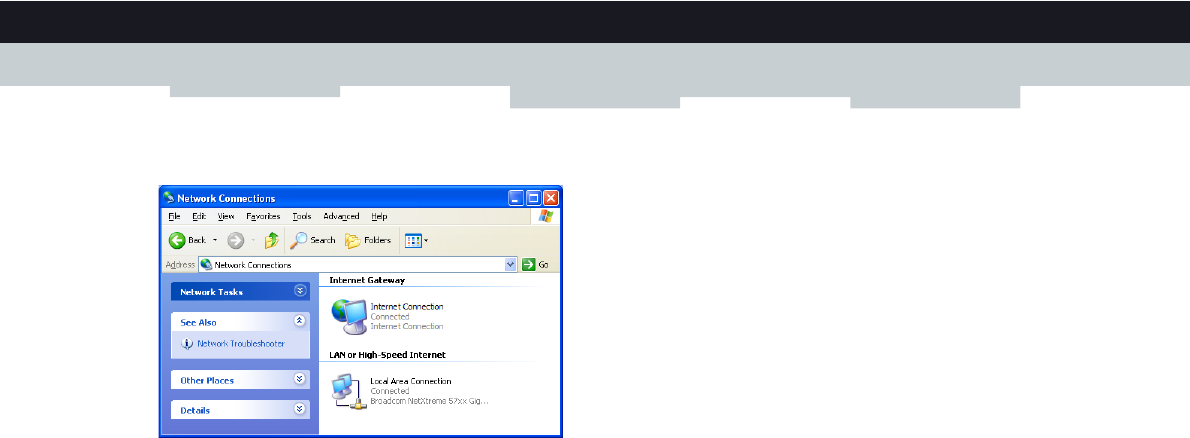
81
9 NETWORK SERVICES
DMS-CTC-20120510-0000 v1.0
3The Network Connections window appears;
4If you right-click the Internet Connection icon, you can connect/disconnect your connection to the Internet.
Disabling this feature
To prevent that users can connect/disconnect you can enable Extended Security. This feature is enabled by default.
For more information, see “9.1.3 Configuring UPnP on the MediaAccess Gateway” on page 82.

82
9NETWORK SERV
ICES
DMS-CTC-20120510-0000 v1.0
9.1.3 Configuring UPnP on the MediaAccess Gateway
Introduction
On the MediaAccess Gateway GUI you can:
Enable/Disable UPnP.
Enable/Disable Extended Security.
Enable/Disable UPnP
Proceed as follows:
1Browse to the MediaAccess Gateway GUI.
For more information, see “Accessing the MediaAccess Gateway GUI” on page 33.
2On the Toolbox menu, click Game & Application Sharing.
3Under Universal Plug and Play:
Select the Use UPnP check box, to enable UPnP.
Clear the Use UPnP check box, to disable UPnP.
4Click Apply.
Extended Security
If Extended Security is enabled, only limited UPnP operation between the host and the MediaAccess Gateway is allowed:
A local host is not allowed to connect/disconnect the MediaAccess Gateway Internet connection. You can then only
connect/disconnect the Internet connection via the MediaAccess Gateway GUI
Address translation mappings can only be added or changed via UPnP for the host on which the UPnP application is
running.
Extended Security is enabled by default.
Enable/Disable Extended Security
Proceed as follows:
1Browse to the MediaAccess Gateway GUI.
For more information, see “Accessing the MediaAccess Gateway GUI” on page 33.
2On the Toolbox menu, click Game & Application Sharing.
3Under Universal Plug and Play, select Use Extended Security.
4Click Apply.
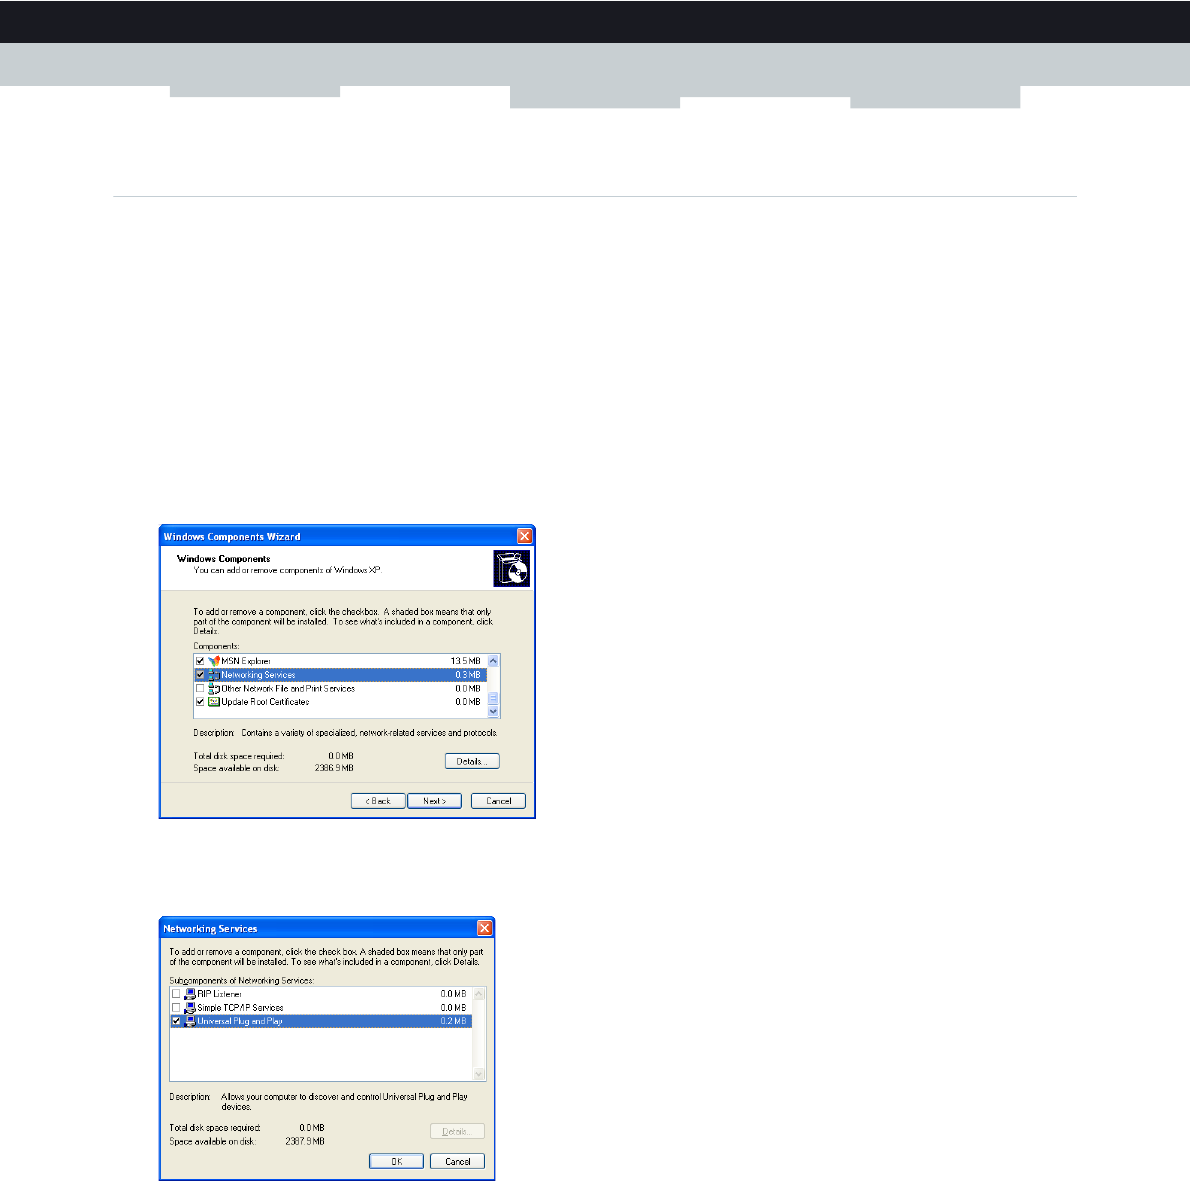
83
9 NETWORK SERVICES
DMS-CTC-20120510-0000 v1.0
9.1.4 Installing UPnP on Windows XP
Adding UPnP
If you are running Microsoft Windows XP, it is recommended to add the UPnP component to your system.
Proceed as follows:
1In the Start menu, click (Settings >) Control Panel.
2The Control Panel window appears.
Click Add or Remove Programs.
3The Add or Remove Programs window appears.
Click Add/Remove Windows Components.
4The Windows Components Wizard appears:
In the Components list, select Networking Services and click Details
5The Networking Services window appears:
Select Universal Plug and Play or UPnP User Interface and click OK.
6Click Next to start the installation and follow the instructions in the Windows Components Wizard.
7At the end of the procedure the wizard informs you that the installation was successful. Click Finish to quit.
Adding IGD Discovery and Control
Your Windows XP system is able to discover and control Internet Gateway Devices (IGD), like the MediaAccess Gateway
on your local network. Therefore, it is recommended to add the IGD Discovery and Control client to your system.
Proceed as follows:
1On the Windows taskbar, click Start.
84
9NETWORK SERV
ICES
DMS-CTC-20120510-0000 v1.0
2Select (Settings >) Control Panel > Add or Remove Programs.
3In the Add or Remove Programs window, click Add/Remove Windows Components.
4The Windows Components Wizard appears:
Select Networking Services in the Components list and click Details.
5The Networking Services window appears:
Select Internet Gateway Device Discovery and Control Client and click OK.
6Click Next to start the installation and follow the instructions in the Windows Components Wizard.
7At the end of the procedure, the wizard informs you that the installation was successful. Click Finish to quit.
85
9 NETWORK SERVICES
DMS-CTC-20120510-0000 v1.0
9.2 Assigning a service (HTTP, FTP,...) to a Computer
Introduction
The MediaAccess Gateway allows you to use one Internet connection for multiple computers. This means that all your
computers share one public IP address, as if only one computer were connected to the outside world.
Issue
When the MediaAccess Gateway receives an incoming message, the MediaAccess Gateway has to decide to which
computer it has to send this message.
If the incoming message is a response to an outgoing message originating from one of your computers, the MediaAccess
Gateway sends the incoming message to this computer.
If your are running a server or an application that acts as a server (for example a HTTP server, Internet game), the initial
message will come from the Internet and the MediaAccess Gateway has no information to decide to which computer it
should forward the incoming message.
Solution
To avoid this problem you can do either of the following:
Enable UPnP.
Assign a game or application to a local networking device.
UPnP
UPnP is a technology that enables seamless operation of a wide range of games and messaging applications. Your computer
will use UPnP to communicate to the MediaAccess Gateway which services are running on the computer.
For example, when you start a UPnP-enabled application on your computer, it will automatically create the necessary port
mappings on this computer and on the MediaAccess Gateway.
For more information on UPnP, see “9.1 UPnP” on page 78.
Internet
Internet
?
86
9NETWORK SERV
ICES
DMS-CTC-20120510-0000 v1.0
Assign a game or application to a local networking device
If you assign a game or application to a local networking device, you will basically tell the MediaAccess Gateway that if it
receives requests for a specific game or application, it has to forward these messages to a specific computer.
Proceed as follows to do so:
1Browse to the MediaAccess Gateway GUI.
For more information, see “Accessing the MediaAccess Gateway GUI” on page 33.
2On the Toolbox menu, click Game & Application Sharing.
3In the Pick a task list, click Assign a game or application to a local network device.
4In the Game or application list, click the service you want to run on the computer. For example, HTTP Server (World
Wide Web).
5In the Device list, select the computer to which you want to assign the service. Your computer will be listed with its
computer name.
6All incoming requests for the selected service will now be directed to the selected device. The MediaAccess Gateway will
also configure its firewall to allow this service.
If the service is not available in the list, click Create a new game or application in the Pick a task list. For more
information, click Help on the MediaAccess Gateway GUI.

87
9 NETWORK SERVICES
DMS-CTC-20120510-0000 v1.0
9.3 Dynamic DNS
Introduction
The Dynamic DNS service allows you to assign a dynamic DNS host name (for example mywebpage.dyndns.org) to a
broadband connection even if it is using a dynamic IP address. As soon as the device gets a new IP address, the dynamic
DNS server updates its entry to the new IP address.
What you need
Before you can configure Dynamic DNS, you first have to create an account at a Dynamic DNS service provider. For
example:
www.dyndns.org
www.no-ip.com
www.dtdns.com
Procedure
Proceed as follows:
1Browse to the MediaAccess Gateway GUI.
For more information, see “Accessing the MediaAccess Gateway GUI” on page 33.
2On the Toolbox menu, click Dynamic DNS.
3On the Navigation bar, click Configure.
4Select the Enabled check box.
5If necessary, select the broadband connection to which you want to assign the Dynamic DNS host name in the Interface
list.
6Type the user name and password of your Dynamic DNS service account in the corresponding fields.
7In the Service list, click the name of your Dynamic DNS service provider.
8In the Host box, type the host name that you got from the Dynamic DNS service provider (for example
mywebpage.dyndns.org).
9Click Apply.
88
9NETWORK SERV
ICES
DMS-CTC-20120510-0000 v1.0
9.4 Network Time Server
Introduction
A Network Time Server is a server that makes sure that the time settings of your device (your MediaAccess Gateway) are
in sync with the official time.
This time will be used for features like:
Access Control
For more information, see “10.3 Access Control” on page 99.
Wireless Time Control
For more information, see “10.4 Wireless Time Control” on page 101.
Call logs
Event logs
Requirements
Your MediaAccess Gateway must be connected to the Internet.
Specifying a time server for your MediaAccess Gateway
Proceed as follows:
1Browse to the MediaAccess Gateway GUI.
For more information, see “Accessing the MediaAccess Gateway GUI” on page 33.
2On the Technicolor Gateway menu, click Configuration.
3The System Configuration page appears. On the Navigation bar, click Configure.
4Under Time Configuration, select Auto-configuration and configure the following settings:
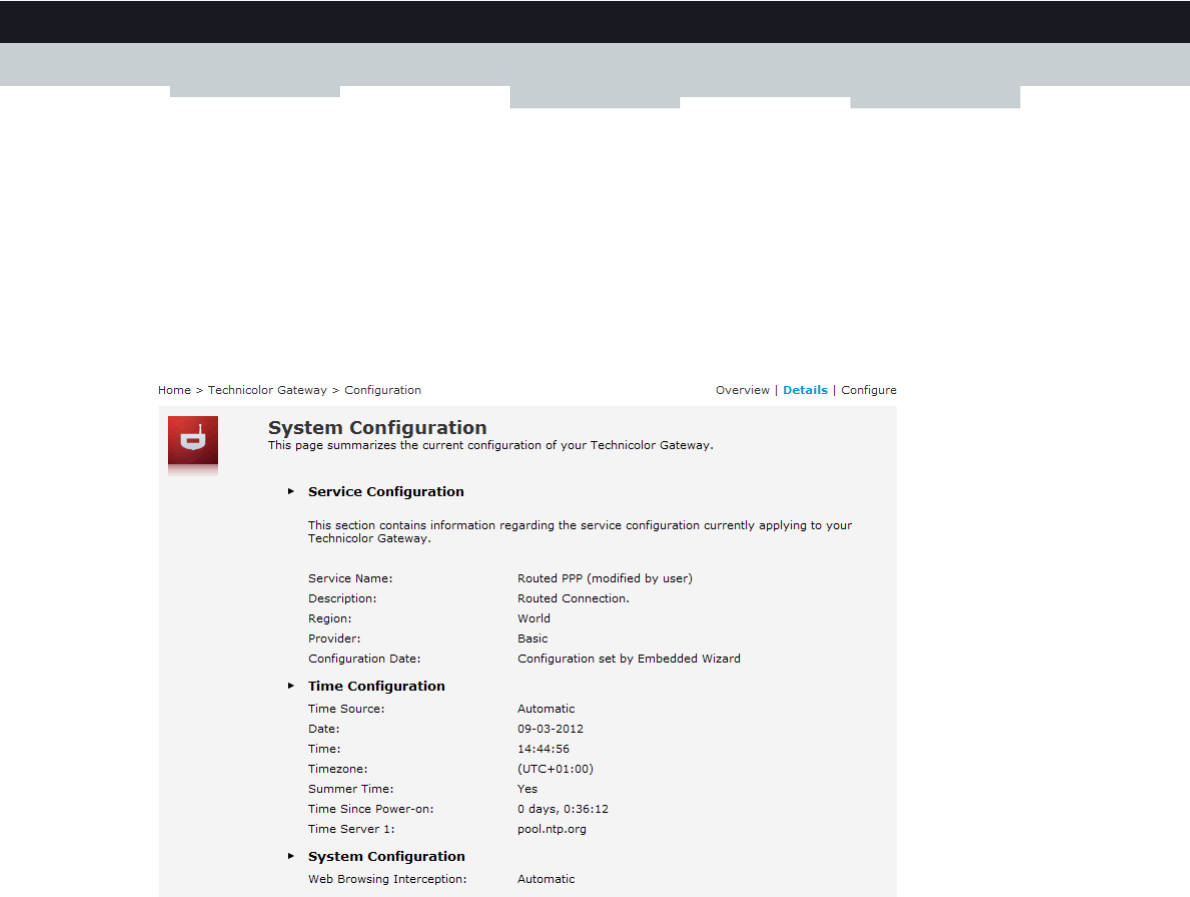
89
9 NETWORK SERVICES
DMS-CTC-20120510-0000 v1.0
Time Zone:
Select your time zone from this list.
Summer Time:
Select Summer Time if you want the clock to follow daylight saving time.
In the Time Server box, type the address of the time server of your choice (for example: pool.ntp.org). You can
define up to five time servers.
5Click Apply.
6Under Time Configuration you can see the newly applied time.

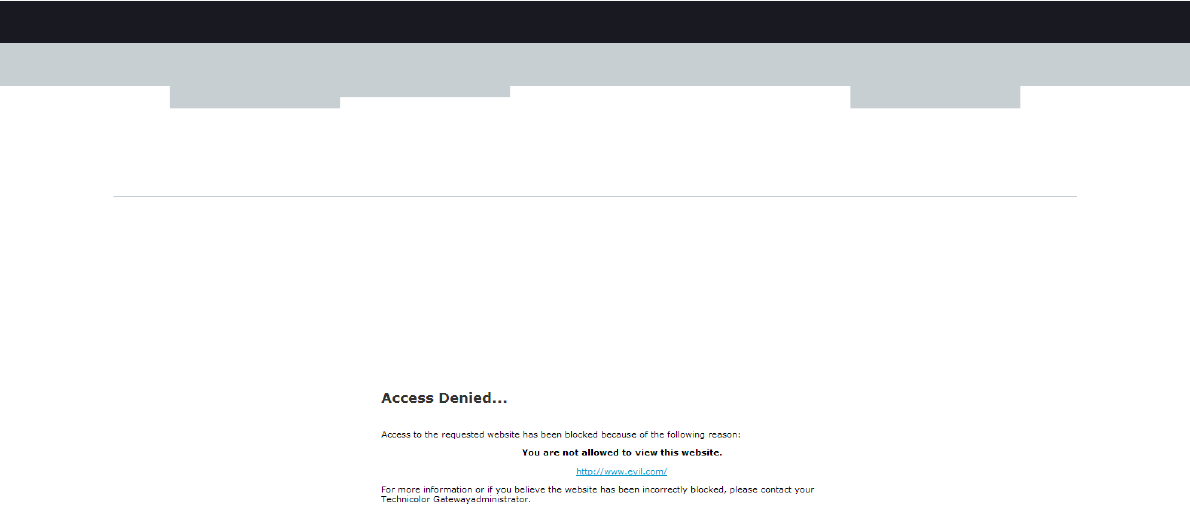
92
10 INTERNET SECURITY
DMS-CTC-20120510-0000 v1.0
10.1 Parental Control
Introduction
The MediaAccess Gateway allows you to deny access to specific web sites.
Access Denied page
When a user tries to access a page that is being blocked, the following page is displayed:
Address-based filtering
With address-based filtering (or URL-filtering) you can block web sites based on their address (for example
www.porn.com).
Content-based filtering
As you know, the Internet consists of a large number of web sites, and that number still increases every day. This makes it
almost impossible to keep the list of addresses up-to-date.
To solve this problem MediaAccess Gateway introduced content-based filtering.
With content-based filtering you can block web sites based on their content category (for example pornography) instead
of their URL. This way, you only need to select the appropriate categories and the content category server takes care of the
rest. This content category server is updated at regular intervals.
Combining the two filters
Address-based filtering has priority over content-based filtering. This means that when you are blocking a specific
category, you can still access a specific address provided you create a rule to allow access to that URL.
For example, if you are blocking content from the Finance / Investment category, you can create a rule to make an
exception for netbanking.mybank.com.
Activating content-based filtering
Before you can use content-based filtering you must first activate it by purchasing a license key at your service provider or by
activating the 30-day trial.
Proceed as follows:
1Browse to the MediaAccess Gateway GUI.
For more information, see “Accessing the MediaAccess Gateway GUI” on page 33.
2On the Toolbox menu, click Parental Control.
3In the Pick a task list, click Activate Web Filtering License.
4The Web Filtering Activation page appears. Under License Type, select:
30-days evaluation if you first want evaluate this feature.
Standard if you have already purchased a license key. The License key box appears as soon as you select this option.
Type the license key that you received from your service provider in this box.
5Click Apply.

93
10 INTERNET SECURITY
DMS-CTC-20120510-0000 v1.0
Option 1: content-based filter (combined with the address-based filter)
If you want to use the content-based filtering:
1Browse to the MediaAccess Gateway GUI.
For more information, see “Accessing the MediaAccess Gateway GUI” on page 33.
2On the Toolbox menu, click Parental Control.
3On the Navigation bar, click Configure.
4Make sure that the Use Content-Based Filter check box is selected.
5Configure the content-based filter. For more information, see “10.1.1 Configuring Content-based Filtering” on page 94.
6If you want to make exceptions for specific web sites, add the necessary rules in the address-based filter. For more
information, see “10.1.2 Adding Rules for Address-Based Filtering” on page 95.
Option 2: address-based filter only
Take this option if content filtering is not available on your MediaAccess Gateway or you don’t want to use it.
To configure address-based filtering:
1Browse to the MediaAccess Gateway GUI.
For more information, see “Accessing the MediaAccess Gateway GUI” on page 33.
2On the Toolbox menu, click Parental Control.
3On the Navigation bar, click Configure.
4Make sure that the Use Address-Based Filter check box is selected.
5In the Action for Unknown Sites, select:
Allow as the default rule if you want to allow access to all web sites and manually specify which web sites may not be
accessed.
Block as the default rule if you want to deny access to all web sites and manually specify a number of web sites that
may be accessed.
6Click Apply.
7If you want to make exceptions for specific web sites, add the necessary rules in the address-based filter.
For more information, see “10.1.2 Adding Rules for Address-Based Filtering” on page 95.

94
10 INTERNET SECURITY
DMS-CTC-20120510-0000 v1.0
10.1.1 Configuring Content-based Filtering
Requirements
Content-based filtering must be activated on your MediaAccess Gateway.
For more information, see “Activating content-based filtering” on page 92.
Accessing the configuration page
Proceed as follows:
1Browse to the MediaAccess Gateway GUI.
For more information, see “Accessing the MediaAccess Gateway GUI” on page 33.
2On the Toolbox menu, click Parental Control.
3On the Navigation bar, click Configure.
4Under Content-Based Filtering you can change the settings of the content-based filter.
Configuration
Under Content-Based Filtering:
1Select Use Content-Based Filter check box (if needed).
2In the Action for uncategorised sites list, select a default action for sites that have not yet been categorised.
3Under Content Level, select the content level you want to use.
If you want a more detailed view of the content that will be blocked for this level, click the Edit link next to the content
level.
If needed, you can change the Name, Description and Configuration of the content level.
4Click Apply after you have made your changes.
Creating your own content level
Proceed as follows:
1In the Pick a task list, click Create a new content level.
2Enter a Name and Description for your content level and click Next.
3Under Configuration, select:
Clone Existing Level if you want to start from an existing level. You can now select the level that you want to clone.
White list if you want to block everything and select which content should be allowed.
Black list if you want to allow everything and select which content should be blocked.
Click Next.
4Under Configuration:
Select the check boxes of the categories/groups you want to allow.
Clear the check boxes of the categories/groups you want to block.
5Click Apply.
6Configure the content-based filter with the new level. For more information, see “Configuration” on page 94.

95
10 INTERNET SECURITY
DMS-CTC-20120510-0000 v1.0
10.1.2 Adding Rules for Address-Based Filtering
Introduction
Address-based filtering has a higher priority than content-based filtering. This means that when you are blocking a specific
category, you can still access a specific site if you allow it in the address-based filter.
Example
If you block content from the Finance / Investment category and allow access to netbanking.mybank.com,
netbanking.mybank.com will still be accessible.
Options
With the address-based filter you can:
Deny access to a specific web site.
Allow access to a specific web site.
Redirect a web site.
Redirect all web sites.
Deny access to a specific web site
Proceed as follows:
1Browse to the MediaAccess Gateway GUI.
For more information, see “Accessing the MediaAccess Gateway GUI” on page 33.
2On the Toolbox menu, click Parental Control.
3Make sure the Use Address-Based Filter check box is selected.
4Type the URL of the Web site you want to block (for example “mail.provider.com”) in the Web Site box.
5In the Action list, click Block.
6Click Add.
Allow access to a specific web site
Proceed as follows:
1Browse to the MediaAccess Gateway GUI.
For more information, see “Accessing the MediaAccess Gateway GUI” on page 33.
2On the Toolbox menu, click Parental Control.
3Make sure the Use Address-Based Filter check box is selected.
4Type the URL of the Web site you want to allow (for example “netbanking.bank.com”) in the Web Site box.
5In the Action list, click Allow.
6Click Add.
Redirect a web site
Proceed as follows:
1Browse to the MediaAccess Gateway GUI.
For more information, see “Accessing the MediaAccess Gateway GUI” on page 33.
2On the Toolbox menu, click Parental Control.
3Make sure the Use Address-Based Filter check box is selected.
4Type the URL of the Web site you want to redirect (for example “cracks.am”) in the Web Site box.

96
10 INTERNET SECURITY
DMS-CTC-20120510-0000 v1.0
5Click Redirect in the Action list.
6Type the URL of the Web site you want to redirect to (for example “mycompany.com/internetpolicy.htm”) in the
Redirect box.
7Click Add.
Redirect all web sites
Proceed as follows:
1Browse to the MediaAccess Gateway GUI.
For more information, see “Accessing the MediaAccess Gateway GUI” on page 33.
2On the Toolbox menu, click Parental Control.
3Make sure the Use Address-Based Filter check box is selected.
4Typ e “ * ” in t he Web Site box.
5Click Redirect in the Action list.
6Type the URL of the Web site you want to redirect to (for example “mycompany.com/internetpolicy.htm”) in the
Redirect box.
7Click Add.
97
10 INTERNET SECURITY
DMS-CTC-20120510-0000 v1.0
10.2 Firewall
Introduction
The MediaAccess Gateway comes with an integrated firewall that helps you protect your network from attacks from the
Internet. This firewall has a number of predefined levels to allow you to adjusted the firewall to your needs.
The Firewall is disabled by default. This means that all traffic passing through the MediaAccess Gateway (from and to the
Internet) is allowed.
Predefined security levels
The MediaAccess Gateway has a number of predefined security levels. The following levels are available:
BlockAll:
All traffic from and to the Internet is blocked. Game and Application Sharing is not allowed by the firewall.
Standard:
All outgoing connections are allowed. All incoming connections are blocked, except for inbound connections assigned to
a local host via Game and Application Sharing. This is the default firewall level.
Disabled:
All in- and outgoing traffic is allowed to pass through your MediaAccess Gateway, including Game and Application
Sharing.
Changing the security level
Proceed as follows:
1Browse to the MediaAccess Gateway GUI.
For more information, see “Accessing the MediaAccess Gateway GUI” on page 33.
2On the Toolbox menu, click Firewall.
3The Firewall page appears. In the upper-right corner, click Configure.
4Under Security Settings, select the security level of your choice and click Apply.
Creating your own security level
Proceed as follows:
1 In the Toolbox menu click Firewall.
2 In the Firewall section, go to the Configure page.
3 In the Pick a task list, click Create a new Security Level.
4 In the Name box, type a name for the new security level and select an existing security level to clone from.
5Click Apply.
6A page with the firewall settings of your newly created security level appears. Click Edit.
7 Enter the following information:
The Name of the firewall rule.
Although BlockAll will block all connections, some mandatory types of traffic such as DNS will still be relayed
between LAN and WAN by the MediaAccess Gateway.
The firewall levels only have impact on traffic passing through your MediaAccess Gateway. This means that the
handling of traffic directly appointed from and to MediaAccess Gateway is independent of the selected firewall level.
Protocol checks will be performed on all accepted connections, irrespective of the chosen level.
Once you create a security level, you can not delete it anymore. It will always available in the list of available security
levels.
98
10 INTERNET SECURITY
DMS-CTC-20120510-0000 v1.0
The Source Interface and IP Address (range).
Or you can type a User-defined IP address (range).
The Destination Interface and IP Address (range)
Or you can type a User-defined IP address (range).
The Service type of the traffic; this can be a protocol (DNS, SMTP,...) or a specific MediaAccess Gateway system
service.
8 Select an Action that should be done on traffic for which the firewall rules applies:
Accept: to allow the traffic to pass
Deny: to drop the traffic (without notification)
Count: to let the traffic pass, but count it (Hits)
9Click Apply.
Use Any as IP address in case all traffic for the interface should be parsed.
Use Any as IP address in case all traffic for the interface should be parsed.
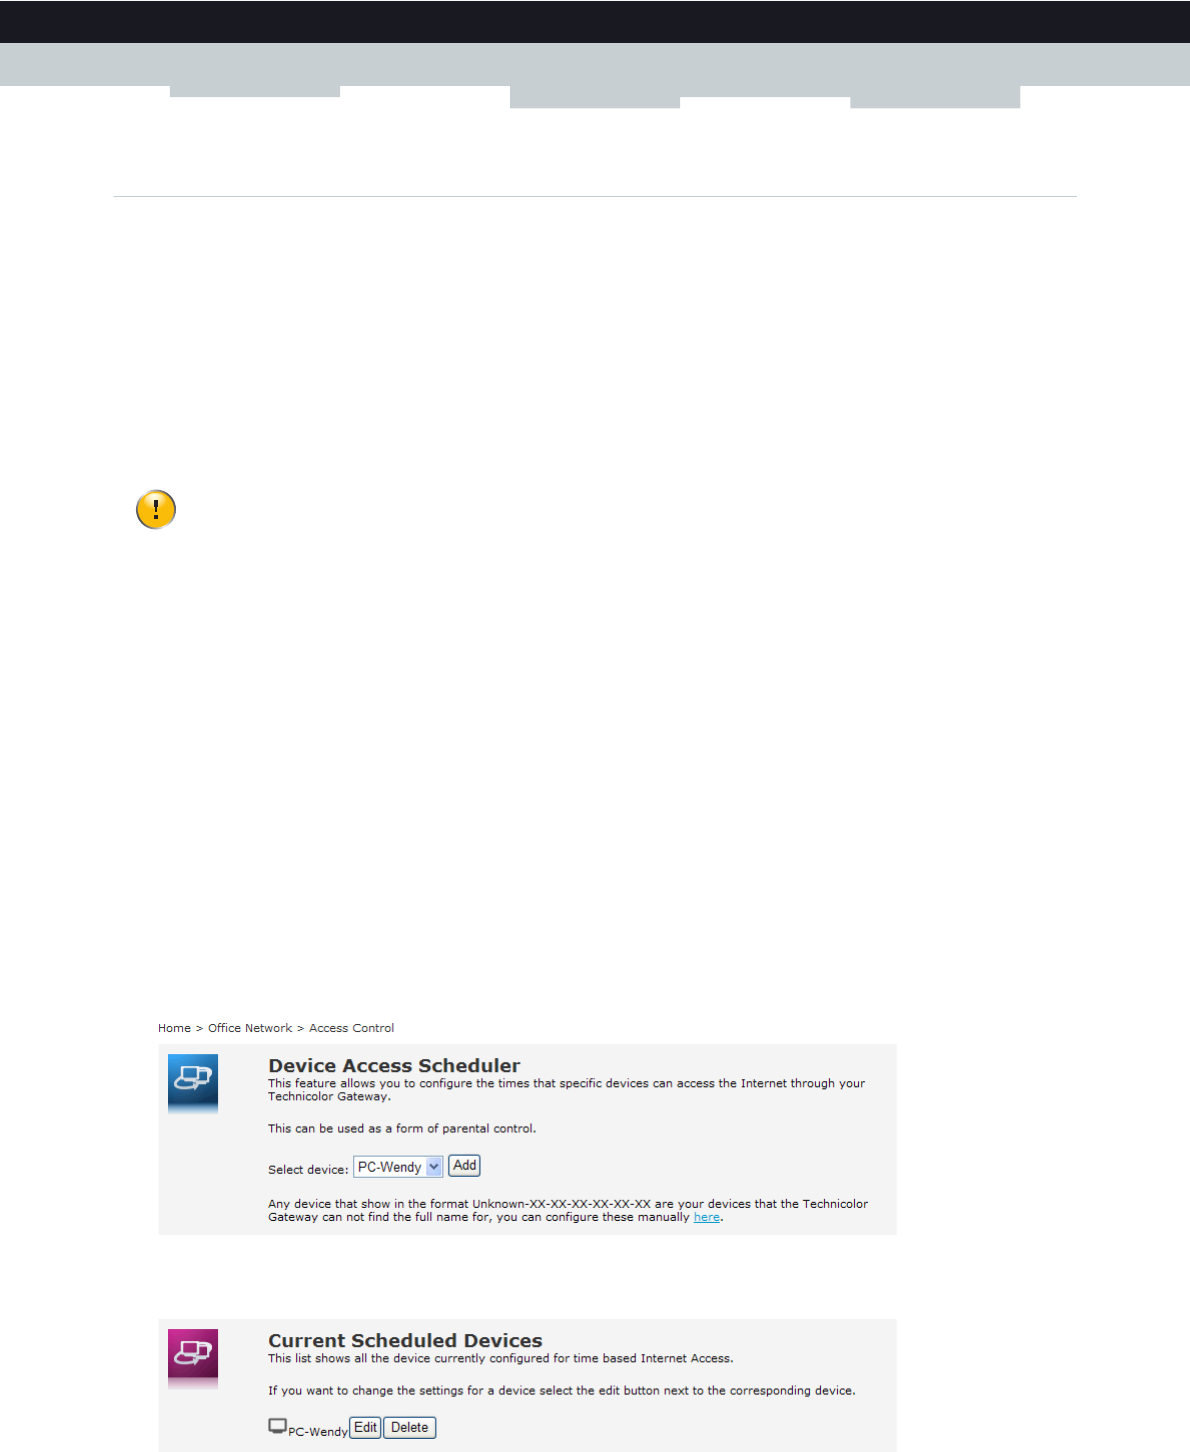
99
10 INTERNET SECURITY
DMS-CTC-20120510-0000 v1.0
10.3 Access Control
Introduction
Access Control allows you to create access schedules for Internet access.
By default, all devices have constant access to the Internet. Access Control allows you to create exceptions on this rule by
adding an access schedule for devices. You can define two schedules for each device:
One schedule for weekdays (Monday until Friday)
For example. On weekdays, your child’s computer is allowed to access the Internet from 6:00 until 7:59 and from 19:00
until 21:59.
One schedule for the weekend (Saturday and Sunday)
For example. In the weekend, your child’s computer is allowed to access the Internet from 9:00 until 22:59.
Warning
Make sure that the persons using these devices are aware of the time schedule. This to avoid the loss of data or unexpected
service interruption.
Requirements
Before you can start:
Your MediaAccess Gateway must be connected to the Internet.
Your MediaAccess Gateway must use a time server for its time configuration.
For more information, see “9.4 Network Time Server” on page 88.
Creating an access schedule
Proceed as follows:
1On the Home Network, click Access Control.
2The Access Control page appears.
3If you did not yet create an access rule for the device, select the device under Device Access Scheduler and click Add.
The selected device is now listed under Current Scheduled Devices.
4Under Current Scheduled Devices, click the Edit button next to your device.
Depending on the software version used by your service provider, this feature may not yet be available on your
MediaAccess Gateway.
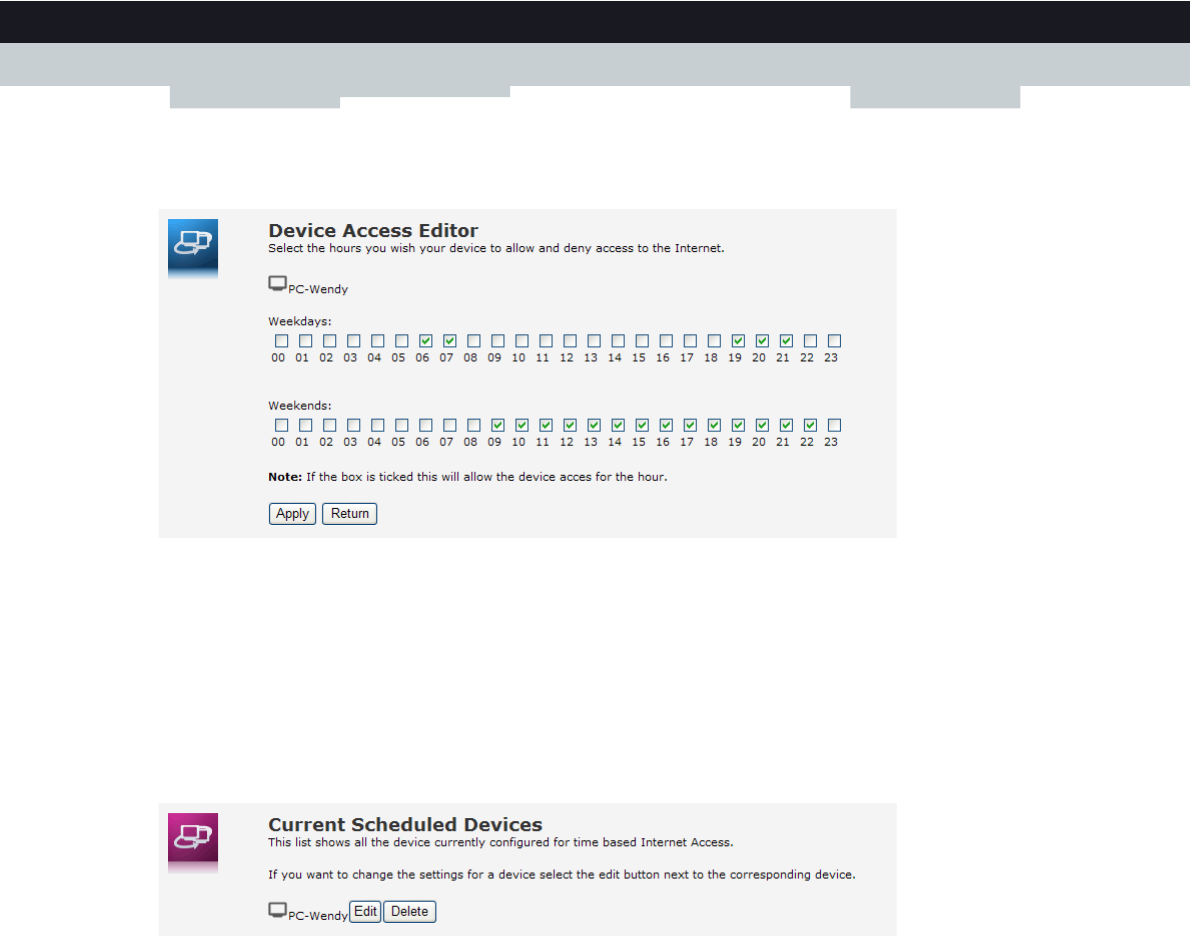
100
10 INTERNET SECURITY
DMS-CTC-20120510-0000 v1.0
5The Device Access Editor page appears. Select the hours for which you want to allow Internet access. For example, if
you select 06 this means that access is allowed from 6:00 until 6:59.
6Click Apply.
7The schedule is now active.
Removing an access schedule
By removing the access schedule for a device, you will provide it constant access to the Internet.
Proceed as follows:
1On the Home Network, click Access Control.
2The Access Control page appears. Under Current Scheduled Devices, click the Delete button next to your device.
3This device now has constant access to the Internet.
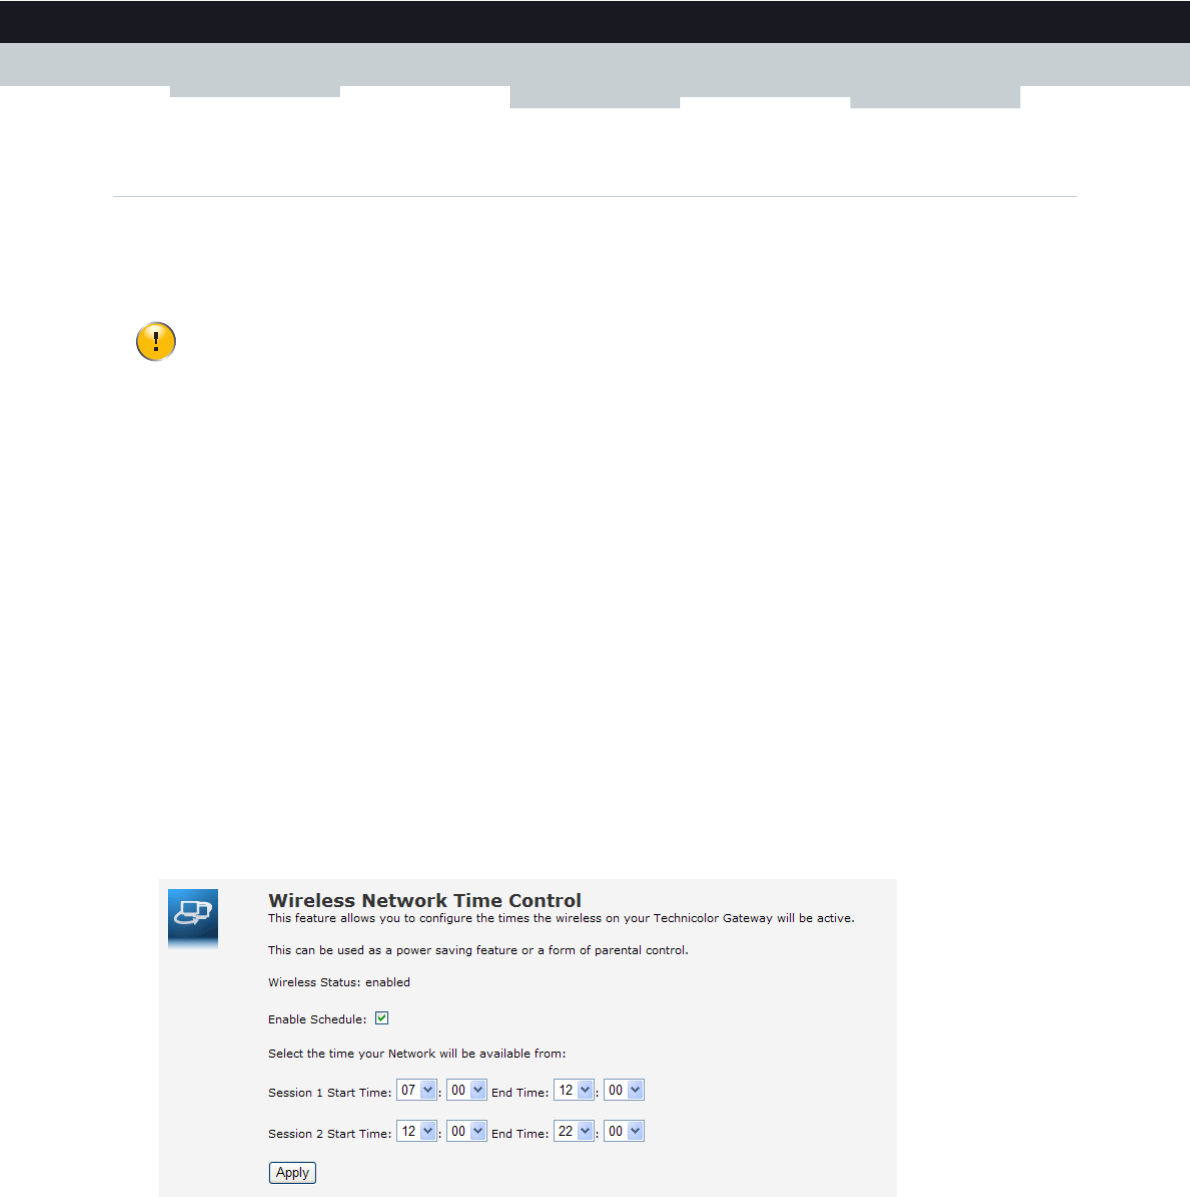
101
10 INTERNET SECURITY
DMS-CTC-20120510-0000 v1.0
10.4 Wireless Time Control
Introduction
Wireless Time Control allows you to restrict wireless access to one or two sessions. This means that your wireless devices will
not be able to connect to the Internet (or your local network) outside these time frames.
Warning
Make sure that the persons that use a wireless connection are aware of these time frames. This to avoid the loss of data or
unexpected service interruption.
Requirements
Before you can start:
Your MediaAccess Gateway must be connected to the Internet.
Your MediaAccess Gateway must use a time server for its time configuration.
For more information, see “9.4 Network Time Server” on page 88.
Procedure
1Browse to the Technicolor GUI.
For more information, see “4.1 MediaAccess Gateway GUI” on page 32.
2On the Home Network, click Access Control.
3The Access Control page appears. In the Pick a task list, click Wireless Time Control.
4The Wireless Network Time Control page appears.
5Select the Enable Schedule box.
6Select a start time and end time for the first session.
7Select a start time and end time for the second session.
8Click Apply.
Depending on the software version used by your service provider, this feature may not yet be available on your
MediaAccess Gateway.
103
11 SUPPORT
DMS-CTC-20120510-0000 v1.0
11 Support
Introduction
This chapter suggests solutions for issues that you may encounter while installing, configuring or using your MediaAccess
Gateway.
If the suggestions do not resolve the problem, look at the support pages on www.technicolor.com or contact your service
provider.
To p i c s
This chapter describes the following topics:
To p i c Page
11.1 Setup Troubleshooting 104
11.2 General MediaAccess Gateway Troubleshooting 105
11.3 Wired Connection Troubleshooting 106
11.4 Wireless Connection Troubleshooting 107
11.5 Voice over IP Troubleshooting 108
11.6 Content Sharing Troubleshooting 109
11.7 Reset to Factory Defaults 110
104
11 SUPPORT
DMS-CTC-20120510-0000 v1.0
11.1 Setup Troubleshooting
Introduction
If you have trouble to install your MediaAccess Gateway with the Setup CD, try the suggested solutions in this section.
The Setup CD does not start automatically
If your computer runs:
Microsoft Windows 7 and Vista:
aClick the Windows Start button.
bIn the Search programs and files box, type the following path: D:\Setup.exe, where D stands for the drive letter of
your CD- or DVD-ROM drive.
cPress ENTER.
Microsoft Windows XP:
aClick the Windows Start button.
bClick Run.
cIn the Open field, type the following path: D:\Setup.exe, where D stands for the drive letter of your CD- or DVD-
ROM drive.
Mac OS X:
aOn your desktop, double-click the CD icon.
bDouble-click Menu.
Your MediaAccess Gateway has not been found
If you see this error during setup, make sure that:
The MediaAccess Gateway is turned on and fully initialized.
Your computer has a valid IP address, that is any address but 0.0.0.0. For more information, consult the help of your
operating system.
No dedicated firewall device or router is placed between your computer and the MediaAccess Gateway.
No personal network security software (for example firewall software) is running on your computer.
Your computer is correctly connected to the MediaAccess Gateway.

105
11 SUPPORT
DMS-CTC-20120510-0000 v1.0
11.2 General MediaAccess Gateway Troubleshooting
None of the LEDs light up (MediaAccess Gateway does not work)
Make sure that:
The MediaAccess Gateway is plugged into a power socket outlet.
You are using the correct power supply for your MediaAccess Gateway device.
The MediaAccess Gateway is turned on via the push button or rocker switch on the back panel.
The Broadband LED does not light up or is blinking
Make sure that:
The DSL cable is correctly connected. For more information, see “3.1 Connecting the MediaAccess Gateway to your
Service Provider’s Network”.
The DSL service is enabled on your telephone line. For more information, contact your Internet Service Provider.
The Internet LED does not light up
If you must authenticate to connect to the Internet, make sure that your user name and password are correct.
Proceed as follows:
1Browse to the MediaAccess Gateway GUI.
For more information, see “Accessing the MediaAccess Gateway GUI” on page 33.
2On the Broadband menu, click Internet Services.
3Under Internet, click View More.
4Check your user name
5Re-enter your password.
6Click Connect.
MediaAccess Gateway unreachable
If you can not access your MediaAccess Gateway via your web browser or the Setup wizard, you might consider a hardware
reset as described in “11.7 Reset to Factory Defaults” on page 110.
The power requirements for your MediaAccess Gateway are clearly indicated on the identification label of the
MediaAccess Gateway. Only use the power adaptor supplied with your MediaAccess Gateway.

106
11 SUPPORT
DMS-CTC-20120510-0000 v1.0
11.3 Wired Connection Troubleshooting
Ethernet LED does not light up
Make sure that:
The Ethernet cable is securely connected to the Ethernet port on your MediaAccess Gateway and your computer.
You are using the correct cable type for your Ethernet equipment, that is at least UTP CAT5 with RJ-45 connectors.

107
11 SUPPORT
DMS-CTC-20120510-0000 v1.0
11.4 Wireless Connection Troubleshooting
No Wireless Connectivity
Try the following:
Make sure that the wireless client adapter is enabled (message like “radio on”).
Make sure that the wireless client is configured for the correct wireless settings (Network Name, security settings).
If the signal is low or not available, try to reposition the MediaAccess Gateway or (if available) redirect the antenna(s) of
the MediaAccess Gateway for optimal performance.
Change the wireless channel.
Poor Wireless Connectivity or Range
Try the following:
Check the signal strength, indicated by the wireless client manager. If the signal is low, try to reposition the MediaAccess
Gateway or (if available) redirect the antenna(s) of the MediaAccess Gateway for optimal performance.
Change the wireless channel.
Use WPA(2)-PSK as encryption.
For more information, see “5.4 Securing Your Wireless Connection” on page 44.
Change the wireless channel
Proceed as follows:
1Browse to the MediaAccess Gateway GUI.
For more information, see “Accessing the MediaAccess Gateway GUI” on page 33.
2Under Home Network, click Wireless
3The Wireless Access Point page appears.
4In the Navigation bar, click Configure.
5Under Configuration, select the channel of your choice in the Channel Selection list.
6Click Apply.
Can not connect via WPS
If you are having trouble connecting your wireless client via WPS, try to configure it manually. For more information, see
“5.2 Connecting Your Wireless Client without WPS” on page 42.

108
11 SUPPORT
DMS-CTC-20120510-0000 v1.0
11.5 Voice over IP Troubleshooting
Introduction
If you cannot make or receive any phone calls via your MediaAccess Gateway, try the suggestions in the following sections.
Calling over VoIP
If you have problems calling via VoIP, check whether:
Your phone is correctly connected to the MediaAccess Gateway.
Your phone number, user name, and password are configured correctly.
The registrar’s and proxy server’s IP address and port number are configured correctly.
The Power, Broadband and Voice LEDs are on.
Problems with Telephony Services
If you have a problem with a service, check whether the service is activated. For more information, see “6.3.1 Activating a
Telephony Service on your MediaAccess Gateway” on page 54.

109
11 SUPPORT
DMS-CTC-20120510-0000 v1.0
11.6 Content Sharing Troubleshooting
Getting the IP address of your USB storage device
The MediaAccess Gateway always uses the highest available address in your DHCP pool. When using the default settings
this will be 192.168.1.253.
You can always check the IP address as follows:
1Browse to the MediaAccess Gateway GUI.
For more information, see “Accessing the MediaAccess Gateway GUI” on page 33.
2On the Tools menu, click Content Sharing.
3Under IP configuration, you can find the IP address to use.
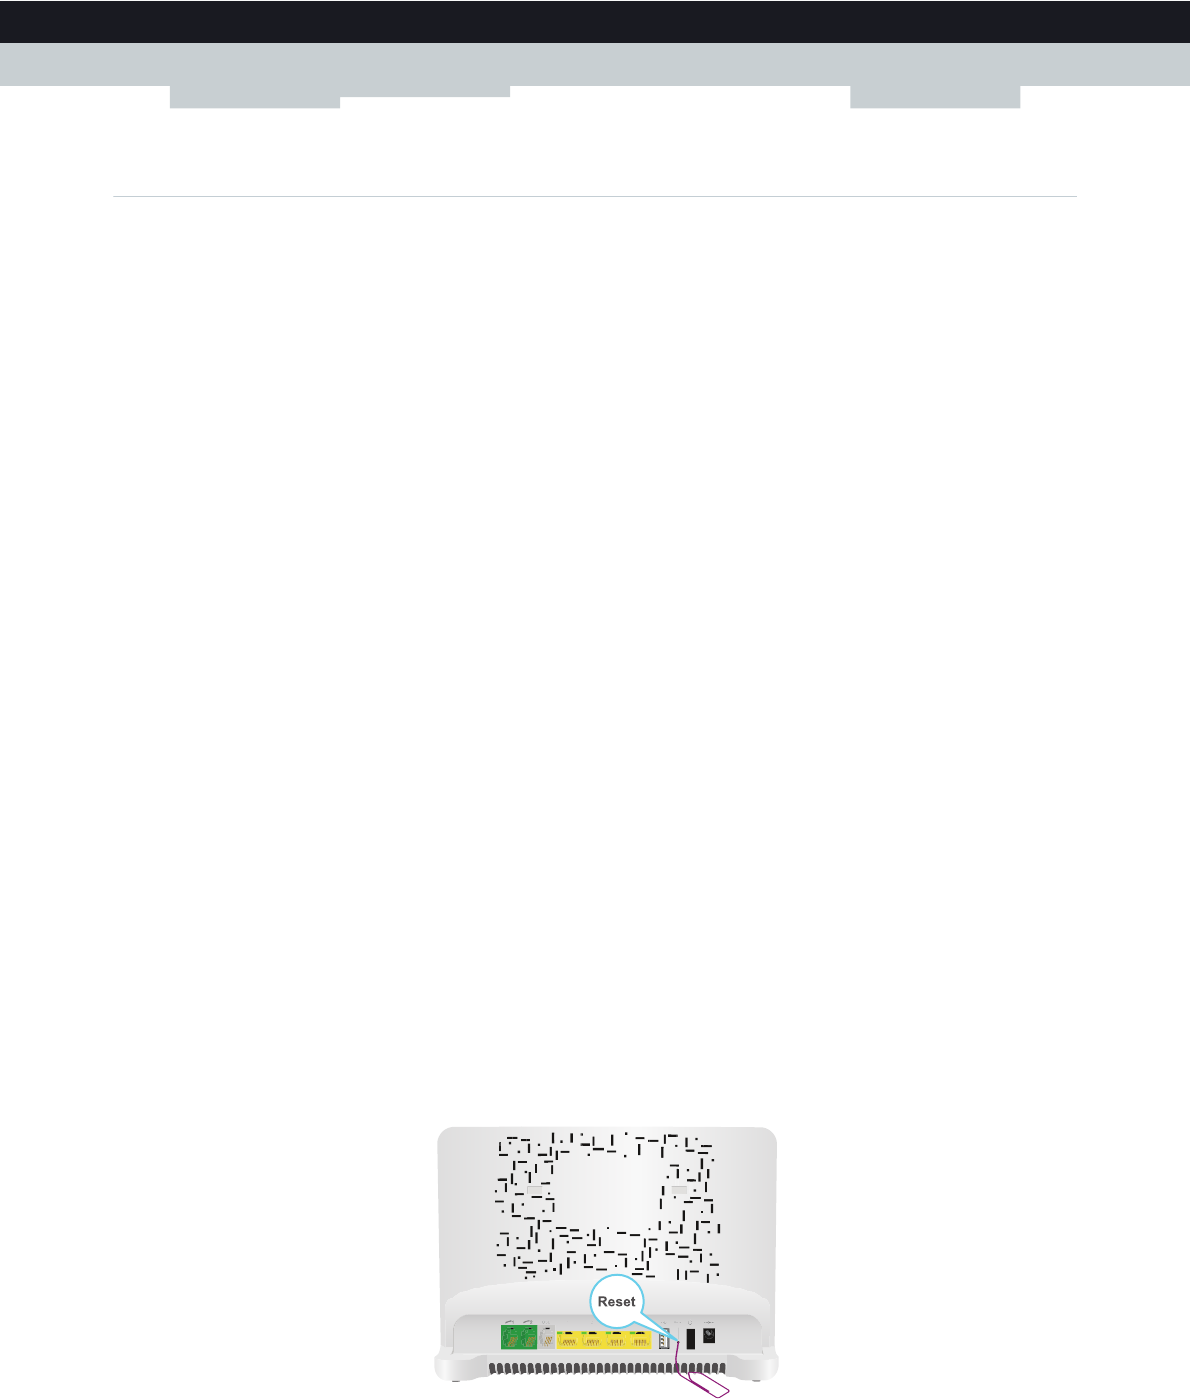
110
11 SUPPORT
DMS-CTC-20120510-0000 v1.0
11.7 Reset to Factory Defaults
Resetting your MediaAccess Gateway
If at some point you can no longer connect to the MediaAccess Gateway or you want to make a fresh install, it may be useful
to perform a reset to factory defaults.
Warning
A reset to factory default settings deletes all configuration changes you made. Therefore, after the reset a reconfiguration of
your MediaAccess Gateway will be needed.
Also your wireless clients will have to be re-associated, as described in “5 The MediaAccess Gateway Wireless Access Point”
on page 39.
Methods
You can choose between:
Resetting the MediaAccess Gateway via the MediaAccess Gateway GUI
Reset the MediaAccess Gateway via the Reset button
Resetting the MediaAccess Gateway via the MediaAccess Gateway GUI
Proceed as follows:
1Browse to the MediaAccess Gateway GUI.
For more information, see “Accessing the MediaAccess Gateway GUI” on page 33.
2On the Technicolor Gateway menu, click Configuration.
3In the Pick a task list, click Reset my Technicolor Gateway.
4The MediaAccess Gateway restores the initial configuration and restarts.
5The MediaAccess Gateway returns to the MediaAccess Gateway home page (unless the IP address of your computer is
not in the same subnet as the default IP address of the MediaAccess Gateway, being 192.168.1.254).
Reset the MediaAccess Gateway via the Reset button
Proceed as follows:
1Make sure the MediaAccess Gateway is turned on.
2Push the Reset button for 7 seconds and the release it.

111
11 SUPPORT
DMS-CTC-20120510-0000 v1.0
3The MediaAccess Gateway restarts.
Your system administrator may have disabled the physical reset button of the MediaAccess Gateway. In this case, a
hardware reset to defaults is not possible.

Copyright 2012 Technicolor. All rights reserved.
All tradenames referenced are service marks, trademarks, or
registered trademarks of their respective companies. Specifications
subject to change without notice.
DMS-CTC-20120510-0000 v1.0
TECHNICOLOR DELIVERY TECHNOLOGIES BELGIUM NV
Prins Boudewijnlaan 47
2650 Edegem
Belgium
www.technicolor.com
Safety Instructions and Regulatory Notices 2
Read this document prior to installation!
Consignes de Sécurité et Informations Réglementaires 9
Lisez ce document avant d’effectuer l’installation!
Sicherheitshinweise und Zulassungsbestimmungen 15
Liest dieses Dokument vor Installation!
Instrucciones de Seguridad e Información Sobre Regulaciones 21
Lea este documento antes de proceder a la instalación!
Instruções de Segurança e Informações Sobre Normas 27
Leia este documento antes de iniciar a instalaçio!
Precauzioni di Sicurezza e Informazioni Sulla Normativa 33
Legger questo documento prima di eseguire l’ instalaçao!
Säkerhetsföreskrifter och -Information 38
Läs säkerhetsföreskrifterna noggrat!
Veiligheidsvoorschriften en Regelgevingsinformatie 43
Gelieve dit document te lezen alvorens te starten met installatie!
EN
FR
DE
ES
PT
IT
SV
NL

2
SAFETY INSTRUCTIONS AND REGULATORY NOTICES
BEFORE YOU START INSTALLATION OR USE OF THIS PRODUCT, CAREFULLY READ THESE
INSTRUCTIONS
Wireless
In case this product is equipped with a wireless transceiver, it uses Direct Sequence Spread Spectrum (DSSS) /
Orthogonal Frequency Division Modulation (OFDM) radio technology. As such it is designed to be inter-operable with
any other wireless DSSS/OFDM type product that:
Complies with the IEEE802.11b/IEEE802.11g/IEEE802.11n Standard on Wireless LANs, as defined and approved
by the Institute of Electrical and Electronics Engineers.
Is Wi-Fi® CERTIFIED™ as defined by the Wi-Fi® Alliance.
Directive
Unless express and prior approval by Technicolor in writing, you may not:
Disassemble, de-compile, reverse engineer, trace or otherwise analyse the equipment, its content, operation, or
functionality,
or otherwise attempt to derive source code (or the underlying ideas, algorithms, structure or organization) from the
equipment,
or from any other information provided by Technicolor, except to the extent that this restriction is expressly
prohibited by local law;
Copy, rent, loan, re-sell, sub-license, or otherwise transfer or distribute the equipment to others;
Modify, adapt or create a derivative work of the equipment;
Remove from any copies of the equipment any product identification, copyright or other notices;
Disseminate performance information or analysis (including, without limitation, benchmarks) from any source
relating to the equipment.
Such acts not expressly approved by Technicolor will result in the loss of product warranty and may invalidate the user's
authority to operate this equipment in accordance with FCC Rules.
Technicolor disclaims all responsibility in the event of use that does not comply with the present instructions.
!
When using this product, always follow the basic safety precautions to reduce the risk of fire, electric shock and
injury to persons, including the following:
Always install the product as described in the documentation that is included with your product.
Avoid using this product during an electrical storm. There may be a remote risk of electric shock from
lightning.
Do not use this product to report a gas leak in the vicinity of the leak.

3
Environmental information
WEEE directive
Energy consumption
Energy savings - You have a role to play...
Learn how you can use and explore ways for using your electronic equipment.
Safety Instructions
Climatic conditions
This product:
Is intended for in-house stationary desktop use; the maximum ambient temperature may not exceed 40°C (104°F).
Must not be mounted in a location exposed to direct or excessive solar and/or heat radiation.
Must not be exposed to heat trap conditions and must not be subjected to water or condensation.
Must be installed in a Pollution Degree 2 environment (Environment where there is no pollution or only dry,
nonconductive pollution).
Cleaning
Unplug this product from the wall socket and computer before cleaning. Do not use liquid cleaners or aerosol cleaners.
Use a damp cloth for cleaning.
This symbol means that your inoperative electronic appliance must be collected separately and not mixed
with the household waste.The European Union has implemented a specific collection and recycling system for
which producers are responsible.
This appliance has been designed and manufactured with high quality materials and components that can be
recycled and reused.
Electrical and electronic appliances are liable to contain parts that are necessary in order for the system to
work properly but which can become a health and environmental hazard if they are not handled or disposed of
in the proper way. Consequently, please do not throw out your inoperative appliance with the household
waste.
If you are the owner of the appliance, you must deposit it at the appropriate local collection point or leave it
with the vendor when buying a new appliance.
If you are a professional user, please follow your supplier's instructions.
If the appliance is rented to you or left in your care, please contact your service provider.
The notice detailed useful information on all the features of your product but also on energy consumption.
We strongly encourage you to carefully read the notice before putting your equipment in service to get the
best service it can offer you.
By working together, we can reduce the impact we have on the earth!

4
Water and moisture
Do not use this product near water, for example near a bathtub, washbowl, kitchen sink, laundry tub, in a wet basement
or near a swimming pool. Transition of the product from a cold environment to a hot one may cause condensation on
some of its internal parts. Allow it to dry by itself before re-starting the product.
Interface classifications
The external interfaces on the rear panel of the product are classified as follows:
DSL, ADSL, SHDSL, VDSL, Line: TNV circuit, subjected to over voltages (TNV-3)
ISDN: SELV circuit
PSTN, FXO: TNV circuit, subjected to over voltages (TNV-3)
Phone, VoIP, FXS: TNV circuit, not subjected to over voltages (TNV-2)
All other interface ports (e.g. Ethernet, 10/100Base-T/MDI(-X), USB, Console, Craft, etc.), including the low
voltage power input from the AC mains power supply: SELV circuits.
Electrical powering
The powering of the product must adhere to the power specifications indicated on the marking labels.
The power supply must be Class II and a Limited Power Source in accordance with the requirements of IEC60950-1/
EN60950-1, Clause 2.5 and rated as indicated on the label on your product. It must be tested and approved to national
or local standards.
For US and Canada: This product is intended to be supplied by a Listed Direct Plug-in, or Desktop Power Unit marked
"Class 2" and rated as indicated on the label on your product.
The use of other types of supplies is prohibited. If you are not sure of the type of power supply needed, consult the
product's user documentation or contact your local product dealer.
ISDN
USB
The device is to be connected to an identified USB port complying with the requirements of a Limited Power Source.
!
WARNING
The Phone, VoIP, FXS port will be classified as a TNV-3 circuit when connected internally to the PSTN,
FXO port, for example, when the device is powered off.
If the product is equipped with a USB interface (slave and/or master) or any type of connector with
metallic shielding, then it is not allowed to connect the Phone, VoIP, FXS port with the PSTN, FXO or the
DSL, ADSL, SHDSL, VDSL, Line port by any means, for example with an external telephone cable.
!
WARNING
For US and Canada: Do not use the ISDN port; do not attempt to connect this port to the network at anytime.

5
Telephone cable
Connect the telecommunication line cord only in the PSTN, FXO, DSL, ADSL, SHDSL, VDSL or Line port of the
product. Never plug the telecommunication line cord in another receptacle of the product.
Follow the installation instructions in the sequence as outlined in the installation guide.
Central splitter / distributed filter(s) (if applicable)
If telephone service is required on the same line, a central splitter or distributed filter(s) must be installed for optimal
DSL performance.
Depending on your DSL configuration and type of splitter / filters, installation must be carried out by qualified service
personnel. Consult your telephone service company or DSL service provider for instructions.
Accessibility
The Direct Plug-in power supply, or the plug on the power supply cord serves as disconnect device. Be sure that the
power socket outlet you plug the power supply into is easily accessible and located as close to the equipment as
possible.
Overloading
Do not overload mains supply socket outlets and extension cords as this increases the risk of fire or electric shock.
Servicing
To reduce the risk of electric shock, do not disassemble this product. None of its internal parts are user-replaceable;
therefore, there is no reason to access the interior. Opening or removing covers may expose you to dangerous voltages.
Incorrect reassembly could cause electric shock if the appliance is subsequently used.
If service or repair work is required, take it to a qualified service dealer.
Damage requiring service
Unplug this product from the wall outlet and refer servicing to qualified service personnel under the following
conditions:
When the power supply or its plug are damaged.
When the attached cords are damaged or frayed.
If liquid has been spilled into the product.
If the product has been exposed to rain or water.
If the product does not operate normally.
If the product has been dropped or damaged in any way.
There are noticeable signs of overheating.
If the product exhibits a distinct change in performance.
!
CAUTION
To reduce the risk of fire, use only No 26 AWG wire size or larger telecommunication line cord.

6
Immediately disconnect the product if you notice it giving off a smell of burning or smoke. Under no circumstances
must you open the equipment yourself; you run the risk of electrocution.
Regulatory Information
You must install and use this device in strict accordance with the manufacturer's instructions as described in the user
documentation that is included with your product.
Before you start installation or use of this product, carefully read the contents of this document for device specific
constraints or rules that may apply in the country where you want to use this product.
In some situations or environments, the use of wireless devices may be restricted by the proprietor of the building or
responsible representatives of the organization.
If you are uncertain of the policy that applies on the use of wireless equipment in a specific organization or environment
(e.g. airports), you are encouraged to ask for authorization to use this device prior to turning on the equipment.
Technicolor is not responsible for any radio or television interference caused by unauthorized modification of the device,
or the substitution or attachment of connecting cables and equipment other than specified by Technicolor. The
correction of interference caused by such unauthorized modification, substitution or attachment will be the
responsibility of the user.
Technicolor and its authorized resellers or distributors are not liable for any damage or violation of government
regulations that may arise from failing to comply with these guidelines.
Europe - European Union
European Community Declaration of Conformity
This equipment can be used in all countries that are member of the European Union and that are member of the
European Free Trade Association.
The Declaration of Conformity can be found on www.technicolor.com.
In case this product is equipped with a wireless transceiver:
it is restricted to indoor use only.
it complies with the basic restrictions and limits as defined in the European Council Recommendation (1999/519/
EC) on the limitation of exposure of the general public to Electromagnetic fields.
This product complies with:
Commission Regulation (EC) No 1275/2008 implementing Directive 2005/32/EC: Ecodesign requirements for
standby and off mode electric power consumption of electrical and electronic household and office equipment.
Commission Regulation (EC) 278/2009: Ecodesign requirements for no-load condition electric power
consumption and average active efficiency of external power supplies.
!
Hereby, Technicolor, declares that this product is in compliance with the essential requirements and other
relevant provisions of Directive 1999/5/EC of the European Parliament and of the Council.

7
North-America - Canada
Notification of Canadian Radio Frequency Interference Statement
This Class B digital apparatus complies with Canadian ICES-003.
NOTICE: This product meets the applicable Industry Canada technical specifications.
NOTICE: The ringer Equivalence Number (REN) for this terminal equipment is 0.1. The REN is an indication of the
maximum number of devices allowed to be connected to a telephone interface. The termination on an interface may
consist of any combination of devices subject only to the requirement that the sum of the RENs of all the devices does
not exceed five.
Canada - Industry Canada (IC)
In case this product is equipped with an IEEE802.11b/IEEE802.11g/IEEE802.11n wireless transceiver, complying with
RSS 210 and/or RSS 213 of Industry Canada, operation is subject to the following two conditions:
1This device may not cause harmful interference.
2This device must accept any interference received, including interference that may cause undesired operation
of the device.
Restricted Frequency Band
In case this product is equipped with an IEEE802.11b/IEEE802.11g/IEEE802.11n wireless transceiver, it only uses
channels 1 to 11 (2412 to 2462 MHz) on Canada territory.
North-America - United States of America
Federal Communications Commission (FCC) Radio Frequency Interference Statement
This equipment has been tested and found to comply with the limits for a Class B digital device, pursuant to Part 15 of
the FCC Rules. These limits are designed to provide reasonable protection against harmful interference in a residential
installation. This equipment generates, uses and can radiate radio frequency energy and, if not installed and used in
accordance with the instructions, may cause harmful interference to radio communications. However, there is no
guarantee that interference will not occur in a particular installation.
If this equipment does cause harmful interference to radio or television reception, which can be determined by turning
the equipment off and on, the user is encouraged to try to correct the interference by one or more of the following
measures:
Reorient or relocate the receiving antenna.
Increase the separation between the equipment and receiver.
Connect the equipment into an outlet on a circuit different from that to which the receiver is connected.
!
IMPORTANT NOTE: Radiation Exposure Statement
This equipment complies with IC radiation exposure limits set forth for an uncontrolled environment. This
equipment should be installed and operated with minimum distance 20 cm (8 inches) between the radiator and
your body.

8
Consult the dealer or an experienced radio/TV technician for help.
FCC Caution: Any changes or modifications not expressly approved by the party responsible for compliance could void
the user's authority to operate this equipment.
Responsible Party: Technicolor, 101W. 103rd St., Indianapolis, IN 46290 USA, 888-898-4377.
This equipment complies with Part 68 of the FCC Rules.
The customer information required for Telephone Terminal Equipment ("TTE") approved for connection to the Public
Switched Telephone Network ("PSTN"), pursuant to 47 CFR §68.218(b)(1) can be found at www.technicolor.com.
RF-Exposure Statement
When the product is equipped with a wireless interface, then it becomes a mobile or fixed mounted modular transmitter
and must have a separation distance of at least 20 cm (8 inches) between the antenna and the body of the user or
nearby persons. In practice, this means that the user or nearby persons must have a distance of at least 20 cm (8 inches)
from the modem and must not lean on the modem in case it is wall-mounted.
With a separation distance of 20 cm (8 inches) or more, the M(aximum) P(ermissible) E(xposure) limits are well above
the potential this module is capable to produce.
The transmitter shall not be collocated with other transmitters or antennas.
Restricted Frequency Band
In case this product is equipped with an IEEE802.11b/IEEE802.11g/IEEE802.11n wireless transceiver, it may only use
channels 1 to 11 (2412 to 2462 MHz) on U.S.A. territory.
This device complies with Part 15 of the FCC Rules. Operation is subject to the following two conditions:
1This device may not cause harmful interference, and
2This device must accept any interference received, including interference that may cause undesired
operation.

9
CONSIGNES DE SÉCURITÉ ET INFORMATIONS RÉGLEMENTAIRES
AVANT D’INSTALLER OU D’UTILISER LE PRODUIT, LISEZ ATTENTIVEMENT CES INSTRUCTIONS
Réseau sans fil
Si le produit est équipé d'un émetteur-récepteur sans fil IEEE802.11b/IEEE802.11g/IEEE802.11n, il utilise la technologie
radio DSSS (Modulation du spectre à séquence directe) / OFDM (Multiplexage par répartition orthogonale de la
fréquence). En tant que tel, il est étudié pour fonctionner sans problèmes avec n’importe quel autre produit sans fils
supportant la norme DSSS/OFDM qui:
est conforme à la norme IEEE 802.11b/IEEE802.11g/IEEE802.11n relative aux réseaux locaux sans fil, telle que
définie et approuvée par l’IEEE (Institute of Electrical and Electronics Engineers).
est certifié Wi-Fi® CERTIFIED™ par l’Alliance Wi-Fi®.
Consignes à respecter
Sauf accord écrit explicite et préalable de Technicolor, vous ne pouvez pas:
démonter, décompiler, décomposer, examiner ou analyser de quelque manière que ce soit l'appareil, son contenu,
son fonctionnement ou ses fonctionnalités,
ni tenter de copier le code source (ou les concepts sous-jacents, les algorithmes, la structure ou l'organisation) de
l'appareil,
ou de toute autre information fournie par Technicolor, sauf si cette restriction est expressément interdite par la
législation locale;
copier, louer, prêter, revendre, mettre sous licence, ni transférer ou distribuer l'appareil à des tiers;
modifier, adapter ou créer un dérivé de l'appareil;
retirer de l'appareil l'identification du produit, les droits d'auteur ou toute autre notification;
diffuser des informations ou analyses relatives aux performances de l'appareil (y compris et sans restriction, les tests
de performance) quelle que soit la source d'information.
Ces actes, réalisés sans l'accord explicite de Technicolor, entraînent la perte de la garantie du produit et enlèvent à
l'utilisateur le droit d'employer l'équipement.
Technicolor rejette toute responsabilité en cas d'utilisation de l'équipement non conforme aux présentes instructions.
!
Afin d’éviter tout risque d’incendie, de choc électrique et de blessure corporelle, il convient d’utiliser le produit
conformément aux mesures de sécurité de base, parmi lesquelles les suivantes:
Respectez toujours les instructions d’installation détaillées dans la documentation accompagnant le
produit.
Évitez de connecter ou d'utiliser ce produit en cas d'orage.La foudre peut provoquer un faible risque de
choc électrique.
N’utilisez pas le produit pour signaler une fuite de gaz à proximité de cette fuite.

10
Environnement
Directive DEEE (WEEE)
Consommation d'énergie
Économies d'énergie – Vous avez un rôle à jouer...
Découvrez comment utiliser votre appareil électronique.
Consignes de sécurité
Conditions climatiques
Ce produit:
est conçu pour une utilisation fixe dans un bureau à une température ambiante maximale de 40°C (104°F).
ne doit pas être installé dans un endroit exposé au rayonnement direct et excessif du soleil et/ou à des radiations de
chaleur.
ne doit pas être mis dans des conditions d'accumulation de chaleur et ne doit pas être soumis à l'humidité ou la
condensation.
doit être installé dans un environnement présentant un degré de pollution 2 (environnement exempt de pollution
ou avec une pollution sèche, non conductrice).
Ce symbole signifie que votre appareil électronique hors d'usage doit être collecté séparément et non jeté
avec les déchets ménagers. Dans ce but, l'Union Européenne a institué un système de collecte et de recyclage
spécifique dont les producteurs ont la responsabilité.
Cet appareil a été conçu et fabriqué avec des matériaux et des composants de haute qualité pouvant être
recyclés et réutilisés.
Les appareils électriques et électroniques sont susceptibles de contenir des éléments qui, bien
qu'indispensables au bon fonctionnement du système, peuvent s'avérer dangereux pour la santé et
l'environnement s'ils sont manipulés ou éliminés de manière incorrecte. Par conséquent, veuillez ne pas jeter
votre appareil usagé avec les ordures ménagères.
Si vous êtes propriétaire de l'appareil, vous devez le déposer au point de collecte local approprié ou le
remettre à votre vendeur contre l'achat d'un produit neuf.
Si vous êtes un utilisateur professionnel, référez vous aux instructions de votre fournisseur.
Si l'appareil vous est loué ou remis en dépôt, contactez votre fournisseur de service.
Le mode d'emploi contient des informations utiles sur les différentes fonctionnalités du produit ainsi que sur la
consommation d'énergie.
Nous vous recommandons de lire attentivement le mode d'emploi avant de mettre l'appareil en service afin
de tirer le meilleur parti de ses fonctionnalités.
Ensemble, nous pouvons réduire l'impact de nos activités sur la planète.

11
Nettoyage
Débranchez l'appareil de la prise murale et de l'ordinateur avant de le nettoyer. N'utilisez pas de détergents liquides ou
d'aérosols. Nettoyez-le avec un chiffon humide.
Eau et humidité
N'utilisez pas ce produit à proximité d'une arrivée d'eau, par exemple près d'une baignoire, d'un lavabo, d'un évier,
d'une machine à laver, dans un sous-sol humide ou près d'une piscine. Le transfert de ce produit d'un environnement
froid vers un environnement chaud peut entraîner l'apparition de condensation sur certaines parties internes. Laissez
l'appareil sécher avant de le remettre en marche.
Classification des interfaces
Les interfaces externes situées sur le panneau arrière du produit sont spécifiées comme suit:
DSL, ADSL, SHDSL, VDSL, Line: circuit TRT, sujet à des surtensions (TRT-3)
ISDN: circuit TBTS
PSTN, FXO: circuit TRT, sujet à des surtensions (TRT-3)
Phone, VoIP, FXS: circuit TRT, non sujet à des surtensions (TRT-2)
Tous les autres ports d'interface (par example, Ethernet, 10/100Base-T/MDI(-X), USB, Console, Craft, etc.), y
compris l'entrée d'alimentation basse tension depuis l'alimentation du réseau: circuits TBTS.
Alimentation électrique
L'alimentation du produit doit respecter les spécifications en matière d'alimentation figurant sur les étiquettes.
L'alimentation doit être de classe II, être une source à puissance limitée conformément aux exigences de la norme
CEI60950-1/ EN60950-1, clause 2.5, aux caractéristiques nominales comme indiquées sur l’étiquette fixée sur le produit.
Elle doit être testée et répondre aux normes nationales ou locales.
Pour le Canada : Ce produit est destiné à être utilisé avec une alimentation directement enfichable, ou module de
bureau et cataloguée de classe 2 aux caractéristiques nominales comme indiquées sur l’étiquette fixée sur le produit.
L'utilisation d'autres types de sources d'énergie est interdite. Si vous n'êtes pas certain du type d'alimentation
nécessaire, veuillez consulter la documentation fournie avec le produit ou contacter votre revendeur local.
!
AVERTISSEMENT
Le port Phone, VoIP, FXS sera classifié comme un circuit TRT-3 lorsqu’il est raccordé en interne au port
PSTN, FXO, par exemple, lorsque le périphérique est mis hors tension.
Si le produit est équipé d’une interface USB (esclave et/ou maître) ou d’un autre type de connecteur avec
un blindage métallique, il est interdit de relier le port Phone, VoIP, FXS au port PSTN, FXO ou au port
DSL, ADSL, SHDSL, VDSL, Line par un moyen quelconque, par exemple, à l’aide d’un câble
téléphonique externe.

12
ISDN
USB
L'appareil doit être connecté à un port USB identifié qui réponde aux besoins d'une source à puissance limitée.
Câble téléphonique
Connectez uniquement le câble téléphonique dans la prise PSTN, FXO, DSL, ADSL, SHDSL, VDSL ou Line du
produit. Ne le branchez jamais dans une autre prise du produit.
Suivez la procédure pour connecter les câbles au produit en suivant la séquence décrite dans le guide d'installation.
Répartiteur central / filtre(s) distribués (le cas échéant)
Si les signaux téléphoniques doivent arriver sur la même ligne, un répartiteur central ou un (des) filtre(s) distribué(s)
doivent être installés pour garantir une performance DSL optimale.
Selon votre configuration DSL et le type de répartiteur/filtres, l'installation doit être effectuée par un membre du
personnel d'entretien qualifié. Consultez votre opérateur de télécommunications ou votre fournisseur de service DSL
pour obtenir des instructions.
Accessibilité
L'alimentation enfichable directement ou la fiche de prise de courant du câble d'alimentation aussi de système de
déconnection. Assurez-vous donc que le socle de la prise dans laquelle vous branchez le cordon d'alimentation est
facilement accessible, et est située le plus près possible de l'équipement.
Surcharge
Ne surchargez pas les socles des prises du réseau d'alimentation ni les rallonges car ceci augmente les risques
d'incendie et de choc électrique.
Entretien
Pour réduire les risques de choc électrique, ne démontez pas ce produit. Aucune de ses pièces internes ne peut être
remplacée par un non-professionnel; il n'y a dès lors pas de raison de l'ouvrir. L'ouverture ou le retrait des couvercles
peut vous exposer à des tensions dangereuses. Un remontage incorrect peut entraîner un choc électrique lors de
l’utilisation suivante.
Si votre appareil doit être réparé ou révisé, confiez-le à un distributeur agréé.
!
Avertissement !
Pour le Canada : N'utilisez pas le port ISDN et n'essayez jamais de connecter ce port au réseau.
!
ATTENTION
Pour réduire les risques d'incendie, utilisez uniquement des conducteurs de télécommunications 26 AWG ou
de section supérieure.

13
Détérioration nécessitant une intervention
Débranchez ce produit de la prise murale et faites effectuer la réparation par un service après-vente qualifié dans les cas
suivants:
Si l'alimentation ou sa fiche sont endommagées.
Si un des câbles fournis est endommagé ou effiloché.
Si vous avez renversé du liquide dans le produit.
Si le produit a été exposé à la pluie ou à de l'eau.
Si le produit ne fonctionne pas normalement.
Si le produit est tombé ou a été endommagé d'une façon quelconque.
S’il y a un signe perceptible de surchauffe.
Si le produit présente des variations importantes au niveau des performances.
Débranchez immédiatement le produit si vous remarquez qu'il s'en dégage une odeur de brûlé ou de la fumée. Vous ne
devez en aucun cas ouvrir l'appareil vous-même car vous risquez d'être électrocuté.
Avis réglementaire
L’appareil doit être installé et utilisé en stricte conformité avec les instructions du fabricant, énoncées dans la
documentation accompagnant le produit.
Avant d’installer ou d’utiliser le produit, lisez attentivement ce document afin de prendre connaissance des restrictions
spécifiques à l’appareil ou des règles en vigueur dans le pays où vous comptez l’utiliser.
Dans certains environnements ou circonstances, l’emploi de dispositifs sans fil peut être prohibé par le propriétaire du
bâtiment ou les représentants responsables de l’organisation concernée.
En cas de doute quant à la politique s’appliquant à l’utilisation d’équipements sans fil dans une organisation ou un
environnement spécifique (par exemple dans les aéroports), il est recommandé de demander la permission d’utiliser
l’appareil avant de l’allumer.
Technicolor n’est pas responsable des interférences avec les postes de radio ou de télévision susceptibles de survenir à
la suite d’une modification non autorisée de l’appareil ou du remplacement ou de la connexion de câbles et
d’équipements non agréés par Technicolor. C’est par conséquent à l’utilisateur qu’il incombe de remédier aux
interférences causées par de telles manipulations.
Technicolor et ses revendeurs et distributeurs agréés déclinent toute responsabilité quant aux dommages ou violation
des réglementations nationales découlant du non-respect de ces instructions.
Europe – l’Union Européenne
Déclaration de conformité pour la Communauté Européenne
Ce produit peut être utilisé dans les pays membres de l’Union Européenne et de l'Association Européenne de Libre
Échange.
!
Par la présente Technicolor déclare que l'appareil est conforme aux exigences essentielles et aux autres
dispositions pertinentes de la Directive 1999/5/CE du Parlement européen et du Conseil.

14
Vous pouvez trouver la déclaration de conformité sur le site www.technicolor.com.
Dans le cas où ce produit est équipé d'un récepteur sans fil IEEE802.11b/IEEE802.11g/IEEE802.11n:
son usage est limité à l'intérieur d’un bâtiment.
il est conforme aux restrictions et limites telles que définies par la recommandation (1999/519/CE) du conseil
Européen relative à la limitation de l'exposition du public aux champs électromagnétiques.
Compatibilité du produit :
Règlement (CE) No 1275/2008 de la Commission du 17 décembre 2008 portant application de la directive 2005/
32/CE du Parlement européen et du Conseil en ce qui concerne les exigences d'écoconception relatives à la
consommation d'électricité en mode veille et en mode arrêt des équipements ménagers et de bureau électriques et
électroniques.
Règlement (CE) No 278/2009 de la Commission du 6 avril 2009 portant application de la directive 2005/32/CE du
Parlement européen et du Conseil en ce qui concerne les exigences d'écoconception relatives à la consommation
d'électricité hors charge et au rendement moyen en mode actif des sources d'alimentation externes.
Amérique du Nord – Canada
Déclaration Canadienne d’interférence de Fréquence Radio.
Cet appareil numérique de Classe B est conforme à la norme canadienne NMB-003.
NOTE: Le présent matériel est conforme aux spécifications techniques applicables d’Industrie Canada.
NOTE: L'indice d'équivalence de la sonnerie (IES) sert à indiquer le nombre maximal de terminaux qui peuvent être
raccordés à une interface téléphonique. La terminaison d'une interface peut consister en une combinaison quelconque
de dispositifs, à la seule condition que la somme d'indices d'équivalence de la sonnerie de tous les dispositifs n'excède
pas 5.
Canada - Industrie Canada (IC)
Si le produit est équipé d'un émetteur-récepteur sans fil IEEE802.11b/IEEE802.11g/IEEE802.11n, il est conforme à la
norme RSS-210 et/ou RSS-213 de Industrie Canada. L’utilization de ce dispositive est autorisée seulement aux deux
conditions suivant:
1il ne doit pas produire de brouillage, et
2l’utilisateur du dispositivf doit être prêt à accepter tout brouillage radioélectrique reçu, même si ce brouillage
est susceptible de compromettre le fonctionnement du dispositif
Bande de fréquence restreinte
Si le produit est équipé d'un émetteur-récepteur sans fil IEEE802.11b/IEEE802.11g/IEEE802.11n, il utilise uniquement
les canaux 1 à 11 (2 412 à 2 462 MHz) sur le territoire canadien.
!
Notice Importante: Avis radiation énoncées
Cet équipement se conforme avec les limites d’exposition aux radiations énoncées pour un environnement
incontrôlé. Il doit être installé et opéré avec une distance minimale de 20 cm (8 inches) entre la source de
radiation et votre corps.

15
SICHERHEITSHINWEISE UND ZULASSUNGSBESTIMMUNGEN
LESEN SIE VOR BEGINN DER INSTALLATION ODER DES GEBRAUCHS DIESES PRODUKTES
AUFMERKSAM DIESE ANWEISUNGEN
Drahtloses LAN
Wenn dieses Produkt mit einem kabellosen Transceiver ausgestattet ist, wird die Funktechnik DSSS (Direct Sequence
Spread Spectrum)/OFDM (Orthogonal Frequency Division Modulation) eingesetzt. Demzufolge ist es für eine
Interoperabilität mit anderen drahtlosen DSSS/OFDM-Produkten konstruiert, die:
dem vom Institute of Electrical and Electronics Engineers festgelegten und genehmigten IEEE802.11b/
IEEE802.11g/IEEE802.11n-Standard für drahtlose LANs entsprechen.
gemäß den Vorschriften von Wi-Fi®-Alliance Wi-Fi® CERTIFIED™ (zertifiziert) wurden.
Richtlinien
Sofern nicht ausdrücklich und eindeutig in schriftlicher Form von Technicolor erlaubt, ist es nicht gestattet:
das Gerät zu demontieren, seinen Inhalt auseinanderzunehmen, die Betriebsweise oder Funktionalität
nachzubauen, nachzuempfinden oder auf eine andere Weise zu analysieren,
oder zu versuchen, den Quellcode (oder die zu Grunde liegenden Ideen, Algorithmen, Strukturen oder
Organisationen) vom Gerät,
oder von jeglichen anderen von Technicolor gelieferten Informationen abzuleiten, es sei denn, das es das
anwendbare Recht ungeachtet dieser Einschränkung ausdrücklich gestattet;
eine Kopie des Geräts zu erstellen, das Gerät an Dritte zu vermieten, zu verleihen, wiederzuverkaufen, zu
lizenzieren oder auf andere Weise weiterzuvermitteln oder zu vertreiben;
das Gerät zu modifizieren, anzupassen oder einen Nachbau davon anzufertigen;
die Produktkennung, Copyright-Informationen oder andere Hinweise von Exemplaren dieses Geräts zu entfernen;
aus jedwelchen Quellen zum Gerät stammende Leistungsdaten oder -analysen zu verbreiten (einschließlich
Benchmarks, ohne jede Einschränkung).
Bei Zuwiderhandlung ist mit dem Verlust des Gewährleistungsschutzes und der Betriebserlaubnis zu rechnen.
Technicolor übernimmt keinerlei Haftung, wenn das Gerät nicht gemäß der vorliegenden Betriebsanleitung verwendet
wird.
!
Befolgen Sie beim Gebrauch dieses Produktes stets die grundlegenden Sicherheitsmaßnahmen, um das Risiko
von Feuer, elektrischem Schlag und Verletzung von Personen zu reduzieren, einschließlich folgendem:
Installieren Sie das Produkt stets wie in der Ihrem Produkt beiliegenden Dokumentation beschrieben.
Vermeiden Sie den Gebrauch dieses Produktes während eines Gewitters. Es besteht das entfernte Risiko
eines Stromschlags durch Blitzeinschlag.
Gebrauchen Sie dieses Produkt nicht zur Meldung von ausströmendem Gas in der Nähe der
Ausströmungsstelle.

16
Umweltschutzinformationen
WEEE-Richtlinie
Energieverbrauch
Energiesparen – Ihr Engagement ist gefragt ...
Erfahren Sie, welche Möglichkeiten es gibt, Ihre elektronischen Geräte verantwortungsbewusst zu nutzen.
Anweisungen zur Sicherheit
Klimatische Bedingungen
Dieses Produkt:
Wurde entwickelt für stationärer Einsatz auf dem Schreibtisch in Innenräumen; die maximale Raumtemperatur darf
40°C nicht überschreiten.
Darf keiner direkten oder übermäßigen Sonneneinstrahlung und/oder Hitze ausgesetzt werden.
Darf keinen Hitzestaus ausgesetzt werden und nicht mit Wasser oder Kondenswasser in Berührung kommen.
Muß einer Umgebung die den Verschmutzungsgrad 2 nicht überschreitet ausgesetzt werden (Die Umgebung muß
frei von Verschmutzungen sein oder darf höchstens trockene, nicht leitende Verschmutzungseigenschaften
aufweisen).
Reinigung
Trennen Sie das Gerät vor der Reinigung von der Steckdose und vom Computer. Verwenden Sie keine flüssigen
Reinigungsmittel oder Sprühreiniger. Reinigen Sie das Gerät mit einem feuchten Tuch.
Dieses Symbol bedeutet, dass Ihr nicht mehr betriebsfähiges Elektrogerät separat gesammelt wird und nicht
mit dem Hausmüll entsorgt werden darf. Die Europäische Union hat diesbezüglich ein Sammel- und
Recyclingsystem entworfen, in dem die Hersteller auch zu Entsorgern werden.
Dieses Gerät wurde mit hochwertigen Materialen und Komponenten gebaut, die recycelt und
wiederverwertet werden können.
Elektrische und elektronische Geräte beinhalten Komponenten, die wohl für den ordnungsgemäßen Betrieb
erforderlich sind, sich jedoch als gesundheits- und umweltschädlich zeigen, wenn sie unsachgemäß
gehandhabt oder entsorgt werden. Bitte aus diesem Grund Ihr Altgerät nicht im Hausmüll entsorgen.
Wenn Sie Besitzer des Gerätes sind, dann dieses bitte an die spezifische Sondermüllsammelstelle bringen
oder das Gerät bei Neukauf Ihrem Fachhändler übergeben.
Falls Sie das Gerät gewerblich nutzen, bitte die Herstelleranweisungen befolgen.
Falls Sie das Gerät in Leasing oder als Depotware hatten, bitte Ihren Vertragshändler kontaktieren.
Diese Mitteilung informiert Sie detailliert über die Merkmale Ihres Produkts und über den Energieverbrauch.
Wir bitten Sie, diese Mitteilung genau zu lesen, bevor Sie Ihr Gerät in Betrieb nehmen, damit es reibungslos
funktioniert.
Gemeinsam können wir dazu beitragen, die Erde für zukünftige Generationen zu erhalten.

17
Wasser und Feuchtigkeit
Verwenden Sie das Gerät nicht in der Nähe von Wasser, wie beispielsweise einer Badewanne, Wasserschüssel, Spüle,
einer Waschmaschine, in einem feuchten Keller oder in der Nähe eines Schwimmbeckens. Beim Transport von einer
kalten in eine sehr warme Umgebung kann sich im Inneren des Geräts Kondenswasser bilden. Lassen Sie das Gerät von
selbst trocknen, ehe Sie es einschalten.
Schnittstellenklassifizierungen
Die externen Schnittstellen an der Rückseite des Geräts werden wie folgt klassifiziert:
DSL, ADSL, SHDSL, VDSL, Line: TNV-Schaltkreis, unterliegt Überspannungen (TNV-3)
ISDN: SELV-Schaltkreis
PSTN, FXO: TNV-Schaltkreis, unterliegt Überspannungen (TNV-3)
Phone, VoIP, FXS: TNV-Schaltkreis, unterliegt keinen Überspannungen (TNV-2)
Alle anderen Schnittstellenports (z. B. Ethernet, 10/100Base-T/MDI(-X), USB, Console, Craft usw.), einschließlich
der Niedrigspannungszufuhr durch das Netzteil (AC): SELV-Schaltkreise.
Stromversorgung
Die auf dem Typenschild des Geräts angegebene Netzspannung muß mit der Ihres Stromnetzes übereinstimmen.
Das Gerät ist mit der Versorgungsspannung wie angegeben auf dem Etikett auf das Produkt zu betreiben. Die
Stromversorgung muß gemäß IEC60950-1/ EN60950-1, Abschnitt 2.5, der Klasse II entsprechen, aus einer begrenzten
Stromquelle stammen und den nationalen bzw. lokalen Standards entsprechen.
Die Verwendung anderer Energieversorgungsarten ist nicht gestattet. Falls Sie sich nicht sicher sind, ob Sie über die
geeignete Stromversorgung verfügen, beziehen Sie sich bitte auf die mit dem Gerät gelieferten Unterlagen, oder
wenden Sie sich an Ihren örtlichen Händler.
USB
Das Gerät muß an ein identifiziertes USB-Port angeschlossen werden, das die Anforderungen für eine begrenzten
Stromquelle erfüllt.
!
WARNUNG
Der Phone-/VoIP-/FXS-Anschluss, wird als TNV-3-Schaltkreis klassifiziert, wenn er intern mit dem
PSTN-/FXO-Anschluss verbunden ist, zum Beispiel, wenn das Gerät abgeschaltet ist.
Ist das Produkt mit einer USB-Schnittstelle (Slave und/oder Master) oder einem Anschlusstyp mit
metallischer Abschirmung ausgestattet, darf der Phone-/VoIP-/FXS-Anschluss auf keine Weise, auch
nicht mit einem externen Telefonkabel, mit dem PSTN-/FXO-, oder DSL-, ADSL-, SHDSL-, VDSL-,
Line-Anschluss verbunden werden.

18
Te l e f o n k a b e l
Schließen Sie das Telefonkabel nur an die Steckbuchsen PSTN, FXO, DSL, ADSL, SHDSL, VDSL, oder Line, des
Geräts an. Stecken Sie das Telefonkabel niemals in andere Anschlüsse am Gerät ein.
Befolgen Sie die Anweisungen zum anschließen des Produktes in der gleichen Reihenfolge wie angegeben im
Installationshandbuch.
Zentraler Verteiler/verteilte Filter (falls vorhanden)
Wenn auf derselben Leitung auch das Telefon verwendet werden soll, müssen ein zentraler Verteiler oder ein bzw.
mehrere verteilte Filter installiert werden, um die optimale DSL-Leistung zu erzielen.
Je nach DSL-Konfiguration und verwendetem Verteiler- bzw. Filtertyp muß die Installation von qualifizierten
Fachkräften durchgeführt werden. Wenden Sie sich an Ihre Telefongesellschaft oder Ihren DSL-Anbieter, um genauere
Anweisungen zu erhalten.
Zugang
Das Direct Plug-In-Netzteil dient als Verbindungstrenner. Achten Sie darauf, das die Netzsteckdose, an die Sie das
Netzteil anschließen, leicht zugänglich ist und sich möglichst nah beim Gerät befindet.
Überlastung
Vermeiden Sie eine Überlastung der Hauptsteckdosen mit Mehrfachsteckern und Verlängerungskabeln. Dies erhöht
die Brandgefahr und das Risiko von Stromschlägen.
Kundendienst
Um das Risiko von Stromschlägen zu verringern, sollten Sie dieses Gerät nicht auseinandernehmen. Keines der inneren
Teile kann vom Benutzer ausgetauscht werden, daher besteht keine Veranlassung, das Gerät zu öffnen. Beim Öffnen
des Geräts oder Entfernen der Abdeckungen können Sie sich gefährlichen Spannungen aussetzen. Wird das Gerät
fehlerhaft zusammengebaut, besteht beim anschließenden Einschalten des Geräts die Gefahr von Stromschlägen.
Wenn Wartungs- oder Reparaturarbeiten erforderlich sind, bringen Sie das Gerät zu einem qualifizierten
Servicehändler.
Fehlerbehebung
Trennen Sie das Gerät von der Steckdose, und überlassen Sie die Arbeiten qualifiziertem Kundendienstpersonal, wenn
eines der folgenden Probleme auftritt:
Das Netzteil oder der Netzstecker sind beschädigt.
Die angeschlossenen Netzkabel sind beschädigt oder abgenutzt.
In das Gerät ist Flüssigkeit eingedrungen.
Das Gerät war Regen oder Wasser ausgesetzt.
Das Gerät funktioniert nicht ordnungsgemäß.
!
ACHTUNG: Um das Brandrisiko zu minimieren, sollten Sie nur Kabel des Typs 26 AWG oder noch
leistungsfähigere Telefonkabel verwenden.

19
Das Gerät wurde fallengelassen oder in anderer Weise beschädigt.
Das Gerät weist Zeichen von Überhitzung auf.
Das Gerät weist eine erheblich veränderte Leistung auf.
Trennen Sie das Gerät unverzüglich vom Netz, wenn Sie Brand- oder Rauchgeruch feststellen. Öffnen Sie das Gerät
auf keinen Fall selbst, Sie könnten einen Stromschlag erhalten.
Ausführungshinweis
Dieses Gerät muß unter strenger Befolgung der Anweisungen des Herstellers installiert und gebraucht werden, wie in
der Ihrem Produkt beiliegenden Benutzerdokumentation beschrieben.
Lesen Sie vor Beginn der Installation oder des Gebrauchs dieses Produktes den Inhalt dieses Dokuments hinsichtlich
spezifischer Einschränkungen oder Vorschriften, die in dem Land gelten, in dem Sie dieses Produkt gebrauchen
möchten, sorgfältig durch.
In manchen Situationen oder Umgebungen kann der Gebrauch drahtloser Geräte durch den Eigentümer des
Gebäudes oder verantwortliche Repräsentanten der Organisation eingeschränkt werden.
Falls Sie sich hinsichtlich der für den Gebrauch drahtloser Systeme in einer spezifischen Organisation oder Umgebung
(zum Beispiel, in Flughäfen) geltenden Vorschriften nicht sicher sind, sollten Sie für den Gebrauch dieses Gerätes um
Genehmigung bitten, bevor Sie das System einschalten.
Technicolor ist nicht verantwortlich für Radio- oder Fernsehinterferenzen aufgrund nicht autorisierter Veränderung des
Gerätes oder des Austauschs oder Anbringens von Anschlusskabeln und Zubehör, die nicht von Technicolor spezifiziert
wurden. Die Korrektur einer durch eine solche nicht autorisierte Veränderung, Austausch oder Anbringung ausgelöste
Interferenz unterliegt der Verantwortung des Benutzers.
Technicolor und seine autorisierten Wiederverkäufer oder Händler sind nicht haftbar für Schäden oder die Übertretung
von Regierungsbestimmungen, die sich aus einer Nichteinhaltung dieser Richtlinien ergeben.
Konformitätserklärung der Europäischen Gemeinschaft
Dieses Gerät darf in den Ländern der EUROPÄISCHEN UNION sowie in allen Mitgliedsländer der Europäischen
Freihandelsorganisation verwendet werden.
Die Konformitätserklärung finden Sie unter www.technicolor.com.
Falls das Produkt mit einem IEEE802.11b/IEEE802.11g/IEEE802.11n drahtlosen Sender/Empfänger ausgerüstet ist:
sollte es nur im inneren Hausbereich benützt werden.
stimmt es überein mit den grundlegenden Einschränkungen gemäß die Europäische Empfehlung (1999/519/EG)
zur Begrenzung der Exposition der Bevölkerung gegenüber elektromagnetischen Feldern.
Dieses Produkt entspricht:
!
Hiermit erklärt Technicolor, das sich dieses Produkt in Übereinstimmung mit den grundlegenden
Anforderungen und den anderen relevanten Vorschriften der Richtlinie 1999/5/EG des Europäischen
Parlaments und des Rates befindet.
20
Verordnung (EG) Nr. 1275/2008 der Kommission vom 17. Dezember 2008 zur Durchführung der Richtlinie 2005/
32/EG des Europäischen Parlaments und des Rates im Hinblick auf die Festlegung von Ökodesign-Anforderungen
an den Stromverbrauch elektrischer und elektronischer Haushalts- und Bürogeräte im Bereitschafts- und im Aus-
Zustand.
Verordnung (EG) Nr. 278/2009 der Kommission vom 6. April 2009 zur Durchführung der Richtlinie 2005/32/EG
des Europäischen Parlaments und des Rates im Hinblick auf die Festlegung von Ökodesign-Anforderungen an die
Leistungsaufnahme externer Netzteile bei Nulllast sowie ihre durchschnittliche Effizienz im Betrieb.

21
INSTRUCCIONES DE SEGURIDAD E INFORMACIÓN SOBRE
REGULACIONES
ANTES DE QUE COMIENCE CON LA INSTALACIÓN DE ESTE PRODUCTO, LEA ATENTAMENTE ESTAS
INSTRUCCIONES
La LAN inalámbrica
Si este producto está equipado con un transmisor-receptor inalámbrico, utilizará tecnología de radio DSSS (Direct
Sequence Spread Spectrum, espectro amplio de secuencia directa)/OFDM (Orthogonal Frequency Division
Modulation, modulación por división de frecuencias de carácter orthogonal), por lo que es interoperable con otros
productos inalámbricos DSSS/OFDM que:
Cumplan la normativa IEEE 802.11b/IEEE802.11g/IEEE802.11n sobre LAN inalámbricas, según ha definido y
aprobado el Instituto de Ingeniería Eléctrica y Electrónica (IEEE, por sus siglas en inglés).
Posean la certificación Wi-Fi® CERTIFIED™ tal como define la Wi-Fi® Alliance.
Directiva
A menos que disponga de la previa aprobación expresa por escrito de Technicolor, no podrá:
desensamblar, descompilar, realizar ingeniería inversa, examinar ni analizar de ninguna otra manera el equipo, su
contenido, funciones,
ni intentar por otros medios extraer el código fuente (ni las ideas, algoritmos, estructura u organización
subyacentes) del equipo,
o de alguna otra información proporcionada por Technicolor, excepto en los términos en que esta restricción sea
aplicada por las leyes competentes;
copiar, alquilar, ceder, revender, traspasar la licencia, ni transferir o distribuir de otra manera el equipo a terceros;
modificar, adaptar ni crear trabajos derivados del equipo;
retirar de ninguna de las copias del equipo la identificación del producto, el copyright u otros avisos;
difundir información o análisis de rendimiento (incluidas, sin limitación, pruebas de referencia) de ninguna fuente
relacionada con el equipo.
Aquellas actuaciones que no sean aprobadas expresamente por Technicolor acarrearán la pérdida de la garantía del
producto y pueden invalidar la autoridad del usuario para trabajar con este equipo.
!
Al utilizar este producto, siga siempre las precauciones de seguridad básicas para reducir el riesgo de incendios,
choque eléctrico y lesiones a personas, lo que incluye lo siguiente:
Instale siempre el producto como se describe en la documentación que acompaña al producto.
Evite la utilización de este producto durante una tormenta eléctrica. Aunque es poco probable, existe el
riesgo de que se produzca una descarga eléctrica a causa de los rayos.
No utilice este producto para informar de un escape de gas en las proximidades de dicho escape.

22
Technicolor renuncia a todo tipo de responsabilidad en caso de utilización que no se ajuste a lo expuesto en estas
instrucciones.
Información medioambiental
Directiva RAEE (WEEE)
Consumo de energía
Ahorro de energía: usted puede contribuir...
Aprenda a utilizar su equipo electrónico y descubra nuevas formas de usarlo.
Instrucciones de seguridad
Condiciones climáticas
Este producto:
Ha sido diseñado para su uso en equipos de un edificio; la temperatura ambiente máxima no puede exceder de
40°C (104°F).
No deberá montarse en una ubicación expuesta a radiación solar o térmica directa o excesiva.
No deberá exponerse a condiciones de acumulación de calor ni deberá exponerse a agua o condensación.
Debe instalarse en un entorno con grado de contaminación 2 (un entorno libre de contaminación o bien ésta sólo
es seca, no conductora).
Este símbolo indica que el aparato eléctrico fuera de uso se debe desechar de forma independiente y nunca
junto a los residuos domésticos. Con este propósito, la Unión Europea ha establecido un sistema de
recolección y reciclaje específico en el que la responsabilidad recae sobre los productores.
Este aparato está diseñado y fabricado con materiales y componentes de alta calidad que se pueden reciclar y
reutilizar.
Es muy probable que los aparatos eléctricos y electrónicos contengan elementos que, si bien son
indispensables para el correcto funcionamiento del sistema, pueden resultar peligrosos para la salud y el
medioambiente si su manipulación o eliminación se realiza de forma incorrecta. Por lo tanto, le rogamos que
no deseche su aparato usado junto con los residuos domésticos.
Si usted es el propietario del aparato, debe depositarlo en el punto de recogida local correspondiente o
entregarlo al vendedor a cambio de la adquisición de un aparato nuevo.
Si usted es un usuario profesional, consulte las instrucciones de su proveedor.
Si tiene el aparato en régimen de alquiler o en depósito, póngase en contacto con su proveedor de
servicios.
En el aviso se incluye información detallada y práctica sobre todas las funciones del producto y también sobre
el consumo de energía.
Le recomendamos que lea atentamente el aviso antes de poner en funcionamiento el equipo para así
aprovechar todo su potencial.
Si colaboramos, podemos reducir el efecto negativo que nuestras actividades tienen en el planeta.

23
Limpieza
Desconecte éste producto del ordenador antes de limpiar. No emplee limpiadores líquidos o en aerosol. Utilice un paño
húmedo para la limpieza.
Agua y humedad
No utilice este producto cerca del agua, por ejemplo, cerca de una bañera, lavabo, fregadero de cocina, lavadero, en un
suelo húmedo o cerca de una piscina. El traslado del producto de un entorno frío a otro caliente puede provocar
condensación en algunas de sus partes internas. Deje que se seque antes de reiniciar el producto.
Clasificaciones de interfaz
Las interfaces externas del panel posterior del producto se clasifican de la siguiente manera:
DSL, ADSL, SHDSL, VDSL, Line: circuito TNV, sujeto a excesos de voltaje (TNV-3)
ISDN: circuito SELV
PSTN, FXO: circuito TNV, sujeto a excesos de voltaje (TNV-3)
Phone, VoIP, FXS: circuito TNV, no sujeto a excesos de voltaje (TNV-2)
Todos los demás puertos de interfaz (p. ej., Ethernet, 10/100Base-T/MDI(-X), USB, Console, Craft, etc.), incluida la
potencia utilizada de baja tensión de la fuente de alimentación de corriente alterna: circuitos SELV.
Alimentación eléctrica
La alimentación eléctrica del producto debe ajustarse a las especificaciones indicadas en las etiquetas de marcado.
La fuente de alimentación debe ser de Clase II y una Fuente de alimentación limitada de acuerdo con los requisitos de
IEC60950-1/ EN60950-1, cláusula 2.5 y estar clasificada como se indica en la etiqueta del producto. Debe ser probada y
aprobada para los estándares nacionales o locales.
Queda prohibida la utilización de otros tipos de fuente de alimentación. Si no conoce con seguridad el tipo de fuente
de alimentación necesaria, consulte la documentación del usuario del producto o bien póngase en contacto con su
distribuidor local del producto.
USB
El producto debe conectarse a un puerto USB identificado que cumple los requisitos de fuente de alimentación
limitada.
!
El puerto de Phone, VoIP, FXS se clasificará como un circuito TNV-3 cuando se conecta internamente al
puerto PSTN, FXO, por ejemplo, cuando el dispositivo está apagado.
Si el producto está equipado con una interfaz USB (esclavo y/o maestro) o cualquier tipo de conector con
recubrimiento metálico, no será posible conectar el puerto de Phone, VoIP, FXS al puerto PSTN, FXO o
DSL, ADSL, SHDSL, VDSL, Line de ningún modo, por ejemplo, con un cable telefónico externo.

24
Cable del teléfono
Conecte el cable de línea de comunicaciones únicamente en el receptáculo PSTN, FXO, DSL, ADSL, SHDSL, VDSL,
o Líne del producto. No enchufe nunca el cable de línea de comunicaciones en otro receptáculo del producto.
Para conectar los cables al producto siga el procedimiento tal y como se indica en la guía de instalación.
Separador central/filtro(s) de distribución (si procede)
Si se necesita servicios de telefonía en la misma línea, deberá instalar un separador central o filtros de distribución para
obtener un rendimiento óptimo de DSL.
Dependiendo de la configuración de DSL y del tipo de separador o filtros que necesite, la instalación deberá llevarla a
cabo personal de servicio técnico cualificado. Consulte a la compañía de servicios telefónicos o al proveedor de
servicios DSL si desea obtener instrucciones.
Accesibilidad
La fuente de alimentación de conexión directa sirve como dispositivo de desconexión. Asegúrese de que el enchufe de
alimentación en el que conecta la fuente de alimentación es de fácil acceso y que se encuentra lo más cercano posible al
equipo.
Sobrecarga
No sobrecargue los enchufes de alimentación eléctrica ni los cables alargadores ya que aumenta el riesgo de incendio o
de descarga eléctrica.
Servicio técnico
Para reducir el riesgo de descarga eléctrica, no desmonte este producto. Ninguno de los componentes internos puede
ser sustituido por el usuario, por tanto no existe razón alguna para acceder al interior. La apertura o extracción de las
cubiertas puede exponerle a tensiones peligrosas. Un reensamblaje incorrecto podría ocasionar una descarga eléctrico
si utiliza el equipo posteriormente.
Si se requieren trabajos de servicio técnico o de reparación, lleve el producto a un representante de servicio técnico
cualificado.
Daños que requieren servicio técnico
Desenchufe este producto de la toma de pared y solicite servicio técnico a personal cualificado ante estas condiciones:
Cuando la fuente de alimentación o su enchufe estén dañados.
Cuando los cables conectados estén dañados o deshilachados.
Si se ha derramado líquido en el producto.
Si el producto ha estado expuesto a la lluvia o al agua.
Si el producto no funciona correctamente.
Si el producto se ha caído o dañado de algún modo.
!
PRECAUCIÓN: Para reducir el riesgo de incendio, utilice únicamente un cable de línea de comunicaciones de
tamaño nº 26 AWG o mayor.

25
Existen signos evidentes de sobrecalentamiento.
Si el producto presenta un cambio notable en el rendimiento.
Desconecte inmediatamente el producto si observa que desprende un olor a quemado o humo. En ninguna
circunstancia debe abrir el equipo usted mismo; corre el riesgo de electrocutarse.
Notificación sobre normativa
Debe instalar y utilizar este dispositivo cumpliendo estrictamente las instrucciones del fabricante, tal como se describen
en la documentación para el usuario que acompaña al producto.
Antes de que comience con la instalación de este producto, lea atentamente el contenido de este documento sobre
limitaciones y la normativa específica sobre este dispositivo que pueden aplicarse en el país en el que desea utilizarlo.
En algunas situaciones o en algunos entornos, la utilización de dispositivos inalámbricos puede estar restringida por el
propietario del edificio o representantes responsables de la organización.
Si no está seguro de la política que corresponde al uso de equipo inalámbrico en una organización o un entorno
concretos (por ejemplo, aeropuertos), le instamos a que pida autorización para utilizar este dispositivo antes de activar
el equipo.
Technicolor no se responsabiliza de ninguna interferencia de radio o televisión ocasionada por la modificación no
autorizada del dispositivo, ni por la sustitución o conexión de cables de conexión o equipo distintos de los especificados
por Technicolor. La corrección de las interferencias ocasionadas por dichas modificaciones, sustituciones o conexiones
no autorizadas será responsabilidad del usuario.
Technicolor y sus distribuidores autorizados quedan exentos de toda responsabilidad por los daños o el incumplimiento
de las normativas gubernamentales que pudieran derivarse de la infracción de dichas pautas.
Declaración de conformidad de la Comunidad Europea
Este equipo puede utilizarse en todos los países miembros de la UNIÓN EUROPEA y de la países miembros de la
Asociación Europea de Libre Comercio.
Puede consultar la Declaración de Conformidad en www.technicolor.com.
En caso que este producto sea equipado con un accesorio inalámbrico IEEE802.11b/IEEE802.11g/IEEE802.11n:
Su uso está restringido sólo a espacios interiores.
Cumple con las restricciones básicas y límites definidos en la Recomendación del Consejo (1999/519/EC) sobre
limitación a la exposición de las personas en general, a campos electromagnéticos.
Este producto cumple con:
Reglamento (CE) n o 1275/2008 de la Comisión, de 17 de diciembre de 2008 , por el que se desarrolla la Directiva
2005/32/CE del Parlamento Europeo y del Consejo en lo concerniente a los requisitos de diseño ecológico
aplicables al consumo de energía eléctrica en los modos preparado y desactivado de los equipos eléctricos y
electrónicos domésticos y de oficina.
!
Por medio de la presente Technicolor declara que el producto cumple con los requisitos esenciales y
cualesquiera otras disposiciones aplicables o exigibles de la Directiva 1999/5/CE del Parlamento Europeo
y del Consejo.
26
Reglamento (CE) n o 278/2009 de la Comisión, de 6 de abril de 2009 , por el que se desarrolla la Directiva 2005/
32/CE del Parlamento Europeo y del Consejo en lo concerniente a los requisitos de diseño ecológico aplicables a
la eficiencia media en activo de las fuentes de alimentación externas y a su consumo de energía eléctrica durante el
funcionamiento en vacío.

27
INSTRUÇÕES DE SEGURANÇA E INFORMAÇÕES SOBRE NORMAS
ANTES DE INICIAR A INSTALAÇÃO OU A UTILIZAÇÃO DESTE PRODUTO, LEIA ATENTAMENTE ESTAS
INSTRUÇÕES
Wireless LAN
No caso deste produto estar equipado com um transceptor sem fio, ele usará a tecnologia de rádio Direct Sequence
Spread Spectrum (DSSS) /Orthogonal Frequency Division Modulation (OFDM), portanto esse produto funciona
com qualguer outro produto sem fio de tipo DSSS/OFDM que:
seja compatível com a Norma IEEE 802.11b/IEEE802.11g/IEEE802.11n sobre LANs sem fio, conforme definida e
aprovada pelo Instituto de Engenheiros Eletricistas e Eletrônicos (IEEE).
seja Wi-Fi® CERTIFIED™, conforme definido pela Wi-Fi® Alliance.
Diretiva
Exceto se aprovado de forma expressa e antecipada pela Technicolor, por escrito, você não poderá:
desmontar, decompilar, reverter a engenharia, rastrear ou analisar de outra forma o equipamento, seu conteúdo,
funcionamento ou funcionalidade,
ou, então, tentar derivar um código-fonte (ou idéias básicas, algoritmos, estrutura ou organização) do
equipamento,
ou com base em qualquer outra informação fornecida pela Technicolor, exceto até onde essa restrição seja
expressamente proibida pela legislação local;
copiar, alugar, emprestar, revender, sublicenciar ou, de outra forma, transferir ou distribuir o equipamento a
terceiros;
modificar, adaptar ou criar um trabalho oriundo do equipamento;
remover de qualquer cópia do equipamento qualquer identificação do produto, notas de direitos autorais ou outras
informações;
divulgar informações ou análise do desempenho (incluindo, mas não se limitando a, padrões de desempenho) de
qualquer fonte relacionada ao equipamento.
Tais atos não autorizados expressamente pela Technicolor resultarão na perda da garantia do produto e na proibição do
uso deste equipamento por parte do usuário.
A Technicolor estará isenta de toda responsabilidade, no caso de uso incompatível com as instruções atuais.
!
Ao utilizar este produto, adote sempre as precauções básicas de segurança para reduzir o risco de incêndio,
choque elétrico e acidentes para as pessoas, incluindo o seguinte:
Instale sempre o produto conforme descrito na documentação que acompanha o produto.
Evite utilizar este produto durante uma tempestade de raios. Pode haver um remoto risco de choque
elétrico por causa dos raios.
Não utilize este produto para informar um vazamento de gás nas proximidades do vazamento.

28
Informações ambientais
Directriz REEE (WEEE)
Consumo de energia
Economia de energia – você tem um papel a cumprir...
Aprenda a usar e explorar maneiras de usar o seu equipamento eletrônico.
Instruções de segurança
Condições climáticas
Este produto:
É elaborado para uso em uma área de trabalho fixa interna; a uma temperatura ambiente máxima de 40ºC.
Não deve ser montado em um local exposto à radiação solar direta ou excessiva e/ou ao calor.
Não deve ser exposto a condições de retenção de calor, nem deve entrar em contato com água ou ficar sujeito à
condensação.
Deve ser instalado em um ambiente de Grau 2 de Poluição (ambiente em que não há poluição ou apenas uma
poluição seca, não alastrável).
Limpeza
Desconecte este produto do computador antes da limpeza. Não utilize produtos de limpeza líquidos ou em aerossol.
Use um pano úmido para a limpeza.
Este símbolo significa que, em caso do seu equipamento ficar inutilizado, deverá ser colectado em separado
do lixo doméstico. A união Europeia implementou um sistema específico de colecta e reciclagem, pelo o qual
os fabricantes são responsáveis.
Este equipamento foi desenhado e manufacturado com materiais e componentes de alta qualidade que
poderão ser reciclados e usados.
Os equipamentos eléctricos e electrónicos poderão conter componentes essenciais ao seu bom
funcionamento mas, que poderão ser perigosos à saúde e ao ambiente se, não forem manuseados e usados
da forma correcta. Assim, por favor, não coloque o seu equipamento inutilizado no lixo doméstico.
Se é o proprietário deste equipamento, deverá depositá-lo num local de colecta apropriado ou, devolvê-lo ao
vendedor a quem o comprou.
Se é um profissional, por favor, siga as instruções do seu fornecedor.
Se este equipamento é alugado ou está a seu cargo, por favor contacte o seu provedor de serviços.
O aviso detalhou informações importantes sobre os recursos do seu produto e também sobre o consumo de
energia.
Recomendamos que você leia cuidadosamente o aviso antes de colocar o seu equipamento em
funcionamento para obter o melhor serviço que ele puder oferecer.
Trabalhando juntos podemos reduzir o impacto na terra!

29
Água e umidade
Não use este produto perto de água, por exemplo, perto de uma banheira, pias, tanque, em uma área molhada ou perto
de uma piscina. A transição do produto de um ambiente frio para um ambiente quente pode gerar condensação em
algumas de suas partes internas. Deixe secar por conta própria, antes de reiniciar o produto.
Classificações da interface
As interfaces externas painel posterior do produto são classificadas como descrito a seguir:
DSL, ADSL, SHDSL, VDSL, Line: Circuito TNV, sujeito a sobretensões (TNV-3)
ISDN: Circuito SELV
PSTN, FXO: Circuito TNV, sujeito a sobretensões (TNV-3)
Phone, VoIP, FXS: Circuito TNV, não sujeito a sobretensões (TNV-2)
Todas as outras portas de interface (como a Ethernet, 10/100Base-T/MDI(-X), USB, Console, Craft, etc…),
incluindo a entrada de alimentação de baixa tensão a partir de alimentação principal de corrente alternada:
Circuitos SELV.
Alimentação elétrica
O sistema de alimentação de energia do produto deve estar de acordo com as especificações indicadas nas etiquetas
de marcação.
A fonte de alimentação deve ser de Classe II e uma Fonte de Alimentação Limitada, em conformidade com as
exigências do IEC60950-1/ EN60950-1, Cláusula 2.5 e com capacidade como e indicado na etiqueta do produto. Deve
ser testado e aprovado em relação aos padrões nacionais ou locais.
É proibido usar outros tipos de fontes de alimentação. Se você não tiver certeza do tipo de fonte de alimentação
necessária, consulte a documentação do usuário do produto ou entre em contato com o representante local do
produto.
USB
O dispositivo deverá ser ligado a uma porta USB que cumpra o requisito de fonte de alimentação limitada.
!
AVISO
O porta Phone, VoIP, FXS, será classificado como um circuito TNV-3 quando conectado internamente à
porta PSTN, FXO por exemplo, quando o dispositivo estiver desligado.
Se o produto estiver equipado com uma interface USB (escrava e/ou mestre) ou com qualquer tipo de
conector com blindagem metálica, não será permitido conectar ao porta Phone, VoIP, FXS com as portas
PSTN, FXO ou DSL, ADSL, SHDSL, VDSL, Line mesmo que seja com um cabo de telefone externo.

30
Cabo telefônico
Ligue o cabo da linha de telecomunicação somente no receptáculo PSTN, FXO, DSL, ADSL, SHDSL, VDSL, ou Line
do produto. Nunca ligue esse cabo a qualquer outra entrada do produto.
Seguir o procedimento para conexão dos cabos ao produto, na mesma seqüência instruída e apresentada no guia de
instalação.
Divisor central / filtro(s) distribuído(s) (se aplicável)
Se um serviço telefônico for necessário na mesma linha, um divisor central ou filtro(s) distribuído(s) deverão ser
instalados para se obter o máximo desempenho do DSL.
Dependendo da configuração do DSL e do tipo de divisores/filtros, a instalação deve ser feita por pessoal técnico
qualificado. Consulte a empresa de serviços telefônicos ou provedor de serviços de DSL para obter instruções.
Acessibilidade
A fonte de alimentação de plugue direto funciona como um dispositivo de desconexão. Certifique-se de que a tomada
do soquete de energia, que recebe a fonte de alimentação, esteja bastante acessível e localizada o mais perto possível
do equipamento.
Sobrecarga
Não sobrecarregue as saídas principais e os fios de extensão porque isso aumenta o risco de incêndio ou choque
elétrico.
Assistência
Para reduzir o risco de choque elétrico, não desmonte este produto. Nenhuma de suas partes internas devem ser
substituídas pelo usuário; sendo assim, não há motivo para acessar o interior do equipamento. A abertura ou remoção
das tampas pode expor o usuário a tensões perigosas. A remontagem incorreta pode causar choque elétrico se o
dispositivo for usado em seguida.
Se for necessária a assistência ou reparo, leve o equipamento a um prestador de serviços qualificado.
Danos que exigem assistência
Se verificar a existência de alguma das seguintes condições, desligue este produto da tomada de energia e solicite
assistência a um técnico qualificado:
Quando a fonte de alimentação ou o plugue estiver danificada(o).
Quando os cabos acoplados estiverem danificados ou esfiapados.
Se qualquer líquido tiver sido derramado sobre o produto.
Se o produto tiver sido exposto à chuva ou água.
Se o produto não funcionar normalmente.
!
CUIDADO
Para reduzir o risco de incêndio, use somente o tamanho de fio Nº 26 AWG ou cabo maior de linha de
telecomunicação.

31
Se o produto tiver caído ou estiver danificado de alguma forma.
Se o produto apresentar uma mudança perceptível no desempenho.
Não há sinais perceptíveis de superaquecimento.
Desligue imediatamente o produto, se ele exalar cheiro de queimado ou fumaça. Em hipótese alguma você deverá abrir
o equipamento; há risco de eletrocussão.
Notificação sobre a regulamentação
Instale e utilize este dispositivo observando rigorosamente as instruções do fabricante, conforme escrito na
documentação do usuário que acompanha o produto.
Antes de iniciar a instalação ou a utilização deste produto, leia atentamente o conteúdo deste documento e localize as
regras ou restrições específica para o dispositivo, que possam se aplicar ao país onde você deseja usar este produto.
Em algumas situações ou ambientes, o uso dos dispositivos sem fio pode ser restringido pelo proprietário do prédio ou
pelos representantes responsáveis pela organização.
Caso não tenha certeza sobre a política aplicável quanto ao uso de equipamentos sem fio em uma organização ou
ambiente específico (em aeroportos, por exemplo), procure pedir autorização de uso deste dispositivo para ligar o
equipamento.
Technicolor não se responsabiliza por qualquer interferência de rádio ou televisão causada por modificações não
autorizadas feitas ao dispositivo, nem pela substituição ou pela inserção dos cabos do equipamento de maneira
diferente da especificada pelo Technicolor. A correção da interferência causada por essa modificação não autorizada,
substituição ou ligação errada será de responsabilidade do usuário.
Technicolor e seus revendedores ou distribuidores autorizados não se responsabilizam por qualquer dano ou violação
das regulamentações do governo que sejam oriundas da não observância destas diretrizes.
Declaração de Conformidade da Comunidade Européia
Este equipamento pode ser usado em todos países membros da União Européia e em todos os países membros da
Associação Européia de Livre Comércio.
A Declaração de Conformidade pode ser encontrada em www.technicolor.com.
Em caso que esse Produto é equipado com um transmissor/receptor sem fio IEEE802.11b/IEEE802.11g/IEEE802.11n:
O uso é limitado ao interior só
É compatível com as restrições básicas e limites básicos como definidos em Council Recommendation (1999/519/
EC) sobre a limitação de exposição do grande público aos radiações.
Este produto está em conformidade com:
!
A Technicolor declara neste documento que este produto está em conformidade com os requisitos
básicos e com outras provisões relevantes da Directiva 1999/5/CE del Parlamento Europeo y del
Consejo.
32
Regulamento (CE) n. o 1275/2008 da Comissão, de 17 de Dezembro de 2008 , que dá execução à Directiva 2005/
32/CE do Parlamento Europeu e do Conselho no que respeita aos requisitos de concepção ecológica para o
consumo de energia do equipamento eléctrico e electrónico doméstico e de escritório nos estados de vigília e de
desactivação.
Regulamento (CE) n. o 278/2009 da Comissão, de 6 de Abril de 2009 , que dá execução à Directiva 2005/32/CE
do Parlamento Europeu e do Conselho no que respeita aos requisitos de concepção ecológica aplicáveis ao
consumo de energia eléctrica em vazio e à eficiência média no estado activo das fontes de alimentação externas.

33
PRECAUZIONI DI SICUREZZA E INFORMAZIONI SULLA NORMATIVA
PRIMA DI INSTALLARE O UTILIZZARE IL PRODOTTO, LEGGERE ATTENTAMENTE LE PRESENTI
ISTRUZIONI
Wireless LAN
Se questo prodotto è dotato di un ricetrasmettitore wireless, verrà utilizzata la tecnologia radio DSSS (Direct Sequence
Spread Spectrum)/OFDM (Orthogonal Frequency Division Modulation). Di conseguenza il prodotto e’ stato
progettato per lavorare in cooperazione con qualsiasi altro prodotto wireless che usi questa tecnologia. ,e che:
sia conforme allo standard IEEE 802.11b/IEEE802.11g/IEEE802.11n per le LAN wireless, definito ed approvato
dall'Institute of Electrical and Electronics Engineers (Istituto Tecnici Elettronici ed Elettrici);
disponga della certificazione "Wi-Fi® CERTIFIED™", definita dalla Wi-Fi® Alliance.
Direttiva
Salvo espressamente e precedentemente approvato da Technicolor per iscritto e nei limiti previsti dalle locali normative
vigenti in materia, è vietato:
disassemblare, decompilare, decodificare, analizzare o altrimenti esaminare l'apparecchiatura, il suo contenuto,
funzionamento o funzionalità,
o altrimenti tentare di individuare il codice sorgente (o le idee, gli algoritmi, la struttura
o l'organizzazione di base) dall'apparecchiatura, o da ogni altra informazione fornita da Technicolor;
copiare, noleggiare, prestare, rivendere, concedere in sublicenza o altrimenti trasferire o distribuire l'apparecchiatura
a terzi;
modificare, adattare o creare un prodotto derivato dell'apparecchiatura;
rimuovere da eventuali copie dell'apparecchiatura l'identificazione del prodotto, il copyright o altre informazioni;
divulgare informazioni o analisi sulle prestazioni (comprese, tra le altre, le analisi comparative) provenienti da
qualsiasi fonte, relative all'apparecchiatura.
Tali atti, se non approvati espressamente da Technicolor, invalideranno la garanzia sul prodotto e l'autorizzazione all'uso
dell'apparecchiatura accordata all'utente.
Technicolor declina qualsiasi responsabilità in caso di utilizzo non conforme alle presenti istruzioni.
!
Quando si utilizza questo prodotto è necessario rispettare sempre le precauzioni di sicurezza fondamentali per
ridurre il rischio di incendio, scosse elettriche o lesioni personali operando nel modo seguente:
Installare sempre il prodotto come illustrato nella documentazione allegata al prodotto.
Evitare di utilizzare questo prodotto durante un temporale. Si potrebbe presentare un rischio remoto di
scossa elettrica causata da un fulmine.
Non utilizzare questo prodotto per segnalare una perdita di gas nelle vicinanze della perdita stessa.

34
Informazioni sulla protezione ambientale
Direttiva RAEE (WEEE)
Consumo energetico
Risparmio energetico - tutti hanno un ruolo...
Imparare in che modo utilizzare le apparecchiature elettroniche.
Precauzioni di sicurezza
Condizioni ambientali
Il prodotto:
Utilizzo in ambienti chiusi con temperatura non superiore a 40° C.
Non va montato in una posizione esposta a radiazioni solari e/o fonti di calore dirette o eccessive.
Non deve essere esposto a condizioni di calore eccessive né entrare in contatto con acqua o condensa.
Deve essere installato in un ambiente con grado di inquinamento 2 (un ambiente esente da agenti inquinanti o in
cui sono presenti solo agenti inquinanti secchi non conduttori).
Pulizia
Disconnetti questo prodotto dal computer prima di pulirlo. Non utilizzare detergenti liquidi o da vaporizzare. Utilizzare
un panno umido per la pulizia.
Questo simbolo significa che il vostro apparecchio elettronico fuori uso non deve essere gettato con i normali
rifiuti casalinghi, ma smaltito separatamente. A questo scopo, l'Unione Europea ha istituito un sistema di
raccolta e riciclaggio specifici la cui responsabilità è affidata ai produttori.
Questo apparecchio è stato progettato e fabbricato con materiali e componenti di alta qualità che possono
essere riciclati e riutilizzati.
Gli apparecchi elettrici e elettronici possono contenere elementi che, benché indispensabili al corretto
funzionamento del sistema, possono risultare pericolosi per la salute e l'ambiente se sono manipolati o
eliminati in modo inadeguato. Siete per questo pregati di non gettare il vostro vecchio apparecchio insieme ai
normali rifiuti.
Se siete proprietari dell'apparecchio, dovete depositarlo presso l'apposito punto di raccolta o consegnarlo al
vostro rivenditore in cambio dell'acquisto di un apparecchio nuovo.
Se lo utilizzate in ambito professionale, riferitevi alle istruzioni del vostro fornitore.
Se l'apparecchio è in affitto o in deposito, contattate il vostro fornitore di servizi.
!
Lo smaltimento abusivo del prodotto da parte dell’utente comporta l’applicazione delle sanzioni amministrative
previste dalle leggi vigenti in materia ambientale.
Sono disponibili informazioni dettagliate sulle caratteristiche del prodotto e sul consumo energetico.
Leggere attentamente il documento prima di attivare l'apparecchiatura per utilizzarla nel modo migliore.
Lavorando insieme è possibile ridurre l'impatto derivante dall'uso delle apparecchiature sul pianeta terra!

35
Acqua e umidità
Non utilizzare il prodotto in prossimità di acqua, ad esempio vicino a una vasca, un lavandino, un lavello, in uno
scantinato umido o vicino a una piscina. Il passaggio del prodotto da un ambiente freddo a uno caldo potrebbe causare
la formazione di condensa su alcuni componenti interni. Lasciare asciugare il prodotto prima di riavviarlo.
Classificazioni dell'interfaccia
Le interfacce esterne del pannello posteriore del prodotto sono classificate come segue:
DSL, ADSL, SHDSL, VDSL, Line: circuito TNV, soggetto a sovraccarichi di tensione (TNV-3)
ISDN: circuito SELV
PSTN, FXO: circuito TNV, soggetto a sovraccarichi di tensione (TNV-3)
Phone, VoIP, FXS: circuito TNV, non soggetto a sovraccarichi di tensione (TNV-2)
tutte le altre porte di interfaccia (ad es. Ethernet, 10/100Base-T/MDI(-X), USB, Console, Craft, ecc.), compresa la
potenza assorbita a bassa tensione per l'alimentatore CA: circuiti SELV.
Alimentazione
L'alimentazione di prodotto deve rispettare le specifiche di alimentazione indicate sulle etichette di marcatura.
L'alimentazione elettrica deve essere di classe II ed essere una fonte limitata di energia in conformità ai requisiti della
normativa IEC60950-1/ EN60950-1, clausola 2.5 con potenza o indicati sull'etichetta di prodotto. L'alimentazione deve
essere stata collaudata e approvata in conformità agli standard nazionali o locali.
È vietato l'utilizzo di altri tipi di alimentazione elettrica. Se non si è sicuri del giusto tipo di alimentazione elettrica,
consultare la documentazione per l'utente del prodotto oppure contattare il rivenditore locale.
USB
L’apparecchio deve essere connesso a una specifica port USB che sia compatibile con i requisiti di una fonte limitata di
energia.
Cavo telefonico
Collegare il cavo per linea di telecomunicazione solamente alla porta PSTN, FXO, DSL, ADSL, SHDSL, VDSL, o Line
del prodotto. Non collegare in nessun caso il cavo ad altre porte del prodotto.
!
AVVISO
La porta Phone, VoIP, FXS verrà classificata come circuito TNV-3 se collegata internamente alla porta
PSTN, FXO, ad esempio quando il dispositivo è spento.
Se il prodotto è dotato di interfaccia USB (slave e/o master) o di un altro tipo di connettore con
schermatura metallica, non è possibile collegare la porta Phone, VoIP, FXS alla porta PSTN, FXO o DSL,
ADSL, SHDSL, VDSL, Line con alcun altro mezzo, ad esempio mediante un cavo telefonico esterno.
!
ATTENZIONE
Per ridurre il rischio di incendio, usare solo un cavo per linea di telecomunicazione AWG 26 o di diametro
maggiore.
36
Seguire la procedura relativa alla connessione dei cavi al prodotto nella stessa sequenza indicata dal guida
d'installazione.
Ripartitore centrale / filtri distribuiti (se disponibili)
Se sulla stessa linea è richiesto il servizio telefonico, per garantire prestazioni DSL ottimali è necessario installare un
ripartitore centrale oppure uno o più filtri distribuiti.
A seconda della configurazione DSL e del tipo di ripartitore/filtri, l'installazione deve essere eseguita da personale
tecnico qualificato. Per le istruzioni, consultare la società telefonica o il provider del servizio DSL.
Accessibilità
L'alimentatore a presa diretta funziona da dispositivo di scollegamento. Assicurarsi che la presa di alimentazione sia
facilmente accessibile e posizionata il più vicino possibile all'attrezzatura.
Sovraccarico
Non sovraccaricare le prese a muro e le prolunghe per non aumentare il rischio di incendio o di scossa elettrica.
Manutenzione
Per ridurre il rischio di scosse elettriche, non smontare il prodotto. Nessuna delle parti interne è sostituibile dall'utente,
pertanto non vi è motivo di accedere al suo interno. L'apertura o la rimozione dei coperchi può esporre l'utente a
tensioni pericolose. Un rimontaggio errato potrebbe provocare scosse elettriche durante il successivo utilizzo
dell'apparecchio.
Se è necessario un intervento di manutenzione o riparazione, portare l'apparecchio in un centro di assistenza qualificato.
Danni che richiedono assistenza
Scollegare il prodotto dalla presa murale e affidare la manutenzione a personale qualificato nei casi riportati di seguito:
l'alimentazione o la spina sono danneggiati.
i cavi collegati sono danneggiati o usurati.
il prodotto è venuto accidentalmente a contatto con sostanze liquide.
il prodotto è stato esposto a pioggia o acqua.
il prodotto non funziona correttamente.
il prodotto è stato danneggiato (ad esempio cadendo).
si riscontra un evidente surriscaldamento.
il prodotto presenta un'evidente variazione delle prestazioni.
Se si avverte odore di bruciato o si nota del fumo fuoriuscire dal dispositivo, scollegarlo immediatamente. Per evitare il
rischio di scosse elettriche, non è consentito in alcun caso aprire l'apparecchiatura.
Avvertenza legale
Questo dispositivo deve essere installato e utilizzato nel pieno rispetto delle istruzioni fornite dal produttore riportate
nella documentazione in dotazione al prodotto.

37
Prima di installare o utilizzare il prodotto, leggere attentamente il contenuto del presente documento sulle restrizioni o le
normative specifiche del dispositivo che poterebbero essere applicate nel Paese di utilizzo del prodotto.
In alcune situazioni o in determinati ambienti, l'utilizzo di dispositivi wireless potrebbe essere limitato dal proprietario
dell'edificio o dai rappresentanti responsabili dell'azienda.
In caso di dubbi sulle norme relative all'utilizzo di apparecchiature wireless in un'azienda o in un ambiente specifici (ad
es. aeroporti), si consiglia di richiedere l'autorizzazione all'utilizzo del dispositivo prima di accendere l'apparecchiatura.
Technicolor non potrà essere ritenuto responsabile per interferenze radio o TV causate da modifiche non autorizzate
apportate al dispositivo oppure dalla sostituzione o dal collegamento di cavi o apparecchiature diversi da quelli prescritti
dal Technicolor. L'eliminazione delle interferenze causate da tali modifiche, sostituzioni o collegamenti non autorizzati
sarà di responsabilità dell'utente.
Technicolor e i relativi rivenditori o distributori autorizzati non potranno essere ritenuti responsabili per danni o violazioni
di norme di legge causati dalla mancata osservanza di queste indicazioni.
Dichiarazione di conformità della Comunità Europea
La presente apparecchiatura può essere utilizzata i paesi membri dell'Unione Europea e i paesi membri
dell'Associazione Europea di Libero Scambio.
La Dichiarazione di conformità è reperibile all'indirizzo www.technicolor.com.
Se il prodotto e’ comprensivo di ricetrasmettitore wireless IEEE 802.11b/IEEE802.11g/IEEE802.11n:
L’utilizzo e’ limitato ad ambienti chiusi.
E’ conforme ai limiti e alle restrizioni imposte dal Council Recommendation (1999/519/EC) in merito all’esposizione
al pubblico a campi elettromagnetici.
Questo prodotto è conforme a:
Regolamento (CE) n. 1275/2008 della Commissione, del 17 dicembre 2008 , recante misure di esecuzione della
direttiva 2005/32/CE del Parlamento europeo e del Consiglio per quanto riguarda le specifiche di progettazione
ecocompatibile relative al consumo di energia elettrica nei modi stand-by e spento delle apparecchiature elettriche
ed elettroniche domestiche e da ufficio.
Regolamento (CE) n. 278/2009 della Commissione, del 6 aprile 2009 , recante misure di esecuzione della direttiva
2005/32/CE del Parlamento europeo e del Consiglio per quanto riguarda le specifiche di progettazione
ecocompatibile relative al consumo di energia elettrica a vuoto e al rendimento medio in modo attivo per gli
alimentatori esterni.
!
Con la presente Technicolor dichiara che il prodotto è conforme ai requisiti essenziali ed alle altre
disposizioni pertinenti stabilite dalla Direttiva 1999/5/CE del Parlamento europeo e del Consiglio.

38
SÄKERHETSFÖRESKRIFTER OCH -INFORMATION
INNAN DU BÖRJAR INSTALLERA ELLER ANVÄNDA DENNA PRODUKT, SKA DU NOGGRANT LÄSA
DESSA FÖRESKRIFTER
Trå dl ö s L A N
Om produkten har en trådlös transceiver används radiotekniken Direct Sequence Spread Spectrum (DSSS) /
Orthogonal Frequency Division Modulation (OFDM). Och är designad att ha interopabilitet med motsvarande
trådlösa produkter av DSSS/OFDM typ:
Uppfyller standarden IEEE 802.11b/IEEE802.11g/IEEE802.11n för trådlösa LAN-produkter, som definierats och
godkänts av Institute of Electrical and Electronics Engineers (IEEE).
är Wi-Fi® CERTIFIED™ enligt Wi-Fi® Alliances definition.
Direktiv
Du får inte utan uttryckligt och skriftligt tillstånd från Technicolor:
Demontera, dekompilera, efterforska, spåra eller på annat sätt analysera utrustningen, dess innehåll, förfaringssätt
eller funktion,
eller på annat sätt försöka härleda källkod (eller bakomliggande idéer, algoritmer, struktur eller organisation) från
utrustningen,
eller någon annan information som tillhandahållits av Technicolor, under förutsättning att denna begränsning inte
uttryckligen är förbjuden enligt tvingande lagstiftning;
Kopiera, uthyra, återförsälja, upplåta i andra hand eller på annat sätt överföra eller distribuera utrustningen till tredje
part;
Ändra, anpassa eller skapa derivat av utrustningen;
Avlägsna identifiering av produkten, immaterialrättsliga eller andra markeringar från utrustningen;
Förändra information om prestanda eller analys (inklusive men ej begränsat till referenser) från någon källa som är
förknippad med utrustningen.
Dylika åtgärder, som inte uttryckligen godkänts av Technicolor, kommer att innebära förverkande av produktgaranti
samt användarens rätt att använda utrustningen.
Technicolor frånskriver sig allt ansvar i händelse av användning på ett sätt som inte överensstämmer med aktuella
föreskrifter.
!
Följ alltid de grundläggande säkerhetsåtgärderna när du använder den här produkten för att förebygga risken för
brand, elstöt och personskador, inklusive följande:
Installera alltid produkten enligt beskrivningen i dokumentationen som medföljer produkten.
Undvik att använda den här produkten under åskoväder. Det kan finnas en liten risk för elstötar från blixtar.
Använd inte den här produkten för att rapportera en gasläcka i närheten av själva gasläckan.

39
Miljöinformation
WEEE-direktiv
Energiförbrukning
Energibesparingar – du kan göra skillnad ...
Ta reda på mer om hur du kan använda din elektronikprodukt.
Säkerhetsföreskrifter
Klimatförhållanden
Denna produkt:
Är avsedd för stationär användning inomhus, på en plats där temperaturen aldrig överstiger 40ºC.
Den får inte monteras på en plats som är utsatt för direkt solljus eller annan hög värmeutstrålning.
Den får inte utsättas för reflekterande värme, eller fukt eller kondens.
Den måste installeras i en miljö som är huvudsakligen fri från föroreningar (en miljö där det inte finns några
föroreningar eller endast torra, icke-ledande föroreningar).
Rengöring
Se till att produkten inte är ansluten till vägguttaget eller datorn innan rengöringen påbörjas. Använd inte flytande
rengöringsmedel eller spray. Använd en fuktig trasa vid rengöring.
Denna symbol anger att din obrukbara elektroniska apparat ska kasseras separat och inte kastas i
hushållsavfallet. Därför har Europeiska Unionen inrättat ett särskilt i uppsamlingssystem för vilket tillverkarna är
ansvariga.
Denna apparat har utformats och tillverkats av material och komponenter av hög kvalitet som kan återvinnas
och komma till användning på nytt.
De elektriska och elektroniska apparaterna kan naturligtvis innehålla element som, även om de är oumbärliga
för systemets funktion, kan visa sig vara farliga för hälsa och miljö om de hanteras eller kasseras på felaktigt sätt
. Därför ska du inte avfallshantera din uttjänta apparat tillsammans med hushållsavfallet.
Om du själv äger apparaten ska du lämna in den på lämplig lokal uppsamlingscentral eller skicka tillbaka den
till försäljaren mot att du köper en ny.
Om du använder apparaten yrkesmässigt hänvisas till anvisningarna från din leverantör.
Om du hyr den eller förvarar den ska du kontakta din tjänsteleverantör.
Meddelandet innehåller användbar information om produktens alla funktioner och även energiförbrukningen.
Vi uppmanar dig att noggrant läsa igenom meddelandet innan du tar apparaten i bruk för att få mesta möjliga
nytta av den.
Genom att samarbeta kan vi minska den inverkan vi har på vår jord!

40
Vatten och fukt
Använd inte produkten i närheten av vatten, såsom vid badkar, handfat, diskbänk, tvättho, fuktig källare eller simbassäng.
Förflyttning av produkten från en kall miljö till en varm kan orsaka kondens på vissa invändiga delar. Låt produkten
självtorka innan den startas igen.
Gränssnittsklassificering
De externa gränssnitten på produkts bakpanel är klassificerade så här:
DSL, ADSL, SHDSL, VDSL, Line: TNV-krets, utsatt för överspänningar (TNV-3)
ISDN: SELV-krets
PSTN, FXO: TNV-krets, utsatt för överspänningar (TNV-3)
Phone, VoIP, FXS: TNV-krets, inte utsatt för överspänningar (TNV-2)
Alla andra gränssnittsportar (t.ex. Ethernet, 10/100Base-T/MDI(-X), USB, Console, Craft, m.fl.), inklusive
lågspänningsingången från växelströmsadaptern: SELV-kretsar.
Strömförsörjning
Strömförsörjningen till produkten måste följa de angivelser om strömkälla som framgår av märkningen.
Elförsörjningen måste vara av klass II och en begränsad strömkälla i enlighet med kraven i IEC60950-1/ EN60950-1,
paragraf 2.5 och märkt som etiketten av produkten. Den måste vara testad och godkänd enligt nationell eller lokal
standard.
Användning av någon annan sorts strömtillförsel är förbjuden. Om du är osäker på vilken elförsörjning som behövs läser
du användarhandboken eller kontaktar din lokala återförsäljare.
USB
Apparaten måste vara ansluten till en känd USB port som möter alla krav på begränsad strömkälla.
Te l e f o n s l a d d
Anslut telekommunikationssladden till någon av kontakterna PSTN, FXO, DSL, ADSL, SHDSL, VDSL eller Line på
produkt. Sätt inte telekommunikationssladden i någon annan ingång på produkt.
Följ installations anvisningarna steg för steg enligt bifogad installations guide.
!
VARNING
Phone-/VoIP-/FXS-porten klassificeras som TNV-3-krets när den ansluts internt till PSTN-/FXO-porten,
till exempel när enheten är avstängd.
Om produkten är försedd med ett USB-gränssnitt (slav och/eller master) eller en typ av anslutning med
metallhölje, är det inte tillåtet att ansluta Phone-/VoIP-/FXS-porten med PSTN-/FXO- eller DSL-/
ADSL-/SHDSL-/VDSL-/Line-porten på något sätt, till exempel via en extern telefonkabel.
!
FÖRSIKTIG
För att minska brandrisken ska endast trådstorlek No 26 AWG eller grövre användas för
telekommunikationssladden.
41
Central linjedelare/fördelningsfilter (om sådant behövs)
Om telefonen ska användas på samma linje, krävs installation av en centraldelare eller ett distributionsfilter för maximala
DSL-prestanda.
Installationen måste utföras av kvalificerad servicepersonal, beroende på vilken typ av DSL-konfigurering och delare/
filter som används. Kontakta ditt telebolag eller din DSL-leverantör för vidare instruktioner.
Åtkomst
Strömadaptern fungerar som frånkopplingsenhet. Se till att det eluttag utrustningen ansluts till är lätt att komma åt och
placerat så nära utrustningen som möjligt.
Överbelastning
Överbelasta inte elnätet eller förlängningssladdar, eftersom detta ökar risken för brand eller elektriska stötar.
Underhåll
Undvik risk för elektriska stötar genom att inte plocka isär produkten. Ingen av de interna komponenterna kan bytas ut
av användaren; därmed finns ingen anledning till att exponera innandömet. Öppnande eller avlägsnande av lock kan
utsätta personer för skadlig elektrisk spänning. Felaktig återmontering kan orsaka elektriska stötar vid påföljande
användning.
Om service eller reparation behövs, bör ni kontakta en kvalificerad reparatör.
Skador som kräver service
Om något av följande inträffar bör du dra ur kontakten ur vägguttaget och kontakta kvalificerad servicepersonal:
Om strömadaptern eller dess kontakt är skadad.
Om inkopplade sladdar är skadade eller slitna.
Om någon vätska har spillts på utrustningen.
Om utrustningen har utsatts för regn eller vatten.
Om utrustningen inte fungerar ordentligt.
Om utrustningen har tappats eller skadats på något sätt.
Om det finns tydliga tecken på överhettning.
Om produkten uppvisar uppenbara förändringar i prestanda.
Koppla omedelbart bort produkten från vägguttaget om det luktar bränt eller rök. Du ska under inga omständigheter
öppna utrustningen på egen hand; du löper risk för dödsfall till följd av elektrisk ström.
Information om bestämmelser
Du måste installera och använda den här utrustningen i enlighet med tillverkarens anvisningar i dokumentationen som
medföljer produkten.
Innan du börjar installera eller använda denna produkt, ska du noggrant läsa innehållet i detta dokument för
apparatspecifika begränsningar eller regler som kan gälla i det land du vill använda denna produkt.

42
I vissa situationer eller miljöer kan användningen av trådlösa enheter begränsas av fastighetsägaren eller en
organisations ansvariga representanter.
Om du är osäker på vad som gäller för användning av trådlös utrustning inom specifika organisationer eller i särskilda
miljöer (t.ex. flygplatser) uppmanas du att fråga om lov innan du slår på utrustningen.
Technicolor är inte ansvarig för radio- eller televisionsstörning som orsakas av obehörig ändring av enheten, eller av att
du bytt ut eller kopplat in anslutningskablar och utrustning, annat än vad som specificerats av Technicolor. Korrigering av
störningen som orsakats av obehörig ändring, obehörigt utbyte eller tillägg är användarens ansvar.
Technicolor och dennes auktoriserade återförsäljare eller leverantörer kan inte hållas ansvariga för skada eller
överträdelse av statliga bestämmelser, som kan uppstå om dessa riktlinjer inte följs.
Konformitetsdeklaration avseende EU
Denna utrustning kan användas inom alla länder som är medlemmar i den Europeiska Unionen och alla länder som är
medlemmar i den europeiska frihandelsorganisation.
Konformitetsdeklarationen finns på www.technicolor.com.
Om produkten har en IEEE 802.11b/IEEE802.11g/IEEE802.11n trådlös mottagare:
Är den avsedd att endast användas i inomhus miljö
De uppfyller direktiven i Council Recommendation (1999/519/EC).
Den här produkten uppfyller:
Kommissionens förordning (EG) nr 1275/2008 av den 17 december 2008 om genomförande av
Europaparlamentets och rådets direktiv 2005/32/EG om krav på ekodesign för elektriska och elektroniska hushålls-
och kontorsprodukters elförbrukning i standby- och frånläge.
Kommissionens förordning (EG) nr 278/2009 av den 6 april 2009 om genomförande av Europaparlamentets och
rådets direktiv 2005/32/EG när det gäller krav på ekodesign för externa nätaggregats elförbrukning vid noll-last och
deras genomsnittliga verkningsgrad.
!
Härmed intygar Technicolor att denna produkt står i överensstämmelse med de väsentliga egenskapskrav
och övriga relevanta bestämmelser som framgår av Europaparlamentets och Rådets direktiv 1999/5/EG.

43
VEILIGHEIDSVOORSCHRIFTEN EN REGELGEVINGSINFORMATIE
LEES AANDACHTIG DEZE INSTRUCTIES DOOR, VOORALEER U BEGINT MET DE INSTALLATIE OF HET
GEBRUIK VAN DIT PRODUCT
Draadloze LAN
Als dit product is uitgerust met een draadloze zender-ontvanger, dan werkt het op basis van Direct Sequence Spread
Spectrum (DSSS) /Orthogonal Frequency Division Modulation (OFDM). Als zodanig is het ontworpen voor gebruik
in combinatie met alle andere draadloze DSSS/OFDM-producten die:
Voldoen aan de standaard IEEE 802.11b/IEEE802.11g/IEEE802.11n voor draadloze LAN's, zoals gedefinieerd en
goedgekeurd door het Institute of Electrical and Electronics Engineers (IEEE).
Wi-Fi® CERTIFIED™ (gecertificeerd voor Wi-Fi®) zijn, zoals gedefinieerd door de Wi-Fi® Alliance.
Richtlijn
Tenzij u beschikt over expliciete, voorafgaande, schriftelijke toestemming van Technicolor is het volgende verboden:
dit product disassembleren, decompileren, onderwerpen aan reverse-engineering, kopiëren of op andere wijze de
apparatuur, de inhoud, werking of functionaliteit analyseren,
of anderszins proberen de broncode af te leiden (of de onderliggende ideeën, algoritmen, structuur of organisatie)
van de apparatuur,
of andere informatie die door Technicolor wordt verschaft, behalve wanneer deze beperking uitdrukkelijk is
verboden door het lokale recht;
dit product kopiëren, verhuren, uitlenen, opnieuw verkopen, een sublicentie verlenen voor deze apparatuur, of op
andere wijze de apparatuur aan anderen overdragen of verspreiden;
dit product wijzigen, aanpassen of van dit product afgeleide apparatuur maken;
de productidentificatie, het copyright of andere bepalingen van kopieën van deze apparatuur verwijderen;
informatie verspreiden over de werking van de apparatuur of analysegegevens (inclusief, zonder beperking,
vergelijkende testen) van iedere bron die met de apparatuur verbonden is.
Deze handelingen die niet uitdrukkelijk zijn goedgekeurd door Technicolor leiden tot verlies van de garantie en kunnen
het recht van de gebruiker om deze apparatuur te gebruiken ongeldig maken.
Technicolor wijst alle aansprakelijkheid af als het gebruik niet beantwoordt aan deze voorschriften.
!
Neem, bij het gebruik van dit product, altijd de volgende elementaire voorzorgsmaatregelen om het risico op
brand, elektrische schokken of persoonlijke letsels tot een minimum te beperken:
Installeer het product altijd op de wijze zoals is beschreven in de documentatie die is meegeleverd met uw
product.
Gebruik dit product niet tijdens onweer. Er bestaat dan een gering risico van elektrische schokken ten
gevolge van blikseminslag.
Gebruik dit product niet in de buurt van een gaslek om melding te maken van dit lek.

44
Informatie inzake milieuzorg
AEEA-richtlijn (WEEE)
Energieverbruik
Energie besparen - U kunt het verschil maken!
Ontdek nieuwe manieren waarop u uw elektronische apparatuur kunt gebruiken.
Veiligheidsvoorschriften
Klimaatomstandigheden
Dit product:
is bedoeld voor gebruik binnenshuis op een vaste plaats; de omgevingstemperatuur mag niet hoger zijn dan 40°C.
mag niet worden geïnstalleerd op een plaats waar deze onderhevig is aan direct of overmatig zonlicht en/of
hitteuitstraling.
mag niet worden blootgesteld aan condities waarbij de warmte niet kan ontsnappen of aan water of condensatie.
moet worden geplaatst in een omgeving met hoogstens een vervuilingsgraad 2. (Omgeving waar geen vervuiling
of alleen droge, niet-geleidende vervuiling is).
Schoonmaken
Ontkoppel het product van de netspanning en de computer voordat u het product schoonmaakt. Gebruik geen
vloeibare schoonmaakmiddelen of spuitbussen. Gebruik een vochtige doek.
Dit symbool betekent dat het product, eens afgedankt, gescheiden moet worden ingezameld en NIET samen
met het huishoudelijk afval mag worden verwerkt. De Europese Unie heeft hiervoor een inzamel- en
recyclagesysteem opgelegd waarvoor de verantwoordelijkheid bij de fabrikant ligt.
Dit product is ontwikkeld en vervaardigd met gebruik van hoogwaardige materialen en componenten die
kunnen worden gerecycleerd en herbruikt.
Elektrische en elektronische apparaten bevatten onderdelen die nodig zijn om een foutloze werking te
garanderen, maar die schadelijk voor het milieu en de gezondheid kunnen zijn als ze op een ondeskundige
manier worden behandeld of verwijderd. Daarom dringen we erop aan om uw afgedankt product niet weg te
gooien met het huishoudelijk afval.
Als particuliere eigenaar van dit product, bent u verplicht het afgedankte apparaat naar een lokaal inzamel- of
recyclagepunt te brengen, of bij aankoop van een nieuw product het in te leveren bij de verkoper.
Als u een professionele gebruiker bent, volg dan de instructies van de fabrikant.
Als u dit product huurt of leaset, neem dan contact op met de verdeler.
Het bericht bevat niet alleen nuttige informatie over alle functies van uw product, maar ook over
energieverbruik.
Om de best mogelijke werking van de apparatuur te verkrijgen, raden we u aan om het bericht aandachtig te
lezen voordat u de apparatuur in gebruik neemt.
Door samen te werken kunnen we onze impact op de aarde verminderen!

45
Water en vocht
Gebruik dit product niet in de buurt van water, bijvoorbeeld een bad, wastafel, aanrecht, wasbak, in een natte kelder of
bij een zwembad. Als u het product van een koude naar een warme omgeving verplaatst, kan condensatie worden
gevormd op bepaalde interne onderdelen. Laat het product drogen voordat u het opnieuw inschakelt.
Classificaties van aansluitingen
De externe aansluitingen aan de achterkant van het product hebben de volgende classificaties:
DSL, ADSL, SHDSL, VDSL, Line: TNV-schakeling blootgesteld aan overspanningen (TNV-3)
ISDN: SELV-schakeling
PSTN, FXO: TNV-schakeling blootgesteld aan overspanningen (TNV-3)
Phone, VoIP, FXS: TNV-schakeling niet blootgesteld aan overspanningen (TNV-2)
Alle overige interfacepoorten (zoals Ethernet, 10/100Base-T/MDI(-X), USB, Console, Craft, enzovoort), inclusief
de laagspanningsingang van de netvoeding: SELV-schakelingen.
Elektrische voeding
De elektrische voeding van het product moet overeenkomen met de specificaties op de labels.
De netvoeding moet van het type “Klasse II” zijn met een gelimiteerd uitgangsvermogen, in overeenstemming met de
voorschriften van IEC60950-1 / EN60950-1, Artikel 2.5 en met een nominale waarde zoals vermeld op het label op uw
product. De voeding moet zijn getest en goedgekeurd conform nationale of lokale normen.
Het gebruik van andere typen voedingen is niet toegestaan. Als u niet zeker weet welk type voeding u moet gebruiken,
raadpleegt u de gebruikersdocumentatie bij het product of neemt u contact op met uw lokale dealer.
USB
Het product dient aangesloten te worden aan een geïdentificeerde voedingsbron met gelimiteerd uitgangsvermogen.
Te l e f o o n k a b e l
Sluit de telefoonkabel alleen op de PSTN-, FXO-, DSL-, ADSL-, SHDSL-, VDSL- of Line-connector van het product
aan. Sluit de telefoonkabel nooit op een andere connector van het product aan.
Volg de instructies voor het aansluiten van het product in dezelfde volgorde als aangegeven in de installatiehandleiding.
!
WAARSCHUWING
De Phone-, VoIP-, FXS-poort wordt geclassificeerd als een TNV-3 circuit wanneer deze intern is
aangesloten op de PSTN-, FXO-poort, bijvoorbeeld wanneer het apparaat is uitgeschakeld.
Als het product is voorzien van een USB-interface (slave en/of master) of een type connector met
metalen afscherming, mag de Phone-, VoIP-, FXS-poort niet met een hulpmiddel (bijvoorbeeld een
externe telefoonkabel) op de PSTN- of DSL-, ADSL-, SHDSL-, VDSL-, Line-poort worden aangesloten.
!
LET OP
Om brandgevaar te beperken, moet u voor de telefoonlijn een kabel met een minimale draaddoorsnede AWG
26 (Amerikaanse kabeldiktemaat) gebruiken.
46
Centrale splitter / distributiefilter(s) (indien van toepassing)
Als u uw telefoon via dezelfde lijn wilt gebruiken, moet voor optimale DSL-prestaties een centrale splitter of
distributiefilter(s) worden geïnstalleerd.
Afhankelijk van de DSL-configuratie en het type splitter of filter moet de installatie door een erkende
onderhoudstechnicus worden uitgevoerd. Neem contact op met het telefoonbedrijf of de DSL-serviceprovider voor
instructies.
To e g a n k e l i j k h e i d
De netvoeding met rechtstreekse aansluiting wordt gebruikt als uitschakelapparaat. Sluit de voeding aan op een
stopcontact dat goed toegankelijk is en zich in de buurt van de apparatuur bevindt.
Overbelasten
Stopcontacten en verlengsnoeren mogen niet overbelast worden omdat dit het risico op brand of elektrische schok
verhoogt.
Onderhoud
U vermindert het risico op een elektrische schok door het product niet zelf te demonteren. De interne onderdelen
kunnen niet door de gebruiker worden vervangen; het is daarom niet nodig om het apparaat te openen. U kunt worden
blootgesteld aan gevaarlijke spanningsniveaus door het apparaat te openen of de behuizing te verwijderen. Als het
apparaat op onjuiste wijze opnieuw wordt gemonteerd, kan het gebruik een elektrische schok veroorzaken.
Neem contact op met een erkende onderhoudstechnicus voor onderhoud of reparatie van de apparatuur.
Schade waarvoor een onderhoudstechnicus is vereist
Onder de volgende omstandigheden ontkoppelt u het product van de netspanning en neemt u contact op met een
erkende onderhoudstechnicus:
Als de voeding of de stekker beschadigd is.
Als de netsnoeren beschadigd of gerafeld zijn.
Als vloeistof in het apparaat is gesijpeld.
Als het product is blootgesteld aan regen of water.
Als het product niet normaal functioneert.
Als het product is gevallen of is beschadigd.
Als er duidelijke tekenen van oververhitting zijn.
Als de werking van het product duidelijk is gewijzigd.
Koppel het product onmiddellijk los van de netspanning als het een brandgeur verspreidt of rookt. U mag het product in
geen geval zelf openen vanwege het risico op elektrocutie.
Juridische Kennisgeving
U moet u bij de installatie en het gebruik van dit apparaat exact aan de instructies van de fabrikant houden, die worden
beschreven in de gebruikersdocumentatie die is meegeleverd met uw product.

47
Lees, voordat u begint met de installatie of het gebruik van dit product, de inhoud van dit document zorgvuldig door en
bepaal of er apparaatspecifieke beperkingen of regels gelden in het land waar u dit product wilt gebruiken.
In sommige situaties of omgevingen is het gebruik van draadloze apparaten mogelijk beperkt door de eigenaar van het
gebouw of door verantwoordelijke vertegenwoordigers van de organisatie.
Als u niet zeker weet welke richtlijnen van toepassing zijn op het gebruik van draadloze apparatuur in een specifieke
organisatie of omgeving (bijvoorbeeld luchthavens), wordt u geadviseerd toestemming voor gebruik van dit apparaat te
vragen voordat u het inschakelt.
Technicolor is niet verantwoordelijk voor eventuele verstoringen van het radio- of televisieverkeer die worden
veroorzaakt door ongeautoriseerde aanpassing van het apparaat of door de vervanging of aansluiting van andere kabels
en apparaten dan zijn gespecificeerd door Technicolor. Het is de verantwoordelijkheid van de gebruiker om zorg te
dragen voor het opheffen van de storing die wordt veroorzaakt door dergelijk ongeautoriseerde aanpassingen,
vervangingen of aansluitingen.
Technicolor en diens geautoriseerde wederverkopers of distributeurs zijn niet aansprakelijk voor enige schade of
overtreding van voorschriften van de overheid die het gevolg is van het niet naleven van deze richtlijnen.
Overeenstemmingsverklaring van de Europese Gemeenschap
Deze apparatuur mag worden gebruikt in alle lidstaten van de Europese Gemeenschap en alle landen die lid zijn van de
Europese Vrijhandelsorganisatie.
De complete overeenstemmingsverklaring vindt u op www.technicolor.com.
Indien het product uitgerust is met een IEEE 802.11b/IEEE802.11g/IEEE802.11n draadloze zender/ontvanger:
dient het enkel en alleen binnenshuis gebruikt te worden.
is het in overeenstemming met de minimale beperkingen en limitaties zoals aangegeven in de Europese
aanbeveling (1999/519/EC) betreffende de beperking van blootstelling van de bevolking aan elektromagnetische
velden.
Dit product voldoet aan:
Verordening (EG) nr. 1275/2008 van de Commissie van 17 december 2008 tot vaststelling van
uitvoeringsbepalingen van Richtlijn 2005/32/EG van het Europees Parlement en de Raad, wat betreft voorschriften
inzake ecologisch ontwerp voor het elektriciteitsverbruik van elektrische en elektronische huishoud- en
kantoorapparatuur in de stand by-stand en de uit-stand.
Verordening (EG) nr. 278/2009 van de Commissie van 6 april 2009 houdende tenuitvoerlegging van Richtlijn
2005/32/EG van het Europees Parlement en de Raad, wat betreft voorschriften inzake ecologisch ontwerp voor
het elektrisch opgenomen vermogen van externe stroomvoorzieningen in niet-belaste toestand en de gemiddelde
actieve efficiëntie van externe stroomvoorzieningen.
!
Hierbij verklaart Technicolor dat dit product in overeenstemming is met de essentiële eisen en de andere
relevante bepalingen van Richtlijn 1999/5/EG van het Europees Parlement en de Raad.

THOMSON TELECOM BELGIUM NV
Prins Boudewijnlaan 47
2650 Edegem
Belgium
www.technicolor.com
PAP
*DSL3681883B*
DSL3681883B
Copyright 2011 Technicolor. All rights reserved.
All tradenames referenced are service marks, trademarks,
or registered trademarks of their respective companies.
Specifications subject to change without notice.
E-DOC-SAF-20100729-0000 v3.0.