Techtuit KS01 Electronic Performance and Tracking System (EPTS) devices User Manual mtd200 manual ENx
Techtuit Co., Ltd. Electronic Performance and Tracking System (EPTS) devices mtd200 manual ENx
Techtuit >
Users Manual
Table of contents
table of contents ..................................................................................................................... 1
FCC Caution .......................................................................................................................... 3
Introduction ............................................................................................................................ 4
KS-01 ..................................................................................................................................... 5
Heart rate sensor device ..................................................................................................... 5
Device buttons and functions .......................................................................................... 5
Smart Wear ........................................................................................................................ 6
5 device chargers ............................................................................................................... 6
1 device chargers ............................................................................................................... 7
KNOWS APP ...................................................................................................................... 7
Battery charging ..................................................................................................................... 7
How to start ............................................................................................................................ 8
1.Device power ON / OFF .................................................................................................... 8
2.account registration ......................................................................................................... 9
Account application screen ................................................................................................. 9
Confirmation mail ............................................................................................................ 10
Approval Complete screen .............................................................................................. 11
3.Login ............................................................................................................................. 12
Login screen ..................................................................................................................... 12
4.Team registration .......................................................................................................... 12
5.management ................................................................................................................. 17
Add coach and player ....................................................................................................... 18
Coach / Player registration screen .................................................................................... 19
Coach addition screen ...................................................................................................... 19
Player addition screen ...................................................................................................... 19
6.Device pairing ............................................................................................................... 22
Automatic .................................................................................................................. 22
Manual ............................................................................................................................ 23
7.Sync .............................................................................................................................. 24
Restart the device power .................................................................................................. 25
Activation - Contents of each menu .................................................................................. 26
Activity .............................................................................................................................. 27
Select date of recording .................................................................................................... 28
New session ..................................................................................................................... 29
statistics ............................................................................................................................ 47
player................................................................................................................................ 50
Player record ................................................................................................................. 51
Player information -1 ................................................................................................... 53
Player information―2 .................................................................................................. 54
management ..................................................................................................................... 55
Configuration .................................................................................................................... 56
Settings - Account ......................................................................................................... 56
Settings - team name and photo ....................................................................................... 57
Settings - training items .................................................................................................... 58
Synchronize devices ..................................................................................................... 60
Synchronize devices (By Manual) ................................................................................... 61
Upload device log screen ................................................................................................ 62
Switch the team screen ................................................................................................. 63
Notes ................................................................................................................................... 64
Sensor device care ......................................................................................................... 64
Smartware care .............................................................................................................. 64
Disclaimer ............................................................................................................................ 65
15.105(b)
This equipment has been tested and found to comply with the limits for a Class B digital
device, pursuant to part 15 of the FCC rules. These limits are designed to provide reasonable
protection against harmful interference in a residential installation. This equipment generates,
uses and can radiate radio frequency energy and, if not installed and used in accordance with
the instructions, may cause harmful interference to radio communications. However, there is
no guarantee that interference will not occur in a particular installation. If this equipment does
cause harmful interference to radio or television reception, which can be determined by
turning the equipment off and on, the user is encouraged to try to correct the interference by
one or more of the following measures:
-Reorient or relocate the receiving antenna.
-Increase the separation between the equipment and receiver.
-Connect the equipment into an outlet on a circuit different from that to which the receiver is
connected.
-Consult the dealer or an experienced radio/TV technician for help.
FCC RF Radiation Exposure Statement:
1. This Transmitter must not be co-located or operating in conjunction with any other
antenna or transmitter.
2. This equipment complies with FCC RF radiation exposure limits set forth for an
uncontrolled environment.
Non-modification Statement:
Changes or modifications not expressly approved by the party responsible for compliance
could void the user's authority to operate the equipment.
FCC Caution:
This device complies with Part 15 of the FCC Rules. Operation is subject to the following two
conditions: (1) This device may not cause harmful interference, and (2) this device must
accept any interference received, including interference that may cause undesired operation.
Introduction
Thank you very much for purchasing KS-01 this time.
KS-01
Heart rate sensor
device
When installing the device in dedicated smartware, training sports and playing
matches, you can check various information such as heart rate and speed of th
in real time.
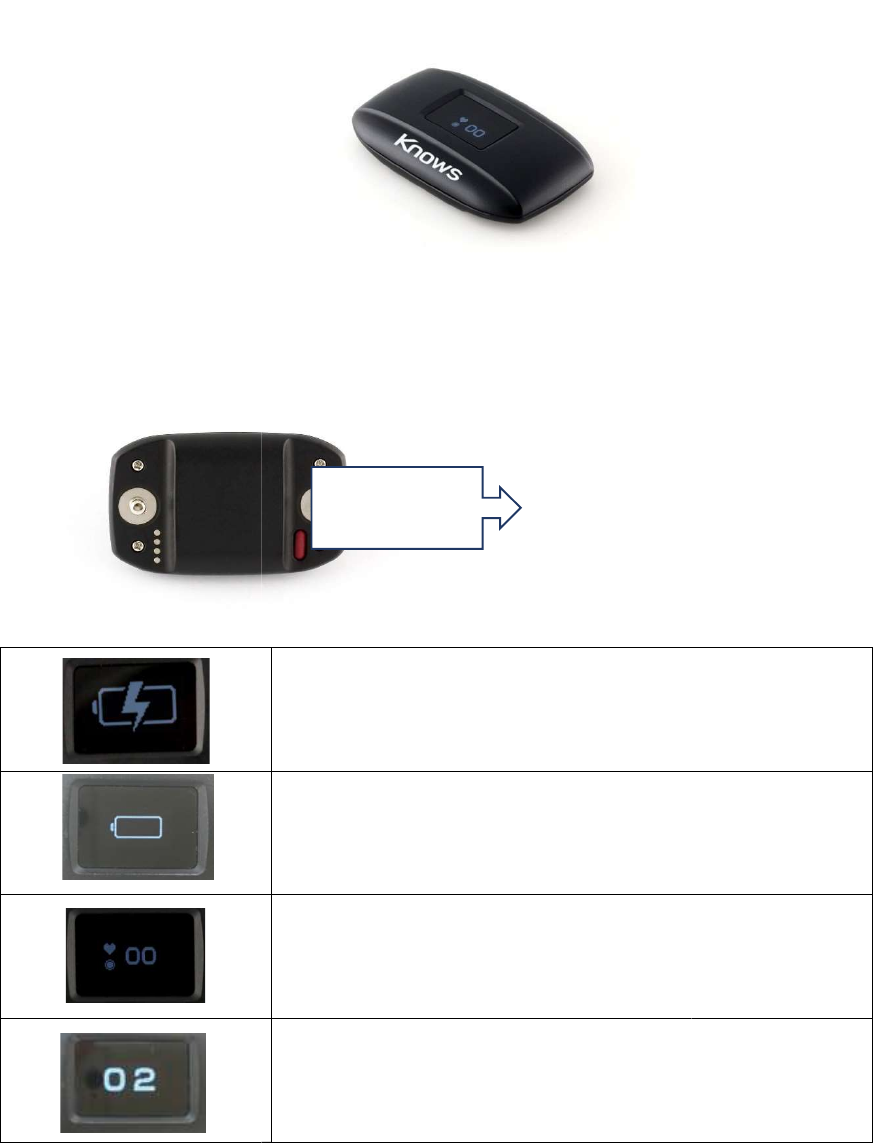
Device buttons and functions
There is a power button on the back of
t
device
When installing the device in dedicated smartware, training sports and playing
matches, you can check various information such as heart rate and speed of th
Device buttons and functions
There is a power button on the back of
the device
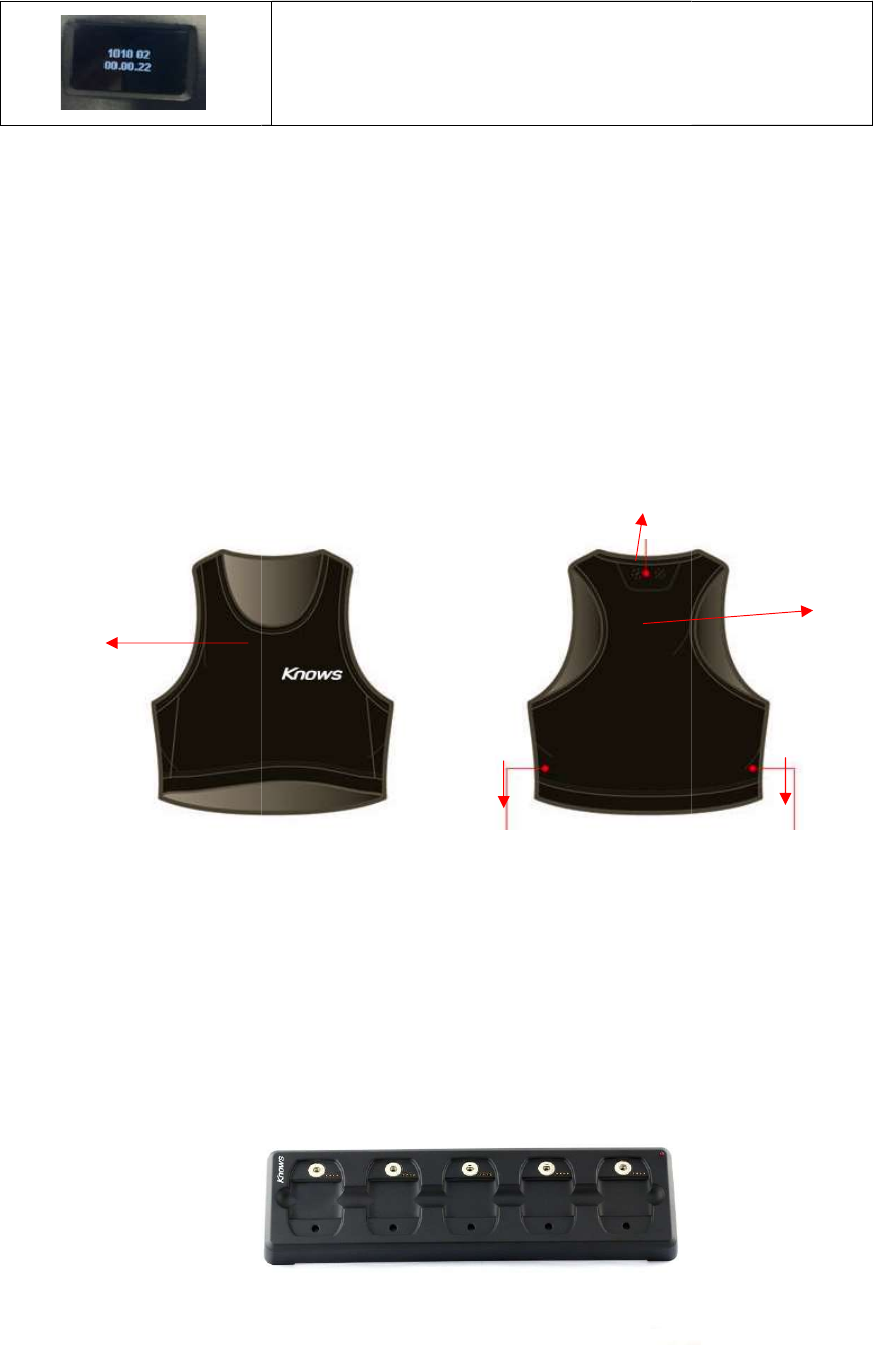
Charging Display
Battery level is below 10% Display
※Device
will notify you by warning sound that the battery
level is too low, Please to charge it.
Normal State。
When the heart rate can be measured, the number is
displayed.
Press the power button on the device once to display the
player's number.
Power button
When installing the device in dedicated smartware, training sports and playing
matches, you can check various information such as heart rate and speed of th
e user
will notify you by warning sound that the battery
When the heart rate can be measured, the number is
Press the power button on the device once to display the
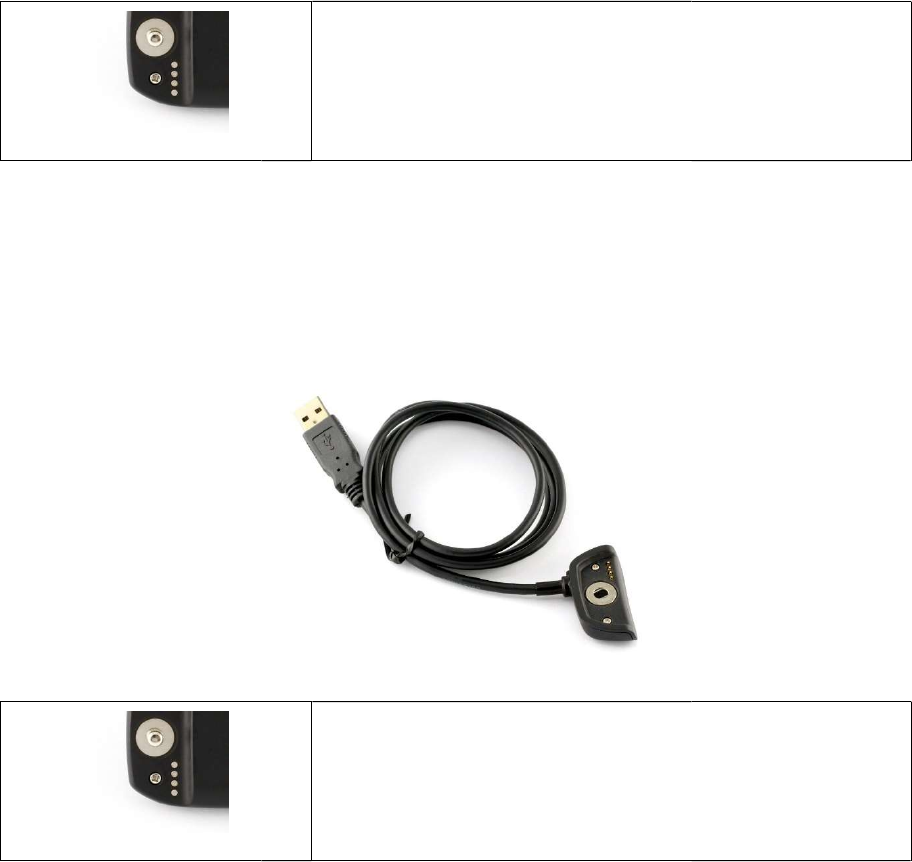
Smart Wear
It is an item effective for analyzing the situation of training. In order to
accurate heart rate, please wear smartwear that fits the user's body
A01----- front
B01----- back
C01-----
The position where the device is to be mounted. Please fix with a hook
D01-----sensor
5
device chargers
For team practice and multiplayer usage, 5 chargers can charge up to 5 devices at the
same time.
A01
Press the power button on the device twice to display the
device number.
It is an item effective for analyzing the situation of training. In order to
accurate heart rate, please wear smartwear that fits the user's body
The position where the device is to be mounted. Please fix with a hook
device chargers
For team practice and multiplayer usage, 5 chargers can charge up to 5 devices at the
C01
D01
Press the power button on the device twice to display the
It is an item effective for analyzing the situation of training. In order to
obtain a more
accurate heart rate, please wear smartwear that fits the user's body
。
The position where the device is to be mounted. Please fix with a hook
For team practice and multiplayer usage, 5 chargers can charge up to 5 devices at the
D01
B01
1
device charger
The dedicated USB cable is used for charging and data synchronization.
KNOWS App
You can be download
KNOWS
Charging the battery
After unpacking the KS
-
before using KS-01
for the first time.
When the remaining battery power reaches 10%, we will inform you with a warning
sound
with insufficient battery power.
When charging, please note the direction of inserting the
device so that the position of the charging pin does not
become opposite.
device charger
The dedicated USB cable is used for charging and data synchronization.
Be careful when inserting so that the position of the device
charging pin does not become opposite when charging.
KNOWS
App from the App Store.
Charging the battery
-
01
package, first charge the battery. Please fully charge
for the first time.
When the remaining battery power reaches 10%, we will inform you with a warning
with insufficient battery power.
When charging, please note the direction of inserting the
device so that the position of the charging pin does not
The dedicated USB cable is used for charging and data synchronization.
Be careful when inserting so that the position of the device
charging pin does not become opposite when charging.
package, first charge the battery. Please fully charge
When the remaining battery power reaches 10%, we will inform you with a warning
How to start
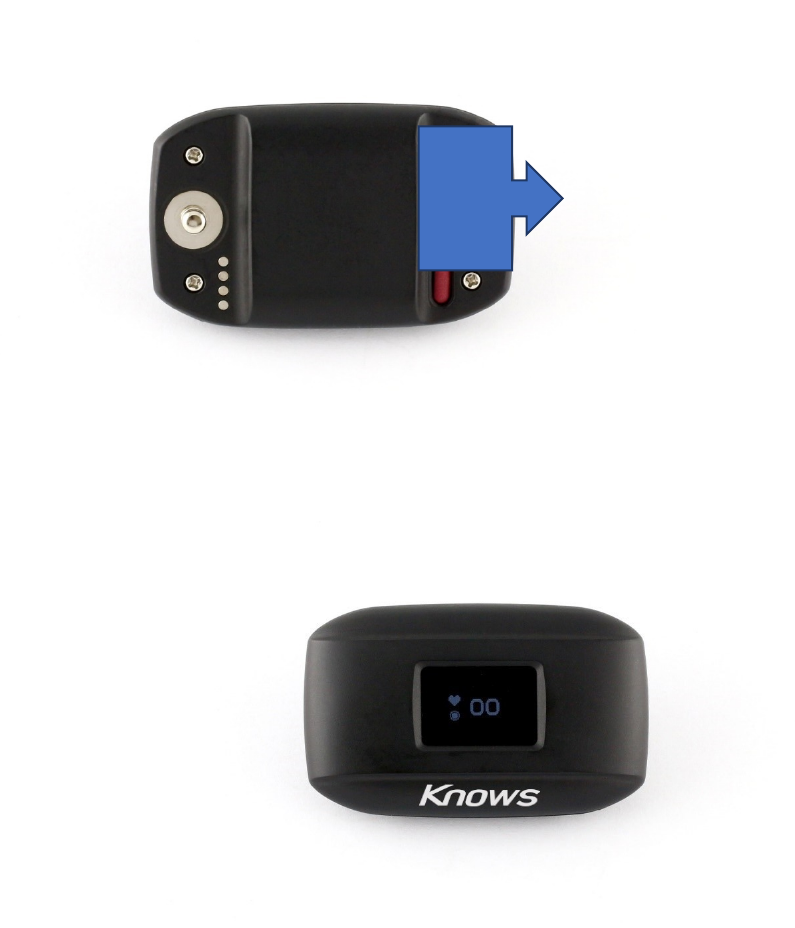
1.Device power ON / OFF
Power ON ····· Power on will be turned on by pushing the red switch on the back of the main
unit for about 1second.
Power off · · · · Main body reverse When you press and hold the red switch for about 3
seconds, the power turns OFF.
Back side of the KS-01
Device Top view(power ON state)
※Battery level is below 10% Display, Device will notify you by warning sound that the
battery level is too low, Please to charge it.
Power
button
2.
account registration
Please open a KNOWS
APP
account registration
APP
and register your account
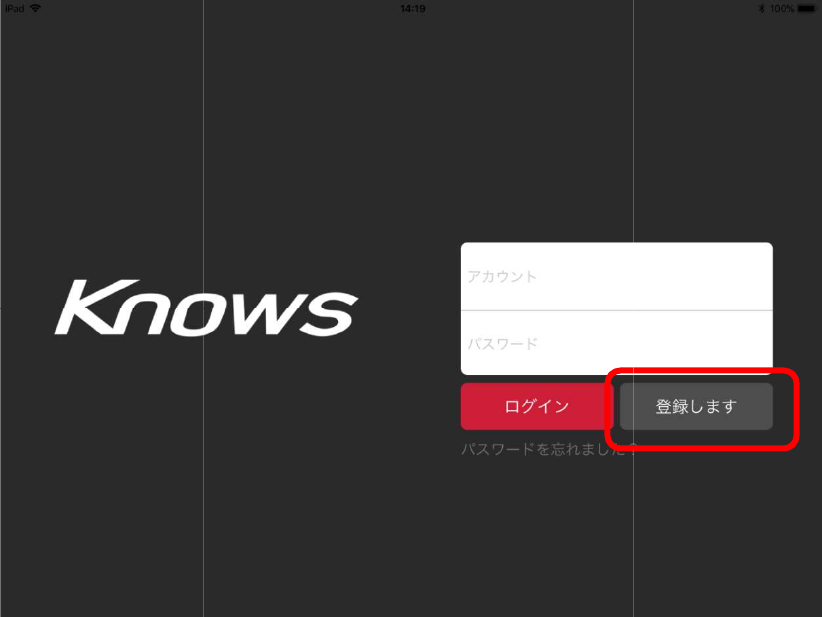
Account application screen
explanation
A
Account (ID) New creation
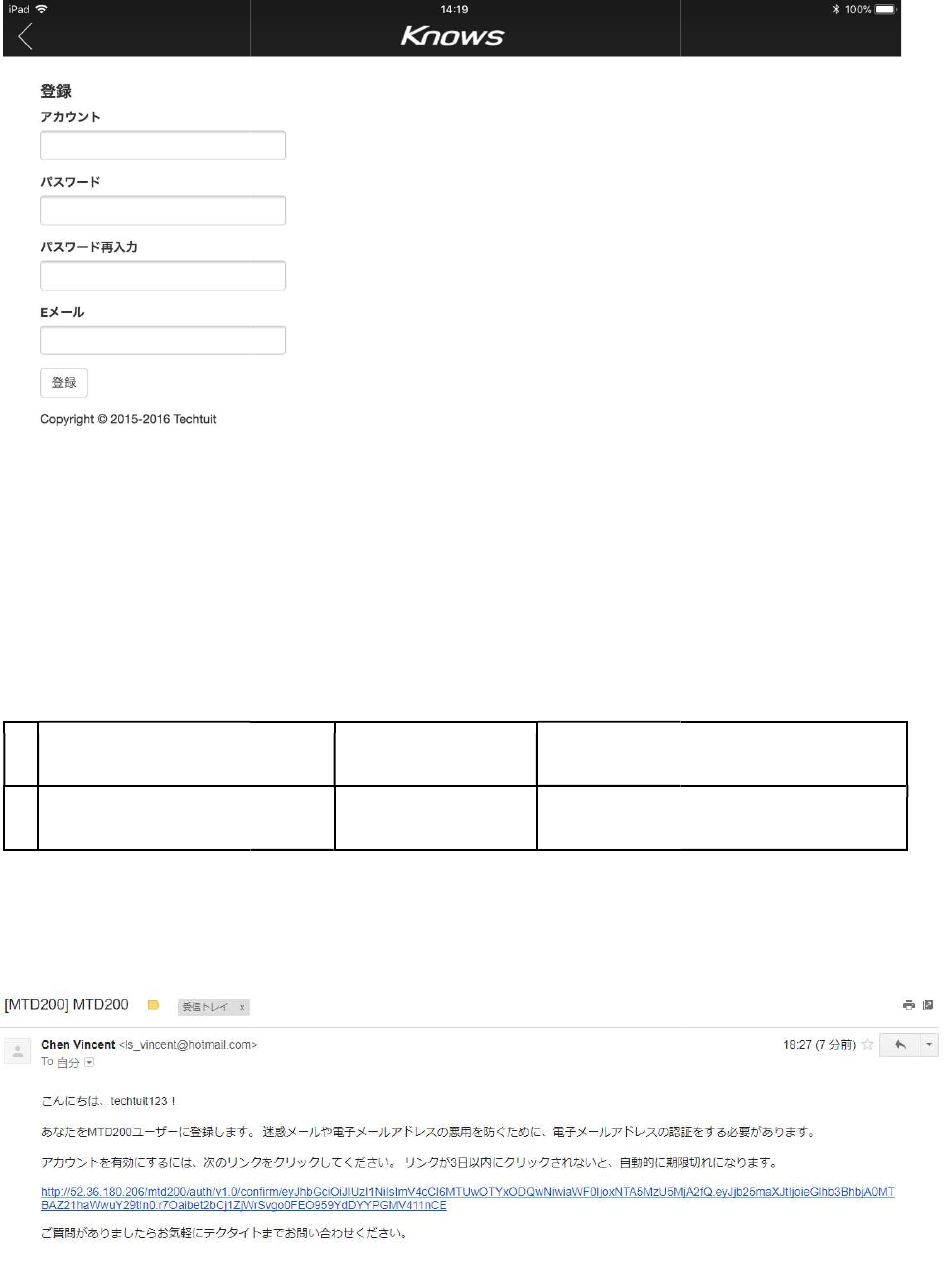
Certification mail
Please click the link in the authentication
Account application screen
Next screen
Error message
Account (ID) New creation
Approval mail
Please click the link in the authentication
mail according to the reply email.
Error message
mail according to the reply email.

When you click the link, "Account application completed" is displayed, you can log in with
Know APP.
Approval Complete screen

3. Login
Login screen
explanation
A
Enter account (ID)
B
Enter password
C
log in
D
Account (ID) New creation
(Web function)
E
If you have forgotten your
password (here on the Web)
4.Team registration
Next screen Error message
N/A
Please enter account (ID)
N/A
Please enter the password
Team list
Account (ID) or password is incorrect
Account (ID) New creation
Create New
If you have forgotten your
password (here on the Web)
home page
A
B
C
E
Please enter account (ID)
Please enter the password
Account (ID) or password is incorrect
D
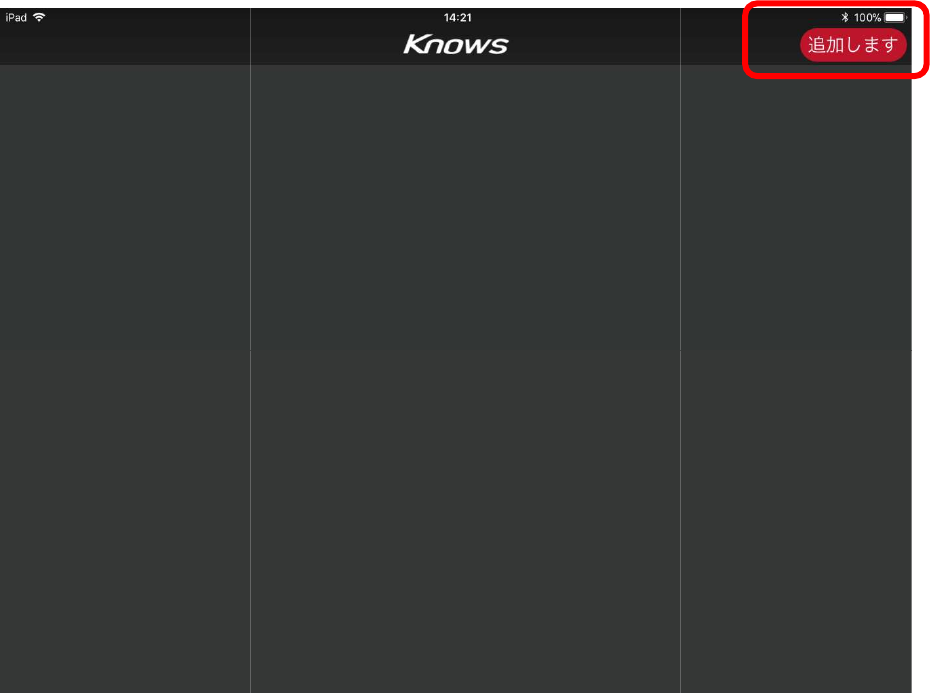
If you can log in, please add a team first
Please select "Add" at the top right. Once selected, it will go to the next team
registration screen.
New team creation screen
After
entering each item and input is completed, please select "Save" in the upper right.
If you can log in, please add a team first
。
Please select "Add" at the top right. Once selected, it will go to the next team
New team creation screen
entering each item and input is completed, please select "Save" in the upper right.
Please select "Add" at the top right. Once selected, it will go to the next team
entering each item and input is completed, please select "Save" in the upper right.
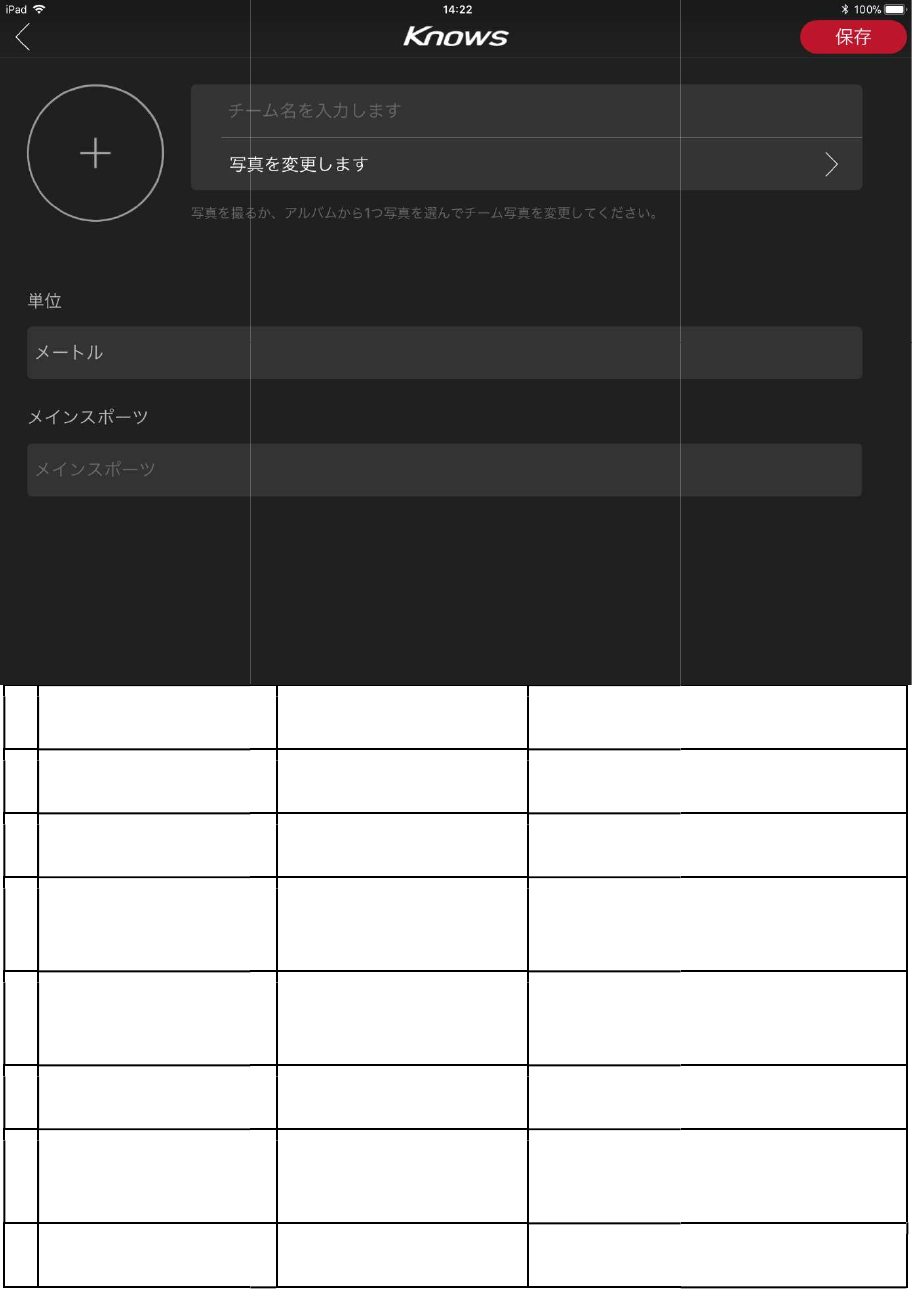
Team registration screen
explanation
A
Save team
B
Team name
C
Select a photo
D
Select a photo
E
Meter / yard
F
Main exercise items
G
Back (no saving)
B
C
D
G
E
F
Team registration screen
Next screen
Error message
Team list
Select a photo → Enter team name
Screen for selecting
photo
Screen for selecting
photo
→ Please be sure to input the
exercise items.
Team list
Error message
Select a photo → Enter team name
→ Please be sure to input the
exercise items.
A
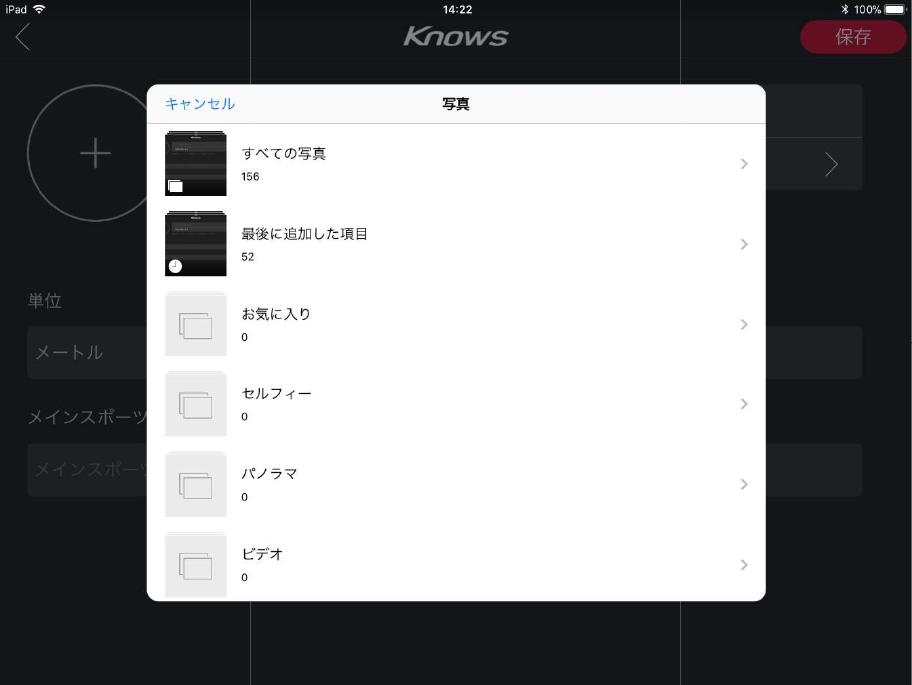
C、D
Screen for selecting photo
To add a
team, select "Add", enter the difference team, and select "Save" after
completing the input.
Screen for selecting photo
team, select "Add", enter the difference team, and select "Save" after
team, select "Add", enter the difference team, and select "Save" after
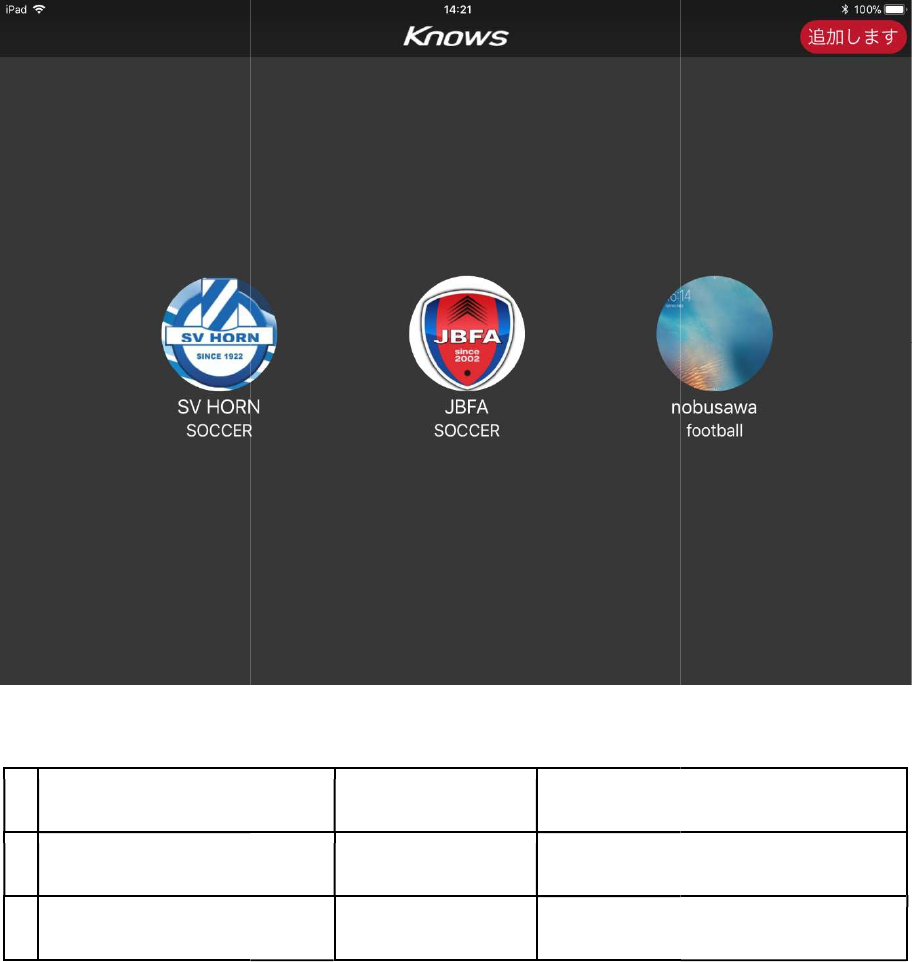
Team registration complete screen
explanation
A
Create a new team
B
Choose a team
Team registration complete screen
Next screen
Error message
New team
Activity
Error message
5.Management
Add coach and player
When registration of the new team is completed, you will register coaches and players.
Please select "Management" in the lower right.
When registration of the new team is completed, you will register coaches and players.
Please select "Management" in the lower right.
When registration of the new team is completed, you will register coaches and players.
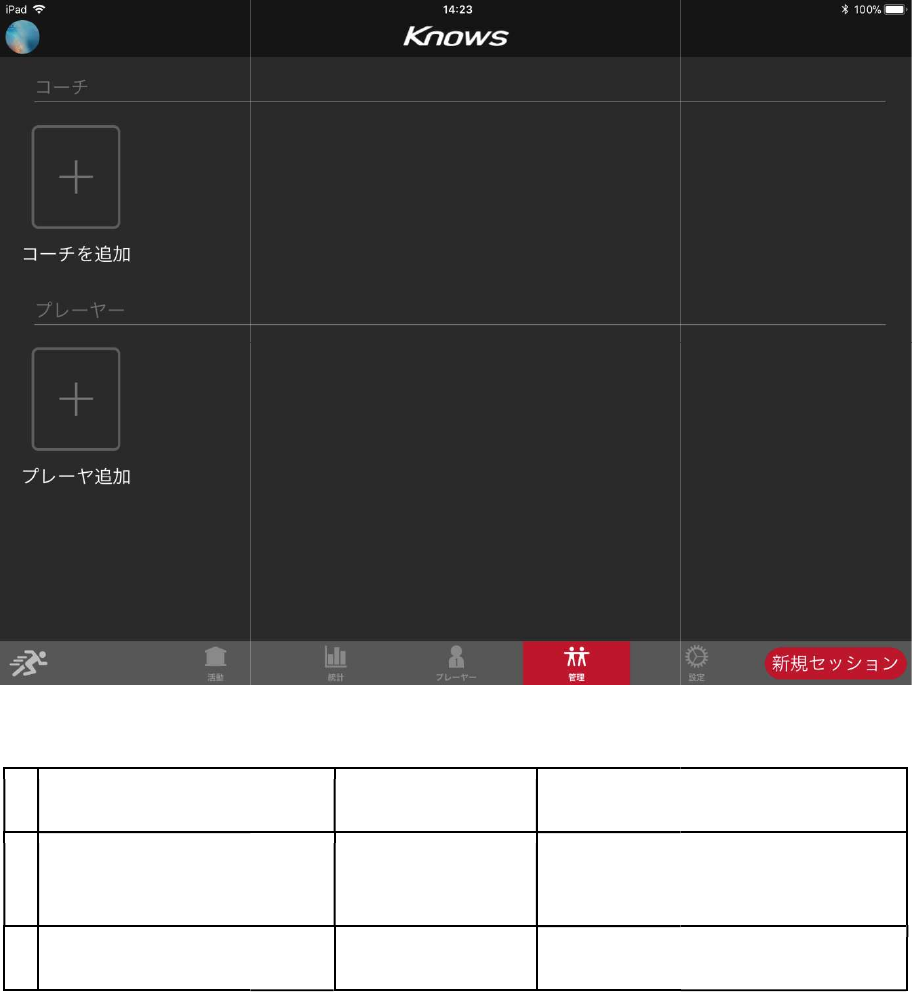
Coach / Player registration screen
explanation
A
Create a new coach
B
Add player
Coach / Player registration screen
Next screen
Error message
Coach addition
screen
Add player
Error message
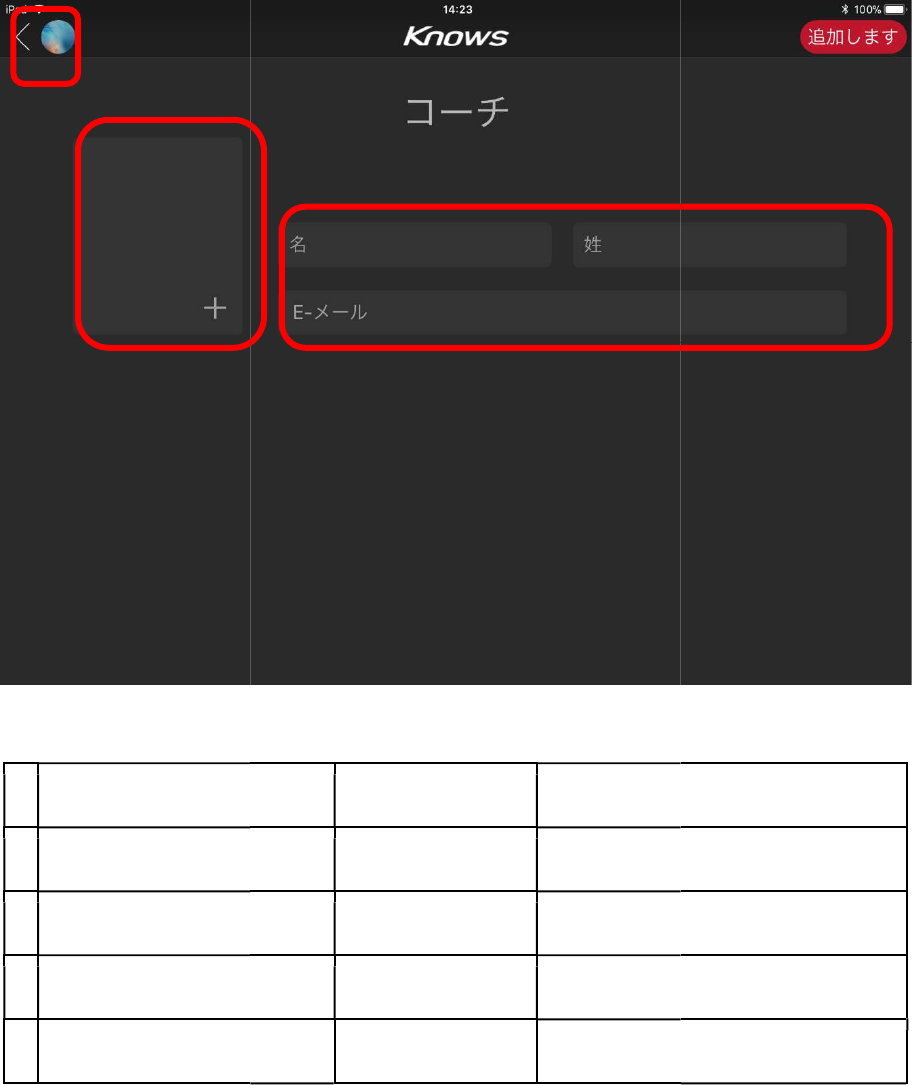
Coach addition screen
Please select "Add coach" and enter your first and last name and e
Please select a photo. Please select "Add" at the end.
explanation
A
Add Cancel
B
Save the coach
C
Add photo
D
Enter coach information
Player addition screen
A
C
Please select "Add coach" and enter your first and last name and e
-
Please select a photo. Please select "Add" at the end.
Next screen
Error message
management
management
Enter coach information
D
-
mail address.
Error message

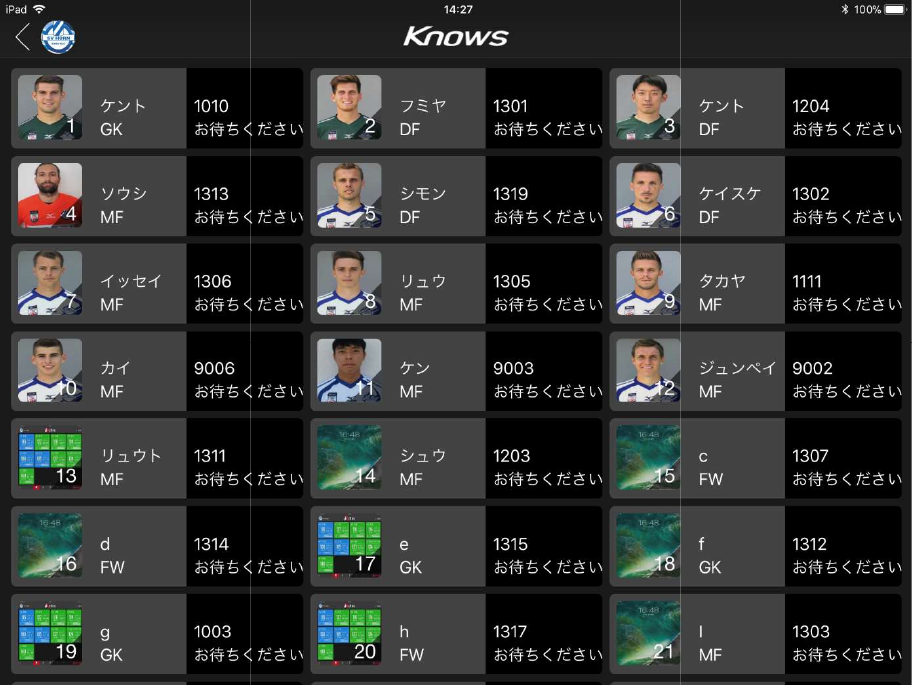
Please select "Add Player" and enter player information.
explanation
A
Add more players
B
Save players
C
Select a photo
D
Enter player information
A
C
E
Please select "Add Player" and enter player information.
Next screen Error message
management
management
Enter player information
Please enter maximum heart rate to
"Max.HR"
Please input maximum running speed to
"Max SPEED".
Please enter "recovery rate",
as well.
D
Please enter maximum heart rate to
Please input maximum running speed to
Please enter "recovery rate",
"position"
B

E
Pair a device Sensor pairing
When adding or editing, you need to synchronize the devices in the settings
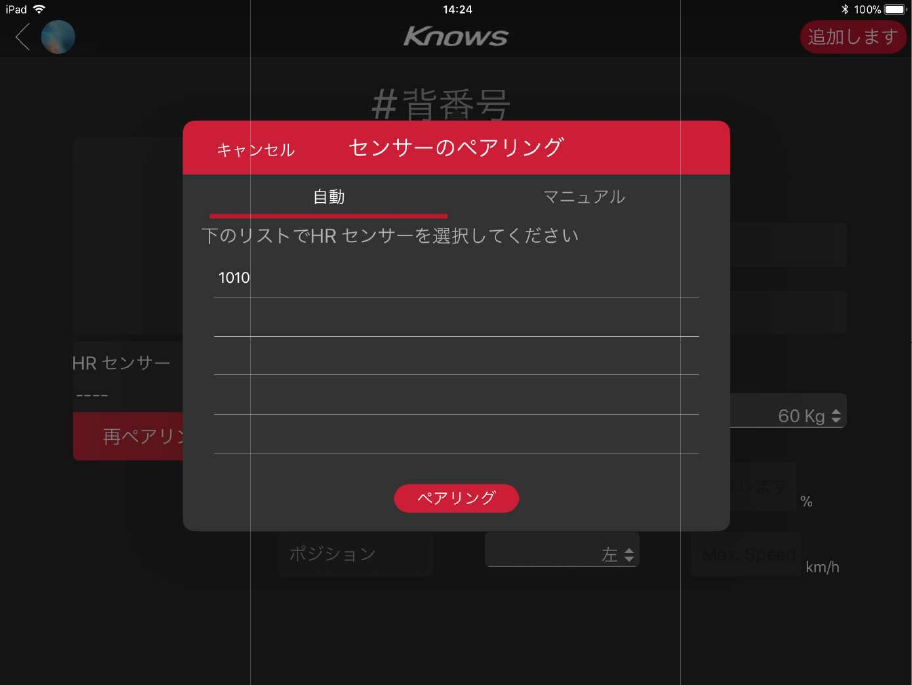
6.Device pairing
①Automatic
elect the device number to be attached and pair it.
elect the device number to be attached and pair it.
Device pairing
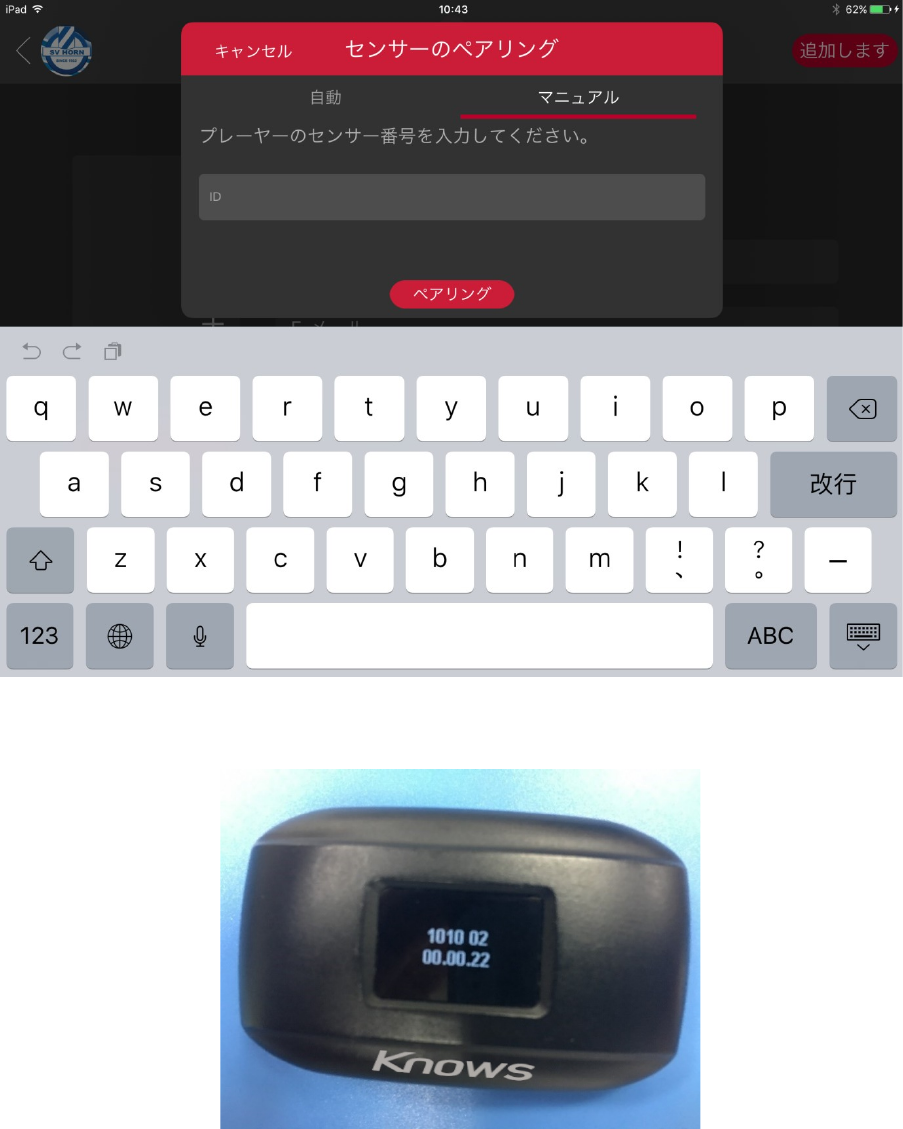
②Manual
After turning on the power, please select the number of the first 4 digits of the
2nd screen for the device number.
.
When pairing is completed, select "D" "Synchronize devices" on the setting screen and
synchronize.

7.Sync
explanation
A
Edit account (ID)
B
Edit team information
C
Edit training type
D
Synchronize device settings
E
Upload device log
F
Change other teams
Restart the device's power supply
※
Please reboot the device's power supply on the screen to synchronize setting /
device.
A
B
C
D
E
F
Next screen
Account (ID) edit screen
Edit team information
Team information edit screen
Training type edit screen
Synchronize device settings
Synchronize device
The screen to upload the logo
Team selection screen
Restart the device's power supply
Please reboot the device's power supply on the screen to synchronize setting /
D
E
F
Error message
Please reboot the device's power supply on the screen to synchronize setting /
Synchronize the device after rebooting.
Synchronize the device after rebooting.
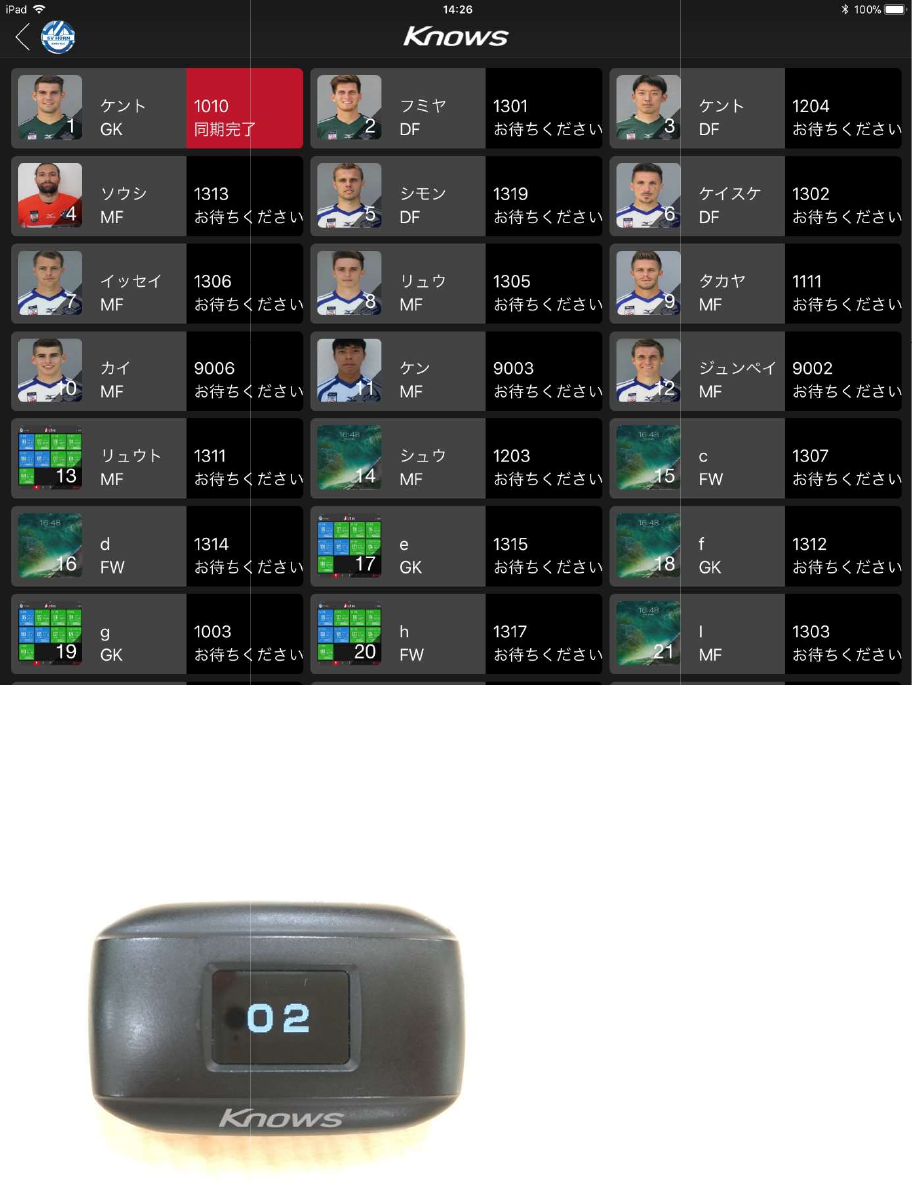
When you can
synchronize, "Sync complete" is displayed.
Also display the set jersey of the device body.
Please start training after synchronization is completed.
synchronize, "Sync complete" is displayed.
Also display the set jersey of the device body.
Please start training after synchronization is completed.
Activation -
Contents of each menu
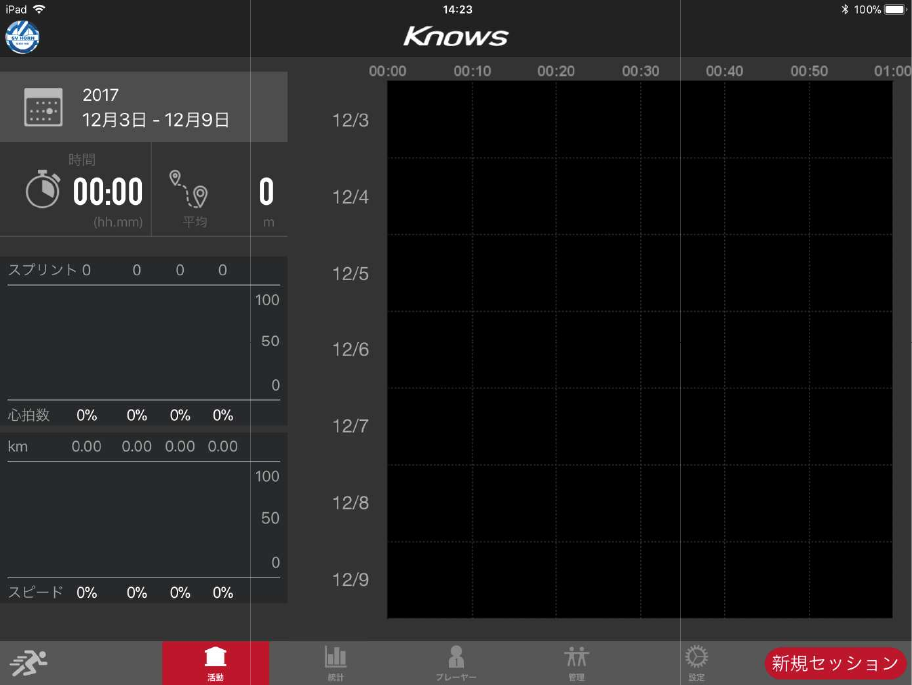
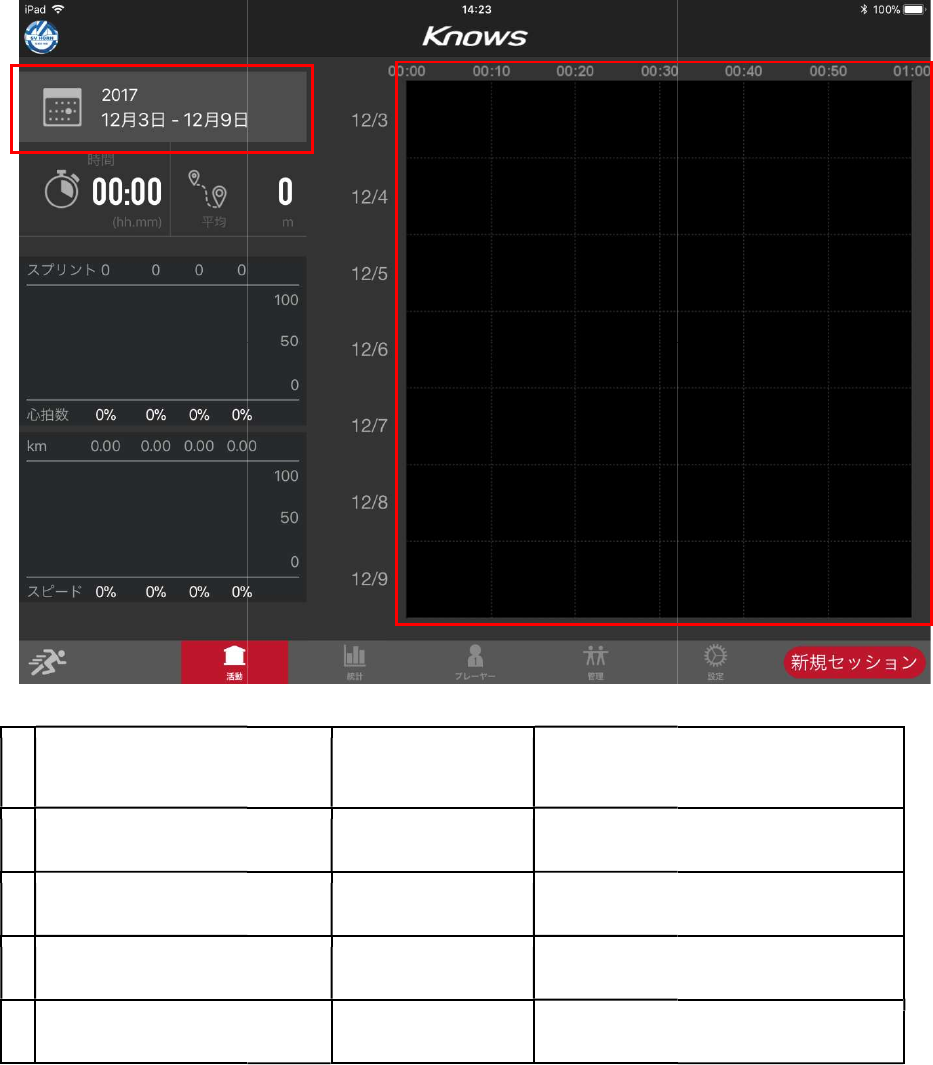
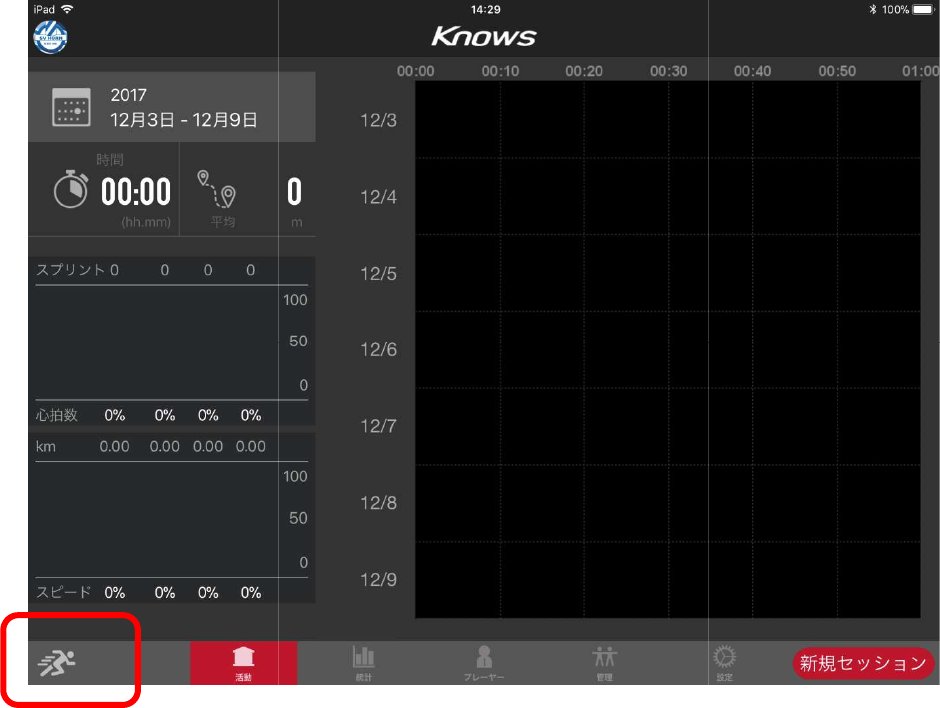
Activity
On the "Activities" screen, "New
displayed.
explanation
A
Choose the month and day
B
Player
measurement mode
C
Training item selection
D
Record / scroll
A
B
Contents of each menu
On the "Activities" screen, "New
Session" is selected and the training data of the team is
Next screen
Error message
Choose the month and day
Select date
measurement mode
Measurement
Training item selection
Map screen
Activity
D
Session" is selected and the training data of the team is
Error message
C
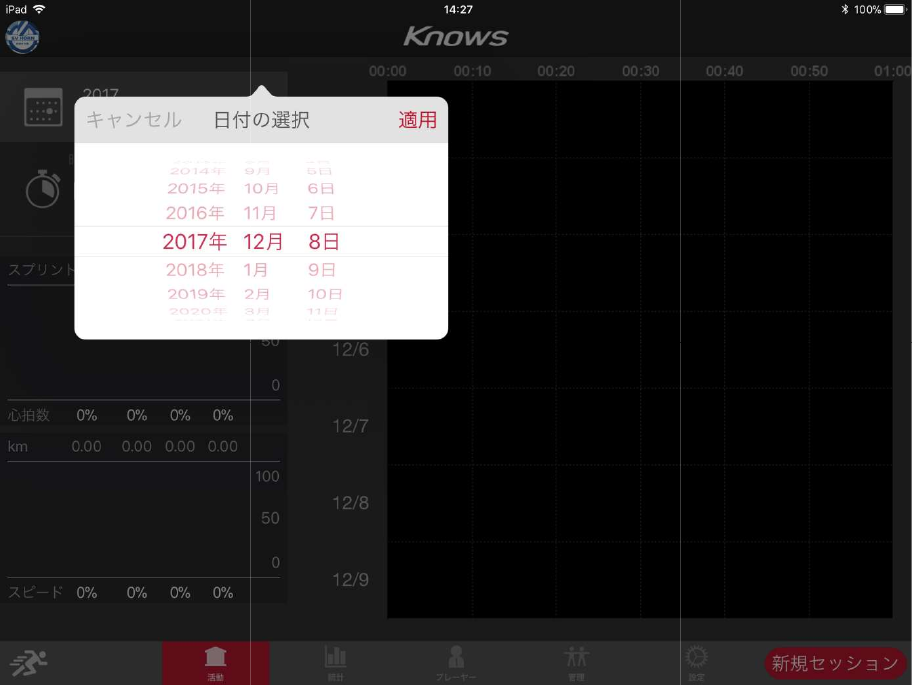
Select date of recording
Selecting a date will indicate a match or training record.
Select date of recording
Selecting a date will indicate a match or training record.
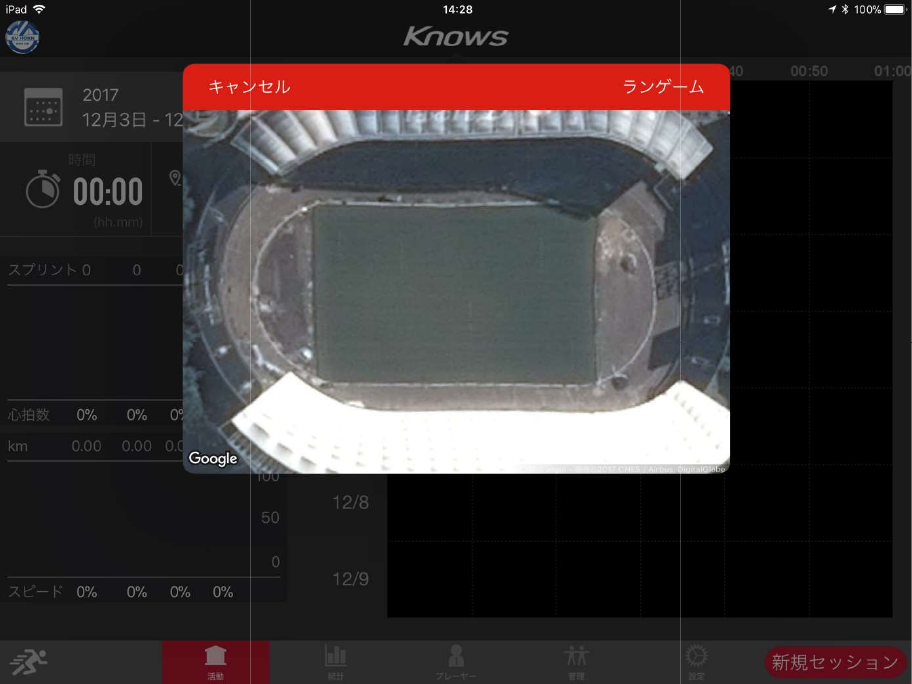
New session
When you select a new session, first select the range of the exercise location from the GPS
map.
※
Please match your current location to
When you select a new session, first select the range of the exercise location from the GPS
Please match your current location to
the size on the screen map and display it.
When you select a new session, first select the range of the exercise location from the GPS
the size on the screen map and display it.
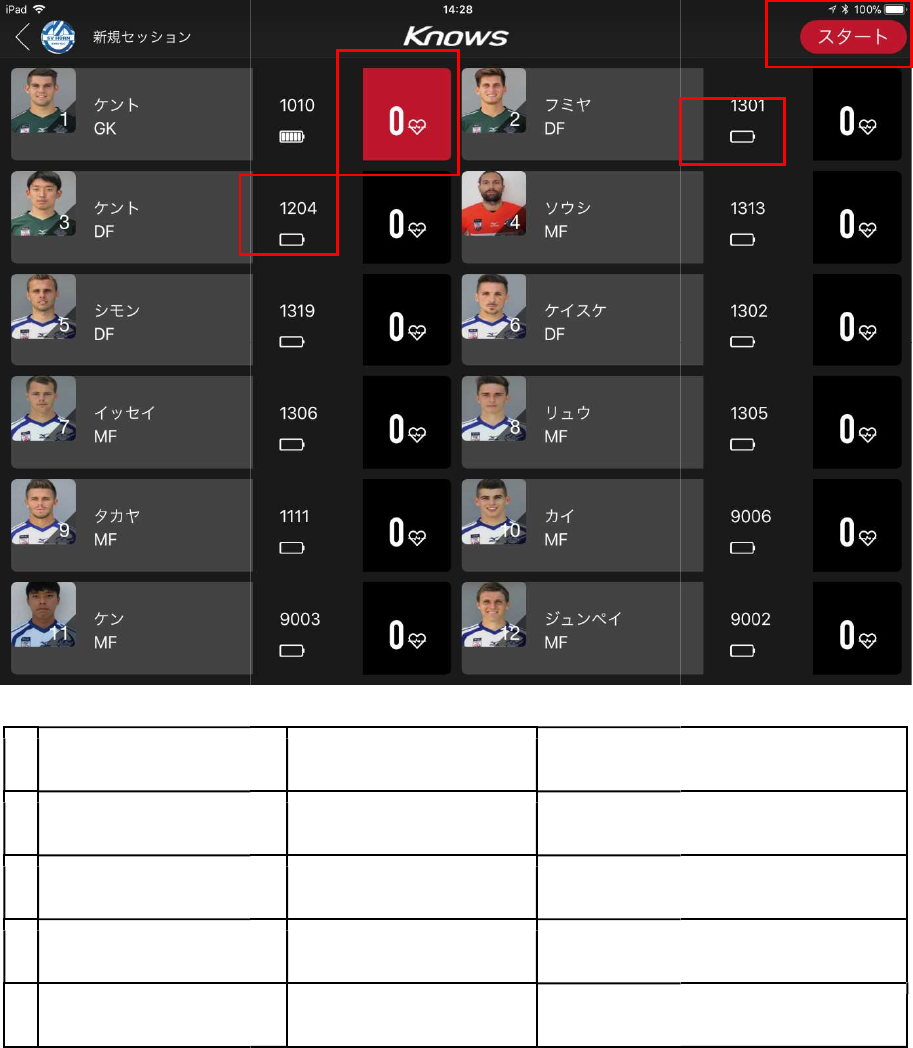
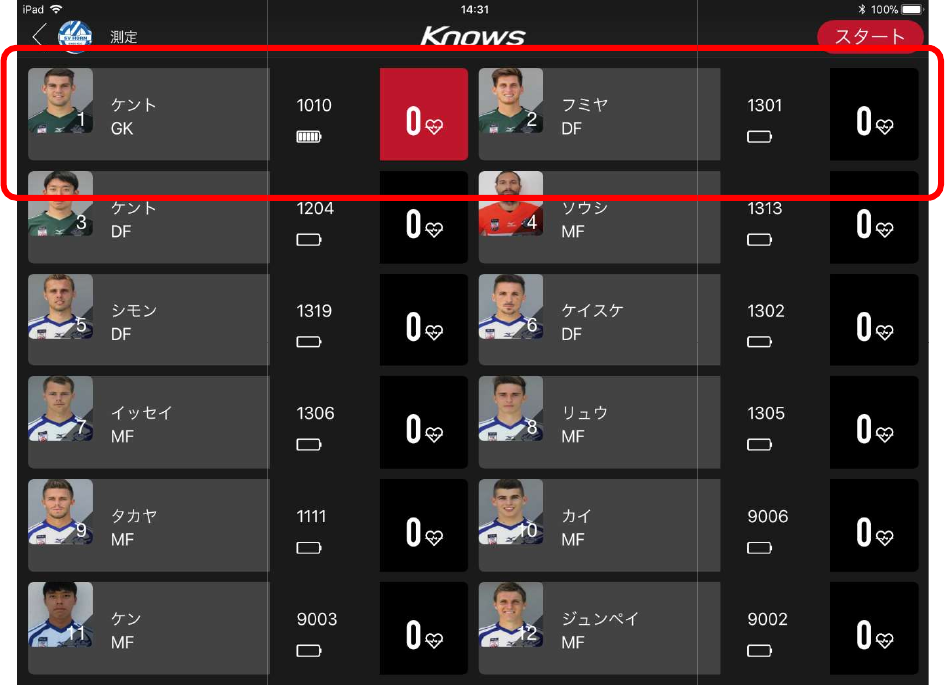
explanation
A
start
B
Device number
C
Remaining battery
D
Real time heart rate
Next screen
Error message
Training List
B
D
Error message
C
A
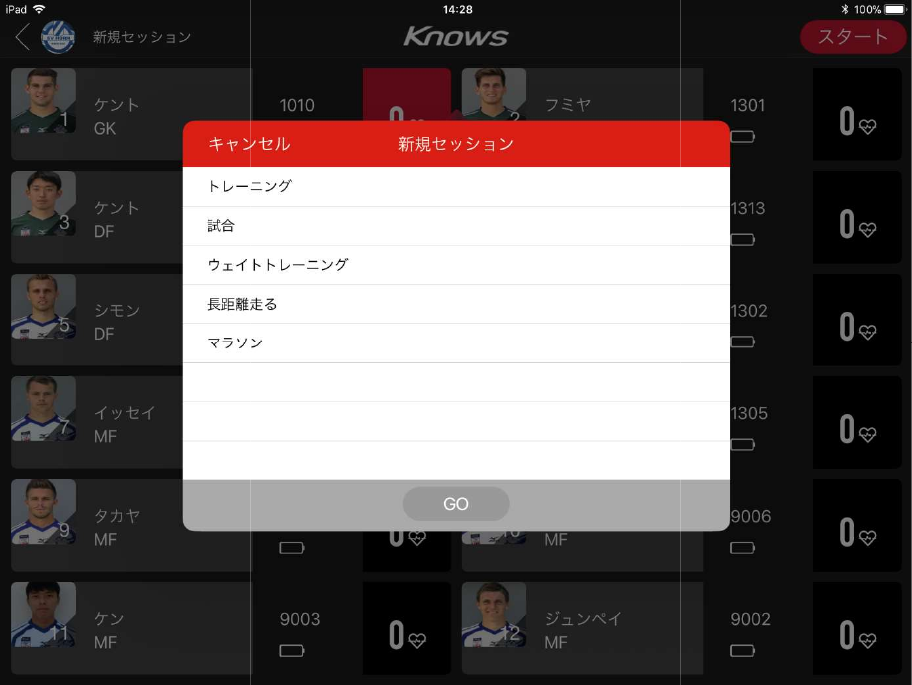
New regulations
Select "Start", select a new
Select "Start", select a new
session type and select "GO".

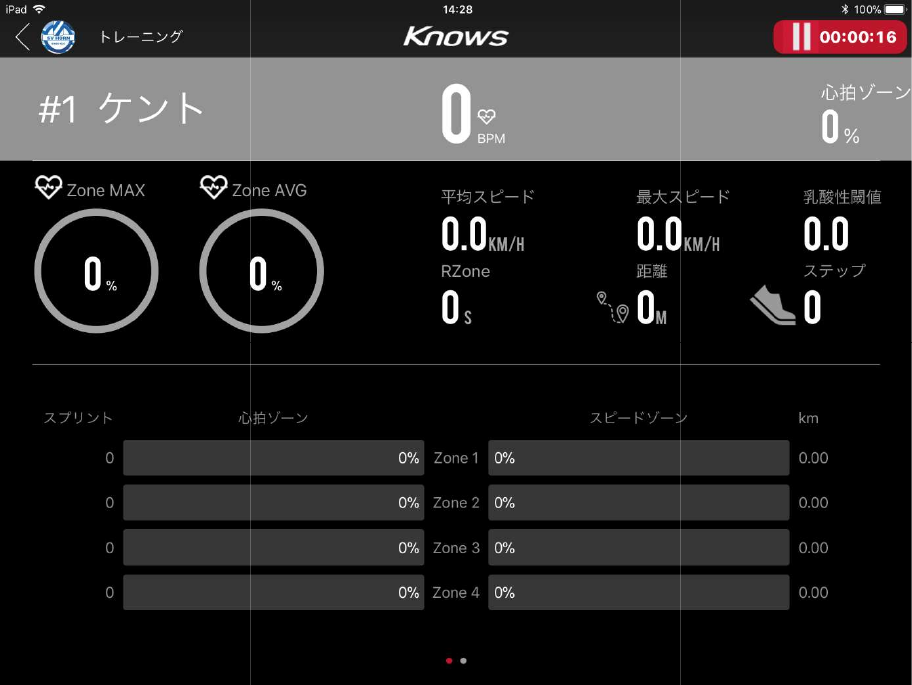
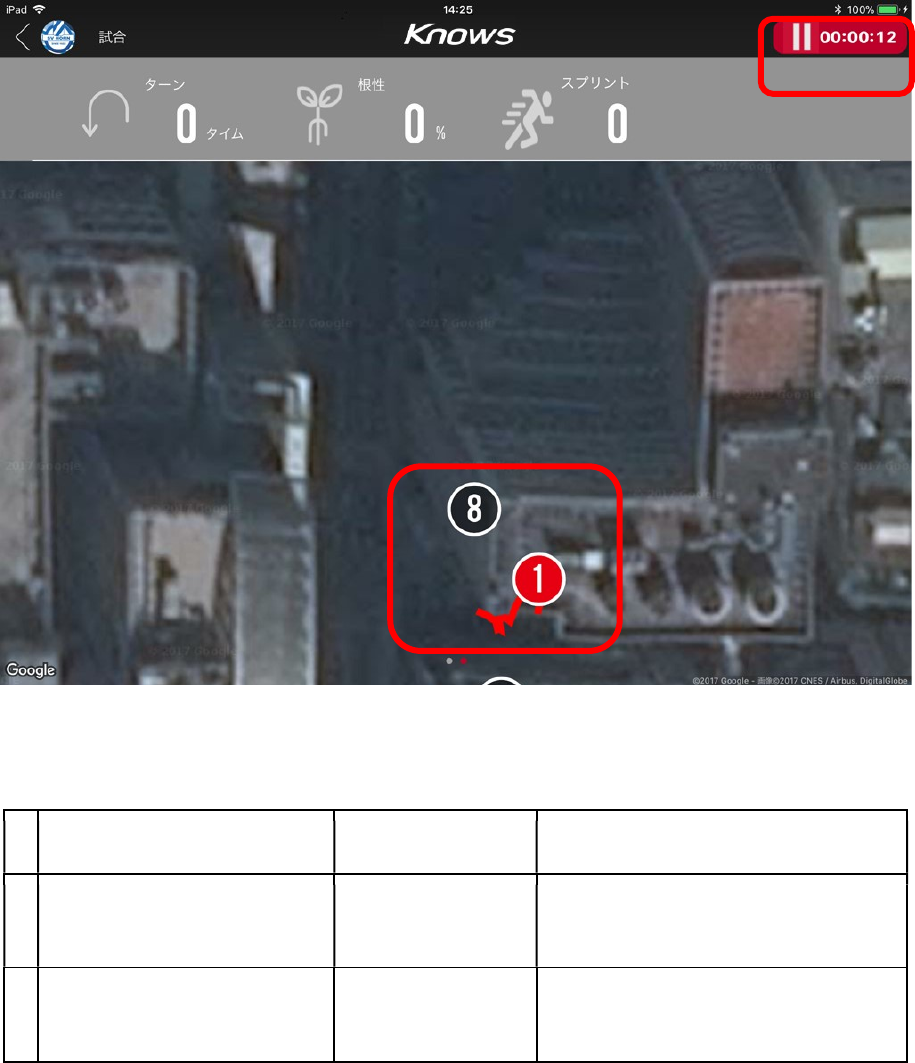
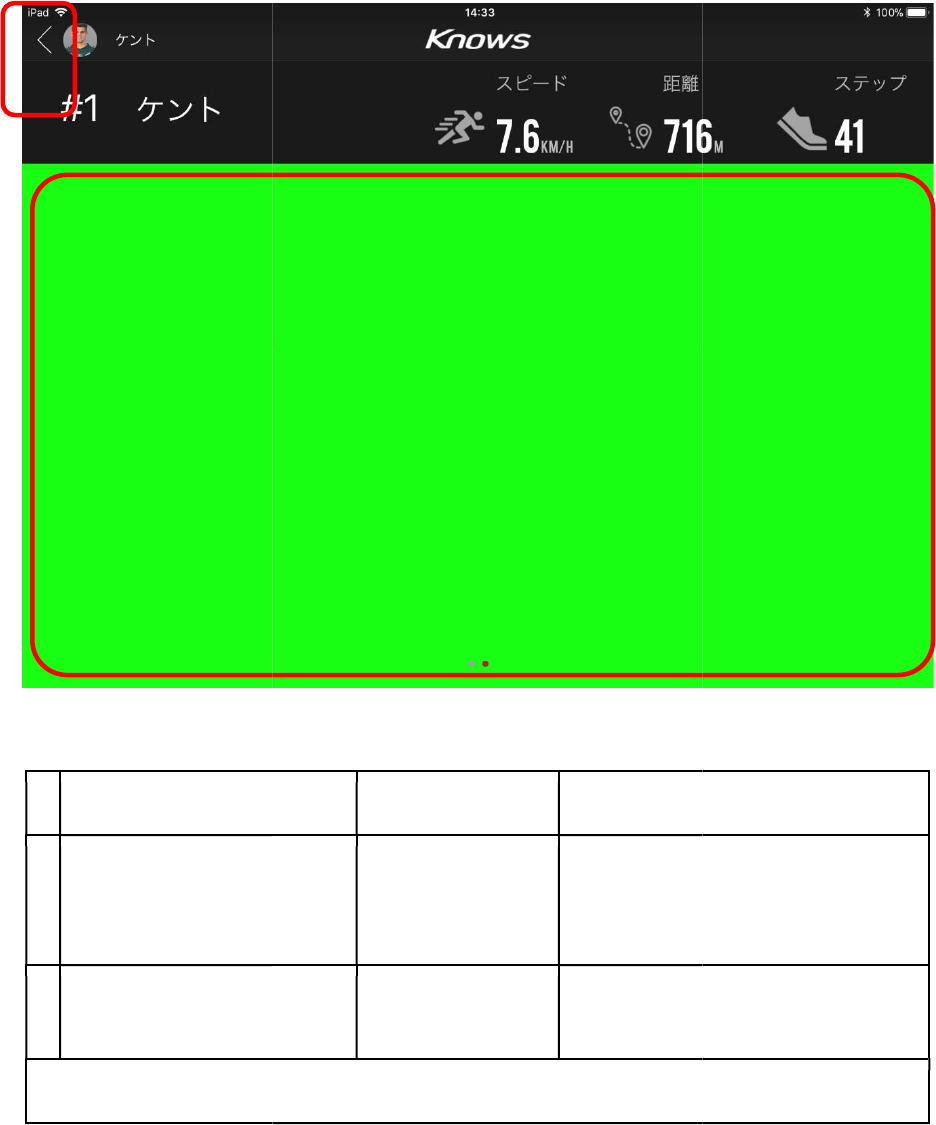
(Example) Match screen
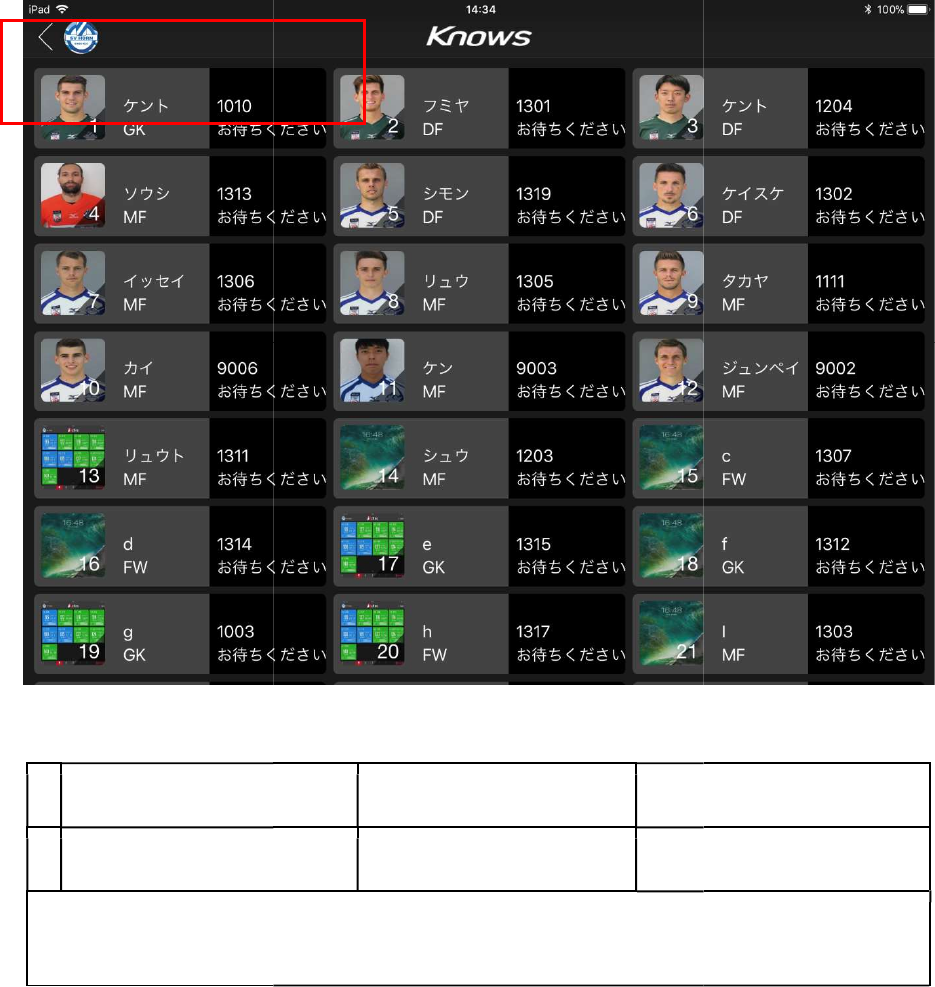
explanation
A
Player information
B
End
C
Player number
When "A, player
information" is selected, it becomes the player's detailed information
screen.
A
Next screen
Error message
Player information
1
Confirm
completion
Bar to select sort
order
information" is selected, it becomes the player's detailed information
Error message
information" is selected, it becomes the player's detailed information
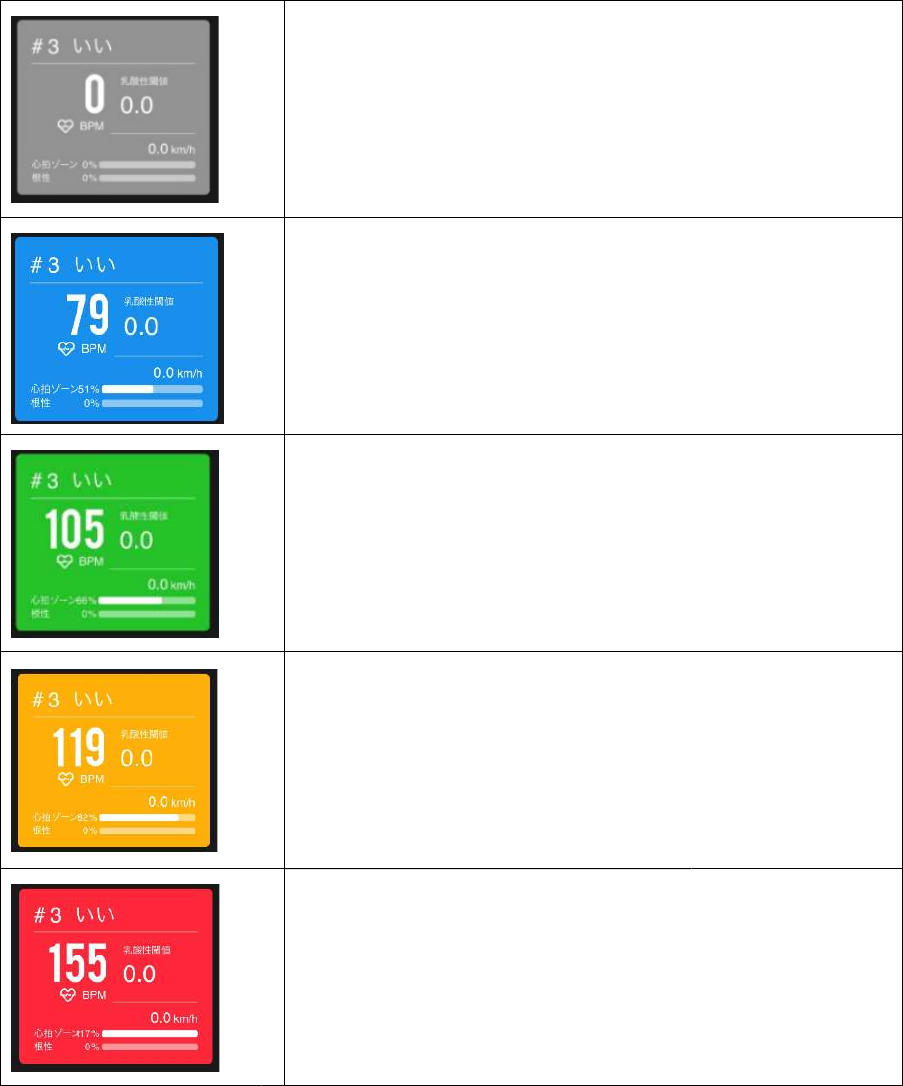
Heart rate state (color display)
Heart rate state (color display)
Gray
The device will be gray if heartbeat is not sensed.
※Check the power supply of the device.
※Please check whether SmartWare is
waving on your body.
green
The number of heart beats perceptual heart rate is less than
or equal to 60% of the maximum heart rate.
Green
Perceived heart rate, maximum heart rate, 60%~80%
Orange
When the detected heart beat is 80% to 90% of the maximum
heart rate, it is displayed in orange
Red
If the detected heart beat exceeds 90% of the maximum heart
rate, the display turns red.
The device will be gray if heartbeat is not sensed.
waving on your body.
The number of heart beats perceptual heart rate is less than
or equal to 60% of the maximum heart rate.
Perceived heart rate, maximum heart rate, 60%~80%
When the detected heart beat is 80% to 90% of the maximum
If the detected heart beat exceeds 90% of the maximum heart
Player information 1
Scroll the upper gray strip to the
Scroll the upper gray strip to the
right to switch display information
Player information 2
explanation Next screen Error message
A
End of session Confirm
completion
B
Player position and
trajectory moved
A
B

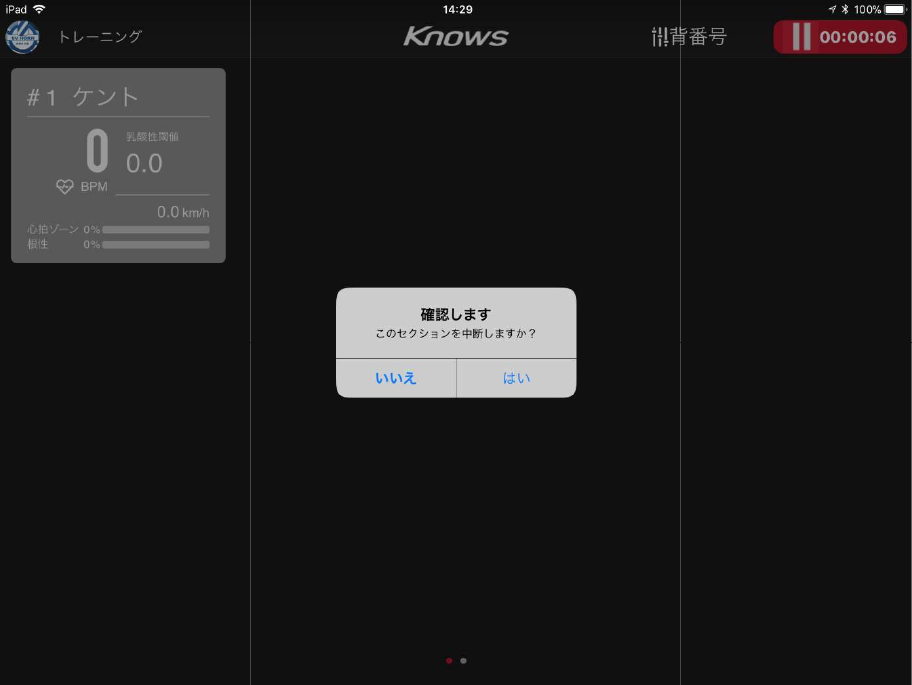
Confirm completion
Please select A in the upper right when
Please select the end button and select "Save and Exit", "Cancel and Exit", "Continue".
If you select "Cancel and Terminate", the interruption confirmation screen will appear.
Please select A in the upper right when
the game or training is over
Please select the end button and select "Save and Exit", "Cancel and Exit", "Continue".
If you select "Cancel and Terminate", the interruption confirmation screen will appear.
Please select the end button and select "Save and Exit", "Cancel and Exit", "Continue".
If you select "Cancel and Terminate", the interruption confirmation screen will appear.
physical measurement
The body measurement mode is the (B) button on the bottom left of each screen.
B
physical measurement
The body measurement mode is the (B) button on the bottom left of each screen.
A
D
The body measurement mode is the (B) button on the bottom left of each screen.
C
Physical measurement screen
In the body measurement mode, first set the maximum heart rate and the maximum speed of
the athlete individual.
Please select
and select the player you want to set up
Physical measurement screen
- setting
In the body measurement mode, first set the maximum heart rate and the maximum speed of
and select the player you want to set up
In the body measurement mode, first set the maximum heart rate and the maximum speed of

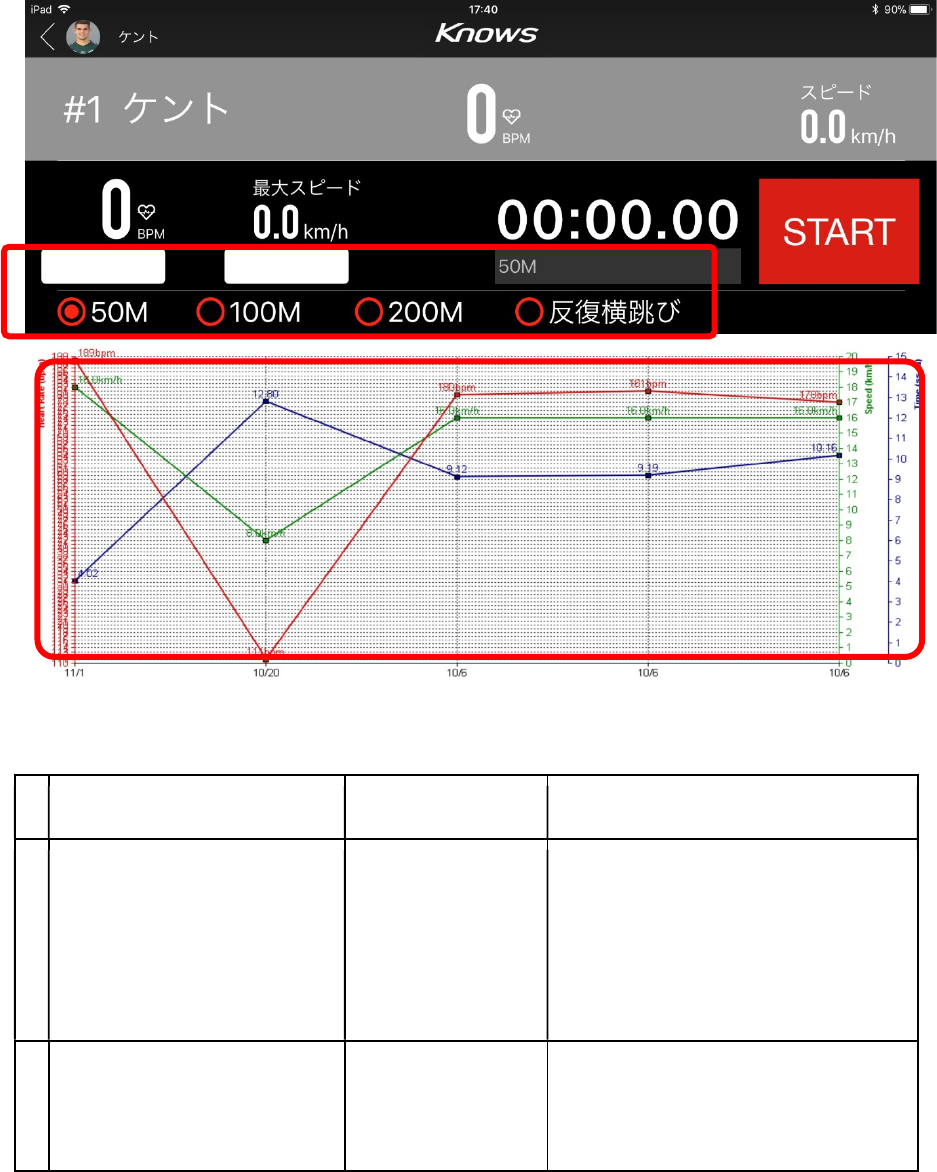
Physical measurement mode (player individual setting screen)
explanation
A
Please select the
measurement item of the
player
B
start
Select the start and the coach will choose "stop" when finishing the distance specified
by the athlete.
D
Physical measurement mode (player individual setting screen)
Next screen
Error message
measurement item of the
“50M”、“100M”、“200M”、
Selection screen of
"Repetitive Landing Jump"
The timer is activated
Select the start and the coach will choose "stop" when finishing the distance specified
A
C
Error message
Select the start and the coach will choose "stop" when finishing the distance specified
B

C
Heart rate, speed
(It will be reflected
automatically when
installed)
D
When you finish and choose
stop, your heart rate and
speed will be reflected.
If the athlete actually runs
and not measuring it, you
can enter the number
manually
E
Back (no saving) Measurement mode
screen
explanation Next screen Error message
A
"50 M", "100 M", "200 M",
and "
You can see the record of
"Repetitive Landing Jump"
on the graph
It is displayed as a
graph in the
column of (B)
B
Graph If there is no
record, the graph
will be blank.
A
B
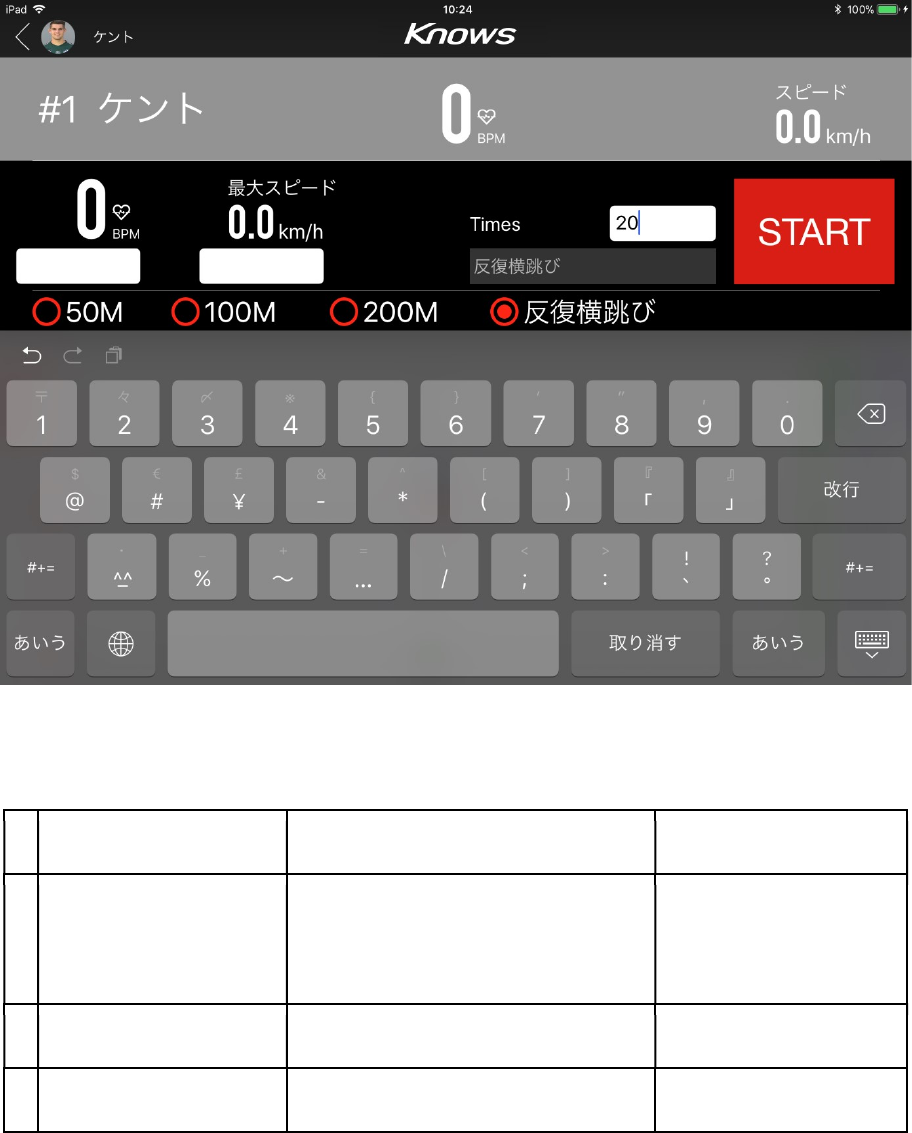
Physical measurement mode (player individual setting screen - case of repetitive
sideways jump)
explanation Next screen Error message
A
Please set the number
of times the player
jumps manually.
keyboard
B
start stop
C
Save
Set the number of jumps, select the start, the player starts to work, and when you reach the
set number of times the coach will choose the stop, the measured number will be reflected.
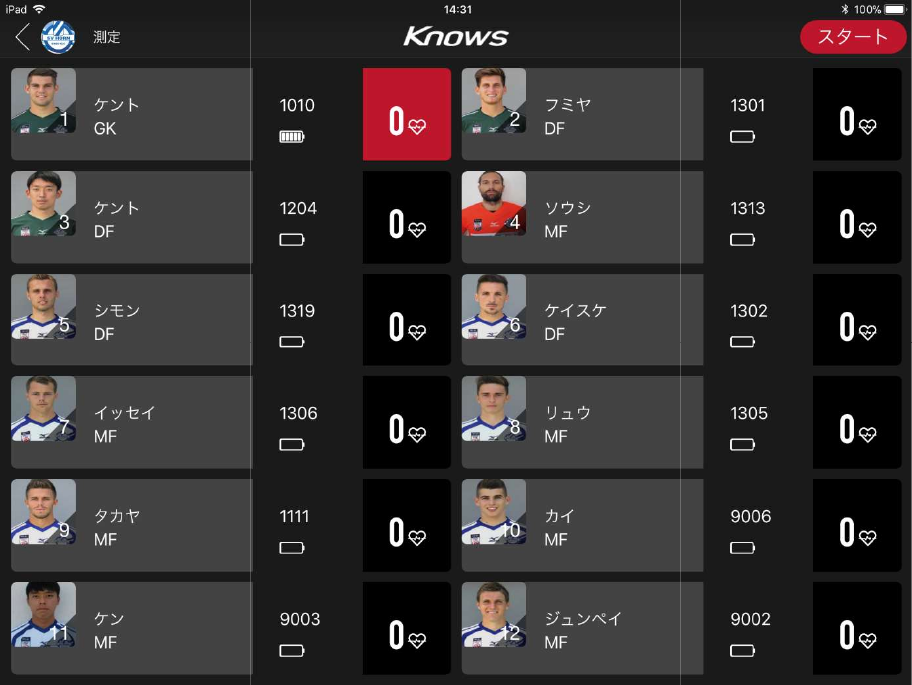
Physical M
easurement screen
Please select "Start" on the upper right of the physical measurement screen.
When selected, the body
measurement mode of everyone can be started. There are no
restrictions on running distance and time.
easurement screen
Please select "Start" on the upper right of the physical measurement screen.
measurement mode of everyone can be started. There are no
restrictions on running distance and time.
Please select "Start" on the upper right of the physical measurement screen.
measurement mode of everyone can be started. There are no
explanation Next screen Error message
A
Player test information なし
B
End Save and Exit
The maximum heart rate is displayed after approximately 30 seconds since GPS search is
possible
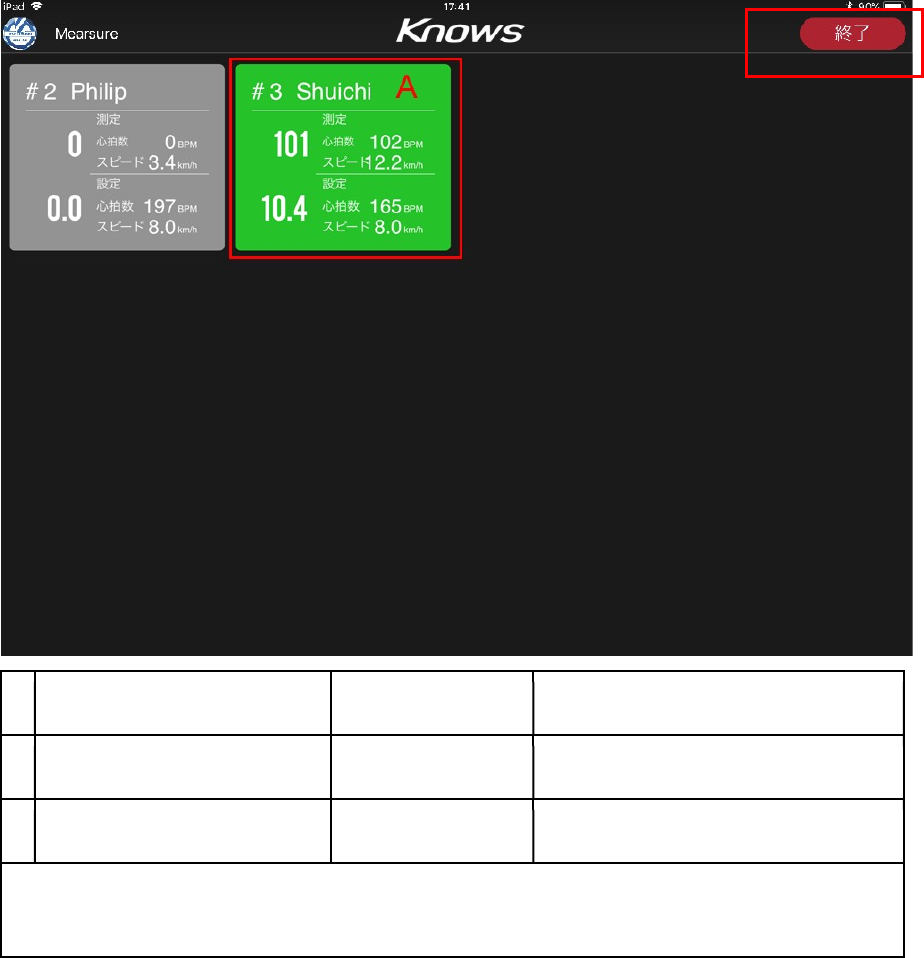
B
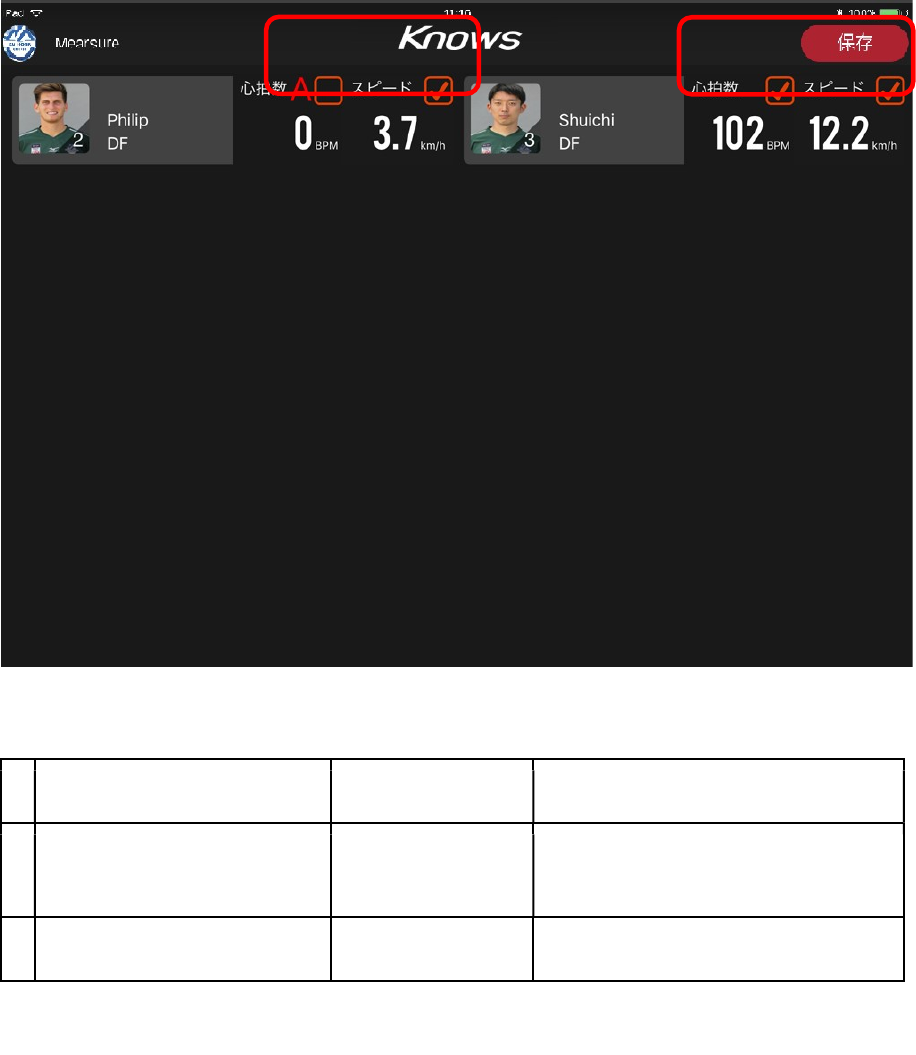
Save and Exit
If you select "Save and Exit", first check the red square (A) of the heart rate or speed you want
to save, then select "Save" in B.
(It can not be checked without numeric data.)
explanation Next screen Error message
A
Results of physical
measurements by athletes
B
Save results Activity
A
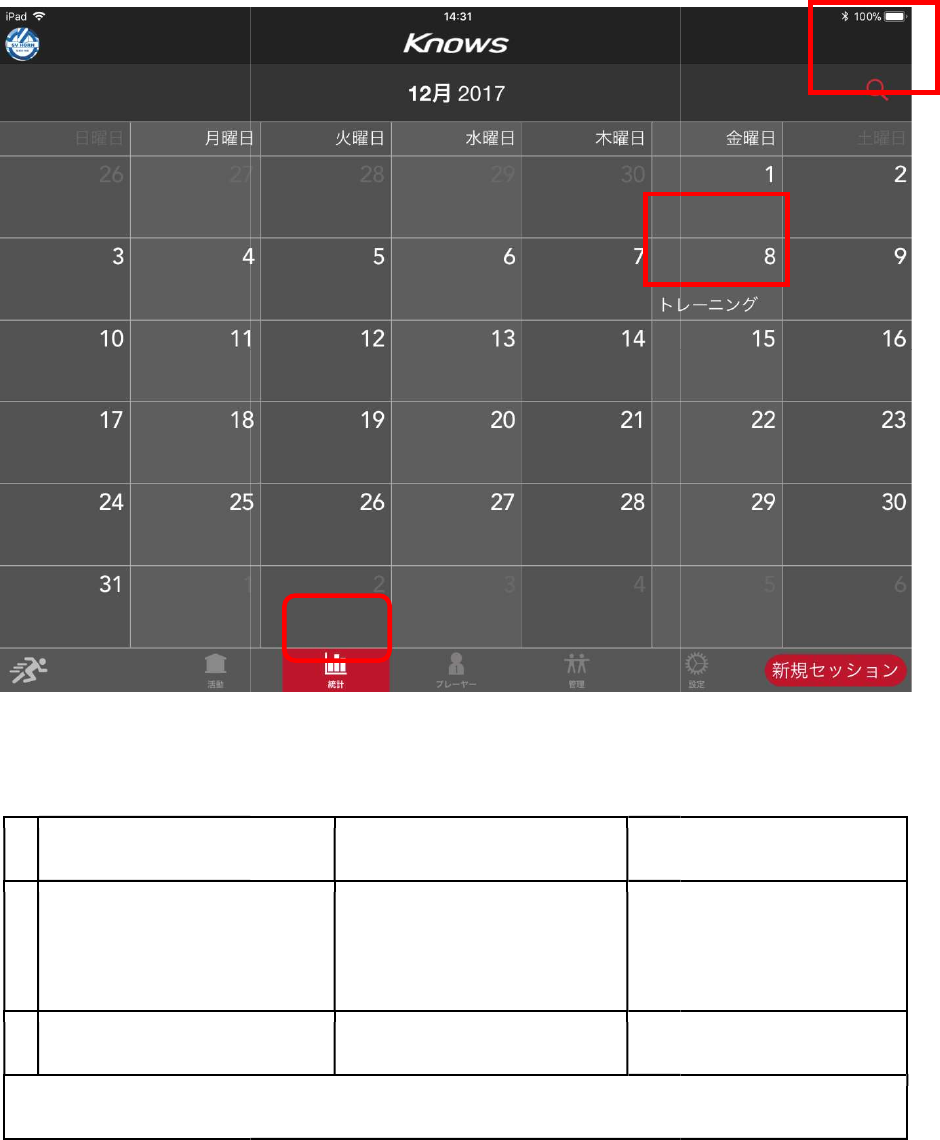
statistics
Statistics screen
explanation
A
Check team training and
game record for the
selected day
B
Select year or
month
You can choose the information of the previous month / next month scroll left and right
Next screen
Error message
Check team training and
Activity record of the day of
the selected date
month
Selection of the month
You can choose the information of the previous month / next month scroll left and right
B
Error message
You can choose the information of the previous month / next month scroll left and right
A
B
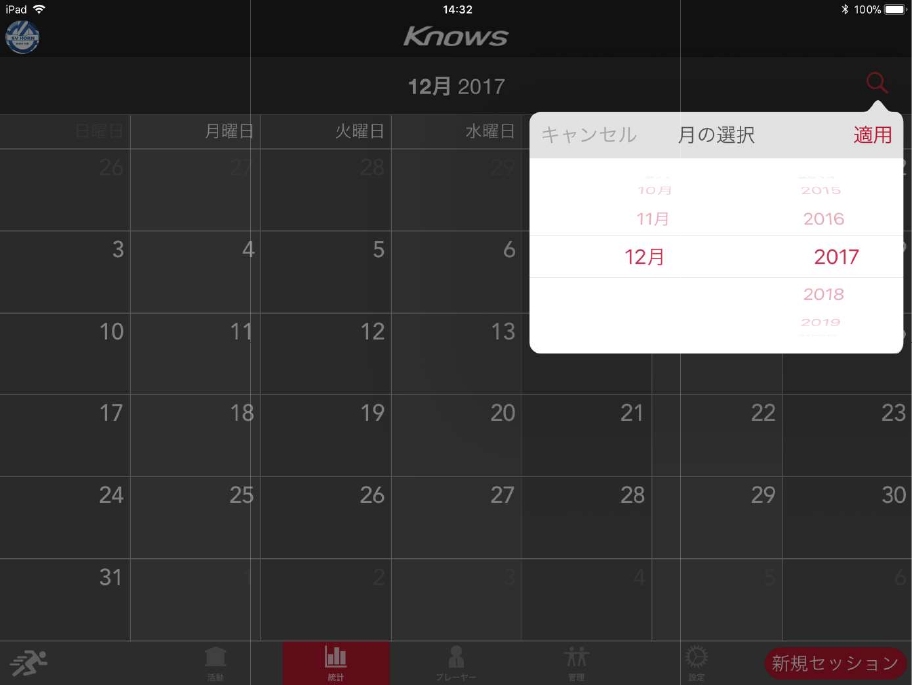
When searching for dates, please choose "Select
When searching for dates, please choose "Select
month".
Team training list
Team training date selection screen
Team training date selection screen
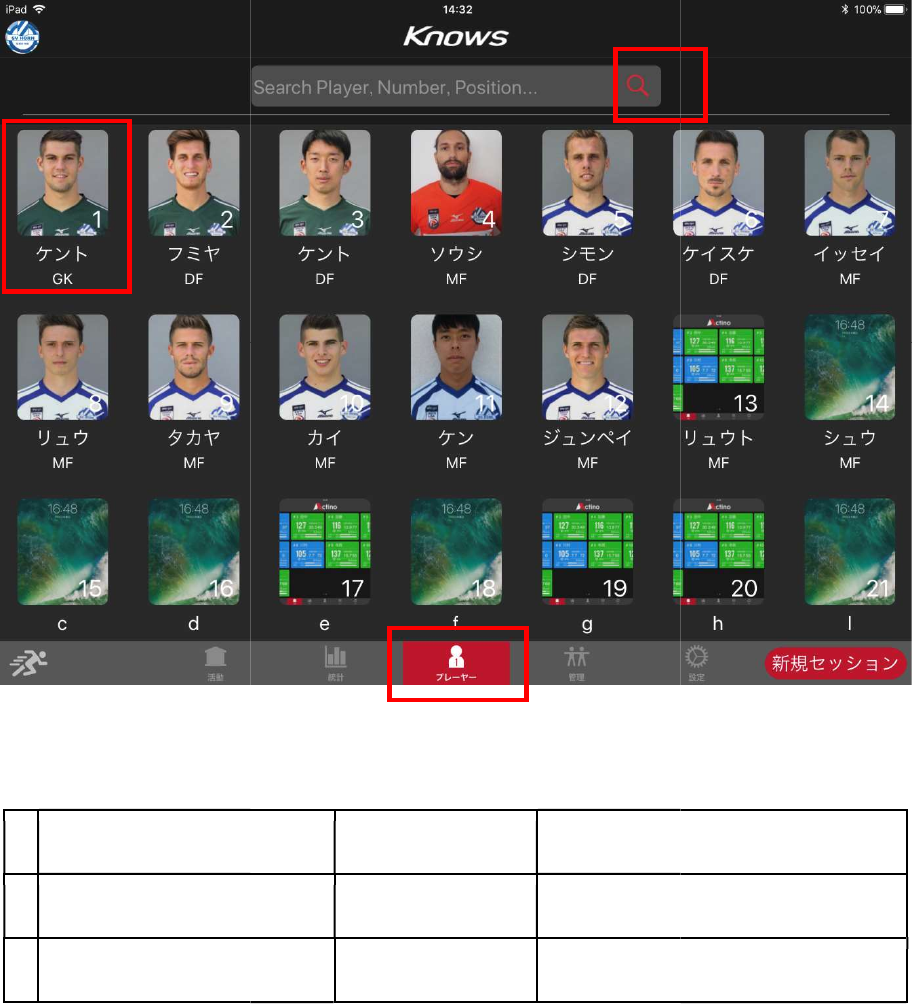
Player
When you open the player you will see the player search screen
explanation
A
Search by player's name
B
Select a player
B
When you open the player you will see the player search screen
.
Next screen
Error message
Search by player's name
Player information
A
Error message
A
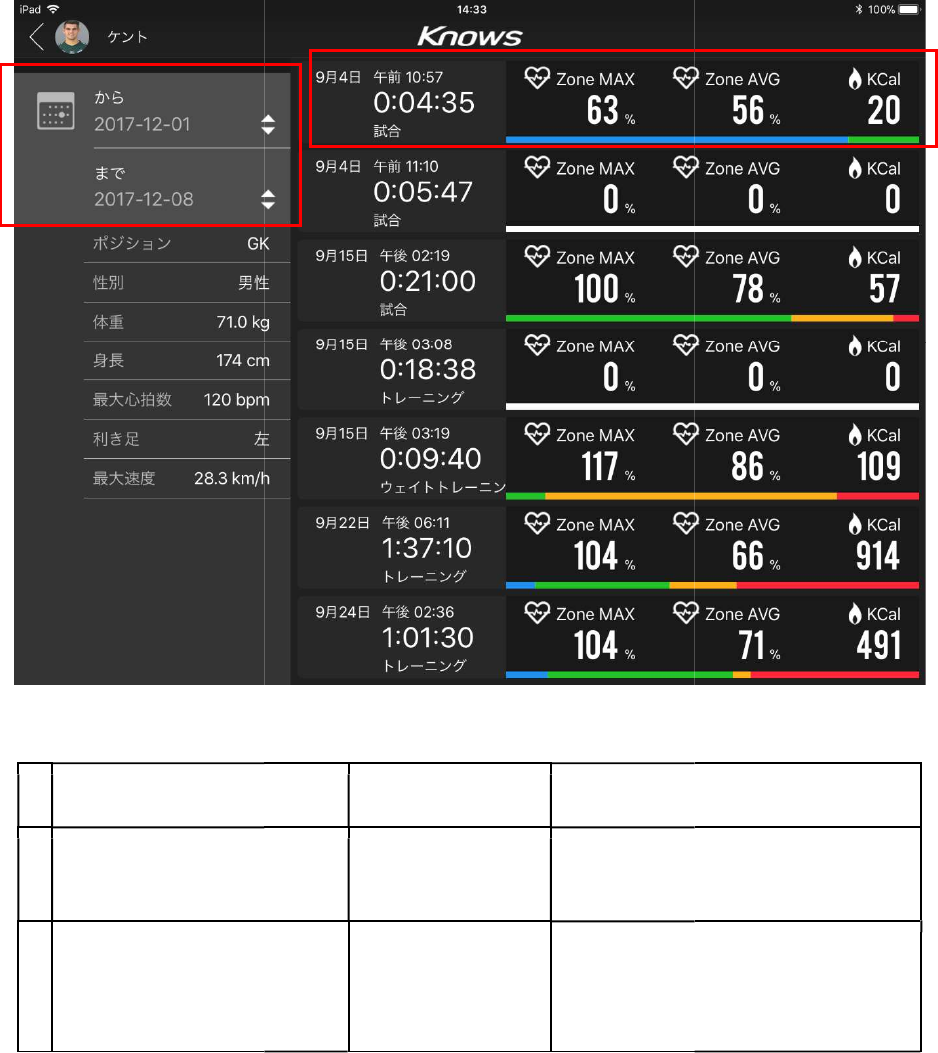
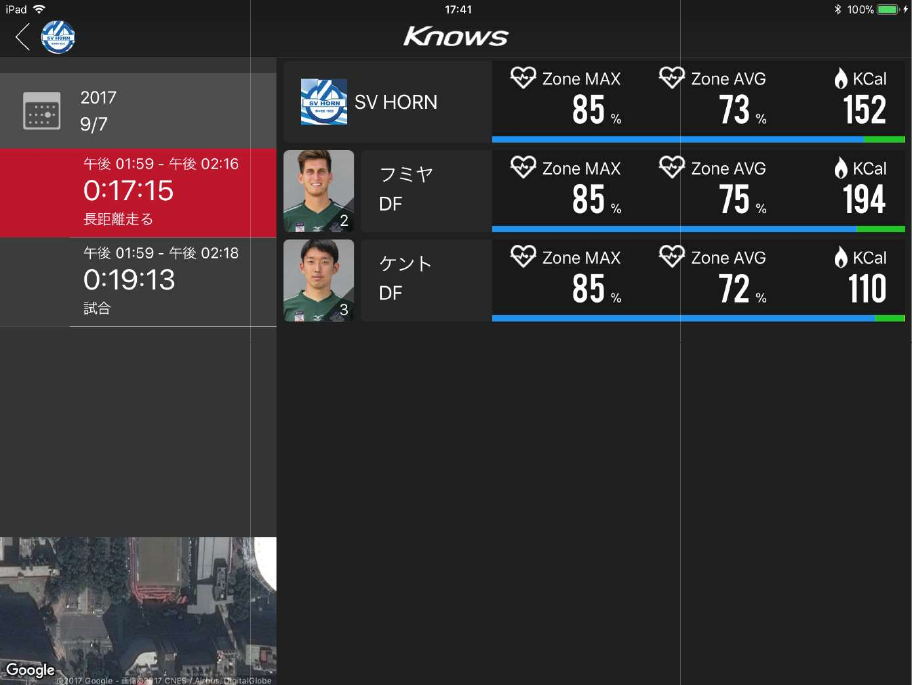
Player record
explanation
A
Select the date on which the
athlete worked
B
Record of the day the player
was active
A
Next screen
Error message
Select the date on which the
Select date
Record of the day the player
Record of the day
the player was
active
B
Error message
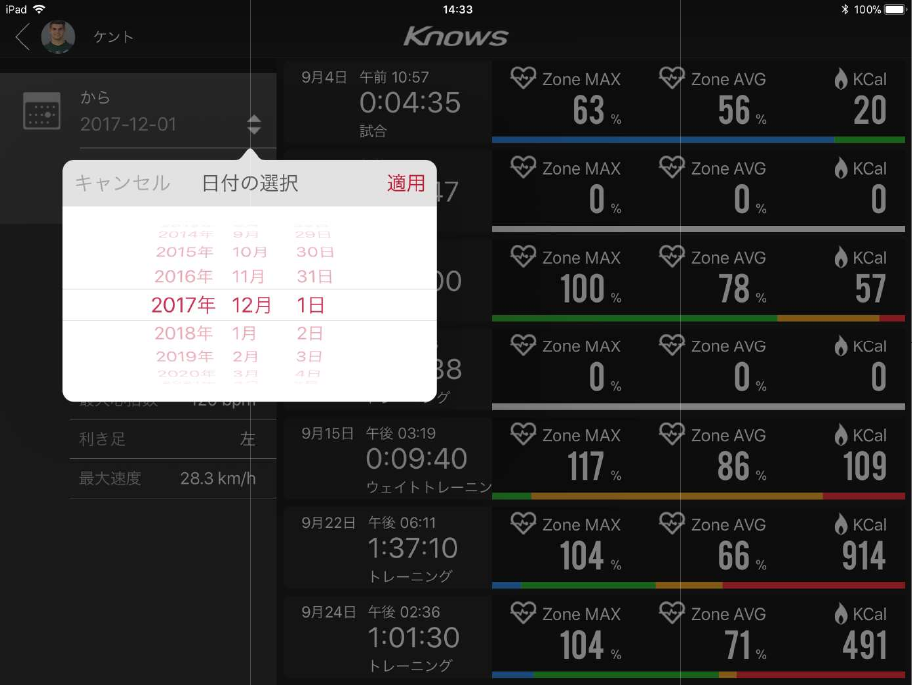
Search by date
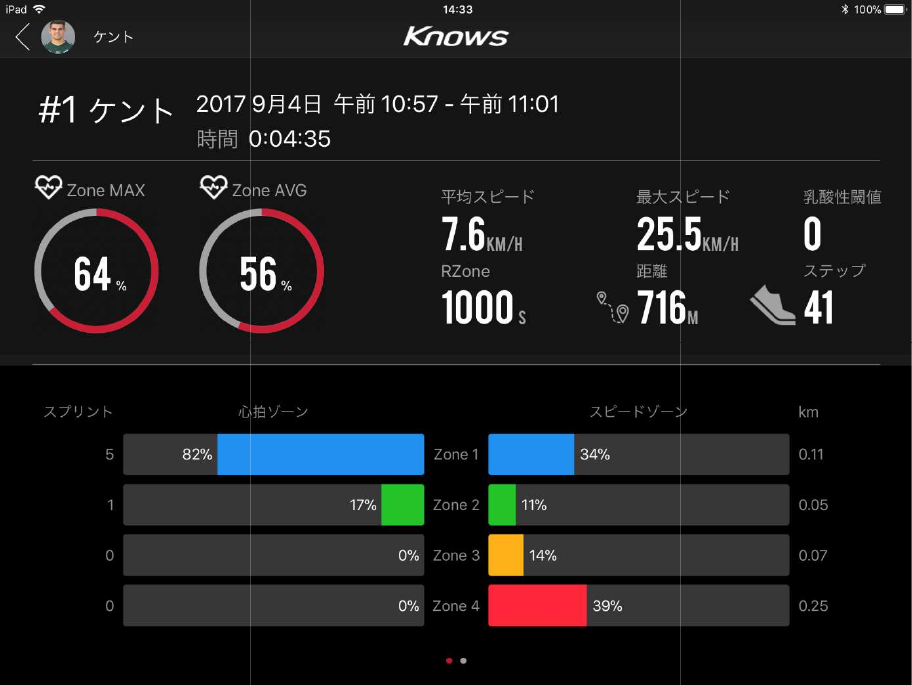
Player information -1
Scroll to the right to display the map.
Scroll to the right to display the map.
Player information -2
explanation
A
map display
(The map is created from
the server.)
B
Return
If you
select Back (B) again, you will return to the "Player" screen.
B
A
Next screen
Error message
(The map is created from
N/A
Screen of the
player record
select Back (B) again, you will return to the "Player" screen.
Error message
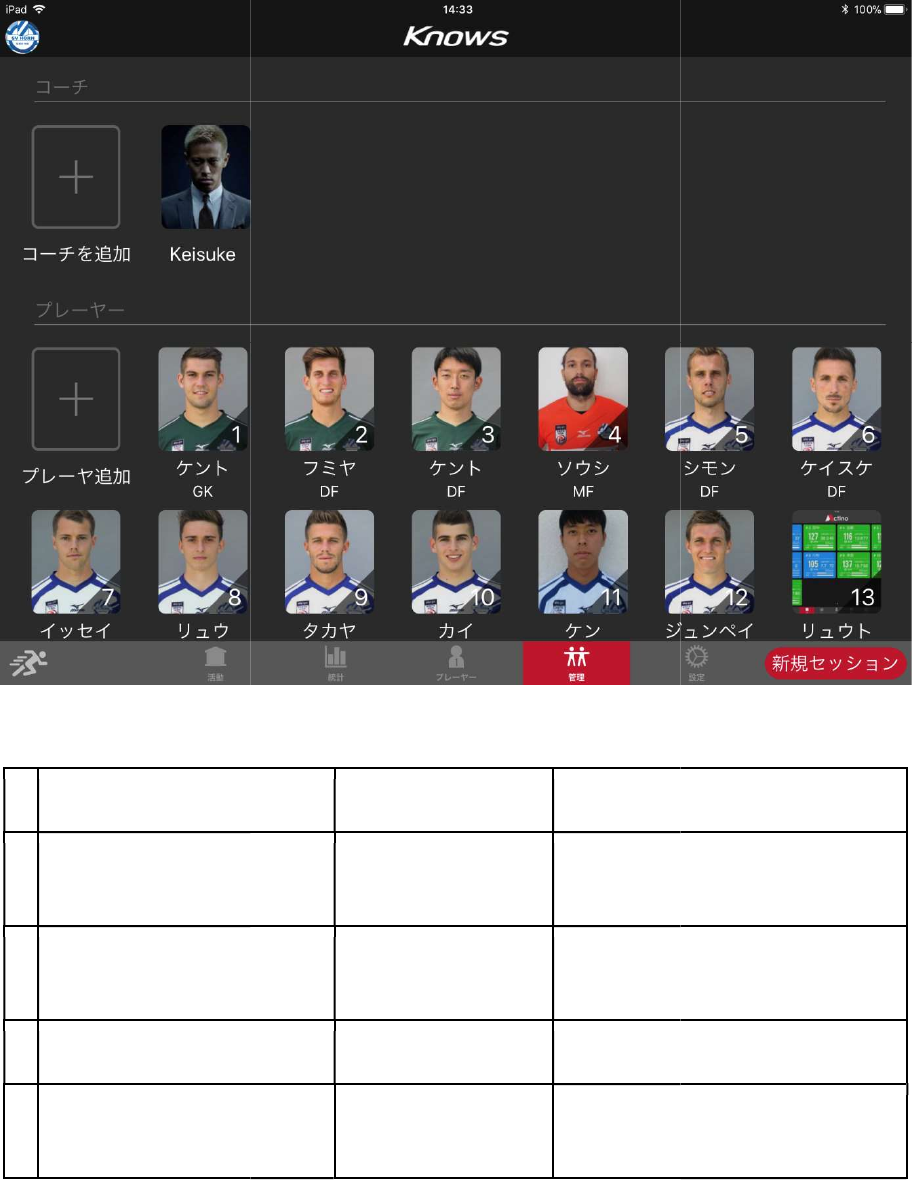
Management
explanation
A
Create a new coach
B
Edit / delete a coach
C
Add a player
D
Edit / delete players
A
B
C
D
Next screen
Error message
Coach addition
screen
Coach information
editing
Add a player
Edit player
information
Error message
Settings
explanation
A
Edit account (ID)
B
Edit team information
C
Edit training type
D
Synchronize device settings
E
Upload device log
F
Change to
other teams
Settings - Account
A
B
C
D
E
F
Next screen
Error message
Account (ID) edit screen
Edit team information
Team information edit screen
Training type edit screen
Synchronize device settings
Synchronize device
The screen to upload the logo
other teams
Team selection screen
D
E
F
Error message
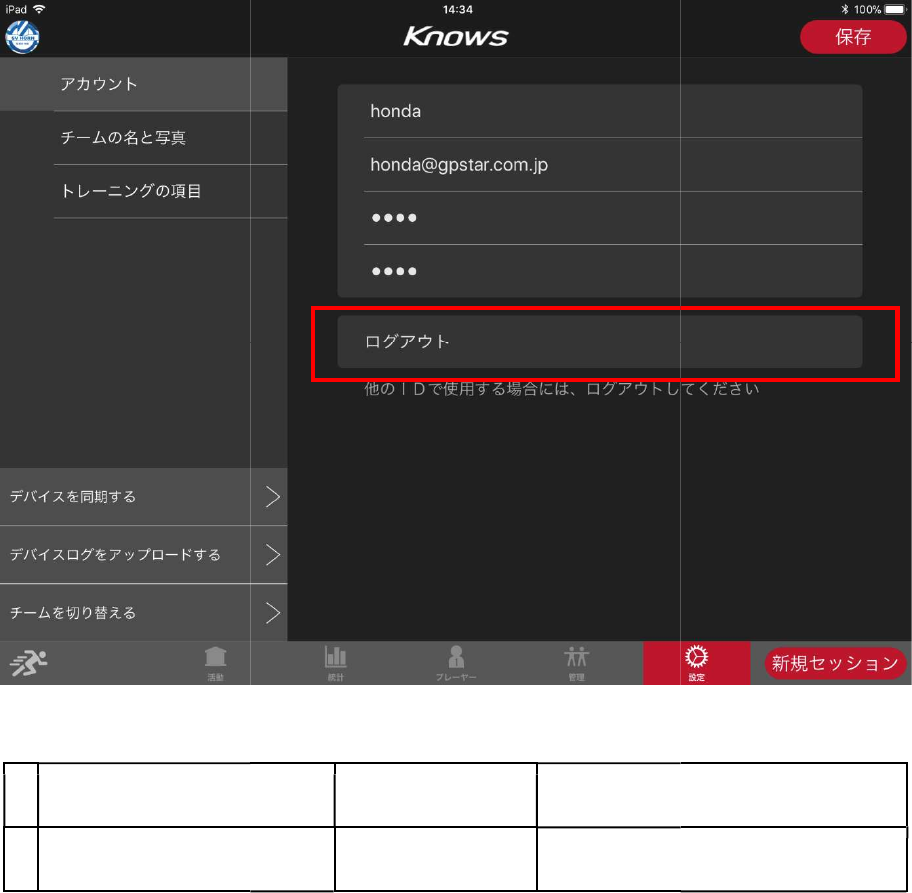
explanation
A
Log out
Next screen Error
message
Log in
A
message
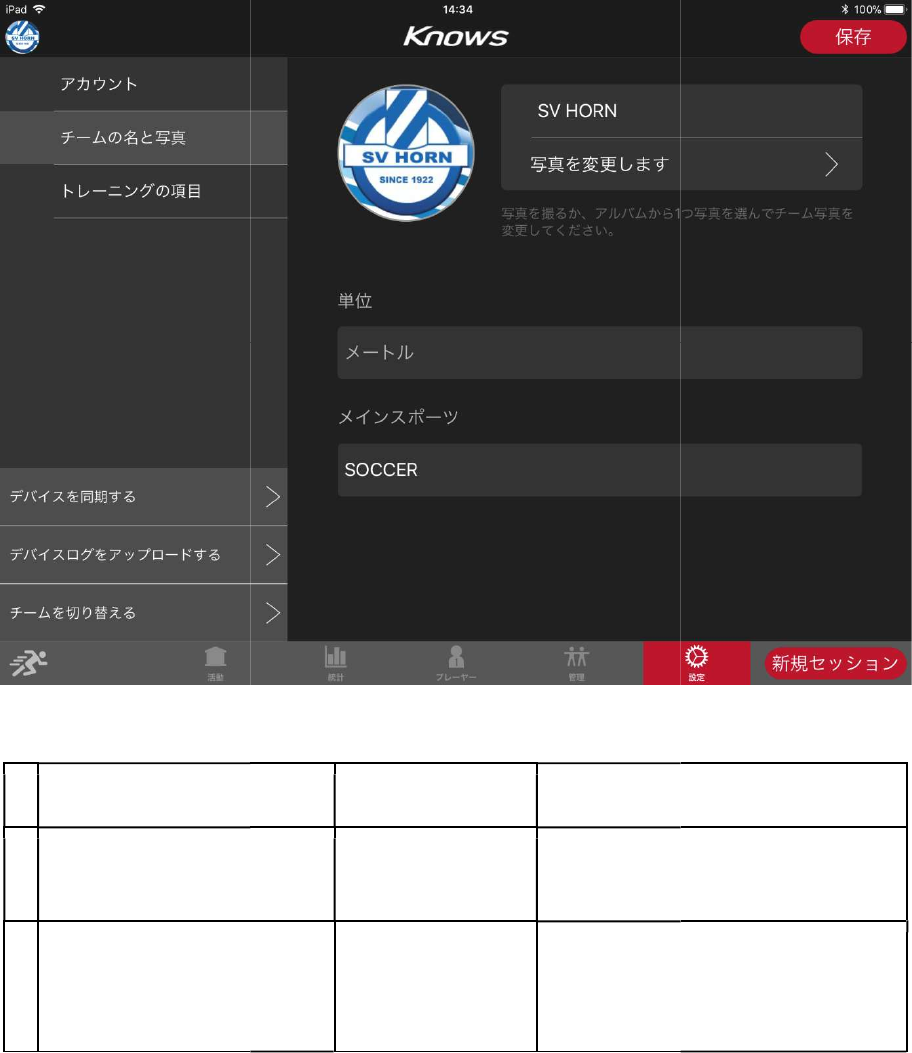
Settings -
team name and photo
explanation
A
Team name and photo
B
You can edit it by choosing
team name, photo, unit,
main sports
team name and photo
Next screen
Error message
Team name and photo
Screen for editing
team information
You can edit it by choosing
team name, photo, unit,
input screen
Error message

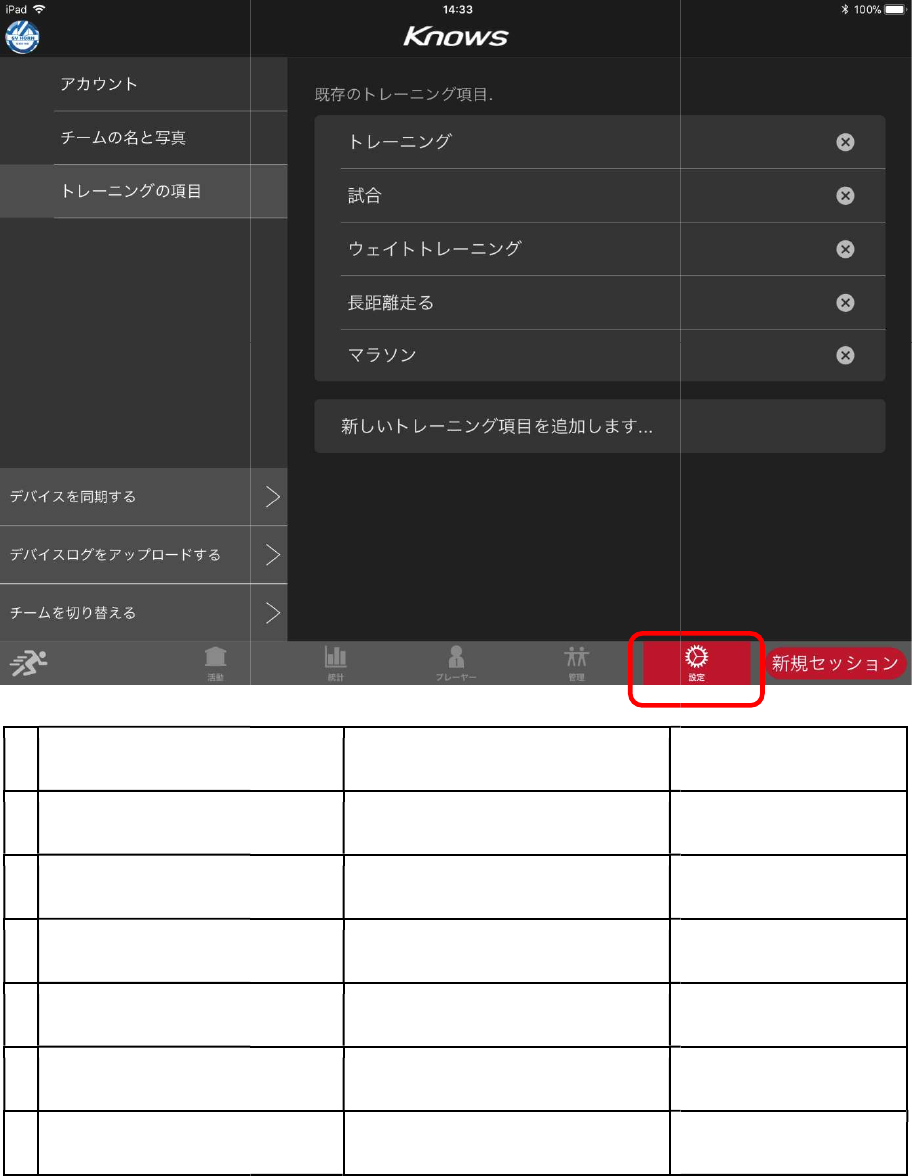
Settings -
training items
In the item of training you can add or delete items other than "training", "game", "weight
training", "long distance running".
explanation
A
Add a new training item
B
Delete training items
training items
In the item of training you can add or delete items other than "training", "game", "weight
training", "long distance running".
Next screen
Error message
Add a new training item
A
In the item of training you can add or delete items other than "training", "game", "weight
Error message
B
Synchronize devices
explanation
A
Pair the device
Once you can pair the device with "Automatic" or "Manual" on this screen, please restart
the power supply of the device once.
A
Next screen
Error message
Pairing devices
Once you can pair the device with "Automatic" or "Manual" on this screen, please restart
the power supply of the device once.
Error message
Once you can pair the device with "Automatic" or "Manual" on this screen, please restart
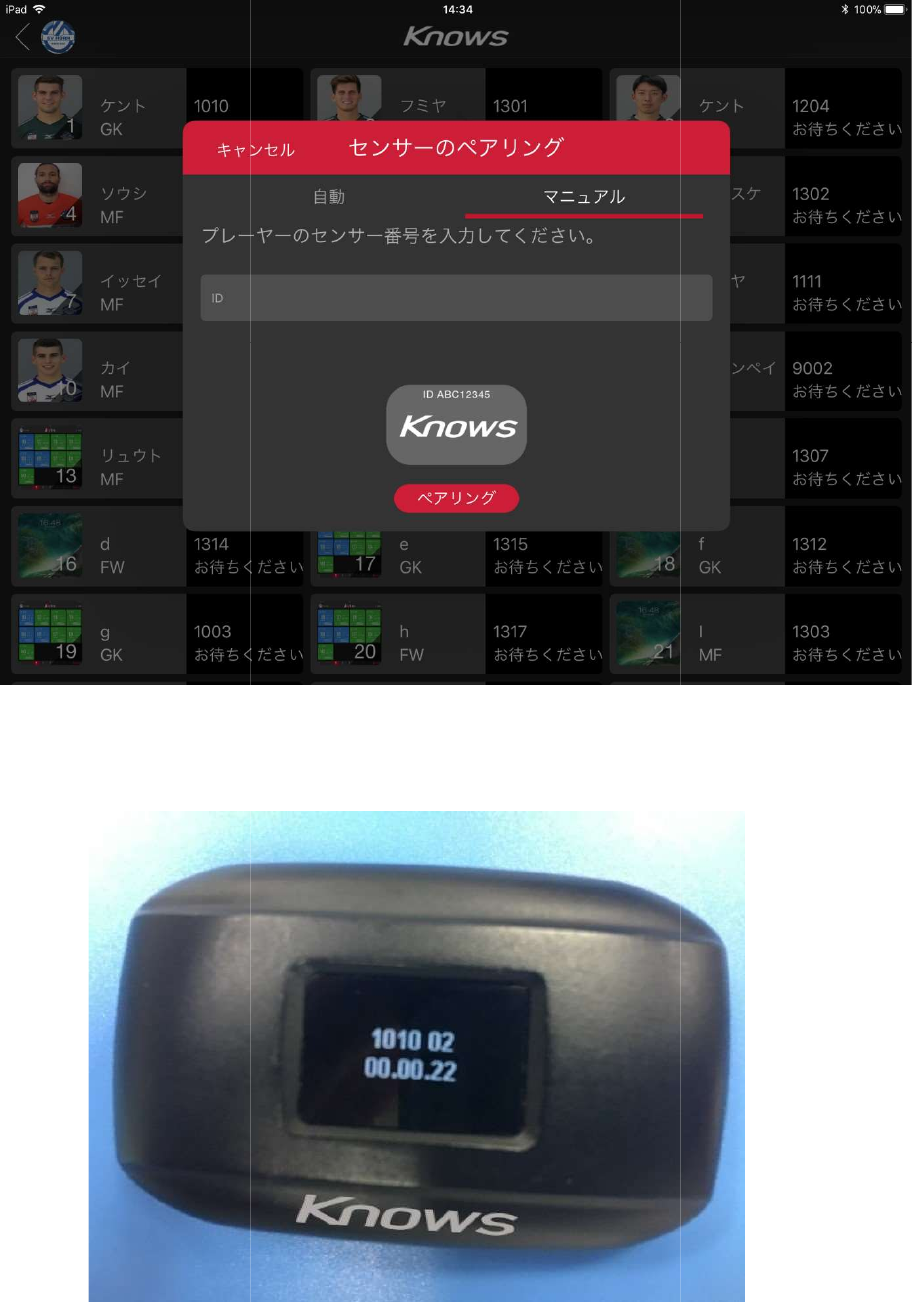
Synchronize devices (manual)
When you turn on the power, select the first 4 digit number of the screen that you pressed
twice.
Synchronize devices (manual)
When you turn on the power, select the first 4 digit number of the screen that you pressed
When you turn on the power, select the first 4 digit number of the screen that you pressed
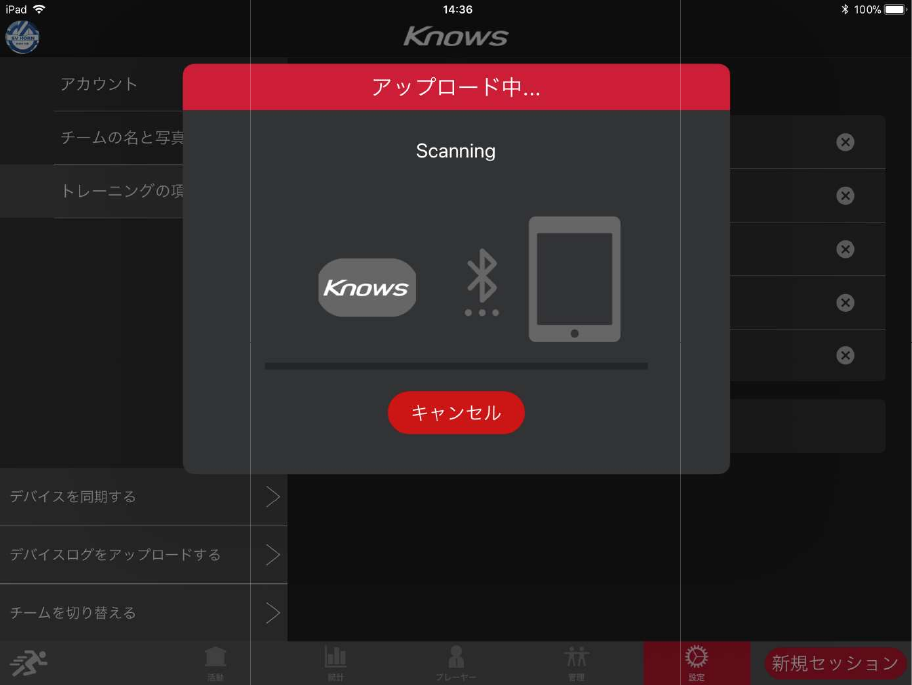
Upload device log screen
Upload device log screen

Channge
the team screen
explanation
A
Create a new team
B
Choose a team
B
the team screen
Next screen
Error message
new team
Activity
Error message
A

Precautions
Please handle carefully
observe the following procedure to receive product warranty and to use the product for
a long time.
How to care the
Sensor device
Keep the
devices clean
Products may have higher product destruction and failure risk ratio due to falling
and impact conditions
Keep the training device sensor in a cool, dry place. Please do not keep it in a
humid place.
We recommend that
consumes little by little during storage
Please wipe with a soft towel after use
Do not do unreasonable repair / disassembly / modification (including software).
Smartware care
※ Handling
precautions during washing
84%N
ylon 16%Spandex
Machine wash cold
Gentle cycle
Line dry in the shade
Do not tumble dry
Wash with like colors
Please handle carefully
KS-01
as well as general electric appliances. Be sure to
observe the following procedure to receive product warranty and to use the product for
Sensor device
devices clean
。
Products may have higher product destruction and failure risk ratio due to falling
and impact conditions
.
Keep the training device sensor in a cool, dry place. Please do not keep it in a
We recommend that
you keep your training device in a charged state. Battery
consumes little by little during storage
.
Please wipe with a soft towel after use
.
Do not do unreasonable repair / disassembly / modification (including software).
precautions during washing
:
ylon 16%Spandex
Machine wash cold
Line dry in the shade
Do not tumble dry
Wash with like colors
as well as general electric appliances. Be sure to
observe the following procedure to receive product warranty and to use the product for
Products may have higher product destruction and failure risk ratio due to falling
Keep the training device sensor in a cool, dry place. Please do not keep it in a
you keep your training device in a charged state. Battery
Do not do unreasonable repair / disassembly / modification (including software).

Disclaimer items
The contents of this manual are for the purpose of providing information only.
Details of the products described in this manual may be changed without notice to
the customer due to product development by the manufacturer.
KS-01 does not constitute warranties or warranties regarding the contents of this
manual or the contents and products described in this document.
KS-01 does not guarantee losses or failures resulting from direct, indirect or
accidental consequential or special actions according to the specifications of this
manual or the products described in this document。