Tecom Co WL5011S Wireless LAN Adapter User Manual WL5011manual new
Tecom Co Ltd Wireless LAN Adapter WL5011manual new
Tecom Co >
OEM Manual
1
WL 5011s
802.11g Wireless Network Adapter
Client Utility User Guide
10/2005
2
1. Introduction
WL5011s client utility is a clean, straightforward GUI (Graphic User Interface) tool,
which is designed for users to configure, manage and monitor users’ wireless network
with ease.
System requirement
Laptop/ PC containing:
• 32-bit Cardbus slot (or Desktop PC with PC Card-PCI adapter)
• Mini PCI
• 32 MB memory or greater
• 300 MHz processor or higher
Operation Systems:
Microsoft Windows 2000, Windows Millennium Edition, Windows 98 Second Edition,
Windows XP, or Windows NT 4.0 (with Service Pack 6)

3
2. Starting WL5011s Utility
Insert WL5011s and click the icon in the system tray (on the right-hand side of the
taskbar), the utility window will appear.
There are total 5 pages (Configure, Status, Network, Site Survey and About) provided
by this utility.
4
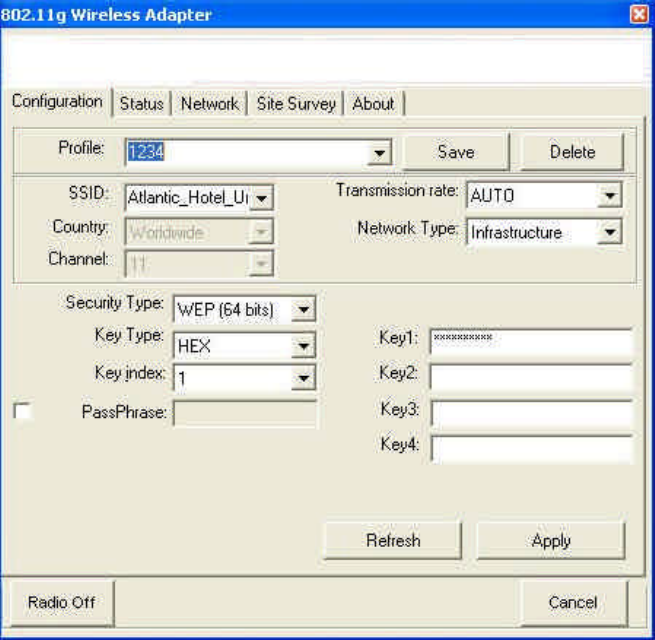
3. Configuration
‘Configure’ page allows you to make all the required settings in order to integrate the
adapter into an existing WLAN.
Profile: Your settings can be collected under one name, e.g. if you want to use your
computer in more than one WLAN network. Click ‘Save’ and all the current
settings will be assigned to the profile name and saved. They will then be
available for future use and are ready to be called up. Click ‘Delete’ to remove
the selected profile. Click ‘Apply’ to use the selected profile.
SSID: All computers in the domain of a wireless LAN must have the same identity in
order to be recognized. If you click the Open arrow you can see a list with the
SSID of all networks which are within the range of the computer. Select the
SSID which you would like to connect up to.
Desired rate: Here you can select the transmission rate. Recommended: ‘Auto’.
Module Type: Here you can define the type of network: ‘Infrastructure’ (all
cable-linked and radio controlled computers within the network are
connected up to one another via an access point) or ‘Ad hoc’ (the
computers only communicate with one another via radio and have no

5
access to a cable-linked network).
Country: for Ad hoc networks only. Radio channel restrictions are different by
countries. Please select properly.
Note: For the US version this item is locked by factory setting and the select
function is disabled.
Channel: for Ad hoc networks only. You can set the radio channel which all computers
must use. The availability of channels depend on which country you have
selected in previous “Country” item.
Note: For the US version only CH 1 to CH 11 is selectable by factory setting.
Security Type: Five network authentication types can be selected.
(1) WEP 64 bit (2) WEP 128 bit (3) WPA-PSK (4) WPA (5) 802.1x.
The detail describe as below.
WARNING
For security reason, enabling one of the security measurements is strongly recommended.
WEP is older and more commonly used in public wireless network. WPA provides stronger
protection than WEP but is more complicated to configure.
(1) WEP 64 bits & (2) WEP 128 bits:
WEP: The same key must be used for the radio module and the access point /router (in
the case of Infrastructure networks). In Ad hoc networks: All computers must
use the same key. 64 or 128 bit keys are supported.
Key Type: The type of WEP key. ‘HEX’: 10 (64 bits) or 26 (128 bits)
Hexadecimal characters (0 - 9 and A - F). ‘ASCII’: 5 (64 bits) or 13
(128 bits) characters.
Key Index: Select which key (Key 1 to Key 4) to use.
PassPhrase: Use this one for WEP key auto-generation. Check box and enter a
password sentence (max. 32 characters, highest safety level) into the
entry field (appears unreadable). The ‘Key Type’ fields will then be
deactivated. For 64 bit WEP key, four keys will be generated. Select the
key number from ‘Key Index’ which is also being used by the access

6
point (Infrastructure networks) or the other computers (Ad hoc
networks). In case of 128 bit WEP key, only one key will be generated
and used.
WARNING
For security reasons there is no standard for the generation of a WEP key (i.e. there
are various algorithms for the generation of a key). Please do not use PassPhrase if
you are not sure that every device within the network shares the same algorithm.
7
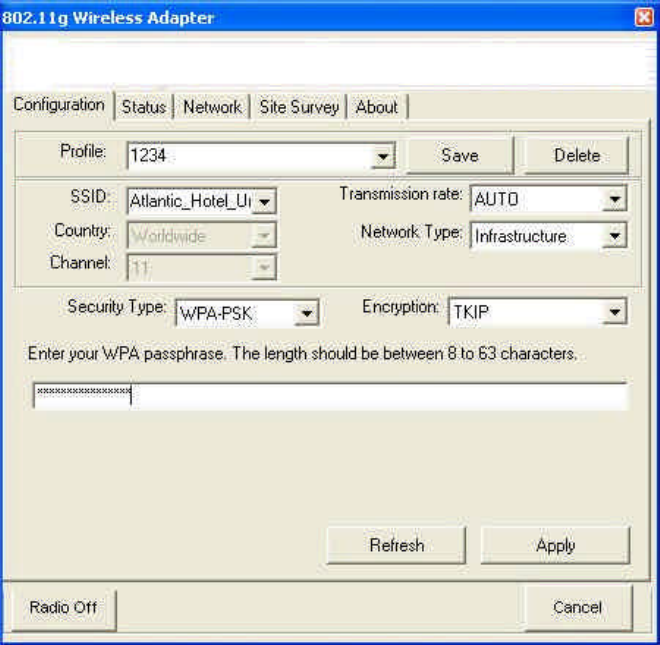
(3) WPA-PSK (Wi-Fi Protected Access -- Pre-shared key):
Encryption :
«TKIP (Temporal Key Integrity Protocol): An enhanced wireless security protocol;
part of the IEEE 802.11i encryption standard for wireless LANs. WPA was developed
to improve the security provided by WEP. WPA employs the same encryption
mechanism, but uses the TKIP (Temporal Key Integrity Protocol) procedure to create
the code.
«AES (Advanced Encryption Standard): An additional replacement for WEP
encryption.
Enter the Pre-shared key should be a string of 8 to 63 ASCII characters.

8
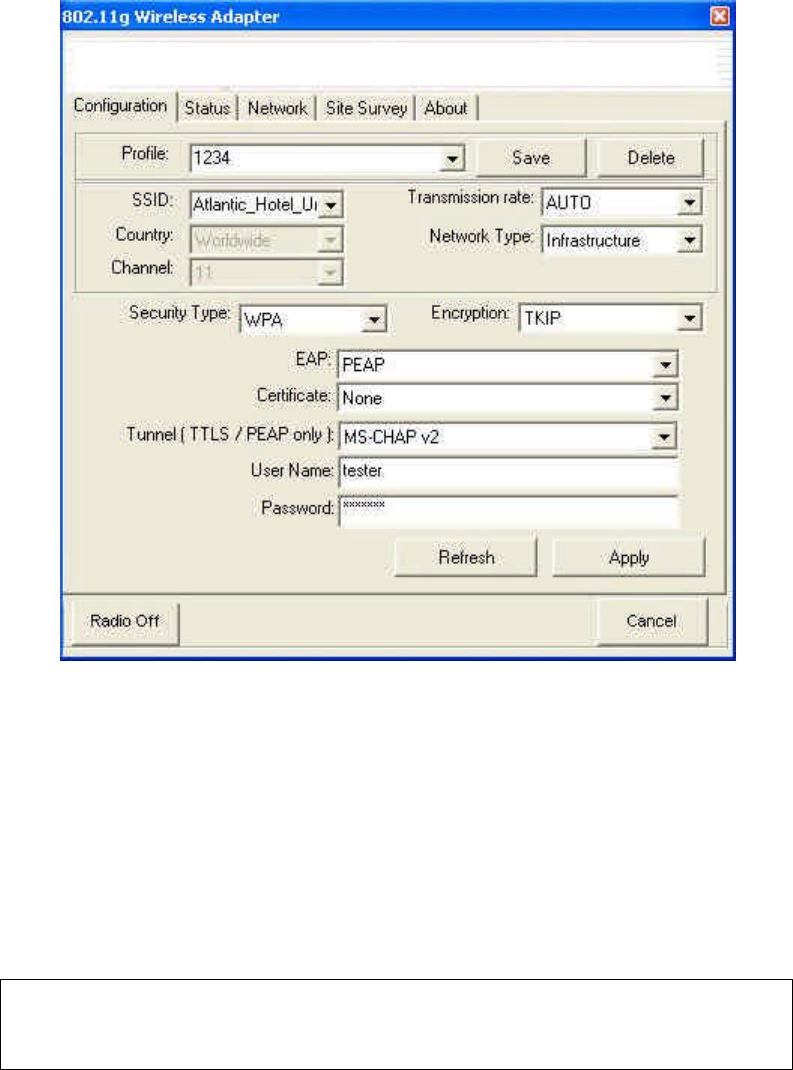
(4) WPA & (5) 802.1x:
WPA provides for an additional authentication by means of a procedure described in
the IEEE 802.1x standard. In this case you do not use a keyword (pre-shared key) for
your wireless router. You should select the option 802.1x or WPA and then configure
your access to an authentication server. As an authentication server you can either use
the wireless router’s internal RADIUS server (e.g. “tiny server”) or an external
RADIUS server.
EAP (Extensible Authentication Protocol):
«PEAP (Protected Extensible Authentication Protocol): A version of EAP. EAP
ensures mutual authentication between a wireless client and a server that resides at the
network operations center.
«LEAP (Light Extensible Authentication Protocol): A version of EAP. EAP ensures
mutual authentication between a wireless client and a server that resides at the
network operations center.
«TLS (Transport Layer Security): The successor to Secure Sockets Layer (SSL)
protocol for ensuring privacy and data integrity between two communicating
applications.
Internal RADIUS server (e.g. “tiny server”):
Server in the wireless router which checks the access data of the participants. This
controls the logging in of users by means of User Name and Password.
Security Type: can select “WPA” (Encryption: “TKIP” or “AES”) or “802.1x”
options.
EAP should select “PEAP” option.
Certificate should select “None” option.
Tunnel should select “MS-CHAPv2” option.
The account information (User Name and Password) must be the same as your
wireless router’s setting.
Note: The selections of Security Type (network authentication) and Encryption must be
the same as wireless router’s configuration.
9
External RADIUS server:
The router forwards the access data to an external server
(Recommend server: Windows 2000 Server’s external RADIUS server).
Security Type: can select “WPA” (Encryption: “TKIP” or “AES”) or “802.1x”
options.
EAP should select “TLS” option.
Certificate should select a certificate which has received from external RADIUS
server.
(The test client must install certificate gotten from external RADIUS server first
and then you can see and select this certificate ).
Note: The selections of Security Type (network authentication) and Encryption must be
the same as wireless router’s configuration.
10
Apply: By clicking "Apply" the settings you have made will be adopted by the adapter
and displayed on the "Status" tab.
Refresh: The settings will be applied to the default settings of the selected, active
profile.
Radio On/Off: The radio of the adapter can be switched on or off. If it is switched off,
the computer can no longer be reached within the network.
Cancel: Closes the utility window, but does not terminate the radio traffic.
11
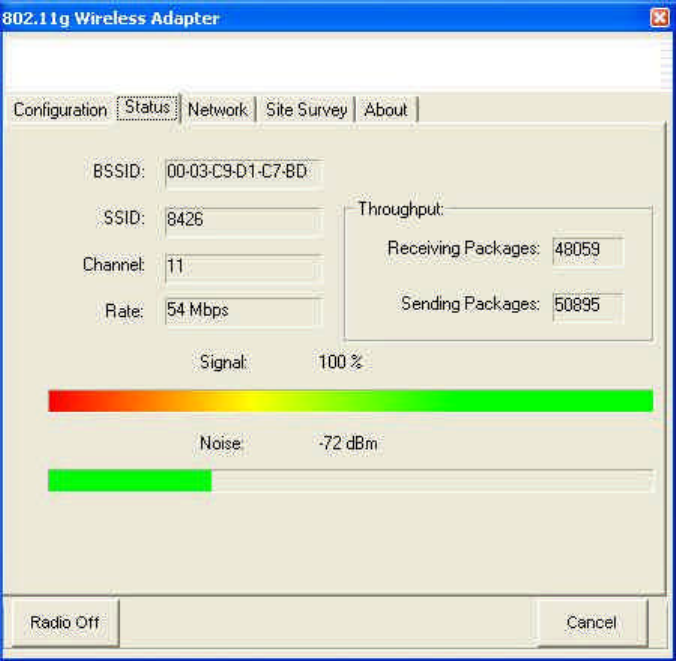
4. Status
The current connection status of the adapter is displayed here. This page is read only.
BSSID: The MAC address of the access point.
SSID: The identity of the network device. A connection is only possible when the
devices in the network have the same SSID.
Channel: The radio channel which is being used.
Rate: The current speed of transmission within the network.
Throughput: The traffic within the network in the form of the incoming (Receiving)
and outgoing (Sending) data packets.
Signal and Noise: Show you the stability the network and the strength of the signal.
12
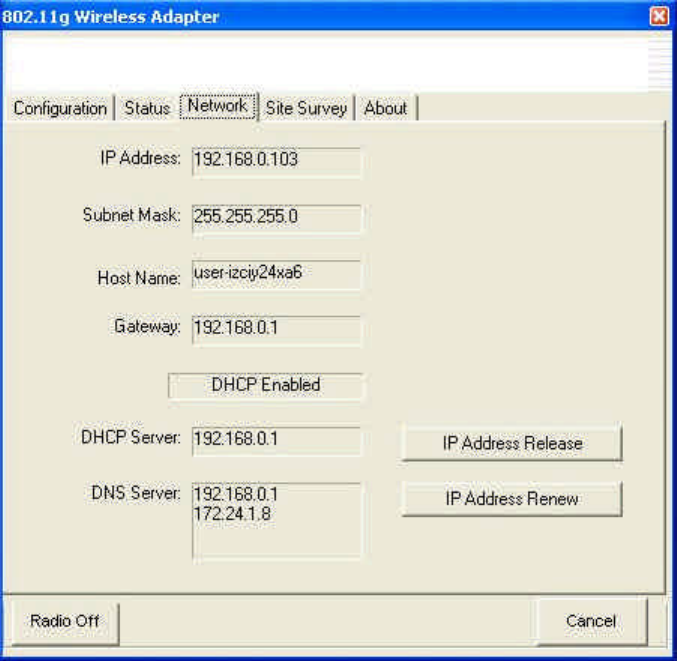
5. Network
This page displays the IP related information of the. The network administrator can use
this information to check the computer and its allocation within the network and, if
necessary, coordinate.
IP Address Release: Release IP address of the adapter obtained from DHCP server.
IP Address Renew: Re-acquire IP address of the adapter from DHCP server.
These two buttons will be gray-out if fixed IP setting of the adapter is used.
13
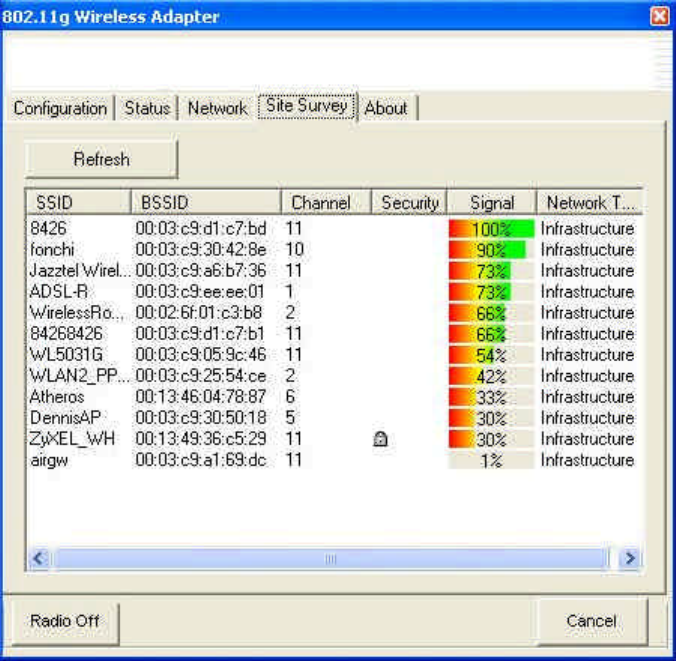
6. Site Survey
This page shows you all of the radio networks which are within range of your computer.
No configuration will be accepted here.
SSID: The network name of access points/routers which are within the radio
range of the computer. It is possible, however, that the SSID of the respective
access point or router has been suppressed. If there is a closed lock beside the
SSID, it means that the access point is encrypted.
BSSID: The MAC address of this access point.
Channel: The radio channel which is being used.
Signal: The strength of the radio signal.
Module Type: the type of network: ‘Infrastructure’ or ‘Ad hoc’.
Refresh: Re-do site survey. By clicking this button you can update the displayed
information.
Double-click one of the displayed ‘SSID’, the adapter will try to associate to the
selected access point and the ‘Status’ page will appear. If the access point is encrypted,
you will be prompted accordingly and ‘Configure’ page will appear.
14
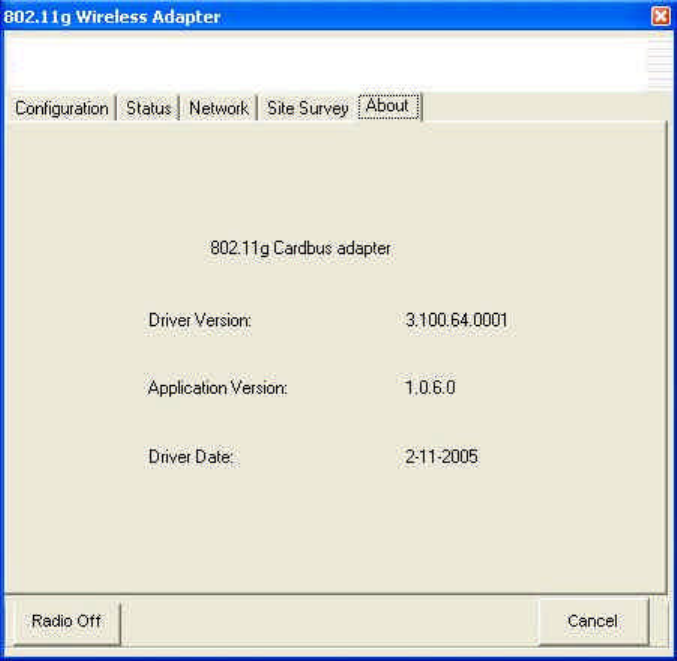
7. About
All driver related information is provided in this page: ‘Driver Version’,
‘Application Version’, and ‘Driver Date’. This information could be important if you
need to contact the customer technical support.
15
FCC statements
Notice: Changes or modifications not expressly approved by the party responsible for
compliance could void the user's authority to operate the equipment.
This device generates and radiates radio-frequency energy. In order to comply with FCC
radiofrequency radiation exposure guidelines for an uncontrolled environment, this equipment
has to be installed and operated while maintaining a minimum body to antenna distance of
20cm. The antenna(s) used for this transmitter must not be co-located or operated in
conjunction with any other antenna or transmitter.
This product does not contain any user serviceable components. Any unauthorized product
changes or modifications will invalidate warranty and all applicable regulatory certifications
and approvals.
This equipment has been tested and found to comply with the limits for a Class B Digital
Device, pursuant to Part 15 of the FCC Rules. These limits are designed to provide reasonable
protection against harmful interference in a residential installation.
This equipment generates, uses and can radiate radio frequency energy and, if not installed
and used in accordance with the instruction may cause harmful interference to radio
communication. However, there is no guarantee that interference will not occur in a particular
installation.
If this equipment does cause harmful interference to radio or television reception, which can be
determined by turning the equipment off and on, the user is encouraged to try to correct the
interference by one or more of the following measures:
-- Reorient or relocate the receiving antenna.
-- Increase the separation between the equipment and receiver.
-- Connect the equipment into an outlet on a circuit different from that to which the receiver is
connected.
-- Consult the dealer or an experienced radio / TV technician for help.
FCC OEM Labeling instructions:
OEM should add following label:
Contains FCC ID: D6XWL5011S
Above should be clearly visible on products where WL5011s modules are installed.