Tecom Co WL503X 802.11b Wireless LAN Access Point User Manual
Tecom Co Ltd 802.11b Wireless LAN Access Point
Tecom Co >
User Manual

WL5030
WLAN Access Point
User’s Manual
Version 1.0
TECOM CO., LTD.
March 2003
©2003 by TECOM CO., LTD.
All rights reserved.
Printed in Taiwan
1
Table of Contents
Package Contents and Trademark(s)- ------------- 2
Software Installation ---------------------------------- 3
Utilities Using Guide -----------------------------------4
Configuration for Optional function----------------7
Point-to-Point Wireless Bridge-----------------------8
Point-to-Multipoint Wireless Bridge----------------9
Troubleshooting --------------------------------------11
Specifications ------------------------------------------ 13
Technical Support ------------------------------------ 13
2
Package Contents
The package you have received should contain the
following items:
Wireless LAN Access Point
CD ROM containing Utility Software and
User’s Manual
Quick Installation Guide
Trademark(s)TM and Registered Trademark(s)®
TECOM and the TECOM logo are trademarks of
TECOM CO., LTD.
Microsoft, Windows are registered trademarks of
Microsoft Corporation. Other brand and product names
may be registered trademarks or trademarks of their
respective holders.
3
Software Installation Guide
For AP Configuration
1. Run the “Setup.exe” in the folder of AP Configuration of the
driver disk. Follow the guideline on the screen, and select
the directory where the application will be installed, it will
deploy all files that needed at that. At the end, windows will
show a message that installation is completed.
2. Power on the Access point.
3. Plug the “cross over” type Ethernet cord into both port of
host PC and AP. (If you don’t have “cross over” type
Ethernet cord and have a hub, then you can use normal type
Ethernet cable to connect both host PC and AP to hub.)
4. You can run the program of “AP Configuration”, which you
can find in “start” ”program” ”TECOM”
”SNMPManager”
5. Make sure that the IP address of your host PC and AP are in
the same sub-net, because this program is based on SNMP.
The default setting of IP address of AP is 10.170.254.37
4
Utilities Using Guide
For AP Configuration
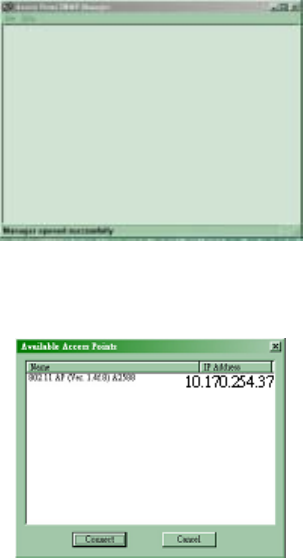
When you run the AP Configuration, you will see a dialog box pop
up like below. Of course, the AP is already connected to your host
PC by Ethernet port.
1. Press “File””Find Access Point”, it will show a dialog box
like below to show you how many Access Points it found on
the net.
5
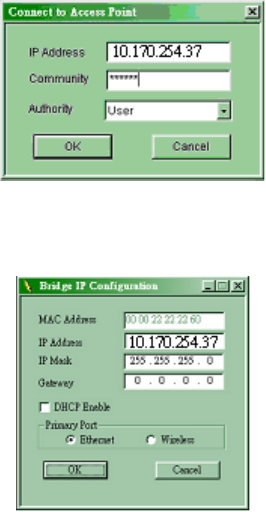
2. Choose the one you want to configure and press “Connect”,
it shows another dialog box like below. Enter your
community and choose your Authority. (The default settings
of community are all “public”.) Press “OK”, After then, if
both of you are in the same sub-net, it will get the Access
point you choose, and turn into a configuration dialog box.
3. Press “Setup” ”Bridge” ”IP Configuration”, a Bridge IP
Configuration dialog box will pop up. Here, you can set the
IP address and IP mask.

6
4. Press “Setup” ”Wireless LAN” ”Operational Settings”,
a Wireless Operational Settings dialog box will pop up. Here,
you can set the ESSID and the channel you want.
5. Press “File” ”Download Changes” to make all you change
download to AP.
After done the above setting, the AP should work properly.
7
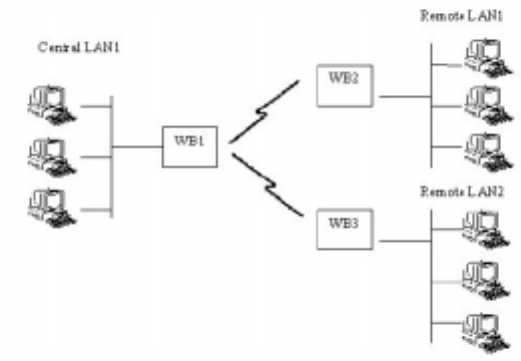
Configuration for Optional function ---Wireless Bridge
Wireless Bridge function is somewhat like a repeater in the
Ethernet world. It can make 2 remote Ethernet LANs just like to be
one, which both LANs must got an individual AP connected with.
(in another word, 2 remote Ethernet LANs can connected with
each other by APs working under the mode.) There are 2 type of
bridge mode, point-to-point and point-to-multipoint. You can see
from below.
8
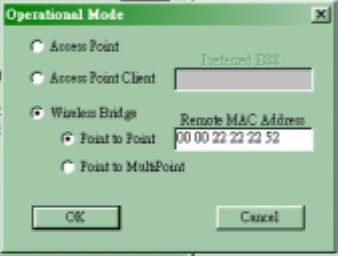
Point-to-Point Wireless Bridge: This mode allows one wireless
bridge communicate with a specific remote one only.
1. Run the “AP Configuration” and make a connection with
your AP.
2. Press “Advanced” button in the right lower Conner of
“Setup” ”Wireless LAN” ”Operational Settings”, then
you will see a pop-up dialog like this.
3. click on “Point to Point” and fill in the remote MAC address
of the other side of AP in this field.
4. Press “File” ”Download Changes” to make all you change
download to AP.
5. On the other side, do as the same, but only the field of
“Remote MAC Address” is that of this side of AP.
9
6. Make both APs working on the same channel, then you
should have an wireless bridge working now.
Point-to-Multipoint Wireless Bridge: This mode allows
wireless bridge communicate with any bridge on the same
channel.
1. Like in “Point-to-Point” mode, just clicks on
“Point-to-MultiPoint”, do the same step to all AP you want
to work in bridge mode.
2. Make sure that all bridge mode AP on the same channel.
Then you can connect with each other.
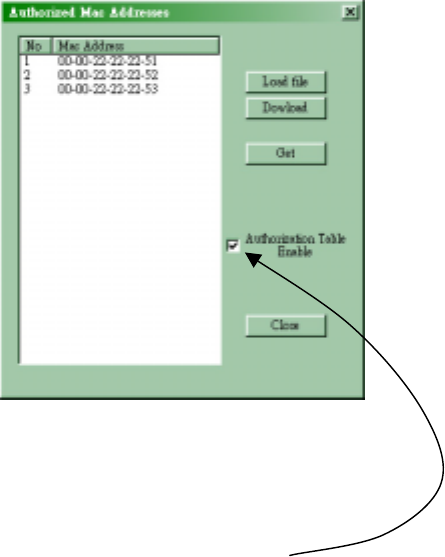
If you want to allow only AP with authentication to connect,
then you can start up authorization algorithm.
1. Make an authorized MAC list---just put all the MAC address
of AP you want to connect in a text file. For example, if you
want AP which MAC address is 00-00-22-22-22-50 in your
MAC list, then you just put “000022222250” in your list file.
2. Run “AP Configuration”. Clicks on “Setup” ”Wireless
LAN” ”Authorized Mac Addresses”, you will see a
pop-up dialog box as below, except the content is blank.
10
3. Clicks on “Load file” button, and choose the authorized
MAC list file that you did in last step.
4. Clicks on “Dowload” button to download the list into AP.
5. Check on “Authorization Table Enable” to make
authorization function enabled.
6. Press “File” “Download Changes” to make all you
change download to AP.
7. Then, only Access Point which MAC address is listed on the
table can communicate with.
11
Troubleshooting
1. AP Installation Problems
If your network adapter cannot find the TECOM
Wireless Access-Point, check the followings,
Make sure the adapter is securely inserted in the
PCMCIA/Cardbus slot. when you insert the
wireless adapter into the notebook’s slot, a click
should be heard if the adapter is properly inserted.
Check for any hardware problems, such as
physical damage to the card connector.
Try the card in another slot. If this also fails, test
your computer with another wireless LAN adapter
(ex: TECOM WL5020i) that is known to operate
correctly.
Check the power of AP is on without problem, or
re-configure the network environment setting is
correctly.
12
2. Diagnostics utility
Make sure your computer is using the latest
BIOS.
If there are other network adapters in the computer,
they may be causing conflict, remove all other
adapters from the computer and test the wireless
adapter separately.

13
Wireless LAN 802.11b AP – TECOM WL5030
Product Name Wireless LAN 802.11b AP
Model Number WL5030
Host Interface 1 WAN port
Frequency
Band 2.400 ~ 2.4835GHz (subject to local
regulations)
USA and Canada – 11
Most European countries – 13
Number of Channel
France – 4 Japan – 13
(optional – 14)
Power Adaptor
Input AC 100 ~ 240V, 0.35A
Input Power DC 5V, 1.0A
Spreading DSSS (Direct Sequence Spread
Spectrum)
Data rate 11Mbps, 5.5Mbps, 2Mbps, 1Mbps
Output Power Typical: 15 dBm, maximal : 17dBm
Receive
Sensitivity Nominal Temp Range:
11 Mbps 10-5 BER @ -83 dBm,
Typical
Modulation 11Mbps and 5.5Mbps CCK
2Mbps: DQPSK
1Mbps: DBPSK;
Security 64-bit and 128-bit WEP Encryption
Antenna Dual antenna diversity system

14
LED indicator Power, WAN Link/Act, RF Activity
Standards IEEE 802.11b compliant for wireless
LAN, IEEE 802.3 for wired LAN
Temperature
Range 0 ~ 55°C (Operating)
-20~65°C (Storing)
Humidity Max. 95% Non-condensing
Operating
Range Open Space: 100 – 300m
Indoor: 30m – 100m
The transmission speed varies in the
surrounding environment.
Network
Protocol TCP/IP, IPX, NetBEUI
Physical
Dimension 150mmx107mmx34mm
Technical Support
If you are still experiencing problems after reading Product User’s
Guide and the Troubleshooting section, you may either contact our
technical support at: support@tecom.com.tw.
OR, simply click our URL address www.tecomproduct.com to go
to our company website and check the latest version and other
information about the product and/or software.
RF exposure statement:
The antenna(s) used for this transmitter must be installed to provide a
separation distance of at least 20 cm from all persons and must not be
co-located or operating in conjunction with any other antenna or
transmitter.