Tecom Co WM5030OD WiMAX Outdoor Modem User Manual WM5030 OD QIG V1 3
Tecom Co Ltd WiMAX Outdoor Modem WM5030 OD QIG V1 3
Tecom Co >
Contents
- 1. Users Manual 1
- 2. Users Manual 2
- 3. Users Manual 3
Users Manual 3

Version1.3
TECOMCO.,LTD
2009/9/1
WM5030-OD WiMAX Outdoor Modem
Quick Installation Guide

WM5030-OD QIG
i
TABLE OF CONTENTS
1. UNPACK THE OUTDOOR MODEM.......................................................................................................................1
2. MAKING CONNECTIONS........................................................................................................................................2
3. OMK..............................................................................................................................................................................3
4. NETWORK CONFIGURATION...............................................................................................................................5
4.1
S
ETUP YOUR COMPUTER TO CONFIGURE
WM5030-OD ..........................................................................................5
4.2
M
AKING
C
ONNECTION TO
W
I
MAX
N
ETWORK
...........................................................................................................7
WM5030-OD QIG
1
1. UNPACK THE OUTDOOR MODEM
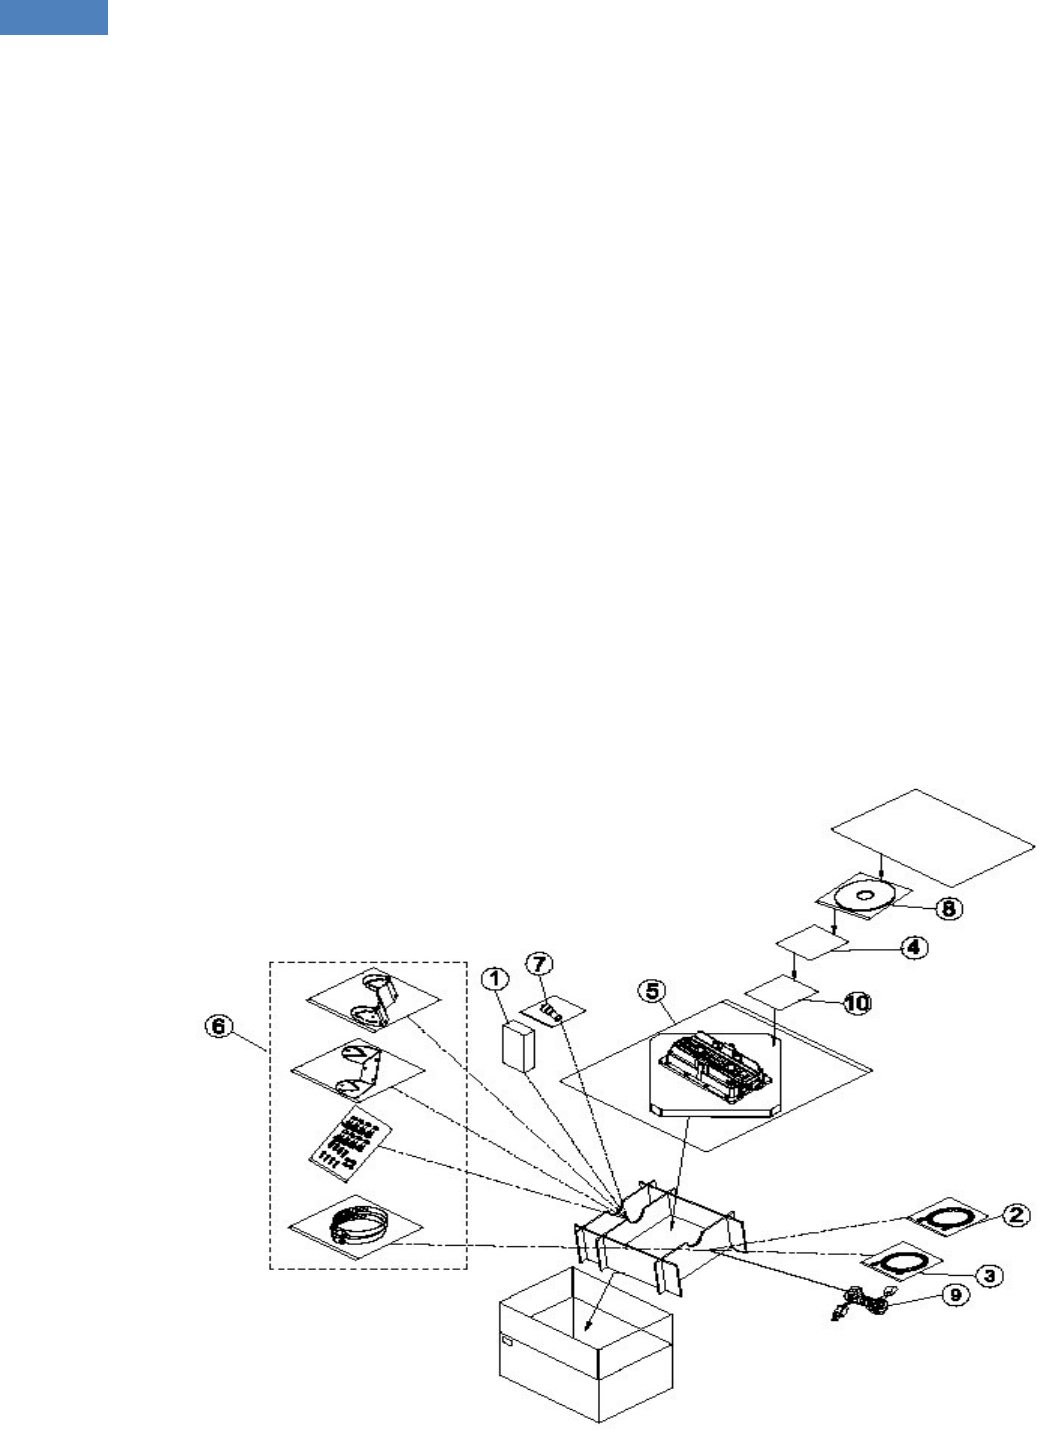
The following figure lists the items shipped with WM5030OD outdoor modem:
1. PoE Adapter: Qty 1
2. 1.5 M 8P4C gray Ethernet cable (between computer and PoE): Qty 1
3. 1 M 8P8C white Ethernet cable (between PoE and Modem) note : Qty 1
4. Quick Installation Guide: Qty 1
5. WM5030-OD outdoor modem: Qty 1
6. Mounting kit: Qty 1
7. RJ45 connector water sealing plug: Qty 1
8. CD-ROM: Qty 1
9. 1.5M Power Cable for PoE Adapter: Qty 1
10.
Warranty Card
: Qty 1
Note: The length of Ethernet cable required connecting outdoor modem and PoE adapter pending on
actual installation requirements, and it is thus not provided. The cable provided is for configuration or
testing purpose only – not for installation purpose.
Figure 1. WM5030 Outdoor Modem Package Contents
WM5030-OD QIG
2
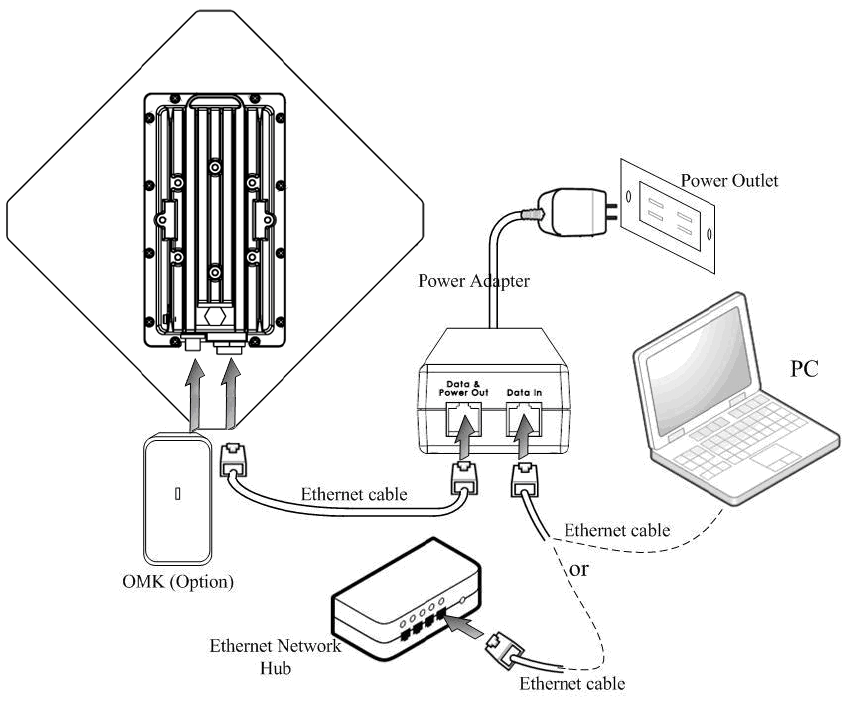
2. MAKING CONNECTIONS
In order to configure WM5030 outdoor modem, please take the following steps:
1. Connect the white Ethernet cable between the RJ-45 connector located at the bottom of the outdoor
modem and the “Data & Power Out” port of PoE adapter.
2. Connect the gray Ethernet cable between the “data in” port of the PoE adapter and your personal
computer.
3. Plug the PoE adapter power cable to power outlet
4. Plug the OMK (Outdoor modem Monitoring Kit) to OMK connector
Figure 2. Typical Installation Diagram

WM5030-OD QIG
3
3. OMK
OMK (Outdoor modem Monitoring Kit) is a convenient tool for technician during installation, testing and
maintenance for WM5030-OD. It is designed for easy carrying and an excellent tool to display radio quality
for technician to adjust orientation and tilt of WM5030-OD for best reception from WiMAX base station. OMK
features include:
z CINR signal quality
z Power indicator
z Link status
z Reset to factory default
Figure 3. OMK
WM5030-OD QIG
4
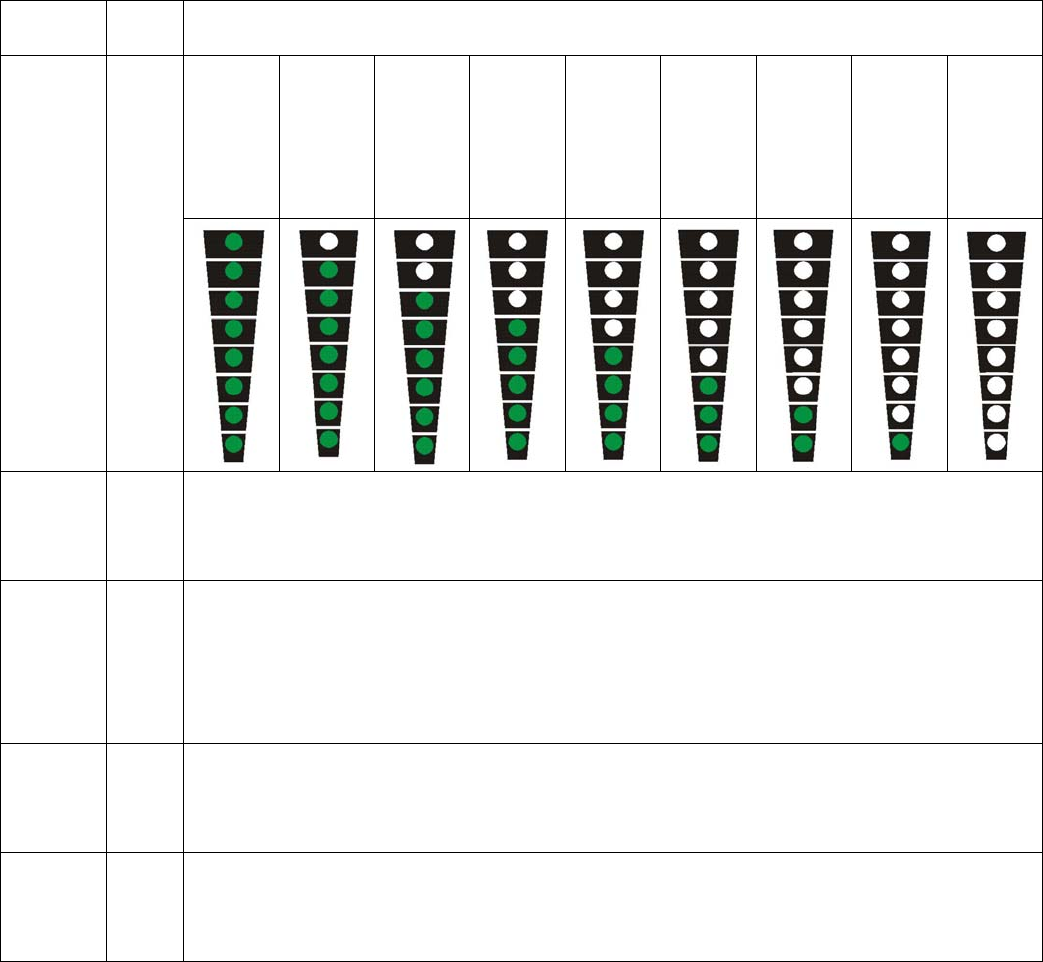
Table 1: Definitions of OMK LED
Color Function
CINR
>
31dBm
31 ≥
CINR ≥
29dBm
29 >
CINR ≥
27dBm
27 >
CINR ≥
24dBm
24 >
CINR ≥
20dBm
20 >
CINR ≥
15dBm
15 >
CINR ≥
10dBm
10 >
CINR ≥
5dBm
CINR
< 5dBm
WiMAX
Signal
Indicator
Green
Saturate
LED
Red RSSI > -20dBm: ON (saturate)
WiMAX
Link
LED
Green Operational: ON
Not in operation: OFF
Power
LED
Green Power-on: ON, Power-off: OFF
Reset
Button
Push and hold for 20 seconds will reset WM5030-OD to factory default
WM5030-OD QIG
5
4. NETWORK CONFIGURATION
4.1 Setup your computer to configure WM5030-OD
Step 1: Complete prior section 2 to connect your computer and WM5030OD.
Step 2: Make sure the power indicator on Modem is on.
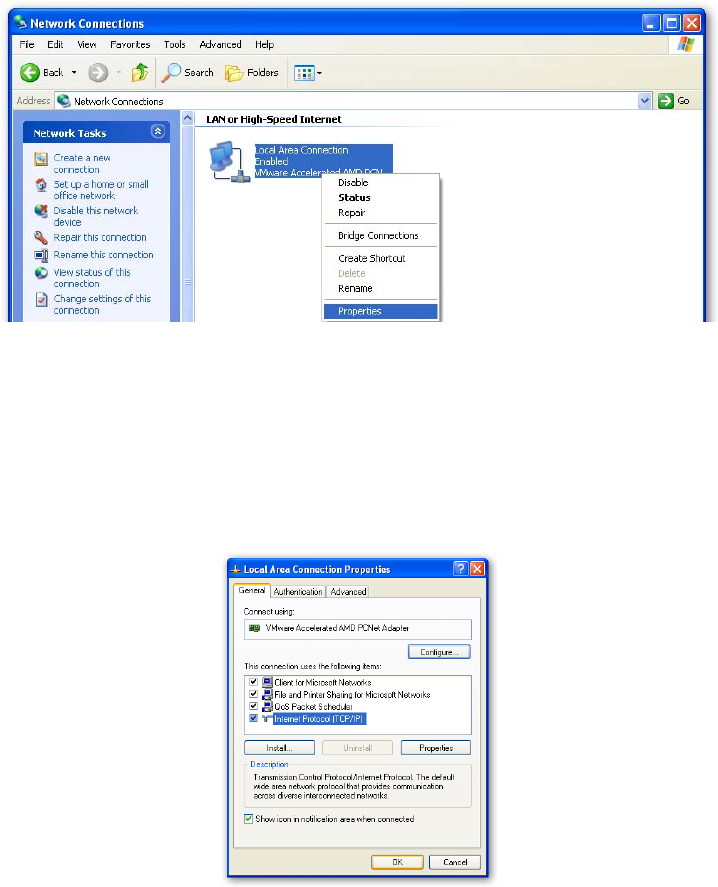
Step 3: Find your “Network Connections” setting in “Control Panel”
Step 4: In your “Network Connections”, right click “Local Area Connection”, and then select
“Properties”. (Ref. Figure 4)
Figure 4. Local Area Connection Property
Step 5: A dialog that contains properties of this network connection appears as below. Please select “Internet
Protocol (TCP/IP)” and click “OK” (Ref. Figure 5)
WM5030-OD QIG
6
Figure 5. TCP/IP
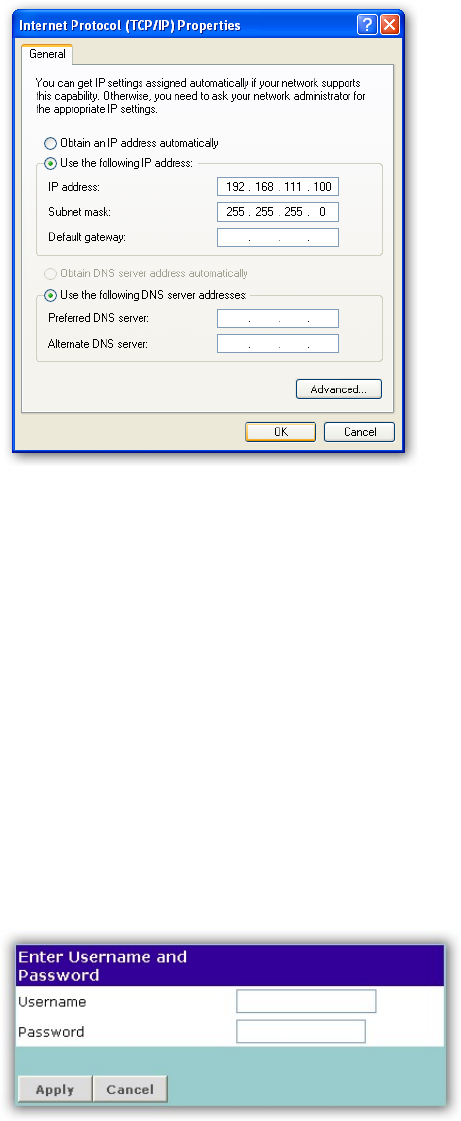
Step 6: Enter 192.168.111.100 into IP address and 255.255.255.0 into Subnet mask, and click “OK”.
(Ref. Figure 6)
Figure 6. IP Configuration
Step 7: Enter the IP address (default is 192.168.111.113) of WiMAX modem into Web Browser. A dialog Box
will pop out to request for user login information (Ref. Figure 7). Please enter management
username/password into the required fields, then click “Apply” to continue. The username/password
for outdoor modem technical installer is isp/isp. After successfully log in, WM5030-OD home page is
displayed.
Figure 7. Login
Note: For subscriber, the default username/password is subscriber/ subscriber with limited control features.
WM5030-OD QIG
7
4.2 Making Connection to WiMAX Network
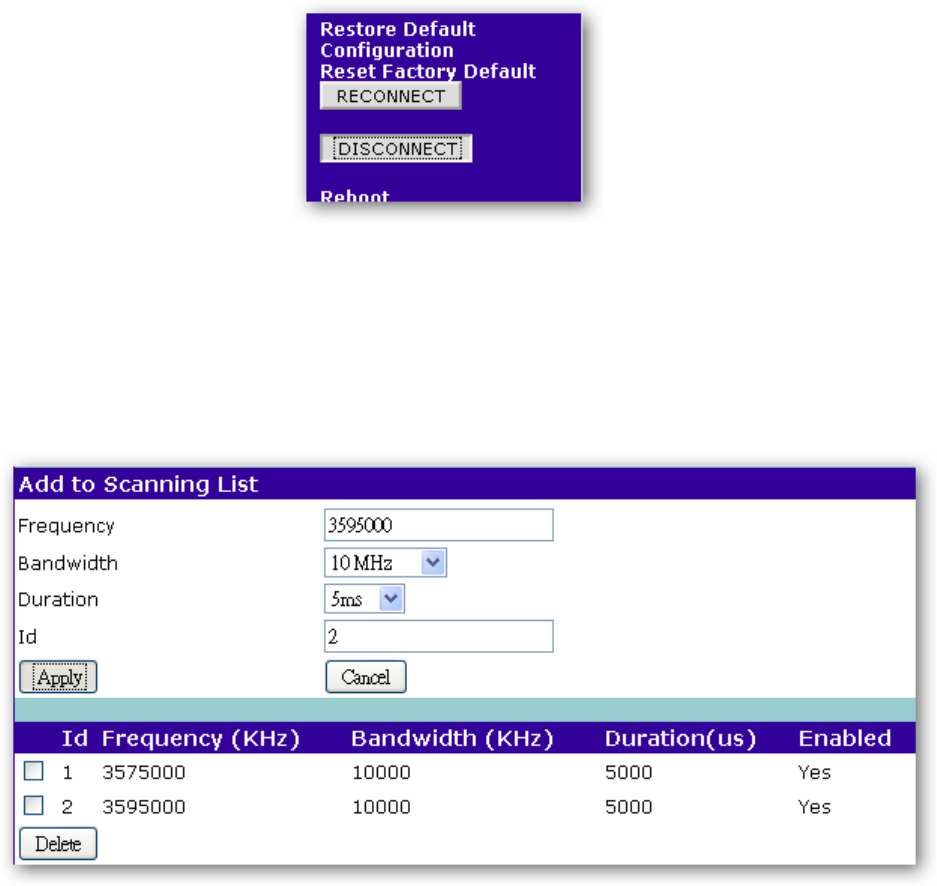
Step 1: Press “Disconnect” button. If user is already connected to WiMAX network, then new channel cannot
be added to the scan list (Ref. Figure 8)
Figure 8. Disconnect before Scanning
Step 2: Type in the central frequency of the WiMAX operator, and select the correct bandwidth to add new
frequency to the scan list (Ref. Figure 9).
Figure 9. Add Operator Central Frequency to Scan List
Note: A channel cannot be added when WiMAX modem is scanning. Press “Disconnect” to stop.

WM5030-OD QIG
8
Step 3. To use the authentication feature, user must provide security settings. Please first select
“Authentication” at the right of the modem home page. If operator requires TLS setting, please follow
steps 4-A. If operator requires TTLS, then please follow step 4-B (Ref. Figure 10).
Figure 10. Choose TLS or TTLS for Authentication
Note: The factory default Authentication setting is “None”.
Step 4-A: Please locate the proper CA Certificate file, User Certificate file and Decryption Key file to upload to
WM5030-OD. Please contact your WiMAX operator for Password of Decryption Key file. Please
also type in account ID and password (Ref. Figure 11).
Figure 11. TLS Configuration
Note: The above figures are just for example. For using the WiMAX service, please use the correct authentication
type and user information that ISP provided for the authentication setting.
WM5030-OD QIG
9
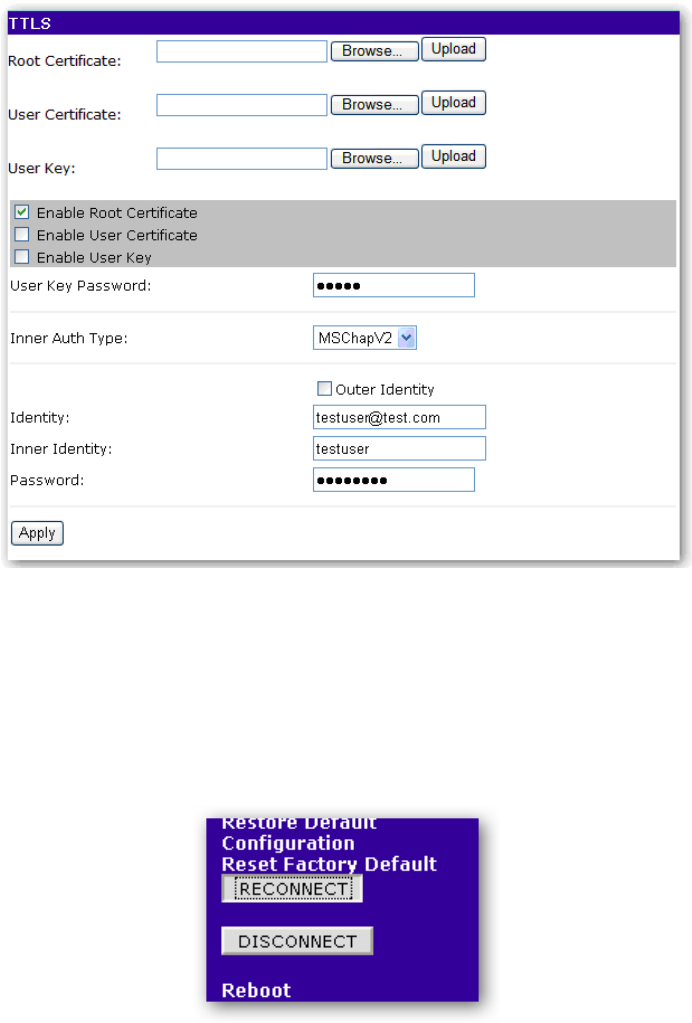
Step 4-B: Please locate the proper CA Certificate file, User Certificate file and Decryption Key file to upload to
WM5030-OD. Please contact your WiMAX operator for Password of Decryption Key file. Please
select the desired Inner EAP category and enter Identity, Inner Identity and Password, then click
“Apply” to configure. (Ref. Figure 12)
Figure 12. TTLS Configuration
Note: The above figures are just for example. For using the WiMAX service, please use the correct authentication
type and user information that ISP provided for the authentication setting.
Step 5: Press “Reconnect” button, to connect to WiMAX network.
Figure 13. Connecting to WiMAX Network
WM5030-OD QIG
10
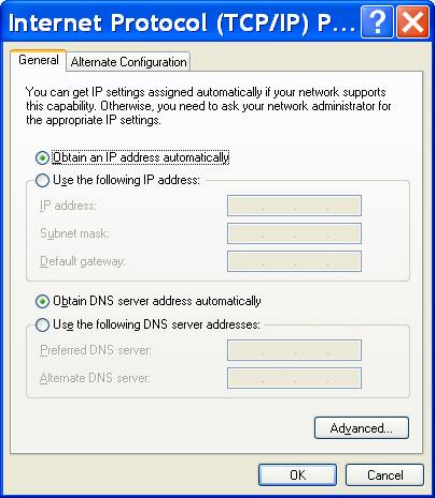
Step 6: Now, please change the network setting of your computer in Internet Protocol (TCP/IP) properties,
select “Obtain an IP address automatically” and select “Obtain DNS server address automatically”.
Figure 14. Configure Your Computer TCP/IP Setting
Step 7: Open web browser such as Internet Explorer (IE) to access Internet to check whether you have
successfully connected to the Internet.
IMPORTANT NOTE:
To comply with the RF exposure compliance requirements, the antenna(s) used for this
transmitter must be installed to provide a separation distance of at least 1 meter from all persons
and must not be co-located or operating in conjunction with any other antenna or transmitter. No
change to the antenna or the device is permitted. Any change to the antenna or the device could
result in the device exceeding the RF exposure requirements and void user’s authority to operate
the device.