Tektronix Stereo System Wfm90 Users Manual
WFM91 to the manual dcfec1f7-c85e-4a0c-94a9-cbd6fcf593d5
2015-02-03
: Tektronix Tektronix-Stereo-System-Wfm90-Users-Manual-464190 tektronix-stereo-system-wfm90-users-manual-464190 tektronix pdf
Open the PDF directly: View PDF ![]() .
.
Page Count: 154 [warning: Documents this large are best viewed by clicking the View PDF Link!]
- Service Manual
- Table of Contents
- List of Figures
- List of Tables
- General Safety Summary
- ServiceSafety Summary
- Preface
- Introduction
- Specifications
- Operating Information
- Theory of Operation
- Performance Verification
- Adjustment Procedures
- Maintenance
- Removal and Replacement
- Troubleshooting Procedures
- Options and Accessories
- Replaceable Parts List
- Diagrams

Service Manual
WFM 90 and WFM 91
Handheld Waveform, Vector, Picture,
and Audio Monitor
070-8969-04
This document supports firmware version 1.00
and above.
Warning
The servicing instructions are for use by qualified
personnel only. To avoid personal injury, do not
perform any servicing unless you are qualified to
do so. Refer to all safety summaries prior to
performing service.
Copyright © Tektronix, Inc. All rights reserved.
Tektronix products are covered by U.S. and foreign patents, issued and pending. Information in this publication supercedes
that in all previously published material. Specifications and price change privileges reserved.
Printed in the U.S.A.
Tektronix, Inc., P.O. Box 1000, Wilsonville, OR 97070–1000
TEKTRONIX and TEK are registered trademarks of Tektronix, Inc.
WARRANTY
Tektronix warrants that the products that it manufactures and sells will be free from defects in materials and workmanship
for a period of one (1) year from the date of shipment. If a product proves defective during this warranty period, Tektronix,
at its option, either will repair the defective product without charge for parts and labor, or will provide a replacement in
exchange for the defective product.
In order to obtain service under this warranty, Customer must notify Tektronix of the defect before the expiration of the
warranty period and make suitable arrangements for the performance of service. Customer shall be responsible for
packaging and shipping the defective product to the service center designated by Tektronix, with shipping charges prepaid.
Tektronix shall pay for the return of the product to Customer if the shipment is to a location within the country in which the
Tektronix service center is located. Customer shall be responsible for paying all shipping charges, duties, taxes, and any
other charges for products returned to any other locations.
This warranty shall not apply to any defect, failure or damage caused by improper use or improper or inadequate
maintenance and care. Tektronix shall not be obligated to furnish service under this warranty a) to repair damage resulting
from attempts by personnel other than Tektronix representatives to install, repair or service the product; b) to repair
damage resulting from improper use or connection to incompatible equipment; c) to repair any damage or malfunction
caused by the use of non-Tektronix supplies; or d) to service a product that has been modified or integrated with other
products when the effect of such modification or integration increases the time or difficulty of servicing the product.
THIS WARRANTY IS GIVEN BY TEKTRONIX IN LIEU OF ANY OTHER WARRANTIES, EXPRESS OR
IMPLIED. TEKTRONIX AND ITS VENDORS DISCLAIM ANY IMPLIED WARRANTIES OF
MERCHANTABILITY OR FITNESS FOR A PARTICULAR PURPOSE. TEKTRONIX’ RESPONSIBILITY TO
REPAIR OR REPLACE DEFECTIVE PRODUCTS IS THE SOLE AND EXCLUSIVE REMEDY PROVIDED TO
THE CUSTOMER FOR BREACH OF THIS WARRANTY. TEKTRONIX AND ITS VENDORS WILL NOT BE
LIABLE FOR ANY INDIRECT, SPECIAL, INCIDENTAL, OR CONSEQUENTIAL DAMAGES IRRESPECTIVE
OF WHETHER TEKTRONIX OR THE VENDOR HAS ADVANCE NOTICE OF THE POSSIBILITY OF SUCH
DAMAGES.
Service Assurance
If you have not already purchased Service Assurance for this product, you may do so at any time during the product’s
warranty period. Service Assurance provides Repair Protection and Calibration Services to meet your needs.
Repair Protection extends priority repair services beyond the product’s warranty period; you may purchase up to three
years of Repair Protection.
Calibration Services provide annual calibration of your product, standards compliance and required audit documentation,
recall assurance, and reminder notification of scheduled calibration. Coverage begins upon registration; you may purchase
up to five years of Calibration Services.
Service Assurance Advantages
HPriced well below the cost of a single repair or calibration
HAvoid delays for service by eliminating the need for separate purchase authorizations from your company
HEliminates unexpected service expenses
For Information and Ordering
For more information or to order Service Assurance, contact your Tektronix representative and provide the information
below. Service Assurance may not be available in locations outside the United States of America.
Name VISA or Master Card number and expiration
Company date or purchase order number
Address Repair Protection (1,2, or 3 years)
City, State, Postal code Calibration Services (1,2,3,4, or 5 years)
Country Instrument model and serial number
Phone Instrument purchase date

WFM 90 and WFM 91 Service Manual i
Table of Contents
General Safety Summary vii. . . . . . . . . . . . . . . . . . . . . . . . . . . . . . . . . . . .
Service Safety Summary xi. . . . . . . . . . . . . . . . . . . . . . . . . . . . . . . . . . . . .
Preface xiii. . . . . . . . . . . . . . . . . . . . . . . . . . . . . . . . . . . . . . . . . . . . . . . . . . .
Introduction xv. . . . . . . . . . . . . . . . . . . . . . . . . . . . . . . . . . . . . . . . . . . . . . .
Service Strategy xv. . . . . . . . . . . . . . . . . . . . . . . . . . . . . . . . . . . . . . . . . . . . . . . . . .
Service Offerings xv. . . . . . . . . . . . . . . . . . . . . . . . . . . . . . . . . . . . . . . . . . . . . . . . .
Before You Begin xvii. . . . . . . . . . . . . . . . . . . . . . . . . . . . . . . . . . . . . . . . . . . . . . . . .
Specifications
Product Description 1–1. . . . . . . . . . . . . . . . . . . . . . . . . . . . . . . . . . . . . . . . . . . . . . .
Characteristics Tables 1–5. . . . . . . . . . . . . . . . . . . . . . . . . . . . . . . . . . . . . . . . . . . . . .
Operating Information
Installation 2–1. . . . . . . . . . . . . . . . . . . . . . . . . . . . . . . . . . . . . . . . . . . . . . . . . . . . . .
Operating Information 2–4. . . . . . . . . . . . . . . . . . . . . . . . . . . . . . . . . . . . . . . . . . . . .
Theory of Operation
Block Diagram Description 3–1. . . . . . . . . . . . . . . . . . . . . . . . . . . . . . . . . . . . . . . . .
Performance Verification
Summary Verification 4–1. . . . . . . . . . . . . . . . . . . . . . . . . . . . . . . . . . . . . . . . . . . . .
Equipment Required 4–2. . . . . . . . . . . . . . . . . . . . . . . . . . . . . . . . . . . . . . . . . . . . . . .
Performance Verification Procedures 4–4. . . . . . . . . . . . . . . . . . . . . . . . . . . . . . . . . .
Adjustment Procedures
Summary Adjustment 5–1. . . . . . . . . . . . . . . . . . . . . . . . . . . . . . . . . . . . . . . . . . . . . .
Equipment Required 5–2. . . . . . . . . . . . . . . . . . . . . . . . . . . . . . . . . . . . . . . . . . . . . . .
Adjustment Procedures 5–3. . . . . . . . . . . . . . . . . . . . . . . . . . . . . . . . . . . . . . . . . . . .
Maintenance
Preparation 6–1. . . . . . . . . . . . . . . . . . . . . . . . . . . . . . . . . . . . . . . . . . . . . . . . . . . . . .
Inspection and Cleaning 6–3. . . . . . . . . . . . . . . . . . . . . . . . . . . . . . . . . . . . . . . . . . . .
After Repair Adjustments 6–4. . . . . . . . . . . . . . . . . . . . . . . . . . . . . . . . . . . . . . . . . .
Repackaging Instructions 6–4. . . . . . . . . . . . . . . . . . . . . . . . . . . . . . . . . . . . . . . . . . .
Removal and Replacement 6–5. . . . . . . . . . . . . . . . . . . . . . . . . . . . . . . . . . .
Tools Required 6–5. . . . . . . . . . . . . . . . . . . . . . . . . . . . . . . . . . . . . . . . . . . . . . . . . . .
Procedures 6–6. . . . . . . . . . . . . . . . . . . . . . . . . . . . . . . . . . . . . . . . . . . . . . . . . . . . . .
Troubleshooting Procedures 6–31. . . . . . . . . . . . . . . . . . . . . . . . . . . . . . . . . .
Equipment Required 6–31. . . . . . . . . . . . . . . . . . . . . . . . . . . . . . . . . . . . . . . . . . . . . . .
Battery-Fault Analysis 6–32. . . . . . . . . . . . . . . . . . . . . . . . . . . . . . . . . . . . . . . . . . . . .
Low-Voltage Power Supply 6–35. . . . . . . . . . . . . . . . . . . . . . . . . . . . . . . . . . . . . . . . .

Table of Contents
ii WFM 90 and WFM 91 Service Manual
Fault Symptom Table 6–35. . . . . . . . . . . . . . . . . . . . . . . . . . . . . . . . . . . . . . . . . . . . . .
Troubleshooting Flowcharts 6–36. . . . . . . . . . . . . . . . . . . . . . . . . . . . . . . . . . . . . . . . .
Connector Diagram 6–50. . . . . . . . . . . . . . . . . . . . . . . . . . . . . . . . . . . . . . . . . . . . . . .
Options
Options 7–1. . . . . . . . . . . . . . . . . . . . . . . . . . . . . . . . . . . . . . . . . . . . . . . . . . . . . . . . .
Accessories 7–2. . . . . . . . . . . . . . . . . . . . . . . . . . . . . . . . . . . . . . . . . . . . . . . . . . . . . .
Replaceable Parts List
Parts Ordering Information 8–1. . . . . . . . . . . . . . . . . . . . . . . . . . . . . . . . . . . . . . . . .
Using the Replaceable Parts List 8–2. . . . . . . . . . . . . . . . . . . . . . . . . . . . . . . . . . . . .
Diagrams
Diagrams 9–1. . . . . . . . . . . . . . . . . . . . . . . . . . . . . . . . . . . . . . . . . . . . . . . . . . . . . . .

Table of Contents
WFM 90 and WFM 91 Service Manual iii
List of Figures
Figure 2–1: Installing the viewing hood 2–2. . . . . . . . . . . . . . . . . . . . . . . .
Figure 2–2: Installing the desk stand 2–2. . . . . . . . . . . . . . . . . . . . . . . . . . .
Figure 2–3: Instrument front panel 2–4. . . . . . . . . . . . . . . . . . . . . . . . . . . .
Figure 2–4: Instrument side panels 2–7. . . . . . . . . . . . . . . . . . . . . . . . . . . .
Figure 2–5: On-screen readout messages 2–9. . . . . . . . . . . . . . . . . . . . . . .
Figure 3–1: Simplified block diagram 3–3. . . . . . . . . . . . . . . . . . . . . . . . . .
Figure 4–1: –3 dB marks on the vector graticule 4–12. . . . . . . . . . . . . . . . .
Figure 5–1: NTSC graticule showing the vector gain adjustment 5–9. . .
Figure 6–1: Removing the top cover 6–7. . . . . . . . . . . . . . . . . . . . . . . . . . .
Figure 6–2: Installing the LCD display cable 6–9. . . . . . . . . . . . . . . . . . . .
Figure 6–3: Installing the LCD display 6–11. . . . . . . . . . . . . . . . . . . . . . . . .
Figure 6–4: Installing the keypad 6–14. . . . . . . . . . . . . . . . . . . . . . . . . . . . .
Figure 6–5: Installing the Top board shield 6–15. . . . . . . . . . . . . . . . . . . . .
Figure 6–6: Installing the Bottom board 6–17. . . . . . . . . . . . . . . . . . . . . . . .
Figure 6–7: Installing the battery cover 6–19. . . . . . . . . . . . . . . . . . . . . . . .
Figure 6–8: Removal and replacement of the turnlock stud 6–20. . . . . . . .
Figure 6–9: Removing the NiCad battery pack 6–22. . . . . . . . . . . . . . . . . .
Figure 6–10: Installed polarity of alkaline batteries 6–23. . . . . . . . . . . . . .
Figure 6–11: Battery contact installation alignment 6–25. . . . . . . . . . . . . .
Figure 6–12: Battery power-wire and turnlock stud receptacle
installation 6–26. . . . . . . . . . . . . . . . . . . . . . . . . . . . . . . . . . . . . . . . . . . . .
Figure 6–13: Battery orientation marker position 6–28. . . . . . . . . . . . . . . .
Figure 6–14: Installing the EMI suppressor 6–29. . . . . . . . . . . . . . . . . . . . .
Figure 6–15: Testing the battery charging circuit – WFM 90 SN B011362
and below; WFM 91 SN B010470 and below 6–32. . . . . . . . . . . . . . . . .
Figure 6–16: Testing the battery charging circuit – WFM 90 SN B011363
and above; WFM 91 SN B010471 and above 6–33. . . . . . . . . . . . . . . . .
Figure 6–17: Flowchart for no display 6–37. . . . . . . . . . . . . . . . . . . . . . . . .
Figure 6–18: Flowchart for distorted waveform display 6–38. . . . . . . . . . .
Figure 6–19: Flowchart for no vector display 6–39. . . . . . . . . . . . . . . . . . . .
Figure 6–20: Flowchart for bad audio display 6–40. . . . . . . . . . . . . . . . . . .
Figure 6–21: Flowchart for no picture display 6–41. . . . . . . . . . . . . . . . . . .
Figure 6–22: Flowchart for bad graticules and menus 6–42. . . . . . . . . . . .

Table of Contents
iv WFM 90 and WFM 91 Service Manual
Figure 6–23: Flowchart for all white display 6–43. . . . . . . . . . . . . . . . . . . .
Figure 6–24: Flowchart for untriggered waveform display 6–44. . . . . . . .
Figure 6–25: Flowchart for unlocked vector display 6–45. . . . . . . . . . . . . .
Figure 6–26: Flowchart for vector display jitter 6–46. . . . . . . . . . . . . . . . .
Figure 6–27: Flowchart for distorted vectors 6–46. . . . . . . . . . . . . . . . . . . .
Figure 6–28: Flowchart for problems with the instrument controls 6–47.
Figure 6–29: Flowchart for bad menus in the picture display 6–48. . . . . .
Figure 6–30: Flowchart for dim or blotchy display 6–49. . . . . . . . . . . . . . .
Figure 6–31: Flowchart for bad displays except Picture mode 6–49. . . . . .
Figure 6–32: Circuit board connector and pin locations 6–50. . . . . . . . . . .
Figure 8–1: Exploded view 8–4. . . . . . . . . . . . . . . . . . . . . . . . . . . . . . . . . . .
Figure 9–1: Interconnect diagram 9–1. . . . . . . . . . . . . . . . . . . . . . . . . . . . .

Table of Contents
WFM 90 and WFM 91 Service Manual v
List of Tables
Table 1–1: Vertical deflection system 1–6. . . . . . . . . . . . . . . . . . . . . . . . . .
Table 1–2: DC restoration 1–7. . . . . . . . . . . . . . . . . . . . . . . . . . . . . . . . . . .
Table 1–3: Audio mode 1–7. . . . . . . . . . . . . . . . . . . . . . . . . . . . . . . . . . . . . .
Table 1–4: Horizontal deflection system 1–8. . . . . . . . . . . . . . . . . . . . . . . .
Table 1–5: Vector mode 1–8. . . . . . . . . . . . . . . . . . . . . . . . . . . . . . . . . . . . .
Table 1–6: Synchronization 1–10. . . . . . . . . . . . . . . . . . . . . . . . . . . . . . . . . .
Table 1–7: Physical characteristics 1–10. . . . . . . . . . . . . . . . . . . . . . . . . . . .
Table 1–8: Environmental characteristics 1–10. . . . . . . . . . . . . . . . . . . . . .
Table 1–9: Power source 1–11. . . . . . . . . . . . . . . . . . . . . . . . . . . . . . . . . . . .
Table 1–10: Safety/EMI 1–12. . . . . . . . . . . . . . . . . . . . . . . . . . . . . . . . . . . . .
Table 2–1: Front panel and menu default settings 2–10. . . . . . . . . . . . . . .
Table 4–1: Summary verification procedure 4–1. . . . . . . . . . . . . . . . . . . .
Table 4–2: Equipment required for performance verification 4–2. . . . . .
Table 5–1: Summary adjustment 5–1. . . . . . . . . . . . . . . . . . . . . . . . . . . . .
Table 5–2: Equipment required for performance verification 5–2. . . . . .
Table 6–1: Tools required for module removal 6–5. . . . . . . . . . . . . . . . . .
Table 6–2: Removal and replacement procedure list 6–6. . . . . . . . . . . . .
Table 6–3: Equipment required for troubleshooting 6–31. . . . . . . . . . . . .
Table 6–4: Low-voltage power supplies 6–35. . . . . . . . . . . . . . . . . . . . . . . .
Table 6–5: Fault symptom table 6–36. . . . . . . . . . . . . . . . . . . . . . . . . . . . . .
Table 8–1: Replaceable parts list column descriptions 8–2. . . . . . . . . . . .

Table of Contents
vi WFM 90 and WFM 91 Service Manual

WFM 90 & WFM 91 Service Manual vii
General Safety Summary
Review the following safety precautions to avoid injury and prevent damage to
this product or any products connected to it.
Only qualified personnel should perform service procedures.
To avoid potential hazards, use this product only as specified.
To Avoid Fire or Shock Hazards:
Use Proper Power Source. Do not operate this product from a power source that
applies more than the voltage specified.
Use Proper AC Adapter. Use only the specified ac adapter provided with this
product to connect it to the mains supply.
Avoid Electric Overload. To avoid electric shock or fire hazard, do not apply a
voltage to a terminal that is outside the range specified for that terminal.
Do Not Operate Without Covers. To avoid electric shock or fire hazard, do not
operate this product with covers or panels removed.
Use Proper Fuse. To avoid fire hazard, use only the fuse type and rating specified
for this product.
Do Not Operate in Wet/Damp Conditions. To avoid electric shock, do not operate
this product in wet or damp conditions.
Do Not Operate in an Explosive Atmosphere. To avoid injury or fire hazard, do not
operate this product in an explosive atmosphere.
Do Not Operate With Suspected Failures. If you suspect there is damage to this
product, have it inspected by qualified service personnel.
Observe All Ratings. Observe and follow all ratings and markings on the product.
Consult the product manual(s) for further ratings information before making any
connections to the product.
This product is intended to be connected to electrical devices with their common
at ground potential. Do not connect to elevated or floating common voltages.

General Safety Summary
viii WFM 90 & WFM 91 Service Manual
For information on replacing and recharging batteries specific to this product,
refer to the detailed instructions provided in this manual.
Replace Batteries Properly . Before replacing batteries, turn the instrument off
and disconnect the AC adapter.
Use only the size and type of batteries specified for this product. Be sure to
install the batteries in the proper polarity. Use care not to short battery terminals
together when replacing batteries.
When replacing alkaline batteries, all batteries should be replaced at the same
time.
Recharge Batteries Properly. Do not attempt to recharge alkaline batteries.
NiCad batteries are automatically recharged in this instrument.
Replace the NiCad battery pack if the batteries do not recharge within the
recommended time, or if the operating time from a full charge seems significant-
ly shortened.
This product contains a Nickel Cadmium (NiCd) battery, which must be recycled
or disposed of properly. For the location of a local battery recycler in the U.S. or
Canada, please contact:
RBRC (800) BATTERY
Rechargeable Battery Recycling Corp. (800) 227-7379
P.O. Box 141870 www.rbrc.com
Gainesville, Florida 32614
Observe These Battery
Precautions
Battery Recycling
General Safety Summary
WFM 90 & WFM 91 Service Manual ix
Terms in this Manual. These terms may appear in this manual:
WARNING. Warning statements identify conditions or practices that could result
in injury or loss of life.
CAUTION. Caution statements identify conditions or practices that could result in
damage to this product or other property.
Terms on the Product. These terms may appear on the product:
DANGER indicates an injury hazard immediately accessible as you read the
marking.
WARNING indicates an injury hazard not immediately accessible as you read the
marking.
CAUTION indicates a hazard to property including the product.
Symbols on the Product. The following symbols may appear on the product:
Protective Ground
(Earth) Terminal ATTENTION
Refer to Manual Double
Insulated
DANGER
High Voltage
Refer to the specifications section for a listing of certifications and compliances
that apply to this product.
Symbols and Terms
Certifications and
Compliances

General Safety Summary
xWFM 90 & WFM 91 Service Manual

WFM 90 & WFM 91 Service Manual xi
Service Safety Summary
Only qualified personnel should perform service procedures. Read this Service
Safety Summary and the General Safety Summary before performing any service
procedures.
Do Not Service Alone. Do not perform internal service or adjustments of this
product unless another person capable of rendering first aid and resuscitation is
present.
Disconnect Power. To avoid electric shock, disconnect the power by means of
the ac adapter or, if provided, the power switch.
Use Care When Servicing With Power On. Dangerous voltages or currents may
exist in this product. Disconnect power, remove battery (if applicable), and
disconnect test leads before removing protective panels, soldering, or replacing
components.
To avoid electric shock, do not touch exposed connections.

Service Safety Summary
xii WFM 90 & WFM 91 Service Manual

WFM 90 and WFM 91 Service Manual xiii
Preface
This manual provides instructions for servicing the WFM 90 and WFM 91
Handheld Waveform, Vector, Picture, and Audio Monitors. This manual
describes features and specifications that are common to all generator modules.
These include system configuration and the common control interface.
About This Manual
This manual is composed of the following sections:
HSpecifications lists the electrical and environmental specifications and
provides a general product description.
HOperating Information describes installation and front panel operation of the
instrument.
HTheory of Operation contains a module-level description based on block
diagrams of the instrument circuitry.
HPerformance Verification provides procedures for verifying instrument
performance.
HAdjustment Procedures provides procedures for adjusting the instrument to
meet performance levels listed in Specifications.
HMaintenance contains instructions for cleaning the instrument, procedures
for removal and replacement of instrument modules, and troubleshooting
procedures.
HOptions lists all of the options that you might find on your instrument.
HReplaceable Electrical Parts points you to Replaceable Mechanical Parts
for the list of replaceable electrical parts and assemblies.
HDiagrams contains the instrument interconnect diagram.
HReplaceable Mechanical Parts lists the part numbers of the replaceable
electrical and mechanical parts and assemblies.
Related Manuals
The WFM 90 and WFM 91 Handheld Waveform, Vector, Picture, and Audio
Monitor User Manual (Tektronix part number 070-8968-XX) describes in detail
how to operate the instrument.

Preface
xiv WFM 90 and WFM 91 Service Manual

WFM 90 and WFM 91 Service Manual xv
Introduction
Service Strategy
NOTE. Throughout this manual, any field-replaceable component, assembly, or
part of this oscilloscope is referred to generically as a module.
This manual contains all the information needed for periodic maintenance of the
WFM90 or WFM91 Handheld Waveform, Vector, Picture, and Audio Monitor.
(Examples of such information are procedures for checking performance and for
readjustment.) Further, it contains all information for corrective maintenance
down to the module level. The procedures, diagrams, and other troubleshooting
aids help isolate failures to a specific module, rather than to components of that
module. Once a failure is isolated, replace the module with a unit obtained from
Tektronix, Inc.
All modules are listed in Mechanical Parts List. To isolate a failure to a module,
use the troubleshooting procedures located in Maintenance. To remove and
replace any failed module, follow the removal and replacement instructions
located in Maintenance.
Service Offerings
Tektronix provides service to cover repair under warranty as well as other
services that may provide a cost-effective answer to your service needs.
Whether providing warranty repair service or any of the other services listed
below, Tektronix service technicians, trained on Tektronix products, are best
equipped to service your instrument. Tektronix technicians are apprised of the
latest information on improvements to the product as well as the latest new
options to the product.
Tektronix warrants this product for one year from date of purchase. (The
warranty appears after the title page and copyright page in this manual.)
Tektronix technicians provide warranty service at most Tektronix service
locations worldwide. Your Tektronix product catalog lists all service locations
worldwide.
Warranty Repair Service

Introduction
xvi WFM 90 and WFM 91 Service Manual
The following services may be purchased to tailor repair and/or calibration of
your WFM90 or WFM91 Handheld Waveform, Vector, Picture, and Audio
Monitor to fit your requirements:
Option M2. When you order option M2, you receive a five year warranty and
remedial service agreement.
Option M8. When you order option M8, you receive four free calibration and
performance tests.
At-Depot Service. Tektronix offers several standard-priced adjustment (calibra-
tion) and repair services:
HA single repair and/or adjustment.
HCalibrations using equipment and procedures that meet the traceability
standards specific to the local area.
HAnnual maintenance agreements that provide for either calibration and repair
or calibration only of the instrument.
Of these services, the annual maintenance agreement offers a particularly
cost-effective approach to service for many owners of the WFM90 or WFM91
Handheld Waveform, Vector, Picture, and Audio Monitor. Such agreements can
be purchased to span several years.
On-Site Service. The annual maintenance agreement can be purchased with
on-site service, with repair and calibration done at your facility. This service
reduces the time your instrument is out of service when calibration or repair is
required.
Service Training. Tektronix provides service training in a number of programs. In
addition to classes held at our Beaverton campus, special classes at convenient
locations can be arranged.
Tektronix supports repair to the module level by providing Module Exchange
and Module Repair and Return.
Module Exchange. This service reduces down time for repair by allowing you to
exchange most modules for remanufactured ones. Tektronix ships you an
updated and tested exchange module from the Beaverton, Oregon service center,
typically within 24 hours. Each module has a 90-day service warranty.
Repair or Calibration
Service
Self Service

Introduction
WFM 90 and WFM 91 Service Manual xvii
Module Repair and Return. This service returns to you within 10 days the same
module that you shipped to Tektronix. The module shipped is repaired, tested,
and returned to you from the Beaverton, Oregon service center. It is not updated
to match current modules of the same type. Again, each module has a 90-day
service warranty.
1-800-TEK-WIDE. For more information about any of the Tektronix service
offerings, US and Canadian customers can call our 24-hour service number at
1-800-TEK-WIDE. Service training questions may require specialists who are
only available between 8 am – 5 pm, Pacific time.
Before You Begin
This manual is for servicing the WFM90 or WFM91 Handheld Waveform,
Vector, Picture, and Audio Monitor. To prevent injury to yourself or damage to
the instrument, do the following tasks before you attempt service:
HBe sure you are a qualified service person.
HRead the Safety Summary found at the beginning of this manual.
HRead Service Strategy in this section.
When using this manual for servicing, be sure to heed all warnings, cautions, and
notes.

Introduction
xviii WFM 90 and WFM 91 Service Manual

Specifications

WFM 90 and WFM 91 Service Manual 1–1
Specifications
This section includes the following information:
HProduct description
HCharacteristics tables
Refer to Performance Requirements on page 1–5 for the conditions over which
the characteristics listed in this section are valid.
Product Description
The Tektronix WFM 90 or WFM 91 Handheld Waveform, Vector, Picture, and
Audio Monitor is a self-contained, rasterizing television monitor. The instrument
has a built-in LCD color display device and is powered by batteries or by an AC
adapter producing 12 VDC.
This product can be used in traditional in-house applications of television
production, post-production, and signal transmission. The portability of this
instrument allows it to be used in untraditional applications, such as field
production and system maintenance.
The following is a list of the key features of this instrument:
HRasterized waveforms and graticules shown on the built-in color, four-inch
diagonal, TFT LCD display with viewing angle adjustment
HPowered by batteries or an AC adapter
HMenu-assisted monitoring operation
HVideo and audio signal input and output capability
HWaveform, Vector, Picture, Audio, and Waveform-in-Picture (WIP) display
modes
HLine Select mode for the selection of any single line of video for display
HTime-out mode to shut off power to the display backlight and/or the
instrument when the instrument is not in use
HSignal level alarm mode for the waveform and audio displays
HPreset menu to store or recall the front panel and menu setup
HInstrument readjustment is performed entirely from the front panel
Key Features

Specifications
1–2 WFM 90 and WFM 91 Service Manual
The key features of this instrument are described below:
Rasterized Color LCD Display. This instrument uses a color, four-inch diagonal,
backlit, thin-film transistor (TFT) LCD raster display module. The proprietary
rasterizer displays analog waveforms or vectors simultaneously with the
appropriate measurement graticules. A viewing-angle control for the display
permits optimal signal viewing from different positions.
The LCD display retains an image if the instrument is left on in one display
mode for an extended period of time. This is typical for the LCD display device.
The retained image fades over time. The fading can be accelerated by leaving the
instrument turned off.
CAUTION. To prevent image retention in the LCD display, enable the backlight
time-out mode or turn the instrument off if the monitor will not be used for more
than two hours.
Battery or AC Adapter Operation. The instrument can be powered by six C-cell
batteries, alkaline or NiCad, or by an AC adapter wall unit with a negative center
lead producing 12 VDC. The rechargeable NiCad batteries are automatically
recharged when the 12 VDC adapter is plugged into the instrument (whether
instrument power is on or off). Alkaline batteries do not recharge. The message
Low Bat is displayed in the on-screen readout when the batteries get critically
low on power.
Menu-Assisted Monitoring Operation. The menus use a combination of on-screen
readout and multi-use buttons, in conjunction with the Arrow Buttons, to control
most of its monitoring functions. Enter the menus by pressing one of the Menu,
Config, or Line Sel buttons. Menus are exited by pressing the entry button for
the displayed menu, or by entering another menu.
Video and Audio Input/Output. The instrument displays signals from the one
channel of composite video input or from the one channel of audio input. An
external reference input allows the use of an external sync signal.
The video and external reference inputs each have a rear-panel switch providing
the choice of an internal 75 W signal termination or an unterminated high-imped-
ance input. The audio input connector is a standard 3-pin XLR connector.
Description of Key
Features

Specifications
WFM 90 and WFM 91 Service Manual 1–3
The video output will drive a remote monitor or video switcher. The audio signal
is output through a mini-headphone stereo jack that outputs the mono input
signal to both stereo channels. The audio volume is fixed for each reference
level. The larger the displayed signal, the louder the volume.
Waveform Display Mode. The Waveform display mode provides a voltage-versus-
time display of the video signal with three standard sweep rates: 1H (5 ms/divi-
sion), 2H (10 ms/division), and 2F (two field). Each line-rate sweep can be
magnified X10 to the following sweep rates: 1H Mag (0.5 ms/division), and 2H
Mag (1 ms/division). The 2F sweep is magnified by approximately X20.
Vertical gain is fixed at X1 or X5, or is variable from 45% to 155% amplitude.
The gain setting tracks between the Waveform and Vector display modes. The
signal filters are Flat (no filter) and Luminance (low-pass filter). The Line Select
mode enables the selection of a single line of video for display.
Vector Display Mode. The Vector display mode presents an XY plot of the
demodulated chrominance phase and amplitude portion of the video signal. The
vector angle represents chrominance phase, and the distance from the center
represents chrominance amplitude. The vector display is useful when making
differential gain and phase measurements.
A full 360_ phase shifter and 75% and 100% color bar settings are provided.
Vector gain is fixed at X1 or X5, or is variable from 45% to 155% amplitude.
The gain setting tracks between the Waveform and Vector display modes. The
+V mode (PAL only) overlays the –V axis on the +V axis to check the PAL
system color encoders.
Picture Display Mode. The Picture display mode provides an unprocessed full
color display of the composite video signal. The NTSC Safe Action and Safe
Title areas, as well as the PAL Safe Area, can be highlighted. The vertical
interval portion of the signal can be viewed by vertically shifting the display.
Controls for adjusting the hue and color of the picture display are provided.
Audio Display Mode. The Audio display mode provides a voltage-versus-time
display of a single audio channel. The audio voltage is displayed on the vertical
scale with time on the horizontal scale at a two-field sweep rate.
Audio reference levels can be set to –10 dBu, 0 dBu, 4 dBu, or 8 dBu, with an
additional level available for microphone checks. The audio headroom reference
level can be set to –3 dB or +10 dB and is for audio signals below or above the
reference level, respectively.

Specifications
1–4 WFM 90 and WFM 91 Service Manual
Waveform-in-Picture Display Mode. The Waveform-in-Picture (WIP) display
mode provides a 1/4-screen-sized window over the Picture display for any one of
the Waveform, Vector, or Audio displays. The WIP window can be positioned to
any one of the four corners of the display. The Arrow Buttons retain their default
function for the display mode in the WIP window.
Line Select Mode. The Line Select mode enables you to select any line of video
for viewing in either the Waveform or Vector display modes. The desired line
can be selected from either all video fields or from alternating fields. With
two-field sweep selected in the Waveform display mode, the selected line is
highlighted in the field display.
Time-out Mode. When the Time-out mode is enabled, power is turned off to the
display backlight and/or the instrument when the front panel has not been in use
for a menu-selected length of time.
Amplitude Alarm Mode. The Amplitude Alarm mode provides automatic signal
level checking in the Waveform and Audio display modes. In the Waveform
display mode, the portion of the waveform exceeding the 100 IRE (1.0 V PAL)
graticule line is highlighted. In the Audio display mode, the portion of the
waveform exceeding the selected reference level is highlighted.
Preset Menu. The Preset menu allows you to store the current instrument front
panel and menu settings for future use. In addition, there is a menu selection that
sets the front-panel and menu settings back to the factory-set defaults. Refer to
Default Settings on page 2–10 for a list of the default settings.
Instrument Readjustment. This instrument can be adjusted entirely from the front
panel after entering the Calibration menu. Instructions for adjusting the
instrument are located in the Adjustment Procedures section of this manual.
The location of some additional information is listed below:
HRefer to Battery Operation on page 2–3 for information on operating the
instrument with batteries
HFront panel operation is described in the Operating Information section
HInstrument options are listed in the Options section
HStandard and optional accessories are listed in the Replaceable Mechanical
Parts section
More Information

Specifications
WFM 90 and WFM 91 Service Manual 1–5
Characteristics Tables
The characteristics tables use the following abbreviations:
Performance Requirement. All performance requirements in the characteristics
tables are identified with Req
and can be assured by performing the procedures
in the Performance Verification section. Allow a warm-up time of 20 minutes
before performing the procedures.
Performance requirements in the electrical specifications are valid over an
ambient temperature range of +20° C to +30°C. The Performance Requirement
tolerances listed in the electrical specifications are doubled over the temperature
range of 0°C to +40°C, unless otherwise specified. Test equipment used to
verify performance requirements must be calibrated and working within the
limits specified in Equipment Required on page 4–2.
Reference Information. Information that amplifies a performance requirement or
is of special importance is indicated by REF. There is no need to check these
items to a specific tolerance.
The following safety standards apply to the WFM 90 or WFM 91 Handheld
Waveform, Vector, Picture, and Audio Monitor:
ANSI/ISA S82. Safety Standard for Electrical and Electronic Test, Measuring,
Controlling, and Related Equipment.
CAN/CSA C22.2 No. 1010.1-92. Safety Requirements for Electrical Equipment for
Measurement, Control, and Laboratory Use.
IEC1010-1. Safety Requirements for Electrical Equipment for Measurement,
Control, and Laboratory Use (1990).
UL3111. Standard for Electrical Measuring and Test Equipment.
Safety Standards

Specifications
1–6 WFM 90 and WFM 91 Service Manual
Table 1–1: Vertical deflection system
Category Description
Frequency Response REF: Specifications apply for full screen height video input signal with Vari-
able Gain off.
REQ: Flat Filter 1 V Full Scale: 50 kHz to 6 MHz within 2% of response at 50 kHz.
REQ: Flat Filter X5 Gain: 50 kHz to 6 MHz within 5% of response at 50 kHz.
REF: Low Pass Filter: w40 dB attenuation at 3.58 MHz (NTSC) or
4.43 MHz (PAL).
REF: Response at 15 kHz does not vary between Flat and Lum (low pass)
filters by more than 1%.
Deflection Factor REQ: 1 V Full Scale: 1 V input displayed within 1% of 140 IRE.
REF: Flat filter selected.
REQ: X5 Gain: Gain accuracy within 5% with 1 V input signal.
REF: X5 Gain Registration: v1 major division of vertical shift from baseline
between unmagnified and magnified signal.
REQ: Variable Gain Range: Input signals between 0.8 V and 2 V can be adjusted
to 140 IRE (1.0 V) display. 160 mV to 400 mV for X5 Gain.
REQ: Position Range: 1 V signal can be positioned so that peak white and sync tip
can be placed at blanking level with the DC Restorer on, regardless of gain
setting.
Transient Response REF: Specifications apply for full screen height video input signal with Vari-
able Gain off, 1 V Full Scale or X5 Gain selected, and Flat filter se-
lected.
REF: Pulse-to-Bar Ratio:
X1: 0.99:1 to 1.01:1.
X5: 0.98:1 to 1.02:1.
REF: Preshoot: v1%.
REF: Overshoot:
X1: v2%.
X5: v4%.
REF: Ringing:
X1: v2%.
X5: v4%.
REF: Field Rate Tilt: v1%.
REF: Line Rate Tilt: v1%.
REQ: Overscan: v2% variation in baseline of 100 IRE (700 mV) 12.5T (20T)
modulated pulse as it is positioned over the middle 80% of the screen.
Maximum Absolute Input Level REF: $5 VDC plus peak AC.
REF: Displays in excess of 200 IRE (1.428 V) may cause frequency re-
sponse aberrations.

Specifications
WFM 90 and WFM 91 Service Manual 1–7
Table 1–1: Vertical deflection system (Cont.)
Category Description
DC Input Impedance
(Unterminated) REQ: 15 kW.
REF: With input switch in the HIZ position.
Video Input Return Loss REF: 40 dB from 50 kHz to 6 MHz with 75 W termination on.
Video Out Return Loss (75W)REF: 30 dB from 50 kHz to 6 MHz.
Video Out Differential Gain (50% APL) REF: Within 1% with a 140 IRE (1.0 V PAL) unit display.
Video Out Differential Phase (50% APL) REF: Within 1° with a 140 IRE (1.0 V PAL) unit display.
Table 1–2: DC restoration
Category Description
DC Restorer Clamp Time REF: Back Porch.
Frequency Response at
60 Hz (50 Hz PAL) REQ: Attenuation of 60 Hz (50 Hz PAL) on Input Signal:
Slow Mode: 20%.
Fast Mode: 90%.
REF: Blanking Level Shift with 10% to 90% APL Change:
APL changes from 50% to either 10% or 90% will cause blanking level
shift of 1 IRE unit (7.14 mV PAL) or less.
REF: Blanking Level Shift Due to Presence or Absence of Burst:
1 IRE unit (7.14 mV) or less shift from no color burst to presence of
color burst.
Table 1–3: Audio mode
Category Description
Reference Levels REQ: –10 dBu, 0 dBu, +4 dBu, +8 dBu.
REF: Nominal MIC Reference: –50 dBu.
Measurement Accuracy REQ: 0.5 dB at 1 kHz.
Frequency Response REQ: 0.5 dB from 50 Hz to 20 kHz.
Maximum Input Level Amplitude REF: +18 dBu.
DC Input Impedance REF: 15 kW.
Audio Output Connector REF: Mini stereo headphone jack.
Maximum Power Output REF: 250 mW.

Specifications
1–8 WFM 90 and WFM 91 Service Manual
Table 1–4: Horizontal deflection system
Category Description
Sweep REQ: Sweep will occur in all horizontal mode settings with or without synchroniza-
tion.
REF: Sweep Length: Two Line and Two Field sweep length is nominally
12 divisions.
1LINE Sweep Repetition Rate REQ: Equal to line rate of applied video or external sync.
2LINE Sweep Repetition Rate REQ: Equal to half line rate of applied video or external sync.
2FLD Sweep Repetition Rate REF: Displays 2 full fields, including the field-rate sync between them.
2FLD Sweep Magnification REF: Approximately X20.
Sweep Magnifier Registration REF: Magnification occurs about the center of the screen.
Timing Accuracy REF: All timing and linearity specifications exclude the first and last major
divisions of the unmagnified display.
REQ: 10 ms/division (2LINE): Within 2%.
REQ: 5 ms/division (1LINE): Within 2%.
REQ: 1 ms/division (2LINE + MAG): Within 2%.
REQ: 0.5 ms/division (1LINE + MAG): Within 3%.
Integral Linearity REQ: Within 1%.
REF: Measured between the 10 ms and 110 ms points on the 10 ms/division
(2LINE) sweep.
Horizontal Position REF: Any portion of a synchronized video sweep can be positioned on
screen in all sweep modes.
Table 1–5: Vector mode
Category Description
Chrominance Processing Nominal Subcarrier
Frequency (FSC)REF: NTSC: 3.579545 MHz.
PAL: 4.43361875 MHz.
Chrominance Processing Chrominance
Bandwidth REQ: Upper –3 dB Point: FSC +500 kHz, 100 kHz.
Lower –3 dB Point: FSC – 500 kHz, 100 kHz.
Chrominance Processing +V Mode
(Applicable to PAL operation only) REF: +V-type display as selected by front-panel button. When pushed, the
V axis is inverted at a 1/2 line rate to produce a single vector display.
Display Vector Phase Accuracy REF: 1.25°.
REF: Measured with color bar signal.
Display Vector Gain Stability REF: Typically 2.5%.
Display Quadrature Phasing REF: Typically 0.5°.

Specifications
WFM 90 and WFM 91 Service Manual 1–9
Table 1–5: Vector mode (Cont.)
Category Description
Display Differential Phase REF: 1°.
REF: Measured with 140 IRE (1 V) linearity signal (5 step, 10 step, or Ramp)
with 40 IRE (300 mV) of subcarrier.
Display Differential Gain REF: 1%.
REF: Measured with 140 IRE (1 V) linearity signal (5 step, 10 step, or Ramp)
with 40 IRE (300 mV) of subcarrier.
Subcarrier Regenerator Pull-In Range REQ: NTSC: 50 Hz of FSC.
PAL: 10 Hz of FSC.
REF: Subcarrier Regenerator free-runs in absence of appropriate signal.
Reference can be burst of either displayed signal or external reference
signal.
Subcarrier Regenerator Pull-In Time REF: Pull-In Time: Within 1 second, with subcarrier frequency within 50 Hz
(10 Hz for PAL) of FSC.
Subcarrier Regenerator Phase Shift with
Subcarrier Frequency Change REQ: NTSC: 2° from FSC to (FSC + 50 Hz), or FSC to (FSC – 50 Hz).
PAL: 2° from FSC to (FSC + 10 Hz), or FSC to (FSC – 10 Hz).
Subcarrier Regenerator Phase Shift with Burst
Amplitude Change REQ: 2° from nominal burst amplitude to 6 dB.
REF: Internal or External burst reference.
Subcarrier Regenerator Phase Shift with Variable
Gain Control REQ: 1° as gain is varied from +3 dB to –6 dB.
Subcarrier Regenerator Phase Control Range REF: 360° continuous rotation.
Subcarrier Regenerator Burst Jitter REF: 0.5° RMS or less.
REF: With 140 IRE (1 V) composite video input. INT or EXT referenced.

Specifications
1–10 WFM 90 and WFM 91 Service Manual
Table 1–6: Synchronization
Category Description
Input Requirements REQ: Internal Reference: Composite video or black burst with sync amplitudes
40 IRE (300 mV PAL) 6 dB.
REQ: External Reference: Sync amplitude between 143 mV and 4 V will synchro-
nize sweeps.
External Reference Input REQ: DC Input Impedance (unterminated): 15 kW.
REF: Return Loss (75 W): 40 dB from 50 kHz to 6 MHz (with 75 Wter-
mination on, instrument power on).
REF: Absolute Maximum Input Voltage: 12 VDC plus peak AC.
Table 1–7: Physical characteristics
Category Description
Dimensions REF: Instrument:
5 inches (127 mm).
3.15 inches (80.0 mm).
9.6 inches (243.8 mm).
Shipping Box:
13.25 inches x 13.75 inches x 6 inches inside
14 inches x 14.25 inches x 6.25 inches outside
Weight REF: With batteries and pouch:
3 lbs, 9 oz.
Without batteries and pouch:
1 lb, 14 oz.
Shipping weight with packaging:
5 lbs, 14 oz.
Table 1–8: Environmental characteristics
Category Description
Operating Altitude REQ: To 15,000 feet (4572 meters).
REF: IEC 1010-1 compliance to 2000 meters.
Operating Temperature REQ: 0° to +50° C.
REF: IEC 1010-1 compliance to +40° C.
Equipment Type REQ: Measurement.
Installation Category REQ: Installation Category I (as defined in IEC 1010-1, Annex J).
REF: Rated for indoor use only.
Pollution Degree REQ: Pollution Degree 2 (as defined in IEC 1010-1).

Specifications
WFM 90 and WFM 91 Service Manual 1–11
Table 1–8: Environmental characteristics (Cont.)
Category Description
Vibration — Operating REF: 15 minutes each axis at 0.015 inch, frequency varied from 10 Hz to
55 Hz to 10 Hz in 1-minute cycles with instrument secured to vibration
platform. Ten minutes each axis at any resonant point or at 55 Hz if no
resonant point is found.
Shock — Non-Operating REF: 100 g, 1/2 sine, 11 ms duration, 3 shocks per surface (18 total).
Transportation REF: Qualified under NTSC Test Procedure 1A, Category II (24-inch drop).
Humidity REF: Will operate at 95% relative humidity for up to five days. Meets the
five-day cycling humidity test as called out in Tektronix standard
062–2847–00.
Table 1–9: Power source
Category Description
Battery REF: 6 C-sized cell batteries, or Tektronix NiCad battery pack (Tektronix Part
Number. 146-0107-00).
Battery Charge Time REF: Fast Charge: 550 mA.
REF: Slow Charge: 150 mA.
Power Consumption REF: Picture Mode: 5.5 W
Waveform Mode: 7.2 W
Vector Mode: 7.2 W
Operating Time REF: Alkaline Batteries:
Picture Mode: 2.5 hours
Waveform Mode: 2 hours
Vector Mode: 2 hours
NiCad Batteries:
Picture Mode: 4 hours
Waveform Mode: 3 hours
Vector Mode: 3 hours
REF: Fully charged or new batteries.
External Power REQ: DC Source of 11 V to 18 V.
REF: Wall Unit Tektronix Part Numbers:
220 V European TUV 119–4540–00
240 V UK 119–4541–00
240 V Australia 119–4542–00
100 V Japan 119–4539–00
120 V North America 119–4538–00

Specifications
1–12 WFM 90 and WFM 91 Service Manual
Table 1–10: Safety/EMI
Category Description
Certifications REQ: Designed to meet or exceed:
ANSI/ISA S82 – Safety Standard for Electrical and Electronic Test, Measur-
ing, Controlling, and Related Equipment.
CAN/CSA C22.2 No. 1010.1-92 – Safety Requirements for Electrical Equip-
ment for Measurement, Control, and Laboratory Use.
IEC1010-1 – Safety Requirements for Electrical Equipment for Measure-
ment, Control, and Laboratory Use (1990).
UL3111 – Standard for Electrical Measuring and Test Equipment.
EMI Compliance REQ: Designed to meet or exceed:
U.S.: FCC 47 CFR Part 15, Subpart B, Class A.
EC Declaration of Conformity Meets intent of Directive 89/336/EEC for Electromagnetic Compatibility.
Compliance was demonstrated to the following specifications as listed in the
Official Journal of the European Communities:
EN 50081-1 Emissions:
EN 55022 Class B Radiated and Conducted Emissions
EN 50082-1 Immunity:
IEC 801-2 Electrostatic Discharge Immunity
IEC 801-3 RF Electromagnetic Field Immunity
IEC 801-4 Electrical Fast Transient/Burst Immunity

Operating Information

WFM 90 and WFM 91 Service Manual 2–1
Operating Information
This section contains the following information:
HMechanical and electrical installation instructions
HOperating instructions that relate to the service of this instrument
Installation
Before installing the WFM 90 or WFM 91 Handheld Waveform, Vector, Picture,
and Audio Monitor, refer to the Environmental Characteristic requirements,
located in Table 1–8 on page 1–10 of the Specifications section.
All qualification testing was performed with the factory shipped cabinet
installed. To guarantee compliance with specifications, only operate the
instrument in its cabinet.
Follow these instructions when you are mechanically installing this instrument:
Unpacking. Save the shipping carton and packing materials (including antistatic
bag) in the event it becomes necessary to ship the instrument to a Tektronix
Service Center for service or repair. Refer to Repackaging Instructions on
page 6–4 for instructions on packaging the instrument for shipment.
Cabinet. The WFM 90 or WFM 91 Handheld Waveform, Vector, Picture, and
Audio Monitor is shipped installed in a cabinet. There are not any optional
cabinets available.
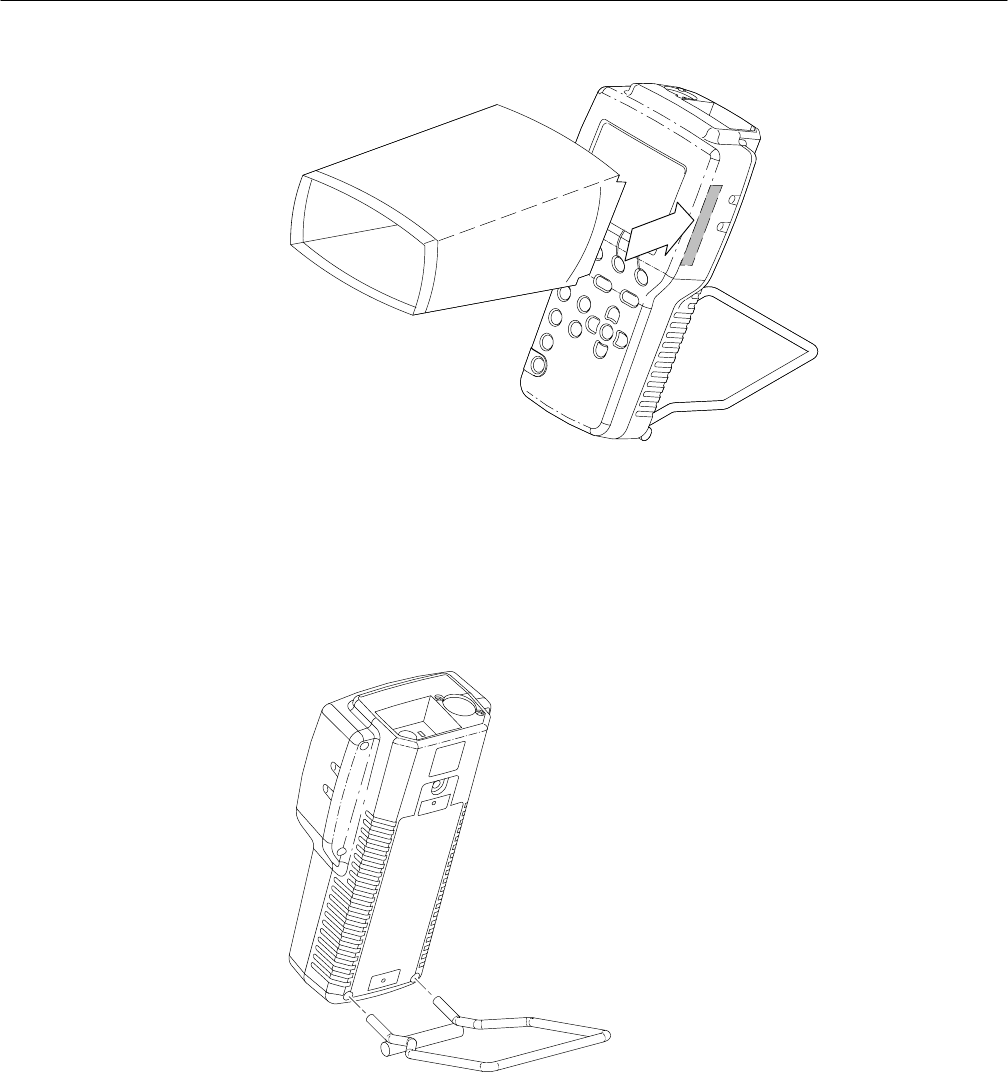
Viewing Hood. The optional viewing hood allows you to readily view the
instrument display in well-lighted situations. The hood is attached to the
instrument by first applying the supplied Velcro strips to the sides of the
instrument, and then pressing the flaps of the viewing hood onto the strips as
shown in Figure 2–1.
Mechanical Installation
Operating Information
2–2 WFM 90 and WFM 91 Service Manual
Figure 2–1: Installing the viewing hood
Desk Stand. The optional desk stand provides the user with a stable means to
hold the instrument upright on a flat surface. The prongs of the stand are inserted
into the holes in the back of the instrument as illustrated in Figure 2–2.
Figure 2–2: Installing the desk stand

Operating Information
WFM 90 and WFM 91 Service Manual 2–3
Follow these instructions when physically installing this instrument:
Power Source. This instrument is designed to operate from either six C-cell
batteries, alkaline or rechargeable NiCad, or from an AC adapter wall unit
producing 12 VDC.
CAUTION. To avoid possible damage to the instrument circuitry when using a DC
power source other than the supplied AC adapter, ensure that the DC source is a
negative-ground +11 V to +18 V system with a negative center lead. The DC
source must provide 12 W of power.
Fuse. This instrument does not have an external power fuse. There are two fuses
located internally on the Bottom board. See page 6–34 of the Maintenance
section for instructions on how to check and replace the power supply fuses.
Battery Operation. The rechargeable NiCad batteries are automatically recharged
when the AC adapter is plugged into the instrument, whether the instrument
power is on or off. The battery charge time is approximately 6.5 hours when the
instrument is off and 20 hours when the instrument is on. The instrument shifts
into a safe trickle-charge mode, which can run indefinitely, when the NiCad
batteries are fully charged. See Table 1–9 on page 1–11 for information regarding
the length of time the instrument will operate on batteries.
The message Low Bat is displayed on screen when the remaining battery power
cannot guarantee reliable instrument operation. The length of time the instrument
will continue to operate after this message is displayed is dependent on the
current operating mode of the instrument and the type of batteries installed.
Use the rechargeable NiCad battery pack in full charge and discharge cycles to
optimize the battery life and capacity. Fully discharge the battery pack before
recharging, and then charge the battery pack until it is fully charged. A new
battery pack will take a few charge and discharge cycles to reach full capacity.
Refer to Batteries on page 6–21 for the instructions on how to install and remove
the batteries.
Operational Jumpers and Installed Options. This instrument does not have any
internal operational jumpers or installed options. All instrument configurations
are available through the on-screen menus.
Operating Environment. Refer to Table 1–8 on page 1–10 for the environmental
limits of this instrument.
Electrical Installation
Operating Information
2–4 WFM 90 and WFM 91 Service Manual
Operating Information
This section will acquaint you with the basic principles of operating this
instrument so that you can service it. Detailed operating instructions are located
in the user manual.
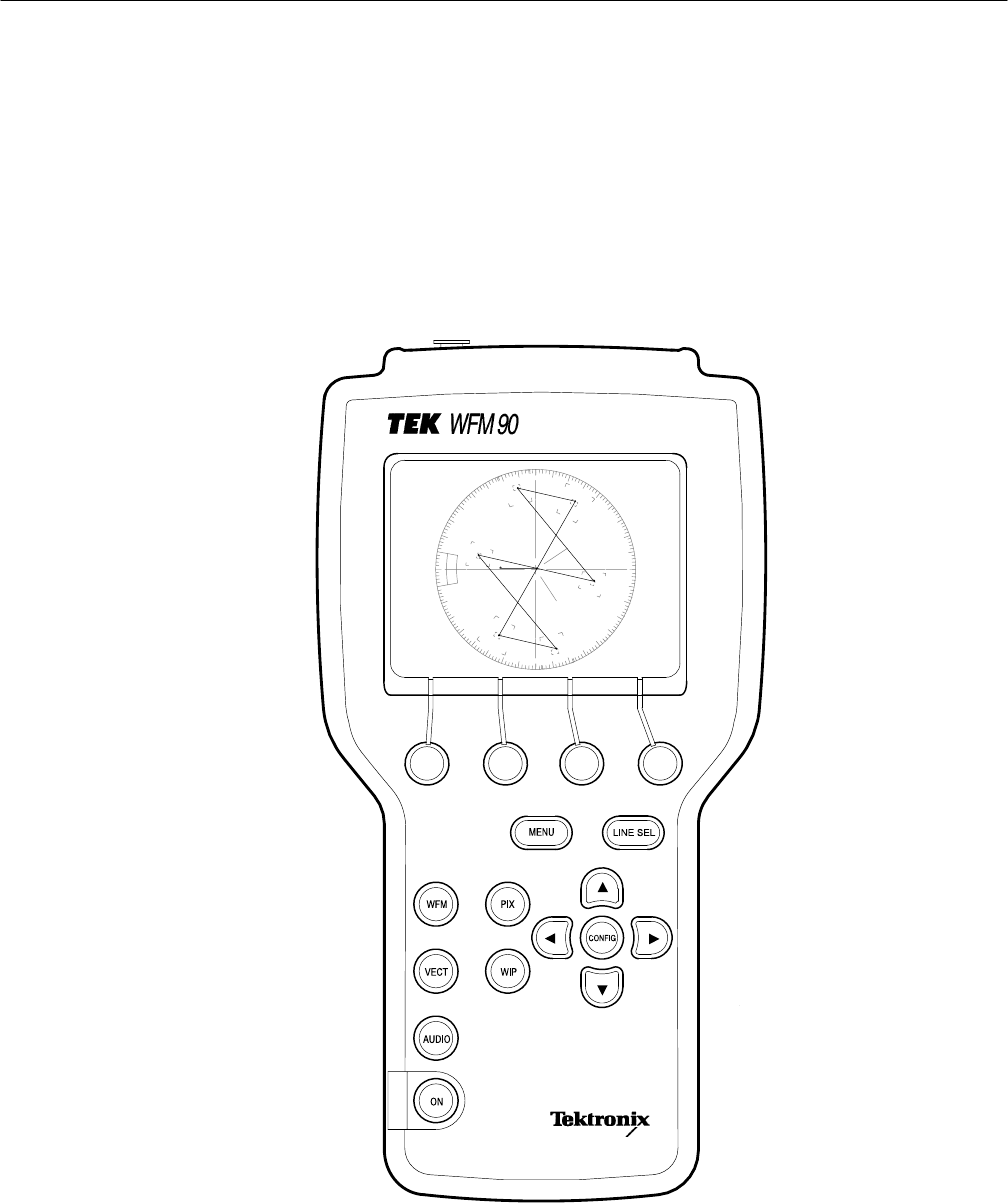
The instrument front panel is illustrated in Figure 2–3.
Figure 2–3: Instrument front panel
Front Panel Controls

Operating Information
WFM 90 and WFM 91 Service Manual 2–5
Power Switch. Press the ON button to toggle the instrument power on and off.
The current instrument keypad and menu selections are saved when the
instrument is turned off using this button.
NOTE. The instrument configuration is not saved if the power source is removed
before the instrument is turned off with this button.
Display Mode Selection. Use the following front-panel buttons to access the
different display modes:
HPress the WFM button to enter the Waveform display mode.
HPress the VECT button to enter the Vector display mode.
HPress the AUDIO button to enter the Audio display mode.
HPress the PIX button to enter the Picture display mode.
HPress the WIP button to enter the Waveform-in-Picture display mode. The
previously selected display mode, other than Picture, is shown in a
1/4-screen-sized window that overlays the Picture display.
Menu Control. Use the following front-panel buttons to enter the different menus:
HPress the MENU button to toggle the Operating menu on and off. The
Operating menu contains monitoring selections which are specifically related
to the currently selected display mode. Operating menu selections include
signal gain and filtering, audio reference levels, and safe action and title
outlines.
HPress the CONFIG button to toggle the Configuration menu on and off. The
Configuration menu contains selections which control overall instrument
monitoring operation. Configuration menu contents include signal and
display controls such as brightness and variable gain. Special modes for
monitoring signal amplitude and managing the battery power consumption
are enabled in this menu.
HPress the LINE SEL button to toggle the Line Select mode on and off and to
display the Line Select menu.
HThe four unlabeled buttons directly below the display are referred to as the
Bezel Buttons. These buttons are used to make menu selections and are only
enabled while menus are displayed on screen.

Operating Information
2–6 WFM 90 and WFM 91 Service Manual
Arrow Buttons. The function of the Arrow Buttons is dependent on the current
state of the instrument. For the Waveform and Audio display modes, they control
signal positioning. For the Vector display mode, they control vector phase, with
the Y and B buttons providing fine adjustment, and the A and " buttons providing
coarse adjustment.
The Arrow Buttons retain their default function for the reduced display when the
Waveform-in-Picture display mode is selected. When the Configuration menu is
displayed, the Y and B buttons operate the menu category selection, while the A
and " buttons retain their default function for the current display mode.
Instrument Reset. Extraordinary conditions may cause the instrument controls to
become locked or to respond erratically. To reset the instrument, first press the
ON button to turn off the power, then press the ON button again while holding
down the WIP and LINE SEL buttons. The instrument should return to normal
operation with the keypad controls and menu selections assigned to the
factory-set defaults.
If this reset does not return the instrument to normal operation, refer to the
Troubleshooting Procedures section of this manual.
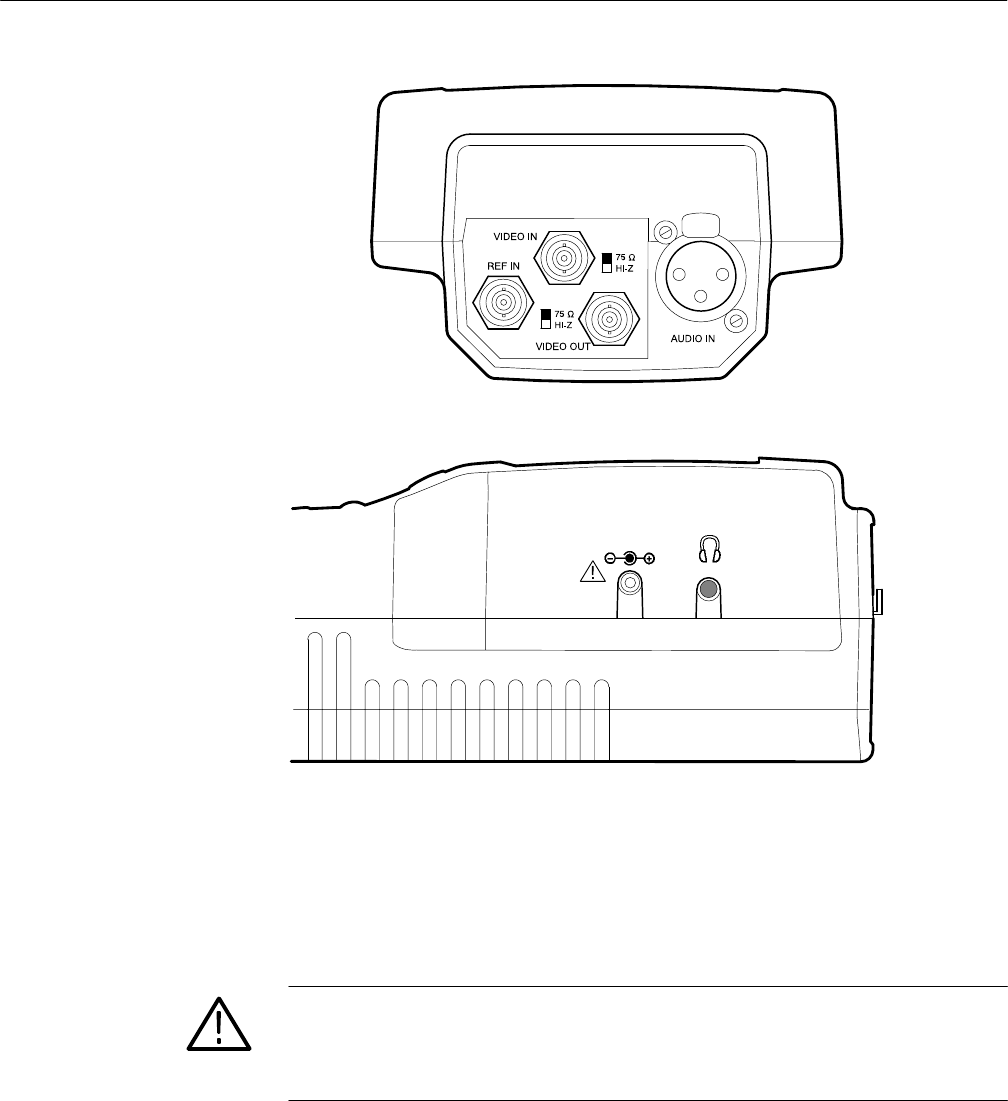
The instrument side panels are illustrated in Figure 2–4.
Video Input and Output Connectors. The VIDEO IN and REF IN connectors are
passive BNC inputs, unterminated, and 75W-compensated for a video signal.
Each input has a rear-panel switch to provide an internal 75W signal termination.
The VIDEO OUT connector is a BNC used to output the instrument display to a
remote monitor or video switcher.
Audio Input and Output Connectors. The AUDIO IN connector is a standard
three-pin XLR connector for a single channel of audio input. The audio output
connector is a standard stereo mini headphone jack for the output of the audio
input signal. The mono input signal is heard on both stereo channels. The audio
volume is fixed for each reference level. The larger the displayed signal, the
louder the volume.
Side-panel Connectors
and Switches
Operating Information
WFM 90 and WFM 91 Service Manual 2–7
DC IN 11-18V
Figure 2–4: Instrument side panels
DC Input Power Connector. The DC IN power connector is a 2 mm plug which
accepts a 12 VDC power input, ranging from +11 V to +18 V, using a negative
center lead.
CAUTION. To avoid possible damage to the instrument circuitry when using a DC
power source other than the supplied AC adapter, ensure that the DC source is a
negative-ground +11 V to +18 V system with a negative center lead. The DC
source should be able to provide 12 W of power.

Operating Information
2–8 WFM 90 and WFM 91 Service Manual
The following special operating modes can be activated through the menus:
Amplitude Alarm Mode. The Amplitude Alarm mode provides a means to
automatically monitor the signal amplitude for the Waveform and Audio
displays. This mode is enabled through the Configuration menu.
For the Waveform display mode, the portion of the signal exceeding the 100 IRE
(1.0 V PAL) graticule line is highlighted. For the Audio display mode, the
portion of the signal exceeding the menu-selected reference level is highlighted.
The highlighted portion of the signal is also visible in the Waveform-in-Picture
(WIP) display mode.
Variable Gain Mode. The Variable Gain mode allows you to vary the signal gain
for the Waveform and Vector displays between 45% and 155%. This mode is
enabled through the Configuration menu.
The variable gain adjustment tracks between the Waveform and Vector display
modes and can be adjusted from the Waveform-in-Picture display mode. When
the Variable Gain mode is enabled, the message GAIN UNCAL is displayed in
the on-screen readout.
Time-out Mode. The Time-out mode allows you to automatically shut down the
backlight and/or the instrument after there has been no front-panel activity for a
menu-selected length of time. The Time-out mode enables you to reduce battery
power usage while the instrument is battery powered and also to extend the life
of the backlight bulb. This mode is enabled through the Configuration menu.
When the backlight times out, the LCD display goes blank and the instrument
appears to be off. The backlight is turned back on by pressing any front panel
button other than the ON button. The backlight shutdown is functional when the
instrument is either battery or DC powered.
When the instrument power times out, the ON button must be pressed to turn the
instrument back on. The instrument power shutdown is only functional when the
instrument is battery powered.
Special Operating Modes
Operating Information
WFM 90 and WFM 91 Service Manual 2–9
Calibration Mode. The Calibration mode allows you to adjust the instrument to
factory specifications, if necessary. The Calibration mode is entered by pressing
and holding the CONFIG button for a few seconds. The instrument adjustments
are performed entirely from the front panel with the use of specified input
signals. The instructions for readjusting the instrument to specifications are
located in the Adjustment Procedures section.
CAUTION. Do not attempt to adjust the instrument without using the instructions
listed in the Adjustment Procedures section, or your instrument may not meet the
published specifications.
This instrument uses on-screen messages to alert you to certain monitoring
conditions. Figure 2–5 shows the readout messages and their locations.
20
40
60
80
100
–20
–40
0
MISSING SYNC
GAIN UNCAL 10uS/DIVEXT REF V1.1
LOW BAT
123
4
6
5
Figure 2–5: On-screen readout messages
Readout Description. Listed below are the corresponding descriptions of the
on-screen readout messages:
HThe GAIN UNCAL message appears in the Waveform, Vector, and
Waveform-in-Picture display modes when the Variable Gain mode is
turned on.
HThe EXT REF message appears in the Waveform and Vector display modes
when the video signal is locking to an external video reference signal.
HThe sweep rate is only displayed in the Waveform display mode. There is no
sweep rate readout when 2 Field sweep is selected.
On-screen Readout

Operating Information
2–10 WFM 90 and WFM 91 Service Manual
HThe instrument software version number is displayed when the Configura-
tion menu is open with the DISPLAY category selected.
HThe LOW BAT message is displayed when the instrument is battery operated
and the remaining battery power has reached a critically low level. The
remaining length of time that the instrument can be operated reliably is
dependent on the current operating mode.
HThe MISSING SYNC message appears in all video display modes when the
signal reference has been lost.
You can reset the front panel and menu settings to the factory-specified default
settings through the Configuration menu. Monitoring adjustments such as signal
position, vector phase, and picture hue are also set. The factory settings are listed
Table 2–1.
Table 2–1: Front panel and menu default settings
Instrument Parameter Factory Default Setting
Display mode Waveform
Signal reference Internal
Filter Flat
DC restorer speed Slow
Gain X1
Variable gain Off
Sweep 2H (2 Line)
Mag Off
Bars 75%
Setup (WFM 90 only) Yes
Alt Phase (WFM 91 only) Off
Reference dBu 0 dBu
Headroom 3 dB
WIP location Bottom right
Alarms Off
Safe Action Off
Safe Title Off
Vertical shift Off
Backlight time-out Disabled
Instrument time-out Disabled
Default Settings

Theory of Operation

WFM 90 and WFM 91 Service Manual 3–1
Theory of Operation
This section contains a module-level description of the instrument circuitry.
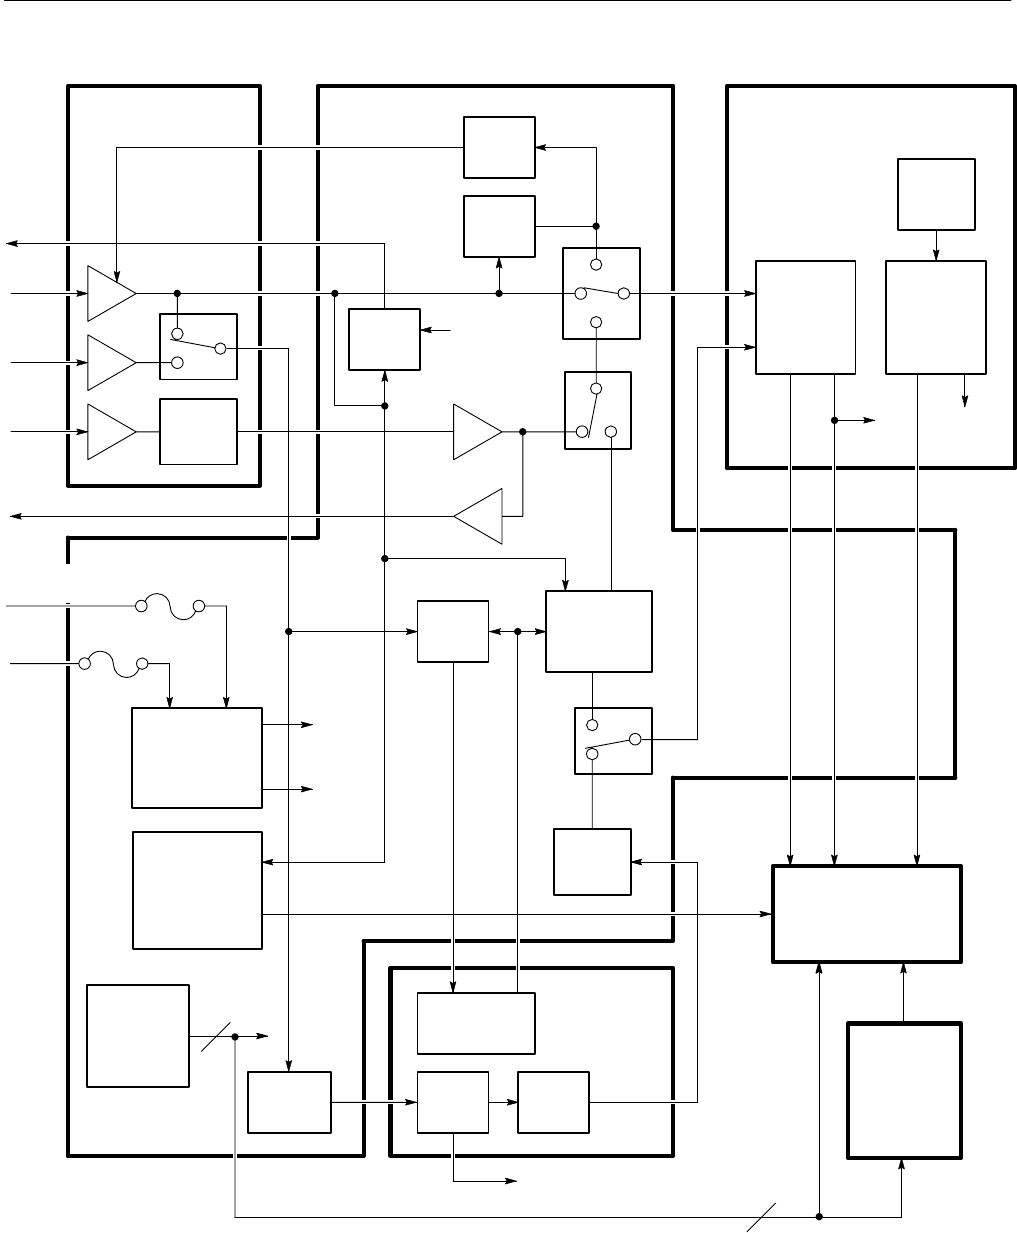
Block Diagram Description
The following description is based on the block diagram in Figure 3–1.
The signal input and output connectors are located on the Input board. There are
receivers for the three inputs, a switch for the video signal reference, and a
variable gain circuit for the audio input.
The video input signal has a DC voltage feedback clamp from the Bottom board.
The video output signal from the Bottom board is routed through the Input
board. The audio variable gain is controlled by the microprocessor serial bus,
which is routed to the Input board from the Top board through the Bottom board.
The Top board contains the microprocessor circuitry, the rasterizer and graphics
generator, the subcarrier oscillator, and the timing generator.
Microprocessor. The microprocessor takes input from the front-panel keypad to
control the operation of the instrument through the serial bus, parallel bus, and
dedicated control lines.
Rasterizer and Graphics. The rasterizer and graphics block produces all internally
generated video including waveforms, graticules, and menus. The rasterizer uses
the horizontal and vertical deflection signals to produce the waveforms. The
rasterizer uses the horizontal and vertical sync signals from the Bottom board to
lock to the incoming video signal.
The rasterizer needs a good analog timing voltage to run correctly. This timing
voltage is generated by a circuit loop between the Top and Bottom boards.
Problems with this circuit can be on either circuit board.
The Bottom board contains the power supply circuitry, the horizontal and
vertical deflection circuits, the NTSC or PAL decoder, the vectorscope and
burst-lock circuitry, the sync separator, and the audio amplifier for the headphone
output.
Input Board
Top Board
Bottom Board

Theory of Operation
3–2 WFM 90 and WFM 91 Service Manual
The Backlight Power Supply board uses the switched DC input voltage from the
batteries or external DC input to generate the voltage for the display backlight.
The backlight mounts into the display module.
The LCD Display module generates the display graphics using input signals
generated on the Top and Bottom boards. The power for the LCD Display
module comes from the Bottom board, while the power for the backlight comes
from the Backlight Power Supply board. The display backlight mounts into the
side of the LCD Display module.
Backlight Power Supply
Board
LCD Display and
Backlight
Theory of Operation
WFM 90 and WFM 91 Service Manual 3–3
16
Input Board
Ref
Var
Gain
Ext
Ref
Audio
In
Video
In
Video
Out
Front
Panel
Keys
Part of
mP
Rasterizer
and
Graphics
Vert
Defl
Horiz
Defl
Instrument
Control
Bottom Board P/O Top Board
LCD Display
and Backlight
Backlight
Power
Supply
Board
RGB
P/O Top Board
Part of
mP
Timing
Subcarrier
Oscillator
Timing
Sel Vid
Backlight
Brightness
RGB
Sweep Trig
Fuse
Fuse
DC In
11–18 VDC
Battery
Sync
Separator
Power Supply
and Battery
Charger
±8 VDC
+5 VDC
Vector
±8 VDC
+5 VDC
Control DAC
(16 analog
Outputs)
Audio
Headphone
NTSC (or PAL)
Decoder (Self
contained
subcarrier
regenerator)
Burst
Lock Vectorscope
(Including Ø
shifter)
Clamp
Video
Out RGB from
Rasterizer
and Graphics
Video In
LPF
B–Y
Fsc
R–Y
DSync
Display
Brightness
and View
Adjust
2
RGB
Figure 3–1: Simplified block diagram

Theory of Operation
3–4 WFM 90 and WFM 91 Service Manual

Performance Verification

WFM 90 and WFM 91 Service Manual 4–1
Performance Verification
This section contains the following information:
HSummary verification procedure
HList of equipment required to perform the procedures
HPerformance verification procedures
Summary Verification
The summary verification is listed in Table 4–1 and is intended for those who are
familiar with the complete performance verification procedures. Procedure titles
and page numbers provide a cross-reference to the performance verification
procedures on the following pages.
Table 4–1: Summary verification procedure
Procedure Procedure Requirement Page #
Preliminary setup Initial equipment connections and control settings. 4–5
Sync separation Signal synchronization will occur with input signals of composite video or
black burst, with sync amplitudes of 40 IRE (300 mV PAL) "6 dB for
internal reference, and sync amplitudes of between 143 mV and 4 V for
external reference.
4–5
Sweep timing and integral linearity Sweep Timing Accuracy: 5 ms/Div. (1 Line), 10 ms/Div. (2 Line), and
1.0 ms/Div. (2 Line + MAG), "2%. 0.2 ms/Div. (1 Line + MAG) "3%.
Integral Linearity: "1%.
4–6
Vertical gain and vertical magnifier registration 1 Volt Full Scale: 1 V input displayed within 1% of 140 IRE (1.00 V PAL).
X5 Gain: Gain accuracy within 5% with 1 V input signal. X5 Gain
Registration: v1 major division of vertical shift from baseline between
unmagnified and magnified signal.
4–7
Variable gain range and vertical position range Variable Gain Range: Input signals between 0.8 V and 2 V can be
adjusted to 140 IRE (1.0 V) display. 160 mV and 400 mV for X5 Gain.
Vertical Position Range: 1 V signal can be positioned so that peak white
and sync tip can be placed at blanking level, with the DC Restorer Clamp
on, regardless of gain setting.
4–7
Overscan v2% variation in baseline of 100 IRE (700 mV PAL) 12.5T (20T PAL)
modulated pulse as it is positioned over the middle 80% of the screen. 4–8
Input and DC restorer frequency response X1 Gain Response (Flat filter selected): 50 kHz to 6 MHz within 2% of
response at 50 kHz. X5 Gain Response (Flat filter selected): 50 kHz to 6
MHz within 5% of response at 50 kHz. Attenuation of 60 Hz (50 Hz PAL)
on Input Signal: SLOW mode: v20%. FAST mode: w90%.
4–9

Performance Verification
4–2 WFM 90 and WFM 91 Service Manual
Table 4–1: Summary verification procedure (Cont.)
Procedure Page #Procedure Requirement
Vector phase stability Phase Shift with Subcarrier Frequency Change from FSC to FSC 50 Hz
(FSC 10 Hz PAL): 2°. Phase Shift with Burst Amplitude Change from
Nominal to 6 dB: 2°. Phase Shift with Variable Gain Control Varied
from +3 dB to –6 dB: 1°.
4–11
Chrominance bandwidth Chrominance Bandwidth: Upper –3 dB Point: FSC + 500 kHz, 100 kHz.
Lower –3 dB Point: FSC – 500 kHz, 100 kHz. 4–11
Audio gain and frequency response Measurement Accuracy: 0.5 dB at 1 kHz. Frequency Response: 0.5 dB
from 50 Hz to 20 kHz. 4–13
Equipment Required
Table 4–2 lists the required equipment and accessory items to perform the
performance verification procedures. Minimum equipment specifications are
followed by an example of equipment that meet these specifications.
An accuracy ratio of 4:1 or better for the warranted specifications will be
obtained using the equipment recommended in Table 4–2 with the following
exceptions:
HAudio Amplitude: 2.5:1
HAudio Flatness: 2.5:1
Table 4–2: Equipment required for performance verification
Equipment Description Minimum Requirements Equipment Example
Television test signal generator Color test signals for the television standard of
the monitor to be tested: color bar signal, pulse
and bar; with 2T pulse, 2T bar, and modulated
pulse, field square wave signal, and black burst
signal
NTSC: Tektronix 14101 TV Test Signal Generator
with Option AA and Option AB (modified SPG2
and TSG7), TSG3, and TSG5
PAL: Tektronix 14111 TV Test Signal Generator
with Option AA and Option AB (modified SPG12
and TSG17), TSG13, and TSG15
Leveled sine wave generator Output Level Range: –11.55 dBm (200 mV) to
0.43 dBm (800 mV);
Frequency: 50 kHz to 10 MHz
Tektronix SG 5032 Leveled Sine Wave Generator
Function generator Range: 0.1 to 5 Vpp when loaded by 75 W,
10 Vpp when unloaded;
Frequency: 50 kHz to 10 MHz.
Tektronix FG 5032 Function Generator
Audio generator Amplitude Range: –10 dBu to 8 dBu;
Frequency: 1 kHz to 50 kHz Tektronix ASG 100 Audio Signal Generator
Voltmeter Range: 0 VDC to 100 VDC;
Accuracy: 0.1% Tektronix DM 504A2 Digital Multimeter

Performance Verification
WFM 90 and WFM 91 Service Manual 4–3
Table 4–2: Equipment required for performance verification (Cont.)
Equipment Description Equipment ExampleMinimum Requirements
Frequency counter Range: 10 Hz to 10 MHz;
Accuracy: 0.001% Tektronix DC 503A2 Universal Counter
Video amplitude calibrator
(VAC) Signal: Adjustable square wave 0.0 mVpp to
999.9 mVpp; Resolution: 0.1 mV; Accuracy:
0.05%; Frequency: Approximately 270 Hz
Tektronix part number 067-0916-002
Peak-to-peak detector Input Signal Range: 0.25 Vpp to 1.0 Vpp;
Flatness: 0.2% 50 kHz to 10 MHz;
Input Impedance: 75 W
Tektronix part number 015-0408-00 (includes
peak-to-peak detector head, Tektronix part
number 015-0413-00)2
75 W terminator Two required; feed-through type Tektronix part number 011-0103-02
75 Wcoaxial cable Two cables required, male to male BNC
connectors Tektronix part number 012-0159-00 (42-inch)
50 Wcoaxial cable 1% precision, male to male BNC connectors Tektronix part number 012-0482-00 (36-inch)
Audio cable XLR female to XLR male Switchcraft part number SC3XXJ
50 W-to-75 W minimum loss
attenuator Impedance: 50 W-to-75 W; Tolerance: 0.5 dB;
Frequency: 100 MHz Tektronix part number 011-0057-00
X10 attenuator 75 WTektronix part number 011-0061-00
Dual input coupler Matched BNC cable-T for making phase
comparisons between two inputs; Matched
length of the two arms within 0.1 inch
Tektronix part number 067-0525-02
BNC female to BNC female
connector Tektronix part number 103-0028-00
1The 1410-Series generators with standard SPG and TSG modules can be used, but not all checks and adjustments can be
made. The standard SPG2 and SPG12 modules will not check lock to changes in sync amplitude, cw lock to changes in
burst amplitude, and frequency lock to burst offset frequency changes. The signal generator can be ordered with one or
both options (AA and AB). The TSG3 and TSG13 are Modulated Staircase Generators with variable APL. The TSG5 and
TSG15 are Pulse and Bar Generators with modulated pulse and field square wave signals.
2Requires a Tektronix TM 500-Series or TM 5000-Series Power Module Mainframe.

Performance Verification
4–4 WFM 90 and WFM 91 Service Manual
Performance Verification Procedures
Perform the performance verification procedures to ensure that the instrument is
operating properly and is meeting the performance requirements listed in the
characteristic tables of the Specifications section.
Throughout these procedures the following conventions apply:
HEach verification procedure uses the following format:
Title of verification procedure
Specification requirement(s) the procedure is verifying
Verification procedure
HWhen you are instructed to use a front-panel control or to select a specific
menu item of the WFM 90 or WFM 91 Handheld Waveform, Vector, Picture,
and Audio Monitor, the name of the control or menu item appears in
boldface type.
NOTE. Do not make changes to the front-panel settings or controls that are not
called out in the procedures. Each procedure will require you to set the
instrument to certain default settings before verifying the procedure requirement.
If you make changes to these settings, other than those called out in the
procedure, you may obtain invalid results.
The verification procedures are written in a format that assumes you are
performing the procedures in sequential order from the beginning. If you are
unsure about equipment hookups or instrument settings for a specific procedure,
you will need to review the previous procedures to verify the hookups and
settings required for the current procedure.
The tests in this section comprise a valid confirmation of instrument performance
when the following requirements are met:
HTest equipment used to verify performance requirements must be calibrated
and working within the limits specified in Table 4–2 on page 4–2.
HThe WFM 90 or WFM 91 Handheld Waveform, Vector, Picture, and Audio
Monitor must have last been adjusted at an ambient temperature range of
+20° C to +30°C, and must have been operating for a warm-up period of at
least 20 minutes.
Conventions
Prerequisites

Performance Verification
WFM 90 and WFM 91 Service Manual 4–5
Perform the following steps before beginning the verification procedures:
1. Plug the AC power adapter into the instrument and then plug the adapter into
the AC power source.
2. Connect the multiburst signal from the television signal generator through a
75 W in-line terminator and dual-input coupler to the VIDEO IN and
REF IN connectors on the WFM 90 or WFM 91 Handheld Waveform,
Vector, Picture, and Audio Monitor.
3. Set the input termination switches to the HIZ position.
4. Turn on the WFM 90 or WFM 91 Handheld Waveform, Vector, Picture, and
Audio Monitor.
5. Enter the Configure menu. Select PRESETS and then select DEFAULT.
NOTE. Be sure you have warmed up the instrument for at least 20 minutes before
you perform any of the verification procedures.
This procedure verifies the following requirement:
Signal synchronization will occur with input signals of composite video or black
burst, with sync amplitudes of 40 IRE (300 mV PAL) 6 dB for internal
reference, and sync amplitudes of between 143 mV and 4 V for external
reference.
1. Enter the Configuration menu and select the INPUT category.
2. Check for a stable display while switching between INT and EXT REF.
3. Remove the terminator from the dual-input coupler.
4. Check for a stable display while switching between INT and EXT REF.
5. Add three 75 W terminators to the dual-input coupler.
6. Check for a stable display while switching between INT and EXT REF.
7. Select INT REF from the Configuration menu INPUT category.
8. Remove the dual-input coupler from the instrument.
Preliminary Setup
Sync Separation

Performance Verification
4–6 WFM 90 and WFM 91 Service Manual
This procedure verifies the following requirement:
Sweep Timing Accuracy: 5 ms/Div. (1 Line), 10 ms/Div. (2 Line), and 1.0 ms/Div.
(2 Line + MAG), 2%. 0.2 ms/Div. (1 Line + MAG) 3%. Integral Linearity:
1%.
1. Connect the multiburst signal from the television signal generator to the
VIDEO IN connector on the WFM 90 or WFM 91 Handheld Waveform,
Vector, Picture, and Audio Monitor, and to the input on the frequency
counter, using a T-connector, 75 W cable, and 75 W in-line terminator.
2. Set the multiburst generator controls to Low, Continuous, and Manual. Set
the output frequency to 100 kHz (as read on the frequency counter).
3. Check for one cycle per division, 1 minor division, over the center ten
graticule divisions.
4. Select 1H SWEEP from the Operating menu.
5. Set the multiburst generator frequency to 200 kHz.
6. Check for one cycle per division, 1 minor division, over the center ten
graticule divisions.
7. Adjust the multiburst generator frequency so that the cycles land exactly on
the first and tenth graticule marks.
8. Check that each cycle is within 0.5 minor division of a major graticule
mark.
9. Select MAG ON from the Operating menu.
10. Set the multiburst generator frequency to 2 MHz.
11. Check for one cycle per division, 1 minor division, over the center ten
graticule divisions, and also at both ends of the magnified sweep (using the
horizontal position control), ignoring the first and last cycle.
12. Set the multiburst generator frequency to 1 MHz.
13. Select 2H SWEEP from the Operating menu.
14. Check for one cycle per division, 1 minor division, over the center ten
graticule divisions, and also at both ends of the magnified sweep (using the
horizontal position control), ignoring the first and last cycle.
15. Select MAG OFF from the Operating menu.
Sweep Timing and Integral
Linearity

Performance Verification
WFM 90 and WFM 91 Service Manual 4–7
This procedure verifies the following requirement:
1 Volt Full Scale: 1 V input displayed within 1% of 140 IRE (1.00 V PAL).
X5 Gain: Gain accuracy within 5% with 1 V input signal. X5 Gain Registration:
1 major division of vertical shift from baseline between unmagnified and
magnified signal.
1. Set the multiburst generator controls to Composite and Multiburst.
2. Position the signal baseline to the graticule baseline, and then select
X5 GAIN from the Operating menu.
3. Check that the signal baseline is within 1 major division of the graticule
baseline.
4. Select X1 GAIN from the Operating menu.
5. Remove the signal and terminator from the VIDEO IN connector.
6. Connect the output of the VAC to the VIDEO IN connector. Do not
terminate the input.
7. Set the VAC for a 999.9 mV output, with all of the buttons out except for
+LUM and NTSC (PAL button for the WFM 91).
8. Check for a display amplitude of 140 IRE 1.4 IRE (1000 mV 10 mV
PAL).
9. Set the VAC for a 199.9 mV output.
10. Select X5 GAIN from the Operating menu.
11. Check for a display amplitude of 140 IRE 5 IRE (1000 mV 50 mV
PAL).
12. Select X1 GAIN from the Operating menu.
This procedure verifies the following requirement:
Variable Gain Range: Input signals between 0.8 V and 2 V can be adjusted to
140 IRE (1.0 V) display. 160 mV and 400 mV for X5 Gain. Vertical Position
Range: 1 V signal can be positioned so that peak white and sync tip can be
placed at blanking level, with the DC Restorer Clamp on, regardless of gain
setting.
1. Set the VAC for a 999.9 mV output.
2. Select VAR GAIN ON from the Configuration menu.
3. Check by adjusting the Variable Gain controls that the signal amplitude can
be displayed less than 70 IRE (500 mV PAL).
Vertical Gain and Vertical
Magnifier Registration
Variable Gain Range and
Vertical Position Range

Performance Verification
4–8 WFM 90 and WFM 91 Service Manual
4. Set the VAC for a 799.9 mV output.
5. Check by adjusting the Variable Gain controls that the signal amplitude can
be displayed greater than 140 IRE (1000 mV PAL).
6. Select X5 GAIN from the Operating menu.
7. Set the VAC for a 399.9 mV output.
8. Enter the Configuration menu and select the VAR GAIN category.
9. Check by adjusting the Variable Gain controls that the signal amplitude can
be displayed less than 140 IRE (1000 mV PAL).
10. Set the VAC for a 159.9 mV output.
11. Check by adjusting the Variable Gain controls that the signal amplitude can
be displayed greater than 140 IRE (1000 mV PAL).
12. Replace the VAC signal on the VIDEO IN connector with a pulse and bar
signal using a 75 W in-line terminator.
13. Check by adjusting the Vertical Position controls, that the white bar and
sync tip portions of the signal can be adjusted to the graticule baseline.
14. Select VAR GAIN OFF from the Configuration menu.
15. Select X1 GAIN from the Operating menu.
This procedure verifies the following requirement:
2% variation in baseline of 100 IRE (700 mV PAL) 12.5T (20T PAL)
modulated pulse as it is positioned over the middle 80% of the screen.
1. Check that the amplitude of the sine wave at the bottom of the mod pulse
varies less than 2% while using the Vertical Position controls to position the
signal over the middle 80% of the graticule.
2. Remove the pulse and bar signal from the VIDEO IN connector.
Overscan

Performance Verification
WFM 90 and WFM 91 Service Manual 4–9
This procedure verifies the following requirement:
X1 Gain Response (Flat filter selected): 50 kHz to 6 MHz within 2% of response
at 50 kHz. X5 Gain Response (Flat filter selected): 50 kHz to 6 MHz within 5%
of response at 50 kHz. Attenuation of 60 Hz (50 Hz PAL) on Input Signal:
SLOW mode: v20%. FAST mode: w90%.
1. Select EXT REF from the Configuration menu.
2. Connect the 50 W precision cable from the output of the leveled sine wave
generator to the dual-input coupler using a 50 W-to-75 W minimum loss
attenuator.
3. Connect one side of the dual-input coupler to the VIDEO IN connector.
4. Connect the 015-0413-00 Peak-to-Peak Detector Head to the other end of the
dual-input coupler, using the female-to-female BNC connector. Connect the
other end of the Peak-to-Peak Detector Head to the 015-0408-00 Peak-to-
Peak Detector + Input.
5. Connect the peak-to-peak detector Output to the digital multimeter or
oscilloscope.
6. Set the leveled sine wave generator frequency to 50 kHz and adjust the
generator amplitude for exactly 100 IRE (700 mV PAL) of display.
7. Adjust the peak-to-peak detector Plus amplifier and input control until the
green LED is on.
8. Note the digital multimeter readout level or the oscilloscope dc level.
9. Set the sine wave generator frequency to 3.58 MHz (4.43 MHz PAL).
10. Adjust the sine wave generator amplitude for exactly 100 IRE (700 mV
PAL) of display.
11. Check that the digital multimeter readout level, or the oscilloscope dc level
is within "14 mV of the reading noted in step 8.
12. Set the sine wave generator frequency to 6 MHz.
13. Adjust the sine wave generator amplitude for exactly 100 IRE (700 mV
PAL) of display.
14. Check that the digital multimeter readout level or the oscilloscope dc level,
is within "14 mV of the reading noted in step 8.
15. Set the sine wave generator frequency to 50 kHz.
16. Select X5 GAIN from the Operating menu.
Input and DC Restorer
Frequency Response

Performance Verification
4–10 WFM 90 and WFM 91 Service Manual
17. Adjust the peak-to-peak detector Plus amplifier and input control fully
counterclockwise.
18. Adjust the sine wave generator for a display amplitude of 100 IRE (700 mV
PAL).
19. Note the digital multimeter readout level or the oscilloscope dc level.
20. Set the sine wave generator frequency to 3.58 MHz (4.43 MHz PAL).
21. Adjust the sine wave generator amplitude for exactly 100 IRE (700 mV
PAL) of display.
22. Check that the digital multimeter readout level, or the oscilloscope dc level,
is within "7 mV of the reading noted in step 19.
23. Set the sine wave generator frequency to 6 MHz.
24. Adjust the sine wave generator amplitude for exactly 100 IRE (700 mV
PAL) of display.
25. Check that the digital multimeter readout level, or the oscilloscope dc level,
is within "7 mV of the reading noted in step 19.
26. Select X1 GAIN from the Operating menu.
27. Remove the dual-input coupler from the instrument.
28. Connect the function generator output to the VIDEO IN connector using a
X10 (75 W) attenuator.
29. Select 1H SWEEP from the Operating menu.
30. Enter the Configuration menu and select the INPUT category. Select
EXT REF and SLOW DC REST.
31. Set the function generator to output a 60 Hz (50 Hz PAL) sine wave with a
display amplitude of 100 IRE (700 mV PAL) on the WFM 90 or WFM 91
Handheld Waveform, Vector, Picture, and Audio Monitor.
32. Connect a black burst signal to the REF IN connector. Do not terminate the
input.
33. Check that the display amplitude is w80 IRE (560 mV PAL).
34. Select FAST DC REST.
35. Check that the display amplitude is v10 IRE (70 mV PAL).
36. Select INT REF and SLOW DC REST from the Configuration menu.
37. Remove all input signals from the WFM 90 or WFM 91 Handheld Wave-
form, Vector, Picture, and Audio Monitor.

Performance Verification
WFM 90 and WFM 91 Service Manual 4–11
This procedure verifies the following requirement:
Phase Shift with Subcarrier Frequency Change from FSC to FSC 50 Hz
(FSC 10 Hz PAL): 2°. Phase Shift with Burst Amplitude Change from
Nominal to 6 dB: 2°. Phase Shift with Variable Gain Control Varied from
+3 dB to –6 dB: 1°.
1. Connect a 75% color bar signal to the VIDEO IN connector. Set the input
switch to the 75 W position.
2. Select VECTOR display mode on the WFM 90 or WFM 91 Handheld
Waveform, Vector, Picture, and Audio Monitor.
3. Use the Phase controls to position the burst vector on the 180° graticule line.
4. Check that when the television generator subcarrier frequency is changed
50 Hz (10 Hz PAL) from nominal, that the display locks, and that the
burst phase has changed 2° or less.
5. Return the subcarrier frequency to nominal on the television signal generator.
6. Replace the color bar signal on the VIDEO IN connector with a black burst
signal.
7. Check that the vector phase changes less than 2° while varying the burst
amplitude from nominal to 6 dB (1/2 to 2X amplitude), using the
television signal generator burst amplitude control.
8. Return the burst amplitude to nominal on the television signal generator.
9. Select VAR GAIN ON from the Configuration menu.
10. Check that the vector phase changes less than 1° while varying the vector
burst amplitude from 1/2 to 1.5 times nominal amplitude using the variable
gain control.
11. Select VAR GAIN OFF from the Configuration menu.
12. Remove the signal input from the VIDEO IN connector.
This procedure verifies the following requirement:
Chrominance Bandwidth: Upper –3 dB Point: FSC + 500 kHz, 100 kHz.
Lower –3 dB Point: FSC – 500 kHz, 100 kHz.
1. Connect the precision 50 W cable to the output of the leveled sine wave
generator. Connect the other end of the cable to the 50 W to 75 W minimum-
loss attenuator, and then connect the attenuator to the VIDEO IN connector.
2. Select EXT REF from the Configuration menu.
Vector Phase Stability
Chrominance Bandwidth
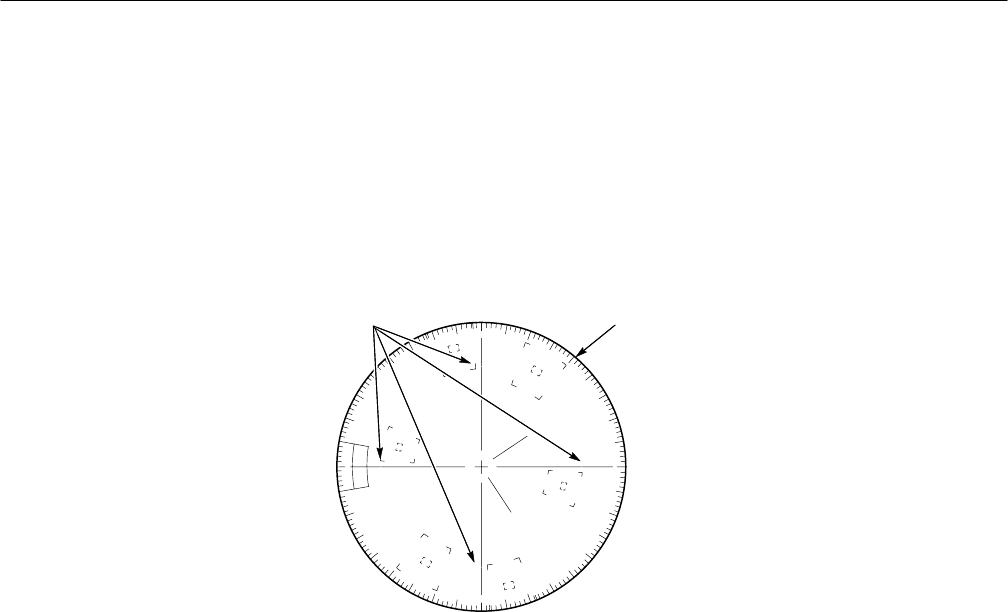
Performance Verification
4–12 WFM 90 and WFM 91 Service Manual
3. Set the leveled sine wave generator frequency to 3.58 MHz (4.43 MHz PAL)
and adjust the amplitude control so that the circle overlays the graticule
compass rose.
4. Decrease the frequency on the leveled sine wave generator until the edge of
the circle display reaches the –3 dB (70%) gaps on the vertical graticule axis.
See Figure 4–1.
Compass rose–3 dB Points
Figure 4–1: –3 dB marks on the vector graticule
5. Check that the frequency readout on the leveled sine wave generator is
between 2.98 and 3.18 MHz (3.83 and 4.03 MHz PAL).
6. Adjust the frequency on the leveled sine wave generator until the edge of the
circle display reaches the –3 dB (70%) point gaps on the horizontal graticule
axis.
7. Check that the frequency readout on the leveled sine wave generator is
between 2.98 and 3.18 MHz (3.83 and 4.03 MHz PAL).
8. Increase the frequency on the leveled sine wave generator until the edge of
the circle display expands out to the compass rose and again reduces to the
–3 dB (70%) point gaps on the vertical graticule axis. See Figure 4–1.
9. Check that the frequency readout on the leveled sine wave generator is
between 3.98 and 4.18 MHz (4.83 and 5.03 MHz PAL).
10. Adjust the frequency on the leveled sine wave generator until the edge of the
circle display reaches the –3 dB (70%) point gaps on the horizontal graticule
axis.

Performance Verification
WFM 90 and WFM 91 Service Manual 4–13
11. Check that the frequency readout on the leveled sine wave generator is
between 3.98 and 4.18 MHz (4.83 and 5.03 MHz PAL).
12. Remove all signals from the WFM 90 or WFM 91 Handheld Waveform,
Vector, Picture, and Audio Monitor.
This procedure verifies the following requirement:
Measurement Accuracy: 0.5 dB at 1 kHz. Frequency Response: 0.5 dB from
50 Hz to 20 kHz.
1. Connect the output from the audio generator to the AUDIO IN connector on
the WFM 90 or WFM 91 Handheld Waveform, Vector, Picture, and Audio
Monitor.
2. Set the audio generator for a 1 kHz tone output, with an amplitude of
+8.0 dBu. Select Signal On.
3. Select AUDIO display mode on the WFM 90 or WFM 91 Handheld
Waveform, Vector, Picture, and Audio Monitor.
4. Enter the Operating menu and select 8 dBu.
5. Check that the display amplitude is within 0.5 dB of the reference level
graticule lines.
6. Set the audio generator for a +4.0 dBu output amplitude.
7. Select 4 dBu from the Operating menu.
8. Check that the display amplitude is within 0.5 dB of the reference level
graticule lines.
9. Set the audio generator for a 0.0 dBu output amplitude.
10. Select 0 dBu from the Operating menu.
11. Check that the display amplitude is within 0.5 dB of the reference level
graticule lines.
12. Set the audio generator for a –10.0 dBu output amplitude.
13. Select –10 dBu from the Operating menu.
14. Check that the display amplitude is within 0.5 dB of the reference level
graticule lines.
Audio Gain and
Frequency Response

Performance Verification
4–14 WFM 90 and WFM 91 Service Manual
15. Set the audio generator for a 50 Hz tone output, with an amplitude of
+8.0 dBu.
16. Select 8 dBu from the Operating menu.
17. Check that the display amplitude is within 0.5 dB of the reference level
graticule lines.
18. Set the audio generator frequency to 5 kHz.
19. Check that the display amplitude is within 0.5 dB of the reference level
graticule lines.
20. Set the audio generator frequency to 10 kHz.
21. Check that the display amplitude is within 0.5 dB of the reference level
graticule lines.
22. Set the audio generator frequency to 15 kHz.
23. Check that the display amplitude is within 0.5 dB of the reference level
graticule lines.
24. Set the audio generator frequency to 20 kHz.
25. Check that the display amplitude is within 0.5 dB of the reference level
graticule lines.

Adjustment Procedures

WFM 90 and WFM 91 Service Manual 5–1
Adjustment Procedures
This section contains the following information:
HSummary adjustment procedure
HList of equipment required to perform the procedures
HAdjustment procedures
Summary Adjustment
Table 5–1 is the summary adjustment procedure and is intended for those who
are familiar with the complete adjustment procedures. Adjustment titles and page
numbers provide a cross-reference to the adjustment procedures on the following
pages.
Table 5–1: Summary adjustment
Adjustment Page #
Preliminary setup 5–4
Raster VCO 5–4
Sweep timing and horizontal mag registration 5–5
Vertical gain and X5 gain registration 5–6
Frequency response 5–7
Vector quadrature phase 5–8
Vector gain and X5 gain phase 5–9
Audio gain 5–10

Adjustment Procedures
5–2 WFM 90 and WFM 91 Service Manual
Equipment Required
Table 5–2 lists the required equipment and accessory items to perform the
adjustment procedures. Minimum equipment specifications are followed by an
example of equipment that meet these specifications.
Table 5–2: Equipment required for performance verification
Equipment Description Minimum Requirements Equipment Example
Television test signal generator 75% color bar test signal for the television
standard of the monitor to be tested NTSC: Tektronix TSG 100;
PAL: Tektronix TSG 111
Leveled sine wave generator Output Level Range: –11.55 dBm (200 mV) to
0.43 dBm (800 mV);
Frequency: 50 kHz to 10 MHz
Tektronix SG 5031 Leveled Sine Wave Generator
Function generator Range: 0.1 to 5 Vpp when loaded by 75 W,
10 Vpp when unloaded;
Frequency: 50 kHz to 10 MHz.
Tektronix FG 5031 Function Generator
Audio generator Amplitude Range: –10 dBu to 8 dBu;
Frequency: 1 kHz to 50 kHz Tektronix ASG 100 Audio Signal Generator
Voltmeter Range: 0 VDC to 100 VDC;
Accuracy: 0.1% Tektronix DM 504A1 Digital Multimeter
Frequency counter Range: 10 Hz to 10 MHz;
Accuracy: 0.001% Tektronix DC 503A1 Universal Counter
Video amplitude calibrator
(VAC) Signal: Adjustable square wave 0.0 mVpp to
999.9 mVpp; Resolution: 0.1 mV; Accuracy:
0.05%; Frequency: Approximately 270 Hz
Tektronix part number 067-0916-001
Peak-to-peak detector Input Signal Range: 0.25 Vpp to 1.0 Vpp;
Flatness: 0.2% 50 kHz to 10 MHz;
Input Impedance: 75 W
Tektronix part number 015-0408-00 (includes
peak-to-peak detector head, Tektronix part
number 015-0413-00)1
75 W terminator One required; feed-through type Tektronix part number 011-0103-02
75 Wcoaxial cable Three cables required, male-to-male BNC
connectors Tektronix part number 012-0159-00 (42-inch)
Tektronix part number 012-1339-00 (24-inch)
50 Wcoaxial cable 1% precision, male-to-male BNC connectors Tektronix part number 012-0482-00 (36-inch)
Dual input coupler Matched BNC cable-T for making phase
comparisons between two inputs; Matched
length of the two arms within 0.1 inch
Tektronix part number 067-0525-02
Audio cable XLR female to XLR male Switchcraft part number SC3XXJ
50 W-to-75 W minimum loss
attenuator Impedance: 50 W-to-75 W; Tolerance: 0.5 dB;
Frequency: 100 MHz Tektronix part number 011-0057-00
BNC female to BNC female
connector Tektronix part number 103-0028-00
BNC female to dual banana
adapter Tektronix part number 103-0090-00
1Requires a Tektronix TM 500-Series or TM 5000-Series Power Module Mainframe.

Adjustment Procedures
WFM 90 and WFM 91 Service Manual 5–3
Adjustment Procedures
The WFM 90 or WFM 91 Handheld Waveform, Vector, Picture, and Audio
Monitor does not have any internal adjustments. Instrument adjustments are
made entirely from the front panel by assigning adjustment functions to the
Arrow Buttons through the Calibration menu.
Throughout these procedures the following conventions apply:
HEach adjustment procedure uses the following format:
Title of adjustment procedure
Adjustment procedure
HWhen you are instructed to use a front-panel control or to select a specific
menu item of the WFM 90 or WFM 91 Handheld Waveform, Vector, Picture,
and Audio Monitor, the name of the control or menu item appears in
boldface type.
NOTE. Do not make changes to the front-panel settings or controls that are not
called out in the procedures. Each procedure will require you to set the
instrument to certain default settings before an adjustment is made. If you make
changes to these settings, other than those called out in the procedure, you may
incorrectly adjust your instrument.
The adjustment procedures are written in a format that assumes you are
performing the procedures in sequential order from the beginning. If you are
unsure about equipment hookups or instrument settings for a specific procedure,
you will need to review the previous procedures to verify the hookups and
settings required for the current procedure.
The adjustments in this section comprise a valid readjustment of instrument
performance when the following requirements are met:
HTest equipment used to verify performance requirements must be calibrated
and working within the limits specified in Table 5–2 on page 5–2.
HThe WFM 90 or WFM 91 Handheld Waveform, Vector, Picture, and Audio
Monitor must have been adjusted at an ambient temperature range of +20° C
to +30°C, and must have been operating for a warm-up period of at least
20 minutes.
Conventions
Prerequisites

Adjustment Procedures
5–4 WFM 90 and WFM 91 Service Manual
The following information provides you with an overview of how adjustments
are made on the WFM 90 or WFM 91 Handheld Waveform, Vector, Picture, and
Audio Monitor.
Calibration Menu. To enter the Calibration menu, press and hold the CONFIG
button for a few seconds. The Calibration menu display consists of a list of
instrument adjustments along with two action selections, CAL and SAVE. Select
CAL to enable the adjustment that is currently selected from the list of adjust-
ments. SAVE must be selected after every adjustment to save the adjustment in
memory.
NOTE. SAVE must be selected from the Calibration menu after each adjustment
is completed to save the adjustment in memory. If an adjustment is not saved, the
instrument will revert to the original adjustment setting on the next power-up.
After you have enabled an adjustment, select CAL MENU to return the display
to the main Calibration menu. Most adjustments provide a POS or PHASE menu
selection, which allows you to toggle the Arrow Buttons between the selected
adjustment and signal positioning to aid in performing the adjustment.
Perform the following steps to prepare the instrument to be adjusted:
1. Plug the AC power adapter into the WFM 90 or WFM 91 Handheld
Waveform, Vector, Picture, and Audio Monitor, and then plug the adapter
into the AC power source.
2. Set the input termination switches to the HIZ position on the WFM 90 or
WFM 91 Handheld Waveform, Vector, Picture, and Audio Monitor.
3. Connect a 75% color bar signal from the television signal generator to the
VIDEO IN connector, using a 75 W in-line terminator.
4. Turn on the instrument.
5. Press the CONFIG button. Select PRESETS, and then select DEFAULT.
Perform the following steps to adjust the raster VCO:
1. Select RAST VCO from the Calibration menu.
2. Select CAL, and then select AUTO.
3. Wait until the CANCEL message disappears from the screen.
4. Select CAL MENU, and then select SAVE from the menu.
Adjustment Methodology
Preliminary Setup
Raster VCO

Adjustment Procedures
WFM 90 and WFM 91 Service Manual 5–5
Perform the following steps to adjust the sweep timing and horizontal mag
registration:
1. Replace the signal on the VIDEO IN connector with the output from the
function generator. Be sure to use a 50 W-to-75 W minimum-loss attenuator
and a precision (1%) 50 W cable if the generator specifies a 50 W output.
2. Set the function generator for a 200 kHz sine wave output.
NOTE. Verify the generator frequencies used in these steps by checking them on
the frequency counter.
3. Select 1H SWEEP from the Operating menu.
4. Select 1H SWEEP from the Calibration menu, and then select CAL.
5. Adjust the Arrow Buttons for one cycle per major division.
6. Select CAL MENU, and then select SAVE.
7. Set the function generator frequency to 100 kHz.
8. Select 2H SWEEP from the Operating menu.
9. Select 2H SWEEP from the Calibration menu, and then select CAL.
10. Adjust the Arrow Buttons for one cycle per major division.
11. Select CAL MENU, and then select SAVE.
12. Replace the signal on the VIDEO IN connector with the output from the
leveled sine wave generator. Use the 50 W-to-75 W minimum-loss attenuator
and precision (1%) 50 W cable if the generator specifies a 50 W output.
13. Set the sine wave generator for a 1 MHz output.
14. Select MAG ON from the Operating menu.
15. Select MAG GAIN from the Calibration menu, and then select CAL.
16. Adjust the Arrow Buttons for one cycle per major division.
17. Select CAL MENU, and then select SAVE.
18. Select MAG OFF from the Operating menu.
19. Replace the signal on the VIDEO IN connector with a 75% color bar signal
from the television signal generator, using a 75 W in-line terminator.
20. Select 2F SWEEP from the Operating menu.
21. Select 2F SWEEP from the Calibration menu, and then select CAL.
Sweep Timing and
Horizontal Mag
Registration

Adjustment Procedures
5–6 WFM 90 and WFM 91 Service Manual
22. Adjust the Arrow Buttons for a sweep length of 12 major divisions.
23. Select CAL MENU, and then select SAVE.
24. Select 2H SWEEP from the Operating menu.
25. Select MAG REG from the Calibration menu, and then select CAL.
26. Select POS, and then use the Arrow Buttons to position the falling edge of
sync to the center graticule tick mark.
27. Select MAG ON, and then select MAG REG.
28. Adjust the Arrow Buttons to reposition the falling edge of sync to the center
graticule tick mark.
29. Select MAG OFF.
30. Select CAL MENU, and then select SAVE.
Perform the following steps to adjust the vertical gain and X5 gain registration:
1. Replace the signal on the VIDEO IN connector with the output from the
VAC. Do not terminate the input.
2. Set the VAC for a 999.9 mV output with all of the buttons out except +LUM
and NTSC (PAL button for the WFM 91).
3. Select X1 GAIN from the Calibration menu, and then select CAL.
4. Adjust the Arrow Buttons for a display amplitude of exactly 140 IRE
(1000 mV PAL).
5. Select CAL MENU, and then select SAVE.
6. Set the VAC for a 199.9 mV output.
7. Select X5 GAIN from the Operating menu.
8. Select X5 GAIN from the Calibration menu, and then select CAL.
9. Adjust the Arrow Buttons for a display amplitude of exactly 140 IRE
(1000 mV PAL).
10. Select CAL MENU, and then select SAVE.
11. Replace the signal on the VIDEO IN connector with a 75% color bar signal
from the television signal generator, using a 75 W in-line terminator.
12. Select X5 POS from the Calibration menu, and then select CAL.
13. Select X1 GAIN, and then position the signal baseline to the graticule
baseline.
Vertical Gain and X5 Gain
Registration

Adjustment Procedures
WFM 90 and WFM 91 Service Manual 5–7
14. Select X5 GAIN from the Calibration menu, and then select X5 POS.
15. Adjust the Arrow Buttons to reposition the signal baseline back to the
graticule baseline.
16. Select X1 GAIN from the Calibration menu.
17. Select CAL MENU, and then select SAVE.
18. Remove the signal and terminator from the VIDEO IN connector.
Perform the following steps to adjust the frequency response:
1. Connect a 50 W precision cable from the output of the leveled sine wave
generator to the dual-input coupler using a 50 W-to-75 W minimum loss
attenuator.
2. Connect one side of the dual-input coupler to the VIDEO IN connector.
3. Connect the 015-0413-00 Peak-to-Peak Detector Head to the other end of the
dual-input coupler, using the female-to-female BNC connector.
4. Connect the other end of the Peak-to-Peak Detector Head to the 015-0408-00
Peak-to-Peak Detector + Input.
5. Connect the peak-to-peak detector Output to the digital multimeter, or an
oscilloscope.
6. Select EXT REF from the Configuration menu.
7. Set the leveled sine wave generator frequency to 50 kHz and adjust the
generator amplitude for exactly 100 IRE (700 mV PAL) of display.
8. Adjust the peak-to-peak detector Plus amplifier and input control until the
green LED is on.
9. Note the digital multimeter readout level or the oscilloscope dc level.
10. Set the sine wave generator frequency to 3.58 MHz (4.43 MHz PAL).
11. Adjust the amplitude of the sine wave generator so that the digital multime-
ter readout, or oscilloscope level, matches that noted in step 9.
12. Select X1 FREQ from the Calibration menu, and then select CAL.
13. Adjust the Arrow Buttons for a display amplitude of exactly 100 IRE
(700 mV PAL).
14. Select CAL MENU, and then select SAVE.
15. Select X5 GAIN from the Operating menu.
Frequency Response

Adjustment Procedures
5–8 WFM 90 and WFM 91 Service Manual
16. Set the leveled sine wave generator frequency to 50 kHz, and adjust the
generator amplitude for exactly 100 IRE (700 mV PAL) of display.
17. Adjust the peak-to-peak detector Plus amplifier and input control fully
counterclockwise.
18. Note the digital multimeter readout level or the oscilloscope dc level.
19. Set the sine wave generator frequency to 3.58 MHz (4.43 MHz PAL).
20. Adjust the amplitude of the sine wave generator so that the digital multime-
ter readout, or oscilloscope level, matches that noted in step 18.
21. Select X5 FREQ from the Calibration menu, and then select CAL.
22. Adjust the Arrow Buttons for a display amplitude of exactly 100 IRE
(700 mV PAL).
23. Select CAL MENU, and then select SAVE.
24. Select X1 GAIN from the Operating menu, and INT REF from the
Configuration menu.
Perform the following steps to adjust the vector quadrature phase:
1. Replace the signal on the VIDEO IN connector with a 75% color bar signal
from the television signal generator using a 75 W in-line terminator.
2. Select VECTOR display mode.
3. WFM 91 ONLY — Select ALT ON from the Configuration menu.
4. Select QUAD PH from the Calibration menu, select CAL, and then select
RY OFFSET.
5. Adjust the Arrow Buttons for the best center dot overlay.
6. Select QUAD PH.
7. Adjust the Arrow Buttons for the best circle overlay.
8. Select CAL MENU, and then select SAVE.
9. WFM 91 ONLY — Select ALT OFF from the Configuration menu.
Vector Quadrature Phase

Adjustment Procedures
WFM 90 and WFM 91 Service Manual 5–9
Perform the following steps to adjust the vector gain and X5 gain phase:
a. WFM 90 ONLY — Verify that the television signal generator has setup
turned on.
b. Select VEC GAIN from the Calibration menu, select CAL, and then
select TEST ON.
c. Adjust the Y and B buttons so that the vector dots land in the center of
the red and cyan graticule target boxes. See Figure 5–1.
d. Adjust the A and " buttons so that the vector dots land in the center of
the yellow and blue graticule target boxes. See Figure 5–1.
Yellow
Cyan
Blue
Blue
Figure 5–1: NTSC graticule showing the vector gain adjustment
e. Select CAL MENU, and then select SAVE.
f. Select X5 PHASE from the Calibration menu, and then select CAL.
g. Select PHASE then use the Arrow Buttons to position the burst vector
exactly on the 180_ graticule line.
h. Select X5 GAIN, and then select X5 PHASE.
i. Adjust the Arrow Buttons so that the burst vector lands exactly on the
180_ graticule line.
j. Select CAL MENU, and then select SAVE.
Vector Gain and X5 Gain
Phase

Adjustment Procedures
5–10 WFM 90 and WFM 91 Service Manual
Perform the following steps to adjust the audio gain:
1. Connect the output from the audio generator to the AUDIO IN connector.
2. Set the audio generator for a 1 kHz tone output with an amplitude of
+8.0 dBu. Select Signal On from the audio generator.
3. Select the AUDIO display mode on the WFM 90 or WFM 91 Handheld
Waveform, Vector, Picture, and Audio Monitor.
4. Select 8 dBu from the Operating menu.
5. Select AUD GAIN from the Calibration menu, and then select CAL.
6. Adjust the Arrow Buttons so that the signal display lands exactly on the
8 dBu graticule lines.
7. Select CAL MENU, and then select SAVE.
Audio Gain

Maintenance

WFM 90 and WFM 91 Service Manual 6–1
Maintenance
This section contains instructions for servicing the WFM 90 or WFM 91
Handheld Waveform, Vector, Picture, and Audio Monitor that include the
following information:
HPreparation procedures to observe before performing maintenance
HProcedures for inspecting and cleaning the instrument
HModule removal and replacement instructions
HTroubleshooting procedures
HAfter-repair adjustments to the instrument
HRepackaging instructions to prepare the instrument for shipment
If the instrument does not function properly, troubleshooting and corrective
measures should be taken immediately to prevent additional problems.
NOTE. Contact your local Tektronix representative for information on where to
return your instrument if it requires repair during the warranty period.
Preparation
Please read and follow these preparation instructions before attempting to
perform any maintenance or service to the instrument.
Make sure of the following before beginning any instrument service:
HThe maintenance or service of this instrument must be performed by
qualified service personnel only.
HRead the Service Safety Summary located at the beginning of this manual
before attempting to perform any maintenance or service to the instrument.
HRead the Operating Information section of this manual before attempting to
perform any maintenance or service to the instrument.
Servicing Prerequisites

Maintenance
6–2 WFM 90 and WFM 91 Service Manual
This instrument contains electrical components that are susceptible to damage
from electrostatic discharge. Static voltages of 1 kV to 30 kV are common in
unprotected environments.
CAUTION. Static discharge can damage any semiconductor component in this
instrument.
Observe the following precautions to avoid static damage:
HMinimize handling of static-sensitive components.
HTransport and store static-sensitive components or assemblies in their
original containers, on a metal rail, or on conductive foam. Label any
package that contains static-sensitive assemblies or components.
HDischarge the static voltage from your body by wearing a wrist strap while
handling these components. Servicing static-sensitive assemblies or
components should only be performed at a static-free workstation by
qualified personnel.
HNothing capable of generating or holding a static charge should be allowed
on the workstation surface.
HKeep the component leads shorted together whenever possible.
HPick up components by the body, never by the leads.
HDo not slide the components over any surface.
HAvoid handling components in areas that have a floor or work surface
covering capable of generating a static charge.
HUse a soldering iron that is connected to earth ground.
HUse only special antistatic, suction-type or wick-type desoldering tools.
NOTE. A 2% RMA flux content solder is recommended for making repairs in this
instrument. Cleaning of rosin residue is not recommended. Most cleaning
solvents tend to reactivate the rosin and spread it under components where it
may cause corrosion under humid conditions. The rosin residue, if left alone,
does not exhibit these corrosive properties.
Electrostatic Damage
Prevention
Maintenance
WFM 90 and WFM 91 Service Manual 6–3
Inspection and Cleaning
Preventive maintenance consists of cleaning, visual inspection, performance
checking, and, if needed, readjustment. The preventive maintenance schedule
established for the instrument should be based on the environment in which it is
operated and the amount of use. Under average conditions, scheduled preventive
maintenance should be performed every 2000 hours of operation.
Protect this instrument from adverse weather conditions. The instrument is not
waterproof.
Do not expose the LCD display to direct sunlight for long periods of time.
CAUTION. To avoid damage to this instrument, do not expose it to sprays,
liquids, or solvents.
The instrument should be cleaned often enough to prevent dust or dirt from
accumulating. Dirt acts as a thermal insulating blanket that prevents effective
heat dissipation, and can provide high-resistance electrical leakage paths between
conductors or components in a humid environment.
Clean the exterior of the instrument by removing dust with a lint-free cloth. Use
care to avoid scratching the clear plastic display lens. A small soft-bristled brush
is useful to remove dust from around the selector buttons and connectors.
For further cleaning, use a soft cloth or paper towel dampened with water. You
can use a 75% isopropyl alcohol solution for more efficient cleaning.
CAUTION. To avoid damage to the surface of this instrument, do not use abrasive
or chemical cleaning agents.
If you must clean the interior of the instrument, allow the interior to thoroughly
dry before reassembling and applying power to the instrument.
Display Screen. The display screen is susceptible to smudging from dirt and
grease. The recommended cleaning agent is petroleum ether, which is available
from the vendor listed below:
JT Baker Inc.
Phillipsburg, NJ 08865 USA
(908) 859–2151
General Care
Cleaning

Maintenance
6–4 WFM 90 and WFM 91 Service Manual
After cleaning, carefully check the instrument for defective connections,
damaged parts, and improperly seated transistors or integrated circuits. The
remedy for most visible defects is obvious; however, if heat-damaged parts are
discovered, determine the cause of overheating before replacing the damaged
part.
Periodic checks of the transistors and integrated circuits are not recommended.
The best measure of performance is the actual operation of the component in the
circuit.
Instrument performance should be checked after each 2000 hours of operation or
every 12 months. This will help to ensure maximum performance and assist in
locating defects that may not be apparent during regular operation. Performance
Verification and Adjustment Procedures are included in this manual.
After Repair Adjustments
It is recommended that you perform the Adjustment Procedures starting on
page 5–1 whenever you have removed the Top or Bottom cover during the
service of this instrument.
Repackaging Instructions
Use the following instructions to prepare your instrument for shipment to a
Tektronix, Inc., Service Center:
1. Attach a tag to the instrument showing: the owner, complete address and
phone number of someone at your firm who can be contacted, the instrument
serial number, and a description of the required service.
2. Package the instrument in the original packaging materials. If the original
packaging materials are not available, follow these directions:
a. Obtain a carton of corrugated cardboard having inside dimensions six or
more inches greater than the dimensions of the instrument. Use a
shipping carton that has a test strength of at least 250 pounds (113.5 kg).
b. Place the instrument in its carrying pouch or surround the instrument
with a protective bag.
c. Pack dunnage or urethane foam between the instrument and the carton. If
using Styrofoam kernels, overfill the box and compress the kernels by
closing the lid. There should be three inches of tightly packed cushion-
ing on all sides of the instrument.
3. Seal the carton with shipping tape, industrial stapler, or both.
Visual Inspection
Performance Verification
and Readjustments
WFM 90 and WFM 91 Service Manual 6–5
Removal and Replacement
This section contains the instructions on how you can remove and replace the
customer replaceable modules and parts of the WFM 90 or WFM 91 Handheld
Waveform, Vector, Picture, and Audio Monitor.
CAUTION. To prevent damage to the instrument, disconnect the power adapter
and remove installed batteries from the monitor before starting disassembly. See
Batteries on page 6–21.
To prevent damage to the instrument, be sure to follow the preparation instruc-
tions on page 6–2.
Tools Required
Use the tools in Table 6–1 to disassemble the instrument to its individual
modules. Some of these tools are required only for removal of specific instru-
ment components.
Table 6–1: Tools required for module removal
Name Description
Torx screwdriver handle Accepts Torx-driver bits
T-10 Torx tip Torx-driver bit for T-10 size screw heads
#1 point Philips tip
9/16” hexagonal driver Deep socket
1/4” hexagonal driver
Flat blade screwdriver
Tweezers or needle-nose pliers
Cleaners See Cleaning on page 6–3
Soldering iron 40 W
Solder 2% RMA flux content solder

Removal and Replacement
6–6 WFM 90 and WFM 91 Service Manual
Procedures
Table 6–2 lists the removal and replacement procedures in this section and their
starting page numbers.
Table 6–2: Removal and replacement procedure list
Replaceable part Page number
Top cover 6–7
LCD display lens 6–8
LCD display 6–9
LCD display padding 6–11
Backlight 6–12
Top board 6–13
Keypad 6–13
Top board shield 6–14
Bottom board 6–16
Backlight board 6–17
Input board assembly 6–18
Battery cover 6–18
Carrying strap 6–19
Turnlock stud and bushing 6–20
Battery cushion pad 6–21
NiCad battery pack 6–21
Alkaline batteries 6–22
Bottom cover 6–23
Battery power connector 6–24
Battery contacts 6–24
Turnlock stud receptacle 6–26
Bottom cover electrical shield 6–27
Battery orientation marker and battery cushion pad 6–27
AC adapter EMI suppressor 6–29
Removal and Replacement
WFM 90 and WFM 91 Service Manual 6–7
The top cover assembly contains replaceable subparts. Procedures for removing
the subparts are included below.
Top Cover. To remove the top cover assembly, perform the following procedure:
1. Remove the six retaining screws using the Torx-tip screwdriver. See
Figure 6–1.
Remove Torx screws (6)
Figure 6–1: Removing the top cover
Top Cover Assembly

Removal and Replacement
6–8 WFM 90 and WFM 91 Service Manual
2. Gently lift the top cover off of the bottom cover.
NOTE. When you are disassembling the WFM 90 or WFM 91, do not let dust
accumulate inside of the top cover. Set the top cover face up on your work
surface or cover it with a lint-free cloth to prevent dust from accumulating on the
inside surface of the cover.
To replace the top cover assembly, perform the following procedure:
1. Make sure that the battery and backlight wires are positioned so that they
will not be pinched between the top and bottom covers.
2. Align the top cover over the bottom cover so that the keypad buttons will
slide through the top cover keypad holes.
3. Gently lower the top cover onto the bottom cover. A slight shaking motion
of the top cover may be necessary to help the keypad buttons slide through
the top cover holes.
4. Install the six retaining screws using the Torx-tip screwdriver.
LCD Display Lens. To remove the LCD display lens, perform the following
procedure:
1. Remove the top cover. Refer to Top Cover on page 6–7.
2. Press firmly on the LCD display lens from the front of the top cover until it
comes loose from the top cover.
3. Clean any remaining glue residue from the top cover. Refer to Cleaning on
page 6–3.
To replace the LCD display lens, perform the following procedure:
1. Remove the protective cover from the cushion on the new LCD display lens.
2. Align the LCD display lens with the depression in the backside of the top
cover and press the lens into place.
3. Install the top cover. Refer to Top Cover on page 6–7.
The LCD display assembly contains replaceable subparts. Procedures for
removing the subparts are included below.
CAUTION. To avoid damaging the LCD display, do not touch the face of the
display because it is hard to clean and is easily scratched.
LCD Display Assembly
Removal and Replacement
WFM 90 and WFM 91 Service Manual 6–9
LCD Display. To remove the LCD display assembly, perform the following
procedure:
1. Remove the top cover. Refer to Top Cover on page 6–7.
2. Disconnect the wires from the two backlight connectors.
3. Grasp the sides of the LCD display to lift it up off of the locating feet and
disconnect the ribbon cable from the back of the display module.
NOTE. The cable connecting the display module to the Bottom board is a zero
insertion-force ribbon cable. To remove the cable from the connector housing,
pull out the connector latch, and then pull the ribbon cable out of the connector.
See Figure 6–2.
Open slide
latch connector
to install cable.
Close latch connector
Contacts
Contacts
Figure 6–2: Installing the LCD display cable

Removal and Replacement
6–10 WFM 90 and WFM 91 Service Manual
NOTE. Some early instruments used cushion pads instead of locating feet to hold
the display module in position. If your instrument has cushion pads, replace the
pads at this time with locating feet. Contact your local Tektronix representative
to order the necessary parts.
To replace the LCD display module, perform the following procedure:
CAUTION. To avoid miscalibrating your display module, do not touch the display
adjustments on the backside of the display module. These adjustments are set by
the manufacturer and should not be adjusted.
1. If you have replaced the display module with a new one, attach the cushion
padding around the display module. Refer to Display Padding on page 6–11.
2. Connect the ribbon cable from the Bottom board into the back of the display
module.
NOTE. The cable connecting the display module to the Bottom board is a zero
insertion-force ribbon cable. To install the cable into the connector, pull out the
connector latch and then push the ribbon cable into the connector housing.
When the cable rests against the back of the connector, press in the connector
latch to lock the cable in place. See Figure 6–2.
3. If you are replacing the ribbon cable, set the LCD display just above its
resting position on the locating feet. Use your finger to crease the ribbon
cable so that when the LCD display is set down on the locating feet, the
ribbon cable does not raise the LCD display up off of the locating feet.
4. Set the LCD display module onto the four locating feet. The locating feet fit
into small holes in each of the four corners on the back of the LCD display.
See Figure 6–3.
5. Connect the backlight wires to the connectors on the side of the display
module.
6. If you have replaced the display module with a new one, carefully remove
the protective plastic cover from the face of the LCD display by prying up
the corner of the cover and pulling it off of the display.
7. If necessary, clean the front of the LCD display. Refer to Cleaning on
page 6–3.
8. Install the top cover. Refer to Top Cover on page 6–7.
Removal and Replacement
WFM 90 and WFM 91 Service Manual 6–11
Level the pad flush
with display case.
LCD locator feet (4)
Long pad
Short pad
Standoff post inserts
into LCD display case.
Figure 6–3: Installing the LCD display
LCD Display Padding. To remove the LCD display padding, perform the
following procedure:
1. Remove the top cover. Refer to Top Cover on page 6–7.
2. Remove the LCD display module. Refer to LCD Display on page 6–9.

Removal and Replacement
6–12 WFM 90 and WFM 91 Service Manual
3. Remove the display padding from the side of the LCD display module.
4. Clean any remaining glue residue from the side of the LCD display module.
Refer to Cleaning on page 6–3.
To replace the LCD display padding, perform the following procedure:
1. Peel the protective cover from the LCD display padding.
2. Align the padding with the top surface of the LCD display module and press
the padding onto the side of the display. See Figure 6–3.
3. Install the LCD display module. Refer to LCD Display on page 6–9.
4. Install the top cover. Refer to Top Cover on page 6–7.
Backlight. To remove the backlight from the LCD display module, perform the
following procedure:
1. Remove the top cover. Refer to Top Cover on page 6–7.
2. Remove the LCD display module. Refer to LCD Display on page 6–9.
3. Remove the display padding from the side of the LCD display module where
the backlight is installed.
4. Remove the two outside retaining screws on the backlight assembly with the
Philips screwdriver. Do not remove the center screw.
5. Gently pull the backlight out of the LCD display module.
To replace the backlight, perform the following procedure:
1. Install the backlight assembly into the side of the LCD display module.
CAUTION. To avoid breaking the backlight, do not force the backlight assembly
into the LCD display module.
2. Install the two retaining screws into the backlight assembly.
3. Install the display padding onto the side of the LCD display module. Refer
to LCD Display Padding on page 6–11. A new display pad is supplied with
the replacement backlight assembly.
4. Install the LCD display module. Refer to LCD Display on page 6–9.
5. Install the top cover. Refer to Top Cover on page 6–7.

Removal and Replacement
WFM 90 and WFM 91 Service Manual 6–13
The Top board assembly contains replaceable subparts. Procedures for removing
the subparts are included below.
Top Board. To remove the Top board, perform the following procedure:
1. Remove the top cover. Refer to Top Cover on page 6–7.
2. Remove the two retaining screws from the top of the Top board.
3. Gently pull on the bottom of Top board to separate it from the Bottom board.
4. If you are replacing the Top board, remove the keypad from the Top board.
Refer to Keypad on page 6–13.
To replace the Top board, perform the following procedure:
1. Install the keypad if you have replaced the Top board. Refer to Keypad on
page 6–13.
2. Gently press on the bottom of the Top board to insert the Top board
connector into the Bottom board connector.
3. Be sure that the circuit board shield is properly aligned. Refer to Top Board
Shield on page 6–14.
4. Install the two retaining screws into the top of the Top board.
5. Install the top cover. Refer to Top Cover on page 6–7.
Keypad. To remove the keypad, perform the following procedure:
1. Remove the top cover. Refer to Top Cover on page 6–7.
2. Remove the Top board. Refer to Top Board on page 6–13.
3. Gently pull the keypad from the Top board.
To replace the keypad, perform the following procedure:
1. Press the nubs on the keypad through the holes in the Top board.
2. Use tweezers or needle-nose pliers from the backside of the Top board to
pull the nubs of the keypad through the Top board. See Figure 6–4.
Top Board Assembly
Removal and Replacement
6–14 WFM 90 and WFM 91 Service Manual
Pull nub
through board
with tweezers
Keypad
Top board
Figure 6–4: Installing the keypad
3. Install the Top board. Refer to Top Board on page 6–13.
4. Install the top cover. Refer to Top Cover on page 6–7.
Top Board Shield. To remove the Top board shield, perform the following
procedure:
1. Remove the top cover. Refer to Top Cover on page 6–7.
2. Remove the two retaining screws from the top of the Top board.
3. Slide the Top board shield out from under the Top board.
To replace the Top board shield, perform the following procedure:
1. If you are replacing the Top board shield, bend the tab on the shield as
shown in Figure 6–5.
Removal and Replacement
WFM 90 and WFM 91 Service Manual 6–15
Lift up the board to slip the
shield underneath the top board.
Shield
Fold tab
The shield tab goes on
top of the board post
and under the circuit
board.
Figure 6–5: Installing the Top board shield
2. Slide the shield under the Top board and align the cutouts in the shield with
the mounting posts of the Top board.
NOTE. Be sure to properly align the tab of the Top board shield so that the tab is
under the Top board and that the Top board retaining screw goes through the
tab. Failure to do this will result in noisy display graphics. See Figure 6–5.
3. Install the two retaining screws into the top of the Top board.
4. Install the top cover. Refer to Top Cover on page 6–7.

Removal and Replacement
6–16 WFM 90 and WFM 91 Service Manual
To remove the Bottom board, perform the following procedure:
1. Remove the top cover. Refer to Top Cover on page 6–7.
2. Remove the LCD display module. Refer to LCD Display on page 6–9.
3. Remove the Top board. Refer to Top Board on page 6–13.
4. Remove the battery cover. Refer to Battery Cover on page 6–18.
5. Lift on the Bottom board while you press on the battery connector in the
battery compartment.
6. Gently pull the Backlight board from the back of the Bottom board.
7. Gently pull the Input board assembly from the back of the Bottom board.
To replace the Bottom board, perform the following procedure:
1. Install the Input board into the back of the Bottom board.
2. Install the Backlight board into the back of the Bottom board.
3. Align the Backlight and Input boards with the slots in the bottom cover and
gently slide the boards into the bottom cover. See Figure 6–6.
4. Install the Top board. Refer to Top Board on page 6–13.
5. Install the LCD display module. Refer to LCD Display on page 6–9.
6. Install the top cover. Refer to Top Cover on page 6–7.
7. Install the battery cover. Refer to Battery Cover on page 6–18.
Bottom Board
Removal and Replacement
WFM 90 and WFM 91 Service Manual 6–17
Align the Backlight and
Input boards into the
slots of the bottom cover
Backlight
board
Input board
assembly
Figure 6–6: Installing the Bottom board
To remove the Backlight board, perform the following procedure:
1. Remove the top cover. Refer to Top Cover on page 6–7.
2. Remove the battery cover. Refer to Battery Cover on page 6–18.
3. Lift on the Bottom board while pressing on the battery connector in the
battery compartment.
4. Gently pull the Backlight board from the back of the Bottom board.
To replace the Backlight board, perform the following procedure:
1. Be sure that the Backlight board shield is in place if you have replaced the
Backlight board.
2. Install the Backlight board into the back of the Bottom board.
3. Align the Backlight and Input boards with the slots in the bottom cover and
gently slide the boards into the bottom cover.
Backlight Board

Removal and Replacement
6–18 WFM 90 and WFM 91 Service Manual
4. Install the Top board. Refer to Top Board on page 6–13.
5. Install the LCD display module. Refer to LCD Display on page 6–9.
6. Install the top cover. Refer to Top Cover on page 6–7.
7. Install the battery cover. Refer to Battery Cover on page 6–18.
To remove the Input board, perform the following procedure:
1. Remove the top cover. Refer to Top Cover on page 6–7.
2. Remove the battery cover. Refer to Battery Cover on page 6–18.
3. Lift on the Bottom board while you press on the battery connector in the
battery compartment.
4. Gently pull the Input board assembly from the back of the Bottom board.
5. Unscrew the retaining nuts from the three BNC connectors on the rear panel.
6. Pull the rear panel cover off of the BNC connectors.
To replace the Input board, perform the following procedure:
1. Install the rear panel cover over the BNC connectors on the Input board.
2. Install the retaining nuts onto the three BNC connectors on the rear panel.
3. Install the Input board assembly onto the back of the Bottom board.
4. Align the Backlight and Input boards with the slots in the bottom cover and
gently slide the boards into the bottom cover.
5. Install the top cover. Refer to Top Cover on page 6–7.
6. Install the battery cover. Refer to Battery Cover on page 6–18.
The battery cover assembly contains replaceable subparts. Procedures for
removing the subparts are included below.
Battery Cover. To remove the battery cover assembly, perform the following
procedure:
1. Turn the turnlock stud 1/4-turn counterclockwise.
2. Pull outwards on the upper portion of the battery cover.
Input Board Assembly
Battery Cover Assembly
Removal and Replacement
WFM 90 and WFM 91 Service Manual 6–19
To replace the battery cover assembly, perform the following procedure:
1. Place the lower lip of the battery cover into the instrument housing and press
the top portion of the cover into the instrument. See Figure 6–7.
Battery Cover
Figure 6–7: Installing the battery cover
2. Secure the battery cover by turning the turnlock stud 1/4-turn clockwise.
Carrying Strap. To remove the carrying strap, perform the following procedure:
1. Remove the battery cover. Refer to Battery Cover on page 6–18.
2. To remove the carrying strap, remove the two retaining nuts on the inside of
the battery cover and pull the carrying strap off of the cover.
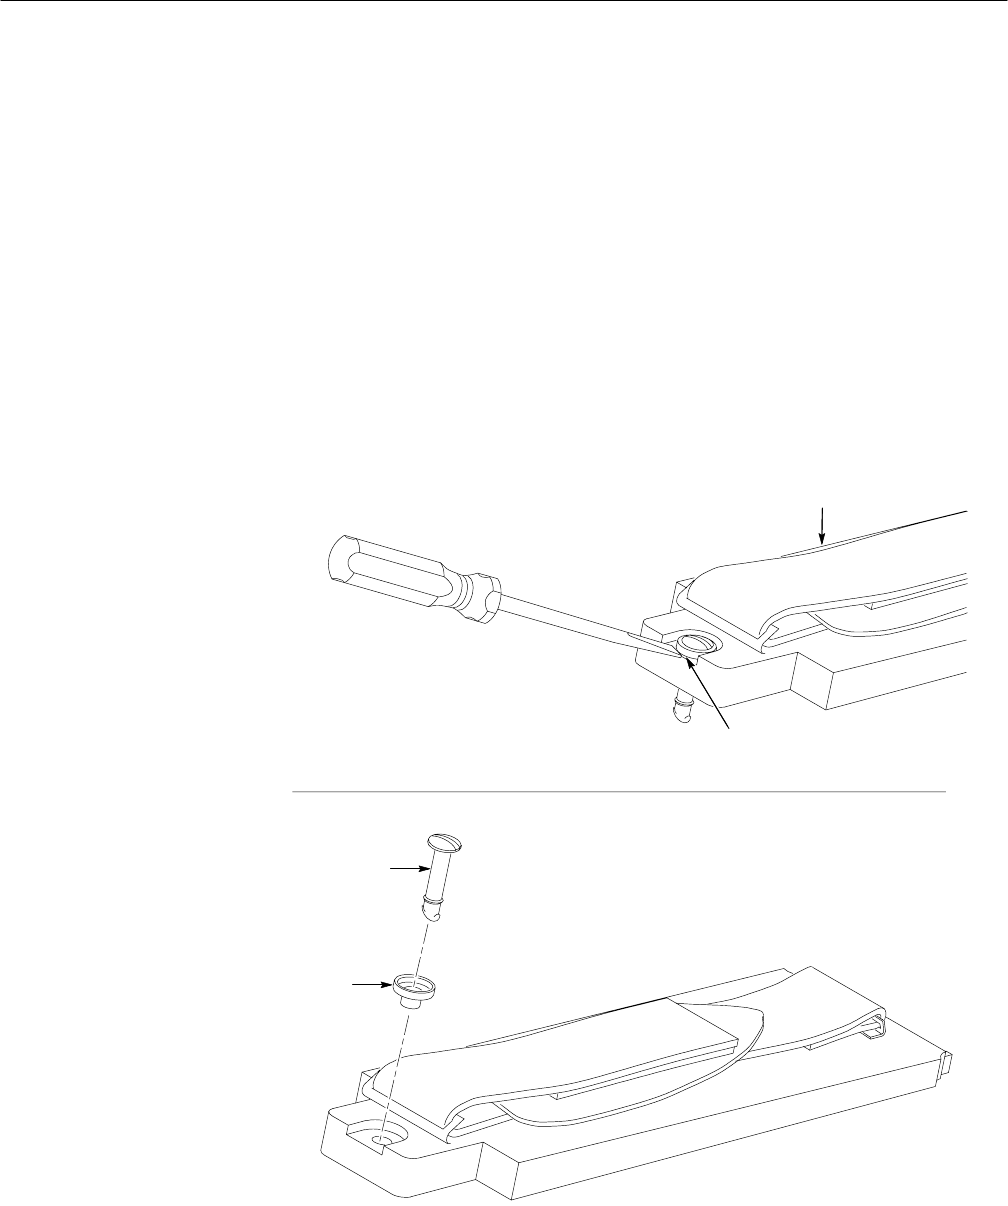
Removal and Replacement
6–20 WFM 90 and WFM 91 Service Manual
To replace the carrying strap, perform the following procedure:
1. Insert the two standoff studs of the carrying strap through the battery cover
and install the two retaining nuts.
2. Install the battery cover. Refer to Battery Cover on page 6–18.
Turnlock Stud and Bushing. To remove the turnlock stud and bushing, perform
the following procedure:
1. Remove the battery cover. Refer to Battery Cover on page 6–18.
2. Gently pry up on the outside portion of the bushing as shown in Figure 6–8.
3. Gently pull and rock the turnlock stud while holding the bushing.
Bushing
Bushing
Turnlock
Battery Cover
Figure 6–8: Removal and replacement of the turnlock stud

Removal and Replacement
WFM 90 and WFM 91 Service Manual 6–21
To replace the turnlock stud and bushing, perform the following procedure:
1. Press the turnlock stud into the bushing.
2. To install the turnlock stud and bushing into the battery cover, press firmly
on the turnlock stud head. Be sure to keep the bushing head level with the
battery cover while you press on the turnlock stud. The bushing will snap
into place when it is correctly installed.
3. Install the battery cover. Refer to Battery Cover on page 6–18.
Battery Cushion Pad. To remove the battery cushion pad, perform the following
procedure:
1. Remove the battery cover. Refer to Battery Cover on page 6–18.
2. To remove the cushion pad, pry it up around the edges and pull it off of the
battery cover.
3. If necessary, clean the surface of the cushion pad to remove any remaining
glue residue. See Cleaning on page 6–3.
To replace the battery cushion pad, perform the following procedure:
1. Peel off the protective covering of the adhesive surface of the cushion pad.
2. Position the cushion pad in place above the battery cover before you press it
onto the battery cover. Rub your fingers over the pad once it is positioned on
the battery cover to make sure the pad is securely in place.
3. Install the battery cover. Refer to Battery Cover on page 6–18.
There are two procedures for replacing the batteries. The first is for the optional
NiCad battery pack and second is for alkaline batteries.
NiCad Battery Pack. To remove the NiCad battery pack, perform the following
procedure:
1. Remove the battery cover. Refer to Battery Cover on page 6–18.
2. Grasp the batteries close to the wire leads. Use your thumb to press in on the
top portion of the battery connector tab, and then pull gently upwards. See
Figure 6–9.
Batteries
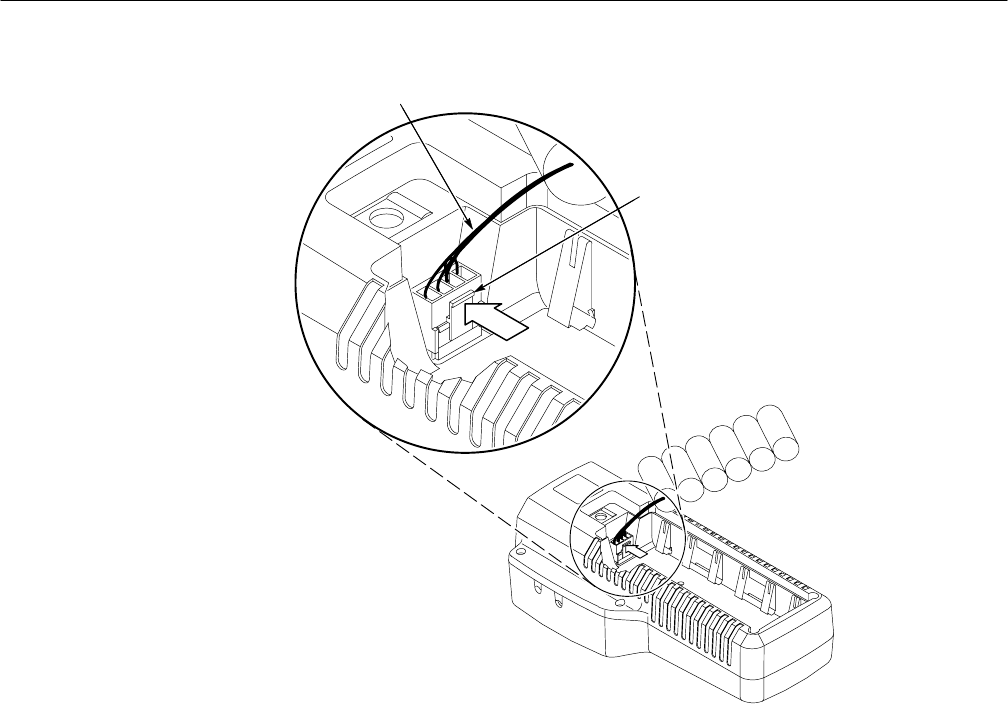
Removal and Replacement
6–22 WFM 90 and WFM 91 Service Manual
Press
Grasp wire
Figure 6–9: Removing the NiCad battery pack
To replace the NiCad battery pack, perform the following procedure:
1. Press the battery connector onto the jumper in the battery compartment. Be
sure the battery connector tab snaps onto the jumper housing to prevent a
loss of battery power.
2. Install the battery cover. Refer to Battery Cover on page 6–18.
Alkaline Batteries. To remove the C-size alkaline batteries, perform the following
procedure:
1. Remove the battery cover. Refer to Battery Cover on page 6–18.
2. Carefully pull the batteries out of the battery compartment.
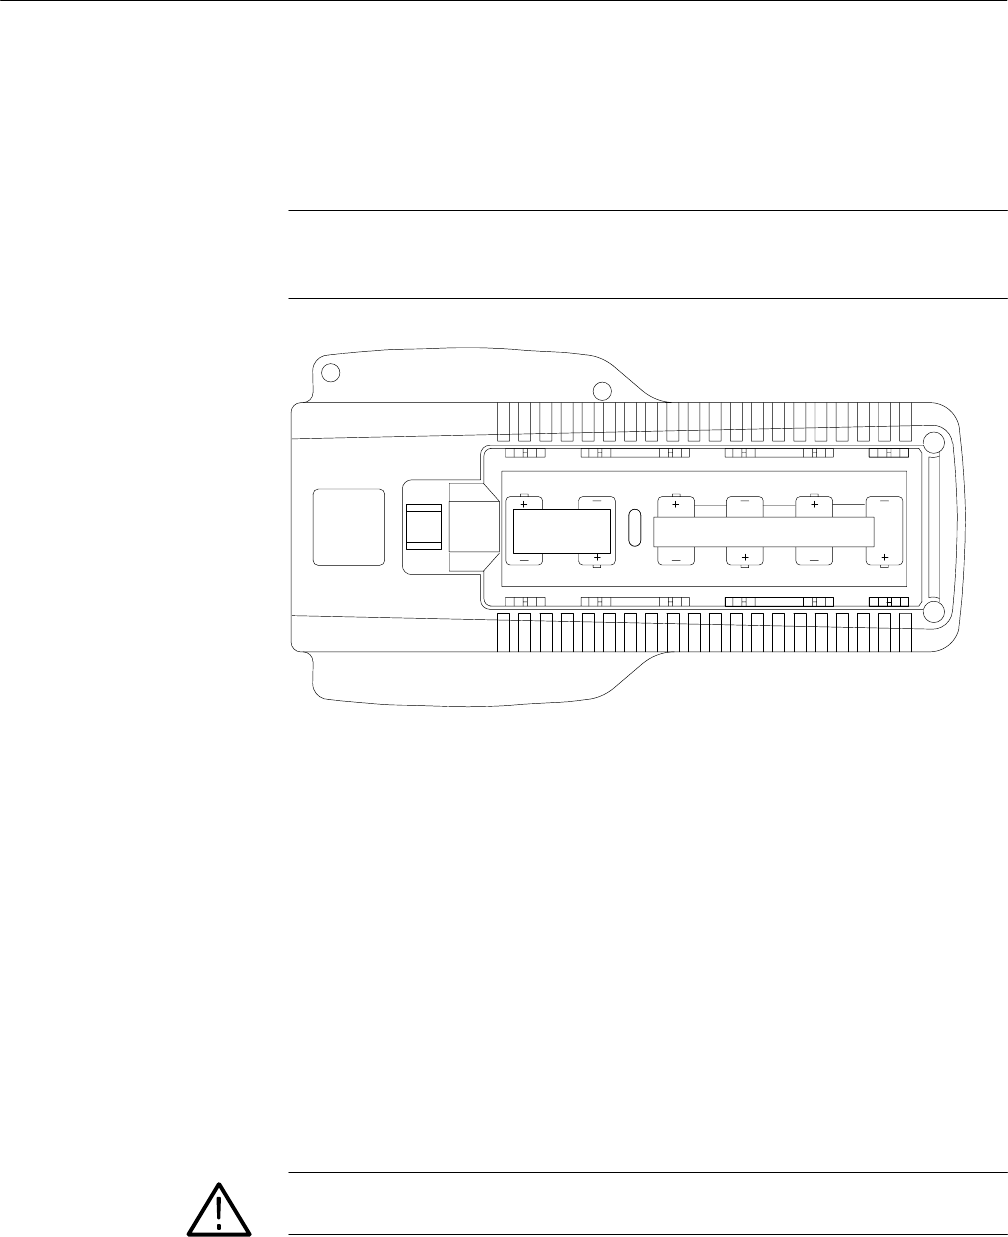
Removal and Replacement
WFM 90 and WFM 91 Service Manual 6–23
To replace the C-size alkaline batteries, perform the following procedure:
1. Press the batteries into place according to the polarity label on the bottom of
the battery compartment. See Figure 6–10.
NOTE. The polarity of the alkaline batteries must be correct for the instrument to
operate. Always replace all of the alkaline batteries at the same time when
replacing discharged batteries.
Figure 6–10: Installed polarity of alkaline batteries
2. Install the battery cover. Refer to Battery Cover on page 6–18.
The bottom cover assembly contains replaceable subparts. Procedures for
removing and installing the subparts are included below.
Bottom Cover. To remove the bottom cover, perform the following procedure:
1. Remove any installed batteries. Refer to Batteries on page 6–21.
2. Remove the six Torx screws from the bottom cover.
3. Carefully remove the bottom cover and place it beside the top cover.
CAUTION. To prevent damage to the battery-power wires soldered to the bottom
cover, carefully remove the bottom cover
Bottom Cover Assembly

Removal and Replacement
6–24 WFM 90 and WFM 91 Service Manual
4. Lift the Bottom board slightly out of the top cover so that you can pull the
battery-power wires from jumper J21 of the Bottom board. See Figure 6–12.
To replace the bottom cover, perform the following procedure:
1. Lift the Bottom board slightly out of the top cover so that you can connect
the battery-power wires onto jumper J21 of the Bottom board.
2. Carefully place the bottom cover onto the top cover.
CAUTION. To prevent damage to the battery-power or backlight wires, carefully
replace the bottom cover. The bottom cover has slots in the molded plastic to
hold both the Backlight board and Input board in place.
3. Install the six Torx screws into the bottom cover.
4. Install your removed batteries. Refer to Batteries on page 6–21.
Battery Power Connector. To remove the battery power connector, perform the
following procedure:
1. Remove the bottom cover. Refer to Bottom Cover on page 6–23.
2. Unsolder the battery connector wires from the battery contacts.
To replace the battery power connector, perform the following procedure:
1. Solder the battery power connector wires to the battery contacts. See
Figure 6–12.
2. Install the bottom cover. Refer to Bottom Cover on page 6–23.
Battery Contacts. To remove the battery contacts, perform the following
procedure:
1. Remove the bottom cover. Refer to Bottom Cover on page 6–23.
2. To remove one of the battery contacts that has the battery power connector
soldered to it, unsolder the battery connector wire before you remove the
battery contact.
3. Pry the battery contact past the retaining lip on the bottom cover. See
Figure 6–11.
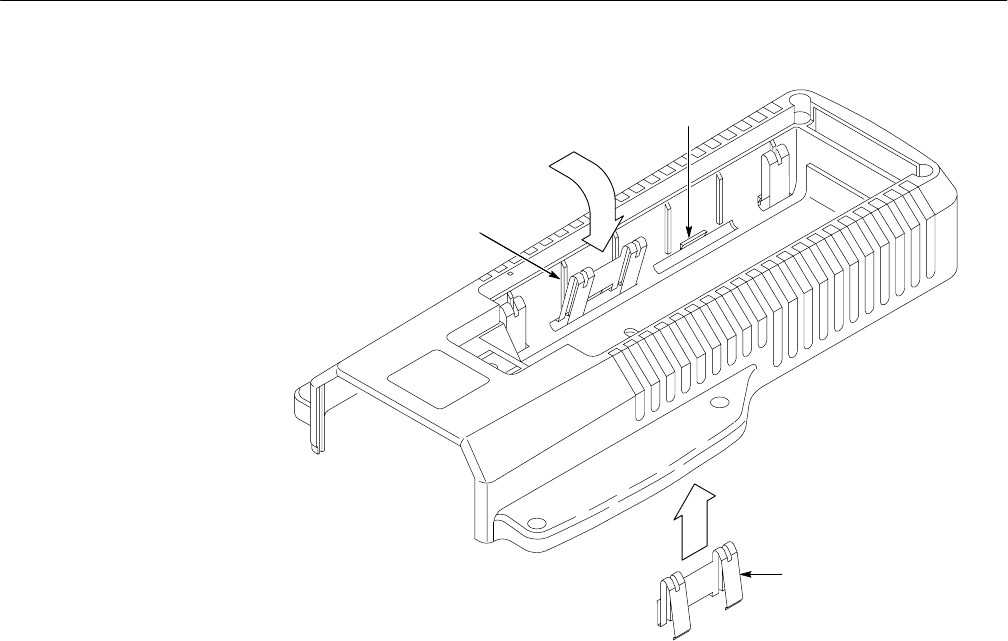
Removal and Replacement
WFM 90 and WFM 91 Service Manual 6–25
Alignment ridge
Retaining lip
Battery contacts
Figure 6–11: Battery contact installation alignment
4. Push the battery contact through the slot on the bottom cover.
To replace the battery contacts, perform the following procedure:
1. Align the slot in the battery contact with the battery contact alignment ridge
on the bottom cover. See Figure 6–11.
2. Push the battery contact through the slot in the bottom cover until the battery
contact snaps past the retaining lip of the bottom cover.
3. If you replaced one of the battery contacts that had the battery-power wires
soldered to it, resolder the battery connector wire to the battery contact. See
Figure 6–12.
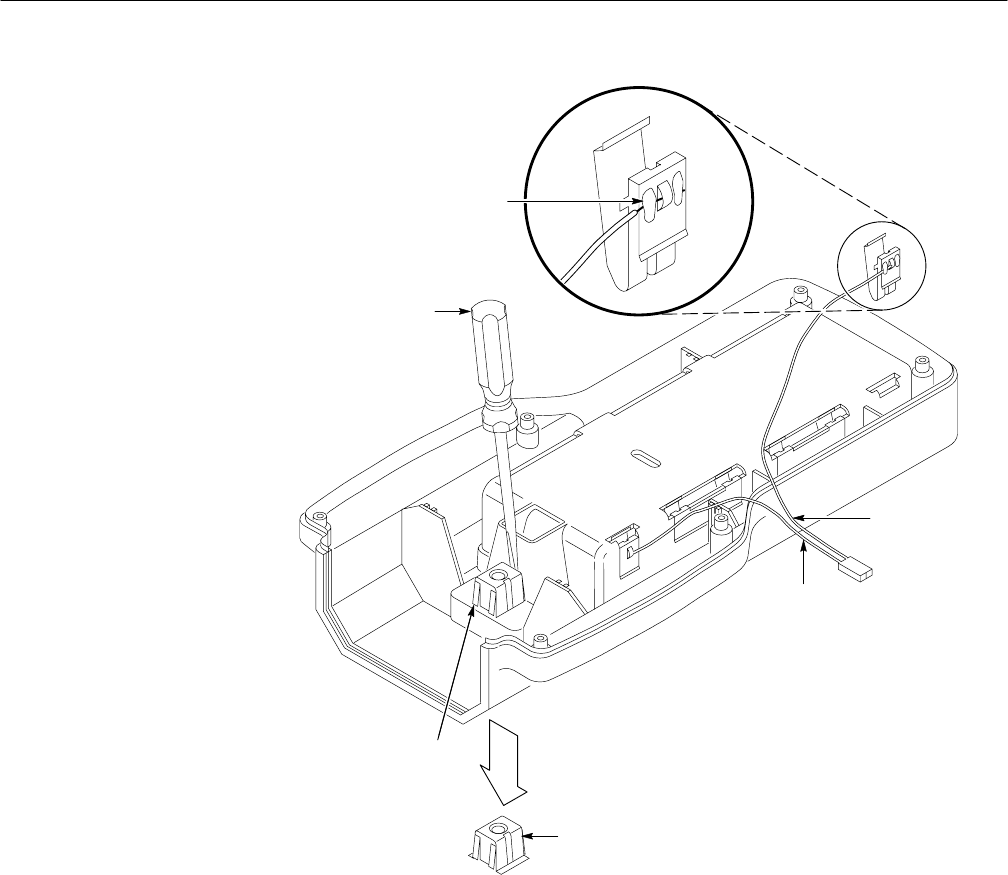
Removal and Replacement
6–26 WFM 90 and WFM 91 Service Manual
Depress receptacle
prongs
Turnlock stud receptacle
Black wire
Red wire
Solder only this side
Receptacle
prongs
Figure 6–12: Battery power-wire and turnlock stud receptacle installation
4. Install the bottom cover. Refer to Bottom Cover on page 6–23.
Turnlock Stud Receptacle. To remove the turnlock stud receptacle, perform the
following procedure:
1. Remove the bottom cover. Refer to Bottom Cover on page 6–23.
2. Depress the retaining fingers on the turnlock stud receptacle and push the
receptacle through the bottom cover. See Figure 6–12.

Removal and Replacement
WFM 90 and WFM 91 Service Manual 6–27
To replace the turnlock stud receptacle, perform the following procedure:
1. Push the turnlock stud receptacle through the bottom cover. Be sure the
retaining fingers snap into position. See Figure 6–12.
2. Install the bottom cover. Refer to Bottom Cover on page 6–23.
Bottom Cover Electrical Shield. Remove the electrical shield by performing the
following procedure:
1. Remove the bottom cover. Refer to Bottom Cover on page 6–23.
2. Pry up the electrical shield on the inside of the bottom cover around the
edges and peel it off of the bottom cover.
3. If necessary, clean the surface of the bottom cover to remove any remaining
glue residue.
To replace the electrical shield, perform the following procedure:
1. Peel off the protective covering of the adhesive surface of the electrical
shield.
2. Position the electrical shield in place above the inside of the bottom cover
before you press it onto the bottom cover. Be sure to align the hole in the
shield with the hole in the bottom cover.
3. Rub your fingers over the shield once it is positioned on the bottom cover to
make sure the pad is securely in place.
4. Install the bottom cover. Refer to Bottom Cover on page 6–23.
Battery Orientation Marker and Battery Cushion Pad. To remove the battery
orientation marker and/or the battery cushion pad, perform the following
procedure:
1. Remove the battery cover. Refer to Battery Cover on page 6–18.
2. To only remove the battery orientation marker, pry it up around the edges
and peel it off of the battery cushion pad on the bottom cover.
3. To remove both the battery orientation marker and the battery cushion pad,
pry the battery cushion pad up around the edges, and peel it off of the bottom
cover.
4. If necessary, clean the surface of the battery cushion pad or the bottom cover
to remove any remaining glue residue. Refer to Cleaning on page 6–3.

Removal and Replacement
6–28 WFM 90 and WFM 91 Service Manual
To replace the battery orientation marker and/or the battery cushion pad, perform
the following procedure:
1. To replace the battery cushion pad and the battery orientation marker, peel
off the protective covering of the adhesive surface of the battery cushion pad.
2. Position the battery cushion pad in place above the bottom cover before you
press it onto the bottom cover. See Figure 6–13.
3. Rub your fingers over the battery cushion pad once it is positioned on the
bottom cover to make sure the pad is securely in place.
Battery orientation
marker
Battery cushion
pad
Line up holes to aid
positioning
Figure 6–13: Battery orientation marker position
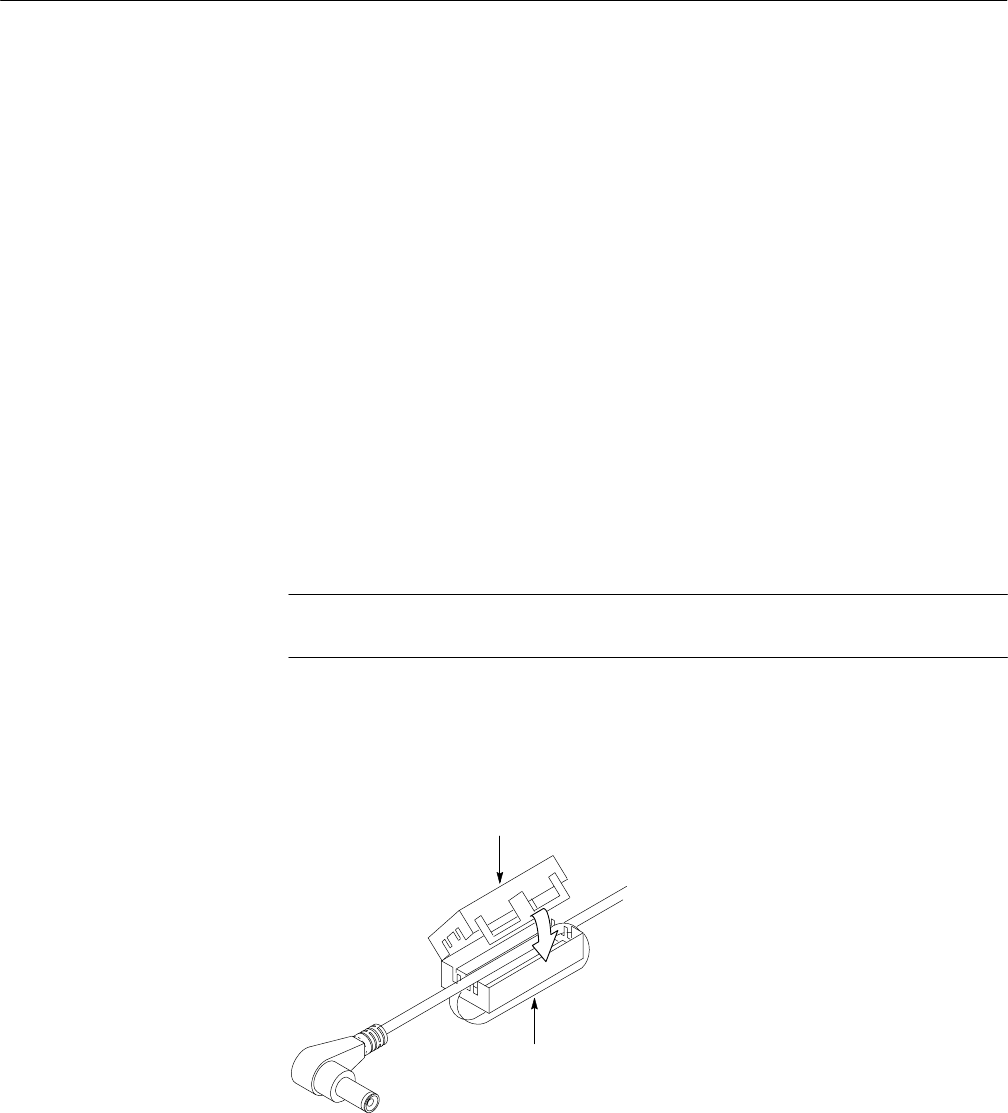
Removal and Replacement
WFM 90 and WFM 91 Service Manual 6–29
4. Peel off the protective covering of the adhesive surface of the battery
orientation marker.
5. Position the battery orientation marker in place above the battery cushion
pad before you press it onto the battery cushion pad. See Figure 6–13.
6. Rub your fingers over the battery orientation marker once it is positioned on
the battery cushion pad to make sure the marker is securely in place.
7. Install the battery cover. Refer to Battery Cover on page 6–18.
To remove the AC adapter EMI suppressor, perform the following procedure:
1. Release the retaining latches on the side of the EMI suppressor.
2. Pull the AC adapter cord from the EMI suppressor.
To replace the AC adapter EMI suppressor, perform the following procedure.
1. Place the EMI suppressor within 12 inches of the end of the adapter cord.
NOTE. The EMI suppressor is most effective when placed close to the end of the
AC adapter cord.
2. Loop the AC adapter cord through the middle of the EMI suppressor. Close
the EMI suppressor until the sides of the suppressor latch together. See
Figure 6–14.
Loop the cord
through once
EMI suppressor
Figure 6–14: Installing the EMI suppressor
AC Adapter EMI
Suppressor

Removal and Replacement
6–30 WFM 90 and WFM 91 Service Manual

WFM 90 and WFM 91 Service Manual 6–31
Troubleshooting Procedures
This section contains the following information starting on the listed pages:
HList of equipment required to perform the procedures, this page
HBattery-fault analysis, page 6–32
HLow-voltage power supply, page 6–34
HFault symptom table, page 6–35
HTroubleshooting flowcharts, page 6–36
HConnector pin locator diagram, page 6–50
Equipment Required
The following equipment and accessory items are required to perform the
Troubleshooting Procedures. Minimum requirement specifications are followed
by an example of equipment that meet these specifications.
Table 6–3: Equipment required for troubleshooting
Equipment Description Minimum Requirements Equipment Example
Television test signal generator 75% color bar and 100% flat field test signals for
the television standard of the monitor to be
tested
NTSC: Tektronix TSG 100;
PAL: Tektronix TSG 111
Audio generator Amplitude Range: –10 dBu to 8 dBu;
Frequency: 1 kHz to 50 kHz Tektronix ASG 100 Audio Signal Generator
Oscilloscope 100 MHz Tektronix 1465B
Picture monitor Composite video for the television standard of
the monitor to be tested
75 Wcoaxial cable Two cables required, male-to-male BNC
connectors Tektronix part number 012-0159-00 (42-inch)
Circuit board vise
Test resistor Two 30 W, 3 W Tektronix part number 308-0142-00
Test resistor 10 kW, 2 W Tektronix part number 305-0103-00
Jumper wires Three, 8 inch 20 AWG
12 V power supply Tektronix PS282
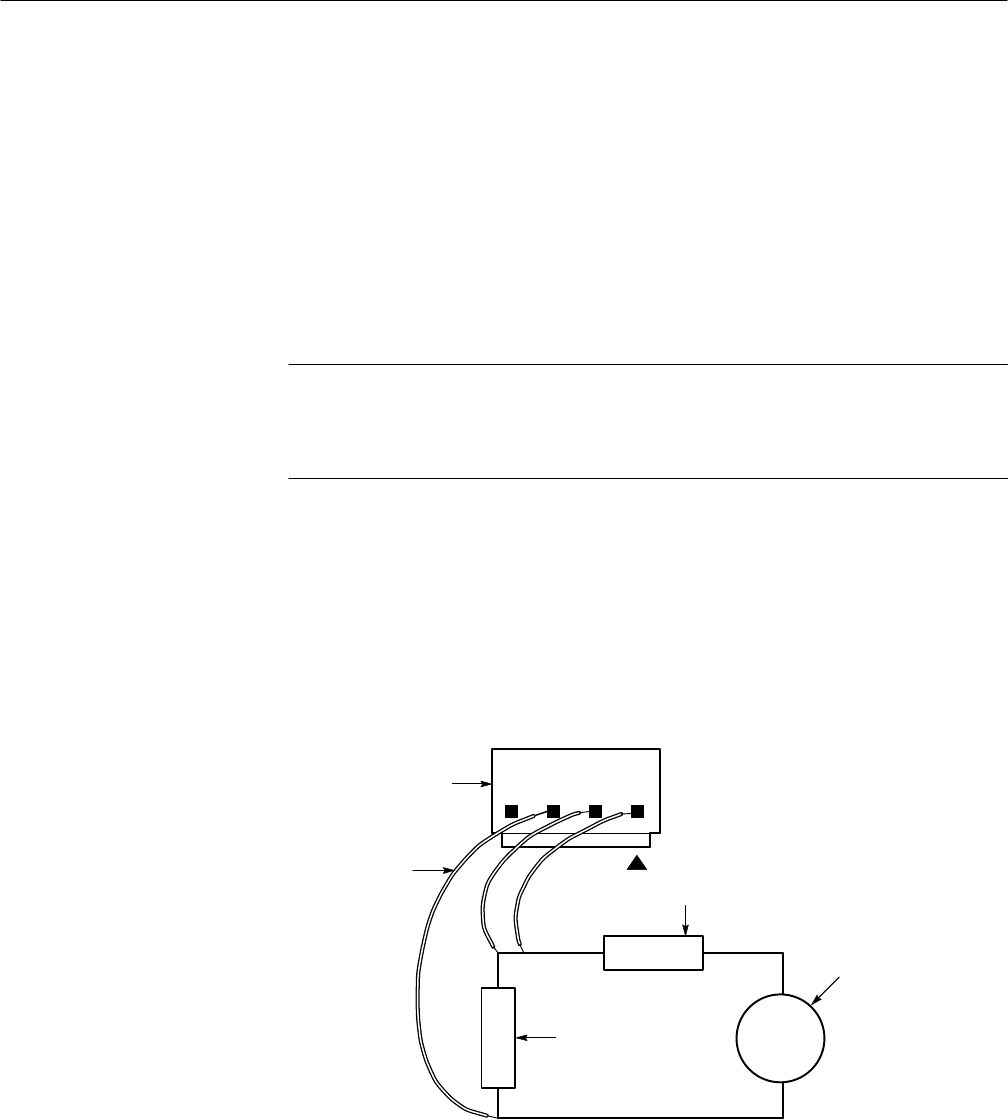
Troubleshooting Procedures
6–32 WFM 90 and WFM 91 Service Manual
Battery-Fault Analysis
Use this procedure to troubleshoot battery or battery charging problems when the
instrument functions properly when powered by the AC adapter. If there are no
battery problems or if the instrument does not function properly with the AC
adapter, go to Low-Voltage Power Supply on page 6–35.
Use the following procedure to determine if the battery charger circuit is
operating properly:
NOTE. The battery-charging circuit in the WFM 90 (SN B011362 and below) and
the WFM 91 (SN B010470 and below) will not charge a completely discharged
battery. The battery must have at least +4 V charge across the battery connector
before the charging circuit will operate.
1. Remove the AC adapter from the WFM 90 or WFM 91 Handheld Wave-
form, Vector, Picture, and Audio Monitor.
2. Remove the battery cover and any installed batteries from the instrument.
See Batteries on page 6–21.
3. Use three jumper wires to connect two 30 W, 3 W resistors and an external
+12 VDC power supply to the battery connector pins. See Figure 6–15.
Battery connector
+
–
+12V
Test resistor #2
Test resistor #1
External power supply
Jumper wires (3)
Figure 6–15: Testing the battery charging circuit – WFM 90 SN B011362 and below;
WFM 91 SN B010470 and below
WFM 90 SN B011362
and Below;
WFM 91 SN B010470
and Below
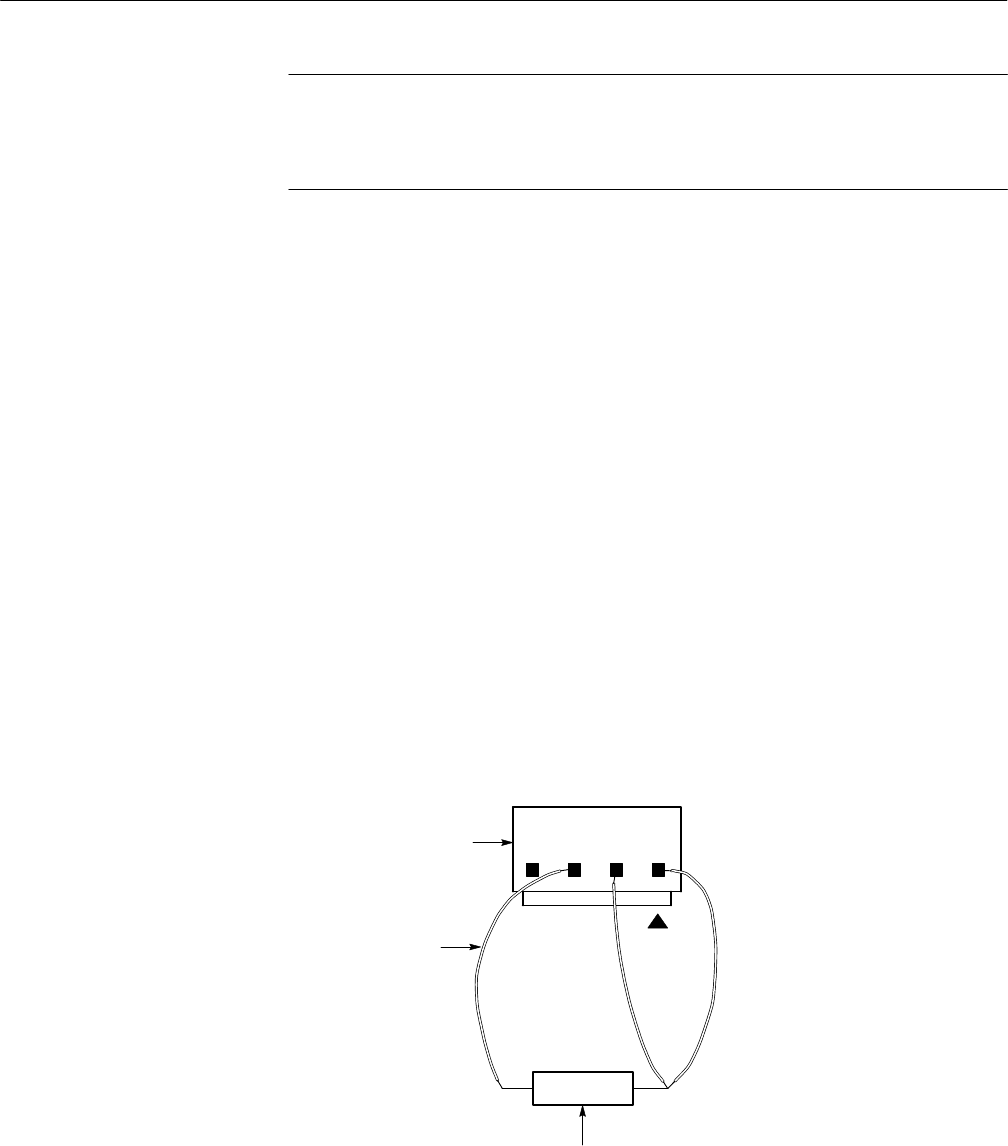
Troubleshooting Procedures
WFM 90 and WFM 91 Service Manual 6–33
NOTE. If the jumper wires will not stay securely attached to the battery connector
pins, you will need to remove the instrument bottom case to obtain access to the
battery connector pins on the Bottom board. Refer to Bottom Cover on
page 6–23.
4. Attach the voltmeter across test resistor #1 in Figure 6–15.
5. Connect the AC adapter to the WFM 90 or WFM 91 Handheld Waveform,
Vector, Picture, and Audio Monitor.
6. Check for a voltage reading of +8 to +9 VDC on the voltmeter with the
instrument turned on or off.
7. If the voltage reading in the previous step was correct, replace the batteries.
If the voltage reading was incorrect, replace the Bottom board.
Use the following procedure to determine if the battery charger circuit is
operating properly:
1. Remove the AC adapter from the WFM 90 or WFM 91 Handheld Wave-
form, Vector, Picture, and Audio Monitor.
2. Remove the battery cover and any installed batteries from the instrument.
See Batteries on page 6–21.
3. Use three jumper wires to connect a 30 W, 3 W resistor to the battery
connector pins. See Figure 6–16.
Jumper wires (3)
Battery connector
+
–
Test resistor
Figure 6–16: Testing the battery charging circuit – WFM 90 SN B011363 and above;
WFM 91 SN B010471 and above
WFM 90 SN B011363
and Above;
WFM 91 SN B010471
and Above

Troubleshooting Procedures
6–34 WFM 90 and WFM 91 Service Manual
NOTE. If the jumper wires will not stay securely attached to the battery connector
pins, you will need to remove the instrument bottom case to obtain access to the
battery connector pins on the Bottom board. Refer to Bottom Cover on
page 6–23.
4. Attach the voltmeter across the test resistor in Figure 6–16.
5. Connect the AC adapter to the WFM 90 or WFM 91 Handheld Waveform,
Vector, Picture, and Audio Monitor.
6. Check for a voltage reading of +2 VDC on the voltmeter with the WFM 90
or WFM 91 Handheld Waveform, Vector, Picture, and Audio Monitor turned
on, and a reading of +8 to +9 VDC with the instrument turned off. The
voltage will slowly rise when the instrument is turned off.
7. If the voltage reading in the previous step was correct, replace the batteries.
If the voltage reading was incorrect, replace the Bottom board.
WARNING. To prevent electric shock and high-voltage arcing, do not operate the
Backlight power supply with the LCD module removed. High voltages in excess
of 1 kV can be present on the Backlight power supply leads when operated open
circuit.
If the LCD module is removed, always remove the Backlight board before
powering up the instrument for test.
Low-Voltage Power Supply
Use the following procedure to check that the low-voltage power supplies are
operating properly before proceeding to Fault Symptom Table.
1. Disconnect the AC adapter from the WFM 90 or WFM 91 Handheld
Waveform, Vector, Picture, and Audio Monitor.
2. Remove any installed batteries. See Batteries on page 6–21.
3. Remove the top cover. See Top Cover on page 6–7.
4. Connect the AC adapter and turn on the instrument.
5. Check the supply voltages listed in Table 6–4:

Troubleshooting Procedures
WFM 90 and WFM 91 Service Manual 6–35
Table 6–4: Low-voltage power supplies
Supply Test Point Output Ripple
+8 V J9, pin 13 40 mV 30 mV
–8 V J9, pin 14 40 mV 30 mV
+5 V J9, pin 15 25 mV 60 mV
6. If the low-voltage power supplies are operating properly, proceed to Fault
Symptom Table.
7. If any of the voltages are out of specification, check the two fuses on the
Bottom board.
CAUTION. Do not use a soldering iron larger than 18 W or you may damage the
circuit board and the surrounding circuitry.
8. If a fuse is bad, remove the AC adapter and replace the fuse before you retest
the low-voltage power supplies.
9. If both of the fuses are ok, replace the Bottom board.
NOTE. Be sure to remove all modules one at a time to isolate the Bottom board in
cases where a supply might be excessively loaded.
Fault Symptom Table
Be sure to check the low-voltage power supplies before proceeding with the
following procedure:
1. Disconnect the AC adapter from the instrument.
2. Remove any installed batteries. See Batteries on page 6–21.
3. Remove the top cover. See Top Cover on page 6–7.
4. Remove the bottom cover. See Bottom Cover on page 6–23.
CAUTION. To avoid breaking the circuit boards, do not tighten the circuit board
vise too tightly.
5. Secure the instrument circuit boards in the circuit board vise.

Troubleshooting Procedures
6–36 WFM 90 and WFM 91 Service Manual
6. Connect a 75% color bar test signal to the VIDEO IN connector and connect
the VIDEO OUT connector to the picture monitor.
7. Locate your fault symptom in Table 6–5 and go to the flowchart indicated to
isolate the faulty module.
Table 6–5: Fault symptom table
Symptom Flowchart
No display after pressing the front panel ON button page 6–37
Graticule is ok, but the Waveform display is distorted or not visible page 6–38
Graticule is ok, but there is no Vector display page 6–39
Graticule is ok, but the Audio display is distorted or not visible page 6–40
No display in the Picture display mode page 6–41
Bad graticule and menu, but Picture display mode ok page 6–42
Display all white page 6–43
Waveform display mode sweep not triggered page 6–44
Vector display unlocked page 6–45
Vector display jitter page 6–46
Distorted vectors in Vector display page 6–46
Control problem page 6–47
Menus horizontally unlocked in Picture display mode page 6–48
Dim or blotchy display page 6–49
All display modes are bad except Picture, when no menus are displayed page 6–49
Troubleshooting Flowcharts
The troubleshooting flowcharts provide a series of steps to follow which should
result in you isolating the faulty module. Each flowchart is directly related to a
fault symptom listed in Table 6–5.
Figure 6–32 on page 6–50 illustrates the connector and pin locations of the
circuit board connectors listed in the troubleshooting flowcharts.
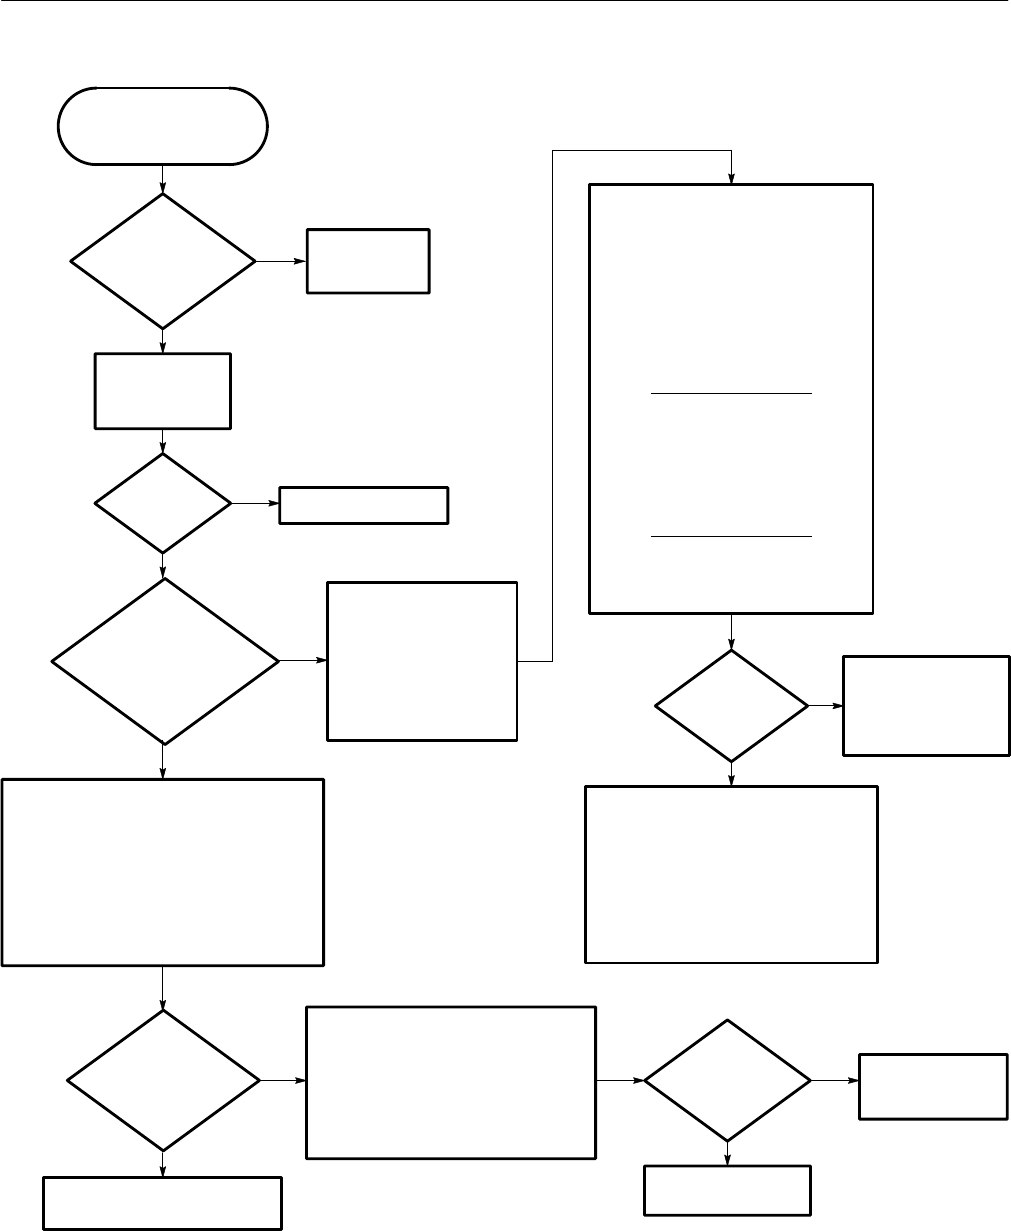
Troubleshooting Procedures
WFM 90 and WFM 91 Service Manual 6–37
Is the
Backlight broken?
(The Display module
will have a rattle
inside.)
Press the front
panel ON button
and then the PIX
mode button.
Is the
Backlight on?
(Look in the end of
the Display module
where the high
voltage is
attached.)
Replace the
Backlight in the
Display module.
Replace the Top board.
Replace the Backlight in the
Display module.
Test the Backlight power supply:
Disconnect the AC Adapter. Remove the Display
module. Attach a 10 kW ≥2 W resistor between
the high voltage connectors using a pair of
jumper wires. Attach an oscilloscope probe to the
end of the resistor attached to the orange
connector. Connect the oscilloscope ground lead
to the GND test point on the Bottom board. Set
the oscilloscope to 50 V/div. Reconnect the AC
adapter and power up the instrument.
Check Backlight power supply inputs:
J20-1 = Ground
J20-2 = 12 VDC Vin (1 Vpp ripple)
J20-3 = 5 VDC (Backlight Enable)
J20-4 = 1.25 VDC (1.25-1.75 VDC as the
Backlight brightness is changed using the
CONFIGURE menu)
Replace the Bottom
board.
Use this procedure if
there is no display after
pressing the front panel
ON button.
Yes
No
No
Yes
Is the
VIDEO OUT
signal good?
Is there
400 VAC as
measured on
the
oscilloscope?
Yes
No Are all of the
Backlight power
supply inputs
good?
Replace the
Backlight board.
Check the Display drive signals:
(Probe J16 from the back of the Bottom
board.)
J16-9 = 1 VDC to 3 VDC as VIEW is
adjusted in the CONFIGURE menu.
J16-10 = (DSYNC) 0 to +600 mV
compsync
J16-14 = (SEL_EXVID) +5 VDC in PIX
mode and 0 VDC in Waveform mode
Select PIX Mode, No Menu,
(Use 100% flat field test signal.)
J16-6 = (B) 2 VDC blanking level/2.5 V
peak video
J16-7 = (G) 2 VDC blanking level/2.5 V
peak video
J16-8 = (R) 2 VDC blanking level/2.5 V
peak video
Select WFM Mode + MENU
(Use 75% color bar signal.)
J16-2 = (B) 0 to +1.3 V
J16-3 = (G) 0 to +1.3 V
J16-4 = (R) 0 to +1.3 V
Remove the AC adapter
and then remove the
Display module and the
Backlight board. Reattach
the AC adapter and leave
the VIDEO IN and VIDEO
OUT cables attached.
Power up the instrument.
Check for bad or
misaligned Display
module interface cable.
If cable is ok, replace
the Display module.
If the DISP BRT signal is bad, replace the
Bottom board.
If the DSYNC signal is bad, replace the Top
board.
If the SEL_EXVID signal is bad, replace the
Top board.
If the RGB video is bad, replace the Bottom
board.
If the Raster Drive signals are bad, replace
the Top board.
Are all of these
signals correct?
Yes
No
Yes
No
No
Yes
Figure 6–17: Flowchart for no display
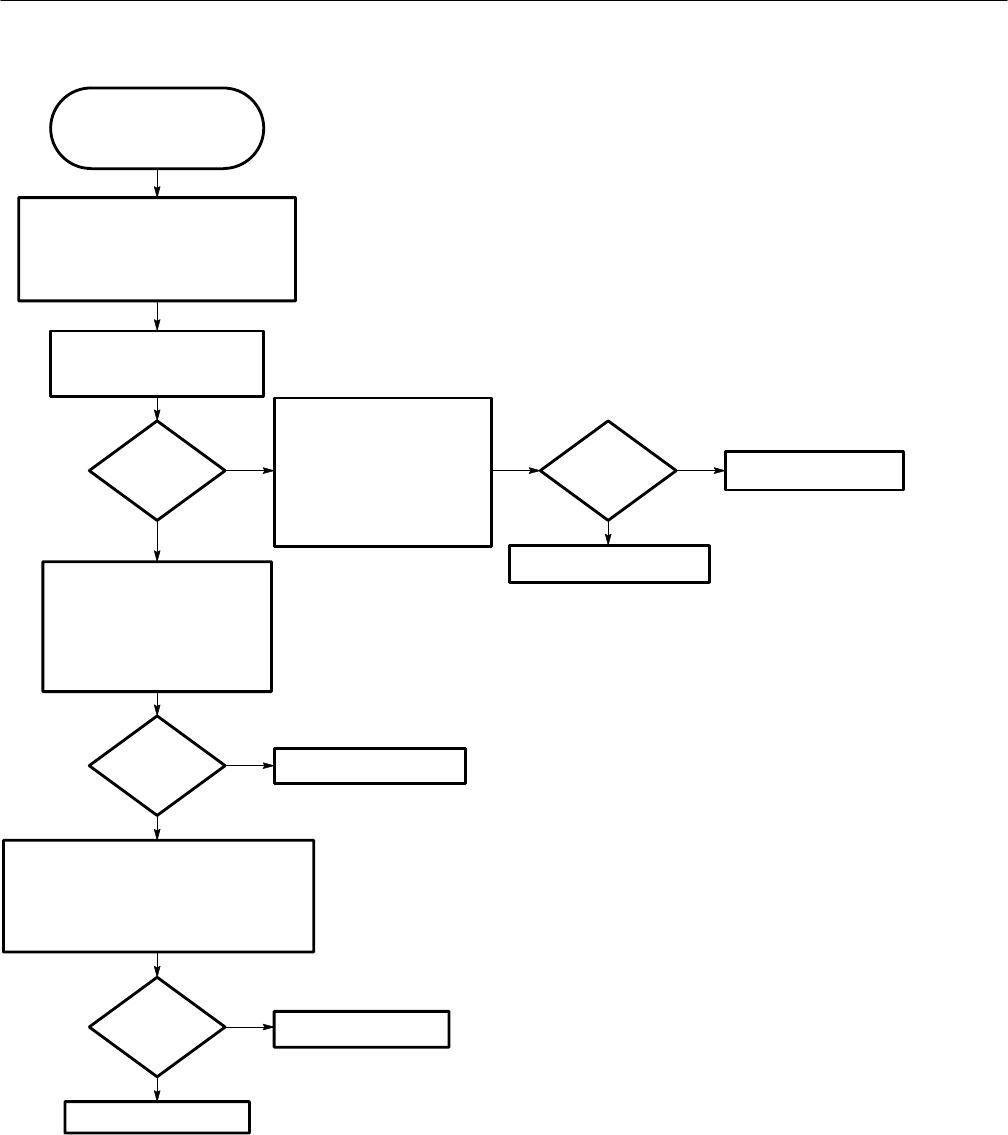
Troubleshooting Procedures
6–38 WFM 90 and WFM 91 Service Manual
Use this procedure when
the graticule is ok, but the
Waveform display is
distorted or not visible.
Remove the Display module and Backlight
board. Power up the instrument and select
DEFAULT PRESETs from the CONFIGURE
menu. Select the Waveform display mode.
Is the
VIDEO IN
signal OK?
Check the Waveform display
mode horizontal and vertical
deflection signals:
(J9 is on the back of the Top
board.)
J9-1 = 1.3 Vpp, 2 VDC (vert.)
J9-3 = 2.2 Vpp, 2.3 VDC (horiz.)
Are the
deflection
signals
ok?
Replace the Input board.
Replace the Bottom board.
Replace the Bottom board.
Is the
VIDEO
IN signal
ok?
Check the input DC clamp circuit:
Short J14-4 to the GND pin on the
Bottom board with a jumper wire.
Check the VIDEO IN signal:
J14-2 = 1.3 Vpp, 0.3 VDC
blanking level.
No
Yes
No
Yes
No
Yes
Check the VIDEO IN signal:
J14-2 = 1.3 Vpp, 0 VDC
blanking level.
Check the horizontal and vertical size control
voltages:
(These voltages are set in the CALIBRATION
MENU.)
J9-7 = 0.9 VDC
J9-8 = 1.2 VDC
Are the size
voltages ok?
Replace the Bottom board.
Replace the Top board.
No
Yes
Figure 6–18: Flowchart for distorted waveform display
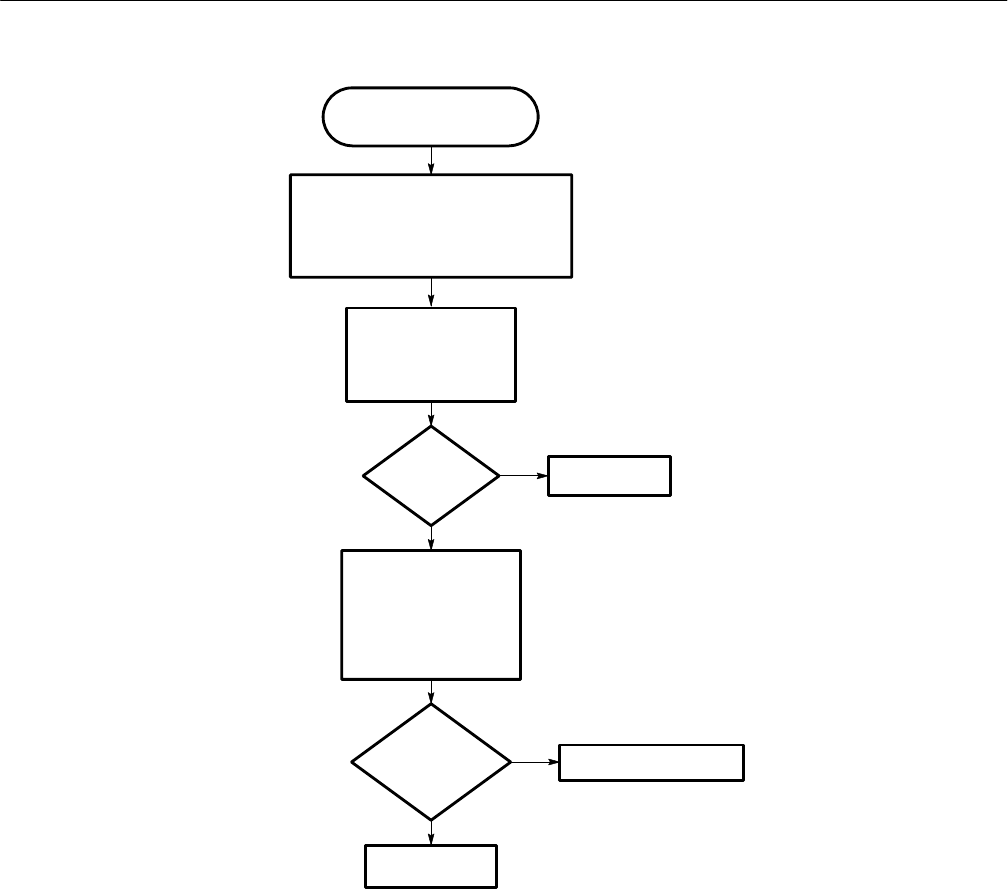
Troubleshooting Procedures
WFM 90 and WFM 91 Service Manual 6–39
Use this procedure when
the graticule is ok, but
there is no Vector display.
Remove the Display module and Backlight
board. Power up the instrument and select
DEFAULT PRESETs from the CONFIGURE
menu. Select Vector display mode.
Is the
VIDEO
IN signal
ok?
No
Yes
No
Yes
Go to Figure 6–18.
Replace the Bottom board.
Replace the
Top board.
Are the vector
deflection signals
ok?
Check the vector
deflection signals
(B-Y/R-Y):
(J9 is on the back of the
Top board.)
J9-1 = 1.3 Vpp, 2.5 VDC
J9-3 = 0.6 Vpp, 2.5 VDC
Check the VIDEO IN
signal:
(J14 is on the Bottom
board.)
J14-2 = 1.3 Vpp, 0 VDC
Figure 6–19: Flowchart for no vector display
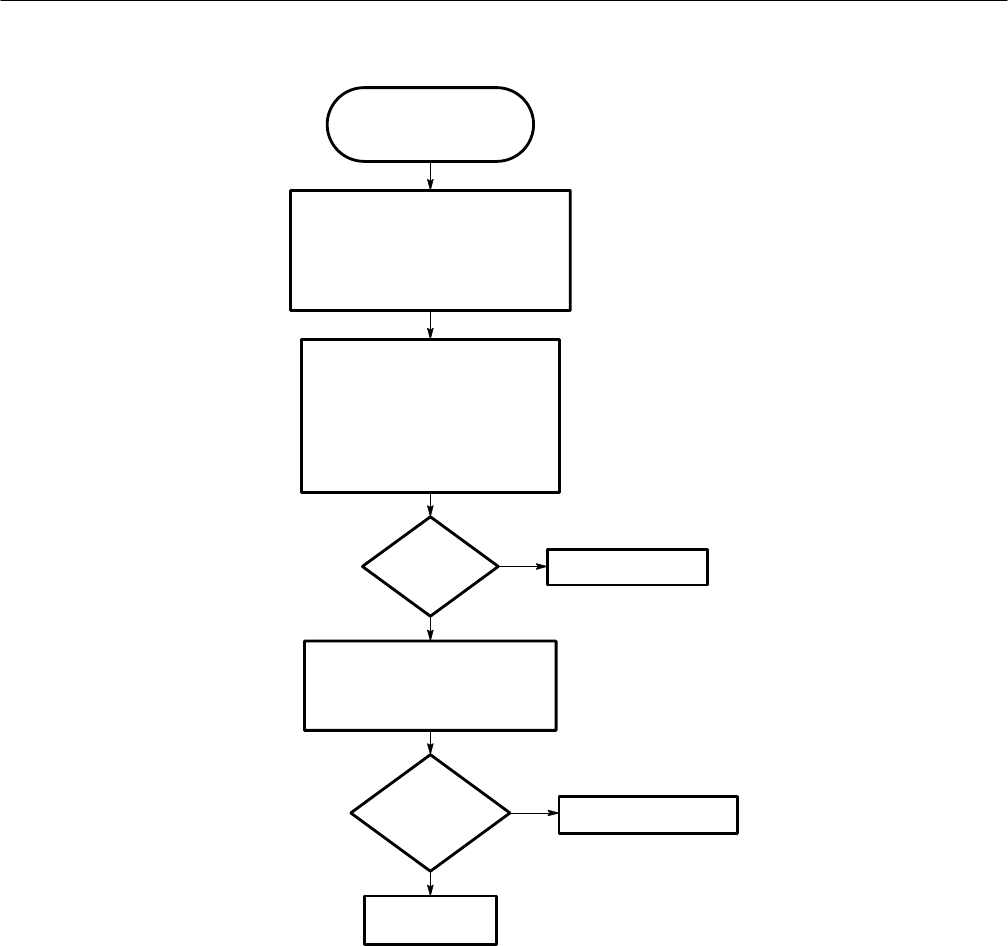
Troubleshooting Procedures
6–40 WFM 90 and WFM 91 Service Manual
Use this procedure when
the graticule is ok, but the
Audio display is distorted
or not visible.
Remove the Display module and the
Backlight board. Power up the instrument
and select DEFAULT PRESETs from the
CONFIGURE menu. Select the Audio
display mode. Attach an audio input signal
from 0 to +8 dbu.
No
Yes
No
Yes
Replace the
Top board.
Check the AUDIO IN signal:
(J15 is on the Bottom board.)
J15-4 = Check for a gain of X1 above
input signal level. The Audio Amplifier
gain is always X1 in +8 dbu. The signal
level should change as different
reference dbu levels are selected from
the menu.
Is the
AUDIO IN
signal ok?
Check the audio deflection signals:
(J9 is on the back of Top board.)
J9-1 = 1 Vpp, 2 VDC
J9-3 = +1 V to +3.8 V ramp with a
35 ms period
Are the audio
deflection signals
ok?
Replace the Input board.
Replace the Bottom board.
Figure 6–20: Flowchart for bad audio display
Troubleshooting Procedures
WFM 90 and WFM 91 Service Manual 6–41
Replace the Top board.
Replace the
Bottom board.
Are the
Display drive
signals
ok?
Check the Display drive signals:
(Probe J16 from the back of the Bottom
board.)
J16-6 = (B) 2 VDC, 2.5 V peak video
J16-7 = (G) 2 VDC, 2.5 V peak video
J16-8 = (R) 2 VDC, 2.5 V peak video
Is there a
display in any
other operating
mode (except
WIP)?
Check the SEL_EXVIDEO signal:
(Probe J16 from the back of the Bottom
board.)
J16-14 = +5 VDC in PIX mode
Is the
SEL_EXVIDEO
signal ok?
Replace the Display
module.
Use this procedure when
there is no display in the
Picture display mode.
Go to Figure 6–17.
Remove the Display module and the Backlight board.
Power up the instrument. Connect a 100% flat field test
signal to the VIDEO INPUT. Select the Picture
display mode.
No
Yes
No
Yes
No
Yes
Figure 6–21: Flowchart for no picture display
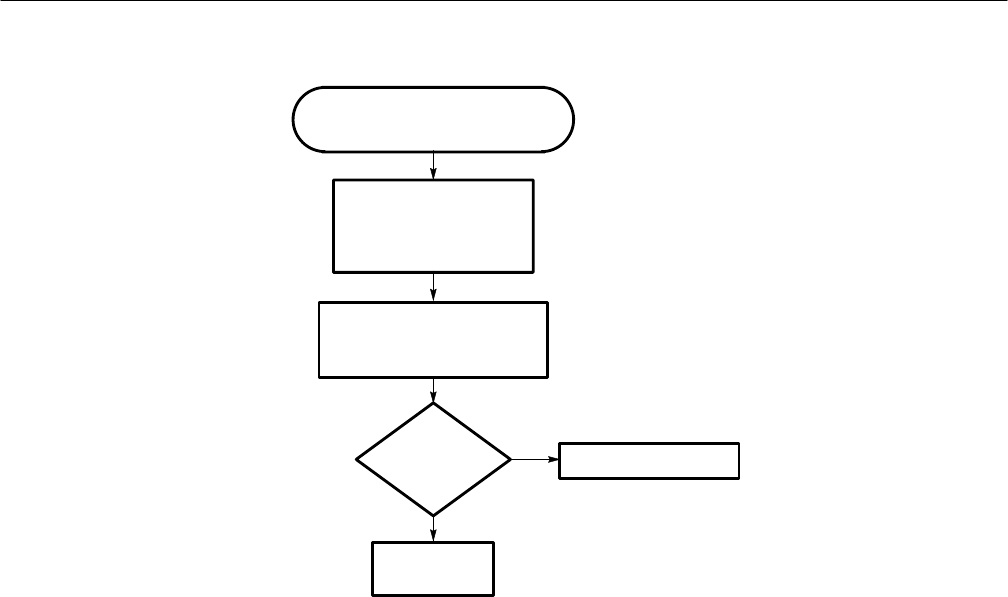
Troubleshooting Procedures
6–42 WFM 90 and WFM 91 Service Manual
Use this procedure when the graticule
and menu are bad, but the PIX mode is
ok (moderate to severe vertical flutter).
No
Yes
Perform the Raster VCO
adjustment, if possible, in
the Adjustment procedures.
Check the Raster VCO control
signal:
(J9 is on the Top board.)
J9-6 = Approximately 10 mVDC
Is the
Raster VCO
control signal
ok?
Replace the
Top board.
Replace the Bottom board.
Figure 6–22: Flowchart for bad graticules and menus

Troubleshooting Procedures
WFM 90 and WFM 91 Service Manual 6–43
Replace the
Bottom board.
Are
all of these
signals
correct?
Replace the
Display module.
Use this procedure when
the display is all white.
Remove the Display module and Backlight board. Connect
the AC Adapter and power up the instrument.
No
Yes
Check the Display drive signals:
(Probe J16 from the back of the Bottom board.)
J16-9 = +1 to +3 VDC as VIEW is adjusted in the CONFIGURE menu.
J16-10 =( DSYNC) 0 to 0.6 V compsync
J16-14 = (SEL_EXVID) +5 VDC in PIX mode/0 VDC in Waveform
mode
Select the PIX Mode, No Menu,
(Use 100% flat field test signal.)
J16-6 = (B) 2 VDC blanking level/2.5 V peak video
J16-7 = (G) 2 VDC blanking level/2.5 V peak video
J16-8 = (R) 2 VDC Blanking/2.5 V peak video
Select WFM Mode + MENU
(Use 75% color bar signal.)
J16-2 = (B) 0 to +1.3 V
J16-3 = (G) 0 to +1.3 V
J16-4 = (R) 0 to +1.3 V
Figure 6–23: Flowchart for all white display
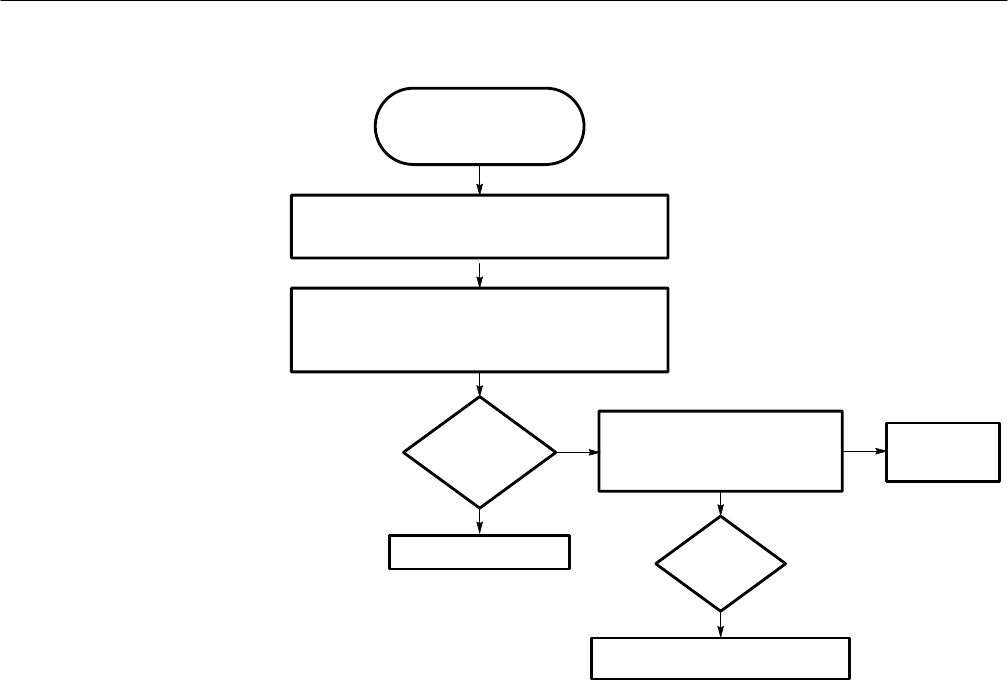
Troubleshooting Procedures
6–44 WFM 90 and WFM 91 Service Manual
Are the
sync
pulses
ok?
Replace the Top board.
Check for vertical and horizontal sync pulses:
(J9 is on Top Board.)
J9-18 = TTL level V-rate sync locked to the input signal.
J9-19 = TTL level H-rate sync locked to the input signal.
Remove the Display module and Backlight board. Connect
the AC Adapter and power up the instrument. Select
INT REF using the CONFIGURE menu.
No
Yes
Use this procedure when
the Waveform display
mode sweep is not
triggered.
Check the REF IN signal:
(J14 is on Bottom Board)
J14-9 = 1.2 Vpp, +1.3 VDC
blanking level.
Is the REF
IN signal
ok? Yes
Replace the Bottom board.
No Replace the
Input board.
Figure 6–24: Flowchart for untriggered waveform display
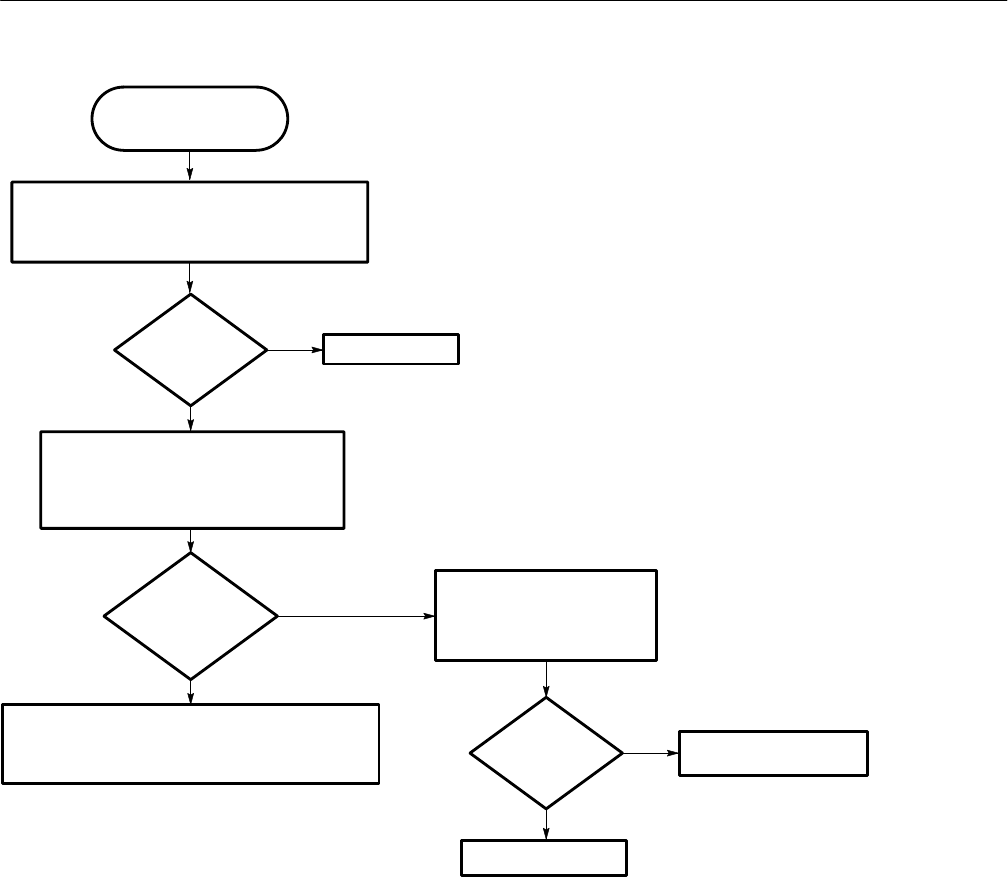
Troubleshooting Procedures
WFM 90 and WFM 91 Service Manual 6–45
Use this procedure when
the Vector display is
unlocked.
Remove the Display module and Backlight board.
Connect the AC Adapter and power up the instrument.
Select INT REF using the CONFIGURE menu.
No
Yes
Is the
Waveform display
triggered?
Check the Subcarrier Regenerator Oscillator
(SRO) control voltage:
(J9 is on the Top board)
J9-12 = approximately 1 VDC
Is the SRO
control signal
a DC
voltage?
No
This problem can be caused by either the Top or Bottom
boards, and can only be determined by replacing these
boards one at a time.
Replace the Top board.
Go to Figure 6–24.
Check the IFsc signal:
(J9 is on the Top board)
J9-43 = 300 mV filtered
square wave.
No
Yes
Yes Replace the Bottom board.
Is the
IFsc signal
ok?
Figure 6–25: Flowchart for unlocked vector display
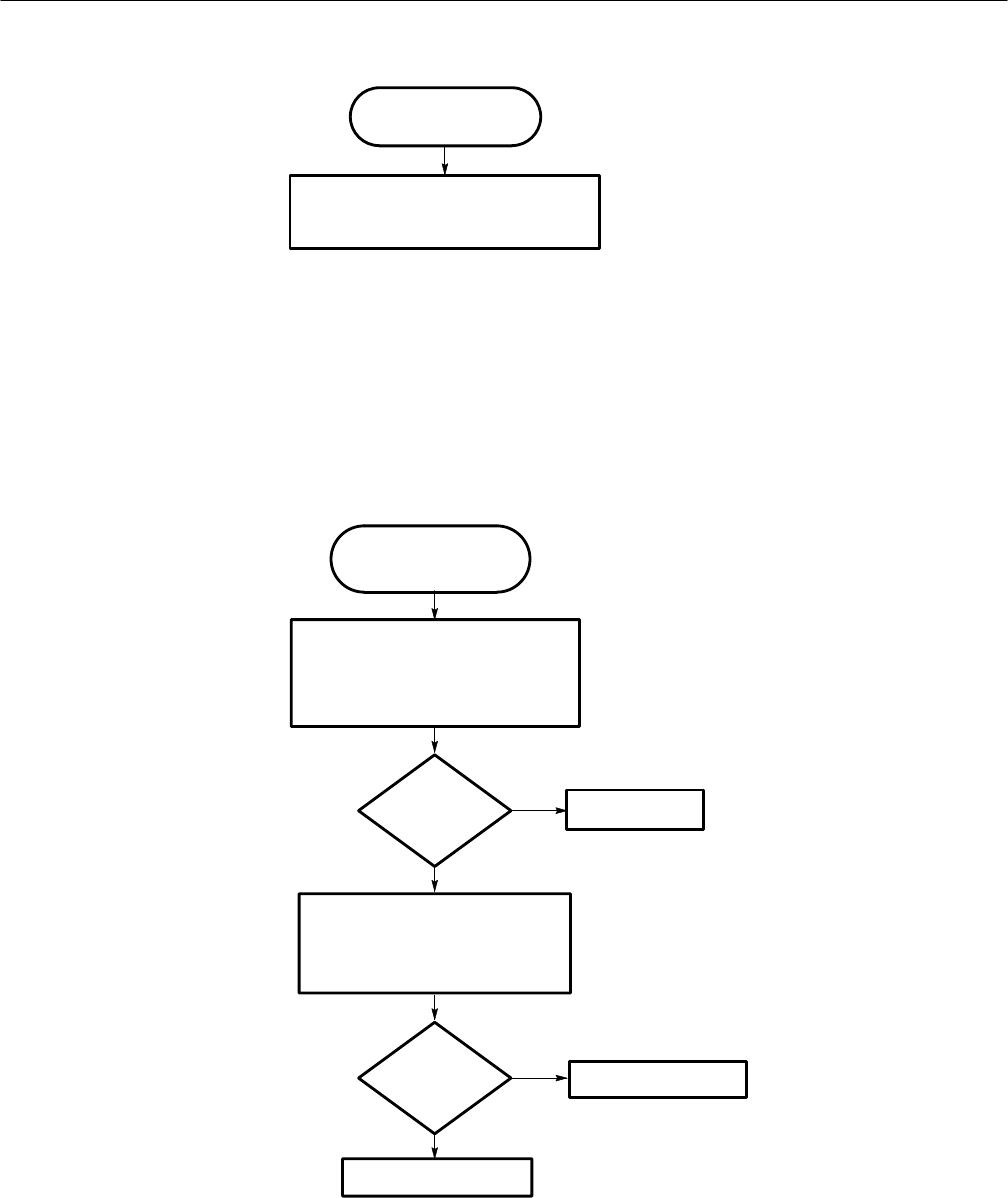
Troubleshooting Procedures
6–46 WFM 90 and WFM 91 Service Manual
Use this procedure when
there is Vector display jitter.
This problem can be caused by either the Top or
Bottom boards, and can only be determined by
replacing these boards one at a time.
Figure 6–26: Flowchart for vector display jitter
Use this procedure when
the vectors are distorted in
the Vector display mode.
Replace the Top board.
Does this
remedy the
problem?
Are the
IFsc and QFsc
signals
ok?
Perform the following steps in the Adjustment
Procedures using the CALIBRATION menu:
Vector Quadrature Phase
Vector Gain and X5 Gain Phase
Check the IFsc and QFsc signals:
(J9 is on the Top Board)
J9-42 = 400 mVpp filtered square wave
J9-43 = 300 mVpp filtered square wave
No
No
Problem solved.
Replace the Bottom board.
Yes
Yes
Figure 6–27: Flowchart for distorted vectors
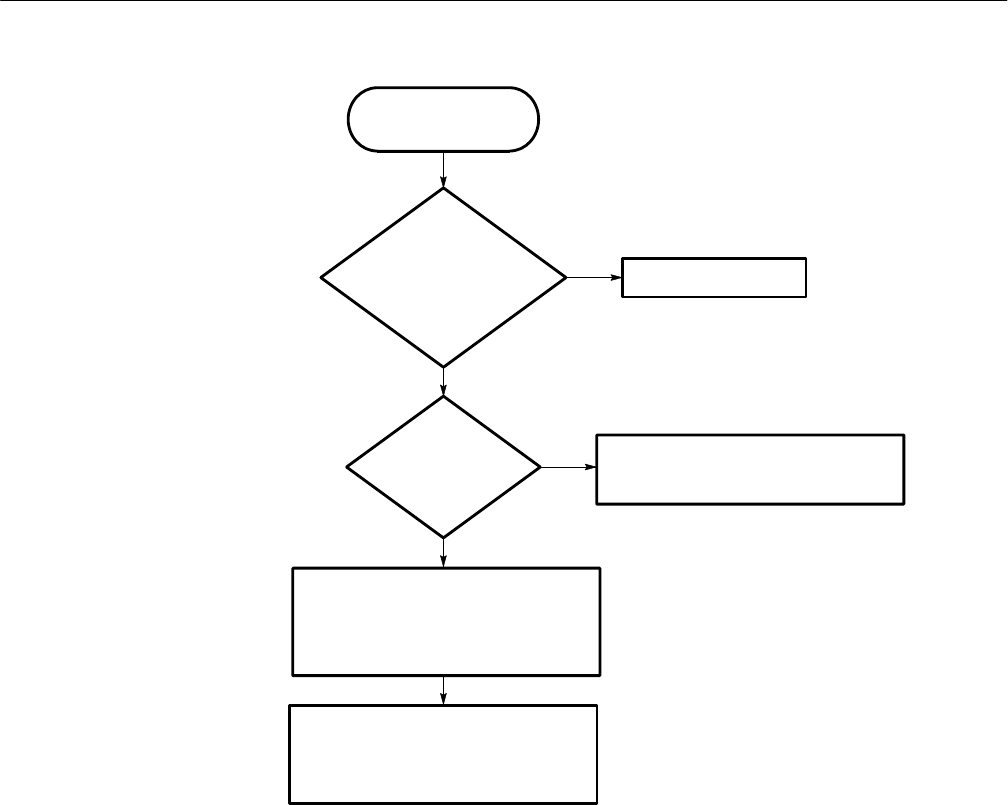
Troubleshooting Procedures
WFM 90 and WFM 91 Service Manual 6–47
Use this procedure when
there is an instrument
control problem.
Yes
Replace the Top Board first. These problems
can be caused by either the Top or Bottom
boards, and can only be determined by
replacing these boards one at a time.
Do menu
selections change as the
front panel buttons are pressed,
and does the graticule
appear ok?
Do some
front panel keys work,
and some
do not?
Other control problems include:
The instrument does not respond to front panel
key presses after being turned on.
All display modes are bad or not visible after the
instrument is turned on.
No
No
Replace the Bottom board.
Remove the Keypad from Top board and clean
the contacts located under the carbon buttons.
Replace the Keypad.
Yes
Figure 6–28: Flowchart for problems with the instrument controls
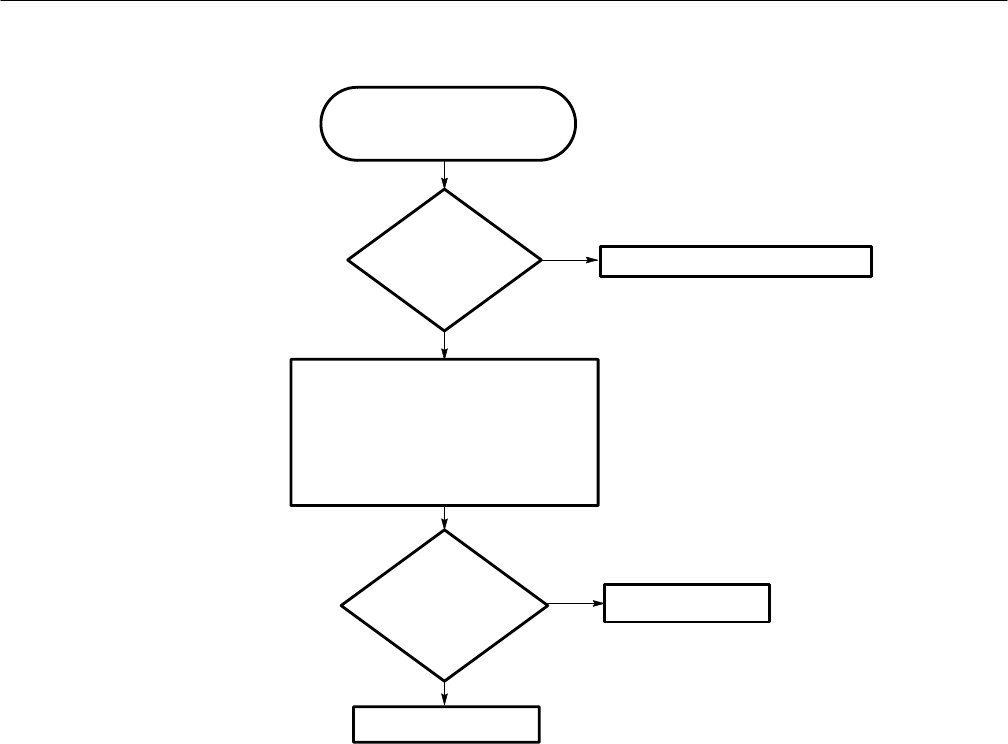
Troubleshooting Procedures
6–48 WFM 90 and WFM 91 Service Manual
Use this procedure when the menus
are horizontally unlocked (tearing) in
the Picture display mode.
Yes
No
Check the horizontal and vertical sync
signals on the Bottom board:
(J9 is on Top board.)
J9-18 = VSYNC is a TTL Level (locked to
Video IN V-sync)
J9-19 = HSYNC is a TTL Level (locked to
VIDEO IN H-sync)
Does the
input signal have
noisy sync?
Are the
VSYNC and HSYNC
signals good and locked
to the video
input signal?
Replace the Top board.
No
Correct the problem on the input signal.
Replace the Bottom board.
Yes
Figure 6–29: Flowchart for bad menus in the picture display
Troubleshooting Procedures
WFM 90 and WFM 91 Service Manual 6–49
Use this procedure when the
display is dim or blotchy.
Replace the Backlight
in the Display module.
Figure 6–30: Flowchart for dim or blotchy display
Use this procedure when all
of the display modes are bad
except Picture when no
menus are displayed.
Replace the Top board.
Figure 6–31: Flowchart for bad displays except Picture mode
Troubleshooting Procedures
6–50 WFM 90 and WFM 91 Service Manual
Connector Diagram
Figure 6–32 illustrates the connector and pin locations of the circuit board
connectors listed in the troubleshooting flowcharts.
J15 J14
J20
Bottom
board
Top
board
J16
J9
J16 as seen from the
back of the Bottom board
J9 as seen from the front
of the Top board
View of the Top
and Bottom boards
as seen from the
keypad side
J9–13 = +8 V
J9–14 = –8 V
J9–15 = +5 V
Ground test point
Fuses
Figure 6–32: Circuit board connector and pin locations

Options

WFM 90 and WFM 91 Service Manual 7–1
Options and Accessories
This section lists the instrument options and accessories that can be ordered for
the WFM 90 or WFM 91 Handheld Waveform, Vector, Picture, and Audio
Monitor. Refer to Parts Ordering Information on page 8–1 for information on
how to order parts for this instrument. Refer to Replaceable Parts List on
page 8–5 for the Tektronix, Inc., part numbers to use when ordering replacement
parts.
Options
The options listed below can be ordered with the WFM 90 or WFM 91 Handheld
Waveform, Vector, Picture, and Audio Monitor.
HOption A1 — 220 V Wall Unit Power Adapter, European TUV
HOption A2 — 240 V Wall Unit Power Adapter, UK
HOption A3 — 240 V Wall Unit Power Adapter, Australia
HOption A6 — 100 V Wall Unit Power Adapter, Japan
HOption M2 — 5 years Warranty/Remedial Service
HOption M8 — 4 Calibration/Performance Tests
HOption 33 — Travel-line package which includes:
HNiCad battery pack
HViewing hood
HDesk flip stand
HCarrying case — used for carrying this instrument and a Pathfinder
TSG 90-Series Signal Generator

Options and Accessories
7–2 WFM 90 and WFM 91 Service Manual
Accessories
The standard accessories are shipped with every instrument while the optional
accessories must be ordered separately.
The part numbers to use when you order any of the following accessories are
listed in Mechanical Parts List on page 8–7.
The standard accessories for the WFM 90 or WFM 91 Handheld Waveform,
Vector, Picture, and Audio Monitor are listed below:
HWFM 90 and WFM 91 Handheld Waveform, Vector, Picture, and Audio
Monitor User Manual
H120 V Wall Unit Power Adapter, North American
HCarrying pouch
The optional accessories available for the WFM 90 or WFM 91 Handheld
Waveform, Vector, Picture, and Audio Monitor are listed below:
HWFM 90 and WFM 91 Handheld Waveform, Vector, Picture, and Audio
Monitor Service Manual
HNiCad battery pack
HDesk stand
HViewing hood
HCarrying Case for this instrument and a Pathfinder TSG 90–Series Signal
Generator
Standard Accessories
Optional Accessories

Replaceable Parts

WFM 90 and WFM 91 Service Manual 8–1
Replaceable Parts List
This section contains a list of the replaceable modules for this instrument. Use
this list to identify and order replacement parts.
Parts Ordering Information
Replacement parts are available through your local Tektronix, Inc., Field Office
or representative.
Changes to Tektronix instruments are sometimes made to accommodate
improved components as they become available and to give you the benefit of
the latest circuit improvements. Therefore, when ordering parts, it is important to
include the following information in your order:
HPart number
HInstrument type or model number
HInstrument serial number
HInstrument modification number, if applicable
If you order a part that has been replaced with a different or improved part, your
local Tektronix, Inc., Field Office or representative will contact you concerning
any change in part number.
Refer to Service Offerings on page xv for information on the service offerings
that Tektronix, Inc., provides for this instrument.
Module Servicing

Replaceable Parts List
8–2 WFM 90 and WFM 91 Service Manual
Using the Replaceable Parts List
Table 8–1 describes each column in the replaceable parts list.
Table 8–1: Replaceable parts list column descriptions
Column Name Description
Fig. & Index Number Items in this column are referenced to the exploded view item
numbers.
Tektronix Part Number Use this part number when ordering replacement parts from
Tektronix.
Serial No. Effective This column indicates the instrument serial number at which the
part was first effective. No entry indicates the part is good for all
serial numbers.
Serial No. Discont’d This column indicates the instrument serial number at which the
part was discontinued. No entry indicates the part is good for all
serial numbers.
Qty This column indicates the quantity of parts used.
Name & Description An item name is separated from the description by a colon (:).
Because of space limitations an item name may sometimes
appear incomplete. Use the U.S. Federal Catalog handbook H6-1
for further item name identification.
Mfr. Code This column indicates the code of the actual manufacturer of the
part. (Code to name and address cross reference is located after
this page.)
Mfr. Part Number This column indicates the actual manufacturer’s or vender’s part
number.
The Mfg. Code Number to Manufacturer Cross Index for the mechanical parts
list is located immediately after this page. The cross index provides codes,
names, and addresses of manufacturers of components listed in the mechanical
parts list.
Abbreviations conform to American National Standards Institute (ANSI)
standard Y1.1—1972.
The part numbers for the standard and optional accessories available with this
instrument are located at the end of the replaceable parts list.
Cross Index–Mfr. Code
Number to Manufacturer
Abbreviations
Instrument Accessories

Replaceable Parts List
WFM 90 and WFM 91 Service Manual 8–3
Manufacturers Cross Index
Mfr.
Code Manufacturer Address City, State, Zip Code
0DWW6 MICRO POWER ELECTRONICS 7973 SW CIRRUS DRIVE
BLDG 22 BEAVERTON, OR 97008
0GV90 GLOBTEK INC 186 VETERANS DRIVE NORTHVALE, NJ 07647–2303
0KB01 STAUFFER SUPPLY CO 810 SE SHERMAN PORTLAND, OR 97214–4657
0LXM2 LZR ELECTRONICS INC 8051 CESSNA AVENUE GAITHERSBURG, MD 20879
14310 AULT INC 7300 BOONE AVE NORTH
BROOKLINE PARK MINNEAPOLIS, MN 55428
39951 AROW COMPONENTS & FASTENERS INC AROW COMPONENTS & FASTENERS, INC.
31012 HUNTWOOD AVE. HAYWARD, CA 94544
73743 FISCHER SPECIAL MFG CO 111 INDUSTRIAL RD
PO BOX 76500 COLD SPRINGS, KY 41076
75915 LITTELFUSE TRACOR INC
SUB OF TRACOR INC 800 E NORTHWEST HWY DES PLAINES IL 60016–3049
80009 TEKTRONIX INC 14150 SW KARL BRAUN DR
PO BOX 500 BEAVERTON, OR 97077–0001
83285 STEWARD MFG CO 1200 E 36TH ST
PO BOX 510 CHATTANOOGA, TN 37401–0510
93907 CAMCAR DIV OF TEXTRON INC ATTN: ALICIA SANFORD
516 18TH AVE ROCKFORD, IL 611045181
94222 SOUTHCO, INC. 210 N BRINTON LAKE RD CONCORDVILLE, PA 19331
TK1415 CABOT SAFETY CORP 7911 ZIONSVILLE RD INDIANAPOLIS, IN 46268
TK1416 SHARP CORP 22–22 NAGAIKE–CHO
ABENO–KU OSAKA, JAPAN
TK2427 A/D ELECTRONICS INC 10421 BURNHAM DRIVE NW, BLDG #4 GIG HARBOR, WA 98332
Replaceable Parts List
8–4 WFM 90 and WFM 91 Service Manual
A2
A3
A4
A5
A1
1
2
3
4
5
6
7
8
9
10
11
12
13
14
15
16
17
18
19
20
21
22
23
24
25
26
27
28
29
30
31
32
33
34
35
36
37
38
39
40
41
42
43
44
Figure 8–1: Exploded view

Replaceable Parts List
WFM 90 and WFM 91 Service Manual 8–5
Replaceable Parts List
Fig. &
Index
Number Tektronix
Part Number Serial No.
Effective Serial No.
Discont’d Qty Name & Description Mfr. Code Mfr. Part Number
10–1 202–0338–10 1 CASE,TOP:POLYCARBONATE,WFM90 80009 202–0338–00
202–0338–20 1 CASE,TOP:POLYCARBONATE,WFM91 80009 202–0338–20
–2 378–0418–00 1 LENS,DISPLAY:POLYCARBONATE,CLEAR,
E/HARDCOAT 80009 378–0418–00
–3 348–1436–00 1 PAD,CUSHION:CUSHION PAD FOR
BACKLIGHT,E.A.R.,LS1512,PSA20 1 SIDE,0.250 X
3.100 X 0.125
80009 348–1436–00
–4 348–1437–00 1 PAD,CUSHION,LCD:CUSHION PAD,LCD,E.A.R.
LS1512,PSA20 1 SIDE,0.250 X 11.000 X 0.125 80009 348–1437–00
–5 174–3287–00 1 CA ASSY,SP:FLAT FLEX,FLX,20,26 AWG,0.050 CTR,
4.0 L,CUT&STRIP X RTANG,PCB,STAGGERED 80009 174–3287–00
–6 131–5148–00 1 JACK,POWER DC:PCB,MALE,RTANG,2.0 MM DIA
PIN,7 MM H X 3.3 MM TAIL,3 COND,W/SWITCH,
MTG POST,DC
TK2427 ADC–016
–7 211–0294–00 2 SCREW,MACHINE:M3 X 0.5 X 10MM,
PNH,STL,CDPL,T–10 TORX DR 0KB01 211–0294–00
–8 131–5798–00 1 CONN,JACK PHONE:PCB,FEMALE,RTANG,3 POS,
W/SHUNT,3.5MM ID,0.354 H X 0.137 TAIL,
5 TERMINAL,W/O THD
0LXM2 SJ100
–9 348–1442–00 4 LCD FOOT:LCD LOCATOR FOOT 80009 348–1442–00
–10 348–1425–00 4 MOUNT,RESILIENT:COMPRESSION MOUNT,
0.280 DIA X 0.320 THK COMPOSITE W/0.2 L 4–40
THD STUD
TK1415 MB–100–UC04–H
–11 159–0378–00 2 FUSE,WIRE LEAD:2.0A,125V,1 SEC MIN – 60
SECTROLLED 75915 R473 002–T1R
–12 210–0586–00 4 NUT,PL,ASSEM WA:4–40 X 0.25,STL CD PL 0KB01 ORDER BY
DESCRIPTION
–13 213–0774–00 2 SCREW,TPG,TF:M3–0.5 X 10MM L,TORX DRIVE
BLACK ENDURION 93907 ORDER BY
DESCRIPTION
–14 220–0497–00 3 NUT,PLAIN,HEX:0.5–28 X 0.562 HEX,BRS CD PL 73743 ORDER BY
DESCRIPTION
–15 210–1039–00 3 WASHER,LOCK:0.521 ID,INT,0.025 THK,SST 0KB01 1224–02–00–0541C
–16 333–4144–00 1 PANEL,REAR:POLYCARBONATE 80009 333–4144–00
–17 671–3044–00 1 CIRCUIT BD ASSY:INPUT BOARD 80009 671–3044–00
–18 174–3288–00 2 CA ASSY,SP:DISCRETE,CPD,2,24 AWG,300V,
TEFLON,2.3 L,1X2,0.079(2MM),RCPT X 1X4,
0.079(2MM),RC
80009 174–3288–00
–19 671–3045–00 B010100 B011542 1 CIRCUIT BD ASSY:BACKLIGHT,WFM90 80009 671–3045–00
671–3045–01 B011543 B023805 1 CIRCUIT BD ASSY:BACKLIGHT,WFM90 80009 671–3045–01
671–3045–02 B023806 B029999 1 CIRCUIT BD ASSY:BACKLIGHT,WFM90 80009 671–3045–02
671–3045–03 B030000 1 CIRCUIT BD ASSY:BACKLIGHT,WFM90 80009 671–3045–03
671–3045–00 B010100 B010440 1 CIRCUIT BD ASSY:BACKLIGHT,WFM91 80009 671–3045–00
671–3045–01 B010441 B021044 1 CIRCUIT BD ASSY:BACKLIGHT,WFM91 80009 671–3045–01
671–3045–02 B021045 B029999 1 CIRCUIT BD ASSY:BACKLIGHT,WFM91 80009 671–3045–02

Replaceable Parts List
8–6 WFM 90 and WFM 91 Service Manual
Replaceable Parts List (Cont.)
Fig. &
Index
Number Mfr. Part NumberMfr. CodeName & DescriptionQty
Serial No.
Discont’d
Serial No.
Effective
Tektronix
Part Number
671–3045–03 B030000 1CIRCUIT BD ASSY:BACKLIGHT,WFM91 80009 671–3045–03
–20 337–4000–00 1 SHEILD:BACKLIGHT ECB,0.005 POLYMIDE 80009 337–4000–00
–21 211–0878–00 6 SCREW:4–40 X 0.5 LONG,PAN HD SCREW,TORX
DRIVE,BLACK ZINC PLATED,W/LOCKING PATCH 0KB01 211–0878–00
–22 214–4636–00 1 RCPT,TURNLOCK F:RECEPTACLE USED WITH
SOUTHCO SNAP IN STUD 94222 82–35–309–56
–23 200–4201–00 1 BATTERY,DOOR:MTC,POLYCARONATE 80009 200–4201–00
–24 358–0792–00 1 BUSHING,RETAINR:STUD RETAINER,SOUTHCO 94222 82–32–401–41
–25 355–0286–00 1 STUD,TURNLOCK:OVAL HEAD,STL, SOUTHCO 94222 82–11–520–16
–26 346–0279–00 1 STRAP,CARRYING:1.00 X 11.00 CARRY HANDLE 80009 346–0279–00
–27 348–1428–00 1 PAD,CUSHIONING:MTL,0.062 THICK PORON 80009 348–1428–00
–28 210–0589–00 2 NUT,SLFLKG,HEX:4–40 X 0.246,STL CD PL 39951 ORDER BY
DESCRIPTION
–29 334–8830–00 1 MARKER,IDENT:BATTERY,0.002 MATTE SILVER
POLYESTER,BLACK NOMENCLATURE 80009 334–8830–00
–30 348–1427–00 1 PAD,CUSHIONING:PAD,CUSHIONING,BATTERY 80009 348–1427–00
–31 202–0339–00 1 CASE,BOTTOM:POLYCARBONATE 80009 202–0339–00
–32 337–4036–00 1 SHIELD,ELEC:0.005 VALOX W/0.005 254 PRESSURE
SENSITIVE ADHESIVE ON BACKSIDE,2.050 X 4.650 80009 337–4036–00
–33 214–4627–00 2 SPRING,CONTACT:BATTERY CONTACT,SINGLE 80009 214–4627–00
–34 214–4628–00 5 SPRING,CONTACT:SPRING BATTERY
CONTACT,DUAL 80009 214–4628–00
–35 174–3289–00 1 CA ASSY,SP:DISCRETE,CPD,2,24 AWG,TEFLON,
4.3 L,1X2,0.079 CTR(2MM),PLZ BOTH ENDS,
JST TYPE
80009 174–3289–00
–36 671–3043–00 B010100 B011122 1 CIRCUIT BD ASSY:BOTTOM BOARD,WFM90 80009 671–3043–00
671–3043–01 B011123 B011362 1 CIRCUIT BD ASSY:BOTTOM BOARD,WFM90 80009 671–3043–01
671–3043–02 B011363 B023820 1 CIRCUIT BD ASSY:BOTTOM BOARD,WFM90 80009 671–3043–02
671–3043–03 B023821 1 CIRCUIT BD ASSY:BOTTOM BOARD,WFM90 80009 671–3043–03
671–3263–00 B010100 B010358 1 CIRCUIT BD ASSY:BOTTOM BOARD,WFM91 80009 671–3263–00
671–3263–01 B010359 B010470 1 CIRCUIT BD ASSY:BOTTOM BOARD,WFM91 80009 671–3263–01
671–3263–02 B010471 B021056 1 CIRCUIT BD ASSY:BOTTOM BOARD,WFM91 80009 671–3263–02
671–3263–03 B021057 1 CIRCUIT BD ASSY:BOTTOM BOARD,WFM91 80009 671–3263–03
–37 337–4035–00 1 SHIELD,ECB:ECB SHIELD,ALUM 80009 337–4035–00
–38 671–3042–00 B010100 B010109 1 CIRCUIT BD ASSY:TOP BOARD,WFM90 80009 671–3042–00
671–3042–01 B010110 B010502 1 CIRCUIT BD ASSY:TOP BOARD,WFM90 80009 671–3042–01
671–3042–02 B010503 B010903 1 CIRCUIT BD ASSY:TOP BOARD,WFM90 80009 671–3042–02
671–3042–03 B010904 B011802 1 CIRCUIT BD ASSY:TOP BOARD,WFM90 80009 671–3042–03
671–3042–04 B011803 B022965 1 CIRCUIT BD ASSY:TOP BOARD,WFM90 80009 671–3042–04
671–3042–05 B022966 B023841 1 CIRCUIT BD ASSY:TOP BOARD,WFM90 80009 671–3042–05

Replaceable Parts List
WFM 90 and WFM 91 Service Manual 8–7
Replaceable Parts List (Cont.)
Fig. &
Index
Number Mfr. Part NumberMfr. CodeName & DescriptionQty
Serial No.
Discont’d
Serial No.
Effective
Tektronix
Part Number
671–3042–06 B023842 1CIRCUIT BD ASSY:TOP BOARD,WFM90 80009 671–3042–06
671–3264–01 B010100 B010184 1 CIRCUIT BD ASSY:TOP BOARD,WFM91 80009 671–3264–01
671–3264–02 B010185 B010524 1 CIRCUIT BD ASSY:TOP BOARD,WFM91 80009 671–3264–02
671–3264–03 B010525 B020839 1 CIRCUIT BD ASSY:TOP BOARD,WFM91 80009 671–3264–03
671–3264–04 B020840 B021090 1 CIRCUIT BD ASSY:TOP BOARD,WFM91 80009 671–3264–04
671–3264–05 B021091 1 CIRCUIT BD ASSY:TOP BOARD,WFM91 80009 671–3264–05
–39 119–4788–00 1 KEYPAD:ELASTOMERIC,FRONT PANEL,17 KEY 80009 119–4788–00
–40 119–4789–00 1 DISPLAY MODULE:LCD,234V X 479H,4 INCH,
COLOR,NTSC/PAL,BACKLIGHT,ANALOG RGB IN TK1416 LQ4RA02
–41 150–0215–00 1 LAMP:BACKLIGHT,FLUORESCENT,REPLACEMENT
FOR 4 IN SHARP TK1416 LQ0B01
STANDARD ACCESSORIES
070–8968–00 B010100 B010352 1 MANUAL,TECH:USERS,WFM90 80009 070–8968–00
070–8968–01 B010353 B021957 1 MANUAL,TECH:USERS,WFM90 80009 070–8968–01
070–8968–02 B021958 B022965 1 MANUAL,TECH:USERS,WFM90 80009 070–8968–02
070–8968–03 B022966 1 MANUAL,TECH:USERS,WFM90 80009 070–8968–03
070–8968–01 B010100 B020560 1 MANUAL,TECH:USERS,WFM91 80009 070–8968–01
070–8968–02 B020561 B020839 1 MANUAL,TECH:USERS,WFM91 80009 070–8968–02
070–8968–03 B020840 1 MANUAL,TECH:USERS,WFM91 80009 070–8968–03
–42 119–4538–00 B010100 1 POWER SUPPLY:12W,12V 1.0A,UNREGULATED,
120VAC 60HZ,183CM CABLE W/5.5MM OD,
2.1MM ID RT ANG CN C, STANDARD, WFM90
14310 P48121000A220CM
119–5507–00 B021958 1 AC ADAPTER ASSY:AC ADAPTER W/NOISE
FILTER,STANDARD, WFM90 80009 119–5507–00
119–4538–00 B010100 1 POWER SUPPLY:12W,12V 1.0A,UNREGULATED,
120VAC 60HZ,183CM CABLE W/5.5MM OD,
2.1MM ID RT ANG CN C, STANDARD, WFM91
14310 P48121000A220CM
119–5507–00 B020561 1 AC ADAPTER ASSY:AC ADAPTER W/NOISE FILTER,
STANDARD, WFM91 80009 119–5507–00
016–1330–00 1 CASE,CARRYING:DUAL ZIPPER,TEK LOGO IN
VINYL,HAND STRAP,BELT HOOP,TRI–RING,
CLEAR VINYL FRONT
80009 016–1330–00
OPTIONAL ACCESSORIES
070–8969–03 B030871 1 MANUAL,TECH:SERVICE,WFM90 80009 070–8969–03
070–8969–03 B030220 1 MANUAL,TECH:SERVICE,WFM91 80009 070–8969–03
276–0838–00 B020561 1 CORE,EM HALF:EMI SUPPRESS,IMPED 298 OHM
AT 100MHZ,PKG,2–HALFS W/ CLAMP,
0.705 X 0.725,1.28 L, WFM91
83285 28A2025–010
386–6787–00 1 STAND FLIP:METAL 80009 386–6787–00
011–0167–00 1 COVER,HOOD:PLASTIC 80009 011–0167–00

Replaceable Parts List
8–8 WFM 90 and WFM 91 Service Manual
Replaceable Parts List (Cont.)
Fig. &
Index
Number Mfr. Part NumberMfr. CodeName & DescriptionQty
Serial No.
Discont’d
Serial No.
Effective
Tektronix
Part Number
016–1344–00 1CASE,CARRYING:CUSTOM CASE FOR WFM90 ,
TSG90 80009 016–1344–00
119–4540–00 1 POWER SUPPLY:12W,12V 1.0A,UNREGULATED,
220VAC 50HZ,183CM CABLE W/5.5MM OD,
2.1MM ID RT ANG CN C, EUROPEAN, WFM90
14310 D48121000A220CM
119–5424–00 B021958 1 AC ADAPTER ASSY:AC ADAPTER W/NOISE FILTER,
EUROPEAN, WFM90 80009 119–5424–00
119–4540–00 1 POWER SUPPLY:12W,12V 1.0A,UNREGULATED,
220VAC 50HZ,183CM CABLE W/5.5MM OD,
2.1MM ID RT ANG CN C, EUROPEAN, WFM91
14310 D48121000A220CM
119–5424–00 B020561 1 AC ADAPTER ASSY:AC ADAPTER W/NOISE FILTER,
EUROPEAN, WFM91 80009 119–5424–00
119–4541–00 1 POWER SUPPLY:12W,12V 1.0A,UNREGULATED,
240VAC 50HZ,183CM CABLE W/5.5MM OD,
2.1MM ID RT ANG CN C, UNITED KINGDOM,WFM90
14310 F48121000A220CM
119–5423–00 B021958 1 AC ADAPTER ASSY:AC ADAPTER W/NOISE FILTER,
UNITED KINGDOM, WFM90 80009 119–5423–00
119–4541–00 1 POWER SUPPLY:12W,12V 1.0A,UNREGULATED,
240VAC 50HZ,183CM CABLE W/5.5MM OD,
2.1MM ID RT ANG CN C, UNITED KINGDOM,WFM91
14310 F48121000A220CM
119–5423–00 B020561 1 AC ADAPTER ASSY:AC ADAPTER W/NOISE FILTER,
UNITED KINGDOM, WFM91 80009 119–5423–00
119–4542–00 1 POWER SUPPLY:12W,12V 1.0A,UNREGULATED,
240VAC 50HZ,183CM CABLE W/5.5MM OD,
2.1MM ID RT ANG CN C, AUSTRALIAN, WFM90
0GV90 WD377E1000CRA12C
N
119–5421–00 B021958 1 AC ADAPTER ASSY:AC ADAPTER W/NOISE FILTER,
AUSTRALIAN, WFM90 80009 119–5421–00
119–4542–00 1 POWER SUPPLY:12W,12V 1.0A,UNREGULATED,
240VAC 50HZ,183CM CABLE W/5.5MM OD,
2.1MM ID RT ANG CN C, AUSTRALIAN, WFM91
0GV90 WD377E1000CRA12C
N
119–5421–00 B020561 1 AC ADAPTER ASSY:AC ADAPTER W/NOISE FILTER,
AUSTRALIAN, WFM91 80009 119–5421–00
119–4539–00 1 POWER SUPPLY:12W,12V 1.0A,UNREGULATED,
100VAC 50HZ,183CM CABLE W/5.5MM OD,
2.1MM ID RT ANG CN C, JAPANESE, WFM90
14310 G48121000A220DM
119–5508–00 B021958 1 AC ADAPTER ASSY:AC ADAPTER W/NOISE
FILTER,JAPANESE, WFM90 80009 119–5508–00
119–4539–00 1 POWER SUPPLY:12W,12V 1.0A,UNREGULATED,
100VAC 50HZ,183CM CABLE W/5.5MM OD,
2.1MM ID RT ANG CN C, JAPANESE, WFM91
14310 G48121000A220DM
119–5508–00 B020561 1 AC ADAPTER ASSY:AC ADAPTER W/NOISE
FILTER,JAPANESE, WFM91 80009 119–5508–00

Diagrams
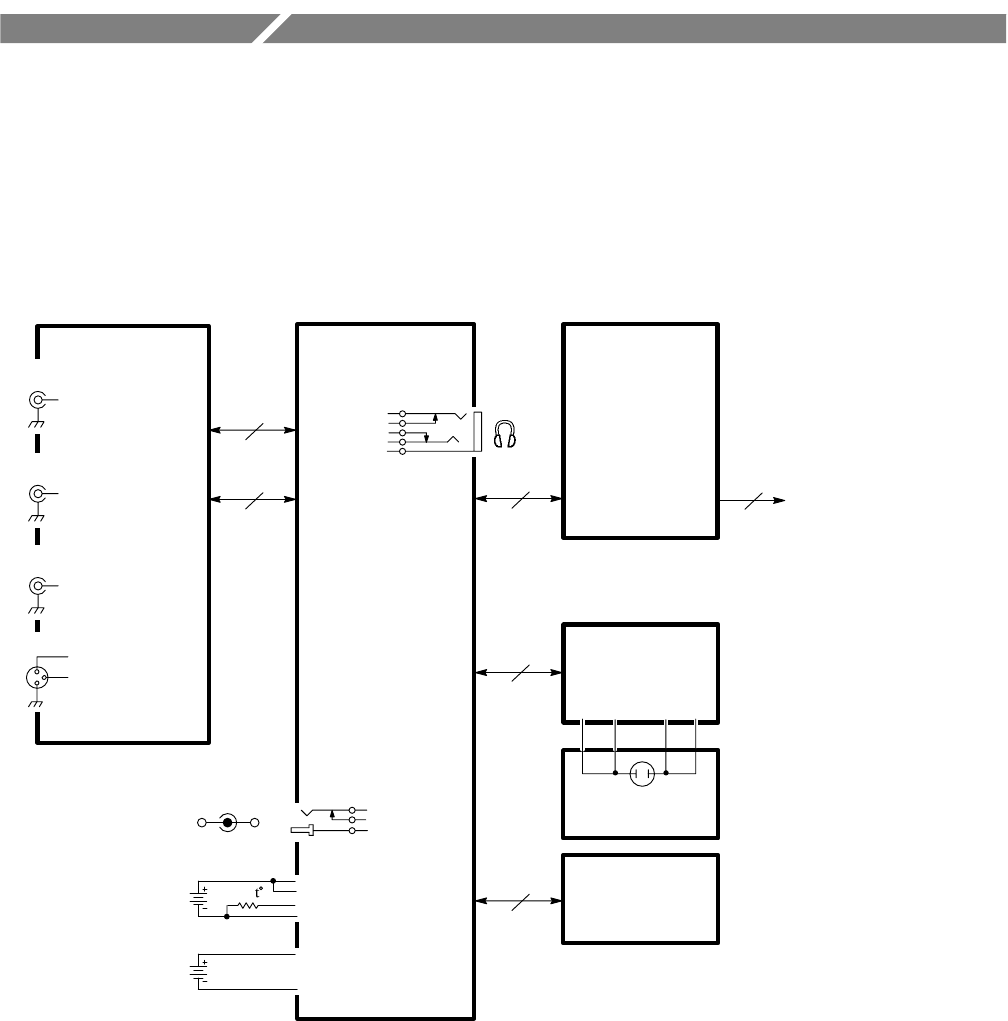
WFM 90 and WFM 91 Service Manual 9–1
Diagrams
This section contains the interconnect diagram for the WFM 90 and WFM 91
Handheld Waveform, Vector, Picture, and Audio Monitor.
A3 Bottom
Board
10
A1 Input
Board
60
10
J9J2
J20
J19
J11
A2 Top Board
12
20
J16 A5 LCD Display
Module
Video In J4
Ref In J5
Video OutJ6
Audio In
J7
J14
10
J12 J15
A4 Backlight
Board
W4W3W2W1
J13
J10
J21
J17
DC in 11–18V
Test only
Backlight
J25
NiCad Battery Pack
6 C Cell Batteries
Figure 9–1: Interconnect diagram

Diagrams
9–2 WFM 90 and WFM 91 Service Manual
