TeleEpoch G10 MOBILE PHONE-USB PORTION User Manual
TeleEpoch Limited MOBILE PHONE-USB PORTION Users Manual
UserManual.wiki
>
TeleEpoch
>
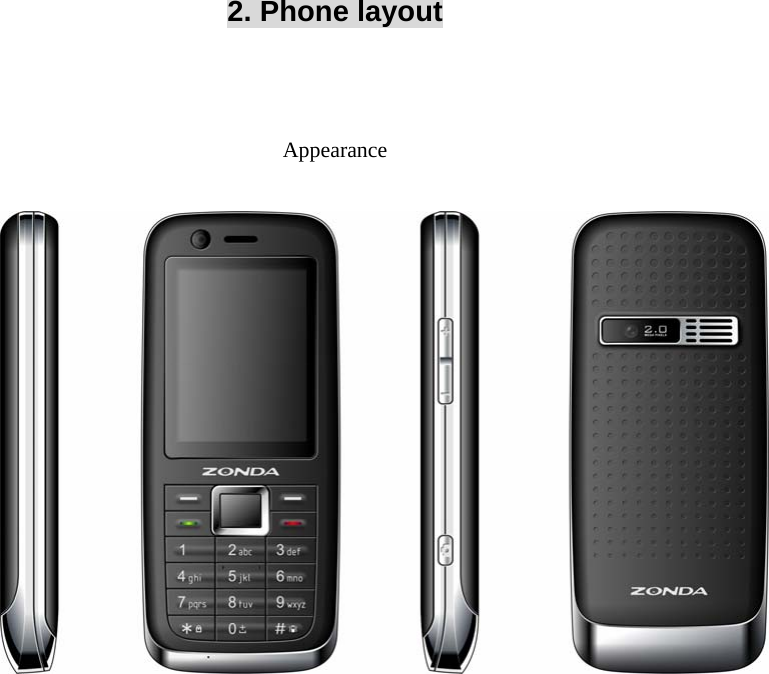
G10 User Manual
Users Manual
Navigation menu
Upload a User Manual
Namespaces
Wiki Guide
HTML
PDF
Info
Views
User Manual
Discussion / Help
Navigation

![4. Essential Topics Communication control keys The ‘Call control’ key is used for making a call (after a number has been entered); or for viewing recent call records. The ‘on/off’ key is used for ending a call (during dialing and communication state), or for exiting menu under menu state to return to standby menu. Pressing and holding this key may switch on or off the phone. Functional keys and soft keys Direction keys of up, down, left and right direction are used for browsing menus, lists, options or content compiled. Under standby state, the up-direction key is used as shortcut key for organizer; the down-direction key is used as shortcut key for contacts; the left-direction key is used as shortcut key for messages; the right-direction key is used as shortcut key for settings. Under standby state, the left soft key is a shortcut key for accessing main menu and the right soft key is a shortcut key for Contact. The functions of the two soft keys under other states are closely related to the phone’s current state. Under standby state, you can press and hold the key ‘#’ to switch between ringing tone and silence; press and hold the key ‘*’ to lock keypad. Standard keypad Keys from ‘0’ to ‘9’, and key ‘*’ and ‘#’ are used for dialing, inputting password, English letters, symbols etc. Note: After the phone’s standby interface maintains for period of time (time length is set by the user), the phone will turn off the backlight of the screen for the purpose of power saving. If the backlight of the screen goes out, you can press any key on the phone’s keypad to turn on the backlight immediately. Display icons Under standby state, common icons on the first row of the screen are as follows: Signal strength received by the antenna Alarm clock There is (are) unread message(s). Battery level indicator (This icon indicates full battery). Roaming Vibrate icon Ring icon Vibrate first then ring Mute Icon Keypad locked Language and input methods Languages supported by this phone are listed under the path [Settings]-Æ[Display Setup] -Æ[Language]. This handset provides input methods as Numbers and accustomed symbols input. Under editing status, you can press the key ‘#’ to switch between input methods and press the key ‘*’ to switch to symbol input method. For detailed operations please refer to relevant chapters of “Operation of Input Methods”. Short message alert modes Four modes of ‘Ring, Vibrate, Vibrate then ring, Off’ are available for your selection under the path [Settings]-Æ[phone setup] -Æ [Profiles], and then choose one alert mode-Æ[Customize]-Æ[Message Alert]. Call alert modes This handset has four alert modes of Ring, Vibrate, Vibrate First Then Ring, off for your selection under the path [Settings]-Æ[phone setup] -Æ [Profiles], and then choose one alert mode-Æ[Customize]-Æ[call alert]. Find contacts This handset provides a way to search for phone number by first letter of a name. Under the contact name list (press the right soft key](https://usermanual.wiki/TeleEpoch/G10/User-Guide-1262695-Page-6.png)
![◆and then enter a right password. 8. Operations of input methods This handset supports English and Spanish. You can set the language under the path [Settings]-Æ[Display Setup]-Æ[Language]. Input methods can be applied to many text input areas such as short message input name in the phonebook, standby greetings etc. This handset provides the following input methods: Multitap and Numbers. Under editing status, press the key ‘#’ to switch between these input methods, press the key ‘*’ to enter into symbol input interface. Multitap input method Multitap input method is to input letters by pressing corresponding keys with letters on the keypad. Normally it is used to input English. Wait a second after inputting a letter for the black strip on the letter to disappear and then you can continue to input the next letter. Press the right soft key once to delete the last letter and press and hold the right soft key to delete all input. Each key corresponds to 3 to 4 letters and press the same key quickly for several times to switch between these letters. Numbers input method Numbers input method is used for inputting numbers. Press the ‘0’-‘9’ keys on the keypad to input any number you want. Symbols input method Symbols input method is used for inputting some special symbols and punctuations. Under text editing state, press the key ‘#’ to enter into symbol input method. There are symbols on the screen for your selection. Press the numeric key before the symbol to select the symbol and return to text editing state. If the symbol you need is not displayed on the screen, please press the up and down-direction key on the keypad to scroll the page until you find the symbol you need. Appendix I Common fault diagnoses Trouble Possible reasons The phone cannot be 1. Any power in battery? 2. Battery is installed properly?](https://usermanual.wiki/TeleEpoch/G10/User-Guide-1262695-Page-19.png)