TeleEpoch M570 CDMA Mobile Phone User Manual User Maunal
TeleEpoch Limited CDMA Mobile Phone User Maunal
Contents
- 1. User Maunal
- 2. User Manual
User Maunal
1
Mobile Phone
User Guide

2
Table of Contents
1.Safety and Cautions .......................................4
2.Look and Feel .........................................5
3.Specification ............................................5
4.Essential Topics ..........................................6
5.Getting Started ..........................................7
6.Basic Operations .........................................8
7.Using the Menu ..........................................9
7.1 Menu option list ........................................ 10
7.2 Messages .............................................. 12
7.3 Contacts .............................................. 16
7.4 Games ................................................ 16
7.5 Call History ............................................ 17
7.6 Profiles ............................................... 18
7.7. Settings .............................................. 18
7.8 Tools ................................................. 19
7.9 Calendar .............................................. 21
8.0 WAP ................................................. 21
8.1 Camera ............................................... 22

3
8.2 Multimedia ............................................ 22
8.3 Blue Tooth ............................................. 23
8.4.Text Input Method ..................................... 23
Appendix I Common Fault Diagnoses ........................ 24
Appendix II Abbreviations and explanations .................... 24

4
1.Safety and Cautions
Switch off the mobile phone in the vicinity of chemical plants, gas stations and other locations
containing explosive objects.
Keep the mobile phone away from small children.
Switch off the mobile phone as instructed where signs are present.
Switch off the mobile phone before boarding planes and during flight.
Obey the local laws while driving. When hands free function is available, use the hands free
calling device to ensure safety. Park the car at the side of the road to make a call in emergency
situations only.
Take special care when using the mobile phone in the vicinity of such devices as pacemakers,
hearing aids and electro-medical equipment, which may be affected by the mobile phone.
When using other medical equipment, verify with suppliers and medical staff that the
equipment will not be affected,
There is no warranty or guarantee for accessories not produced by the original mobile phone
manufacturer.
Never attempt to disassemble the mobile phone. Opening the unit may void any warranty.
Recharging the mobile phone without the battery installed can damage the phone and create
a fire hazard.
Charge the mobile phone in a well-ventilated environment, and keep it away from flammable
or explosive objects.
To avoid demagnetization, keep the handset away from magnetic substances such as magnetic
discs or credit cards.
Keep the handset away from liquids. Remove the battery if the handset gets wet. Do not
attempt to use the mobile phone under these circumstances.
Avoid using the mobile phone in extreme temperature environments. Never leave the mobile
phone exposed directly to sunlight or in a extremely humid or dust filled environment.
Do not clean the handset with liquids or detergents.
Do not drop the handset or subject it to strong pressure or any other forms of abuse.
The original mobile phone manufacturer will not honor any warranties or guarantees if the
above instructions are not followed by the mobile phone user.
Please recycle the lithium-ion batteries or dispose of them properly. Do not dispose of the
batteries by throwing them into household waste.
5
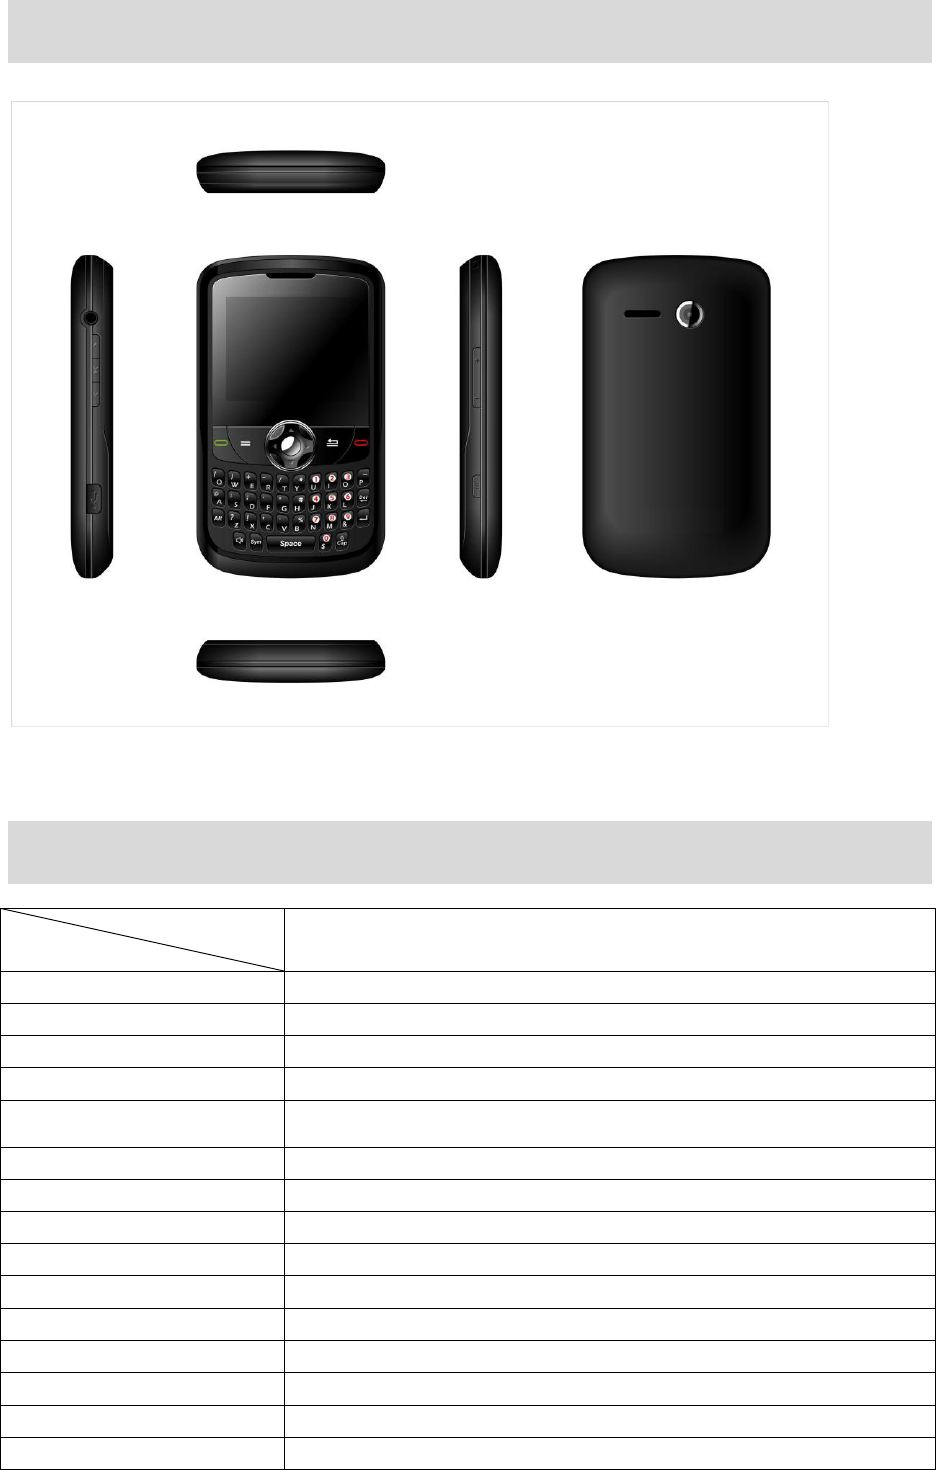
2.Look and Feel
Note:Picture is for reference purposes only.
3.Specification
Model
Specification
Dimension
110×63×13.9mm
Weight
110g
LCD display resolution
1600*1200
Frequency
800MHz/1900MHZ
Contact capacity
500
SMS capacity
200 messages
Call history
20 each for missed, answered and dialed calls
Vibrate
Supported
Preset ringtone type
5ringtones
Preset SMS ringtone
5 ringtones
Call time
Supported
Single key dial
Supported
Blacklist
Supported
Date and time display
Supported
Alarm/Calculator
Supported

6
Smart Input method
Supported
Receive/Send SMS
Supported
English/French input method
Supported
Incoming call display*
Supported
Call forward*
Supported
Call blocking*
Supported
Call waiting*
Supported
Voice message*
Supported
Reduced Temperature Range
-15°C to 50°C
Note: Funcons or services marked with ‘*’are supported by this unit but require network services to fully
function.
4.Essential Topics
Communication control keys
The green ‘Answer /Send’ key is used for answering a call, making a call (after a number has been
entered); or for dialing from the call history.
The red ‘On/Off’ key is used for ending a call (during dialing and communication state), or for exiting
menu under menu state to return to standby menu. Pressing and holding this key will switch the
phone on or off.
Navigation keys and soft keys
Navigation keys of up, down, left and right direction are used for browsing menus, lists, options or
content compiled.
Under standby mode, the up/down navigation key is used to change the volume of the ring from
maximum to Zero. Right and left navigation keys scroll thru Messages to Contacts, to Call History to
Profiles. Under standby state, the left soft key is a shortcut key for accessing main graphical menu.
The functions of the two soft keys depend on the mode and the functions that are being accessed.
The keypad
Keys from ‘0’ to ‘9’, and key ‘*’ and ‘#’ are used for dialing. (# and * automatically switch from text to
digit depending on the mode the phone is currently in.)
Inputting password, letters, symbols etc. is accomplished by the QWERTY keyboard. See the section
on input method for further details.
Backlight
After the mobile phone is in standby for period of time (time length is set by the user), the phone will
turn off the screen backlight to save power. If the screen backlight goes out, you can press any key on
the phone’s keypad to turn on the backlight again.
Display icons
In standby, common icons on the top of the screen are as follows :

7
Signal strength received by the antenna
Alarm clock
There are unread messages
Battery level indicator (This icon indicates full battery).
Vibrate mode
Ring mode
Silent
Keypad locked
Missed call
Bluetooth
Alert modes
There are multiple user-selectable tones available for text message and call notifications. Please
follow the paths below for selecting the modes and the specific tones for each type.
Text message alerts: For text message alerts, follow the path [Profiles], then choose one alert
mode from the list (General, Silent, Meeting, Outdoor, Headset, In Car, Airplane)
[Personalize] [Message Alert Tone], select, OK and exit.
Call alerts and ringtones: Follow the [Profiles], then choose one alert mode from the list
(General, Silent, Meeting, Outdoor, Headset, In Car, Airplane) [Personalize] [Caller Ring
Tone]-and select tone, OK and exit.
Find contacts
This handset provides a way to search for phone number by first letter of a name. Highlight and select
‘Contacts’ under main, input the first letter of the contact’s name and the screen will display all
applicable records.
5.Getting Started
Charging your battery
A new baery must be fully charged before it is used for the rst me.
To keep the baery funconing opmally, it is recommended that you occasionally discharge
the baery fully by consuming the power unl the phone is switched o automacally.
During the course of charging, it is normal for the phone and the battery to heat up slightly.

8
The phone will automacally protect itself when baery temperature rises to control
temperature variaon by extending the charging time.
The handset will give o an alert as the baery is running out. When the power has run out
the handset will be switched o automacally.
Note: Actual time of usage of the battery varies according to different operation modes and settings
of network base station. If you use the phone when battery is rather low, the phone may switch off
automatically.
Procedure for battery charging
Insert the charging plug into the Micro USB jack of the phone, then connect the charger to a
wall socket.
While the battery is charging, the baery symbol will gradually scan from right to le.
You may choose to charge the baery under power-o or standby state. If the phone is
charged under power-o state, it will start and display the graphic denoting that the unit is
‘Charging’.
When the battery is fully charged, charging operation stops automatically. The battery symbol
on the screen will maintain a graphic showing that the battery is full. At this time, please
unplug the charging plug.
Calls can be made while charging.
USB Charging
The phone may also be charged by plugging a cable with the micro-USB end to the phone and the
other end to a supported USB source for power such as a computer.
6.Basic Operations
Switching on
Pressing and holding the ‘on/off’ key in the standby state will switch on the phone. It will automatically
search the network as long as the phone has no password protection. After the phone has registered
on the network, the signal strength will be displayed at the top right corner of the screen. The phone is
now in the standby state and you can make or answer a call.
Your phone remains in a searching state if it fails to find the available network system.
If a password for the phone is required after it is switched on, please input the password, , then press
the right soft key for confirmation. After unlocking, the phone will display the signal strength.
Switching off
To switch off the phone, please press and hold the ‘on/off’ key for 2 seconds or more if the phone is in
the standby state. When the phone displays ‘power off’, the phone will switch off.
Warning: If you switch off the phone by removing the battery, you may lose stored information.
Making a call
Under standby state, input number directly via the keypad. In case of international number, please see
your local requirements to access international service or press alt ‘O’ until ‘+’ displays and then input
the number completely. Then press the ‘Answer/Send’ key to make the call.

9
If you want to make a call to another city within the country, you’ll need to use a long-distance area
code.
To end a call, press the ‘on/off’ key. When a call is ended, the call timer stops and the text ‘Call ends’ is
displayed on the screen.
Saving a number by dialing
You may save the other party’s number in the contacts list (phonebook), or by dialing under standby
state. The number saving procedure of the former method is described in details in communication
phonebook section of this manual. Specific steps for saving a number by dialing under standby
state are as follows:
Input the other party’s phone number under standby state.
Press the left soft key for Options. You may highlight ‘save” then OK to save this number ”to
Phone” (the number is saved in the phone), to ‘Update records’ (add this number to an
existing contact), save this number in the phone.
Adjusting the volume during a call
During a conversation, you may press the up and down-navigation key (on the side of the phone) to
adjust the volume of earpiece.
Answering a call
To answer a call, press the green ‘Answer Call’ key to answer the call directly. To reject a call,
press the red ‘On/Off’ key . The call will go directly to Voice Mail, if that service is active.
If you have subscribed to the caller ID service, then during the conversation the caller ID will
be displayed on the screen. If this number is already saved in the phonebook, then caller’s
name will also be displayed on the screen.
To end a conversation, press the ‘on/off’ key.
Note: If you have subscribed to the call forwarding services, incoming calls may be forwarded to the
specified number automatically.
Call Silencing
When ringing tone is enabled, you may press and hold the # key to select vibration mode, and back
again by pressing and holding the same key.
Recent call numbers
This handset will store the 60 most recent numbers in the call history. On standby screen, press the
‘Answer/Send’ key to display the call history. You can press the up and down keys to view the called
numbers and press the ‘Call’ key to directly dial the selected number. You may also access the call
history menu to view the most recent call history.
Missed call
If there are missed calls, the missed call symbol’ will be displayed on the main screen. You can access
the call history menu to view the record of the calls missed.
7.Using the Menu
The main menu has four options, Messages, Contacts, Call History and Profiles. By pressing the left
10
soft key, all 12 menu items can be viewed. Each set of menus is further divided into multi-item
sub-menus. Menu functions may let you set, check or change the phone’s various functional settings
to meet your personal requirements. Please refer to the following ‘Menu option list’ for selection of
the functions you require.
Press the navigation keys to select from the menu. Press OK key or left soft key to enter the
sub-menu list of the selected menu. Then press up and down-navigation key to select and the
left soft key to confirm or enter into the lower-level menu.
Press the right soft key to return to higher-level menu. Press the ‘on/off’ key to exit the menu
directly and return to the standby screen.
In editing state (during texting or adding names, etc), the right soft key has deleting function.
Press it once to delete one character and hold it to delete all the input characters.
In options, ‘On’ or ‘Activate’ enables corresponding function and ‘Off’ or ‘Cancel’ disables
corresponding function. By pressing the ‘back’ key before changes are made, the previous
selection remains unchanged.
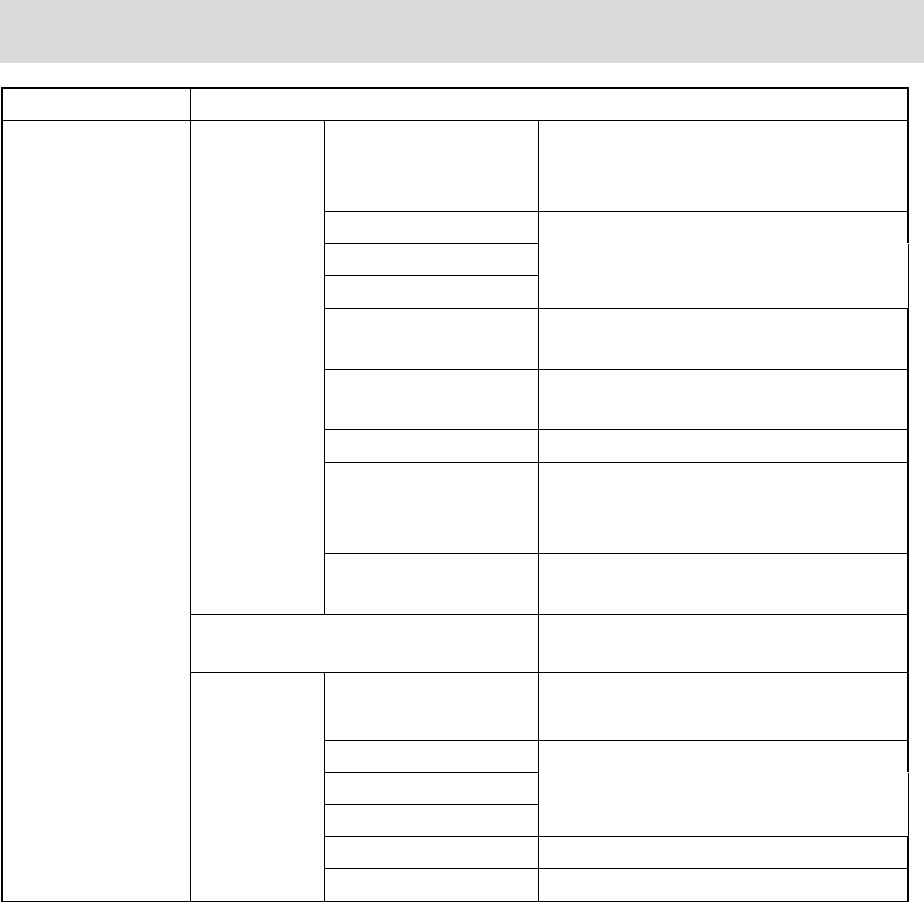
7.1 Menu option list
Option
Brief Description
Messaging
SMS
New SMS
Create message, preset message,
continue edit
Inbox
200 total pieces for inbox, outbox and
sentbox
Outbox
Sentbox
Draftbox
50 pieces in Draftbox
Templates
Commonly used phrases
Deferred
Drafts of messages
Settings
Delivery report, storage, validity
period, auto delete
Delete all
All, Inbox, Outbox, Sentbox, Draftbox
Voice mail
Edit number, connect to voice mail
MMS
Create MMS
Create MMS, Inbox, Outbox, Drafts,
Sent, Templates, Settings
Inbox
200 total pieces for inbox, outbox and
sentbox
Outbox
Sent
Draftbox
50 pieces in Draftbox
Templates
Commonly used phrases

11
Settings
Profile, Send, Receive, Edit, View
Mode Memory Status, Restore
default, Save MMS
Contacts
Contact List
Display all contacts.
Search Entry
Search contacts by name
Add new Entry
Add new contacts to the phone.
Delete
Delete call contacts in phone.
Memory Status
Check memory status of phone.
Game
Snake
Russia Block
Call History
Missed calls
Maximally display 20 pieces missed
call
Received calls
Maximally display 20 pieces received
call
Dialed call
Maximally display 20 pieces dialed call
Delete log
Delete Missed Calls, Delete Received
Calls, Delete Dialed Calls, Delete All
Call time
Last Call Time, Total Dialed, Total
Received, Total Call Time
Profile
General, Silent, Meeting, Outdoor,
Headset, In Car, Airplane
Activate, Personalize
Settings
Call Setup
Time Reminder, Call Connect
Notification, Blacklist, Emergency Call
Display
Setup
Wallpaper, LCD Backlight, Brightness
Call History Lock
Security
Contacts Lock
Enable/Disable
Setup
Message Lock
Off, 5 sec, 30 sec, 60 sec, 5
min
Change Password
Enable/Disable
Restore Factory Setting
Enable/Disable
Phone Lock
Enable/Disable
Keypad Lock
Language
English/French
Phone
Greeting
Choose, Disable/Enable
12
Setup
USB Disk Mode
Clock Format
Digital 12, Digital 24
Date Format
DD/MM/YYYY, etc
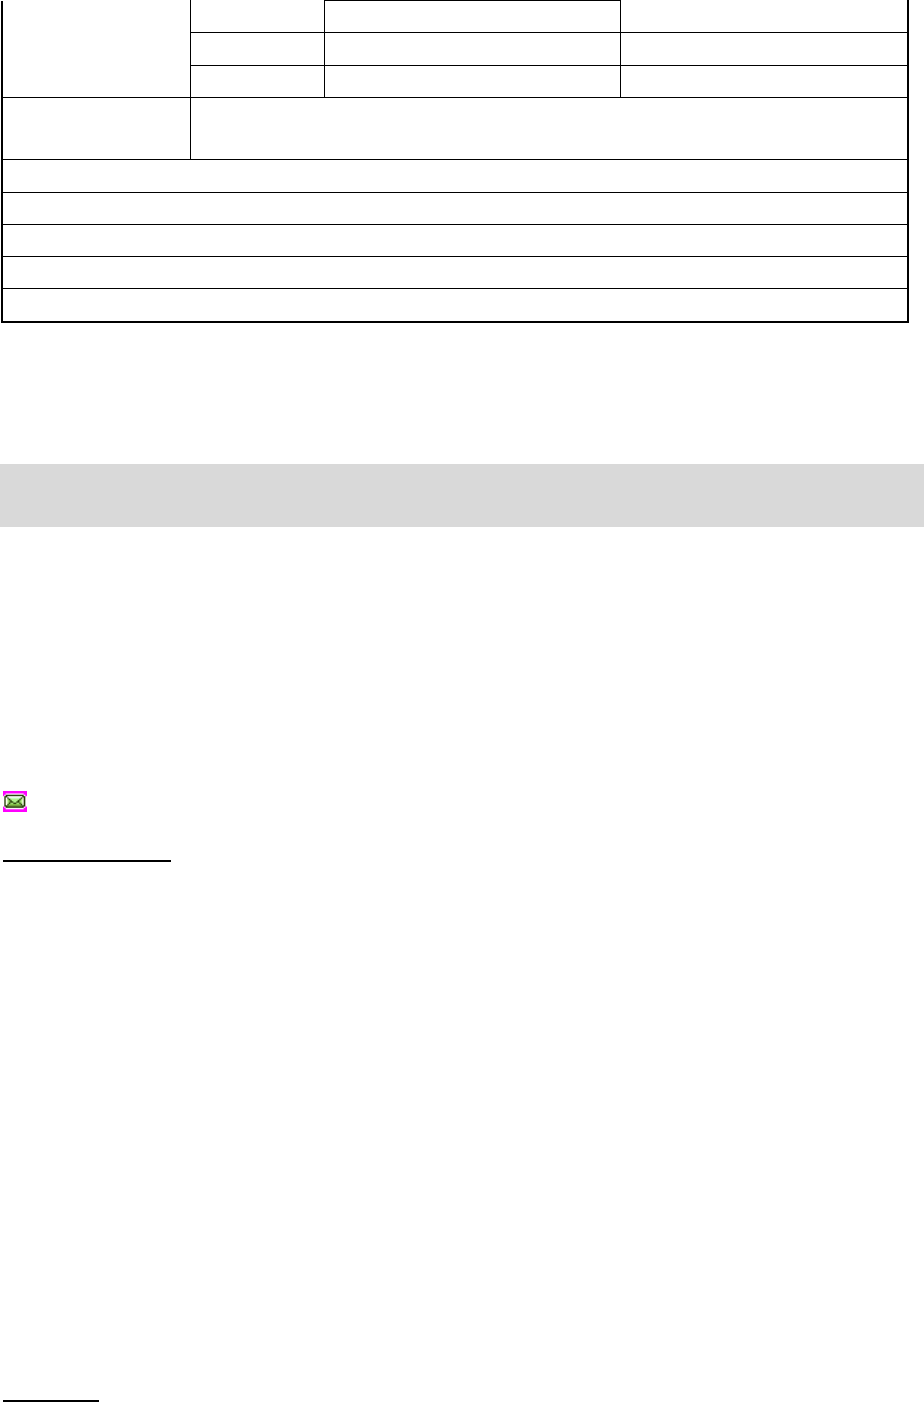
Phone info
Software Version, Hardware Version, Phone Number, MEID, PRL Version, SID
Alarm(3 alarms in maximum )
Calculator
Stopwatch
Calendar
Note: This menu structure only lists the main menu of this phone; for details please see the phone’s
software.
7.2 Messages
Text messaging is a network service. You may be required to subscribe to the service from your
network operator prior to sending and receiving text messages. Under standby status, you can use the
up-navigation key to access the text message menu.
A message is sent to the messages center of the network, then to the targeted user by the network. If
the targeted user’s phone is off or out of network area, the network will store the message
temporarily.
When the phone receives a new text message, you will be prompted according to setting and the icon
will appear at the top of the main screen to indicate unread text message.
New text Message
You can create a text message in this menu. Every text message has a capacity of 160 characters.
Once the text has been entered, the following options are available, by pressing the left soft key.
Save and send: Send text message and save it to outbox.
Send: Send text message.
Send to many: Send text message to others .
Save: Save text message to draft.
Insert Contact info: Insert contact number.
Insert text template: Insert common phrase in the text message. It provides you with 12 common
phrases.
Sending Options: Set delivery priority, send reporting, immediate/delayed send, send date and
time.
Text Entry: Select input method.
Saveto Drafts: Save to outbox.
Cancel Message: Return to information list interface
Voice Mail
Edit Number: Display the voicemail number you have set. You may also modify this number.
Connect to voicemail: Call the voicemail number that has been set.

13
Inbox
The Inbox is used for reading text messages received. In the inbox, the phone can store up to 50 text
messages. You may press up and down-navigation key to browse the message list. Press the up and
down navigation key to scroll the list. In the message reading mode, the following options are
available.
Delete: Delete the text message you are currently reading.
Reply: Reply to the text message you are currently reading.
Forward: Forward the text message you are currently reading to others.
Use number: Retrieve the number from the message. It can then be saved or called.
Outbox
This feature is used to store sent and failed messages (select store send when sending)
Send: Send the message currently being read.
Delete: Delete the message currently being read.
Delete Multiple: Delete multiple items.
Forward: Forward the message currently being read (it can be edited).
Clean up Message: Delete all Outbox messages
New SMS: Create a new text message.
Sentbox
The sentbox is used for storing the text messages you have sent.
Delete: Delete the message currently being read.
Delete Multiple: Delete multiple items
Clean up Message: Delete all Outbox messages
New SMS: Create a new text message.
Draftbox
After editing a new text message, choose “Save”. The message will be saved into the draft box.
Delete: Delete the message currently being read.
Delete Multiple: Delete multiple items
Clean up Message: Delete all Outbox messages
New SMS: Create a new text message.
Template
There are 12 common short phrases stored in the phone. You can add, then edit or delete your own
common phrases.
Deferred
Lists messages that have been deferred sending.
Settings
Delivery report: This is a message sending receipt. It’s used for indicating whether the message

14
is sent successfully or not.
Validity Period: 12 hours, 1 day, 1 week, 1 month, 200 days (sets the time that texts are stored)
Auto Delete On/Off
Memory Status: Displays the amount of memory being used for Contacts and text messages.
Signature: Set signature information.
Delete All
ALL: Delete all text messages stored in the outbox, inbox, sentbox, outbox
Inbox: Delete all text messages in the inbox in the phone.
Outbox: Delete all text messages stored in the outbox.
Sentbox: Delete all text messages in the sentbox in the phone.
Draftbox: Delete all text messages in the draftbox in the phone.
Voicemail: Delete all messages in voicemail
MMS
Your cell phone can also send and receive MMS. This means you can send messages that contain
photos, sounds, and text through a MMS service.
When sending a MMS message, the receiver must be using a MMS compatible cell phone in order for
him or her to view your message.
Note:
This feature can only be used with a network provider or service that supports MMS. MMS messages can
only be received and viewed by devices with MMS compatibility or e-mail features. Access to the
internet is the premise for sending MMS messages. Please contact your local network operator for
setting up MMS messaging.
Create MMS:
Receiver: Set the number or e-mail address of the receiver.
Edit Content: Edit the content of the MMS. Press “Edit” to enter the following options.
o Add: You can add a new page, theme, number to CC, number to BCC, or e-mail address.
o Insert: You can insert images, sounds or other elements using the cell phone or T-FLASH.
o Preview: Preview the inserted multimedia elements.
o Slideshow Time: Set the time when the images change in the previewed multimedia
message.
Inbox:
This menu allows you to review your received MMS messages. Select MMS and click the left keypad to
enter the following options:
Open: View the content of a MMS message.
Reply: Reply to the sender with a MMS, text, or e-mail message.
Forward: Forward the selected MMS message to another person.
Delete: Delete the current MMS message.
Delete All: Delete all the MMS messages in the Inbox.
Lock/Unlock:
Save As Template: Save this MMS message as a template.
Outbox:

15
MMS messages that failed to send or are being sent are stored in the Outbox. The following operations
can be performed on the messages in the Outbox:
Resend: Resend the selected MMS message.
Delete: Delete the current MMS message.
Delete All: Delete all the MMS messages in the Inbox.
Lock/Unlock:
Drafts:
MMS messages can be optionally stored in Drafts after being edited. The following operations can be
performed on messages in Drafts:
Forward: Forward the selected message.
Delete: Delete the current MMS message.
Delete All: Delete all the MMS messages in the Inbox.
Lock/Unlock:
Sent:
MMS messages there were successfully sent are stored in Sent. The following operations can be
performed on messages in Sent
Send Again: Resend the selected MMS message
Forward: Forward the selected message.
Delete: Delete the current MMS message.
Delete All: Delete all the MMS messages in the Inbox.
Lock/Unlock:
Templates:
Edited MMS messages can be stored in Templates.
Settings:
This menu allows you to make the following settings to the configuration for sending and receiving
messages.
Profile: Select a Public mobile or User-defined Network.
Delivery Settings: Set delivery reports, save sent items, and validity period.
o Delivery Report: Set to enable or disable the delivery report.
o Save sent items: Set to enable or disable the save sent items.
o Validity period: Set the validity period for storing MMS messages as Max, 1 week, 2 days, 1
day, 12 hours, or 1 hour.
o Delivery time: Set the delivery time as Immediate, 1 hour, 3 hours, 6 hours, or 12 hours.
Receive Settings
o Send Delivery Report: Set to enable or disable the send delivery report.
o Retrieval Mode: Set the retrieval mode as automatic or manual.
Edit Settings
Signature: Set to enable or disable the signature.
Slide Time: Set the switch time when previewing MMS message slideshows to 2 seconds, 5
seconds, 8 seconds, or 10 seconds.
Preview Mode: Set the preview time to manual or automatic.
Storage Status: Display the use rate and storage space of received and sent MMS messages.

16
Restore Default Settings: Restore settings to their defaults.
Save MMS Messages: Select the storage location as internal memory card or cell phone.
7.3 Contacts
In the standby mode, highlight the Contacts Icon and press the Center Select key to access the contact
list. After accessing the phonebook, scroll up and down-navigation key to browse the records. When
the cursor stops at a certain record, press the left soft key to access the menu of various operations for
this record.
In the Contacts menu from the Menu screen the following options are available.
Contact list
Display all contacts.
Search
This handset provides a way to search for phone number by name. After correctly inputting the name
to be searched, press the left soft key and the screen will display the record for which you are
searching.
Create new Contact
After accessing the Add New Entry menu, you may select to add a record to your phone.
Input name and number, then save. If you need to add other information to the record, you can do this
in ‘Edit’ menu.
Group
You can set five groups.
Set Speed Dial
Set keys and enter contacts for Speed dial.
Memory info
Display the memory status of the phonebook in the phone.
7.4 Games
This handset provides two fully-graphic games: Russian Block and Snake. Select Games from the main
menu to access the game list. Press the left soft key to confirm. When the game interface and
description of the selected game appears, press the left soft key again to start the game.
Both games allow turning the audio On/Off and provide Help and High Scores. Please see the menu
for each game for Rules and Help.

17
7.5 Call History
Missed calls
If there are missed calls, you can view the detailed information of the missed calls in the ‘missed calls’
menu. Each record contains the number or the contact name if number is already in the phonebook,
date, time etc. Press the up and down-navigation key to view the information of other missed calls.
Press the ‘Call control’ key to dial this number and press the right soft key to return to higher-level
menu. Missed calls are divided into the following two situations:
1. If the number is not stored in the phone, the phone number will be displayed in the missed call list.
Select the number and press the left soft/menu key to access the sub-menu of this missed call, which
has the following 5 items:
Delete: Delete this missed call number record.
Save to Contacts
Dial
Send SMS: Send text message to this missed call number.
Blacklist: Block all incoming calls from this number
2. If this number is already stored in the phone, the caller’s name will be displayed in the missed call
list. Select one of the names and press the left soft key to access the sub-menu of this missed call,
which has the following functions:
Delete: Delete this missed call number record.
Save to Contacts
Dial
Send SMS: Send text message to this missed call number.
Blacklist: Block all incoming calls from this number
Received calls
The phone saves the 20 most recently received calls automatically. Functional operation and display
mode is the same as those of missed calls.
Dialed calls
The phone saves the 20 most recently dialed calls automatically. Functional operation and display
mode is the same as those of missed calls.
Delete log
Delete Missed Calls: Delete all records of missed calls.
Delete Received Calls: Delete all records of received calls.
Delete Dialed Calls: Delete all records of dialed calls.
Delete All: Delete all records of recent calls.
Call time
Last Call Time
Total Dialed: Total of all dialed calls time since the timer was reset last time.
Total Received: Total of all received calls time since the timer was reset last time.

18
Total Call Time
7.6 Profiles
Here you can set different profiles according to your requirements. You have seven choices: General,
Silent, Meeting, Outdoor, Headset, In car, Airplane
Activate: Set to be current active profile.
Within the “Personalize” menu, you are able to customize the following settings for each of the above
choices,
Incoming call alert: Alert method for incoming calls.
Ringtone: Select the incoming ring tone.
Ring volume: Set the ring volume for incoming calls.
Vibrating alert: Select whether or not to enable vibration.
Message alert tone: Select the text message alert tone.
Keypad tones: Set the keypad tone.
Auto Answer: Set auto answer time.
Speaker Phone: Select whether or not to enable the speaker
7.7. Settings
Phone Setup
Greeting: Switch between Enable and Disable
Clock Format: Set between 12 hour (w/AM and PM) or 24 hour.
Date Format: Set the order of Month, Day and Year
USB Disk Mode: Connect by USB to another device or T card to be able to access the
documents on the phone or T card.
Display Setup
Wallpaper: Display this picture as background.
LCD Backlight: This option provides you different time periods for your selection as the
backlight duration time. The screen turns off the backlight automatically when time is out. You
can choose one of three choices: ‘Always on’, ’10 seconds’, ’30 seconds’, ’Always On’.
Brightness: You can choose different brightness type of the LCD backlight by pressing the
navigation key.
Call Setup
Call Duration Reminder: Set the reminder to sound during calls at 45 seconds, 50 seconds, 55
seconds, or off.
Call Connect Notification: If this feature is turned on, then a notification will sound each time a
call is connected.

19
Blacklist: You can set up a blacklist. After enabling the blacklist, the phone numbers listed in
the blacklist will not be able to call this phone.
o Status: Disable/Enable.
o Blacklist List: Up to nine blacklisted entries can be added. You can edit the list through
this menu.
Security setup
You must input correct phone password before accessing Security setup menu. The initial password is
1234.
Phone Lock If ‘Enabled”, from then on the system will prompt you to enter the phone’s password
when switched on and only when the password is correctly entered can you use the phone.
Keypad Lock Keypad will not be automatically locked if ‘Off’ is selected. Otherwise, after the time
selected, for example 5/30/60 seconds, 5 minutes as your option, keypad will be automatically
locked after that time with no key operation. Even when locked, you may answer an incoming call.
To unlock, press * then Answer/Send key
Call History Lock: If ‘Enabled” from then on the system will prompt you to enter the phone’s
password when switched on and only when the password is correctly entered can you use the
phone.
Phonebook Lock: If enabled, the phonebook cannot be edited until the password is entered.
Message Lock: If enabled, the messaging function will not be available, until the password is
entered.
Change Password: Change the password via this option. The Old Password must be entered
before a new one is accepted. Enter the same new password twice and press the left soft key to
confirm. The new password will then become effective. During this course you may press the right
soft key to discard the change at any time and return to higher-level menu. You can create
separate passwords for the phone, the call history, the phonebook lock and the message lock.
Restore Factory Settings: This function is used for restoring to the default factory settings.
Phone Info: Displays cell phone information.
7.8 Tools
File Manager
This phone provides memory space for use by the user. T-Flash cards (of optional capacity) are also
supported. You can use these features to easily manage the directories and files of all forms stored on the
cell phone or T-Flash card. Go to “My Storage”, click “Options” to access the following operations:
Open
Use this function to enter the root directory of the memory. Default system directories, created data
directories, and account files will be listed at the root directory (the root directory will only contain system
folders the first time the phone is turned on or if the user has yet to create any directories).
Select a folder (such as the “Music” directory on the T-Flash card), click “Open” to enter the music list,
click the left keypad to enable the following operations:
Send via: Send through Bluetooth.
Serve As: Serve as the tone for incoming calls or alarms.
Manage: The following actions can be performed on the files listed: copy, move, delete, rename, and

20
view properties.
Tags: Add tags to this document.
Delete: Delete this document.
Memory: Display available space and total capacity.
Create a New Folder
This feature can be used to create a new data folder at a location you designate.
Format
Format all the data in memory using said feature. The system will then recreate default directories.
After formatting, data cannot be restored. Please be very careful when using this feature.
Alarm
You may set up to 3 alarms.
Operation tips:
Press the up and down-navigation key in the tools main menu and select alarm. Press the left
soft key to access the alarm list.
Press the up and down-navigation key to select one of the alarms and press the left soft key to
access the alarm setting.
Press the left and right-navigation key in the alarm clock setting interface to select alarm clock
setting content. You may set the alarm clock using State (On/Off), Time, Mode and Prompt.
The AM/PM is set by the numbers 8 for PM, 0 for AM.
When you have selected state, press the up and down-navigation key to select the next line;
when you have selected time, you can input the time directly.
Notes
This function is a place to write notes to yourself, assign a type of note and store them.
Calculator
Calculator can perform four fundamental operations (plus, minus, multiply, divide). Use 0-9 keys to
input a value.
The layout of the calculator matches the keypad, so that multiplication is shown with the “*” key, the
enter key is the = sign, addition is with the + key and so on. You can also press the navigation keys to
select one of the four operations: plus, minus, multiply and divide. Press numeric keys or symbol keys
to input the second operation value and then select enter key. The result will be displayed on the
screen.
Stopwatch
This unit provides two stopwatch functions, common mode and loop mode.
The Common Mode is a simple stopwatch, on/off and reset. Press “Select” to start timing. Press Select
or left soft key to stop. Press again to continue timing. If there is a time noted, press the right soft
key to clear.
The Loop Mode is so that additional time segments can be added, started and stopped to record

21
various activities within the event. The “add” button adds another loop while recording the previous
loop’s time.
World Time
To view the time in different locations of the world, scroll right/left across the map.
Brew
This phone provides a BREW downloading feature. You can use this feature to download any games and
application software you wish. The Brew encompasses end users' ability to shop for, purchase, download, and
install software over the wireless carrier's network.
The BREW Shop lets users browse the carrier's Application Download Server to see what applications are
available for purchase or trial. The entire transaction is completed over the air. The carrier generates a billing
record for each purchase and a corresponding charge appears on the subscriber's monthly phone bill.
7.9 Calendar
Calendar: You can view the current date or scroll the calendar to view other monthly
calendars.
Schedule: You may schedule an event into the calendar, with date, time and an alarm to notify
you of that event. By highlighting an entry, the following options are available
o Delete
o Add
o View and Edit
o Delete All
8.0 WAP
This feature allows your cell to browse the internet. Your cell phone provides certain modes of
access. All you need to do is start one to these modes and you can then start browsing.
Home Page: A home page can be saved with each mode. When using WAP to browse, the home
page for this mode will first be accessed.
Search: Highlight to select a search engine to perform searches, then enter text criteria To search
on.
Enter URL: Enter an URL for the web address to be connected to.
History: You can review the latest accessed web pages.
Bookmarks: Multiple bookmarks can be created. Enter the Options menu and you can perform the
following operations on Bookmarks:
o Open: Log in to the selected web address.
o Add bookmark: Add a new bookmark.
o Delete bookmark: Delete the selected bookmark.
o Delete all bookmarks: Delete all the bookmarks.
o Edit bookmark: Edit the name and web address of the selected bookmark.

22
o Lock bookmark: Lock the bookmark.
o New directory: Add a new directory.
o Details: View the details on the selected bookmark.
o Reset: Restore default settings.
Push Box: Store information on messages to notify the user about WAP site messages.
Save pages: – Used to save a page for reviewing the web page later
Advanced Options: Advanced options are primarily used to configure certain internet parameters
and information.
About: Displays the WAP software LOG.
Exit Browser: Exit the browser and return to the menu interface.
8.1 Camera
The camera can be accessed in either of three ways: simply by pressing the button on the side of the
phone, thru the main menu or thru the multimedia menu..Once you are in the camera interface, you
can use this feature to take pictures as you wish.
Select “Camera” to enter the interface. The functions for the icons at the bottom are explained as
follows:
Take a Picture: Take picture and store the photo.
Focus Adjustment: After moving the cursor to the selected icon, press the up and down
keypad to zoom in or out of the photo.
Exposure Compensation: After moving the cursor to the selected icon, press the up and down
keypad to adjust the brightness of the image.
Album: After moving the cursor to the selected icon, press the “OK” key to browse the photos.
The album displays the images in a matrix view. Press the up and down keypad to scroll.
Photo size: After moving the cursor to the selected icon, you can select different sizes for the
photos, such as 1280 x 960, etc.
Note: Please follow local laws and regulations when using this cell phone to take pictures.
8.2 Multimedia
Music Player
The music player is provided for you to play all music file types stored on the cell phone or storage card.
Supported music file formats include: MP3, MIDI, AMR, AAC, WAV, and QCP. The music player interface
icons are sequentially: Previous, Pause, Play, Stop, and Next. You can move the cursor using the left and
right keypad and then press the “OK” key to perform an operation.
Press the left keypad to enter to options. The functions for the “Options” provided are as follows:e
Add To List: New songs can be added from the file manager.
Play: Play the currently selected song.

23
Play List: After selected a play list, the music player interface will display the items in the list. They
can be play in order or songs can be selected from the list.
Repeat: Repeat the song.
Bluetooth Playback: After connecting a Bluetooth device, the music can be heard through
Bluetooth earphones.
Delete: Delete the currently selected song.
Delete All: Clear the play list.
8.3 Blue Tooth
Device Search: When a Bluetooth device is enabled, all Bluetooth hands free devices and Bluetooth
devices will be searched for. Bluetooth devices are then added and paired. After detecting a
Bluetooth hands free device, a Bluetooth password must be entered to perform the pairing. Once
pairing completes, it will connect with the device. (Bluetooth passwords are set by other Bluetooth
devices.)
Discoverable On 3 minutes: Enable this function to make it discoverable within three minutes.
Found Devices: Display detected devices.
Manage: List the devices connect to the cell phone. Bluetooth hands free devices and Bluetooth
devices can be deleted and configured.
o Pair: Pair with the device selected.
o Remove: Remove the selected device from the list.
o Browse Files: When browsing files, the selected device must be successfully paired.
o Setup Bluetooth: Enable and disable Bluetooth, rename, and device status.
8.4.Text Input Method
This handset supports full English and French. You can set the language under the path [Settings] >
[Phone Setup] > [Language].
Multiple text entry modes are available in the SMS text input screen. By selecting, ‘More” and then
‘Text Entry,’ the mode can be changed. The icon in the upper left of the SMS screen changes to show
the modes.
Abc –first letter capitalized
abc –all letters lower case
ABC –all letters upper case
En –predictive text in English
Fr –predictive text in French
123-numeric
In the predictive text modes, after the first two letters are input, suggestions to the word are noted at
24
the bottom of the screen. By pressing the ‘navigation’ key to the right, additional words are
presented. By selecting the word and pressing the ‘select’ key, that word is entered.
sym This key brings up a separate screen showing commonly used symbols. This is active for one
keystroke only.
^aA Changes the case of letters for one keystroke, reverting back to standard case with the next
key pressed.
Alt Changes the key from letter to the related number or punctuation, for one keystroke only.
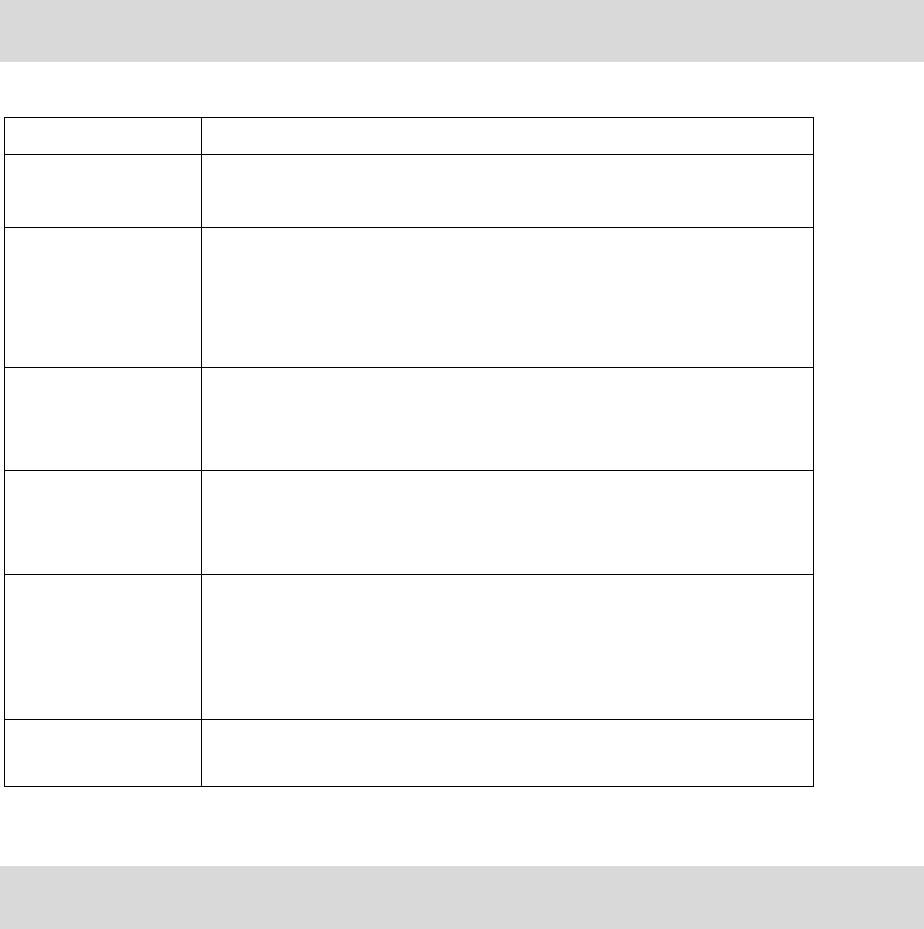
Appendix I Common Fault Diagnoses
Trouble
Possible reasons
The phone cannot
be switched on
1. Any power in battery?
2. Battery is installed properly?
Battery cannot be
charged
1. Check if the charger is connected with the phone correctly.
2. Check if the charge is connected with the socket correctly.
3. Is the battery usable? The performance of the battery will
degrade over time.
Fail to link the
network
1. The signal is too weak, or there may be some radio
interference. View the signal indicator on the screen to see
whether any bars are showing
Cannot make a call
1. Is the phone registered in the network? Check whether the
screen displays signal indicator.
2. Calling prohibited due to call charges not paid?
Cannot answer a
call
1. Is the phone registered in the network?
2. Incoming call prohibited due to call charges not paid?
3. Is the ‘call forwarding’ function enabled?
4. Is the ‘Blacklist incoming’ function enabled?
Unable to use
some functions
Consult with network operator for whether it supports these
functions and whether subscription is required.
Appendix II Abbreviations and explanations
SMS Short Message Service
MMS Multimedia Message Service
*Coverage disclaimer: Various services through this device, such as roaming, may require
upgrades or additional charges from the carrier. Please contact your provider for additional
information.
25
Disclaimer Note: Some of the contents in this printed material may differ from your phone depending on
the software level and/or your service provider’s requirements.
For details pertaining to the warranty terms for your phone model, please contact your service provider
or visit a local retail store.
FCC Regulations:
This mobile phone complies with part 15 of the FCC Rules. Operation is subject to the following two
conditions: (1) This device may not cause harmful interference, and (2) this device must accept any
interference received, including interference that may cause undesired operation.
This mobile phone has been tested and found to comply with the limits for a Class B digital device,
pursuant to Part 15 of the FCC Rules. These limits are designed to provide reasonable protection against
harmful interference in a residential installation. This equipment generates, uses and can radiated radio
frequency energy and, if not installed and used in accordance with the instructions, may cause harmful
interference to radio communications. However, there is no guarantee that interference will not occur in a
particular installation If this equipment does cause harmful interference to radio or television reception,
which can be determined by turning the equipment off and on, the user is encouraged to try to correct the
interference by one or more of the following measures:
-Reorient or relocate the receiving antenna.
-Increase the separation between the equipment and receiver.
-Connect the equipment into an outlet on a circuit different from that to which the receiver is connected.
-Consult the dealer or an experienced radio/TV technician for help.
Changes or modifications not expressly approved by the party responsible for compliance could void the
user‘s authority to operate the equipment.
The antenna(s) used for this transmitter must not be co-located or operating in conjunction with any other
antenna or transmitter.

26
RF Exposure Information (SAR)
This mobile phone meets the government’s requirements for exposure to radio waves.
This phone is designed and manufactured not to exceed the emission limits for exposure to radio frequency
(RF) energy set by the Federal Communications Commission of the U.S. Government.
The exposure standard for wireless mobile phones employs a unit of measurement known as the Specific
Absorption Rate, or SAR. The SAR limit set by the FCC is 1.6W/kg. *Tests for SAR are conducted using
standard operating positions accepted by the FCC with the phone transmitting at its highest certified power
level in all tested frequency bands. Although the SAR is determined at the highest certified power level,
the actual SAR level of the phone while operating can be well below the maximum value. This is because
the phone is designed to operate at multiple power levels so as to use only the poser required to reach the
network. In general, the closer you are to a wireless base station antenna, the lower the power output.
The highest SAR value for the device as reported to the FCC when tested for use at the ear is 1.27 W/kg for
WWAN Head SAR and when worn on the body, as described in this user guide, is 1.15W/kg for WWAN
Body SAR (Body-worn measurements differ among device models, depending upon available accessories
and FCC requirements.
While there may be differences between the SAR levels of various phones and at various positions, they all
meet the government requirement.
The FCC has granted an Equipment Authorization for this model phone with all reported SAR levels
evaluated as in compliance with the FCC RF exposure guidelines. SAR information on this model phone is
on file with the FCC and can be found under the Display Grant section of http://www.fcc.gov/oet/fccid after
searching on FCC ID: U46-M570
For body worn operation, this phone has been tested and meets the FCC RF exposure guidelines for use with
an accessory that contains no metal and the positions the handset a minimum of 1.5 cm from the body. Use
of other accessories may not ensure compliance with FCC RF exposure guidelines. If you do no t use a
body-worn accessory and are not holding the phone at the ear, position the handset a minimum of 1.5 cm
from your body when the phone is switched on.
This device is compliance with SAR for general population /uncontrolled exposure limits in ANSI/IEEE
C95.1-1999 and had been tested in accordance with the measurement methods and procedures specified in
OET Bulletin 65 Supplement C.