Telecell Mobile F55L Mobile Phone User Manual
Telecell Mobile (H.K) Ltd. Mobile Phone
Contents
- 1. User Manual
- 2. Users Manual
User Manual
ATRIUM 5.5
User Manual
Manual de Usuario
Model No.:F55L
1
Tabla de Contenido
Información de Seguridad ...................................................................................................................................................2
Apariencia y Funciones .......................................................................................................................................................3
Introducción ........................................................................................................................................................................4
Realizar una Llamada .........................................................................................................................................................5
Contactos ...........................................................................................................................................................................5
Mensajería .........................................................................................................................................................................7
Navegador de Internet .....................................................................................................................................................8
Bluetooth .........................................................................................................................................................................9
Cámara ............................................................................................................................................................................10
Fotos ................................................................................................................................................................................10
Alarma .............................................................................................................................................................................11
Radio FM .........................................................................................................................................................................12
Configuración ..................................................................................................................................................................13
Almacenamiento .............................................................................................................................................................16
2
Información de Seguridad
Por favor, lea atentamente los siguientes términos: Use de Forma Segura
No utilice el teléfono móvil donde esté prohibido o cuando pueda causar peligro.
Seguridad de Transporte
Tenga en cuenta todas las leyes y regulaciones de transporte.
Por favor maneje con las dos manos en el volante.
NO USE MENSAJERIA DE TEXTO CUANDO ESTEN CONDUCIENDO
Hospitales
Por favor, apague su teléfono móvil cuando cerca de instrumentos médicos. Aeropuertos
Por favor, siga todas las normas de seguridad de vuelo y no use el teléfono durante el vuelo.
Sustancias Químicas y Tóxicas
No utilice su teléfono móvil cerca de combustibles o productos químicos.
Accesorios y Baterías
Utilice únicamente accesorios y baterías autorizados de Blu.
Prueba de Agua
El teléfono móvil no es impermeable. Por favor, manténgalo alejado del agua.
Copia de Seguridad
Por favor, recuerde hacer una copia de seguridad o llevar un registro por escrito de toda la información importante almacenada en su teléfono
móvil.
Llamadas de Emergencia SOS
Asegúrese de que su teléfono móvil está encendido y en un área de servicio. En la pantalla de inicio, pulse la tecla del teléfono y marque el 911.
3
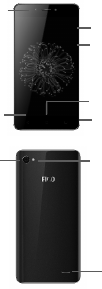
Apariencia y Funciones
Encender
V
olumen
Retroceder
Inicio
Menú
Cámara
Trasera
Alt avoz
Flash
Cámara
Frontal
4
Introducción
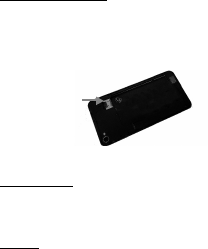
Instalación de la Tarjeta SIM
Por favor, instale la tarjeta SIM antes de utilizar su teléfono.
Aviso: Mantenga la tarjeta SIM fuera del alcance de los niños. El contacto de la tarjeta SIM se daña fácilmente debido al roce o flexión. Por
favor tenga cuidado al transportar o instalar la tarjeta SIM. Para insertar la tarjeta SIM:
1. Apague el teléfono móvil y retire la cubierta posterior.
2. Inserte la tarjeta(s) SIM.
3. Finalmente vuelva a colocar la tapa posterior y encienda el teléfono móvil.
Encender y Apagar
Encender - Asegúrese de que la tarjeta SIM se ha insertado correctamente en el teléfono. Mantenga pulsado el botón de encendido para
encender el teléfono.
Apagar - En el modo de espera, mantenga pulsado el botón de encendido hasta que aparezca el menú de opciones. Seleccione apagar en el
menú y confirme para apagar el teléfono.
Seguridad
Se puede configurar una imagen de desbloqueo de pantalla o un bloqueo de código PIN como medida de seguridad. Para más información
sobre bloqueos de contraseña, revisión de contraseña y otras funciones, por favor diríjase a los ajustes de seguridad del teléfono.
SIM 1(Parte Posterior)
SIM 2 (Parte Inferior)
5
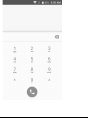
Realizar una Llamada
En el teclado de marcación, introduzca el número de teléfono y haga clic en icono del teléfono para realizar una llamada. Si llamas a una
extensión, puede hacerle clic en el icono del teclado en la parte inferior de la pantalla y abrir la interface para introducir el número de la
extensión. También puede introducir un número de entrada y llamar a contactos a través de marcación rápida.
Registros de Llamadas
Cada número de teléfono llamado y recibido se guardará en el registro de llamadas del teléfono. Habrá un indicador en el registro de llamadas
que mostrará SIM1 o SIM2. Todos los números en el registro de llamadas se pueden marcar directamente haciendo clic en el icono de
marcado en el lado derecho de la pantalla. Cuando el número aparezca en la lista, haga clic en él para ver más detalles.
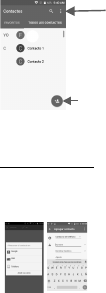
Contactos
Ingreso: Haga clic en el menú de aplicaciones y seleccione Contactos
La pantalla predeterminada es la agenda del teléfono y los contactos de la tarjeta SIM
Los contactos están organizados alfabéticamente.
6
Haga clic en el icono de búsqueda para acceder a la interface de búsqueda de contactos.
Cualquier número o letras asociadas con algunos de los contactos guardados en la lista, se muestra en los resultados de búsqueda.
Si no hay resultados, la interface mostrará que no ha encontrado Contactos.
Agregar Contacto Nuevo
1. Haga clic en el icono de "Agregar Contacto"
2. Seleccione para guardar los contactos en el teléfono o en la tarjeta SIM.
3. Puedes editar imagen de contacto, nombre, número de teléfono, grupo, dirección y correo electrónico, entre otras opciones 4. Haz clic para
finalizar y guardar contactos.
Ag
re
g
ar Contacto
Bús
q
ueda
7
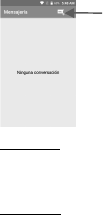
Mensajería
Puede utilizar esta función para intercambiar mensajes de texto y mensajes multimedia con su familia y amigos. Los mensajes mandados y
recibidos del mismo contacto o número de teléfono se guardan en una sola conversación y se puede ver el historial de mensajes.
Mandar un SMS
Pulse Menú de Aplicaciones » Mensajeria » Nuevo Mensaje
1. Pulse para entrar al destinatario (Puede introducir contactos de la guía telefónica o introduzca un nuevo número)
2. Escriba el Mensaje
3. Envié el Mensaje
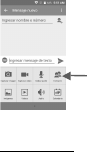
Mandar un MMS
Al crear un mensaje, el estilo de mensaje predeterminado es SMS. El mensaje se convertirá automáticamente a MMS cuando se añade un
archivo adjunto.
1. En la interface de mensajes, haga clic en el icono de sujetapapeles.
2. Haga clic para "Adjuntar" y añadir archivos adjuntos.
Nuevo Mensaje
8
Navegador de Internet
Funciones de Menú
Retroceder
Después de navegar a través de varias páginas, esta opción permite al usuario volver a la página anterior. Adelantar
Después de navegar a través de varias páginas, esta opción permite al usuario adelantar la página actual. Ventanas
Puede ver todas las ventanas abiertas. Marcadores
Haga clic en la opción de "Marcadores" para guardar un URL actual como un favorito.
Haga clic en el Marcador en la lista de favoritos y se abrirá la página de internet. Mas
Buscar en la página: Búsqueda de datos en la página.
Compartir Pagina: Seleccione para compartir la página actual.
Guardar para leer en línea: Guarda la página para leer en línea Información de Página: La dirección de la página y otra información de la
exploración actual.
Historia: Mostrar el historial de navegación y ver las páginas más visitadas.
Ajustes: Contiene una variedad de ajustes del navegador.
Tipo de
Para
9
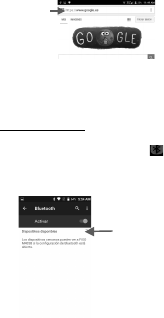
Bluetooth
Bluetooth es una tecnología de comunicaciones de corto alcance inalámbrico que los dispositivos pueden utilizar para intercambiar información
y conectar a diferentes tipos de dispositivos que incluyen auriculares, kits de coches, y otros dispositivos.
Encender el Bluetooth
1) Pulse Ajustes » Bluetooth y seleccione para encender Bluetooth.
2) El icono Bluetooth aparecerá en gris en la barra de notificaciones. Haga clic en "Buscar dispositivos" y el teléfono empezará a
buscar todos los dispositivos dentro del alcance.
3) En la configuración de Bluetooth todos los dispositivos encontrados se mostrarán en la lista bajo el icono. Importante: El máximo
tiempo de detección del teléfono es de 2 minutos.
Lista de
dispositivos
disponibles
Nave
g
ador

10
Cámara
Antes del uso: Instalación de la tarjeta de memoria es necesario antes de utilizar la cámara o cámara de vídeo. Todas las fotos o vídeos
tomados por el teléfono se almacenan en la tarjeta de memoria.
Abrir Cámara
1. Pulse Menú de Aplicaciones » Cámara
2. Pulse el botón de la cámara para tomar la foto. Aviso: También puede colocar un icono de la cámara con acceso
directo en cualquiera de las pantallas
Tomar Fotos
1. Apunte y enfoque el objeto por el visor de la cámara.
2. Pulse el botón de la cámara para tomar la foto.
3. Después de tomar la foto, el archivo se guardará en la carpeta de la galeria de la cámara.Puede realizar varios ajustes para la cámara en
la interface de la cámara.
En el visor de la cámara, se puede cambiar a la función de galería. En la parte superior derecha de modo de visor de la cámara, se encuentra
la pantalla de la imagen anteriormente tomada. Haga clic en el "cuadro de vista previa" y la foto se mostrará en pantalla completa.
Fotos
Abrir Imágenes
Pulse Menú de Aplicaciones » Fotos
Compartir Fotos
Se puede enviar imágenes a través de la función de mensajes MMS escribiendo un mensaje o correo electrónico y adjuntando la imagen.
Cualquier imagen también puede ser enviada a través de la función Bluetooth.
Ajustar Imágenes
Al abrir la imagen, en la parte inferior vera las opciones de editar para ajustar la imagen.
11
Se puede elegir diferentes efectos para fotos que incluyen: Vintage
(Antiguo), Blanco y Negro, Instantánea, Latte, Litho, Rociamiento,
Enderezar, Recortar, Girar, Espejo, Automático, Viñeta, Exposición, Contraste, Sombras, Nitidez, y otros ajustes que se puede usar para editar
imágenes.
Ver Imágenes
En la interface de imagen, haga clic en un álbum de fotos para ver las imágenes archivadas.
Recortar Imágenes
1. Si desea ajustar el tamaño de la imagen, se puede utilizar las herramientas de recorte. Una vez que aparezca la flecha, pellizque los
dedos hacia adentro o hacia afuera para ajustar el tamaño.
2. Si desea ajustar la imagen y mantener su proporción, por favor, mantenga pulsada cualquiera de las cuatro esquinas de la imagen y
ajuste.
Alarma
1. Abra la aplicación: Menú de aplicaciones » Reloj
2. Haga clic en el botón de alarma e ingrese la configuración de la alarma
Editar Foto
12
Pulse para agregar o editar una alarma
Radio FM
A través de esta función, se puede escuchar la radio FM en el dispositivo. La radio FM utiliza los auriculares con cable como una antena para
recibir la señal. Antes de utilizar esta función, conecte los auriculares de equipos originales que vienen con el teléfono. Abrir Radio FM
Pulse el icono de Radio FM para abrir la aplicación.
1. Haga clic en "Búsqueda" para buscar canales de radio FM.
2. Haga clic para agregar el canal a la lista de canales de favoritos.
Control
de
Agreg
estaciones
radi
favorit
Búsque
Radio
FM
13
Radio FM como fondo
Haga clic en el botón Inicio o Retorno para mover el programa de radio FM en segundo plano.
Configuración
Administración de la Tarjeta SIM
Seleccione esta opción para desactivar la tarjeta SIM.
Operadores de la Red. Wi-Fi
Wi-Fi – Haga clic en Wi-Fi para encender Cuando está activado, la conexión de Wi-Fi automáticamente buscará las redes
disponibles. Cualquier red no segura se puede utilizar directamente y cualquier red segura requiere una contraseña al conectar.
Bluetooth
Pulse el botón para encender Bluetooth. Una vez encendido, el Bluetooth buscará automáticamente cualquier equipo abierto cerca.
Uso de Datos
Datos de uso y límite de tráfico de datos móviles.
Más Conexiones Inalámbricas y Redes
Modo de Vuelo
VPN
Anclaje a red y zona Wi-Fi
Redes Móviles y APN
Aviso: Cuando el teléfono está en modo de vuelo, el Wi-Fi se desactivará automáticamente. .
Sonido/notificación
Esta opción configura los ajustes de tonos de teléfono:
Vibrar, Volumen, Tonos de llamada, Tonos de llamada, y Tonos de notificación.
Pantalla

14
Configure diferentes opciones como Brillo, Auto Rotación de Pantalla, Fondo, Tiempo de Espera de Pantalla.
Espacio de Almacenamiento
Ver la información de la tarjeta SD y el uso de memoria del teléfono.
Permite la eliminación o el formateo de la tarjeta SD.
Permite la selección de la memoria predeterminada.
Batería
Uso de consumo de batería.
Aplicaciones
Administrar Aplicaciones - Administrar y eliminar aplicaciones instaladas.
Servicios Corrientes - Pulse para seleccionar uno de los servicios enumerados en el cuadro de operación. Pulse el botón "Parar"
para cancelar cualquiera de los servicios en ejecución.
Ubicación
Uso Inalámbrico - Utilizar los servicios inalámbricos para encontrar ubicaciones.
Cuando se utiliza la ubicación por satélite GPS, aplique la precisión a nivel de la calle.
Seguridad
Configure bloqueos de pantalla: Utilice un patrón, PIN o contraseña para bloquear la pantalla.
Patrón: La primera vez que habrá sencillas instrucciones de desbloqueo y ejemplos. Haga clic en "siguiente paso" para continuar con
el paso del patrón de seguridad.
PIN: Introduzca el número PIN para desbloquear la pantalla.
Contraseña: Establecer contraseña para desbloquear la pantalla.
Puedes cancelar la función de seguridad en cualquier momento. Bloqueo de la Tarjeta Sim y Pin

15
PIN de Tarjeta SIM se utiliza para prevenir el uso no autorizado de las tarjetas SIM. Para cambiar un código de PIN bloqueado, tendrá que
desbloquear el SIM y luego ir a configuración de cambio de contraseña. El teléfono le pedirá que introduzca el código PIN antiguo y pedirá que
introduzca un código PIN nuevo dos veces. El teléfono le mostrara que el cambio se haya realizado correctamente. Si introduce el PIN de
forma incorrecta tres veces, el código PIN de la tarjeta SIM y se bloquea automáticamente. Usted necesitará el código PUK para desbloquear
el teléfono. Este código está disponible a través de su proveedor de servicios. Si introduce el código PUK incorrecto 10 veces seguidas, la
tarjeta SIM quedará bloqueada permanentemente. Por favor consulte a su proveedor de servicios para una nueva tarjeta SIM.
Credenciales de Seguridad - Permite aplicaciones que visite las credenciales de seguridad.
Instalar desde la tarjeta SD - Instale el certificado cifrado desde la tarjeta SD.
Teclado e Idioma
Idioma – Cambiar el idioma del teléfono.
Diccionario Personalizado - Agregar o eliminar palabras al diccionario personalizado.
Teclado y metodos de entrada – Capitalizar,
Copia de Seguridad
Copia de Seguridad – se copia de seguridad de todos los datos de aplicaciones, contraseñas WLAN y otros ajustes a los servidores
de Google
Restaurar datos de Fabrica - Borrar todos los datos y ajustes almacenados en el teléfono
Fecha y Hora
Seleccione Formato de fecha - Hay 3 tipos de formatos que se pueden elegir: Mes-Día-Año – Día-Mes-Año y Año-Mes-Día. La
opción de Mes-Día-Año y Día Mes es el valor predeterminado
Zona horaria automática – Usar zone horaria proporccionada por la red.
Programar encendido y apagado
Programar encendido y apagado
Accesibilidad
16
Sistema – Subtitulos
Gestos de ampliación
Botón de encendido- Corta la Llamada
Contraseñas Audibles
Pantalla – Inversión de Color, Correción de Color
Opciones de Desarrollo
Si el teléfono no muestra opciones para desarrollado, Pulse 'Numero de compilación' siete (7) veces en la ficha sobre el teléfono en ambientes
para acceder.
Depuración USB y otras funciones de desarrollo.
Acerca del dispositivo
Se puede revisar posibles cambios de software o de firmware a través de la opción de Actualizaciones del sistema
Almacenamiento
Conecte el teléfono con el cable USB suministrado. Una vez conectado, el icono de conexión aparecerá en la barra de estado. Deslice hacia
abajo la barra y haga clic en el icono. Una vez en el modo de interface de conexión, seleccione "almacenamiento masivo USB" y encender.
Algunos ajustes y la interface de usuario pueden variar dependiendo de la versión de SW final.
TABLE OF CONTENTS
1- Get Started with your Atrium 5.5 device
Set up & use your device 1
Connect to WI-FI networks 8
Browse and organize your home screen 10
2- Explore your Atrium 5.5 device
Make & receive phone calls 13
Manage your contacts and call log 16
Send & receive text messages 18
Type Text by speaking 22
Relax with Google Play 23
Change the wallpaper 24
3- Settings
Wireless & network settings 25
Device Settings 33
Security settings 38
Account and location Settings 40
Factory Reset 44
4- Hardware reference
Safety information 45
FCC 46
1
Get Started
Set up and use your device
x Install SIM cards
Important: Turn your device off before installing or removing the SIM cards. Do not bend or scratch the
SIM cards. Take care when handling, installing, or removing SIM cards, and avoid exposing the SIM cards
to static electricity, water, or dirt. Keep SIM cards out of reach of small children.
You can install up to 2 micro SIM cards in your Android device. You can check to see how many micro SIM
cards are installed and assign activities to each of them on your device.
To install SIM cards in your Android device, follow these steps:
1- While the phone is turned off, remove the back cover.
If the battery is in place, remove it.
2- Carefully insert the SIM cards into each of the SIM slots.
3- Insert the battery, making sure to align the gold contacts. Press down gently to secure the battery.

2
4- Position the back cover over the battery compartment and press down firmly along the edges of
the cover to secure it.
After you install a SIM card, you'll be asked to assign the activities you want to use the SIM card for, like
phone calls, text messages, or using data.
x Check what SIM cards are installed
You can check to see what SIM cards are installed in your Android device at any time by following these
steps:
1- Open your device’s Settings menu .
2- Under "Wireless & networks," touch SIM management.
3- The screen shows the carrier data and phone number for each SIM card installed in the device.
x Assign activities for a SIM card
After you’ve installed SIM cards in your Android device, you can assign the activities you want to use each
SIM card for. These activities include phone calls, text messaging, and using data.
To assign an activity to a SIM card, follow these steps:
1- Open your device’s Settings menu .
3
2- Under "Wireless & networks," touch SIM management.
3- You can assign a SIM to an activity, such as SMS messaging. Under "Activities," touch the
activity and choose the SIM to use.
For some apps, you'll need to assign a SIM card to complete app activities. Follow the instructions in the app
to complete the process.
x Install a micro SD card
x A micro SD (Secure Digital) card is a small device you can insert in your phone to extend its storage
capacity. For some apps or features on your phone, you'll need a micro SD card. Here's how to
install and use it.
1- While the phone is turned off, remove the back cover and the battery.
2- Carefully place the SD card into the slot with an arrow labeled.
3- Position the back cover over the battery compartment and press down firmly along the edges of
the cover to secure it.
x Mount or unmount a micro SD card
To start using your micro SD card after you've inserted it, you need to make sure it's mounted. If you
want to remove the SD card, you need to unmount it first in order to remove it safely.

4
To mount or unmount a micro SD card, follow these steps:
1- Open your device’s Settings menu .
2- Under "Device," touch Storage.
3- To mount a micro SD card, touch Mount SD card.
4- To unmount a micro SD card, touch Unmount SD card and then touch OK. If you unmount the
SD card, some of your apps may not work properly until you remount the SD card.
x Erase a micro SD card
To erase a micro SD card, follow these steps:
1- Open your device’s Settings menu .
2- Under "Device," touch Storage.
3- Touch Erase SD card to erase all data, including any music or photos saved on the SD card.
x Charge your Android device
Your battery will not be fully charged when you first unpack your Android. It’s a good idea to fully charge
the battery as soon as you get a chance.
To charge your Android, follow these steps:
5
1- Using the adapter that comes with the phone, connect one end of the micro USB cable to the
charger port at the bottom of the phone.
2- Connect the other end to the travel adapter.
3- Connect the travel adapter to a power outlet.
Important: Use only the travel adapter and USB cable that came with your Android. Using a different travel
adapter or cable may damage your phone.
Charging your phone through a USB cable attached to another device, such as a laptop computer, takes
longer than charging with a travel adapter.
x Set up your Atrium 5.5
The first time you turn on your Atrium 5.5, it'll walk you through the steps to get it set up. You'll be
prompted to do the following:
1- Choose the language you want your phone to use
2- Connect to a Wi-Fi network or your cellular data network
3- Sign in with your Google Account
6
If you use Gmail, you have a Google Account. Just use the same email address and password to sign in here.
By signing in, all of your email, contacts, calendar events, and other data associated with that account will be
synced to your phone.
If you don't have a Google Account, you can create one during the setup process. You can also skip this step
and create one later.
If you have more than one Google Account, you can add other ones later.
To make sure your phone doesn't lose power during setup, it's recommended that you keep it plugged in
until setup is complete.
x Atrium 5.5Basics
Here are some tips to get you familiar with your Atrium 5.5 device. They'll help you with the basic features
you're likely to use often.
Navigation buttons
At the bottom of every screen, no matter what you're doing, you'll always find these three navigation buttons:
1- Back: Takes you back to your previous screen. If you back up to the Home screen, you can't go
back any further.

7
2- Home: Takes you to the Home screen. If you're on a left or right Home screen, it takes you to the
central Home screen.
3- Recent apps: Opens a list of thumbnail images of apps you’ve used recently. To open an app,
touch it. To remove a thumbnail from the list, swipe it left or right.
Settings and Quick Settings
To change your device's settings, including your network, sound, account, and many others, go to the
Settings screen:
1- In your Favorites tray, touch the All Apps icon.
2- Look for the Settings icon and touch it.
3- Select the setting you want to change
You can get quick access to settings like Wi-Fi, screen brightness, and others you use frequently by going to
Quick Settings
4- Swipe down from the top of the screen with one finger to pull down the notifications shade.
5- In the top-right, touch the Quick Settings icon.
Help with your device

8
Many screens in apps and Settings include a Menu icon. Touch it to explore additional options, often
including a Help item that provides more information about that screen.
Connect to Wi-Fi networks
You can connect to Wi-Fi networks with your device, as well as add networks you use often or remove
networks you don't use any longer. You can also change the settings for saved Wi-Fi networks on your
device.
Keep in mind that your device will remember networks you connect to and connect automatically when in
range.
x Turn on Wi-Fi and connect to a network
1- Open your device’s Settings menu .
2- Under "Wireless & networks," touch Wi-Fi.
3- Touch the Wi-Fi switch to turn it to the On position.
4- You'll see a list of saved and available networks.
5- Secured networks display a lock icon and ask for a password to connect.

9
6- Your device will remember networks it connects to and automatically connect to them when in
range.
7- You can forget a saved Wi-Fi network if you don't want your device to connect to it
automatically.
8- Touch a network name from the list of available networks to connect to it.
9- Once connected, your device will say "Connected" under the network name.
x Remove a Wi-Fi network
You can forget a saved Wi-Fi network if you don't want your device to connect to it automatically. To
remove a Wi-Fi network from your device, follow these steps:
1- Open your device’s Settings menu .
2- Under "Wireless & networks," touch Wi-Fi.
6- Make sure the Wi-Fi switch is in the On position.
7- In the Wi-Fi settings screen, touch the name of a saved network.
8- Touch Forget.
x View Wi-Fi network details and change network settings

10
You can view your saved Wi-Fi networks' details and change network settings by following these steps:
1- Open your device’s Settings menu .
2- Under "Wireless & networks," touch Wi-Fi.
3- Connect to the network you want to view details for.
4- Touch the network name. You can see information about:
-Connection status
-Signal strength
-Link speed
-Frequency
-Security
5- To change network settings, touch and hold the network name. You can choose to:
-Forget the network
-Modify the network
Browse and organize your home screens
x Browse Home screens

11
Your Home screens are the first ones you see when you turn on or unlock your device. You can find them at
any time when you touch the Home button.
x Add apps and widgets to your Home screen
You can add apps and widgets ("at-a-glance" view of an app’s most important information) to your Home
screens so you can easily find them.
To add an app or widget to a Home screen:
Go to the Home screen where you want to place the app or widget.
1- Touch the All Apps icon .
2- Swipe right, if necessary, to find the app or widget you want.
3- Touch and hold the app or widget until the Home screen appears, slide it into place, and lift your
finger.
To move an app or widget icon to a different location on a Home screen:
1- Touch and hold the icon.
2- Slide your finger to the new position. To bump another icon out of the way, slide slowly into it.
To move between Home screens, slide toward the edge of the screen.
es
you
12
3- Lift your finger.
4- The icon drops into its new position.
x Remove an app or widget
To remove an app or widget from a Home screen, follow these steps:
1- Touch and hold the app or widget.
2- Drag it up to the Remove icon at the top of the screen.
x Create a folder for apps
To create a folder, follow these steps:
1- Touch and hold the app.
2- Slide the app icon quickly over the other.
3- To rename a folder, touch its name.

13
Make & receive phone calls
x Make, receive, and block phone calls
You can place calls from the Phone app , Contacts app , People app , or other apps or widgets that
display contact information. Wherever you see a phone number, you can usually touch it to dial.
x Make a phone call
To open the Phone app, touch the Phone icon on your mobile device. Wherever you see a phone number on
your screen, you can usually touch it to dial. You can use the Phone app to make a phone call in the
following ways:
1- Dialpad: Touch the Dialpad whenever you want to use the keypad to manually type in a
phone number. Type the number, then touch the Phone icon below the keypad to make a call. If
you type a wrong number, touch backspace to erase digits one by one. To end a call in
progress, touch end call at the bottom of the screen.
2- Speed dial: Touch the "Speed dial" tab for one-touch dialing for your favorites and numbers you
call frequently. Just touch the contact in the list and the call will start.
14
3- Recents: Touch the "Recents" tab to view your call log and select a contact or number that you
recently called.
4- Contacts: Touch the "Contacts" tab to select from the list of all your contacts. Once you select a
contact, touch their phone number to place a call.
x Manage incoming phone calls
When you receive a phone call, you'll get a notification that you have an incoming call. If the caller is an
existing contact in your Contacts app or People app, you may see additional information about the caller.
You can choose to answer or dismiss the phone call and send a text message to the caller.
You can manage an incoming call in the following way:
1- You can choose to answer or dismiss the call from within the notification simply by
touching Answer or Dismiss.
2- For more options, touch the notification to open it, then touch the white phone icon, and slide
over one of the following icons:
o Answer call: Touch the green phone icon to answer the call and start talking to the caller.
o Send to voicemail: Touch the red phone icon to direct the caller to leave a voicemail message.
15
o Send a text message to the caller: Touch the message icon to open a list of quick short text
responses or the option to write your own message and send it to the caller immediately. You
can edit text responses from within the Phone app by touching the menu icon then
selecting Settings, Other Settings and then Quick responses.
To block a call, follow these steps:
1- Open the Contacts app .
2- Touch the contact you want to block or add that contact.
3- Touch the menu icon .
4- Check the box next to "Block incoming calls"
x Options during a call
During a call, you can touch the following icons in the Phone app:
1- Touch to switch to the dial keypad.
2- Touch to turn the speakerphone on or off. If a Bluetooth headset is connected, this functions
as a three-way switch among the built-in earpiece, the speakerphone, and the headset. The icon
changes to indicate the current output. Touch and hold to see a three-way menu.
3- Touch to mute your microphone.

16
4- Touch to put the other party on hold.
5- Touch to switch to another call in progress.
6- Touch to merge separate calls as a single conference call.
Answer or respond to another incoming call
To answer another incoming call while you're already in a call, touch the white phone icon and slide to
answer, respond with a text message, or send the call to voicemail.
If you answer, the first call will be put on hold. If you respond with a message or send to voicemail, you
return to the first call.
Manage your contacts and call log
x Manage your contacts
Favorite contacts, contacts you call often, and contacts you star will show on the screen when you open the
Phone app. Open your Phone app by touching on your mobile device.
To go to a contact's card, simply touch their name from your list of contacts. You can manage your contacts
in the following ways:

17
1- Search: If you're looking for a specific contact, you can search your contacts or for nearby places
in the Search bar at the top of the screen.
2- Add a contact: To add a contact touch the menu icon , then touch New contact and add the
contact's information. If you're signed in to a Google Account, the new contact will sync with
your account.
3- Favorite: To make a contact a favorite, touch the star icon on a contact's card and it will
show up in the speed dial tab when you open the Phone app.
4- Organize: You can organize the contacts on your screen in your speed dial list by touching and
holding them to move them around.
5- Edit: To edit a contact, touch the edit icon on a contact's card.
6- Share: To share a contact or place it on a Home screen for easier access, select it from the
contacts list, then touch the menu icon .
7- Remove: Touch and drag contacts to the top of the screen to remove them from the grid.
x Use the call log
You can see a list of all the calls you’ve placed, received, or missed in the Recents tab in the Phone app. It's
an easy way to redial a number, return a call, or add a number to your contacts.

18
To use the call log, follow these steps:
1- Open the Phone app on your device.
2- Touch the "Recents" tab. You'll see a list of your most recent incoming and outgoing calls.
3- Touch View full call history to see more calls. Arrow icons beside a call indicate the type of call,
and multiple arrows indicate multiple calls:
- Missed incoming call
- Received incoming call
- Outgoing call
4- You have the following options for recent calls:
- Touch a number or contact then Details for more information about the call.
- Touch "Call back" to dial the number.
- Touch the trash icon to delete the call from your call log.
- Touch the the menu icon , then Edit number to make changes to the call back number.
Send & receive text messages
x Open messaging

19
From a Home or All Apps screen, touch the Messaging icon .
The Messaging screen opens, where you can create a new message or open an ongoing conversation.
To read the messages in an existing conversation, touch the conversation. A list of its messages appears.
Touch & hold a message to take any of these actions:
1- Copy text. Copy the message text.
2- Forward. Forward the message to one of your contacts or another recipient.
3- Lock. Prevent the message from being deleted if you reach your storage limits.
4- View details. View information about the message and the sender.
5- Delete. Delete the message from the conversation.
x Delete a conversation
1- While viewing the list of conversations, touch & hold a conversation to select it.
2- Touch the Trash icon to delete the conversation.
To delete all conversations, go to the main Messaging screen and touch Menu > Delete all threads.
x Search Messaging
To search for a specific word or contact do the following:
1- Touch the Search icon .
20
The Search Messaging field appears at the top of the screen.
2- Use the onscreen keyboard to type your search terms.
x Premium Text message warnings
Apps may sometimes send text messages using premium services that cost you money. To alert you to such
charges, Android detects any attempt by an app to send a message on your behalf. If it looks like the message
may cause you additional charges, you'll see a dialog indicating the name of the app, the address to which
the text message is being sent, and a warning. When this happens, you can choose to cancel the message or
send it anyway.
From a Home or All Apps screen, go to Messaging > Menu > Settings.
x Storage settings
1- Delete old messages. Check to delete older messages in a conversation when limits are reached.
Uncheck to keep all messages.
2- Text message limit. Touch to set the number of text messages to save per conversation. When the
limit is reached, older text messages are deleted if Delete old messages is checked.
21
3- Multimedia message limit. Touch to set the number of multimedia messages to save per
conversation. When the limit is reached, older multimedia messages are deleted if Delete old
messages is checked.
x Text message (SMS) settings
1- Delivery reports. Check to receive a delivery report for each text message you send.
2- Manage SIM card messages. Manage text messages stored on your SIM card.
x Multimedia message (MMS) settings
1- Delivery reports. Check to receive a delivery report for each multimedia message you send.
2- Read reports. Request to receive notifications that your message was read by the recipient.
3- Auto-retrieve. Check to automatically retrieve multimedia messages that you receive.
4- Roaming auto-retrieve. Check to automatically retrieve multimedia messages while roaming.
x Notification settings
1- Notifications. Check to display message notifications in the status bar.
2- Sound. Touch to select a ringtone for message notifications.
3- Vibrate. Touch to have your phone vibrate when messages are received.

22
Type text by speaking
You can speak to enter text in most places that you can enter text with the onscreen keyboard.
1. Touch a text field, or a location in text you’ve already entered in a text field.
2. Touch the Microphone key on the onscreen keyboard.
3. When you see the microphone image, speak what you want to type.
Say “comma,” “period,” “question mark,” “exclamation mark,” or “exclamation point” to enter
punctuation. (Spoken punctuation is currently supported in English, French, German, Italian, Russian, and
Spanish.)
When you pause, what you spoke is transcribed by the speech-recognition service and entered in the text
field, underlined. You can touch the Delete key to erase the underlined text. If you start typing or entering
more text by speaking, the underline disappears.
To improve processing of your voice input, Google may record a few seconds of ambient background noise
in temporary memory at any time. This recording remains on the device only fleetingly and is not sent to
Google.

23
Relax with Google Play
Google Play brings together all your favorite content in one place – movies, TV shows, books, music,
magazines, and more – so you can reach it from any of your devices.
If you purchased content on Google Play in the past, you'll automatically have access to this content on other
Android devices - just make sure you're signed in to the same account you used to purchase it.
x Use Google play widgets
These widgets are available for your Home screens:
1- My Library: Displays your most recently used music, books, and so on. Touch any of the images
to see your content.
2- Recommended on Play: Suggests music, movies, and other content that may interest you. Touch
the suggestion to learn more about it.
3- Recommended apps: Recommends apps that you can add to your Home screen. Touch the
recommendation to learn more about it.

24
To resize a widget, touch & hold, then let go and drag the blue dots. To remove it, touch & hold, then drag it
to the Remove icon at the top of the screen.
To add another Google Play widget, touch the All Apps icon, then Widgets, and swipe from right to left
until you see the one you want. Then touch & hold, and let go in the Home screen location you want.
x Shop on Google Play
To open the Google Play Store app, touch the Play Store icon on a Home or All Apps screen.
Most things you purchase on Google Play are available from your computer as well as from any of your
Android mobile devices. (Android apps are one exception – they run only on Android devices.)
Sign in to play.google.com to get your entertainment from anywhere
x Google Play Support
For more detailed information about Google Play, including phone and email support options, visit:
Support.google.com/googleplay
Change the wallpaper
To change the wallpaper that's displayed on your Home screens:
1- Touch & hold anywhere on a Home screen that's not occupied. A list of options appears.
25
2- Touch a wallpaper source, such as Live Wallpapers. You can download additional wallpapers on
Google Play.
3- To set a wallpaper, touch Set wallpaper or, for other images, drag the blue dots to determine the
cropping and touch OK.
To change your device's wallpaper in Settings, touch Settings > Device > Display > Wallpaper.
Wireless & network settings
x Optimize data usage
Data usage is the amount of data that your device uploads or downloads in a given period. You can check
your data usage in the Settings app on your device. You can see how you use data and change the settings to
make sure you’re not using data unnecessarily.
Important: The data usage you see in your device’s Settings app is measured by your device - your carrier
could count data usage differently. If you go over your plan’s data usage limit, your carrier could charge you
fees. Check your plan to see your data limits.

26
You can turn mobile data on or off in the Settings app. If it's off, you can’t use data over your mobile
network and many features of your device and apps might not work correctly. You’ll still be able to use data
if you’re connected to a Wi-Fi network.
Keep in mind that you need to have a SIM inserted in your device to see the mobile data option. You need to
assign cellular data usage to a SIM before adjusting data usage settings.
To turn mobile data usage on or off, follow these steps:
1- Open the Settings menu on your device.
2- Under Wireless & networks, touch Data usage.
3- Move the switch next to "Cellular data" or "Mobile data" to the On or Off position. If you're
turning data off, touch OK.
x Check your data usage
To check how you much data you use on your device, follow these steps:
1- Open the Settings menu on your device.
2- Under Wireless & networks, touch Data usage:

27
- In the Mobile tab, you can see how much data you use on your carrier's data network or
networks. If more than one is displayed, touch the tabs at the top of the screen to switch
between them.
- To see Wi-Fi usage, touch the menu icon in the top right corner of the screen. Check
the box next to "Show Wi-Fi usage." In the Wi-Fi tab on the main screen, your device
will show how much data you use over Wi-Fi connections.
3- You can check the following settings :
- Check current data usage: By default, you’ll see the date range of your most recent data
usage cycle. You can see how much data you’ve used in that time period simply by
looking in between the two vertical white lines on the graph.
- Check data usage from different time periods: Move the vertical white lines on the graph
to the time period that you want to view. Then check to see how much data you used
during that period of time.
- Check total data usage: You can see the total data usage for the time period you select
below the graph.

28
- Check data usage by app: You can see how much data each of your apps is using below
the graph. Apps are listed in order of how much data they’ve used.
x Set data usage Warning
You can set a warning to alert you when your device uses a certain amount of data. This feature is only
available if you have mobile data.
To set a data usage warning, follow these steps:
1- Open the Settings menu on your device.
2- Under Wireless & networks, touch Data usage.
3- In the graph that shows your data usage, drag the line by its right side to the level where you want
to receive a warning.
4- When your data usage reaches this level, you'll receive a notification on your device.
x Set data usage limit on your device
You can set a limit to the amount of data that your device uses. When your data usage reaches that limit,
mobile data on your device will turn off automatically and you'll receive a notification. Many features on

29
your device might not work correctly when data is turned off. This feature is only available if you have
mobile data.
To set a data usage limit, follow these steps:
1- Open the Settings menu on your device.
2- Under Wireless & networks, touch Data usage.
3- Turn on Set cellular data limit or Set mobile data limit depending on your version of Android.
4- When the dialog box appears, read the message, and touch OK.
5- Drag the line at the top of the graph by its right side to the limit you want to set.
6- When your data usage reaches this level, mobile data on your device will turn off automatically
and you'll receive a notification.
To turn mobile data back on, follow these steps:
1- Open the Settings menu on your device.
2- Under Wireless & networks, touch Data usage.
3- Move the switch next to "Cellular data" or "Mobile data" to the On position.
x Change you data usage settings

30
You can adjust your data usage settings to optimize the data that you use. Some apps use data only when
you’re using them. Other apps use data in the background, even if you’re not actually using the app. You
can conserve data usage by changing how and when apps you use access data
You can conserve data usage by turning off access to data while you’re on your mobile network. If you do
this, you won’t be able to get any data over your mobile network, but you’ll still be able to use data when you
connect to a Wi-Fi network.
To turn off data access over your mobile network, follow these steps:
1- Open the Settings menu on your device.
2- Under Wireless & networks, touch Data usage.
3- Use the switch next to "Cellular data" or "Mobile data" to turn it off, then touch OK.
4- To turn mobile data back on, simply move the switch to the On position.
x Data Roaming
Data roaming allows your device to send data over other carriers’ networks when you leave an area that is
covered by your own carrier’s networks. You can conserve data usage by turning off data roaming. Keep in
mind that using data roaming may be the only way to connect to the Internet in some places.

31
x Tethering & portable hotspot
You can share your device’s Internet connection with another device, such as a laptop computer, via USB
tethering or Bluetooth tethering. You can also turn your mobile device into a portable Wi-Fi hotspot and
share its Internet connection with up to 10 other devices at once.
You can turn your phone with mobile data into a portable Wi-Fi hotspot for up to 10 other devices, such as a
laptop computer.
1- Open your device’s Settings menu.
2- Under “Wireless & networks,” touch More > Tethering & portable hotspot.
3- Check the box next to “Portable Wi-Fi hotspot.”
When the option is turned on, you’ll see one of the following notifications:
- Portable Wi-Fi hotspot active
- Multiple tethering or hotspot connections active
Touch the notification, then follow these steps:
1- Touch Set up Wi-Fi hotspot.

32
2- You can choose a new name for the hotspot in the “Network SSID” field if you prefer. If you want
a different password, enter a new one in the “Password” field. If you don’t want security,
choose None under “Security.”
3- Touch Save.
4- Use the other device and find the new network name in the list of Wi-Fi options.
5- Select the network and enter the password.
To stop sharing your data connection, uncheck the box next to “Portable Wi-Fi hotspot.”
x USB tethering
USB tethering isn’t available on computers running Mac OS.
To share your phone’s Internet connection with another device using USB tethering, follow these steps:
1- Connect your phone to another device using a USB cable.
2- You’ll see a USB icon and a notification Connected as a media device or Connected as a
camera appear at the top of the screen. For the purposes of tethering, the type of connection
doesn't matter.
3- Open your device’s Settings menu.

33
4- Under “Wireless & networks,” touch More > Tethering & portable hotspot.
5- Check the box next to “USB tethering.”
When the connection is made, you’ll see one of the following notifications:
- USB or portable hotspot active
- Multiple tethering or hotspot connections active
To stop sharing your data connection, uncheck USB tethering or disconnect the USB cable.
Device Settings
x Set and change ringtones
You can change your default ringtone, have different ringtones for different people, and get new ringtones.
1- Open your device's Settings menu .
2- Under "Device," touch Audio profiles.
3- Touch Settings for the selected profile.
4- Touch “voice call ringtone”.
5- Select a ringtone and touch OK to save.

34
Assign ringtone to contact:
1- Open the Contacts app . If you're running Android 4.4 or lower, open the People app .
2- Touch a contact, then touch Menu .
3- Touch Set ringtone.
4- Touch Phone ringtone.
5- Select a ringtone and touch OK to save.
Tip: You can quickly set your phone to vibrate for phone calls and texts. Make sure your screen is unlocked,
then press the Volume Down key until you feel the phone vibrate. To resume normal ringing, press
the Volume Up key
x Check your remaining battery life
You can see how much battery you have left by looking at the battery level icon at the the top of your screen.
To check the percentage of your remaining battery life, swipe down from the top of the screen. Touch the
battery icon to go to the battery setting menu.
You can check your remaining battery life and usage since last full charge in the Settings menu:
1- Open your device’s Settings menu .
35
2- Under "Device," touch Battery.
3- You can check the following settings:
- Percent of battery life
- Length of time your battery is estimated to last
- Use and usages details since last full charge
x Manage memory usage
You typically don’t need to worry about managing apps beyond installing, opening, and using them. But
there may be times when you want to know more about what's happening behind the scenes in order to
better manage your storage.
Important: Android manages and carefully guards the portion of internal storage where the system, apps,
and most data for those apps are stored, because this area may contain your private information. It's not
possible to view this portion of internal storage when you connect your device to a computer with a USB
cable. The other portion of internal storage, where music, downloaded files, and so on are stored, remains
visible for your convenience.
You're able to optimize your memory usage by:
- Uninstalling apps you don't use.

36
- Deleting downloaded files or files you created.
- Copying files between your device and a computer via USB.
- Removing content from Google Play that's saved for offline use and streaming it via a
Wi-Fi or mobile network.
You can use the Apps screen to adjust several aspects of the way your device uses memory. To view these
settings, follow these steps:
1- Open your device's Settings menu .
2- Under "Device," touch Apps.
3- You'll see three tabs at the top of the screen, each displaying a list of apps or their components.
- Downloaded. Displays apps you’ve downloaded on Google Play or other sources.
- Running. Displays all apps, processes, and services that are currently running or that
have cached processes, and how much memory they are using. The graph on the Running
tab shows the total memory in use and the amount free.
- All. Displays all apps that came with Android and all apps you downloaded on Google
Play or other sources.

37
To switch the order of the lists displayed in the Downloaded or All tabs, touch Menu > Sort by
name or Sort by size.
To view details about an app or other item listed under any tab, touch its name. The information and
controls available vary among different types of apps, but commonly include:
- Force stop button. Stops an app that is misbehaving. Stopping an app, process, or service
may cause your device to stop working correctly. You may need to restart your device
after doing this.
- Uninstall button. Deletes the app and all of its data and settings.
- Disable button. Prevents the app from running, but does not uninstall it. This option is
available for some apps and services that can't be uninstalled.
- Clear data button. Delete an app’s settings and other data without removing the app
itself.
- Clear cache. If the app stores data in a temporary area of the device's memory, lists how
much information is stored, and includes a button for clearing it.
- Launch by default. If you have configured an app to launch certain file types by default,
you can clear that setting here.

38
- Permissions. Lists the kinds of information about your device and data the app has access
to.
Security settings
x Manage security settings
You can manage the security settings for your device by opening the Settings menu and
touching Security. Here are the settings you can change:
- Screen security: Manage screen lock options. Encryption: Encrypt the data on your
phone.
- SIM card lock: Set up a PIN to lock your device's SIM card.
- Passwords: Make passwords visible, which helps you to enter a password that is more
complex and secure.
- Device administration: Manage device administrators, allow apps to be installed from
sources other than the Play Store, and choose to verify apps from all sources. Unknown
sources: Manage installation of apps from sources other than the Play Store.

39
- Credential storage: Manage, install, or clear certificates on your devices.
- Trust agents: Manage trust agents for features like Smart Lock
Tip: Touch Settings > Security > Owner info to enter information that's displayed on the lock screen.
This can be useful in case you lose your device.
You can secure your phone by setting a screen lock. Each time you turn on your device or wake up the
screen, you’ll be asked to unlock your device.
x Set up or change a screen lock:
1- Open your device's Settings menu .
2- Under "Personal," touch Security.
3- Under "Screen security," touch Screen lock. If you’ve already set a lock, you’ll need to enter the
pattern, PIN, or password before you can choose a different lock.
4- Touch the screen lock you’d like to use and follow the on screen instructions.
Some applications can harm you or your device. You can choose to verify apps that you download from the
Internet in order to help prevent harmful software from being installed on your device.

40
The Google Play Store helps prevent harmful software from being installed on your device by blocking
potentially harmful apps. If you install apps from other sources, you can turn on app verification to make
sure the apps you install are scanned for malware. You'll also need to allow your device to download apps
from sources other than the Google Play Store.
Account and location Settings
You can add accounts so that information associated with that account automatically syncs with your device.
You need to have an account set up on your device if you want to get apps from the Google Play store.
x Add an account on your device
1- Open the Settings menu on your device.
2- Under "Accounts," touch Add account.
3- Touch the type of account you want to add. You may be able to choose from choices like
"Google," "IMAP," or "POP3."
- Choose "Google" if you want to add your Google Account. When you sign in with a
Google Account, all the email, contacts, Calendar events, and other data associated with
that account are automatically synced with your device.

41
- Choose "IMAP" or "POP3" if you want to access your mail with a program like
Microsoft Outlook or Thunderbird, even when you aren't connected to the Internet.
4- Follow the on-screen instructions to add the account.
Whenever you need to change the settings of any of the accounts you added, follow these steps to get to them:
1- Open the Settings menu on your device.
2- Under "Accounts," select your account. If you’re using a Google account, touch Google and then
your account.
x Remove an account from your device
You can remove an account you've added to your device. When you do so, everything associated with that
account, including email, contacts, and settings, will also be deleted.
To remove an account from your device, follow these steps:
1- Open the Settings menu on your device.
2- Under "Accounts," touch the name of the account you want to remove.

42
3- If you’re using a Google account, touch Google and then the account. Keep in mind that when you
sign out of your Google Account, all the email, contacts, Calendar events, and other data
associated with that account will no longer automatically sync with your device.
4- Touch the Menu icon in the top right corner of the screen.
5- Touch Remove account.
x Change your location mode
You can use different modes when you turn on location for your device. These modes replace the GPS, Wi-Fi,
and cellular network options in previous versions of Android.
Each mode uses different sources to estimate your device’s location. You can allow apps to use this
information to provide location-based services, such as the ability to check in, view commute traffic, or find
nearby restaurants.
To control what location information your device can use, follow these steps:
1- Open your device's Settings menu .
2- Under “Personal,” touch Location.
43
- When the switch at the top of the screen is Off, your device location isn’t shared with any
apps.
Important: Turning off location for your device also turns it off for Google apps and non-Google apps. That
means that apps can’t use your device location, and many useful features will be turned off.
When the switch at the top of the screen is On, you can select one of the following modes:
- High accuracy. High accuracy mode uses GPS, Wi-Fi, cellular networks, and other
sensors to get the highest-accuracy location for your device. It uses Google's location
service to help estimate your location faster and more accurately.
- Battery saving. Battery saving mode estimates your location using low battery-intensive
location sources, such as Wi-Fi and cellular networks. It uses Google's location service to
help estimate your location faster and more accurately.
- Device only. Device only mode estimates your location using GPS only. It doesn’t use
Google's location service to provide location information. This mode may use more
battery power and take longer to determine your location.

44
You’ll see the location icon at the top of your screen when your device’s precise location is being used by
any app. This icon doesn’t necessarily indicate GPS activity: it means that a mode using more power to
determine your location is turned on.
Factory reset
If you want to erase all your personal data from your device, follow these steps:
1- Open your device's Settings menu.
2- Under "Personal," touch Backup & reset.
3- Touch Factory data reset.
All of your data is erased from your device, including your Google Account, any other accounts, your system
and app settings, and any downloaded applications.
After resetting your device, you'll need to re-enter the same information requested when you first set it up. If
you've been backing up your data to a Google Account, an option during the setup process allows you to
restore it.
45
Safety information
To reduce the risk of fire or electric shock, do not expose the battery charger to rain or moisture. Do not
expose the charger to dripping or splashing of liquids.
7KHEDWWHU\FKDUJHUPXVWEHXVHGLQGRRUV,WLVQHLWKHUGHVLJQHGQRUWHVWHGIRUXVHRXWGRRUVLQUHFUHDWLRQ
vehicles, or on boats.
&KDUJHWKHEDWWHU\RQO\RQDFKDUJHUDSSURYHGE\)LJR'RQRWFRQWLQXHFKDUJLQJWKHEDWWHU\if it does not
reach full charge within the specified charging time. Doing so may cause the battery to become hot, rupture,
or ignite. If you see any heat deformation or leakage, properly dispose of the battery.
'RQRWH[SRVHWKHEDWWHU\WRWHPSHUDWXUHVgreater than 212°F (100°C). If exposed to excessive heat, the
battery can catch fire and explode.
'RQRWSODFHWKHEDWWHU\LQGLUHFWVXQOLJKWRUXVHRUVWRUHLWLQVLGHFDUVLQKRWZHDWKHUZKHUHLWFDQEH
exposed to temperatures in excess of 140°F (60°C). Doing so may cause the battery to generate heat, rupture,
or ignite. Using the battery in this manner also may result in a loss of performance and a shortened life
expectancy.
46
'RQRWVKRUWFLUFXLWWKHEDWWHU\$YRLGSODFLQJLWDURXQGPHWDOREMHFWs such as keys, pocket change, paper
clips, and jewelry.
'RQRWKLWWKHEDWWHU\ZLWKDKDPPHUVWHSRQWKURZRUGURSLWWRH[SRVHLWWRDVWURQJVKRFN'RQRWSLHUFH
the battery with a sharp object such as a nail. Do not crush, dent, or deform the battery in any way. If the
battery becomes deformed, properly dispose of it.
7KHEDWWHU\XVHGLQWKLVGHYLFHPD\SUHVHQWDULVNRIILUHRUFKHPLFDOEXUQLIPLVWUHDWHG'RQRW
disassemble, heat above 212°F (100°C), or incinerate. Replace battery with an approved Figo battery only.
Use of another battery may present a risk of fire or explosion.

FCCCaution.
§15.19Labellingrequirements.
Thisdevicecomplieswithpart15oftheFCCRules.Operationissubjecttotheconditionthatthis
devicedoesnotcauseharmfulinterference.
§15.21Informationtouser.
AnyChangesormodificationsnotexpresslyapprovedbythepartyresponsibleforcompliancecould
voidtheuser'sauthoritytooperatetheequipment.
§15.105Informationtotheuser.
Note:ThisequipmenthasbeentestedandfoundtocomplywiththelimitsforaClassBdigitaldevice,
pursuanttopart15oftheFCCRules.Theselimitsaredesignedtoprovidereasonableprotection
againstharmfulinterferenceinaresidentialinstallation.Thisequipmentgeneratesusesandcan
radiateradiofrequencyenergyand,ifnotinstalledandusedinaccordancewiththeinstructions,may
causeharmfulinterferencetoradiocommunications.However,thereisnoguaranteethat
interferencewillnotoccurinaparticularinstallation.Ifthisequipmentdoescauseharmful
interferencetoradioortelevisionreception,whichcanbedeterminedbyturningtheequipmentoff
andon,theuserisencouragedtotrytocorrecttheinterferencebyoneormoreofthefollowing
measures:
‐Reorientorrelocatethereceivingantenna.
‐Increasetheseparationbetweentheequipmentandreceiver.
‐Connecttheequipmentintoanoutletonacircuitdifferentfromthattowhichthereceiveris
connected.
‐Consultthedealeroranexperiencedradio/TVtechnicianforhelp.
SpecificAbsorptionRate(SAR)information:
ThisMobilePhonemeetsthegovernment'srequirementsforexposuretoradiowaves.Theguidelines
arebasedonstandardsthatweredevelopedbyindependentscientificorganizationsthroughperiodic
andthoroughevaluationofscientificstudies.Thestandardsincludeasubstantialsafetymargin
designedtoassurethesafetyofallpersonsregardlessofageorhealth.
FCCRFExposureInformationandStatementTheSARlimitofUSA(FCC)is1.6W/kgaveragedoverone
gramoftissue.Devicetypes:F55L(FCCID:2ADX3F55L)hasalsobeentestedagainstthisSARlimit.
ThehighestSARvaluereportedunderthisstandardduringproductcertificationforuseattheearis
0.27W/kgandwhenproperlywornonthebodyis1.23W/kg.Thisdevicewastestedfortypical
body‐wornoperationswiththebackofthehandsetkept1.5cmfromthebody.Tomaintain
compliancewithFCCRFexposurerequirements,useaccessoriesthatmaintaina1.5cmseparation
distancebetweentheuser'sbodyandthebackofthehandset.Theuseofbeltclips,holstersand
similaraccessoriesshouldnotcontainmetalliccomponentsinitsassembly.Theuseofaccessories
thatdonotsatisfytheserequirementsmaynotcomplywithFCCRFexposurerequirements,and
shouldbeavoided.
Body‐wornOperation
Thisdevicewastestedfortypicalbody‐wornoperations.TocomplywithRFexposurerequirements,a
minimumseparationdistanceof1.5cmmustbemaintainedbetweentheuser’sbodyandthe
handset,includingtheantenna.Third‐partybelt‐clips,holsters,andsimilaraccessoriesusedbythis
deviceshouldnotcontainanymetalliccomponents.Body‐wornaccessoriesthatdonotmeetthese
requirementsmaynotcomplywithRFexposurerequirementsandshouldbeavoided.Useonlythe
suppliedoranapprovedantenna.
FCCHearing‐AidCompatibility(HAC)
The(SL5550)hasbeentestedforhearingaidcompatibility.ThisdevicehasanM4andT3rating.
Whensomewirelessdevicesareusednearsomehearingdevicessuchashearingaidsandimplants,
usersmaydetectabuzzingorhummingnoise.Somehearingdevicesaremoreimmunethanothersto
thisinterferencenoise.Wirelessdevicesmayalsovaryintheamountofinterferencetheygenerate.
Theratingsforcompatibilityofdigitalwirelessdeviceswithhearingaidsaredescribedinthe
AmericanNationalStandardsInstitute(ANSI)C63.19standard:
M‐Rating:PhonesratedM3orM4meetFCCrequirementsandarelikelytogeneratelessinterference
withhearingdevicesthanphonethatarenotlabeled.M4isthebetter/higherofthetworatings.
(SL5550)isratedM4.
T‐Rating:PhonesratedT3orT4meetFCCrequirementsandarelikelybemoreusablewithhearing
devices’telecoilthanunratedphones.T4isthebetter/higherofthetworatings.
(SL5550)isratedT3.
Themoreimmunethehearingaiddeviceis,thelesslikelyoneistoexperienceinterferencenoise
fromthewirelessphone.Hearingaiddevicesmayalsoberated.Addingtheratingofthehearingaid
andthephonewoulddetermineprobableusability:
1.Anycombinedratingequaltoorgreaterthansixoffersthebestuse.
2.Anycombinedratingequaltofiveisconsiderednormaluse.
Theratingsarenotguarantees.Resultswillvarydependingontheuser’shearingdeviceandhearing
loss.Ifyourhearingdevicehappenstobevulnerabletointerference,youmaynotbeabletousethis
devicesuccessfully.Tryingoutthisdevicewithyourhearingdeviceisthebestwaytoevaluateitfor
yourpersonalneeds.Thisdevicehasbeentestedandratedforusewithhearingaidsforsomeofthe
wirelesstechnologiesthatitutilizes.However,theremaybesomenewerwirelesstechnologiesused
inthisphonethathavenotbeentestedyetforusewithhearingaids.Itisimportanttotrythe
differentfeaturesofthisphonethoroughlyandindifferentlocations,usingyourhearingaidor
cochlearimplant,todetermineifyouhearanyinterferingnoise.Consultyourserviceproviderorthe
manufacturerofthisphoneforinformationonhearingaidcompatibility.
Forinformationabouthearingaidsanddigitalwirelessphones
FCCHearingAidCompatibilityandVolumeControl:
http://www.fcc.gov/cgb/dro/hearing.html
GallaudetUniversity,RERC:
https://fjallfoss.fcc.gov/oetcf/eas/reports/GenericSearch.cfm