Telefield 1000A 4 Line Corded / Cordless Phone - Base Unit User Manual ZKV3501RA00 R 01 0 20161221
Telefield Ltd. 4 Line Corded / Cordless Phone - Base Unit ZKV3501RA00 R 01 0 20161221
User Manual
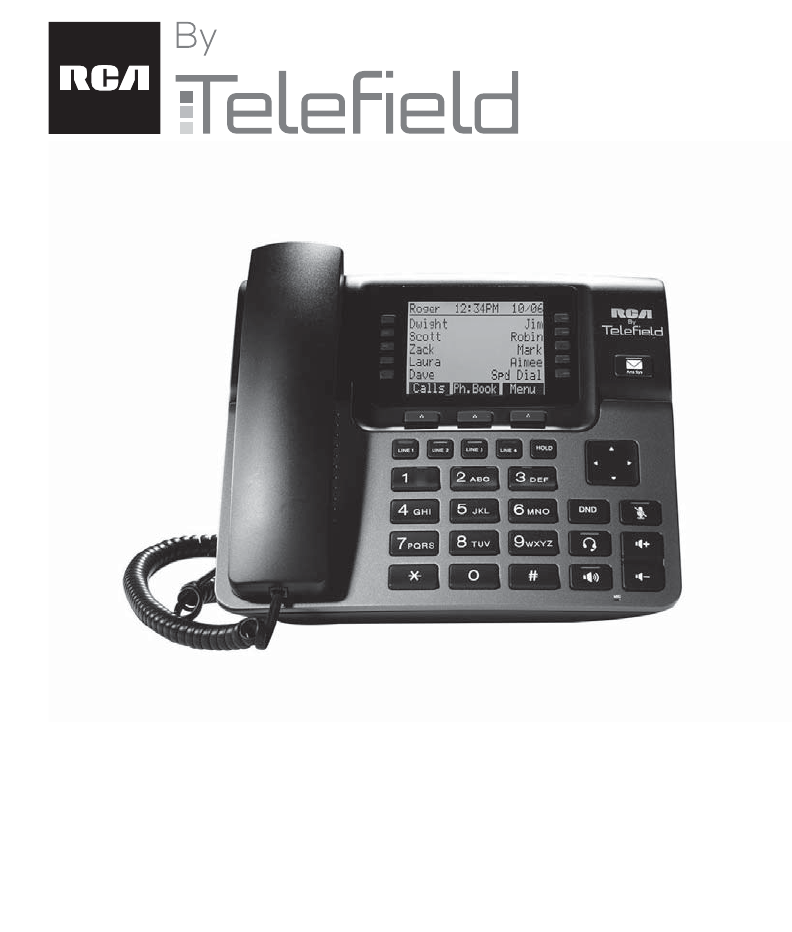
UNISON BASE STATION
U1000/U1100
This product meets the applicable Innovation, Science and Economic Development Canada technical
specifications.
Ce produit répond à la innovation, des sciences et de Développement économique Canada spécifications
techniques applicables.

Interference Information
This device complies with Part 15 of the FCC Rules. Operation is subject to the following two conditions: (1)
This device may not cause harmful interference; and (2) This device must accept any interference received,
including interference that may cause undesired operation. This equipment has been tested and found to
comply with the limits for a Class B digital device, pursuant to Part 15 of the FCC Rules. These limits are
designed to provide reasonable protection against harmful interference in a residential installation. This
equipment generates, uses, and can radiate radio frequency energy and, if not installed and used in
accordance with the instructions, may cause harmful interference to radio communications. However, there is
no guarantee that interference will not occur in a particular installation. If this equipment does cause harmful
interference to radio or television reception, which can be determined by turning the equipment off and on,
the user is encouraged to try to correct the interference by one or more of the following measures:
• Reorient or relocate the receiving antenna (that is, the antenna for radio or television that is “receiving” the
interference).
• Reorient or relocate and increase the separation between the telecommunications equipment and receiving
antenna.
• Connect the telecommunications equipment into an outlet o
• Consult the dealer or an experienced radio/TV technician for help.
n a circuit different from that to which the
receiving antenna is connected.
If these measures do not eliminate the interference, please consult your dealer or an experienced
radio/television technician for additional suggestions. Also, the Federal Communications Commission has
prepared a helpful booklet, “How To Identify and Resolve Radio/TV Interference Problems.” This booklet is
available from the U.S. Government Printing Office, Washington, D.C. 20402. Please specify stock number
004-000-00345-4 when ordering copies.
Notice:The changes or modifications to this equipment not expressly approved by the party responsible for
compliance could void the user’s authority to operate the equipment.
FCC RF Radiation Exposure Statement
This equipment complies with FCC RF radiation exposure limits set forth for an uncontrolled environment.
This equipment should be installed and operated with a minimum distance of 20 centimeters between the
radiator and your body. This transmitter must not be co-located or operated in conjunction with any other
antenna or transmitter.”
Licensing
Licensed under US Patent 6,427,009.
Hearing Aid Compatibility
This telephone system meets FCC
standards for Hearing Aid Compatibility.
3

Table of Contents
Equipment Approval Information 2
Introduction 5
Features 5
Connections and Setup 6
Base Layout 7
Installing the Phone 8
Connecting your System 9
Updating your Extension List 10
Programming the phone 10
Language 10
Call Volume 10
Ringer Volume 10
Ring Tone 10
Tone/Pulse Dialing (U1000 only) 11
Priority Line 11
Delay Ring 11
Phone ID 11
Flash Time 12
Intercom Auto Answer 12
Call Alert Tone 12
Key Tone 12
No Unknown/Blocked 12
Display 13
Local Area Code 13
Manually Setting Time/Date (U1000 only) 13
Reset Phone Settings 14
Restoring the Default Settings 14
Basic Operation 14
Making Calls 14
Pre-dialing 14
Answering Calls 15
Switching Between the Speakerphone,
Handset, and Headset 15
4
Mute 15
Do Not Disturb 15
Line Privacy 15
Hold 16
Transferring and Conferencing 16
Intercom Calls 16
Caller ID 17
Phonebook 18
Answering System 19
Playing/Deleting/Forwarding 19
Recording a Greeting 19
Call Screening 20
Memo Recording 20
Two-Way recording 19
Accessing the Answering System 20
20
Setting up Remote Access
from Another Location
20
Accessing your messages remotely 21
Answer Delay 21
Message Interrupt 21
Digital Receptionist (U1000 only) 21
Greetings 22
Office Hours 22
Weekend Greetings 23
Music on Hold 23
Recording Custom Music 24
Troubleshooting 24
General Product Care 25
Service 26
Warranty 26
Product Registration 27
Playback of a Greeting 20
Message Length 21

Introduction
Your Unison 4-Line Phone is a full-featured phone ideally suited for home or office use. It is designed to
receive calls on up to four incoming telephone lines and serve up to 9 extensions. It also features a Digital
Receptionist which will answer and redirect incoming calls to other extensions in the system. It is possible to
expand your system with the additional purchase of the U1100 Unison Wireless Deskphone or the U1200
Unison Cordless Handset.
Features
•Call Waiting and Caller ID
•10 Programmable Feature Keys
•99 Phonebook Memory
•Hold and Call Transfer
•Conference Call and Intercom
•Full-Duplex Speakerphone
This telephone has been designed to be simple to use, however, you can reach its potential more quickly by
taking a few minutes to read this instruction book. This telephone is a multifunction product for use with Call
Waiting and Caller ID services available from your local telephone company.
Your Caller ID Call Waiting phone allows you to:
• View the name and telephone number of a caller while you are on the phone (Call Waiting Caller ID).
• Identify callers before you answer the phone.
• View the time and date of each incoming call.
• Record up to 99 Caller ID messages sequentially in each handset.
• Know who called while you are on the line or when you were away.
• Screen unwanted calls, eliminate harassment from annoying calls, or to get prepared before answering
a call.
IMPORTANT: In order to use all the features of this telephone, you must subscribe to two separate services
available from your local telephone company: the standard Name/Number Caller ID Service to know who is
calling when the phone rings and Caller ID with Call Waiting Service to know who is calling while you are on
the phone.
5
Caution: When installing and using telephone equipment, there are basic safety instructions that
Caution: To maintain the compliance with the Industry Canada's RF exposure guideline, place the
base unit at least 20 cm from nearby persons.
should always be followed. Refer to the IMPORTANT SAFETY INSTRUCTIONS provided with this
product and save them for future reference.

Connections and Setup
Parts Checklist
Make sure your package includes the following items:
• Phone base
• Handset
• Handset cord
• Power adaptor
• 4x 2-line phone cords (U1000 only)
• Stand
Digital Security System
Your cordless phone uses a digital security system to protect against false ringing, unauthorized access,
and charges to your phone line.
Telephone Jack Requirements
To use this phone system, you will need an RJ11C (for a single line) or an RJ14C (for two lines) type
modular phone jack. If you do not have either modular jack available in your home or office, call your local
phone company to find out how to get one installed.
Important Installation Information
• Never install telephone wiring during a lightning storm
• Never install telephone jacks in wet locations unless the jack is specifically designed for wet locations.
• Never touch uninsulated telephone wires or terminals unless the telephone line is disconnected from the
network.
• Use caution when installing or modifying telephone lines.
• Temporarily disconnect any other equipment connected to the telephone.
Important Installation Guidelines
• Install telephone near both a telephone jack and an electrical power outlet.
• Avoid sources of noise, such as a window or a busy street, and electrical noise, such as motors,
microwave ovens and fluorescent lighting.
• Avoid heat sources, such as heating air ducts, heating appliances, radiators and direct sunlight.
• Avoid areas of excessive moisture or extremely low temperature.
• Avoid dusty locations
• Avoid other cordless telephones or personal computers.
CAUTION: Always disconnect all phone cords from the base unit before battery installation or replacement.
INSTALLATION NOTE: Certain other communications devices may also use the DECT 6.0 frequency for
communication, and, if not properly set, these devices may interfere with each other and/or your new
telephone. If you are concerned with interference, please refer to the owner’s manual for these devices on
how to properly set channels to avoid interference.
6
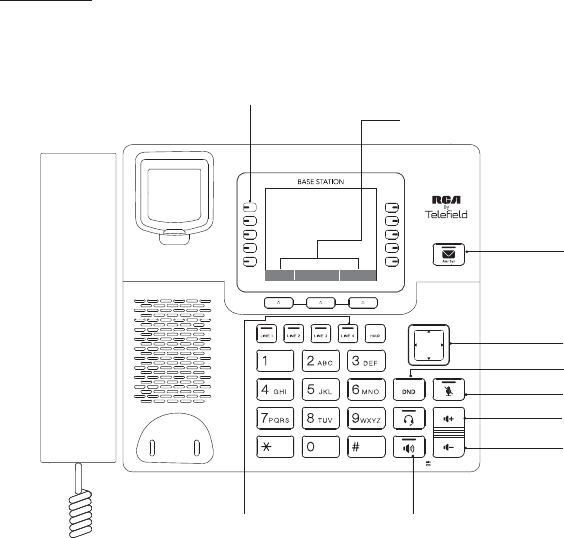
Base Layout
7
Calls Ph.Book Menu
Digital Answering System
Navigation Button
Mute
Do Not Disturb
Volume UP
Volume Down
Speakerphone
4 Line Status
Indicators
Extension Status Indicators
3 Soft Keys
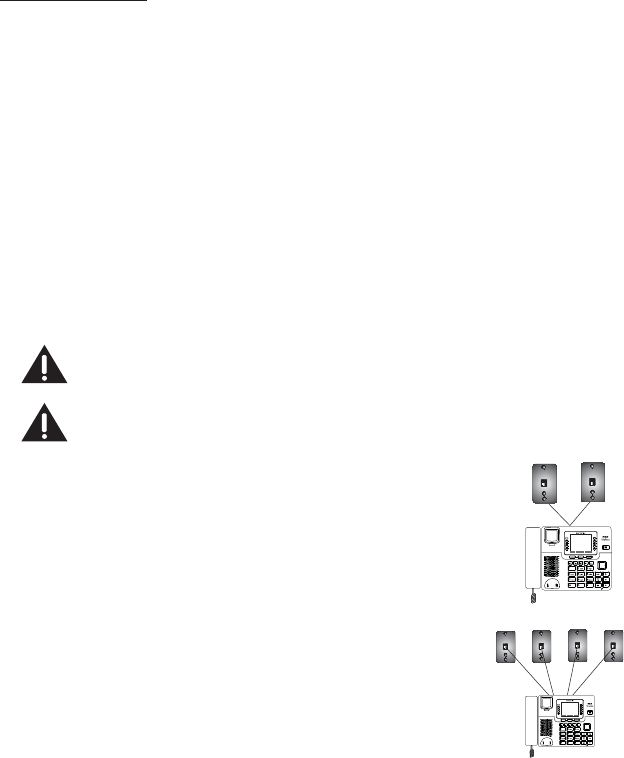
Installing the Phone
The U1000 may be connected to either two 2-line (RJ14C) wall jacks or four single line (RJ11C) wall jacks to
accommodate all four lines. The U1100 does not require connection to telephone lines.
Choose an area near an electrical outlet and telephone wall jack. Your phone should be placed on a level
surface, such as a table top or desk.
Install 5 AAA-size alkaline batteries (not included) for backup power in the event of a power failure. To open
the battery door, find the tab on the top of the battery compartment. Push down on the tab and pull away
from the phone. A flat bladed screw driver may be needed. Insert the batteries only as shown on the diagram
inside the battery compartment.
NOTE: If the low battery appears in the display, you will need to replace the batteries to ensure unit
operation during a power failure.
IMPORTANT: If you are not going to use the telephone for more than 30 days, remove the batteries to avoid
battery leakage and damage to the unit.
Plug the AC power supply cord into the power jack on the back of the base and the other end into an
electrical outlet.
1. Connect the telephone line cords:
If you have two 2-line wall jacks installed in your home or office, plug
one end of the straight telephone linecord tagged as “Line 1+2” into
the jack marked “LINE 1+2” on the back of the U1000 base. Plug the
otherend of the line cord into the wall jack. Plug the other line cord into
If you have four single-line wall jacks installed in your home or office,
simply plug each single line cord intothe corresponding port on the back
of the U1000 base phone.
2. Connect the handset cord:
Connect one end of the coiled handset cord to the jack on the side
of the base and the other end into thejack in the handset, then place
the handset in the cradle.
8
Calls Ph.Book Menu
Calls Ph.Book Menu
CAUTION: To reduce risk of personal injury, fire, or damage use only the T-T017(7.5V, 800mA)
For pluggable equipment, the socket-outlet (power adaptor) shall be installed near the equipment
and shall be easily accessible. Pour les appareils raccordés, la prise de courant (adaptateur
secteur) doit être installée près de l'équipement et doit être facilement accessible.
power adaptor listed in the user's guide. This power adaptor is intended to be correctly orientated
in a vertical or floor mount position. Unison system is a Class (Classe) 2 Power Source
the jack marked “LINE 3+4” on the back ofthe phone, with the other end
plugged into the wall jack as well.

9
Connecting your System
Once the U1000 phone is set up and has dial tone, it is ready to be wirelessly connected to the other U1100
phones and U1200 handsets that will make up your system. Once you have unboxed and plugged in your
U1100 phone or U1200 handset, they will be ready to register to the base.
To Register a U1100 Wireless Deskphone to the System
1. On your U1000 base, press the “Menu” softkey.
2. Using the directional pad, move the indicator to “Add/Remove Phones .” Press the “Select” softkey.
3.
4.
search for the base.
5. If registration is successful, both phones will beep and display “Registration Complete!” If registration is
not successful, move the phones closer together and try again.
To Register a U1200 Cordless Handset to the System
1. On your U1000 base, press the “ Menu ” softkey.
2. Using the directional pad, move the indicator to “ Add/Remove Phones .” Press the “ Select ” softkey.
3.
Registration Mode as it searches for another phone to register.
4. On your U1200 cordless handset, press the “ Reg ” softkey. It will also enter Registration Mode and search
for the base.
5. If registration is successful, both phones will beep and display “ Registration Complete! ” If registration is
not successful, move the phones closer together and try again.
NOTE: If your U1100 or U1200 does not display the “Press “REG” To Initiate Registration” message on
the display when you plug it in, the “Register Phone”o
ption is available in the “Add/Remove Phones”
menu.
To remove a U1100 or U1200 from the system you must deregister it from the U1000 base phone.
1. On your U1000 base, press the “ Menu ” softkey.
2. Using the directional pad, move the indicator to “ Add/Remove Phones .” Press the “ Select ” softkey.
3. Select the “ Deregister Phone ” option and press the “ Select ” softkey.
4.
the “ Yes ” softkey.
Note: Removing an extension from the system will leave it unable to make or receive calls until it is
re-registered to a U1000 base.
Select the “Registration Phone” option and press the “Select” softkey. This will put the U1000
base in Registration Mode as it searches for another phone to register.
Select the “ Register Phone ” option and press the “ Select ” softkey. This will put the U1000 base in
Select from the list the extension you wish to remove and press the “ Select ” softkey. Confirm by pressing
On your U1100 wireless deskphone, press the “Reg” softkey. It will also enter Registration Mode and

Updating your Extension List
When a handset or extension changes their name, that name will automatically be updated on the rest of the
phones on the system. In certain situations, such as if a phone is temporarily removed from the system or
otherwise unreachable, may require a manual update to the extension list names.
1. On your U1000 base, press the “ Menu ” softkey.
2. Using the directional pad, move the indicator to “ Add/Remove Phones .” Press the “ Select ” softkey.
3. Select the “ Refresh List ” option and press the “ Select ” softkey. The updated name list will be sent to
each extension on the system.
Programming the Phone
When programming the phone or changing the settings, if at any time you wish to discontinue programming
press the “ Back ”or“ Home ” softkey until you reach the idle screen. The phone will also return to the idle
screen if left on any menu screen for several seconds without input.
Language
Set the display language to show messages in either English, Spanish, Portuguese or French.
1. Press the “ Menu ” softkey while in idle mode.
2. Using the directional pad, move the indicator to “ Phone Settings .” Press the “ Select ” softkey.
3. Press the “ Select ” softkey again with the indicator on “ Language ”.
4. Using the directional pad, move the indicator to your chosen language and press the “ Select ” softkey.
Call Volume
The ringer, speaker, handset, and headset volumes are set independently with the Vol (+ or -) buttons.
There are 7 possible volume levels in each mode. The volume indicator is displayed on the screen during
volume
Ringer Volume
To change the volume of the telephone ringer:
1. Press the “ Menu ” softkey while in idle mode.
2. Using the directional pad, move the indicator to “ Line Settings .” Press the “ Select ” softkey.
3. Move the indicator to “ Ringtone Volume
4. This menu will allow you to control the ring volume for all lines (and the intercom) separately. Using the
directional pad, move the indicator to the phone line whose volume you wish to change. When selected,
each line will play a sample of the current ringtone at the selected volume.
5. Using the left and right arrows of the directional pad, adjust the volume to your liking. Press the “ Select ”
softkey when you are finished.
NOTE: To mute a ringer, reduce the volume to off.
Ring Tone
The ringers for all four lines may be set independently of one another.
10
adjustment. To adjust the volume, press the Vol (+ or -) buttons during an active call while using
either the speaker, handset, or headset.
” and press the “ Select ” softkey.
1. Press the “ Menu ” softkey while in idle mode.
2. Using the directional pad, move the indicator to “ Line Settings .” Press the “ Select ” softkey.
3. Move the indicator to “ Ringtone
4. This menu will allow you to control the ring tones on each line and the intercom. Using the directional pad,
move the indicator to the phone line you wish to change the tone for. When selected, each line will play
sample of the ringtone.
5. Using the left and right arrows of the directional pad, select the desired ring tone. Press the “ Select
when you are finished.
Tone/Pulse Dialing (U1000 only)
Telephone lines in some areas may still require pulse dialing.
1. Press the “ Menu ” softkey while in idle mode.
2. Using the directional pad, move the indicator to “ Line Settings .” Press the “ Select ” softkey.
3. Move the indicator to “ Tone/Pulse Dial ” and press the “ Select ” softkey.
4. Using the directional pad, move the indicator to the phone line whose dial mode you wish to change.
5. Using the left and right keys on the directional pad, choose either “ Tone ”or“ Pulse ” and press the “ Select ”
softkey.
NOTE: All lines are set to “Tone” by default.
Priority Line
The priority line has precedence over the other three lines and, if available, will be used automatically when
the handset is lifted or the speakerphone is used. If the priority line is in use, the next available line will be
selected.
1. Press the “ Menu ” softkey while in idle mode.
2. Using the directional pad, move the indicator to “ Line Settings .” Press the “ Select ” softkey.
3. Move the indicator to “ Priority Line ” and press the “ Select ” softkey.
4. Select which line you wish to be the Priority Line and press the “ Select ” softkey.
Delay Ring
Use this setting to delay this phone’s ringer. Other phones on the system will still ring immediately on
incoming calls.
1. Press the “
Menu ” softkey while in idle mode.
2. Using the directional pad, move the indicator to “ Phone Settings .” Press the “ Select ” softkey.
3. Move the indicator to “ Delay Ring ” and press the “ Select ” softkey.
4. Using the up and down buttons on the directional pad, select how many rings this phone will remain silent
before ringing during an incoming call.
Phone ID
Phone ID is what you name your phone and how it will appear on the intercom lists of the other phones on
the system.
1. Press the “ Menu ” softkey while in idle mode.
2. Using the directional pad, move the indicator to “ Phone Settings .” Press the “ Select ” softkey.
3. Move the indicator to “ Extension Name ” and press the “ Select ” softkey.
11
” and press the “ Select ” softkey.
” softkey
4. Using the alphanumeric dial pad, enter a phone name up to 12 characters. More than one letter is stored
in each of the number keys. For example, to enter “Lorraine,” press the 5 key three times for the letter L,
press the the 6 key three times for the letter O, press the 7 key three times for the letter R, and so on.
5. When finished, press the “ Save ” softkey to save the name to your phone. If you make a mistake, press
the “ Clear ” softkey to delete the previous character.
NOTE: The current phone name will appear in the top left corner of the idle screen.
Intercom Auto Answer
For hands-free operation, your phone can be set to answer intercom calls by automatically activating the
speakerphone. This feature may also be used for room monitoring.
1. Press the “ Menu ” softkey while in idle mode.
2. Using the directional pad, move the indicator to “ Phone Settings .” Press the “ Select ” softkey.
3. Move the indicator to “ Intercom Auto Answer ” and press the “ Select ” softkey.
4. Choose “ On ” or “ Off ” and press the “ Select ” soft key.
Flash Time
Use the “ Flash ” softkey to activate custom calling services such as call waiting or call forwarding, which are
available through your local phone company.
1. Press the “ Menu ” softkey while in idle mode.
2. Using the directional pad, move the indicator to “ Phone Settings .” Press the “ Select ” softkey.
3. Move the indicator to “ Flash Length ” and press the “ Select ” softkey.
4. Choose how long hook flash will last. The default setting is 600ms.
Call Alert Tone
Turn on the call alert to hear a tone for incoming calls while you are using the telephone. This setting can be
changed for each individual line.
1. Press the “ Menu ” softkey while in idle mode.
2. Using the directional pad, move the indicator to “ Phone Settings .” Press the “ Select ” softkey.
3. Move the indicator to “ Call Alert Tone ” and press the “ Select ” softkey.
4. Using the up and down keys on the directional pad to indicate which line you wish to change. Then, using
the left and right keys on the directional pad, toggle the Call Alert Tone “ On ” or “ Off .”
Key Tone
If you wish to hear or silence the tone that plays whenever a key is pressed, follow these instructions:
1. Press the “ Menu ” softkey while in idle mode.
2. Using the directional pad, move the indicator to “ Phone Settings .” Press the “ Select ” softkey.
3. Move the indicator to “ Key Tone ” and press the “ Select ” softkey.
4. Select “ On ” or “ Off ” and press the “ Select ” softkey.
No Unknown/Blocked
This feature allows you to decide whether caller ID records from unknown or blocked caller ID calls are saved
12
or not. If you choose “No”, the re
1. Press the “ Menu ” softkey while in idle mode.
2. Using the directional pad, move the indicator to “ Phone Settings .” Press the “ Select ” softkey.
3. Move the indicator to “ No Unknown/Blocked ” and press the “ Select ” softkey.
4. Choose “ Yes ” or “ No ” and press the “ Select ” soft key.
Display Contrast
1. Press the “ Menu ” softkey while in idle mode.
2. Using the directional pad, move the indicator to “ Phone Settings .” Press the “ Select ” softkey.
3. Move the indicator to “ Contrast ” and press the “ Select ” softkey.
4. Using the left and right keys on the directional pad, adjust the contrast to your liking and press the “ Select ”
softkey.
Display Backlight
1. Press the “ Menu ” softkey while in idle mode.
2. Using the directional pad, move the indicator to “ Phone Settings .” Press the “ Select ” softkey.
3. Move the indicator to “ Backlight ” and press the “ Select ” softkey.
4. Select either “ Always On ”or“ Automatic ” and press the “ Select ” softkey. When the Backlight is on
“ Automatic ” mode it will only light up during calls and when the user interacts with the phone. It will
automatically turn off after several seconds of inactivity.
Local Area Code
Setting up Home and Local area codes helps the phone determine the number format to display when a valid
caller ID record is received. Call records matching any of the set area codes are displayed as 10 digits.
1. Press the “
Menu ” softkey while in idle mode.
2. Using the directional pad, move the indicator to “ Phone Settings .” Press the “ Select ” softkey.
3. Move the indicator to “ Area Codes ” and press the “ Select ” softkey.
4. Move the indicator to “ Home Area Code ” and press the “ Select ” softkey.
5. Using the dial pad, enter the 3 digit area code used in your location. Press the “ Select ” softkey to save.
6. If there are other area codes that are used in your area and require 10 digit dialing, repeat the process
with the other “ Local Area Code ” menu options.
Manually Setting the Time and Date(U1000 only)
The time and date is automatically set when you receive your first Caller ID call. If you wish to manually set
the time and date, follow the steps below.
1. Press the “ Menu
” softkey while in idle mode.
2. Using the directional pad, move the indicator to “ Phone Settings .” Press the “ Select ” softkey.
3. Move the indicator to “ Date & Time ” and press the “ Select ” softkey.
4. Using the up and down key on the directional pad and the numbers on the dial pad, adjust the year,
month, day, and time. You may also adjust the clock to use a 12 or 24 hour configuration.
5. When you are finished, press the “ Save ” softkey.
13
cords will be saved in the call history.

Reset Phone Settings
This feature allows you to reset the menu to the original default settings.
1.Press the “ Menu ” softkey while in idle mode.
2. Using the directional pad, move the indicator to “ Reset Phone Settings.” Press the “ Select ” softkey.
3. Move the indicator to “ Yes ” and press the “ Select ” softkey. Confirm the action once more and the phone
will reboot with the default settings.
For servicing or replacement, you can purchase a suitable headset through service centre or retailer shop.
Pour l'entretien ou le remplacement, vous pouvez acheter un écouteur approprié par le centre commercial
ou le magasin de détaillant.
14
Restoring the Default Settings
This feature will reset the phone settings back to the original factory defaults
NOTE: This will erase records in call history and phone book, all greetings,and all messages in the memories.
1. Press the “ Menu ” softkey while in idle mode.
2. Using the directional pad, move the indicator to “ Factory Reset .” Press the “ Select ” softkey.
3. Move the indicator to “ Yes ” and press the “ Select ” softkey. Confirm the action once more and the phone
will reboot with the default settings.
Basic Operation
Your phone provides the convenience of four separate telephone lines, each with its own phone number. It
can have up to ten telephones or cordless handsets sharing multiple lines. Each station is connected to all
others via intercom.
Making Calls with the Handset
1. Pick up the handset and the phone automatically selects the priority line. If the priority line is in use, it will
select the next open line or you may select a line by pressing the corresponding line key.
2. Wait for the dial tone, then dial a phone number.
3. Hang up the handset when finished.
Making Calls with the Speakerphone
1. Press the Speakerphone button and the phone automatically selects the priority line. If the priority line is
in use, it will select the next open line or you may select a line by pressing the corresponding line key.
2. Wait for the dial tone, then dial a phone number.
3. Press the Speakerphone button when finished.
Making Calls with the Optional Headset
1. Connect the headset plug into the headset jack on the right side of the base.
2. Adjust the headset so the microphone is approximately 2 to 3 inches away from your mouth.
3. Press the Headset button and the phone automatically selects the priority line. If the priority line is in use,
it will select the next open line or you may select a line by pressing the corresponding line key.
4. Wait for the dial tone, then dial a phone number.
5. Press the Headset button when finished.
NOTE: The Unison system will work with most telecom headsets that have a 2.5mm headset jack.
Pre-dialing
1. With the phone idle and the handset in the cradle, manually enter the telephone number. The number will
show in the display.
Answering Calls
When receiving an incoming call, you may:
1. Pick up the handset
2. Press the Speakerphone button
3. Press the Headset button
4. Press the Line button corresponding to the line the incoming call is on. This will activate Speakerphone
mode.
5. When finished, hang up the handset, press the Headset button or press the Speakerphone button.
Switching Between the Speakerphone, Handset, and Headset
1. To switch to the speakerphone, press the Speakerphone button. Replace the handset in the cradle.
2. To switch to the handset, lift it out of the cradle. The speakerphone or headset mode will switch off
automatically.
3. To switch to the headset, make sure your headset is plugged into the headset port and press the Headset
button. Replace the handset in the cradle.
Mute
If you are on an active call and do not wish the other party to hear you, use the Mute feature. You will still,
however, be able to hear them.
1. Press the Mute button to toggle the feature. The indicator light on the button will stay lit for as long as the
call is muted.
2. Press the Mute button again to unmute the call.
Do Not Disturb
This feature will disable your telephone's ringer for a set period of time to prevent incoming calls from
interrupting. When an incoming call or intercom call occurs, the status indicators will light up but the phone
will not ring.
1. Press the DND button when the phone is in idle mode.
2. Using the up and down keys on the directional pad, choose the duration you wish to remain undisturbed.
You may select as few as 15 minutes or as long as 24 hours. After that time expires, the phone will
automatically turn off the DND feature.
3. Press the “ Select ” softkey to enable DND for your chosen duration. A DND timer will appear on the top of
the display indicating how much time remains before the DND feature is automatically turned off. DND can
be cancelled manually at any time by pressing the DND key again.
Line Privacy
This feature, when enabled, will prevent other phones on the same system from accessing the line used by
your active call.
1. Press the “ Menu ” softkey while in idle mode.
2. Using the directional pad, move the indicator to “ Phone Settings .” Press the “ Select ” softkey.
3. Move the indicator to “ Line Privacy ” and press the “ Select ” softkey.
15
2. Press the “ Dial ” softkey, press the Speaker button or lift the handset to take a line and the number will
automatically be dialed. Press the “ Clear ” softkey to delete the previous digit and the “ Home ” softkey to
cancel the call before dialing.

4. Choose “ Yes ” or “ No ” and press the “ Select ” soft key.
Hold
Placing a Call on Hold
When on an active call, press the hold button to put the line in use on hold. The line indicator for the held
line will flash red on each phone on the system. The caller will hear either your Music on Hold selection or a
reminder beep, letting them know the call is still connected.
Releasing a Call from Hold
Once a call is placed on hold, it can be released from hold on any phone on the system that has access to
that phone line. Press the corresponding Line key or the Hold button to release that line’s call from hold.
The call will now be active on the Speakerphone. If you wish to change modes, either lift the handset or
press the headset button after pressing the Line key.
Transferring and Conferencing
Transferring a Call to Another Station
1. While on an active call, press the “ X-fer ” softkey.
2. A list of the extensions on your system will appear on the display. Using the up and down keys of the
directional pad, choose the destination extension for your call and press the “ Select ” softkey.
3. Selecting an extension will initiate an intercom call to that extension. If you do not wish to attend the
transfer, you may hang up now and the call transfer will be completed. For an attended transfer, wait until
the other party has answered, then press the “Conf” softkey when you are ready to include all parties. When
you hang up, their call will continue.
Conference Calls
1. While on an active call, press the Hold button to put that call on hold.
2. The phone will return to the idle screen. Make another call as usual by dialing the number or pressing the
desired intercom key.
3. When the second call is connected, press the “ Conf ” softkey. The two active calls will be put into
conference with you.
Intercom Calls
Making an Intercom Call
Press the Programmable Feature Key button to the left or right of the display that corresponds to the
intended recipient. The phone will immediately begin the call in Speakerphone mode. To switch to handset,
lift the handset from the cradle. To switch to headset mode, press the Headset button.
Answering an Intercom Call
When you receive an intercom call, the display will indicate who the call is from and the corresponding
intercom button of that phone will flash. To answer the call, lift the handset, press the Speakerphone button
or the Headset button.
16

Caller ID
Press the “ Calls ” softkey to bring up the Call History screen. This summary screen shows the current time,
date and the phone number of the last 5 calls to this phone. Using the up and down keys on the directional
pad, you can scroll through the call history. To redial a record, simply move the indicator to the desired call
record and lift the handset, press the Speakerphone button, or press the Headset button. You may also
press the corresponding PFK button to redial that record.
Viewing a Caller ID Record
Using the up and down keys on the directional pad, scroll to the desired call record. Press the “ View ”
softkey. This will display the full record of the call, including the full phone number, the date, the time and
which line the call came in on. From here you can also dial the number using the handset, speakerphone or
headset.
NOTE: Each phone can store up to 99 caller ID records. When the memory is full, a new call record
automatically replaces the oldest call in memory.
Storing a Caller ID Record in the Phonebook
1. Using the up and down keys on the directional pad, scroll to the desired call record. Press the “ View ”
softkey. This will bring up the detailed record of the call. Press the “ Store ” softkey.
2. You will be prompted to add a name to the Phonebook record. Using the alphanumeric dial pad, enter a
name up to 16 characters. More than one letter is stored in each of the number keys. For example, to enter
“Lorraine,” press the 5 key three times for the letter L, press the the 6 key three times for the letter O, press
the 7 key three times for the letter R, and so on. If you make a mistake, press the “ Clear ” softkey to delete
the previous character. When finished, press the “ Select ” softkey.
3. You will then be asked to confirm the phone number for this record. You can delete characters using the
“ Clear ” softkey and enter numbers using the dial pad. When finished, press the “ Save ” softkey.
4. If you would like the entry to be saved into the Phonebook, press the “ Ph.Book ” softkey. If you would like
the record save into the speed dials, press the “ Speed ” softkey.
5. If you save to the speed dials, you will be prompted to pick a location for the speed dial. Using the “ >>> ”
and “ <<< ” softkeys, navigate to the desired page and select a location using the softkeys on the right and left
of the display.
Deleting a Caller ID Record
1. Using the up and down keys on the directional pad, scroll to the desired call record. Press the “ Delete ”
softkey.
2. You will be asked to confirm the deletion. Press the “ Yes ” softkey to permanently delete the record. Press
the “ No ” softkey to cancel.
Deleting all Caller ID Records
1. Press and hold the “ Delete ” softkey for 3 seconds.
2. You will be asked to confirm the deletion of all records. Press the “ Yes ” softkey to permanently delete all
caller ID records. Press the “ No ” softkey to cancel.
17

Call Waiting Caller ID
This feature allows you to see who is calling when you hear the call waiting beep. The caller identification
information appears on the display after you hear the tone. Press the “ Flash ” softkey to put the current
active call on hold and answer the incoming call.
IMPORTANT: To use all the features of this unit, you must subscribe to either the standard Name/Number
Caller ID Service or Caller ID with Call Waiting Service. To know who is calling while you are on the phone,
you must subscribe to Caller ID with Call Waiting service.
Phonebook
Dialing a Phonebook Record
Press the “ Ph.Book ” softkey to bring you to the Phonebook screen. This summary screen shows the name
assigned to each phonebook record, stored in alphabetical order. Using the up and down keys on the
directional pad, you can scroll through the phonebook entries. To dial a record, simply move the indicator to
the desired record and lift the handset, press the Speakerphone button, or press the Headset button. You may
Viewing a Phonebook Record
Using the up and down keys on the directional pad, scroll to the desired phonebook record. Press the “ View ”
softkey. From here you can also dial the number using the handset, speakerphone or headset.
Creating a New Phonebook Record
1. Press the “ New ” softkey to create a new phonebook record.
2. You will be prompted to add a name to the Phonebook record. Using the alphanumeric dial pad, enter a
name up to 16 characters. More than one letter is stored in each of the number keys. For example, to enter
“Lorraine,” press the 5 key three times for the letter L, press the the 6 key three times for the letter O, press
the 7 key three times for the letter R, and so on. If you make a mistake, press the “ Clear ” softkey to delete
the previous character. When finished, press the “ Select ” softkey.
3. You will be prompted to enter the phone number of this phonebook record. Using the numbers on the dial
pad, enter the phone number. If you make a mistake, press the “ Clear ” softkey to delete the previous
character. When finished, press the “ Save ” softkey.
Editing a Phonebook Record
1. Using the up and down keys on the directional pad, scroll to the desired call record. Press the “ View ”
softkey. This will take you to the detailed view of the record. Press the “ Edit ” softkey.
2. You will be prompted to confirm or change the name of the Phonebook record. Using the alphanumeric
dial pad, enter a name up to 16 characters. More than one letter is stored in each of the number keys. For
example, to enter “Lorraine,” press the 5 key three times for the letter L, press the the 6 key three times for
the letter O, press the 7 key three times for the letter R, and so on. If you make a mistake, press the “ Clear ”
softkey to delete the previous character. When finished, press the “ Select ” softkey.
3. You will then be asked to confirm or change the phone number for this record. You can delete characters
using the “ Clear ” softkey and enter numbers using the dial pad. When finished, press the “ Save ” softkey.
Deleting a Phonebook Record
1. Using the up and down keys on the directional pad, scroll to the desired phonebook record. Press the
18
also press the corresponding PFK button to redial that record.

“ View ” softkey on the left side of the display. This will take you to the detailed view of the record. Press the
“ Delete ” softkey.
2. You will be asked to confirm the deletion. Press the “ Yes ” softkey to permanently delete the record. Press
the “ No ” softkey to cancel.
Answering System
Each extension on the system can have access to a mailbox of it’s own on the answering system. The
Answering System can store approximately 200 minutes of messages, memos, and announcements. If there
is a new message waiting, the light on the “ Ans Sys ” button will be lit.
Turning the Answering System On and Off
1. Press the “ Menu ” softkey while in idle mode.
2. Using the directional pad, move the indicator to “ Answering System .” Press the “ Select ” softkey.
3. Move the indicator to “ General MB On/Off ” and press the “ Select ” softkey.
4. Select “ On ”, “ Off ”, or “ Announce Only ” if you wish to have a greeting for callers but do not want them to
be able to leave a message.
Playing Messages
When you have messages
1. Press the “ Ans Sys ” button while in idle mode.
2. Using the directional pad, move the indicator to “ Play Messages ” Press the “ Select ” softkey.
3. Starting with your newest messages, all messages will be played. Messages are played through the
Speakerphone by default. If you wish to hear your messages through the handset, lift it out of the cradle
after pressing the “ Play Messages ” softkey. To stop playback of messages, press the “Stop” softkey at any
time.
Deleting Messages
To delete the message that is currently playing, press the “ Delete ” softkey. You will be asked to confirm the
deletion by pressing the “ Yes ” or “ No ” softkeys.
To delete all old messages on the answering system, move the indicator to the “ Delete All Old ” option and
press the “ Select ” softkey. You will be asked to confirm the deletion by pressing the “ Yes ” or “No” softkeys.
Forwarding a Message to Another Extension
1. If you wish to forward the current message to another extension, press the “ Fwd ” softkey during
playback.
2. Select the extension to which you wish to send the message by pressing the corresponding PFK key
next to their name. The message will arri
Recording a Greeting
1. Press the “ Menu ” softkey while in idle mode.
2. Using the directional pad, move the indicator to “ Answering System .” Press the “ Select ” softkey.
3. Choose either the “ General Greeting ”or“ Announce Only ” greeting. Move the indicator to your choice
19
the light on the “ Ans Sys ” button will be blinking.
ve in their mailbox as a new message.
and press the “ Select ” softkey.
NOTE: The Announce Only option will not allow callers to leave a message after playing.
4. Select “ Record Greeting ” and press the “Select” softkey.
5. Record your message. Press the "Save" softkey.
save. If you are not satisfied, simply select the “ Record Greeting ” option again and re-record.
Playback of a Greeting
1. Press the “ Menu ” softkey while in idle mode.
2. Using the directional pad, move the indicator to “ Answering System .” Press the “ Select ” softkey.
3. Choose either the “ General Greeting ”or“ Announce Only ” greeting. Move the indicator to your choice
and press the “ Select ” softkey.
4. Select “ Play Greeting ” and press the “ Select ” softkey. Your current greeting will be played.
Call Screening
If you wish incoming messages to be played over the speakerphone, activate the Call Screening feature. To
take the call, pick up the handset and the answering system will stop recording.
1. Press the “ Menu ” softkey while in idle mode.
2. Using the directional pad, move the indicator to “ Answering System ” Press the “ Select ” softkey.
3. Move the indicator to “ Call Screening ” and press the “ Select ” softkey.
4. Select “ On ” or “ Off ” and press the “Select” softkey.
Memo Recording
This feature allows you to record a memo to yourself and store it on the answering system.
1. Press the “ Ans Sys ” button while in idle mode.
2. Using the directional pad, move the indicator to “ Record Memo ” Press the “ Select ” softkey.
3. Record your memo after the beep. Press the “
Finish
” softkey when your memo is complete.
NOTE: Your memo will be stored with your other incoming messages in your inbox. To hear it again, play
your messages.
20
The greeting will play back for you and automatically
Accessing the Answering System from Another Location
You can access many features of this answering system when you are away from your phone. To access
your mailbox, you must turn on the remote function and set a three-digit remote password.
NOTE:You Answering System must be set to On for this feature to function.
Setting up Remote Access
1. Press the “Menu” softkey while in idle mode.
2. Using the directional pad, move the indicator to “Answering System” Press the “Select” softkey.
Two-Way recording
If you are on an active call,you can record a phone converation.
1.While on a call,press Rec PFK key to begin recording the conversation.
2.If you want to end,press Stop PFK key to stop recording.This is considered standard message and will be
included in the message counter.
Note:Before start to record the phone conversation,suggest you to tell the party you are speaking to that the
conversation will be recorded.
3. Move the indicator to “Remote Password” and press the “Select” softkey.
4. Activate the feature by highlighting the “On” option and pressing the “Select” softkey.

6. Using the key pad, enter your three digit passcode, then press the “Select” softkey.
Accessing your messages remotely
1. From a phone outside of your Unison phone system, dial one of the phone numbers your system uses.
When the Answering System answers, enter the number of the extension whose messages you wish to check.
2. After the Answering System answers and plays your greeting, enter your three digit remote access
passcode.
3. If the passcode is entered correctly, the Answering System will play your messages. The voice menu will
also direct you to the following options:
Press 2 to play messages, press 2 again to stop
Press 3 to skip
Press 1 to review
Press 0 while playing message to erase
Press 4 to turn on and off
Press 6 to play greeting
Press 7 to review menu again
4. When finished reviewing your messages, hang up.
21
5 After the feature is activated, return to the menu and highlight the “Set Passcode” option and press the
“Select” softkey.
Answer Delay
This sets the number of rings before the answering system picks up the call.
1. Press the “ Menu ” softkey while in idle mode.
2. Using the directional pad, move the indicator to “ Answering System .” Press the “ Select ” softkey.
3. Move the indicator to “ Answer delay ” and press the “ Select ” softkey.
4. Select either 3 rings up to 10 rings,or Toll Saver. The default is 2 rings.
5. Press the “ Select ” softkey to save.
NOTE: Toll Saver can save you the cost of a call when you access your message from another phone.
- If you have new messages, the unit answers after the 3rd ring.
- If you have no new messages, the unit answers after the 5th ring.
- You can hang up after the 3rd or 4th ring and save the pay telephone or long distance charge.
Message Length
1. Press the “ Menu ” softkey while in idle mode.
2. Using the directional pad, move the indicator to “ Answering System .” Press the “ Select ” softkey.
3. Move the indicator to “ Message Length ” and press the “ Select ” softkey.
4. Select either “ No Limit ,” “ 1 Minute ,” or “ 2 Minutes ” and press the “ Select ” softkey.
Message Interrupt
When message interrupt is enabled, you will be able to interrupt an incoming caller leaving a message and
make it an active call instead of a message in your mailbox.
1. Press the “ Menu ” softkey while in idle mode.
2. Using the directional pad, move the indicator to “ Answering System .” Press the “ Select ” softkey.
3. Move the indicator to “ Message Interrupt ” and press the “ Select ” softkey.
4. Select either “ On ” or “ Off ” and press the “ Select ” softkey.
Digital Receptionist(U1000 only)
You can set the U1000 base phone to function as a Digital Receptionist. When the Digital Receptionist is on,
Turn Digital Receptionist On/Off
1. Press the “ Menu ” softkey while in idle mode.
2. Using the directional pad, move the indicator to “ Digital Receptionist ” Press the “ Select ” softkey.
3. Move the indicator to “ D.R. On/Off ” and press the “ Select ” softkey.
4. Using the up and down keys on the directional pad, select the line on which you wish to activate or
deactivate the Digital Receptionist. Press the left and right keys to toggle on or off. Press the “ Select ”
softkey when finished.
Digital Receptionist Greetings
There are three different Digital Receptionist outgoing messages. They are Day Greeting, Night Greeting and
Auxiliary Greeting.
Day Greeting is played during the time you set as day time. Night Greeting is played during the time you set
as night time. This can be helpful if you want different messages played during and after business hours.
The default greeting for both greetings is
“Hello, please enter your party’s extension. If you do not know the extension number, press zero (0), zero
(0).”
The Auxiliary Greeting is played when an outside caller presses the “0” key twice after hearing the Day or
Night message. It can be used for an extension list or to inform the caller how to reach the company
operator. The Default Auxiliary Greeting is “Please enter your party’s extension.”
Recording your Own Greeting
To customize your Digital Receptionist greeting for either the Day, Night or Auxiliary Greeting, follow these
steps:
1. Press the “ Menu ” softkey while in idle mode.
2. Using the directional pad, move the indicator to “ Digital Receptionist. ” Press the “ Select ” softkey.
3. Using the up and down keys on the directional pad, select “ Day Greeting ,” “ Night Greeting ”or“ Auxiliary
Greeting .” Press the “ Select ” softkey.
4. Select the “ Record Greeting ” option. Speak your greeting into the Speakerphone. Press the "Save"
when you are finished. Your recorded greeting will be played back to you. If you are not satisfied
with the greeting, simply select “Record Greeting” and try again.
Playback or Delete Greeting
If you wish to review or delete your greeting, follow these steps:
1. Press the “ Menu ” softkey while in idle mode.
2. Using the directional pad, move the indicator to “ Digital Receptionist. ” Press the “ Select ” softkey.
3. Using the up and down keys on the directional pad, select “ Day Greeting, ”“ Night Greeting ”or“ Auxiliary
Greeting .” Press the “ Select ” softkey.
4. Select “ Play Greeting .” This will play back the current greeting.
22
the U1000 automatically picks up a ringing line after the answer delay you programmed and plays the
designated Digital Receptionist greeting. When a caller enters an extension number after hearing the
greeting, the Digital Receptionist transfers the call to that extension. If the requested extension doesn’t pick
up within 45 seconds, the Digital Receptionist takes the call back and plays the greeting again. If the caller
does not enter an extension number after hearing the message, the Digital Receptionist waits 5 seconds and
replays the greeting for the caller. If the caller still does not enter an extension number within 5 seconds the
call will be ended.
softkey

Answer Delay
In some circumstances you may wish to have the Digital Receptionist wait longer than the default 6 seconds
before picking up. To change this setting:
1. Press the “ Menu ” softkey while in idle mode.
2. Using the directional pad, move the indicator to “ Digital Receptionist .” Press the “ Select ” softkey.
3. Move the indicator to “ Answer Delay ” and press the “ Select ” softkey.
4. Select anywhere from 6 seconds to 13 seconds and press the “ Select ” softkey.
Night Time On/Off
If you wish to have a separate greeting play after hours, activate the Night Time mode and set up your Office
Hours.
1. Press the “ Menu ” softkey while in idle mode.
2. Using the directional pad, move the indicator to “ Digital Receptionist .” Press the “ Select ” softkey.
3. Move the indicator to “ Night Time ” and press the “ Select ” softkey.
4. Select “ On ” or “ Off ” and press the “ Select ” softkey.
Setting Up Office Hours
The default office hours are set from 8:00am to 5:00pm. If the Night Time feature is active, the Day Greeting
will play during these hours. After these hours, the Night Greeting will play. You may also customize these
hours to match your own office hours.
1. Press the “ Menu ” softkey while in idle mode.
2. Using the directional pad, move the indicator to “ Digital Receptionist .” Press the “ Select ” softkey.
3. Move the indicator to “ Annoucement Time ” and press the “ Select ” softkey.
4. Using the directional pad and the key pad, highlight and change the time to better match your own office
hours. Press the “ Am/Pm ” softkey to toggle the currently selected time from AM to PM or from PM to AM.
Press the “Save” softkey to finalize your entries.
NOTE: The system will only accept hours that are between 01:00 and 12:00.
Weekend Greeting
If your office is closed on the weekend and you would like the Night Greeting played during those days, set
the Weekend Greeting to “ Use Night Greeting .” Otherwise you can set it to behave the same each day of
the week with “ Use Day Greeting .”
1. Press the “ Menu ” softkey while in idle mode.
2. Using the directional pad, move the indicator to “ Digital Receptionist. ” Press the “ Select ” softkey.
3. Move the indicator to “ Weekend Greeting ” and press the “ Select ” softkey.
4. Select “Use Night Greeting” or “ Use Day Greeting ” and press the “ Select ” softkey.
Music on Hold
The Unison phone system has a customizable Music On Hold feature that allows you to play the following
options to held calls:
A beep to remind callers their call is still active;
A preloaded musical track;
A custom track or message recorded onto the phone’s memory; 23
5. If you would like to delete this greeting, use the directional pad to select the “ Delete ” option. Confirm you
selection by pressing the “ Select ” softkey. This will remove this greeting and replace it with the default
greeting.

A custom track or message played live through the auxiliary port;
Or if you prefer, you can select no Music on Hold.
Choosing the Music on Hold source
1. Press the “ Menu ” softkey while in idle mode.
2. Using the directional pad, move the indicator to “ Music On Hold. ” Press the “ Select ” softkey.
3. Move the indicator to “ M.O.H. Source ” and press the “ Select ” softkey.
4. Make your choice on which source you will use and press the “ Select ” softkey.
Recording your custom Music on Hold
1. Plug a compatible device into the provided auxiliary cord and plug that cord into the headset port.
2. Press the “ Menu ” softkey while in idle mode.
2. Using the directional pad, move the indicator to “ Music On Hold .” Press the “ Select ” softkey.
3. Select the “ Record M.O.H. ” option. Play your message or music selection on your device.
4. When you are finished recording, press the “ Save ” softkey.
Playing your Custom Music on Hold through the Auxiliary Port
1. Plug a compatible device into the provided auxiliary cord and plug that cord into the headset port.
2. Press the “ Menu ” softkey while in idle mode.
3. Using the directional pad, move the indicator to “ Music On Hold .” Press the “ Select ” softkey.
4. Move the indicator to “ M.O.H. Source ” and press the “ Select ” softkey.
5. Select “ Auxiliary In ” and press the “ Select ” softkey. As long as that device is plugged in and playing, it
will be heard by all held calls on the system.
Troubleshooting
Operation By Battery
If the power cord is not plugged into the unit, and the battery is available the unit will enter Battery Operation
Mode. The Battery Operation Mode is designed to allow users to continue use of the phones during a power
outage and is not intended for prolonged use.
No dial tone
• Check or repeat installation steps:
• Make sure the telephone line cords are connected to the phone and the wall jack. Make sure the line cords
are not damaged.
• Make sure the telephone handset cord is connected to the phone and to the headset. MAke sure the cord
is not damaged.
• Make sure the hook switch pops up when the handset is lifted.
• Check the SPEAKER button. Make sure the indicator is off.
• Disconnect the phone from the wall jack and connect another phone to the same jack. If there is no dial
tone in the second phone, the problem might be your wiring or local service.
24

You cannot be heard by the other party.
• Make sure the handset or headset cord is inserted properly and securely.
• Make sure the MUTE feature is not turned on.
Phone does not ring.
• Make sure the ringer is turned on.
• Make sure the Do Not Disturb feature is not activated.
• You may have too many extension phones on your line. Try unplugging some phones.
• See solutions for “No dial tone.”
• If the phone is an extension, make sure the phone is properly registered with the U1000 base.
Incoming voice too low or none at all.
• Check volume setting.
Memory dialing doesn’t work
• Did you program the memory location keys correctly?
• Did you follow proper dialing sequence?
• Make sure the phone number is formatted properly
"Battery Low" shows in the display
• The 5 “AAA” batteries need replacing or are improperly installed or not installed at all.
Intercom does not function correctly
• Make sure all extension phones are properly registered to the U1000 base.
• Make sure all extension phones are within range
interference neaby.
General Product Care
To keep your telephone working and looking good, follow these guidelines:
• Avoid putting the phone near heating appliances and devices that generate electrical noise (for example,
motors or fluorescent lamps).
• DO NOT expose to direct sunlight or moisture.
• Avoid dropping the handset, as well as other rough treatment to the phone.
• Clean the phone with a soft cloth.
• Never use a strong cleaning agent or abrasive powder because this will damage the finish.
• Retain the original packaging in case you need to ship the phone at a later date.
25
of the U1000 base and there are no major sources of

Service
If trouble is experienced with this equipment, for repair or warranty information, please contact customer
service at 1-800-511-3180. If the equipment is causing harm to the telephone network, the telephone
company may request that you disconnect the equipment until the problem is resolved.
This product may be serviced only by the manufacturer or its authorized service agents. Changes or
modification not expressly approved by Telefield NA Inc. could void the user’s authority to operate this
product. For instructions on how to obtain service, refer to the warranty included in this guide or call customer
service at 1-800-511-3180.
Or refer inquiries to:
Telefield NA Inc.
Manager, Consumer Relations
4915 SW Griffith Dr. #302
Beaverton, OR 97005
Attach your sales receipt to the booklet for future reference or jot down the date this product was purchased
or received as a gift. This information will be valuable if service should be required during the warranty
period.
Purchase date
Name of store
Warranty
Limited Warranty
What will your warranty cover?
• Defects in materials or workmanship For how long after your purchase?
• Two years, from date of purchase What we will do:
• Provide you with a replacement unit. The exchange unit is under warranty for the remainder of the original
product’s warranty period.
How to get service?
• Locate your proof of purchase in the form of a bill of sale or receipted invoice which is evidence that the
product is within the warranty period. Proof of warranty eligibility is required and must be presented to
obtain warranty service.
• Contact RCA Customer Care at (800) 511-3180. Our representatives will help you troubleshoot and
diagnose the problem. You may be asked to disconnect your RCA telephone from the power source, so
you must call from another telephone. If the issue cannot be resolved by our Customer Care Team, you will
26

be issued an RMA (Return Merchandise Authorization) number and be given instructions on how to submit
your proof-of-purchase paperwork, And where to send your defective merchandise.
You will be responsible for shipping the defective unit back to our warranty fulfillment center at your own
expense. You are responsible for damage or loss during shipment so insuring the product during return
shipping is highly recommended.
• We will ship a replacement to you freight prepaid. What your warranty does not cover:
• Customer instruction. (Your Instruction Book provides information regarding operating instructions and
User controls. Additionally, our Customer Care Center is staffed 24x7 with product experts that can assist
you with any questions that may arise during setup and use of your RCA telephone.
• Installation and setup service adjustments
• Batteries, if applicable
• Damage from misuse or neglect
• Products that have been modified of serviced outside the USA
• Products purchased from non-authorized retailers, dealers or resellers
• Products purchased or serviced outside the USA
• Acts of nature, such as, but not limited to lightning damage
• 3rd party products, such as headsets
• Installation and setup service adjustments
• Batteries, if applicable
• Damage from misuse or neglect
• Products that have been modified of serviced outside the USA
• Products purchased from non-authorized retailers, dealers or resellers
• Products purchased or serviced outside the USA
• Acts of nature, such as, but not limited to lightning da
mage
• 3rd party products, such as headsets
Product Registration:
• Please visit http://www.rca4business.com/registration/ to register your product. It will make it easier to
contact you should it ever be necessary. The registration of your product is not required for warranty
coverage.
Limitation of Warranty:
THE WARRANTY STATED ABOVE IS THE ONLY WARRANTY APPLICABLE TO THIS PRODUCT. ALL
OTHER WARRANTIES, EXPRESS OR IMPLIED (INCLUDING ALL IMPLIED WARRANTIES OF
MERCHANTABILITY OR FITNESS FOR A PARTICULAR PURPOSE) ARE HEREBY DISCLAIMED. NO
VERBAL OR WRITTEN INFORMATION GIVEN BY TELEFIELD NA INC., ITS AGENTS, OR EMPLOYEES
27
SHALL CREATE A GUARANTY OR IN ANY WAY INCREASE THE SCOPE OF THIS WARRANTY.
REPAIR OF REPLACEMENT AS PROVIDED UNDER THIS WARRANTY IS THE EXCLUSIVE REMEDY
OF THE CONSUMER. TELEFIELD NA INC. SHALL NOT BE LIABLE FOR INCIDENTAL OR
CONSEQUENTIAL DAMAGES RESULTING FROM THE USE OF THIS PRODUCT OR ARISING OUT OF
ANY BREACH OF ANY EXPRESS OR IMPLIED WARRANTY ON THIS PRODUCT. THIS DISCLAIMER
OF WARRANTIES AND LIMITED WARRANTY ARE GOVERNED BY THE LAWS OF THE STATE OF
OREGON. EXCEPT TO THE EXTENT PROHIBITED BY APPLICABLE LAW, ANY IMPLIED WARRANTY
OF MERCHANTABILITY OR FITNESS FOR A PARTICULAR PURPOSE ON THIS PRODUCT IS LIMITED
TO THE APPLICABLE WARRANTY PERIOD SET FORTH ABOVE.
How state law relates to this warranty:
•Some states do not allow the exclusion nor limitation of incidental or consequential damages, or
limitations on how long an implied warranty lasts so the above limitations or exclusions may not apply to
you.
• This warranty gives you specific legal rights, and you also may have other rights that vary from state to
state.
If you purchased your product outside the USA, Mexico or Canada:
This warranty does not apply. Contact your dealer for warranty information.
Visit the RCA web site at www.rca4business.com
Please do not send any products to the Oregon address listed in this manual or on the carton. This will
only add delays in service for your product.
Telefield NA Inc.
4915 SW Griffith Dr. #302
Beaverton, Or 97005
RCA is a trademark of RCA Trademark Management S.A.
Used under license.
© 2017. All rights reserved.
Model U1000/U1100
T0006247 (Rev.0 E)
16-50
Printed in China