Telemotive Controls E10738 Remote Control Transmitter User Manual telePendant D
Telemotive Industrial Controls Remote Control Transmitter telePendant D
Exhibit D Users Manual per 2 1033 b3

TCTX12P-0 Rev. D 11/5/2003
P
PR
RO
OG
GR
RA
AM
MM
MI
IN
NG
G
A
AN
ND
D
U
US
SE
ER
RS
S
M
MA
AN
NU
UA
AL
L
TELEMOTIVE
telePendantTM
TRANSMITTERS
R
RA
AD
DI
IO
O
C
CO
ON
NT
TR
RO
OL
L
E
EQ
QU
UI
IP
PM
ME
EN
NT
T
175 Wall Street
Glendale Heights, IL 60139-1985
Phone: 630-582-1111, Toll Free: 888-687-4400
Website: http://www.telemotive.com
telePendant programming is
found on page 20.

Table of Contents
2
1- Service Information..................................................................................................... 3
2- Radio Controlled Crane Safety................................................................................... 4
3- General System Information..................................................................................... 11
4- Operation.................................................................................................................... 12
5- Programming ............................................................................................................. 18
6- Spare Parts.................................................................................................................. 30

Section 1 - Service Information
1-1. Service Information.
For questions regarding service or technical
information or ordering replacement parts, ask
for Telemotive Customer Care. Telemotive’s
normal business hours are Monday through
Friday 8:00 AM to 5:00 PM Central Standard
Time. After hours emergency technical service is
available.
For new product orders or quotations, ask for
Telemotive Sales.
Telemotive Industrial Controls
175 Wall Street
Glendale Heights, IL 60139-1985
USA
Telephone: (630) 582-1111
In the USA toll free: (888) 687-4400
Website: http://www.telemotive.com
Manuals for downloading are available for many
products at the Telemotive website.
Telemotive Fax Numbers:
Main: (630) 582-1195
Sales: (630) 582-1204
Customer Care: (630) 582-1205
Telemotive Industrial Control trademarks:
Boommate, GateMate, 10K, inteleSmart,
Telemotive, telePilot, telePendant, Laser
Guard, Teledrive, Teltec, TeleMotion are either
trademarks or registered trademarks of
Telemotive Industrial Controls.
Third-party trademarks: All other trademarks,
trade names or company names referenced
herein are used for identification only and are the
property of their respective owners.
CAUTION
• DO NOT ATTEMPT TO OPEN OR SER-
VICE THE TELEPENDANT UNIT.
• ONLY TRAINED QUALIFIED INDIVIDU-
ALS SHOULD DO SERVICING.
• STRICT ANTI-STATIC HANDLING
PROCEDURES MUST BE FOLLOWED.
• FAILURE TO FOLLOW THIS CAUTION
COULD RESULT IN SERIOUS DAMAGE TO
EQUIPMENT AND/OR VOID THE
WARRANTY.
.
Section 2 – Radio Controlled Safety
4
2-1. Warnings, Cautions and Notes.
Through out this document WARNING, CAUTION
and NOTE statements have been deliberately placed
to highlight items critical to the protection of
personnel and equipment.
WARNING – A warning highlights an essential
operating or maintenance procedure, practice, etc.
which if not strictly observed, could result in injury
or death of personnel, or long term physical hazards.
Warnings are highlighted as shown below:
WARNING
CAUTION – A caution highlights an essential
operating or maintenance procedure, practice, etc.
which if not strictly observed, could result in damage
to, or destruction of equipment, or loss of functional
effectiveness. Cautions are highlighted as shown
below:
CAUTION
NOTE – A note highlights an essential operating or
maintenance procedure, condition or statement. Notes
are shown as below:
NOTE
WARNINGS, CAUTIONS AND NOTES SHOULD
NEVER BE DISREGARDED.
The safety rules in this section are not intended to
replace any rules or regulations of any applicable
local, state, or federal governing organizations. The
following information is intended to be used in
conjunction with other rules or regulations already in
existence. It is important to read all of the safety
information contained in this section before installing
or operating the Radio Control System.
2-2. Critical Installation Considerations.
WARNING
ALL EQUIPMENT MUST HAVE A MAINLINE
CONTACTOR INSTALLED AND ALL TRACKED
CRANES AND SIMILAR EQUIPMENT MUST
HAVE A BRAKE INSTALLED. FAILURE TO
FOLLOW THIS WARNING COULD RESULT IN
SERIOUS INJURY OR DEATH AND DAMAGE
TO EQUIPMENT.
WARNING
ON ALL REMOTE CONTROLLED CRANES AN
AUDIBLE AND/OR VISUAL WARNING MEANS
MUST BE PROVIDED. THESE AUDIBLE
AND/OR VISUAL WARNING DEVICES MUST
MEET ALL GOVERNMENTAL REQUIRE-
MENTS. FAILURE TO FOLLOW THIS WARN-
ING COULD RESULT IN SERIOUS INJURY OR
DEATH AND DAMAGE TO EQUIPMENT.
WARNING
REMOVE ALL ELECTRICAL POWER FROM
THE CRANE OR MACHINERY BEFORE AT-
TEMPTING ANY INSTALLATION PROCE-
DURES. DE-ENERGIZE AND TAG OUT ALL
SOURCES OF ELECTRICAL POWER BEFORE
TOUCH TESTING ANY EQUIPMENT. FAILURE
TO FOLLOW THIS WARNING COULD RESULT
IN SERIOUS INJURY OR DEATH AND DAM-
AGE TO EQUIPMENT.

Section 2 – Radio Controlled Safety (Continued)
5
WARNING
THE DIRECT OUTPUTS OF THIS PRODUCT
ARE NOT DESIGNED TO INTERFACE DI-
RECTLY TO TWO STATE SAFETY CRITICAL
MAINTAINED FUNCTIONS, I.E., MAGNETS,
VACUUM LIFTS, PUMPS, EMERGENCY
EQUIPMENT, ETC. A MECHANICALLY LOCK-
ING INTERMEDIATE RELAY SYSTEM WITH
SEPARATE POWER CONSIDERATIONS MUST
BE PROVIDED. FAILURE TO FOLLOW THIS
WARNING COULD RESULT IN SERIOUS IN-
JURY OR DEATH AND DAMAGE TO EQUIP-
MENT.
2-3. General.
Radio controlled overhead cranes and other material
handling equipment operate in several directions.
They are large, bulky pieces of equipment that handle
heavy loads efficiently at high speeds. Quite
frequently, the equipment is operated in areas where
people are working on the floor below. The crane
operator must exercise extreme caution at all times.
Workers must constantly be alert to avoid accidents.
The following rules have been included to indicate
how your careful and thoughtful actions may prevent
injuries, damage to equipment, or even save a life. If
radio controlled material-handling equipment is
operated from the cab, special care must be taken to
secure the transmitter. Refer to section titled Section
2-9. Boarding The Crane for specific safety rules.
2-4. Persons Authorized To Operate Radio
Controlled Cranes.
Only properly trained persons designated by
management should be permitted to operate radio-
controlled cranes.
Radio controlled cranes should not be operated by
any person who cannot read or understand signs,
notices and operating instructions that pertain to the
crane.
Radio controlled cranes should not be operated by
any person with insufficient eyesight or hearing or by
any person who may be suffering from a disorder or
illness or is taking any medication that may cause
loss of crane control.
2-5. Training Checklist for Crane Operators.
Anyone being trained to operate a radio-controlled
crane should possess as a minimum the following
knowledge and skills before operating the crane:
The operator should have knowledge of hazards
peculiar to crane operation.
The operator should have knowledge of the safety
rules for radio-controlled cranes.
The operator should have the ability to judge distance
or moving objects.
The operator should have knowledge of the radio
transmitter.
The operator should know the limit switch test
procedure.
The operator should know, where authorized,
instructions for plugging motions.
The operator should have knowledge of the use of
crane warning lights and alarms.
The operator should have knowledge of observing
crane signal lights.
The operator should be trained to avoid striking any
obstructions.
The operator should have knowledge of the proper
clearance of lifts or hooks before moving bridge or
trolley.
The operator should have knowledge of the proper
storage space for radio control box when not in use.
The operator should be trained in transferring radio
control box to another person.
The operator should be trained how and when to
report unsafe or unusual operating conditions.
The operator should be trained how to exhibit caution
in approaching bridge or trolley bumpers.
The operator should know equipment capacity.
The operator should be trained in making lifts below
floor level.
The operator should be trained in making side pulls.
The operator should know how to keep himself and
other people clear of lifts and to avoid "pinch" points.
Section 2 – Radio Controlled Safety (Continued)
6
The operator should know cable and hook inspection
procedures.
The operator should know procedures for testing
hoist, trolley, and bridge brakes.
2-6. Operating Area.
Aisles between equipment, stock, etc., should be free
of obstructions so the crane operator can move freely.
These aisles should be a minimum of three feet (one
meter) wide, or meet local regulations.
Crane operators should always position themselves
for the best view of the crane they are controlling.
The crane should never be operated blindly. The
operator should stay as close to the crane load as
possible. Operators should never position themselves
in a "pinch" point.
2-7. Transmitter Unit.
Transmitter switches should never be mechanically
blocked ON or OFF for any crane motion. When not
in use turn the transmitter OFF. A secure storage
space should be provided for the transmitter unit and
the transmitter unit should always be placed there
when not in use. This precaution will prevent
unauthorized people from operating the crane.
Spare transmitters should be stored in a secure
storage space and only removed from the storage
space after the current transmitter in use has been
turned OFF, taken out of the service area and
secured.
Before putting the transmitter in service the
transmitter unit should be inspected for any damage
or excessive wear. Units with, but not limited to, any
of the following: broken housings, broken or sticking
switches and levers or broken handles, missing
battery doors, damaged or missing switch boots or
damaged or missing switch knobs should be repaired
before putting into service.
2-8. Operating the Crane.
2-8.1. Pre-operation Test.
At the start of each work shift, or when a new op-
erator takes control of the crane, operators shall do as
a minimum the following steps before making lifts
with any crane or hoist:
Test the upper-limit switch. Slowly raise the
unloaded hook block until the limit switch trips.
When checking limit switches the hoist should be
centered over an area free of personnel and
equipment.
Visually inspect the hook, load lines, trolley, and
bridge as much as possible from the operator's
station; in most instances, this will be the floor of the
building.
The bridge and trolley brakes should be tested. On
transmitter units equipped with two or more speeds,
use the "lowest" speed when testing braking devices.
When lifting maximum loads, the crane operator
should test the hoist brakes by raising the load a few
inches from the floor. If the brakes do not hold, the
load should immediately be lowered to the floor.
If provided, test the lower-limit switch.
Test all warning devices.
Test all direction and speed controls for both bridge
and trolley travel.
Test all bridge and trolley limit switches, where
provided, if operation will bring the equipment in
close proximity to the limit switches.
Test the transmitter emergency stop.
Test the hoist brake to verify there is no drift without
a load.
If any crane or hoist fails any of the above tests notify
the supervisor and lock out and tag for repair.
2-8.2. General Rules for Operation.
Consult the crane manufacturer, local and
governmental regulations for complete rules of
operation. In general the following rules apply to
remotely controlled cranes:
The limit switches should never be used as a regular
stopping device. They are intended to be protective
devices.
Do not make lifts in excess of the equipment rated
capacity.
The bridge and trolley should be centered directly
over the load when the load is raised to prevent
swinging when making lifts.
A crane designed for this purpose and only with
supervisor permission should make side pulls. When
a lift is being made, the crane operator should not be
Section 2 – Radio Controlled Safety (Continued)
7
positioned in the line of travel. The crane or hoist
should be operated from a position either to the side
or opposite from the direction of travel.
When raising or lowering a load, proceed slowly and
make certain the load is under control. Tag lines
should be used for handling unusual lengths or bulky
loads. Remove slack from chains or slings gradually.
Make certain all personnel are clear before making a
lift.
The crane operator should keep all body parts away
from the lift and should never be positioned under the
lift.
Do not make a lift or move a load if anyone is in a
location where they could be struck by the crane or
the load.
If the crane operator is being helped, the crane should
not be moved until the helper signals they are clear of
the crane and its load.
When a load is hanging from the crane hook and the
crane is being moved, the crane operator should
sound all warning devices frequently.
Loads should not be carried over workers heads. If a
worker is in the path of crane travel, the crane
operator should stop the crane and clear the area
before proceeding.
Runway stops or other cranes should never be
bumped into.
When moving the crane, the crane operator should be
sure that the hook block and attachments or cables
would not catch on nearby equipment. Slings, chains,
or cables should never be dragged along the floor.
Unless required for operator safety, gloves should not
be worn when operating the transmitter unit.
All loose materials or parts should be removed from
the load before starting the lift.
The crane operator should always hoist lifts high
enough to clear all equipment and workers.
The crane operator should never permit anyone to
ride on the load or hook except when authorized by
the supervisor.
When another crane on the same runway is stationary
with a load hanging, the crane operator should
maintain a safe distance between the stationary crane
and the one under their control.
Never leave suspended loads unattended. In an
emergency, if the crane is inoperative and a load
suspended, notify the supervisor immediately,
barricade and post signs on the floor beneath crane
and load.
If power to the crane is removed, the crane operator
should turn the transmitter unit OFF and keep it OFF
until power is restored.
If the crane fails to respond properly, the crane
operator should stop operation, turn the transmitter
unit OFF and immediately report the condition to
their supervisor.
Outdoor cranes, which are subject to movement by
wind, should be securely anchored when left
unattended. If the crane is equipped with bridge
brakes, the parking brake should be set immediately.
2-9. Boarding the Crane.
The crane should not be boarded without permission
of the supervisor.
The crane operator should turn off the transmitter and
take it with them when boarding the crane.
If more than one person is boarding the crane, one
person should be made responsible for ensuring all
personnel are off the crane before the system is
returned to operation.
2-10. Crane Maintenance and Repair.
Qualified personnel must maintain a regularly, i.e.,
such as monthly, scheduled crane inspection. During
this crane inspection the functionality and safety of
the crane remote control must also be tested. The
inspection shall include, but be not limited to items
listed in Section 2-12. Condition of the Radio
Controlled Crane. Consult crane manufacturer, local
and governmental regulations for recommended
inspection intervals and proper inspection
procedures. Problems noted during this inspection
must be repaired before using the crane or the remote
control.
Minor repairs include routine maintenance and
repairs such as greasing, cleaning and control
troubleshooting. All other repairs should be con-
sidered major. If the repair crew consists of more
than one person, one person should be designated as
the repair crew leader with the following
responsibilities. If the repair crew consists of only
one person, that person has the following
responsibilities:

Section 2 – Radio Controlled Safety (Continued)
8
For minor repairs warning signs should be placed on
the floor beneath the crane or suspended from the
crane. For major repairs, the floor area below the
crane should be roped off.
When major repairs are to take place, all persons
operating other cranes on the same or adjacent
runways, if any, must be notified prior to starting
repairs. Notification should include the nature of the
repair, safeguards provided, and movement
limitations while repairs are in progress.
When practical, radio controlled cranes which cannot
be moved during repairs must be protected against
being bumped by other cranes on the runway.
Bumpers should be installed on the exposed side or
sides of the crane under repair. They should be
placed as far away as possible. The location of these
bumpers should be indicated by red lights placed so
that they are clearly visible to other crane operators
traveling on the same runway. When it is not possible
to use bumpers, red lights must be placed so they are
clearly visible to other crane operators traveling on
the same runway to indicate the restricted travel zone.
All crane operators on the same runway must be
informed of the repair effort and thoroughly
instructed to what their operations are limited to and
informed they will be notified when repairs are
completed.
If any hazard involving the repairmen exists when
there is a runway adjacent to the crane under repair,
the adjacent runway should be blocked off as
described above. When it is necessary to continue
crane operation on the adjacent runways warning
lights must be installed and be visible to operators of
cranes on those runways. All cranes should come to a
complete stop prior to entering the restricted area and
should proceed through this area only after receiving
permission from a signal person designated for this
purpose. Access of persons to and from the crane
being repaired should be under control of the repair
crew leader.
When boarding the crane, the transmitter should be
turned OFF and the transmitter should remain with
the repair crew leader. The leader should board the
crane first, open and lock out the main switch, and
then signal the other members of the crew it is safe to
board the crane.
If work on the crane is to be done in areas not
protected by standard handrails, the repair crew
should wear approved safety belts.
All tools and equipment should be moved onto the
crane by the use of hand lines. The tools and
equipment should be adequately secured to the hand
lines.
If it is necessary to have the crane control circuits
energized, all power circuits for crane movement
must be opened prior to energizing the control
circuits.
All personnel and tools should be moved to a safe
spot before moving the crane during repairs.
Headroom is at a minimum in some crane cabs and
on some crane walkways. Caution should be
exercised when boarding or working on cranes. Hard
hats should be worn whenever possible.
When repairs are finished, all personnel, tools and
repair equipment should be removed before
energizing the crane circuits.
2-11. Using the Crane as a Work Platform.
When the crane is to be used as a stationary work
platform, follow all rules provided in Section 2-10.
Crane Maintenance and Repair. When it is necessary
for the crane to be moved from time to time, the
crane operator should board the crane with the
transmitter unit. The crane operator should ensure all
personnel working on the crane are in a secure
position before moving the crane to the next
workstation. It should also be the crane operator’s
responsibility to ensure the main switch is open and
locked down before work is resumed.
WARNING
THE CRANE OPERATOR SHOULD NOT AT-
TEMPT TO REPAIR ANY OF THE ITEMS
STATED BELOW. THE CRANE CONDITION
SHOULD BE REPORTED TO THE SUPERVISOR.
FAILURE TO FOLLOW THIS WARNING COULD
RESULT IN SERIOUS INJURY OR DEATH AND
DAMAGE TO EQUIPMENT.
2-12. Condition of the Radio Controlled Crane.
If the crane fails to respond properly, the crane
operator(s) should notify their supervisor. When
serious conditions are noticed (conditions that make
the crane unsafe to operate), the crane should be shut

Section 2 – Radio Controlled Safety (Continued)
9
down immediately and the supervisor notified. The
following is a list of some of the items that should be
included in the report. (See the crane manufacturer
for specifics and possible additional items):
Condition of hoisting cable and hook block (broken
strands, clipped sheave wheels, etc.).
Condition of brakes (hoist, trolley, and bridge). (No
bluing, rivets on shoes showing, glazing, etc.).
Condition of trolley and rail stops.
Condition of bridge structure.
Condition of festoon system.
Broken welds in any part of the crane structure.
Proper fluid levels and lubrication.
Condition of bridge and trolley stops.
Carbon dust or signs burning on the covers of motors.
Indication of fluid, oil or grease leaks.
Condition of rail sweeps.
Walkways required handrails and ladders are in
place, sturdy and not loose.
Protective guards are in place for all moving parts.
Alignment of bridge (screeching or squealing wheels
indicate bridge is out of line).
Broken, cracked, or chipped rails on trolley or
runway.
Condition of limit switches.
Condition of electrical and mechanical control
(electrical or mechanical defects which cause faulty
operation such as un-commanded stopping or starting
of any crane motions, warning devices, lights, or
auxiliary functions).
Condition of gears (grinding or squealing may
indicate foreign materials in gear teeth or a lack of
lubrication.
All controls especially E-STOPs are in place and in
working order.
Frequent relay tripping of power circuits.
Mechanical parts loosened by vibration (loose rivets,
covers, bolts, etc.).
Uneven riding (worn or damaged wheels).
Condition of collector shoes or bars.
Condition of warning or signal lights and horns.
(Burned out or broken).
2-13. Batteries
WARNING
KNOW AND FOLLOW PROPER BATTERY
HANDLING, CHARGING AND DISPOSAL PRO-
CEDURES. IMPROPER BATTERY PROCE-
DURES CAN CAUSE BATTERIES TO EXPLODE
OR DO OTHER SERIOUS DAMAGE. FAILURE
TO FOLLOW THIS WARNING COULD RESULT
IN SERIOUS INJURY OR DEATH AND DAM-
AGE TO EQUIPMENT.
2-13.1. Battery Handling.
Use only batteries approved by Telemotive for the
specific product.
Do not dispose of a battery pack in fire; it may
explode.
Do not attempt to open the battery pack.
Do not short circuit battery.
Do not attempt to use a battery that is leaking,
swollen or corroded.
For intrinsically safe environments only use specified
Telemotive intrinsically safe batteries.
Keep the battery pack environment cool during
charging operation and storage, (i.e., not in direct
sunlight or close to a heating source).
Do not submerse battery in water.
If battery leaks avoid contact with electrolyte.
Section 2 – Radio Controlled Safety (Continued)
10
2-13.2. Battery Charging.
For those transmitters equipped with battery chargers,
please familiarize all users with the instructions of
the charger before attempting to use.
Use only Telemotive approved chargers for the
appropriate battery pack.
Do not attempt to charge non-rechargeable battery
packs.
Avoid charging the battery pack for more than 24
hours.
Do not charge batteries in a hazardous environment.
Do not short charger.
Do not attempt to charge a damaged battery.
Charger units are not intended for outdoor use. Use
only indoors.
Always unplug the charger when not in use.
Do not store, place or use the charger where it could
come into contact with water or moisture.
To reduce the risk of electric shock, unplug your
charger from the wall outlet before cleaning.
2-13.3. Battery Disposal.
Before disposing of batteries consult local and
governmental regulatory requirements for proper
disposal procedures.

Section 3 – General System Information
11
3-1. General System Information.
The Telemotive Radio Control System (system)
provides remote control of overhead cranes using
radio signals. The system consists of a hand held
portable battery operated transmitter unit and a fixed
station receiver unit.
A unique 16-bit code (Access Code) for each system
is preset in every transmitter and receiver. The
receiver considers any received signal, which does
not match the receiver access code setting, invalid.
The Access Code is made up of 16-bits (65,000
combinations) and no two similar codes are assigned
to any two Telemotive systems.
Up to four systems may be used with the same
frequency in a 600-foot area (220 meters). Each
transmitter operating on the same frequency may be
operated in close proximity, not less than six feet (1.9
meters), to each other.
3-2. TMS Low Power Signaling.
TMS (Time Multiplexed Signaling) is a Telemotive
proprietary high-speed packet data system. The
system software is structured to minimize "on the air"
transmission time of any transmitter. This allows for
multiple transmitters to share a common frequency.
The TMS system is designed so that a transmitter will
send a signal for a predetermined ON time, and then
will turn OFF. The length of transmitter ON time is
referred to as data burst or packet. The packet length
is a function of the quantity of data to be sent, and the
data rate (baud). Once the packet is sent, the
transmitter will turn OFF. This allows for other
transmitters to time-share the same frequency when a
transmitter has turned OFF. The TMS system soft-
ware determines the OFF period and repetition rate of
the ON period. Since each system has its own access
code, up to 4 transmitters can share and have equal
access to the same frequency. TMS also allows for
reduced battery consumption and extended battery
life.
These systems have low power pulsed signaling,
FCC certified under Part 15 Telecommunications
Code of Regulations, no license is required. The
transmitter unit is frequency modulated, low power
and is certified under the appropriate regulations. A
license is not required for the transmitter or operator.
Modifications to the RF section of this system are not
permitted and could void FCC certification.
Active ESTOP (optional), this feature causes the
transmitter to send confirmation that the ESTOP is
not being engaged via a periodic confirmation signal.
Units so equipped will shut down the receiver when
out of range.
3-3. Channel Designations:
AK01 - 439.8 MHz AK06 - 438.8 MHz
AK02 - 439.6 MHz AK07 - 438.6 MHz
AK03 - 439.4 MHz AK08 - 438.4 MHz
AK04 - 439.2 MHz AK09 - 438.2 MHz
AK05 - 439.0 MHz AK10 - 438.0 MHz
AK11 - 437.8 MHz AK16 - 436.8 MHz
AK12 - 437.6 MHz AK17 - 436.6 MHz
AK13 - 437.4 MHz AK18 - 436.4 MHz
AK14 - 437.2 MHz AK19 - 436.2 MHz
AK15 - 437.0 MHz AK20 - 436.0 MHz
AKA00 - 433.125 MHz AKA05 - 434.125 MHz
AKA01 - 433.325 MHz AKA06 - 434.325 MHz
AKA02 - 433.525 MHz AKA07 - 434.525 MHz
AKA03 - 433.725 MHz AKA08 - 434.725 MHz
AKA04 - 433.925 MHz
3-4. Transmitter Specifications.
Transmitter housing: NEMA 4.
Operating Temperature: –22° F to +158° F (-30º C to
+70º C) ambient.
Humidity: up to 95 % (non-condensing).
Typical Operating Range: 200 feet (70 meters).
3-5. Transmitter Unit.
The transmitter is battery operated, has an ON and
OFF switch, E-STOP, motor controls and auxiliary
controls used for such item warning indicators.
LED’s mounted on the front panel provide indication
of battery voltage, ON/OFF, Modes and data
transmission status.
A power down feature allows the transmitter and the
receiver unit to turn OFF if no keys are pressed for
predetermined number of minutes. The transmitter
unit must again be turned ON. The unit uses pulsed
operation for extremely long battery life. A
configuration of the system is available without
automatic timeout.
Housings are designed of high impact, chemical
resistant, materials. The antenna for the unit is
internal. A strap is provided for carrying the
transmitter.
Section 4 – Operation
12
4-1. Transmitter Buttons.
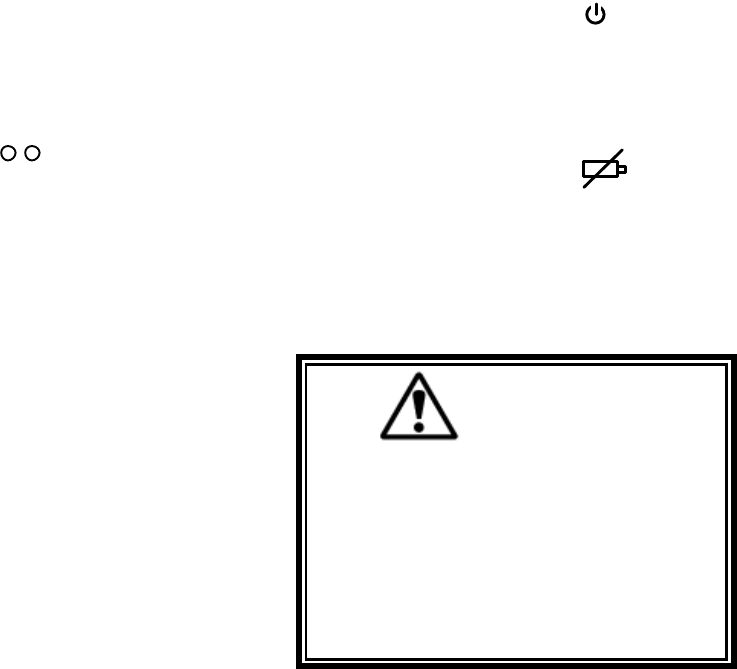
ON/OFF On the telePendant Transmitter ON
and OFF is the same button. This button toggles
between turning the transmitter ON and then
sending the ON command to the receiver and
sending the OFF command to the receiver and
then turning the transmitter OFF. Press and hold
the button for one full second to turn the unit
ON.
Labels are provided for the auxiliary buttons and
the labeled pushbutton boots can be unsnapped
and moved to reflect the desired labeling.
Custom labels are available from Telemotive.
NOTE
IN THE TELEPENDANT THE
TRANSMITTER DOES NOT TURN ON TILL
THE ON PUSH BUTTON IS RELEASED
AFTER BEING DEPRESSED FOR ONE
SECOND. THE OFF FUNCTION IS
IMMEDIATE UPON DEPRESSING THE
ON/OFF PUSH BUTTON.
E-STOP – Stops all equipment movement and
disables all functions except Alarm. Reset the
system for normal operation by turning the
transmitter “OFF” then “ON”. Use for
emergencies only. (NOT FOR NORMAL SHUT
DOWN).
NOTE
ON THE TELEPENDANT TRANSMITTER
THE USER CAN CHOOSE AND CUSTOM
LABEL THE FUNCTIONS FOR A SPECIFIC
MOTOR. THE FUNCTIONAL DESIGNA-
TIONS SHOWN BELOW ARE COMMON
AND TRADITIONAL DESIGNATIONS.
Common Designations Listed Below:
Motor 1 Dir 1, UP – Selects hoist movement in
the UP direction speed one (first switch
position), speed two (second switch position). Or
speed three (third switch position if so
equipped).
Motor 1 Dir 2, DOWN – Selects hoist
movement in the DOWN direction speed one
((first switch position), speed two (second switch
position). or speed three (third switch position if
so equipped).
Motor 2 Dir 1, NORTH or EAST – Selects the
appropriate direction of the bridge or trolley
(depending how unit is wired at installation)
speed one (first switch position), speed two
ON/OFF & Low Battery Indicators
Figure 4
-
1.
2
-
and 3
-
Speed
telePendant
.Transmitter.
E-STOP
Motor 1
Dir 1
Dir 2
Motor 2
Dir 1
Dir 2
Motor 3
Dir 1
Dir 2
Programmable
Motor Control and Select Indicators
AUX 1
AUX 2
AUX 3
AUX 4
AUX 5
AUX 6
Auxiliary
Controls
A B
ON/
OFF
Section 4 – Operation (Continued)
13 11/5/2003
(second switch position). Or speed three (third
switch position if so equipped).
Motor 2 Dir 2, SOUTH or WEST – Selects the
appropriate direction of the bridge or trolley
(depending how unit is wired at installation)
speed one (first switch position), speed two
(second switch position). Or speed three (third
switch position if so equipped).
Motor 3 Dir 1, EAST or NORTH – Selects the
appropriate direction of the bridge or trolley
(depending how unit is wired at installation)
speed one (first switch position), speed two
(second switch position). Or speed three (third
switch position if so equipped).
Motor 3 Dir 2, WEST or SOUTH – Selects the
appropriate direction of the bridge or trolley
(depending how unit is wired at installation)
speed one (first switch position), speed two
(second switch position). Or speed three (third
switch position if so equipped).
4-2. Programmable Motor Control and Select
Indicators.
This programmable pushbutton can be
designated as an auxiliary motor or select
function. As an example for systems that have a
main and auxiliary hoist, pushing this switch will
toggle the function of the set of motor 1
pushbuttons between the outputs for main and
auxiliary hoist.
There are two red LEDs above this pushbutton
labeled “A” and “B”. The “A” LED comes ON
for the main function and the “B” comes ON for
the auxiliary. As the pushbutton is toggled the
sequence of outputs and LEDs is as follows.
Normally the main output only is active and the
“A” LED is lit. Pushing the pushbutton lights
only the “B” LED and the auxiliary output only
is active. Pushing the pushbutton a second time
lights both “A” and “B” LEDs and both main
and auxiliary outputs are active in tandem. (This
tandem operation can be disabled See Section 5-
3.2. telePendant Programming). When turning
the transmitter ON the default condition is
always “A”.
This pushbutton can be used with the Select
function also. When used for the Select function
the “A” and “B” LEDs work as described in the
above paragraph toggling the Select 2 output and
the Select 1 outputs respectively.
NOTE
THE “A” LED LIT CAUSES THE SELECT 2
RELAY TO CLOSE. THE “B” LED CAUSES
THE SELECT 1 RELAY TO CLOSE.
For telePendants with four or five motors
programmed, this indicator will toggle between
“A”,”B” and both (for units programmed with or
without tandem operation). Pressing the push
button directly beneath the indicators toggles the
state.
AUX’s 1 through 6 – Selects the Auxiliary
relay(s), which may be used for a warning device
as a horn or other function. Check the receiver
manual to determine how many auxiliaries are
available, some have the ability to be
programmed to be latching.
ON/OFF LED Indicator.
Top left indicator on telePendant. When the
transmitter is ON the red LED flashes slowly.
When the unit transmits, the red LED flashes
rapidly. This LED also indicates Bank selected.
4-3. Low Battery Indication.
In the telePendant transmitter there is a
separate low battery indicator located to the right
of the ON/OFF indicator. This is a yellow LED
that turns ON solid when it is time to replace the
batteries. See Section 4-6. Battery Replacement
for battery replacement.
WARNING
BEFORE TURNING ON OR OPERATING
THE CRANE, MAKE SURE ALL PERSON-
NEL ARE CLEAR OF THE OPERATING
AREA AND NO ONE IS STANDING UNDER
THE LOAD. FAILURE TO FOLLOW THIS
WARNING COULD RESULT IN SERIOUS
INJURY OR DEATH AND DAMAGE TO
EQUIPMENT.
A B
Section 4 – Operation (Continued)
14 11/5/2003
WARNING
WHEN OPERATING THE CRANE FOLLOW
LOCAL AND GOVERNMENTAL RULES ON
THE USE OF HORNS AND ALARMS. FAIL-
URE TO FOLLOW THIS WARNING COULD
RESULT IN SERIOUS INJURY OR DEATH
AND DAMAGE TO EQUIPMENT.
4-4. Operation.
Make sure that all personnel are clear of the
crane movement and no one is under the crane or
load.
Turn unit ON by pressing the ON/OFF (ON)
button. The red LED ON/OFF indicator
should flash rapidly for a few seconds indicating
the ON command is being sent to the receiver.
After the receiver is turned ON the red LED
should flash slowly indicating the transmitter is
now ready to send commands.
Perform whatever safety checks are required. See
Section 2. Radio Controlled Safety. Operate any
horns or alarms as required by local and
governmental regulations.
To operate the crane, press and hold the desired
function button to maintain operation. Press the
directional buttons harder to second position to
engage second speed for those cranes having 2-
speed motors.
Always turn system OFF by pressing the
ON/OFF (OFF) button on the transmitter when
done with crane operation. Do not use the E-
STOP button as an ON/OFF button.
In an emergency always hit E-STOP (EMS)
immediately. To clear the emergency condition,
turn the transmitter OFF and ON again to resume
normal operation.
Typically the receiver will time-out after
approximately 15 minutes if there is no activity.
The transmitter can programmed to time-out if
not used for some number of minutes. The
transmitter time out time is selectable.
WARNING
IN AN EMERGENCY HIT “E-STOP” TO
STOP ALL CRANE MOVEMENT. WHEN
EMERGENCY HAS CLEARED TURN THE
TRANSMITTER OFF THEN ON AGAIN TO
RESUME NORMAL OPERATION. FAILURE
TO FOLLOW THIS WARNING COULD RE-
SULT IN SERIOUS INJURY OR DEATH AND
DAMAGE TO EQUIPMENT.
4-5. Additional telePendant Transmitter
Operational Features.
telePendant E-STOP Function.
The E-STOP command will be repeatedly sent as
long as the E-STOP pushbutton is depressed.
The E-STOP is always live on the telePendant
transmitter. Upon pushing the E-STOP
pushbutton the transmitter will send an E-STOP
command for the last selected Bank even if the
unit is turned OFF. (Obviously, if the battery is
dead this will not work).
telePendant Self-Test Function.
When the unit turns on if any function key is
depressed the unit will fault, not send a turn on
command and not become operational. The red
LED will stay ON till the unit is turned OFF.
The unit will frequently scan the 2nd position of
the motion switches while the transmitter is ON
and if one of these is closed without the first
position closed, the unit will fault as above.
telePendant Red LED ON/OFF Indicator.
The red LED, at the upper most left hand side of
the transmitter, operates as follows:
• Be OFF when the transmitter is OFF.
• Flash slowly when the transmitter is
ON, but not transmitting. If the
transmitter has Bank select enabled the
there will be a number of quick flashes
followed by a pause. The number of
quick flashes indicates the Bank the
transmitter is in.
Section 4 – Operation (Continued)
15 11/5/2003
• Flash rapidly when the transmitter is
transmitting, including during E-STOP
when the transmitter is OFF.
• Remain ON continuously for: waiting
password, un-programmed Bank
selected or a logic or pushbutton fault.
telePendant Low Battery Shutoff Function.
If the battery gets too low the unit will shut off
and send an OFF command to the receiver as it
turns OFF.
telePendant Battery Yellow Indicator Light.
The yellow LED to the right of the ON/OFF
indicator operates as follows:
• Be OFF when the transmitter is OFF.
• Be OFF when the transmitter is ON and
the battery is good.
• Remain ON continuously for a low
battery needing replacement.
telePendant Bank Select (Normally
Password Protected).
This feature is like having four completely
different transmitters in one unit. Up to four
banks (operational configurations) are possible.
A fifth bank is reserved for programming, this
Bank is not password protected. A Bank is a
specific configuration of user-defined parameters
including:
System type
Frequency
Access codes
Also: Key arrangement
Relay configuration
Time-out-timer time
Mode selection
Alarm settings
To select a specific bank: With the transmitter
turned OFF, the ON/OFF push button is then
pressed and held down while one of the five
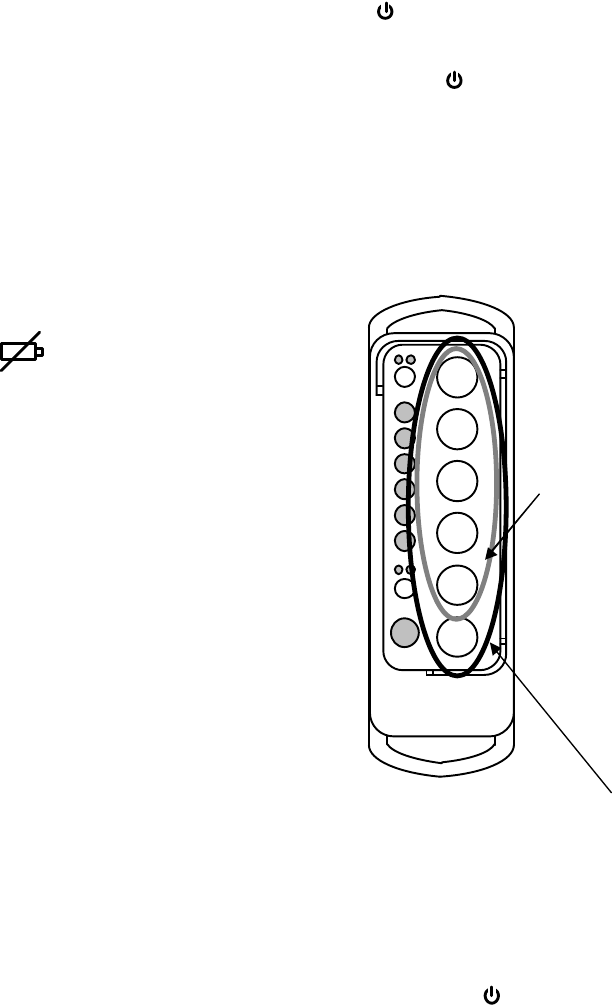
upper most motion push buttons (buttons 1
through 5 see Figure 4-2. Bank and Password
Input Buttons) is pressed. Press push button 1 for
Bank 1, push button 2 for Bank 2, push button 3
for Bank 3, push button 4 for Bank 4 or push
button 5 for Bank 5 the programming bank.
While the Bank button is held down release the
ON pushbutton and then the Bank button. (The
sequence is important). The transmitter red LED
ON/OFF indicator then stays ON (for five
seconds) till the password is entered. Once the
password is entered (see below) the transmitter
red LED ON/OFF indicator flashes indicating
the current Bank the operator is in while the
transmitter is ON and not transmitting. One flash
then a pause repeatedly indicates Bank 1, two
quick flashes indicates Bank 2, three quick
flashes and a pause indicates Bank 3 and so on.
The transmitter will remember what Bank it is in
even if turned OFF and ON again.
It is not necessary to program all four Banks, if
an un-programmed or turned “off” Bank is
selected the ON/OFF indicator will remain
ON continuously, the transmitter will send no
commands and will turn itself off shortly.
telePendant Bank Password Protection
Function.
This enables the owner to create a four-stroke
password word to enable changing Banks. With
Password enabled the operator selects a four-
button sequence to enable a Bank after different
Bank has been selected (see above). When the
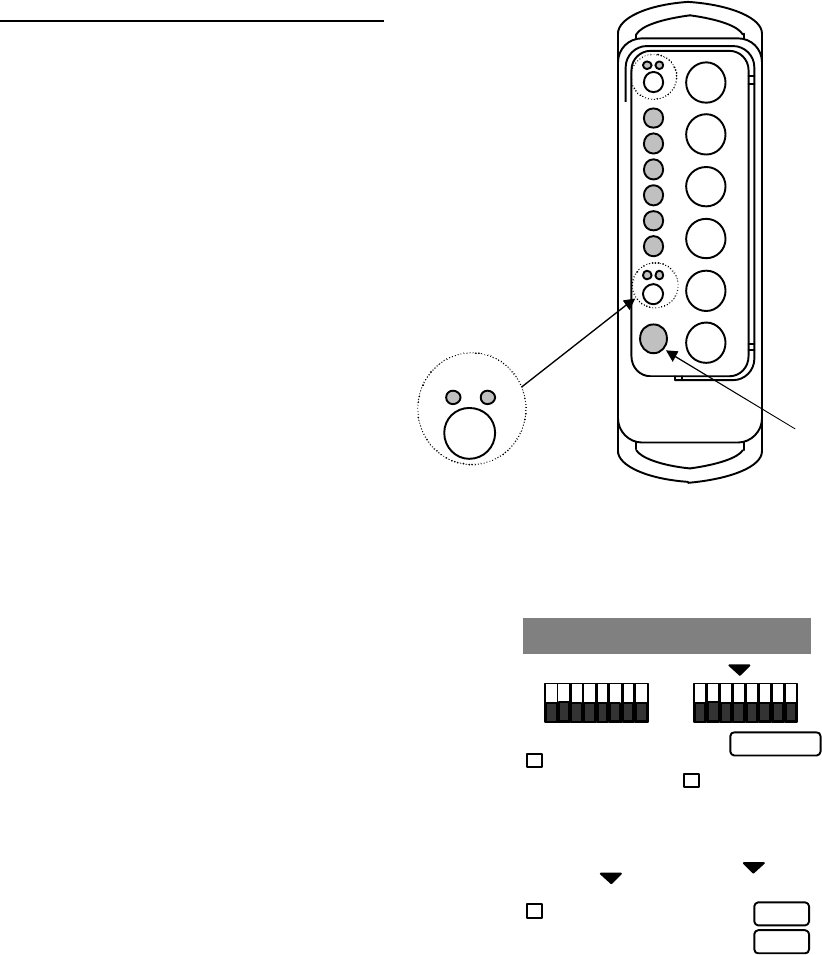
Figure 4-2. Bank and Password Input Buttons.
1
2
3
4
5
6
Bank Input Buttons
Password Designators for
Programming
Section 4 – Operation (Continued)
16 11/5/2003
transmitter is turned ON, after Bank Selection is
made and the ON/OFF indicator will remain
lit until the correct password sequence is entered
with in five seconds. An incorrect password
sequence or failure to enter the sequence in time
shuts the unit OFF. The user is allowed to restart
and try again an unlimited amount of times. The
Bank Password is the same for all four Banks.
WARNING
THIS PASSWORD FUNCTION IS NOT TO BE
USED AS A SECURITY DEVICE. THE PUR-
POSE OF THIS FUNCTION IS TO PREVENT
ACCIDENTAL BANK SWITCHING. THE
BEST FORM OF SECURITY IS ALWAYS TO
LOCKUP THE TRANSMITTER WHEN NOT
IN SERVICE. FAILURE TO FOLLOW THIS
WARNING COULD RESULT IN SERIOUS
INJURY OR DEATH AND DAMAGE TO
EQUIPMENT.
When initially programming the unit the default
password is 6, 5, 4, 3. This password can be
easily changed by the PDA during initial
programming.
A password is a sequence of four pushbutton
entries. These entries are any combination of
inputs from the upper most six buttons on the
right hand side of the telePendant transmitter.
On 2- and 3-Speed transmitters the second and
third speed is ignored.
Acceptable sequences could duplicate buttons
numbers such as 2, 2, 6, 6 or 1, 1, 1, 4.
NOTE
ALWAYS REMEMBER TO STORE THE
PASSWORD IN A SECURE LOCATION FOR
ACCESS IF THE PASSWORD IS LOST OR
FORGOTTEN. ONCE THE TRANSMITTER IS
PROGRAMMED THERE IS NO WAY TO DE-
FEAT THE PASSWORD WITHOUT USING A
PDA TO EITHER READ THE PASSWORD
OUT OR REPROGRAM A NEW ONE.
The Bank password can be disabled during
initial programming by the PDA.
WARNING
DISABLING THE PASSWORD FUNCTION
PUTS THE SYSTEM IN ACTIVE BANK
SELECT. THIS ALLOWS THE CRANE
OPERATOR TO SWITCH BETWEEN BANKS
QUICKER. THE OPERATOR IN THIS MODE
MUST BE AWARE AND RESPONSIBLE FOR
ALL POSSIBLE CONTROLLED CRANES.
FAILURE TO FOLLOW THIS WARNING
COULD RESULT IN SERIOUS INJURY OR
DEATH AND DAMAGE TO EQUIPMENT.
telePendant Time-Out-Timer Function.
The transmitter has a time-out timer and the
default condition is 15 minutes. Upon timing out
the transmitter will send an OFF command to the
receiver if Auto Turn Off is active. The
transmitter time-out-timer function is
programmable in minute increments to up to and
including 15 minutes. After that it is
programmable in five-minute increments up to
and including one hour. Infinite time-out (none)
is also selectable. The time-out-timer measures
the time since the last pushbutton stroke and is
continuously reset by any pushbutton activation.
4-6. Battery Replacement.
telePendant Battery Replacement.
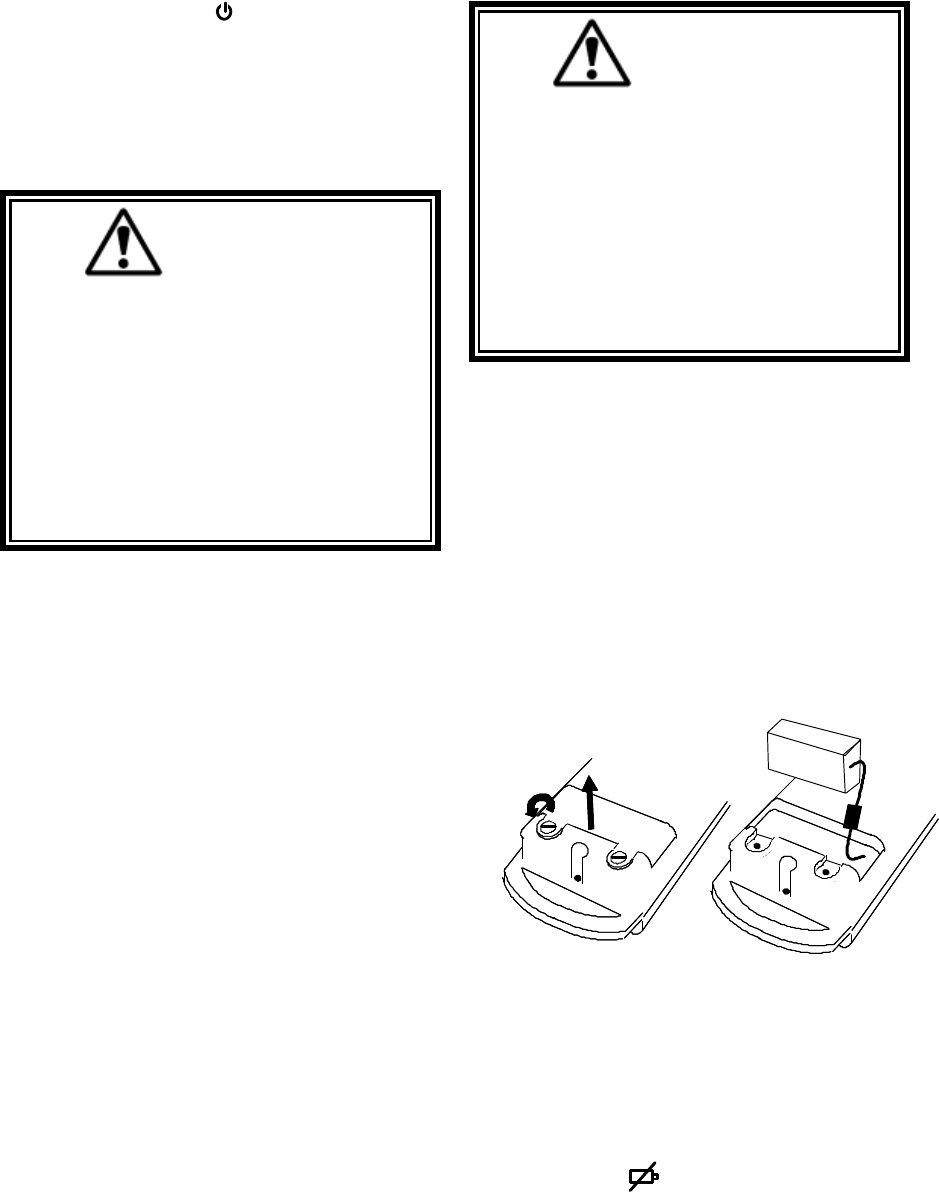
On the telePendant if the yellow battery
indicator light starts to flash replace the
battery at the earliest opportunity. If the light is
on solid replace the battery immediately.
Figure 4-3. telePendant Battery Replacement.
Section 4 – Operation (Continued)
17 11/5/2003
NOTE
THERE IS NO NEED TO RUSH BATTERY
REPLACEMENT. THE PROGRAMMING IN
THE TELEPENDANT WILL NOT BE LOST
BY REMOVAL OF THE BATTERY OR
PROLONGED LOSS OF POWER.
Turn the transmitter OFF, loosen the two coin-
screws on the bottom of the unit with a small
coin and remove the bottom door. (See below).
Pull out the battery holder until the batteries can
be accessed. Do not pull hard on the battery
holder as it is attached to the logic board by a
cable.
For a battery carrier with two “AA” cells,
replace the two “AA” cell batteries with new
batteries, noting the polarity for “AA” cells
marked on the holder. (Best life can be obtained
if the two “AA” batteries used are new, a good
quality alkaline type, both cells of the same type
and from the same manufacturer). Accidentally
putting the batteries in the wrong direction will
not damage the unit.
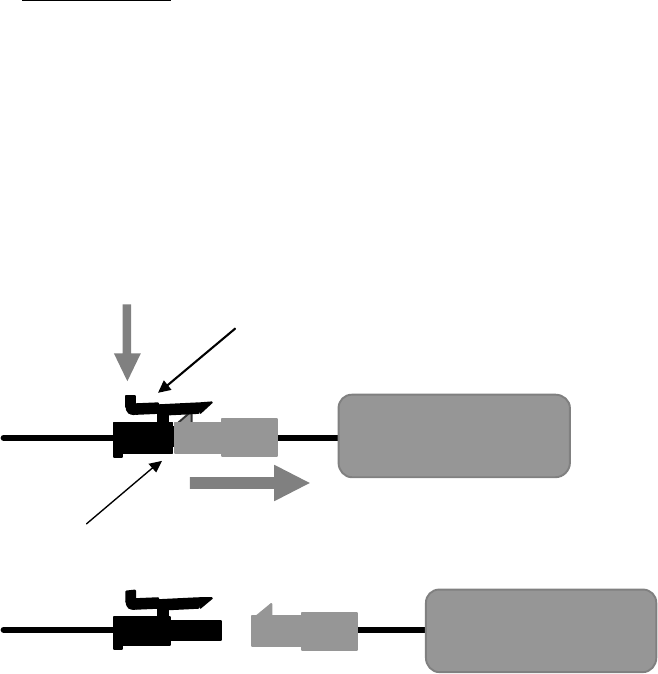
For battery packs, unlatch the battery cable by
pressing or squeezing the locking tab on the
battery connector and pulling apart, pulling on
the connector housings, not the wires. (see
Figure 4.4 below). Slide the new battery pack
connector into place until the connector latches.
After replacing the battery(s) place the battery
back inside the transmitter, replace the battery
door and tighten the thumbscrews. See Section 6
– Spare Parts, for battery part numbers.
Battery
Connector
Battery
Press Tab
Pull
on
connector housing
Battery
Figure 4.4 Disconnecting the battery.
Locking Tab
Section 5 – Programming
18
5-1. Access Codes.
5-1.1. Programming Access Codes.
The access code is set at the factory and should not be
changed unless absolutely necessary. If you are
reprogramming a spare or new transmitter make sure the
other transmitter is securely taken out of service.
WARNING
TWO OPERATIONAL TRANSMITTERS WITH THE
SAME ACCESS CODES OPERATING AT THE
SAME TIME IS A DEFINITE SAFETY HAZARD.
FAILURE TO FOLLOW THIS WARNING COULD
RESULT IN SERIOUS INJURY OR DEATH AND
DAMAGE TO EQUIPMENT.
5-1.2. Changing Transmitter Access Codes.
5-1.2.1. telePendant Access Code Programming.
For detailed instructions on setting parameters including
access codes see Section 5-3.2. telePendant
Programming.
WARNING
AFTER CHANGING THE ACCESS CODES ON THE
TRANSMITTER, TEST THE UNIT BY TURNING IT
ON AND OFF NEAR THE APPROPRIATE
RECEIVER. IF THE RECEIVER DOES NOT
RESPOND, DO NOT ACTIVATE A FUNCTION
BUTTON! THE TRANSMITTER MAY HAVE THE
WRONG ACCESS CODE, WHICH COULD MOVE
ANOTHER CRANE. RE-CHECK THE ACCESS
CODE IN THE TRANSMITTER AND RETEST.
FAILURE TO FOLLOW THIS WARNING COULD
RESULT IN SERIOUS INJURY OR DEATH AND
DAMAGE TO EQUIPMENT.
NOTE
IN EVENT PROGRAMMING OF ACCESS CODES IS
REQUIRED, TAKE SPECIAL CARE TO
CORRECTLY LOCATE ACCESS CODE SWITCHES
A AND B. LOOK FOR THE LABELS A AND B ON
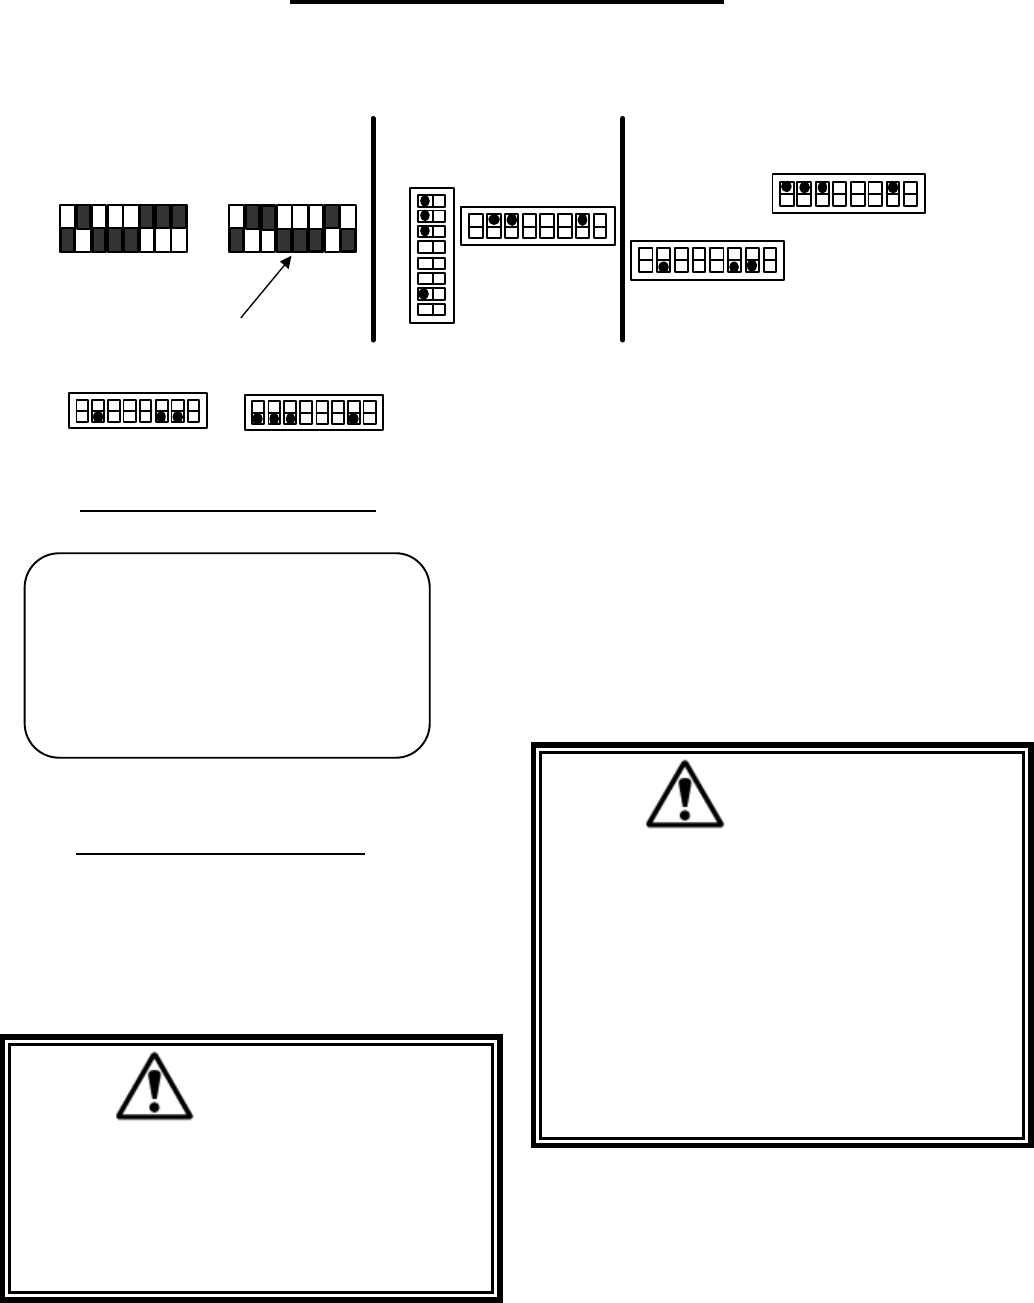
Figure 5
-
1. Access Code Setting.
(A dot on a switch position or a “1” in the
label is an indication that the respective
switch position should be ON).
Sample Membrane or
Pendant
Transmitter
Access Code Label
Sample access code only do not use
SW1
Membrane
Transmitter 10K Pendant Transmitter
SW1
OFF
1 A 8
ON
OFF
ON
8 B 1
MODEL #
-
10KXXXXXXXX
S/N=XXXXXXXXXXXXXXXXX
ACCESS CODE SETTING
1 A 8 1 B 8
0 1 0 0 0 1 1 1 0 1 1 0 0 0 1 0
FREQ : = AK01 J # = XXXXX
Access Code Switches
Sample access code only, do not use
SW2 ON
ON
SW1
8 A 1
OFF OFF
8 B 1
TR12 Receiver
ON
8 A 1
SW2
OFF
8 A 1
1 B 8
OFF
ON
SW2 OFF
A1
tele
Pendant
Transmitter
1 A 8
ON
OFF
1 B 8
ON
OFF
B1
Receiver access code
1
0 1
0
Indicates switch in OFF position
Section 5 – Programming (Continued)
19 11/5/2003
THE PRINTED CIRCUIT BOARD NEAR THE
RESPECTIVE SWITCHES. DETERMINE THEIR
ORIENTATION. THE SWITCHES MAY NUMBER
FROM LEFT TO RIGHT OR RIGHT TO LEFT. LOOK
FOR THE NUMBERING ON THE SWITCHES.
MATCH ACCESS CODES A1, A2, - -- B1, B2 ETC.
After changing the access code, test the receiver (s) with
a matching transmitter. (If the red LED “Wrong Access
Code” comes ON in the receiver only while transmitting
receiver the code does not match, recheck the access
code settings). See receiver manual for LED location.
WARNING
THE ACCESS CODES IN THE RECEIVER ARE
UNIQUE AND FACTORY PRESET. DO NOT
CHANGE THESE ACCESS CODES UNLESS YOU
ARE REPLACING AN EXISTING RECEIVER AND
ITS ACCESS CODE. CHANGING THIS CODE
COULD MAKE IT COMMON WITH ANOTHER
RECEIVER ACCESS CODE, WHICH COULD MOVE
ANOTHER CRANE. NO TWO SYSTEMS IN ANY
LOCATION SHOULD EVER HAVE THE SAME
ACCESS CODES INDEPENDENT OF FREQUENCY.
FAILURE TO FOLLOW THIS WARNING COULD
RESULT IN SERIOUS INJURY OR DEATH AND
DAMAGE TO EQUIPMENT.
5-2. Multibox.
Multibox Operation. (Optional, for receivers with
Multibox option only).
Do not use on InteleSmart Receivers. Use Group
Code feature, see InteleSmart Receiver Manual.
WARNING
IF YOUR RECEIVER WAS NOT ORDERED WITH
MULTIBOX DO NOT ATTEMPT TO PROGRAM
MULTIBOX IN THE FIELD. TELEMOTIVE MUST
COORDINATE ACCESS CODE ASSIGNMENTS
WITH THE TRANSMITTERS PRIOR TO ENABLING
MULTIBOX. PLEASE CONTACT TELEMOTIVE IF
YOU NEED TO ADD MULTIBOX. FAILURE TO
FOLLOW THIS WARNING COULD RESULT IN
SERIOUS INJURY OR DEATH AND DAMAGE TO
EQUIPMENT.
WARNING
IF YOUR UNIT HAS MULTIBOX DO NOT
ATTEMPT TO PROGRAM ADDITIONAL
TRANSMITTERS IN THE FIELD. TELEMOTIVE
MUST COORDINATE ACCESS CODE AS-
SIGNMENTS WITH THE NEW TRANSMITTERS
PRIOR TO EXPANDING MULTIBOX. PLEASE
CONTACT TELEMOTIVE IF YOU NEED TO ADD
ADDITIONAL TRANSMITTERS. FAILURE TO
FOLLOW THIS WARNING COULD RESULT IN
SERIOUS INJURY OR DEATH AND DAMAGE TO
EQUIPMENT.
Many receivers have Multibox capability that allows up
to 8 transmitters to access a single system. Only one
transmitter may control the receiver(s) at a given time.
Access is on a first come first serve basis. Once a
transmitter has gained control, another transmitter may
not access the receiver(s) until the controlling transmitter
relinquishes control by transmitting an OFF command to
the receiver(s) or the receiver(s) times out due to
inactivity.
The first transmitter to send an ON command after the
receiver has been released will then gain control of the
receiver(s). The number of transmitters (1-8) allowed to
control the receiver(s) is dip switch selectable on the
Receiver Board.
NOTE
THE DESIRED MULTIBOX TRANSMITTERS MUST
HAVE CONSECUTIVE ACCESS CODES
BEGINNING FROM THE FIRST ACCESS CODE.
Section 5 – Programming (Continued)
20 11/5/2003
5-3. Programming.
5-3.1. Transmitter Programming Options.
The following parameters are programmable in the
transmitter:
Switch Position – Hoist, Trolley Etc.
Timer-out-timer operation.
Modes – Single speed switch grouping.
Crane configuration -
Tandem disable – Eliminates “both”
Select invert – Inverts the select function.
5-3.2. telePendant Programming.
Read Section 4-5. Additional telePendant Operational
Features to familiarize you with the features listed
below. The telePendant transmitter remote unit for
programming uses a PDA (Personal Digital Assistant).
Such products as Palm Pilot® or many other products
using Palm OS® less than version 5.0 can be used to run
the telePendant programming software. If unsure if
your PDA will work or for a recommended product
contact the appropriate Telemotive representative or
check our website. The software for the PDA is available
on a disk shipped with your unit, and can be emailed
from your Telemotive representative.
telePendant PDA software is quite user friendly and is
intended to mimic the dip switch settings used in other
Telemotive products without the inconvenience of
having to open the transmitter case. The PDA software
allows you to select frequency, access code, time-out-
timer settings, switch arrangement and crane
configuration as in other Telemotive transmitter
products. Follow the lettered steps below:
A. Load PDA Program.
Load the telePendant programming software into your
PDA, refer to your PDA manual or contact Telemotive
for the appropriate procedure. Once loaded, look for the
Telemotive circle and hook logo labeled Transmittr for
the appropriate application. Select this application to
begin programming.
With the telePendant programmer you can load up to
four different transmitter types for use on four different
systems. Each transmitter configuration is stored in a
“Bank”. There are up to four configurable banks
available. This Bank feature is like having four
completely different transmitters in one unit. Up to four
Banks (operational configurations) are possible. A fifth
bank is used for programming. A configurable Bank is a
specific configuration of user-defined parameters
including:
Frequency
Access codes
Also possible:
Key arrangement
Relay configuration
Tandem disable
Invert crane select
Time-out-timer time
Mode selection
Alarm settings
After loading the telePendant program the first screen
is the initial setup screen.
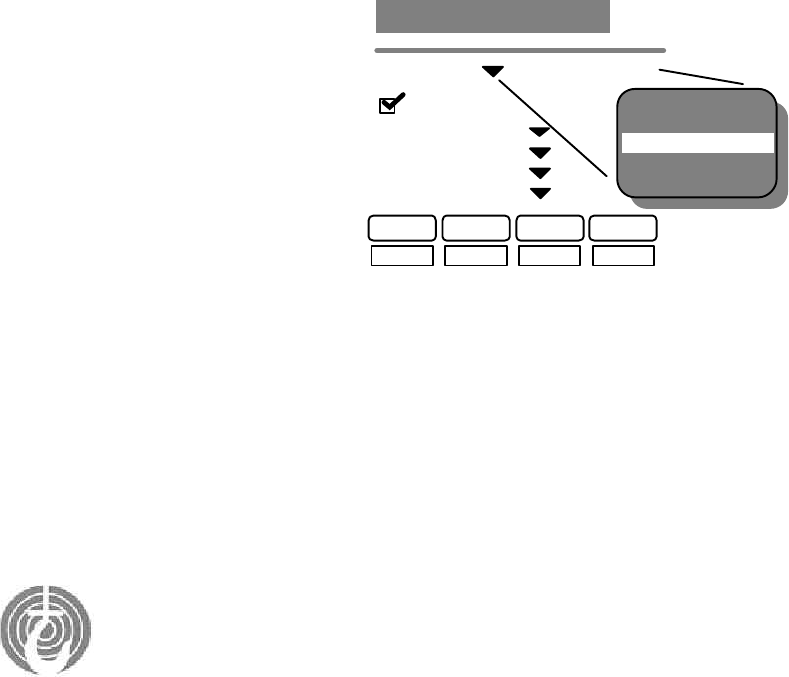
B. Enter “Tx Type” (Must be selected).
First select the transmitter type being used (two-speed “2
SPD telePendant” or three-speed “3 SPD telePendant”).
With your PDA stylus tap the arrow after transmitter “Tx
Type”. A pull down menu will appear, select “2 SPD
telePendant” or “3 SPD telePendant” and the menu will
close showing your selection.
For 3-Speed legacy 10K receivers select 3-Speed 10K
Pendant.
C. Enter Bank Password (Can be disabled).
Bank password protection is available in changing the
transmitter once it has turned OFF. The Bank Password
is the same for all Banks. Bank password protection is
described in the telePendant operational description in
Section 4-5. Additional telePendant Operational
Features. Please familiarize yourself with this section
Transmittr
Tx Type 2 SPD telePendant
Transmitter Programmer
Name: ……………………………..…. M
Use bank password
First press Button 6
Second press Button 5
Third press Button 4
Fourth press Button 3
Bank 1 Bank 2 Bank 3 Bank 4
off off off off
1 SPD telePilot
2 SPD telePilot
2 SPD telePendant
3 SPD 10K Pendant
3 SPD telePendant
Section 5 – Programming (Continued)
21 11/5/2003
before programming. A check appears in the box and a
list of four buttons. These buttons list the first through
fourth buttons and are in the order of entry for the
appropriate buttons. Select the four transmitter buttons in
the sequence that you wish to be the password by
tapping the arrow by “Button #” and making a selection
from the pull down menu for each of the four password
entries. Be sure to write this password down in a safe
place for future reference. The default password is 6, 5,
4, 3.
NOTE
ALWAYS REMEMBER TO STORE THE
PASSWORD IN A SECURE LOCATION FOR
ACCESS IF THE PASSWORD IS LOST OR
FORGOTTEN. ONCE THE TRANSMITTER IS PRO-
GRAMMED THERE IS NO WAY TO DEFEAT THE
PASSWORD WITHOUT USING A PDA TO EITHER
READ THE PASSWORD OUT OR REPROGRAM A
NEW ONE.
WARNING
THIS PASSWORD FUNCTION IS NOT TO BE USED
AS A SECURITY DEVICE. THE PURPOSE OF THIS
FUNCTION IS TO PREVENT ACCIDENTAL BANK
SWITCHING. THE BEST FORM OF SECURITY IS
ALWAYS TO LOCKUP THE TRANSMITTER WHEN
NOT IN SERVICE. FAILURE TO FOLLOW THIS
WARNING COULD RESULT IN SERIOUS INJURY
OR DEATH AND DAMAGE TO EQUIPMENT.
The Bank password can be disabled during initial
programming by the PDA. To disable password
protection, tap the check in the box next to the phase
“Use bank password”. Disabling the Bank password is
not recommended unless the operator has access and
visibility to all possible cranes controlled.
WARNING
DISABLING THE PASSWORD FUNCTION PUTS
THE SYSTEM IN ACTIVE BANK SELECT. THIS
ALLOWS THE CRANE OPERATOR TO SWITCH
BETWEEN BANKS QUICKER. THE OPERATOR IN
THIS MODE MUST BE AWARE AND
RESPONSIBLE FOR ALL POSSIBLE CONTROLLED
CRANES. FAILURE TO FOLLOW THIS WARNING
COULD RESULT IN SERIOUS INJURY OR DEATH
AND DAMAGE TO EQUIPMENT.
D. Select a Bank (At least one must be selected).
When done with the password section. Select the number
of Bank you wish to program and tap the cell labeled
with the appropriate Bank number.
The screen should switch to the Setup Bank screen
shown below. Complete the Bank setup as described
below and hit save. The PDA will revert to the initial
screen and the cell for the just programmed Bank should
darken and the word “on” appears. Tap on the cell
labeled with the next bank you wish to program and a
similar “Setup” screen to the one shown below will
appear. Continue doing this until you have programmed
the four Banks.
You do not have to use all Banks and you do not have to
use them in order.
Even after programming a Bank you can turn it back
“OFF”. A programmed Bank will not lose its
programming by turning it “off”. By turning ON and
OFF Banks you can easily save certain transmitter
configurations in the transmitter to turn them on at a later
time with the PDA without having to completely
reprogram them.
Bank 1 Bank 2 Bank 3 Bank 4
off off off off
Button 1
Button 2
Button 3
Button 4
Button 5
Button 6
Name: ……………………………..…. M
Tx Type 2 SPD telePendant
Use bank password
Transmitter Programmer
First press Button 6
Second press Button 5
Third press Button 4
Fourth press Button 3
Bank 1 Bank 2 Bank 3 Bank 4
off off off off
Section 5 – Programming (Continued)
22 11/5/2003
Setup Bank Programming Screen.
After seleting a Bank, the number of the Bank will
appear at the top of the screen.
The respective screens appear as shown below (the 2-
Speed screen is shown first):
NOTE
IF YOU HAVE AN INTELESMART RECEIVER
FREQUENCY AND ACCESS CODES CAN EASILY
BE DOWN LOADED DIRECTLY INTO YOUR PDA.
E. Downloading Parameters from an InteleSmart
receiver.
Select the Bank you wish to program, cycle the power to
the InteleSmart receiver. Within the first 10 seconds of
the receiver turning ON, point the PDA at the receiver’s
IR port (see receiver manual for location) and tap the
“Rx Setting” button on the PDA. The frequency and
Access Code will be downloaded, then skip the next two
steps.
F. Select a Frequency (Must be inputted for system
to work):
There should be a label either on the receiver or the
transmitter being replaced listing frequency, it should be
a channel number between AK01 to AK20. Find this
number and tap the “Freq” arrow and select that channel
number.
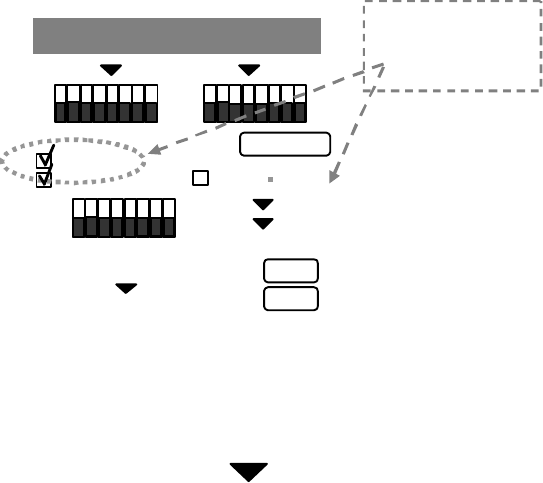
G. Enter the Access Code (Must be inputted for
system to work):
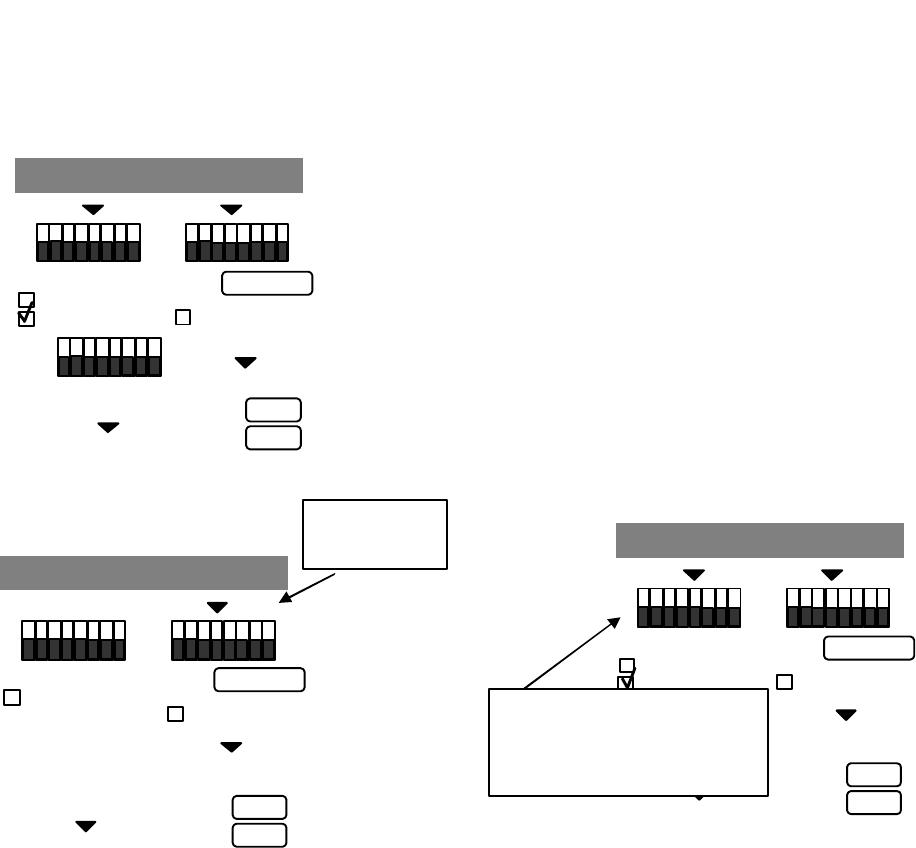
Screen switch operation.
The screen switches are labeled from left to right “A”,
and “B”. They are numbered from left to right 1 to 8.
The darken rectangle to the bottom is “OFF” or “0” the
darken rectangle to the top is “ON” or a “1”. Tapping the
lighten rectangle will cause the switch to toggle.
See Section 5.1. Access Code Programming for details
on access code programming. There should be a label
either on the receiver or the old transmitter showing the
access code, it should be numbered A1 through A8 and
B1 though B8. Find this number and tap the respective
switches on the screen. If you cannot find a label with
access code information, copy directly from the access
code dip switches in your transmitter or receiver, being
careful to match the designation and switch position as
they do vary from model to model.
2-Speed telePendant Bank Programming Screen.
System 10K Freq AK01
Setup Bank #
A1
Receiver access code
1
0
B1 1
0
S3-1 1
0
Timer
Switch conf.: H,T,B
Main/Aux Aux only Save
Cancel
Multibox
Auto Turn Off Active ESTOP
RX Setting
15
3
-
Speed 10K Pendant and 3
-
Speed
telePendant Bank Programming Screen.
Multibox
Active ESTOP
RX Setting
15
Freq AK01
Setup Bank #
A1
Receiver access code
1
0
B1 1
0
Timer
Save
Cancel
E. Select a
Frequency
Motor 5 telePendant Access Code Programming.
Cancel
System 10K Freq AK01
Setup Bank #
A1
Receiver access code
1
0
B1 1
0
Timer
Save
Multibox
Auto Turn Off Active ESTOP
RX Setting
15
S3-1 1
0
Switch conf.: H,T,B
Main/Aux Aux only
F. Screen switches for
Access Code
Section 5 – Programming (Continued)
23 11/5/2003
H. Multibox (Optional, skip if you do not wish to use
the Multibox feature):
Do not use on InteleSmart Receivers. Use Group Code
feature see InteleSmart Receiver Manual.
See Section 5-2. Multibox for details on Multibox
programming. If your current receiver does not have
Multibox do not attempt to use this function. This
function WILL NOT turn Multibox on in the receiver. It
only assists you in programming the correct transmitter
access code for a receiver that already has Multibox.
Make sure when you are using the Multibox feature that
the access code of the receiver is programmed into the
access code above and not one copied from an existing
transmitter on a Multibox system. If you cannot find the
receiver transmitter code and wish to copy existing
transmitter on a Multibox system, put the transmitter’s
access code in the access code switches above and DO
NOT check the Multibox box on the PDA.
Select the Tx # this should be the next number in the
series of transmitter being put on a Multibox system. If
the are two transmitters on already and you are adding a
third, select the number 3. Make sure as stated in the
Multibox section the receiver is programmed for the
appropriate number of transmitters.
The Tx # goes up to 8. Many Multibox systems only go
to four. Check with your Telemotive representative if
you need more then 4 transmitters on a Multibox system.
I. Set Time-Out–Timer Time. Default time is 15
minutes.
The time it takes the transmitter to shutoff due to un-use
is programmable. Tap the arrow next to the word
“Timer” to program and scroll through the numbers
shown. Units shown are in minutes.
J. Active ESTOP.
This feature causes the Receiver to shutdown if the
transmitter is out of range. For this to work the
companion receiver must have this feature also. Please
check the receiver manual. All InteleSmart receivers
have this feature, both the receiver and the transmitter
must have this box checked. DO NOT use this feature
with non equipped receivers. It is not recommended to
have multiple transmitters on the same channel if Active
ESTOP is used due to the additional channel loading.
K. Auto Turn Off. (Normally Leave Checked).
Auto Turn Off causes the unit to send an OFF command
to the receiver if the battery goes bad or the transmitter
times out. Removing the check from this box disables
this feature.
L. Go to the appropriate Section for your system.
5-3.3 2-Speed telePendant, Page 24.
5-3.4 3-Speed telePendant, Page 26.
5-3.5 3-Speed 10K Pendant, Page 27.
System 10K Freq AK01
Setup Bank #
A1
Receiver access code
1
0
B1 1
0
S3-1 1
0
Timer
Switch conf.: H,T,B
Main/Aux Aux only Save
Cancel
Multibox
Auto Turn Off Active ESTOP
RX Setting
15
Tx # 1
tele
Pendant
Multibox
Programming.
Multibox
Programming
Timer
15

Section 5 – Programming (Continued)
24 11/5/2003
5-3.3. 2-Speed telePendant Programming.
NOTE
IF REPLACING A MEMBRANE OR PENDANT
TRANSMITTER, YOU CAN COPY THE SWITCH
SETTINGS ON THE EXISTING TRANSMITTER.
Membrane: Copy Switch 3 (all positions) settings on
the Membrane transmitter to S3 on the PDA.
Pendant: Copy Switch 3 (positions 1, 2, 3 and 8)
settings on the Pendant transmitter to S3 (positions 1, 2,
3 and 8 respectively) on the PDA. Copy Switch 4
(positions 5, 6 and 7) settings on the Pendant transmitter
to S3 (positions 5, 6 and 7 respectively) on the PDA. If
Switch 4 on the Pendant transmitter has positions 1 and
or 2 Switched ON see the write-up on Main/Aux Menu
below. If SW4 position 3 is switched “ON” un-check
Tandem box on PDA. If SW4 position 4 is switched
“ON” check Invert box on PDA.
M. S3 Programming. Not required for an
InteleSmart receiver.
S3 Positions 1-3 Repositioning of telePendant
Transmitter Motion Switch Functions. (Standard
configuration all “OFF”).
S3 positions 1 through 3 can change the functional
positions of the switches controlling hoist, trolley and
bridge. This reconfiguration does NOT affect receiver
wiring. As these switches are changed the motor controls
are moved.
Standard, Motor 1 is H (Hoist) Motor 2 is T (Trolley)
and Motor 3 is B (Bridge). The standard configuration
(all switches OFF) is, starting at the top right hand pair
of buttons on the transmitter, Motor 1. Moving down to
the middle two right hand pair of buttons that is Motor 2.
The bottom pair on the right is Motor 3. This is indicated
the display “Switch config: H,T,B. The order of Hoist,
Trolley and Bridge will vary as S3-1 to 3 switch
positions is changed. Toggle the switches sequencially
till you see the order you need. There are six possible
combinations.
S3 Position 4 And 8 Time-out-timer Disable.
(Normally turned “OFF”).
Disables the transmitter time-out-timer if turned ON. If
the time-out-timer is active, the length of time for time
out can be selected for numbers of minutes till shut
down. The minutes are selectable in one-minute steps
from 1 to 10 and five minutes steps up to an hour. Tap
on the “Timer” arrow and scroll down through the
number of minutes and tap on the desired number.
Positions 5-7 Special Crane Control Configurations.
(Standard all “OFF”).
The wiring section of the manual for receiver shows all
the different crane configurations and the switch
positioning needed to achieve them. The standard
transmitter comes with the output standard output
configuration. For special crane control configurations
program S3 positions 5-7 to match the programming
information shown for the respective wiring diagram.
When any of the special crane configuration switches is
turned ON, the words “Crane control enabled” appears
on the display and Main/Aux disappears.
Position 8, Same as Switch Position 4. See write up
for switch 4 above (Normally turned “OFF”).
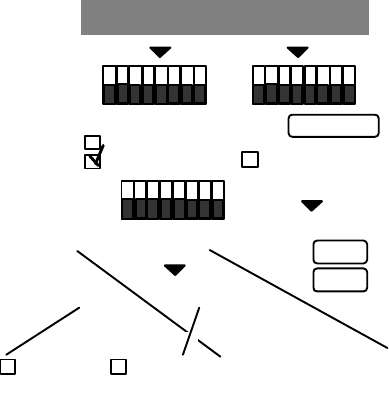
N. Main/Aux Menu for controlling the
“Programmable Motor Control and Select Push
Button”.
This menu shows only if no Special Crane
Configurations are selected (Switch 3 positions 5-7).
This programming redefines the function of the button
just above the E-STOP.
(If a three motor crane use “Aux”, for standard four
motor use “Motor ”, for Select function use Select).
If replacing a Pendant transmitter: if Switch 4 on the
Pendant transmitter has position 1 “OFF” and position 2
“ON” use “Motor”, if Switch 4 has position 1 “ON” and
position 2 “ON” use “Select”.
For a three motor system this Programmable Motor
Control and Select push button is non functional.
For a four motor system this button controls a main and
aux motor such as a hoist. (See Section 4. Operation, for
details on the operation of this button.) To program a
fourth motion select “Motor”. This four motor
application can only be used with 4 motor crane
configurations. The Programmable Motor Control and
Select push button becomes a switch to toggle between
“A” and “B” or both. Where “A” and “B” are main and
auxiliary motors respectively. The main motor output is
motor 1 and the auxiliary motor output is motor 4.
For up to 5 motors using the select function this button
is available to use select relays. This select function can
only be used with five crane configurations. To program
in the select function tap the word “Select”. The
Programmable Motor Control and Select push button
Section 5 – Programming (Continued)
25 11/5/2003
becomes a switch to toggle between “A” and “B” or
both. Where “A” and “B” are Select 2 and Select 1
outputs respectively.
NOTE
THE “A” LED LIT CAUSES THE SELECT 2 RELAY
TO CLOSE. THE “B” LED CAUSES THE SELECT 1
RELAY TO CLOSE.
Tandem For Hoist, Trolley or Bridge. (Normally
checked).
This function appears if a four motor system or select
function is chosen. Normally the box is checked
meaning “Both A and B” operation is enabled (both
MAIN and Aux or Select 2 and Select 1 can be ON at
the same time). Removing the check from the box by
tapping on it disables the “Both” function. (“A” and “B”
will not come ON at the same time). This function maps
to Pendant Switch 4 position 3, if SW4 position 3 is
switched “ON” un-check Tandem box on PDA.
Position 4 Invert Crane Select Aux. Outputs.
(Normally not checked).
This function appears if a system using select is
programmed in. Turning this switch “ON” inverts the
select function operation so that the relay closes for the
unselected function. This function maps to Pendant
Switch 4 position 4, if SW4 position 4 is switched “ON”
check Invert box on PDA.
This completes the 10K 2-speed programming, when
completed with the above tap “Save”.
Save will take you back to the Initial start screen. At this
point select another Bank to program or Go to Section
5-4. Saving, Downloading, Reading the Programs and
Other PDA Functions on page 28.
NOTE
TO PROGRAM OR READ DATA FROM
THE telePendant, THE TRANSMITTER
MUST BE TURNED ON AND IN BANK
FIVE (5).
Crane control enabled
Tandem Invert
System 10K Freq AK01
Setup Bank #
A1
Receiver access code
1
0
B1 1
0
S3-1
1
0
Timer
Switch conf.: H,T,B
Main/Aux Aux only Save
Cancel
Multibox
Auto Turn Off Active ESTOP
RX Setting
15
Section 5 – Programming (Continued)
26 11/5/2003
5-3.4. 3-Speed telePendant Programming .
M. Motor Menu for controlling the “Programmable
Motor Control” Push Button.
(If a three motor crane use “3”, for standard five or
four motor use “5 “).
For three motor system this push button is non
functional. (Motor “ 3”). This configuration is typically
used with the InteleSmart 16 output Receiver.
For five motor system this button controls main and aux
motors such as a hoist and trolley. (See Section 4.
Operation, for details on the operation of this button). To
program a fourth or fifth motion select (Motor “5”). This
five motor application can only be used with the
InteleSmart 24 output Receiver. The Programmable
Motor Control push button becomes a switch to toggle
between “A” and “B” or both. Where “A” and “B” are
main and auxiliary motors respectively. The main motor
outputs are motor 1 and motor 2 and the auxiliary motor
outputs are motor 4 and 5 respectively.
Tandem for Hoist, Trolley or Bridge. (Normally not
checked).
This function appears if a four or five motor system
function is chosen. Normally the box is not checked
meaning “Both A and B” operation is enabled (both
MAIN and Aux can be ON at the same time). Removing
the check from the box by tapping on it disables the
“Both” function. (“A” and “B” will not come ON at the
same time). This function maps to Pendant Switch 4
position 3, if SW4 position 3 is switched “ON” check
Tandem box on PDA.
This completes the telePendant 3-Speed
programming, when completed with the above tap
“Save”.
Save will take you back to the initial start screen. At this
point select another Bank to program or Go to Section
5-4. Saving, Downloading, Reading the Programs and
Other PDA Functions on page 28.
NOTE
TO PROGRAM OR READ DATA FROM
THE telePendant, THE TRANSMITTER
MUST BE TURNED ON AND IN BANK
FIVE (5).
E-STOP
3 speed telePendant Transmitter.
Programmable
Motor Control Push Button with
Indicators
A B
Freq AK01
Setup Bank #
A1
Receiver access code
1
0
B1 1
0
Timer
Save
Cancel
Multibox
Active ESTOP
Motor 5
Tandem off
RX Setting
15
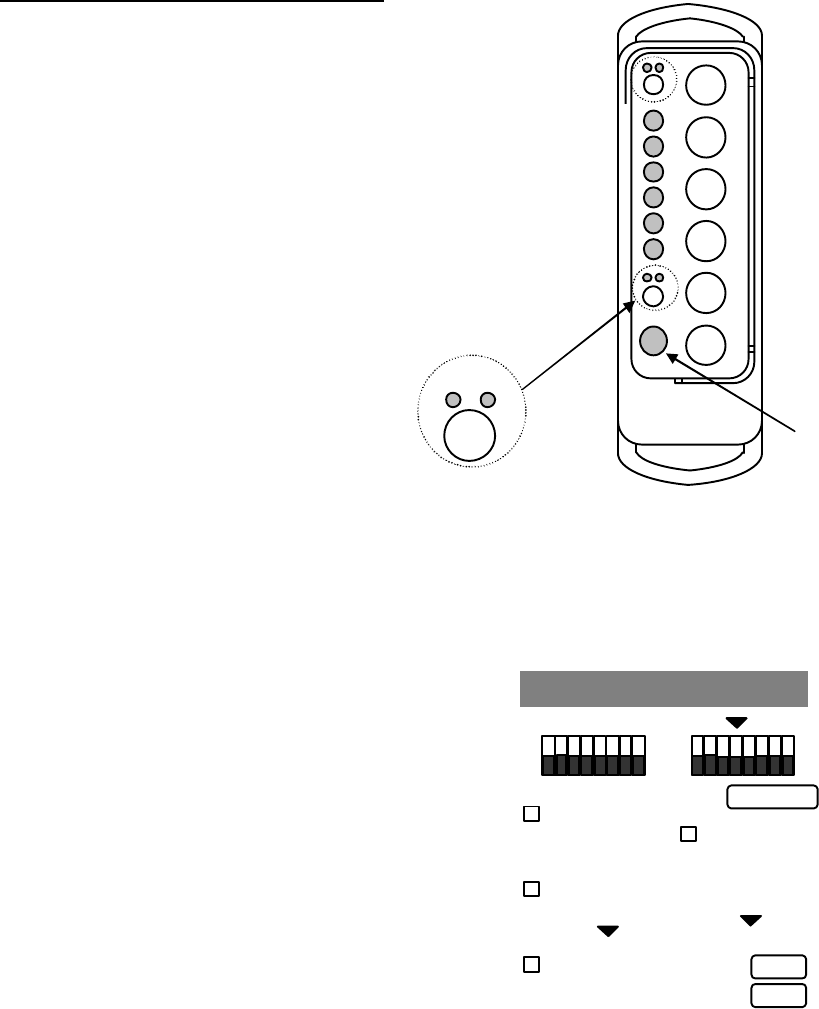
Section 5 – Programming (Continued)
27 11/5/2003
5-3.5. 3-Speed 10KPendant Programming.
N. Motor Menu for controlling the “Programmable
Motor Control and Select” Push Button.
(If a three motor crane use “3”, for standard five
motor use “5”, for Select function use Select).
For three motor system this push button is non
functional. (Motor “3”). This configuration is typically
used with the 10K16 output Receiver.
For five motor systems this button controls the main
and aux motors such as a hoist and trolley. (See Section
4. Operation for details on the operation of this button).
To program a fifth motion select (Motor “5”). This five
motor application can only be used with the 10K24
output Receiver. The Programmable Motor Control and
Select push button becomes a switch to toggle between
“A” and “B” or both. Where “A” and “B” are main and
auxiliary motors respectively. The main motor outputs
are motor 1 and motor 2 and the auxiliary motor outputs
are motor 4 and 5 respectively.
For up to 5 motors using the select function this button
is available to use select relays (Motor “Select”).
Aux Trolley OFF
This function appears if a 5 motor system is programmed
in. Checking the box disables the Aux Trolley function
for a 4 motor system.
Tandem OFF For Hoist, Trolley or Bridge.
(Normally not checked).
This function appears if a five motor system or select
function is chosen. Normally the box is not checked
meaning “Both A and B” operation is enabled (both
MAIN and Aux or Select 2 and Select 1 can be ON at
the same time). Putting the check in the box by tapping
on it disables the “Both” function. (“A” and “B” will not
come ON at the same time). This function maps to
Pendant Switch 4 position 3, if SW4 position 3 is
switched “ON” check Tandem OFF box on PDA.
This completes the telePendant 3-Speed
programming, when completed with the above tap
“Save”.
Save will take you back to the Initial start screen. At this
point select another Bank to program or Go to Section
5-4. Saving, Downloading, Reading the Programs and
Other PDA Functions on page 28.
NOTE
TO PROGRAM OR READ DATA FROM
THE telePendant, THE TRANSMITTER
MUST BE TURNED ON AND IN BANK
FIVE (5).
E-STOP
3 Speed 10K Pendant Transmitter.
Programmable
Motor Control and Select Push Button
with Indicators
A B
Freq AK01
Setup Bank #
A1
Receiver access code
1
0
B1 1
0
Timer
Save
Cancel
Multibox
Active ESTOP
Aux Trolley off
Motor 5
Tandem off
RX Setting
15
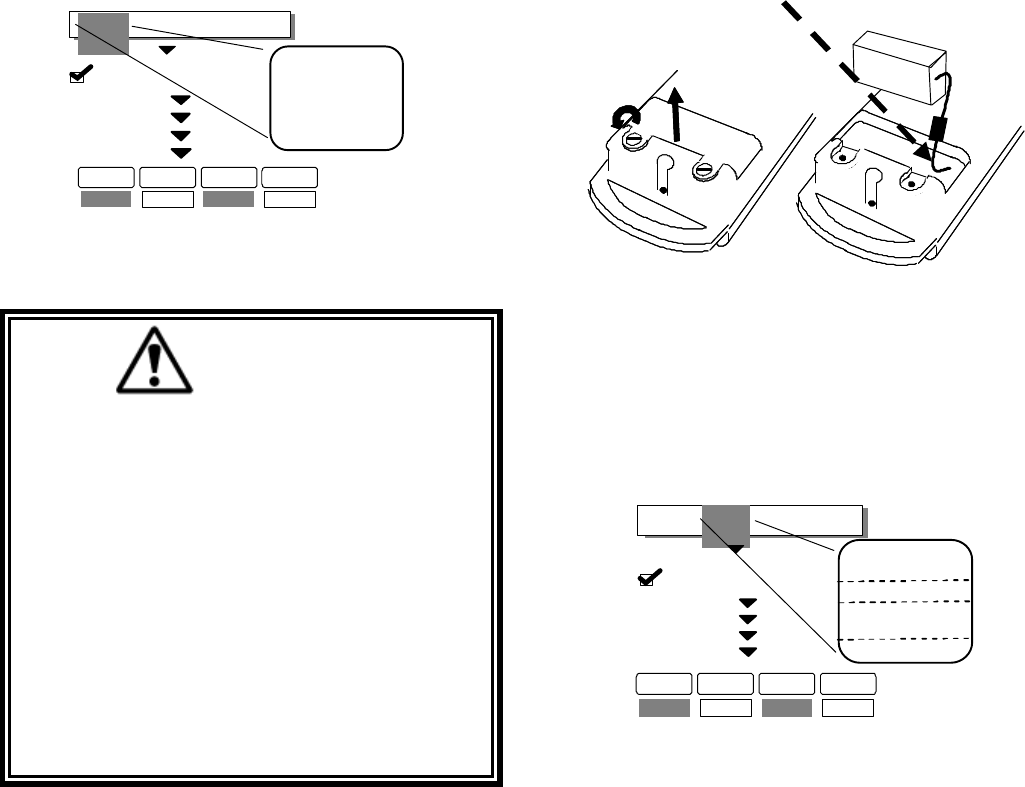
Section 5 – Programming (Continued)
28 11/5/2003
5-4. Saving, Downloading, Reading The Programs
and Other PDA Functions.
NOTE
TO PROGRAM OR READ DATA FROM
THE telePendant, THE TRANSMITTER
MUST BE TURNED ON AND IN BANK
FIVE (5).
Saving the Programming File.
With the initial telePendant screen displayed, tap in the
lower left corner of your PDA, the title bar at the top of
the screen will show a menu or tap on the word
“telePendant”. Choose the way you wish to save the
file. Tap on your choice and follow the instructions on
the PDA to complete file saving. Old files can be
deleted, called up, modified and renamed by this same
menu.
Sending a Program to the telePendant.
WARNING
AFTER EVERY PROGRAMMING OF THE TRANS-
MITTER, TEST THE UNIT BY TURNING IT ON
AND OFF NEAR THE APPROPRIATE RECEIVER. IF
THE RECEIVER DOES NOT RESPOND, DO NOT
ACTIVATE A FUNCTION BUTTON! THE TRANS-
MITTER MAY HAVE INCORRECT PROGRAM-
MING, WHICH COULD MOVE ANOTHER CRANE.
RE-CHECK THE PROGRAMMING IN THE TRANS-
MITTER AND RETEST. AFTER ACTIVATION OF
RECEIVER, FUNCTIONALLY TEST ALL COM-
MANDS ON THE TRANSMITTER BY INITIALLY
JOGGING THE BUTTONS, THEN WITH A FULL
MOVEMENT BEFORE RETUNING TO SERVICE.
FAILURE TO FOLLOW THIS WARNING COULD
RESULT IN SERIOUS INJURY OR DEATH AND
DAMAGE TO EQUIPMENT.
To send a program file, consisting of up to four
banks, to a telePendant Transmitter:
1. Turn transmitter unit OFF. Note that the Tx Red
LED is OFF.
2. Switch the unit to Bank 5 by: pressing the ON
button down, while holding the ON button
down then press the fifth down from the top
motion button down, then release the ON button
and then release the fifth motion button.. Note
that the Tx Red LED is flashing quickly fives
times then pausing. This flashing indicates you
are in bank 5.
3. Line up the PDA’s infrared port with the
transmitters infrared port (remove battery door
on the back and pull battery pack back and
expose the telePendant’s infrared port. See
figure below: telePendant Infrared Port
Access).
4. From the application file’s main menu click on
the PDA a dropdown menu icon located at
bottom left corner or tap on the word
“Programmer” at the top of the screen. Select
“Admin.”
5. Under “Admin.” select “Send Setting.”
Name: ……………………………..…. M
Tx Type
2 SPD
telePendant
Use bank password
Setting
Admin
Bank 1
on
Bank 2
off
Bank 3
on
Bank 4
off
Send Set
ting
Receive Setting
Beam Setting
Transmitter ID
History
About
First press Button 6
Second press Button 5
Third press Button 4
Fourth press Button 3
telePendant Infrared Port Access.
Battery pack
2 SPD telePendant
Name: ……………………………..…. M
Tx Type
Use bank password
Setting
Admin
First press Button 6
Second press Button 5
Third press Button 4
Fourth press Button 3
New
Open
Rename Current
Delete Current
Save Current
Save Current As
Bank 1
on
Bank 2
off
Bank 3
on
Bank 4
off
Section 5 – Programming (Continued)
29 11/5/2003
6. Select a name you want for the telePendant
unit being programmed and tap “OK”.
7. Wait for confirmation text on PDA screen:
8. After programming, always operationally test
all the functions of the transmitter by using the
appropriate receiver with the MR relay disabled
before retuning transmitter to service.
Receiving (Reading) the telePendant Programming.
To read a program file from the telePendant
Transmitter:
1. Line up the PDA’s infrared port and go to bank
5 as in steps 1 to 3 above, with the transmitter
ON. Select “Admin”
2. Select “Receive Setting.”
3. PDA will confirm reception and automatically
display current programming in the
telePendant unit.
Reading the telePendant ID.
To read an identity (an identity is the name that was
programmed in by step 5 of Sending a Program To The
telePendant, listed above) from the telePendant
Transmitter:
1. Line up the PDA’s infrared port and go to bank
5 as in steps 1 to 3 above, with the transmitter
ON. Select “Admin”
2. Select “Transmitter ID.”
3. PDA will read: Name, Serial/Job Number, and
Manufacturing information of the telePendant
unit.
Reading the telePendant History.
To read Service information from the telePendant
Transmitter:
1. Line up the PDA’s infrared port and go to bank
5 as in steps 1 to 3 above, with the transmitter
ON. Select “Admin”
2. Select “History”
4. Unit will read: Past Service Orders of the
telePendant unit.
Reading the PDA Transmitter Software Version.
To read PDA Software Version from the telePendant
Transmitter:
1. Select “Admin”
2. Select “About”
3. Unit will read: Transmitter Programmer
Software Version number.
Beaming (Sending) the Configuration(s) to another
PDA.
To send a configuration setting to another PDA.
1. Line up the PDA’s infrared port as, with the
other PDA, which is turned ON.
2. Select “Beam Setting.”
3. Select the item(s) you wish to send.
4. Wait for confirmation text on PDA screen:
Error Statements and Codes.
Tx Type Mismatch; If while attempting to program a
telePendant you receive an error code such as “Error
AAAB” you have selected a different style transmitter
in the PDA than you are attempting to program. Most
common cause is trying to program a 2-speed
telePendant with 3-speed selected or visa versa.
NOTE
TO PROGRAM OR READ DATA FROM
THE telePendant, THE TRANSMITTER
MUST BE TURNED ON AND IN BANK
FIVE (5).

Section 6 – Spare Parts
30 11/5/2003
telePendant TRANSMITTER
PART NUMBER DESCRIPTION
Call MAIN CIRCUIT BOARD 2- or 3-SPEED (Please contact Telemotive with Job
Number to assure exact replacement).
H1212-0 #4 x 3/8” SELF TAPPING SCREWS, PC BOARD MOUNTING (2)
H1147-0 NEOPRENE WASHER, PC BOARD MOUNTING (4)
H1976-0 STEEL FLAT WASHER, PC BOARD MOUNTING (2)
N10705-1 LABELS (AUXILIARY FUNCTION)
MP10620-0 SHOULDER STRAP
TCTX12P-0 MANUAL
FW3045-1 PDA PROGRAMMING SOFTWARE
MP10709-0 BELT LOOP ASSEMBLY
A10737-0 BATTERY DOOR ASSEMBLY
S1088-102 PUSH BUTTON SWITCH 2-SPEED ASSEMBLY (3)
S1088-103 PUSH BUTTON SWITCH 3-SPEED ASSEMBLY (3)
H1151-0 PUSH BUTTON SWITCH SCREWS (6)
S1085-0 MEMBRANE SWITCH PACK
WA1055-0 SWITCH RIBBON CABLE
A10743-0 TOP HOUSING ASSEMBLY
MP10734-0 TOP HOUSING ONLY
MP10735-0 BOTTOM HOUSING
H1240-0 HOUSING SCREWS (8)
MP10742-0 BOOTS/RING/LENS ASSEMBLY
MP10705-2 BATTERY, “AA” HOLDER ASSEMBLY
BT111-0 BATTERY, LITHIUM DISPOSABLE
BT111-1 BATTERY, RECHARGEABLE LITHIUM ION
A10723-0 BATTERY CHARGER, RECHARGEABLE LITHIUM ION FOR BT111-1
31 11/5/2003