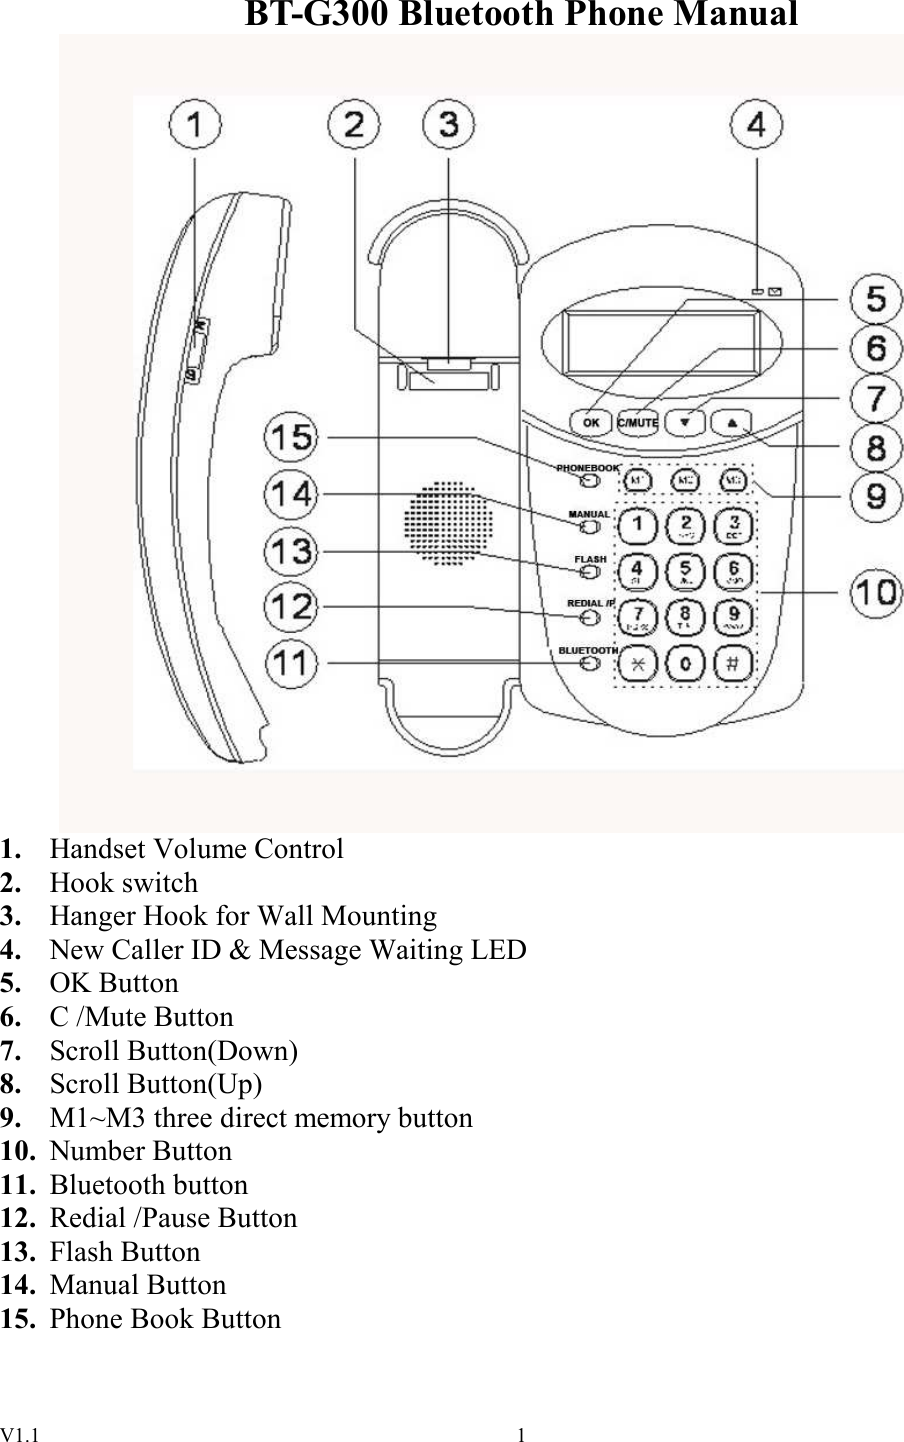
Telewell Electric BT-X300 BLUETOOTH PHONE User Manual

Telewell Electric Co., Ltd. BLUETOOTH PHONE

User manual

V1.1  1BT-G300 Bluetooth Phone Manual  1.  Handset Volume Control 2.  Hook switch 3.  Hanger Hook for Wall Mounting 4.  New Caller ID & Message Waiting LED 5.  OK Button 6.  C /Mute Button 7.  Scroll Button(Down) 8.  Scroll Button(Up) 9.  M1~M3 three direct memory button 10.  Number Button 11.  Bluetooth button 12.  Redial /Pause Button   13.  Flash Button 14.  Manual Button 15.  Phone Book Button
V1.1  2NOTE: The changes or modifications not expressly approved by the party responsible for compliance could void the user’s authority to operate the equipment.  To comply with the FCC RF exposure compliance requirements, this device and its antenna must not be co-located or operating to conjunction with any other antenna or transmitter.  This equipment has been tested and found to comply with the limits for a Class B Digital Device, pursuant to part 15 of the FCC Rules. These limits are designed to provide reasonable protection against harmful interference in a residential installation. This equipment generates, uses and can radiate radio frequency energy and, if not installed and used in accordance with the instruction, may cause harmful interference to radio communication. However, there is no grantee that interference will not occur in a particular installation. If this equipment dose cause harmful interference to radio or television reception, which can be determined by turning the equipment off and on , the user is encouraged to try to correct the interference by one or more of the following measures:  --Reorient or relocate the receiving antenna. --Increase the separation between the equipment and receiver. --Connect the equipment into an outlet on a circuit different from that to which the       receiver is connected. --Consult the dealer or an experienced radio/TV technician for help.
V1.1  3Installation HAC Volume Control (Hearing Aid Compatibility) HAC switch is specially designed for deaf person, HAC switch located in side of battery box at the bottom of telephone. Before turn it on please open the cover of battery box. To turn it on please set the switch to “H” position, and to turn it off please set the switch to “L” position!  Adapter To ensure that the memory and announcement message are retained during Adapter must be installed. If adapter not installed, the    symbol will be visible in the display.  Bluetooth key can be functioned when the adapter is connected.  Connection Once the Adapter have been installed: 1. Connect the curly cord to the handset and to the socket left side of the telephone. 2. Connect the telephone line cord to the socket on the back of the telephone and then to a telephone network wall socket. 3. A click will be heard when the modular plug is correctly in place. 4. Position the cables in the grooves underneath the telephone. 5. Lift the handset and listen for the dial tone.   Your telephone is now operational.  Wall Mounting 1. Press the wall mount adapter in the base and slide it toward the rear until it locks in place. 2. Secure two screws, vertically positioned 83 mm apart. 3. The screws should locate into the two ‘keyholes’ on the back of the telephone. 4. Remove the hanging peg (located by the hook switch) by pushing it upwards. 5. Rotate the hanging peg 180 degrees, and then replace it.  The Display In the standby mode (handset down, no dial tone) the display will show the time, total number of new phone calls and the total number of telephone numbers (30/60 maximum) that have been stored in the Caller ID memory. ※ Choose either 30 Caller ID with name or 60 Caller ID memory without name.
V1.1  4 Handset Volume Control The handset earpiece volume may be adjusted during a call, use switch on the handset right side to increase or decrease the volume.  Ringer On  the  right  side  of  the  telephone  there  are  switches  to  adjust  the  ringing  tone  and volume. There are three choices for ringer volume: high, low and off.  Setting the Time and Date 1. Press MANUAL, “MEMORY” will be displayed. 2. Scroll until “SETTINGS” is displayed using  /  Press   OK 3. “TIME/DATE” will be displayed. Press OK. 4.  The  hour  digits  will  now  flash.  Scroll  until  the  desired  hour  (24-hour  format)  is displayed using  / . Press   OK. 5. The minute digits will now flash. Scroll until the desired minutes are displayed using / . Press   OK. 6. The date digits will now flash. Scroll until the desired date is displayed using  / .  Press OK. 7.  The  month  digits  will  now  flash.  Scroll  until  the  desired  month  is  displayed  using / . Press   OK. 8. Confirm the programmed settings by pressing C.  Language The display messages can be shown more then one languages 1. Press MANUAL, “MEMORY” will be displayed. 2. Scroll until “SETTINGS” is displayed using  / . Press   OK. 3. Scroll until “LANGUAGE” is displayed using  / . Press OK. 4. Scroll until the desired language you require is shown using  / . Press OK. 5. Confirm the programmed settings by pressing C.
V1.1  5Operation  Mute Button The handset microphone can be disabled during a call by pressing C/MUTE.       Press C/MUTE once more to reactivate the microphone. The display will show “MUTE” for as long as the function is active.   Redial Button The five most recently Called numbers can redial using REDIAL/P button. 1. Press REDIAL/P repeatedly to scroll through the numbers. 2. Press OK, the selected number will now be dialed.  Flash Button Press the FLASH button flash followed by the extension number to transfer calls when connected to a PBX .Access to additional network services can be gained by using the FLASH button, Contact your network operator for more information.   Bluetooth Button Pairing When  Bluetooth  earphone  is  in  the  pairing  mode,  press  and hold    BLUETOOTH key over 2 seconds,the Red LED would be bright and then flash alternately. LCD show ”BT PAIRING…” . When the connected is made, LCD will show ”PAIRING OK”.   When the connection is failed, LCD show ”PAIRING FAIL”. Calling LCD  will  display  “CALLING”  when  press  the  key  of  Bluetooth,  you  may  make outgoing calls by pressing “connect” key on Bluetooth earphone. Using earphone Answering a call:   You will hear ringing tone through the hands free when there is an incoming call. You either press the“connect”button to accept the call. Bluetooth Dialing 1. Press the “BLUETOOTH” key, the LCD will display “CALLING...” meanwhile, you
V1.1  6will hear ringing sound from Bluetooth earphone.  Then  you  may  make  outgoing  calls  by  pressing  “CONNECT”  key  on  Bluetooth earphone while the LCD display “ ”. 2. Press Bluetooth earphone “last numbers redial” function key. You can make outgoing calls while the LCD display “ ”.  ※   Bluetooth key can be functioned when BT-G300 is plugged in.  Display Contrast There are 7 different settings being available for the displays contrast. 1. Press MENU. 2. Scroll using  /  until “SETTINGS” is displayed. Press OK. 3. Scroll using  / until “LCD” is displayed. Press OK. 4. Scroll using  /  to the display contrast required (1 light > 7 dark). 5. Confirm the programmed settings by pressing C.  Timer Approximately 6 seconds after dialing a timer will be shown on the display. The timer helps you keep track of how long the call lasts.  Explanation of Caller ID Caller ID allows you to see who is calling before you answer a call, and to see who has called  in  your  absence.  If  the  number  received  is  stored  in  the  phone  book,  that corresponding entry is shown as well. Numbers received are logged with date and time, and can easily be retrieved for review or dialing. The call log will store up to 30/60 telephone numbers.    New calls are indicated by the message waiting indicator light flashing and an envelope symbol in the display. The display will also indicate the number of calls both new and total  received.  The  indicator  and  the  envelope  will  stop  flashing  as  soon  as  the  new number(s) are reviewed. When the log is full, the oldest number will be deleted automatically, as a new call is logged.  Calls from the same telephone number will only be saved in one location. The symbols x 0-9 state the number of calls received from that particular telephone number.
V1.1  7 Please note! In  order  for  numbers  to  be  shown,  the  Caller  ID  service  must  be  provided  by  your network operator and  a  current subscription in place. Contact your operator for  more information.  Retrieving CID phone Numbers Press  /  to  review  phone  numbers  that  have  been  stored  in  the  CID  memory.  The telephone will automatically return to standby mode.  Dial a number from CID This function allows the telephone number currently shown on the display to be dialed. 1.  Scroll to the desired telephone number using  / . 2.  Pick up handset. 3. Press OK. The displayed telephone number will now be dialed.  Messages Besides  showing  telephone  numbers,  the  display  may  also  show  a  number  of  text messages. UNAVAILABLE  It  is  an  International  call  or  a  call  from  a  PBX  (no  information received) SECRET                      Information  on  the  number  is  blocked.  The  call  could  also  be from a PBX. MESS WAITING      Indicated when a message has been received to a message service   with your network operator. The message waiting light will flash,   and the number of calls will also be displayed.  Erasing Individual Numbers from CID 1. Scroll to the telephone number you wish to erase  / . 2. Press C. The display will show “ERASE ?” 3. Press C again to confirm.  Erasing ALL numbers from CID 1. Scroll to any telephone number in the CID list using  / . 2. Press and hold C until “ERASE ALL?” is displayed. 3. Press C again to confirm.
V1.1  8MANUAL Button MANUAL Description The telephone has an easy menu system with distinct display texts. The following buttons are used to operate the menu system:  MANUAL   Access menu system. /  Used to scroll through the menus. OK Confirms selected option, and/or moves forward one step. C        Used to erase or correct, and/or moves back one step.   The menu contains the following main headings:  MEMORY    Under this setting you can store, change or erase entries in the phone book, and the direct memory M1, M2,M3 number. SETTINGS  To program TIME/DATE, Least Cost Routing (LCR), Language and Area Code selections for display texts.  Memory M1,M2,M3 The telephone has 3 keys M1~M3 in addition to the numbers that can be stored in the Phonebook. A number stored in M1~M3 can be then dialed using fewer keystrokes.  Storing M1~M3 memory 1. Press MANUAL. “MEMORY” will be displayed. Press OK. 2. Scroll until “STORE M1 or M2 or M3” is displayed using /. Press OK. 3. Enter telephone number (up to 22 digits). Use C to erase or change. 4. Press OK. 5. Enter name. Press the corresponding number button until the first letter of the name being entered is displayed, (See table), the cursor will automatically move, repeat this until the name is entered. 6. Confirm the programmed settings by pressing OK.  Please note! Press PAUSE if you want a pause in the telephone number. In case of a number change, store the new number in the location of the old one following the procedure above.
V1.1  9Dial Using the M1~M3 Memory 1. Pick up handset 2. Press memory button. The stored telephone number will now be dialed.  Phone Book The  phone  book  will  store  20  names  and  phone  numbers,  this  allows  a  stored  phone number to be dialed using fewer button presses than if dialed manually. The phone book is organized alphabetically.  When the telephone is not in use the display will show VIP to indicate that a call has been received from a number stored in the phone book  Please note! If the phone book is full, an existing memory location will need to erased to allow a new number/name to be stored.  Each number key has been allocated certain letters. Some letters and special characters, e.g. A, and O, are stored in the memory even if they are not displayed on the buttons. Please see the table below.  Button       Letters/symbols 1................................... . , ? - ! & ‘ 1 2................................... A B C A Å Ä Æ 2 3................................... D E F 3 4................................... G H I 4 5................................... J K L 5 6................................... M N O Ö Ø 6 7................................... P Q R S 7 8................................... T U V 8 9................................... W X Y Z 9 0................................... [Space] 0 *.................................... * #................................... #   Storing Phone Book 1. Press MANUAL. “MEMORY” will be displayed. Press OK.
V1.1  102. The display will show “ADD NEW”. Press OK. 3. Enter telephone number (up to 22 digits). Use C to erase or change. 4. Press OK. 5. Enter name. Press the corresponding number button until the first letter of the name being entered is displayed, (See table on page 7), the cursor will automatically move, repeat this until the name is entered. 6. Confirm the programmed settings by pressing OK. 7. Repeat the above to enter further telephone numbers, or press PHONEBOOK twice to return to standby mode.  Please note! If  the  next  letter  is  not  on  the  same  button,  you  can  immediately  press  the  button containing the next letter, without waiting. Press PAUSE if you want a pause in the telephone number. If  case  of  a  number  change,  store  the  new  number  in  the  location  of  the  old  one  by following the procedure above.  Erasing Phone Book 1. Press PHONEBOOK. Memory location 01 is displayed. 2. Scroll to the desired memory location using /. 3. Press C. The display will show “ERASE ?” 4. Press C again to confirm. 5.  Repeat  the  above  to  erase  further  memories,  or  press  PHONEBOOK  to  return  to standby mode.  Dial Numbers from the Phone Book 1. Press PHONEBOOK. Memory location 01 is displayed. 2.  Scroll to the desired memory location using  / . 3.  Pick up handset. 4. Press OK. The displayed telephone number will now be dialed.  Least Cost Routing (LCR) Using Least Cost Routing (LCR) This  function  will  automatically  select  the  telephone  network  operator  of  choice.  The telephone  can  be  set  up  to  add  digits  to  and/or  replace  certain  digits  in  telephone numbers. To choose a certain network operator, you would normally dial a prefix code before the actual phone number. If you have chosen a certain LCR operator for international calls, in order to dial your calls using their service you must dial a prefix code before the country code, for example
V1.1  119502. You can program the LCR function so whenever you dial a number beginning with 00, the phone will automatically change this to 950200. For example: 0046 46 2805000 would automatically be dialed 950200 46 462805000.  Please note! In order to place your call with a certain operator you must be a registered subscriber. Only one LCR (Least Cost Routing) setting can be active at a time.  Setting LCR 1. Press MANUAL. 2. Scroll until “SETTINGS” is displayed using  / . Press OK. 3. Scroll until “LCR” is displayed using  / . Press OK. 4. Select either ON or OFF using  / . Press OK. 5. Enter the dialing sequence to be replaced (up to four digits, e. g. 00). If there is already a number entered here, erase it using c and press OK. 6. If you have entered less than four digits, press OK to move on. 7. Enter the new dialing sequence (up to eight digits, e. g. 950200). If there’s already a number entered here, it can be erased using C. 8. Confirm the programmed settings by pressing OK.  Automatic Network Prefix using LCR The LCR function can be used to insert a number/s in front of all telephone numbers. 1. Press MANUAL. 2. Scroll until “SETTINGS” is displayed using  / . Press OK. 3. Scroll until “LCR” is displayed using  / . Press OK. 4. Select either “ON” or “OFF” using  / . Press OK. 5. The left side of the display must be empty. If there’s already a number entered here, erase it using C. Press OK. 6. If you have entered less than four digits, press OK to move on. 7. Enter the new dialing sequence (up to eight digits, e. g. 9 or 09). If    there’s already a number entered here, it can be erased using C. 8. Confirm the programmed settings by pressing OK.  Area Code Setting (OPTION) Receiver call phone numbers will automatic delete the area code in callback the phone number. 1. Press MANUAL. 2. Scroll until “SETTINGS” is displayed using  / . Press OK. 3. Scroll until “AREA CODE” is displayed using  / . Press OK.
V1.1  124. Enter the “AREA CODE” number then Press OK. 5. Confirm the programmed settings by pressing C

Navigation menu