Telian TDM-3100 TDMA/AMPS Cellular & PCS Telephone User Manual revised manual
Telian Corporation TDMA/AMPS Cellular & PCS Telephone revised manual
Telian >
Contents
- 1. Users Manual
- 2. revised manual
revised manual

- 1 -
T
TR
RI
I-
-M
MO
OD
DE
E
T
TD
DM
MA
A
P
PH
HO
ON
NE
E
MODEL: TDM-3100
PRELIMINARY
Rev : 1.11
Dat
e: February 27, 2001
Telian Corporation
- 2 -
C o n t e n t s
1. SAFETY INFORMATION ...................................................................... 7
2. PREPARING YOUR PHONE FOR USE............................................. 11
2.1 Install the battery------------------------------------------------------------------------11
2.2 Remove the battery -------------------------------------------------------------------11
2.3 Charge the battery---------------------------------------------------------------------11
3. HIGHLIGHTS OF FEATURES.............................................................. 12
4. ABOUT THE PHONE............................................................................. 13
4.1 Name and function---------------------------------------------------------------------13
4.2 Key functions ------------------------------------------------------------------------------14
4.2.1 Selection keys..................................................................................... 14
4.2.2 Key.................................................................................................................... 14
4.2.3 Key.................................................................................................................... 14
4.2.4 0 ~ 9
wxyz
# Number keys ..........................................................14
4.2.5 Scroll keys...........................................................................................14
4.2.6 Volume keys .........................................................................................14
4.2.7 Using the selection keys.............................................................................14
4.2.8 Using the scroll keys...................................................................................... 14
4.3 About display indicators and icons------------------------------------------14
4.3.1 Start screen.......................................................................................................... 15
4.3.2 Scroll bar................................................................................................................ 15
4.4 Display messages----------------------------------------------------------------------15
4.4.1 No service.............................................................................................................15
4.4.2 Dialing......................................................................................................................15
4.4.3 Call Receive.........................................................................................................15
4.4.4 Wait for service.................................................................................................. 15
5. BASIC OPERATIONS............................................................................ 16

- 3 -
5.1 Switch the phone ON or OFF---------------------------------------------------16
5.2 Make a call ----------------------------------------------------------------------------------16
5.3 Answering a call-------------------------------------------------------------------------16
5.4 Adjusting the earpiece volume-------------------------------------------------16
5.5 Redial the last-dialed number --------------------------------------------------17
5.6 Use caller ID -------------------------------------------------------------------------------17
5.7 Keep calls private-----------------------------------------------------------------------17
6. USE PHONE MENUS............................................................................ 18
6.1 Navigate menus -------------------------------------------------------------------------18
6.1.1 Scroll through menus....................................................................................18
6.1.2 Use a shortcut....................................................................................................18
6.1.3 Exit menu levels................................................................................................18
6.2 List of shortcuts--------------------------------------------------------------------------18
7. ENTER LETTERS AND NUMBERS.................................................... 21
7.1 Enter letters---------------------------------------------------------------------------------21
7.1.1 Exit name...............................................................................................................21
7.1.2 Change from capital (uppercase) letters.........................................21
7.1.3 Use punctuation and special characters......................................... 21
7.2 Enter number------------------------------------------------------------------------------22
7.2.1 List of special characters............................................................................22
8. USE THE PHONE BOOK...................................................................... 23
8.1 About the phone book ---------------------------------------------------------------23
8.2 Use phone book menus------------------------------------------------------------23
8.3 Add names and numbers----------------------------------------------------------23
8.4 Change a stored telephone number ---------------------------------------24
8.5 Recall and redial numbers--------------------------------------------------------24
8.6 Erase stored names and numbers ------------------------------------------24
9. USE VOICE MAIL................................................................................... 25

- 4 -
9.1 Set up your voice mailbox---------------------------------------------------------25
10. WORK WITH THE CALL LOG........................................................... 26
10.1 Call the call log---------------------------------------------------------------------------26
10.1.1 Check missed calls......................................................................................... 26
10.1.2 Check previously dialed calls.................................................................. 27
10.1.3 Check received calls......................................................................................27
10.2 Check call timers------------------------------------------------------------------------27
11. USEADVANCED CALLING FEATURE............................................ 28
11.1 Set in-call options-----------------------------------------------------------------------28
11.2 Use call waiting---------------------------------------------------------------------------28
11.2.1 Store the call waiting feature code......................................................28
11.2.2 Activate call waiting........................................................................................28
11.2.3 Manage calls.......................................................................................................29
11.3 Use call forwarding--------------------------------------------------------------------29
11.3.1 Store the call forwarding feature code.............................................. 29
11.3.2 Activate call forwarding................................................................................29
11.4 Radial automatically-------------------------------------------------------------------30
11.5 Use a calling card-----------------------------------------------------------------------30
11.5.1 Save calling card information..................................................................30
11.5.2 Choose a calling card to use................................................................... 31
11.5.3 Make a calling card call...............................................................................31
12. Customize your phone ........................................................................ 32
12.1 What is a profile? -----------------------------------------------------------------------32
12.2 Customize a profile--------------------------------------------------------------------32
12.2.1 Set the ringer volume....................................................................................32
12.2.2 Set the ring tone...............................................................................................33
12.2.3 Set the message alert tone....................................................................... 33
12.2.4 Set ring style........................................................................................................33
12.2.5 Set a vibration ....................................................................................................34
12.2.6 Set warning and game tones................................................................... 34
12.2.7 Set keypad volume......................................................................................... 35

- 5 -
12.2.8 Set your phone to answer automatically.........................................35
12.3 Rename profiles -------------------------------------------------------------------------35
12.4 Restore defaults settings ----------------------------------------------------------36
12.5 Set the display language-----------------------------------------------------------36
12.6 Set and display the clock ----------------------------------------------------------36
12.6.1 Set the clock........................................................................................................36
12.7 Add a welcome note------------------------------------------------------------------36
13. Security.................................................................................................. 38
13.1 Lock the keypad-------------------------------------------------------------------------38
13.1.1 Active keyguard.................................................................................................38
13.1.2 Deactivate keyguard...................................................................................... 38
13.2 Restrict calls--------------------------------------------------------------------------------38
13.2.1 Restrict incoming calls..................................................................................38
13.2.2 Restrict outgoing calls..................................................................................39
14. Set network services features............................................................ 40
14.1 Set up how your phone selects a system ------------------------------40
14.2 Roaming--------------------------------------------------------------------------------------40
15. SEND AND RECEIVE TEXT MESSAGES...................................... 42
15.1 About writing messages------------------------------------------------------------42
15.1.1 Write with standard text input..................................................................42
15.2 Write and send a new text message---------------------------------------42
15.2.1 Save a message in the saved folder.................................................. 43
15.3 Receive a text message------------------------------------------------------------43
15.3.1 Read a text message....................................................................................43
15.4 When your phone’s memory is full------------------------------------------43
15.5 Delete a message----------------------------------------------------------------------43
16. Send and receive e-mail messages.................................................. 45
16.1 Send an e-mail message----------------------------------------------------------45
17. USE YOUR PERSONAL ASSISTANT ............................................. 46

- 6 -
17.1 Use the calendar------------------------------------------------------------------------46
17.1.1 View the calendar............................................................................................46
17.1.2 Add a calendar note....................................................................................... 46
17.1.3 View the day’s notes......................................................................................47
17.2 Alarm clock----------------------------------------------------------------------------------47
17.2.1 Set the alarm clock......................................................................................... 47
17.2.2 Turn off the alarm clock when it tings................................................48
17.2.3 Turn off the alarm clock altogether...................................................... 48
17.3 Calculator ------------------------------------------------------------------------------------48
17.3.1 Use the calculator............................................................................................ 48
18. GAMES.................................................................................................. 50
19. TECHNICAL INFORMATION ............................................................ 51
- 7 -
1. SAFETY INFORMATION
SAFETY INFORMATION FOR WIRELESS HANDHELD PHONES
WARNING! Please do not use your Audiovox wireless telephone if you may be
distracted from another activity (such as driving a motor vehicle or walking across
the street) and create a safety hazard to yourself and others. Use your wireless
telephone responsibly. Be alert to your surroundings whenever you operate your
wireless telephone.
For the safe and efficient operation of your phone, observe the following
guidelines:
EXPOSURE TO RADIO FREQUENCY SIGNALS
Your wireless handheld portable telephone is a low power radio transmitter and
receiver. When it is ON, it receives and also sends out radio frequency (RF)
signals.
In August 1996, the Federal Communications Commissions (FCC) adopted RF
exposure quidelines with safety levels for handheld wireless phones. Those
guidelines are consistent with the safety standards previously set by both U.S. and
international standards bodies:
ANSI C95.1 (1992)*
NCRP Report 86 (1986)*
ICNIRP (1996)*
*American National Standards Institute; National Council on Radiation Protection
and Measurements; International Commission on Non-Ionizing Radiation
Protection
Those standards were based on comprehensive and periodic evaluations of the
relevant scientific literature. For example, over 120 scientists, engineers, and
physicians from universities, government health agencies, and industry reviewed
the available body of research to develop the ANSI Standard (C95.1)
The design of your phone complies with the FCC guidelines ( and those
standards).
CAUTION! To comply FCC radio-frequency exposure requirements, this phone
must worn with the belt clip provided with the device. Use of
accessories/configurations not approved by the company may result in non-
compliance with FCC RF exposure limit, therefore should be avoided.
ANTENNA CARE
Use only the supplied or an approved replacement antenna. Unauthorized

- 8 -
antennas, modifications, or attachments could damage the phone and may violate
FCC regulations.
PHONE OPERATION
NORMAL POSITION: Hold the phone as you would any other telephone with the
antenna pointed up and over your shoulder.
TIPS ON EFFICIENT OPERATION:
For your phone to operate most efficiently:
• Extend your antenna fully.
• Do not touch the antenna unnecessarily when the phone is in use. Contact with
the antenna affects call quality and may cause the phone to operate at a higher
power level than otherwise needed.
DRIVING
Check the laws and regulations on the use of wireless telephones in the areas
where you drive. Always obey them. Also, if using your phone while driving,
please:
• Give full attention to driving—driving safely is your first responsibility;
• Use hands-free operation, if available;
• Pull off the road and park before making or answering a call if driving conditions
so require.
ELECTRONIC DEVICES
Most modern electronic equipment is shielded from RF signals. However, certain
electronic equipment may not be shielded against the RF signals from your
wireless phone.
Pacemakers
The Health Industry Manufacturers Association recommends that a minimum
separation of six (6”) inches be maintained between a handheld wireless phone
and a pacemaker to avoid potential interference with the pacemaker. These
recommendations are consistent with the independent research by and
recommendations of Wireless Technology Research.
Persons with pacemakers:
• Should ALWAYS keep the phone more than six inches from their pacemaker
when the phone is turned ON
• Should not carry the phone in a breast pocket

- 9 -
• Should use the ear opposite the pacemaker to minimize the potential for
interference
• If you have any reason to suspect that interference is taking place, turn your
phone OFF immediately.
Hearing Aids
Some digital wireless phone may interfere with some hearing aids. In the event of
such interference, you may want to consult your service provider (or call the
customer service line to discuss alternatives).
Other Medical Devices
If you use any other personal medical device, consult the manufacturer of your
device to determine if they are adequately shielded from external RF energy. Your
physician may be able to assist you in obtaining this information.
Turn your phone OFF in health care facilities when any regulations posted in these
areas instruct you to do so. Hospitals or health care facilities may be using
equipment that could be sensitive to external RF energy.
Vehicles
RF signals may affect improperly installed or inadequately shielded electronic
systems in motor vehicles. Check with the manufacturer or its representative
regarding your vehicle. You should also consult the manufacturer of any
equipment that has been added to your vehicle.
Posted Facilities
Turn your phone OFF in any facility where posted notices so require.
AIRCRAFT
FCC regulations prohibit using your phone while in the air.
Switch OFF your phone before boarding an aircraft.
BLASTING AREAS
To avoid interfering with blasting operations, turn your phone OFF when in a
- 10 -
“blasting area” or in areas posted: “Turn off two-way radio.” Obey all signs and
instructions.
POTENTIALLY EXPLOSIVE ATMOSPHERES
Turn your phone OFF when in any area with a potentially explosive atmosphere
and obey all signs and instructions. Sparks in such areas could cause an explosion
or fire resulting in bodily injury or even death.
Areas with a potentially explosive atmosphere are often but not always clearly
marked. They include fueling areas such as gasoline stations; below deck on
boats; fuel or chemical transfer or storage facilities; vehicles using liquefied
petroleum gas (such as propane or butane); areas where the air contains
chemicals or particles, such as grain, dust, or metal powders; and any other area
where you would normally be advised to turn off your vehicle engine.
FOR VEHICLES EQUIPPED WITH AN AIR BAG
An air bag inflates with great force. DO NOT place objects, including both installed
or portable wireless equipment, in the area over the air bag or in the air bag
deployment area. If in-vehicle wireless equipment is improperly installed and the
air bag inflates, serious injury could result.

- 11 -
2. PREPARING YOUR PHONE FOR USE
2.1 Install the battery
Simply place the battery in the grooves on the back of the phone. Then slide the
battery upward until clicks.
2.2 Remove the battery
Note: Switch the phone off before removing the battery!
Press and hold the button at the top of the battery.
Slide the battery toward the bottom of the phone.
Lift the battery off the phone.
2.3 Charge the battery
• Connect the lead from the charger to the bottom of the phone.
• Connect the charger to an AC wall outlet. The battery indicator bar starts to
scroll.
Note: If the battery is totally empty, it may take a few minutes before the
charging indication appears on the screen.
Tip: The phone can be used while charging if the phone is switched on.
Note: Disconnect your phone from the charger if the phone becomes hot during a
call.
• The battery is fully charged when the battery indicator bar stops scrolling, and
the Battery full text is briefly displayed if the phone is switched on. Charging
time depends on the charger and battery used.
• Disconnect the charger from the AC outlet and the phone.

- 12 -
3. HIGHLIGHTS OF FEATURES
Easy to read graphical display
Phone book (up to 200 names and numbers)
Easy to use keypad layout
Side keys for ringer mute and volume control
3 Ring tones and 5 Ring style selections
Adjustable ring volume
Vibrating alert (optional)
Quick access to the last 10 numbers dialed
Caller ID (last 50 numbers)
Games
Auto redial
Calculator
Clock with Alarm
Dialed, received, missed calls
Call restriction
Keypad lock
Call timer
Profile settings
Security PIN code
Short message service
Voice mail capability
2 different NAM
Multi-Languages (English, French, Spanish and Portuguese)
Earphone / microphone jack
- 13 -
4. ABOUT THE PHONE
This phone operates in digital mode within the 800 and 1900MHz frequency bands and
operates in analog mode within the 800 MHz range.
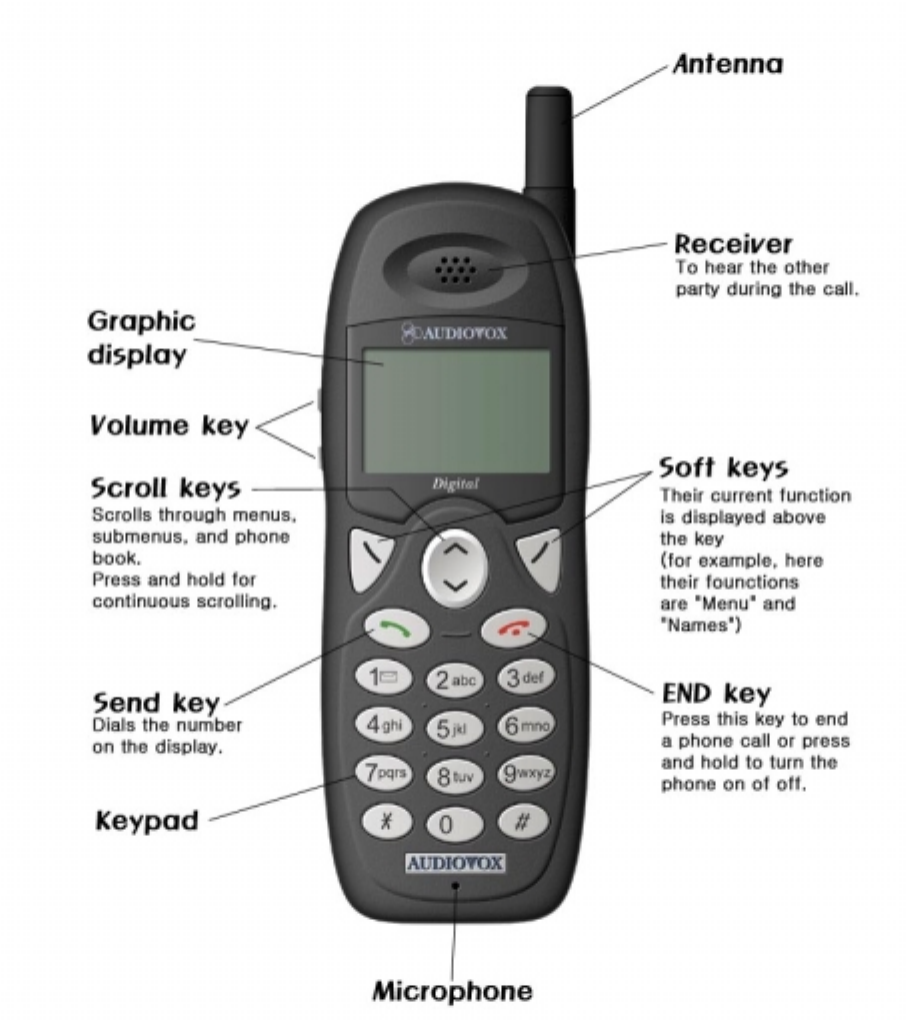
4.1 Name and function
- 14 -
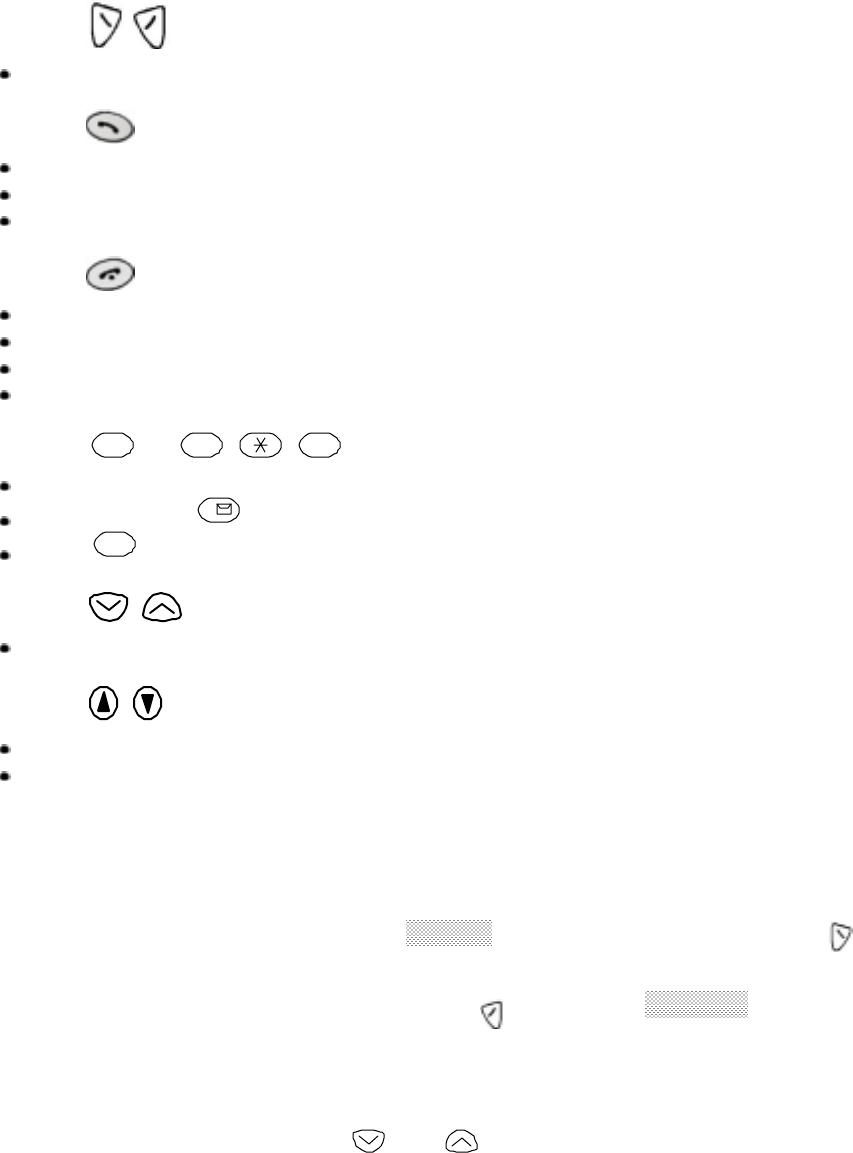
4.2 Key functions
4.2.1 Selection keys
Press to perform the function indicated by the text on the screen above the
key.
4.2.2 Key
Press to make a call to name / number shown on the screen.
Press to answer a call.
Press once to enter the list of last dialed numbers.
4.2.3 Key
Press and hold the key to switch the phone on or off.
Press to end a call.
Press to temporarily mute a call.
Press once to exit a function and to return to the start screen.
4.2.4 0 ~ 9
wxyz
# Number keys
Used for entering numbers and letters.
Press and hold 1 to call the voice mailbox.
Press # to toggle between upper case, lower case and numeric modes.
4.2.5 Scroll keys
Press to move through the phone’s menu or phone book.
4.2.6 Volume keys
Press to increase the earpiece volume during a call.
Press to decrease the earpiece volume during a call.
4.2.7 Using the selection keys
The functions of the selection keys depend on the guiding texts shown above
the keys.
For example, when there is the text
MENU
above the left selection key
, pressing this key enters the menu functions.
Similarly, pressing the right selection key under text
NAMES
has access
to phone book functions.
4.2.8 Using the scroll keys
The phone has two scroll keys, and , located just below the screen. The
scroll keys have up and down arrows on them, press these to move through
the phone’s menus and phone book.
4.3 About display indicators and icons
The display indicators and icons inform about the operation of the phone.
- 15 -
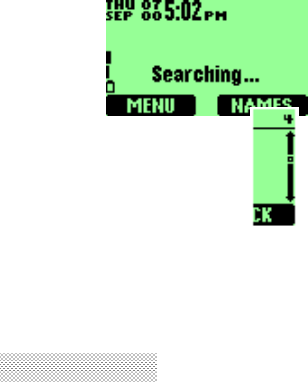
4.3.1 Start screen
The start screen displays when the phone is turned on.
Several features can be used only when the phone is at
the Start Screen.
4.3.2 Scroll bar
When you access the phone’s menu, there is a scroll bar at the far
right of the screen. This bar indicates user’s location in the menu:
each “tab” on the bar represents a different menu item.
4.4 Display messages
4.4.1 No service
If the phone is out side the wireless service area,
Νο Σερϖιχε
will display on
the display.
No calls can be made or received, including emergency calls.
4.4.2 Dialing
The phone is dialing the number shown in the display.
4.4.3 Call Receive
The phone is receiving a call.
4.4.4 Wait for service
The phone is waiting for service.

- 16 -
5. BASIC OPERATIONS
5.1 Switch the phone ON or OFF
Press and hold the key for two seconds to switch on the phone until the
phone sounds a beep.
Note: If the phone has the vibrate alert option activated, the phone will also
briefly vibrate.
To turn the phone off, press and hold key until the phone sounds a beep
and turns off.
5.2 Make a call
1 Hold the phone as you would any other telephone, with the earpiece over your
ear and the microphone near your mouth.
2 Deactivate the keyguard, if it is on.
3 Enter the phone number-including the area code-and press .
4 Press to end the call or to cancel the call attempt.
Note: It is normal for the phone to become hot during use. If the phone becomes
too hot, it automatically drops the current call and returns to the “start
screen”. Until the phone cools, user will be unable to receive or make calls.
5.3 Answering a call
To answer a phone call:
1 Press any key to answer the call. to answer the call
2 Press to end the call.
5.4 Adjusting the earpiece volume
You can adjust the earpiece volume (while in a call or at any time) by pressing the
volume keys on the upper left side of the phone.
Press the key up to increase the volume.
Press down to decrease the volume.

- 17 -
5.5 Redial the last-dialed number
To redial the last-dialed number on your phone:
Stored numbers may be up to recently dialed numbers. Stored numbers may be
up to 28 digits long.
1 If not there, return to the Start screen by pressing . Otherwise proceed to
step •.
2 Press two times.
5.6 Use caller ID
Caller ID is a network service that identifies incoming calls. Contact your service
provider to find out how to get this feature.
When Caller ID is active, your phone shows the caller’s phone number during an
incoming call, as long as this number is a part of your service provider’s wireless
network.
The wireless network lets you know if it doesn’t recognize the calling number. The
wireless network will also let you know if the calling party has blocked the Caller
ID feature.
If you have stored the name and number of the calling party in your phone book
and that number is supported by the wireless network, the caller’s name might
also appear.
5.7 Keep calls private
The Voice Privacy feature encrypts the voice channel so that people cannot
eavesdrop on your phone conversations.
Voice Privacy is a network service, so you must contact your service provider to
obtain access to the feature.
To turn on Voice Privacy:
1 Press
MENU
4
>
5
>
1
(
Σεττινγσ
>
Νετωορκ σερϖιχε
>
ςοιχε
πριϖαχψ
).
2 Press
ON
.
Repeat the steps above except, in step , press
OFF
.

- 18 -
6. USE PHONE MENUS
6.1 Navigate menus
A menu is a list of choices you can make. Your phone has 10 main menus. Each
main menu contains numerous submenus that allow you to use the phone book,
change the ringing tone, and so on. You can use menus and submenus two ways:
by scrolling or by using shortcuts.
6.1.1 Scroll through menus
1 Room the Start screen, press
Menu
, and then scroll through the menus
using the and keys.
2 Press
Options
,
SELECT
,
ENTER
, or
OK
, using the selection keys, at
the option you want.
3 Use the scroll and selection keys to navigate the submenus and to return to
the Start screen.
6.1.2 Use a shortcut
To get to options directly, without scrolling through lists, you can use a
shortcut.
6.1.3 Exit menu levels
• To return the previous menu level, press
BACK
or
EXIT
.
• To return to the Start screen, press .
No menu setting changes are saved.
6.2 List of shortcuts
Your phone’s menu may differ from the following list, depending on the network
services to which you have subscribed and the accessories you are using. If you
have any questions, call your service provider.
1. Phone book
1. Details
2. New
3. Delete
4. Speed Dial
2. Call Log
1. Missed
2. Received
3. Dialed
4. Timers
1. Last Call
- 19 -
2. Received
3. Dialed
4. Lifetime
3. Messages
1. Inbox
2. Outbox
3. New Text Msg
4. Use Template
5. Write E-mail
6. Voice Mail
1. Call Voicemail
2. Voicemail Num
4. Setting
1. Call Settings
1. Emergency Key 9
2. Calling Card
3. One-Touch Dial
4. Auto Redial
2. Phone Settings
1. Date and Time
2. Set Alarm Clock
3. Languages
4. Welcome
5. Backlight
6. Restore Defaults
7. Minute Reminder
3. Answer Settings
1. Auto Answer
2. Any Key Answer
4. Network Services
1. Voice Privacy
2. Call Forwarding
3. Call Waiting
4. Caller ID
5. Feature Settings
6. NAM Selection
5. Security Settings
1. Call Restriction
2. Access Codes
5. Profiles
1. General
1. Select
2. Customize (the following submenus appear in all profiles)
1. Volume
2. Ring Tone
3. Message Tone
4. Ring Style
5. Vibration
6. Warn&GameTon
7. Keypad Volume
3. Rename
2. Meeting
3. Outdoor
4. Silent
5. Custom
6. Car
- 20 -
6. System
1. Automatic
2. Manual
3. New Search
7. Calendar
8. Calculator
9. Games
1. Breakout
2. Snake
0. Keyguard
- 21 -
7. ENTER LETTERS AND NUMBERS
You can enter letters, as well as numbers, when storing information into your phone
by using your phone’s keypad. To enter letters, press the key associated with the
letter you wish to enter until it appears on the screen (numbers also appear).
7.1 Enter letters
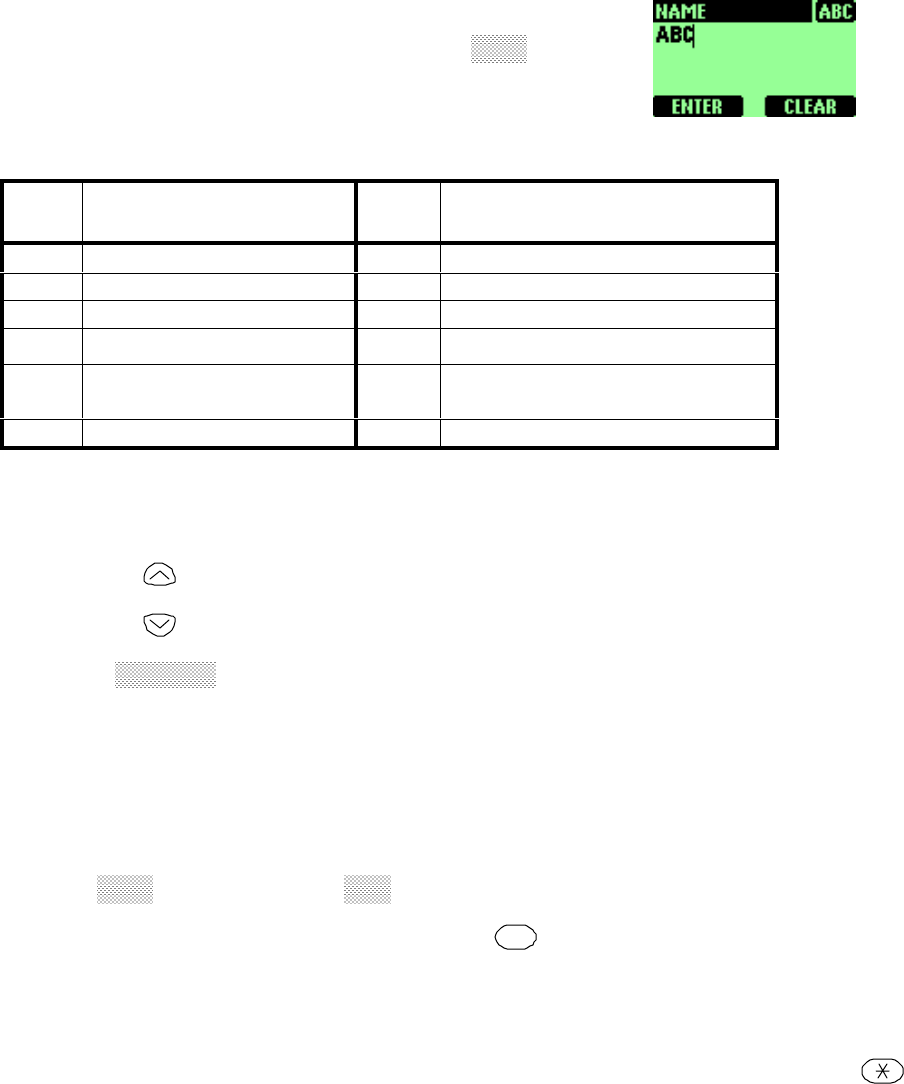
When you want to add new names or when you view
names in the phone book, your phone automatically
switches to the ABC mode and displays the
ΑΒΧ
icon.
• Press a key once or several times to enter the letter(s)
you want.
For example, press the 2 key three times to enter the letter C.
Key Characters Key Characters
11 , . ’ @ * # 7P Q R S 7
2A B C 2 8T U V 8
3D E F 3 9W X Y Z 9
4G H I 4 0Enters an empty space, 0
5J K L 5 *(symbols and special
characters)
6M N O 6 #Change letter case
7.1.1 Exit name
To edit a name in the phone book:
• Use the scroll key to move the cursor to the left.
• Use the scroll key to move the cursor to the right.
• Press
CLEAR
to correct any mistakes.
7.1.2 Change from capital (uppercase) letters
To switch between capital letters(uppercase) and lowercase letters:
• Press the <#> key.
• The
ΑΒΧ
icon switches to
αβχ
, indicating that you are using lowercase.
• To switch back to uppercase, press the # key again.
7.1.3 Use punctuation and special characters
When in ABC mode, you can enter special characters. To do so, press the
key. The following special characters appear:

- 22 -
. , ? ! : ; - + # * ( ) ‘ “ _ @ & $ % / < > =
• Press or to move to the character that you want to use and press
SELECT
.
Tip: If you want to access a special character that appears toward the end of
this list, press for quicker access.
7.2 Enter number
You use the 123 mode to enter numbers. When you’re in 123 mode, the screen
shows the
123
icon.
Note: You cannot enter special characters in 123 mode from the special characters
list.
7.2.1 List of special characters
* Use as bypass key.
+ Use to precede an international telephone number.

- 23 -
8. USE THE PHONE BOOK
8.1 About the phone book
Your phone includes a phone book that can store up to 200 names and associated
phone numbers. Stored numbers can be up to 21 digits long. Stored names can be
up to 12 characters long.
Make entries unique:
You cannot store identical names in your phone.
Example: You can’t have one entry for John Jones with a home number and
another entry for John Jones with a work number. You need to store the
names as, for example, John Jones Work and John Jones Home.
8.2 Use phone book menus
The phone book has several menus from which you can choose. These menus
appear when you press Names. Use the scroll keys to move to the menu you want
to use.
∆εταιλσ
Allows you to view details name and numbers.
Νεω
Allows you to enter new name and numbers.
Σπεεδ ∆ιαλ
Allows you to assign up to seven one-touch dial locations.
Ερασε
Allows you to erase only one name and number at a time.
8.3 Add names and numbers
4 Press
NAMES
.
5 Press
OPTIONS
.
6 Scroll to
Νεω
and press
SELECT
.
7 Using the keypad, enter the name. Use the <#> key to switch between upper
and lowercase letters.
8 Press
ENTER
.
9 Enter the phone number and press
ENTER
.
Shortcut:
You can also enter numbers by using a shortcut from the Start screen.
1 Enter a phone number and press
SAVE
.

- 24 -
2 Enter a name at
ΝΑΜΕ
.
3 Press
ENTER
.
8.4 Change a stored telephone number
You can change a number without changing its associated name.
1 Press
Names
.
2 Scroll to the name you want and press
OPTIONS
.
3 Scroll to
∆εταιλσ
, then press
SELECT
to view the number.
4 Press
OPTIONS
.
5 If
Εδιτ
is not highlighted, scroll to it and press
SELECT
.
6 Press
SELECT
.
The associated number appears.
7 Press
CLEAR
to erase one number at a time, or press and hold
CLEAR
to
erase all the numbers on the screen.
8 Enter the new number
9 Press
ENTER
to save the new number.
8.5 Recall and redial numbers
To recall and dial a number:
1 At the Start screen, press or to display the names and associated
numbers that are stored in your phone book.
2 Scroll to the appropriate name and press to dial the associated
number.
8.6 Erase stored names and numbers
Note: You cannot undo Erase functions, so be careful!
1 Recall the stored name.
2 Press
Options
.
3 Scroll to
∆ελετε
, then press
SELECT
.
The
ΧΟΝΦΙΡΜ
message appears.
4 Press
OK
to erase this name and associated number.

- 25 -
9. USE VOICE MAIL
Voice mail is a network services feature. Colleagues who miss you when they call
leave a voice message, which you can retrieve later.
9.1 Set up your voice mailbox
As part of your network’s voice mail feature, your service provider gives you a
voice mailbox phone number. Save this number in your phone to make getting our
voice messages quick and convenient.
1 Press
MENU
3
>
7
(
Messages
>
Voice mail Num
).
2 Enter your mailbox phone number.

- 26 -
10. WORK WITH THE CALL LOG
The call log keeps track of:
Missed calls
Numbers from which you’ve received calls
Numbers you’ve dialed
The amount of time you’ve spent on calls
10.1 Call the call log
Press
MENU
2
to access
Χαλλ Λογ
, then press
SELECT
.
The following submenus are available:
Missed
Received
Dialed
Timers
To select any of these options, press the
SELECT
key while the option is
displayed on the screen. The
Μισσεδ
,
∆ιαλεδ
, and
Ρεχειϖεδ
menu include the
following options (available when you press the
OPTIONS
key):
Χαλλ Νυµβερ
Allows you to view a number when an associated name
appears on the screen.
Σαϖε Νυµβερ
Allows you to save the displayed number into your phone book.
∆ελετε
Allows you to delete the displayed number from the call log.
10.1.1 Check missed calls
Your phone stores up to the last 23 numbers associated with calls you have
missed. When you miss a call(s), the message Missed calls appears on your
phone’s screen, along with the number of calls missed.
You are notified of missed calls only if your phone was turned on in the service
area from which the missed call originated.
To check missed calls:
1 Press
SELECT
.
The phone shows the numbers of the calls you missed.
2 Either scroll through the list using the or keys until you reach a
number that you want to dial and press , or press
BACK
to return to
the Start screen.
- 27 -
If you prefer, you can press
MENU
2
>
1
(
Χαλλ λογ
>
Μισσεδ
), then
scroll through the list of numbers.
Note: If you chose the
Φορωαρδ ιφ νοτ ανσωερεδ
if not answered option
in
Χαλλ Φορωαρδινγ
, then your phone treats these forwarded calls as
missed calls.
You can also access previously dialed numbers by pressing and then
quickly pressing or to scroll through the list.
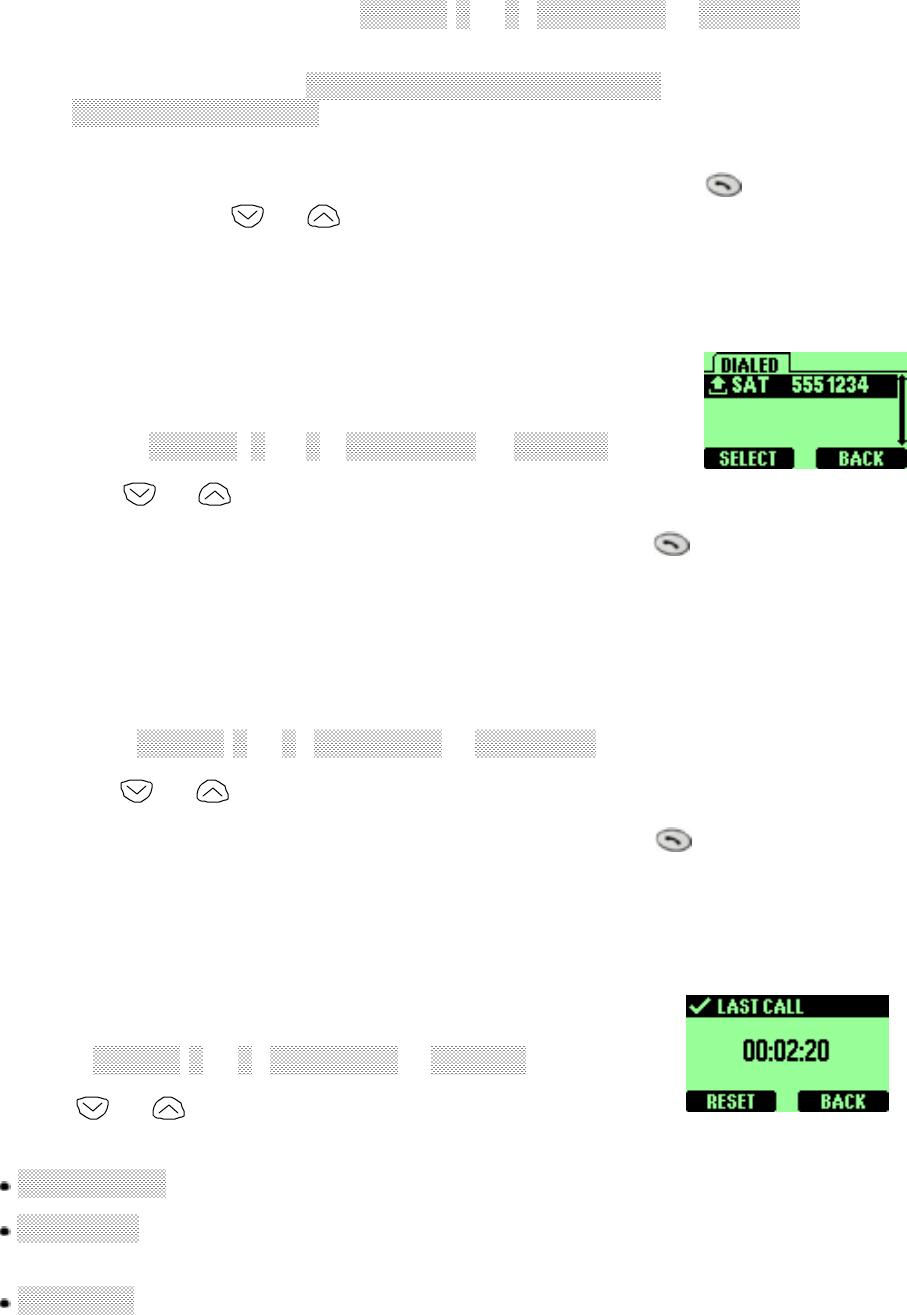
10.1.2 Check previously dialed calls
Your phone stores up to the last 10 numbers associated
with calls that you have dialed. To check this list of
numbers:
1 Press
MENU
2
>
3
(
Χαλλ λογ
>
∆ιαλεδ
).
2 Use or to scroll through the dialed numbers list.
3 When you reach the number you want to dial, press .
10.1.3 Check received calls
You phone stores up to the last 10 numbers associated with calls that you
have answered. To check this list of numbers:
1 Press
MENU
2
>
2
(
Χαλλ λογ
>
Ρεχειϖεδ
).
2 Use or to scroll through the list of received numbers.
3 When you reach the number you want to dial, press .
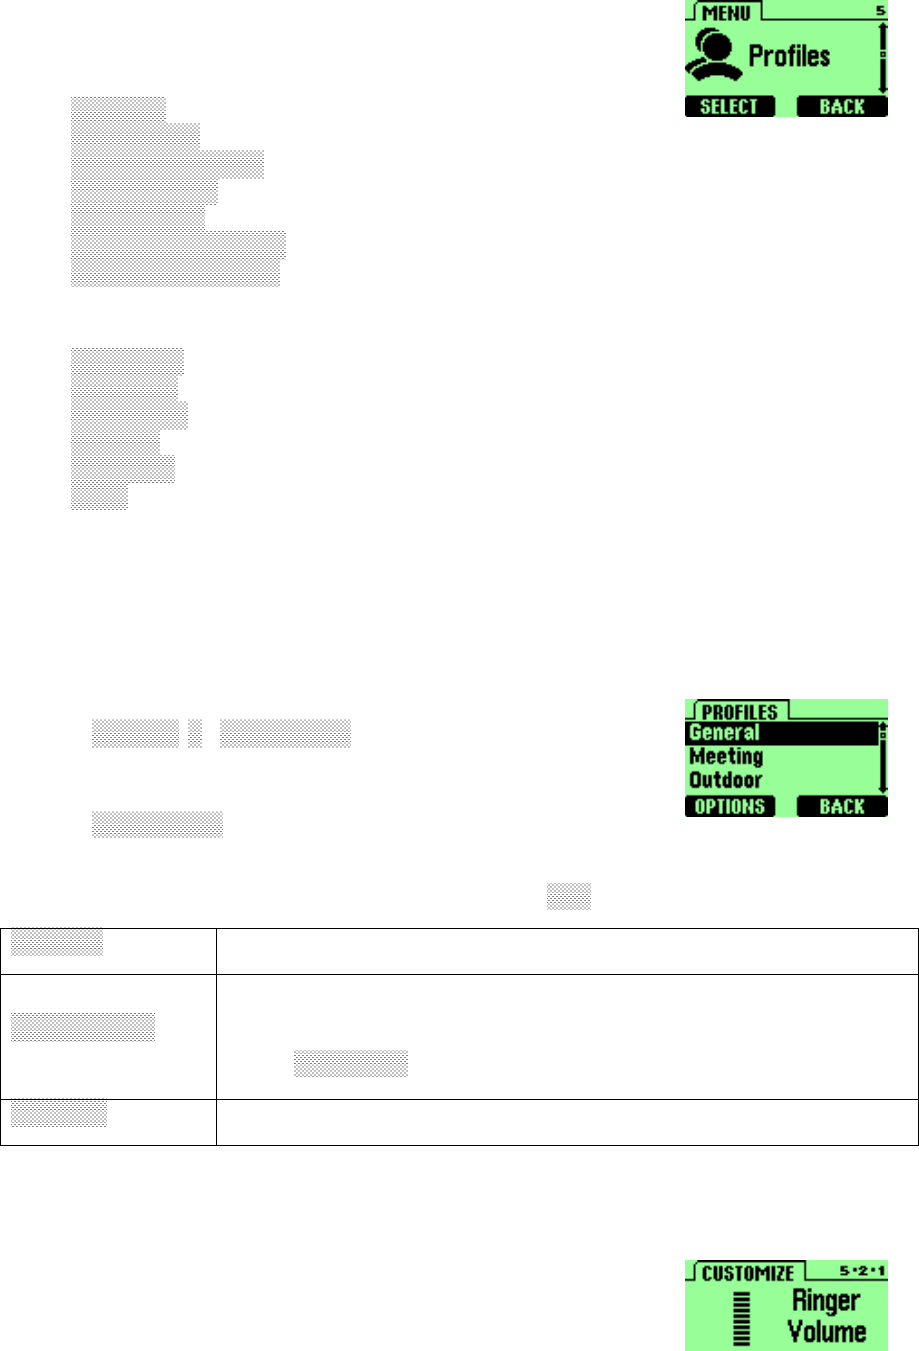
10.2 Check call timers
Your phone tracks the amount of time you spend on each
call. To obtain information about time spent on phone calls:
1 Press
MENU
2
>
4
(
Χαλλ λογ
>
Τιµερσ
).
2 Use or to scroll through the options described in
the following list:
Λαστ χαλλ
Shows the call duration of the last made call.
Ρεχειϖεδ
Shows the duration of all incoming calls since you reset the
timers.
Λιφετιµε
Shows the duration of all calls for the life of your phone. This
option cannot be reset.

- 28 -
11. USEADVANCED CALLING FEATURE
11.1 Set in-call options
Your phone allows you to use a number of features during a
call. These features are known as in-call options.
Note: Many in-call options are network services features.
To use these options, you must contact your service
provider.
You cannot use all these options at all times. This section tells you when you can
use a certain option.
1 To access an option during a call, press
OPTIONS
.
2 Choose from some or all of the following options:
∆ροπ
Allows you to end the call.
Μαιν Μενυ
Allows you to access the
MENU
.
11.2 Use call waiting
If you have call waiting, your phone beeps during a call to let you know that
someone else is calling you.
Depending on your caller ID setup, the phone might also display the number of
the incoming call.
Note: Call waiting may not be available in all wireless systems. Contact your
service provider for details and availability.
Before you can use call waiting, you must first store its feature code. Then you
must activate the call waiting feature.
11.2.1 Store the call waiting feature code
1 Press
MENU
4
>
4
>
5
(
Σεττινγσ
>
Νετωορκ σερϖιχεσ
>
Φεατυρε
σεττινγ
).
The
Φεατυρε χοδε
box appears.
2 Enter the feature code your service provider gave to you and press
OK
.
3 Scroll to
Χαλλ ωαιτινγ
and press
SELECT
.
4 Make sure that
Αχτιϖατε
is highlighted and press
OK
.
11.2.2 Activate call waiting
1 Press
MENU
4
>
4
>
3
(
Σεττινγσ
>
Νετωορκ σερϖιχεσ
>
Χαλλ

- 29 -
ωαιτινγ
).
2 Use or to scroll to
Αχτιϖατε
and press
SELECT
.
Your phone calls the network to confirm the feature code you entered. After
the network confirms the feature code, call waiting is activated.
11.2.3 Manage calls
Call waiting works with both local and long distance calls.
To answer an incoming call, press .
To switch from one call to another, press .
To end both calls, press .
11.3 Use call forwarding
Whit call forwarding, you can forward incoming calls to another number. This way,
if you are unable to receive calls on your phone, all calls going to that phone can
be forwarded to another phone. You never have to miss an important call.
Note: The call forwarding feature might not be available in all wireless.
11.3.1 Store the call forwarding feature code
1 Press
MENU
4
>
4
>
5
(
Σεττινγσ
>
Νετωορκ σερϖιχεσ
>
Χαλλ
φορωαρδινγ
).
The Feature code field appears.
2 Enter the feature code your service provider gave you and press
OK
.
3 Use or to scroll to
Χαλλ φορωαρδινγ
and press
SELECT
.
11.3.2 Activate call forwarding
1 Press
MENU
4
>
4
>
2
(
Σεττινγσ
>
Νετωορκ σερϖιχεσ
>
Χαλλ
φορωαρδινγ
).
2 Scroll to the desired call forwarding option, as described in the following
table, and press
SELECT
.
Αλλ Χαλλσ
Forwards all incoming calls.
Ιφ Βυσψ
Forwards calls only when you’re one your phone
and do not have voice mail.
Ιφ Νοτ Ανσωερεδ
Forwards calls if you don’t answer. This option is
handy if you want to give your phone to someone
for a short period of time, but you don’t want
them to answer the phone.
Χανχελ Αλλ Φωδ
Cancels all forwarding options that are currently
active.

- 30 -
3 Highlight
Αχτιϖατε
and press
SELECT
.
4 At the
Νυµβερ
field, enter the number to which you want your calls
forwarded.
5 Press
ENTER
.
Your phone calls the network to confirm the feature code that you entered in
MENU
4
>
4
>
5
. After the network confirms the feature code, call
forwarding is activated.
11.4 Radial automatically
Automatic redial enables your phone to continue trying to call a number that was
busy due to wireless network problems.
When you call a number and get a busy signal because of network problems, your
phone redials this number up to 3 times. If you want to stop this process prior to
the last attempt, press . This stops the automatic redialing.
Before you can use the Automatic Redial feature, you must activate it.
1 Press
MENU
4
>
1
>
4
> (
Σεττινγσ
>
Χαλλ Σεττινγσ
>
Αυτο Ρεδιαλ
).
2 Press
ON
.
11.5 Use a calling card
You can use a calling card when you dial long distance calls. First you must store
your calling card information in the phone. Your phone can store information about
a maximum of four calling cards.
11.5.1 Save calling card information
1 Press
MENU
4
>
1
>
2
(
Σεττινγσ
>
Χαλλ Σεττινγσ
>
Χαλλινγ
χαρδ
).
2 Scroll to the
Α
,
Β
,
Χ
, or
∆
calling card and press Options.
3 Scroll to
Εδιτ
and press
OK
.
4 Enter your
Σεχυριτψ χοδε
and press
OK
.
5 Press
SELECT
.
6 Use or to scroll through the list of dialing sequences, as described in
the following late.
Dialing sequence Use for cards that require you to Associated
cards
Access no.
+ phone no.
+ card no
Dial 1-800 access number, then phone
number, then card number (+ PIN if
required).
MCI,
Sprit Canada,
Unitel

- 31 -
Access no.
+ card no.
+ phone no.
Dial 1-800 access number, then card
number (+ PIN if required), then
phone number
Network MCI,
WorldPhone MCI,
AT&T
Prefix
+ phone no.
+ card no.
Dial the prefix (any numbers that
must precede the phone number) and
phone number you want to dial, then
card number )+ PIN, if required).
GTE, PacBell,
AT&T, Stentor
Calling cards shown here are frequently used with the dialing sequences
listed in the first column. However, this information might vary and it is
subject to change at the phone companies’ discreption.
7 Press
SELECT
.
11.5.2 Choose a calling card to use
If you have more than one calling card, you’ll need to choose one before
making a call.
1 Press
MENU
4
>
1
>
2
(
Σεττινγσ
>
Χαλλ Σεττινγσ
>
Χαλλινγ
χαρδ
).
2 Scroll to the desired card and press
OPTIONS
.
3 Press or to highlight
SELECT
and press
OK
.
The
Σεχυριτψ χοδε
field appears.
4 Enter your security code and press
OK
.
The message
Χαρδ ρεαδψ φορ υσε
appears.
11.5.3 Make a calling card call
To make a calling card call:
1 Enter the phone number, including any prefix (such as 0 or 1) your calling
card might require when you make a calling card call. See your calling card
for instructions.
2 Press and hold until your phone displays the message Card call, then
Wait for tone and press OK, and then Wait for tone and press OK
again.
3 When you hear the tone from your calling card service, press
OK
.
Note: This procedure might not apply to all the calling card options that
are programmed into your phone. Check the back of your calling card
for more information, or contact your long distance company.
- 32 -
12. Customize your phone
12.1 What is a profile?
A profile is a “set of settings” you can use to customize the
way your phone works. You can set your own preferences
for these items:
ςολυµε
Ρινγ Τονε
Μεσσαγε Τονε
Ρινγ Στψλε
ςιβρατιον
Ωαρν&ΓαµεΤον
Κεψπαδ ςολυµε
Your phone comes with seven profiles:
Γενεραλ
Μεετινγ
Ουτδοορ
Σιλεντ
Χυστοµ
Χαρ
You can customize any of the profiles. If at any time you want to return to the
original settings, you can do so.
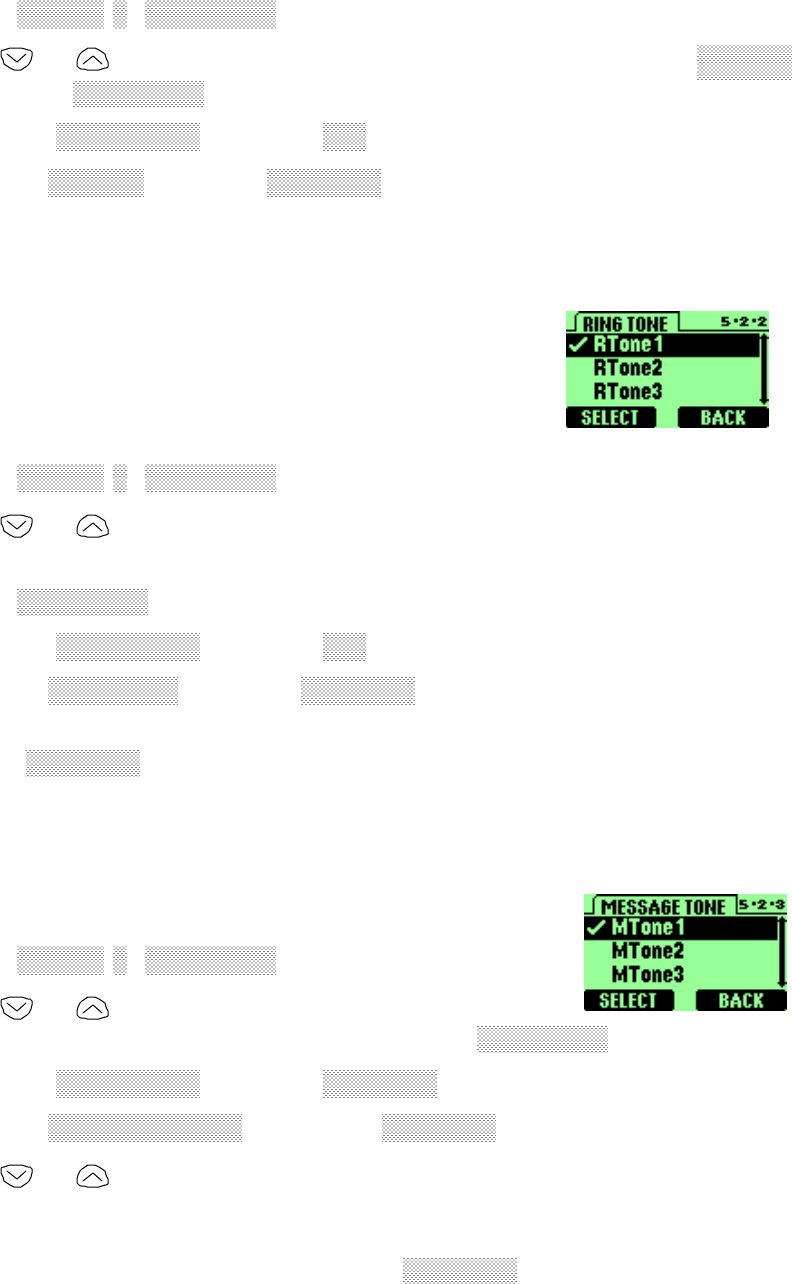
12.2 Customize a profile
1 Press
MENU
5
(
Προφιλεσ
).
2 Scroll to the desired profile in the list.
3 Press
OPTIONS
to view the options for the selected
profile.
4 Select one of the following options, then press
OK
.
Σελεχτ
Activates the currently highlighted profile.
Χυστοµιζε
Enables you to customize a profile by changing the current
settings.
Press
SELECT
to choose from several lists.
Ρεναµε
Enables you to rename the profile.
12.2.1 Set the ringer volume
You can set the default ringing volume for incoming voice calls and message
- 33 -
alert tones.
1 Press
MENU
5
(
Προφιλεσ
).
2 Use or to scroll to the profile for which you want to set the
ςολυµε
,
and press
OPTIONS
.
3 Highlight
Χυστοµιζε
and press
OK
.
4 Scroll to
ςολυµε
and press
SELECT
.
12.2.2 Set the ring tone
You can set your phone’s ring tone to a specific sound-
or tune-for incoming voice calls.
Note: If you have already chosen a ringing option of
either Silent or Beep once, the ring tones are already
turned off.
1 Press
MENU
5
(
Προφιλεσ
).
2 Use or to scroll to the profile for which you want to set the ringing
tones.
3 Press
OPTIONS
.
4 Highlight
Χυστοµιζε
and press
OK
.
5 Scroll to
Ρινγ Τονε
and press
SELECT
.
6 Scroll through the options, and, when you hear the tone you want to use,
press
SELECT
.
12.2.3 Set the message alert tone
You can set your phone to use a certain tone to indicate
an incoming text message.
1 Press
MENU
5
(
Προφιλεσ
).
2 Use or to scroll to the profile for which you
want to set the message alert tone, and press
OPTIONS
.
3 Highlight
Χυστοµιζε
and press
SELECT
.
4 Scroll to
Μεσσαγε Τονε
, then press
SELECT
.
5 Use or to scroll through your choices.
The phone plays samples of each choice as you scroll to it.
6 When you find the tone you want, press
SELECT
.
12.2.4 Set ring style

- 34 -
You can choose the tone that your phone uses to notify you of an incoming
call. This setting does not affect any incoming text message alert tones.
1 Press
MENU
5
(
Προφιλεσ
).
Your phone lists each profile.
2 Use or to scroll to the desired profile in the list for which you want
to set the
Ρινγ Στψλε
, and press
OPTIONS
.
3 Highlight
Χυστοµιζε
and press
OK
.
4 Scroll to
Ρινγ Στψλε
and press
SELECT
.
5 Scroll to one of the
Ρινγ Στψλε
, as described below, and press
SELECT
.
Ρινγ
The phone rings until it is answered.
Ρινγ Ασχενδινγ
Ringing volume increases (gets louder) if the phone
is not answered.
Ονε Ρινγ
The phone rings once to indicate an incoming call.
Ονε Βεεπ
The phone beeps once to indicate an incoming call.
Σιλεντ
The phone makes no sound.
12.2.5 Set a vibration
Instead of choosing to have our phone ring, you can have it vibrate to indicate
an incoming call.
1 Press
MENU
5
(
Προφιλεσ
).
2 Use or to scroll to the profile for which you want to set the
vibration, and press
OPTIONS
.
3 Highlight
Χυστοµιζε
and press
SELECT
.
4 Scroll to
ςιβρατιον
and press
SELECT
again.
5 Press the
SELECT
key to switch the
ON
or
OFF
.
The phone does not vibrate when it is connected to or placed in any changing
device.
12.2.6 Set warning and game tones
You can set warning tones and the tones used for the games in your phone.
Warning tones include the sounds your phone makes during error conditions,
during confirmations, when a battery is low, and when you need to recharge
the battery.
1 Press
MENU
5
(
Προφιλεσ
).
2 Use or to scroll to the profile for which you want to set the warning
tone, and press
OPTIONS
.

- 35 -
3 Highlight
Χυστοµιζε
and press
SELECT
.
4 Scroll to
Ωαρν&ΓαµεΤον
, then press
SELECT
.
5 Press the
SELECT
key to switch the
ON
or
OFF
.
If you do not want to use warning or game tones, you can turn them off by
switching to
OFF
.
12.2.7 Set keypad volume
Keypad volume set the volume of the tone you hear when you press your
phone’s keys.
1 Press
MENU
5
(
Προφιλεσ
).
2 Use or to scroll to the profile for which you want to set the keypad
volume, and press
OPTIONS
.
3 Highlight
Χυστοµιζε
and press
SELECT
.
4 Scroll to
Κεψπαδ ςολυµε
and press
SELECT
.
5 Use or to scroll to one of the levels and press
SELECT
.
If you chose the
Σιλεντ
profile in step •, the keypad volume are turned off.
12.2.8 Set your phone to answer automatically
You can set your phone to answer incoming voice calls after one ring. This
feature can be used only when your phone is connected to a headset or to an
approved handsfree car kit that is equipped with the ignition sense option,
with the ignition on.
1 Press
MENU
4
>
3
>
1
(
Σεττινγσ
>
Ανσωερ Σεττινγσ
>
Αυτο
Ανσωερ
).
2 Scroll to
Αυτο Ανσωερ
and press
SELECT
.
3 Use or to scroll to the phone setting for which you want to set your
phone to answer automatically, and press
SELECT
.
12.3 Rename profiles
1 Press
MENU
5
(
Προφιλεσ
).
2 Use or to scroll to the desired profile and press
OPTIONS
.
3 Scroll to
Ρεναµε
and press
SELECT
.
4 Enter the new name and press
OK
again.
- 36 -
12.4 Restore defaults settings
You can change the default settings for your phone. Later, you can return them to
the original settings when needed.
Note: The memory, timers, language selection, security code, and lock code are
not reset. However, any profiles you have modified are reset when you restore our
settings.
1 Press
MENU
4
>
2
>
6
(
Σεττινγσ
>
Πηονε Σεττινγσ
>
Ρεστορε
∆εφαυλτσ
).
2 Press
OK
.
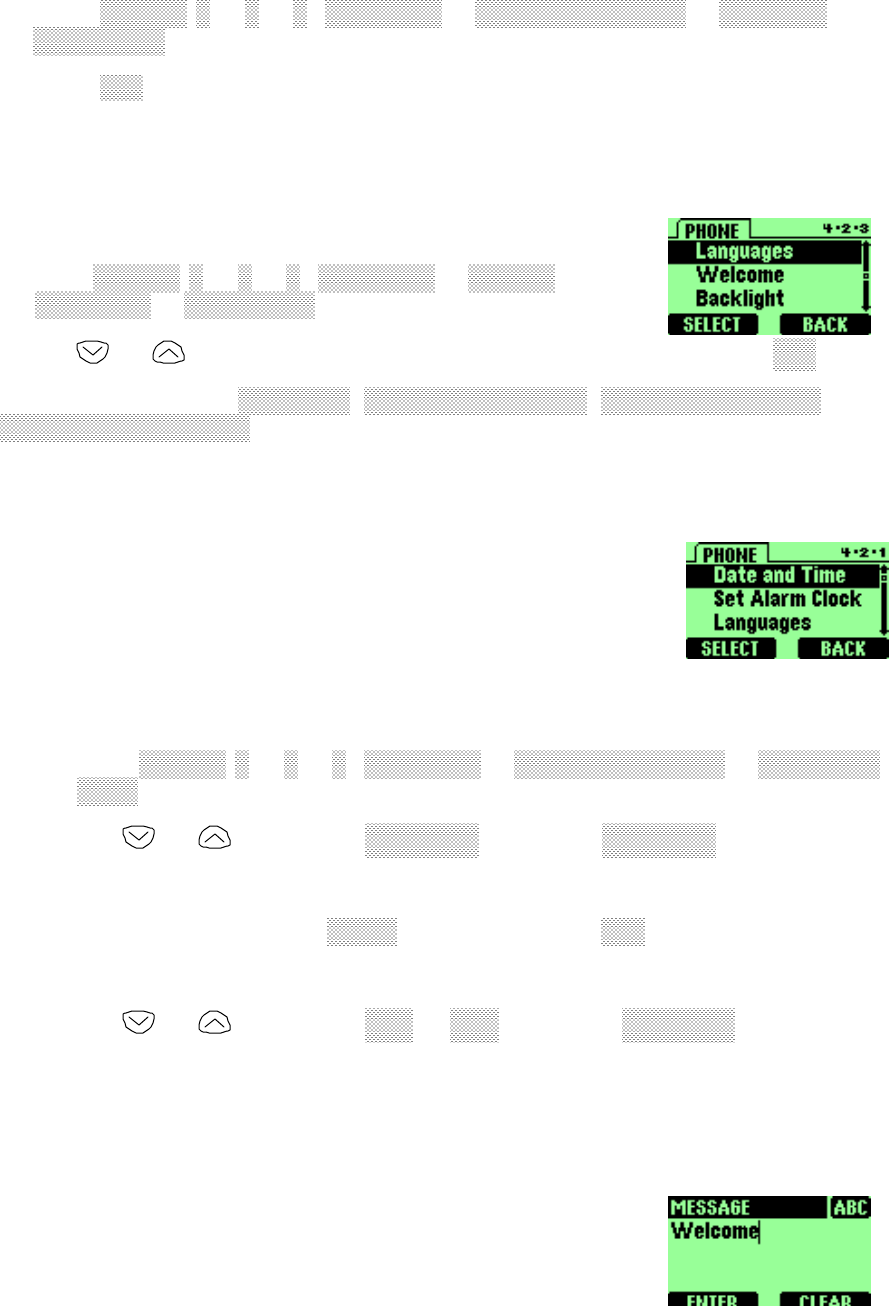
12.5 Set the display language
You can set your phone to display a certain language.
1 Press
MENU
4
>
2
>
3
(
Σεττινγσ
>
Πηονε
Σεττινγσ
>
Λανγυαγε
).
2 Use or to scroll to the language you want to use and press
OK
.
You can choose from
Ενγλιση
,
Μεξιχο Σπανιση
,
Χαναδα Φρενχη
and
Βραζιλ Πορτυγεσε
.
12.6 Set and display the clock
Your phone has an internal clock that you can set to appear
on the phone’s screen. The clock is connected to an alarm
clock.
12.6.1 Set the clock
To set the clock to the appropriate time:
1 Press
MENU
4
>
2
>
1
(
Σεττινγσ
>
Πηονε Σεττινγσ
>
∆ατε ανδ
Τιµε
).
2 Use or to scroll to
Σετ Τιµε
and press
SELECT
.
The Time field appears.
3 Enter the time using a
ξξ:ξξ
format and press
OK
.
For example, to set your clock to 9:30, enter 09:30.
4 Use or to scroll to
ΑΜ
or
ΠΜ
and press
SELECT
.
12.7 Add a welcome note
You can set your phone to display a welcome note each

- 37 -
time you switch on your phone. This note could say, for example: Hello. It could
include your name, a reminder, or more. The maximum length of this note 20
characters.
1 Press
MENU
4
>
2
>
4
(
Σεττινγσ
>
Πηονε Σεττινγσ
>
Ωελχοµε
).
2 Enter the text of the welcome note.
As you enter characters, they appear to the left of the cursor. Press
CLEAR
to delete characters to the left of the cursor. Press or to move the
cursor right or left.
3 Press
ENTER
.

- 38 -
13. Security
Your phone is equipped with a versatile security system that prevents the
unauthorized use of the phone.
You cannot activate or use certain phone features without having first successfully
entered your phone’s security code.
When entering our security code, a * appears on the screen each time you press a
number key. This prevents others from seeing your code.
If you incorrectly enter a security code five times in a row, your phone won’t accept
any entries for the next 5 minutes. However, if you realize that you’ve entered the
code incorrectly before pressing
OK
, you can use
CLEAR
to erase the code, digit by
digit, beginning with the last digit.
When this guide describes an action that requires the entry of your security code,
each step necessary to this action is provided.
13.1 Lock the keypad
When you lock the keypad, you prevent accidental key
presses•for example, when your phone is in a pocket or
purse. This feature is called keyguard.
13.1.1 Active keyguard
There are three different ways to activate the keyguard:
At the Start screen:
Press
MENU
0
(
Κεψγυαρδ
).
13.1.2 Deactivate keyguard
1 Press
UNLOCK
.
2 Press .
13.2 Restrict calls
You can restrict incoming and outgoing calls. To restrict outgoing calls, you create a
list of restrictions and apply the appropriate restriction.
Before you define restrictions for outgoing calls, only one restriction option is
available:
13.2.1 Restrict incoming calls
To restrict incoming calls:

- 39 -
1 Press
MENU
4
>
5
>
1
(
Σεττινγσ
>
Σεχυριτψ Σεττινγσ
>
Χαλλ
Ρεστριχτιον
).
2 Use or to scroll to
Ινχοµινγ
and press
SELECT
.
3 Highlight
Αχτιϖατε
and press
SELECT
.
4 Enter your security code and press
ENTER
.
13.2.2 Restrict outgoing calls
1 Press
MENU
4
>
5
>
1
(
Σεττινγσ
>
Σεχυριτψ Σεττινγσ
>
Χαλλ
Ρεστριχτιον
).
2 Use or to scroll to
Ουτγοινγ
and press
SELECT
.
3 Highlight
Αχτιϖατε
and press
SELECT
.
4 Enter your security code and press
ENTER
.

- 40 -
14. Set network services features
The following network services can be obtained from your service provider:
Voice privacy
Call waiting
Call forwarding
When you subscribe to any of these services, your service provider gives you a feature
code that activates each service. Deactivation codes are used to deactivate each
service.
After you store the appropriate code in your phone, the code is sent to the network to
verify that you’re using the correct feature code. The voice privacy feature does not
require you to store a feature code before using it.
After you store a feature code, the respective service appears as a menu option on
your phone’s screen. You can use these menus to activate and deactivate the network
services.
14.1 Set up how your phone selects a system
Your phone is capable of working in residential, private, and public systems (such
as your home system). You can choose how your phone selects a network to use.
1 Press
MENU
6
.
You see the following three options:
Αυτοµατιχ
: Your phone automatically searches for available networks and
chooses the appropriate one. Every time you turn on your phone, it resets to
Αυτοµατιχ
.
Μανυαλ
: The phone searches for networks and then displays a listing of all
of the possible networks on your phone’s screen. Next to each network, one of
the following appears:
Αϖαιλαβλε
or
Νοτ αϖαιλαβλε
. If a network is
designated as
Νοτ αϖαιλαβλε
, you cannot use it.
Νεω Σεαρχη
: Your phone begins a new search for both private and
residential systems. When it finds the best system available, your phone
displays it on its screen. You can then select this system or start another
search by pressing
Νεξτ
.
2 Use or to scroll through the choices, and press
SELECT
when you see
the one you want.
14.2 Roaming
The term roaming is used to indicate when your phone is not in its home area.
Calls made or received while you are roaming are usually more expensive than
calls made in your home area.
- 41 -
While roaming in some systems outside your home area, your phone may not be
recognized by the host system, which is the system in which you’re traveling. You
may not be able to place a call.
Contact your service provider for more specific information on how roaming works
with your phone and for information about coverage limitations.
- 42 -
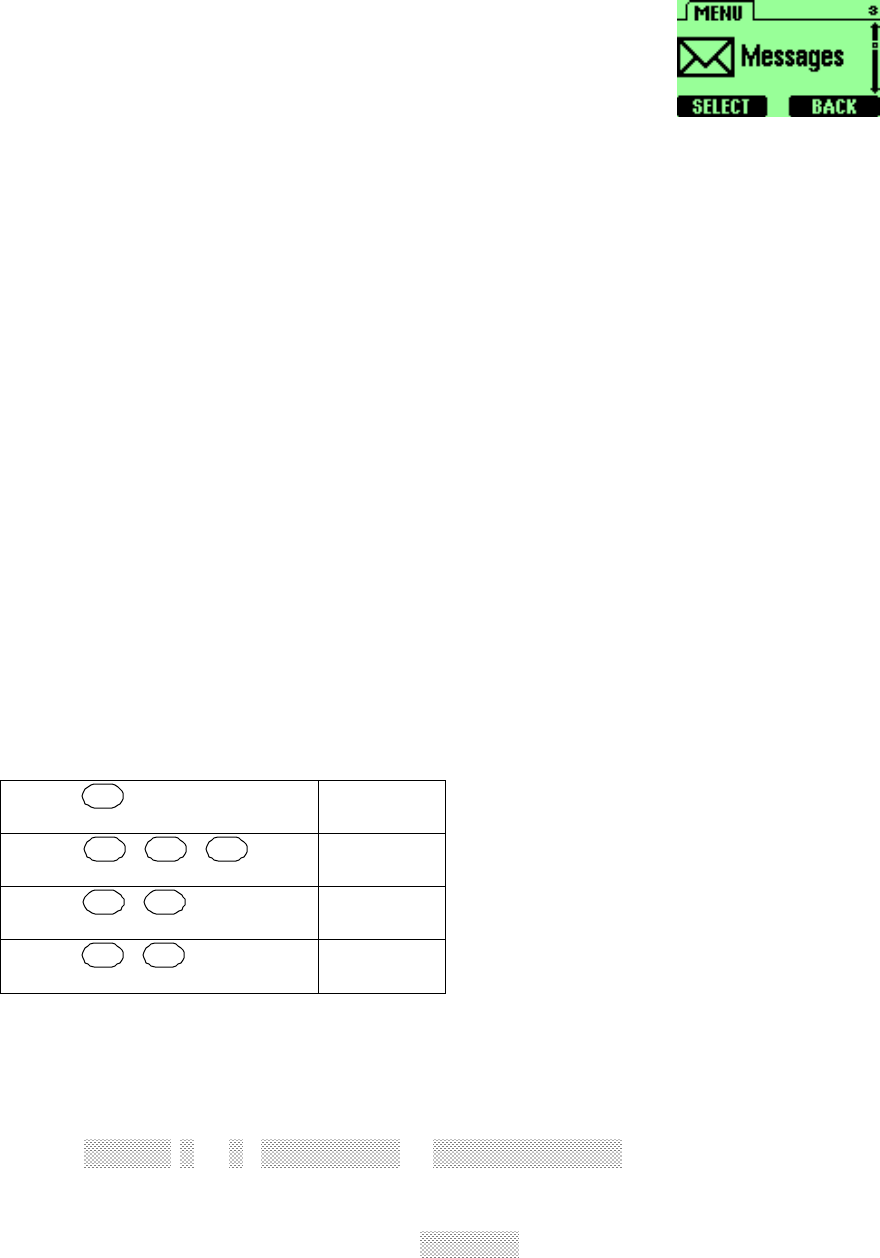
15. SEND AND RECEIVE TEXT
MESSAGES
With the text message network service, you can send and
receive short text message. You can also send and receive
messages that contain a person’s name and/or number (a
“business card”).
To get your messages, other phones must have text message
capability. Or, you can ask the service provider to convert the message to other
formats, such as e-mail.
The maximum length of a received text message is 160 characters. Your phone has
space for up to 80 text messages, depending on the length of each message.
Note: The maximum length of a text message differs, depending on the capabilities of
the network from which it originated. Also, text messages may appear different at
different times because messages can originate in networks other than your own.
Contact your service provider for more information about this feature.
15.1 About writing messages
15.1.1 Write with standard text input
Standard text input is the default mode for text entry. The ABC icon ABC appears
as visual confirmation.
1 Find the key that is below the letter you want to enter.
2 Press it as many times as needed for letter to appear on the screen.
For example, to enter the name John:
Press 5jkl J
Press 6mno 6mno 6mno O
Press 4ghi 4ghi H
Press 6mno 6mno N
15.2 Write and send a new text message
1 Press
MENU
3
>
3
(
Μεσσαγεσ
>
Νεω Τεξτ Μσγ
).
2 Enter a message of up to 160 characters.
3 When you’ve finished writing, press
ENTER
.

- 43 -
4 Enter or recall the recipient’s phone number, then
ENTER
.
When the message is successfully sent,
Μεσσαγε σεντ
appears.
If you need to exit while writing the message, press at any time.
15.2.1 Save a message in the saved folder
When writing a text message, it’s a good idea to save it in the saved folder.
Then if there is a message delivery problem, you can easily resend the
message.
1 While writing the message, press
ENTER
.
2 Scroll to
SAVE
, then press
SELECT
.
15.3 Receive a text message
When you receive a text message, the phone sounds a message alert tone and the
text message icon appears, along with one of the following messages:
Νεω Μεσσαγε
: Indicates that you have an unread message or page. If you
have more than one message or page, the appropriate number is listed f\before
this message
15.3.1 Read a text message
1 Press
READ
.
2 Scroll to the message, then press
OPTIONS
.
3 Scroll to the Details, and press
SELECT
.
4 Press
OPTIONS
for a list of choices you have while reading the message.
5 Press
SELECT
when the option you want is highlighted.
15.4 When your phone’s memory is full
When your phone’s message memory is full, one or more messages of the lowest
priority are automatically deleted. These messages are usually delete from your
phone’s outbox.
If after deleting messages the memory is still full, your phone shows the message
icon appear.
15.5 Delete a message
1 While reading a message, press
OPTIONS
.
2 Scroll
∆ελετε
, then press
SELECT
.

- 44 -
Your phone asks you to confirm that you want to delete the message.
3 Press
OK
.

- 45 -
16. Send and receive e-mail messages
You can use your phone to send and receive e-mail messages. This means you no
longer need to be at your computer to send or receive messages.
16.1 Send an e-mail message
1 At the Start screen, press
MENU
and then, at
Μεσσαγεσ
, press
SELECT
.
Scroll to
Ωριτε Ε−µαιλ
, and press
SELECT
.
2 Enter the e-mail address.
If you enter the e-mail address, press
ENTER
when you’ve finished.
The
Συβϕεχτ:
opens.
3 Enter a subject and press
ENTER
.
4 When the message contents screen appears, enter your message.
5 When you’ve finished the message, press
ENTER
, select
Send and Discard
or
Send and Save
, and press
ENTER
.
A status message tells you the mail is being sent.
Other options for a completed message:
Σαϖε
Save the message in the saved folder until you send it.

- 46 -
17. USE YOUR PERSONAL ASSISTANT
Your phone can be your personal assistant. It can wake you up in the morning and
remind you of meetings, birthdays, and tasks. You can check the current time,
calculate a tip at dinner, and convert currencies.
With a calendar, clock, alarm clock, and phone book, you have everything you need to
keep track of your life.
17.1 Use the calendar
The calendar application allows you to enter appointments
and reminders into the phone.
You phone must be switched on for the calendar to work. Do
not switch on the phone, however, where wireless phone use
is prohibited or where the use of the phone could cause
interference or danger.
17.1.1 View the calendar
1 Press
MENU
>
7
(
Χαλενδαρ
).
Today’s day and date appear.
17.1.2 Add a calendar note
This option enables you to add a note. You can also set an alarm for any
calendar note.
1 Go to the day you want, then press
SELECT
.
The list of note appears.
2 Press
ADD
.
The
ΝΟΤΕ:
field appears.
3 Enter the information and press
ENTER
.
The current date appears.
If you do not want to change the date, just press
OK
.
The
Τιµε:
field appears.
If you want to change the date for this note, do so and press
OK
.
4 Enter the time when you need to make this call using the hh:mm format
and press
OK
. Select
ΑΜ
or
ΠΜ
and press
SELECT
.
5 Select either
Νο Αλαρµ
or
Σετ Αλαρµ
and press
SELECT
.
If you don’t want to set an alarm, select
Νο Αλαρµ
.

- 47 -
If you select
Σετ Αλαρµ
, the alarm date field appears.
6 Enter the date on which you want the alarm to sound and press
OK
.
The alarm time field appears.
7 Enter the time at which you want the alarm to sound using the hh:mm
format and press
OK
.
8 Select either
ΑΜ
or
ΠΜ
and press
SELECT
.
17.1.3 View the day’s notes
You can review notes you’ve written for certain days.
1 To review notes for a certain day, open the calendar and scroll to the day
you want.
2 Press
SELECT
, scroll to note list and press
SELECT
.
The following options are available:
Details
Add Entry
Edit Entry
Delete Entry
Delete All For Day
Delete All Entries
17.2 Alarm clock
You can set the alarm clock to ring at any time. The alarm
clock’s volume is determined by the current ringing volume
and tone settings.
If you have selected the
Σιλεντ
or
Ονε Βεεπ
ringing tone,
then your alarm clock quietly beeps once.
17.2.1 Set the alarm clock
1 Press
MENU
4
>
2
>
2
(
Σεττινγσ
>
Πηονε σεττινγσ
>
Σετ Αλαρµ
Χλοχκ
).
The Set alarm clock message appears.
2 Enter the time for which you want to set the alarm using the hh:mm format
and press
OK
.
Any existing numbers are replaced with the newly entered numbers.
- 48 -
3 Select either
ΑΜ
or
ΠΜ
and press
SELECT
.
17.2.2 Turn off the alarm clock when it tings
When the alarm clock rings:
Press
STOP
to turn it off.
17.2.3 Turn off the alarm clock altogether
If you decide that you don’t want the alarm to ever go off, you can turn it
completely off.
1 Press
MENU
4
>
2
>
2
(
Σεττινγσ
>
Πηονε σεττινγσ
>
Σετ Αλαρµ
Χλοχκ
).
2 Press
OFF
.
If you have selected the
Σιλεντ
or
Μεετινγ
profile, your alarm beeps only
once. The best profile to use when using the alarm clock is
Γενεραλ
or
Ουτδοορ
, unless these profiles have been modified from their original
settings.
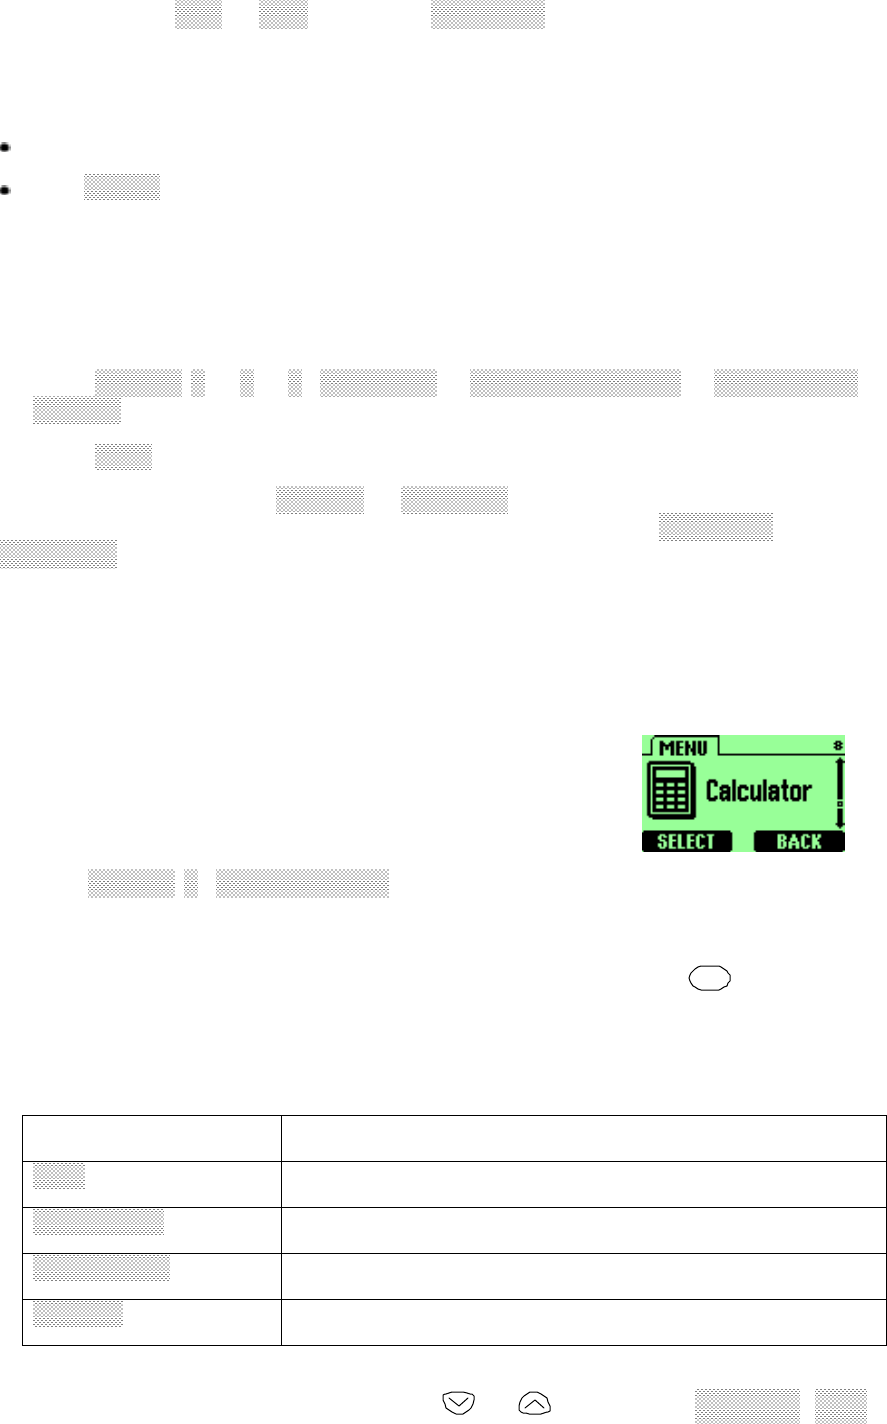
17.3 Calculator
Your phone’s calculator adds, subtracts, multiplies, divides,
and converts currencies.
17.3.1 Use the calculator
• Press
MENU
8
(
Χαλχυλατορ
).
• Enter the first number in the calculation.
If you need to enter a number with a decimal point, press # to indicate
it.
• Then, based on the type of calculation that you need to perform, use one of
the following actions:
If you want to… Then…
Αδδ
Press * (for + symbol)
Συβτραχτ
Press ** twice (for – symbol)
Μυλτιπλψ
Press *** (for * symbol)
∆ιϖιδε
Press **** (for / symbol)
Or, you can press Options, then use or to scroll to:
Εθυαλσ
,
Αδδ
,

- 49 -
Συβτραχτ
,
Μυλτιπλψ
,
∆ιϖιδε
, or
Εξιτ
. Then press
SELECT
.
• Enter the second number in the calculation and press
Options
.
• Use or to scroll to
Εθυαλσ
and press
SELECT
.
Note: Repeat steps • and • as many times as necessary.
Press
Clear
to erase any mistakes.
- 50 -
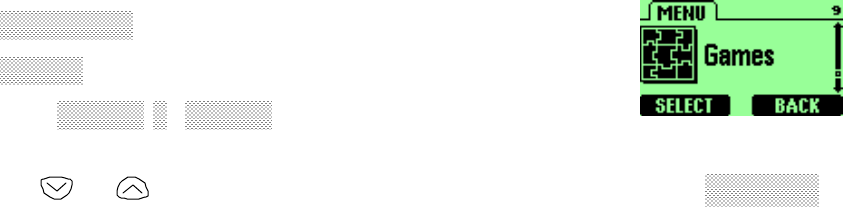
18. GAMES
You phone includes for exciting games that you can play whenever the phone is
turned on:
Βρεακουτ
Σνακε
1 Press
MENU
9
(
Γαµεσ
) to display the listing of these
games.
2 Use or to scroll to the game you want to play and press
SELECT
.

- 51 -
19. TECHNIC AL INFORM ATION
Weight 157g with 900 mAh
NiMH Battery
Size (H x W x D) 130.6 x 47.2 x 29.6 mm
Wireless Networks TDMA800
TDMA1900
AMPS
Frequency Range
Lowband 824.04-848.97 MHz (TX)
869.04-893.97 MHz (RX)
Highband 1850.04 – 1909.92 MHz (TX)
1930.08 – 1989.96 MHz (RX)
Transmitter Output
Power Up to 600mW
Battery Voltage 3.6V nominal
Number of
Channels 832 lowband
1997 highband
Number of NAMs 2
Memory Locations 200
Memory Capacity Alpha: 15 digits per location
Numeric: 32 digits per location