User Manual

EcoWave
Installation Guide
PST6000 and PST6550

EcoWave
Installation
Guide
Telkonet,
Inc.
Table of Contents
10200 W. Innovation Dr., Ste. 300
Revision 9
Milwaukee
, WI 53226
Page
1
(800) 380
-
9640
www.telkonet.com
Table of Contents
Table of Contents ................................................................................................................... 1
Installation Requirements .......................................................................................................... 2
Required Equipment ............................................................................................................. 2
Hardware ........................................................................................................................ 2
Regulatory Compliance .......................................................................................................... 2
FCC Notice ...................................................................................................................... 2
Wiring the EcoInsight/EcoSource ................................................................................................. 3
Wireless Installation of the EcoAir ............................................................................................... 6
Configuration ......................................................................................................................... 7
Join the EcoInsight/EcoSource to the EcoConnect ......................................................................... 7
Required Equipment ........................................................................................................... 7
Join Process ..................................................................................................................... 7
EcoAir to EcoInsight/EcoSource Association ............................................................................... 10
Associating One EcoAir with One EcoInsight/EcoSource (Standard) ................................................ 10
Associating One EcoAir with Multiple EcoInsights/EcoSources (Multi-Bind) ....................................... 12
Troubleshooting.................................................................................................................... 14

EcoWave
Installation
Guide
Telkonet,
Inc.
Installation Requirements
10200 W. Innovation Dr., Ste. 300
Revision 9
Milwaukee
, WI 53226
Page
2
(800) 380
-
9640
www.telkonet.com
Installation Requirements
Required Equipment
Hardware
• EcoAir (P/N: PST6550)
• EcoInsight/EcoSource (P/N: PST6000)
• Voltmeter
• Small Phillips screwdriver
• Wire nut or electrical tape
• Wire stripper
• Wire cutter
• Security screw wrench
• Level
• Two AA Batteries
Regulatory Compliance
This device complies with Part 15 of the FCC Rules. Operation is subject to the following two conditions: (1)
this device may not cause harmful interference, and (2) this device must accept any interference received,
including interference that may cause undesired operation.
FCC Notice
This equipment has been tested and found to comply with the limits for a class B digital device pursuant to
part 15 of the FCC Rules. These limits are designed to provide reasonable protection against harmful
interference in a residential installation. This equipment generates, uses and can radiate radio frequency
energy and if not installed and used in accordance with the instructions, may cause harmful interference to
radio communications. However, there is no guarantee that interference will not occur in a particular
installation. If the equipment does cause harmful interference to radio or television reception, which can be
determined by turning the equipment off and on, the user is encouraged to try to correct the interference by
one or more of the following measures:
• Reorient or relocate the receiving antenna.
• Increase the separation between the equipment and the receiver.
• Connect the equipment into an outlet on a circuit different from that to which the receiver is
connected.
• Consult the dealer or experienced radio/TV technician for help.
In order to maintain compliance with FCC regulations, shielded cables must be used with this equipment.
Operation with non-approved equipment is likely to result in interference to radio and TV reception. The user
is cautioned that changes and modifications made to the equipment without the approval of the manufacturer
could void the user’s authority to operate the equipment.
To satisfy RF exposure requirements, this device and its antennas must operate with a separation distance of at
least 20 cm from all persons and must not be co-located or operating in conjunction with any other antenna or
transmitter.
EcoWave
Installation
Guide
Telkonet,
Inc.
Wiring the EcoInsight/EcoSource
10200 W. Innovation Dr., Ste. 300
Revision 9
Milwaukee
, WI 53226
Page
3
(800) 380
-
9640
www.telkonet.com
Wiring the EcoInsight/EcoSource
1. Locate the wiring in the HVAC Unit.
2. Review the table below and determine where the EcoInsight/EcoSource will be mounted.
Mounting
Consideration
Best Practice
RF Interference
If the
EcoInsight/
EcoSource will be mounted inside a metal HVAC unit
or in a room with a
large amount of metallic equipment, an external antenna may be necessary.
3. Turn the power off at the circuit breaker.
4. Lockout and label all circuits in accordance with local code.
5. Disconnect the existing thermostat, if any.
6. Use the voltmeter to verify the power is off.
It may not be possible to switch off transformer supply voltage on low
-
voltage units. Use caution
when installing these systems.
7. Strip the LINE wire back 0.25 inches.
8. Cap the LINE wire with a wire nut or electrical tape.
9. Cut the GROUND wire so the copper is flush with the insulation.
10. Strip all wires except for GROUND back 0.25 inches.
11. Remove the security screw from the EcoInsight/EcoSource thermostat.
12. Separate the backplate from the EcoInsight/EcoSource thermostat.
13. Level the backplate using a level across the bottom of the backplate.
14. Mark the placement for the mounting screws.
15. Mount the backplate to the wall or HVAC unit using either the wall anchors (mounting to drywall) or
the self-tapping metal screws (mounting to metal).
EcoWave
Installation
Guide
Telkonet,
Inc.
Wiring the EcoInsight/EcoSource
10200 W. Innovation Dr., Ste. 300
Revision 9
Milwaukee
, WI 53226
Page
4
(800) 380
-
9640
www.telkonet.com
16. Refer to either the wiring diagram provided by your Telkonet Project Manager for this install or use the
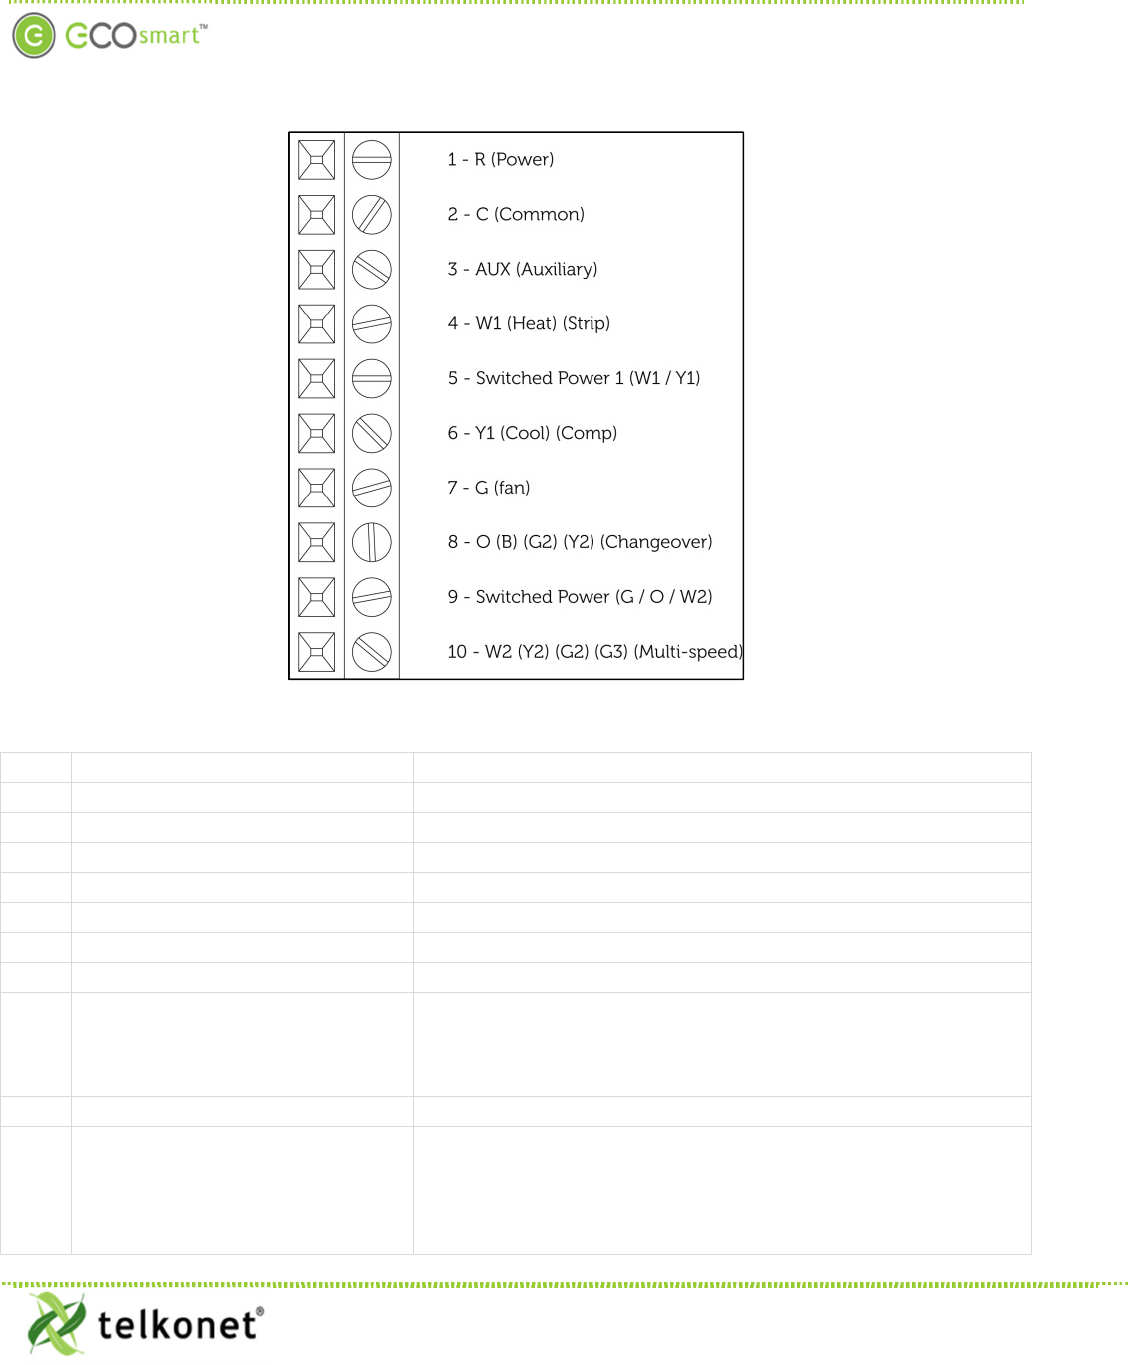
wiring pinouts below in Figure 1and Table 1.
Figure 1: EcoInsight/EcoSource Wiring Pinout
Table 1: EcoInsight/EcoSource Wiring Pinout
Pin
Label on Backplate
Function
1
R (Power)
12
-
277VAC power from HVAC, used to power the thermostat
2
C (Common)
AC Common
3
AUX (Auxiliary)
User defined
4
W1 (Heat) (Strip)
Heat call
or strip heat call (depends on programming)
5
Switched Power 1 (W1/Y1)
Provides alternate power for W1 and Y1
6
Y1 (Cool) (Comp)
Cool/Compressor call
7
G (Fan)
Fan Call
-
Low speed
8 O (B) (G2) (Y2) (Changeover)
Multi
-
use
-
depends on programming and
site requirements:
• Changeover
• 2
nd
Stage Fan
• 2
nd
Stage Cooling
9
Switched Power 2
(G/O/W2)
Provides alternate power for G, O, and W2
10 W2 (Y2) (G2) (G3) (Multi-speed)
Multi
-
use
-
depends on programming and site requirements:
• 2
nd
stage heat
• Electric heat (for HPs with strip heat, etc.)
• Emergency heat
• Other
EcoWave
Installation
Guide
Telkonet,
Inc.
Wiring t
he EcoInsight/EcoSource
10200 W. Innovation Dr., Ste. 300
Revision 9
Milwaukee
, WI 53226
Page
5
(800) 380
-
9640
www.telkonet.com
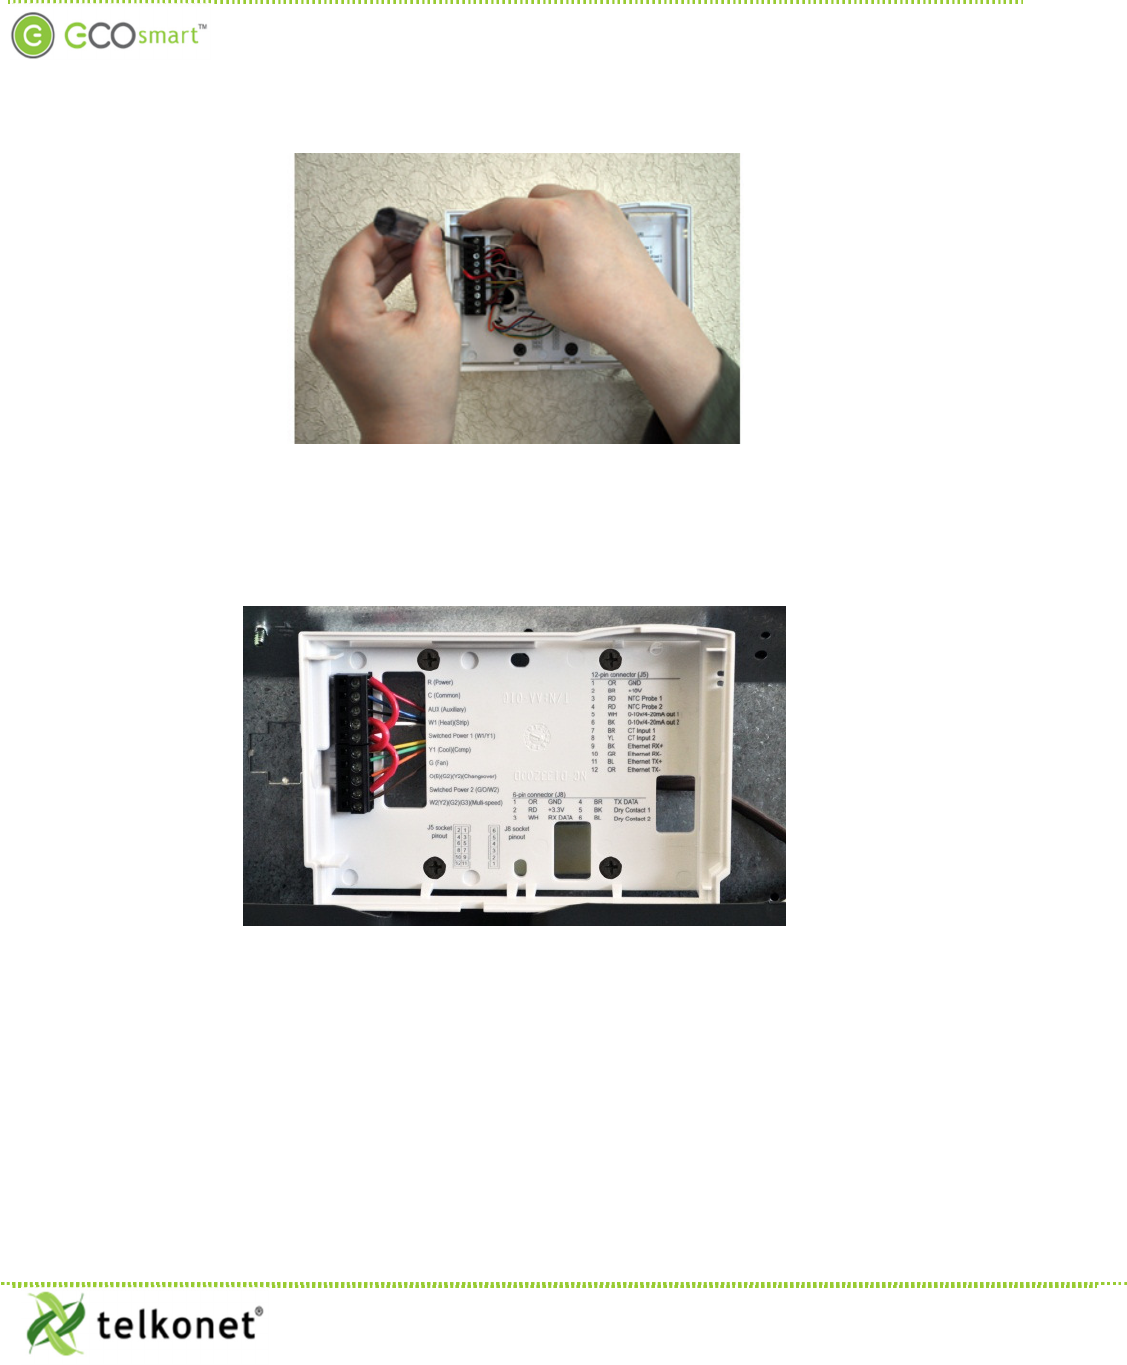
17. Starting at the bottom of the terminal block and working up, use a Phillips screwdriver to secure each
of the HVAC wires into the appropriate pins on the terminal block. See Figure 2.
Figure 2: Connecting Wiring from Bottom to Top
18. If any wires are left unused, cap off the wire using a wire nut or electrical tape.
19. Verify each wire is secure by gently tugging on it.
20. Verify the completed wiring looks similar to Figure 3.
Figure 3: EcoInsight/EcoSource Backplate Wired to HVAC Unit
21. Hook the EcoInsight/EcoSource to the hinges on the right-hand side of the backplate.
22. Gently swing the EcoInsight/EcoSource closed onto the backplate until it snaps into place. If you
encounter resistance, check to make sure no wires are pinched between components.
23. Inside the PTAC, verify the GFI (if so equipped) has not been tripped.
24. Verify that the PTAC has been set to Class II (remote thermostat) operation (if applicable). Consult
PTAC manual for proper procedure.
25. Reinsert and tighten the security screw on the EcoInsight/EcoSource.
26. Remove all lockouts or tags from the circuit breaker.
27. Return the electrical circuit to operation.
28. Verify the display on the EcoInsight indicates the state of the device; verify the LED on the EcoSource
is lit solid green.

EcoWave
Installation
Guide
Telkonet,
Inc.
Wireless Installation of the EcoAir
10200 W. Innovation Dr., Ste. 300
Revision 9
Milwaukee
, WI 53226
Page
6
(800) 380
-
9640
www.telkonet.com
Wireless Installation of the EcoAir
1. Review the table below and determine where the EcoAir will be mounted.
Mounting
Consideration
Best
Practice
Temperature
The EcoAir should be mounted on a wall
away from heat or cold sources that could affect its
temperature reading. This includes outside-facing walls with poor insulation, walls with
pipes circulating hot water, and walls near radiators.
If a suitable location without a heat or cold source is not available, contact a Telkonet
Project Manager.
The EcoAir should be mounted on the wall, not set into the wall. This will ensure that the
backplate provides proper airflow.
Distance to
Occupant
If the occupants will likely be stationary…
(e.g. sleeping in bed)
Position the EcoAir within
2 to
12
feet of
their expected location.
If the occupants will move occasionally…
(e.g. working at desk)
Position the EcoAir within 15
feet of their
expected location.
If the occupants will move regularly…
(e.g. walking in hall)
Position the EcoAir within
20
feet of their
expected location.
2. Remove the security screw from the EcoAir.
3. Separate the backplate from the EcoAir.
4. Level the backplate using a level across the bottom of the backplate.
5. Mark the placement for the mounting screws.
6. Mount the backplate to the wall or HVAC unit using either the wall anchors (mounting to drywall) or
the self-tapping metal screws (mounting to metal).
7. Insert two AA batteries into the EcoAir.
8. Hook the EcoAir to the hinges on the right-hand side of the backplate.
9. Gently swing the EcoAir closed onto the backplate until it snaps into place.
10. Verify the screen on the EcoAir is lit and responds to button presses.
11. Reinsert and tighten the security screw on the EcoAir.
12. EcoAir installation is complete.
EcoWave
Installation
Guide
Telkonet,
Inc.
Configuration
10200 W. Innovation Dr., Ste. 300
Revision 9
Milwaukee
, WI 53226
Page
7
(800) 380
-
9640
www.telkonet.com
Configuration
Join the EcoInsight/EcoSource to the EcoConnect
Enter the join codes on each device. The PAN and Channel will be set automatically.
Required Equipment
Hardware
• An EcoCommander or EcoCommander Pro
• An EcoConnect
• An EcoInsight/EcoSource that has been wired
• Unbent paperclip or pen
Join Process
1. Verify the EcoCommander or EcoCommander Pro is powered.
2. Verify the EcoConnect is powered.
3. Verify the EcoConnect is connected to the EcoCommander or EcoCommander Pro.
4. Verify the EcoInsight/EcoSource is powered.
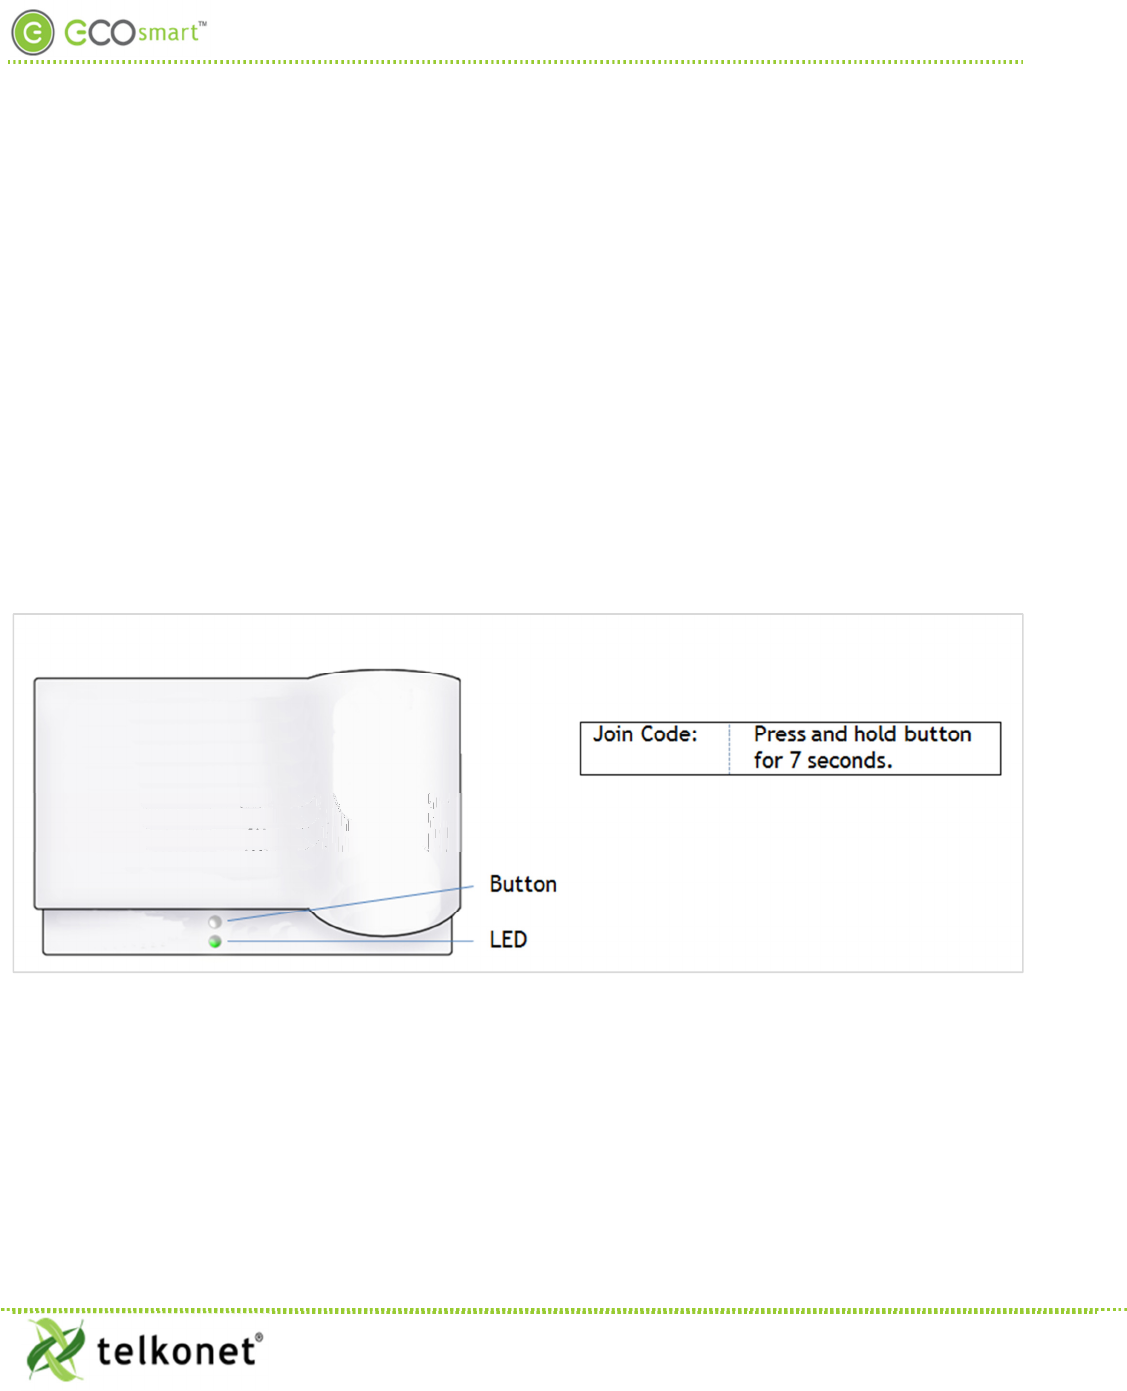
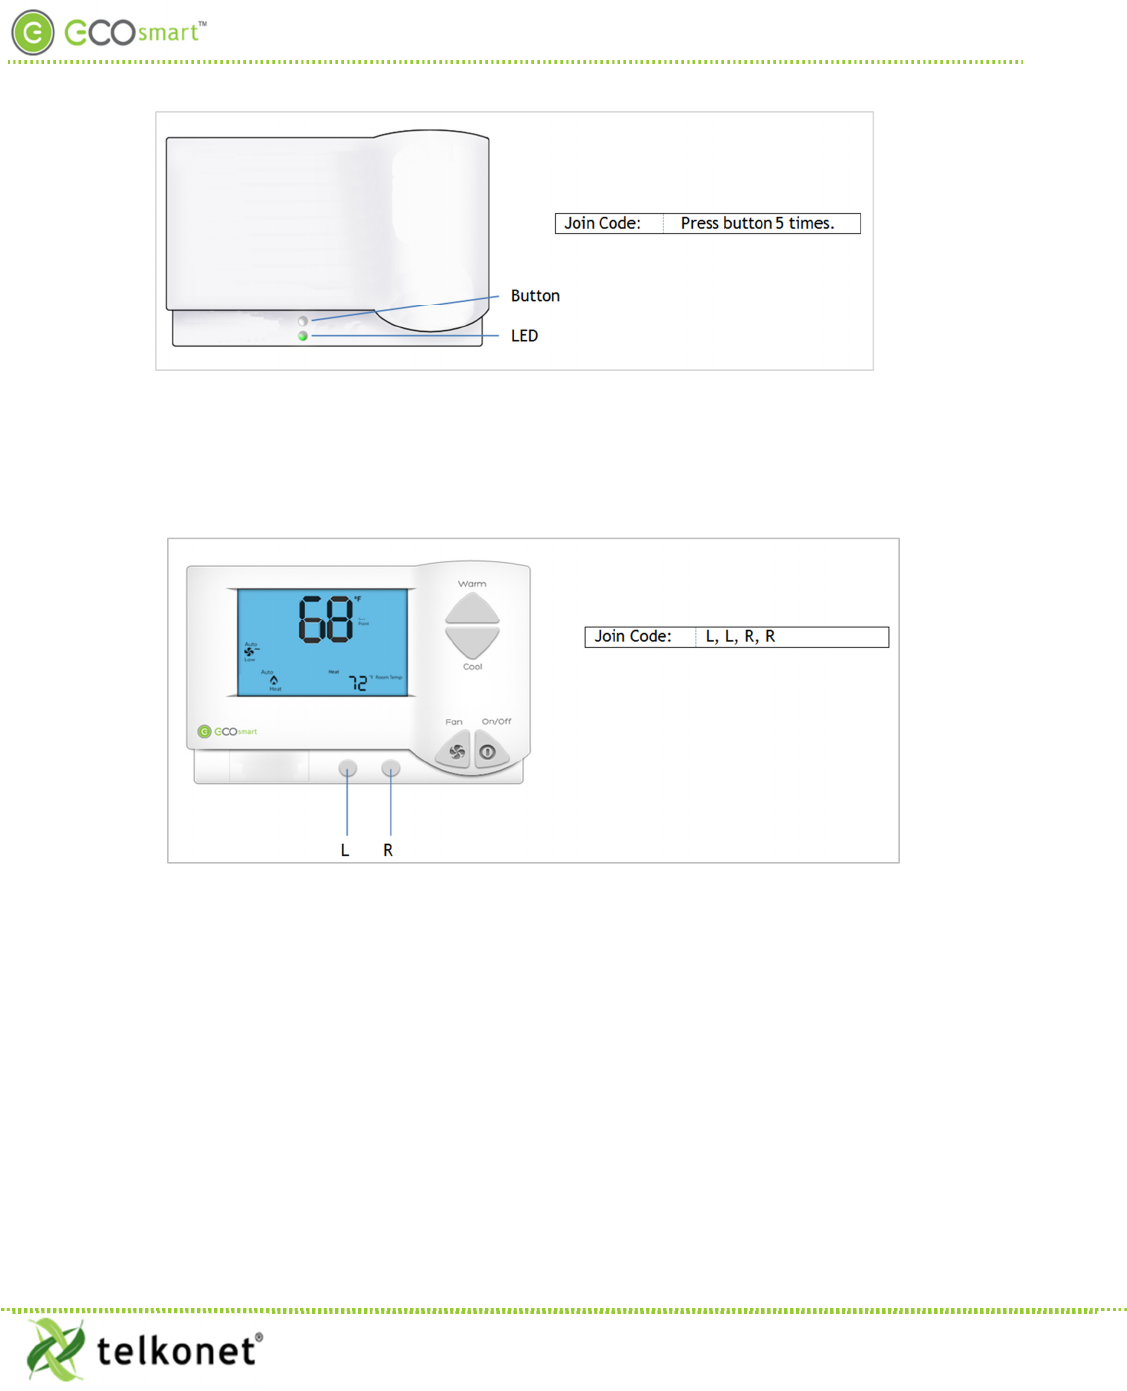
5. Use a paperclip or pen and Figure 4 below to enter the join code on the EcoConnect.
Figure 4: EcoConnect and Join Code
6. Verify the LED on the front of the EcoConnect rapidly blinks green.
7. If your device is an EcoSource, proceed to the next step. If your device is an EcoInsight, proceed to
Step 13.
8. Use a paperclip or pen and Figure 5 below to enter the join code on the EcoSource.
EcoWave
Installation
Guide
Telkonet,
Inc.
Configuration
10200 W. Innovation Dr., Ste. 300
Revision 9
Milwaukee
, WI 53226
Page
8
(800) 380
-
9640
www.telkonet.com
Figure 5: EcoSource and Join Code
9. Verify the LED on the front of the EcoSource blinks a “Red, Red, Green” sequence.
10. Wait 60 seconds for the EcoSource to find the network.
11. Verify that the EcoSource reboots.
12. Verify that the LED on the front of the EcoSource is lit solid green. Continue to Step 18.
13. Use figure 6 to enter the join code on the EcoInsight.
Figure 6: EcoInsight and Join Code
14. Verify the two horizontal bars appear above "Room Temp". This indicates the EcoInsight is scanning for
the EcoConnect.
15. Wait 60 seconds for the EcoInsight to find the network.
16. Verify that the EcoInsight reboots.
17. Verify that the EcoInsight shows zero bars above "Room Temp". This indicates the EcoInsight has
properly joined the EcoConnect. Continue to next step.

EcoWave
Installation
Guide
Telkonet,
Inc.
Configuration
10200 W. Innovation Dr., Ste. 300
Revision 9
Milwaukee
, WI 53226
Page
9
(800) 380
-
9640
www.telkonet.com
18. Using the paperclip or pen, press the pushbutton on the front of the EcoConnect once. The LED on the
front of the EcoConnect should change from blinking green to solid green. This means the EcoConnect
will no longer accept join requests from ZigBee devices.
19. If configuring a multi-bind system where multiple EcoInsights/EcoSources will be used to control one or
more HVAC units, repeat steps 1 through 18 for each EcoInsight/EcoSource.
20. Complete the appropriate steps beginning on page 10 or page 12 to associate the EcoAir to the
EcoInsight(s)/EcoSource(s).
EcoWave
Installation
Guide
Telkonet,
Inc.
Configuration
10200 W. Innovation Dr., Ste. 300
Revision 9
Milwaukee
, WI 53226
Page
10
(800) 380
-
9640
www.telkonet.com
EcoAir to EcoInsight/EcoSource Association
Associating One EcoAir with One EcoInsight/EcoSource (Standard)
In most installations, one EcoAir will be associated with one EcoInsight/EcoSource. The EcoInsight/EcoSource
manages Recovery Time calculations, temperature profiles, and HVAC drift and drive. The EcoAir acts as a
remote control to change settings on the EcoInsight/EcoSource.
Required Equipment
• Paperclip or pen
Associate the EcoAir with the EcoInsight/EcoSource
1. If your device is an EcoSource, continue to Step 2. If your device is an EcoInsight, continue to Step 6.
2. Locate the recessed pushbutton above the LED on the EcoSource.
3. Using the paperclip or pen, press the pushbutton once. The EcoSource will be lit solid red.
4. Hold the “On / Off” button on the EcoAir until the EcoAir displays two digits on its screen. This may
take up to 10 seconds. The displayed digits will be the last two digits of the EcoSource’s serial number.
5. Verify the EcoSource LED has changed from solid red to blinking green. Association is complete.
Continue to Step 12.
6. Press and hold the “Fan” button on the EcoInsight for 10 seconds, then press the “On/Off” button. The
Maintenance Menu should appear. Verify the text “Learn” appears in the Maintenance Menu.
7. Press the “On/Off” button to enter the Learn menu. Either one or two numbers will appear in the
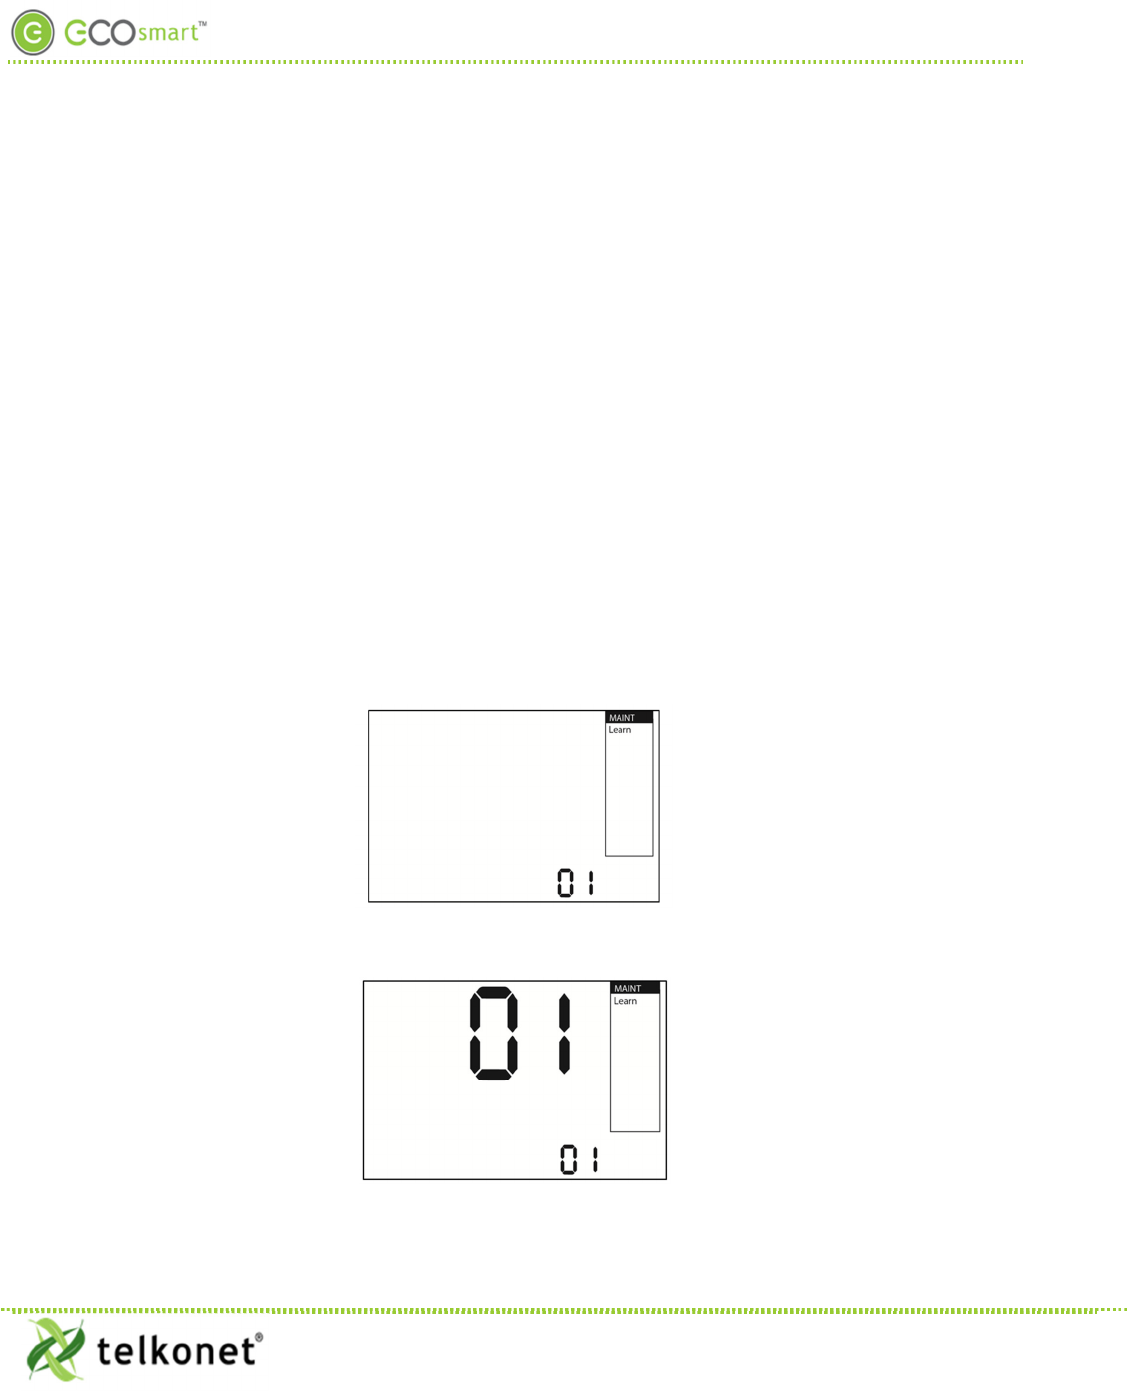
center of the screen, depending on the number of devices associated with the EcoInsight. See Figure 7
and Figure 8. Assign a unique installer number by pushing the up or down arrows. The smaller number
on the screen will increase or decrease.
Figure 7: Maintenance → Learn Menu
With 0 Devices Associated
Figure 8: Maintenance → Learn Menu
With 1 Device Associated
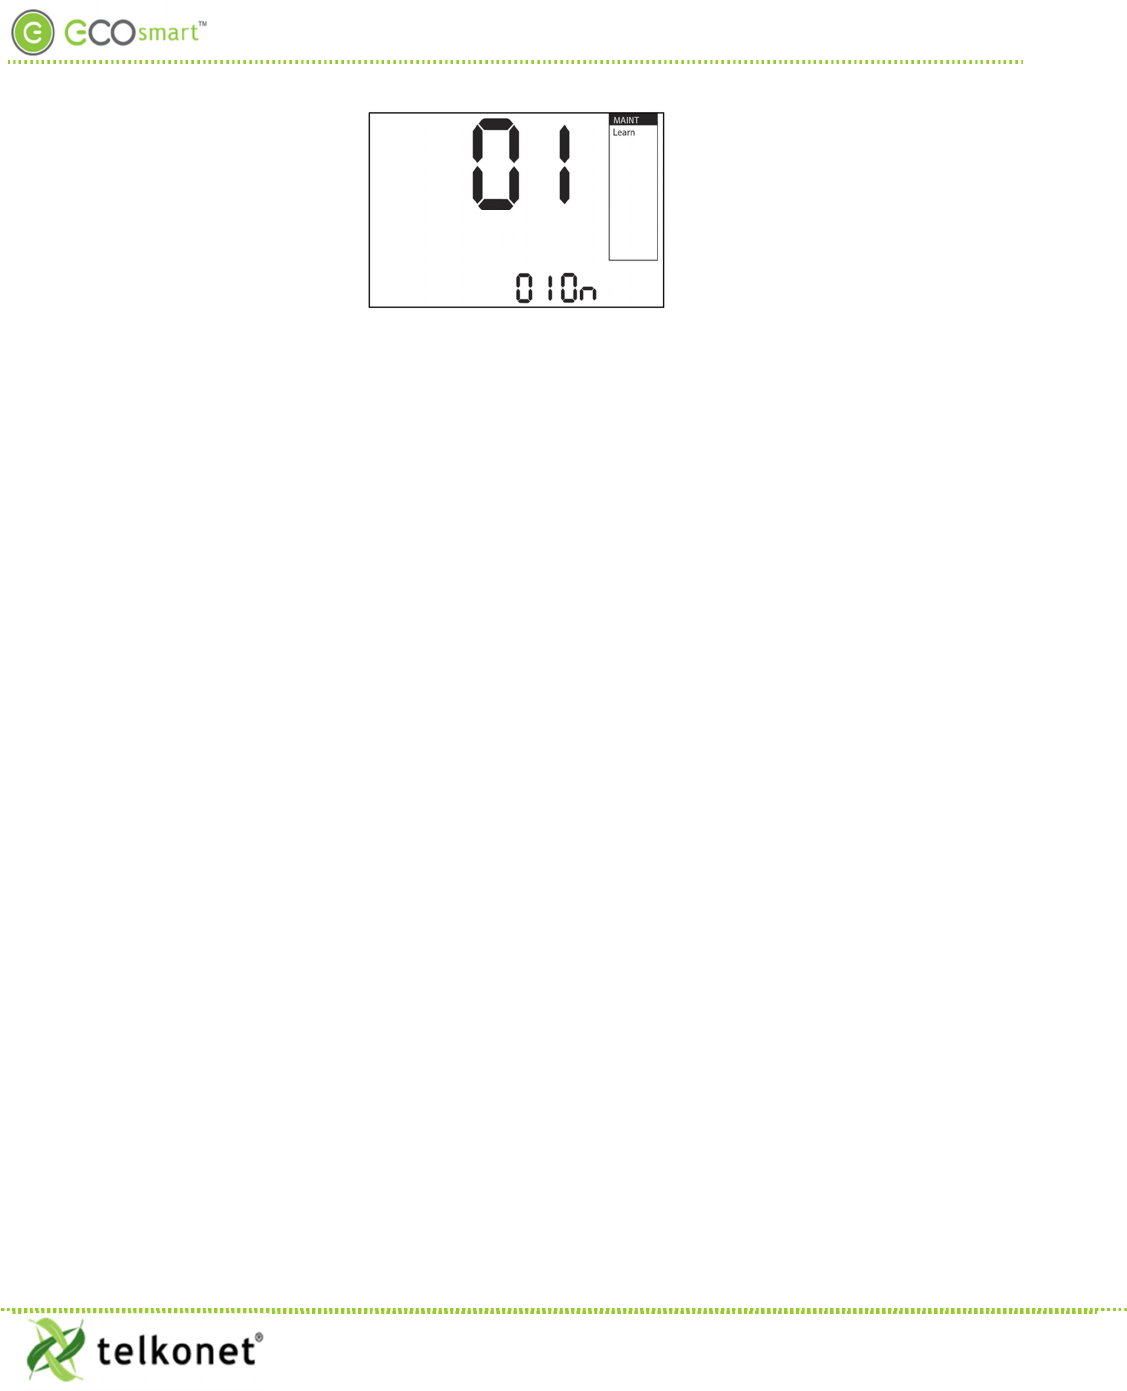
8. Press the “On/Off” button again to activate Learn Mode. The text “On” should appear next to the
smaller number. See Figure 9.
EcoWave
Installation
Guide
Telkonet,
Inc.
Configuration
10200 W. Innovation Dr., Ste. 300
Revision 9
Milwaukee
, WI 53226
Page
11
(800) 380
-
9640
www.telkonet.com
Figure 9: Maintenance → Learn Menu
With 1 Device Associated, In Learn Mode
9. Hold the “On / Off” button on the EcoAir until the EcoAir displays two digits on its screen. This may
take up to 10 seconds. The displayed digits will be the last two digits of the EcoInsight’s serial number.
10. Verify the larger number in the EcoInsight “Learn” menu has increased by one.
11. Press the Fan button on the EcoInsight twice to exit the Maintenance Menu. Association is complete.
Continue to Step 12.
Verify the Association
12. Activate heat mode on the EcoAir (exact steps will vary by EcoAir firmware).
13. Increase the set temperature above the current room temperature.
14. Verify the EcoInsight/EcoSource engages its HVAC unit’s heating mode.
15. Activate cool mode on the EcoAir (exact steps will vary by EcoAir firmware).
16. Decrease the set temperature below the current room temperature.
17. Verify the EcoInsight/EcoSource engages its HVAC unit’s cooling mode.
18. Change the fan speed on the EcoAir to high by pressing the “Fan” button until the High fan speed is
indicated.
19. Verify the EcoInsight/EcoSource engages its HVAC unit’s fan at the highest speed.
20. Configuration is complete.

EcoWave
Installation
Guide
Telkonet,
Inc.
C
onfiguration
10200 W. Innovation Dr., Ste. 300
Revision 9
Milwaukee
, WI 53226
Page
12
(800) 380
-
9640
www.telkonet.com
Associating One EcoAir with Multiple EcoInsights/EcoSources (Multi-Bind)
In some installations, one EcoAir may communicate with multiple EcoInsights/EcoSources. One
EcoInsight/EcoSource, designated the Master EcoInsight/EcoSource, manages the Recovery Time calculations
and temperature profiles. All other EcoInsights/EcoSources, designated Slave EcoInsights/EcoSources, drift or
drive their own HVAC unit at the command of the Master EcoInsight/EcoSource. The EcoAir acts as a remote
control to change settings on the Master EcoInsight/EcoSource.
Required Equipment
• Paperclip or pen
Network Setup
1. Determine which EcoInsight/EcoSource will be set as the Master EcoInsight/EcoSource.
Power Down All Devices
2. Remove power from the Master EcoInsight/EcoSource.
3. Remove power from each Slave EcoInsight/EcoSource.
4. Remove the two AA batteries from the EcoAir.
Associate the EcoAir with the Master EcoInsight/EcoSource
5. Return power to the Master EcoInsight/EcoSource.
6. Insert the two AA batteries back into the EcoAir.
7. If your device is an EcoSource, continue to the next step. If your device is an EcoInsight, continue to
Step 12.
8. Locate the recessed pushbutton above the LED on the Master EcoSource.
9. Using the paperclip or pen, press the pushbutton twice. The Master EcoSource LED will blink red.
10. Hold the “On / Off” button on the EcoAir until the EcoAir displays two digits on its screen. This may
take up to 10 seconds. The displayed digits will be the last two digits of the EcoSource’s serial number.
11. Verify the Master EcoSource LED has changed from blinking red to blinking green. Continue to Step 18.
12. Press and hold the “Fan” button on the Master EcoInsight for 10 seconds, then press the “On/Off”
button. The Maintenance Menu should appear. Verify the text “Learn” appears in the Maintenance
Menu.
13. Press the “On/Off” button to enter the Learn menu. Either one or two numbers will appear in the
center of the screen, depending on the number of devices associated with the Master EcoInsight. See
Figure 7 and Figure 8.
14. Assign a unique installer number by pushing the up or down arrows. The smaller number on the screen
will increase or decrease.
15. Press the “On/Off” button again to activate Learn Mode. The text “On” should appear next to the
smaller number. See Figure 9.
16. Hold the “On / Off” button on the EcoAir until the EcoAir displays two digits on its screen. This may
take up to 10 seconds. The displayed digits will be the last two digits of the EcoInsight’s serial number.
17. Verify the larger number in the Master EcoInsight “Learn” menu has increased by one. Press the Fan
button on the EcoInsight twice to exit out of the Maintenance Menu.
18. Remove power from the Master EcoInsight/EcoSource.
Associate the EcoAir with each Slave EcoInsight/EcoSource
19. Return power to the Slave EcoInsight/EcoSource.
20. Remove the two AA batteries from the EcoAir.
21. Wait 15 seconds.
22. Insert the two AA batteries back into the EcoAir.

EcoWave
Installation
Guide
Telkonet,
Inc.
Configuration
10200 W. Innovation Dr., Ste. 300
Revision 9
Milwaukee
, WI 53226
Page
13
(800) 380
-
9640
www.telkonet.com
23. If your device is an EcoSource, continue to the next step. If your device is an EcoInsight, continue to
Step 30.
24. Locate the recessed push button above the LED on the Slave EcoSource.
25. Using the paperclip or pen, press the push button three times. The Slave EcoSource LED will double-
blink red.
26. Hold the “On / Off” button on the EcoAir until the EcoAir displays two digits on its screen. This may
take up to 10 seconds. The displayed digits will be the last two digits of the EcoSource’s serial number.
27. Verify the Slave EcoSource LED has changed from double-blinking red to blinking green.
28. Remove power from the Slave EcoSource.
29. Repeat steps 19 through 28 for each Slave EcoInsight/EcoSource. Then continue to Step 30.
30. Press and hold the “Fan” button on the Slave EcoInsight for 10 seconds, then press the “On/Off”
button. The Maintenance Menu should appear. Verify the text “Learn” appears in the Maintenance
Menu.
31. Press the “On/Off” button to enter the Learn menu. Either one or two numbers will appear in the
center of the screen, depending on the number of devices associated with the Slave EcoInsight. See
Figure 7 and Figure 8.
32. Assign a unique installer number by pushing the up or down arrows. The smaller number on the screen
will increase or decrease.
33. Press the “On/Off” button again to activate Learn Mode. The text “On” should appear next to the
smaller number. See Figure 9.
34. Hold the “On / Off” button on the EcoAir until the EcoAir displays two digits on its screen. This may
take up to 10 seconds. The displayed digits will be the last two digits of the EcoInsight’s serial number.
35. Verify the larger number in the Slave EcoInsight “Learn” menu has increased by one. Press the Fan
button on the EcoInsight twice to exit out of the Maintenance Menu.
36. Remove power from the Slave EcoInsight.
37. Repeat Steps 19 through 22 and Steps 30 to 36 for each Slave EcoInsight/EcoSource. Then continue to
Step 38.
Power Up All Devices In Order
38. Remove the two AA batteries from the EcoAir.
39. Return power to the Master EcoInsight/EcoSource.
40. Insert the two AA batteries back into the EcoAir.
41. Return power to each Slave EcoInsight/EcoSource, one at a time.
Verify the Association
42. Activate heat mode on the EcoAir (exact steps will vary by EcoAir firmware).
43. Increase the set temperature above the current room temperature.
44. Verify both the Master EcoInsight/EcoSource and the Slave EcoInsight/EcoSource engage their HVAC
unit’s heating mode.
45. Activate cool mode on the EcoAir (exact steps will vary by EcoAir firmware).
46. Decrease the set temperature below the current room temperature.
47. Verify both the Master EcoInsight/EcoSource and the Slave EcoInsight/EcoSource engage their HVAC
unit’s cooling mode.
48. Change the fan speed on the EcoAir to high by pressing the “Fan” button until the High fan speed is
indicated.
49. Verify both the Master EcoInsight/EcoSource and the Slave EcoInsight/EcoSource engage their HVAC
unit’s fan at the highest speed.
50. Configuration is complete.

EcoWave
Installation
Guide
Telkonet,
Inc.
Troubleshooting
10200 W. Innovation Dr., Ste. 300
Revision 9
Milwaukee
, WI 53226
Page
14
(800) 380
-
9640
www.telkonet.com
Troubleshooting
Issues Configuring Firmware
Problem
Potential Cause
Potential Solution
The
EcoInsight/
EcoSource says
cmd
not found after entering a zb
command.
Backspace was used while typing
the zb command.
Re
-
enter the
zb
command without
using backspace.
The channel was not set to the
value I entered.
The channel you
entered was
below 11 or above 26.
Re
-
enter the
zb
command.
Recommended channels are 15, 20,
25, and 26.
Backspace was used while typing
the zb command.
Re
-
enter the
zb
command without
using backspace.
The PAN was not set to the value I
entered.
The PAN
you entered was not
specified in hexadecimal.
Re
-
enter the
zb –p
command,
ensuring you preface the PAN value
with 0x, such as 0x201.
Backspace was used while typing
the zb command.
Re
-
enter the
zb
command without
using backspace.
The ShortAdd shows the default
value of 0xFFFF.
The
EcoInsight/
EcoSource and
EcoConnect are not configured
with the same channel.
Verify and re
-
enter the channel
value into the
EcoInsight/EcoSource.
The EcoInsight/ EcoSource and
EcoConnect are not configured
with the same PAN.
Verify and re
-
enter the PAN value
into the EcoInsight/EcoSource.
The EcoInsight/ EcoSource cannot
communicate with the EcoConnect
due to interference.
Reconfigure the
EcoInsight/EcoSource and
EcoConnect to use a different
channel. Recommended channels
are 15, 20, 25, and 26.
EcoSource:
After entering the join
code, the EcoSource LED does not
blink a "Red, Red, Green"
sequence.
EcoInsight: After entering the join
code, the EcoInsight does not
display the two horizontal bars
appear above "Room Temp".
The join code was not entered
properly.
Verify and re
-
enter the join code
into the EcoInsight/EcoSource.