Telkonet SS8030 Load Control Module - Switch User Manual
Telkonet, Inc. Load Control Module - Switch
Telkonet >
User Manual


Table of Contents
EcoSwitch Installation Guide
Revision: 9
i
Table of Contents
Table of Contents .................................................................................................................... i
Installation Requirements .......................................................................................................... 1
Required Equipment ............................................................................................................. 1
Electrical Requirements ......................................................................................................... 1
Regulatory Compliance .......................................................................................................... 2
FCC Notice ...................................................................................................................... 2
Wiring the EcoSwitch ............................................................................................................... 3
Associating the EcoSwitch with an EcoInsight .................................................................................. 6
Connect the EcoSwitch to the ZigBee Network ............................................................................. 6
Associate the EcoSwitch with the EcoInsight ................................................................................ 6
Associating the EcoSwitch with an EcoWave (EcoAir + EcoSource) ......................................................... 7
Connect the EcoSwitch to the ZigBee Network ............................................................................. 7
Associate the EcoSwitch with the EcoSource ................................................................................ 7
Troubleshooting...................................................................................................................... 8
Issues Connecting the EcoSwitch to the ZigBee Network .................................................................. 8
Issues Associating the EcoSwitch with the Thermostat .................................................................... 8

Installation Requirements
EcoSwitch Installation Guide
Revision: 9
1
Installation Requirements
Required Equipment
EcoSwitch (P/N: SS8030)
Flathead screwdriver for mounting and unmounting wall plate
Wire nuts
Voltmeter
Electrical Requirements
Before installation, ensure that the EcoSwitch will be connected to a line with the following electrical
properties:
LINE Type
Alternating Current (AC)
LINE Voltage
120 Volts (V)
LINE Frequency
60 Hertz (Hz)
Before installation, ensure that the devices controlled by the EcoSwitch use less than the following maximum
loads:
Incandescent Load
600 Watts (W)
Motor Load
1/2 Horsepower (HP)
Resistive Load
1800 Watts (W)
15 Amperes (A)

Installation Requirements
EcoSwitch Installation Guide
Revision: 9
2
Regulatory Compliance
FCC Notice
This equipment has been tested and found to comply with the limits for a class B digital device pursuant to
part 15 of the FCC Rules. These limits are designed to provide reasonable protection against harmful
interference in a residential installation. This equipment generates, uses and can radiate radio frequency
energy and if not installed and used in accordance with the instructions, may cause harmful interference to
radio communications. However, there is no guarantee that interference will not occur in a particular
installation. If the equipment does cause harmful interference to radio or television reception, which can be
determined by turning the equipment off and on, the user is encouraged to try to correct the interference by
one or more of the following measures:
Reorient or relocate the receiving antenna.
Increase the separation between the equipment and the receiver.
Connect the equipment into an outlet on a circuit different from that to which the receiver is
connected.
Consult the dealer or experienced radio/TV technician for help.
Operation with non-approved equipment is likely to result in interference to radio and TV reception. The user
is cautioned that changes and modifications made to the equipment without the approval of the manufacturer
could void the user’s authority to operate the equipment.
To satisfy RF exposure requirements, this device and its antennas must operate with a separation distance of at
least 20 cm from all persons and must not be co-located or operating in conjunction with any other antenna or
transmitter.
Wiring the EcoSwitch
EcoSwitch Installation Guide
Revision: 9
3
Wiring the EcoSwitch
1. Turn the power off at the circuit breaker.
2. Unmount the existing switch cover plate.
3. Unmount the existing switch from the junction box.
4. Use the voltmeter to verify the power is off.
5. Disconnect the existing switch from its wiring.
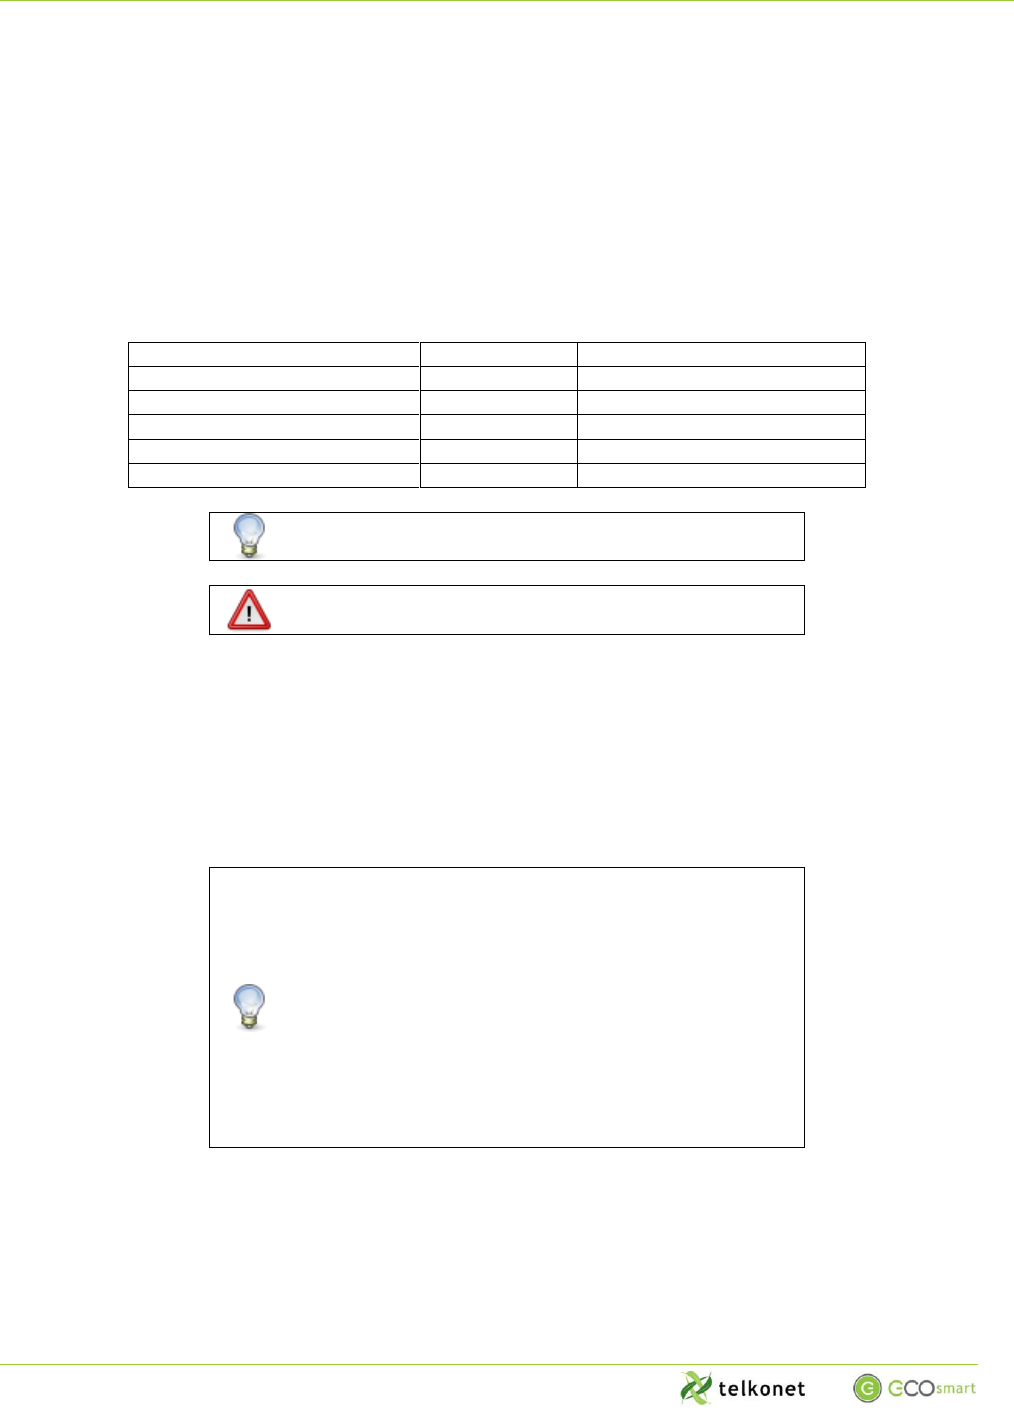
6. Use the table below to determine which wires are the 120V LINE, GROUND, and NEUTRAL IN from the –
breaker panel.
7. Use the table below to determine which wires are the LOAD and NEUTRAL OUT wires to control the
light fixture.
Function
Term
Commonly Used Wire Color
120V In From Breaker Panel
LINE
Black
Out to Fixture
LOAD
Red
Neutral From Breaker Panel
NEUTRAL IN
White
Neutral to Fixture
NEUTRAL OUT
White
Ground
GROUND
Green
Some junction boxes may only have one neutral wire.
If there are no neutral wires, the EcoSwitch will not
function. Discontinue installation.
8. Label the wires appropriately.
9. Connect the LINE wire from the wall to the black wire on the EcoSwitch.
10. Connect the GROUND wire from the wall to the green GROUND wire on the EcoSwitch.
11. Connect the LOAD wire leading to the fixture to the red wire on the EcoSwitch.
12. Connect the NEUTRAL IN wire from the breaker panel to the white NEUTRAL IN wire on the EcoSwitch.
13. Connect the NEUTRAL OUT wire leading to the fixture to the white NEUTRAL OUT wire on the
EcoSwitch.
If only one neutral wire exists, connect the NEUTRAL
IN wire on the EcoSwitch to the NEUTRAL IN wire
coming from the breaker panel. Cap the NEUTRAL
OUT wire coming from the EcoSwitch.
Alternatively, both the NEUTRAL IN and the NEUTRAL
OUT wires from the EcoSwitch can be connected to
the NEUTRAL IN wire from the breaker panel.
With only one neutral wire, the EcoSwitch will not be
able to report power or current. The EcoSwitch will
only report Voltage.
Wiring the EcoSwitch
EcoSwitch Installation Guide
Revision: 9
4
14. Verify all wire connections. The wires should now look like Figure 1. If only one Neutral connection was
available, the wires will look like Figure 2.
Figure 1: EcoSwitch Wiring Diagram with two Neutral Wires
Figure 2: EcoSwitch Wiring Diagram with only one Neutral Wire

Wiring the EcoSwitch
EcoSwitch Installation Guide
Revision: 9
5
15. Turn the power on at the circuit breaker.
16. Press the switch once.
17. Verify the switch clicks and the light fixture turns on.
18. Press the switch once.
19. Verify the switch clicks and the light fixture turns off.
20. Turn the power off at the circuit breaker.
21. Mount the EcoSwitch into the junction box.
22. Mount the switch cover plate.
23. Turn the power on at the circuit breaker.
24. Wiring is complete. Complete either of the two following association sections depending on the
thermostat installed in the room.

Associating the EcoSwitch with an EcoInsight
EcoSwitch Installation Guide
Revision: 9
6
Associating the EcoSwitch with an EcoInsight
Connect the EcoSwitch to the ZigBee Network
1. Determine which EcoConnect will provide the ZigBee network for the EcoSwitch. The same EcoConnect
must be used for both the EcoInsight and the EcoSwitch.
2. Activate joining on the EcoConnect using the EcoCentral Virtual Engineer web interface or by pressing
the recessed button on the EcoConnect’s front plate. The green LED on the front of the EcoConnect
should blink green.
3. Press and hold the EcoSwitch for 10 seconds.
4. Verify the green LED on the EcoSwitch rapidly blinks green. If it does not blink or rapidly blinks red, see
“Issues Connecting the EcoSwitch to the ZigBee Network” in Troubleshooting on page 8.
Associate the EcoSwitch with the EcoInsight
5. Press the right-most button beneath the display on the EcoInsight six times.
6. Verify the EcoInsight shows “Learn” in the upper right-hand corner. See Figure 3.
Figure 3: Learn Mode on the EcoInsight
7. Press and hold the EcoSwitch for 5 seconds.
8. Verify the green LED on the EcoSwitch rapidly blinks green. If it does not blink or rapidly blinks red, see
“Issues Associating the EcoSwitch with the Thermostat” in Troubleshooting on page 8.

Associating the EcoSwitch with an EcoWave (EcoAir + EcoSource)
EcoSwitch Installation Guide
Revision: 9
7
Associating the EcoSwitch with an EcoWave (EcoAir + EcoSource)
Connect the EcoSwitch to the ZigBee Network
1. Determine which EcoConnect will provide the ZigBee network for the EcoSwitch. The same EcoConnect
must be used for both the EcoSource and the EcoSwitch.
2. Activate joining on the EcoConnect using the EcoCentral Virtual Engineer web interface or by pressing
the recessed button on the EcoConnect’s front plate. The green LED on the front of the EcoConnect
should blink green.
3. Press and hold the EcoSwitch for 10 seconds.
4. Verify the green LED on the EcoSwitch rapidly blinks green. If it does not blink or rapidly blinks red, see
“Issues Connecting the EcoSwitch to the ZigBee Network” in Troubleshooting on page 8.
Associate the EcoSwitch with the EcoSource
5. Press and hold the EcoSwitch for 5 seconds.
6. Verify the green LED on the EcoSwitch rapidly blinks green. If it does not blink or rapidly blinks red, see
“Issues Associating the EcoSwitch with the Thermostat” in Troubleshooting on page 8.

Troubleshooting
EcoSwitch Installation Guide
Revision: 9
8
Troubleshooting
Issues Connecting the EcoSwitch to the ZigBee Network
Problem
Potential Cause
Potential Solution
After pressing and holding the
EcoSwitch for 10 seconds, the LED
is solid green.
The EcoSwitch was not held down
continuously for 10 seconds.
Wait 5 seconds and try again.
After pressing and holding the
EcoSwitch for 10 seconds, the LED
rapidly blinks red.
The sensor is unable to locate an
EcoConnect in Joining mode.
Reactivate joining on the
EcoConnect and try again.
Issues Associating the EcoSwitch with the Thermostat
Problem
Potential Cause
Potential Solution
After pressing and holding the
EcoSwitch for 5 seconds, the LED is
solid green.
The EcoSwitch was not held down
continuously for 5 seconds.
Wait 5 seconds and try again.
After pressing and holding the
EcoSwitch for 10 seconds, the LED
rapidly blinks red.
The sensor is unable to locate an
EcoInsight or EcoSource in Learn
mode.
Reactivate Learn mode on the
EcoInsight or EcoSource and try
again.