Telrad Networks 2D1VWIFIAP DM-CPE7000-Indoor-2D-1V-WiFi-AP User Manual
Telrad Networks Ltd DM-CPE7000-Indoor-2D-1V-WiFi-AP Users Manual
Users Manual
Indoor WiFi AP
Quick installation Guide

0
Copyright
This DOCUMENT is copyrighted with all rights reserved. No part of this publication
may be reproduced, transmitted, transcribed, stored in a retrieval system, or translated
into any language in any form by any means without the written permission of Telnet.
Notice
Telnet reserves the right to change specifications without prior notice.
While the information in this document has been compiled with great care, it may
not be deemed an assurance of product characteristics. Telnet shall be liable only to the
degree specified in the terms of sale and delivery.
The reproduction and distribution of the documentation and software supplied with
this product and the use of its contents is subject to written authorization from Telnet.

1
Contents
Copyright
Notice
Contents .................................................................................... 1
1. About this Guide .................................................................... 2
2. What’s in the box? .................................................................. 2
3. Connectors & LED Indicators ................................................... 3
4. Connect IDU to ODU ............................................................... 5
5. Easy Setup .............................................................................. 6
6. Wi-Fi Setting ........................................................................... 7
7. Make Phone Call ..................................................................... 8
2
1. About this Guide
This document provides information and procedures on installation/configuration of
LTE Indoor CPE. You could utilize the theoretical information in this guide to setup your
device. This Quick Installation Guide covers the basic installation of the Indoor Gateway.
2. What’s in the box?
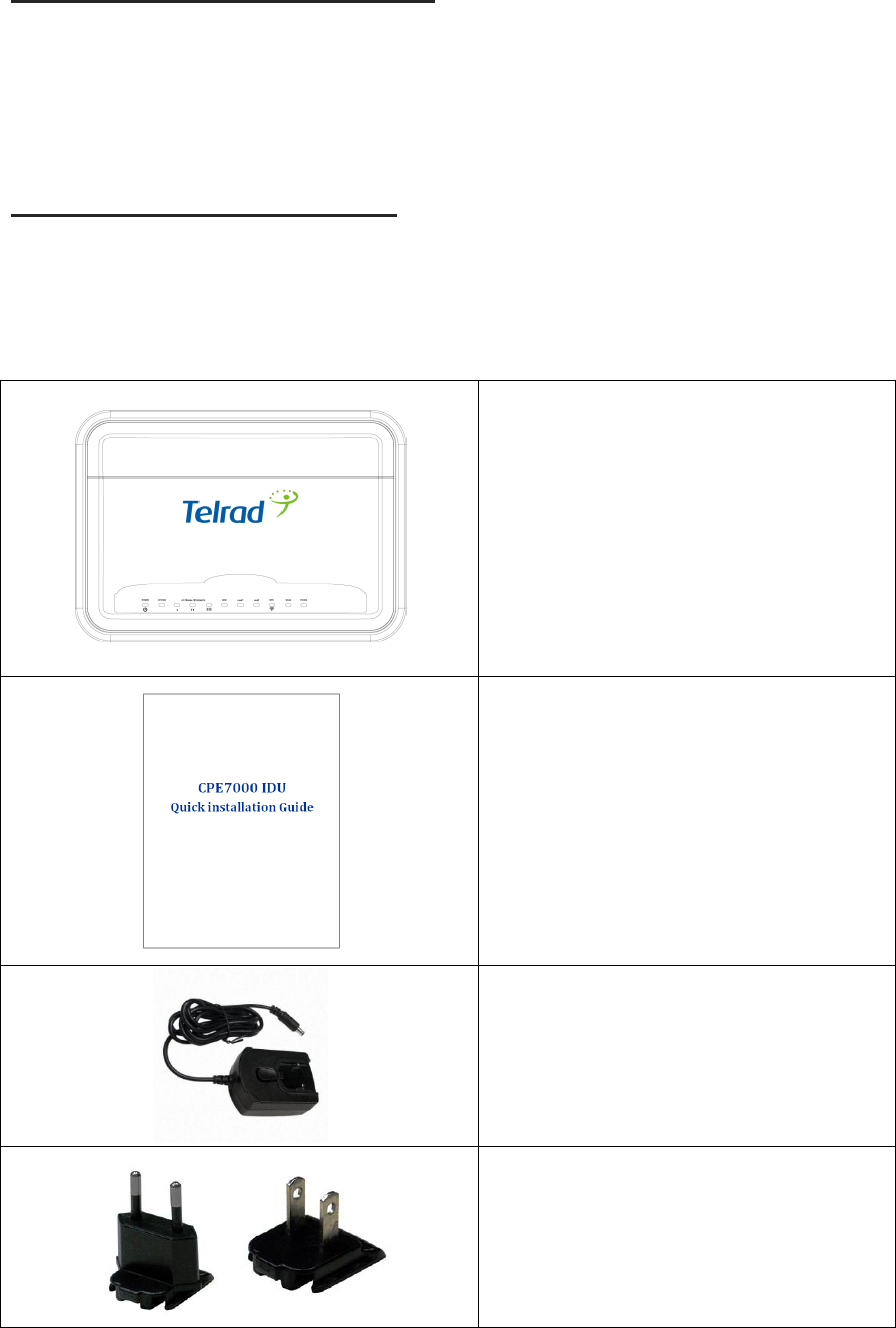
Here's a quick checklist of everything inside your box. Before installing the ODU,
please check you have all of these items listed below. If any of these items is missing or
damaged, please contact your LTE service provider.
The LTE Indoor CPE
Quick installation Guide
Power Adapter
Power Plug (EU)/ Power Plug (US)
3
3. Connectors & LED Indicators
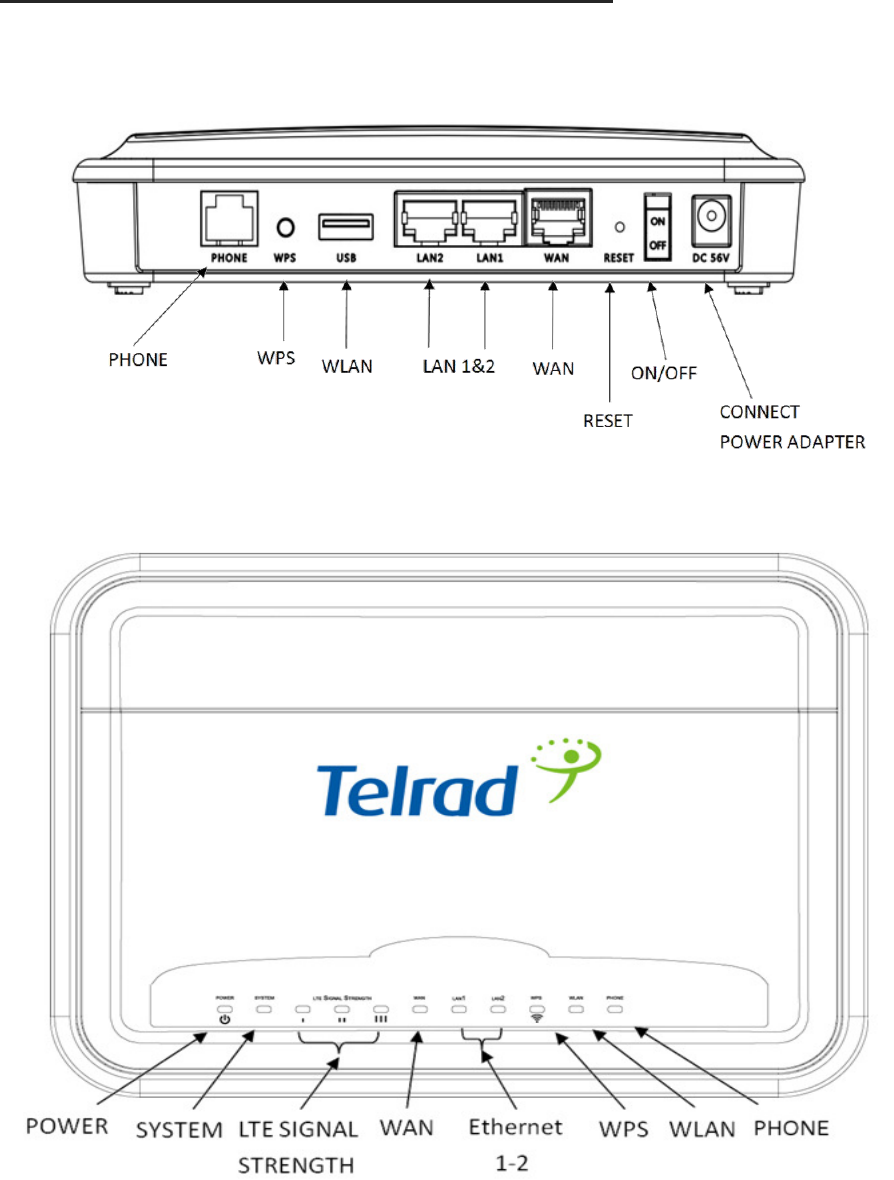
IDU Rear Panel
IDU Front Panel
4
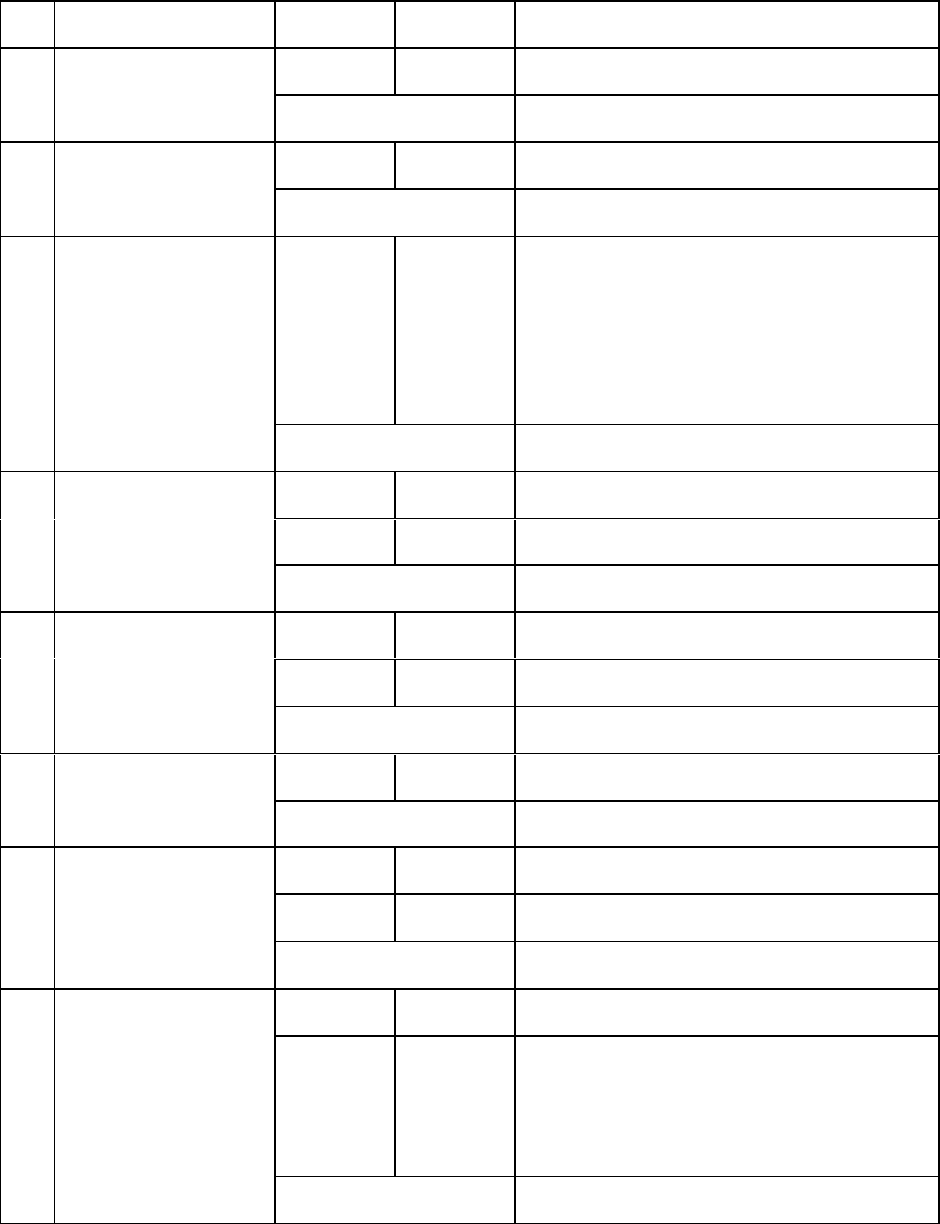
IDU LED Indicators:
No.
Type
Color
Action
Description
1
Power
Green
Solid ON
Power on
OFF
Power off
2
System
Green
Solid ON
System is booting
OFF
System is disabled
3
LTE Signal Strength
Green
Solid ON
Display signal strength
1 LED: 0<=CINR<8
2 LED: 8<=CINR<24
3 LED: 24<=CINR
OFF
No signal
4
WAN
Green
Solid ON
LTE is connected
Green
Blinking
LTE is transmitting data
OFF
LTE is disabled
5
LAN1&2
Green
Solid ON
LAN is connected
Green
Blinking
LAN is transmitting data
OFF
LAN is disabled
6
WPS
Green
Blinking
WPS is connecting
OFF
WPS is disabled
7
WLAN
Green
Solid ON
WiFi is enabled
Green
Blinking
WiFi is transmitting data
OFF
WiFi is disabled
8
Phone
VoIP
Green
Solid ON
VoIP Registered/ Off-hook/ Busy
Green
Blinking
Incoming call ringing
New incoming call during conversation
Incoming voice mail waiting
OFF
VoIP not registered / VoIP disabled
5
4. Connect IDU to ODU
DO NOT CONNECT A COMPUTER OR A SWITCH DIRECTLY TO THE IDU’S POE PORT DUE TO THE HIGH
POE POWER (56V).
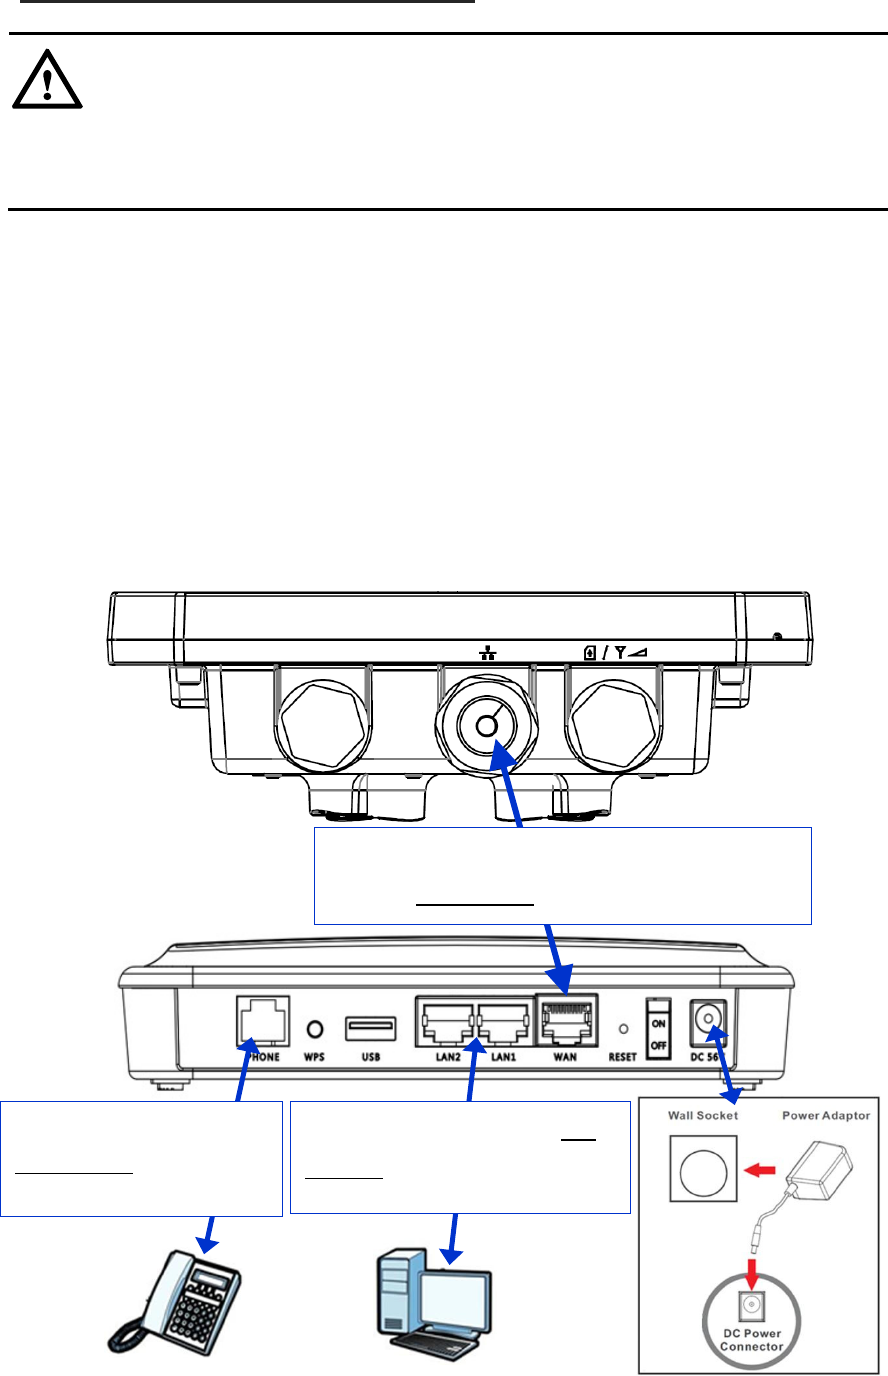
Connect the IDU, ODU & IDU Hardware Connections
1. Connect the CAT 5 Ethernet cable which is already connected to the ODU to the IDU’s
RJ-45(WAN) POE port.(Suggest to use Cat5E shielded Patch Cable, and must not
exceed 100m).
2. Connect the Ethernet cable from computer to one of the IDU’s Etheret Ports.
3. Connect the RJ11 (Phone Line cable) to the Phone Port for using VoIP.
4. Connect the supplied power adapter to this IDU device. The Power LED will remain
steady green when device is ready.
ODU
IDU
1. CAT 5 (or Cat5E) Outdoor Shielded Patch Ethernet
cable (not Included) for connecting IDU and ODU
2. CAT5 8-wire Ethernet cable (not
included) for connecting IDU and PC
3. One RJ-11 phone cable
(not included) for connecting
IDU and Phone
CAUTION
6
5. Easy Setup
Physical connection as following (Refer to Installing Device Instruction).
․Make sure there is a SIM in ODU(SIM CARD SLOT).
․Connect IDU(WAN) and ODU(RJ45 & POE POWER SLOT) via Ethernet cable.
․Use power adapter to connect IDU(Power).
․Connect IDU(ETHERNET PORTS) and PC via Ethernet cable.
Please follow the steps below to configure your device through the web interface:
Step1: Open the Web browser (Internet Explorer) and enter the default IP address of
the ODU CPE, which is : http://192.168.254.251
Default username/password: admin/admin
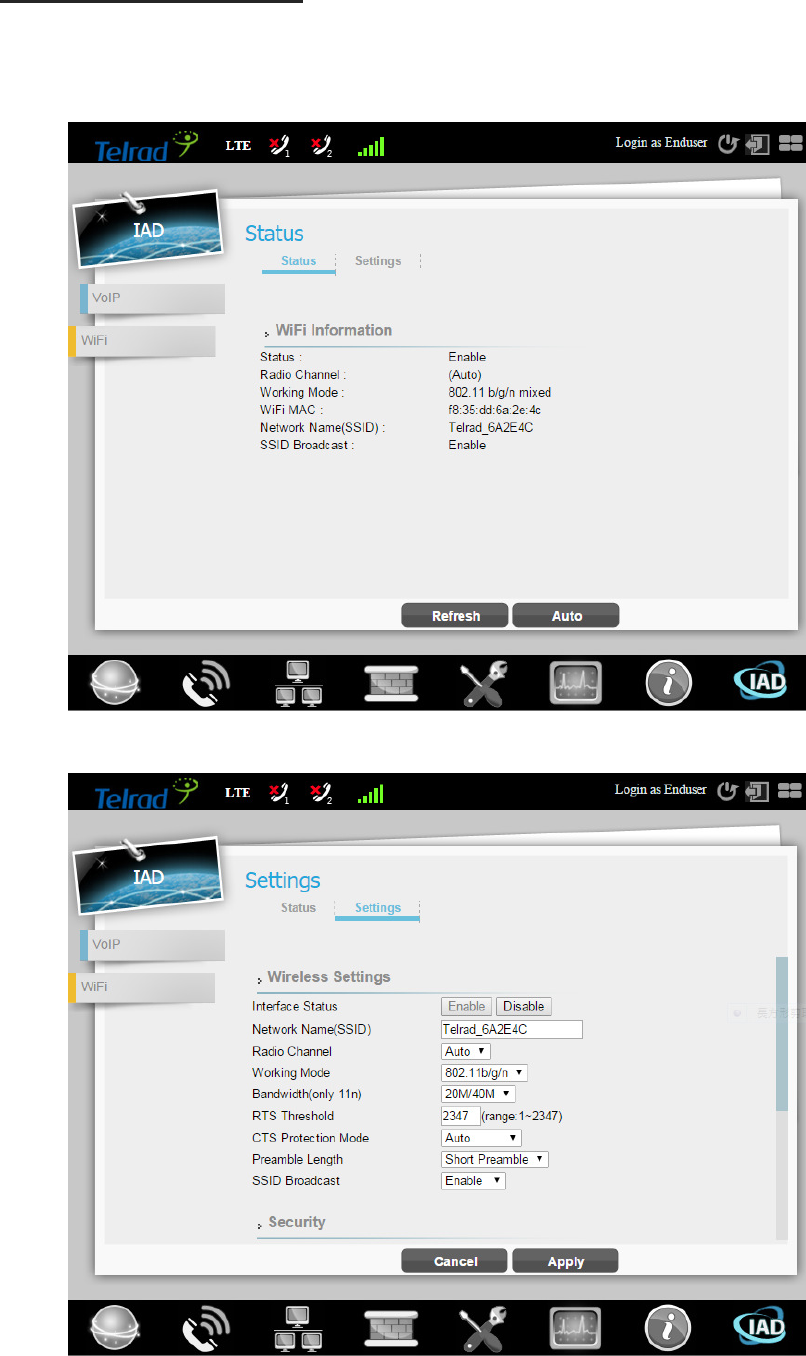
Step2: The page shown here gets displayed in your browser after login; you can now
configure the device settings. Signal Strength indicator on the upper-left corner of
webpage.
Mode:
LTE
Operator:
APN Name
Signal:
(More bar means better signal)
(Disconnect, no signal)
7
6. Wi-Fi Setting
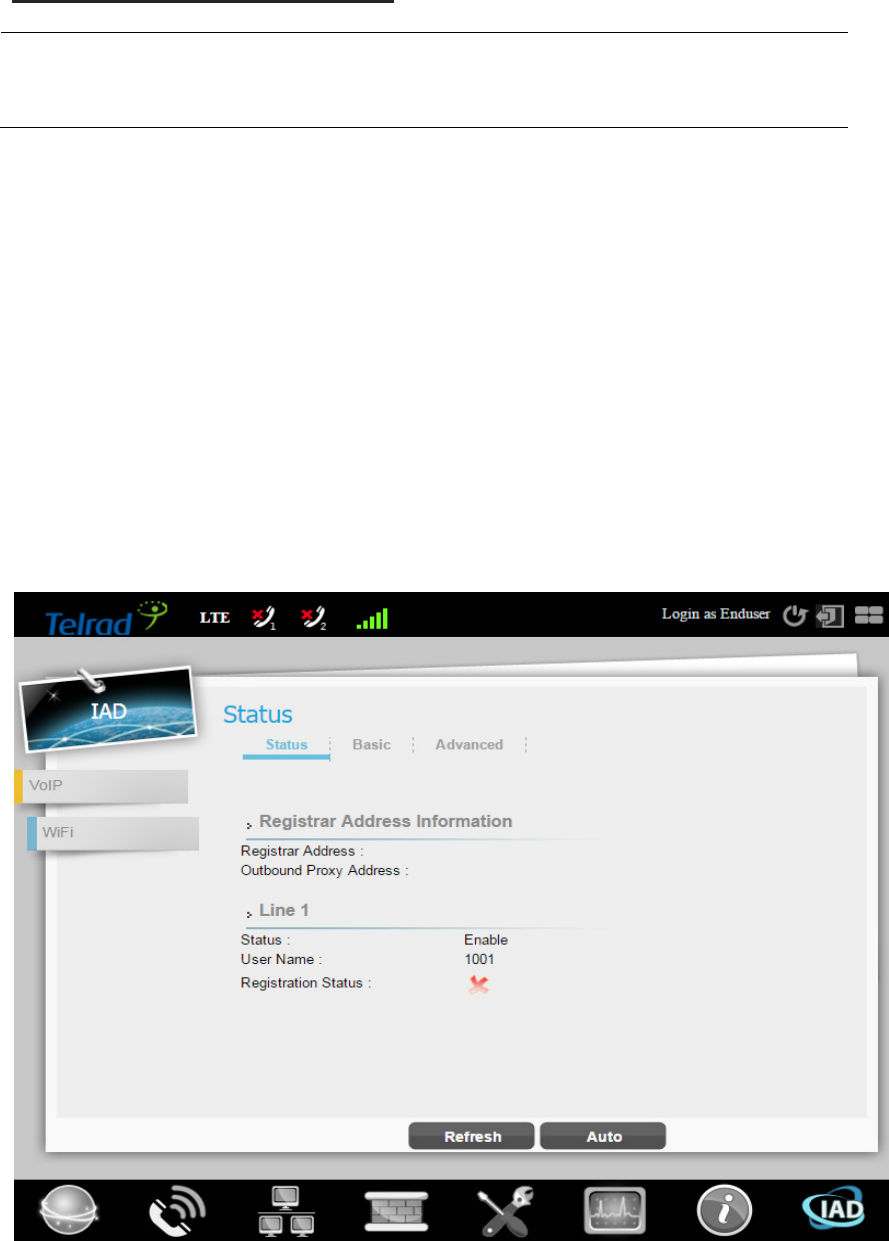
Step1: Select WIFI from main menu. Then screen will display the default setting of SSID,
radio channel, working mode, and SSID broadcast.
Step2: You could specify a radio channel, working mode, bandwidth in Settings page.
8
7. Make Phone Call
The VoIP settings should be provided by your VoIP service provider.
VoIP does’t support flash + uer feature.
Using a telephone connected to the PHONE port on IDU device, and making a call to
another phone (either an Internet phone, or a regular PSTN number). If you are able to
call the other number, your VoIP setup is working properly. Follow these directions to
make calls over the Internet:
To dial a SIP uer, press the uers o your phoe’s keypad to ake the all.
To call regular telephone numbers, use your VoIP service provider’s dialing plan.
For call forward service, contact your service provider to know if they support this
feature.
To receive a call through the IDU, the other party must have your SIP number and a
SIP account of their own.
9
Federal Communication Commission Interference Statement
This equipment has been tested and found to comply with the limits for a Class B
digital device, pursuant to Part 15 of the FCC Rules. These limits are designed to
provide reasonable protection against harmful interference in a residential
installation. This equipment generates, uses and can radiate radio frequency
energy and, if not installed and used in accordance with the instructions, may
cause harmful interference to radio communications. However, there is no
guarantee that interference will not occur in a particular installation. If this
equipment does cause harmful interference to radio or television reception, which
can be determined by turning the equipment off and on, the user is encouraged to
try to correct the interference by one of the following measures:
- Reorient or relocate the receiving antenna.
- Increase the separation between the equipment and receiver.
- Connect the equipment into an outlet on a circuit different from that
to which the receiver is connected.
- Consult the dealer or an experienced radio/TV technician for help.
FCC Caution: Any changes or modifications not expressly approved by the party
responsible for compliance could void the user's authority to operate this
equipment.
This device complies with Part 15 of the FCC Rules. Operation is subject to the
following two conditions: (1) This device may not cause harmful interference, and
(2) this device must accept any interference received, including interference that
may cause undesired operation.
IMPORTANT NOTE:
Radiation Exposure Statement:
This equipment complies with FCC radiation exposure limits set forth for an
uncontrolled environment. This equipment should be installed and operated with
minimum distance 20cm between the radiator & your body.
This transmitter must not be co-located or operating in conjunction with any other
antenna or transmitter.
Country Code selection feature to be disabled for products marketed to the
US/CANADA
10
Industry Canada statement:
This device complies with Industry Canada’s licence-exempt RSSs. Operation is
subject to the following two conditions:
(1) This device may not cause interference; and (2) This device must accept any
interference, including interference that may cause undesired operation of the
device.
Cet appareil est conforme aux CNR exemptes de licence d'Industrie Canada. Son
fonctionnement est soumis aux deux conditions suivantes:
(1) Ce dispositif ne peut causer d'interférences; et(2) Ce dispositif doit accepter
toute interférence, y compris les interférences qui peuvent causer un mauvais
fonctionnement de l'appareil.
Radiation Exposure Statement:
This equipment complies with IC radiation exposure limits set forth for an
uncontrolled environment. This equipment should be installed and operated with
minimum distance 20cm between the radiator & your body.
Déclaration d'exposition aux radiations:
Cet équipement est conforme aux limites d'exposition aux rayonnements IC
établies pour un environnement non contrôlé. Cet équipement doit être installé et
utilisé avec un minimum de 20 cm de distance entre la source de rayonnement et
votre corps.