Telular CDMAFWT2004 CDMA800 and 1900 Fixed Wireless Terminal User Manual 56029901 SX5T CDMA2000 1X
Telular Corporation CDMA800 and 1900 Fixed Wireless Terminal 56029901 SX5T CDMA2000 1X
Telular >
User Manual
4/19/04 Part Number 56029901
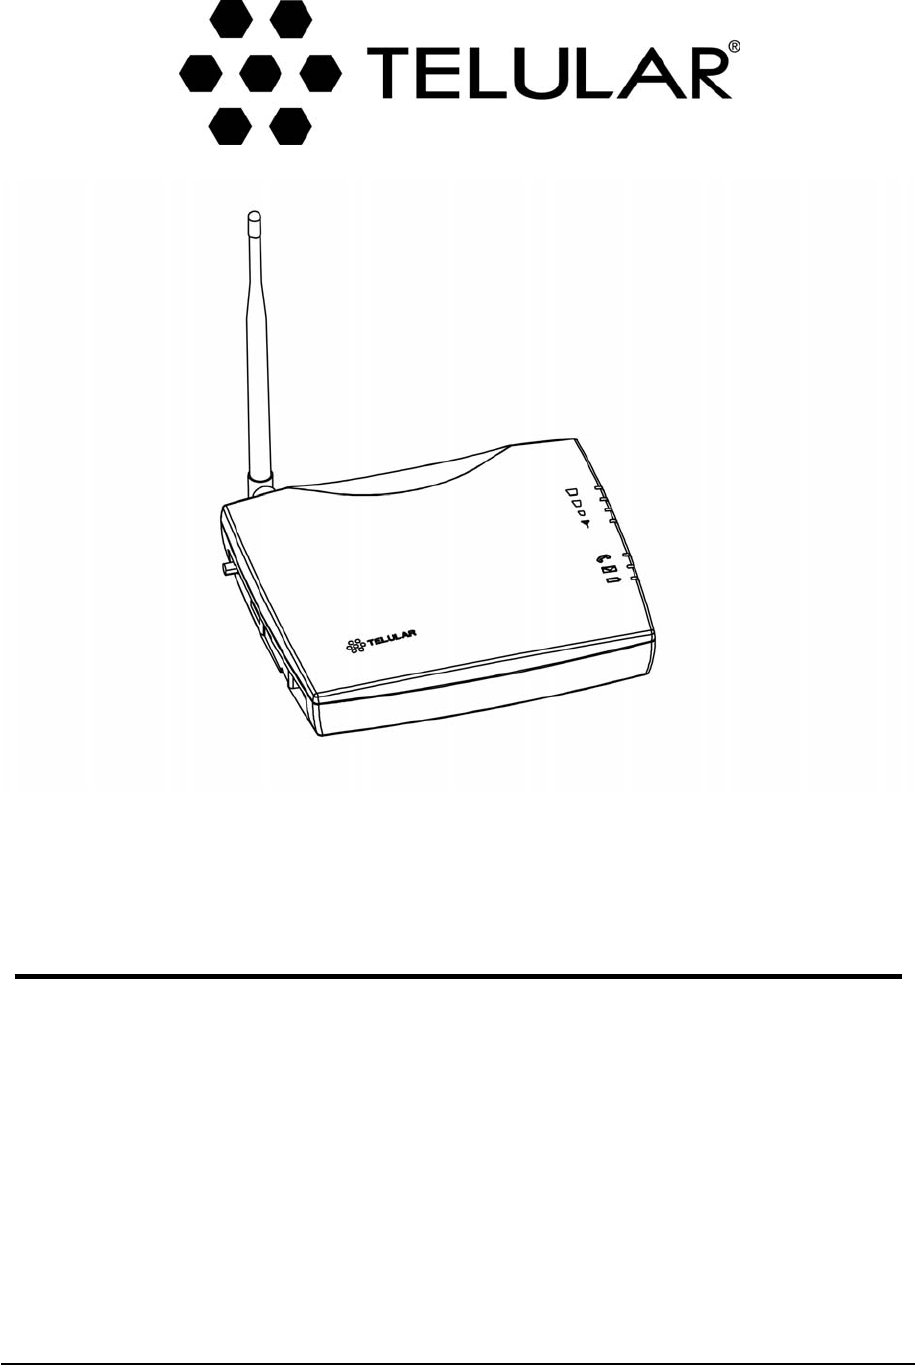
Phonecell®SX5T CDMA2000®1X
Fixed Wireless Terminal
800/1900 MHZCDMA
USER MANUAL
Phonecell®SX5T CDMA ii User Manual
QUICK CONNECTION GUIDE
SX5 Fixed Wireless Terminal
Phonecell®SX5T CDMA iii User Manual
Before installing the Phonecell®SX5T, carefully remove the contents from the shipping carton
and check for evidence of shipping damage. If damage is found, contact your Authorized
Telular Distributor or shipping agent immediately.
SAFE OPERATION INSTRUCTIONS
IMPORTANT! Before installing or operating this product, read the SAFETY INFORMATION
section of this manual.
•• Install the unit indoors.
•• Install the unit on a hard, flat surface for proper ventilation.
•• Do not expose the unit to rain or moisture.
••Do not place the unit on or close to sources of heat.
IMPORTANT NOTICES
TERMS AND CONDITIONS FOR USE OF PHONECELL®PRODUCTS ("Product")
These Terms and Conditions are a legal contract between you and Telular Corporation for the title to
and use of the Product. BY RETAINING AND USING THE PRODUCT AFTER RECEIPT OF IT,
YOU AGREE TO THE TERMS AND CONDITIONS INCLUDING WARRANTY DISCLAIMERS,
LIMITATIONS OF LIABILITY AND INDEMNIFICATION PROVISIONS BELOW. IF YOU DO NOT
AGREE TO THE TERMS AND CONDITIONS, DO NOT USE THE PRODUCT AND IMMEDIATELY
RETURN THE UNUSED PRODUCT FOR A COMPLETE REFUND. You agree to accept sole
responsibility for any misuse of the Product by you; and, in addition, any negligent or illegal act or
omission of your or your agents, contractors, servants, employees, or other users of the Product so
long as the Product was obtained from you, in the use and operation of the Product.
INDEMNIFICATION OF TELULAR CORPORATION ("TELULAR")
YOU SHALL INDEMNIFY, DEFEND AND HOLD HARMLESS TELULAR FOR ANY OF THE COST, INCLUDING REASON-
ABLE ATTORNEYS' FEES, AND FROM CLAIMS ARISING OUT OF YOU, YOUR CLIENTS' OR OTHER THIRD PARTIES'
USE OR OPERATION OF THE PRODUCT: (i) FOR MISUSE OR IN A MANNER NOT CONTEMPLATED BY YOU AND
TELULAR OR INCONSISTENT WITH THE PROVISIONS OF THIS MANUAL; (ii) IN AN ILLEGAL MANNER OR AGAINST
PUBLIC POLICY; (iii) IN A MANNER SPECIFICALLY UNAUTHORIZED IN THIS MANUAL; (iv) IN A MANNER HARMFUL
OR DANGEROUS TO THIRD PARTIES; (v) FROM CLAIMS BY ANYONE RESPECTING PROBLEMS, ERRORS OR MIS-
TAKES OF THE PRODUCT; OR (vi) COMBINATION OF THE PRODUCT WITH MATERIAL, MODIFICATION OF THE
PRODUCT OR USE OF THE PRODUCT IN AN ENVIRONMENT NOT PROVIDED, OR PERMITTED, BY TELULAR IN
WRITING. THE PARTIES SHALL GIVE EACH OTHER PROMPT NOTICE OF ANY SUCH COST OR CLAIMS AND COOP-
ERATE, EACH WITH THE OTHER, TO EFFECTUATE THIS INDEMNIFICATION, DEFENSE AND HOLD HARMLESS.
PLEASE SEE THE IMPORTANT NOTICES SECTION OF THIS MANUAL FOR
IMPORTANT INFORMATION ON USE, WARRANTY AND INDEMNIFICATION
CONTENTS
Telular Corporation
Corporate Headquarters
647 North Lakeview Parkway
Vernon Hills, Illinois 60061, USA
Technical Support
Tel: 847-247-9400 • Fax: 847-247-0021
E-mail: support@telular.com • http://www.telular.com
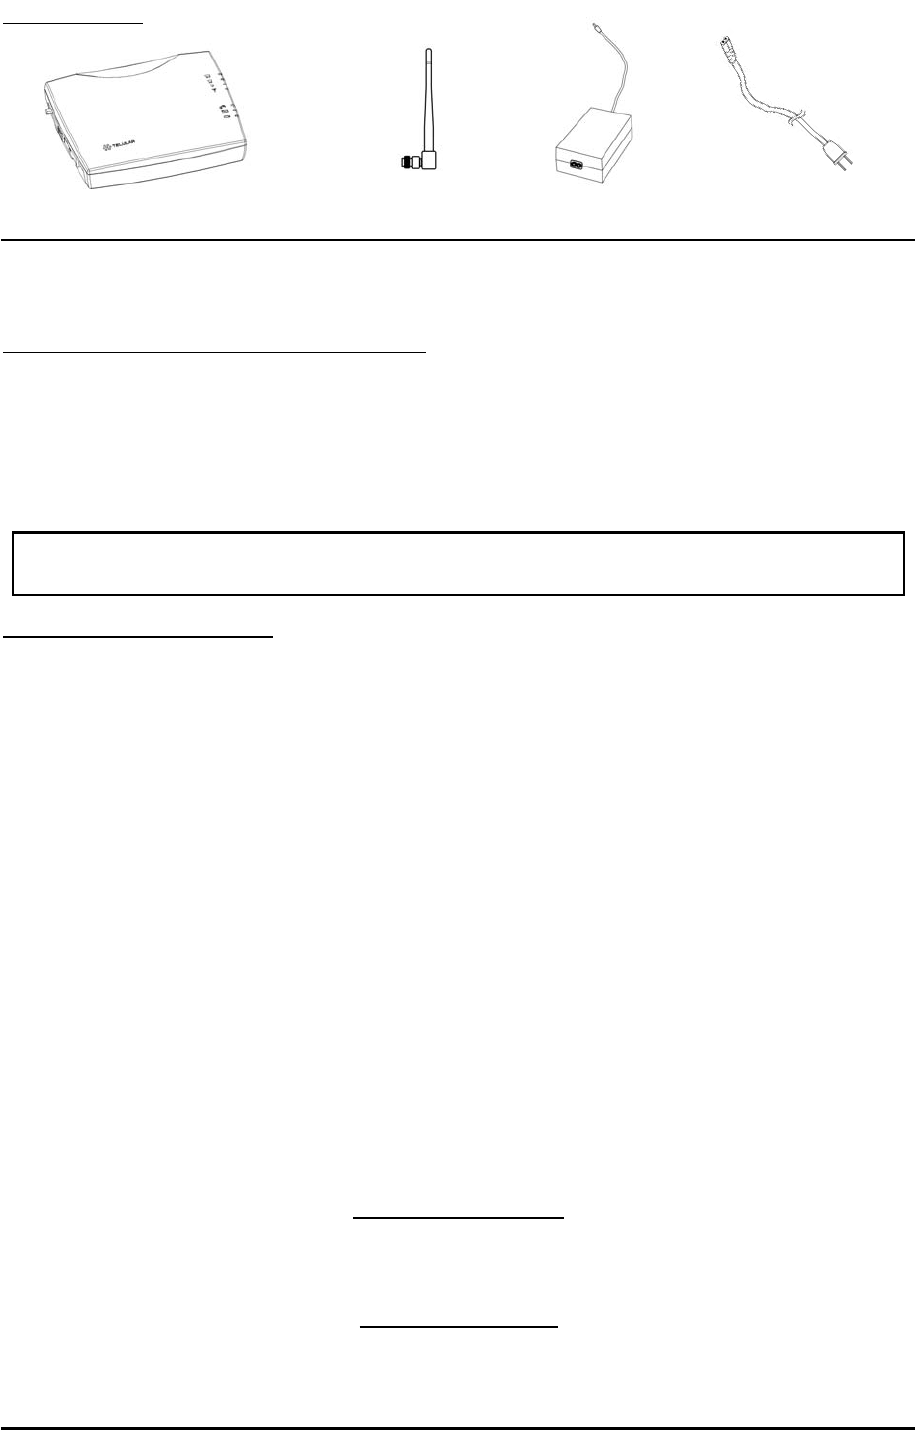
Phonecell®SX5T CDMA FWT Spike Antenna
Part Number 56029901 ©2004 Telular Corporation, All Rights Reserved
Power Supply
AC Power Cord

Phonecell®SX5T CDMA iv User Manual
TABLE OF CONTENTS
QUICK CONNECTION GUIDE ......................................................................................ii
IMPORTANT NOTICES.................................................................................................iii
Technical Support ......................................................................................................iii
SETUP............................................................................................................................1
Emergency Batteries..................................................................................................1
SX5 Location and Installation ....................................................................................2
Wall Mounting.............................................................................................................2
Connect the SX5 to AC Power...................................................................................3
Attach a Telephone to the SX5 ..................................................................................3
GETTING TO KNOW YOUR SX5..................................................................................4
LED Status Indicators ................................................................................................4
Important Dial Tones ..................................................................................................5
CALL FUNCTIONS ........................................................................................................6
Making Calls...............................................................................................................6
Receiving Calls ..........................................................................................................6
Ending Calls ...............................................................................................................6
In-Call Features..........................................................................................................6
SX5 USER FEATURES..................................................................................................7
Messages (Voice Mail and Text Messages)...............................................................7
Audio Settings ............................................................................................................7
Dial Settings ...............................................................................................................7
Caller ID .....................................................................................................................8
Setting Time and Date ...............................................................................................8
Reset User Factory Defaults......................................................................................8
Dialing Prefix Setup ...................................................................................................9
DATA FEATURES ........................................................................................................10
Connecting SX5 a Computer ...................................................................................10
Configure PC for Circuit Switch Data.......................................................................10
Automatic Baud Rate Fallback Control....................................................................10
Digital Fax Setup ......................................................................................................11
Analog Modem Support............................................................................................11
SX5T CDMA FWT WITH FAX......................................................................................14
Set SX5 for Analog Fax ...........................................................................................14
Connect SX5 for Dual Jack Mode............................................................................14
Connect SX5 for Single Jack Mode .........................................................................14
Fax Timing Adjustments ...........................................................................................14
Analog Fax Bypass ..................................................................................................15
SX5 TROUBLESHOOTING .........................................................................................15
CONFORMANCE STATEMENTS ................................................................................16
SAFETY INFORMATION .............................................................................................16
WARRANTY .................................................................................................................18

SETUP
Safe Operation Requirement
The Phonecell®SX5 must be either wall mounted or desk mounted and should not be operated
when any person is within 203 mm (8 inches) of the antenna.
Emergency Batteries
Install Batteries
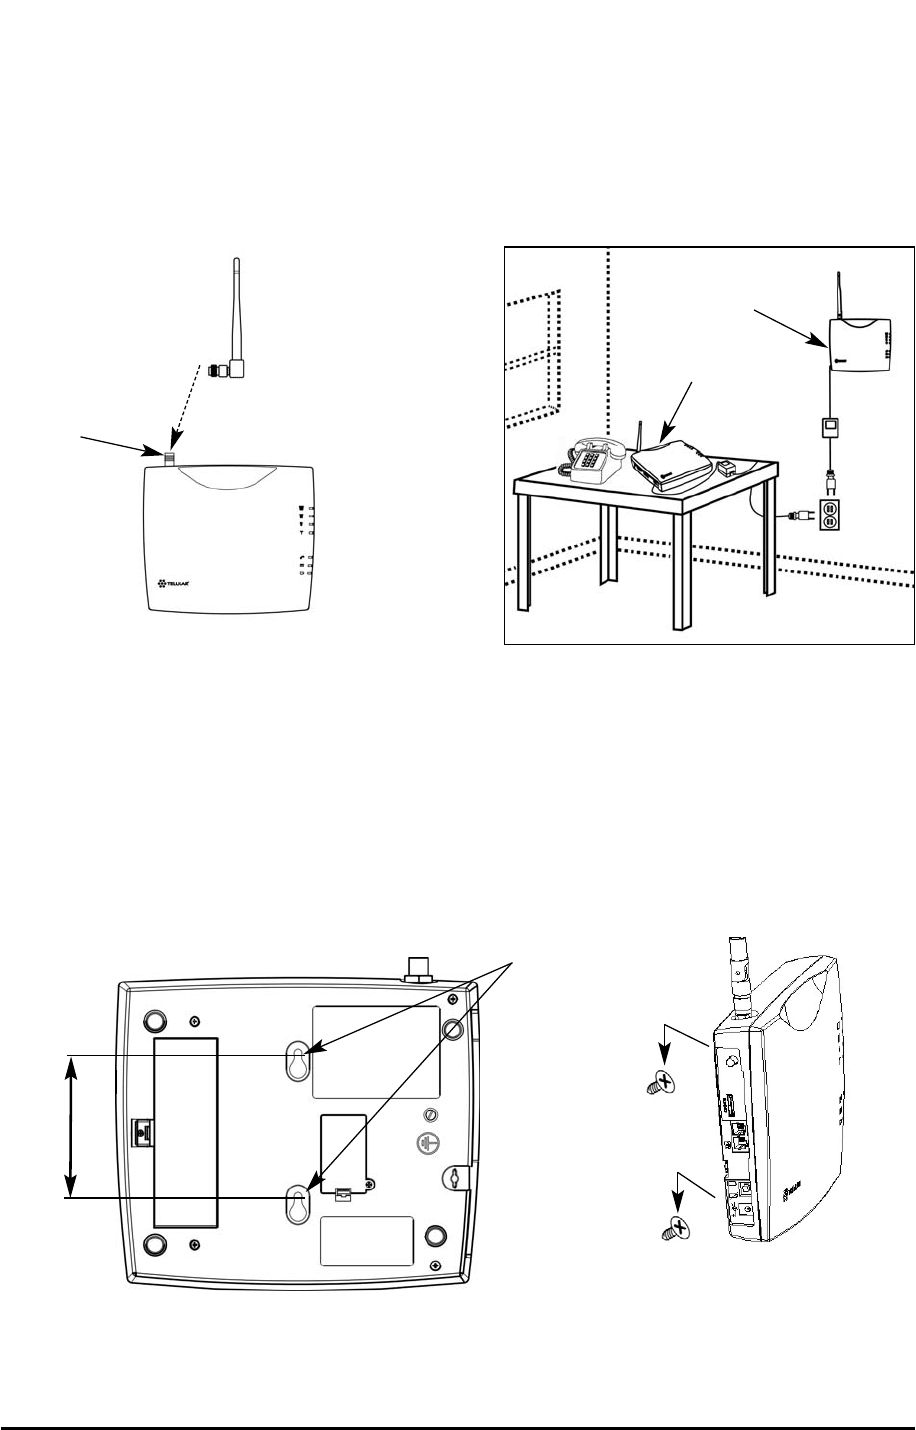
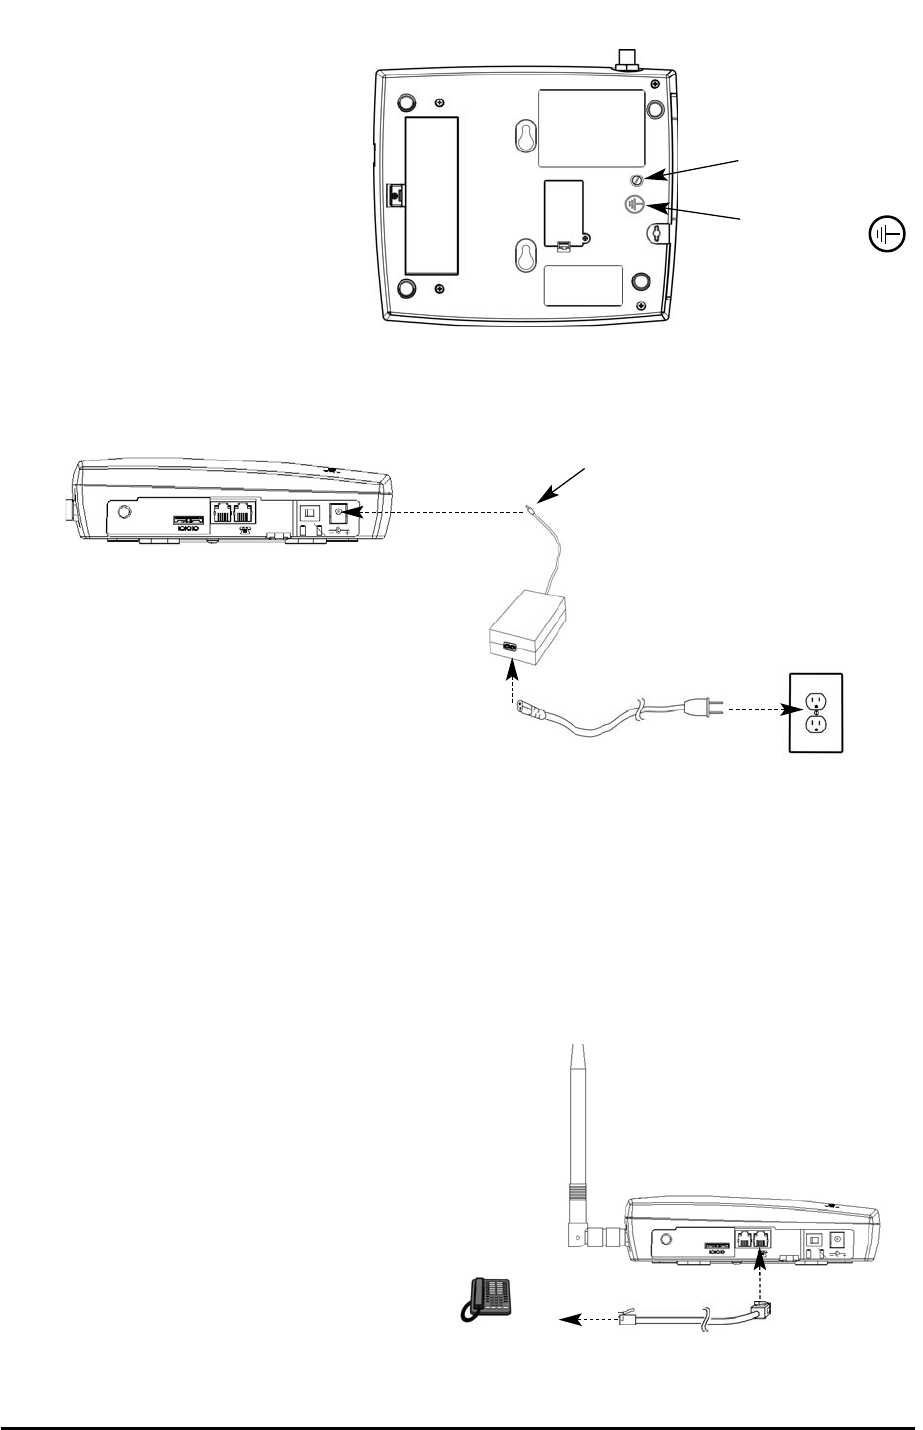
1. Remove the battery access door screw located on the bottom of the unit - see Figure 3.
2. Press the battery access door tabs and remove the battery access door.
3. Install 4 “AA” alkaline batteries (not supplied) - see Figure 3.
4. Reinstall the battery access door using the screw.
5. To test the batteries, turn the AC/Battery switch to battery operation. After the test, turn the
switch back to AC unless you want to continue to operate from battery power. - see Figure 4.
NOTE: The SX5 does not support rechargeable batteries.
Battery Operation
The unit will not automatically switch from AC to battery upon loss of AC power. The AC/Battery
switch must be changed manually - see Figure 4. Battery power will provide up to one hour of
standby and 30 minutes of talk time, depending on the SX5 model.
Phonecell®SX5T CDMA 1User Manual
AC/Battery Switch
Figure 4 – SX5 AC/Battery switch.
Battery Position AC Position
WARNING!
Only “AA” alkaline batteries are to be used with the Phonecell®SX5.
Use of any other batteries may result in fire and/or other damage to the unit.
!
Battery
Access
Door
Battery Access
Door Screw
Figure 3 – SX5 battery installation.
Phonecell®SX5T CDMA 2User Manual
SX5 Location and Installation
The SX5 comes with a standard spike antenna (TNC) - see Figure 5. For optimal signal
strength, choose a location that is above ground and as close to windows (or exterior walls) as
possible - see Figure 6. Cellular signal strength is displayed by the Received Signal Strength
Indicator (RSSI) LED on the unit - See the How to Use the LED Status Indicators section of this
manual.
1. Connect the antenna to the terminal - see Figure 5.
2. Finger-tighten the antenna. Do not over-tighten the antenna.
Wall Mounting
1. Mark two hole locations 98,5 mm (3-7/8 inches) vertically apart and drill two holes into the
wall.
2. Install the screws (not supplied) into the wall, leaving a gap (approximately 3 mm (1/8 inch))
between screw head and wall.
3. Align the mounting holes with the screws and mount the SX5 onto the screws - see Figures
7 and 8.
Figure 6 – Typical SX5 installation.
Wall Mount
Figure 5 –
SX5 antenna connection.
Spike
antenna
TNC Antenna
Connector
Table Mount
Figure 7 – SX5 mounting holes. Figure 8 – Mount the SX5 onto the screws.
Mounting Holes
98,5 mm (3 7/8”)
Phonecell®SX5T CDMA 3User Manual
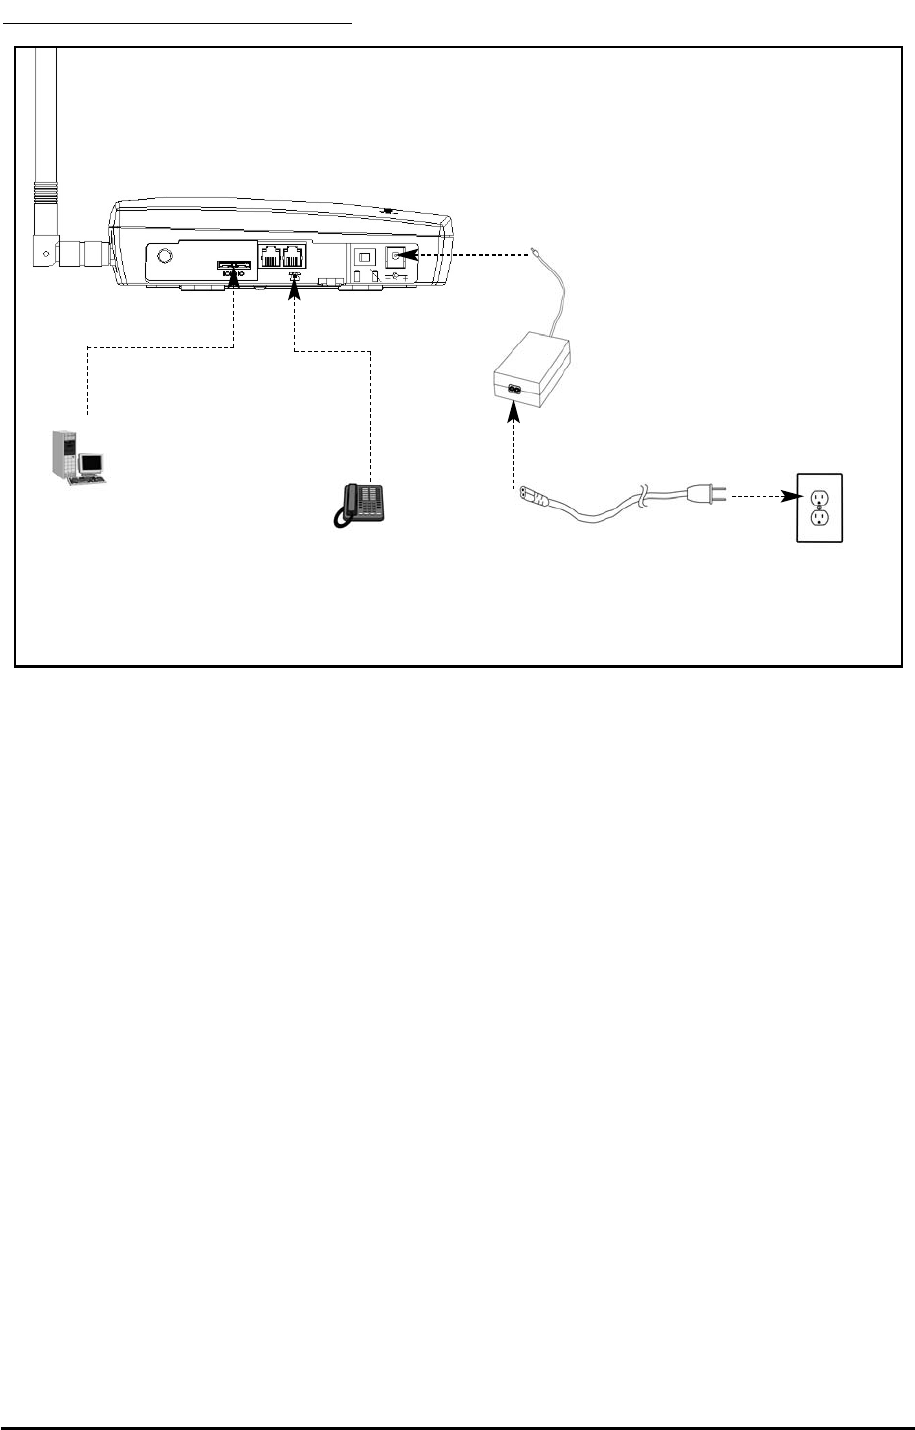
Connect the SX5 to AC Power
1. A protective earth (safety
ground) terminal (screw)
marked with a protective
earth symbol is provided
on the back of the SX5 -
see Figure 9a. Connect
this terminal to a good
earth ground (i.e., a cold
water pipe) by means of
an 18 gauge or heavier
insulated wire. The wire
insulation should be
green with a yellow stripe
to indicate that this is a
protective earth (safety
ground) connection.
2. Connect the barrel connector of the power supply to the AC power input receptacle of the
SX5 - see Figure 9b.
3. Plug the AC power cord into the power supply.
4. Plug the AC power cord into the AC Power outlet.
HINT: If there are no batteries in the SX5, it will only power on if the AC/Battery switch is in
the AC position - see Figure 4.
5. Check the cellular signal strength and move the unit until you achieve the best signal
possible - see the LED Status Indicators section of this manual.
Attach a Telephone to the SX5
1. Plug one end of a standard phone
cord into a phone- see Figure 10.
2. Connect the other end of the phone
cord to the telephone port on the side
of the SX5 (marked with a phone icon)
- see Figure 10.
Figure 9a –
Earth ground terminal screw.
Protective earth
(safety ground)
terminal screw
Protective earth
symbol
Figure 9b –
Connect the SX5 to AC Power.
AC Power
AC Power Input
AC Power Cord
Power
Supply
Barrel Connector
Figure 10 - Connect SX5 to Telephone.
Phonecell®SX5T CDMA 4User Manual
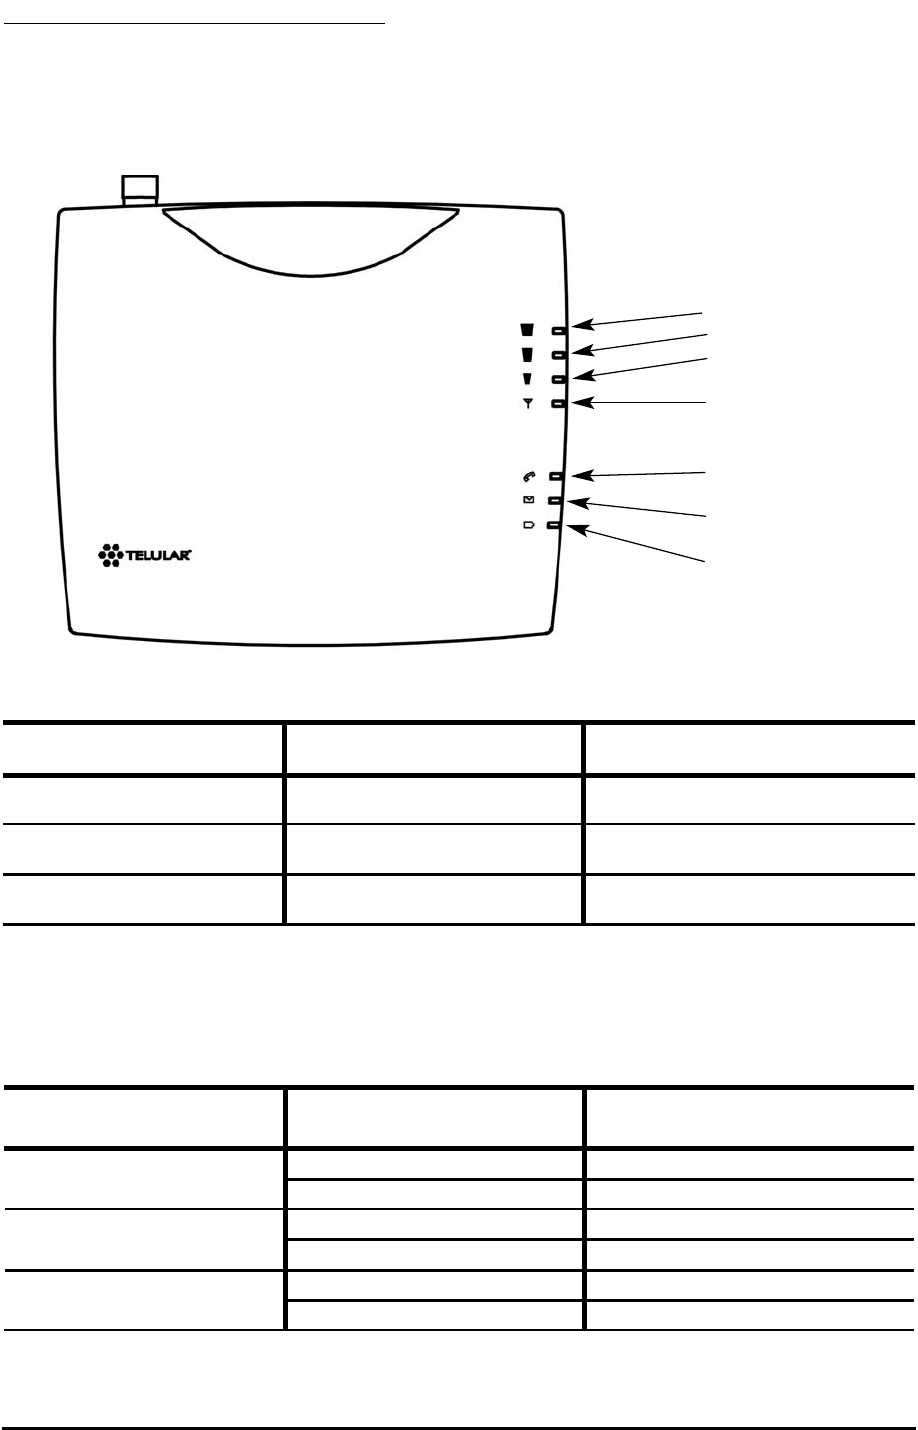
GETTING TO KNOW YOUR SX5
LED Status Indicators
The LED indicators are activated when the SX5 is powered on. The following tables describe the
modes and operation of the indicators.
NOTE: If you are getting no service, contact your service provider for more information.
RSSI 3
RSSI 2
RSSI 1
Service Indicator
Hook Indicator
Message Indicator
Power/Battery
* Contact your service provider to verify that service has been activated.
Service Indicator
LED Color Activity Description
Green Continuous Full Service
Green Flashing Roaming
Red Continuous No Service*
Received Signal Strength Indicator (RSSI)
RSSI LED's Activity Cellular Signal Strength
Flashing Lowest
Continuous Poor
Flashing Fair
Continuous Good
Flashing Very Good
Continuous Best
RSSI 1
RSSI 2
RSSI 3

Important Dial Tones
Service - Indicates that phone is ready for use (steady tone).
No Service - Indicates that there is no service available (fast beeping tone).
Roam - Indicates service in a roam area.
Supplementary Service - Indicates that supplementary services have been activated.
Phonecell®SX5T CDMA 5User Manual
Hook Indicator
LED Color Activity Description
Green Flashing (with ringer) Incoming call
Green Continuous FWT is off hook
Green Fast Flashing Processing data call
Green Slow Flashing Call on hold
Message Indicator
LED Color Activity Description
Green Slow Flashing New voice mail or text message
AC Power/Battery Indicator
LED Color Activity Description
Green Continuous AC power applied
Amber Continuous Battery level good
(battery switch on)
Amber/Green Alternating Battery level poor
(battery switch on)

CALL FUNCTIONS
Making Calls
1. Pick up the telephone handset (the phone is now “off-hook”).
2. Listen for dial tone. If service is not available, a No-Service tone is produced. Hang-up the
phone and try again. If the No-Service tone continues, contact your service provider to verify
that cellular service is available.
3. Dial the phone number. The call will be sent automatically.
HINT: Pressing the Flash key or pressing and releasing the switch-hook after dialing a num-
ber will send the call immediately.
Receiving Calls
When the telephone rings, pick up the handset and begin talking.
Ending Calls
Hang-up the phone (place the handset back onto the telephone cradle).
In-Call Features
Place a Call on Hold 1
To place a call on hold, press the Flash key on your phone. If your phone does not have a Flash
key, press and release the Switch-Hook. When the call is on hold, the Hook Indicator LED
will flash and you will hear a dial tone on your phone. If you hang-up your phone when a call is
on hold, the call will be disconnected.
Retrieve a Call on Hold 1
Press the Flash key or press and release the switch-hook to go back to your held call.
Answer Call Waiting 1
When you're on an active call, you will hear a beep tone on your phone when a new call is
incoming. To answer the new call and place the first call on hold, press Flash or press and
release the Switch-Hook.
Answer a Call when Dialing or Off Hook with Dial Tone
Sometimes you may receive a call as you are dialing or when your just about to dial a number. If
this happens, you will hear a call waiting tone (beep tone) on your phone. Press Flash or press
and release the Switch-Hook to answer the call.
Adjust the Volume Level
If the volume level on the phone is too high or too low, adjust the levels using the keypad on the
telephone. The telephone must be in Tone-Dial (DTMF) mode to adjust the levels.
• To Increase Volume press: # *8 #
• To Decrease Volume press: # *3 #
NOTE: The default setting allows adjustment of the volume three (3) steps from the default in
either direction (Up or Down). The volume setting remains in effect for future calls until changed
manually. When power to the SX5 is cycled (powered OFF/ON), the default mid-range volume
setting will be restored.
1Call Hold and Call Waiting are network dependent features. Contact your service provider for information
on activating these features.
Phonecell®SX5T CDMA 6User Manual

SX5 USER FEATURES
The SX5 has many user features and setup options that can be accessed using a telephone
connected to the SX5. To access these features, press the key sequence for the option at any
time. Some options are not available during a call. See the In-Call Functions heading in the Call
Functions section for functions that are allowed during calls.
All user options are activated with a sequence of digits entered from the telephone keypad. If
you hear an ordinary dial tone after a key sequence is entered, the option has been successfully
changed or set. If you hear three tones before the dial tone, there has been an error.
HINT: Make sure to use a tone-dial (DTMF) type telephone when accessing any user feature or
option that requires a key sequence. Pulse-dial and rotary-dial telephones will not allow key
(DTMF) sequences.
Messages (Voice Mail and Text Messages)
The SX5 is capable of receiving both text and voice mail messages. The Message LED will flash
to indicate a text or voice message has been received.
Voice Mail Access
To check voice mail, dial your voice mail access number and follow the prompts. Contact your
service provider for more information.
Text Messaging (SMS)
The SX5 allows you to send and receive text messages using a Personal Computer (PC). To do
this, you need a PC connected to the SX5 data port.
Message Indication Clearing
The Message LED will flash until you remove the message notification from the SX5. After you
have heard or read your messages, you can clear the notification by pressing # *112 #.
NOTE: All text messages will be erased when you clear the notification.
Audio Settings
Line Level
The Line Level option controls the handset volume for any telephones connected to the SX5.
Press: # * 69 * <output level> #
0= Low
1= Normal (default)
2= High
Ringer Styles
The SX5 can be set to use one of three different ringer styles (US, UK, or European). Any phone
connected to the SX5 will ring according to the alert type selected. If the Ringer Style is set to
Off, there will be no audible alert.
Press: # * 100 * <line alert option> #
1= US (default)
2= UK
3= European
0= Off
Dial Settings
Dial Delay
The Dial Delay is the time that the SX5 waits after a number is dialed before automatically send-
ing the number.
Press: # * 11 * <delay> #
The delay must be between 2 and 20 seconds. The default delay time is 3 seconds.
Phonecell®SX5T CDMA 7User Manual

Pulse Dial Option
Press: # * 12 * <pulse-dial> #
0= disable Pulse Dialing capability (default)
1= enable Pulse Dialing capability
Auto Dial
The SX5 will recognize frequently called phone numbers and send them without waiting for the
Dial Delay. Up to 50 numbers that have been successfully called at least twice will be stored
when this feature is enabled. Any loss of power to the SX5 will clear this list.
Press: # * 21 * <auto dial> #
0= disable Auto Dial option (default)
1= enable Auto Dial option
On-Hook Idle Voltage
This feature has been added to the SX5 and allows control of the on-hook idle voltage at the RJ-
11. It is recommended that only a qualified technician for PBX or payphone environments should
only change this parameter. Contact your installer for more information.
Press: # * 134 * <mode> #
0= Low battery mode and forward active when on-hook (default).
1= High battery mode and low power standby when on-hook
Caller ID
The SX5 will support Caller ID device operation. The default format setting is designed to work
for most Caller ID devices.
Change Caller ID Format
The following key sequence is used to select the Caller ID (CID) format:
Press: # *84 *<CID format> # <Flash>
1= MDMF (Multiple Data Message Format) (default)
2= SDMF (Single Data Message Format)
3= OFF
Set Time and Date
Allows for a set time and date to be displayed on a connected caller ID device.
Set Date
Press: # * 131 * <month> * <day> * <year>
<month> = 1-12
<day> = 1-31
<year> = 2000-2999
Set Time
Press: # * 130 * <hours> * <minutes> #
<hours> = 0 - 23
<minutes> = 0 - 59
Reset User Factory Defaults
Reset all user programmable options back to the factory defaults.
Press: # *107 *1 #
Phonecell®SX5T CDMA 8User Manual

Dialing Prefix Setup
The SX5 allows for a prefix to be setup that will be added to the dial string of every outbound
call. A maximum of 10 digits can be added to the dial string.
Enable/Disable Dialing Prefix
To enable press: # * 119 * 1 #
To disable press: # * 119 * 0 #
Configure Dialing Prefix
The dial prefix can be up to 10 digits of 0 - 9, #, or *.
Press: # * 120 * <prefix> #
Phonecell®SX5T CDMA 9User Manual

Phonecell®SX5T CDMA 10 User Manual
DATA FEATURES
When connected to a personal computer (PC), the SX5 is capable of sending and receiving digi-
tal fax and data, sending and receiving email communications, and accessing the Internet. Data
speeds may vary depending upon your cellular network.
Connect SX5 to a Computer
Use a data cable to connect the data port on the SX5 to the appropriate data port on your PC - see
Figure: 20
Configure PC for Circuit Switched Data
Requirements
• Active CDMA account with your network service
provider including a Data/Fax facility
• Windows (version 95/98 or later)
• PC with a serial or USB Port.
Modem Setup
1. Power on your PC/laptop.
2. Access the Control Panel, then select the Modems option.
3. Install a new modem device for the SX5 with the following specifications:
Modem Type: Standard 19200 bps Modem
Maximum speed of serial port: 19,200
Data bits: 8
Parity: None
Stop bits: 1
Use Flow Control: Enable this option and select Hardware [RTS/CTS]
Extra settings: AT & D1
Automatic Baud Rate Fallback Control
The SX5 supports an automatic fallback to 19,200 bps when errors are detected in the data
stream. This is useful for applications such as PC digital fax because most PC fax applications
require a 19,200 bps baud rate on the serial port.
Enabling Fallback
Enable this feature when you have an application that uses a port speed of 19,200 bps. When
the SX5 has a port speed that does not match the port speed on the PC, errors will be detected.
When these errors are detected, the SX5 will adjust the port speed to 19,200 bps, thus matching
the PC application rate of 19,200 bps. It does not matter if the SX5's port speed is higher or
lower than 19,200 bps, the SX5 will still be adjust the rate to 19,200 bps.
NOTE: The SX5 does not support autobauding and will only adjust the port speed to 19,200 bps
under the above conditions. No other rate will be automatically set.
Press: # * 132 * 1 # ( <default setting> )
When to Disable Fallback
If you mainly use the SX5 for GPRS data, then disable fallback of the port rate. This will allow
some errors in the data stream without effecting a change in port speed on the SX5.
Press: # * 132 * 0 #
Baud Rate AT Commands
The SX5 will accept AT commands to setup the port speed. If you want to change the SX5 port
speed for a session or keep the change permanent, or if you just want to see the profile settings,
use the following AT commands from a terminal application (like HyperTerminal).
NOTE: Make sure DTE Fallback is OFF before making changes to the baud rate.
Figure 20 - Data Port on the SX5
Data Port
Phonecell®SX5T CDMA 11 User Manual
Digital Fax Setup
The SX5T is capable of receiving and sending faxes via a personal computer using a serial or
USB port. The PC application and modem setup must be able to support software flow control.
To setup flow control properly, follow the instructions for setting up a standard modem connection
in Appendix A of this manual with the following changes.
HINT: Set up separate modems for PC fax and PC circuit switched data connections. This way
you will not have the make changes to the modem settings everytime you want to switch
between fax and data.
1. Change the flow control of the standard modem to enable software flow control.
2. Change Extra Settings from AT&D1 to AT+IFC=1,1 &d1. This enables software flow control on
the SX5.
3. To deliver faxes to your computer’s USB port, set the SX5T to USB data connection by
entering # * 67 * 3 #.
4. Run your PC fax application using this new modem connection for receiving and sending
faxes.
HINT: To set the SX5T to receive fax calls through its RJ-11, press # * 67 * 1 #.
Analog Modem Support
The SX5T supports connectivity with an analog modem.
RJ-11 Port Setup
The RJ-11 voice jack on the SX5 (the jack marked with a phone icon) can be configured for
voice (default setting) or analog modem data. If the jack is configured for analog data, the
bypass string for voice calls must be entered before a voice call can be made. In voice mode,
data transmissions are routed through the data port. To send data via an analog modem while in
voice mode, use the analog bypass string.
Modem Connection Options
The SX5T has the capability to either wait for a remote modem to connect before the local modem
connects or not. If your application has timing issues where the local application times out before
the remote modem connects, then use the following string command to enable this option.
Press: # *113 *<mode> #
Bypass String
Enter the bypass string if you want to make a single call in a different mode than the current
mode. After the call, the SX5 will return to the mode that was active before the call.
Press: # *19 *<bypass code> #
0= Voice
1 = Fax
2= Analog Modem
View current configuration AT&V
Change the port speed on the SX5T to <baud rate> AT+IPR=<baud rate>
Permanently change the SX5T port speed to <baud rate> AT+IPR=<baud rate>&W
Parameter Value
<mode> 0 = Voice (default)
1 = Analog Data
<option> 0 = Off (default)
1 = On

Modulation
The analog modem interface can be configured to specific modulations or set to automatic
modulation adjustment.
NOTE: This modulation is only for the connection between the modem and the SX5.
Press: # *114 *<modulation> #
Example: To set the modulation between the modem and the SX5T to V.22bis @ 24,
enter # *114 *7 #
Phonecell®SX5T CDMA 12 User Manual
Supported Modulations
Modulation Baud Rates (bps) <modulation>
V.8 Auto 0 (default)
V.32bis TCM 14,400 1
V.32bis TCM 12,000 2
V.32bis TCM 9600 3
V.32 9600 4
V.32bis TCM 7200 5
V.32 4800 6
V.22bis 2400 7
V22.bis 1200 8
V.22 1200 9
V.22 600 10

Air Interface Data Rates and Error Correction
The SX5T supports both transparent (no error correction) and non-transparent (error correction)
data connectivity along with different air interface data rates. Check with your carrier to deter-
mine which is right for your application. If you are not sure what your carrier supports, use the
default setting of non-transparent
Press: # *115 *<error correction> *<air interface modulation> #
Error Correction
0= transparent (no error correction) (default)
1= non-transparent (error correction)
Example: To set the air interface rate to V.32 @ 9600 bps with no error correction,
enter # *115 *0 *7 #
Phonecell®SX5T CDMA 13 User Manual
Supported Air Interface Data Rates
Modulation Over the Air Data
Rate (bps)
<air interface
modulation>
Automatically
Selected Auto 0 (default)
V.21 300 1
V.22 1200 2
V.23 1200 (uplink)
75 (downlink) 3
V.22bis 2400 4
V.26ter 2400 5
V.32 4800 6
V.32 9600 7
V.34 9600 12
V.34 14,400 14
V.110 300 65
V.110 1200 66
V.110 2400 68
V.110 4800 70
V.110 9600 71
V.110 14,400 75
Phonecell®SX5T CDMA 14 User Manual
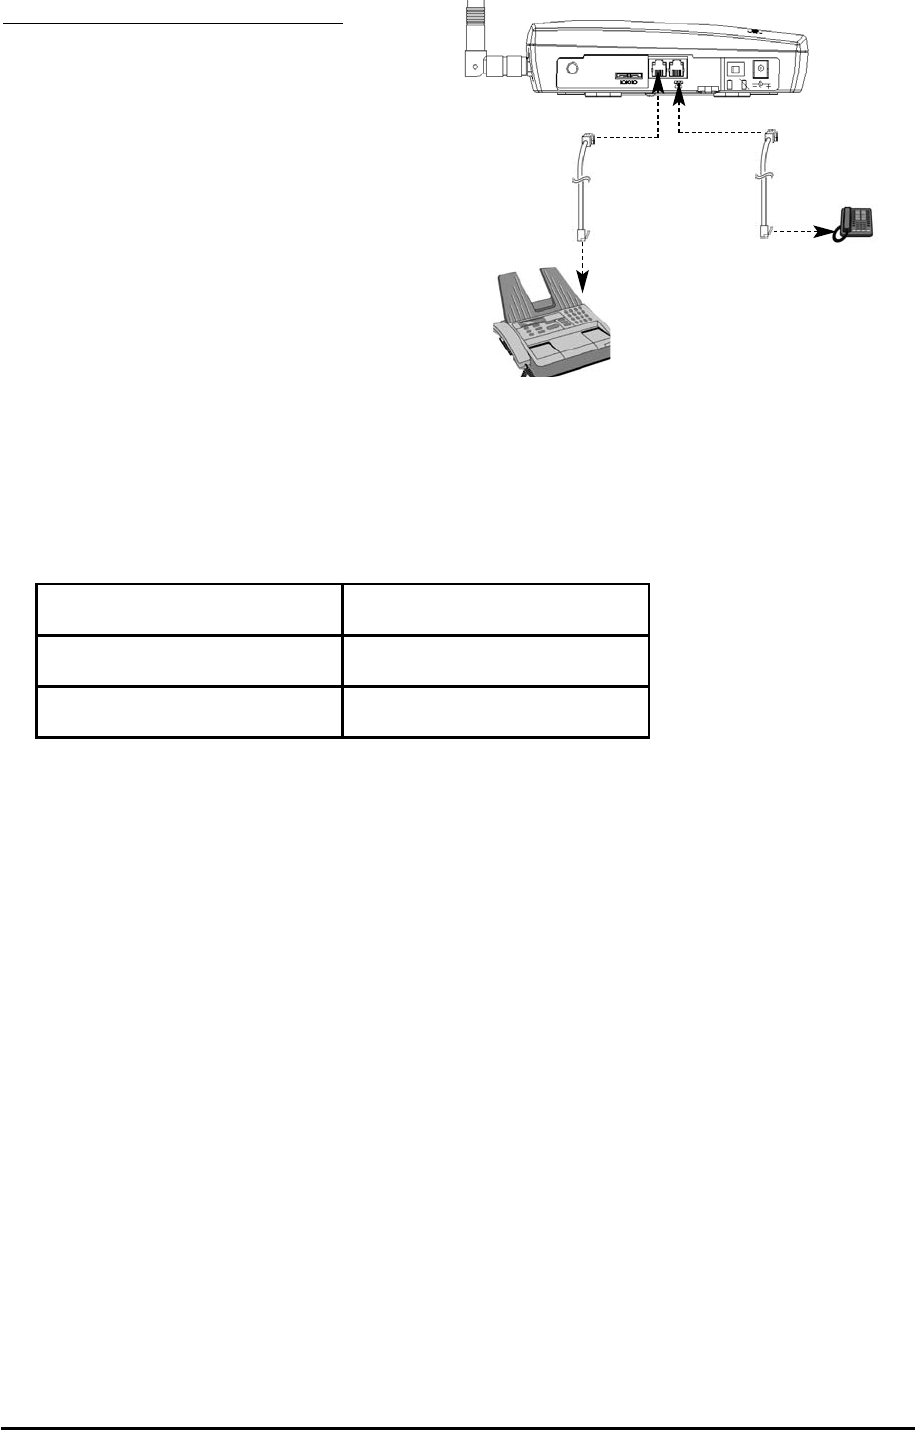
SX5T CDMA FWT WITH FAX
The SX5T CDMA FWT with Fax allows
connection to a fax machine and
additional telephones. Simply connect
your phone(s) or fax machine(s) to either
or both of the RJ-11 jacks on the side of
the SX5T.
Fax Timing Adjustments
Phase D adjustments can be made to analog faxing. If you experience faxing issues try adjusting
this setting.
Press: # * 133 * <control> * <time out> #
Analog Fax Bypass
This feature allows the phone jack to process the next outgoing call as an analog fax call. After
this call, the phone jack automatically returns to the default voice protocol. The user enters this
key sequence prior to dialing the telephone number. The terminal interprets the string and prop-
erly sets up the call. Refer to the following examples.
NOTE: The analog fax bypass string can only be used in single jack operation.
Use the Fax Bypass
1. Lift up the handset (take off-hook).
2. Press: # *19 *1 #, then dial the fax number to be called.
3. Press START on the fax machine.
HINT: If the fax machine does not have a handset, enter # * 19 * 1 #, followed by the
remote fax number to be called. Press START.
HINT: If the fax machine has the capability to store telephone numbers for speed dialing, the
# *19 *1 # command string may be programmed into the machine as a prefix to the telephone
number. With some machines, it may also be possible to store the command string as a speed
dial number and dial the remote fax machine telephone number manually.
Figure 12 - Connecting a Phone and a Fax.
Parameter Values
<control> 0 = Disable
1 = Enable
<time out> 1 - 255 in 15ms steps

SX5 TROUBLESHOOTING
Telephone Service is Not Working (Cannot make or receive calls)
· Make sure the SX5 powered on properly.
· Make sure any equipment that is externally connected to the SX5 is connected correctly .
· Test any externally connected equipment on a known system to verify its operation.
· Do you have the antenna connected? If not, connect the antenna.
· Is service established with a service provider? If so, is there any service provider issue? Your
service may be disconnected or not functioning properly. Contact your service provider if you
think this is the problem.
Unable to Receive Calls
· Is the handset on the cradle? If not, place the handset on the cradle and try again.
· Is the SX5 making a loud repetitive tone (ROH)? Then either speakerphone or the handset is
off hook. Hang up and try again.
Unable to Make Calls
· If you do not hear standard dial tone when your phone is off hook, then your service has a
problem. Contactyour service provider if you think this is the problem.
· Do you have telephone extensions connected to the SX5? If so, one of those may be off hook
(the display will show this information).
Unable to Send or Receive Analog Fax Calls
· Is your fax machine connected properly? You may have the fax machine connected to the
wrong RJ-11 jack of the SX5. Make sure it is connected to the jack with no symbol (no phone
icon). If you want to use the SX5 in single jack mode, please refer to the fax section of this
manual for proper setup.
· Do you have fax service on your wireless account? Contact your service provider for more
information.
· Do you have good signal strength? If you signal is low it may affect faxing. Try repositioning the
unit or obtaining a direction high gain external antenna.
Unable to Send or Receive Circuit Switched Data (CSD) Calls
· Is your computer connected to the data port of the SX5T? If not, connect the computer with an
appropriate data cable.
· Do you have CSD service on your wireless account? Contact your service provider for more
information.
· Is your computer configured properly to access data service with the SX5T? Please refer to
the data sections of this manual to check your setup.
Moisture or Ventilation Problems
· Is moisture forming on or around the SX5? Remove any moisture with a clean dry towel and
move the unit to a well ventilated area.
No Power
· Is the power supply connected to the unit? Make sure power is available and that the power
supply is properly connected to the SX5.
· If the power supply is connected but the unit still has no power, make sure power is being
delivered to the power supply. Check your breakers & contact your power company. Power may
be off at your location.
Phonecell®SX5T CDMA 15 User Manual
Phonecell®SX5T CDMA 16 User Manual
CONFORMANCE STATEMENTS
The SX5 800/1900 MHz models are in conformance with all applicable FCC requirements.
FCC Part 15/Part 22/Part 24 Class B Compliance
This Phonecell®SX5 model has been tested and found to comply with the limits for a Class B
digital device, pursuant to Part 15, Part 22 and Part 24 of the FCC rules. Changes or modifica-
tions not expressly approved by Telular Corporation will void your authority to operate the equip-
ment per FCC part 15 paragraph 15.21.These limits are designed to provide reasonable protec-
tion against harmful interference in a residential installation. This equipment generates, uses and
can radiate radio frequency energy and, if not installed and used in accordance with the instruc-
tions, may cause harmful interference to radio communications. However, there is no guarantee
that interference will not occur in a particular installation. If this equipment does cause harmful
interference to radio or television reception, which can be determined by turning the equipment
OFF and ON, the user is encouraged to try to correct the interference by one or more of the fol-
lowing measures:
• Reorient or relocate the antenna.
• Increase the separation between the equipment and the terminal.
• Connect the equipment into an outlet on a circuit different from that to which the terminal is
connected.
• Consult your Authorized Telular Distributor or an experienced radio/TV technician for help.
SAFETY INFORMATION
The Phonecell®SX5 functions as both a radio transmitter and receiver. When it is ON, the SX5
receives and sends out radio frequency (RF) energy. The SX5 CDMA unit operates in the fre-
quency ranges of 824 MHz to 894 MHz and / or 1850 MHz to 1910 MHz. When you use the
SX5, the cellular system handling your call controls the power level at which the unit transmits.
Exposure to RF (Radio Frequency) Energy
In 1991, the Institute of Electrical and Electronics Engineers (IEEE), and in 1992, the American
National Standards Institute (ANSI), updated the 1982 ANSI Standard for safety levels with
respect to human exposure to RF energy. After reviewing the available body of research, more
than 120 scientists, engineers and physicians from universities, government health agencies and
industry developed this updated Standard. In March, 1993, the U.S. Federal Communications
Commission (FCC) proposed the adoption of this updated Standard.
The design of the Telular Phonecell®SX5 complies with this updated Standard. Of course, if you
want to limit RF exposure even further than the updated ANSI Standard, you may choose to con-
trol the duration of your calls and operate your phone in the most power-efficient manner.
Safe Operation Requirement
The Phonecell®SX5 must be either wall mounted or desk mounted and should not be operated
when any person is within 203 mm (8 inches) of the antenna.
Temperature Environment
Operating Temperature: From -10°C to +50°C ; Up to 95% relative humidity (non-condensing).
Storage Temperature: From -40°C to +60°C; Up to 95% relative humidity (non-condensing).
Antenna Care and Replacement
Do not use the Phonecell®SX5 with a damaged antenna. If a damaged antenna comes into con-
tact with the skin, a minor burn may result. Have the antenna replaced by a qualified technician
immediately. Use only a manufacturer-approved antenna. Unauthorized antennas, modifications,
or attachments could damage the Phonecell®SX5.
WARNING!
The Phonecell®SX5 is intended either to be wall mounted or mounted on
a flat surface to allow proper ventilation. Do not block the space beneath
the Phonecell®SX5 as this could cause the unit to overheat and fail.
!

Phonecell®SX5T CDMA 17 User Manual
Driving
Check the laws and regulations on the use of cellular products in the areas where you drive.
Some jurisdictions prohibit use of a cellular device while driving a vehicle. Even if your jurisdiction
does not have such a law, we strongly suggest that, for safety reasons, the driver use extreme
caution when operating the cellular device while the vehicle is in motion. Always obey the law.
Exposure to Electronic Devices
Most modern electronic equipment is shielded from RF energy. However, RF energy from cellular
devices may affect inadequately shielded electronic equipment. RF energy may affect improperly
installed or inadequately shielded electronic operating and entertainment systems in motor vehi-
cles. Check with the manufacturer or its representative to determine if these systems are ade-
quately shielded from external RF energy. You should also check with the manufacturer of any
equipment that has been added to your vehicle.
Consult the manufacturer of any personal medical devices (such as pacemakers, hearing aids,
etc.) to determine if they are adequately shielded from external RF energy. Turn the Phonecell®
SX5 OFF in health care facilities when any regulations posted in the areas instruct you to do so.
Hospitals or health care facilities may be using equipment that could be sensitive to external RF
energy.
Aircraft
Turn OFF the Phonecell®SX5 before boarding any aircraft.
• Use it on the ground only with crew permission.
• Do not use it in the air.
To prevent possible interference with aircraft systems, U.S. Federal Aviation Administration (FAA)
regulations require you to have permission from a crew member to use your cellular phone (or
any other cellular product) while the plane is on the ground. To prevent interference with aircraft
systems, FCC regulations prohibit using your cellular device while the plane is in the air.
Children
To prevent damage to the unit, do not allow children to play with the Phonecell®SX5 .
Blasting Areas
Construction crews often use remote control RF devices to set off explosives. Therefore, to avoid
interfering with blasting operations, turn the Phonecell®SX5 OFF when in a "blasting area" or in
areas posted: "Turn off two-way radio."
Potentially Explosive Atmospheres
Turn the Phonecell®SX5 OFF when in any area with a potentially explosive atmosphere. It is
rare, but the Phonecell®SX5 or its accessories could generate sparks. Sparks in such areas
could cause an explosion or fire resulting in bodily injury or even death.
Areas with a potentially explosive atmosphere are often, but not always, clearly marked. They
include fueling areas such as gas stations; below deck on boats; fuel or chemical transfer or stor-
age facilities; areas where the air contains chemicals or particles, such as grain, dust, or metal
powders; and any other area where you would normally be advised to turn off your vehicle engine.
Do not transport or store flammable gas, liquid or explosives in the area of the Phonecell®SX5
or accessories.
Vehicles using liquefied petroleum gas (such as propane or butane) must comply with the National
Fire Protection Standard (FPA-58). For a copy of this standard, contact the National Fire Protection
Association, One Batterymarch Park, Quincy, MA 02269, Attn: Publications Sales Division.

WARRANTY
I. WHAT THIS WARRANTY COVERS AND FOR HOW LONG:
TELULAR CORPORATION ('Telular") warrants to a distributor Buyer, or to a customer only if the
customer is a Buyer directly from Telular, that the Products (including accessories) shall comply
with the applicable Specifications and shall be free from defects in material and workmanship
under normal use and service for a period of fifteen (15) months from date of shipment from
Telular. Telular, at its option, shall at no charge either repair, replace or refund the purchase
price of the Product during the warranty period, provided it is returned by Buyer in accordance
with the terms of this warranty to the Telular designated repair center. Repair or replacement, at
Telular's option, may include the replacement of parts, boards or Products with functionally
equivalent reconditioned items. Repaired and replacement items are warranted for the balance
of the original warranty period. All replaced items shall become the property of Telular. SUCH
ACTION ON THE PART OF TELULAR SHALL BE THE FULL EXTENT OF TELULAR'S LIA-
BILITY HEREUNDER, AND BUYERS EXCLUSIVE REMEDY. Buyer shall be responsible for all
costs and expenses incurred by Buyer including without limitation any handling, labor or trans-
portation charges. OTHER THAN AFORESAID, THIS EXPRESS WARRANTY IS EXTENDED
BY TELULAR TO BUYER ONLY AND NOT TO BUYER'S CUSTOMERS OR USERS OF
BUYER'S PRODUCTS.
II. HOW TO OBTAIN WARRANTY SERVICE
Product covered under this warranty shall only be accepted from and returned to Buyer's
designated repair center. Buyer's dealers, distributors, agents, and end users cannot submit
items to Telular under this warranty. To receive warranty service an RMA number must first be
obtained from Telular Technical Support. The defective or non-compliant Product should be sent
by Buyer freight pre-paid to: Telular Corporation, 647 North Lakeview Parkway, Vernon Hills, IL
60061, USA or other designated location. The product must be packaged in the original carton
and packing material or an equivalent package and must have the assigned RMA number clearly
marked on the carton. Returned Product received without an RMA number will be returned to the
sender.
III. WARRANTY CONDITIONS:
This is the complete warranty for the Products manufactured by Telular and sold to Buyer. Telular
assumes no obligation or liability for additions or modifications to this warranty unless made in
writing and signed by an officer of Telular. Unless made in separate written agreement between
Telular and Buyer, Telular does not warrant the installation, field maintenance or service of the
Products or parts.
TELULAR CANNOT BE RESPONSIBLE IN ANY WAY FOR ANY ANCILLARY EQUIPMENT
NOT FURNISHED BY TELULAR WHICH IS ATTACHED TO OR USED IN CONNECTION WITH
THE PRODUCTS OR FOR OPERATION OF THE PRODUCTS WITH ANY ANCILLARY EQUIP-
MENT AND ALL SUCH EQUIPMENT IS EXPRESSLY EXCLUDED FROM THIS WARRANTY.
FURTHERMORE, TELULAR CANNOT BE RESPONSIBLE FOR ANY DAMAGE TO THE
PRODUCTS RESULTING FROM THE USE OF ANCILLARY EQUIPMENT NOT FURNISHED
BY TELULAR FOR USE WITH THE PRODUCTS.
WHEN THE PRODUCT IS USED IN CONJUNCTION WITH ANCILLARY OR PERIPHERAL
EQUIPMENT NOT MANUFACTURED BY TELULAR, TELULAR DOES NOT WARRANT THE
OPERATION OF THE PRODUCT/PERIPHERAL COMBINATION, AND TELULAR SHALL
HONOR NO WARRANTY CLAIM WHERE THE PRODUCT IS USED IN SUCH A COMBINA-
TION AND IT IS DETERMINED BY TELULAR THAT THERE IS NO FAULT WITH THE PROD-
UCT. TELULAR DISCLAIMS LIABILITY FOR RANGE, COVERAGE, AVAILABILITY, OR
OPERATION OF THE CELLULAR SYSTEM WHICH IS PROVIDED BY THE CARRIER.
Phonecell®SX5T CDMA 18 User Manual

IV. WHAT THIS WARRANTY DOES NOT COVER:
(a) Subsequent upgrades and enhancements to the Product. (b) Defects, non-compliance or
damage resulting from use of the Product in other than its normal and customary manner or
environment. (c) Defects, noncompliance or damage from misuse, lightening, accident or
neglect. (d) Defects, noncompliance or damage from improper testing, operation, maintenance,
installation, adjustment, or any alteration or modification of any kind. (e) Product disassembled or
repaired in such a manner as to adversely affect performance or prevent adequate inspection
and testing to verify any warranty claim. (f) Product which has had the serial number removed or
made illegible. (g) Defects, non-compliance or damage due to spills of food or liquid. (h) All
plastic surfaces and all other externally exposed parts that are scratched or damaged due to
customer normal use. (i) Costs and expenses, including without limitation handling, labor and
transportation, incurred in returning Product for warranty service to Telular's Repair Center. (j)
Repair, programming or servicing by someone other than Telular.
V. GENERAL PROVISIONS:
THIS WARRANTY IS GIVEN IN LIEU OF ALL OTHER EXPRESS OR STATUTORY
WARRANTIES. IMPLIED WARRANTIES, INCLUDING WITHOUT LIMITATION IMPLIED
WARRANTIES OF MERCHANTABILITY, FITNESS FOR A PARTICULAR PURPOSE, TITLE,
INFRINGEMENT, DELIVERY, NEGLIGENCE AND PERSONAL INJURY, ARE DISCLAIMED.
FURTHER, AS THE CELLULAR CARRIER IS NOT CONTROLLED BY TELULAR, NO
WARRANTY IS MADE AS TO COVERAGE, AVAILABILITY OR GRADE OF SERVICE
PROVIDED BY THE CELLULAR CARRIER. IN NO EVENT SHALL TELULAR BE LIABLE
FOR DAMAGES IN EXCESS OF THE PURCHASE PRICE OF THE PRODUCT, FOR ANY
LOSS OF USE, LOSS OF TIME, INCONVENIENCE, COMMERCIAL LOSS, LOST PROFITS
OR SAVINGS OR OTHER INCIDENTAL, SPECIAL OR CONSEQUENTIAL DAMAGES
ARISING OUT OF THE USE OR INABILITY TO USE SUCH PRODUCT TO THE FULL
EXTENT SUCH MAY BE DISCLAIMED BY LAW. SOME JURISDICTIONS DO NOT ALLOW
THE EXCLUSION OR LIMITATIONS OF INCIDENTAL OR CONSEQUENTIAL DAMAGES OR
LIMITATION ON HOW LONG AN IMPLIED WARRANTY LASTS.
VI. SOFTWARE PROVISIONS:
Laws in the United States and other countries preserve for Telular certain exclusive rights for
copyrighted Telular software such as the exclusive rights to reproduce in copies and distribute
copies of such Telular software. Telular software may be copied into, used in and redistributed
with only the Product associated with such Telular software. No other use, including without
limitation, disassembly of such Telular software or exercise of exclusive rights in such Telular
software is permitted and Telular reserves all rights not expressly granted in this Limited
Commercial Warranty.
Patents:
Telular Corporation products are protected and manufactured under one or more of the following
U.S. patents and related international patents and patents pending relating thereto: 4,658,096;
4,737,975; 4,775,997; 4,868,519; 4,922,517; 5,134,651; 5,361,297; 5,469,494; 5,046,085;
5,715,296.
Trademarks:
Telular Corporation owns the following registered trademarks: TELULAR and design, TELULAR,
CELJACK, MAXJACK, TELCEL, HEXAGON LOGO, PHONECELL, CELSERV, TELGUARD,
CPX, and AXCELL.
“Licensed by QUALCOMM Incorporated under one or more of the following Patents:
4,901,307 5,490,165 5,056,109 5,504,773 5,101,501 5,778,338
5,506,865 5,109,390 5,511,073 5,228,054 5,535,239 5,710,784
5,267,261 5,544,196 5,267,262 5,568,483 5,337,338 5,659,569
5,600,754 5,414,796 5,657,420 5,416,797
CDMA2000
®
is a registered trademark of the Telecommunications Industry Association (TIA-USA).
Phonecell®SX5T CDMA 19 User Manual

©2004 Telular Corporation, all rights reserved. Part Number 56029901
647 North Lakeview Parkway
Vernon Hills, Illinois 60061, USA
Tel: 847-247-9400 • Fax: 847-247-0021
E-mail: support@telular.com
http://www.telular.com