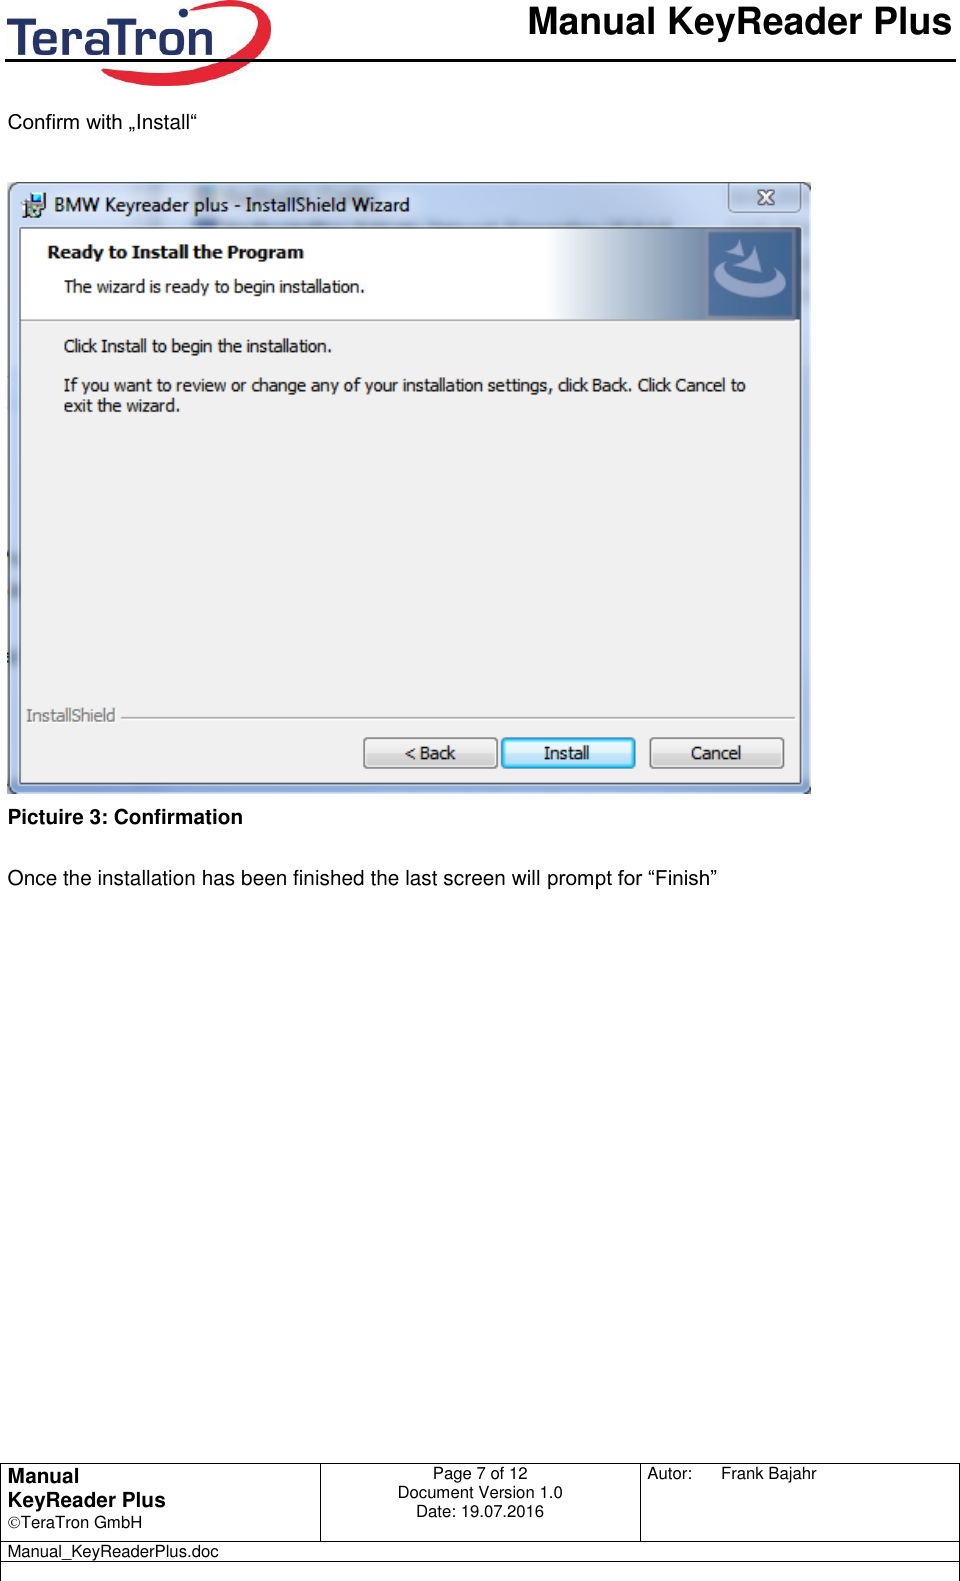
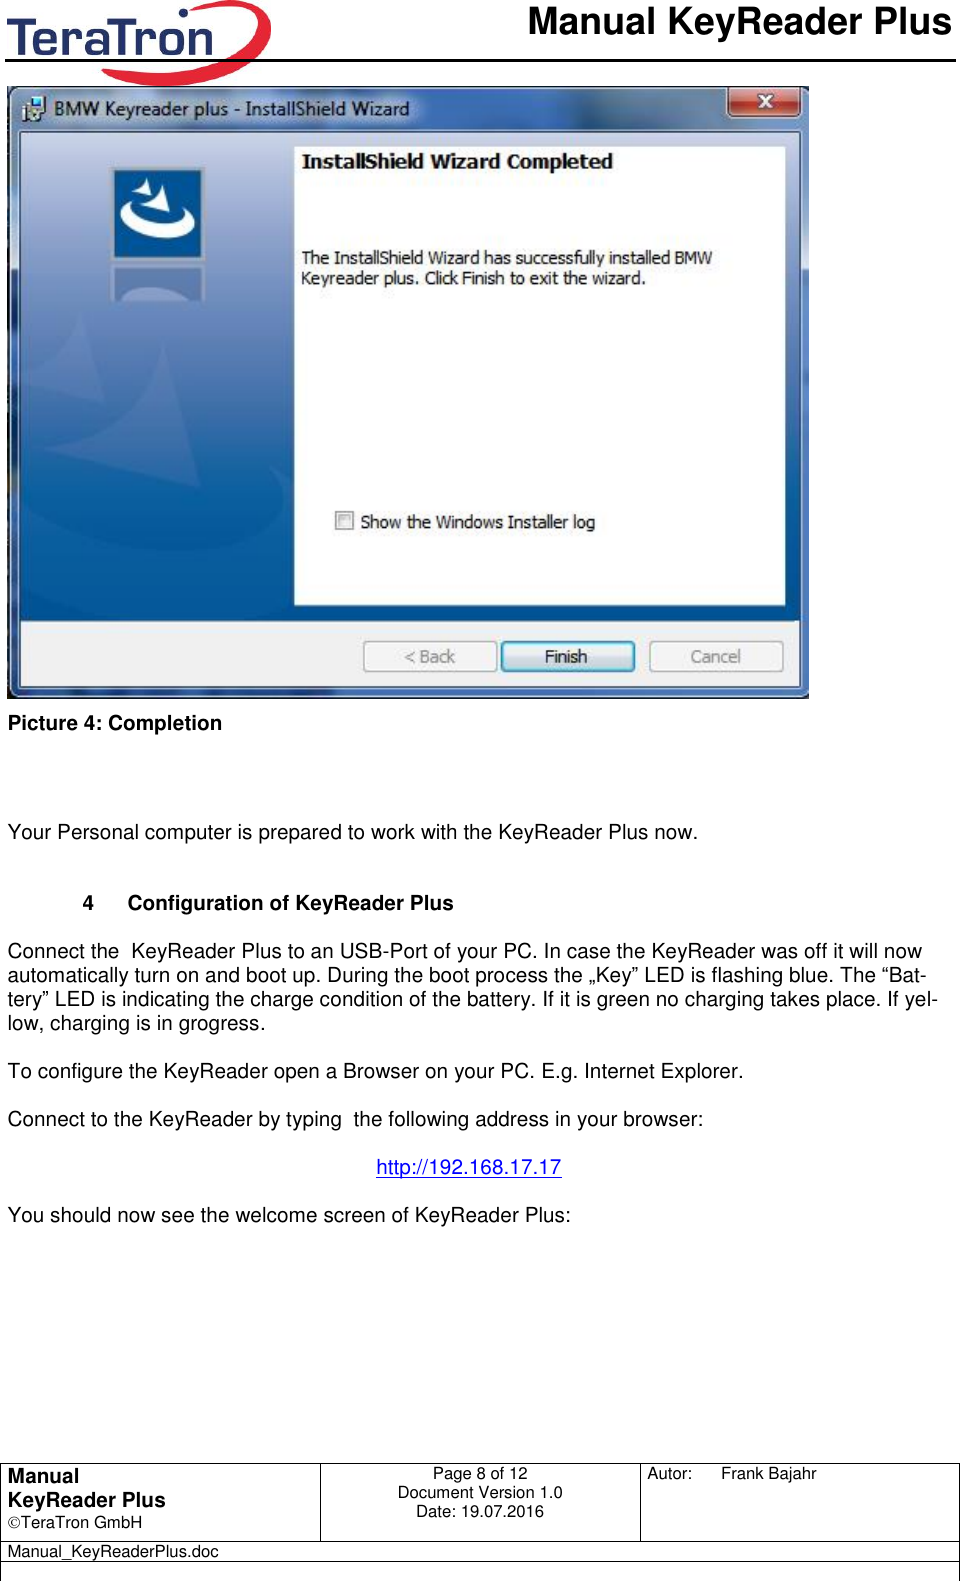
Tera Tron KRP Key programming device User Manual Benutzer Handbuch Schl sselfr se

Tera Tron GmbH Key programming device Benutzer Handbuch Schl sselfr se

User manual

      Manual KeyReader Plus   Manual KeyReader Plus TeraTron GmbH Page 1 of 12     Document Version 1.0 Date: 19.07.2016  Autor:  Frank Bajahr   Manual_KeyReaderPlus.doc     KeyReader Plus
      Manual KeyReader Plus   Manual KeyReader Plus TeraTron GmbH Page 2 of 12     Document Version 1.0 Date: 19.07.2016  Autor:  Frank Bajahr   Manual_KeyReaderPlus.doc    Document: Manual Bedatungsstation  Project: 0211  Documenten Version: 1.0 Datum: 19.07.2016   Autor Name Tel. Fax E-Mail V 1.0 Frank Bajahr +49 2261 8082 133  Frank.bajahr@teratron.de                                      Document status Draft  Confidential public  Release Organisation Name Datum               Version Date Version Change Name  19.07.2016 V 1.0 - first release Frank Bajahr    -                           Attach-ments Auther Document
      Manual KeyReader Plus   Manual KeyReader Plus TeraTron GmbH Page 3 of 12     Document Version 1.0 Date: 19.07.2016  Autor:  Frank Bajahr   Manual_KeyReaderPlus.doc   Index  1 Introduction ................................................................................................................................... 4 2 Mechanical .................................................................................................................................... 5 3 Driver Installation .......................................................................................................................... 5 4 Configuration of KeyReader Plus ................................................................................................. 8 5 Operation of KeyReader Plus ..................................................................................................... 11
      Manual KeyReader Plus   Manual KeyReader Plus TeraTron GmbH Page 4 of 12     Document Version 1.0 Date: 19.07.2016  Autor:  Frank Bajahr   Manual_KeyReaderPlus.doc    1  Introduction  The KeyReaderPlus is a portable Device which is capable of reading data stored in dedicated vehicle keys. Once the data have been read the data  are transferred to a remote server. The transfer takes place via Wifi or the USB Interface.  Delivery Content  KeyReaderPlus Handheld  USB-Cable   The  user(s)  of  these  products  are cautioned to  only  use  accessories  and  peripherals  approved,  in advance, by MANUFACTURER. The use of accessories and peripherals, other than those approved by MANUFACTURER, or any changes or modifications not expressly approved by the party responsi-ble for compliance could void the user’s authority to operate the equipment.  Installation  The KeyReader Plus should be completly charged before the first operation. Charging is done by con-necting the KeyReader Plus to a USB-port or USB-Power Supply which is capable to deliver at least 500mA. The Micro-USB-Connection at the KeyReader Plus is coverd by a sliding bar.  As soon as the KeyReader is connected  to the power  supply the device is booting up. The LED is giving the battery status.   Indicator and Operating Elements  The KeyReader Plus has 3 RGB-LEDs, which are giving a feedback on ist actual working condition. The LEDs are marked with a Symbol. There is one LED for the vehicle key reading function (symbol : Key), one for the connection state of the server (symbol: waves) and one for the battery status (sym-bol: battery).   At the opposite side is are, covered by a sliding bar, the Micro-USB-Connevtor and a small switch. With this switch the KeyReader Plus can be switched off by holding it down for min of 2 sec. After the switch is released the KeyReader Plus will drive down. This is  indicated by the  flashing  blue  “Key”-LED.    In case the KeyReader Plus needs tob e set back to inital factory state the button has to be pressed for > 10 sec. A Factory Reset is performed and all configuration settings and memory is set back.  Via the micro-USB-connection the  KeyReader Plus can be cahrged.  Furthermore the initial settings can be made via this Interface.
      Manual KeyReader Plus   Manual KeyReader Plus TeraTron GmbH Page 5 of 12     Document Version 1.0 Date: 19.07.2016  Autor:  Frank Bajahr   Manual_KeyReaderPlus.doc          2  Mechanical                                           3  Driver Installation   All required components will be installed by performing the  Setup-Program on the target PC. During the Setup it is required to login as a local admin.  System Requirements:  Personal Computer with Windows 7, 8.1 oder 10 Eine freie USB-Schnittstelle  Internet Browser, e.g. Internet Explorer, Firefox  Battery Status Server Connection Status Key Reading On/Off/Factory Reset Micro-USB Sliding Bar
      Manual KeyReader Plus   Manual KeyReader Plus TeraTron GmbH Page 6 of 12     Document Version 1.0 Date: 19.07.2016  Autor:  Frank Bajahr   Manual_KeyReaderPlus.doc   In order to charge the KeyReader Plus the USB-Interface should be capable to deliver at least 500mA. If this is not given charging has to be done with an appropriate USB-Charger.   To  install  the  required  driver  please  start  the  KeyReaderPlus_Vx.x.x.x.exe.  Select  the  language  to proceed.   Picture  1: select language  Confirm with „Next“   Picture 2: Welcome Screen
      Manual KeyReader Plus   Manual KeyReader Plus TeraTron GmbH Page 7 of 12     Document Version 1.0 Date: 19.07.2016  Autor:  Frank Bajahr   Manual_KeyReaderPlus.doc    Confirm with „Install“    Pictuire 3: Confirmation  Once the installation has been finished the last screen will prompt for “Finish”
      Manual KeyReader Plus   Manual KeyReader Plus TeraTron GmbH Page 8 of 12     Document Version 1.0 Date: 19.07.2016  Autor:  Frank Bajahr   Manual_KeyReaderPlus.doc    Picture 4: Completion    Your Personal computer is prepared to work with the KeyReader Plus now.   4  Configuration of KeyReader Plus  Connect the  KeyReader Plus to an USB-Port of your PC. In case the KeyReader was off it will now automatically turn on and boot up. During the boot process the „Key” LED is flashing blue. The “Bat-tery” LED is indicating the charge condition of the battery. If it is green no charging takes place. If yel-low, charging is in grogress.   To configure the KeyReader open a Browser on your PC. E.g. Internet Explorer.  Connect to the KeyReader by typing  the following address in your browser:  http://192.168.17.17  You should now see the welcome screen of KeyReader Plus:
      Manual KeyReader Plus   Manual KeyReader Plus TeraTron GmbH Page 9 of 12     Document Version 1.0 Date: 19.07.2016  Autor:  Frank Bajahr   Manual_KeyReaderPlus.doc     Picture 5: Welcome screen   The following system information are shown:  KeyReader Plus Serial Number:  serial number of the device  Identifier KeyReader Plus: peronal name of device (can be configured.)  Software Version OS/FW: version of the operating system and firmware version  HW Version Main/SUB: hardware version  USB-Connected: status of the USB connection  Battery Status: status of the battery  Battery Charging active: current charging status  Battery Capacity in %: charging condition of the battery
      Manual KeyReader Plus   Manual KeyReader Plus TeraTron GmbH Page 10 of 12     Document Version 1.0 Date: 19.07.2016  Autor:  Frank Bajahr   Manual_KeyReaderPlus.doc   Battery charge cycles: no. of charging cycles   WLAN Mac Adr: mac address of the Wifi-Interface  WLAN Connected: Wifi connection status  Login-Button: you have to login to configure the KeyReader Plus. Login name and passwort are configurable  Default username / password:  BMW / admin  Find Me !: This button will activate an acoustic feedback of the device  Factory Reset: sets the KeyReader Plus back to factory settings  Ping to KAI IP : check the connection to the KAI server. (attention: only the connection to the server is testet)   Configuration (via login button)   Picture 6: Configuration screen
      Manual KeyReader Plus   Manual KeyReader Plus TeraTron GmbH Page 11 of 12     Document Version 1.0 Date: 19.07.2016  Autor:  Frank Bajahr   Manual_KeyReaderPlus.doc   At the Configuration page the system time is shown. If there is an active connection to the Internet the system time is set automatically. In case there is not Internet connection the system time can be set by hitting the “Set System Time” button.  Identifier Key Reader Plus: name teh KeyReader Plus to your personal needs  Web-Interface IP-Port: Port for this web interface. Default port is 80  Use Old Operation Mode: If this is switched to On the KeyReader Plus will not send data to the KAI Server. It is only possible to collect the key data via the mass storage feature.   Web Interface User Name: login name  Web Interface Password: login password  Duration Find Me: repetition of acoustic signal for “Find me” Featrure.  Wifi: Operation mode for Wifi interface. OFF, DHCP or static.   Wifi Security: Select Security Mode: WPA or IEC802.1X (Radius Server Mode)  Wifi SSID: SSID of the desired network  Wifi /Radius Password: network password (WPA or Radius password)  Wifi Radius User Name: user name of radius server  The following for IP-numbers only have to be selected manually if Wifi-mode „static“ was selected. In this case please check with your network admin for correct settings.  USB Subnet: subnet for the USB connection. Please don´t change if you are not sure  USB IP: IP address for USB connection. Please don´t change if you are not sure  USB Gateway: IP address of USB host PC. Please don´t change if you are not sure  The following settings have to be adviced by your network admin  KAI IP Address: Adress of KAI Server  KAI Port: Port of KAI Server  KAI Path: Path of KAI Server  Any change has to be confirmed by teh Button „Save nd Reset. After a reboot the new settings are valid.    5  Operation of KeyReader Plus  After the correct configuration the KeyReader Plus is able to operate. If you place a vehicle key pn top of the landing pad the key is read and the data are send to the KAI Server.  The start of the reading is indicated by an acoustic beep and the yellow “Key” LED. During reading the key should stay in the reading position. After the key is successfully read a second beep will indicate this condition. In addition the “Key” LED will change to green.
      Manual KeyReader Plus   Manual KeyReader Plus TeraTron GmbH Page 12 of 12     Document Version 1.0 Date: 19.07.2016  Autor:  Frank Bajahr   Manual_KeyReaderPlus.doc   The time for reading a key might be different, based on the data content of the key. It should be in the range of 1 to 4 sec.  Once the data have been read they will be transferd tot he KAI server. If the transmission is successful the reader will beep a third time and the LED in the middle will flash green for confirmation. In case thaer is no contection to the KAI server the LED will start flashing red (no Wifi connection) or yellow (server is not responding). The data of the key is stored in the KeyReader. Every 15sec the KeyRead-er will try to establish a connection to the KAI-server to transmit the remaining data. Up to 1000 keys can be temporary stored.   FEDERAL COMMUNICATIONS COMMISSION INTERFERENCE STATEMENT  This equipment has been tested and found to comply with the limits for a Class B digital device, pursuant to part 15 of the FCC Rules. These limits are designed to provide reasonable protection against harmful interference in a residential installation. This equipment generates, uses and can radiate radio frequency energy and, if not installed and used in accordance with the instructions, may cause harmful interference to radio communications. However, there is no guarantee that interference will not occur in a particular installation. If this equipment does cause harmful interference to radio or television reception, which can be determined by turning the equipment off and on, the user is encouraged to try to correct the interference by one or more of the following measures: -Reorient or relocate the receiving antenna. -Increase the separation between the equipment and receiver. -Connect the equipment into an outlet on a circuit different from that to which the receiver is connected. -Consult the dealer or an experienced radio/ TV technician for help. CAUTION:  Any changes or modifications not expressly approved by the grantee of this device could void the user's authority to operate the equipment. RF Exposure Information (SAR) This device meets the government's requirements for exposure to radio waves. This device is designed and manufactured not to exceed the emission limits for exposure to radio frequency (RF) energy set by the Federal Communications Commission of the U.S. Government. The exposure standard employs a unit of measurement known as the Specific Absorption Rate, or SAR. The SAR limit set by the FCC is 1.6 W/kg. Tests for SAR are conducted using standard operating positions accepted by the FCC with the EUT transmitting at the specified power level in different channels. The FCC has granted an Equipment Authorization for this device with all reported SAR levels evaluated as in compliance with the FCC RF exposure guidelines. SAR information on this device is on file with the FCC and can be found under the Display Grant section of www.fcc.gov/eot/ea/fccid after searching on FCC ID: QLXKRP  This device complies with Part 15 of the FCC Rules. Operation is subject to the following two conditions: (1) this device may not cause harmful interference, and (2) this device must accept any interference received, including interference that may cause undesired operation.

Navigation menu