Texas Instruments 85XX2590EM The CC85xx-CC2590EM is a reference design for wireless audio modules including a range extender. User Manual
Texas Instruments Inc. The CC85xx-CC2590EM is a reference design for wireless audio modules including a range extender.
user manual
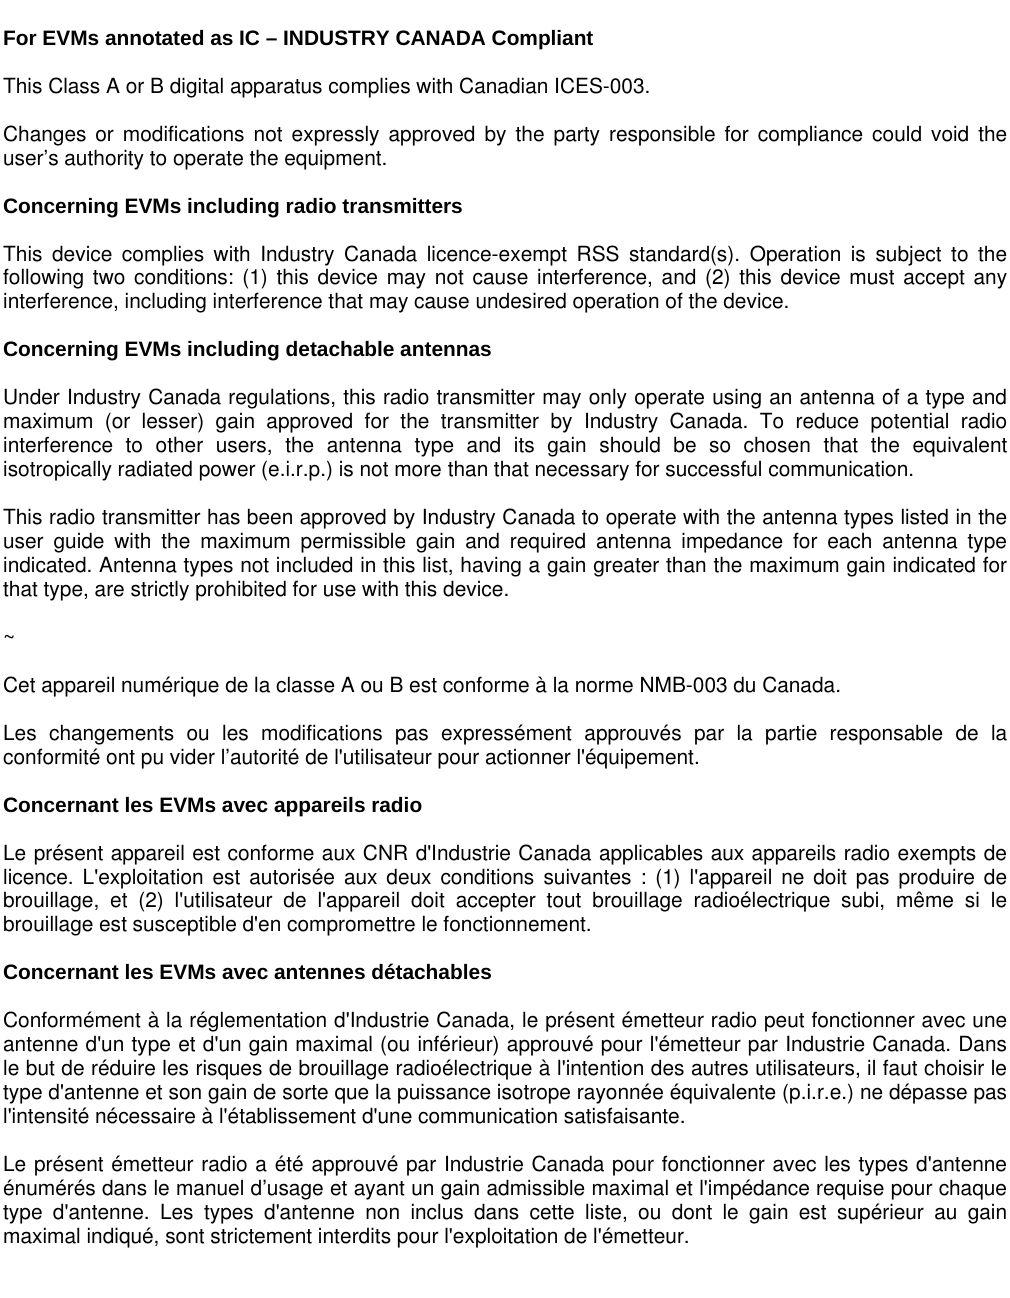
![SWRU252B September 2012 CC85XXDK Quick Start Guide 1. Kit Contents The following items are included in the CC85XXDK: 2 x Purepath Wireless AudioEB 1 x CC Debugger 2 x CC85xxEM 2 x CC85xx-CC2590EM 2 x 2.4 GHz Antennas Cables Documentation The RF boards in this kit are FCC and IC certified and tested/comply with ETSI/R&TTE over temperature from 0 to +35°C. The antenna, W1010 from Pulse, is a ¼ wave dipole antenna with 2 dBi gain. 2. Purpose of this Quick Start Guide This quick start guide will provide step-by-step instructions showing how to set up an audio link between two wireless units provided in the development kit. The procedure is the same regardless of which evaluation module is being used, i.e. either the C85xxEM or the CC85xx-CC2590EM. The EMs are pre-programmed with firmware to stream audio from the (Master) line-in input of one AudioEB to the (Slave) line-out and headphone output on the other AudioEB. Please follow step 2 to 9. For the latest firmware revision see step 10. For more details on CC85xx, see the product folder of the CC8520 [1]. Caution! To minimize risk of injury, avoid touching components during operation if symbolized as hot. Caution! The kit contains ESD sensitive components. Handle with care to prevent permanent damage. 3. Plug Master EM into PPW Audio EB Connect the CC85xxEM or the CC85xx-CC2590EM marked MASTER (label attached on the backside of the board). These boards are pre-programmed with master firmware. Attach the antenna to the SMA connector. 4. Plug Slave EM into PPW Audio EB Connect the CC85xxEM or the CC85xx-CC2590EM marked SLAVE (label attached on the backside of the board.) These boards are pre-programmed with slave firmware. Attach the antenna to the SMA connector. 5. Connect Audio Cables to the Master Connect an audio source (CD-player, MP3-player or similar) to the line-in input of the AudioEB with CC85xxEM or CC85xx-CC2590 with the “MASTER” label plugged in. The CC85xx-CC2590EM and CC85xxEM with the “MASTER” label are pre-programmed with firmware which sets up the onboard TLV320AIC3101 codec [2] to use analog input on the PPW AudioEB. 6. Connect Audio Cables to the Slave Connect an amplifier to line out or connect a headphone to the mini jack of the AudioEB with the CC85xxEM or the CC85xx-CC2590 with the “SLAVE” label plugged in. The CC85xx-CC2590EM and CC85xxEM with the “SLAVE” label are pre-programmed with firmware which sets up the onboard TLV320AIC3101 codec [2] to use line out and headphone output of the PPW AudioEB.](https://usermanual.wiki/Texas-Instruments/85XX2590EM/User-Guide-1830965-Page-1.png)
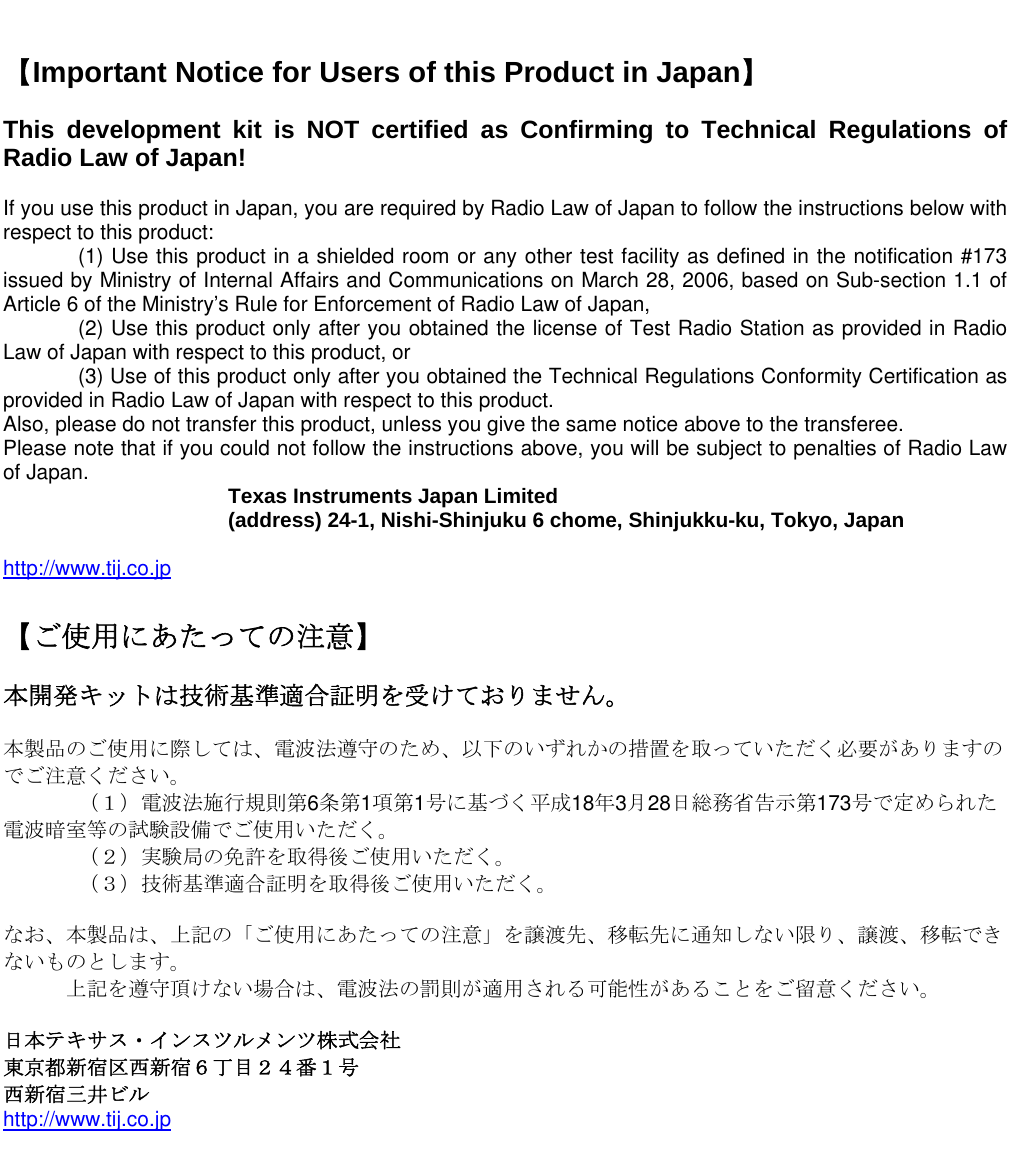
![SWRU252B September 2012 7. Power To power the PPW AudioEBs; connect a USB cable to each of the PPW AudioEBs and make sure J10 is in the position “OUT-USB” (Pos 1-2). Finally, switch P6 to “ON”. The LED D3 should now be lit. Note! When using the DC jack connector or screw terminal to power the AudioEB, the power source should be in a range from 5.5V to 15V with a maximum current source capability of 1A. There should only be one active power source at any one time. Do not leave the board powered when unattended. 8. Pairing When powered for the first time, LED D9 will blink to indicate that the devices are not connected. To pair the Slave with the Master; click first on SW9 on Master and then click on SW9 on the Slave within a few seconds after you clicked on the Masters SW9. When the devices are paired and the link is established, LED D9 will be constantly lit. Note that the pairing operation is only needed the first time. Next time they will pair automatically when powered. You can now turn on your audio source and start testing! 9. Volume control The output volume can be adjusted on the Slave by pressing SW 1 to increase the volume and SW3 to decrease the volume. 10. PurePath Wireless Configurator The next step is to download the PurePath Wireless Configurator (PPWC). PPWC makes it possible to explore all the configuration options of the CC85xx family. After creating device configurations for Master and Slave network roles, PPWC can program the CC85xx devices directly through the CCDebugger (included in the kit). For more details; download the PPW Configurator and the PPW Configurator Quick Start Guide. Links to download the PPW Configurator can be found in the CC8520 product folder [1] A. More information On Texas Instruments’ Low-Power RF web site you will find information about our latest products, software, application notes, events and much more. Just go to www.ti.com/lprf The Low Power RF Online Community has forums, blogs and videos. Use the forums to find information, discuss and get help with your design. Join us at www.ti.com/lprf-forum The TI LPRF eNewsletter keeps you up to date on e.g. new products, application notes, software and events. Sign up at www.ti.com/lprfnewsletter We hope you will enjoy working with the CC8520 and associated Low-Power RF products from Texas Instruments. B. References [1] CC8520 product page www.ti.com/product/cc8520 [2] TLV320AIC3101 product page www.ti.com/product/tlv320aic3101 P6 J10](https://usermanual.wiki/Texas-Instruments/85XX2590EM/User-Guide-1830965-Page-2.png)