Texas Instruments 85XXHEADSET The CC85xxHeadset is a reference design for wireless audio headsets for development only and cannot be used in an end product. User Manual Development Kit
Texas Instruments Inc. The CC85xxHeadset is a reference design for wireless audio headsets for development only and cannot be used in an end product. Development Kit
Users Manual
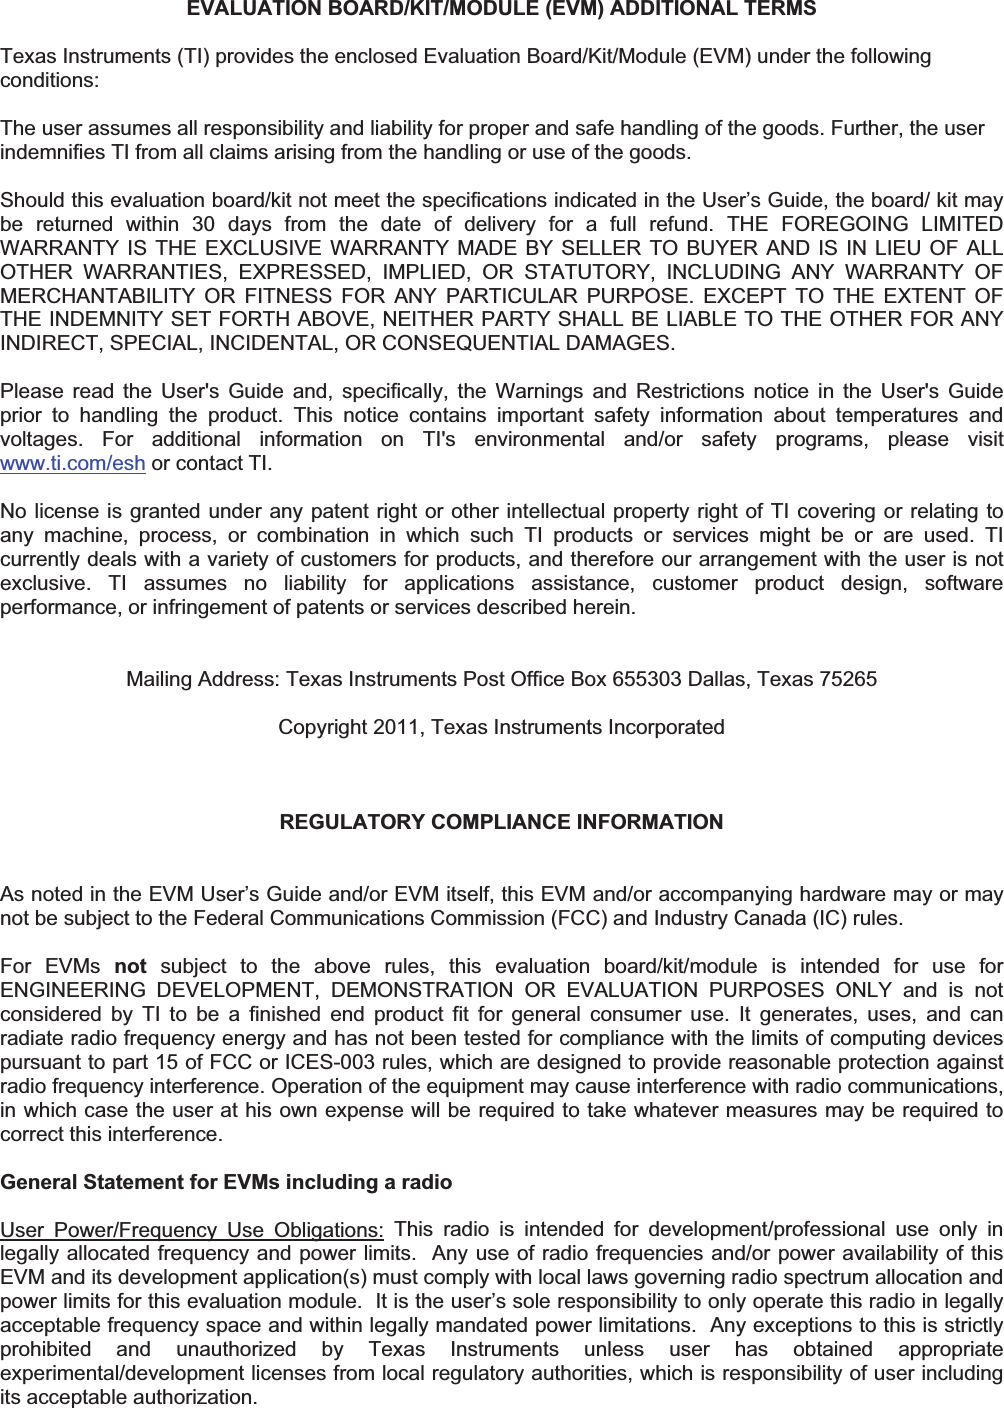
![SWRU282A June 2012 CC85XXDK-HEADSET Quick Start Guide 1. Kit Contents The following items are included in the CC85XXDK-HEADSET: 2 x CC85XX Headset boards 2 x Battery 1 x CC Debugger 1 x USB micro cable 1 x 3.5mm jack to 3.5mm jack cable Documentation If anything is missing in the CC85XXDK-HEADSET please contact your local TI sales representative. Caution! The kit contains ESD sensitive components. Handle with care to prevent permanent damage. 2. Purpose of this Quick Start Guide This quick start guide will provide step-by-step instructions showing how to set up an audio link between two wireless units provided in the development kit. The CC8531 on each of the boards are pre-programmed with firmware to stream audio from the Master microphone input to the Slave headphone output. Please follow step 3 to 9. Information on how to upgrade with latest firmware, see step 10. For more details on CC85XX, see the product folder of the CC8520 [1]. Performance and functionality of the CC8531 are strongly dependant on the firmware. Thus, for performance testing etc make sure the firmware used is the latest released firmware from the TI web site, see step 10. 3. Plug the batteries to each of the Headset boards There’s only one way to connect the battery plug to the socket on the board. With the pre-programmed firmware the CC8531 enters the OFF power mode when the battery is connected. The batteries should have enough charge out-of-the-box to establish a link and stream audio. To charge the battery, see section 9. With full battery the link should run for typically 15 hours, the Master being the bottleneck. The Slave plays audio for 22 hours typically. Warning! Always use the battery supplied with the kits with the CC85xx Headset boards. 4. Power up both boards In the pre-programmed firmware the toggling between power modes OFF and ON is mapped to pressing the rocker switch IN for 1.6 seconds. The two boards are unpaired out-of-the-box, so in the ON power mode the topmost LED should flash once every second indicating network state ALONE . In the OFF power mode the LED is turned off. Make sure both boards are flashing. Caution! To minimize risk of injury, avoid touching components during operation if symbolized as hot. Do not leave EVM powered when unattended. 5. Connect an audio source to the Master Connect an audio source (CD-player, MP3-player or similar) to the line in connector on the Master Headset board (labeled Master on the back side) via the 3.5mm jack cable. The Master is pre-programmed with firmware to set up the onboard TLV320AIC3204 codec [2] to power down the DAC and use the line in connector as source to the ADC input. 6. Connect a headphone to the Slave Connect a headphone to the 3.5mm headphone output on the board labeled Slave on the back side. The Slave is pre-programmed with firmware to set up the onboard TLV320AIC3204 codec [2] to power down the ADC and have the headphone connector as destination of the DAC output.](https://usermanual.wiki/Texas-Instruments/85XXHEADSET/User-Guide-1801963-Page-1.png)
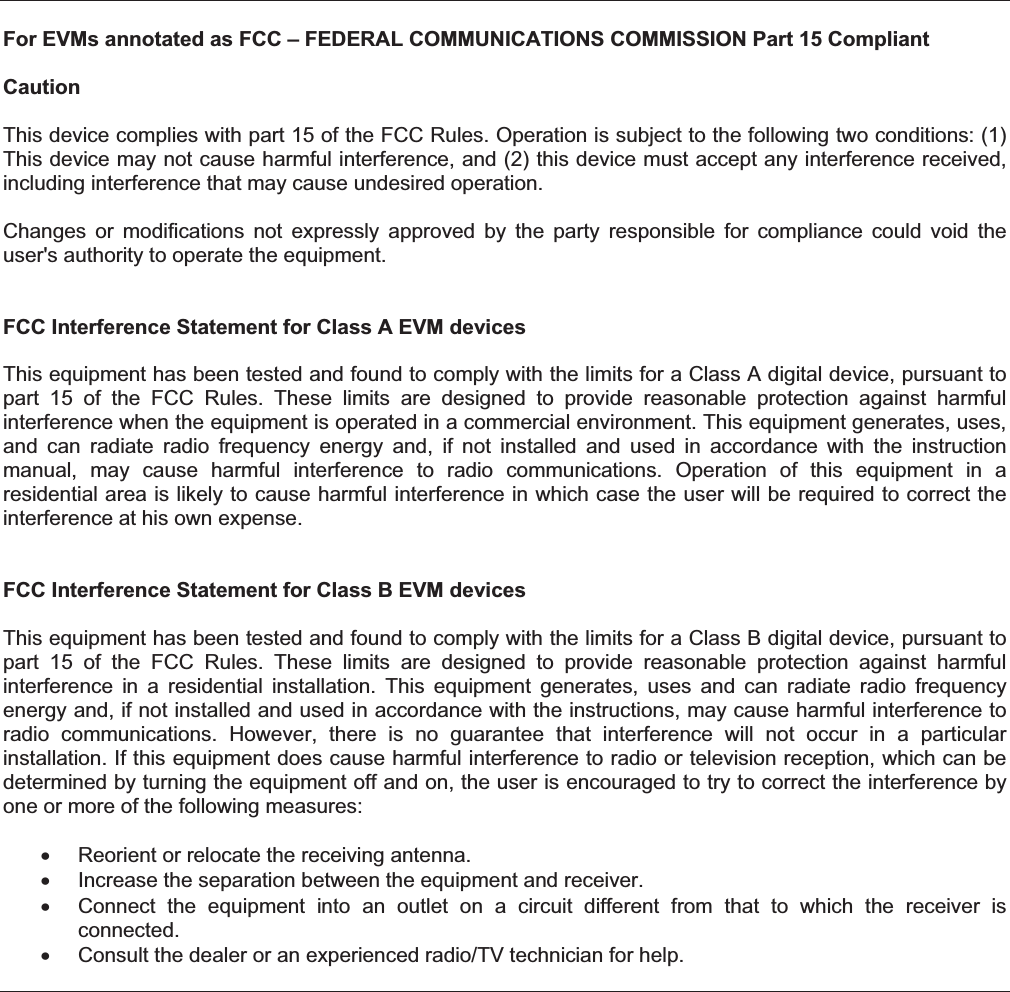
![SWRU282A June 2012 7. Pairing In the pre-programmed firmware the pairing button is mapped to pressing the rocker switch IN (not hold, which is power toggling as described in 4). Press the pairing button on either board and observe that the LED blinking pattern changes. It will now flash two times per second which indicates that the device is trying to pair with another device. If the pairing button on the other board is pressed within 10 seconds the devices will pair. The Master status LED will be constantly lit, and the Slave status LED will flash once every 2.5 seconds. Audio is now being streamed to the Slave. When successfully paired the Slave will save the Master’s device ID in non-volatile memory and automatically try to pair with this Master whenever in the ALONE state. Thus pressing the pairing buttons again will no longer be necessary (unless the Slave is re-programmed or paired with another Master). 8. Volume control The pre-programmed Slave firmware is configured to have so-called “local volume control” meaning that the Slave controls its own volume locally. The volume buttons are mapped to clicking/holding the rocker switch UP and DOWN. 9. Charging To charge the battery, simply connect the USB micro cable while the battery is also connected. The charge voltage should be 5V (plugging the USB cable in your computer will work perfectly). The bottom LED will be lit indicating charging. When the battery is fully charged the LED will go dark. The Headset board can be powered from USB alone (remove the battery and connect USB cable). Then the LED will be lit the whole time. Audio can be streamed while charging. For information about the single chip charger and DC/DC converter, see [4]. 10. PurePath Wireless Configurator The next step is to download the PurePath Wireless Configurator (PPWC) [3]. PPWC makes it possible to explore all the configuration options of the CC85XX family. After creating device configurations for Master and Slave network roles, PPWC can program the CC85XX devices directly through the CCDebugger (included in the kit). A. More information On Texas Instruments’ Low-Power RF web site you will find all our latest products, application and design notes, FAQ section, news and events updates, and much more. Just go to www.ti.com/lprf The Low Power RF Online Community has forums, blogs and videos. Use the forums to find information, discuss and get help with your design. Join us at www.ti.com/lprf-forum The TI LPRF eNewsletter keeps you up to date on e.g. new products, application notes, software and events. Sign up at www.ti.com/lprfnewsletter We hope you will enjoy working with the CC85XX and associated Low-Power RF products from Texas Instruments. B. References [1] CC8520 product web page http://www.ti.com/CC8520 [2] TLV320AIC3204 product web page http://focus.ti.com/docs/prod/folders/print/tlv320aic3204.html [3] PPW Configurator product web page http://www.ti.com/ppwc [4] BQ25015 product web page http://focus.ti.com/docs/prod/folders/print/bq25015.html [5] CC2590 product web page http://focus.ti.com/docs/prod/folders/print/cc2590.html](https://usermanual.wiki/Texas-Instruments/85XXHEADSET/User-Guide-1801963-Page-2.png)