Texas Instruments GEMINIB Gemini Base Station User Manual webpad15 ug
Texas Instruments Inc. Gemini Base Station webpad15 ug
UserManual.wiki
>
Texas Instruments
>
GEMINIB User Manual
>
Revised User Manual
Contents
1.
Users Guide
2.
Revised User Manual
3.
User manual version 13
Revised User Manual
Navigation menu
Upload a User Manual
Namespaces
Wiki Guide
HTML
PDF
Info
Views
User Manual
Discussion / Help
Navigation

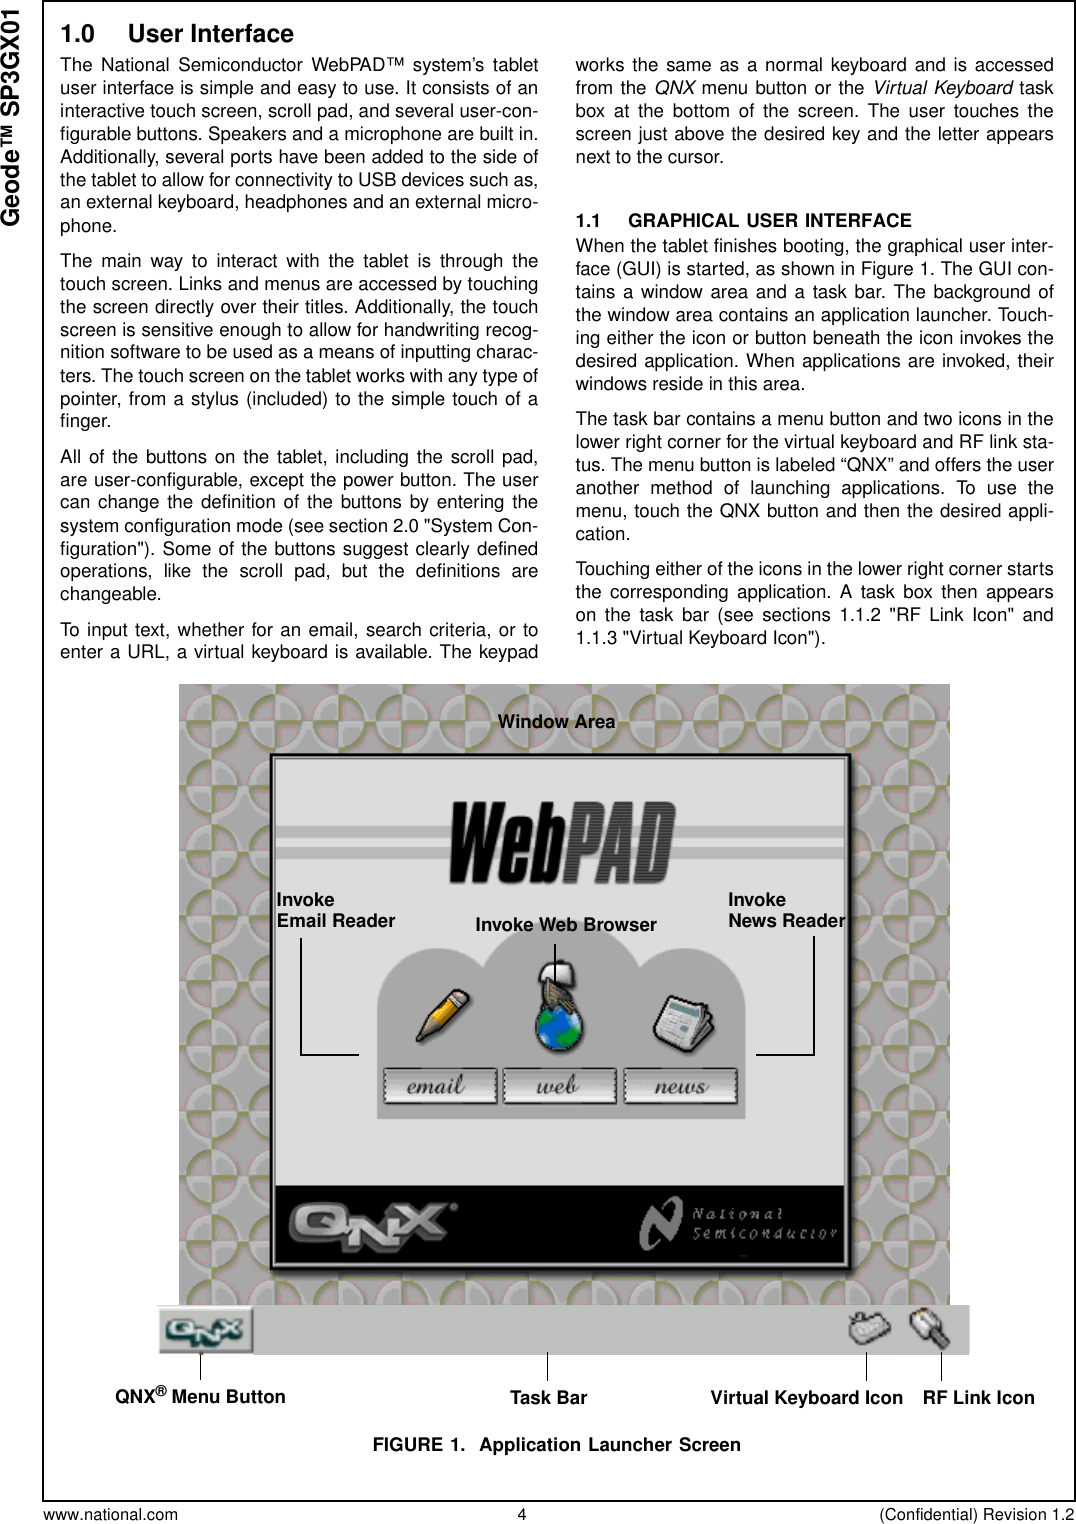


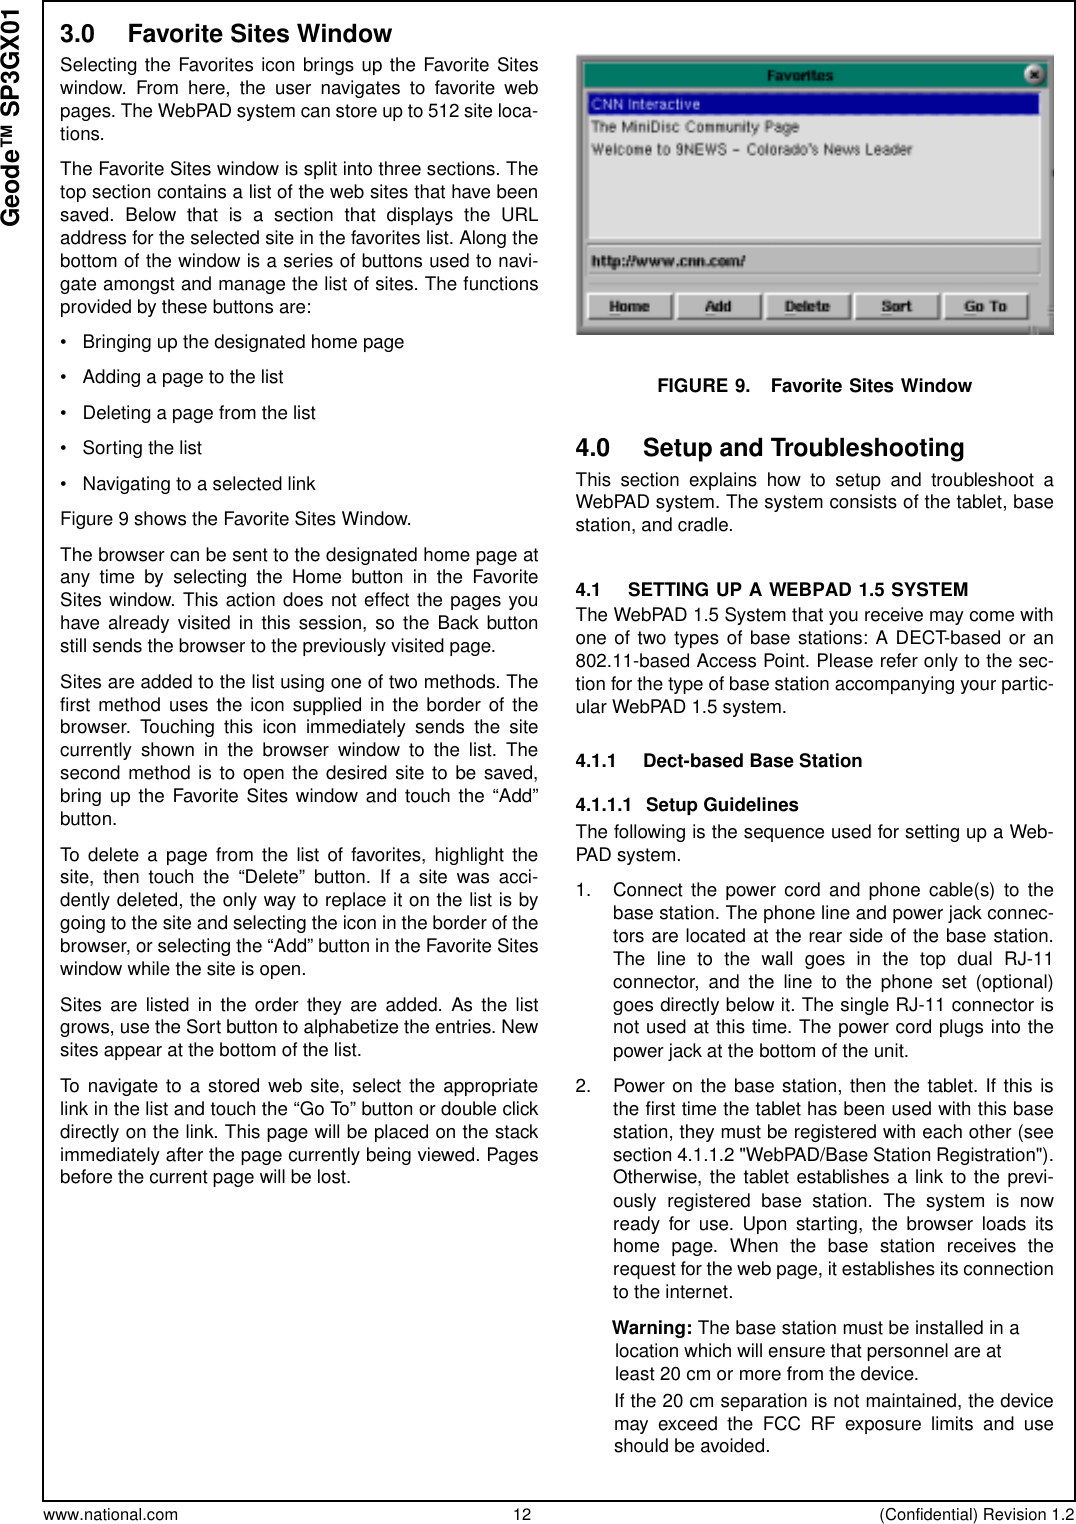
![www.national.com 8 (Confidential) Revision 1.2Geode™ SP3GX011.5.10 Low Battery WarningThis application warns the user when the battery is aboutto run out of power. Upon seeing this warning, plug in theAC adapter. If the adapter is not plugged in at this time,the tablet will automatically power off within minutes.1.5.11 DECT Monitor (DECT-based systems only)The DECT Monitor allows the user to interact with theDECT-based base station. This is the application used toscan for DECT-based base stations in the proximity of thetablet, register the tablet and base station with each other,and modify the PIN numbers used in the registration pro-cess. This application only appears on systems shippedwith the DECT-based base stations.1.5.12 Internet Dialer (DECT-based systems only)The Internet Dialer is used to setup and establish connec-tions to a Internet Service Provider (ISP). The applicationis capable of storing information for multiple ISPs. Seesection 4.1.1.4 "Adding a New Dial-up Account" for detailson how to configure a new ISP.2.0 System ConfigurationThe tablet has several configuration options that can bemodified. To enter the system configuration mode, touchthe sailing ship/toolbox icon in the upper left corner of theweb browser. The options that appear on the screen are:• WebPAD Configuration-Browser- Buttons-Radio- VersionSelecting any of the configuration option links takes theuser to a screen where modifications can be made.2.1 BROWSER CONFIGURATIONThe Browser Configuration page contains links to configu-ration screens for customizing the browser. The optionsare:• Browser Configuration- Cache-Fonts- Colors-NetworkSelecting one of these links takes the user to a screenwhere component configurations can be modified.2.1.1 Browser>CacheThis screen allows the user to modify the settings for thebrowser cache. Configuration settings for the cache areasshowninFigure2.Max Connections - Specifies the maximum number ofsimultaneously open TCP/IP connections to the Internet.Number of Pages to Cache - Specifies the number ofpages to cache locally. Increasing the number will speedup the time it takes to open previously visited pages. How-ever, caching more pages uses more memory and mayaffect overall performanceImage Cache Size KB - Specifies the size of the imagecache, in kilobytes. Increasing the size of the cache allowsmore images to be stored locally, thereby increasing therate at which previously visited pages are displayed; how-ever, the user must be careful not to assign too muchmemory.FIGURE 2. Browser>Cache Configuration Screen2.1.2 Browser>FontsFigure 3 shows the screen that allows the user to alter thefont style and text size. Three options of text feature modi-fication are available: Font style, font size and underliningof links. After making changes, touch “Update” to imple-ment the changes.Underline Links - Specifies whether the links incorpo-rated in a web page are underlined. If the box is colored,links are underlined; if not colored, the links are not under-lined.User Text Size [0-4] - Specifies the default font size. Thefont size can be changed by touching the font size icon butwill revert to the configuration value upon each restart.Body Font,HeadingFont,andFixedFont- Specifiesthe font styles (“times”, for Times Roman, “helv”, for Hel-vetica or “cour” for Courier) available.Browser ConfigurationCacheMax connections:Number of pages to cache:Image cache size KB:Browser ConfigurationWebPAD Configuration544000Update](https://usermanual.wiki/Texas-Instruments/GEMINIB.Revised-User-Manual/User-Guide-101599-Page-8.png)
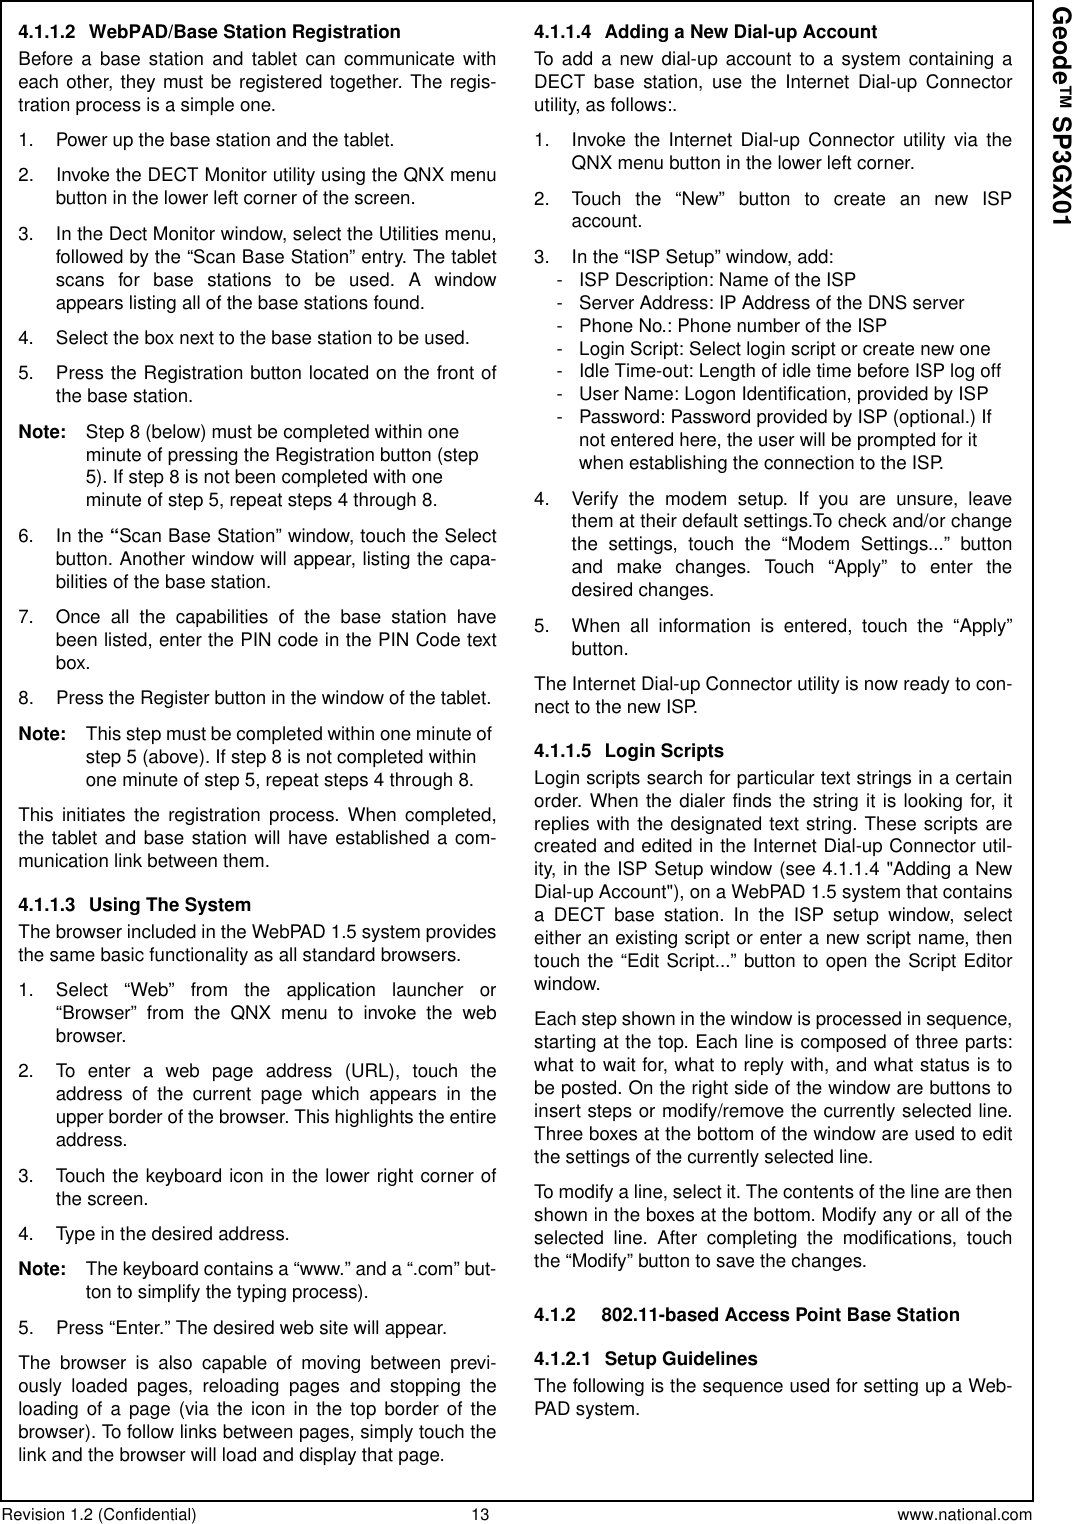
![Revision 1.2 (Confidential) 9 www.national.comGeode™ SP3GX01FIGURE 3. Browser>Fonts Configuration Screen2.1.3 Browser>ColorsThe Browser>Colors screen, as illustrated in Figure 4,allows the user to modify the color attributes of the text,links, and background. Each setting is a hexadecimalvalue which defines the intensity of each of the color com-ponents of the pixel. The first two digits specify the inten-sity of the red, the middle two digits specify the intensity ofthe green and the last two digits specify the intensity ofthe blue. These colors can be overridden by a web page,but upon leaving the web page, the colors revert to thedefaults. Touch the keyboard icon to edit the settings.After making any changes to the configuration, touch“Update” to implement the changes.Active Color - Specifies the color of a link when it hasbeen selected.Visited Color - Specifies the color of a link on a pageafter the link has already been visited.Link Color - Specifies the color of a link before the linkhas been visited.HL Color - Specifies the color used to highlight text.Body Text Color - Specifies the color of the text used inthe body of the web page. Any text which is not a link isaffected by this setting.Background Color - Specifies the default color of thebackgroundofawebpage.FIGURE 4. Browser>Colors Configuration Screen2.1.4 Browser>NetworkFigure 5 shows the Browser>Network configurationscreenwhichallowstheusertoalterproxyandwebdesti-nation settings. Touch the keyboard icon to edit the set-tings. After making changes to the settings, touch“Update” to implement the changes. The tablet can onlyrun with a SOCKS proxy or HTTP proxy, but not both.Therefore, if the user selects one of the proxy servers, theother is automatically deselected.Home Page - Specifies the home page displayed whenthe browser is first started.Search Page -SpecifiestheURLforthewebpagetogoto when the Search icon is touched.SOCKS Proxy Server - Determines whether the browserwill use a SOCKS proxy server. If the box is colored, thebrowser will use the SOCKS proxy server configured onthe base station. If the box is not colored, the browser willnot use a SOCKS proxy server.HTTP Proxy Server - Determines whether the browserwill use a HTTP proxy server. If the box is colored, thebrowser will use the HTTP proxy server configured on thebase station. If the box is not colored, the browser will notuseanHTTPproxyserver.Proxy Address - Specifies the IP address of the proxyserver. This value is ignored if a proxy server is not beingused. If using an access point base station, this valueneeds to be cleared.Proxy Port - Specifies the port number to which allbrowser requests are sent. The port must match the typeof proxy server being used. If the SOCKS proxy server isselected, set the proxy port to 1080. If the HTTP proxyserver is selected, set the proxy port to 80.Email Server - Specifies where emails are sent when a“mailto:” link is selected.Email Address - Specifies the “From” address in emailsgenerated after a “mailto:” link has been selected.Browser ConfigurationFontsUnderline Links:User text Size [0-4] =Body Font =Browser ConfigurationWebPAD Configuration2timesUpdatehelvcourHeading Font =Fixed Font =Browser ConfigurationColorsActive Color (RGB) =Visited Color (RGB) =Link Color (RGB) =Browser ConfigurationWebPAD Configuration0000FFUpdateFF00FF000000HL Color (RGB) =Body Text Color (RGB) =FF0000008080FFFFFFBody Text Color (RGB) =](https://usermanual.wiki/Texas-Instruments/GEMINIB.Revised-User-Manual/User-Guide-101599-Page-9.png)
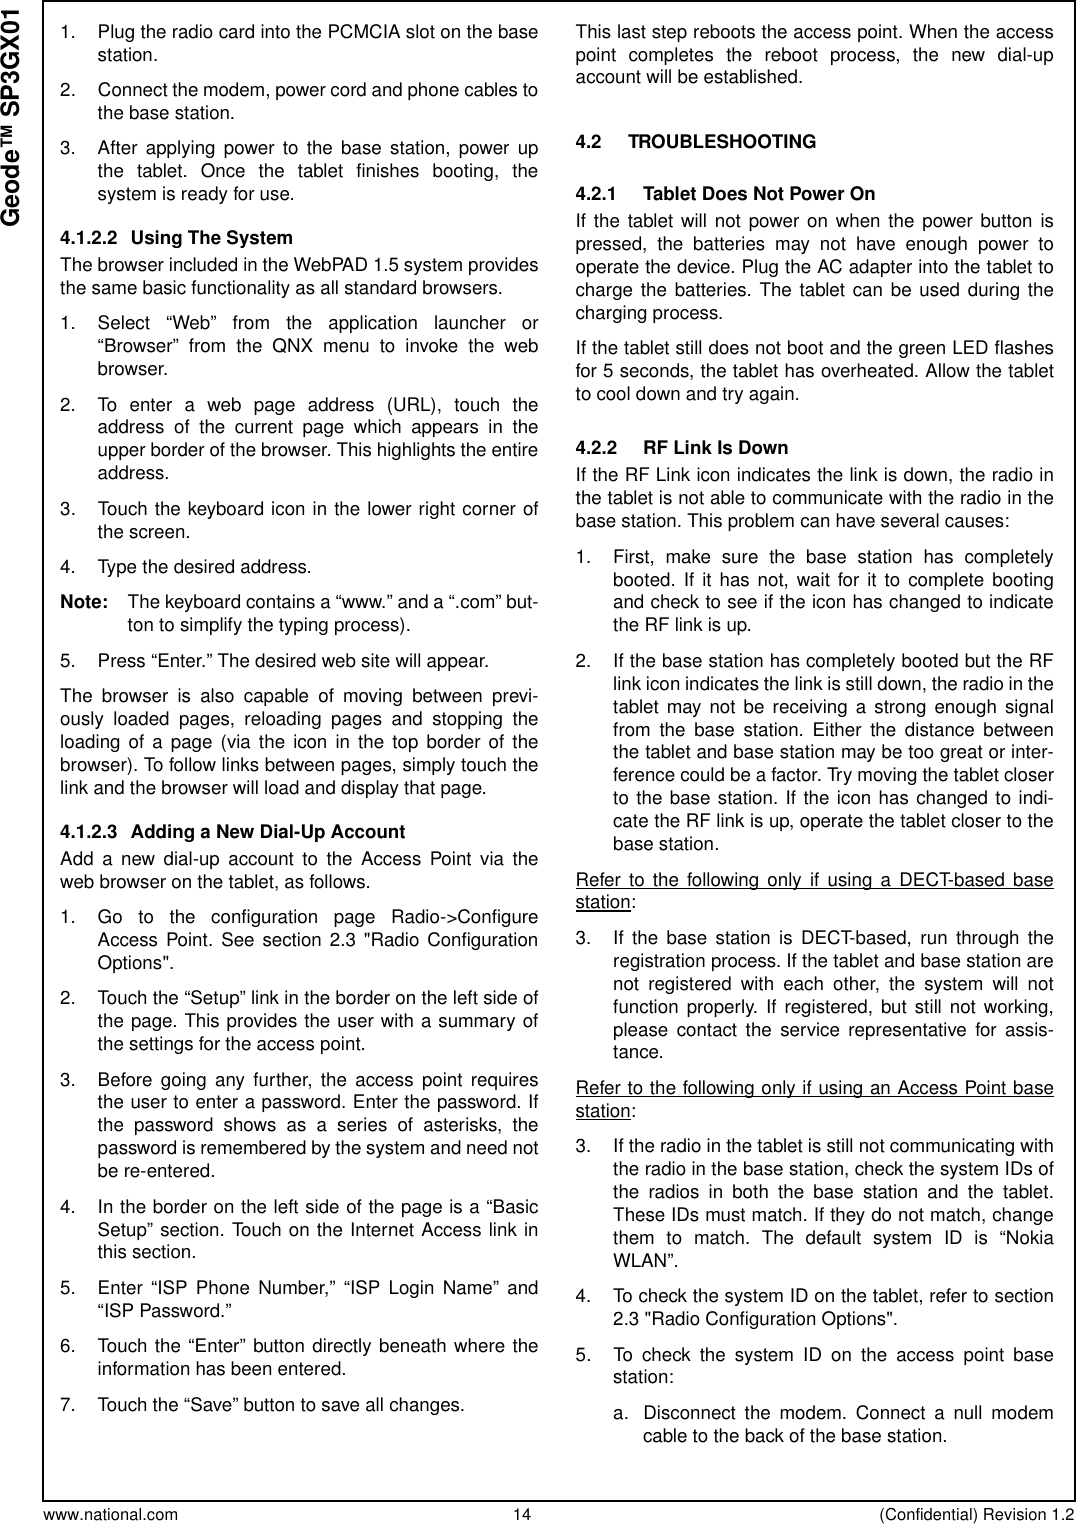
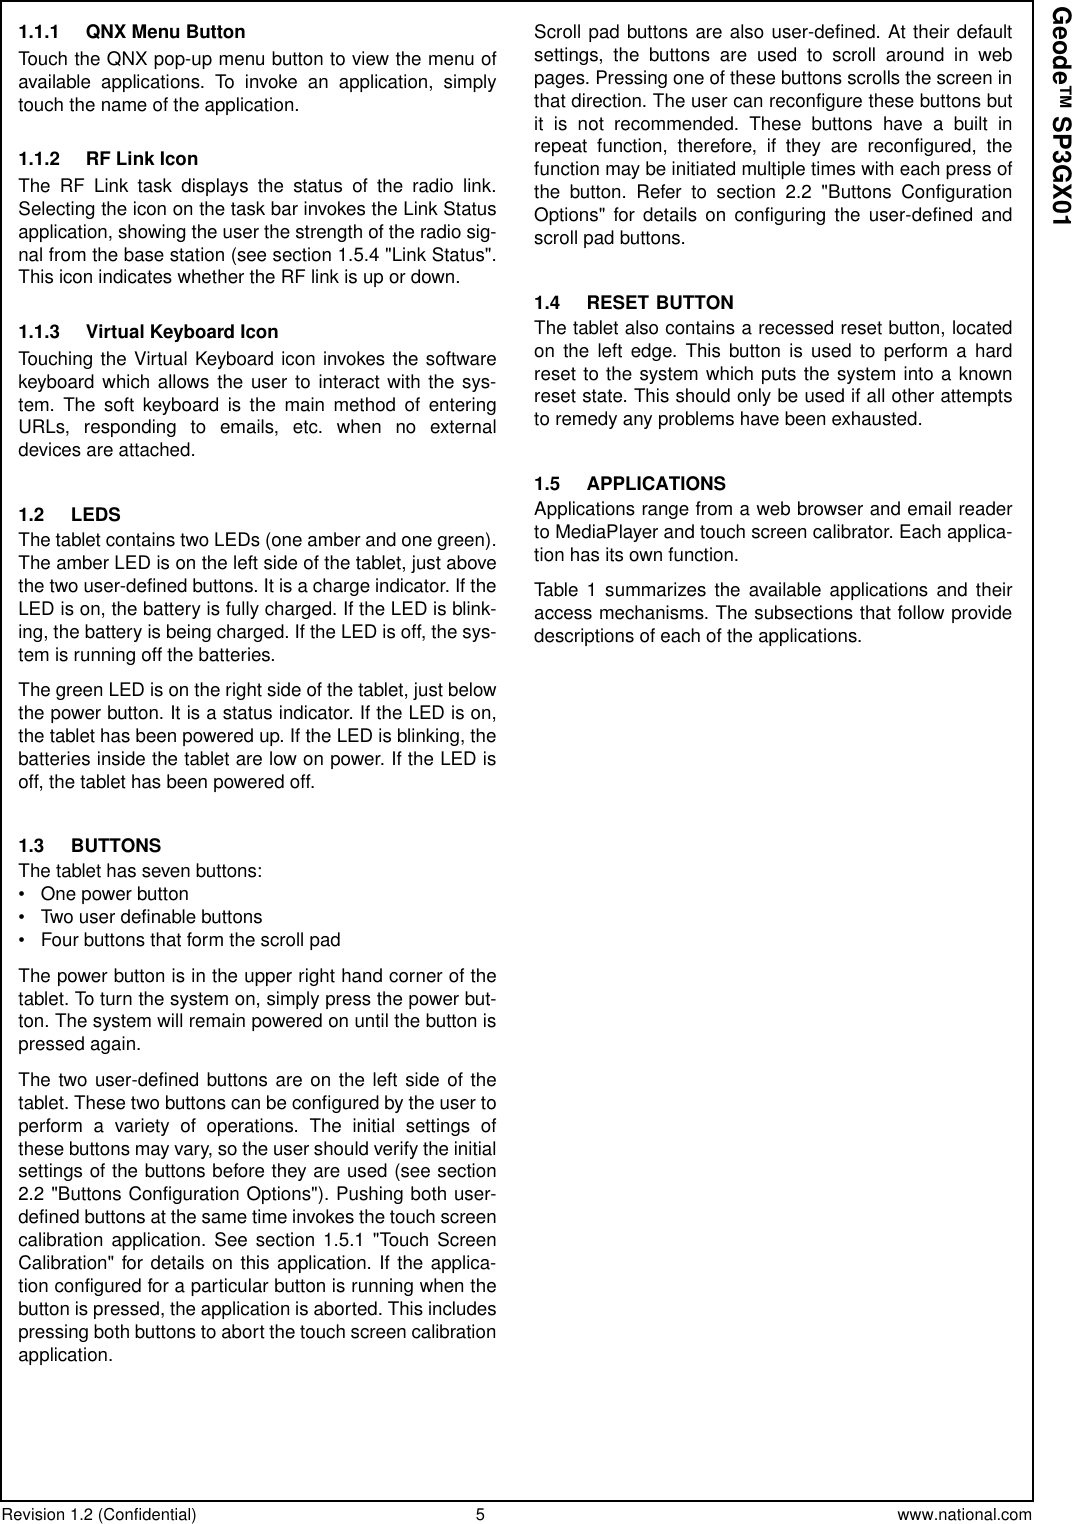
![www.national.com 10 (Confidential) Revision 1.2Geode™ SP3GX01FIGURE 5. Browser>Network Configuration Screen2.2 BUTTONS CONFIGURATION OPTIONSThis link allows the user to configure the operation of thetablet's buttons. Figure 6 identifies the buttons. Figure 7shows the button configuration screen and examples ofhow buttons can be configured. Next to each button identi-fier is a field defining the button's operation.To change the function of a button, replace the currentoperation with a new operation. The operations take theform of:<action>[<type>]<action> - defines the type of operation the button pro-vides. The values are: CMD, KEY, MAC. When a buttonwith the action of CMD is pressed, a command is exe-cuted. The KEY action is used to define the button as aparticular key from the keyboard. The MAC action invokesamacro.<type> - is dependent on the action defined. For “CMD”actions, the type is the executable command string. For“KEY” actions, the type is either “UP”, “DN”, “LF”, or “RT”and refers to the Up, Down, Left and Right arrow keys onthe keyboard. For “MAC” actions, the type is NXT. NXTcycles between all active windows.When all of the buttons have been configured, press the"Update" button to implement and save the changes.FIGURE 6. Button Identifier DiagramBrowser ConfigurationNetworkHome Page:Search Page:SOCKS ProxyHTTP Proxy ServerProxy AddressProxy Port:www.national.com/webpadwww.yahoo.com191.168.0.11080191.168.0.1Email Server:xxxx@xxx.comEmail Address:ServerBrowser ConfigurationWebPAD ConfigurationUpdateBUT1BUT2BUT4BUT3BUT6BUT5](https://usermanual.wiki/Texas-Instruments/GEMINIB.Revised-User-Manual/User-Guide-101599-Page-10.png)
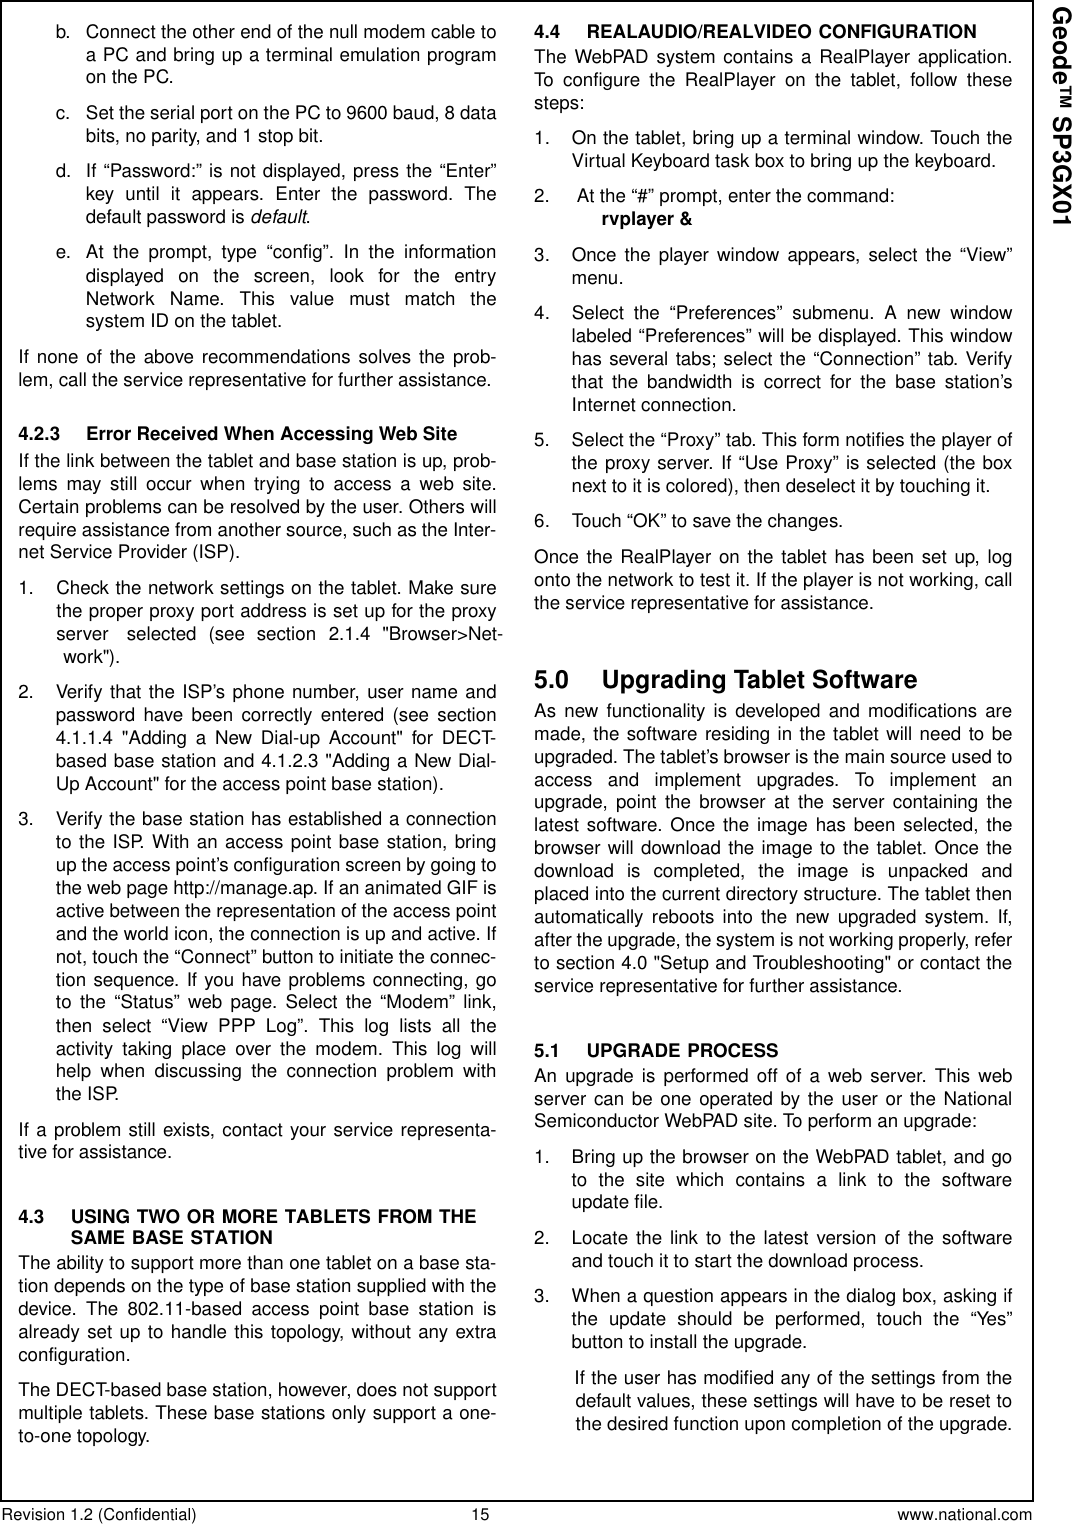
![Revision 1.2 (Confidential) 11 www.national.comGeode™ SP3GX01FIGURE 7. Button Configuration Screen2.3 RADIO CONFIGURATION OPTIONSThe Radio Configuration options screen, shown in Figure 8, allows the user to define the system ID and the RF link chan-nel. The system ID is the 802.11 SS ID shared between the base station and tablet. A base station associates only witha tablet that shares the same SS ID. If the SS ID of the base station and tablet do not match, the base station will ignoredata coming from the tablet. The “DS channel” is the radio channel used by the base station. Touching the “ConfigureAccess Point” link loads the page “http://manage.ap” to allow the user to change the settings of the access point.2.4 SOFTWARE IMAGE VERSIONThe software image version indicates the current version of the software. In addition, the page contains release notes onchanges made to the previous version. Links at the bottom of the page will go to either the initial WebPAD system config-uration page or to the browser configuration page.FIGURE 8. Radio Configuration ScreenHardware Button ConfigurationBUTx = action[type]BUTx is a button identifier for BUT1 thru BUT6WebPAD ConfigurationUpdate‘action’ is a key, macro or a command definition – ‘KEY’, ‘MAC’ or ‘CMD’‘type’ for commands must be the actual command string to execute‘type’ for key definitions are: ‘UP’; ‘DN’, ‘LF’, ‘RT’‘type’ for macro key definitions are ‘NXT’BUT1 =BUT2 =BUT3 =BUT4 =BUT5 =BUT6 =KEY[UP]KEY[DN]KEY[LT]KEY[RT]MAC[NXT]CMD[/usr/webpad/bin/keypad]The System ID is the 802.11 SS ID shared between a base and client pair. A base will only allow a clienttoassociateiftheysharethesameSSID.YoumaysettheSSIDoftheclienthere.Itisastringofupto32 alphanumeric characters.Radio ConfigurationWebPAD ConfigurationUpdateSystem ID: webpadThe radio channel used by the base. A number between 0-11.DS Channel: 6Configure Access Point](https://usermanual.wiki/Texas-Instruments/GEMINIB.Revised-User-Manual/User-Guide-101599-Page-11.png)