Texas Instruments TINAVAP 802.11b/g Access Point User Manual InstallationGuide
Texas Instruments Inc. 802.11b/g Access Point InstallationGuide
Users Manual

TI-Navigator™
Installation Guide
_____________________________________________
Write the System ID number here.
The number is printed inside the case for the CD.

ii
Important Information
Texas Instruments makes no warranty, either express or implied,
including but not limited to any implied warranties of merchantability
and fitness for a particular purpose, regarding any programs or book
materials and makes such materials available solely on an "as-is" basis. In
no event shall Texas Instruments be liable to anyone for special,
collateral, incidental, or consequential damages in connection with or
arising out of the purchase or use of these materials, and the sole and
exclusive liability of Texas Instruments, regardless of the form of action,
shall not exceed the purchase price of this product. Moreover, Texas
Instruments shall not be liable for any claim of any kind whatsoever
against the use of these materials by any other party.
Copyright © 2006, 2008 Texas Instruments Incorporated.
Microsoft® and Windows® are trademarks of their owners.
Regulatory Information
USA FCC Information Concerning Radio Frequency
Interference
Federal Communication Commission Interference
Statement
This equipment has been tested and found to comply with the limits for a
Class B digital device, pursuant to Part 15 of the FCC Rules. These limits
are designed to provide reasonable protection against harmful
interference in a residential installation. This equipment generates, uses,
and can radiate radio frequency energy and, if not installed and used in
accordance with the instructions, may cause harmful interference to
radio communications. However, there is no guarantee that interference
Product Name: TI-Navigator™
Model Number/Name: Network Hub
FCC ID: POTCX6601B
Product Name: TI-Navigator™
Model Number/Name: NAV-AP-US
FCC ID: V7R-TINAVAP

iii
will not occur in a particular installation. If this equipment does cause
harmful interference to radio or television reception, which can be
determined by turning the equipment off and on, the user is encouraged
to try to correct the interference by one or more of the following
measures:
• Reorient or relocate the receiving antenna.
• Increase the separation between the equipment and receiver.
• Connect the equipment into an outlet on a circuit different from
that to which the receiver is connected.
• Consult the dealer or an experienced radio/TV technician for help.
FCC Caution: This device complies with Part 15 of the FCC Rules.
Operation is subject to the following two conditions: (1) This device may
not cause harmful interference, and (2) this device must accept any
interference received, including interference that may cause undesired
operation.
RF Radiation Exposure and Hazard Statement:
To ensure compliance with FCC RF exposure requirements, this device
must be installed in a location such that the antenna of the device will be
greater than 20 cm (8 in.) away from all persons. Using higher gain
antennas and types of antennas not covered under the FCC certification
of this product is not allowed. Installers of the radio and end users of the
product must adhere to the installation instructions provided in this
manual.
This transmitter must not be co-located or operating in conjunction with
any other antenna or transmitter.
Non-modification Statement:
Use only the integral antenna supplied by the manufacturer when
operating this device. Unauthorized antennas, modifications, or
attachments could damage the TI Navigator access point and violate FCC
regulations. Any changes or modifications not expressly approved by the
party responsible for compliance could void the user's authority to
operate this equipment.
Deployment Statement:
This product is certified for indoor deployment only. Do not install or use
this product outdoors.

iv
Canadian IC Information
Industry Canada Statement:
Operation is subject to the following two conditions in Canada:
1. this device may not cause interference, and
2. this device must accept any interference, including interference that
may cause undesired operation of the device
To prevent radio interference to the licensed service (i.e. co-channel
Mobile Satellite systems) this device is intended to be operated indoors
and away from windows to provide maximum shielding. Equipment (or
its transmit antenna) that is installed outdoors is subject to licensing and
not supported by the TI-Navigator™ access point.
European Union and European Free Trade
Association (EFTA) Regulatory Compliance
This equipment may be operated in the countries that comprise the
member countries of the European Union and the European Free Trade
Association. These countries, listed in the following paragraph, are
referred to as The European Community throughout this document:
AUSTRIA, DENMARK, FINLAND, FRANCE, GERMANY, ITALY,
NETHERLANDS, PORTUGAL, SPAIN, SWEDEN, UNITED KINGDOM,
NORWAY, SWITZERLAND
The TI-Navigator™ Access Point communicates with either a
TI-Navigator™ Network Hub or TI-Nspire™ Navigator™ Wireless Cradle
via a wireless 802.11b/g link to provide wireless local area networking
(WLAN) capabilities and with a personal computer using a standard USB
cable. The TI-Navigator™ Access Point includes one 802.11a and one
802.11b/g radio. In the current model, NAV-AP-US, the 802.11a radio is
disabled at the factory and via software preventing it from being
configured and used when installed at an end user facility.
Product Name: TI-Navigator™
Model Number/Name: NAV-AP-US
IC ID: 451E-TINAVAP
Product Name: TI-Navigator™
Model Number/Name: Network Hub
IC ID: 4773A-CX6601B

v
Declaration of Conformity
Marking by this symbol:
indicates compliance with the Essential Requirements of the R&TTE
Directive of the European Union (1999/5/EC).
This equipment meets the following conformance standards:
Safety: EN 60950-1:2001 + A11:2004
EMC: EN 55022:2006, EN 55024:1998 + A1:2001 + A2:2003, EN 301-489-1
v1.7.1, EN 301-489-17 v1.3.2, CISPR22:1997, CISPR24
Including: EN 61000-3-2, -3-3, -4-2, -4-3, -4-4, -4-5, -4-6 and -4-11. The
product is also licensed as required for additional country specific
standards as required for the International Marketplace.
Radio: EN 300-328 v.1.7.1 (2006-10)
Electromagnetic compatibility and Radio spectrum Matters (ERM);
Wideband transmission systems; Data transmission equipment operating
in the 2,4 GHz ISM band and using wide band modulation techniques.
Certifications are harmonized to the EN standards covering essential
requirements under article 3.2 of the R&TTE Directive. Compliance
includes testing with the supplied integral antenna.
SAR: EN 50385:2002
European Community Declaration of Conformity
Hereby, Texas Instruments declares that this TI-Navigator™ Access Point is
in compliance with the essential requirements and other relevant
provisions of Directive 1999/5/EC.
The Declaration of Conformity may be consulted in the Product
Stewardship page at education.ti.com.
English Hereby, Texas Instruments declares that this
TI-Navigator™ Access Point is in compliance with
the essential requirements and other relevant
provisions of Directive 1999/5/EC.
The Declaration of Conformity may be consulted
in the Product Stewardship page at
education.ti.com.

vi
Dansk Undertegnede Texas Instruments erklærer
herved, at følgende udstyr TI-Navigator™ Access
Point overholder de væsentlige krav og øvrige
relevante krav i direktiv 1999/5/EF.
Overensstemmelsesdirektivet (Declaration of
Conformity) kan findes på Product Stewardship
siden på education.ti.com.
Norsk Texas Instruments erklærer herved at utstyret
TI-Navigator™ Access Point er i samsvar med de
grunnleggende krav og øvrige relevante krav i
direktiv 1999/5/EF.
Samsvarserklæringen kan konsulteres på
produktforvaltningssiden (Product Stewardship)
på education.ti.com.
Suomi Texas Instruments vakuuttaa täten että
TI-Navigator™ Access Point tyyppinen laite on
direktiivin 1999/5/EY oleellisten vaatimusten ja
sitä koskevien direktiivin muiden ehtojen
mukainen.
Vaatimustenmukaisuusvakuutus on saatavilla
tuotteen ympäristövaikutuksen sivulta
osoitteessa education.ti.com.
Français Par la présente Texas Instruments déclare que
l'appareil TI-Navigator™ Access Point est
conforme aux exigences essentielles et aux autres
dispositions pertinentes de la directive 1999/5/CE.
La déclaration de conformité peut être consultée
sur le site education.ti.com à la page
Responsabilité Produit (Product Stewardship)
Deutsch Hiermit erklärt Texas Instruments, dass sich das
Gerät TI-Navigator™ Access Point in
Übereinstimmung mit den grundlegenden
Anforderungen und den übrigen einschlägigen
Bestimmungen der Richtlinie 1999/5/EG befindet.
Die Konformitätserklärung ist unter
Produktbetreuung (Product Stewardship) bei
education.ti.com einzusehen.

vii
Italiano Con la presente Texas Instruments dichiara che
questo TI-Navigator™ Access Point è conforme ai
requisiti essenziali ed alle altre disposizioni
pertinenti stabilite dalla direttiva 1999/5/CE.
La dichiarazione di conformità può essere
consultata sulla pagina Product Stewardship del
sito education.ti.com.
Nederlands Hierbij verklaart Texas Instruments dat het
toestel TI-Navigator™ Access Point in
overeenstemming is met de essentiële eisen en
de andere relevante bepalingen van richtlijn
1999/5/EG.
De verklaring van overeenstemming kan worden
geraadpleegd op de pagina Product Stewardship
(Productverantwoordelijkheid) op
education.ti.com.
Português Texas Instruments declara que este
TI-Navigator™ Access Point está conforme com
os requisitos essenciais e outras disposições da
Directiva 1999/5/CE.
Pode-se consultar a Declaração de Conformidade
na página de Gestão de Produto, (Product
Stewardship) no sítio education.ti.com.
Español Por medio de la presente Texas Instruments
declara que el TI-Navigator™ Access Point
cumple con los requisitos esenciales y
cualesquiera otras disposiciones aplicables o
exigibles de la Directiva 1999/5/CE.
La Declaración de Conformidad puede
consultarse en la página de Administración de
Productos (Product Stewardship) en
education.ti.com.
Svenska Härmed intygar Texas Instruments att denna
TTI-Navigator™ Access Point står I
överensstämmelse med de väsentliga
egenskapskrav och övriga relevanta
bestämmelser som framgår av direktiv 1999/5/EG.
Förenlighetsdeklarationen kan konsulteras på
Produktförvaltningssidan (Product Stewardship)
på education.ti.com.

viii
Countries of Operation and Restrictions of Use in the
European Community
Operation Using the 2.400 to 2.4835 GHz Channels in the
European Community
The installer and/or end user should use the configuration utility
provided with this product to verify the current channel of operation and
to confirm that the device is operating in conformance with the spectrum
usage rules for the selected European Community country.
This device is intended to be operated in all countries of the European
Community. Additional restrictions of use for the TI-Navigator™ Access
Point within the European Community countries in the 2.400 to 2.4835
GHz band are listed below.
• The frequencies associated with channels 1 to 13 in the 2.400 to
2.4835 GHz band are allowed to be used either indoors or outdoors
in all countries of the European Community, except where noted
below:
• In Greece, Italy, Latvia, and Spain the end-user must apply for a
license from the national spectrum authority to operate this device
outdoors. Please consult the TI Navigator User's Guide for further
information regarding restrictions and operating conditions for
outdoor configurations.
• In France, the following operation is permitted:
– Outdoor operation is only permitted using the 2.400 - 2.454 GHz
band, which includes channels 1 to 7, at a maximum EIRP of 100
mW (20 dBm).
– Outdoor operation is permitted in the 2.400 to 2.4835 GHz band
on channels 1 to 13 at a maximum EIRP of 10 mW (10 dBm).
– Indoor operation is permitted in the 2.400 to 2.4835 GHz band
on channels 1 to 13 at a maximum EIRP of 100 mW (20 dBm).
Warning Statements
Warning! Install this device in such a manner as to maintain a minimum
of 20 cm (7.9 inches) separation distance between the radiating
element(s) and all persons. This safety warning conforms to FCC radio
frequency exposure limits.
Warning! Do not touch or move the TI-Navigator™ Access Point when
the antennas are transmitting or receiving.
Warning! The TI-Navigator Access Point is intended for indoor use only.
Do not install the device nor operate it outdoors.

ix
Warning! Intentional radiators, such as the TI-Navigator Access Point,
are not intended to be operated with any antenna(s) other than those
furnished by Texas Instruments. An intentional radiator may only be
operated with the antenna(s) with which it is authorized.
Warning! The access point radio(s) are disabled by default and can be
enabled only by the system administrator using the Management
software application.
Warning! The radio frequency band, operating channels, and transmit
power depend on the country of operation specified by the system
administrator during setup and configuration using the Management
software.
Warning! Prior to installation, read and follow all warning notices and
instructions marked on the product or included in the documentation to
ensure legal operation of this device.

x

Contents
ix
Important Information................................................................... ii
Regulatory Information ................................................................. ii
USA FCC Information Concerning Radio Frequency Interferenceii
Federal Communication Commission Interference Statement
ii
RF Radiation Exposure and Hazard Statement: ................... iii
Non-modification Statement:................................................ iii
Deployment Statement:......................................................... iii
Canadian IC Information............................................................... iv
Industry Canada Statement:.................................................. iv
European Union and European Free Trade Association (EFTA)
Regulatory Compliance ........................................................... iv
Declaration of Conformity...................................................... v
European Community Declaration of Conformity ................ v
Countries of Operation and Restrictions of Use in the
European Community ............................................................. vi
Warning Statements .............................................................. vi
Overview ......................................................................................... 1
System requirements...................................................................... 2
Minimum system requirements.............................................. 2
Other requirements ................................................................ 2
Unpacking the boxes...................................................................... 3
Classroom kit ........................................................................... 4
Student kit (up to 16 students) .............................................. 5
Individual kit............................................................................ 5
Assembling and charging the network hubs................................ 6
Removing the network connectors........................................ 7
Checking the LEDs................................................................... 8
Before you begin............................................................................ 8
Installing .................................................................................. 8
Setting up your TI-Navigator™ network the first time ............. 11
Before you begin................................................................... 11
Connecting the cables to the access point .......................... 12
Starting the wizard ............................................................... 13
Installing the calculator operating system.................................. 17
Connecting the calculators to the hubs...................................... 19
Installing software Apps on the calculators ............................... 21
Required ................................................................................ 21
Optional................................................................................. 22
Technical information .................................................................. 23
Wireless access point............................................................. 23
Wireless network information ............................................. 23
Access point LEDs .................................................................. 24

x
Battery information for wireless network hubs ..................24
Storing the hubs .................................................................... 24
Removing the battery pack...................................................25
Hub LEDs ................................................................................25
Troubleshooting............................................................................27
Lost connections ....................................................................27
Calculator device not responding.........................................27
Messages ................................................................................ 28
.......................................................................................................32
Texas Instruments Support and Service .......................................33
For general information .......................................................33
For TI-Navigator™ technical questions ................................33
For product (hardware) service.............................................33
Battery Precautions for Calculators .............................................34
Battery Precautions for Rechargeable Battery Packs..................35
Storage...................................................................................35

1
Overview
The TI-Navigator™ classroom learning system from Texas Instruments can
help you:
• Assess student understanding.
• Verify that students are on task.
• Use classroom results to engage students.
• Get immediate feedback from your students to promote student
achievement.
The system is composed of two parts, hardware and software. The
hardware creates a wireless communications network so that your
computer can communicate with your students’ TI graphing calculators.
The software contains a number of tools to enhance your classroom,
including:
•Activity Center. Lets you run interactive activities with your classes
involving lists, graphs, points, and equations.
•Quick Poll. Lets you send polls to your students, receive the
students’ responses to the polls, and review the poll results with your
students.
•Screen Capture. Lets you capture your students’ calculator screens.
•Class Analysis. Lets you create, distribute, and analyze educational
content.
•LearningCheck™ Creator. Lets you create quizzes and self-
assessment opportunities.
•App and OS Transfer. Lets you transfer TI Graphing Calculator
Operating System (OS) and Applications (Apps) to students’
calculators.
•Transfer tools. Multiple tools that let you send, collect, and delete
data files on your students’ calculators.
You can obtain educational content on the Web at TI’s Activities
Exchange (education.ti.com/activities.) Or, using the tools on the product
CD, you can create your own:
• StudyCard™ stacks
• CellSheet™ application variables
• TI NoteFolio™ Creator text files that you transfer to TI calculators
• TImeSpan™ Creator timelines of chronological events that can be
viewed on a TI calculator

2
• Data sets (lists, matrices, and so on)
There are several ways to learn to set up and use the TI-Navigator™
system:
•The Getting Started poster—a short version of the setup process with
fewer details.
•The Installation Guide (this book, provided in both printed and PDF
formats)—complete setup details, troubleshooting, and technical
information.
• Online Help—After you install the TI-Navigator™ software on your
computer, you can access Online Help from the Help menu.
•The TI-Navigator™ Guidebook, a printed version of the help.
The process of unpacking the equipment, setting up the hardware, and
installing the software will probably require about two hours of your
time.
System requirements
Minimum system requirements
• Windows® Vista Ultimate installed, Windows® XP Professional with
Service Pack 1 or Service Pack 2 installed, or Windows® 2000 with
Service Pack 4 installed.
• 900 MHz Pentium-compatible CPU (1.2 GHz recommended)
• Video adapter set at 1024 x 768 screen resolution
• 256 MB RAM (512 MB recommended)
• Approximately 500 MB of available hard-disk space (to install TI
Connect™ , TI-Navigator™ , Network Manager, Class Analysis, and
LearningCheck™ Creator)
• CD-ROM drive
• Available USB 2.0 (Hi-Speed USB) port on the computer
• Internet Explorer version 5.5 or higher (installed and operational)
Other requirements
• The TI-Navigator™ system communicates with specific TI graphing
calculators (TI-73 Explorer™, TI-83 Plus, TI-83 Plus Silver Edition,
TI-84 Plus, or TI-84 Plus Silver Edition). Your school or your students
may already own these. Calculators are not included with the TI-
Navigator system.

3
• Data cables and cradles for the TI-83 Plus and TI-83 Plus Silver Edition
calculators are sold separately.
• The latest operating system (1.90 for the TI-73 Explorer, 1.19 for the
TI-83 Family, and 2.41 for the TI-84 Family) must be installed on each
calculator used with the TI-Navigator system. These operating
systems are included on the CD and are available at
education.ti.com/latest.
Unpacking the boxes
The TI-Navigator™ product consists of one classroom kit and a
combination of student kits and individual kits, depending on your
specific order. Each kit is packaged separately. If necessary, you can
purchase additional kits to accommodate as many as 40 students.
1. Determine which kits you have received.
2. Unpack the items from the packing materials.
3. Identify each item, and check the items against the following lists to
make sure your order is complete.
4
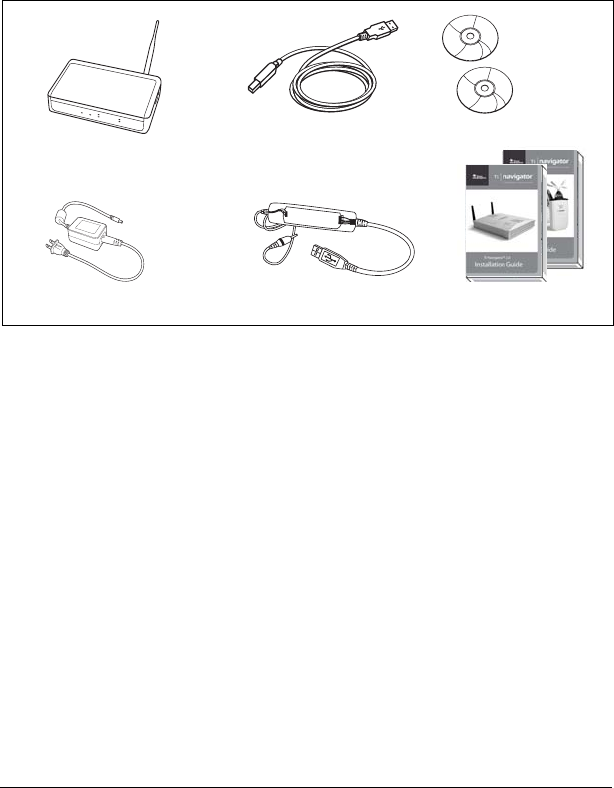
Classroom kit
• 1 access point with AC9930 power adapter
• 1 USB computer cable
• 2 CDs, one containing system and application software, and one
containing educational activities
• 1 USB Silver Edition cable
•This Installation Guide, the TI-Navigator™ Reference Guide, and
other printed materials
The Standard-A to Mini-B USB cable and the black and gray
TI-GRAPH LINK™ cables do not work with the TI-Navigator™ system.
The USB computer cable and the USB Silver Edition cable require a USB
port. The USB Silver Edition cable is used to connect a calculator to the
teacher’s computer.
Note: Connecting a calculator to the teacher’s computer with the
USB Silver Edition cable adds the calculator to the network without the
need for a network hub. When a teacher uses the calculator to login
using her teacher account, she can send and receive Quick Polls, send files
to the class, or use the Activity Center, all without using the computer.
See the TI-Navigator™ Reference Guide or Help for more information.
Access point
USB cable
AC9930 power adapter USB Silver Edition cable
Two CDs
Classroom kit
Two user guides
5
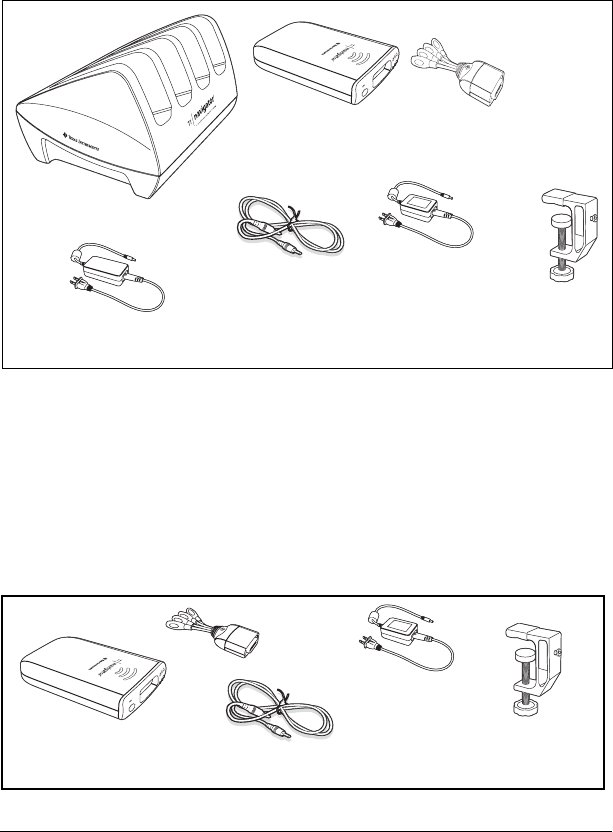
Student kit (up to 16 students)
• 1 charging bay with AC9940 power adapter
• 4 network hubs
• 4 network connectors
• 4 clamps (to attach hubs to student work surfaces)
• 16 data cables (to connect the calculators to the network connectors)
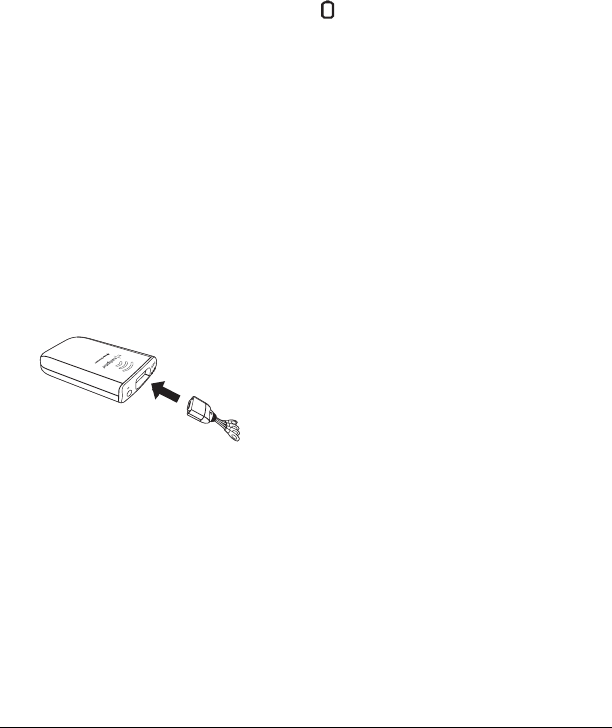
Individual kit
• 1 network hub with AC9930 power adapter
• 1 network connector
•1 clamp
• 4 data cables (to connect the calculators to the network connectors)
Student kit
Hub-charging bay
4 network
hub clamps
4 network hubs and
4 network connectors
AC9940 power adapter
(for the charging bay)
16 data cables AC9930 power
adapter (for
individual hub
or access point)
Network hub with
network connector
Network hub
clamp
Individual kit
AC9930 power
adapter
4 data cables
6
Assembling and charging the network hubs
The network hubs contain rechargable batteries. Hub batteries are
already charged when shipped, but you should charge them overnight
before using them in your class. When the hubs are fully charged, they
will function all day under continuous use. You should recharge them
each night.
The network charging bay can hold from one to four hubs. After you
place the hubs in the charging bay, they are charged simultaneously until
all are fully charged. If the batteries are fully discharged, it may take up
to 12 hours to fully charge the batteries.
With four network hubs in the charging bay, you should charge them for
12 hours. Typically this is done overnight or over a weekend. When the
hubs are fully charged in the bay, the LED shows solid green.
Note: You cannot damage the batteries by leaving them in the charging
bay beyond the time needed to fully charge them. Also, it is not
necessary to fully discharge the batteries before recharging them.
1. Make sure you have enough (3–4) power outlets for the equipment
you received. If necessary, obtain a plug strip so that you have plenty
of grounded outlets.
2. Insert the small end of the AC9940 power adapter cord into the
charging bay’s power jack.
3. Plug the other end of the adapter into a power outlet.
4. Attach a network connector to each hub. Press firmly to make a
good connection.
5. Insert each hub into the charging bay. You can insert them only one
way.

7
Note: If you purchased the individual kit and do not have a charging bay,
you can charge a single hub using the AC9930 power adapter instead.
The network connector acts as an on-off switch for the network hub. It
must be connected for the hub to function on the network, but you can
charge a hub with or without a network connector attached. If you
remove a hub from the charging bay with no network connector
attached, the hub’s power-status LED goes off until you attach a
connector.
Removing the network connectors
When the hubs are out of the charging bay using battery power but are
not in use, we recommend removing the network connectors from the
hubs to extend battery life.
fTo remove a network connector from a hub, use your thumb
and forefinger to squeeze the two buttons on the sides of the
connector, and then pull it away from the hub.

8
Checking the LEDs
Three LEDs (small lights) at the top of each hub blink or change colors to
indicate various operations or status.
The LED indicates whether the hub is configured. The LED indicates
network activity. The LED indicates battery-charging status.
When the network hubs are still in the charging bay:
• The LED blinking in a green-amber-red sequence means the hubs
are currently recharging.
• A solid green LED means the hub is fully charged.
A complete list of LED operations and status modes is available, along
with complete information about the network hubs’ rechargable
batteries and how to store the hubs.
Before you begin
To install software on your computer, you must have administrator
privileges when you log in to Windows®. If you don’t know whether or
not you have administrator privileges, check with your school’s help desk
or system administrator.
Installing
1. Insert the TI-Navigator™ CD in your computer’s CD-ROM drive. The
window to the CD should open automatically.
LEDs

9
Note: If your computer is running Windows® XP Service Pack 2, you
may see the following message. If so, click Yes to continue.
Note: If the setup program does not run, click Start > Run, and then
type D:\Autorun.exe, where D is your CD-ROM drive, and click OK.
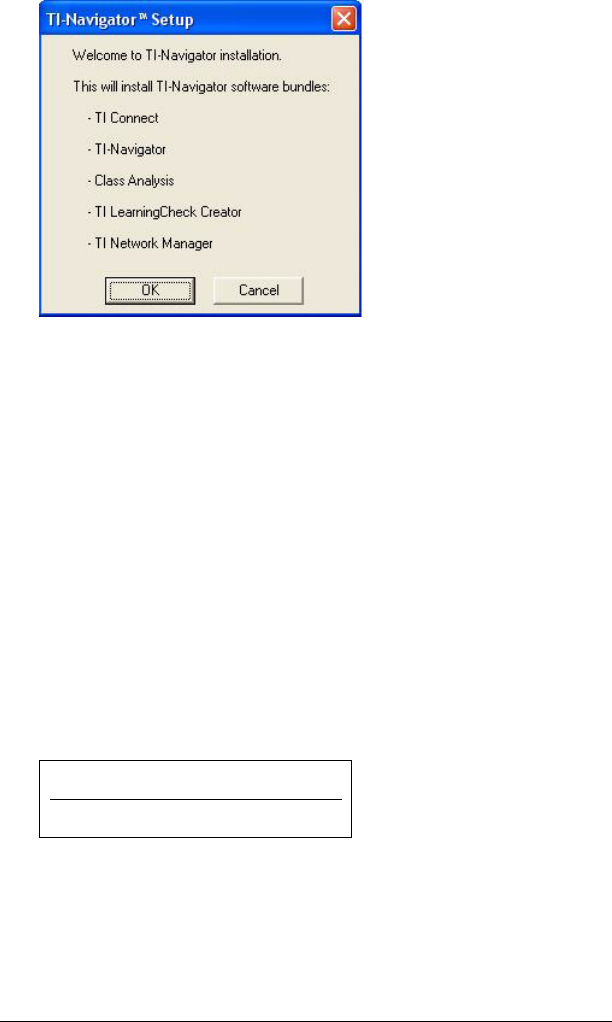
2. Click TI-Navigator Software, and then click Install TI-Navigator™.
The TI-Navigator™ Setup dialog displays.
3. Click OK to continue.
10
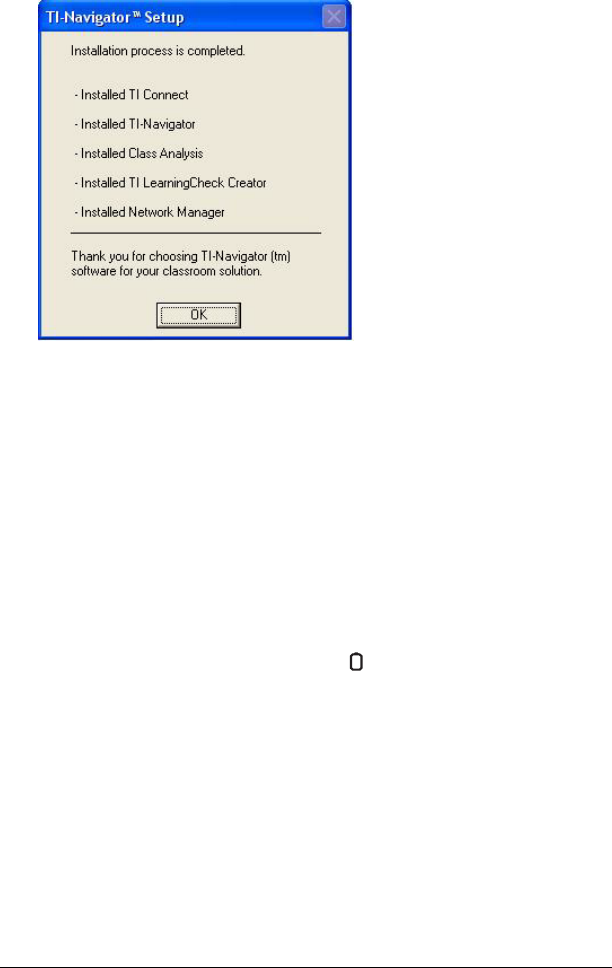
4. Five separate installations will occur:
– TI Connect™
– TI-Navigator™ software
– Class Analysis
– LearningCheck™ Creator
– Network Manager software
Note: If version 1.3 or earlier of TI Connect is already installed on
your computer, the installation program will uninstall it, and install
TI Connect 1.6. If earlier versions of other TI-Navigator™ components
are already installed, the installation program will uninstall it and
install the current version.
When the TI Connect install is complete, you will be prompted to
enter the system ID to install the remaining TI-Navigator™
components.
5. Find the system ID in the case with the CD.
6. When asked, enter the system ID so you can proceed with the
installation.
Note: Enter the system ID exactly as shown. Be careful not to enter a
zero for the letter O or a letter O for a zero.
(sample)
TI-Navigator™ System ID
48z6-co2j-cyms-qol2x
11
7. When the installation is complete, the TI-Navigator™ Setup dialog
displays the status of installed components.
You are now ready to set up your network.
8. After pressing OK, you may be required to reboot your computer.
Setting up your TI-Navigator™ network the first
time
A Network Setup wizard helps you activate the access point and hubs for
wireless communication.
Before you begin
1. Make sure you have installed the TI-Navigator™ software on your
computer.
2. Make sure each hub is fully charged ( LED is solid green).
3. Remove the hubs from the charging bay. Each hub must have a
network connector attached.
12
The LED changes from solid green to blinking green when you
remove a hub from the charging bay.
4. Have a ball-point pen or paper clip handy; you’ll need it to reset the
hubs.
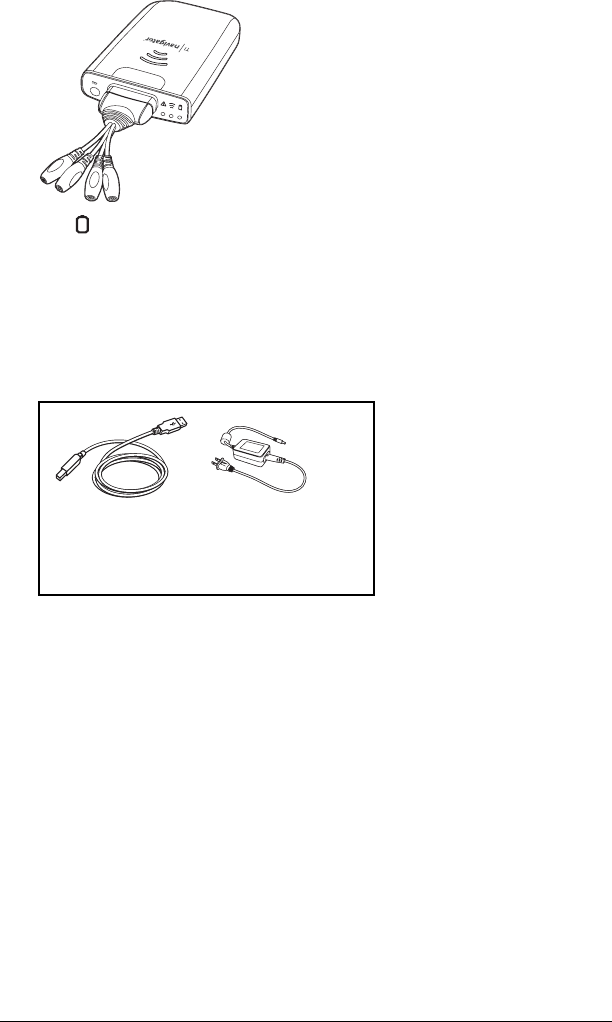
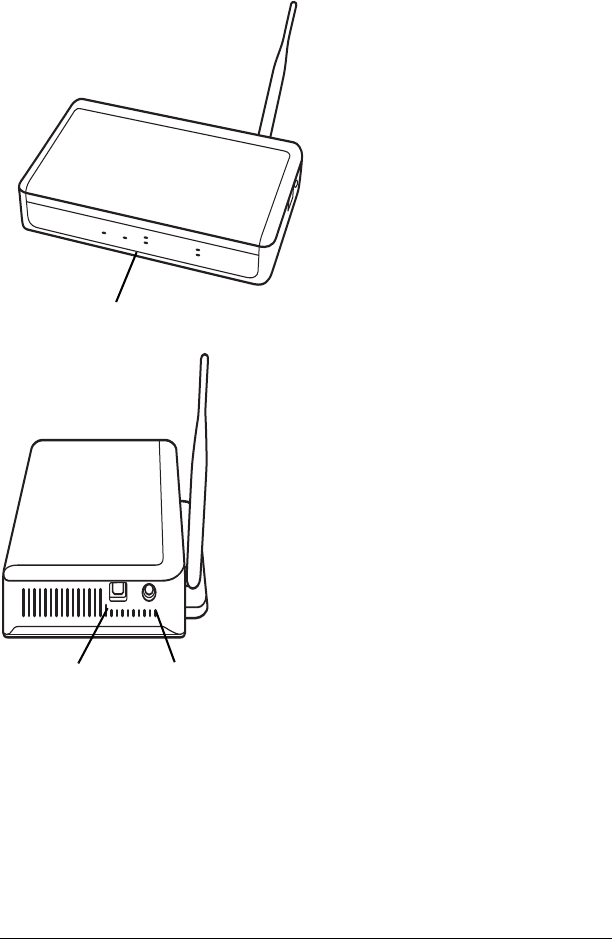
Connecting the cables to the access point
1. Identify the cables.
2. Connect the AC9930 power adapter to the power jack on the access
point.
3. Connect the USB cable to the access point.
AC9930 Power
adapter
USB cable
13
Starting the wizard
A First Time Setup screen opens automatically when you complete the
installation of the TI-Navigator™ software. You are immediately
prompted to run the network setup wizard.
Note: If you want to run the Setup Wizard later, click Start > Programs >
TI Tools > TI Network Manager. When Network Manager opens, click
Actions > Setup Wizard.
1. Click Setup to start the wizard.
2. Confirm that the AC9930 power adapter is connected to the access
point.
3. Plug the AC adapter into a power outlet.
4. Plug the USB cable into the computer.
5. Click Next to proceed with the wizard.
Your computer recognizes the new hardware component.
Network Manager sends signals to the access point to add it to the
network.
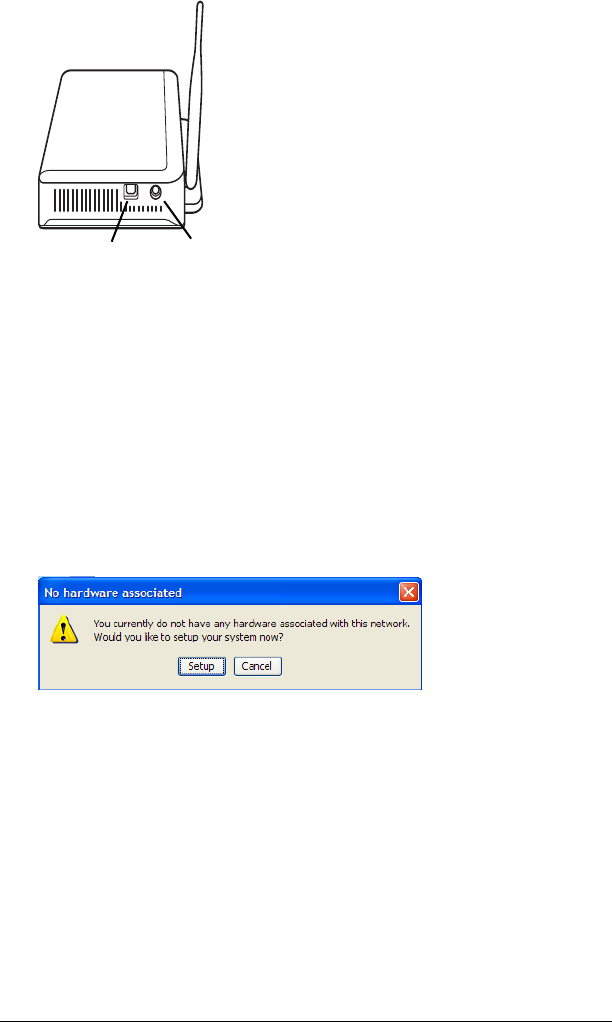
After the access point is found, the wizard displays a message.
USB conection
Access point, side view
Power adapter
jack

14
6. Click OK.
The next step is to add the network hubs to your classroom network.
7. Make sure the hubs are charged (that is, the LED is green and
blinking).
8. Select Wireless Hubs.
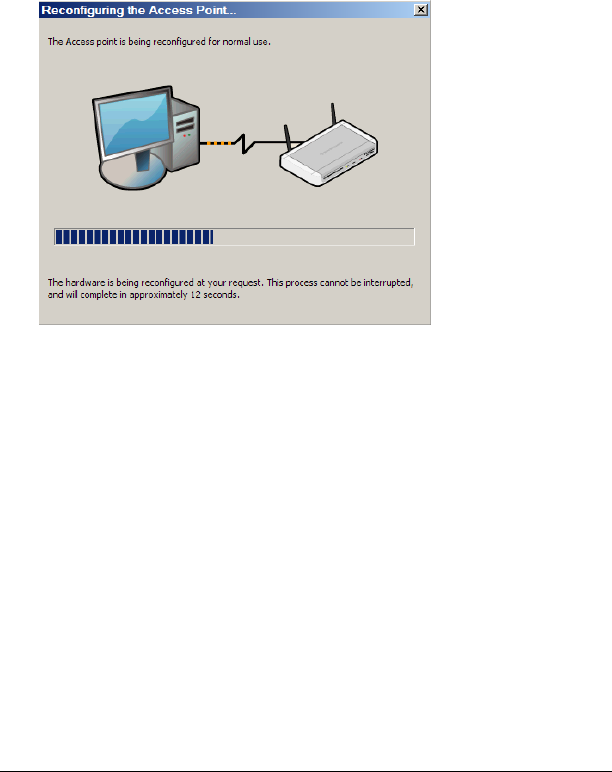
9. Click Next. The Network Manager software reconfigures the access
point to add hubs to the system.
10. When the next screen appears, follow the directions on the screen.
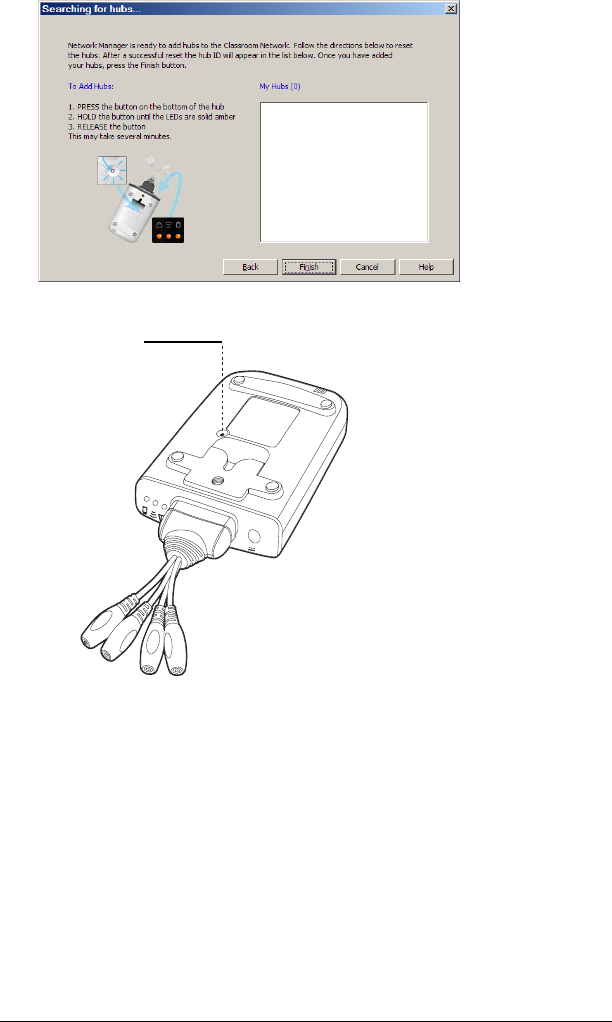
15
11. Use a ball point pen to press the reset button on the back of the hub.
Hold the button in until the LEDs are solid amber, then release the
button. This resets the hub to its factory default settings. Repeat for
each hub in the classroom.
A serial number is printed on the back of each network hub. The last
five digits of the serial number of each hub are displayed on the
screen as the access point recognizes and associates with each hub.
Reset button
Network hub, bottom view
16
12. Compare the number of hubs that are found with the total number
of hubs in your classroom. (For example, you know you have 10 hubs
in your classroom, but only 8 were found.)
13. If some of the hubs were not found, match the serial numbers on the
screen with the hubs in the classroom to identify which hubs were
found. Use a sticker or some other method to mark the hubs that
were found, and then press the reset button again on the hubs that
were not found.
14. When all the hubs have been found (total number of hubs matches
what you have in your classroom), click OK.
Another screen indicates that the access point is being reconfigured
to communicate with the hubs.
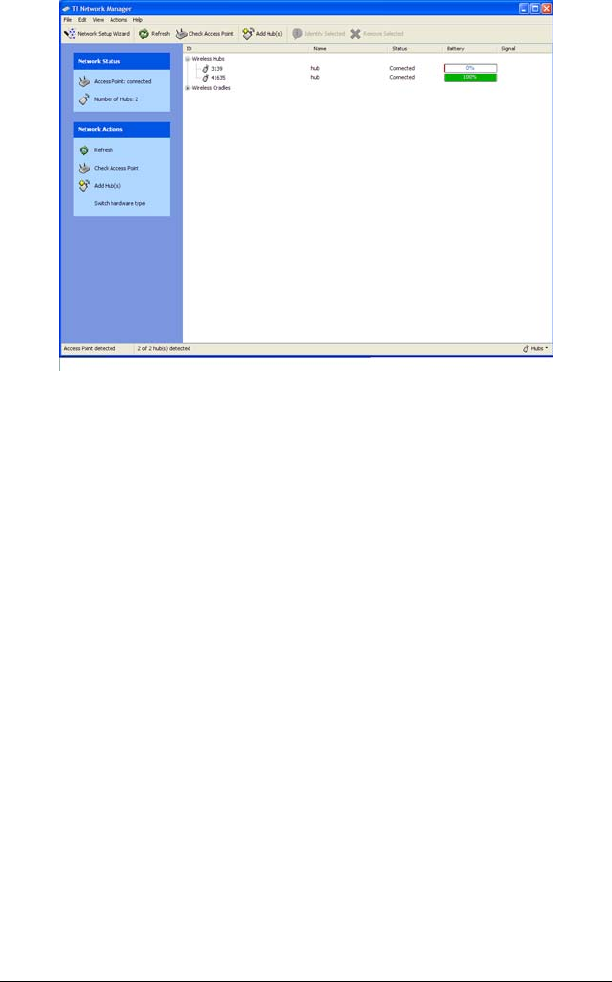
17
When all of the hubs are found, Network Manger displays the list of
hubs.
Installing the calculator operating system
Before you can use the calculators on the network, you must use the
TI Connect™ software to update the operating system on each calculator.
All calculators on the network must have the latest operating system
installed for the TI-Navigator™ system to work properly. For TI-73
Explorer, use OS version 1.90 or higher, TI-83 Plus calculators, use OS
version 1.19 or higher. For TI-84 Plus calculators, use OS version 2.41 or
higher.
Note: TI-73 users can update the OS on all calculators at once, using the
App and OS Transfer tool. Refer to the Guide to TI-Navigator™ with the
TI-73 Explorer.
An operating system may take ten minutes per calculator to transfer and
install.
1. Connect the calculator to your computer using the
USB Silver Edition cable.
2. Insert the installation CD in your computer’s CD-ROM drive. The
window should open automatically.
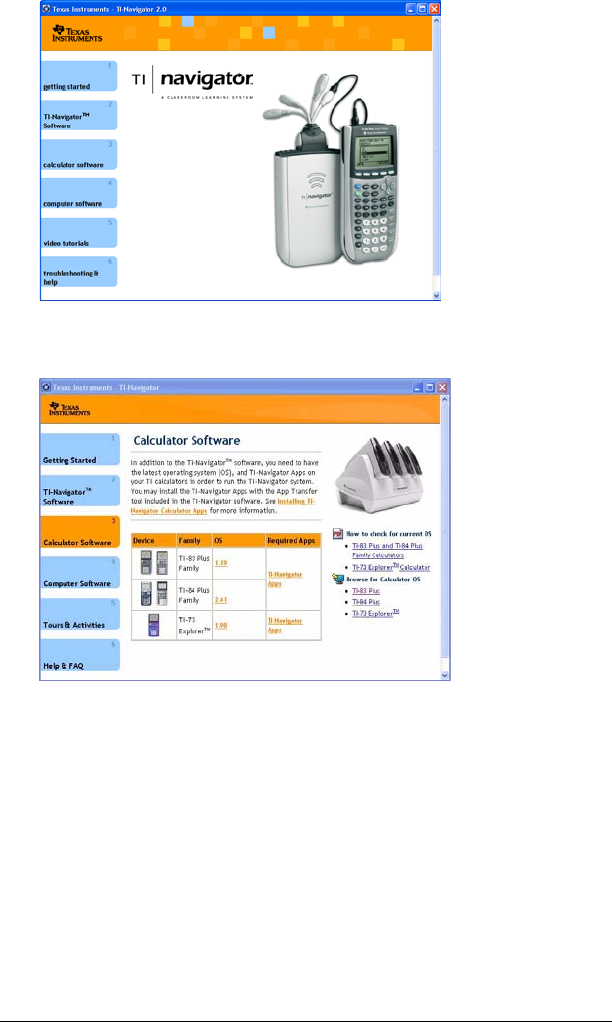
18
3. Click the Calculator Software button. The Calculator Software
screen appears.
4. Under Required OS, click the version number of the model of
calculator to which you are installing.
5. Use TI Connect™ to install the operating system on the calculator.
a) Locate the operating system file on the CD.
b) Right-click the operating system file.
c) Click Send to TI device. The TI Connect™ Select TI Device
dialog box opens.
d) Follow the instructions on the screen. An operating system
may take ten minutes per calculator to transfer and install.
6. Install the operating system on every calculator to be used with your
TI-Navigator™ system.
19
Warning: Do not disconnect the cable at any time while updating an
operating system or installing Apps to a calculator.
Note: Consider keeping one or two spare calculators with the latest
operating system and ample memory. It is also a good idea to have spare
cradles and data cables on hand. If a problem occurs, you can substitute a
spare part.
Connecting the calculators to the hubs
After charging the hubs and resetting them so they are recognized by
Network Manager, you are ready to connect the hubs to the calculators.
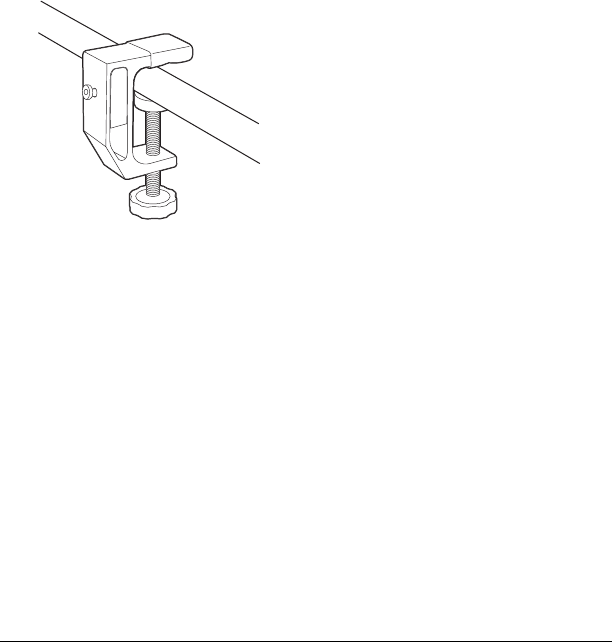
Using the clamps is optional; however, they save space, reduce clutter,
and prevent the hubs from being accidentally knocked off your work
surface.
1. Attach one clamp for each hub to the edge of a work surface.
Tighten the thumbwheel.
2. Attach a hub to each clamp.

20
3. Plug as many as four TI graphing calculators into the four jacks on
the network connector at the top of each network hub. Insert the
plug carefully; do not bend the plug.
4. Connect the graphing calculator with a data cable.
21
Note: Connecting a calculator to the teacher’s computer with the
USB Silver Edition cable adds the calculator to the network without the
need for a network hub. When a teacher uses the calculator to login
using her teacher account, she can send and receive QuickPolls, send files
to the class, or use the Activity Center, all without using the computer.
See the TI-Navigator™ Reference Guide or Help for more information.
At the end of the school day, return the hubs to the charging bay and
charge them overnight. The hubs are fully charged when all the
(power status) LEDs are solid green.
Installing software Apps on the calculators
Required
Four required Apps must be installed on all the calculators on the
network. These Apps are named NavNet (used to connect to the
TI-Navigator™ system), EAlgACT, Enavstk, and LearnChk (used to view
activities on the calculator). TI-73 Explorer users require an additional
App, EMSact, which is used to run the Visual Fractions and NumberLine
Activities. Use the App Transfer utility to install the Apps.
1. Click Start > Programs > TI Tools > TI-Navigator > TI-Navigator.
The TI-Navigator™ home screen appears. If you have not used the
software before, the Create a Class dialog box opens, and you are
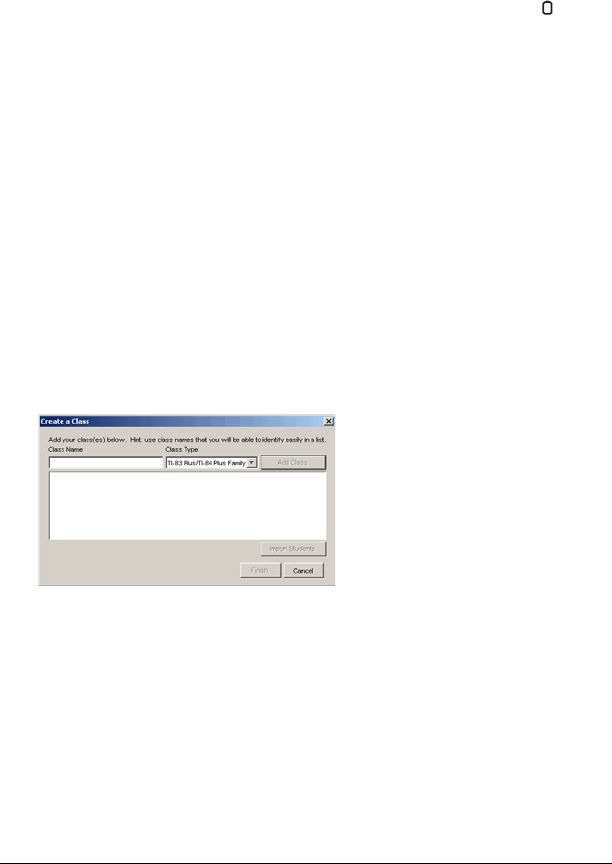
asked if you want to set up your classroom.
If you prefer, you can click Cancel to skip to step 3 and create your
classes later.
2. To create classes, follow these steps.
a) Click in the Class Name box and type a name for your class.
b) Select a Class Type from the dropdown menu.
c) Click Add Class.
d) Repeat until you have created all the classes you want.

22
e) If you want to import a list of students into a class, click to
select the class name in the list, and then click Import
Students.
or
f) Click Finish. You can then enter the names of the students
manually into each class.
Note: Refer to the TI-Navigator™ Reference Guide or the
TI-Navigator™ Help for details on using the TI-Navigator™ software.
3. On the TI-Navigator™ home screen, click the Tools tab.
4. On the Tools panel, under Utilities, double-click the App Transfer
icon, and then click Start Transfer.
The four Apps are automatically sent out to all the calculators
connected to the network.
Optional
Additional software Apps for TI calculators (TI-83 Plus, TI-83 Plus Silver
Edition, TI-84 Plus, or TI-84 Plus Silver Edition) are included on the
product CD.
• StudyCards™ Viewer
• CellSheet™ Converter App
• NoteFolio™ App
• TImeSpan™ Viewer App
You can install these items to all the calculators on the network using the
App Transfer utility in the TI-Navigator™ software, or you can install
them to a single calculator using the USB Silver Edition cable and
TI Connect™ software.
23
Technical information
Wireless access point
Wireless network information
The TI-Navigator™ classroom learning system includes a wireless local-
area network based on the IEEE 802.11b/g industry standard, also known
as Wi-Fi (wireless fidelity). This networking standard provides high-speed
data transfer in the license-free 2.4 GHz band. The TI-Navigator™ system
has been tested to perform at a range of 70 feet.
LEDs
Power
jack
USB port

24
If possible, avoid sources of potential interference, such as metal walls,
microwave ovens, and wireless phones.
Access point LEDs
POWER – Indicates that the access point is receiving power from the
power adapter.
TEST – The access point is in self-test mode. This LED should blink for a
minute and then stop.
STATUS: 100 LINK/ACT – Indicates data transfer.
SIGNAL: 802.11 b/g – Indicates wireless link activity.
Battery information for wireless network hubs
• You cannot damage the batteries by leaving them in the charging
bay beyond the time needed to fully charge them. Also, you will not
damage the hubs by inserting or removing them from the charging
bay at any time.
• It is not necessary to unplug the power adapter from the charging
bay, even when no hubs are present.
• To charge as many as four network hubs at a time, use the charging
bay. If you only need to charge one hub, you can connect the AC9930
power adapter directly from the hub to a power outlet.
• It is not necessary to fully discharge the batteries before recharging
them.
• Do not leave the hubs in an extremely cold or extremely warm
location, such as inside an automobile in hot weather.
• Every few weeks, you should clean the electrical contacts on the
charging bay and the hubs using a clean, dry cloth.
Storing the hubs
If you need to store the wireless network hubs for more than two weeks:
• Remove the network connector from each hub. This is important to
preserving battery life, because the network connector acts as an
“on-off” switch for the hub.
• Store the hubs in a cool, dry place.
• Fully charge the hubs at least once every 10-12 months.

25
Removing the battery pack
If you need to store the wireless network hubs for more than two
months, remove the battery pack from the hub.
1. Disconnect the clamp, network connector, and power adapter from
the hub.
2. Insert a coin at the bottom end of the hub and twist to remove the
front section of the case.
3. Insert your forefinger to remove the battery pack, and then
reassemble the outer case.
Under normal use, the rechargeable battery pack will last 2-3 years. If
you must replace the battery pack, use only the 3.6L43BPA battery from
Texas Instruments.
Hub LEDs
The LEDs on each network hub use various colors and blink patterns to
indicate overall status, data activity, or power status. This can occur either
when the hubs are seated in the charging bay or when they are outside
the charging bay.
When a hub powers up (because you have either inserted it into the
charging bay or connected a network connector), all the LEDs emit solid
amber, and then each LED, one at a time, emits solid green. When the
power-up sequence is complete, the LEDs indicate status as follows.
Status LED
Activity LED
Color and pattern Meaning
Off Normal
Blinking amber Hub is not configured
Color and pattern Meaning
Blinking green Indicates data transfer to and from the
access point.
Blinking amber Not associated with the access point.

26
Battery (Power Status) LED
Color and pattern Meaning
Changing from green
to amber to red
The battery is charging.
Solid green Power on; fully charged and powered by a
charging bay or power adapter.
Blinking green Power on; battery powered. The battery is
30% to 99% charged.
Blinking amber Low battery (lower than 30% charged).
Blinking red Battery is critically low (lower than 8%
charged).

27
Troubleshooting
This section provides troubleshooting information related to the
TI-Navigator™ hardware and the Network Manager software. For
information about the TI-Navigator™ software, see the TI-Navigator™
Reference Guide or TI-Navigator™ Help.
Lost connections
Certain actions, such as resetting the access point, can cause the
TI-Navigator™ network to lose its connection to one or more hubs. This
can occur even when Network Manager reports that the hubs are
responding.
If you attempt to transfer data to or from calculators, and some of the
hubs do not respond (even though they are listed as “found”), try one of
the following remedies:
• Disconnect the network connector from the offending hub, and then
re-connect it. Make sure the data cable from the calculator is
properly connected to the network connector.
-or-
• Use a ball point pen to reboot the hub.
To reboot a hub, hold the reset button for 2–3 seconds and release it
while the LEDs are still blinking. This reboots the hub but does not reset
the hub to its factory defaults, which happens when you hold the reset
button until the LEDs emit solid amber. Rebooting a hub allows it to be
reassociated with the access point. Resetting the hub to its factory
defaults will remove the hub entirely from the network.
Calculator device not responding
If you save an assignment from LearningCheck™ Creator with a title that
has 65 or more characters, and one or more of the first 65 characters is a
special character (such as a division symbol), the assignment could cause
TI-73 Explorer, TI-83 Plus, TI-83 Plus Silver Edition, TI-84 Plus, and TI-84
Plus Silver Edition calculators to stop responding. To prevent this
problem, avoid creating assignments with long titles and special
characters. Try to use titles that contain only letters of the alphabet,
numerals, and spaces.

28
Messages
Problem or
message
Possible solutions
Device not
found
• Make sure the data cable from the calculator
is properly connected to the network
connector.
• Ensure that the access point is connected and
its power adapter is plugged in.
Problem or
message
Possible causes or solutions
Device is
incorrectly
configured
An access point
was located, but
one or more
configuration
parameters are
set incorrectly.
Troubleshoot the Access Point procedure to
reconfigure this device. (See “Setting up your
TI-Navigator™ network the first time” on
page 11.)
Device did not
respond, or
Device not
found
No access point
was located by
the system. The
hubs cannot be
configured until
this is corrected.
• The access point has not yet been added to
the system.
• The access point is turned on but still
initializing.
• Run Network Manager and click on Check
Access Point.
Cannot add the
access point to
the network
• The access point is not in a receptive state. If
its configuration has been corrupted, reset
the access point to the original settings. You
will need to reconfigure the access point and
add all the hubs to the network again.

29
Device is
incorrectly
configured
This hub has been
located, but one
or more
configuration
parameters are
set incorrectly.
• Repeat the Add Hubs procedure to
reconfigure this hub.
• Remove the hub and then add it back into the
network.
The device did
not respond
The hub was
previously added
to the classroom
network, but was
not located at this
time.
• The access point was not found.
• The hub’s network connector is removed.
• The hub is too far away from the access point.
Try to keep the hubs within 70 feet of the
access point.
• If you changed the channel, try removing all
the hubs and then adding all the hubs back
into the network.
Problem or
message
Possible causes or solutions

30
The device did
not respond, or
hub is not listed
in the Network
Manager window.
• Refresh the network status (Click View >
Refresh). After checking for the previous
conditions, refresh the status screen to see if
the hub has been detected.
• Make sure the hub’s battery is fully charged
or verify that the power adapter is connected.
• Make sure that the network connector is
properly attached to the hub.
• Make sure the hub is within range of the
access point.
• When in the process of adding hubs, be
patient. It may take up to 30 seconds after
resetting a hub before it is recognized and
configured by the software.
• You may have to reset the hub a second time.
Remember to hold the reset button until the
LEDs are solid amber.
• Sometimes you must choose a different
channel to avoid interference and improve
reception. If you changed the channel, try
removing all the hubs and then adding all the
hubs back into the network.
• If more than one network is located in the
same area, hubs sometimes associate with the
wrong access point. To avoid this, make sure
that hubs are added to only one
TI-Navigator™ system at a time, and make
sure a TI-Navigator™ system in a nearby
classroom is not adding hubs at the same
time.
Communication
Error
One or more hubs
is not
communicating
with the access
point.
• To restore communication between the hub
and access point, click View > Refresh.
• If the error message remains, select the hubs
that are not working, remove them from the
network, and then add them back into the
network.
Problem or
message
Possible causes or solutions

31
The batteries in
the network hubs
run down during
class time,
resulting in dead
or low batteries.
• Make sure the network hubs are recharged
overnight every night.
• Normally, the network hubs’ rechargable
batteries can be recharged and used for up to
three years. If you charge a battery overnight
and the LED on the network hub still blinks
red or amber, contact Texas Instruments for
help.
Phone: 1.866.TI.NAVIGATOR (1.866.846.2844)
E-mail: ti-navigator@ti.com
Extra hubs appear
on the network
• Do not attempt to configure more than one
classroom network at the same time.
• Remove the network connector from hubs
that you do not want to add to your network.
• Compare the hub numbers listed in the
Network Manager window with the numbers
stamped on the backs of the hubs themselves.
Highlight and remove any hubs in the list that
should not be part of your network.
Data is received
by some
calculators, but
not all.
• Make sure all of the calculators have the
latest operating system from Texas
Instruments installed.
• Make sure the calculator’s RAM is not
completely full.
• Make sure an alternate operating system,
such as Mirage, is not installed. If found,
remove it from the calculator.
The calculator
does not respond
in any way, and
appears to be
“locked up.”
• Reset the calculator. For instructions, refer to
the guidebook for the calculator.
A plug bends or
breaks when
inserted into a
jack on the
calculator or the
network
connector.
• Replace with a spare calculator unit, spare
network connector, or spare data cable.
Contact Texas Instruments for help.
Phone: 1.866.TI.NAVIGATOR (1.866.846.2844)
E-mail: ti-navigator@ti.com
Problem or
message
Possible causes or solutions

32
You have a
conflict on the
operating
channel used by
your
TI-Navigator™
access point.
• A conflict could be caused if another access
point or a cordless telephone is using the
same channel.
• To try a different channel, open Network
Manager, click Actions > Change Operating
Channel. In the Operating Channel list, click a
different channel number, and click OK. If the
changing the channel doesn’t correct the
problem, try a different channel.
Problem or
message
Possible causes or solutions

33
Texas Instruments Support and Service
For general information
For TI-Navigator™ technical questions
For product (hardware) service
Customers in the U.S., Canada, Mexico, Puerto Rico and Virgin
Islands: Always contact Texas Instruments Customer Support before
returning a product for service.
All other customers: Refer to the leaflet enclosed with this product
(hardware) or contact your local Texas Instruments retailer/distributor.
Home Page: education.ti.com
KnowledgeBase and
e-mail inquiries:
education.ti.com/support
Phone: (800) TI-CARES / (800) 842-2737
For U.S., Canada, Mexico, Puerto Rico, and
Virgin Islands only
International
information:
education.ti.com/international
E-mail: ti-navigator@ti.com
Phone: (866) TI-NAVIGATOR / (866) 846-2844

34
Battery Precautions for Calculators
Take these precautions when replacing batteries.
THERE IS A RISK OF EXPLOSION IF REPLACED BY AN INCORRECT TYPE.
REPLACE ONLY WITH THE SAME OR EQUIVALENT TYPE RECOMMENDED
BY TEXAS INSTRUMENTS. DISPOSE OF USED BATTERIES ACCORDING TO
LOCAL REGULATIONS.
• Do not leave batteries within the reach of children.
• Do not mix new and used batteries. Do not mix brands (or types
within brands) of batteries.
• Do not mix rechargeable and non-rechargeable batteries.
• Install batteries according to polarity (+ and - ) diagrams.
• Do not place non-rechargeable batteries in a battery recharger.
• Properly dispose of used batteries immediately.
• Do not incinerate or dismantle batteries.

35
Battery Precautions for Rechargeable Battery
Packs
The TI-Navigator™ network hub contains a Lithium Ion battery pack.
Adherence to the following instructions and cautions will help you get
the most from your battery pack.
Contact TI if you have problems with the battery.
WARNING: THERE IS A RISK OF EXPLOSION IF REPLACED BY AN
INCORRECT TYPE. REPLACE ONLY WITH THE SAME OR EQUIVALENT TYPE
RECOMMENDED BY TEXAS INSTRUMENTS. DISPOSE OF USED BATTERIES
ACCORDING TO LOCAL REGULATIONS. DO NOT RECHARGE,
DISASSEMBLE, CRUSH, HEAT ABOVE 140º (60º C), OR INCINERATE.
Always follow the following guidelines:
• Replace only with TI-specified battery pack.
• Use only in TI-Navigator™ network hubs.
• Do not disassemble, puncture, crush, or incinerate batteries.
• Charge batteries only with an approved charger designed for use
with your Texas Instruments product.
• Do not place non-rechargeable batteries in a battery recharger.
• Properly dispose of used batteries immediately. Do not leave them
within the reach of children.
• Remove batteries for disposal in accordance with your local
regulations before disposing of the TI-Navigator™ system.
Storage
• Remove batteries from the calculator.
• Store in controlled climate conditions between 20 degrees C and 35
degrees C.
• Avoid high temperature storage conditions. Do not store under
sunlight or in an automobile.
• Recharge after storing if rechargeable.
• Do not leave batteries within reach of children.

36

Index
37
A
access point
activating 11
illustrated 23
LEDs 24
assembling and charging hubs 6
B
batteries
charging 6
battery information 24
battery precautions 34
battery precautions (rechargeables)
35
C
calculators
connecting to hubs 19
installing software on 21
CellSheet 1
charging and assembling hubs 6
clamping hub to work surface 19
Classroom kit 4
connecting
calculators to hubs 19
contact information 33
contents of kits 3
copyright statement ii
customer support and service 33
E
error messages 27
F
FCC statement ii
H
hubs
activating 11
assembling and charging 6
checking power status 8
connecting calculators to 19
resetting 11
I
Individual kit 5
inventory 3
K
kit
Classroom 4
Individual 5
Student 5
L
LEDs
on access point 24
on hubs 25
power status on hubs 8
M
messages
error 27
N
network
setting up 11
network connector
attaching to hub 6
O
operating system
installing on calculators 21
overview of TI-Navigator 1
P
precautions with batteries 34
precautions with rechargeable
batteries 35
problems
resolving network 27

38
R
recharging network hubs 6
resetting
hubs 11
S
safety
battery 34
rechargeable batteries 35
service and support 33
setting up network 11
software
installing on calculators 21
Student kit 5
StudyCard 1
support and service 33
system requirements 2
T
technical information 23
TI-Navigator overview 1
trademarks ii
troubleshooting 27, 28
U
unpacking the boxes 3
W
wizard
network setup 11