Texas Instruments TINAVAP2 Navigator Access Point User Manual NavigatorAP
Texas Instruments Inc. Navigator Access Point NavigatorAP
V7R-TINAVAP2_UserManual_Rev1

Setting Up the TI-Nspire™ Navigator™ Teacher Software 1
Setting Up the TI-Nspire™ Navigator™
Teacher Software
The TI-Nspire™ Navigator™ classroom learning system provides the
hardware and software tools you need to set up a wireless classroom
network.
The hardware creates a wireless communications network so that your
computer can communicate with student handhelds. The hardware
includes TI-Nspire™ CX Wireless Network Adapters, TI-Nspire™
Navigator™ Cradles, and the TI-Nspire™ Navigator™ Access Point.
The wireless adapters are used with the TI-Nspire™ CX and TI-Nspire™
CX CAS handhelds. The cradles are used with the TI-Nspire™ CX,
TI-Nspire™ CX CAS, TI-Nspire™, or TI-Nspire™ CAS handhelds.
The TI-Nspire™ Navigator™ Access Point is the communication link used
in all wireless classroom setups. The TINAVAP2 access point supports the
following wireless clients:
• TI-Nspire™ CX Wireless Network Adapters
• TI-Nspire™ Navigator™ Cradles with FCC or IC numbers ending in
TINAVWC2
The software contains a number of tools to enhance your classroom,
including:
•Quick Poll. Lets you send polls to students, receive student responses
to the polls, and review the poll results with your students.
•Screen Capture. Lets you capture screens from the students’
handhelds or computers automatically or at specific time intervals.
You can collect a stack, or history, or screens.
•Live Presenter. Lets you display work as it is being performed on
your handheld screen or on student handheld screens.
•Review. Lets you collect and review student assignments, watch
results in real time as students answer questions, and analyze data for
the entire class or for individual students.
You can obtain educational content on the Web at TI’s Activities
Exchange: education.ti.com/activities.
The setup process involves these steps:
• Unpacking the boxes
• Charging the TI-Nspire™ Navigator™ Cradles
• Installing the handheld software
2 Setting Up the TI-Nspire™ Navigator™ Teacher Software
• Connecting the access point to the computer
• Starting the Network Manager wizard
• Setting up a network
• Adding the wireless clients to the network
Unpacking the Boxes
The TI-Nspire™ Navigator™ System product consists of TI-Nspire™
Navigator™ Teacher Software, an access point, and either 15 or 30
cradles or wireless adapters, depending on your specific order. If
necessary, you can purchase additional kits to accommodate as many as
60 students.
Identify each item, and check the items against the following lists to
make sure your order is complete.
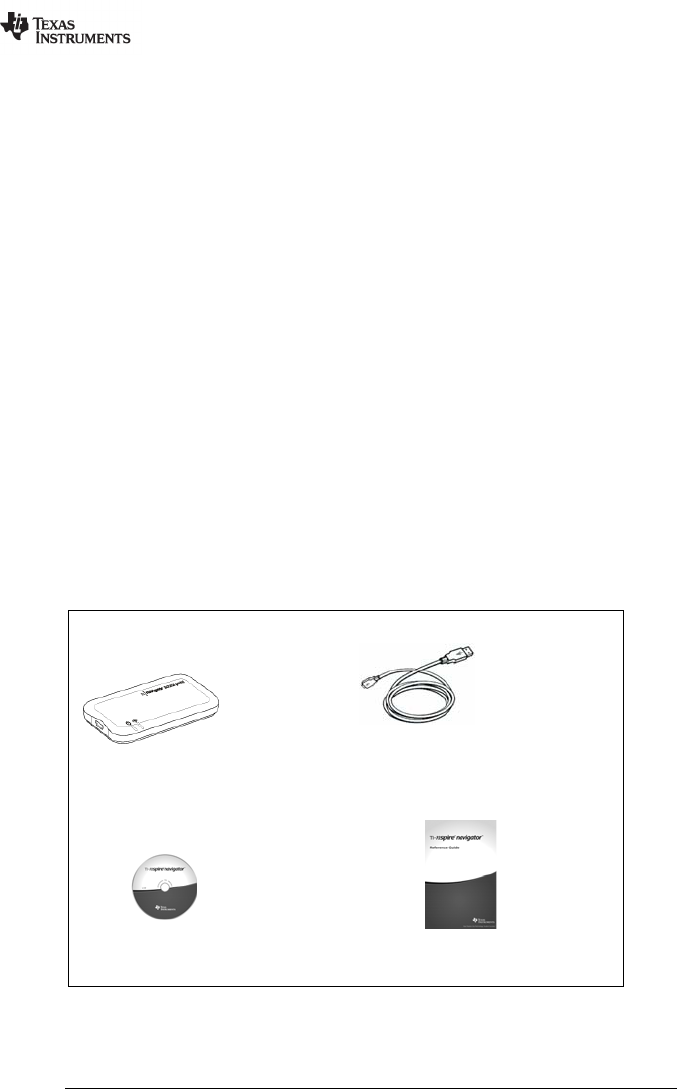
Each TI-Nspire™ Navigator™ System comes with the following items.
• One TI-Nspire™ Navigator™ Access Point
• One 60 inch USB computer cable
• One DVD containing TI-Nspire™ Navigator™ Teacher Software
•The Getting Started with the TI-Nspire™ Navigator™ Teacher
Software guide
One access point
One USB cable
One DVD Getting Started guide
Setting Up the TI-Nspire™ Navigator™ Teacher Software 3
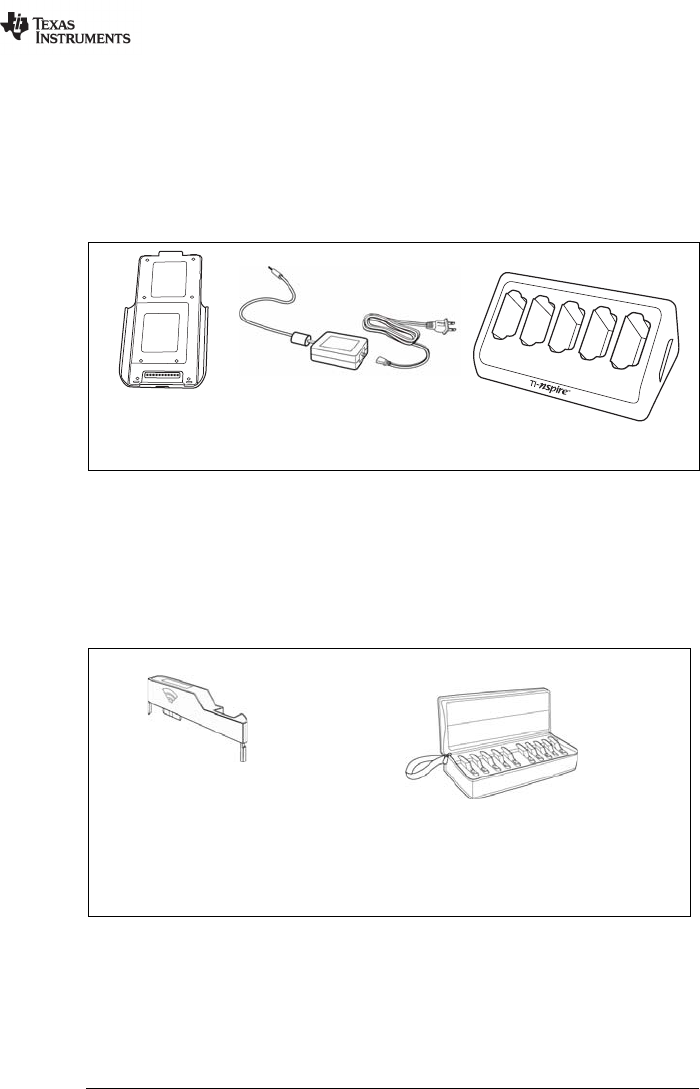
If you purchased the TI-Nspire™ Navigator™ System for use with the
TI-Nspire™ CX, TI-Nspire™ CX CAS, TI-Nspire™, or TI-Nspire™ CAS
handhelds, contents include the following items:
• TI-Nspire™ Navigator™ Cradles
• AC9940 power adapter (includes power supply and power cord)
• TI-Nspire™ Navigator™ Cradle Charging Bay
If you purchased the TI-Nspire™ CX Navigator™ System for use with the
TI-Nspire™ CX or TI-Nspire™ CX CAS handhelds exclusively, contents
include the following items. Quantities will vary, depending on the
system you purchased.
• TI-Nspire™ CX Wireless Network Adapters
• TI-Nspire™ CX Wireless Network Adapter storage cases
Charging the Cradles
The TI-Nspire™ Navigator™ Cradles contain rechargable batteries. You
must charge the batteries overnight before using them in class. When the
cradles are fully charged, they will function all day under continuous use.
You should recharge them each night.
Cradle charging bay
Cradles AC9940 power adapter
(for the charging bay)
Wireless network
adapter
Storage case for the TI-Nspire™ CX
Wireless Network Adapters
4 Setting Up the TI-Nspire™ Navigator™ Teacher Software
The TI-Nspire™ Navigator™ Cradle Charging Bay can hold from one to
five cradles. After you place the cradles in the charging bay, they are
charged simultaneously until all are fully charged. If the batteries are
fully discharged, it may take up to 12 hours to fully charge the batteries.
Note: You cannot damage the batteries by leaving them in the charging
bay beyond the time needed to fully charge them. Also, it is not
necessary to fully discharge the batteries before recharging them.
Make sure you have enough (3-4) power outlets for the equipment you
received. If necessary, obtain a power strip so that you have plenty of
grounded outlets.
1. Insert the small end of the AC9940 power adapter cord into the
charging bay’s power jack.
2. Plug the other end of the adapter into a power outlet.
3. Insert each TI-Nspire™ Navigator™ Cradle into the TI-Nspire™
Navigator™ Cradle Charging Bay. Make sure the LED is amber.
Note: You can charge a single wireless cradle using an AC9926 adapter
(sold separately).
Checking the LEDs
Two LEDs (small lights) at the top of each TI-Nspire™ Navigator™
wireless cradle blink or change colors to indicate various operations or
status.
The LED indicates network activity. The LED indicates battery-
charging status.
LEDs
Setting Up the TI-Nspire™ Navigator™ Teacher Software 5
When the cradles are still in the TI-Nspire™ Navigator™ Cradle Charging
Bay:
• A solid amber LED means the wireless cradle is currently
recharging.
• A solid red LED means the wireless cradle does not have good
contact with the charging bay. Reposition the cradle so it has good
contact and the LED turns amber.
• A solid green LED means the wireless cradle is fully charged.
Installing the Handheld Software
Before you use the TI-Nspire™ Navigator™ Teacher Software with
handhelds, make sure you have the latest operating system installed on
all of the handhelds for the software to work properly.
You can use the TI-Nspire™ Navigator™ Teacher Software to update the
handheld operating system.
Note: After you install the latest OS on one handheld, you can use that
handheld to install the OS on other handhelds.
1. Connect a TI-Nspire™ handheld to your computer.
2. Show all connected handhelds.
• In the Content Workspace, click Connected Handhelds in the
Resources pane.
• In the Documents Workspace, open the Content Explorer and
click Connected Handhelds.
3. Click the handheld you want to update.
4. Click Help > Check for Handheld/Lab Cradle OS Update.
The Check for Handheld/Lab Cradle OS Update dialog box opens.
5. Click Install OS on my handheld.
6 Setting Up the TI-Nspire™ Navigator™ Teacher Software
You can also save a copy of the OS file on your computer by clicking
the Save a copy of the OS to check box. Click Browse to navigate to
the location wherer you want to save the handheld OS if different
from the default location.
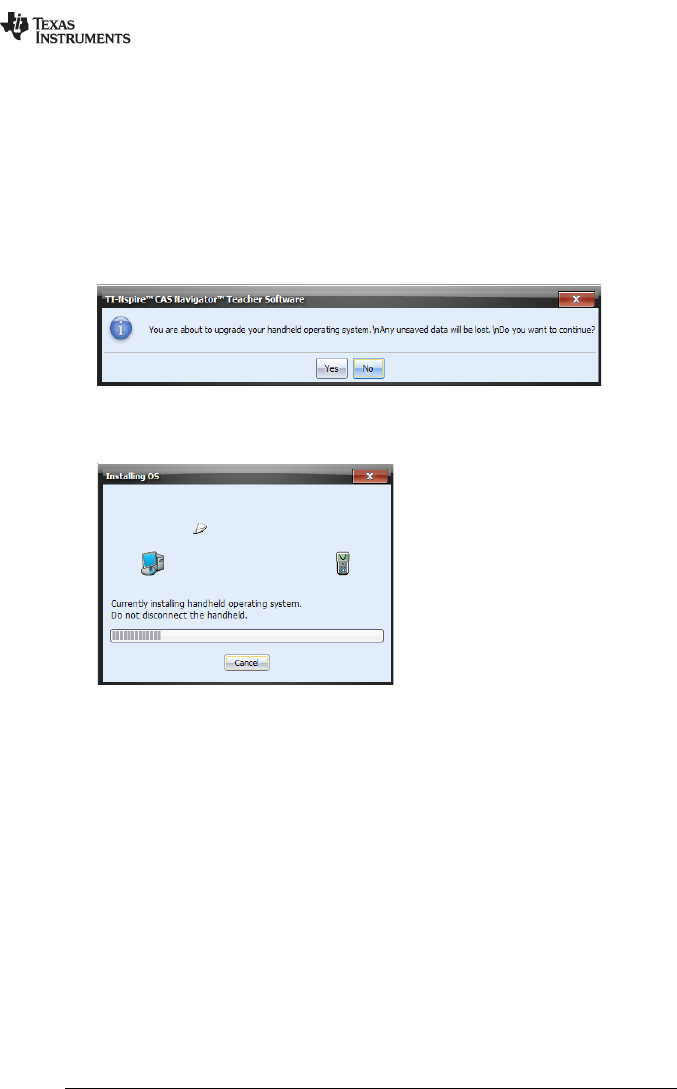
6. Click Continue.
7. Accept the license agreement and click Continue.
TI-Nspire™ Navigator™ Teacher Software displays a message box
warning you that any unsaved data will be lost. Click Yes to continue.
The Installing OS dialog box opens, showing the status of the
installation.
8. When the operating system software has transferred to your
TI-Nspire™ handheld, click OK. You may now disconnect the
handheld from the computer, and the operating system software will
install itself onto the handheld.
Setting Up a TI-Nspire™ Navigator™ Network the
First Time
A Network Setup wizard helps you activate the access point and wireless
adapters and cradles for wireless communication.
If you have not used the TI-Nspire™ Navigator™ Teacher Software
before, a prompt opens asking if you want to set up your classroom. You
can choose to set up your classroom or continue on to the TI-Nspire™
Navigator™ computer home screen.
Setting Up the TI-Nspire™ Navigator™ Teacher Software 7
Before you Begin
• Make sure you have installed and activated the TI-Nspire™
Navigator™ Teacher Software on your computer.
• If you are using TI-Nspire™ Navigator™ Cradles, make sure each
cradle is charged ( LED is solid amber or solid green).
Note: If you are using TI-Nspire™ Wireless Network Adapters, you do
not need to charge them. The wireless network adapters are powered
by the TI-Nspire™ CX or TI-Nspire™ CX CAS handheld.
• Make sure all handhelds have the latest operating system installed.
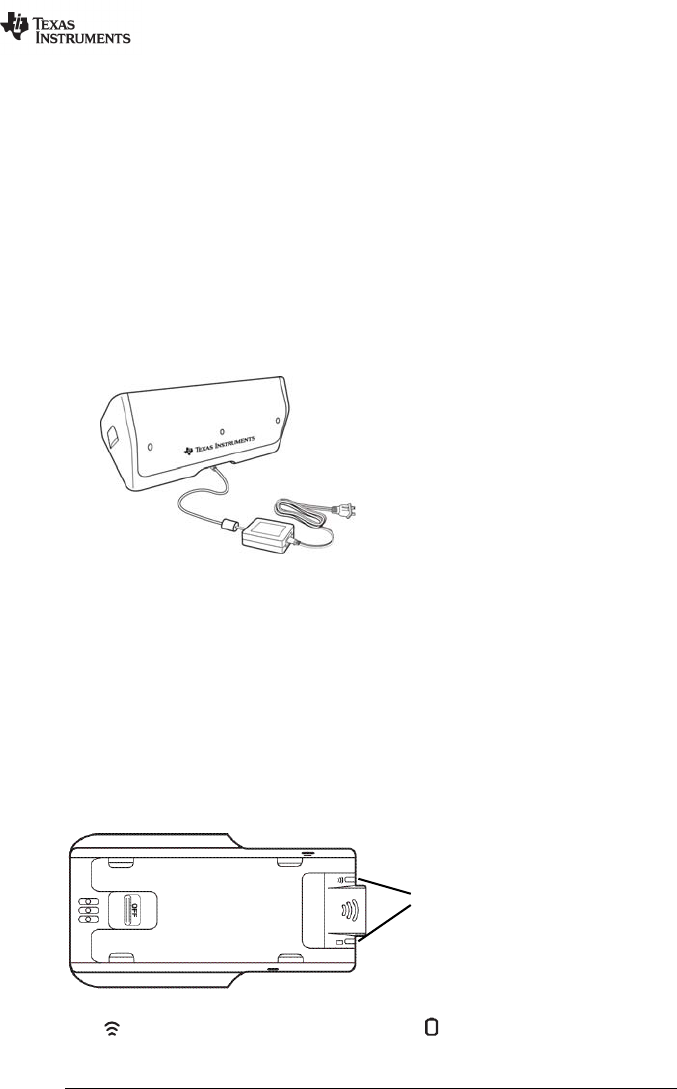
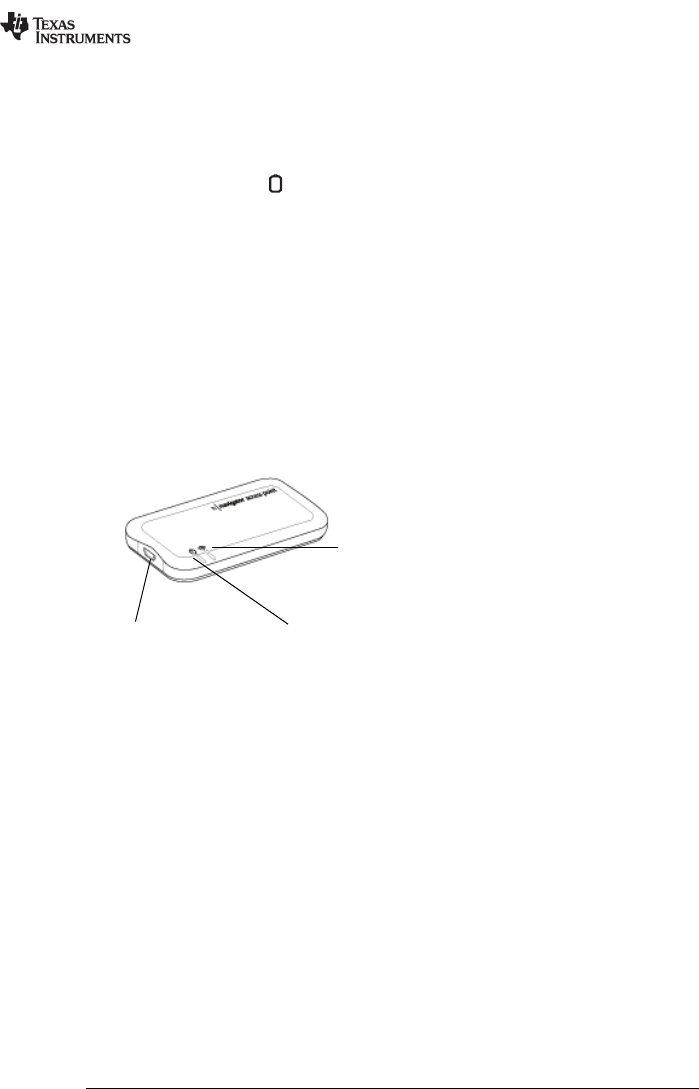
Connecting the Access Point to the Computer
The TI-Nspire™ Navigator™ Access Point is powered by your computer.
When you connect the access point to your computer, it is powered on
and ready to communicate with wireless network adapters and cradles.
1. Connect the small end of the USB cable to the access point.
2. Connect the other end of the cable to the USB port on your computer.
3. Make sure the access point power light is on.
The power light indicates that the access point is receiving power from
the computer. The signal light indicates wireless link activity.
Starting the Wizard
When installation of the TI-Nspire™ Navigator™ Teacher Software is
complete, open TI-Nspire™ Network Manager to set up your system.
To open Network Manager, click Tools > Network Manager.
A setup wizard helps you through the next steps.
Note: You can run the setup wizard later by opening TI-Nspire™
Network Manager and clicking Actions > Network Setup Wizard.
1. Plug one end of the USB cable into the access point, and the other
end into the computer.
USB connection Power light
Signal light
8 Setting Up the TI-Nspire™ Navigator™ Teacher Software
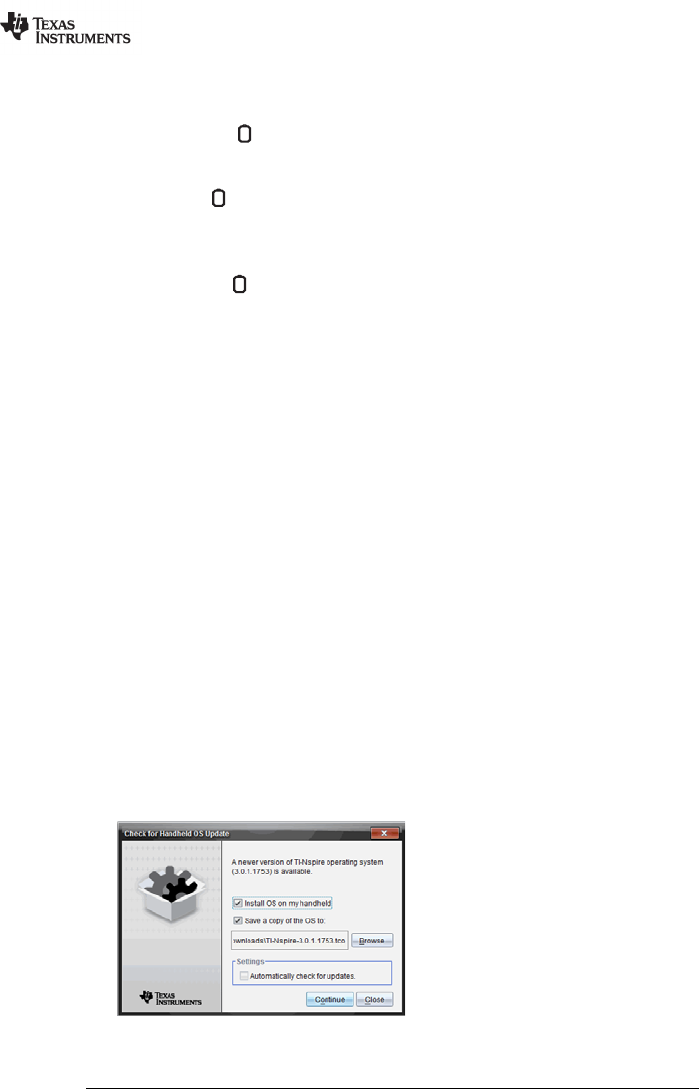
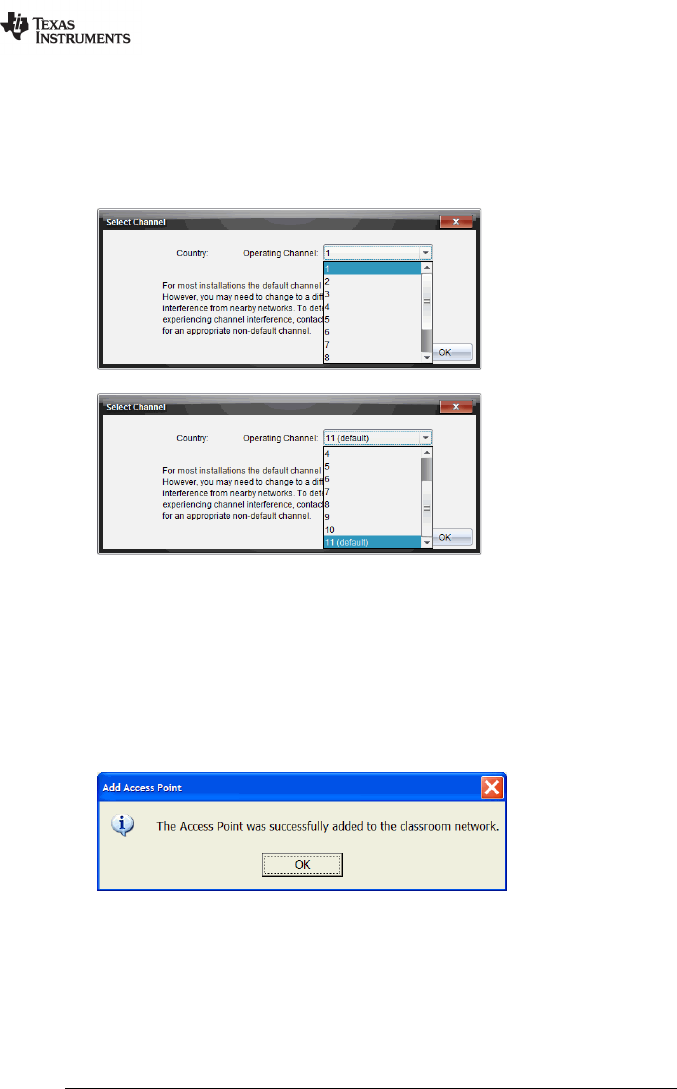
2. Click Next to proceed with the wizard.
The Select Channel dialog box opens.
The operating channel is automatically set to a default setting. You
can change it later if necessary. The available channels are 1
through 11.
3. Click OK.
Note: The software may display a message saying the access point
firmware needs to be updated. Click Yes to update the access point
firmware.
TI-Nspire™ Network Manager sends signals to the access point to add
it to the network.
After the access point is found, the wizard displays a message.
4. Click OK.
Setting Up the TI-Nspire™ Navigator™ Teacher Software 9
The next step is to add the TI-Nspire™ CX Wireless Network Adapters or
TI-Nspire™ Navigator™ Cradles to your classroom network. The wireless
adapters are used to communicate between the TI-Nspire™ CX
handhelds and the access point. The cradles are used to communicate
between any of the TI-Nspire™ handhelds and the access point. Both the
wireless adapters and the cradles allow teachers to communicate with
student handhelds to transfer files, update the OS, and other actions.
Note: The TI-Nspire™ Network Manager wizard automatically guides
you through the process for adding wireless adapters or cradles. You can
automatically or manually add wireless adapters or cradles at any time by
following the procedures below.
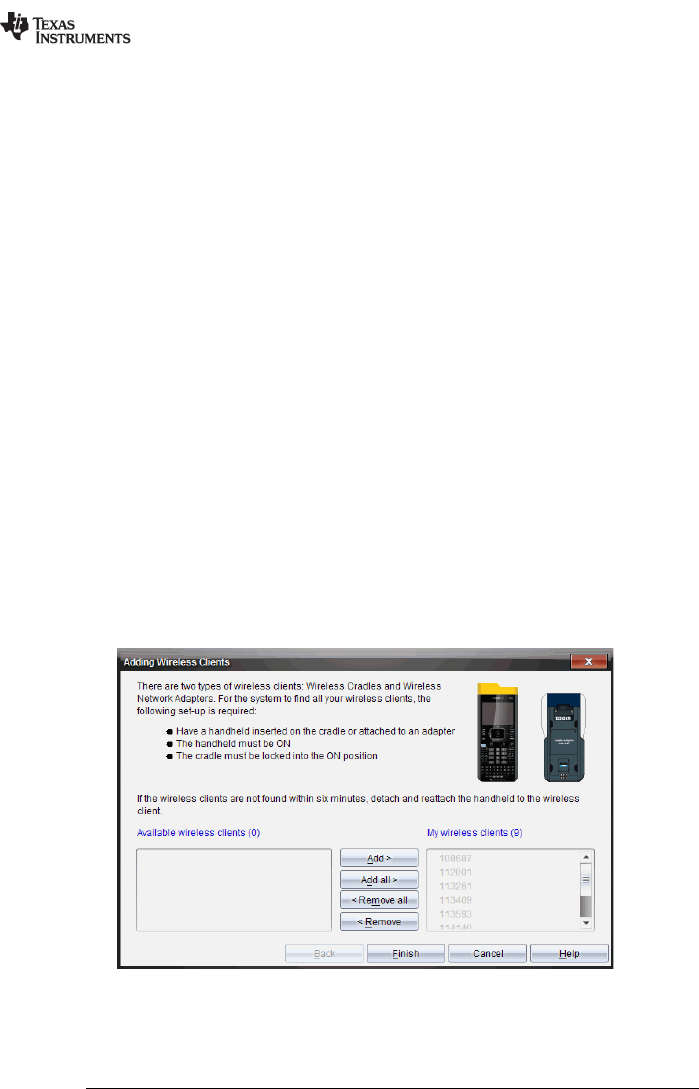
Adding Wireless Adapters or Cradles Automatically
Note: Before you use the auto-discover feature, make sure the
TI-Nspire™ Navigator™ Cradles are charged.
1. Click Auto-Discover Wireless Client(s).
2. Turn on each TI-Nspire™ handheld.
3. Attach the wireless adapter or the wireless cradle to each handheld.
(See the instructions below for connecting wireless adapters or
cradles to a TI-Nspire™ handheld.)
After a brief search for existing wireless adapters or cradles, the
Adding Wireless Clients dialog box opens, listing all adapters and
cradles that were found.
4. Highlight each wireless adapter or wireless cradle you want to add,
and then click Add.
10 Setting Up the TI-Nspire™ Navigator™ Teacher Software
To add all of the wireless clients listed in the Available Wireless Clients
column, click Add All.
Note: If the adapter or cradle does not appear in the Available
Wireless Clients column after six minutes, try these tips:
• Check the ID numbers of the wireless adapters or cradles to see
which ones are not connecting.
• Detach and reattach the wireless adapter or wireless cradle to the
handheld.
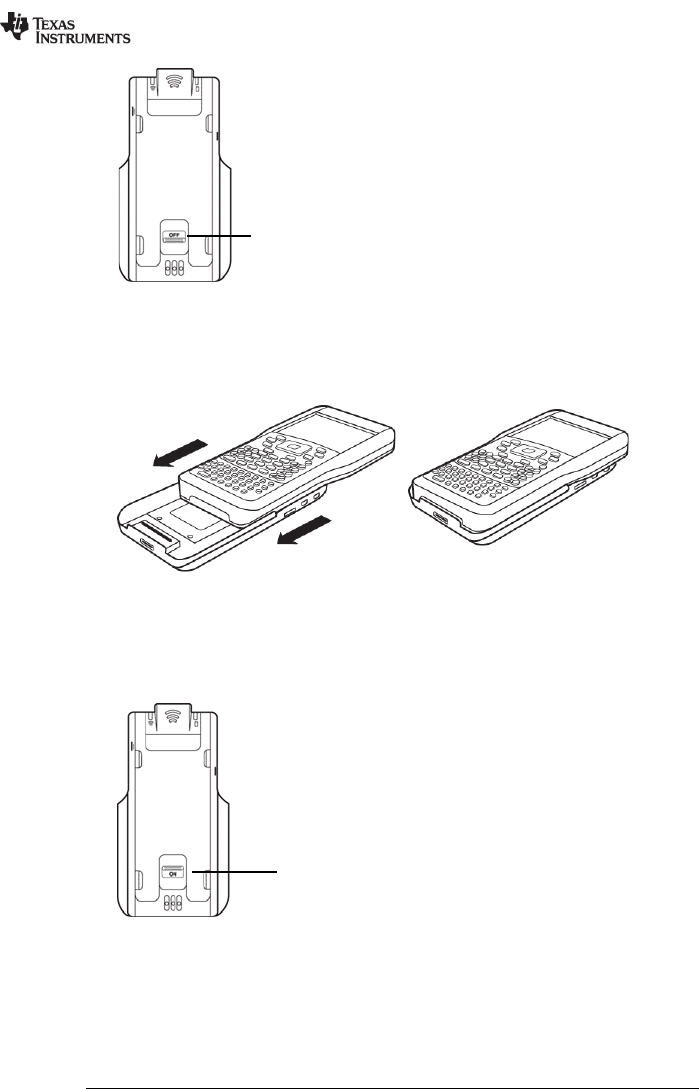
• Verify that the cradle is locked. (The lock on the back of the cradle
is in the ON position.)
5. When all of the adapters and cradles are added, click Finish.
Adding Wireless Adapters or Cradles Manually
When you add a wireless adapter or cradle manually, it immediately
appears in the TI-Nspire™ Network Manager window.
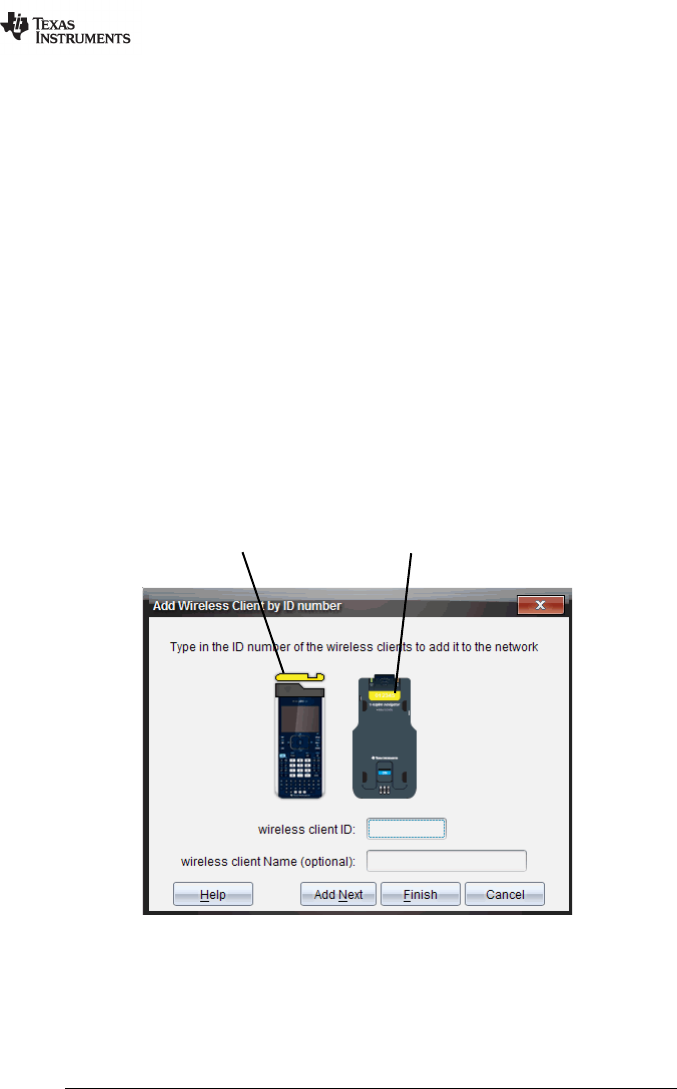
1. Click Manually Add Wireless Client(s).
The Add Wireless Clients by ID Number dialog box opens.
2. For each wireless adapter or cradle you are adding, find the ID
number on the back of the adapter or cradle, and type it in the
Wireless Client ID box. The ID is six digits.
3. Enter a nickname in the Wireless Client Nickname box (optional).
Wireless network adapter ID Cradle ID

Setting Up the TI-Nspire™ Navigator™ Teacher Software 11
Nicknames can consist of letters, spaces, and numbers. A nickname
must contain a minimum of 1 character and can contain a maximum
of 64 characters.
4. Click Add Next to add another adapter or cradle if you have more
than one wireless client to add.
5. When you are finished adding all the adapters and cradles, click
Finish.
Removing Adapters or Cradles from an Existing Network
Even though a classroom network has been set up correctly, sometimes
you may need to remove TI-Nspire™ Navigator™ Wireless Network
Adapters or TI-Nspire™ Navigator™ Cradles from the network.
You might need to remove adapters or cradles because your access point
has been associated with wireless clients that should belong to another
classroom.
1. In the TI-Nspire™ Network Manager window, select the wireless
adapters and cradles that you want to remove from the network.
2. Click Actions > Remove Selected or click .
3. Click Remove at the prompt.
The wireless client is no longer listed in the Network Manager
window.
Connecting the Handhelds to the Wireless
Adapters
The TI-Nspire™ CX wireless network adapters work with the TI-Nspire™
CX and TI-Nspire™ CX CAS handhelds. To connect the handheld to the
wireless adapter, follow these steps.
1. Position the wireless adapter on top of the handheld so the connector
on the adapter lines up with the connector on top of the handheld.
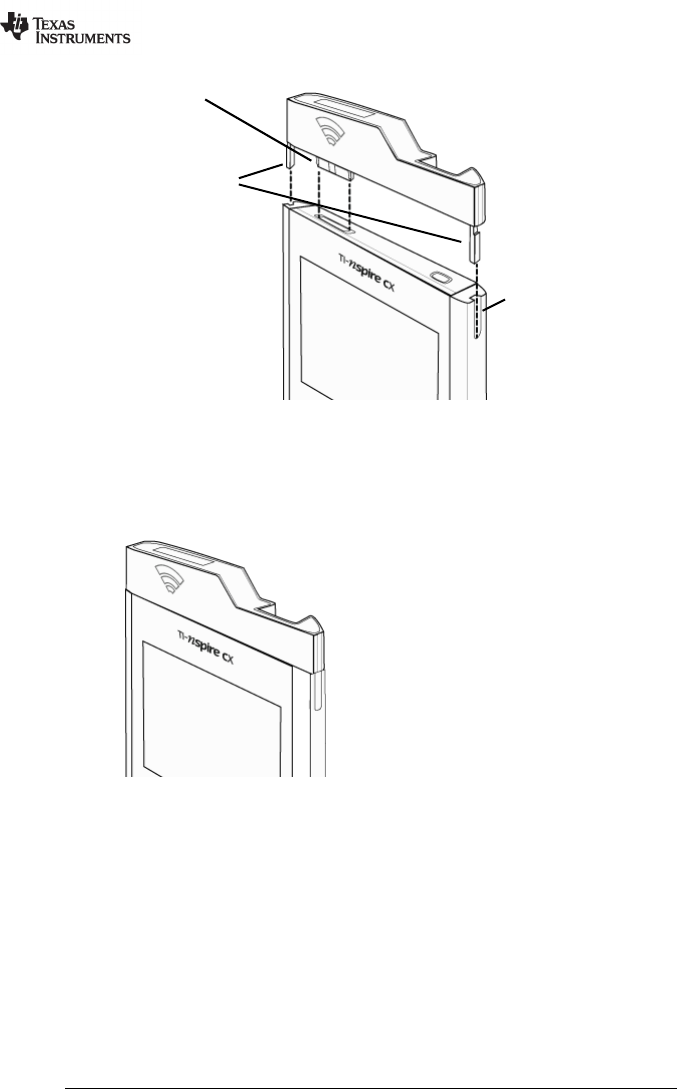
12 Setting Up the TI-Nspire™ Navigator™ Teacher Software
2. Slide the adapter into position, making sure the guides on the sides
of the adapter slide into the grooves on the sides of the handheld.
3. Firmly press the adapter into place.
Connecting the Handhelds to Cradles
The cradles work with the TI-Nspire™, TI-Nspire™ CAS, TI-Nspire™ CX
and TI-Nspire™ CX CAS handhelds. To connect the handheld to a cradle,
follow these steps.
1. Slide the lock on the back of the cradle to the OFF position.
Guides for aligning
with handheld
Connector
Grooves to align
wireless adapter
Setting Up the TI-Nspire™ Navigator™ Teacher Software 13