Texas Instruments TINAVWC2 TI-NSPIRE NAVIGATOR WIRELESS CRADLE User Manual TI Navigator Help PRINT
Texas Instruments Inc. TI-NSPIRE NAVIGATOR WIRELESS CRADLE TI Navigator Help PRINT
Users Manual

TI-Nspire™ Navigator™
Reference Guide
This guidebook applies to TI-Nspire™ Navigator™ software version 1.1.
To obtain the latest version of the documentation, go to
education.ti.com/guides.
TI-Navigator_Help_PRINT.book Page i Tuesday, January 26, 2010 10:29 AM

ii
Important Information
Texas Instruments makes no warranty, either express or implied,
including but not limited to any implied warranties of merchantability
and fitness for a particular purpose, regarding any programs or book
materials and makes such materials available solely on an "as-is" basis. In
no event shall Texas Instruments be liable to anyone for special,
collateral, incidental, or consequential damages in connection with or
arising out of the purchase or use of these materials, and the sole and
exclusive liability of Texas Instruments, regardless of the form of action,
shall not exceed the purchase price of this product. Moreover, Texas
Instruments shall not be liable for any claim of any kind whatsoever
against the use of these materials by any other party.
© 2008, 2009 Texas Instruments Incorporated
TI-Navigator_Help_PRINT.book Page ii Tuesday, January 26, 2010 10:29 AM

Contents
iii
Important Information................................................................... ii
Installing the TI-Nspire™ Navigator™ software...................1
Unpacking the boxes...................................................................... 2
Charging the wireless cradles ........................................................ 4
Connecting the handhelds to the wireless cradles....................... 6
Installing the software................................................................... 7
Setting up your TI-Nspire™ Navigator™ network
the first time ........................................................................... 12
Checking the status of wireless cradles....................................... 17
Overview ...............................................................................21
Starting the TI-Nspire™ Navigator™ software
on your computer................................................................... 21
The TI-Nspire™ Navigator™ computer home screen................. 22
TI-Nspire™ Navigator™ computer tools..................................... 26
Creating and managing your teacher account........................... 27
Logging in to the TI-Nspire™ Navigator™ system
from the handheld ................................................................. 30
Logging in to the TI-Nspire™ Navigator™ system
(student instruction)............................................................... 33
Managing classes..................................................................35
Creating classes............................................................................. 35
Selecting a class ............................................................................ 37
Beginning and ending a class session ......................................... 38
Changing the class view............................................................... 38
Removing items from the Class Record....................................... 40
Removing classes .......................................................................... 41
Managing student accounts.................................................43
Adding students to classes........................................................... 43
Removing a student from a class................................................. 44
Resetting student passwords ....................................................... 46
Checking student login status ..................................................... 48
Arranging the seating chart ........................................................ 48
Sorting student information........................................................ 49
Changing the classes assigned to a student ............................... 50
Changing student names and identifiers.................................... 52
Moving a student to another class.............................................. 54
Copying a student to another class............................................. 54
TI-Navigator_Help_PRINT.book Page iii Tuesday, January 26, 2010 10:29 AM

iv
Using Portfolio...................................................................... 57
Viewing Portfolio..........................................................................58
Saving an item to Portfolio..........................................................58
Importing an item to Portfolio ....................................................59
Sorting information in Portfolio.................................................. 60
Viewing assignment details .........................................................60
Deleting files from Portfolio........................................................ 60
Opening a Portfolio item .............................................................60
Redistributing a Portfolio item .................................................... 61
Renaming a Portfolio item........................................................... 61
Collecting missing files from students.........................................62
Sending missing files to students.................................................62
Exchanging files with students ........................................... 63
Sending files..................................................................................63
Sending files (student instruction)............................................... 66
Collecting files............................................................................... 67
Managing Unprompted actions...................................................69
Deleting files from handhelds .....................................................72
Checking the status of file transfers............................................74
Canceling file transfers.................................................................76
Viewing file properties.................................................................76
Polling students.................................................................... 79
The Quick Poll tool window and tabs .........................................79
Opening the Quick Poll tool ........................................................82
Polling your students....................................................................82
Stopping polls ...............................................................................83
Pausing polls .................................................................................83
Resuming paused polls.................................................................84
Responding to polls (student instruction)...................................84
Sending poll results to students................................................... 85
Saving polls ...................................................................................85
Viewing poll results ...................................................................... 85
Showing and hiding display names.............................................87
Viewing previous polls .................................................................88
Closing the Quick Poll tool...........................................................88
Capturing handheld screens................................................ 89
Capturing handheld screens ........................................................90
Viewing captured screens ............................................................93
Saving captured screens ...............................................................93
Refreshing captured screens ........................................................94
Using the Gallery View................................................................. 96
TI-Navigator_Help_PRINT.book Page iv Tuesday, January 26, 2010 10:29 AM

v
Creating stacks of student screens .............................................. 97
Using the Compare Student Screens feature.............................. 98
Randomizing screens.................................................................... 98
Copying and pasting a screen...................................................... 99
Printing screens ............................................................................ 99
Using Live Presenter ................................................................... 100
Keyboard Shortcuts for Screen Capture.................................... 105
The Class Analysis Tool .......................................................107
Opening Class Analysis............................................................... 107
Using Views to interpret Class Analysis results......................... 109
Grading questions and fine tuning correct responses ............. 117
Displaying Class Analysis results ................................................ 119
Saving and exporting Class Analysis results.............................. 121
Additional information.............................................................. 122
Glossary ....................................................................................... 123
The Transfer Tool .................................................................125
Opening the Transfer Tool......................................................... 125
Adding files to the transfer list ................................................. 126
Removing files from the transfer list ........................................ 127
Changing the destination folder............................................... 128
Viewing transfer status .............................................................. 128
Deleting all handheld folders and files..................................... 129
Stopping file transfers................................................................ 130
Closing the Transfer tool............................................................ 131
Managing the hardware.....................................................133
Wireless cradles .......................................................................... 133
Wireless access point.................................................................. 135
Troubleshooting..................................................................139
Frequently-asked questions ....................................................... 139
Error messages............................................................................ 144
Glossary...............................................................................153
Terms ........................................................................................... 153
File types ..................................................................................... 155
Regulatory Information .....................................................157
USA FCC Information Concerning Radio Frequency
Interference .......................................................................... 157
Canadian IC Information............................................................ 158
Warning Statements .................................................................. 163
TI-Navigator_Help_PRINT.book Page v Tuesday, January 26, 2010 10:29 AM


Installing the TI-Nspire™ Navigator™ software 1
Installing the TI-Nspire™ Navigator™
software
The TI-Nspire™ Navigator™ classroom learning system provides the
hardware and software tools you need to set up a wireless classroom
network. The TI-Nspire™ Navigator™ system lets you:
• Create and manage classes on the classroom network.
• Transfer files between your computer or TI-Nspire™ handheld and
your students’ handhelds.
• Monitor your students with screen captures and polling.
• Use different tools to create, distribute, and analyze educational
content.
• Delete files from your students’ handhelds, and send files to your
students’ handhelds.
• Upgrade and install TI-Nspire™ Navigator™ OS files on all students’
handhelds at one time.
The system is composed of two parts, hardware and software. The
hardware creates a wireless communications network so that your
computer can communicate with your students’ TI-Nspire™ or
TI-Nspire™ CAS handhelds. The software contains a number of tools to
enhance your classroom, including:
•Quick Poll. Lets you send polls to your students, receive the
students’ responses to the polls, and review the poll results with your
students.
•Screen Capture. Lets you capture your students’ handheld screens.
•Transfer tools. Multiple tools that let you send, collect, and delete
data files on your students’ handhelds.
•Portfolio. Lets you collect student assignments, and review and
distribute student assignments and scores.
•Class Analysis. Lets you analyze student answers for the entire class
or for individual students, share the analysis with the class, and print
analysis reports.
You can obtain educational content on the Web at TI’s Activities
Exchange (education.ti.com/activities).
There are a couple of ways to learn to set up and use the TI-Nspire ™
Navigator™ system:
TI-Navigator_Help_PRINT.book Page 1 Tuesday, January 26, 2010 10:29 AM

2 Installing the TI-Nspire™ Navigator™ software
•The Getting Started poster—a short version of the setup process with
fewer details.
•The TI-Nspire™ Navigator™ Reference Guide (this guidebook,
provided in both printed and PDF formats)—complete installation
and setup details, troubleshooting, and technical information. After
you install the TI-Nspire™ Navigator™ software on your computer,
you can use the book or PDF file as a reference for the software
tools.
The process of unpacking the equipment, setting up the hardware, and
installing the software will probably require about two hours of your
time.
Unpacking the boxes
The TI-Nspire™ Navigator™ product consists of one classroom kit and a
combination of student kits and individual kits, depending on your
specific order. Each kit is packaged separately. If necessary, you can
purchase additional kits to accommodate as many as 40 students.
1. Determine which kits you have received.
2. Unpack the items from the packing materials.
3. Identify each item, and check the items against the following lists to
make sure your order is complete.
TI-Navigator_Help_PRINT.book Page 2 Tuesday, January 26, 2010 10:29 AM
Installing the TI-Nspire™ Navigator™ software 3
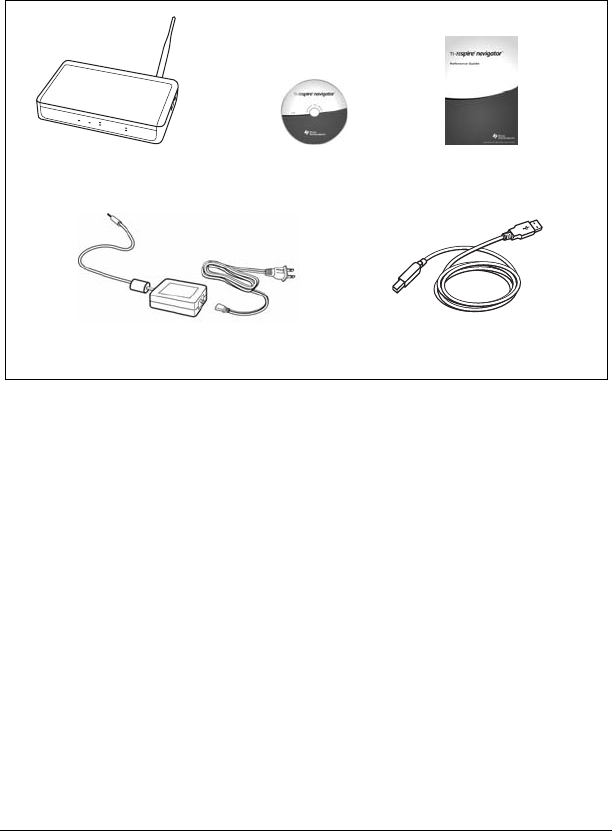
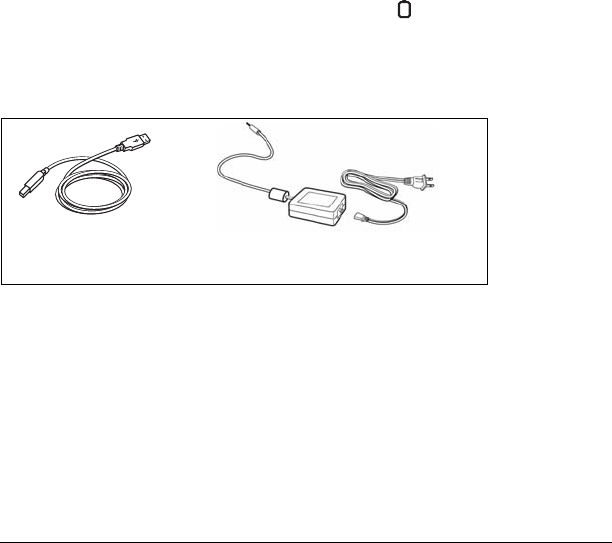
Classroom kit
• 1 TI-Navigator™ access point
• 1 AC9930 power adapter (includes power supply and power cord)
• 1 USB computer cable
• 1 CD containing system and application software
•This TI-Nspire™ Navigator™ Reference Guide
The Standard-A to Mini-B USB cable and the black and gray
TI-GRAPH LINK™ cables do not work with the TI-Nspire™ Navigator™
system.
Access point
USB cable
AC9930 power adapter for the access point
One CD
Classroom kit
Reference guide
TI-Navigator_Help_PRINT.book Page 3 Tuesday, January 26, 2010 10:29 AM
4 Installing the TI-Nspire™ Navigator™ software
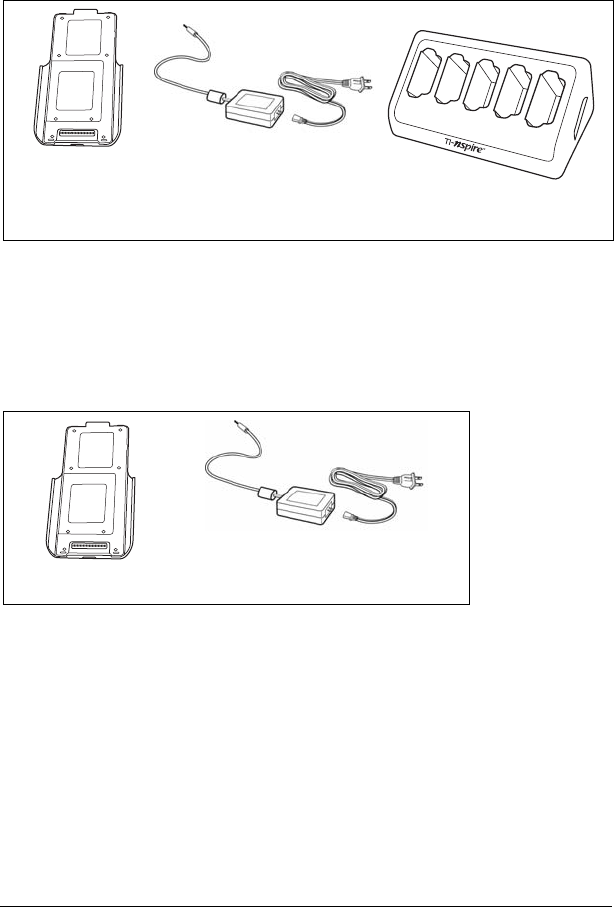
Student kit (up to 5 students)
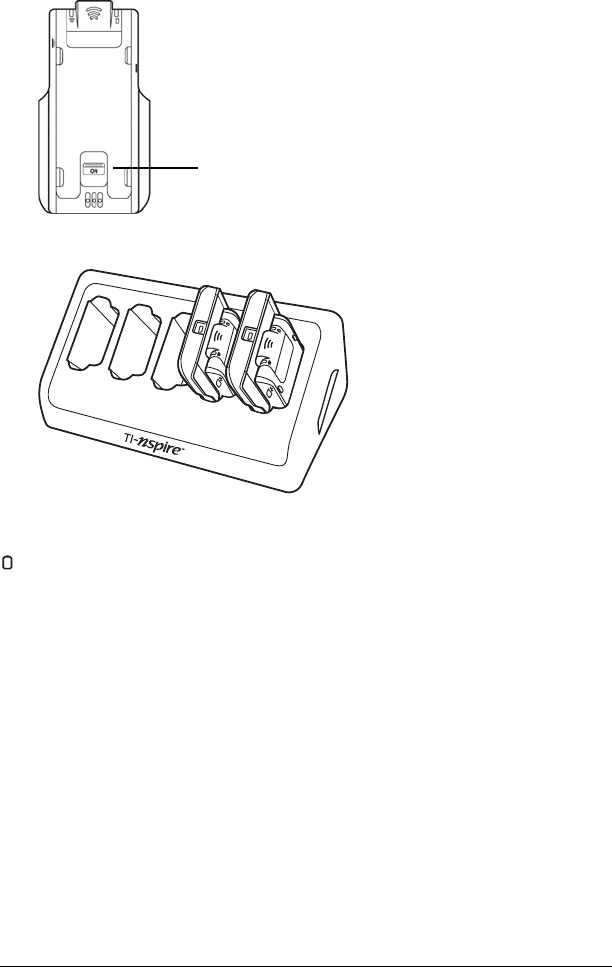
• 1 TI-Nspire™ Navigator™ cradle charging bay
• 1 AC9940 power adapter (includes power supply and power cord)
• 5 TI-Nspire™ Navigator™ wireless cradles
Individual kit
• 1 TI-Nspire™ Navigator™ wireless cradle
• 1 AC9926 power adapter (includes power supply and power cord)
Charging the wireless cradles
The TI-Nspire™ Navigator™ wireless cradles contain rechargable
batteries. You must charge the batteries overnight before using them in
your class. When the cradles are fully charged, they will function all day
under continuous use. You should recharge them each night.
The TI-Nspire™ Navigator™ cradle charging bay can hold from one to
five wireless cradles. After you place the cradles in the charging bay, they
are charged simultaneously until all are fully charged. If the batteries are
fully discharged, it may take up to 12 hours to fully charge the batteries.
Student kit
Cradle charging bay
5 wireless cradles AC9940 power adapter
(for the charging bay)
Wireless cradle
Individual kit
AC9926 power adapter
TI-Navigator_Help_PRINT.book Page 4 Tuesday, January 26, 2010 10:29 AM
Installing the TI-Nspire™ Navigator™ software 5
With five wireless cradles in the charging bay, you should charge them
for 12 hours. Typically this is done overnight or over a weekend.
Note: You cannot damage the batteries by leaving them in the charging
bay beyond the time needed to fully charge them. Also, it is not
necessary to fully discharge the batteries before recharging them.
1. Make sure you have enough (3–4) power outlets for the equipment
you received. If necessary, obtain a plug strip so that you have plenty
of grounded outlets.
2. Insert the small end of the AC9940 power adapter cord into the
charging bay’s power jack.
3. Plug the other end of the adapter into a power outlet.
4. Insert each TI-Nspire™ Navigator™ wireless cradle into the
TI-Nspire™ Navigator™ cradle charging bay. Make sure the LED is
amber.
Note: If you purchased the individual kit and do not have a cradle
charging bay, you can charge a single wireless cradle using the AC9926
adapter instead.
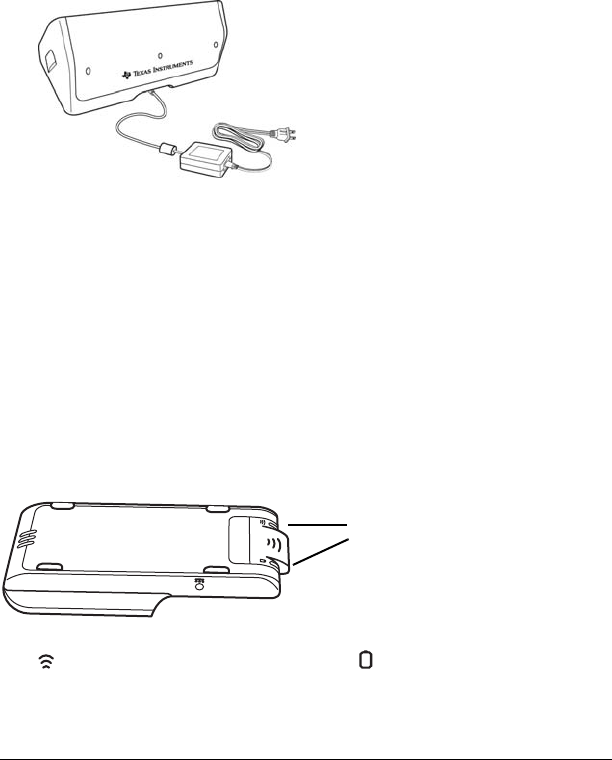
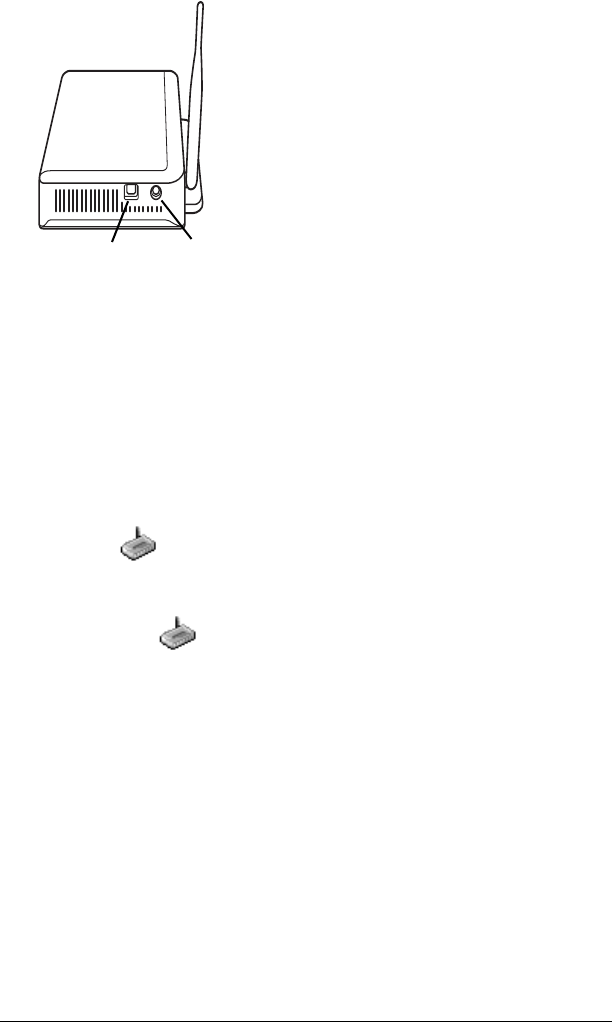
Checking the LEDs
Two LEDs (small lights) at the top of each TI-Nspire™ Navigator™
wireless cradle blink or change colors to indicate various operations or
status.
The LED indicates network activity. The LED indicates battery-
charging status. (For more information, see the Technical Information
chapter.)
LEDs
TI-Navigator_Help_PRINT.book Page 5 Tuesday, January 26, 2010 10:29 AM
6 Installing the TI-Nspire™ Navigator™ software
When the wireless cradles are still in the TI-Nspire™ Navigator™ cradle
charging bay:
• A solid amber LED means the wireless cradle is currently
recharging.
• A solid red LED means the wireless cradle is recharging but does
not have good contact with the charging bay. Reposition the cradle
so it has good contact. The LED should then turn amber to indicate it
is recharging.
• A solid green LED means the wireless cradle is fully charged.
Connecting the handhelds to the wireless cradles
After charging the TI-Nspire™ Navigator™ wireless cradles, you are
ready to connect the wireless cradles to the TI-Nspire™ or
TI-Nspire™ CAS handhelds.
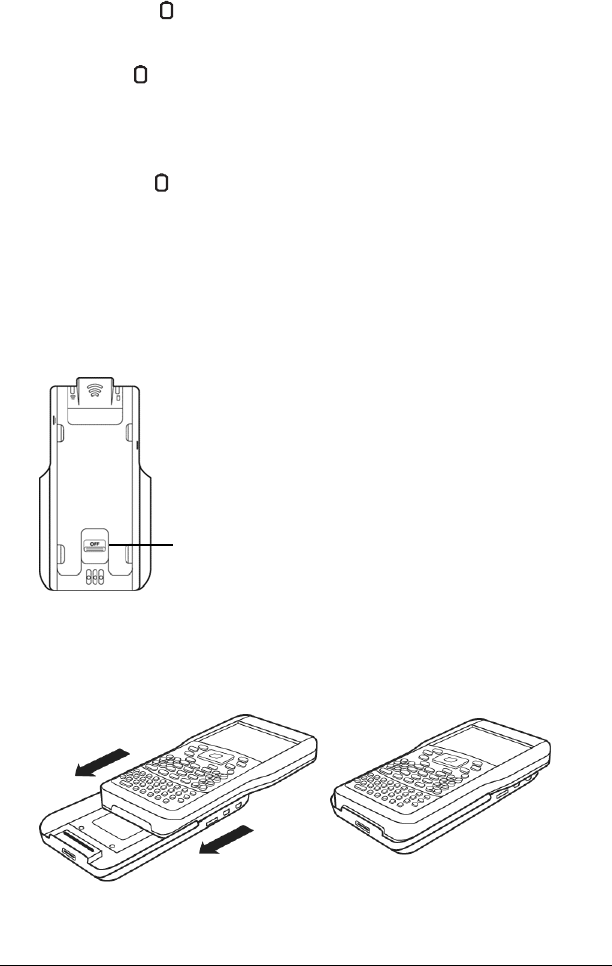
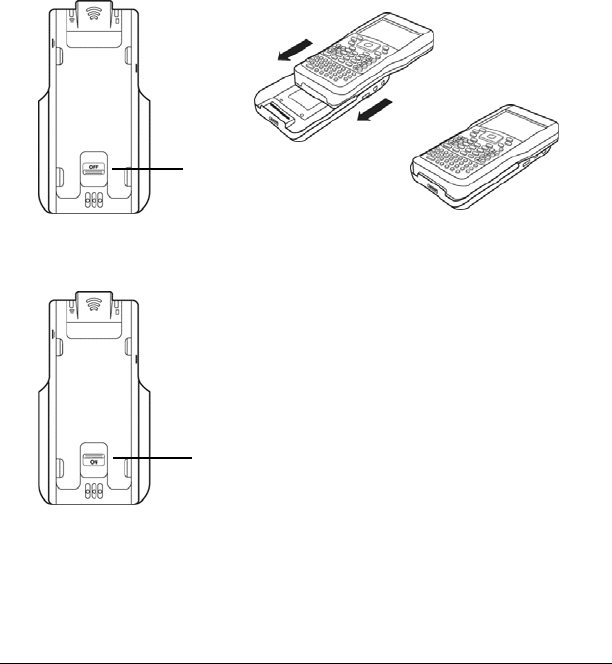
1. Slide the lock on the back of the cradle to the OFF position.
2. To attach the handheld, face the screen upward and slide the
handheld onto the top of the TI-Nspire™ Navigator™ wireless
cradle. Be sure that both sides of the handheld are inserted into both
of the side guides.
3. Press firmly to make a good connection. When properly connected,
the TI-Nspire™ handheld appears to be sitting on top of the cradle.
Lock in OFF position.
TI-Navigator_Help_PRINT.book Page 6 Tuesday, January 26, 2010 10:29 AM
Installing the TI-Nspire™ Navigator™ software 7
4. Lock the handheld in place by sliding the lock on the back of the
cradle to the ON position.
5. Insert each cradle into the charging bay. Make sure the LED is amber.
At the end of the school day, return the wireless cradle to the charging
bay and charge them overnight. The cradles are charged when all the
(power status) LEDs are solid green or amber.
Installing the software
Before you install and set up the TI-Nspire™ Navigator™ system, make
sure you have the latest operating system installed on your handhelds.
Installing the handheld operating system
Before you can use the handhelds on the network, you must update the
operating system on each handheld. You can use the TI-Nspire™ Teacher
software 2.0 or the TI-Nspire™ Computer Link software to update the
handheld operating system. TI-Nspire™ Computer Link software is
available at education.ti.com.
All handhelds on the network must have the latest operating system
installed for the TI-Nspire™ Navigator™ system to work properly.
Lock in ON position.
TI-Navigator_Help_PRINT.book Page 7 Tuesday, January 26, 2010 10:29 AM
8 Installing the TI-Nspire™ Navigator™ software
1. Download the latest TI-Nspire™ operating software from the CD
that comes with your kit or from education.ti.com/latest. Make
note of where you save it on your computer’s hard drive.
2. Make sure you have connected a TI-Nspire™ handheld to your
computer.
Note: The TI-Nspire™ Computer Link Software works with the
TI-Nspire™ and TI-Nspire™ CAS handhelds only.
3. Open the Teacher software.
The software displays a list of connected handhelds and lets you
select one.
Note: You can communicate with only one handheld at a time.
4. If multiple handhelds are connected, click the handheld to which you
want to connect.
5. Click Select.
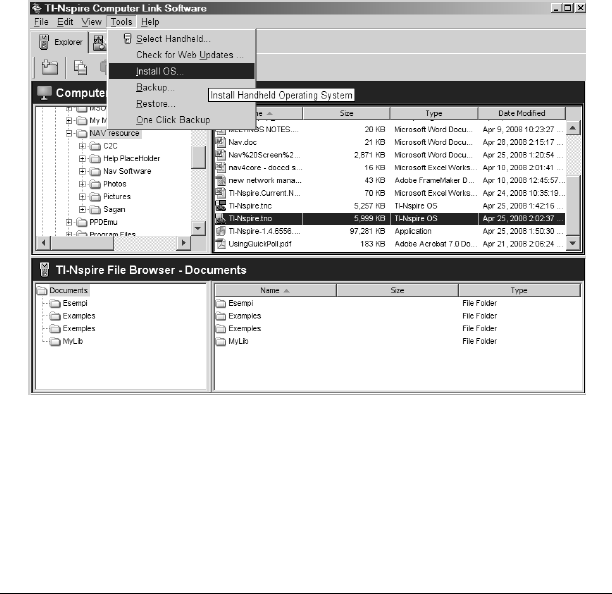
6. TI-Nspire™ Computer Link Software displays the Explorer tab.Click
Tool s > In s tal l OS.
TI-Navigator_Help_PRINT.book Page 8 Tuesday, January 26, 2010 10:29 AM
Installing the TI-Nspire™ Navigator™ software 9
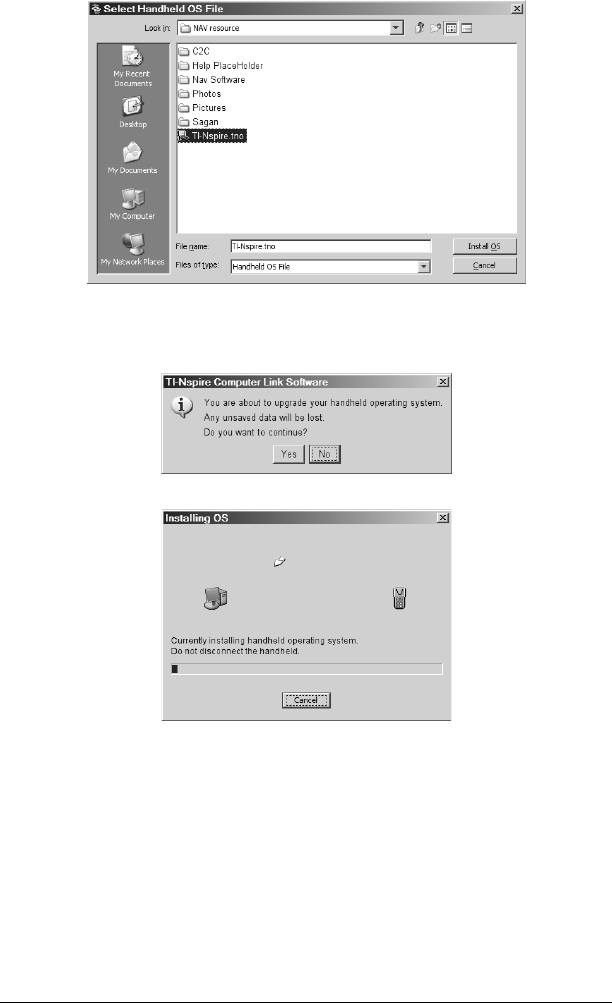
7. Browse to the location you saved the TI-Nspire™ operating system.
8. Highlight the operating system file and click Install OS.
TI-Nspire™ Computer Link Software displays a message box. Click
Yes.
A progress screen is displayed.
9. When the operating system software has transferred to your
TI-Nspire™ handheld, click OK. You may now disconnect the
handheld from your computer, and the operating system software
will install itself onto your handheld.
Note: Consider keeping one or two spare handhelds with the latest
operating system and ample memory. It is also a good idea to have spare
cradles on hand. If a problem occurs, you can substitute a spare part.
TI-Navigator_Help_PRINT.book Page 9 Tuesday, January 26, 2010 10:29 AM

10 Installing the TI-Nspire™ Navigator™ software
Installing the TI-Nspire™ Navigator™ software
To install software on your computer, you must have administrator
privileges when you log in to the Windows® operating system. If you
don’t know whether or not you have administrator privileges, check with
your school’s help desk or system administrator.
1. Insert the TI-Nspire™ Navigator™ CD in your computer’s CD-ROM
drive. The window to the CD should open automatically.
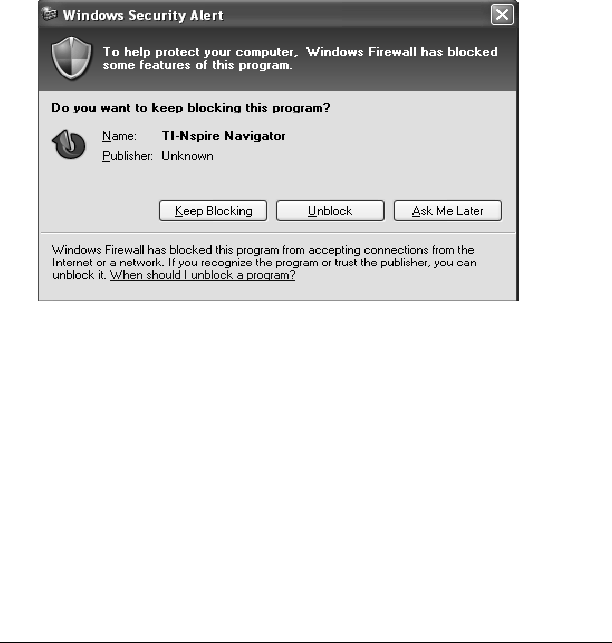
Note: If your computer is running Windows® XP Service Pack 2, you
may see the following message. If so, click Yes to continue.
Note: If the setup program does not run, click Start > Run, and then
type D:\Autorun.exe, where D is your CD-ROM drive, and click OK.
2. Click TI-Nspire Navigator Software, and then click Install
TI-Nspire™ Navigator™ Software.
The TI-Nspire™ Navigator™ Setup dialog displays.
Separate installations will occur:
– TI-Nspire™ Navigator™ software
– TI-Nspire™ Teacher software and TI-Nspire™ CAS Teacher
software. Refer to the TI-Nspire™ Teacher software user guide,
included with your system, for more information about the
TI-Nspire™ Teacher software.
3. When the installation is complete, the TI-Nspire™ Navigator™ Setup
dialog displays the status of installed components.
• If you have already purchased the software, click Activate this
software, and then click Next. Follow the instructions on the screen
to activate the software.
• If you have not purchased the software, click Continue with trial
version. The screen displays how many days remain in your trial
period.
• If you have been using the trial version and would like to purchase
the software, click Purchase software. You can complete the
TI-Navigator_Help_PRINT.book Page 10 Tuesday, January 26, 2010 10:29 AM

Installing the TI-Nspire™ Navigator™ software 11
purchase online, and will receive the license and serial number
necessary to begin the activation process.
Activating the software
Activating the software allows to you continue using it past the 30-day
evaluation period.
1. To begin the activation process, click Activate this software, and
then click Next.
Regardless of which activation method you prefer, you will need to
supply the Serial Number and License Number printed on the license
card in your DVD case.
Note: Be careful not to enter a zero for the letter O or a letter O for
a zero.
•Internet — This method uses your Internet connection to
activate your software. You provide the Serial Number and
License Number only. This process will automatically activate
your software.
•Web Portal — This alternative method is for a user who does
not have an active Internet connection on the computer that is
activating the software. Visit this Web page, and insert your
Serial Number and License Number when prompted to retrieve
an activation ID. The ID is displayed on the Web page. If you
provide your e-mail address, the ID is also sent to you by e-mail.
Note: The next time you launch the TI-Nspire™
Navigator™software, you will see an option to activate. Enter
the activation ID at this time to complete the activation process.
•Phone — You provide a TI representative with the Serial
Number and License Number as well as an Installation ID
displayed on your screen. The representative then provides an
Activation ID.
•I already have an Activation ID — After accepting a license
agreement, you fill out a screen with the Serial Number, License
Number, and the Activation ID.
Note: Your activation ID can expire. Be sure to activate as soon
as you get your activation ID via the web portal or your call
center representative.
2. Click an activation method, and then click Next and follow the
instructions.
3. To complete the activation and create a user profile, enter the
requested information, and then click Next.
TI-Navigator_Help_PRINT.book Page 11 Tuesday, January 26, 2010 10:29 AM
12 Installing the TI-Nspire™ Navigator™ software
You are now ready to set up your network.
Setting up your TI-Nspire™ Navigator™ network
the first time
A Network Setup wizard helps you activate the access point and wireless
cradles for wireless communication.
If you have not used the TI-Nspire™ Navigator™ software before, a
prompt opens asking if you want to set up your classroom. You can
choose to set up your classroom or continue on to the TI-Nspire™
Navigator™ computer home screen.
If you have used Connect-to-Class™ software and have class data, a
prompt opens asking if you want to import the data. Click Yes to import
the data. You can skip this step and import the data later by clicking
File > Import Class Data. You may have to restart the software for the
changes to take effect.
Before you begin
1. Make sure you have installed and activated the TI-Nspire™
Navigator™ software on your computer.
2. Make sure each wireless cradle is charged ( LED is solid amber or
solid green).
Connecting the cables to the access point
1. Identify the cables.
2. Connect the AC9930 power adapter to the power jack on the access
point.
3. Connect the USB cable to the access point.
AC9930 Power adapter
USB cable
TI-Navigator_Help_PRINT.book Page 12 Tuesday, January 26, 2010 10:29 AM
Installing the TI-Nspire™ Navigator™ software 13
Starting the wizard
When you complete the installation of the TI-Nspire™ Navigator™
software, open TI-Nspire™ Network Manager to set up your system. To
open TI-Nspire™ Network Manager from the TI-Nspire™ Navigator™
home screen, do one of the following:
• Click Tools > TI-Nspire™ Network Manager
• Click in the toolbar
• Click the Tool s tab, and then click TI-Nspire™ Network
Manager .
A setup wizard helps you through the next steps.
Note: You can run the setup wizard later by opening TI-Nspire™
Network Manager and clicking Actions > Network Setup Wizard.
1. Confirm that the AC9930 power adapter is connected to the access
point.
2. Plug the AC adapter into a power outlet.
3. Plug the USB cable into the computer.
4. Click Setup to proceed with the wizard.
TI-Nspire™ Network Manager displays a dialog box to select a
country and channel.
USB connection
Access point, side view
Power adapter
jack
TI-Navigator_Help_PRINT.book Page 13 Tuesday, January 26, 2010 10:29 AM

14 Installing the TI-Nspire™ Navigator™ software
5. Select your country. The operating channel is automatically set to a
default setting.
6. Click OK.
TI-Nspire™ Network Manager sends signals to the access point to
add it to the network.
After the access point is found, the wizard displays a message.
7. Click OK.
TI-Navigator_Help_PRINT.book Page 14 Tuesday, January 26, 2010 10:29 AM
Installing the TI-Nspire™ Navigator™ software 15
The next step is to add the TI-Nspire™ Navigator™ wireless cradles
to your classroom network.
Note: The TI-Nspire™ Network Manager wizard automatically
guides you through the process for adding cradles. You can
automatically or manually add cradles at any time by following the
procedures below.
To add cradles automatically
Before you use the auto-discover feature, make sure the TI-Nspire™
Navigator™ wireless cradles are charged.
1. Click Auto-Discover Cradle(s).
2. Turn on each TI-Nspire™ learning handheld.
3. Slide the lock on the back of the wireless cradle to the OFF position
and attach the handheld to the cradle.
4. Lock the handheld in place by sliding the lock on the back of the
cradle to the ON position.
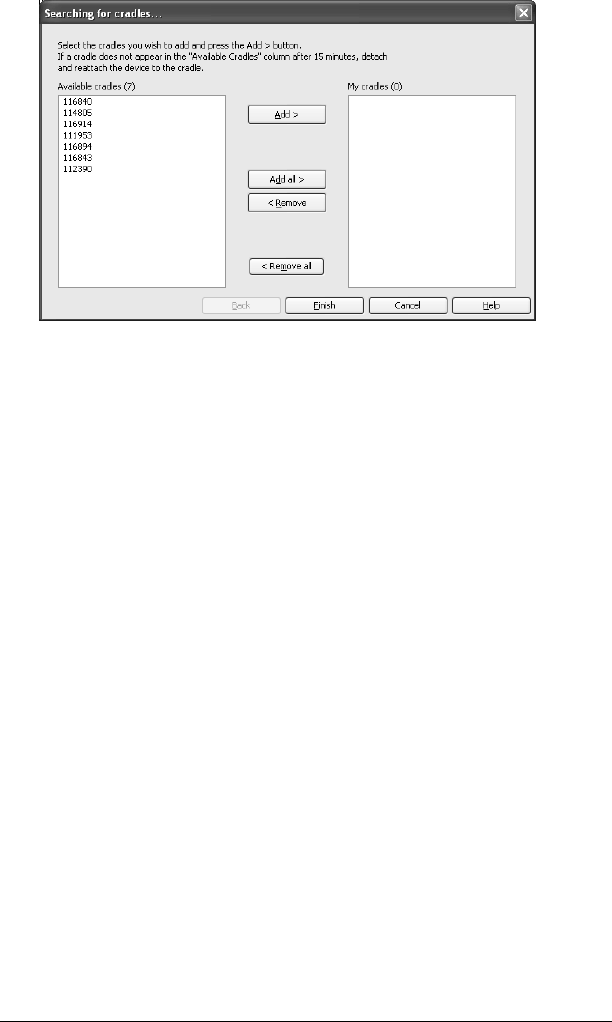
After a brief search for existing wireless cradles, a dialog box opens,
listing all cradles that were found.
Lock in OFF position
Lock in ON position
TI-Navigator_Help_PRINT.book Page 15 Tuesday, January 26, 2010 10:29 AM
16 Installing the TI-Nspire™ Navigator™ software
5. Highlight each wireless cradle you want to add, and click Add.
Note: If the cradle does not appear in the Available cradles
column after 6 minutes, try these tips:
• Check the cradle numbers to see which ones are not connecting.
• Detach and reattach the handheld to the cradle.
• Verify that the cradle is locked. (The lock on the back of the
cradle is in the ON position.)
6. When all of the cradles are added, click Finish.
To add cradles manually
When you add a cradle manually, it immediately appears in the
TI-Nspire™ Network Manager window.
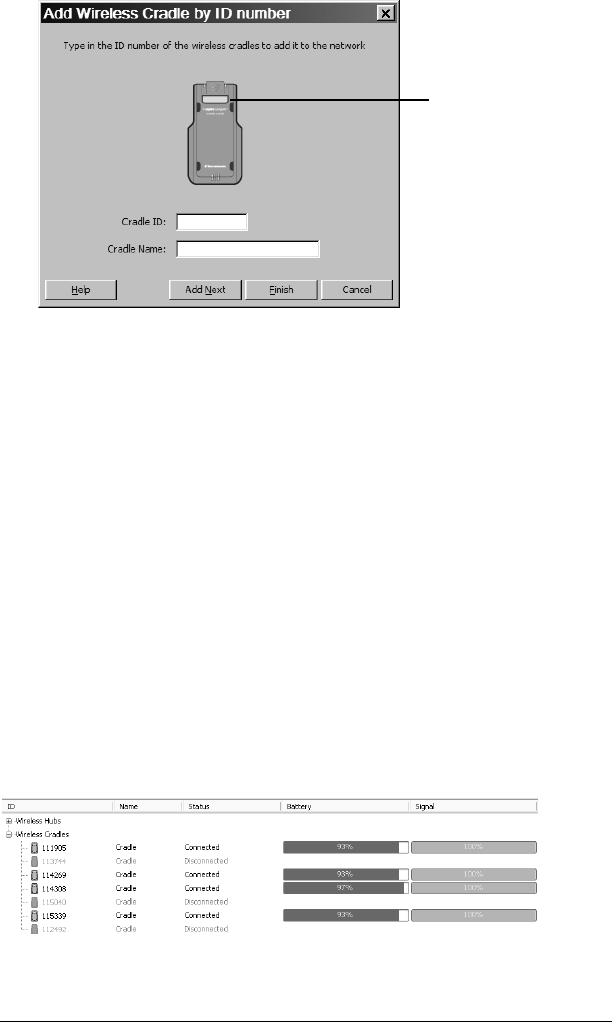
1. Click Manually Add Cradle(s).
The Add Wireless Cradles by ID Number dialog box displays.
TI-Navigator_Help_PRINT.book Page 16 Tuesday, January 26, 2010 10:29 AM
Installing the TI-Nspire™ Navigator™ software 17
2. Identify the cradle ID number on the back of the cradle, and enter it
in the Cradle ID box. The cradle ID is six digits.
3. Enter a nickname for the cradle in the Cradle Name box (optional).
Nicknames can consist of letters, spaces, and numbers. A nickname
must contain a minimum of 1 character and can contain a maximum
of 64 characters. If you do not enter a nickname, the name defaults
to "Cradle."
4. Click Add Next to add another cradle if you have more than one
cradle to add.
5. When you are finished adding all of the cradles, click Finish.
Checking the status of wireless cradles
After you have added wireless cradles automatically or manually, all of
the wireless cradles you added appear in the TI-Nspire™ Network
Manager window. If the wireless cradle is charged and attached to a
TI-Nspire™ handheld that is powered on, TI-Nspire™ Network Manager
shows the status as connected. It may take up to 30 seconds to recognize
the cradle and show its status as connected.
Cradle ID
TI-Navigator_Help_PRINT.book Page 17 Tuesday, January 26, 2010 10:29 AM
18 Installing the TI-Nspire™ Navigator™ software
If the wireless cradle is not charged or not connected to a TI-Nspire™
handheld that is powered on, TI-Nspire™ Network Manager displays the
status as disconnected. TI-Nspire™ Network Manager remembers the
cradle IDs you added, and the next time you turn on the TI-Nspire™
handheld that is connected to the wireless cradle, TI-Nspire™ Network
Manager recognizes it.
Note: To refresh the TI-Nspire™ Network Manager window, click
View > Refresh or click .
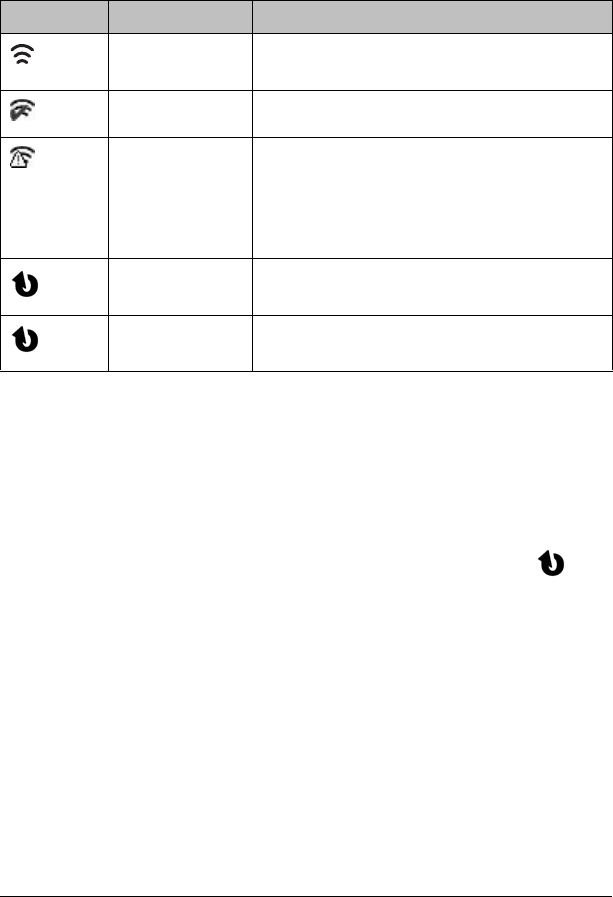
Wireless cradle LEDs
The LEDs on each wireless cradle use various colors and blink patterns to
indicate data activity or power status. This can occur either when the
cradles are seated in the charging bay or when they are outside the
charging bay.
The LEDs indicate status as follows.
Activity LED
Color and pattern Meaning
Blinking green Indicates data transfer to and from the
access point.
TI-Navigator_Help_PRINT.book Page 18 Tuesday, January 26, 2010 10:29 AM

Installing the TI-Nspire™ Navigator™ software 19
Battery (Power Status) LED
Color and pattern Meaning
In the charging bay
Solid amber The battery is charging.
Solid green Power on; charged and powered by a
charging bay or power adapter.
Solid red The battery is charging, but does not have
good contact with the charging bay.
Reposition the cradle so it has good contact.
The LED should then turn amber to indicate
it is recharging.
Outside the charging bay
Blinking green Power on; battery powered. The battery is
30% to 99% charged.
Blinking amber Low battery (lower than 30% charged).
Blinking red Battery is critically low (lower than 8%
charged).
TI-Navigator_Help_PRINT.book Page 19 Tuesday, January 26, 2010 10:29 AM

20 Installing the TI-Nspire™ Navigator™ software
TI-Navigator_Help_PRINT.book Page 20 Tuesday, January 26, 2010 10:29 AM
Overview 21
Overview
The TI-Nspire™ Navigator™ computer software contains the tools and
options you need to run your wireless classroom network. The software
automatically opens upon installation, or you can start the software at
any time by following the directions below.
Starting the TI-Nspire™ Navigator™ software on
your computer
You can start the TI-Nspire™ Navigator™ classroom learning system from
your computer’s start menu.
1. Click Start > Programs > TI Tools > TI-Nspire Navigator > TI-Nspire
Navigator.
A Security Alert window opens.
2. Click Unblock to allow full access to the TI-Nspire™ Teacher Edition
software, if you installed that option. Refer to the TI-Nspire™ CAS
Computer Software Teacher Edition user guide, included with your
system, for more information about the TI-Nspire™ Teacher Edition
software.
Note: If you click Keep Blocking or Ask Me Later, you will not be
able to use the option "Send to Class" in the TI-Nspire™ Teacher
Edition software, and this window reappears the next time you open
the TI-Nspire™ Navigator™ software. You can choose Unblock at
that time to gain full access to the TI-Nspire™ Teacher Edition
software.
The TI-Nspire™ Navigator™ computer home screen opens.
TI-Navigator_Help_PRINT.book Page 21 Tuesday, January 26, 2010 10:29 AM

22 Overview
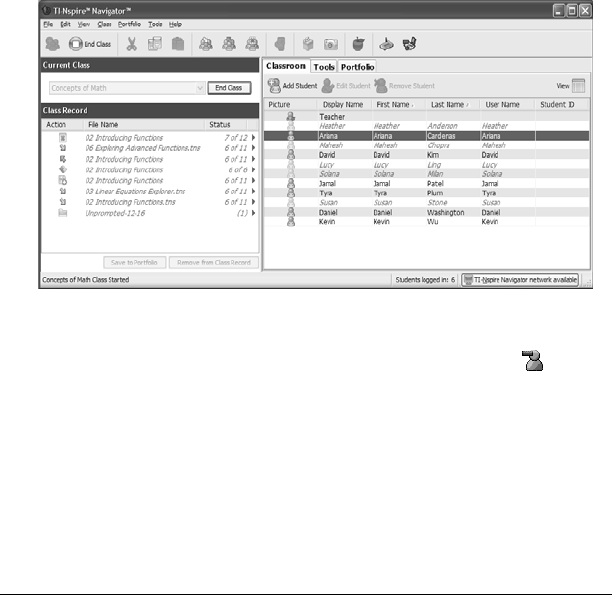
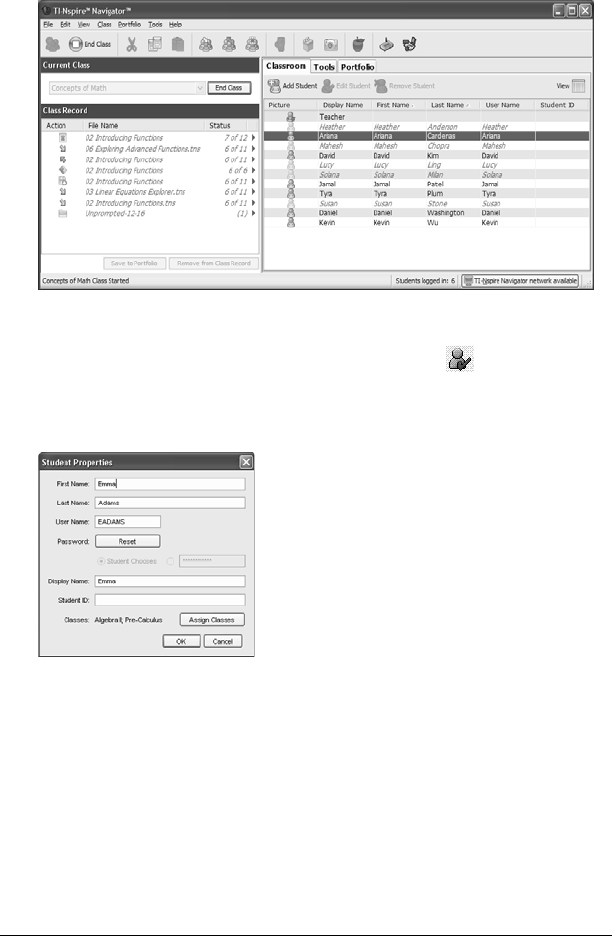
The TI-Nspire™ Navigator™ computer home
screen
The TI-Nspire™ Navigator™ computer home screen provides the tools
and options you need to run the TI-Nspire™ Navigator™ software. Below
you can see an example of the TI-Nspire™ Navigator™ computer home
screen with its main parts labeled. Following the TI-Nspire™ Navigator™
computer home screen, you can find detailed explanations of each
labeled part.
Note: The example below shows the Classroom tab in Seating Chart view.
Ê Classroom tab
Ë Tools tab
Ì Portfolio tab
Í Current Class
Î Class Record
Note: Make sure that the network indicator at the bottom of the screen
indicates that the TI-Nspire™ Navigator™ network is available. If it is not
available, this indicates an error.
ÊË
Í
Î
Ì
Network indicator
TI-Navigator_Help_PRINT.book Page 22 Tuesday, January 26, 2010 10:29 AM

Overview 23
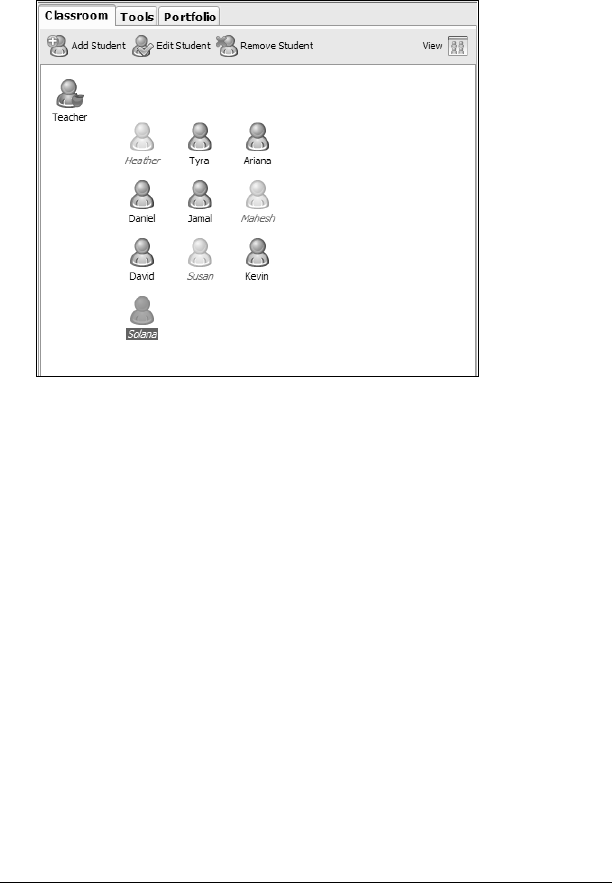
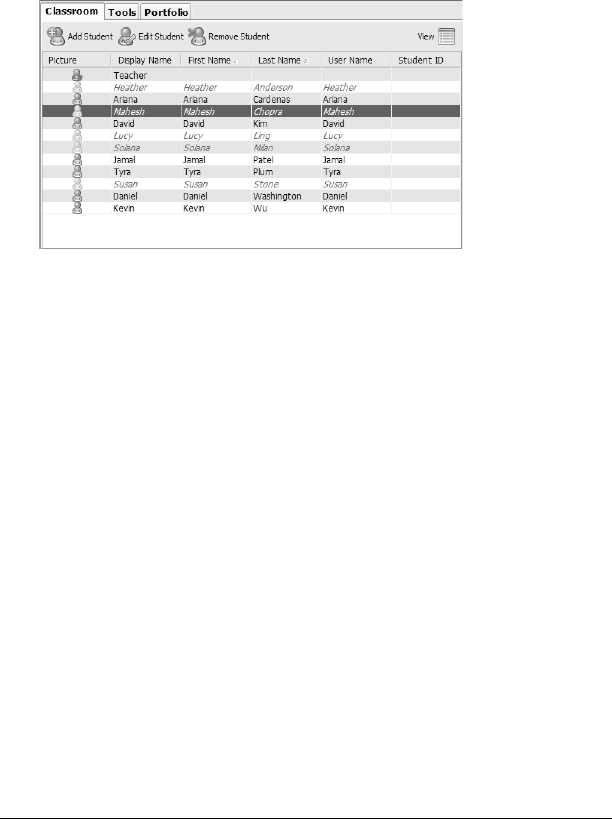
1: Classroom tab
In the Classroom tab, you can view the students in the selected class and
add, remove, or edit students. The Classroom tab has two views, the
Seating Chart and Student List views. In the Seating Chart view, you can
view your students by their display name and an icon. In the Student List
view, you can view your students listed in a table with some of their
account information.
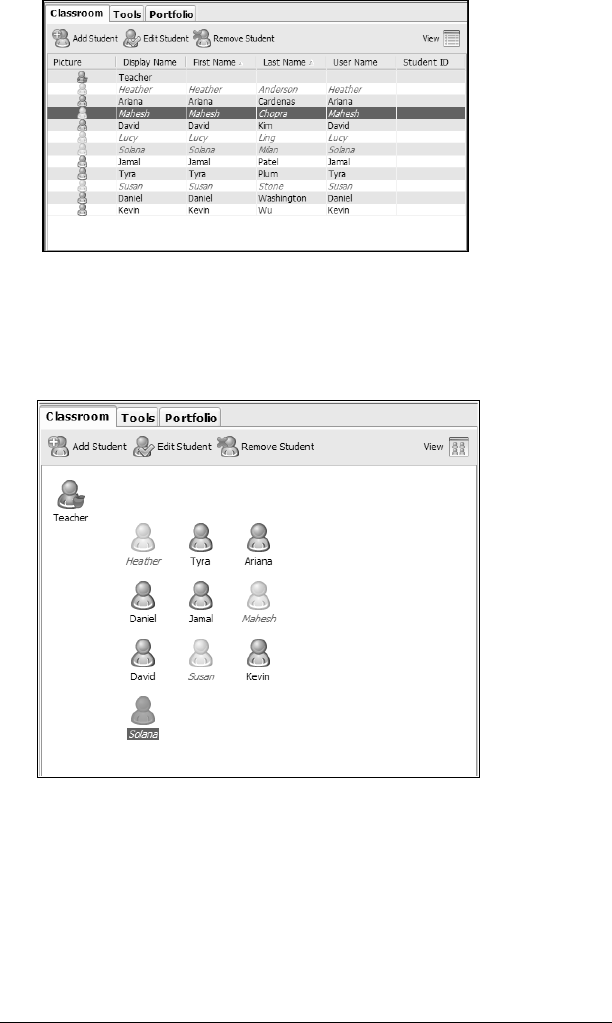
Note: The example below shows the Classroom tab in Student List view.
A: Classroom toolbar. Lets you add a class, and collect, send, and delete
files.
B: Student roster.
1) Seating Chart view - Shows students listed with display names and
student icons. The Seating Chart view lets you arrange your students
in the Classroom tab like they are seated in your classroom.
2) Student List view - Shows students listed in a table with some of their
account information. The Student List view lets you sort students by
display name, first name, last name, user name, and student ID. C: View
selector. Lets you toggle between the Seating Chart view and the
Student List view.
2: Tools tab
The Tools tab contains icons that link to a particular tool in the
TI-Nspire™ Navigator™ software.
A
B
C
TI-Navigator_Help_PRINT.book Page 23 Tuesday, January 26, 2010 10:29 AM

24 Overview
The task icons let you launch task tools in the TI-Nspire™ Navigator™
software, including Quick Poll, Screen Capture, Send to Class, Collect
from Class, Delete from Class, the Transfer Tool, and TI-Nspire™ Network
Manager.
3: Portfolio tab
The Portfolio tab displays student names, assignment names and scores,
and icons of collected files.
4: Current Class
Current Class lets you select classes you have created, as well as begin and
end class sessions for the selected class. Below you can see an example of
the Current Class with its main parts labeled.
AB
TI-Navigator_Help_PRINT.book Page 24 Tuesday, January 26, 2010 10:29 AM
Overview 25
A: Class list. A drop-down list where you can select a class from the ones
you have created. The Class list is disabled when you have a class session
running.
B: Begin/End Class button. Button that lets you begin or end a class
session.
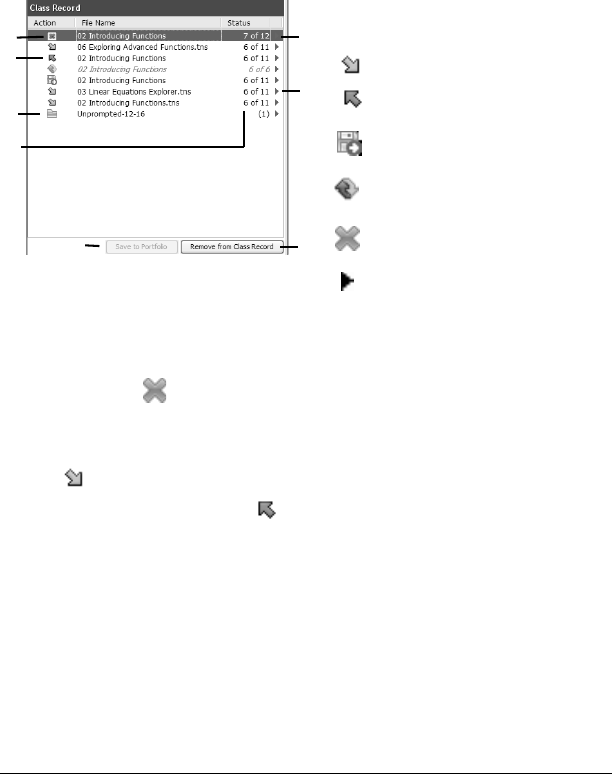
5: Class Record
The Class Record contains both the current and historical activity for the
selected class. Below you can see an example of the Class Record with its
main parts labeled, and an explanation of icons.
A: File deletion. The deletion of a file from your students’ handhelds,
indicated by the symbol.
B: File transfer. The transfer of files between your computer and your
students’ handhelds. Arrows beside files indicate file transfers. The send
symbol indicates transfers from your computer to your class’s
handhelds. The collect symbol indicates transfers from your class’s
handhelds to your computer. File transfers remain current until all
students receive the file, you stop the transfer, or you end the class
session.
C: Unprompted from Class folder. A folder that contains the files
students have sent to you that were not part of a collect action.
D: Status. The progress of an action. For example, “23 of 25” indicates
that 23 out of 25 students have received a file.
E: Current action. An action (for example, send) that is still active.
C
F
D
B
A
G
H
E
Class Record icons
Sent file to class
Collected file from class
Saved to porfolio
Redistributed to class
Deleted file from students’
handhelds
Click for options
TI-Navigator_Help_PRINT.book Page 25 Tuesday, January 26, 2010 10:29 AM
26 Overview
F: Menu icon. Click this icon for quick access to certain menu items. This
icon gives you the same options as a right-click. You can perform the
following actions on a selected item in Class Record: Open in Class
Analysis, Save to Portfolio, Collect Selected File, Redistribute Selected
File, Collect Missing, Remove from Class Record, and Record Item
Properties.
G: Remove From Class Record button. Button that lets you remove
selected historic or active actions from the Class Record. You can remove
a single action or multiple actions.
H: Save to Portfolio button. Button that enables you to save an item in
the Class Record to the Portfolio. The button is available when in full
color: .
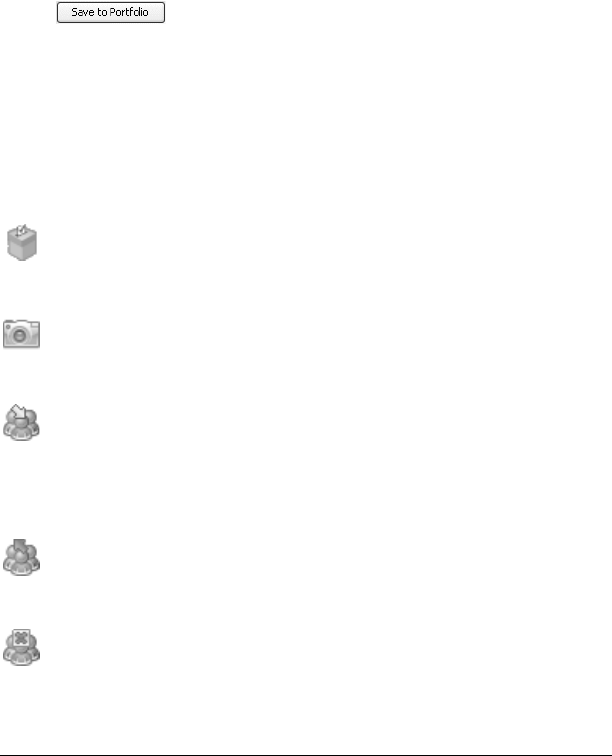
TI-Nspire™ Navigator™ computer tools
The TI-Nspire™ Navigator™ classroom learning system contains tools
that you can use to interact with your students from your computer. This
section describes the tools, and tells you how to launch them.
The TI-Nspire™ Navigator™ computer tools
Quick Poll – Lets you send polls to your students and receive their
poll responses.
Screen Capture – Lets you capture your students’ handheld
screens and display them on your computer.
Send to Class – Lets you send TI-Nspire™ handheld-compatible
files to your students’ handhelds from your handheld or from your
computer. You can send files to the whole class, to students who are
currently logged in, or to individual students.
Collect from Class – Lets you collect TI-Nspire™ handheld-
compatible files from your students’ handhelds to your computer.
Delete from Class – Lets you delete files from your students’
handhelds. You can delete files from the whole class or from individual
students.
TI-Navigator_Help_PRINT.book Page 26 Tuesday, January 26, 2010 10:29 AM

Overview 27
Transfer Tool – Lets you transfer document, application, and
Operating System (OS) files to a succession of handhelds, without
requiring students to log in.
TI-Nspire™ Network Manager – Lets you add or remove
TI-Nspire™ Navigator™ wireless cradles and TI-Nspire™ access points to
your network.
To launch TI-Nspire™ Navigator™ computer tools
1. Click the Tool s tab.
The Tools tab opens.
2. If the tool you want to launch is inactive, begin the class session.
3. Click the icon of the tool you want to launch.
Note: You can also launch many of these tools from the Tools menu.
Creating and managing your teacher account
You can create your teacher account in the Teacher Preferences section of
the TI-Nspire™ Navigator™ classroom learning system. Your teacher
account lets you log in to the TI-Nspire™ Navigator™ network from your
handheld. After you create your teacher account, you can later change
your password or your user name.
TI-Navigator_Help_PRINT.book Page 27 Tuesday, January 26, 2010 10:29 AM

28 Overview
To create your teacher account
1. If you have a class session running, end it.
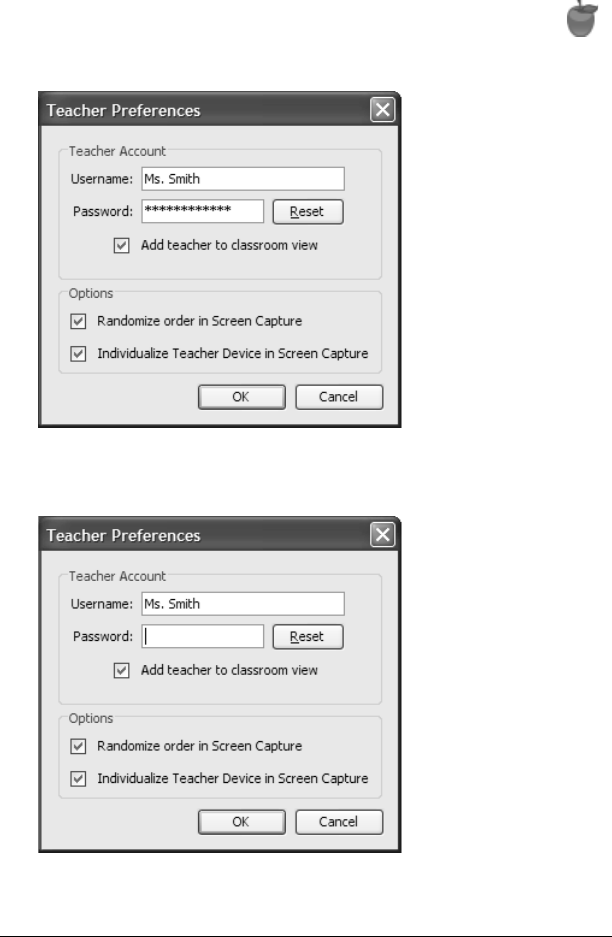
2. Click Tools > Teacher Preferences or click Teacher Preferences .
The Teacher Preferences dialog box opens.
3. Enter a username.
4. Enter a password.
5. Select or deselect the preference for the teacher icon to appear in
the classroom view.
If you select this preference, the teacher icon will appear in the
classroom view, and you will be included as a recipient in Send to
Class, Collect from Class and Delete from Class operations. The
teacher handheld screen will be included in screen captures of the
class.
6. Select or deselect the options to randomize the order in Screen
Capture, and to individualize the teacher handheld in Screen
Capture.
• Randomize order in Screen Capture: selecting this option
captures and displays student screens in a random order, not the
order on the class listing. This enables students to concentrate
on the assignment, not whose screen they are viewing.
• Individualize Teacher Handheld in Screen Capture: selecting this
option shows the teacher’s screen in the screen capture.
7. Click OK.
TI-Navigator_Help_PRINT.book Page 28 Tuesday, January 26, 2010 10:29 AM
Overview 29
To change the password of your teacher account
1. Make sure you are not logged in to the TI-Nspire™ Navigator™
network on your handheld.
2. Click Tools > Teacher Preferences or click Teacher Preferences .
The Teacher Preferences dialog box opens.
3. Click Reset.
TI-Nspire™ Navigator™ software clears the current password.
4. Enter a new password.
TI-Navigator_Help_PRINT.book Page 29 Tuesday, January 26, 2010 10:29 AM
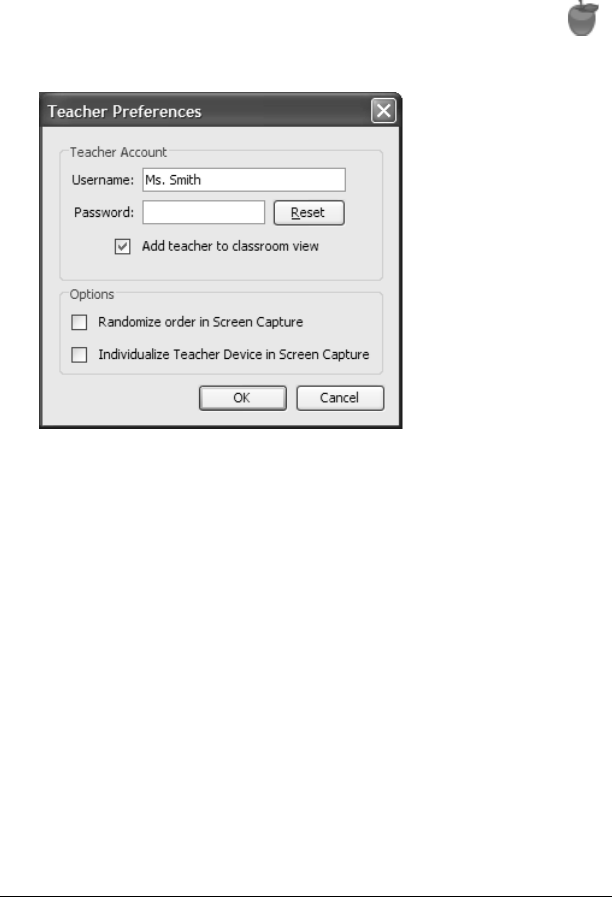
30 Overview
5. Click OK.
To change the user name of your teacher account
1. Make sure you are not logged in to the TI-Nspire™ Navigator™
network on your handheld.
2. Click Tools > Teacher Preferences or click Teacher Preferences .
The Teacher Preferences dialog box opens.
3. Enter a new user name.
4. Click OK.
Logging in to the TI-Nspire™ Navigator™ system
from the handheld
The TI-Nspire™ Navigator™ classroom learning system uses both your
computer and your students’ handhelds. Your computer and your
students’ handhelds communicate through the TI-Nspire™ Navigator™
network.
Note: You do not have to log in to communicate with your students’
handhelds; you can use the Transfer Tool to delete files or send files and
operating systems to the students handhelds. However, if you plan to
participate from your handheld during the TI-Nspire™ Navigator™ class
session, then you must log in to the TI-Nspire™ Navigator™ network
from your handheld.
TI-Navigator_Help_PRINT.book Page 30 Tuesday, January 26, 2010 10:29 AM
Overview 31
TI-Nspire™ handheld login status icons
The icons on the TI-Nspire™ and TI-Nspire™ CAS handheld screens
indicate the communication status between the handheld and the access
point, cradle, or TI-Navigator™ network. The icons indicate status as
follows.
Before you log in
Create your teacher account in Teacher Preferences.
To log in to the TI-Nspire™ Navigator™ network
1. If you have not already done so, begin the class session on your
computer.
2. Make sure the TI-Nspire™ handheld is ready for login. (The icon
is blinking.)
3. To log in, do one of the following:
– From the home screen of your TI-Nspire™ handheld, select
5:Settings & Status > 5:Login.
– From a screen other than the home screen, press ~ > 8:Login.
4. Type your username and password. (Press e to move to the next
field.)
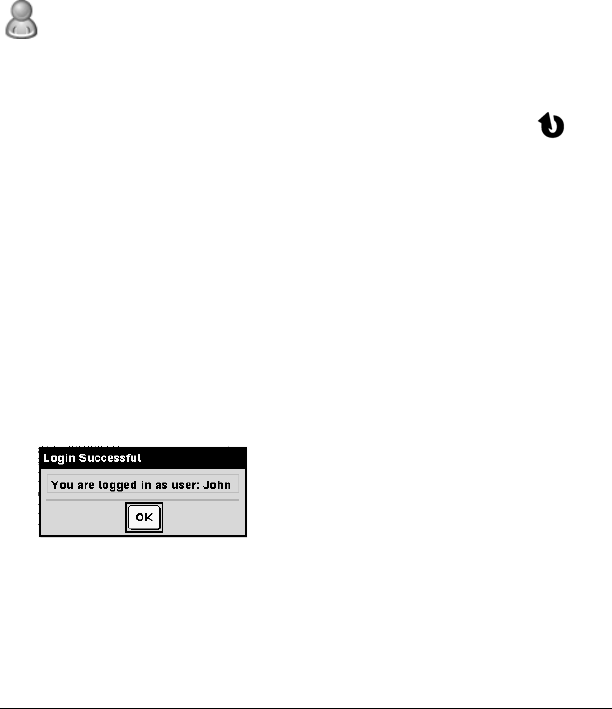
5. Select Login.
The Login Successful screen displays.
Icon Status Meaning
Blinking The handheld is searching for an access
point.
Solid The handheld has found an access point.
Solid The handheld is not communicating
with the cradle. Unattach the handheld
from the cradle, wait for the icon to
disappear, and then reattach the
handheld to the cradle.
Blinking The handheld is connected to the
network and is ready to login.
Solid The handheld is logged in to the
network and is fully charged.
TI-Navigator_Help_PRINT.book Page 31 Tuesday, January 26, 2010 10:29 AM

32 Overview
TI-Navigator_Help_PRINT.book Page 32 Tuesday, January 26, 2010 10:29 AM
Overview 33
Logging in to the TI-Nspire™ Navigator™ system
(student instruction)
Your computer and your students’ handhelds communicate through the
TI-Nspire™ Navigator™ network. In order for you and your students to
communicate using this network, your students must log in to the
network from their handhelds. Below you can find instructions you can
use to tell your students how to log in to the TI-Nspire™ Navigator™
network.
Before your students log in
• Create your students’ accounts.
• Provide your students with their usernames and, if necessary, their
passwords.
Student Point of View: The steps below are from the student’s
point of view.
To log in to the TI-Nspire™ Navigator™ network
1. Make sure the TI-Nspire™ handheld is ready for login. (The icon
is blinking, indicating the handheld is fully charged and
communicating with the network.)
2. To log in, do one of the following:
– From the home screen of your TI-Nspire™ handheld, select
5:Settings & Status > 5:Login.
– From a screen other than the home screen, press ~ > 8:Login.
3. Type your username and password. (Press e to move to the next
field.)
4. Select Login.
The Login Successful screen displays.
TI-Navigator_Help_PRINT.book Page 33 Tuesday, January 26, 2010 10:29 AM

34 Overview
TI-Navigator_Help_PRINT.book Page 34 Tuesday, January 26, 2010 10:29 AM

Managing classes 35
Managing classes
The TI-Nspire™ Navigator™ classroom learning system typically includes
one or more classes. In order to use TI-Nspire™ Navigator™, you need to
create and use classes for each class period that you teach. This section
contains the information you need to create and effectively manage your
classes.
Creating classes
When you start using the TI-Nspire™ Navigator™ classroom learning
system, one of the first things you should do is create your classes. Make
sure you create a class for each of the class periods you plan to teach with
TI-Nspire™ Navigator™.
To create classes
1. If you have a class session running, end it.
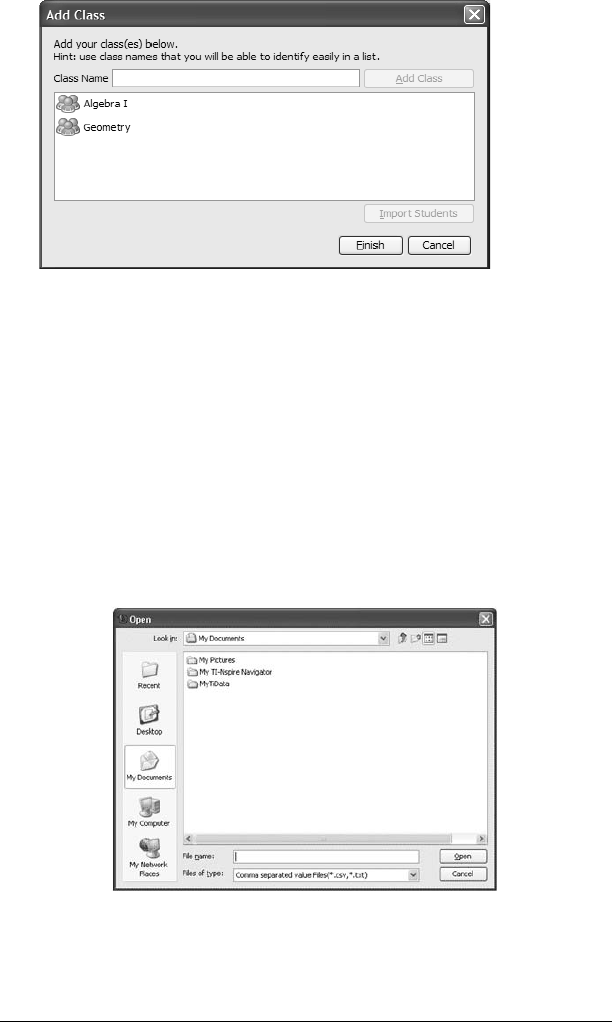
2. Click File > Add Class or click Add Class .
The Add Class dialog box opens.
3. Enter a class name.
Note: You can use a mix of TI-Nspire™ handhelds and
TI-Nspire™ CAS handhelds in the same class.
4. Click Add Class.
The new class appears in the Add Class dialog box.
TI-Navigator_Help_PRINT.book Page 35 Tuesday, January 26, 2010 10:29 AM
36 Managing classes
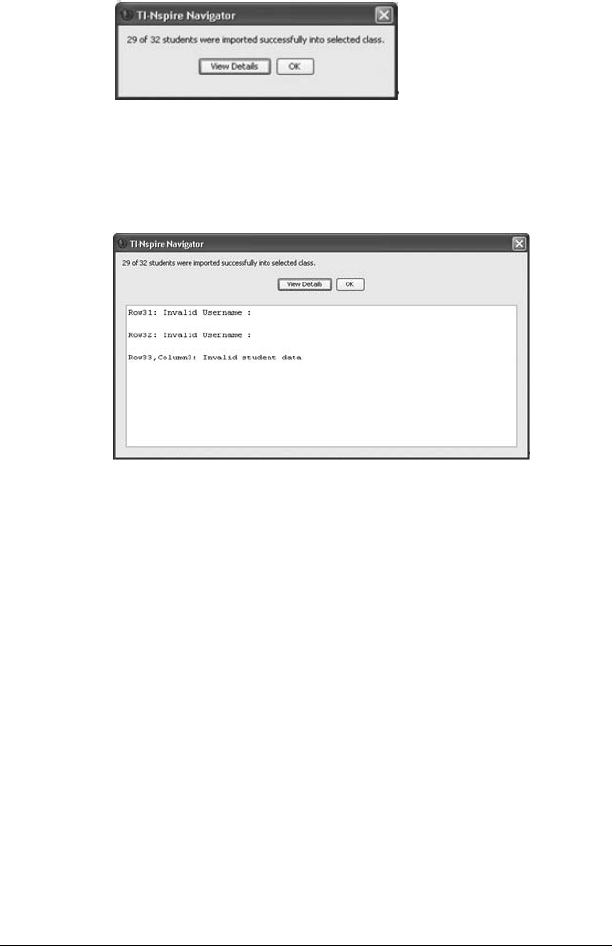
5. (Optional) Import students into the class.
Note: You can import a comma-separated value (CSV) file or a *.txt
file. The CSV or .txt file must have all of these headers in this order:
First Name
Last Name
User Name
Password
Display Name
Student ID
a) Click the class.
b) Click Import Students.
The Open dialog box opens.
c) Select the file that contains the students you want to
import.
d) Click Open.
TI-Navigator_Help_PRINT.book Page 36 Tuesday, January 26, 2010 10:29 AM
Managing classes 37
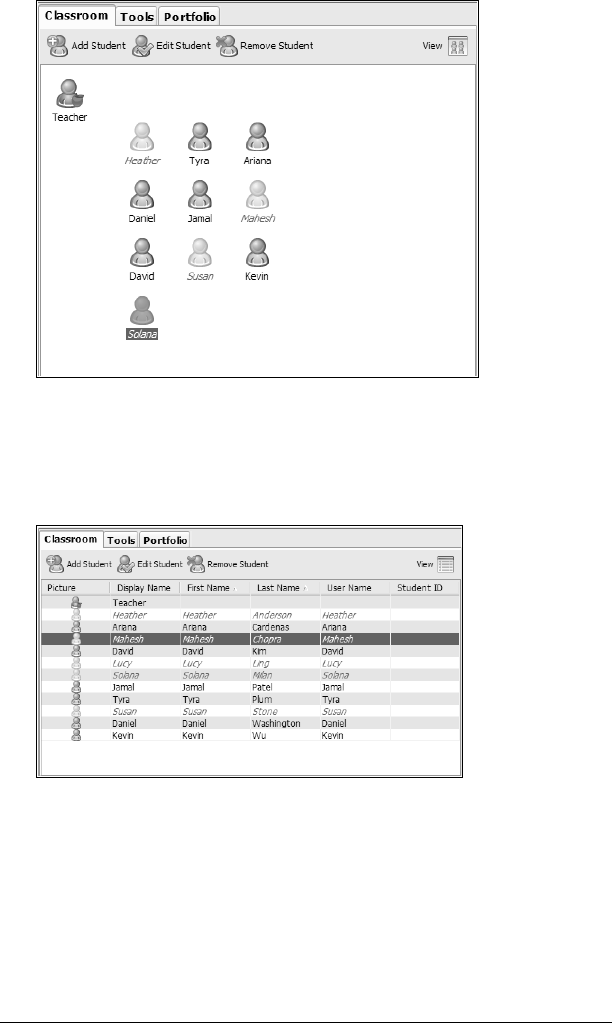
The Import Status dialog box opens telling you how many
students the TI-Nspire™ Navigator™ software successfully
imported.
e) (Optional) If some students did not import successfully, click
View Details to determine the problem.
The details of the import open in the Import Status dialog
box.
f) Click OK.
6. If you need to create another class, repeat steps 3 - 4.
7. Click Finish.
Selecting a class
You can create many classes in the TI-Nspire™ Navigator™ classroom
learning system. To view or start a class, you must select it from a list of
the classes in the Current Class section of the TI-Nspire™ Navigator™
computer home screen.
To select a class
1. If you have a class session running, end it.
2. Click File > Select Class.
A list of classes opens.
3. Click the class you want.
TI-Navigator_Help_PRINT.book Page 37 Tuesday, January 26, 2010 10:29 AM

38 Managing classes
TI-Nspire™ Navigator™ software displays the information for the
selected class.
Note: You can view and edit information in the selected class,
however, you cannot perform any network activities until you begin
the class.
Beginning and ending a class session
A class session is the period when the TI-Nspire™ Navigator™ classroom
learning system is active for a specific class. While a class session is
running, you can perform TI-Nspire™ Navigator™ communications
functions with the selected class. You cannot use TI-Nspire™ Navigator™
software to interact with your class until you begin a class session, and
you cannot begin another class in the TI-Nspire™ Navigator™ system
until you end the current one.
To begin a class session
1. If you have a class session running, end it.
2. From the Current Class drop-down list, select the class you want to
begin.
3. Click File > Begin Class or click Begin Class .
To end a class session
fClick File > End Class or click End Class .
Changing the class view
In the Classroom tab, you can view the selected class in either the Student
List view or the Seating Chart view. The Student List view shows your
students in a table that contains their display names, first name, last
name, user name, and student ID. The Seating Chart view shows your
students as student icons with display names. You can change the class
view at any time.
To change class view to Student List
1. Click the Classroom tab.
The Classroom tab opens.
Note: The contents of the Classroom tab vary depending on the
selected class and view. The example below shows the Classroom tab
in Seating Chart view.
TI-Navigator_Help_PRINT.book Page 38 Tuesday, January 26, 2010 10:29 AM
Managing classes 39
2. In the menu, click View > Classroom > Student List.
-or-
In the Classroom tab, click View > Student List.
The Classroom tab changes the class view to Student List.
To change the class view to Seating Chart
1. Click the Classroom tab.
The Classroom tab opens.
Note: The contents of the Classroom tab vary depending on the
selected class and view. The example below shows the Classroom tab
in Student List view.
TI-Navigator_Help_PRINT.book Page 39 Tuesday, January 26, 2010 10:29 AM
40 Managing classes
2. In the menu, click View > Classroom > Seating Chart.
-or-
In the Classroom tab, click View > Seating Chart.
The Classroom tab changes the class view to Seating Chart.
Removing items from the Class Record
The Class Record maintains a list of all of the actions you have performed
in your class. Items remain in this list until you remove the items or you
remove the class. You can remove items from the Class Record at any
time.
TI-Navigator_Help_PRINT.book Page 40 Tuesday, January 26, 2010 10:29 AM

Managing classes 41
Note: If you remove a collected file list from the Class Record without
first saving it to Porfolio, the TI-Nspire™ Navigator™ software deletes
those students’ files.
To remove items from the Class Record
1. In the Class Record, click the item you want to remove.
The TI-Nspire™ Navigator™ software highlights the selected item in
the Class Record.
2. Click Edit > Remove From Class Record.
Note: If you are removing an item that is still in progress, the
Remove From Record dialog box opens asking if you are sure you
want to remove the item. Click Remove.
Removing classes
If you have a class you no longer need, you can remove it from the
TI-Nspire™ Navigator™ classroom learning system. When you remove a
class, the TI-Nspire™ Navigator™ software removes the class from the
software and removes the files on the hard drive that correspond to that
class. If you have students who are not part of any other classes, the
software removes those students from the software as well.
Note: You cannot undo the removal of a class.
To remove classes
1. If you have a class session running, end it.
2. From the Current Class drop-down list, select the class you want to
remove.
The TI-Nspire™ Navigator™ system shows the selected class in the
Current Class field.
TI-Navigator_Help_PRINT.book Page 41 Tuesday, January 26, 2010 10:29 AM

42 Managing classes
3. Click File > Remove Class.
The TI-Nspire™ Navigator™ system asks if you are sure you want to
remove the class.
4. Click Remove.
TI-Navigator_Help_PRINT.book Page 42 Tuesday, January 26, 2010 10:29 AM
Managing student accounts 43
Managing student accounts
The TI-Nspire™ Navigator™ classroom learning system typically contains
many student accounts associated with one or more classes. Each of your
students must have an account to access TI-Nspire™ Navigator™ on their
handhelds. This section contains information on creating and managing
your students’ accounts.
Adding students to classes
Once you create your classes, you will want to add students to them. You
can add students to your classes at any time.
Note: The instructions below explain how to add students once you
create a class. You can also add students when you create a class by
importing them.
To add students to classes
1. Select the class to which you want to add the students.
Note: If you have a class session running, you must end it to select
the class.
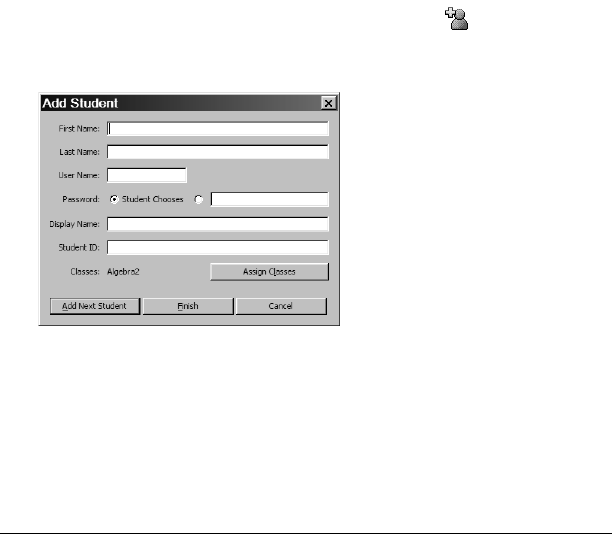
2. Click Class > Add Student or click Add Student .
The Add Student dialog box opens.
3. Enter the student’s first name.
4. Enter the student’s last name.
5. Enter a user name.
Note: The user name you choose must be unique. It cannot exist in
the current class or any other class.
TI-Navigator_Help_PRINT.book Page 43 Tuesday, January 26, 2010 10:29 AM
44 Managing student accounts
6. If you want your student to create their own password, select
Student Chooses.
-or-
If you want to create a password for your student, select the blank
password entry box and enter a new password.
7. (Optional) Enter a display name.
Note: If you leave the display name blank, the TI-Nspire™
Navigator™ software uses the student’s first name as the display
name.
8. (Optional) Enter a student ID.
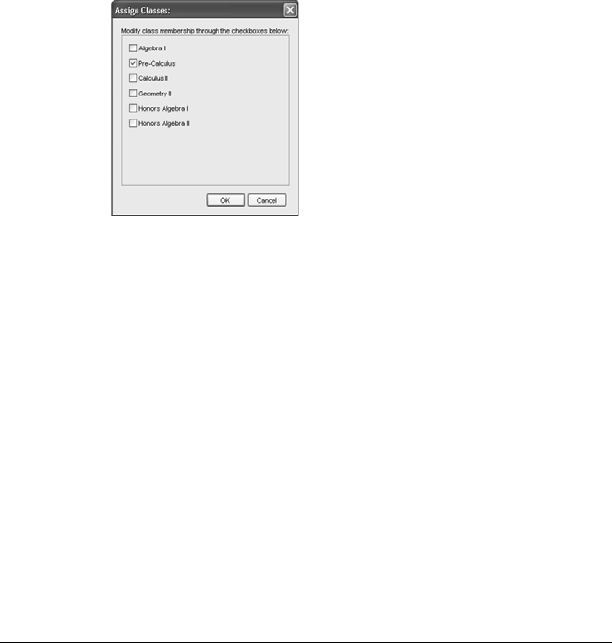
9. (Optional) Assign the student to other classes:
a) Click Assign Classes.
The Assign Classes dialog box opens.
b) Select the check boxes of the student’s classes.
c) Clear the check boxes of the classes to which the student
does not belong.
d) Click OK.
10. If you need to add another student, click Add Next Student and
repeat steps 3 - 9.
11. Click Finish.
Removing a student from a class
As necessary, you can remove students from your classes. When you
remove students, the TI-Nspire™ Navigator™ classroom learning system
only removes them from the selected class. If the students are in other
classes, then they remain in those classes.
TI-Navigator_Help_PRINT.book Page 44 Tuesday, January 26, 2010 10:29 AM
Managing student accounts 45
Notes:
• You cannot remove students who are logged in to the TI-Nspire™
Navigator™ network.
• You cannot undo the removal of students.
• You can access many of the student account items by right-clicking
the student and choosing an action from the menu.
To remove a student from a class
1. Select the class from which you want to remove the student.
Note: If you have a class session running, you must end it to select
the class.
2. Click the Classroom tab.
The Classroom tab opens.
Note: The contents of the Classroom tab vary depending on the
selected class and view.
3. Click the student you want to remove.
4. Click Class > Remove Student, or click Remove Student , or
right-click the student and choose Remove Student from the menu.
The TI-Nspire™ Navigator™ software asks if you are sure you want
to remove the student.
5. Click Yes.
The TI-Nspire™ Navigator™ software removes the student.
TI-Navigator_Help_PRINT.book Page 45 Tuesday, January 26, 2010 10:29 AM

46 Managing student accounts
Resetting student passwords
The TI-Nspire™ Navigator™ classroom learning system maintains the
privacy of your students’ passwords. Because of this, you cannot retrieve
passwords for your students if they forget them. However, if necessary
you can reset your students’ passwords. You can reset passwords for all of
the students in a class or for individual students.
Note: You cannot reset the passwords of students who are currently
logged in to the TI-Nspire™ Navigator™ network.
To reset passwords for all students in a class
1. Select the students’ class.
Note: If you have a class session running, you must end it to select
the class.
2. Click the Classroom tab.
The Classroom tab opens.
3. Click a student in the class.
4. Click Edit > Select All.
TI-Nspire™ Navigator™ system selects all of the students in the class.
5. Click Class > Reset Student Password(s).
The Confirm Reset Passwords dialog box opens.
6. Click OK.
TI-Navigator_Help_PRINT.book Page 46 Tuesday, January 26, 2010 10:29 AM

Managing student accounts 47
7. The next time your students log in, instruct them to enter passwords
of their choosing.
To reset student passwords for individual students
1. Select a class of the student whose password you want to reset.
Note: If you have a class session running, you must end it to select
the class.
2. Click the Classroom tab.
The Classroom tab opens.
Note: The contents of the Classroom tab vary depending on the
selected class and view.
3. Click the student you want to edit.
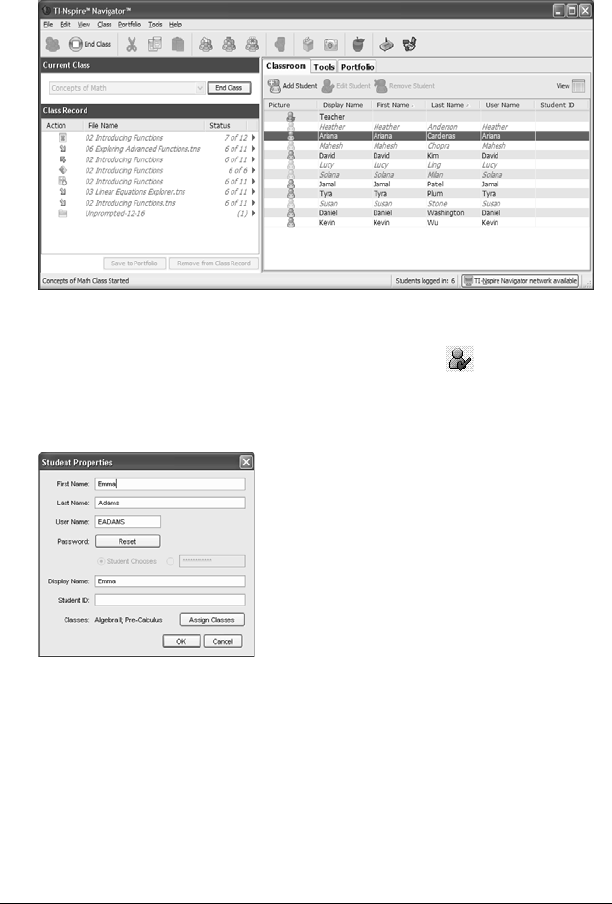
4. Click Class > Edit Student, or click Edit Student , or right-click
the student and choose Edit Student from the menu.
The Student Properties dialog box opens.
5. Click Reset.
TI-Navigator_Help_PRINT.book Page 47 Tuesday, January 26, 2010 10:29 AM

48 Managing student accounts
6. If you want the student to create his or her own password, select
Student Chooses.
-or-
If you want to create a specific password for the student, select the
blank password entry box and enter a new password.
7. Click OK.
The TI-Nspire™ Navigator™ system resets the student’s password.
8. The next time the student logs in:
• If you selected Student Chooses, instruct the student to enter a
password of his or her choosing.
• If you created a password for the student, tell the student the
new password.
Checking student login status
The TI-Nspire™ Navigator™ classroom learning system lets you view the
students’ login status from the Classroom tab. The color of the icon by
your students’ display names indicates their login status as well as the
class status:
Arranging the seating chart
Initially, the Classroom tab arranges the students in the Seating Chart
view in the order that you added them. However, you can rearrange the
students so that they have the same seating arrangement in the
Classroom tab as they do in your actual classroom. You can rearrange the
seating chart at any time.
To arrange students in the seating chart
1. Select the students’ class.
Icon Class status Student status Color
Class session not
started.
N/A Grey
Class session started. Student not logged
in.
Light blue
Class session started. Student logged in. Dark blue
TI-Navigator_Help_PRINT.book Page 48 Tuesday, January 26, 2010 10:29 AM
Managing student accounts 49
Note: If you have a class session running, you must end it to select
the class.
2. In the menu, click View > Classroom > Seating Chart.
The Classroom tab opens displaying your class in the Seating Chart
view.
3. Within the Classroom tab, drag each student’s icon to the location
that you want.
The TI-Nspire™ Navigator™ software moves the student icons to the
new locations.
Note: Do not place one student’s icon on top of another students’
icon. If you do this, you will only be able to see one of the student’s
icons.
Sorting student information
The Student List view in the Classroom tab shows the information for
students in the selected class. It includes your students’ display names,
first names, last names, user names, and student IDs. In the Student List
view, you can sort your students’ information by each of these categories.
The TI-Nspire™ Navigator™ classroom learning system sorts the
information alphabetically from A-Z or Z-A and numerically from 1-9 or
9-1. You can sort student information at any time.
TI-Navigator_Help_PRINT.book Page 49 Tuesday, January 26, 2010 10:29 AM
50 Managing student accounts
To sort student information
1. Select the class that contains the student information you want to
sort.
Note: If you have a class session running, you must end it to select
the class.
2. In the menu, click View > Classroom > Student List.
The Classroom tab opens displaying the Student List view.
3. Click the column title of the list you want to sort.
The TI-Nspire™ Navigator™ software sorts the selected list.
4. If you want to sort the selected information in the opposite order,
click the column title again.
Changing the classes assigned to a student
Occasionally your students may move to a different class, or they may
take more than one of your classes. The TI-Nspire™ Navigator™
classroom learning system lets you change your students’ classes when
necessary.
Note: You cannot change the classes of students who are logged in to
the TI-Nspire™ Navigator™ network.
Note: You can access many of the student account items by right-clicking
the student and choosing an action from the menu.
To change a student’s classes
1. Select a class to which the student belongs.
Note: If you have a class session running, you must end it to select
the class.
2. Click the Classroom tab.
TI-Navigator_Help_PRINT.book Page 50 Tuesday, January 26, 2010 10:29 AM
Managing student accounts 51
The Classroom tab opens.
Note: The contents of the Classroom tab vary depending on the
selected class and view.
3. Click the student you want to edit.
4. Click Class > Edit Student, or click Edit Student , or right-click
the student and choose Edit Student from the menu.
The Student Properties dialog box opens.
5. Click Assign Classes.
The Assign Classes dialog box opens.
TI-Navigator_Help_PRINT.book Page 51 Tuesday, January 26, 2010 10:29 AM

52 Managing student accounts
6. Select the check boxes of the student’s classes.
7. Clear the check boxes of the classes to which the student does not
belong.
8. Click OK.
9. In the Student Properties dialog box, click OK.
Changing student names and identifiers
After you add your students, you may find that you need to change one
of their names or identifiers. In the TI-Nspire™ Navigator™ classroom
learning system, there are five different names and identifiers associated
with your students, including:
• First name
•Last name
• User name
• Display name
• Student ID
This section covers how to change any of these types of names and
identifiers.
Note: You cannot change the account information of students who are
logged in to the TI-Nspire™ Navigator™ network.
Note: You can access many of the student account items by right-clicking
the student and choosing an action from the menu.
To change a student’s names or identifiers
1. Select a class to which the student belongs.
Note: If you have a class session running, you must end it to select
the class.
TI-Navigator_Help_PRINT.book Page 52 Tuesday, January 26, 2010 10:29 AM
Managing student accounts 53
2. Click the Classroom tab.
The Classroom tab opens.
Note: The contents of the Classroom tab vary depending on the
selected class and view.
3. Click the student you want to edit.
4. Click Class > Edit Student, or click Edit Student , or right-click
the student and choose Edit Student from the menu.
The Student Properties dialog box opens.
5. Click the field of the name or identifier you want to change.
6. Make the necessary changes.
7. Repeat steps 5 and 6 for any other names or identifiers you want to
change.
8. Click OK.
TI-Navigator_Help_PRINT.book Page 53 Tuesday, January 26, 2010 10:29 AM

54 Managing student accounts
Moving a student to another class
If any of your students move to a different class, you can move them
within the TI-Nspire™ Navigator™ classroom learning system as well.
Note: You cannot move students who are logged in to the TI-Nspire™
Navigator™ network.
Note: You can access many of the student account items by right-clicking
the student and choosing an action from the menu.
To move a student
1. Select a class to which the student belongs.
Note: If you have a class session running, you must end it to select
the class.
2. Click the student you want to move.
3. Click Edit > Cut or click Cut .
The TI-Nspire™ Navigator™ software removes the student from the
class and places his or her student account information on the
Clipboard.
4. From the Current Class drop-down list, select the class where you
want to move the student.
5. Click Edit > Paste or click Paste .
TI-Nspire™ Navigator™ software moves the student to the selected
class.
Copying a student to another class
When you have students in more than one of your classes, you may find
it convenient to simply copy them from one class to another. Copying
students saves you the time of entering all of their information again.
Note: You cannot copy students who are logged in to the TI-Nspire™
Navigator™ network.
Note: You can access many of the student account items by right-clicking
the student and choosing an action from the menu.
To copy a student
1. Select a class to which the student belongs.
Note: If you have a class session running, you must end it to select
the class.
TI-Navigator_Help_PRINT.book Page 54 Tuesday, January 26, 2010 10:29 AM

Managing student accounts 55
2. Click the student you want to copy.
3. Click Edit > Copy or click Copy .
The TI-Nspire™ Navigator™ classroom learning system copies the
student onto the Clipboard.
4. From the Current Class drop-down list, select the class to which you
want to copy the student.
5. Click Edit > Paste or click Paste .
The TI-Nspire™ Navigator™ software copies the student to the
selected class.
TI-Navigator_Help_PRINT.book Page 55 Tuesday, January 26, 2010 10:29 AM

56 Managing student accounts
TI-Navigator_Help_PRINT.book Page 56 Tuesday, January 26, 2010 10:29 AM

Using Portfolio 57
Using Portfolio
Portfolio gives you a way to save, store, review, and manage files your
students send you. Files that you save in Portfolio remain there until you
remove them.
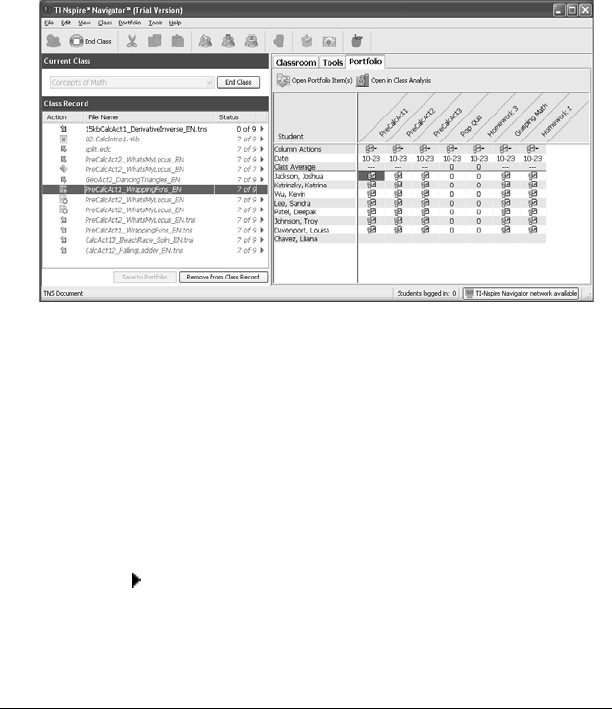
The Portfolio tab displays a list of students in the selected class with the
scores they have received for each assignment included in Portfolio.
A. Open Portfolio Item(s) button. Lets you open a selected .tns file in
the TI-Nspire™ software.
B. Open in Class Analysis button. Lets you open a selected item in Class
Analysis.
C. Column header. Shows the name of the file or folder that has been
collected or saved to Portfolio. The Student header lets you sort by
student name. You can resize the column header. The TI-Nspire™
Navigator™ software remembers the size adjustment the next time you
start the software.
D. Column Actions. Lets you perform certain actions on a column.
Clicking a file icon on this row allows you to: Open in Class Analysis,
Select Column, Sort, Send Missing, Collect Missing, Redistribute Portfolio
Column, Remove Portfolio Column, or Rename Portfolio Column. Each of
these actions is explained in further detail in this chapter.
E. Date. Shows the date the file was created or saved.
A B
C
G
D
E
F
TI-Navigator_Help_PRINT.book Page 57 Tuesday, January 26, 2010 10:29 AM
58 Using Portfolio
F. Class Average. Shows the average score of the class for the item in
that column.
G. File icon. Shows the type of file. The file types shown are Quick Poll
and *.tns files.
Viewing Portfolio
1. Select the class that contains the Portfolio you want to view.
Note: If you have a class session running, you must end it to select
the class.
2. In the menu, click View > Portfolio, or click the Portfolio tab.
The Portfolio displays.
Saving an item to Portfolio
You can save (add) collected *.tns files and quick poll results to Portfolio.
1. To save an item to Portfolio from the Class Record, highlight the
collected file you want added to Portfolio.
Note: You can select multiple items listed on a window and add
them to Portfolio in one add action.
To save an item to Portfolio from Quick Poll, stop any active poll.
2. Click Edit > Save to Portfolio or choose Save to Portfolio from the
menu icon .
3. The Save to Portfolio dialog box opens. You can create a new
Portfolio column, or add the item to an existing Portfolio column.
TI-Navigator_Help_PRINT.book Page 58 Tuesday, January 26, 2010 10:29 AM

Using Portfolio 59
• Choose Add as new portfolio column to create a new column.
Type a name for the column and click Save.
• Choose Add to existing portfolio column to add the file to an
existing column. Click the drop-down arrow to select the desired
column, and then click Save.
The item is added to Portfolio, and the status bar confirms the
addition.
Items saved in Portfolio are saved in chronological order from the
time of collection.
In the Class Record, the item is marked with a Portfolio icon .
Default names for files saved to Portfolio are as follows. You can edit
the names in the text box.
• Quick Polls are named Poll_mmddyyyy.
• Class records are named with the file name.
Note: If one or more items with the same name already exist in Portfolio,
you will see a warning that you are using a duplicate name for the file.
Importing an item to Portfolio
You can import a .tns file from your computer to a student’s Portfolio
entry.
Before you begin, make sure the column that you are importing the file
to is not open in Class Analysis.
1. Highlight the cell in the student’s row where you want to import the
file.
Note: You can import a file for only one student at a time.
2. Right-click the cell and choose Import Item.
A Windows Explorer window opens.
3. Navigate to the file you want to import and click it.
Note: You can import only one file at a time.
4. Click Import.
If a file already exists in that cell, the software displays a dialog box
asking you to confirm replacing the file.
• Click Replace to save your imported file over the existing file.
• Click Keep Existing to keep the existing file and cancel the
import file function.
TI-Navigator_Help_PRINT.book Page 59 Tuesday, January 26, 2010 10:29 AM

60 Using Portfolio
Sorting information in Portfolio
1. Click the column header of the list you want to sort.
The TI-Nspire™ Navigator™ software sorts the selected list.
2. If you want to sort the selected information in the opposite order,
click the column header again.
Viewing assignment details
fDouble-click the Class Average cell for the Portfolio item you would
like to view. The desired assignment opens in Class Analysis.
Note: A dashed line (---) indicates there is not a Class Analysis file to
open.
Deleting files from Portfolio
There may be times you want to delete files from Portfolio. For example,
a student turned in a Quick Poll file before it was completed, and the low
grade gives a false class average; or an incorrect file was sent to or
collected from a student.
1. Select the items you want to delete. You may select multiple files in a
column.
2. Do one of the following:
• Click Portfolio > Column Actions > Remove Item(s).
• Right-click and select Remove Item(s)
• Press the Delete key on your computer.
3. The system displays a delete confirmation screen. Click Remove to
perform the deletion; click Don’t Remove to cancel the request.
Note: If a file is saved to the Portfolio and later deleted from the Class
Record, that delete action does not affect the file copy in the Portfolio.
The copy remains in Portfolio until it is deleted.
Opening a Portfolio item
You can open a Portfolio item in the TI-Nspire™ software, or you can
open an item or a selected column of items in Class Analysis.
To open an item in the TI-Nspire™ software
1. Select the .tns file you want to open.
Note: You can open more than one file in a column, but you can not
open multiple files from different columns.
TI-Navigator_Help_PRINT.book Page 60 Tuesday, January 26, 2010 10:29 AM

Using Portfolio 61
2. Do one of the following:
• Click Portfolio > Column Actions > Open Portfolio item(s).
• Click the Open Portfolio Item(s) button .
• Press the Enter key on your computer.
3. The TI-Nspire™ software opens the item.
If you selected a column, all files are opened, one by one.
To open an item in Class Analysis
You can open a .tns or Quick Poll file in Class Analysis.
Note: You can not open a file if you collected it using the Custom Files
option.
To open a file or multiple files, do one of the following:
• Select a single file or multiple files in a column and click the
Open in Class Analysis button.
• Click a file icon on the Column Actions row and select Open in
Class Analysis to open all items in that column.
• Double-click a cell in the Class Average row to open all items in
that column.
Redistributing a Portfolio item
This is a useful way to return graded assignments. It is also useful if you
clear the students’ handhelds (for example, before a test) and later want
to return assignments for additional work.
1. Select the item you want to redistribute (highlight the item.)
2. Click Portfolio > Column Actions > Redistribute Portfolio item, or
right-click the column and choose Redistribute Portfolio Item.
3. The system sends the respective file to each student logged onto the
TI-Nspire™ Navigator™ network.
Renaming a Portfolio item
You can rename a column header.
1. Select the column you want to rename by double-clicking the
column header.
2. Click Portfolio > Column Actions > Rename Portfolio Column or
click the Rename Portfolio Column button.
TI-Navigator_Help_PRINT.book Page 61 Tuesday, January 26, 2010 10:29 AM

62 Using Portfolio
3. The system displays the Rename Portfolio Item dialog. Type the new
name, then press Rename to complete the rename operation.
4. The column appears in Portfolio with the new name.
Collecting missing files from students
There may be times when you store a set of student files to the Portfolio
and the collection is incomplete because not all students were present,
had the file ready for collection, or were not logged on.
1. Select an individual file, or click a file icon on the Column Actions
row to select all files in that column.
Note: You can send only one column of files at a time.
2. Select Collect Missing.
3. Missing files are collected from those students who are logged onto
the network and whose files were not initially collected.
Note: You can also collect missing files from the Class Record.
Sending missing files to students
There may be times when you send a set of student files to the students
and the send is incomplete because not all students were present, or
logged on, or a new student was added to the class.
1. Select an individual file, or click a file icon on the Column Actions
row to select all files in that column.
Note: You can send only one column of files at a time.
2. Select Send Missing.
3. Missing files are sent to those students who are logged onto the
network and who did not initially receive the files.
Note: You can also send missing files from the Class Record.
TI-Navigator_Help_PRINT.book Page 62 Tuesday, January 26, 2010 10:29 AM

Exchanging files with students 63
Exchanging files with students
The TI-Nspire™ Navigator™ classroom learning system lets you exchange
information with the students in your classes. From the TI-Nspire™
Navigator™ system, you can send files to your students and collect files
from your students, as well as delete files from your students’ handhelds.
Your students can send files to you and receive files from you. This
section covers the different ways to work with files in the TI-Nspire™
Navigator™ system, and includes both instructions for you to use and
instructions for you to give your students.
Sending files
You can send handheld-compatible files (such as .tns files) to your
students’ handhelds from your computer or your handheld. Choosing the
location that you want to send files from depends on the location of your
files and the number of choices you want about where you send the files.
If you choose to send the files from your handheld, then you send files to
your whole class. When you send files from your computer, you can:
• Send files to your whole class, or
• Send files to members of the class currently logged in, or
• Send files to individual students.
To send files from your computer
1. If you have not already done so, begin the class session.
2. Click Tools > Send to class or click Send to class .
The Select file(s) to send dialog box opens.
TI-Navigator_Help_PRINT.book Page 63 Tuesday, January 26, 2010 10:29 AM
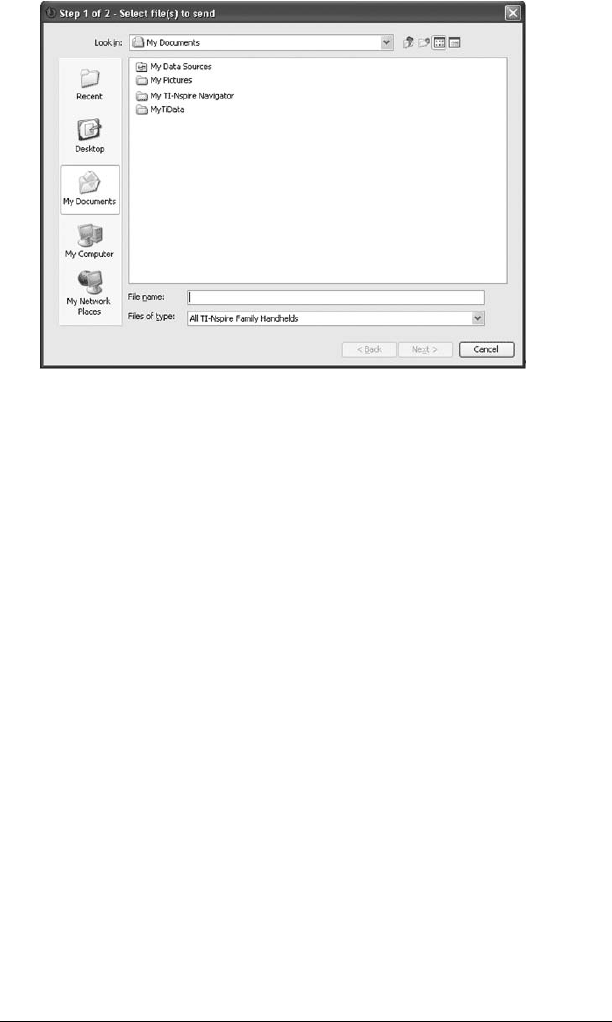
64 Exchanging files with students
3. Click the Folders button to choose folders, or click the Files button
to choose files.
Note: You can send only files or folders, not a combination of files
and folders.
4. To choose the files or folders you want to send, do one of the
following:
• Navigate to the file or folder you want to send and click it. To
select multiple files or folders, press and hold the Ctrl key while
clicking each file name.
• Type the name of the file or folder in the File name or Folder
name box. Folder names may use alphanumeric characters. You
can enter slashes ( / and \ ), but double slashes ( // and \\ ) and
some special characters (? | : * " " < > | ) are not allowed.
Note: You can also drag and drop files from a file browser window
onto the TI-Nspire™ Navigator™ window to send files.
5. Click Next.
The Select individual(s) dialog box opens.
TI-Navigator_Help_PRINT.book Page 64 Tuesday, January 26, 2010 10:29 AM
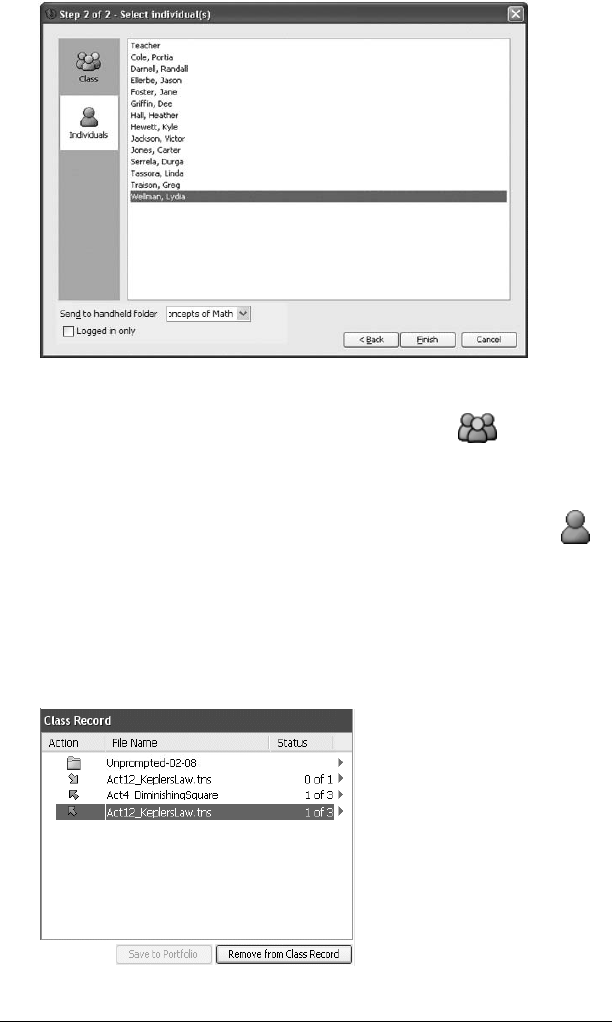
Exchanging files with students 65
6. Select the student(s) to whom you want to send the file:
• To send the file to the whole class, click Class . To send the
file only to class members who are currently logged in, check the
Logged in only checkbox.
• To send the file to an individual student, click Individuals
and then click the student.
Note: If you had any students selected in the Classroom tab, the
TI-Nspire™ Navigator™ software already has them selected.
7. Click Finish.
The file transfer appears in the Class Record.
TI-Navigator_Help_PRINT.book Page 65 Tuesday, January 26, 2010 10:29 AM

66 Exchanging files with students
Once students receive the file, they can open it on their handhelds.
To send files from your handheld
1. If you have not already done so, begin the class session.
2. On your handheld, log in to the TI-Nspire™ Navigator™ network.
3. From the TI-Nspire™ handheld, open the file you want to send to
the class.
Press ~ > 1:File > 6:Send.
The file sent from the teacher’s handheld appears in the Class
Record.
On the student’s handheld, the message Transfer Complete
displays.
The file transfer appears in the Class Record when you view the
TI-Nspire™ Navigator™ software on your computer.
After your students log in to the TI-Nspire™ Navigator™ network,
they can receive the file from their transfer screen. Once they receive
the file, they can open it on their handhelds.
Sending files (student instruction)
Your students may send files to you outside of a collection. Students can
send files to you unprompted at any time during a class session. Below
you can find instructions you can use to tell your students how to send
files during a collection and how to send files unprompted.
Student Point of View: The steps below are from the student’s
point of view.
TI-Navigator_Help_PRINT.book Page 66 Tuesday, January 26, 2010 10:29 AM

Exchanging files with students 67
To send files
1. If you have not already done so, log in to the TI-Nspire™ Navigator™
network.
2. Open the file on the handheld.
3. Press ~ > 1:File > 6:Send.
Collecting files
You can collect handheld-compatible files (such as .tns files) from your
students’ handhelds to your computer. You also have the option of
deleting the collected files from your students’ handhelds.
To collect files
1. If you have not already done so, begin the class session.
2. Click Tools > Collect from Class or click Collect from Class .
The Select file(s) to collect dialog box opens.
3. If you want a file already listed in the dialog box, navigate to the file
you want to collect and click it.
-or-
Right click on the sent file in the Class Record, and select Collect
Selected File(s).
-or-
If you want a custom file not in the dialog box:
TI-Navigator_Help_PRINT.book Page 67 Tuesday, January 26, 2010 10:29 AM
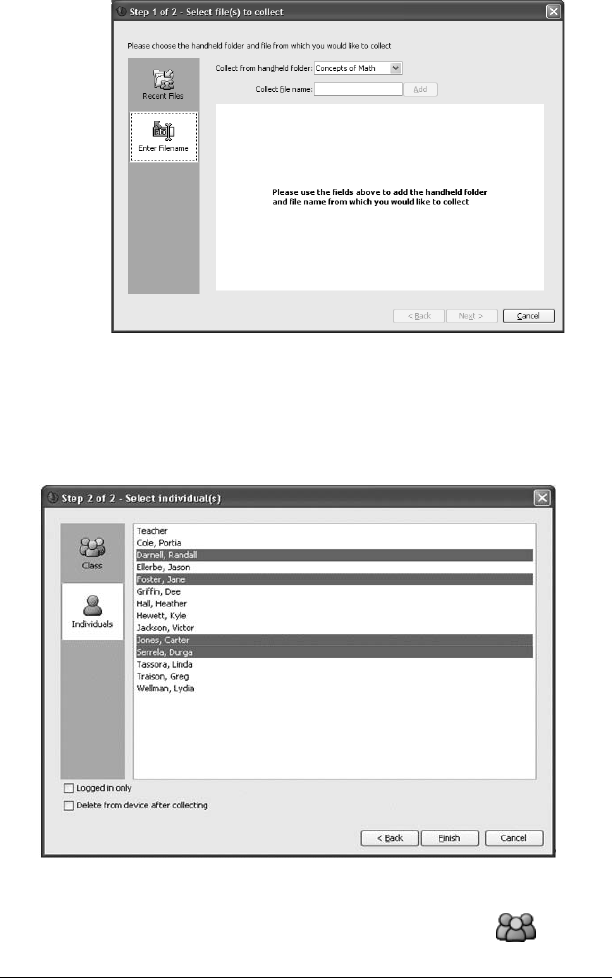
68 Exchanging files with students
a) Click Enter Filename.
The dialog box opens.
b) Enter the file name, such as homework.tns.
c) Click Add.
4. Click Next.
The Select individual(s) dialog box opens.
5. Select the student(s) from whom you want to collect the file:
• To collect the file from the whole class, click Class .
TI-Navigator_Help_PRINT.book Page 68 Tuesday, January 26, 2010 10:29 AM

Exchanging files with students 69
• To collect the file from an individual student, click Students
and then click the student.
Notes:
• To select a contiguous range of students in the list, press Shift +
click. To select multiple students, press Ctrl + click.
• If you had any students selected in the Classroom tab, the
TI-Nspire™ Navigator™ software already has them selected.
6. If you want to remove the file from the students’ handhelds after
you collect it, select Delete from device after collecting.
7. Click Finish.
The file transfer appears in the Class Record.
Note: You can correct the files or add notes and resend the files to
the students.
Managing Unprompted actions
When a student logged into a Class session sends you a file outside of a
collection, an Unprompted action is created.
These files, which are stored in a database, display in the Class Record
until they are removed. This section shows how to manipulate these files,
including:
•Viewing
• Saving to Portfolio
•Removing
•Exporting
TI-Navigator_Help_PRINT.book Page 69 Tuesday, January 26, 2010 10:29 AM

70 Exchanging files with students
Reviewing and opening Unprompted actions
Unprompted actions are named "Unprompted" followed by the month
and date. Each Class session contains all .tns files received from students
in one Unprompted folder.
The latest Unprompted action appears at the top of the Class Record for
the most recent files sent by a student during a Class session. During the
next Class session, more recent Unprompted actions appear in the Class
Record above the previous action.
To open the Unprompted action:
1. Double-click the action or right-click and choose Record Item
Properties.
The Unprompted dialog opens. By default, no items in the
Unprompted action are selected.
2. From the Unprompted dialog, you can view one or more items, save
the items to Portfolio, remove the items, export the items to another
file location, or do nothing.
Viewing items in an Unprompted action
1. From the Unprompted dialog, click on the checkbox to the left of the
item(s) you want to view.
Note: You can also click on the View icon beside an item to quickly
access the item.
2. Click View.
The items open as read-only files.
Adding items to a new Portfolio record
1. From the Class Record, double-click on the Unprompted action to
open it.
2. Select the items to add to the new Portfolio record.
3. Click Save to Portfolio.
The Save to Portfolio dialog opens.
Note: If you receive an error while saving, there are probably
multiple documents assigned to a single user. You will be returned to
the Unprompted dialog. Review the files on display, de-select the
duplicate file that you do not want to keep, and continue with the
save.
4. Type the name for the new portfolio column and click Save.
TI-Navigator_Help_PRINT.book Page 70 Tuesday, January 26, 2010 10:29 AM

Exchanging files with students 71
The items are saved to the Portfolio and you return to the
Unprompted dialog.
Note: The files you have saved in Portfolio display in the Class Record
until you remove them using the Remove command.
Adding items to an existing portfolio record
Note: Using this option replaces existing files, so be sure this is what you
want to do.
1. From the Class Record, double-click on the Unprompted action to
open it.
2. Select the items to add to the new Portfolio record.
3. Click Save to Portfolio.
The Save to Portfolio dialog opens.
Note: If you receive an error while saving, there are probably
multiple documents assigned to a single user. You will be returned to
the Unprompted dialog. Review the files on display, de-select the
duplicate file that you do not want to keep, and continue with the
save.
4. Click on Add to existing portfolio column.
5. Select the column name you want from the drop-down list.
6. Click Save.
Removing individual items from an Unprompted action
The Class Record displays items in Unprompted actions until you remove
the Unprompted action. Even if you have exported or saved items, its
Unprompted action continues to display until you remove it. To remove
items from an Unprompted action:
1. From the Class Record, double-click on the Unprompted action to
open it.
2. From the Unprompted dialog, click on the checkbox to the left of the
item(s) you want to remove.
3. Click Remove.
Removing an entire Unprompted action
You can remove an Unprompted action from the Class Record. This
removes all items contained within the Unprompted action, as well as
removing the Unprompted action from the Class record.
1. From the Class Record, click on the Unprompted action to highlight
it.
TI-Navigator_Help_PRINT.book Page 71 Tuesday, January 26, 2010 10:29 AM

72 Exchanging files with students
2. Click Remove from Class Record.
Exporting Unprompted action items
You can export items from the database to the file system. To export
items from an Unprompted action:
1. From the Class Record, double-click on the Unprompted action to
open it.
2. Select the files you want to export.
3. Click Export.
A file browser opens.
4. Select the location for the export.
5. Click Select Folder.
Deleting files from handhelds
When necessary, you can delete files from your students’ handhelds.
To delete files from handhelds
1. If you have not already done so, begin the class session.
2. Click Tools > Delete from class or click Delete from class .
The Select file(s) to delete dialog box opens.
3. If you want to delete a file already listed in the dialog box, navigate
to the file you want to delete and click it.
-or-
TI-Navigator_Help_PRINT.book Page 72 Tuesday, January 26, 2010 10:29 AM
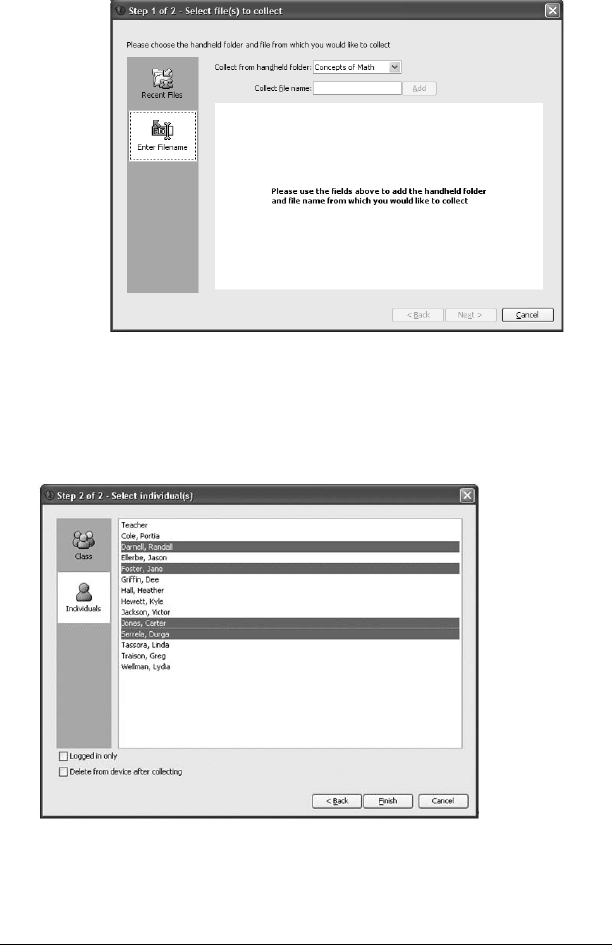
Exchanging files with students 73
If you want delete a custom file not in the dialog box:
a) Click Enter Filename.
The dialog box opens.
b) Enter the file name.
c) Click Add.
4. Click Next.
The Select individual(s) dialog box opens.
5. Select the student(s) whose files you want to delete:
TI-Navigator_Help_PRINT.book Page 73 Tuesday, January 26, 2010 10:29 AM
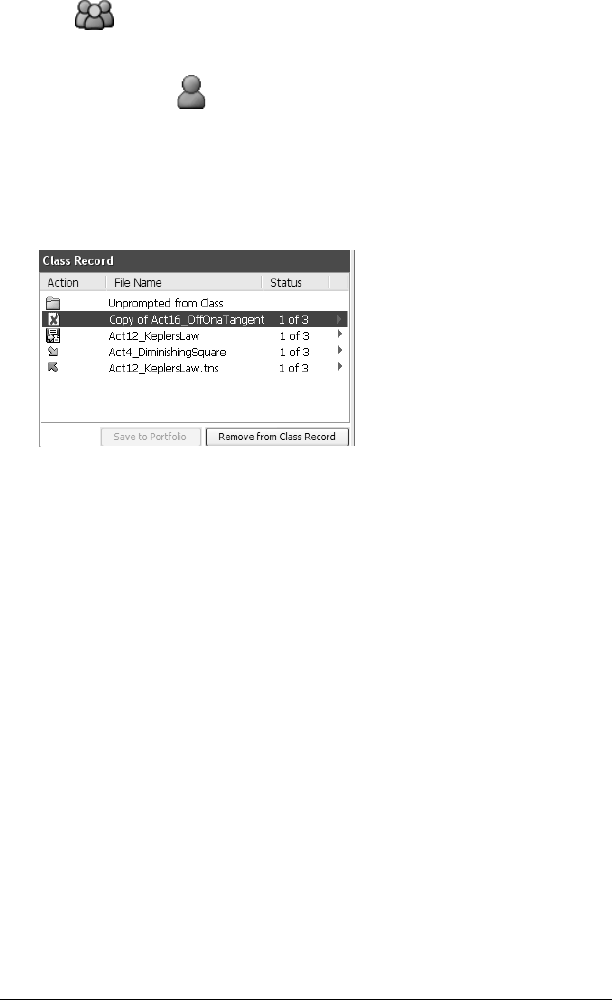
74 Exchanging files with students
• To delete the file from the whole class’s handhelds, click Class
.
• To delete the file from an individual student’s handheld, click
Individuals and then click the student.
Note: If you had any students selected in the Classroom tab, the
TI-Nspire™ Navigator™ software already has them selected.
6. Click Finish.
The file deletion appears in the Class Record.
Checking the status of file transfers
When you are sending or collecting files, you may want to check to see
which of your students have received or sent their files.
To check the status of file transfers
1. Click the Classroom tab.
The Classroom tab opens.
TI-Navigator_Help_PRINT.book Page 74 Tuesday, January 26, 2010 10:29 AM

Exchanging files with students 75
Note: The contents of the Classroom tab vary depending on the
selected class and view.
2. In the Class Record, click the file whose status you want to check.
The TI-Nspire™ Navigator™ software indicates the status of your
students as follows:
• A green background indicates that students have
sent/received the file.
• A yellow background indicates that a student received
the collect or delete action, but they do not have the file on
their handheld.
• A red background indicates that students have not yet
sent/received/deleted the file.
Note: You can also see the file transfer status in the file’s Properties
dialog box.
TI-Navigator_Help_PRINT.book Page 75 Tuesday, January 26, 2010 10:29 AM

76 Exchanging files with students
Canceling file transfers
If you change your mind about a file transfer, you can cancel the transfer
in the Class Record. Canceling file transfers stops the TI-Nspire™
Navigator™ classroom learning system from transferring more files. Any
files TI-Nspire™ Navigator™ transfers before you cancel remain on the
students’ handhelds.
To cancel file transfers
1. In the Class Record, click the file whose transfer you want to cancel.
2. Click Edit > Remove From Class Record or click Remove From Class
Record.
The TI-Nspire™ Navigator™ software asks if you’re sure you want to
remove the action.
3. Click Remove.
The TI-Nspire™ Navigator™ software stops the file transfer and
removes the file from the Class Record list.
Viewing file properties
Each file that you send or collect has a set of properties that you can
view. These properties include the file’s name, size, date sent, and status.
You can view the file properties at any time.
To view file properties in the TI-Nspire™ Navigator™
system
1. Select the class with the file in the Class Record.
Note: If you have a class session running, you must end it to select
the class.
2. Click the file.
3. Click Edit > Record Item Properties or right-click the file in Class
Record and select Record Item Properties.
The Properties dialog box opens displaying the file’s properties.
TI-Navigator_Help_PRINT.book Page 76 Tuesday, January 26, 2010 10:29 AM

Exchanging files with students 77
TI-Navigator_Help_PRINT.book Page 77 Tuesday, January 26, 2010 10:29 AM

78 Exchanging files with students
TI-Navigator_Help_PRINT.book Page 78 Tuesday, January 26, 2010 10:29 AM

Polling students 79
Polling students
The Quick Poll tool in the TI-Nspire™ Navigator™ system lets you “poll”
your students. A poll is a survey you send to your students that they
immediately receive on their calculators. After your students receive the
poll, they can then send their responses back to your computer. Once you
receive your students’ responses, you can use the Quick Poll tool to
review the responses by yourself or with your class. This section contains
information you need to know to use the Quick Poll tool in your class.
The Quick Poll tool window and tabs
The Quick Poll tool window contains several sets of controls and three
tabs that you can use to run and view polls in the TI-Nspire™ Navigator™
system. Below you can find the:
• Quick Poll tool window
• Poll Prompt tab
• Poll Summary tab
• Poll Details tab
The Quick Poll tool window
Ë
Ê
Ì
Í
Î
Ï
TI-Navigator_Help_PRINT.book Page 79 Tuesday, January 26, 2010 10:29 AM
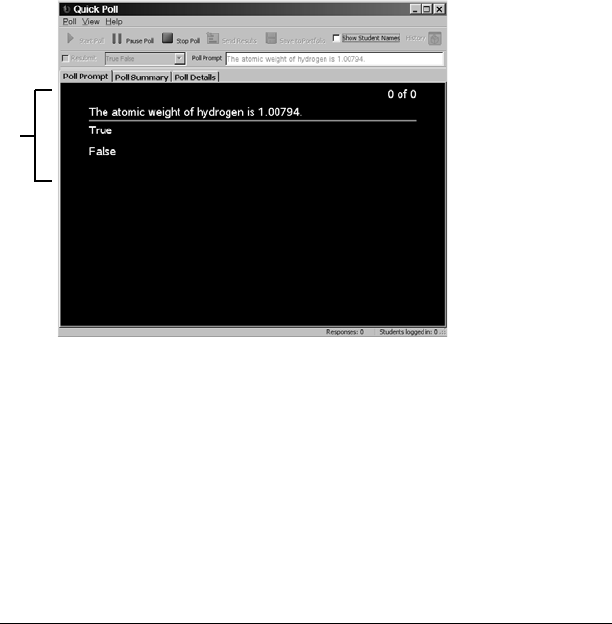
80 Polling students
Ê Poll controls. Controls that let you start, pause, and stop polls, as well
as send poll results to your students, update the poll results, and save
them in Portfolio.
Ë Poll set up bar. A set of options that let you create the questions and
polls you send to your students.
Ì Poll data tabs. Tabs that let you view poll results in either a list or a
graph.
Í Data controls. Controls that let you show/hide display names in Poll
Listing and view previous poll results.
Î Poll responses. Displays number of responses and number of students
logged in.
Ï Status bar. Displays number of responses and number of students
logged in.
Poll Prompt tab
Ê Active Poll. Displays question and possible answers for currently active
poll.
Ê
TI-Navigator_Help_PRINT.book Page 80 Tuesday, January 26, 2010 10:29 AM

Polling students 81
Poll Summary tab
Ê Graph. The graphical representation of the poll responses you receive
from your students.
Poll Details tab
Ê Display Name column. Column containing the display names for the
students who respond to the poll. By default, the Quick Poll tool hides
the display names.
Ë Response column. Column containing a list of the poll responses
received from your students.
Ê
ÊËÌ
TI-Navigator_Help_PRINT.book Page 81 Tuesday, January 26, 2010 10:29 AM
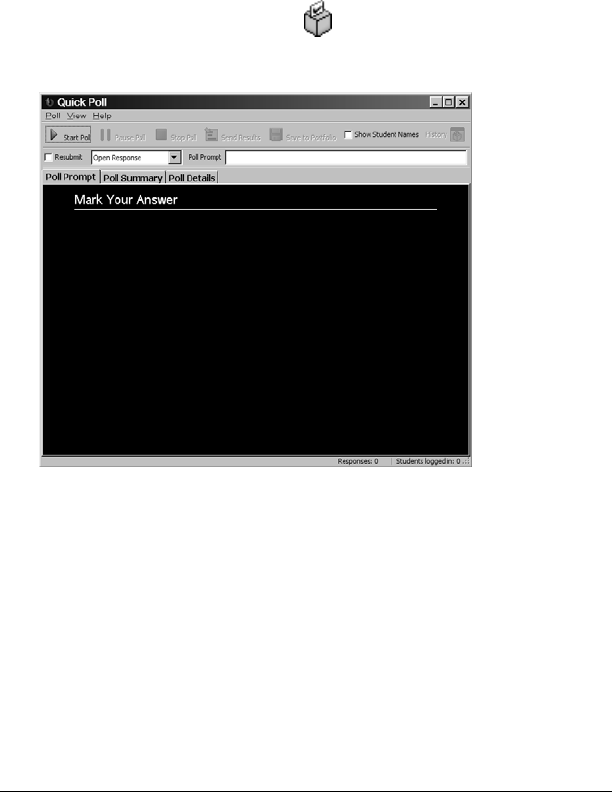
82 Polling students
Ì Time Stamp column. Column containing the dates and times that your
students sent their poll responses.
Opening the Quick Poll tool
You can open the Quick Poll tool from the home screen of the TI-Nspire™
Navigator™ system.
To open the Quick Poll tool
1. If you have not already done so, begin the class session.
2. Click Tools > Quick Poll or click Quick Poll.
The Quick Poll tool window opens.
Polling your students
The Quick Poll tool lets you poll your class from the TI-Nspire™
Navigator™ system. There are a variety of polling question types you can
send, including:
• Open Response
• Agree/Disagree
– Agree/Disagree (5)
– Agree/Disagree (3)
– Agree/Disagree (2)
TI-Navigator_Help_PRINT.book Page 82 Tuesday, January 26, 2010 10:29 AM

Polling students 83
•Yes/No
• True/False
• Right/Wrong
• Always/Sometimes/Never
• Multiple Choice
• Multiple choice: A-E, A-D, A-C, or A-B
You can poll your students from your computer. When you poll your
students from your computer, you can create the question to send to
your students.
To poll students from your computer
1. Select or clear the Resubmit check box.
2. Select a question type from the drop-down list.
3. Enter your question at the poll prompt.
4. Click Poll > Start Poll or click Start Poll.
Your students receive the poll on their calculators.
5. Instruct your students to respond to the poll.
Stopping polls
You can stop polls at any time. Once you stop a poll, you cannot restart it.
If you plan to continue the poll, you should pause the poll instead of
stopping it. Your students do not need to do anything on their
calculators to stop the poll.
To stop polls sent from your computer
fClick Poll > Stop Poll or click Stop Poll.
Pausing polls
If you want to temporarily keep students from responding to a poll, you
can pause the poll. While you have the poll paused, your students cannot
perform any polling actions on their calculators.
To p a use p o l ls
fClick Poll > Pause Poll or click Pause Poll.
TI-Navigator_Help_PRINT.book Page 83 Tuesday, January 26, 2010 10:29 AM

84 Polling students
Resuming paused polls
After you pause a poll, you can resume the poll again at any time.
To resume paused polls
fClick Poll > Resume Poll or click Resume Poll.
Responding to polls (student instruction)
The poll you send to your students interrupts whatever your students are
doing. When they receive the poll, they can choose to respond to it or
they can exit the poll and resume what they were doing before. You can
use this section to instruct your students on how to respond to the polls
you send them, including both multiple choice and open response polls.
Note: Multiple choice refers to Agree/Disagree, Yes/No, True/False,
Right/Wrong, and Always/Sometimes/Never questions as well as standard
multiple choice questions.
Student Point of View: The following instructions are from the
student’s point of view.
To respond to multiple choice polls
1. If the poll says “Mark your answer,” wait for your teacher to ask you
the poll question.
2. Use your calculator’s up and down arrow keys or the tab key to
navigate to your response.
3. Press the tab key to select Send and then press xor · to send
your answer to the teacher.
Your calculator sends your poll response to your teacher and returns
you to the last screen you used. Your poll response appears on your
teacher’s computer in the Quick Poll tool window.
Note: The contents of the Quick Poll tool window vary depending on
the tab your teacher has selected and the poll responses your teacher
has received from your classmates.
To respond to open choice polls
1. If the poll says “Mark your answer,” wait for your teacher to ask you
the poll question.
2. Press the tab key to move the cursor to the answer box, and type
your response.
TI-Navigator_Help_PRINT.book Page 84 Tuesday, January 26, 2010 10:29 AM
Polling students 85
3. Press the tab key to select Send and then press the enter key or the
click button x to send your answer to the teacher.
Your calculator sends your poll response to your teacher and returns
you to the last screen you used. Your poll response appears on your
teacher’s computer in the Quick Poll tool window.
Note: The contents of the Quick Poll tool window vary depending on
the tab your teacher has selected and the poll responses your teacher
has received from your classmates.
Sending poll results to students
After you receive the results of your poll from your students, you may
want to discuss the results with your class. You can send the poll results to
your class to help with your discussion.
Note: You cannot send open response poll results.
To send poll results to students
1. If a poll is in process, stop the poll.
2. Click Poll > Send Results or click Send Results.
Saving polls
1. If a poll is in progress, stop the poll.
2. Click Poll > Save to Portfolio or click Save to Portfolio.
Note: After the first save, subsequent changes to the poll can be
updated in Portfolio by clicking Poll > Update Portfolio. All of the quick
polls you conduct and update in Portfolio in a class session will update
the score as one assessment.
Viewing poll results
After your students send their poll responses to you, you can view their
results as a histogram or in a table. In the Quick Poll tool window, you
can view poll results graphically in a bar chart or listed in a table.
TI-Navigator_Help_PRINT.book Page 85 Tuesday, January 26, 2010 10:29 AM
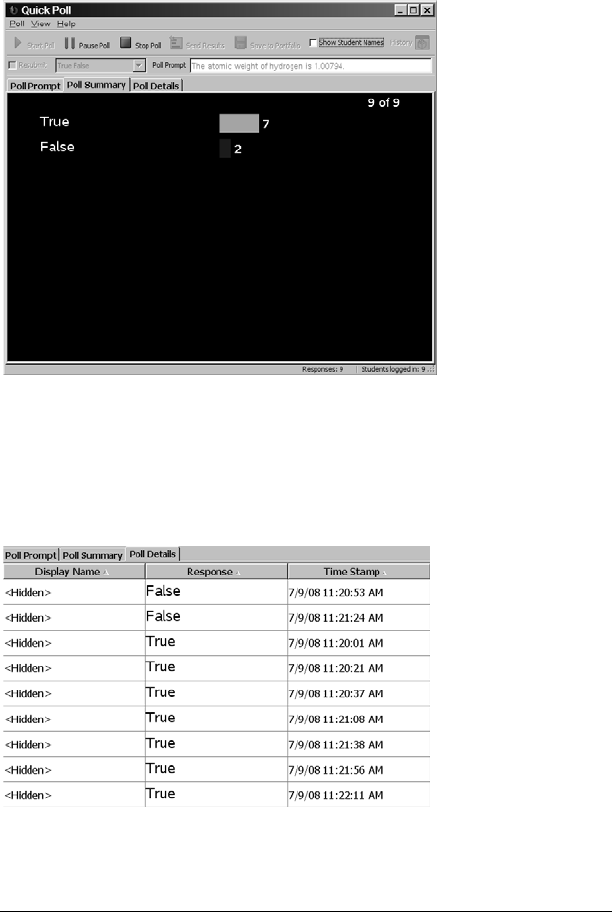
86 Polling students
To view poll results graphically
Click View > Poll Summary or click the Poll Summary tab.
The Poll Summary tab opens displaying the poll results as a histogram.
To view poll results in a table
Click View > Poll Details or click the Poll Details tab.
The Poll Details tab opens displaying the poll results listed in a
table.
TI-Navigator_Help_PRINT.book Page 86 Tuesday, January 26, 2010 10:29 AM
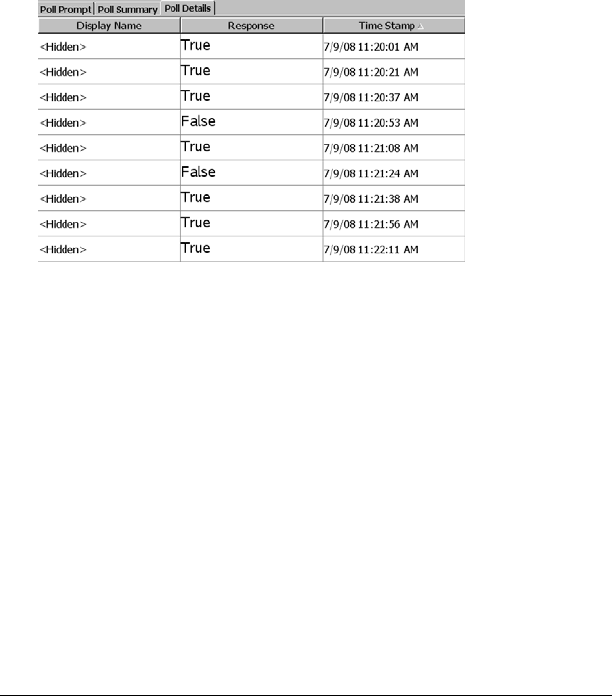
Polling students 87
Sorting poll data
The poll data that the Quick Poll tool collects includes the students’
display names, poll responses, and time of submission. You can sort the
poll data by each of these categories.
To sort poll data
1. Click View > Poll Details or click the Poll Details tab.
The Poll Details tab opens.
2. Click the column title of the information you want to sort.
The Quick Poll tool sorts the information in the selected column.
Note: The example below shows the poll details sorted by Time
Stamp.
3. If you want to sort the information in the opposite order, click the
column title again.
Showing and hiding display names
The Poll Details tab gives you the option of showing or hiding the display
names of the students who respond to the poll.
Notes: By default, the Quick Poll tool hides the display names.
To show or hide display names
fSelect or clear the Show Student Names check box.
If you selected the Show Student Names check box, the
students’ names appear in the Display Name column.
If you cleared the Show Student Names check box, the word
TI-Navigator_Help_PRINT.book Page 87 Tuesday, January 26, 2010 10:29 AM

88 Polling students
“Hidden” replaces the students’ names in the Display Name
column.
Viewing previous polls
The Quick Poll tool stores all of the polls for the current class session in its
history. You can open and view these polls as necessary until you end the
class session.
To view previous polls
1. If a poll is in process, stop the poll.
2. Click History.
A drop-down list of previous polls opens.
3. Click the poll you want to view.
The selected poll opens in the Quick Poll tool’s window.
Closing the Quick Poll tool
You can close the Quick Poll tool from your computer.
To close the Quick Poll tool on your computer
fClick Poll > Close.
TI-Navigator_Help_PRINT.book Page 88 Tuesday, January 26, 2010 10:29 AM
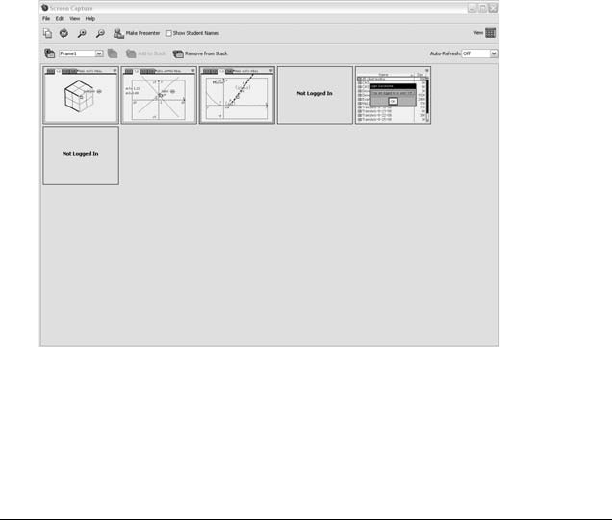
Capturing handheld screens 89
Capturing handheld screens
The Screen Capture tool in the TI-Nspire™ Navigator™ classroom
learning system enables you to do the following:
• monitor and view your students’ handheld screens. This enables you
to ensure all students are on track with an assignment.
• capture one or several students’ screens for discussion in the
classroom. You can hide student names to focus the discussion on
teaching aims and not on individuals.
• select and display an individual student’s screen and view work as a
live presentation.
This section contains the information you need to know to use the Screen
Capture tool in your classroom.
Views in the Screen Capture tool
There are three ways to view captured screens in the Screen Capture tool:
• Tiled - This view shows all captured screens as thumbnails on the
computer display. This is the traditional view for screen captures
within TI-Nspire™ Navigator™ software.
• Gallery - This view shows tiles of all captured screens down the left
side of the display. When you select one screen, it is enlarged and
TI-Navigator_Help_PRINT.book Page 89 Tuesday, January 26, 2010 10:29 AM

90 Capturing handheld screens
displayed on the right side of the display so you can view it in
greater detail.
• Live Presenter - This feature enables the student or teacher to project
what they are doing on their handheld.
More details about Gallery and Live Presenter views are provided later in
this chapter.
Capturing handheld screens
In the TI-Nspire™ Navigator™ classroom learning system, you can use the
Screen Capture tool to capture and view your students’ handheld
screens. You can capture the handheld screen of one student, of selected
students, or of all the students in your class.
Notes: In order for you to capture your students’ handheld screens, they
must be logged onto the TI-Nspire™ Navigator™ software.
To capture handheld screens
1. If you have not already done so, begin the class session and ask your
students to log in.
2. Click Tools > Screen Capture or click Screen Capture from the
Tools tab.
The Select Students dialog box opens.
TI-Navigator_Help_PRINT.book Page 90 Tuesday, January 26, 2010 10:29 AM

Capturing handheld screens 91
Note: If you selected one or more students in the Classroom tab
before you started the Screen Capture tool, TI-Nspire™ Navigator™
software has these students pre-selected in the Select Students
dialog box.
3. Select the students whose handheld screens you want to capture:
• To capture all of your students’ handheld screens, click Class
.
• To capture the handheld screens of individual students, click
Individuals and then click the name of each student from
whom you want to capture a screen.
Note: To collect screens from only those students currently logged
in, click the Logged in only check box under the left pane. If you
refresh your screen, any students who log in after the initial
collection will be listed at the end of the screen capture window.
4. Click OK.
TI-Navigator_Help_PRINT.book Page 91 Tuesday, January 26, 2010 10:29 AM

92 Capturing handheld screens
The TI-Nspire™ Navigator™ software captures the selected students’
screens and displays them in the Screen Capture tool window.
Note: The example below shows the screens from three selected
students’ handhelds.
5. Decide if you want to display or hide the students’ names. The
default is to hide student names, but you can change this. To do this,
click View > Show Student Names or click the checkbox on the
toolbar.
Note: Each time you initiate a screen capture, the default will reset
to hide student names. You need to change this option each time if
you want to display names.
You can log in and capture your own handheld screen along with the
students. You can also select to make your screen stand out on the
display by going to the Teacher Preferences screen from the main
TI-Nspire™ Navigator™ window, and selecting "Individualize Teacher
Device in Screen Capture."
TI-Navigator_Help_PRINT.book Page 92 Tuesday, January 26, 2010 10:29 AM

Capturing handheld screens 93
Viewing captured screens
Once you have captured screens, you can rearrange their order and zoom
the view.
To rearrange captured screens
1. Click to select the desired screen.
2. Holding the left mouse button down, drag the screen to the desired
location and release.
To zoom the view of captured screens
fClick to see a larger view of the screens, or to make
the view smaller.
These commands are also available from the View menu or by using
keyboard shortcuts, Ctrl + # (zoom in) and Ctrl + $ (zoom out).
To resize captured screens
Select the View menu and select a magnification level. The default zoom
level is 50% of the screen size.
In Tiled view, you can enlarge or shrink the entire view of all captured
screens by a specified percentage. These are shown in a grid formation,
and if the size of the tiles increases, then the screens wrap on the display
so that all are completely displayed. To see all enlarged captured screens,
scroll down the page.
Saving captured screens
You can save the individual screens you capture from your students onto
your computer.
To save one screen
1. Click the screen you want to save.
2. Click File > Save Selected Screen(s).
The Save dialog box opens.
TI-Navigator_Help_PRINT.book Page 93 Tuesday, January 26, 2010 10:29 AM

94 Capturing handheld screens
3. Navigate to the location where you want to save the captured
screen.
4. Enter a file name.
5. Click Save.
The TI-Nspire™ Navigator™ software saves the image as a Portable
Network Graphics file (.png).
To save multiple screens
1. Select the screens you want to save.
To select more than one screen, Press Ctrl and click on each screen
you want to save.
2. Click File > Save Selected Screen(s).
3. Select the location to save the screens.
4. Click Save.
Note: The keyboard shortcut, Ctrl + S, can be used as a shortcut for
saving screen captures.
Refreshing captured screens
After you capture screens from your students, you can refresh them in
the Screen Capture tool’s window. When you refresh screens, the Screen
Capture tool captures the latest screens from your students’ handhelds.
To refresh captured screens
fClick .
TI-Navigator_Help_PRINT.book Page 94 Tuesday, January 26, 2010 10:29 AM

Capturing handheld screens 95
The Screen Capture tool captures the latest screens from the selected
students’ handhelds.
Note: If the Screen Capture tool cannot refresh the screen of a
student, a yellow box appears around the student’s previously
captured screen.
To refresh one or more selected student screens
There may be times when it is useful to refresh the screen captures of
only one or a few students in a class. To do this:
1. From the Tiled view display of a class’ screens, click to select the
student(s) for whom you want to obtain a new screen capture.
2. Click . A new screen is captured for each student selected.
To enable the auto-refresh screen capture feature
This feature is useful in monitoring a class’ performance. When the
TI-Nspire™ Navigator™ Screen Capture tool is initially launched, auto-
refresh is Off by default. To enable the feature:
1. Click View > Auto Refresh or click the Auto-Refresh dropdown box
on the toolbar.
2. Select one of the available time interval options.
TI-Navigator_Help_PRINT.book Page 95 Tuesday, January 26, 2010 10:29 AM
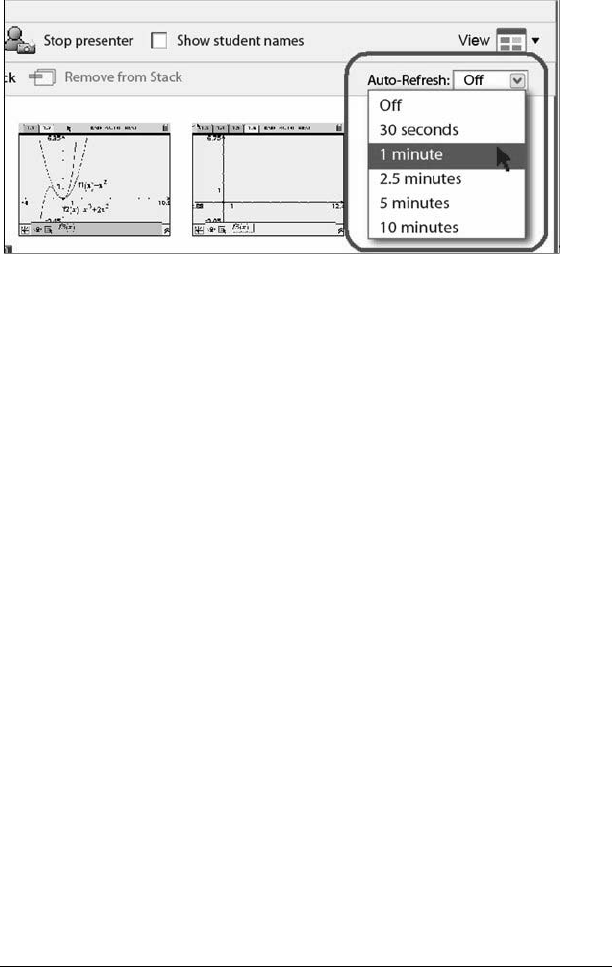
96 Capturing handheld screens
Note: Auto-refresh is available when using either the Tiled or Gallery
view. It is not available for Presentation mode.
Using the Gallery View
Do one of the following to switch to the Screen Capture tool’s Gallery
View.
• Click View > Gallery or
• Click the View icon drop down menu and select Gallery.
The thumbnail images of captured screens are displayed in a column in
the left pane of this view. They appear in the same order as in the Tile
View. When you select a screen to view in detail, it is displayed in the
right pane. If you select multiple thumbnails to view in the left pane,
they are displayed in the right pane. If you select more than four
thumbnails, you view the additional screens by scrolling down the right
pane.
Tips and Hints for using the Gallery View:
If you elected to show student names, these are centered under each
student’s captured screen.
Zoom functions are disabled in Gallery View.
You can reorder screens in the Gallery View.
The width of the thumbnail pane cannot be changed.
TI-Navigator_Help_PRINT.book Page 96 Tuesday, January 26, 2010 10:29 AM
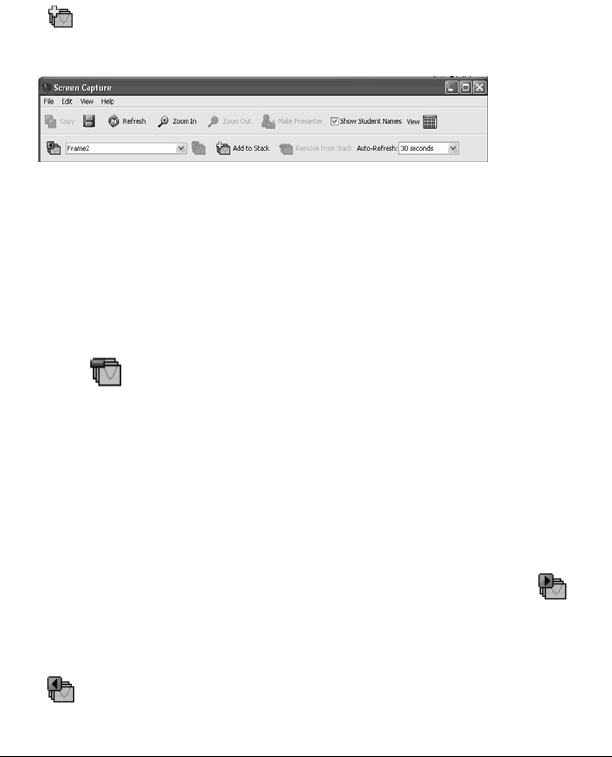
Capturing handheld screens 97
Creating stacks of student screens
This feature of the Screen Capture tool enables you to collect a history of
one or more students’ screen captures. These collections are called stacks,
and you can add or remove screens from each student’s stack as well as
navigate within and through student stacks. Using stacks is a convenient
way to check progress in a lesson, collect student presentations or
assignments for review and grading later, or for showing performance
and progress in parent/teacher meetings.
To add screens to a stack
fClick View > Stacks > Add to Stack, click the toolbar icon
( ), or open the Context menu and select Stacks > Add to
Stack.
Tips for creating/adding to stacks:
• When the first set of screens are added to a new stack, they are
labeled Frame1. Each subsequent addition increases the number by
one; e.g., Frame2, Frame3, etc.
To remove a frame from a stack
fClick View > Stacks > Remove from Stack, click the toolbar
icon ( ), or open the Context menu and select Stacks >
Remove from Stack.
As frames are removed from a stack, their frame names are adjusted to
remain sequential and reflect the deletion. For example, if Frame6 is
deleted, Frame7 is renamed to Frame6 and all subsequent frame
numbers are adjusted downward by one digit.
To navigate through stacks
fView > Stacks > Next Frame, click the toolbar icon ( ), or
open the Context menu and select Stacks > Next Frame.
fView > Stacks > Previous Frame, click the toolbar icon
( ), or open the Context menu and select Stacks >
Previous Frame.
TI-Navigator_Help_PRINT.book Page 97 Tuesday, January 26, 2010 10:29 AM

98 Capturing handheld screens
Note: These options are available only if there is a next or previous frame
to view.
You can navigate a stack of frames from either the tiled or gallery view.
Using the Compare Student Screens feature
This feature enables you to compare two students’ screens in one step. It
uses the Gallery view to show the screen comparison, but you can access
this feature from the Tiled view. In both views, you select student screen
tiles to compare.
To start a comparison
1. Select student screen tiles to compare. When you select each screen,
the border changes color.
Note: If you select more than four screens, you will have to scroll the
viewing pane to see them.
2. Click View > Gallery. The view changes to Gallery view and enlarges
the screens to fit the pane.
You can select to see student names or hide them.
To end a comparison
Click on any student screen tile to stop the comparison feature. When
you end a comparison, the selected student screen retains the
highlighted border.
Randomizing screens
If you use a digital projector to show screen captures to your class and
you do not show student names, then over time, your students may be
able to identify their screen as well as other students’ screens. This
feature is checked by default. Randomizing screens scrambles the order
of screen captures.
To select or deselect Randomize Screen Capture
1. Open Teacher Preferences in the main TI-Navigator™ window.
2. Click the Randomize order in Screen Capture box.
If you select not to randomize captures, then student screens are
captured and displayed in alphabetical order by Display Name.
Refreshing the screens does not change the order. Changing this setting
applies to all your classes. It is not possible to specify a different setting
for different classes.
TI-Navigator_Help_PRINT.book Page 98 Tuesday, January 26, 2010 10:29 AM
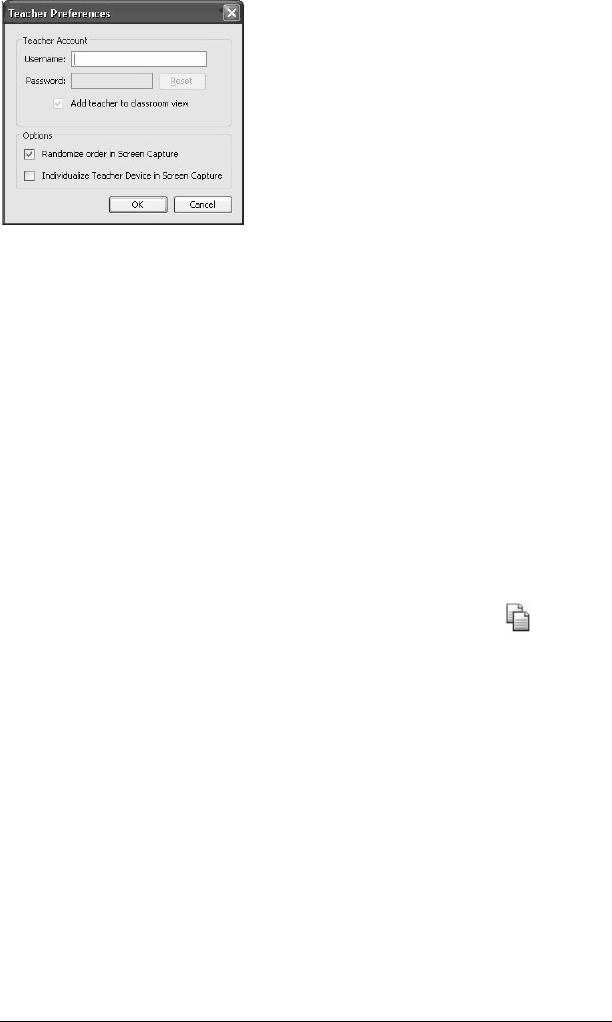
Capturing handheld screens 99
Copying and pasting a screen
You can select a captured screen and copy it to the clipboard for inclusion
into other documents or applications. You can also print copied screens.
Copied screens are captured at 100% zoom level, and they are copied in
the order of selection.
The applications that can receive copied screens are:
• Microsoft Word®
• Microsoft PowerPoint®
• Microsoft Excel®
To copy a screen
1. Select the screen to copy.
2. Click Edit > Copy Selected Screen, click the Copy icon , or press
Ctrl + C.
To paste a screen
fDepending on the application you are pasting to, click Edit >
Paste, or press Ctrl + V.
Note: You can also drag a screen capture to another application. This
functions as a copy and paste.
Printing screens
You can print one, multiple or all class screen captures. For each printed
page, the class name is printed in the page header, and the date and
page number is printed in the page footer.
TI-Navigator_Help_PRINT.book Page 99 Tuesday, January 26, 2010 10:29 AM
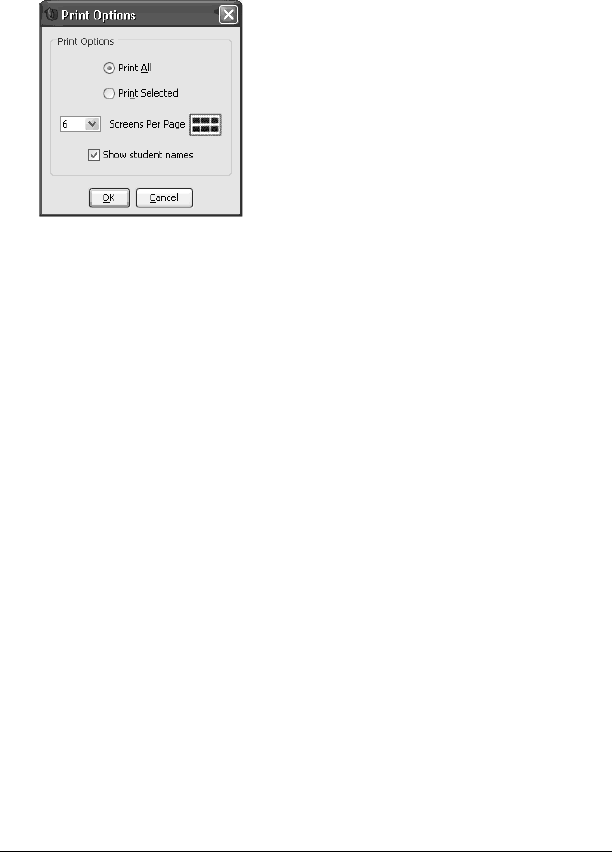
100 Capturing handheld screens
To p r int s c re en ca p tures
1. Select the screen captures that you want to print.
2. Click File > Print.
3. If you select more than one screen, then select the number of screen
captures that you want per page. You can select one screen per
page, six screens per page, or all screens on the page.
4. Select the individual printer options for your printer.
5. Select the number of copies you want printed.
6. Select if you do or do not want the students’ names to be printed
under their screens.
7. Click Print to begin printing.
Using Live Presenter
You can display your own handheld screen, or you can select any
student’s handheld screen, to display work as it is being performed and
discuss the step-by-step progress with the class. While the live
presentation is displayed, you can record key strokes, show the
TI-Nspire™ Navigator™ handheld being displayed, and show a key press
history.
Your computer starts and stops the Live Presenter session. You also
control what appears on the presentation screen: student’s name,
handheld display, key press history display, and movie record mode.
While Live Presenter is active, all other students’ handhelds are
unaffected by the presentation and can be used.
Note: During a Live Presentation, all menu and corresponding
toolbar/context menu options are disabled except the items listed:
TI-Navigator_Help_PRINT.book Page 100 Tuesday, January 26, 2010 10:29 AM

Capturing handheld screens 101
File > Close
Edit > Copy Selected Screen(s)
View > Show Student Names
View > Live Presenter
Stop Presenter
Help.
To start Live Presenter using a student screen
Make sure the student who you select to be the live presenter is logged
in to an active session.
1. Select the student’s screen.
• Click the student screen capture from either a tiled or gallery
view, or
• select the student from the Context menu and choose Live
Presenter.
Note: If the students’ names are displayed in tiled or gallery
view, the name is also displayed in live presenter mode.
2. Click View > Live Presenter > Make Presenter, or click the Make
Presenter icon .
The selected screen displays as a Live Presenter screen.
Although only one student can present at a time, you can select any
student to present as long as the student is logged in and the session is
active.
To start Live Presenter using the teacher’s handheld
There may be times when you want to use your own handheld in Live
Presenter mode. This is very effective in demonstrations using a digital
projector.
1. Log in your handheld.
2. Select the handheld labeled Teacher.
3. Click View > Live Presenter > Make Presenter, or click the Make
Presenter icon .
The Live Presenter display
The default display for Live Presenter shows only the selected screen. If
student names are displayed, the name is shown under the screen.
TI-Navigator_Help_PRINT.book Page 101 Tuesday, January 26, 2010 10:29 AM
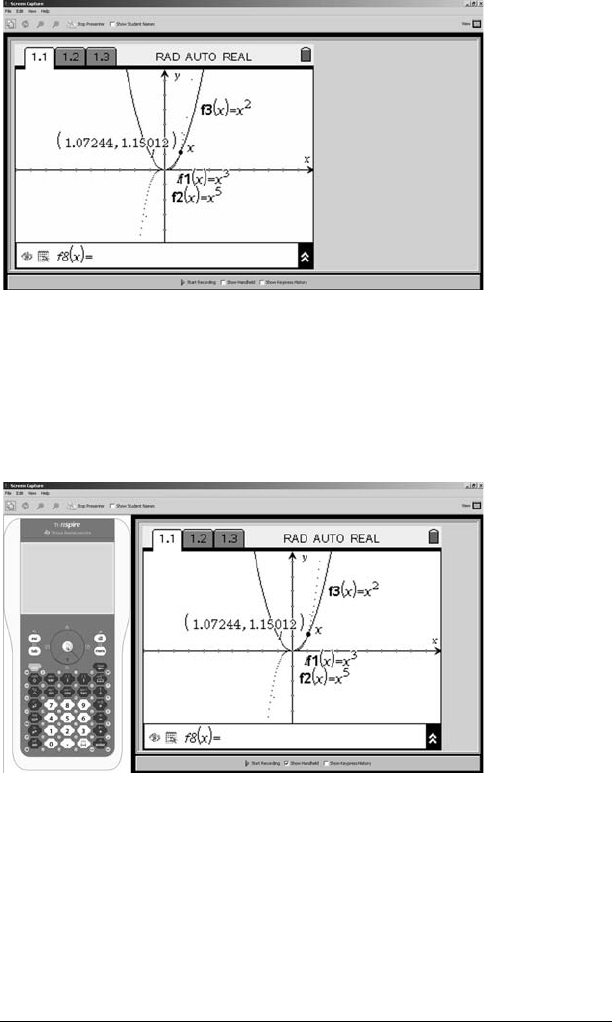
102 Capturing handheld screens
The Show Handheld and Show Key press History options are available
from the bar under the display.
To add the handheld to the display
Click the check box to select Show Handheld. The screen is split to display
the handheld to the left of the presentation screen. The control bar
shows that Show Handheld is active.
The handheld display enables the class to see what keys are pressed
during the presentation. The last key pressed remains highlighted until a
different key is pressed.
Note: The keys on the handheld display are not pressable (or clickable).
This visual display only shows what the live presenter presses on their
handheld.
TI-Navigator_Help_PRINT.book Page 102 Tuesday, January 26, 2010 10:29 AM

Capturing handheld screens 103
To add the key press history to the display
Click the check box to select Show Keypress History. If you start from the
default display, the screen is split to display the history to the left of the
presentation screen. The control bar shows that Show Keypress History is
active.
As keys are pressed during the live presentation, they appear in the
history area of the display. The order of key press addition is from left-to-
right, then top-to-bottom.
If the presenter presses the same key more than once, each repeated key
press is shown in the history. If the presenter presses and holds one key
(as when moving the cursor), then the key is recorded in the history only
one time.
You can copy the key press history onto the clipboard and then paste it
into another document. You can also clear the key press history.
(Students are not able to do this.)
To add handheld and keypress history
Click both check boxes on the bar under the display. The screen is split to
display the handheld to the left of the presentation screen. The keypress
history displays under the screen.
TI-Navigator_Help_PRINT.book Page 103 Tuesday, January 26, 2010 10:29 AM
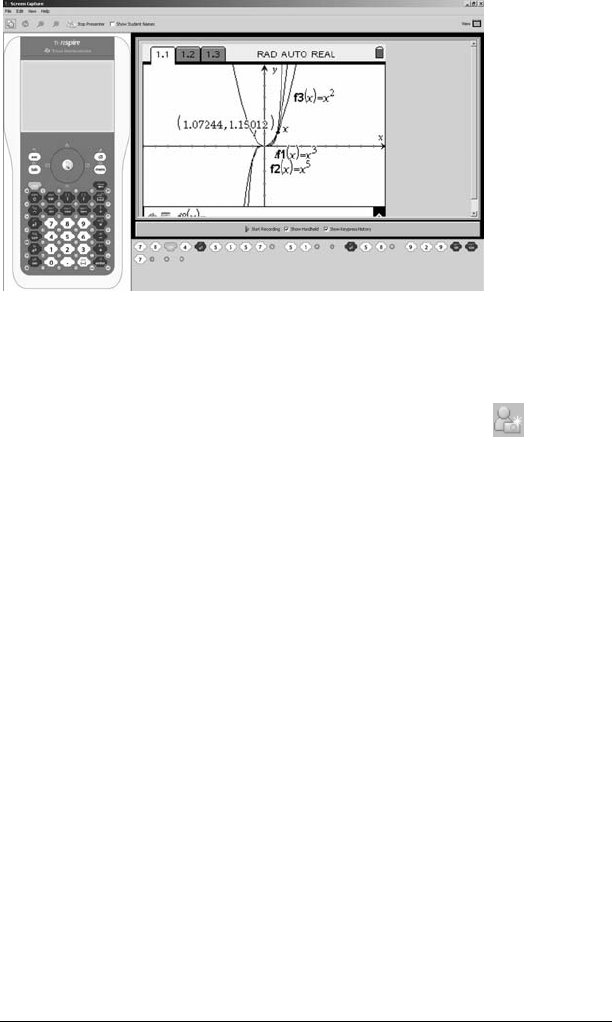
104 Capturing handheld screens
During lengthy live presentation sessions, the keypress history may
expand beyond the display area. When this happens, a scroll bar appears
so you can review all key presses during the session.
To stop Live Presentation
To stop the live presentation, click the Stop Presenter icon , or click
View > Live Presenter > Stop Presenter. The presentation window
closes, and the view you selected Live Presentation from is redisplayed.
For example, if the tile view was active, your computer display returns to
that tile view.
To save a Live Presentation as a movie
You can save a live presentation as a movie. This can be your own
presentation or a student’s presentation. Movies are a useful way to
present demonstrations to a class or provide additional tutoring lessons
for difficult concepts. Live Presentation files are stored with the .avi file
extension.
You control the movie creation (start and stop) from your computer.
Deciding to save a live presentation has no impact on the actual
presentation.
fTo begin the movie, click View > Live Presenter > Start
Recording or click the Start recording button on the
control bar under the live presentation screen.
fTo end the movie, click View > Live Presenter > Stop
Recording or click the Stop recording button on the control
bar under the live presentation screen.
TI-Navigator_Help_PRINT.book Page 104 Tuesday, January 26, 2010 10:29 AM
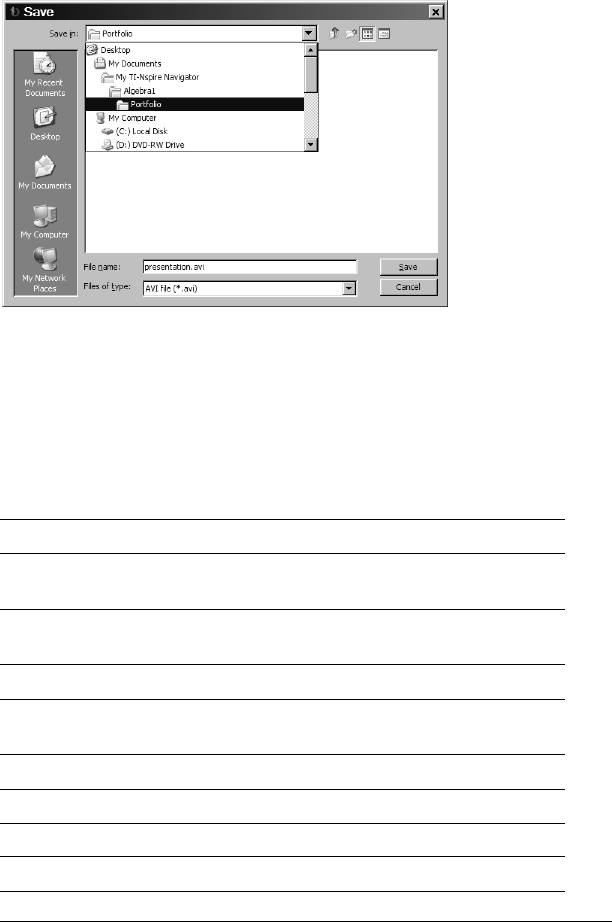
Capturing handheld screens 105
When you stop recording, the software prompts you to save the movie.
The default name for the movie is "presentation" and the default save
location is the student porfolio location for the class that is active. You
can change both the movie file name and the storage location.
• To change the file name, type a new name over the default name.
• To change the storage location, type a new location including the
drive designation.
Keyboard Shortcuts for Screen Capture
The following table shows the keyboard shortcuts available when using
the Screen Capture tool.
Menu Option Shortcut Comment
File Save Selected
Screen(s) Ctrl + S Saves to your computer
Print Ctrl + P Sends class snapshot to
default printer
Close Ctrl + W
Edit Copy Ctrl + C One or more screens
must be selected
Select All Ctrl + A
View Tiled Ctrl +T
Gallery Ctrl + G
Refresh now F5
TI-Navigator_Help_PRINT.book Page 105 Tuesday, January 26, 2010 10:29 AM

106 Capturing handheld screens
Zoom In Ctrl + #
Zoom Out Ctrl + $
Help Screen Capture
Help F1
TI-Navigator_Help_PRINT.book Page 106 Tuesday, January 26, 2010 10:29 AM

The Class Analysis Tool 107
The Class Analysis Tool
The TI-Nspire™ Navigator™ Class Analysis tool enables you to:
• Review and analyze student answers for a selected TI-Nspire™
assignment. With TI-Nspire™ Navigator™ network, you collect the
answers electronically from the whole class.
• View a class summary, a student-by-student analysis, or an item-by-
item analysis. These views are available from tab selections in Class
Analysis.
• Include grades from open response questions in the analysis, and
give partial credit or extra credit for answers of any question type.
• Share the analysis with the class, using the slide show feature.
Opening Class Analysis
There are different ways to open Class Analysis:
• Open a collected assignment from the Class Record (except those
collected using the Custom Files option)
• Open an analysis from Portfolio
To open from the Class Record
1. Locate the collected assignment to analyze.
Note: You can not open a file if you collected it using the Custom
Files option.
2. Right click on the assignment name, and select Open in Class
Analysis.
3. The selected assignment is opened in the Class Analysis window.
Class Analysis reads and grades each student’s response using a
master for the assignment, then displays the results.
TI-Navigator_Help_PRINT.book Page 107 Tuesday, January 26, 2010 10:29 AM
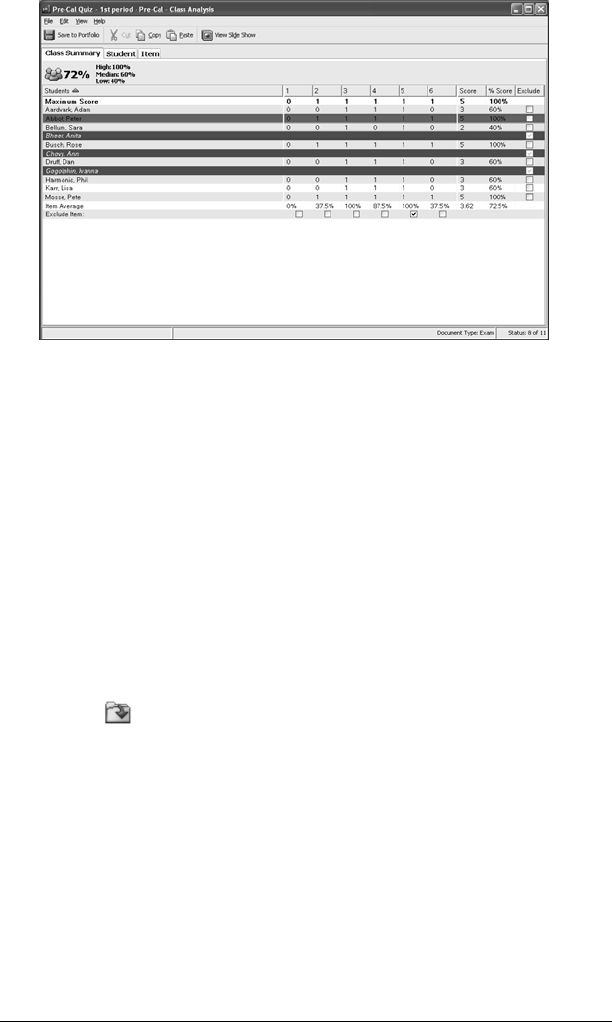
108 The Class Analysis Tool
In order to perform the assessment, you must have sent the files to the
students, and then the collected files can be analyzed. For Open
Response question types, Class Analysis enables you to electronically
evaluate and grade the response. The revised grade is automatically
stored, and all grade calculations are updated to reflect the change.
Note: If there are no question pages in the assignment, Class Analysis
will not open. If there are any question pages without answers provided
in the master file, Class Analysis opens the assignment, but cannot grade
those questions. You will need to manually grade those questions.
To open from Portfolio
1. Locate the assessment to open.
2. Double click the Class Average cell, or highlight the Class Average
cell for the assessment and click the Open Portfolio Item(s)
button .
Note: There must be a score in the cell for the assessment to open.
3. The selected assessment is opened in the Class Analysis window.
To select a collected assignment and send to Portfolio with
automatic grading
This option is a "silent" analysis of results. The assignments are sent
directly to Portfolio and automatically evaluated in the background. If
the assignment has questions, a score displays in Portfolio. If the
assignment does not have questions, an icon displays in Portfolio. The
analysis resides in Portfolio until you open it for review.
TI-Navigator_Help_PRINT.book Page 108 Tuesday, January 26, 2010 10:29 AM
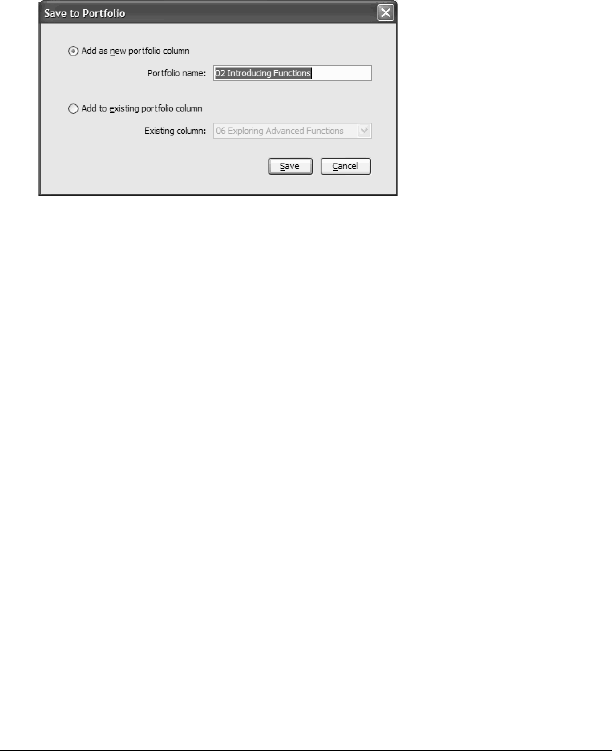
The Class Analysis Tool 109
1. To send a collected assignment to Portfolio with automatic grading,
do one of the following:
• From the Class Record, right click on the collected assignment
and select Save to Portfolio.
• Highlight the collected assignment and click the Save to
Portfolio button.
• Highlight the collected assignment and click Edit > Save to
Portfolio.
2. The Save to Portfolio dialog displays. You can save the assessment
file as a new Portfolio column, or add it to an existing column.
3. Enter the assessment file name, and click Save.
When the file name is entered, the background evaluation starts.
The class session status does not affect autograding.
Using Views to interpret Class Analysis results
Class Summary View
When Class Analysis initially displays, it displays in Class Summary view.
TI-Navigator_Help_PRINT.book Page 109 Tuesday, January 26, 2010 10:29 AM
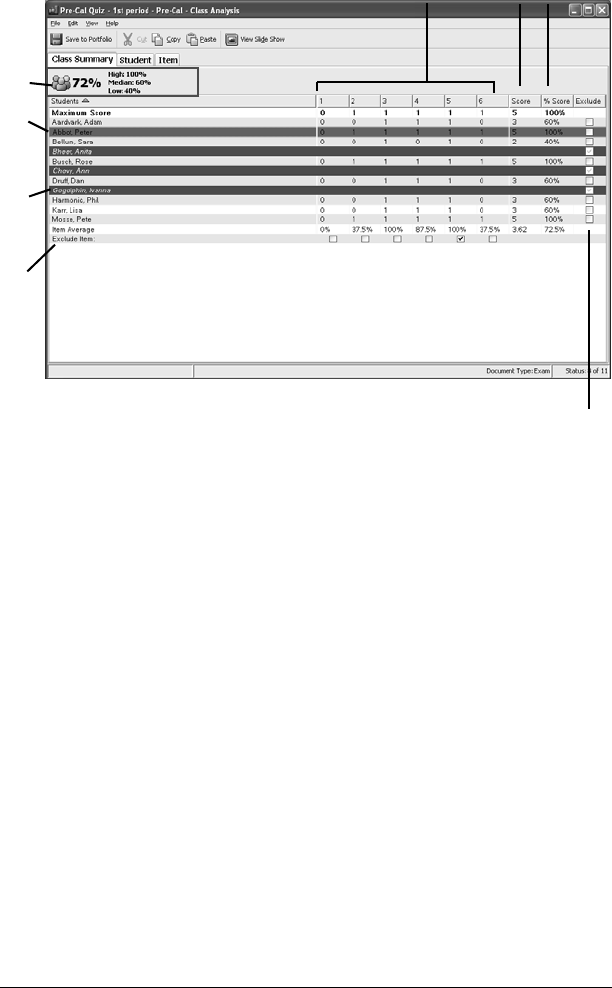
110 The Class Analysis Tool
Interpreting this summary:
1: Just under the Class Summary tab is the class average for the
assignment. In the above example, the class average is 72%. The
high score is 100%, the median score is 60%, and the low score is
40%.
2: The student name with the blue background (or your computer’s
color choice) is the currently selected student.
3: The student name with the red background is a student for whom
no file was collected. When no file is received for evaluation, then
that student is automatically excluded from the class summary
results. (Note the check in the box at the far right side of the
screen.)
4: The Exclude Items row contains check boxes to allow you to
exclude one or more items from the evaluation. Note that the
fifth item in the assignment has been excluded by the teacher in
the example.
5: The Item Average shows the average class grade for each item in
the assignment.
6: This column displays the student’s raw score.
1
2
3
7
8
5
4
6
TI-Navigator_Help_PRINT.book Page 110 Tuesday, January 26, 2010 10:29 AM

The Class Analysis Tool 111
7: % Score column converts each students’ raw score into a
percentage grade.
8: Exclude check boxes enable you to manually exclude a student’s
grades from all calculations. This does not erase the student’s file.
Note that in the example, the third student has been excluded by
the teacher. Students who do not turn in documents are always
excluded.
Things to remember:
• Students are listed alphabetically by ascending last name.
• If you want to share the results with the class by using an overhead
projector, you can hide the student names by clicking View > Class
Summary > Students.
• When you manually exclude a student or an item from the
assessment, the software automatically italicizes that student row or
item column. No student or value is actually deleted; instead, the
excluded values are not used in any calculations.
• When a file is requested of a student but none is received, that
student’s row has a red background and the student’s grades are
automatically excluded from class and item averages calculations.
• If you close Class Analysis before all files are collected from students,
the collect action completes, but the analysis is cancelled unless it
was saved to Portfolio.
• You cannot edit any student’s answers, but you can edit their scores
for each item.
• You can give partial credit or extra credit for responses.
• If a file is collected from a student but the student does not answer
one or more questions, then the response cell shows a grade of 0.
• The background color for a selected student may vary from the color
shown in the example. The color you see is based upon your
computer preferences.
• Any edits made in this view are carried over to all views, in real time.
• You can hide columns of data from the display. When Class Analysis
initially opens, all columns are shown. To hide a column, right click
on the header of any column and select the colums you want to
show or hide by selecting them on the menu. A check mark next to a
column name indicates it will be shown. A blank next to a column
name indicates it will be hidden. You can choose to hide: students,
item columns, score, and % score. You can also hide selected items
from the View menu.
TI-Navigator_Help_PRINT.book Page 111 Tuesday, January 26, 2010 10:29 AM
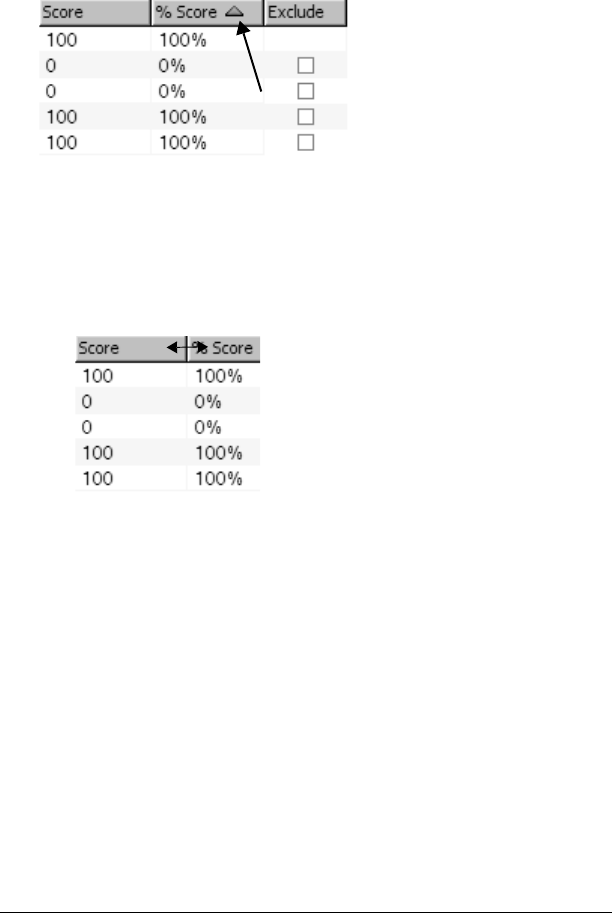
112 The Class Analysis Tool
• To sort the data, click the label at the top of the column by which
you want to sort.
The data becomes sorted and a sort indicator is shown next to the
label you clicked.
To reverse the order of the sort, click the label again.
• To change the width of a column:
– At the top of the column, point to the boundary that you want
to move.
The mouse pointer changes to a double-headed arrow.
– Drag the boundary left or right.
Student View
To review one student’s performance on an assessment:
1. Click the Student tab or click View > Student.
2. The display shows the student’s response to each question along
with the actual question and the correct answer.
TI-Navigator_Help_PRINT.book Page 112 Tuesday, January 26, 2010 10:29 AM

The Class Analysis Tool 113
3. To view another student’s results, either click the Previous / Next
buttons or use the Student drop down list to locate and select the
desired student.
Interpreting this view
1: The percentage grade for the selected student on the assessment.
2: The item table of all the items in the assignment. You can select an
assessment question for review. Use the µ and ¶ keys on your
computer to review other items.
3: Details of the selected question. The original question and all
possible answers display along with the student’s response and the
correct answer. The example shows a correct student response by
displaying a check box next to the question. An incorrect response
would show a red X in the box.
4: The Exclude Student from Analysis check box. Should you wish to
exclude the student from the class analysis, you can do it here
rather than returning to the Class Summary view. If you checked
this box on the Class Summary view, the box remains checked in
this view.
5: The Previous / Next buttons to review other students’
performances. These are to the right of the student roster drop
down box.
6: The student whose assessment is being reviewed. You can select
another student from the drop down list, or click the Previous /
Next buttons to review another student’s results.
1
3
2
5
4
6
TI-Navigator_Help_PRINT.book Page 113 Tuesday, January 26, 2010 10:29 AM

114 The Class Analysis Tool
Copying and pasting cell data
You can copy and paste rows of text while in edit mode.
To copy text to the Clipboard
1. Double-click the row.
2. Click Edit > Copy, click , or press Ctrl + C.
The selected row is now available for pasting.
To paste text from the Clipboard
1. Double-click the item.
2. Click to insert the text cursor where you want to paste the Clipboard
row of text.
3. Click Edit > Paste, click , or press Ctrl + V.
The Clipboard text is inserted at the cursor location. The text is not
removed from the Clipboard, so you can paste it into additional
locations.
Tips to remember
• You cannot edit any student responses.
• Any images or non-question applications such as notes, calculator
items, or graphs that are included in the assessment are not
displayed.
• The background color for a selected item may vary from the color
shown in the example. The color you see is based upon your
computer preferences.
• If you click on a specific item in the table, the question and all
possible answers along with the student’s response display. The
correct answer is identified.
• You can hide columns of data from the display. When Class Analysis
initially opens, all columns are shown. To hide a column, right-click
on the header of any column and select the colums you want to
show or hide by selecting them on the menu. A check mark next to a
column name indicates it will be shown. A blank next to a column
name indicates it will be hidden.
• To sort the data, click the label at the top of the column by which
you want to sort.
The data becomes sorted and a sort indicator is shown next to the
label you clicked.
TI-Navigator_Help_PRINT.book Page 114 Tuesday, January 26, 2010 10:29 AM

The Class Analysis Tool 115
To reverse the order of the sort, click the label again.
• To change the width of a column:
– At the top of the column, point to the boundary that you want
to move.
The mouse pointer changes to a double-headed arrow.
– Drag the boundary left or right.
Item View
To review all student responses for an item:
1. Click the Item tab or click View > Item > Item Tab.
2. Use the Item drop down listing to select the desired item, or use the
Previous / Next buttons to display the desired item.
3. The item and all student responses display.
TI-Navigator_Help_PRINT.book Page 115 Tuesday, January 26, 2010 10:29 AM
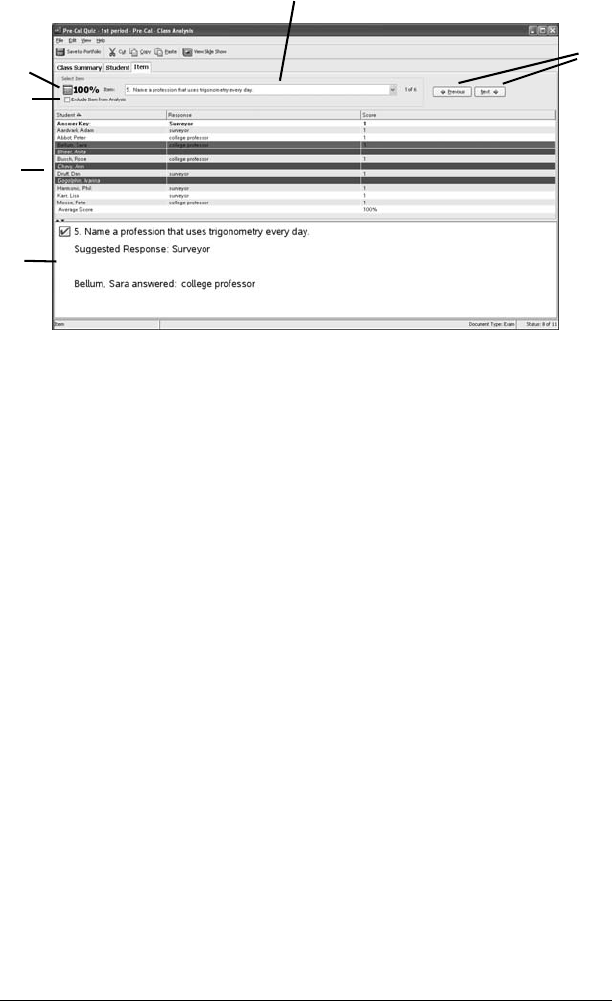
116 The Class Analysis Tool
Interpreting this view
1: The class average for the selected item.
2: Student roster showing each student’s response and grade.
3: The selected assessment question, in detail.
4: Exclude item from Analysis check box. You can click it to exclude
the item from performance calculations. If you checked the box on
the Class Summary view, then it will automatically be checked
here.
5: Previous / Next buttons. These are to the right of the Item drop
down box to enable you to view as many individual items as you
desire.
6: The item currently being reviewed. You can select another item
from the drop down list, or click the Previous / Next buttons to
review another item.
Tips to remember
• Students manually excluded on the Class Summary or Student View
screens remain italicized in this view.
• Students who did not submit the assignment are displayed with a
red background.
• You cannot edit any student responses, but you can edit their scores.
• Any images or non-question applications such as notes, calculator
items, or graphs that are included in the assessment are not
displayed.
1
2
3
4
5
6
TI-Navigator_Help_PRINT.book Page 116 Tuesday, January 26, 2010 10:29 AM

The Class Analysis Tool 117
• The background color for a selected student may vary from the color
shown in the example. The color you see is based upon your
computer preferences.
• To sort the data, click the label at the top of the column by which
you want to sort.
The data becomes sorted and a sort indicator is shown next to the
label you clicked.
To reverse the order of the sort, click the label again.
• To change the width of a column:
– At the top of the column, point to the boundary that you want
to move.
The mouse pointer changes to a double-headed arrow.
– Drag the boundary left or right.
Grading questions and fine tuning correct
responses
Grading an open response question
All Open Response questions must be graded by the teacher. To set the
score for an open response question:
1. Click the Student tab.
2. In the open response question row, double-click the Max Score cell,
and change the max score from 0 to the question value.
TI-Navigator_Help_PRINT.book Page 117 Tuesday, January 26, 2010 10:29 AM

118 The Class Analysis Tool
3. Press Enter.
4. Review the student’s response.
5. Double-click the Student Score cell and change the student score
from 0 to the desired value.
6. Click the Previous / Next button to review and grade another
student’s question.
7. Click the Save to Portfolio button to update the class scores and
students’ scores.
Changing a student’s score for an item
There may be times when a student fills in an Open Response with an
equivalent answer to the correct answer. For example, an assignment
contains a question that requires the word “Autumn” as the correct
answer. One student has entered “Fall.” If you want to give the student
full or partial credit, you can do so by changing the student’s score for
the question. While you cannot change the student’s answer, you can
change the score earned by the student for that question.
1. Click the Class Summary tab.
2. In the student’s row, double-click the item score.
3. Type the replacement score, and press Enter. To cancel, press Esc.
The analysis is recalculated, based on the student’s new score.
Changing the maximum score possible for an item
There can be times when you want to split the question credit for an
item in different ways.
To make this change:
1. Click the Class Summary tab.
2. In the Maximum Score row, double-click the item score.
3. Type the replacement score, and press Enter. To cancel, press Esc.
The analysis is recalculated for all students, based on the new
maximum score.
Changing the correct response for an item
There may be times when you find you selected a wrong correct answer
for an item. For example, a multiple-choice question in the assignment
erroneously shows the identifier of the correct response as C. You
recognize that the correct choice is actually A. You can change the
correct response from C to A.
To change the correct response for an open response
TI-Navigator_Help_PRINT.book Page 118 Tuesday, January 26, 2010 10:29 AM

The Class Analysis Tool 119
question
1. Click the Item tab.
2. Locate the item whose correct response you want to change.
3. Double-click the correct response.
4. Type the new correct response, and press Enter. To cancel, press Esc.
The analysis is recalculated for all students, based on the new correct
response.
To change the correct response for a multiple choice
question
1. Click the Item tab.
2. Locate the item whose correct response you want to change.
3. Click the correct response.
A drop-down menu of possible answers is displayed.
4. Select the correct answer from the menu. If the question was created
to allow multiple answers, use Shift+click or Ctrl+click to select more
than one option.
5. Press Enter.
Displaying Class Analysis results
If you have the ability to connect your computer to an overhead display
device, you can share assessment results with the class by presenting a
slide show of the questions and responses or by showing a histogram for
each item.
Notes:
• If you included any graphics or non-question applications such as
notes, calculator items, or graphs in the original assessment file, they
are not displayed with their questions in Class Analysis.
• Students who did not submit an assignment are not included in the
No Response category nor in the results graphs.
Slide Shows
1. There are two ways to produce a slide show:
a) From the main menu, click View > Slide Show.
b) From the toolbar, click the View Slide Show icon .
TI-Navigator_Help_PRINT.book Page 119 Tuesday, January 26, 2010 10:29 AM
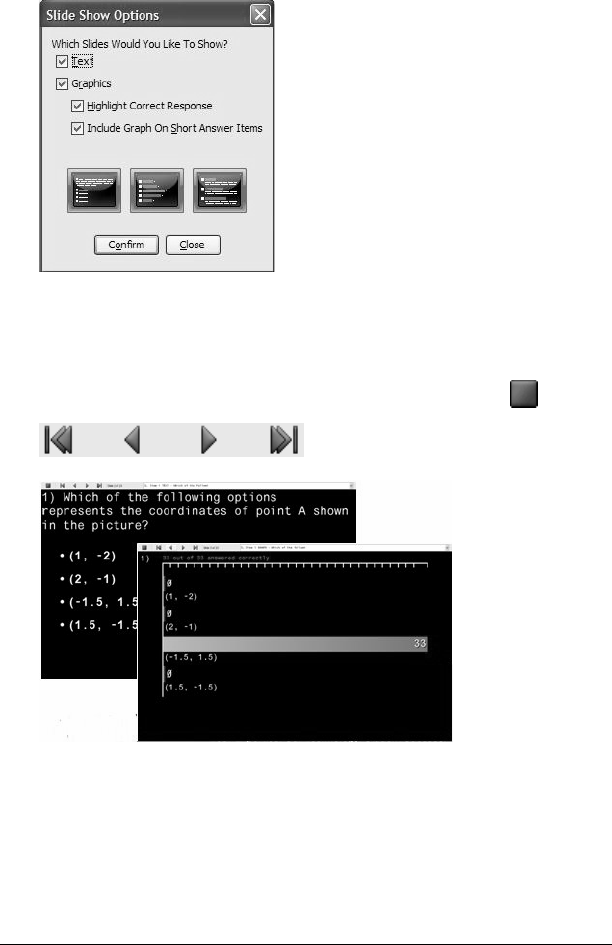
120 The Class Analysis Tool
2. If you use View > Slide Show, the Slide Show Options dialog box
opens. By default, all options are selected. Uncheck the options you
do not want.
3. Click Confirm to begin the slide show.
The Class Analysis window is minimized. You control the slide show
presentation using the First, Prev, Next, and Last buttons at the top
of the slide show window to view the slides. To end the slide show at
any point, press ESC. To close the slide show, click Stop ().
The Slide Show shows each item as originally seen by the students,
including all possible answers for multiple choice/short answer items. The
second slide for each item shows the number of responses for each
possible answer along with a No Response when one or more students
did not answer the question. The correct response percentage bar
displays in green and all incorrect and No Response bars display blue.
TI-Navigator_Help_PRINT.book Page 120 Tuesday, January 26, 2010 10:29 AM

The Class Analysis Tool 121
Saving and exporting Class Analysis results
If you launched Class Analysis from the Class Record or Student views,
you will need to save the analysis if you want it available for future
reference.
To save to Portfolio
1. Do one of the following:
• From the Class Analysis view, click the Save to Portfolio icon
.
• Click File > Save to Portfolio (available from all views.)
Note: If you close Class Analysis without first saving the analysis, or if
you have made changes to the analysis since you last saved it, the
Save to Portfolio dialog displays.
2. If this is the first save for the analysis, enter the title for the stored
analysis. The default name is the file name.
• Click Save to store the analysis. If the analysis already exists in
the Portfolio, the analysis is saved with the existing name.
• Click Cancel to close Class Analysis without saving the analysis. If
you select Cancel and unsaved changes are in the file, you are
prompted to save the changes before exiting Class Analysis.
Exporting results
If you or your school district use electronic grade storage and reporting,
you may want to export percent scores to these programs. The file type
created by the export service is .csv. Exported scores are not saved in the
Portfolio.
1. Click File > Export Scores.
2. Class Analysis prompts you for an export location.
TI-Navigator_Help_PRINT.book Page 121 Tuesday, January 26, 2010 10:29 AM

122 The Class Analysis Tool
The default location is the My Documents folder. The default name is
the analysis name.
3. Click Save.
Information included for each student in the file are:
• "Lastname, Firstname"
• Student ID
• Item scores
• Point score
• Maximum score
•% score
• Maximum % score
All items and students excluded from the analysis are included in this
file.
Note: Your class’ status does not affect your ability to create an export
file.
Additional information
File types used in Class Analysis
Class Analysis works with two files types, .edc and .tns.
TI-Navigator_Help_PRINT.book Page 122 Tuesday, January 26, 2010 10:29 AM

The Class Analysis Tool 123
assignment (.tns) file – A PC file containing the assignment title, the
text and images of each item, possible responses, correct-response
identification, and all other information for a specific assignment.
LearningCheck™ Creator (.edc) file – A LearningCheck™ Creator
document file. LearningCheck™ Creator lets you create exams or self-
check tests.
Glossary
Assignment Type – Can be Self Check or Examination. On Self Check
assignments, students can view the correct answers on their handhelds.
On Examination assignments, students are not permitted to view the
correct answers (available in the Class Summary view only).
Correct Response – The text of the correct response (for fill-in-the-
blank questions) or the identifier (such as 1, 2, 3 or a, b, c) of the
designated correct response for an item.
Maximum Score – The highest number of points that can be earned for
an item (available in the Class Summary and Student views only).
Score –
In the Class Summary view, the number of points earned for an item or
for all items.
In the Student view, the number of points earned by the current student
for each item.
In the Item view, the number of points earned for the current item by
each student.
% Score –
In the Class Summary view, the student’s score for the entire assignment
divided by the maximum score possible for the entire assignment,
expressed as a percentage. This value can be greater than 100%.
In the Student view, the current student’s score on an individual item
divided by the maximum score possible for that item, expressed as a
percentage. This value can be greater than 100%.
Student – The name that the student used to log in to class from the
handheld.
TI-Navigator_Help_PRINT.book Page 123 Tuesday, January 26, 2010 10:29 AM

124 The Class Analysis Tool
Student Response – The sequential identifier (such as 1, 2, 3 or a, b, c)
of the student’s response to a multiple-choice item.
TI-Navigator_Help_PRINT.book Page 124 Tuesday, January 26, 2010 10:29 AM

The Transfer Tool 125
The Transfer Tool
TI-Nspire™ Navigator™ software includes a Transfer Tool that you can
use to transfer files or folders to TI-Nspire™ handhelds when a class
session is not active. The Transfer Tool allows you to transfer document
files and Operating System (OS) files to a succession of handhelds,
without requiring students to log in.
The Transfer Tool streamlines the file transfer process. You can select
folders, or TI-Nspire™ document and OS files that you have stored on
your computer and install them on your students’ TI-Nspire™ handhelds.
Once the transfer begins, it continues until you stop it. TI-Nspire™
handhelds can be connected in succession and receive queued files. The
TI-Nspire™ Navigator™ software keeps track of what handhelds have
been connected and the status of file transfers to those handhelds.
This section covers the information you need to know to use the Transfer
tool.
Opening the Transfer Tool
You can open the Transfer Tool from the TI-Nspire™ Navigator™
software home screen, click the Transfer Tool icon on the TI-Nspire™
Navigator™ toolbar, or use the keyboard shortcut, Ctrl + T.
To open the Transfer Tool from the TI-Nspire™ Navigator™
home screen
1. If you have a class session running, end it.
2. Select Tools > Transfer Tool.
The Transfer Tool dialog displays.
TI-Navigator_Help_PRINT.book Page 125 Tuesday, January 26, 2010 10:29 AM
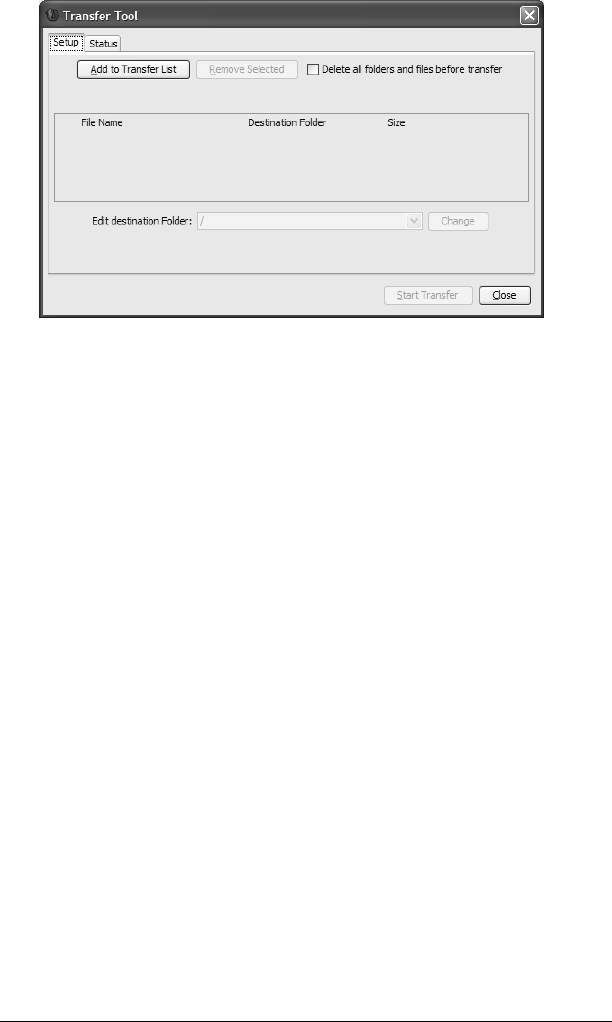
126 The Transfer Tool
Adding files to the transfer list
You must add TI-Nspire™ document files, folders, or Operating System
files (OS) to the transfer list in order to transfer them.
Only one OS per handheld type may be added to the list.
Adding files or folders to the transfer list
1. Click the Add to Transfer List button.
The Open window displays.
TI-Navigator_Help_PRINT.book Page 126 Tuesday, January 26, 2010 10:29 AM
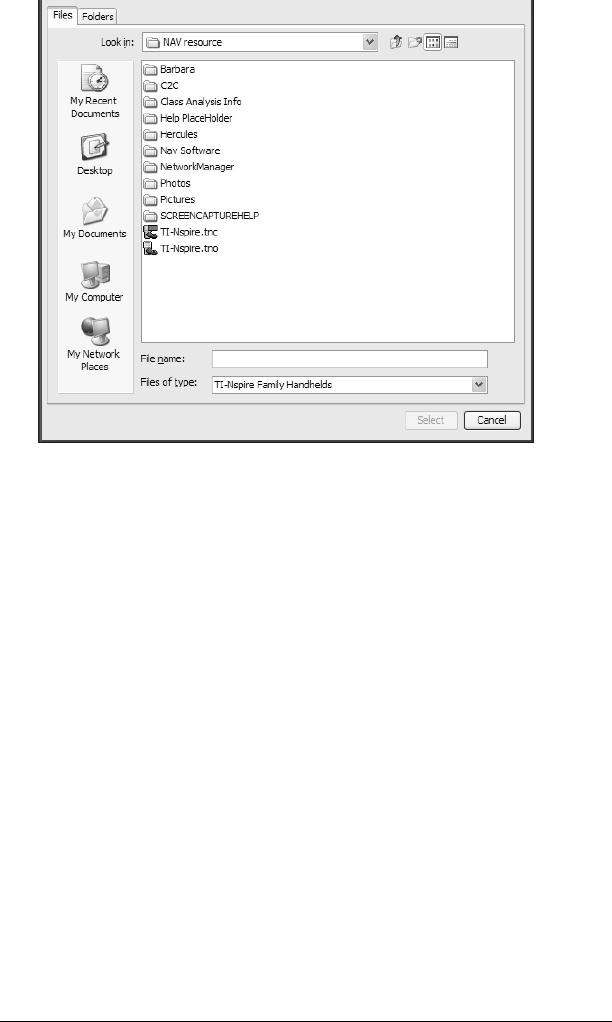
The Transfer Tool 127
2. To select files to send, click the File tab. To select folders, click the
Folder tab.
3. Navigate to the file or folder you want to add, and click to select it.
Note: To select multiple files or folders, press and hold the Ctrl key
while clicking each file name.
4. Click Select. The file(s) are added to the list on the Transfer Tool
screen.
5. Repeat Steps 2 - 6 until all files or folders for transfer are added to
the list.
6. Click Start Transfer to send the files.
Note: Clicking Start Transfer transfers all of the files and folders in the
Transfer Tool, including files that may have already been in the list when
you added new files.
Removing files from the transfer list
If there are TI-Nspire™ documents, folders, or OS files in the transfer list
that you no longer want to have available for transfer, you can remove
the files from the transfer list.
TI-Navigator_Help_PRINT.book Page 127 Tuesday, January 26, 2010 10:29 AM
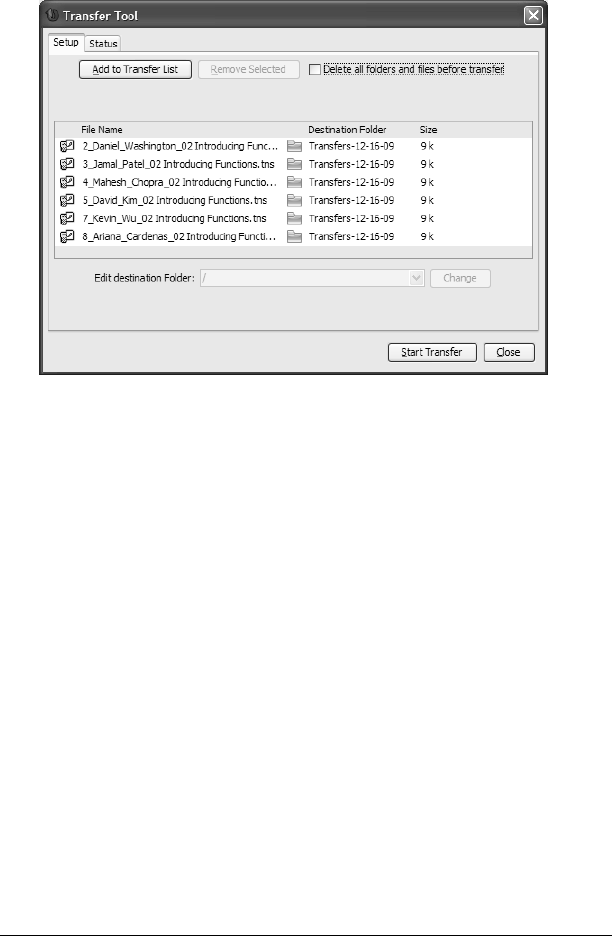
128 The Transfer Tool
1. Click the name of the file you want to remove from the transfer list.
Note: To select multiple files or folders, press and hold the Ctrl key
while clicking each file name.
2. Click Remove Selected.
Changing the destination folder
You can change the destination folder for a file transfer.
1. Click on the current folder name.
2. Type a new name in the Edit destination folder box.
Note: Folder names may use alphanumeric characters. You can enter
slashes ( / and \ ), but double slashes ( // and \\ ) and some special
characters (? | : * " " < > | ) are not allowed.
3. Click Change.
In addition, you can select a destination folder from a list of previously
used folder names. To do this, click on the cell, then click the down arrow
at the right side of the cell to list previously used class names. Click on the
class name you want to use.
Viewing transfer status
To view the status of individual file transfer for a selected handheld, click
the Status tab and then click on the + before the file name to expand the
display.
TI-Navigator_Help_PRINT.book Page 128 Tuesday, January 26, 2010 10:29 AM

The Transfer Tool 129
In the expanded view, the following information displays for each
connected handheld:
• Handheld ID (and handheld icon).
•Name of file
• Progress bar for that file on that handheld.
• Error conditions:
– Low battery
– Wrong handheld type
–Memory full
– Lost connectivity
Other transfer status information
• When a new handheld is connected, the status updates.
• The handheld progress of a file disappears when it reaches 100%.
• Incomplete transfers remain in the expanded view of the file status.
• During a transfer session, the transfer tool keeps track of what
handheld IDs have connected and successfully completed one or
more transfers.
• If a handheld unplugs and then replugs into the transfer session, the
transfer tool shows the status of completed transfers, and resumes
transfer of other files, if necessary.
• During a transfer, if you select the Setup tab, all the controls are
disabled (read only).
If you stop a transfer
• Files under the Setup tab remain listed.
• Status information for the transfer no longer displays under the
Status tab. The message “No transfers are active. Use the Setup tab
to configure and start the transfer” displays.
Deleting all handheld folders and files
The Transfer Tool provides the option to delete all files and folders on
each connected handheld before beginning a new file transfer. This
allows you to "baseline" your students’ handhelds to ensure that only
the files you want your students to work with are stored on their
handhelds. By default, this option is not selected.
TI-Navigator_Help_PRINT.book Page 129 Tuesday, January 26, 2010 10:29 AM
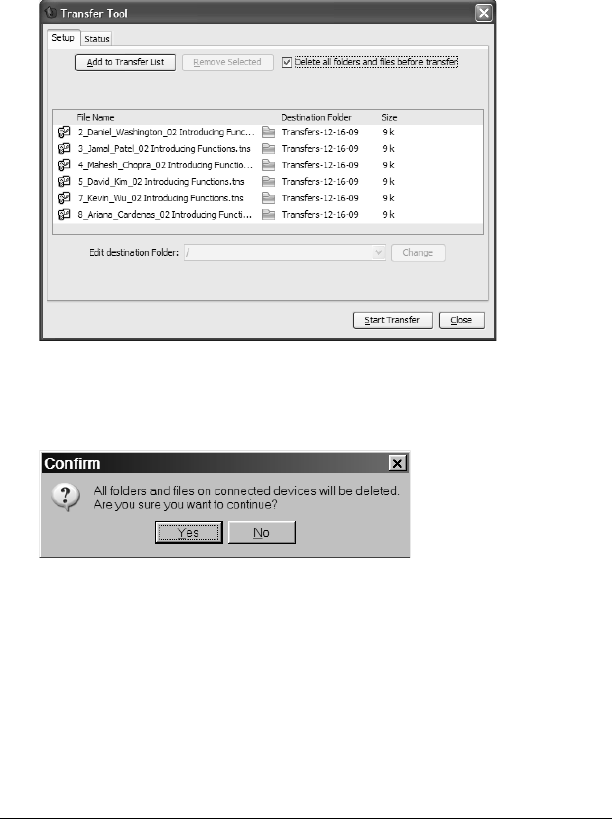
130 The Transfer Tool
The ability to delete all folders and files also exists as a command on the
TI-Nspire™ Navigator™ Tools menu. You can invoke this command while
class is in session. It performs the same actions as the command available
from the Transfer Tool.
Note: You do not have to send a file to delete all files.
To delete folders and files on connected handhelds
1. Click the check box next to the option.
2. Click the Start Transfer button to begin the deletion.
A message displays to confirm that you want to delete the folders
and files.
3. Click Yes to confirm.
The status tab tracks the progress of the delete actions as they occur,
displaying which handhelds have been plugged in, and when the
actions are completed.
Stopping file transfers
You can stop a file transfer at any time.
TI-Navigator_Help_PRINT.book Page 130 Tuesday, January 26, 2010 10:29 AM

The Transfer Tool 131
To stop a file transfer
1. Press the Stop Transfer button.
2. A warning dialog displays, asking if you are sure you want to stop
the transfer.
3. To confirm that you want to halt transmission, click Yes. Transfers
are stopped.
Note: If any student handhelds received the file or files, those files
remain on the handhelds.
Closing the Transfer tool
When you finish transferring files to your students’ TI-Nspire™
handhelds, close the Transfer tool. To do this, click Close.
TI-Navigator_Help_PRINT.book Page 131 Tuesday, January 26, 2010 10:29 AM

132 The Transfer Tool
TI-Navigator_Help_PRINT.book Page 132 Tuesday, January 26, 2010 10:29 AM

Managing the hardware 133
Managing the hardware
This section gives additional information about the TI-Nspire™
Navigator™ wireless cradles, and steps on how to add or disconnect the
access point.
Wireless cradles
Identifying selected wireless cradles
At times you may have a problem with one or two TI-Nspire™
Navigator™ wireless cradles in your network that aren’t responding.
When you look at the list of cradles in the TI-Nspire™ Network Manager
window, you can identify which ones are not responding by the Status
message, and you can see the serial numbers.
You could match the serial numbers in the window with the ones printed
on the back of each wireless cradle. However, TI-Nspire™ Network
Manager gives you an easier way to physically locate them. You can use
the Identify selected command to quickly tell which cradles are working
properly in your classroom.
1. From the list of hardware components in the TI-Nspire™ Network
Manager window, click to select all of the working cradles. To select
more than one cradle, press and hold the Shift or Ctrl key, and click
the items you want to select.
2. Click Actions > Identify Selected.
3. Look around your classroom at the cradles in your network. Both
LEDs on the cradles that you selected will blink rapidly with a green
color. You can identify the cradles that are not working because their
LEDs are not blinking.
Now that you know where the non-working cradles are, you can add the
cradles to the network again.
Removing cradles from an existing network
Even though a classroom network has been set up correctly, sometimes
you may need to remove TI-Nspire™ Navigator™ wireless cradles from
the network.
You might need to remove cradles because your access point has been
associated with cradles that should belong to another classroom.
TI-Navigator_Help_PRINT.book Page 133 Tuesday, January 26, 2010 10:29 AM

134 Managing the hardware
1. In the TI-Nspire™ Network Manager window, select the TI-Nspire™
Navigator™ wireless cradles that you want to remove from the
network.
Note: To select more than one cradle, hold down the Shift key or
the Ctrl key while clicking the cradles that you want to select.
2. Click Actions > Remove Selected or click .
3. Click Remove at the prompt.
The cradle is no longer listed in the Network Manager window.
Battery information for wireless cradles
• You cannot damage the batteries by leaving them in the charging
bay beyond the time needed to fully charge them. Also, you will not
damage the wireless cradles by inserting or removing them from the
charging bay at any time.
• It is not necessary to unplug the power adapter from the charging
bay, even when no wireless cradles are present.
• To charge as many as five wireless cradles at a time, use the charging
bay. If you only need to charge one cradle, you can connect the
AC9926 power adapter (available in the individual kit) directly from
the cradle to a power outlet.
• It is not necessary to fully discharge the batteries before recharging
them.
• Do not leave the wireless cradles in an extremely cold or extremely
warm location, such as inside an automobile in hot weather.
• Every few weeks, you should clean the electrical contacts on the
charging bay and the wireless cradles using a clean, dry cloth.
Storing the wireless cradles
If you need to store the TI-Nspire™ Navigator™ wireless cradles for more
than two weeks, store the cradles in a cool, dry place.
Fully charge the cradles at least once every 10-12 months.
TI-Navigator_Help_PRINT.book Page 134 Tuesday, January 26, 2010 10:29 AM

Managing the hardware 135
Wireless access point
An access point is essential to any wireless network. In the TI-Navigator™
system, the access point lets the computer communicate with the
TI-Nspire™ Navigator™ wireless cradles, which communicate with the
students’ handhelds. Normally, your access point is configured with the
Setup Wizard when you first set up your classroom network.
If you need to replace a TI-Navigator™ access point because of a problem
or failure, you must disconnect the old access point, disconnect the
cradles, add a new access point, and then reconnect the cradles.
Disconnecting the access point
Before you disconnect an access point, first make sure you remove the
wireless cradles from the network.
1. Disconnect the USB cable from the TI-Navigator™ access point.
2. Disconnect the power adapter from the access point.
The Network Status window displays the message “Access point
disconnected.”
Adding the access point
1. Ensure that the TI-Navigator™ access point:
– Is properly connected to the computer with the USB cable
– Is connected to a power adapter that is plugged into an AC
power outlet.
2. Click Actions > Check Access Point, or click .
3. Click OK.
TI-Nspire™ Network Manager finds the access point and displays a
status window.
TI-Navigator_Help_PRINT.book Page 135 Tuesday, January 26, 2010 10:29 AM
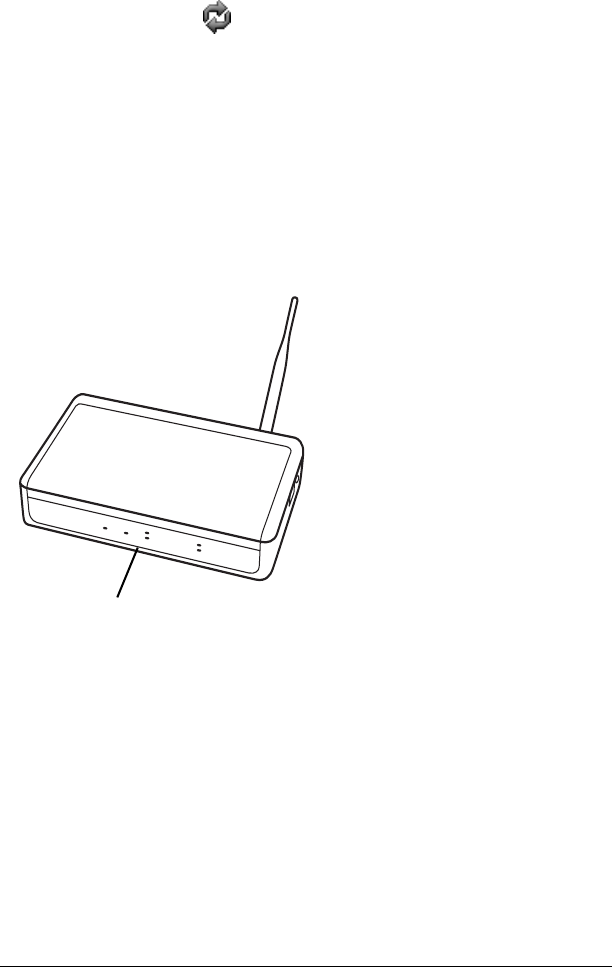
136 Managing the hardware
4. Click OK.
Note: To refresh the TI-Nspire™ Network Manager window, click
View > Refresh or click .
Wireless access point technical information
The TI-Nspire™ Navigator™ classroom learning system includes a wireless
local-area network based on the IEEE 802.11b/g industry standard, also
known as Wi-Fi (wireless fidelity). This networking standard provides
high-speed data transfer in the license-free 2.4 GHz band. The
TI-Nspire™ Navigator™ system has been tested to perform at a range of
70 feet.
If possible, avoid sources of potential interference, such as metal walls,
microwave ovens, and wireless phones.
LEDs
TI-Navigator_Help_PRINT.book Page 136 Tuesday, January 26, 2010 10:29 AM

Managing the hardware 137
Access point LEDs
POWER – Indicates that the access point is receiving power from the
power adapter.
TEST – The access point is in self-test mode. This LED should blink for a
minute and then stop.
STATUS: 100 LINK/ACT – Indicates data transfer.
SIGNAL: 802.11 b/g – Indicates wireless link activity.
Power
jack
USB port
TI-Navigator_Help_PRINT.book Page 137 Tuesday, January 26, 2010 10:29 AM

138 Managing the hardware
TI-Navigator_Help_PRINT.book Page 138 Tuesday, January 26, 2010 10:29 AM

Troubleshooting 139
Troubleshooting
This section contains information to help you quickly solve any problems
you may encounter while using the TI-Nspire™ Navigator™ classroom
learning system. If you are unable to find an answer to your question
here or in the help, visit the TI-Cares KnowledgeBase.
Frequently-asked questions
Below you can find frequently-asked questions about the TI-Nspire™
Navigator™ classroom learning system. To help you find answers faster,
the questions are divided into the following categories:
•Classes
• File transfers
• The Quick Poll tool
• The Screen Capture tool
• Students
• TI-Nspire™ Navigator™ network
Classes
Why can’t I create a class?
You cannot create a class because you have a class session running. If you
need to create a class, you must first end the running class session.
Why can’t I select a class?
You cannot select a class because you have a class session running. If you
need to select a class, you must first end the running class session.
How many characters can I use in my class name?
Your class name can have 3 to 32 letters and/or numbers.
File transfers
Why won’t the TI-Nspire™ Navigator™ system let me
change my default file location?
You have a class session running. You can only change the default file
location if there is not a class session running.
Why can’t I send or collect files?
You haven’t started your class session yet. You cannot perform any
TI-Nspire™ Navigator™ network tasks until you start a class session.
TI-Navigator_Help_PRINT.book Page 139 Tuesday, January 26, 2010 10:29 AM

140 Troubleshooting
When I send files to my students’ handhelds from the
TI-Nspire™ Navigator™ system, where on the handhelds
does the TI-Nspire™ Navigator™ system send the files?
The files you send to the TI-Nspire™ handhelds go to the My Documents
folder on the handheld Home screen, separated into folders by their class
name. To access the documents on the handheld, press ~.
Where does the TI-Nspire™ Navigator™ system store the
unprompted files I receive from my students?
By default, the TI-Nspire™ Navigator™ system stores unprompted files at
My Documents\My TI-Nspire Navigator, and separates them into folders
by their class name. However, you can change the default file location for
unprompted files if necessary.
Can I send files to individual students from my handheld?
No. From your handheld, you can only send files to the whole class.
The Quick Poll tool
What types of poll questions can I send?
You can send any of the following types of poll questions:
• Open Response
• Agree/Disagree
•Yes/No
• True/False
• Right/Wrong
• Always/Sometimes/Never
• Multiple Choice
Is there a length limit for my poll questions?
Yes. Your questions cannot contain more than 249 characters.
Do I have to enter a question to send a poll?
No, you do not have to enter a question to send a poll. If you do not
enter a question, the Quick Poll tool sends the text “Mark your answer”
by default.
Why haven’t my students received the poll I sent them?
There are a couple of reasons why your students might not receive a poll:
• The students are not logged in to the network.
TI-Navigator_Help_PRINT.book Page 140 Tuesday, January 26, 2010 10:29 AM

Troubleshooting 141
• The students’ TI-Nspire™ handheld is disconnected from the wireless
cradle.
Why can’t I send poll results to my students?
There are a couple of reasons why you might not be able to send a poll:
• You cannot send poll results to your students because you have not
stopped the current poll. You must stop the current poll to send poll
results.
• The poll is an Open Response poll. You cannot send the results of an
Open Response poll to your students.
What happens when I choose "Update Portfolio"?
All of the quick polls you conduct and update in Portfolio in a class
session will update the score as one assessment.
Why did the open poll on my computer close?
The open poll may have closed because you started a new poll from your
handheld. If you start a new poll on your handheld, the open poll on the
computer closes and the new one you sent from your handheld opens.
The Screen Capture tool
Can I capture screens from my own handheld?
Yes. You can capture screens from your handheld as well as from the
students’ handhelds.
Can I capture the screens of students who aren’t currently
logged in?
Yes. Students are included in a screen capture if they have logged in at
least once during the class session, even if they are not currently logged
in.
Why is there a yellow outline around a captured screen?
The yellow outline indicates that the screen did not refresh.
Why is there a yellow screen with the words
“Communication Error” in it?
This indicates that the TI-Nspire™ Navigator™ software cannot find the
student on the network. The student’s handheld may have become
disconnected from the wireless cradle.
Students
Why can’t I see a student’s icon?
Another students’ icon may be on top of the icon you are trying to find.
TI-Navigator_Help_PRINT.book Page 141 Tuesday, January 26, 2010 10:29 AM

142 Troubleshooting
If I delete a student from a class, can I later restore the
student to the class?
It depends on whether or not the student is also in other classes. If the
student is in other classes, then you can restore the student’s information
to the class by copying him or her to the class. If the student is not in
other classes, then the deletion is permanent.
Can I retrieve my students’ account passwords in the
TI-Nspire™ Navigator™ system if they forget them?
No. Once you enter your students’ passwords, they become hidden. If
your students forget their passwords and you do not have their
passwords recorded elsewhere, you must reset their passwords in the
TI-Nspire™ Navigator™ system.
Why can’t I edit a student’s information?
You can’t edit your students’ information because they are logged in to
the TI-Nspire™ Navigator™ network.
Why can’t I delete a student?
You cannot delete the student because the student is logged in to the
TI-Nspire™ Navigator™ network.
Why can’t I see my students’ passwords?
The TI-Nspire™ Navigator™ system hides the passwords to protect your
students’ privacy. You cannot retrieve the passwords in the TI-Nspire™
Navigator™ system. However, you can reset the passwords.
Can my students create their own passwords?
Yes. When you add or edit your student, select Student Chooses. This lets
your student choose their own password the first time they log in.
Why wasn’t a student’s password reset?
There are two reasons why a student’s password might not be reset:
• You did not select the student when you reset the passwords.
• The student was logged in at the time you reset the password. You
cannot reset the password of a student who is logged in.
How many characters can I use in a student’s user name?
You can use 3 to 12 letters and/or numbers.
How many characters can I use in a student’s password?
You can use 3 to 12 letters and/or numbers.
TI-Navigator_Help_PRINT.book Page 142 Tuesday, January 26, 2010 10:29 AM

Troubleshooting 143
Can I give students the same user name?
No, you cannot give students the same user name, even if they are in
different classes. All student user names must be unique.
Why can’t I move or copy students to different classes?
Either the students are logged in or the students already exist in the class
where you are trying to move them.
TI-Nspire™ Navigator™ network
Why do I get a “Cannot start a class session” error?
The TI-Nspire™ Navigator™ system cannot locate the appropriate
network hardware (for example, an access point and one or more
wireless cradles). Check your hardware connections. If you still see this
error, open TI-Nspire™ Network Manager and make sure your network
hardware is properly configured.
Why does my home screen say “TI-Nspire Navigator
network unavailable” in the bottom right-hand corner?
The TI-Nspire™ Navigator™ system cannot locate appropriate network
hardware (for example, an access point and one or more wireless
cradles). Check your hardware connections. If you still see this error, open
TI-Nspire™ Network Manager and make sure your network hardware is
properly configured.
During class sessions, can multiple students log in to the
TI-Nspire™ Navigator™ network from one handheld?
Yes. Multiple students can log in to the TI-Nspire™ Navigator™ network
on each handheld. However, only the last student to log in is active in the
classroom.
What do I need to log in to the TI-Nspire™ Navigator™
network from my handheld?
To log in to the TI-Nspire™ Navigator™ network from your handheld,
you need a teacher account. You can create your teacher account under
Teacher Preferences.
TI-Navigator_Help_PRINT.book Page 143 Tuesday, January 26, 2010 10:29 AM

144 Troubleshooting
How many characters can I use in my teacher account user
name?
You can use 3 to 12 letters and/or numbers.
Can I retrieve my password if I forget it?
No. You cannot retrieve previously entered passwords. If you forget your
password, you must reset it.
How many characters can I use in my teacher account
password?
You can use 3 to 12 letters and/or numbers.
What can I do if I forget my password?
If you forget your password, you can reset your teacher account
password.
What can I do after I log in to the TI-Nspire™ Navigator™
network from my handheld?
After you log in to the TI-Nspire™ Navigator™ network from your
handheld, you can:
• Send files to students
• Collect files from students
Error messages
Below you can find solutions to error messages that you or your students
might come across while using the TI-Nspire™ Navigator™ classroom
learning system, including:
• Computer error messages
• Handheld error messages
• TI-Nspire™ Navigator™ software error messages
TI-Navigator_Help_PRINT.book Page 144 Tuesday, January 26, 2010 10:29 AM

Troubleshooting 145
Computer error messages
Error message Possible causes or solutions
TI-Nspire™
Navigator™ Network
Unavailable
The TI-Nspire™ Navigator™
system cannot locate appropriate
network hardware (for example,
an access point and one or more
wireless cradles). Check your
hardware connections. If you still
see this error, open TI-Nspire™
Network Manager and make sure
your network hardware is
properly configured.
Cannot start a class
session
The TI-Nspire™ Navigator™
system cannot locate the
appropriate network hardware
(for example, an access point and
one or more wireless cradles).
Check your hardware
connections. If you still see the
error, open TI-Nspire™ Network
Manager and make sure your
hardware is properly configured.
Invalid First Name In the Add Student dialog box,
you did not enter the student’s
first name or you included invalid
characters in the first name.
Invalid Last Name In the Add Student dialog box,
you did not enter the student’s
last name or you included invalid
characters in the last name.
Invalid User Name In the Add Student dialog box,
you either did not enter a user
name or you did not meet the
user name requirements. User
names must contain 3 to 12
letters and/or numbers.
TI-Navigator_Help_PRINT.book Page 145 Tuesday, January 26, 2010 10:29 AM

146 Troubleshooting
Handheld error messages
Invalid Password In the Add Student dialog box,
you either did not enter a
password or you did not meet
the password requirements.
Passwords must contain 3 to 12
letters and/or numbers.
No Classes Selected You do not have any classes
selected for the student you are
creating or editing.
Error message Possible causes or solutions
Communication
failed
Check the connection
• The handheld is not
connected to the wireless
cradle. Check the
connections to the
handheld, then try again.
•(Student point of view only) The
teacher hasn’t started the
TI-Nspire™ Navigator™
system on his or her
computer. Wait until the
teacher starts the TI-Nspire™
Navigator™ system and the
class, then try again.
Class not started (Student point of view only) The
teacher hasn’t started the class in
the TI-Nspire™ Navigator™
system. Wait until the teacher
starts the class and try again.
Error message Possible causes or solutions
TI-Navigator_Help_PRINT.book Page 146 Tuesday, January 26, 2010 10:29 AM

Troubleshooting 147
Could not login • The user name or password
you entered is not correct.
Make sure you are using the
correct user name and
password and try again.
• The teacher has not yet
started the class session.
Wait until the teacher has
started the class and try
again.
No file selected You did not select a file to
transfer.
Error message Possible causes or solutions
TI-Navigator_Help_PRINT.book Page 147 Tuesday, January 26, 2010 10:29 AM

148 Troubleshooting
TI-Nspire™ Navigator ™ software error messages
Problem or
message
Possible causes or solutions
Device not
found (cradle)
• Make sure the TI-Nspire™ handheld is
securely connected to the TI-Nspire™
Navigator™ wireless cradles.
• Ensure that the access point is connected and
its power adapter is plugged in.
• Right-click My Computer on the Windows®
Desktop, and click Properties. Under the
General tab, make sure your computer lists
Windows Vista® Ultimate, Home, or Business
with Service Pack 1; Windows® XP
Professional with Service Pack 2 or 3; or
Windows® 7 Home Premium, Ultimate, or
Professional installed.
Device is
incorrectly
configured
An access point
was located, but
one or more
configuration
parameters are
set incorrectly.
Repeat the Access Point procedure to reconfigure
this device.
Device did not
respond, or
Device not
found
No access point
was located by
the system. The
cradles cannot be
configured until
this is corrected.
The access point is
turned on but still
initializing.
• Run TI-Nspire™ Network Manager and click
on Check Access Point.
TI-Navigator_Help_PRINT.book Page 148 Tuesday, January 26, 2010 10:29 AM

Troubleshooting 149
Cannot add the
access point to
the network
• The access point is not in a receptive state. If
its configuration has been corrupted, reset
the access point to the original settings. You
will need to repeat the Access Point
procedure and add all the cradles to the
network again.
The Access Point
did not update
successfully.
• Call TI Support and Service for help.
Device is
incorrectly
configured
This cradle has
been located, but
one or more
configuration
parameters are
set incorrectly.
• Repeat the Add cradles procedure to
reconfigure this cradle.
• Remove the cradle and then add it back into
the network.
The device did
not respond
The cradle was
previously added
to the classroom
network, but was
not located at this
time.
•Click
View > Refresh or click .
• The cradle is too far away from the access
point. Try to keep the cradles within 70 feet
of the access point.
• If you changed the channel, try removing all
the cradles and then adding all the cradles
back into the network.
Problem or
message
Possible causes or solutions
TI-Navigator_Help_PRINT.book Page 149 Tuesday, January 26, 2010 10:29 AM

150 Troubleshooting
The device did
not respond, or
cradle is not listed
in the TI-Nspire™
Network
Manager window.
• Refresh the network status. After checking
for the previous conditions, refresh the status
screen to see if the cradle has been detected.
• Make sure the cradle’s battery is charged or
verify that the power adapter is connected.
• Make sure the cradle is within range of the
access point.
• When in the process of adding cradles, be
patient. It may take up to 30 seconds after
resetting a cradle before it is recognized and
configured by the software.
• Sometimes you must choose a different
channel to avoid interference and improve
reception. If you changed the channel, try
removing all the cradles and then adding all
the cradles back into the network.
• If more than one network is located in the
same area, cradles sometimes associate with
the wrong access point. To avoid this, make
sure that cradles are added to only one
TI-Nspire™ Navigator™ system at a time, and
make sure a TI-Nspire™ Navigator™ system in
a nearby classroom is not adding cradles at
the same time.
Communication
Error
One or more
cradles is not
communicating
with the access
point.
• To restore communication between the cradle
and access point, click View > Refresh.
• If the error message remains, select the
cradles that are not working, remove them
from the network, and then add them back
into the network.
Problem or
message
Possible causes or solutions
TI-Navigator_Help_PRINT.book Page 150 Tuesday, January 26, 2010 10:29 AM

Troubleshooting 151
The batteries in
the wireless
cradles run down
during class time,
resulting in dead
or low batteries.
• Make sure the wireless cradles are recharged
overnight at least every other night. If your
system is used heavily during the day,
recharge the batteries every night.
• Normally, the wireless cradle’s rechargable
batteries can be recharged and used for up to
three years. If you charge a battery overnight
and the LED on the network cradle still blinks
red or amber, contact Texas Instruments for
help.
Extra cradles
appear on the
network
• Do not attempt to configure more than one
classroom network at the same time.
• Remove the handhelds from cradles that you
do not want to add to your network.
• Compare the cradle numbers listed in the
TI-Nspire™ Network Manager window with
the numbers stamped on the backs of the
cradles themselves. Highlight and remove any
cradles in the list that should not be part of
your network.
Data is received
by some
handhelds, but
not all.
• Make sure the TI-Nspire™ handheld is
securely connected to the TI-Nspire™
Navigator™ wireless cradles.
• Make sure all of the handhelds have the latest
operating system from Texas Instruments
installed.
• Make sure the handheld’s RAM is not
completely full.
• Make sure an alternate operating system,
such as Mirage, is not installed. If found,
remove it from the handheld.
The handheld
does not respond
in any way, and
appears to be
“locked up.”
• Reset the handheld. For instructions, refer to
the guidebook for the handheld.
Problem or
message
Possible causes or solutions
TI-Navigator_Help_PRINT.book Page 151 Tuesday, January 26, 2010 10:29 AM

152 Troubleshooting
Lost connections
Certain actions, such as resetting the access point, can cause the
TI-Nspire™ Navigator™ network to lose its connection to one or more
wireless cradles. This can occur even when TI-Nspire™ Network Manager
reports that the cradles are responding.
If you attempt to transfer data to or from handhelds, and some of the
wireless cradles do not respond (even though they are listed as “found”),
try to disconnect the TI-Nspire™ handheld from the offending cradle,
and then re-connect it.
You have a
conflict on the
operating
channel used by
your
TI-Navigator™
access point.
• A conflict could be caused if another access
point or a cordless telephone is using the
same channel.
• To try a different channel, open TI-Nspire™
Network Manager. Switch hardware types if
necessary. Click Actions > Change Operating
Channel. On the Operating Channel Selection
screen, in the Operating Channel list, click a
different channel number, and click OK. If the
changing the channel doesn’t correct the
problem, try a different channel.
Problem or
message
Possible causes or solutions
TI-Navigator_Help_PRINT.book Page 152 Tuesday, January 26, 2010 10:29 AM

Glossary 153
Glossary
This section provides reference material that you may find helpful while
using the TI-Nspire™ Navigator™ classroom learning system. In it, you
can find terminology and file types.
Terms
App – A TI graphing calculator software application.
class – A group of student accounts with an associated class record,
seating layout, and various preferences and settings.
Class Record – A component of the TI-Nspire™ Navigator™ computer
home screen. The Class Record shows the network actions of a class as
well as a list of historical actions.
class session – A period of time when the TI-Nspire™ Navigator™
network is available for a particular class.
Classroom tab – A component of the TI-Nspire™ Navigator™ computer
home screen. In the Classroom tab, you can view representations of the
students in the current class; add, edit, or remove students from the
current class; view visual indications of the students’ log in status; and
view the status of the current network action.
classroom view – A means of representing the students in a class. The
two classroom views available in the TI-Nspire™ Navigator™ system are
the Seating Chart view and the Student List view.
collect – To transfer files from your students’ handhelds to your
computer.
current class – Part of the TI-Nspire™ Navigator™ home screen that lets
you select previously created classes and start/end class sessions for the
selected class.
display name – The name of a student that appears in the TI-Nspire™
Navigator™ window.
force collect – A collect action that interrupts your students to retrieve
the file immediately.
force send – A send action that interrupts your students to send the file
to the calculator immediately.
TI-Navigator_Help_PRINT.book Page 153 Tuesday, January 26, 2010 10:29 AM

154 Glossary
poll – A survey of the class. In a poll, students use the TI-Nspire™
Navigator™ network to respond to a verbal or written prompt.
point – Mathematical data (often a set of X and Y values) that
represents the idea of a location in the graph.
network application – An application that connects to the TI-Nspire™
Navigator™ network. An example of a network application is Screen
Capture.
network status indicator – A component of the TI-Nspire™
Navigator™ computer home screen. The network status indicator shows
whether or not you are connected to the TI-Nspire™ Navigator™
network. The indicator shows the Network Available icon if the
network hardware is connected and powered on and the Network
Unavailable icon if it is not.
Seating Chart – The Classroom view that shows a class’s students as
icons labeled with their display names.
send – To transfer files from your computer to your students’ calculators
and from your students’ calculators to your computer.
screenshots – Images of screens captured from your students’
calculators.
status – The progress of a current network action or the final state of an
historical action. For example, the status “15 of 20” means that the
TI-Nspire™ Navigator™ network has transferred 15 out of a possible 20
files.
student list – The Classroom view that lists a class’s students with their
display names, first names, last names, user names, and student IDs.
teacher account – An account (user name and password) that lets you
log into the TI-Nspire™ Navigator™ network as a teacher.
TI-Nspire™ handheld – A TI-Nspire™ or TI-Nspire™ CAS handheld.
TI-Nspire™ Navigator™ computer – A computer running the
TI-Nspire™ Navigator™ software.
TI-Navigator_Help_PRINT.book Page 154 Tuesday, January 26, 2010 10:29 AM
Glossary 155
Tools tab – A component of the TI-Nspire™ Navigator™ computer home
screen. The Tools tab contains shortcuts to the Apps and tools available in
the TI-Nspire™ Navigator™ system.
transfer – The exchange of calculator data between TI-Nspire™
Navigator™ computers and TI-Nspire™ handhelds. For example, a send
or a collect.
Unprompted from Class – Files students send you that you did not
request with a collect.
user name – The name used to identify your students when they log in
to the TI-Nspire™ Navigator™ network from their handhelds. Each user
name must be unique throughout all of your classes.
File types
Below you can find a list of file types that you can send to your students’
calculators using the TI-Nspire™ Navigator™ system.
Type TI-Nspire™ or
TI-Nspire™ CAS extension
Assignment file .tns
Operating System file .tno or .tnc
Apps .edc or .fig
TI-Navigator_Help_PRINT.book Page 155 Tuesday, January 26, 2010 10:29 AM

156 Glossary
TI-Navigator_Help_PRINT.book Page 156 Tuesday, January 26, 2010 10:29 AM

157
Regulatory Information
USA FCC Information Concerning Radio Frequency
Interference
Federal Communication Commission Interference
Statement
This equipment has been tested and found to comply with the limits for a
Class B digital device, pursuant to Part 15 of the FCC Rules. These limits
are designed to provide reasonable protection against harmful
interference in a residential installation. This equipment generates, uses,
and can radiate radio frequency energy and, if not installed and used in
accordance with the instructions, may cause harmful interference to
radio communications. However, there is no guarantee that interference
will not occur in a particular installation. If this equipment does cause
harmful interference to radio or television reception, which can be
determined by turning the equipment off and on, the user is encouraged
to try to correct the interference by one or more of the following
measures:
• Reorient or relocate the receiving antenna.
• Increase the separation between the equipment and receiver.
• Connect the equipment into an outlet on a circuit different from
that to which the receiver is connected.
• Consult the dealer or an experienced radio/TV technician for help.
FCC Caution: The TI-Navigator™ access point and the TI-Nspire™
Navigator™ wireless cradle comply with Part 15 of the FCC Rules.
Operation is subject to the following two conditions: (1) These devices
may not cause harmful interference, and (2) these devices must accept
any interference received, including interference that may cause
undesired operation.
Product Name:
TI-Nspire™ Navigator™ Wireless
Cradle
Product Name:
TI-Navigator™ Access Point
Model Number/Name: NAV-AP-US
FCC ID: V7R-TINAVAP
TI-Navigator_Help_PRINT.book Page 157 Tuesday, January 26, 2010 10:29 AM
FCC ID: V7R-TINAVWC2

158
RF Radiation Exposure and Hazard Statement:
To ensure compliance with FCC RF exposure requirements, the
TI-Navigator™ access point must be installed in a location such that the
antenna of the device will be greater than 20 cm (7.9 inches) away from
all persons. Using higher gain antennas and types of antennas not
covered under the FCC certification of this product is not allowed.
Installers of the radio and end users of the product must adhere to the
installation instructions provided in this manual.
This transmitter must not be co-located or operating in conjunction with
any other antenna or transmitter.
Non-modification Statement:
Use only the integral antenna supplied by the manufacturer when
operating these devices. Unauthorized antennas, modifications, or
attachments could damage the TI-Navigator™ access point or TI-Nspire™
Navigator™ wireless cradle and violate FCC regulations. Any changes or
modifications not expressly approved by the party responsible for
compliance could void the user's authority to operate this equipment.
Deployment Statement:
This product is certified for indoor deployment only. Do not install or use
this product outdoors.
Canadian IC Information
Industry Canada Statement:
Operation is subject to the following two conditions in Canada:
1. these devices may not cause interference, and
2. these devices must accept any interference, including interference
that may cause undesired operation of the device
Product Name:
TI-Nspire™ Navigator™ Wireless
Cradle
Product Name:
TI-Navigator™ Access Point
Model Number/Name: NAV-AP-US
IC ID: 451E-TINAVAP
TI-Navigator_Help_PRINT.book Page 158 Tuesday, January 26, 2010 10:29 AM
IC ID: 451E-TINAVWC2

159
To prevent radio interference to the licensed service (i.e. co-channel
Mobile Satellite systems) these devices areintended to be operated
indoors and away from windows to provide maximum shielding.
Equipment (or its transmit antenna) that is installed outdoors is subject
to licensing and not supported by the TI-Navigator™ access point or
TI-Nspire™ Navigator™ wireless cradle.
European Union and European Free Trade Association
(EFTA) Regulatory Compliance
This equipment may be operated in the countries that comprise the
member countries of the European Union and the European Free Trade
Association. These countries, listed in the following paragraph, are
referred to as The European Community throughout this document:
AUSTRIA, DENMARK, FINLAND, FRANCE, GERMANY, ITALY,
NETHERLANDS, PORTUGAL, SPAIN, SWEDEN, UNITED KINGDOM,
NORWAY, SWITZERLAND
The TI-Navigator™ access point communicates with either a
TI-Navigator™ network hub or TI-Nspire™ Navigator™ wireless cradle
via a wireless 802.11b/g link to provide wireless local area networking
(WLAN) capabilities and with a personal computer using a standard USB
cable. The TI-Navigator™ access point includes one 802.11a and one
802.11b/g radio. In the current model, NAV-AP-US, the 802.11a radio is
disabled at the factory and via software preventing it from being
configured and used when installed at an end user facility.
Declaration of Conformity
Marking by this symbol:
indicates compliance with the Essential Requirements of the R&TTE
Directive of the European Union (1999/5/EC).
This equipment meets the following conformance standards:
Safety: EN 60950-1:2001 + A11:2004
EMC: EN 55022:2006, EN 55024:1998 + A1:2001 + A2:2003, EN 301-489-1
v1.7.1, EN 301-489-17 v1.3.2, CISPR22:1997, CISPR24
Including: EN 61000-3-2, -3-3, -4-2, -4-3, -4-4, -4-5, -4-6 and -4-11. The
product is also licensed as required for additional country specific
standards as required for the International Marketplace.
Radio: EN 300-328 v.1.7.1 (2006-10)
TI-Navigator_Help_PRINT.book Page 159 Tuesday, January 26, 2010 10:29 AM

160
Electromagnetic compatibility and Radio spectrum Matters (ERM);
Wideband transmission systems; Data transmission equipment operating
in the 2,4 GHz ISM band and using wide band modulation techniques.
Certifications are harmonized to the EN standards covering essential
requirements under article 3.2 of the R&TTE Directive. Compliance
includes testing with the supplied integral antenna.
SAR: EN 50385:2002
European Community Declaration of Conformity
Hereby, Texas Instruments declares that the TI-Navigator™ access point
and TI-Nspire™ Navigator™ wireless cradle are in compliance with the
essential requirements and other relevant provisions of Directive
1999/5/EC.
English Hereby, Texas Instruments declares that the
TI-Navigator™ access point and TI-Nspire™
Navigator™ wireless cradle are in compliance
with the essential requirements and other
relevant provisions of Directive 1999/5/EC.
The Declaration of Conformity may be consulted
in the Product Stewardship page at
education.ti.com.
Dansk Texas Instruments erklærer hermed, at dette
TI-Navigator™-adgangspunkt og denne trådløse
TI-Nspire™ Navigator™-holder er i
overensstemmelse med de væsentlige krav og
andre relevante bestemmelser i direktiv
1999/5/EF.
Overensstemmelsesdirektivet (Declaration of
Conformity) kan findes på Product Stewardship
siden på education.ti.com.
Norsk Hierbij verklaart Texas Instruments dat het
TI-Navigator™ toegangspunt en de TI-Nspire™
Navigator™ draadloze houder voldoen aan de
wezenlijke vereisten en andere relevante
bepalingen van de Richtlijn 1999/5/EC.
Samsvarserklæringen kan konsulteres på
produktforvaltningssiden (Product Stewardship)
på education.ti.com.
TI-Navigator_Help_PRINT.book Page 160 Tuesday, January 26, 2010 10:29 AM

161
Suomi Texas Instruments vakuuttaa, että tukiasema
TI-Navigator™ ja langaton teline TI-Nspire™
Navigator™ täyttävät niitä koskevat oleelliset
vaatimukset ja muut direktiivin 1999/5/EY ehdot.
Vaatimustenmukaisuusvakuutus on saatavilla
tuotteen ympäristövaikutuksen sivulta
osoitteessa education.ti.com.
Français Par le présent, Texas Instruments déclare que le
point d'accès TI-Navigator™ et le support sans fil
TI-Nspire™ Navigator™ sont conformes aux
conditions essentielles et aux autres dispositions
appropriées de la Directive 1999/5/EC.
La déclaration de conformité peut être consultée
sur le site education.ti.com à la page
Responsabilité Produit (Product Stewardship)
Deutsch Hiermit erklärt Texas Instruments, dass der
Zugang zu TI-Navigator™ und das drahtlose
System TI-Nspire™ Navigator™ den wesentlichen
Anforderungen und anderen relevanten
Bestimmungen der Richtlinie 1999/5/EC
entsprechen.
Die Konformitätserklärung ist unter
Produktbetreuung (Product Stewardship) bei
education.ti.com einzusehen.
Italiano Texas Instruments dichiara che il TI-Navigator™
access point e il caricatore wireless TI-Nspire™
Navigator™ sono conformi con i requisiti
essenziali e altri provvedimenti pertinenti della
Direttiva 1999/5/EC.
La dichiarazione di conformità può essere
consultata sulla pagina Product Stewardship del
sito education.ti.com.
TI-Navigator_Help_PRINT.book Page 161 Tuesday, January 26, 2010 10:29 AM

162
Nederlands Texas Instruments erklærer herved at
TI-Navigator™ aksesspunkt og TI-Nspire™
Navigator™ trådløs krybbe er i
overensstemmelse med de vesentligste kravene
og andre relevante bestemmelser i Direktivet
1999/5/EC.
De verklaring van overeenstemming kan worden
geraadpleegd op de pagina Product Stewardship
(Productverantwoordelijkheid) op
education.ti.com.
Português Texas Instruments declara por meio deste
documento que TI-Navigator™ access point e
TI-Nspire™ Navigator™ wireless cradle estão em
conformidade com os requisitos essenciais e
outras disposições relevantes da Directiva
1999/5/CE.
Pode-se consultar a Declaração de Conformidade
na página de Gestão de Produto, (Product
Stewardship) no sítio education.ti.com.
Español Por el presente documento, Texas Instruments
declara que este punto de acceso TI-Navigator™
y la base de conexión inalámbrica TI-Nspire™
Navigator™ cumplen los requisitos básicos y
otras disposiciones relevantes de la Directiva
1999/5/EC.
La Declaración de Conformidad puede
consultarse en la página de Administración de
Productos (Product Stewardship) en
education.ti.com.
Svenska Texas Instruments intygar härmed att
åtkomstpunkten TI-Navigator™ och den trådlösa
vaggan TI-Nspire™ Navigator™ uppfyller de
väsentliga kraven och andra relevanta
bestämmelser enligt direktivet 1999/5/EG.
Förenlighetsdeklarationen kan konsulteras på
Produktförvaltningssidan (Product Stewardship)
på education.ti.com.
TI-Navigator_Help_PRINT.book Page 162 Tuesday, January 26, 2010 10:29 AM

163
Countries of Operation and Restrictions of Use in the
European Community
Operation Using the 2.400 to 2.4835 GHz Channels in the
European Community
The installer and/or end user should use the configuration utility
provided with this product to verify the current channel of operation, the
expected transmit power level, and to confirm that the device is
operating in conformance with the spectrum usage rules for the selected
European Community country. If operation is occurring outside of
the allowable channels as indicated in this guide, then operation
of the product must cease immediately and the installer must
consult with the local technical support staff responsible for the
wireless network.
These devices are intended to be operated in all countries of the
European Community. Additional restrictions of use for the
TI-Navigator™ access point within the European Community countries in
the 2.400 to 2.4835 GHz band are listed below.
• The frequencies associated with channels 1 to 13 in the 2.400 to
2.4835 GHz band are allowed to be used either indoors or outdoors
in all countries of the European Community, except where noted
below:
• In Greece, Italy, Latvia, and Spain the end-user must apply for a
license from the national spectrum authority to operate this device
outdoors. Please consult the TI-Navigator™ User's Guide for further
information regarding restrictions and operating conditions for
outdoor configurations.
• In France, the following operation is permitted:
– Outdoor operation is only permitted using the 2.400 - 2.454 GHz
band, which includes channels 1 to 7, at a maximum EIRP of 100
mW (20 dBm).
– Outdoor operation is permitted in the 2.400 to 2.4835 GHz band
on channels 1 to 13 at a maximum EIRP of 10 mW (10 dBm).
– Indoor operation is permitted in the 2.400 to 2.4835 GHz band
on channels 1 to 13 at a maximum EIRP of 100 mW (20 dBm).
Warning Statements
Warning! Install the TI-Navigator™ access point in such a manner as to
maintain a minimum of 20 cm (7.9 inches) separation distance between
the radiating element(s) and all persons. This safety warning conforms to
FCC radio frequency exposure limits.
TI-Navigator_Help_PRINT.book Page 163 Tuesday, January 26, 2010 10:29 AM

164
Warning! Do not touch or move the TI-Nspire™ access point when the
antennas are transmitting or receiving.
Warning! The TI-Nspire™ access point and TI-Nspire™ Navigator™
wireless cradle are intended for indoor use only. Do not install the device
nor operate it outdoors.
Warning! Intentional radiators, such as the TI-Nspire™ access point and
TI-Nspire™ Navigator™ wireless cradle, are not intended to be operated
with any antenna(s) other than those furnished by Texas Instruments. An
intentional radiator may only be operated with the antenna(s) with
which it is authorized.
Warning! The TI-Nspire™ access point radio(s) are disabled by default
and can be enabled only by the system administrator using the
Management software application.
Warning! The radio frequency band, operating channels, and transmit
power depend on the country of operation specified by the system
administrator during setup and configuration using the Management
software.
Warning! Only qualified personnel must perform installation. Read and
follow all warning notices and instructions marked on the product or
included in the documentation.
TI-Navigator_Help_PRINT.book Page 164 Tuesday, January 26, 2010 10:29 AM

Texas Instruments Support and Service 165
Texas Instruments Support and Service
For general information
For technical support
For product (hardware) service
Customers in the U.S., Canada, Mexico, Puerto Rico and Virgin
Islands: Always contact Texas Instruments Customer Support before
returning a product for service.
All other customers: Refer to the leaflet enclosed with this product
(hardware) or contact your local Texas Instruments retailer/distributor.
Home Page: education.ti.com
KnowledgeBase and
e-mail inquiries:
education.ti.com/support
Phone: (800) TI-CARES / (800) 842-2737
For U.S., Canada, Mexico, Puerto Rico, and
Virgin Islands only
International
information:
education.ti.com/international
KnowledgeBase and
support by e-mail:
education.ti.com/support
Phone
(not toll-free):
(972) 917-8324
TI-Navigator_Help_PRINT.book Page 165 Tuesday, January 26, 2010 10:29 AM

166 Texas Instruments Support and Service
TI-Navigator_Help_PRINT.book Page 166 Tuesday, January 26, 2010 10:29 AM

Index
167
A
access point
activating 12
adding 135
disconnecting 135
LEDs 137
account, teacher 27
adding
access point 135
files to transfer list 126
students to classes 43
arranging seating chart 48
assignment file description 123
assignment type description 123
auto-refresh captured screens 95
B
batteries
charging 4
battery information 134
beginning class sessions 38
C
calculator screens
capturing 90
refreshing captured 94
calculators
connecting to cradles 6
error messages 146
sending files from 66
canceling file transfers 76
captured screens
rearranging 93
refreshing 94, 95
saving 93
capturing calculator screens 90
changing
Classroom tab view 38
correct responses 118
maximum scores 118
student classes 50
student names 52
charging wireless cradles 4
checking student login status 48
Class Analysis
changing correct responses 118
changing scores 118
description 107
file types 122
grading questions 118
item view 115
opening 107
opening from Class Record 107
opening from Portfolio 108
send assignment to Portfolio 108
student view 112
summary view 109
Class Record
canceling file transfers 76
checking file transfers status 75
opening Class Analysis 107
removing items 26, 40
saving items to Portfolio 26, 58
sending assignment to Portfolio
108
using 25
viewing file properties 76
class sessions
beginning 38
ending 38
classes
adding students to 43
changing for students 50
changing view 38
copying students to 54
creating 35
frequently-asked questions 139
moving students to 54
removing 41
removing students from 44
selecting 37
Classroom kit 3
Classroom tab
changing view 38
parts of 23
closing
Quick Poll 88
Transfer Tool 131
collecting files 67
TI-Navigator_Help_PRINT.book Page 167 Tuesday, January 26, 2010 10:29 AM

168
compare student screens 98
computer home screen 22
Class Record 25
Classroom tab 23
Current Class 24
Tools tab 23
computer tools, launching 27
computers
error messages 145
sending files from 63
connecting
calculators to wireless cradles 6
contact TI 165
contents of kits 2
copying students 54
copying/pasting screens 99
copyright statement ii
correct response description 123
correct response,changing 118
cradles
charging 4
checking LEDs 5
connecting calculators to 6
removing from network 133
creating
classes 35
movie in Live Presentation 104
teacher account 27
Current Class tab on home screen 24
customer support and service 165
D
deleting files from Portfolio 60
disconnecting the access point 135
display names
showing and hiding in Quick Poll
87
E
ending class sessions 38
error messages 144
F
FCC statement 157
file transfers
canceling 76
checking status 74
frequently-asked questions 139
file types for Class Analysis 122
file types used in TI-Nspire Navigator
155
files
adding to transfer list 126
canceling transfers 76
collecting 67
removing from transfer list 127
sending 63
sending from calculators 66
sending from computers 63
viewing properties 76
frequently-asked questions 139
classes 139
file transfers 139
network 143
polls 140
Screen Capture 141
students 141
transfers 139
G
Gallery view 96
grading questions 118
H
hiding display names in Quick Poll 87
home screen, computer 22
I
Individual kit 4
inventory 2
item view in Class Analysis 115
K
keyboard shortcuts for Screen
Capture tool 105
kit
Classroom 3
Individual 4
Student 4
TI-Navigator_Help_PRINT.book Page 168 Tuesday, January 26, 2010 10:29 AM

169
L
launching computer tools 27
LEDs
on access point 137
on wireless cradles 18
status on cradles 5
Live Presenter 100
logging in to network (students) 33
login status 48
M
managing teacher account 27
maximum score
changing 118
description 123
moving students 54
N
names
changing 52
navigate stacks 97
network
frequently-asked questions 143
logging in to (students) 33
setting up 12
Network Manager window
refreshing 136
O
opening
Class Analysis 107
Portfolio item 60
Quick Poll 82
Transfer Tool 125
P
passwords
changing for teacher 29
resetting for students 46
pausing polls 83
percent score description 123
Poll Details tab 79, 81
Poll Prompt tab 80
Poll Summary tab 79, 81
polling students 82
polls
frequently-asked questions 140
pausing 83
responding to 84
resuming paused 84
sending results to students 85
sorting data 87
stopping 83
viewing previous 88
viewing results 85
Portfolio 57
deleting items 60
opening an item 60
redistributing an item 61
renaming 61
saving 58
sorting 60
viewing 58
printing screens 99
properties of files 76
Q
Quick Poll 81
closing 88
frequently-asked questions 140
opening 82
pausing polls 83
Poll Details tab 79
Poll Prompt tab 79, 80
Poll Summary tab 79, 81
polling students 82
responding to polls (students) 84
resuming paused polls 84
saving items to Portfolio 58
sending results 85
showing and hiding display
names 87
sorting data 87
stopping polls 83
viewing previous polls 88
viewing results 85
window 79
R
randomize screen capture screens 98
refreshing captured screens 94
TI-Navigator_Help_PRINT.book Page 169 Tuesday, January 26, 2010 10:29 AM

170
refreshing the Network Manager
window 136
removing
classes 41
files from transfer list 127
frames from a stack 97
items from Class Record 40
students from classes 44
removing cradles from network 133
renaming Portfolio items 61
resetting student passwords 46
resize captured screens 93
responding to polls 84
responses, sorting in Quick Poll 87
results of polls, sending 85
resuming paused polls 84
S
saving
a presentation as a movie 104
items to Portfolio 58
screenshots 93
score description 123
score, changing 118
Screen Capture tool
auto-refresh 95
capture calculator screesn 90
compare student screens 98
copying/pasting screens 99
frequently-asked questions 141
Gallery view 89, 96
keyboard shortcuts 105
Live Presenter 100
navigate stacks 97
printing screens 99
randomize screens 98
rearrange captured screens 93
remove frame from stack 97
resize captured screens 93
saving a presentation as a movie
104
show student names 92
slideshows 97
stacks 97
Tiled view 89
screenshots
capturing 90
frequently-asked questions 141
saving 93
seating chart
arranging 48
changing class view 39
selecting classes 37
sending
files 63
files (students) 66
files from calculators 66
files from computers 63
poll results to students 85
service and support 165
setting up network 12
showing display names in Quick Poll
87
slideshows of captured screens 97
sorting
poll data 87
Portfolio items 60
student information 49
stacks 97
navigating 97
removing a frame 97
starting TI-Nspire Navigator 21
stopping polls 83
student information, sorting 49
Student kit 4
student list, changing view 38
student response description 124
student view in Class Analysis 112
student’s score, changing 118
students
adding to classes 43
arranging in seating chart 48
changing classes 50
changing names 52
checking login status 48
copying 54
frequently-asked questions 141
moving 54
polling 82
removing from classes 44
resetting passwords for 46
responding to polls 84
sending files 66
sending poll results to 85
summary view in Class Analysis 109
TI-Navigator_Help_PRINT.book Page 170 Tuesday, January 26, 2010 10:29 AM

171
support and service 165
T
tabs
Classroom 23
Poll Details 79, 81
Poll Prompt 79, 80
Poll Summary 79, 81
Tools 23
teacher
add to classroom view 28
teacher account 27
changing password 29
changing user name 30
terms 153
TI-Nspire Navigator
home screen (computer) 22
logging in to network (students)
33
starting 21
tools (computer) 26
tools
on computer 26
Tools tab 23
Transfer Tool
adding files 126
closing 131
opening 125
removing files 127
transfers
canceling 76
frequently-asked questions 139
troubleshooting 148
U
unpacking the boxes 2
user name, changing for teacher 30
V
view, changing for class 38
viewing
file properties 76
poll results 85
Portfolio 58
previous polls 88
W
window
Quick Poll 79
wireless cradles
charging 4
checking LEDs 5
connecting calculators to 6
wizard
network setup 12
TI-Navigator_Help_PRINT.book Page 171 Tuesday, January 26, 2010 10:29 AM

172
TI-Navigator_Help_PRINT.book Page 172 Tuesday, January 26, 2010 10:29 AM