Texas Instruments TINAVWNA TI-NSPIRE CX WIRELESS NETWORK ADAPTER User Manual C SettingUpSoftware
Texas Instruments Inc. TI-NSPIRE CX WIRELESS NETWORK ADAPTER C SettingUpSoftware
Users Manual

Setting up the TI-Nspire™ Navigator™ Teacher Software 1
Setting up the TI-Nspire™ Navigator™
Teacher Software
This TI-Nspire™ Navigator™ Teacher Software Getting Started Guide is
designed to help you get started with your TI-Nspire™ Navigator™
classroom learning system. This guide gives you information on setting
up the TI-Nspire™ Navigator™ Teacher Software for the first time,
setting up the hardware, creating and managing classrooms, managing
student accounts; and guides you through an introduction of using some
of the features included in the software.
For more detailed information on using these features and to see all of
the features of the TI-Nspire™ Navigator™ Teacher Software, refer to
the TI-Nspire™ Navigator™ Teacher Software Guidebook available at
education.ti.com/guides.
The TI-Nspire™ Navigator™ classroom learning system provides the
hardware and software tools you need to set up a wireless classroom
network.
The system is composed of two parts, hardware and software. The
hardware creates a wireless communications network so that your
computer can communicate with your students’ handhelds. The
hardware includes TI-Nspire™ CX Wireless Network Adapters, TI-Nspire™
Navigator™ Cradles, and the TI-Navigator™ access point.
The wireless adapters are used with the TI-Nspire™ CX handhelds. The
cradles are used with the TI-Nspire™ CX, TI-Nspire™ CX CAS, TI-Nspire™,
or TI-Nspire™ CAS handhelds. The access point is the communication link
used in all wireless classroom setups.
The software contains a number of tools to enhance your classroom,
including:
•Quick Poll. Lets you send polls to your students, receive the students’
responses to the polls, and review the poll results with your students.
•Screen Capture. Lets you capture your students’ handheld screens
automatically or at specific time intervals.
•Live Presenter. Lets you display work as it is being performed on
your handheld screen or your students’ handheld screens.
•Review and Analysis. Lets you collect and review student
assignments, and analyze data for the entire class or for individual
students.
You can obtain educational content on the Web at TI’s Activities
Exchange (education.ti.com/activities).

2 Setting up the TI-Nspire™ Navigator™ Teacher Software
There are a few ways to learn to set up and use the TI-Nspire™
Navigator™ Teacher Software:
•The Start Here Guide—a short version of the setup process with fewer
details.
•This TI-Nspire™ Navigator™ Teacher Software Getting Started Guide,
provided in both printed and PDF formats. The Getting Started Guide
introduces you to the software and walks you through setting up
classrooms.
•The TI-Nspire™ Navigator™ Teacher Software Guidebook, provided
in PDF format and available at education.ti.com/guides. The
TI-Nspire™ Navigator™ Teacher Software Guidebook gives you
complete information on all functions of the software.
After you install the TI-Nspire™ Navigator™ Teacher Software on your
computer, you can use the Getting Started Guide or the Software
Guidebook as a reference for the software tools.
The process of unpacking the equipment, setting up the hardware, and
installing the software will probably require about two hours of your
time.
Unpacking the boxes
The TI-Nspire™ Navigator™ system product consists of TI-Nspire™
Navigator™ Teacher Software, an access point, and either 15 or 30
cradles or wireless adapters, depending on your specific order. If
necessary, you can purchase additional kits to accommodate as many as
40 students.
Identify each item, and check the items against the following lists to
make sure your order is complete.
Setting up the TI-Nspire™ Navigator™ Teacher Software 3
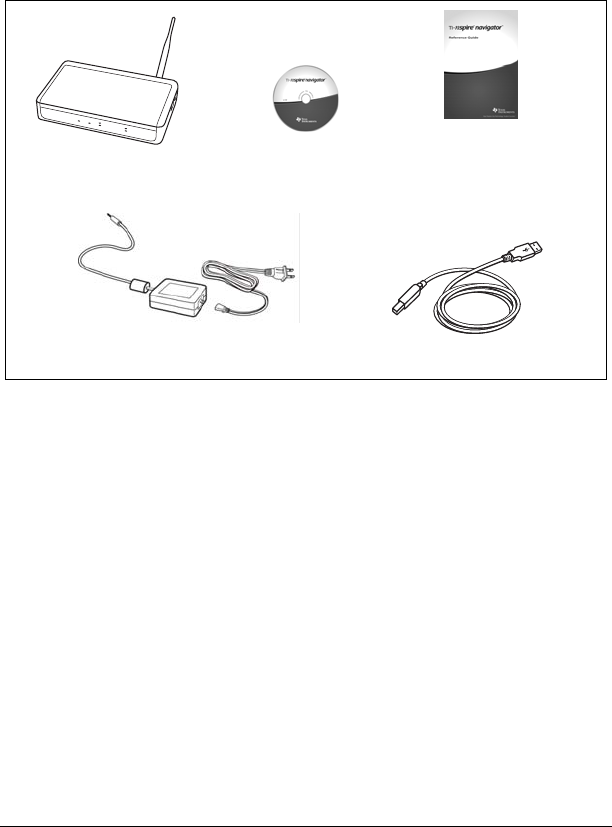
Each TI-Nspire™ Navigator™ system comes with the following items.
• 1 TI-Navigator™ access point
• 1 AC9930 power adapter (includes power supply and power cord)
• 1 USB computer cable
• 1 containing system software
•The TI-Nspire™ Navigator™ Teacher Software Getting Started Guide
Access point
USB cable
AC9930 power adapter for the access point
One
Getting Started guide
4 Setting up the TI-Nspire™ Navigator™ Teacher Software
If you purchased the TI-Nspire™ Navigator™ System for use with the
TI-Nspire™ CX, TI-Nspire™ CX CAS, TI-Nspire™, or TI-Nspire™ CAS
handhelds, your contents include the following items:
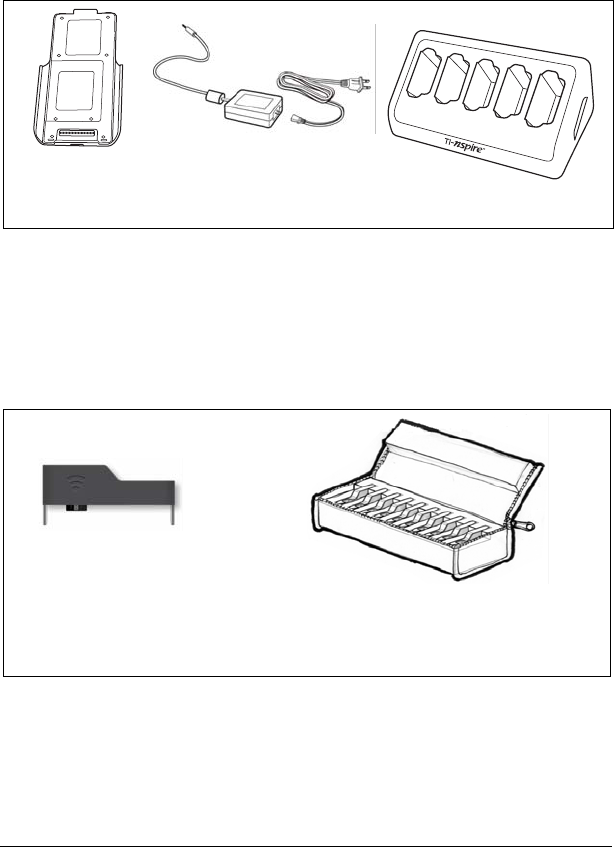
• TI-Nspire™ Navigator™ Cradles
• AC9940 power adapter (includes power supply and power cord)
• TI-Nspire™ Navigator™ Cradle Charging Bay
If you purchased the TI-Nspire™ CX Navigator™ System for use with the
TI-Nspire™ CX or TI-Nspire™ CX CAS handhelds exclusively, your contents
include the following items. Quantities will vary, depending on the
system you purchased.
• TI-Nspire™ CX Wireless Network Adapaters
• TI-Nspire™ CX Wireless Network Adapter storage cases
Cradle charging bay
Cradles AC9940 power adapter
(for the charging bay)
Wireless network
adapter
Storage case for
the TI-Nspire™ CX Wireless Network
Adapters
Setting up the TI-Nspire™ Navigator™ Teacher Software 5
Charging the cradles
The TI-Nspire™ Navigator™ Cradles contain rechargable batteries. You
must charge the batteries overnight before using them in your class.
When the cradles are fully charged, they will function all day under
continuous use. You should recharge them each night.
The TI-Nspire™ Navigator™ Cradle Charging Bay can hold from one to
five cradles. After you place the cradles in the charging bay, they are
charged simultaneously until all are fully charged. If the batteries are
fully discharged, it may take up to 12 hours to fully charge the batteries.
Note: You cannot damage the batteries by leaving them in the charging
bay beyond the time needed to fully charge them. Also, it is not
necessary to fully discharge the batteries before recharging them.
Make sure you have enough (3–4) power outlets for the equipment you
received. If necessary, obtain a plug strip so that you have plenty of
grounded outlets.
1. Insert the small end of the AC9940 power adapter cord into the
charging bay’s power jack.
2. Plug the other end of the adapter into a power outlet.
3. Insert each TI-Nspire™ Navigator™ wireless cradle into the
TI-Nspire™ Navigator™ Cradle Charging Bay. Make sure the LED is
amber.
Note: You can charge a single wireless cradle using an AC9926 adapter
(sold separately).
Checking the LEDs
Two LEDs (small lights) at the top of each TI-Nspire™ Navigator™
wireless cradle blink or change colors to indicate various operations or
status.

6 Setting up the TI-Nspire™ Navigator™ Teacher Software
The LED indicates network activity. The LED indicates battery-
charging status.
When the cradles are still in the TI-Nspire™ Navigator™ Cradle Charging
Bay:
• A solid amber LED means the wireless cradle is currently
recharging.
• A solid red LED means the wireless cradle does not have good
contact with the charging bay. Reposition the cradle so it has good
contact and the LED turns amber.
• A solid green LED means the wireless cradle is fully charged.
Installing the handheld software
Before you use the TI-Nspire™ Navigator™ Teacher Software with your
handhelds, make sure you have the latest operating system installed on
all of the handhelds in order for the software to work properly.
You can use the TI-Nspire™ Navigator™ Teacher Software to update the
handheld operating system.
Note: After you install the latest OS on one handheld, you can use that
handheld to install the OS on other handhelds.
1. Make sure you have connected a TI-Nspire™ handheld to your
computer.
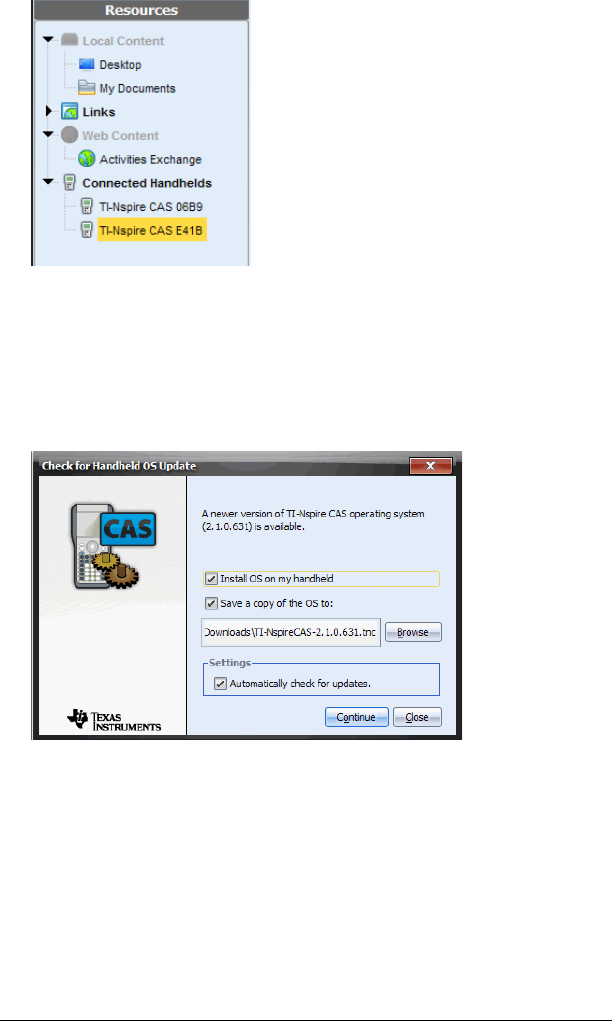
2. Open the TI-Nspire™ Navigator™ Teacher Software.
3. Make sure you are in the Content workspace.
The software displays a list of connected handhelds in the Resources
pane and lets you select one.
Note: You can communicate with only one handheld at a time.
LEDs
Setting up the TI-Nspire™ Navigator™ Teacher Software 7
4. If multiple handhelds are connected, click the handheld to which you
want to connect.
5. Click Help >Check for Handheld OS Update.
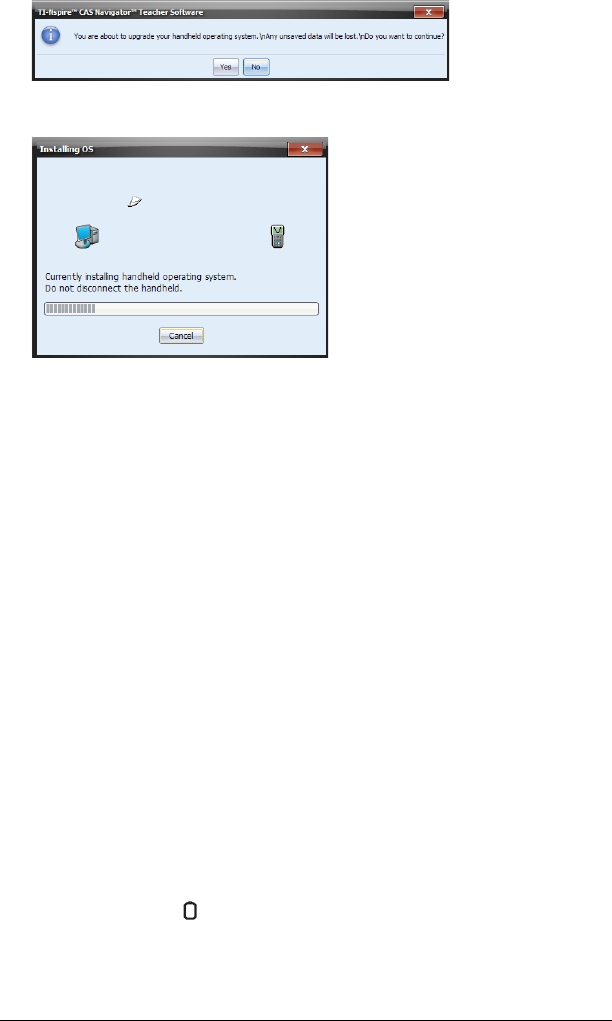
TI-Nspire™ Navigator™ Teacher Software displays a dialog box asking
if you want to install the OS on the handheld, save it to your
computer, or both.
6. Click Browse if you want to change the location to save the handheld
operating system.
7. Click Continue.
8. Accept the license agreement and click Continue.
TI-Nspire™ Navigator™ Teacher Software displays a message box
warning you that any unsaved data will be lost. Click Yes to continue.
8 Setting up the TI-Nspire™ Navigator™ Teacher Software
A progress screen is displayed.
9. When the operating system software has transferred to your
TI-Nspire™ handheld, click OK. You may now disconnect the
handheld from your computer, and the operating system software
will install itself onto your handheld.
Note: Consider keeping one or two spare handhelds with the latest
operating system and ample memory. It is also a good idea to have spare
cradles on hand. If a problem occurs, you can substitute a spare part.
Setting up your TI-Nspire™ Navigator™ network
the first time
A Network Setup wizard helps you activate the access point and wireless
adapters and cradles for wireless communication.
If you have not used the TI-Nspire™ Navigator™ Teacher Software
before, a prompt opens asking if you want to set up your classroom. You
can choose to set up your classroom or continue on to the TI-Nspire™
Navigator™ computer home screen.
Before you begin
1. Make sure you have installed and activated the TI-Nspire™
Navigator™ Teacher Software on your computer.
2. If you are using TI-Nspire™ Navigator™ Cradles, make sure each
cradle is charged ( LED is solid amber or solid green).
Note: If you are using TI-Nspire™ Wireless Network Adapters, you do not
need to charge them. The wireless network adapters are powered by the
TI-Nspire™ CX or TI-Nspire™ CX CAS handheld.
Setting up the TI-Nspire™ Navigator™ Teacher Software 9
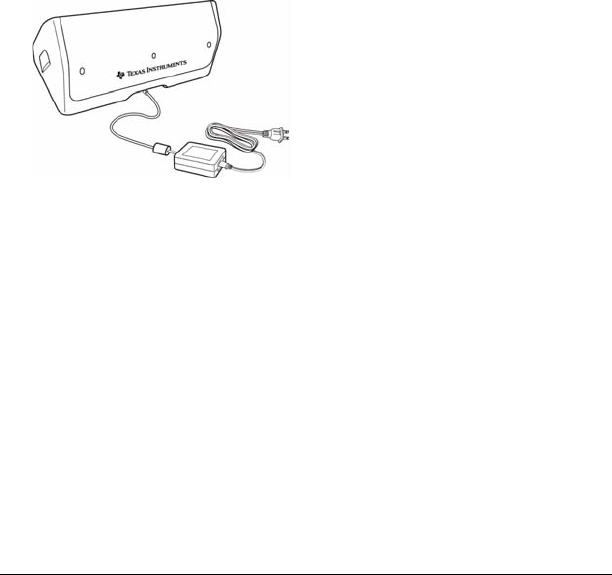
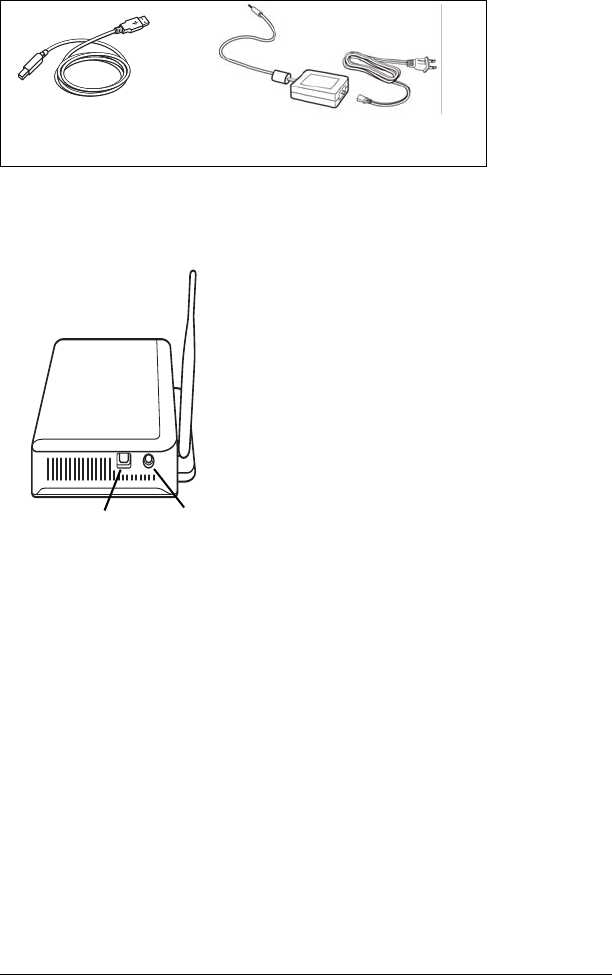
Connecting the cables to the access point
1. Identify the cables.
2. Connect the AC9930 power adapter to the power jack on the access
point.
3. Connect the USB cable to the access point.
4. Make sure the access point power light is on.
AC9930 Power adapter
USB cable
USB connection
Access point, side view
Power adapter
jack

10 Setting up the TI-Nspire™ Navigator™ Teacher Software
Checking the access point LEDS
POWER – Indicates that the access point is receiving power from the
power adapter.
TEST – The access point is in self-test mode. This LED should blink for a
minute and then stop.
STATUS: 100 LINK/ACT – Indicates data transfer.
SIGNAL: 802.11 b/g – Indicates wireless link activity.
Starting the wizard
When you complete the installation of the TI-Nspire™ Navigator™
Teacher Software, open TI-Nspire™ Network Manager to set up your
system.
To open Network Manager, click Tools > Network Manager.
A setup wizard helps you through the next steps.
Note: You can run the setup wizard later by opening TI-Nspire™
Network Manager and clicking Actions > Network Setup Wizard.
1. Confirm that the AC9930 power adapter is connected to the access
point.
2. Plug the AC adapter into a power outlet.
3. Plug the USB cable into the computer.
4. Click Next to proceed with the wizard.
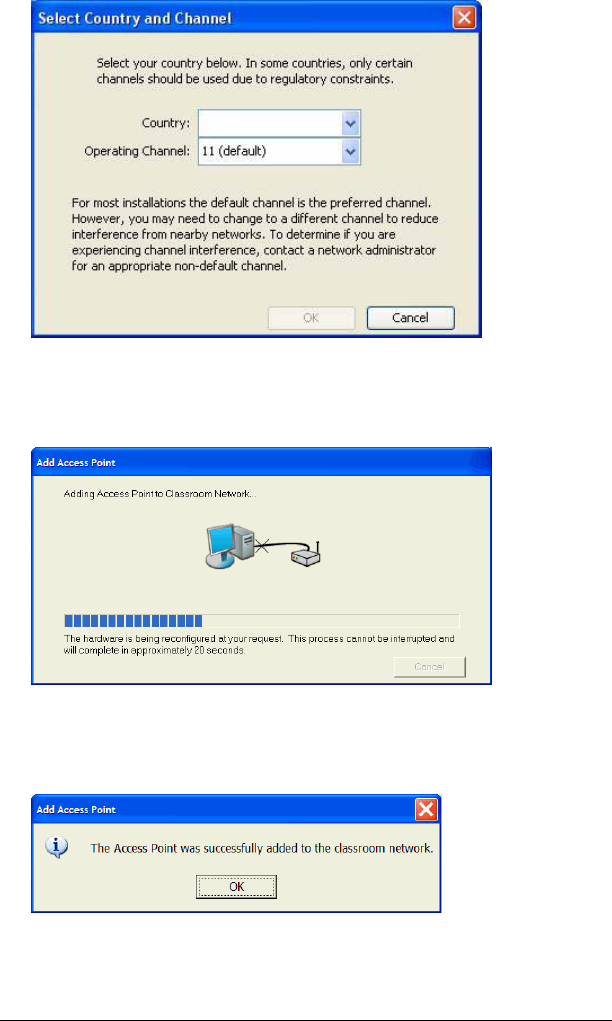
TI-Nspire™ Network Manager displays a dialog box to select a country
and channel.
Power Test
Status
Signal
Setting up the TI-Nspire™ Navigator™ Teacher Software 11
5. Select your country. The operating channel is automatically set to a
default setting.
6. Click OK.
TI-Nspire™ Network Manager sends signals to the access point to add
it to the network.
After the access point is found, the wizard displays a message.
7. Click OK.
12 Setting up the TI-Nspire™ Navigator™ Teacher Software
The software may display a message saying the access point firmware
needs to be updated. Click Yes to update the access point firmware.
The next step is to add the TI-Nspire™ CX Wireless Network Adapters
or TI-Nspire™ Navigator™ Cradles to your classroom network. The
wireless adapters are used to communicate between the TI-Nspire™
CX handhelds and the access point. The cradles are used to
communicate between any of the TI-Nspire™ handhelds and the
access point. Both the wireless adapters and the cradles allow
teachers to communicate with the students’ handhelds to transfer
files, update the OS, and other actions.
Note: The TI-Nspire™ Network Manager wizard automatically guides
you through the process for adding wireless adapters or cradles. You
can automatically or manually add wireless adapters or cradles at any
time by following the procedures below.
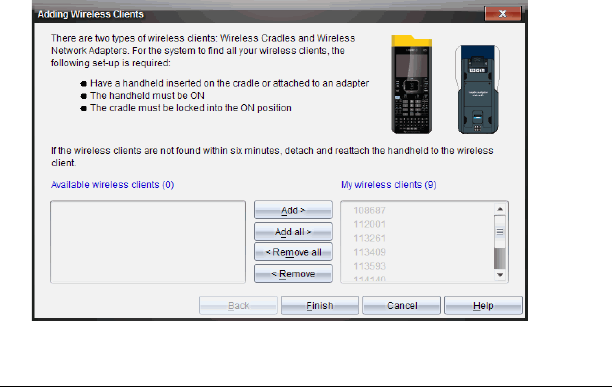
Adding wireless adapters or cradles automatically
Before you use the auto-discover feature, make sure the TI-Nspire™
Navigator™ Cradles are charged.
1. Click Auto-Discover Wireless Client(s).
2. Turn on each TI-Nspire™ handheld.
3. Attach the wireless adapter or the wireless cradle to each handheld.
(See the instructions below for connecting wireless adapters or
cradles to a TI-Nspire™ handheld.)
After a brief search for existing wireless adapters or cradles, a dialog
box opens, listing all adapters and cradles that were found.
Setting up the TI-Nspire™ Navigator™ Teacher Software 13
4. Highlight each wireless adapter or wireless cradle you want to add,
and click Add.
To add all of the wireless clients listed in the Available Wireless Clients
column, click Add All.
Note: If the adapter or cradle does not appear in the Available
Wireless Clients column after 6 minutes, try these tips:
• Check the ID numbers of the wireless adapters or cradles to see
which ones are not connecting.
• Detach and reattach the wireless adapter or wireless cradle to the
handheld.
• Verify that the cradle is locked. (The lock on the back of the cradle
is in the ON position.)
5. When all of the adapters and cradles are added, click Finish.
Adding wireless adapters or cradles manually
When you add a wireless adapter or cradle manually, it immediately
appears in the TI-Nspire™ Network Manager window.
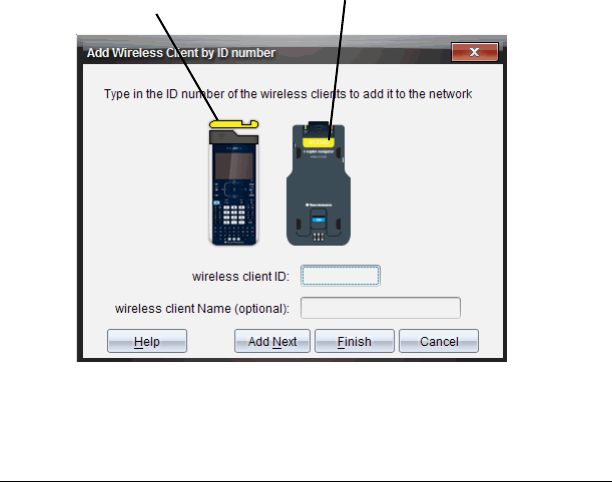
1. Click Manually Add Wireless Client(s).
The Add Wireless Clients by ID Number dialog box displays.
2. For each wireless adapter or cradle you are adding, identify the ID
number on the back of the adapter or cradle, and enter it in the
Wireless Client ID box. The ID is six digits.
Wi
re
l
ess networ
k
adapter ID
Cradle ID

14 Setting up the TI-Nspire™ Navigator™ Teacher Software
3. Enter a nickname in the Wireless Client Nickname box (optional).
Nicknames can consist of letters, spaces, and numbers. A nickname
must contain a minimum of 1 character and can contain a maximum
of 64 characters.
4. Click Add Next to add another adapter or cradle if you have more
than one wireless client to add.
5. When you are finished adding all of the adapters and cradles, click
Finish.
Removing adapters or cradles from an existing network
Even though a classroom network has been set up correctly, sometimes
you may need to remove TI-Nspire™ Navigator™ Wireless Network
Adapters or TI-Nspire™ Navigator™ Cradles from the network.
You might need to remove adapters or cradles because your access point
has been associated with wireless clients that should belong to another
classroom.
1. In the TI-Nspire™ Network Manager window, select the wireless
adapters and cradles that you want to remove from the network.
2. Click Actions > Remove Selected or click .
3. Click Remove at the prompt.
The wireless client is no longer listed in the Network Manager
window.
Connecting the handhelds to the wireless
adapters
The TI-Nspire™ CX wireless network adapters work with the TI-Nspire™
CAS and TI-Nspire™ CX CAS handhelds. To connect the handheld to the
wireless adapter, follow these steps.
1. Position the wireless adapter on top of the handheld so the connector
on the adapter lines up with the connector on top of the handheld.

Setting up the TI-Nspire™ Navigator™ Teacher Software 15
2. Slide the adapter into position, making sure the guides on the sides
of the adapter slide into the grooves on the sides of the handheld.
3. Firmly press the adapter into place.
Guides for aligning with
handheld
Connector
Grooves to
align wireless
adapter
Sideview of
handheld
16 Setting up the TI-Nspire™ Navigator™ Teacher Software
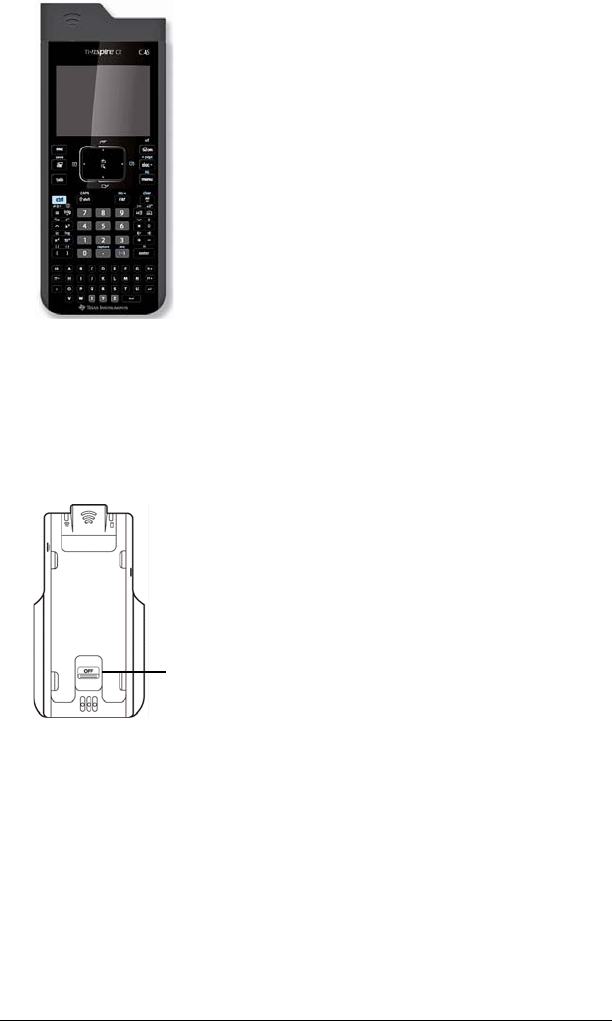
Connecting the handhelds to the cradles
The cradles work with the TI-Nspire™, TI-Nspire™ CAS, TI-Nspire™ CX
and TI-Nspire™ CX CAS handhelds. To connect the handheld to the
cradle, follow these steps.
1. Slide the lock on the back of the cradle to the OFF position.
2. To attach the handheld, face the screen upward and slide the
handheld onto the top of the TI-Nspire™ Navigator™ wireless cradle.
Be sure that both sides of the handheld are inserted into both of the
side guides.
Lock in OFF position.
Setting up the TI-Nspire™ Navigator™ Teacher Software 17
3. Press firmly to make a good connection. When properly connected,
the TI-Nspire™ handheld appears to be sitting on top of the cradle.
4. Lock the handheld in place by sliding the lock on the back of the
cradle to the ON position.
5. Insert each cradle into the charging bay. Make sure the LED is amber.
At the end of the school day, return the wireless cradle to the charging
bay and charge them overnight. The cradles are charged when all the
(power status) LEDs are solid green or amber.
Lock in ON position.
18 Setting up the TI-Nspire™ Navigator™ Teacher Software
Storing the wireless adapters and cradles
When you charge the handhelds overnight, you can leave the TI-Nspire™
Wireless Network Adapters attached to the handhelds before placing the
handhelds in the TI-Nspire™ CX Docking Station. When you are ready to
use the handhelds the next morning, the handheld should be fully
charged, and the adapter is ready for use.
You can remove the wireless adapter from the handheld, and store the
adapters in the adapter storage case overnight.
If you need to store the wireless adapters for more than two weeks,
remove the wireless adapter from the handheld, and store the adapters
in the adapter storage case. Place the storage case in a cool, dry place.
If you need to store the TI-Nspire™ Navigator™ Cradles for more than
two weeks, remove the handhelds from the cradles, and store the cradles
in a cool, dry place. You cannot damage the batteries by leaving them in
the charging bay beyond the time needed to fully charge them, or by
leaving them in the charging bay while the charging bay is unplugged.
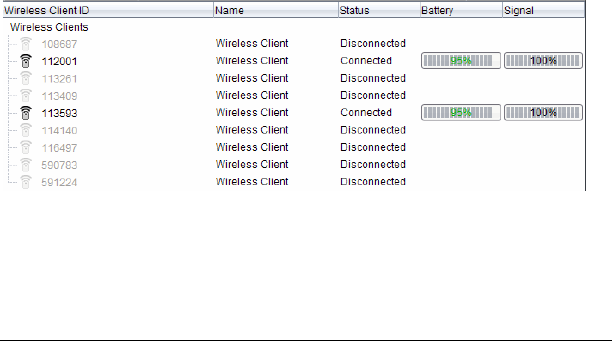
Checking the status of wireless adapters and
cradles
After you have added wireless adapters or cradles automatically or
manually, all of the adapters or cradles you added appear in the
TI-Nspire™ Network Manager window. If the wireless adapter or cradle is
charged and attached to a TI-Nspire™ handheld that is powered on,
TI-Nspire™ Network Manager shows the status as connected. It may take
up to 30 seconds to recognize the wireless client and show its status as
connected. The status window also displays the battery status and signal
strength.

Setting up the TI-Nspire™ Navigator™ Teacher Software 19
If the cradle is not charged, or the adapter or cradle is not connected to a
TI-Nspire™ handheld that is powered on, TI-Nspire™ Network Manager
displays the status as disconnected. TI-Nspire™ Network Manager
remembers the adapter and cradle IDs you added, and the next time you
turn on the TI-Nspire™ handheld that is connected to the adapter or
cradle, TI-Nspire™ Network Manager recognizes it.
Note: To refresh the TI-Nspire™ Network Manager window, click
View > Refresh or click .
Identifying selected cradles
At times you may have a problem with one or two TI-Nspire™
Navigator™ Cradles in your network that aren’t responding. When you
look at the list of cradles in the TI-Nspire™ Network Manager window,
you can identify which ones are not responding by the Status message,
and you can see the serial numbers.
You could match the serial numbers in the window with the ones printed
on the back of each wireless cradle. However, TI-Nspire™ Network
Manager gives you an easier way to physically locate them. You can use
the Identify selected command to quickly tell which cradles are working
properly in your classroom.
1. From the list of hardware components in the TI-Nspire™ Network
Manager window, click to select all of the working cradles. To select
more than one cradle, press and hold the Shift or Ctrl key
(Macintosh®: “key), and click the items you want to select.
2. Click Actions > Identify Selected.
3. Look around your classroom at the cradles in your network. Both LEDs
on the cradles that you selected will blink rapidly with a green color.
You can identify the cradles that are not working because their LEDs
are not blinking.

20 Setting up the TI-Nspire™ Navigator™ Teacher Software
Now that you know where the non-working cradles are, you can add the
cradles to the network again.
Cradle LEDs
The LEDs on each cradle use various colors and blink patterns to indicate
data activity or power status. This can occur either when the cradles are
seated in the charging bay or when they are outside the charging bay.
The LEDs indicate status as follows.
Activity LED
Color and pattern Meaning
Blinking green Indicates data transfer to and from the
access point.

Setting up the TI-Nspire™ Navigator™ Teacher Software 21
Battery (Power Status) LED
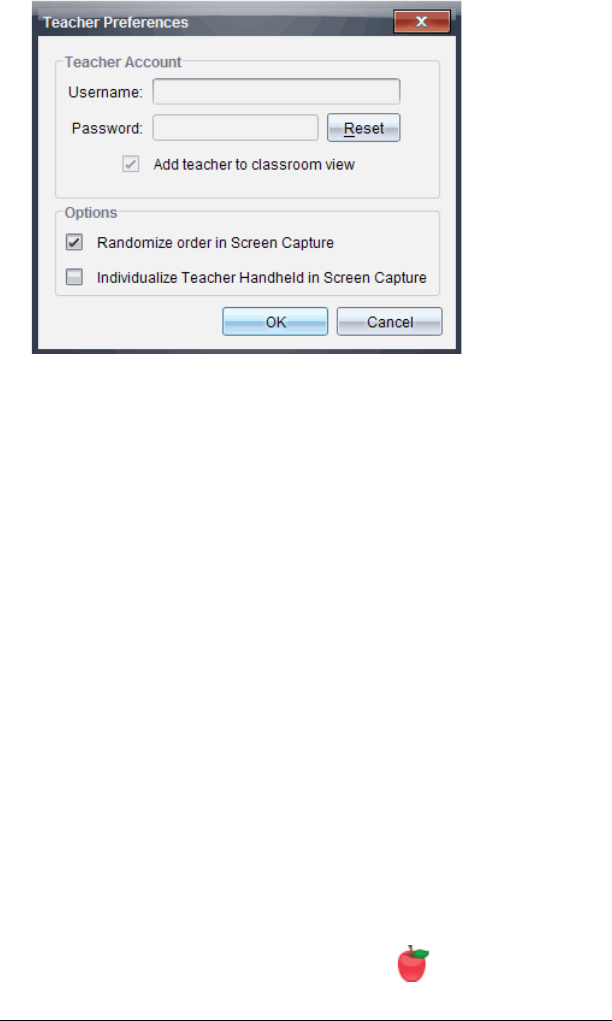
Creating and managing your teacher account
You can create your teacher account in the Teacher Preferences section of
the TI-Nspire™ Navigator™ Teacher Software. Your teacher account lets
you log in to the TI-Nspire™ Navigator™ network from your handheld.
After you create your teacher account, you can later change your
password or your user name.
Creating your teacher account
1. Use the Workspace selector to choose the Class workspace.
2. Click File > Settings > Teacher Preferences .
The Teacher Preferences dialog box opens.
Color and pattern Meaning
In the charging bay
Solid amber The battery is charging.
Solid green Power on; charged and powered by a
charging bay or power adapter.
Solid red The battery is charging, but does not have
good contact with the charging bay.
Reposition the cradle so it has good contact.
The LED should then turn amber to indicate
it is recharging.
Outside the charging bay
Blinking green Power on; battery powered. The battery is
30% to 99% charged.
Blinking amber Low battery (less than 30% charged).
Blinking red Battery is critically low (less than 8%
charged).
22 Setting up the TI-Nspire™ Navigator™ Teacher Software
3. Enter a username.
4. Enter a password.
5. Select or deselect the preference for the teacher icon to appear in the
classroom view.
If you select this preference, the teacher icon will appear in the
classroom view, and you will be included as a recipient in Send to
Class, Collect from Class and Delete from Class operations. The
teacher handheld screen will be included in screen captures of the
class.
6. Select or deselect the options to randomize the order in Screen
Capture, and to individualize the teacher handheld in Screen Capture.
• Randomize order in Screen Capture: selecting this option captures
and displays student screens in a random order, not the order on
the class listing. This enables students to concentrate on the
assignment, not whose screen they are viewing.
• Individualize Teacher Handheld in Screen Capture: selecting this
option shows the teacher’s screen in the screen capture.
7. Click OK.
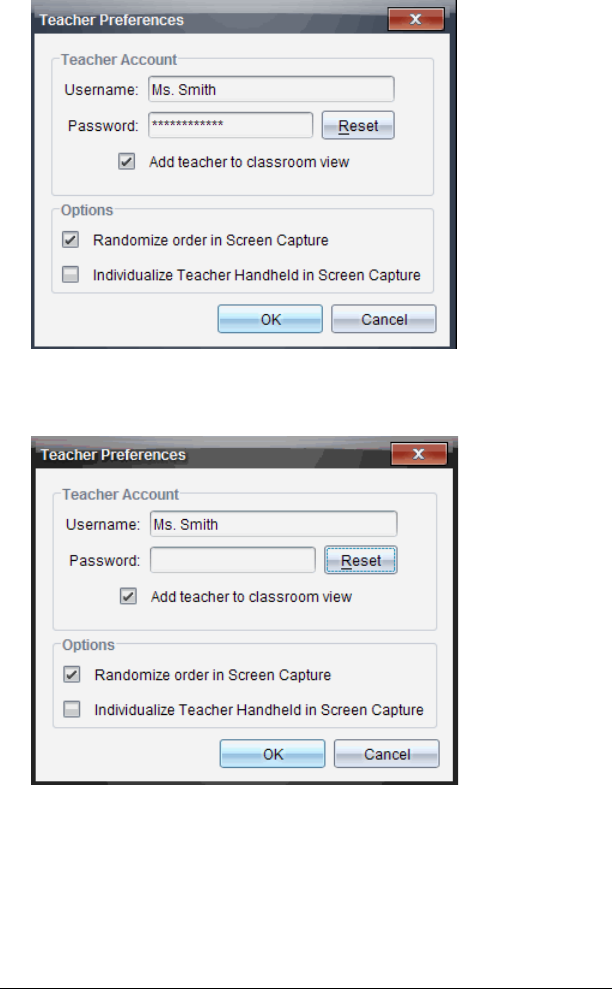
Changing the password of your teacher account
1. Make sure you are not logged in to the TI-Nspire™ Navigator™
network on your handheld.
2. Click File > Settings > Teacher Preferences .
Setting up the TI-Nspire™ Navigator™ Teacher Software 23
The Teacher Preferences dialog box opens.
3. Click Reset.
TI-Nspire™ Navigator™ software clears the current password.
4. Enter a new password.
5. Click OK.
Changing the user name of your teacher account
1. Make sure you are not logged in to the TI-Nspire™ Navigator™
network on your handheld.
24 Setting up the TI-Nspire™ Navigator™ Teacher Software
2. Click File > Settings > Teacher Preferences .
The Teacher Preferences dialog box opens.
3. Enter a new user name.
4. Click OK.
Logging in to the TI-Nspire™ Navigator™ system
from the handheld
The TI-Nspire™ Navigator™ classroom learning system uses both your
computer and your students’ handhelds. In order for you and your
students to communicate using the TI-Nspire™ Navigator™ network,
your students must log in to the network from their handhelds.
Note: You do not have to log in to communicate with your students’
handhelds; you can use the Transfer Tool to delete files or send files and
operating systems to the students handhelds. However, if you plan to
participate from your handheld during the TI-Nspire™ Navigator™ class
session, then you must log in to the TI-Nspire™ Navigator™ network
from your handheld.
Before you log in, make sure these items are ready:
• You have created your teacher account in Teacher Preferences.
• You have started a class session on your computer.
• The TI-Nspire™ handheld is ready for login. (The icon is
blinking.)
Setting up the TI-Nspire™ Navigator™ Teacher Software 25
Before your students log in, make sure you have completed these items:
• Create your students’ accounts.
• Provide your students with their usernames and, if necessary, their
passwords.
Logging in to the TI-Nspire™ Navigator™ network
1. To log in, do one of the following:
– From the home screen of your TI-Nspire™ handheld, select
5:Settings & Status > 5:Login.
– From a screen other than the home screen:
On a TI-Nspire™ Touchpad, press ~> 8:Login.
On a TI-Nspire™ Clickpad, press /c> 8:Login.
2. Type your username and password. (Press e to move to the next
field.)
3. Select Login.
The Login Successful screen displays.
TI-Nspire™ handheld login status icons
The icons on the TI-Nspire™ CX, TI-Nspire™ CX CAS, TI-Nspire™, and
TI-Nspire™ CAS handheld screens indicate the communication status
between the handheld and the access point, wireless adapter, wireless
cradle, or TI-Navigator™ network. The icons indicate status as follows.
Icon Status Meaning
Blinking The handheld is searching for an access
point.
Solid The handheld has found an access point.
Solid The handheld is not communicating
with the adapter or cradle. Unattach the
handheld from the adapter or cradle,
wait for the icon to disappear, and then
reattach the handheld to the adapter or
cradle.

26 Setting up the TI-Nspire™ Navigator™ Teacher Software
Blinking The handheld is connected to the
network and is ready to login.
Solid The handheld is logged in to the
network and is fully charged.
Icon Status Meaning

201
FCC Statement
Note: This equipment has been tested and found to comply with the
limits for a Class B digital device, pursuant to Part 15 of the FCC Rules.
These limits are designed to provide reasonable protection against
harmful interference in a residential installation. This equipment
generates, uses and can radiate radio frequency energy and, if not
installed and used in accordance with the instructions, may cause
harmful interference to radio communications. However, there is no
guarantee that interference will not occur in a particular installation.
If this equipment does cause harmful interference to radio or television
reception, which can be determined by turning the equipment off and
on, the user is encouraged to try to correct the interference by one or
more of the following measures:
• Reorient or relocate the receiving antenna.
• Increase the separation between the equipment and receiver.
• Connect the equipment into an outlet on a circuit different from that
to which the receiver is connected.
• Consult the dealer or an experienced radio/TV technician for help.
USA FCC Information Concerning Radio Frequency
Interference
Federal Communication Commission Interference
Statement
This equipment has been tested and found to comply with the limits for a
Class B digital device, pursuant to Part 15 of the FCC Rules. These limits
are designed to provide reasonable protection against harmful
interference in a residential installation. This equipment generates, uses,
and can radiate radio frequency energy and, if not installed and used in
accordance with the instructions, may cause harmful interference to
Product Name:
TI-Nspire™ Navigator™ Cradle
FCC ID: V7R-TINAVWC2
Product Name:
TI-Navigator™ Access Point
Model Number/Name: NAV-AP-US
FCC ID: V7R-TINAVAP
Product Name:
TI-Nspire™ CX Wireless Network
Adapter
FCC ID:
V7R-TINAVWNA

202
radio communications. However, there is no guarantee that interference
will not occur in a particular installation. If this equipment does cause
harmful interference to radio or television reception, which can be
determined by turning the equipment off and on, the user is encouraged
to try to correct the interference by one or more of the following
measures:
• Reorient or relocate the receiving antenna.
• Increase the separation between the equipment and receiver.
• Connect the equipment into an outlet on a circuit different from that
to which the receiver is connected.
• Consult the dealer or an experienced radio/TV technician for help.
FCC Caution: The TI-Navigator™ Access Point, TI-Nspire™ Navigator™
Cradle, and TI-Nspire™ CX Wireless Network Adapter comply with Part
15 of the FCC Rules. Operation is subject to the following two conditions:
(1) These devices may not cause harmful interference, and (2) these
devices must accept any interference received, including interference
that may cause undesired operation.
RF Radiation Exposure and Hazard Statement:
To ensure compliance with FCC RF exposure requirements, the
TI-Navigator™ access point must be installed in a location such that the
antenna of the device will be greater than 20 cm (7.9 inches) away from
all persons. Using higher gain antennas and types of antennas not
covered under the FCC certification of this product is not allowed.
Installers of the radio and end users of the product must adhere to the
installation instructions provided in this manual.
This transmitter must not be co-located or operating in conjunction with
any other antenna or transmitter.
Non-modification Statement:
Use only the integral antenna supplied by the manufacturer when
operating these devices. Unauthorized antennas, modifications, or
attachments could damage the TI-Navigator™ Access Point, TI-Nspire™
CX Wireless Network Adapter, or TI-Nspire™ Navigator™ Cradle and
violate FCC regulations. Any changes or modifications not expressly
approved by the party responsible for compliance could void the user's
authority to operate this equipment.
Deployment Statement:
This product is certified for indoor deployment only. Do not install or use
this product outdoors.

203
Canadian IC Information
Industry Canada Statement:
Operation is subject to the following two conditions in Canada:
1. these devices may not cause interference, and
2. these devices must accept any interference, including interference
that may cause undesired operation of the device
To prevent radio interference to the licensed service (i.e. co-channel
Mobile Satellite systems) these devices areintended to be operated
indoors and away from windows to provide maximum shielding.
Equipment (or its transmit antenna) that is installed outdoors is subject
to licensing and not supported by the TI-Navigator™ Access Point,
TI-Nspire™ CX Wireless Network Adapter, or TI-Nspire™ Navigator™
Cradle.
European Union and European Free Trade Association
(EFTA) Regulatory Compliance
This equipment may be operated in the countries that comprise the
member countries of the European Union and the European Free Trade
Association. These countries, listed in the following paragraph, are
referred to as The European Community throughout this document:
AUSTRIA, DENMARK, FINLAND, FRANCE, GERMANY, ITALY,
NETHERLANDS, PORTUGAL, SPAIN, SWEDEN, UNITED KINGDOM,
NORWAY, SWITZERLAND
Product Name:
TI-Nspire™ Navigator™ Cradle
IC: 451E-TINAVWC2
Product Name:
TI-Navigator™ Access Point
Model Number/Name: NAV-AP-US
IC: 451E-TINAVAP
Product Name:
TI-Nspire™ CX Wireless Network
Adapter
IC: 451E-TINAVWNA

204
The TI-Navigator™ access point communicates with either a
TI-Navigator™ network hub, TI-Nspire™ Navigator™ wireless cradle, or
TI-Nspire™ CX Wireless Network Adapter via a wireless 802.11b/g link to
provide wireless local area networking (WLAN) capabilities and with a
personal computer using a standard USB cable. The TI-Navigator™ access
point includes one 802.11a and one 802.11b/g radio. In the current
model, NAV-AP-US, the 802.11a radio is disabled at the factory and via
software preventing it from being configured and used when installed at
an end user facility.
Declaration of Conformity
Marking by this symbol:
indicates compliance with the Essential Requirements of the R&TTE
Directive of the European Union (1999/5/EC).
This equipment meets the following conformance standards:
Safety: EN 60950-1:2001 + A11:2004
EMC: EN 55022:2006, EN 55024:1998 + A1:2001 + A2:2003, EN 301-489-1
v1.7.1, EN 301-489-17 v1.3.2, CISPR22:1997, CISPR24
Including: EN 61000-3-2, -3-3, -4-2, -4-3, -4-4, -4-5, -4-6 and -4-11. The
product is also licensed as required for additional country specific
standards as required for the International Marketplace.
Radio: EN 300-328 v.1.7.1 (2006-10)
Electromagnetic compatibility and Radio spectrum Matters (ERM);
Wideband transmission systems; Data transmission equipment operating
in the 2,4 GHz ISM band and using wide band modulation techniques.
Certifications are harmonized to the EN standards covering essential
requirements under article 3.2 of the R&TTE Directive. Compliance
includes testing with the supplied integral antenna.
SAR: EN 50385:2002
European Community Declaration of Conformity
Hereby, Texas Instruments declares that the TI-Navigator™ access point,
TI-Nspire™ Navigator™ wireless cradle, and TI-Nspire™ CX Wireless
Network Adapter are in compliance with the essential requirements and
other relevant provisions of Directive 1999/5/EC.

205
English Hereby, Texas Instruments declares that the
TI-Navigator™ access point, TI-Nspire™
Navigator™ wireless cradle, and TI-Nspire™ CX
Wireless Network Adapter are in compliance
with the essential requirements and other
relevant provisions of Directive 1999/5/EC.
The Declaration of Conformity may be consulted
in the Product Stewardship page at
education.ti.com.
Dansk Hereby, Texas Instruments declares that the
TI-Navigator™ access point, TI-Nspire™
Navigator™ wireless cradle, and TI-Nspire™ CX
Wireless Network Adapter are in compliance
with the essential requirements and other
relevant provisions of Directive 1999/5/EC.
The Declaration of Conformity may be consulted
in the Product Stewardship page at
education.ti.com.
Norsk Hereby, Texas Instruments declares that the
TI-Navigator™ access point, TI-Nspire™
Navigator™ wireless cradle, and TI-Nspire™ CX
Wireless Network Adapter are in compliance
with the essential requirements and other
relevant provisions of Directive 1999/5/EC.
The Declaration of Conformity may be consulted
in the Product Stewardship page at
education.ti.com.
Suomi Hereby, Texas Instruments declares that the
TI-Navigator™ access point, TI-Nspire™
Navigator™ wireless cradle, and TI-Nspire™ CX
Wireless Network Adapter are in compliance
with the essential requirements and other
relevant provisions of Directive 1999/5/EC.
The Declaration of Conformity may be consulted
in the Product Stewardship page at
education.ti.com.

206
Français Hereby, Texas Instruments declares that the
TI-Navigator™ access point, TI-Nspire™
Navigator™ wireless cradle, and TI-Nspire™ CX
Wireless Network Adapter are in compliance
with the essential requirements and other
relevant provisions of Directive 1999/5/EC.
The Declaration of Conformity may be consulted
in the Product Stewardship page at
education.ti.com.
Deutsch Hereby, Texas Instruments declares that the
TI-Navigator™ access point, TI-Nspire™
Navigator™ wireless cradle, and TI-Nspire™ CX
Wireless Network Adapter are in compliance
with the essential requirements and other
relevant provisions of Directive 1999/5/EC.
The Declaration of Conformity may be consulted
in the Product Stewardship page at
education.ti.com.
Italiano Hereby, Texas Instruments declares that the
TI-Navigator™ access point, TI-Nspire™
Navigator™ wireless cradle, and TI-Nspire™ CX
Wireless Network Adapter are in compliance
with the essential requirements and other
relevant provisions of Directive 1999/5/EC.
The Declaration of Conformity may be consulted
in the Product Stewardship page at
education.ti.com.
Nederlands Hereby, Texas Instruments declares that the
TI-Navigator™ access point, TI-Nspire™
Navigator™ wireless cradle, and TI-Nspire™ CX
Wireless Network Adapter are in compliance
with the essential requirements and other
relevant provisions of Directive 1999/5/EC.
The Declaration of Conformity may be consulted
in the Product Stewardship page at
education.ti.com.

207
Português Hereby, Texas Instruments declares that the
TI-Navigator™ access point, TI-Nspire™
Navigator™ wireless cradle, and TI-Nspire™ CX
Wireless Network Adapter are in compliance
with the essential requirements and other
relevant provisions of Directive 1999/5/EC.
The Declaration of Conformity may be consulted
in the Product Stewardship page at
education.ti.com.
Español Hereby, Texas Instruments declares that the
TI-Navigator™ access point, TI-Nspire™
Navigator™ wireless cradle, and TI-Nspire™ CX
Wireless Network Adapter are in compliance
with the essential requirements and other
relevant provisions of Directive 1999/5/EC.
The Declaration of Conformity may be consulted
in the Product Stewardship page at
education.ti.com.
Svenska Hereby, Texas Instruments declares that the
TI-Navigator™ access point, TI-Nspire™
Navigator™ wireless cradle, and TI-Nspire™ CX
Wireless Network Adapter are in compliance
with the essential requirements and other
relevant provisions of Directive 1999/5/EC.
The Declaration of Conformity may be consulted
in the Product Stewardship page at
education.ti.com.
Chinese-
Traditional
Hereby, Texas Instruments declares that the
TI-Navigator™ access point, TI-Nspire™
Navigator™ wireless cradle, and TI-Nspire™ CX
Wireless Network Adapter are in compliance
with the essential requirements and other
relevant provisions of Directive 1999/5/EC.
The Declaration of Conformity may be consulted
in the Product Stewardship page at
education.ti.com.

208
Chinese-Simplified Hereby, Texas Instruments declares that the
TI-Navigator™ access point, TI-Nspire™
Navigator™ wireless cradle, and TI-Nspire™ CX
Wireless Network Adapter are in compliance
with the essential requirements and other
relevant provisions of Directive 1999/5/EC.
The Declaration of Conformity may be consulted
in the Product Stewardship page at
education.ti.com.

209
Countries of Operation and Restrictions of Use in the
European Community
Operation Using the 2.400 to 2.4835 GHz Channels in the
European Community
The installer and/or end user should use the configuration utility
provided with this product to verify the current channel of operation, the
expected transmit power level, and to confirm that the device is
operating in conformance with the spectrum usage rules for the selected
European Community country. If operation is occurring outside of
the allowable channels as indicated in this guide, then operation
of the product must cease immediately and the installer must
consult with the local technical support staff responsible for the
wireless network.
These devices are intended to be operated in all countries of the
European Community. Additional restrictions of use for the
TI-Navigator™ access point within the European Community countries in
the 2.400 to 2.4835 GHz band are listed below.
• The frequencies associated with channels 1 to 13 in the 2.400 to
2.4835 GHz band are allowed to be used either indoors or outdoors in
all countries of the European Community, except where noted below:
• In Greece, Italy, Latvia, and Spain the end-user must apply for a
license from the national spectrum authority to operate this device
outdoors. Please consult the TI-Nspire™ Navigator™ Teacher
Software Guidebook for further information regarding restrictions
and operating conditions for outdoor configurations.
• In France, the following operation is permitted:
– Outdoor operation is only permitted using the 2.400 - 2.454 GHz
band, which includes channels 1 to 7, at a maximum EIRP of 100
mW (20 dBm).
– Outdoor operation is permitted in the 2.400 to 2.4835 GHz band
on channels 1 to 13 at a maximum EIRP of 10 mW (10 dBm).
– Indoor operation is permitted in the 2.400 to 2.4835 GHz band on
channels 1 to 13 at a maximum EIRP of 100 mW (20 dBm).
Warning Statements
Warning! Install the TI-Navigator™ Access Point in such a manner as to
maintain a minimum of 20 cm (7.9 inches) separation distance between
the radiating element(s) and all persons. This safety warning conforms to
FCC radio frequency exposure limits.

210
Warning! Do not touch or move the TI-Navigator™ Access Point when
the antennas are transmitting or receiving.
Warning! The TI-Navigator™ Access Point, TI-Nspire™ Navigator™
Cradle, and TI-Nspire™ CX Wireless Network Adapter are intended for
indoor use only. Do not install the device nor operate it outdoors.
Warning! Intentional radiators, such as the TI-Navigator™ Access Point,
TI-Nspire™ Navigator™ Cradle, and TI-Nspire™ CX Wireless Network
Adapter are not intended to be operated with any antenna(s) other than
those furnished by Texas Instruments. An intentional radiator may only
be operated with the antenna(s) with which it is authorized.
Warning! The TI-Navigator™ Access Point radio(s) are disabled by
default and can be enabled only by the system administrator using the
Management software application.
Warning! The radio frequency band, operating channels, and transmit
power depend on the country of operation specified by the system
administrator during setup and configuration using the Management
software.
Warning! Only qualified personnel must perform installation. Read and
follow all warning notices and instructions marked on the product or
included in the documentation.