The Genie a Division of Overhead Door 315390R1 GARAGE DOOR REMOTE CONTROL RECEIVER User Manual 42227 english
The Genie Company a Division of Overhead Door Corporation GARAGE DOOR REMOTE CONTROL RECEIVER 42227 english
UserManual.wiki
>
The Genie a Division of Overhead Door
>
315390R1 User Manual
USERS MANUAL
Navigation menu
Upload a User Manual
Namespaces
Wiki Guide
HTML
PDF
Info
Views
User Manual
Discussion / Help
Navigation
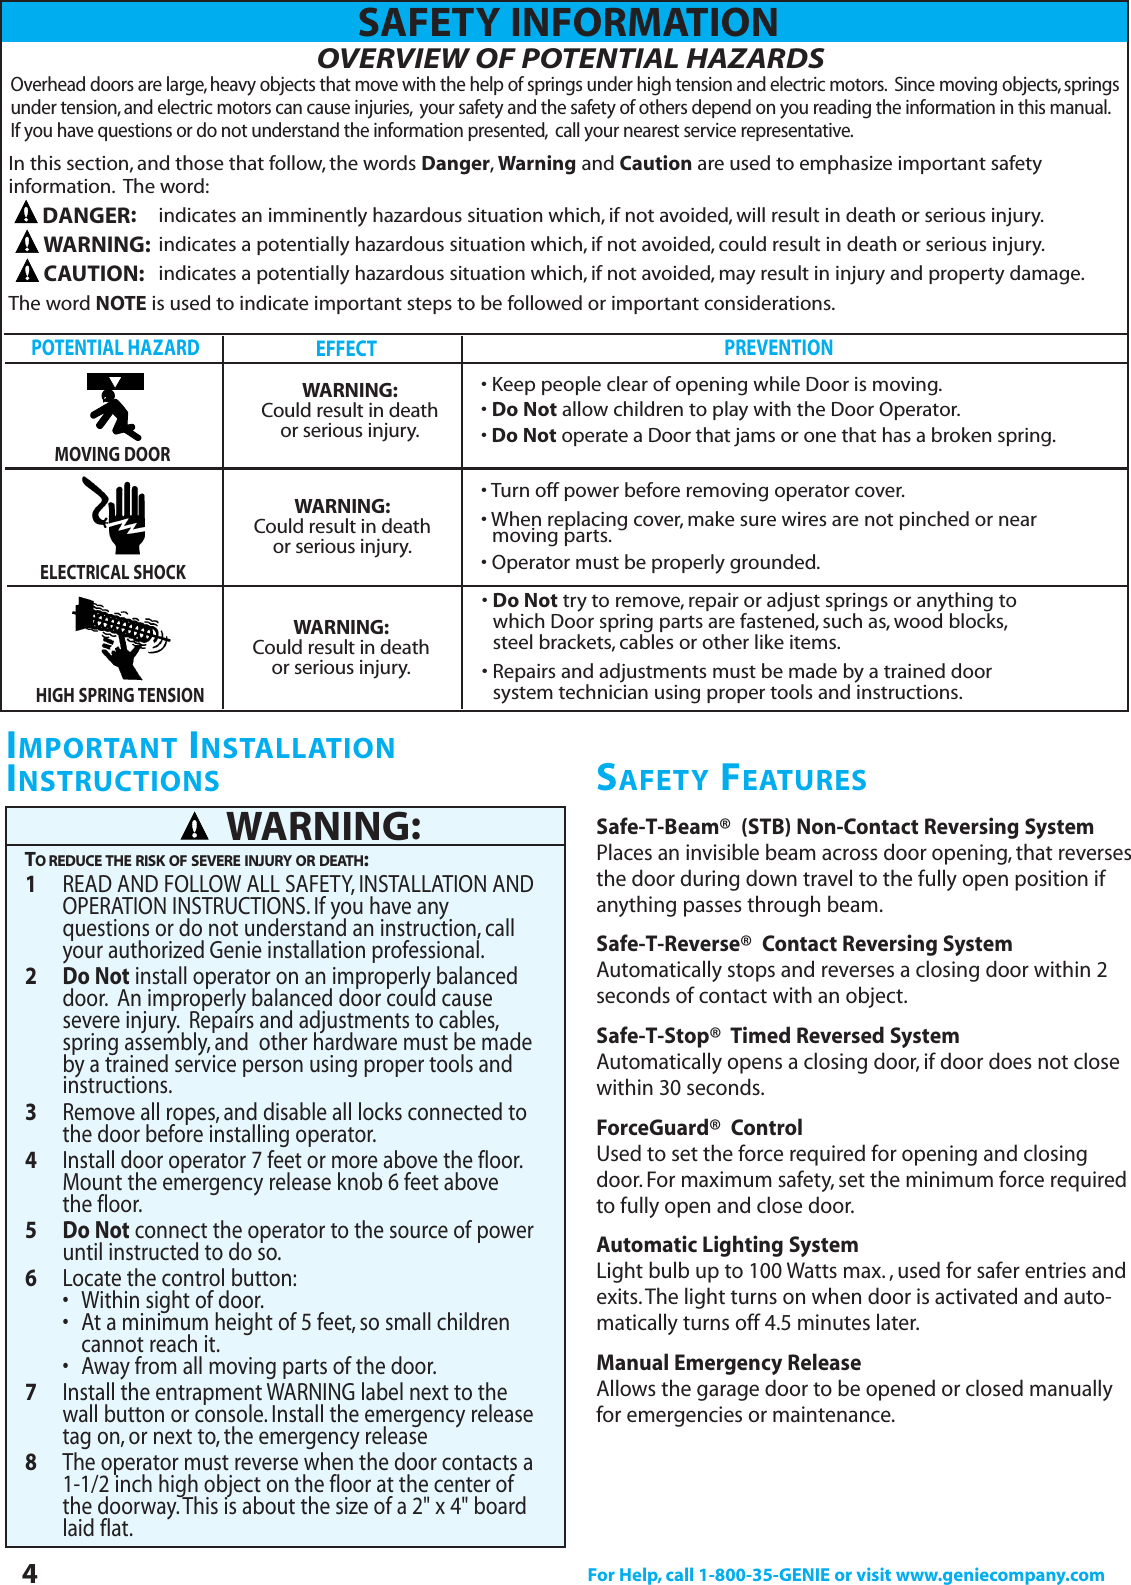


![18 For Help, call 1-800-35-GENIE or visit www.geniecompany.comPARTS IDENTIFICATIONItemPart Name*1 Power Head Assembly 1*1A Cover (by Series Model) 1*1B Front Panel Assembly 1*1D Motor Parts 1*1E Circuit Board Assembly 1*1F Capacitor (By Series/Model) 1*1G Opto Wheel (not shown) 1*1H Carriage Slide 1*1J Chain 1*1K Circuit Board Bracket 1*1L Drive Module 1*1M Terminal Strip 1*1N No. 8-32 x 3/4" Hex Head Screww /int. Lockwasher 1*1P Shock Absorbtion Stop 1*1Q Motor Mount Bracket (not shown) 1*1X Chassis 14 1/4-20 Shoulder Bolt 15 1/4" Flange Nut 139 Coupler 141 No. 8-32 x 3/8" Phillips Hex Head Screw 142 No. 8-32 x 3/8" Phillips Pan Head Screw 148 Mounting Straps 249 Light Lens 1Power Head Parts ListPOWER HEAD(continued next page)NumberIncludedPower Head Assembly[1]*Pre-assembled1J 1X1L1N1E1K1D1A1N1N1H1B1Q1G1D1F491P1N1M](https://usermanual.wiki/The-Genie-a-Division-of-Overhead-Door/315390R1/User-Guide-623783-Page-18.png)
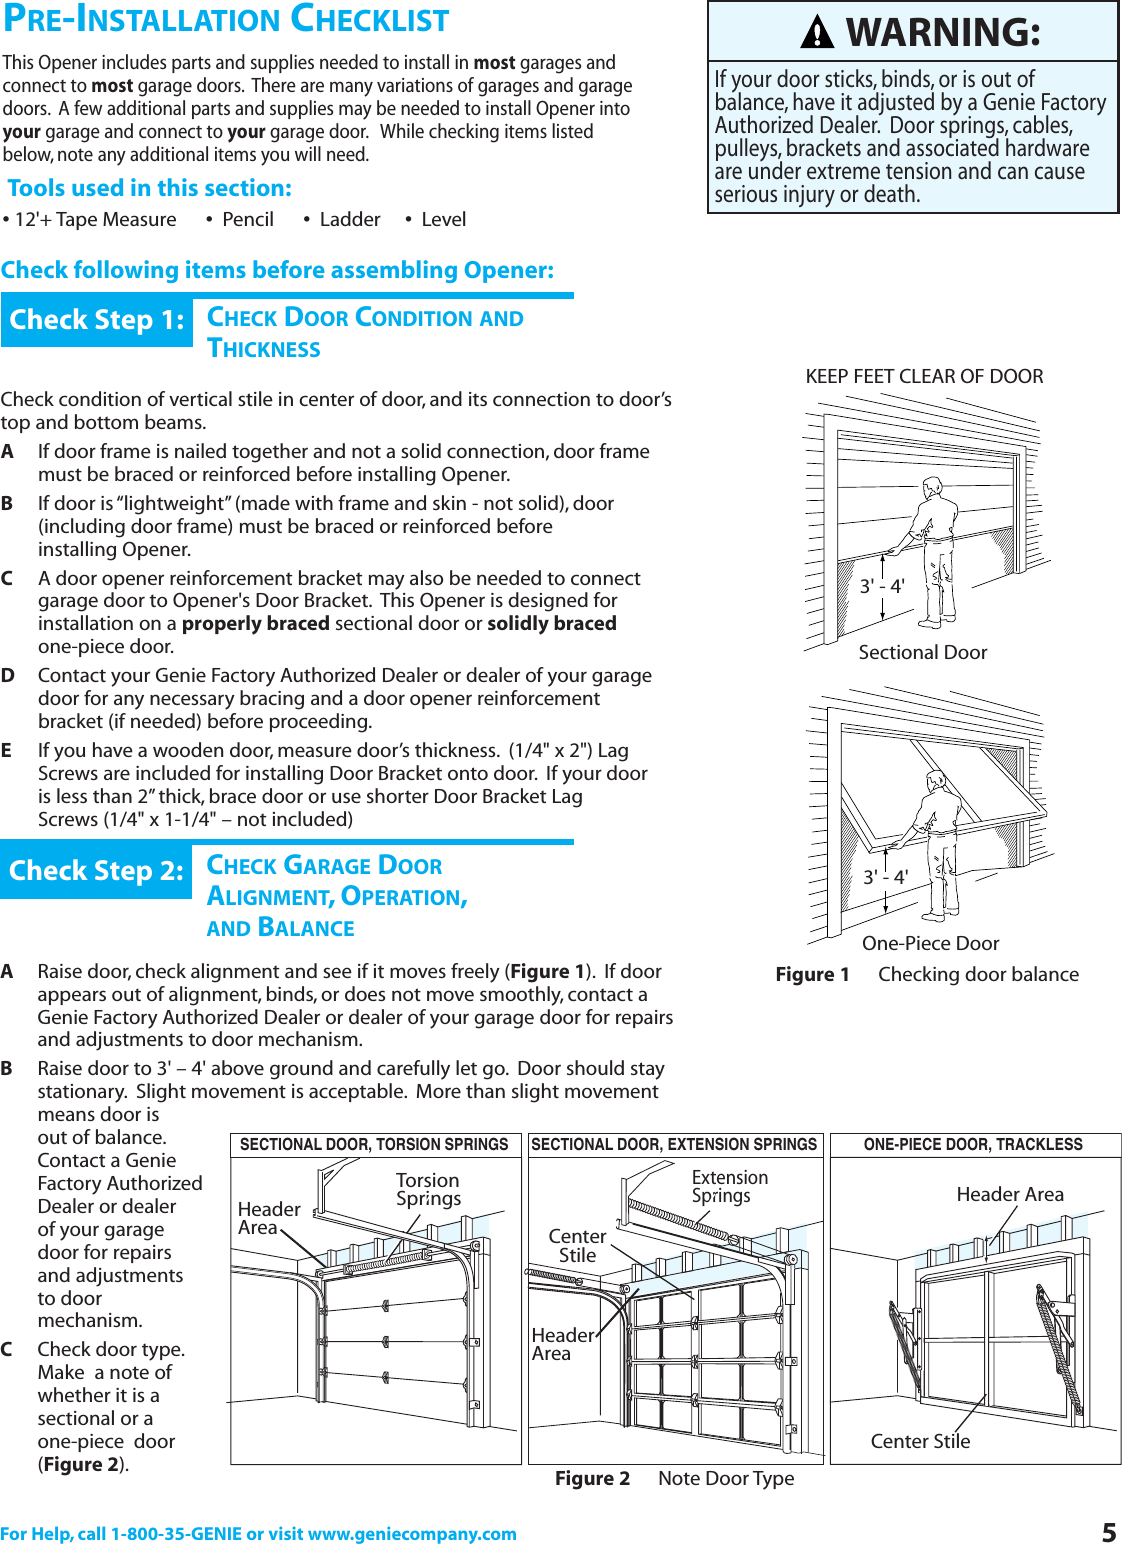
![For Help, call 1-800-35-GENIE or visit www.geniecompany.com 19PARTSIDENTIFICATION[2]Item Part Name1 Power Head Assembly (main box) 12 Rail Assembly (1-piece)4 Rail Assembly (3-piece)(main box) 15 First Rail Section (separate box) 16 Middle Rail Section (separate box) 17 End Rail section (separate box) 18 Rail Clamps (blue bag) 49 1/4"-20 x 5/8" Hex Head Bolt (blue bag) 1210 1/4"-20” Hex Flange Nut (blue bag) 1211 Carriage Assembly (main box) 112 Rail Strap (blue bag) 113 Limit Switch (white wire)(blue box) 114 Limit Switch (brown wire)(blue box) 115 Release Cord (green bag) 116 Release Knob (green bag) 117 Emergency Release Tag (green bag) 118 Header Bracket orange bag) 120 Door Bracket (orange bag) 122 1/4" x 2" Lag Screw (orange bag) 823 Straighth Door Arm (main box) 124 Clevis Pin (yellow bag) 225 Cotter Pin (yellow bag) 226 Curved Door Arm (main box) 127 3/8"-16 x 7/8" H. H. Bolt (yellow bag) 228 3/8"-16 Hex Flange Nut (yellow bag) 229 Wire (main box) 130 Insulated Staples (red bag) varies by modelParts ListItem Part Name31 Wall Button (red bag) varies bymodel32 Wall Console (main box) varies by model33 #6 x 1-1/4" pan head phillips screw varies by model34 Entrapment Warning Label (manual) 135 Safe-T-Beam® Sensor (main box) 136 Safe-T-Beam® Source (main box) 137 Safe-T-BeaM® Mounting Brackets 238 Remote Controls (main box) varies by model39 #8-32 x 1" Machine Screw (green bag) 240 Safety and Maintenance Guide (manual) 141 Wire Clips varies bymodel42 1/4"-20 x 3/4" Self-drilling Screws(orange bag) 344 #10-16 x 1-1/4" Phillips Hex Head Screw(yellow bag) 446 5/16"-18 x 3/4" Hex Head Bolt (orange bag) 347 5/16"-18 Hex Flange Nut (orange bag) 448 Mounting Straps (main box) 2Parts ListNumberIncluded NumberIncludedPower Head AssemblyRail & Attachments11341142793918210224712 26231724 422015251648102875698109839](https://usermanual.wiki/The-Genie-a-Division-of-Overhead-Door/315390R1/User-Guide-623783-Page-19.png)