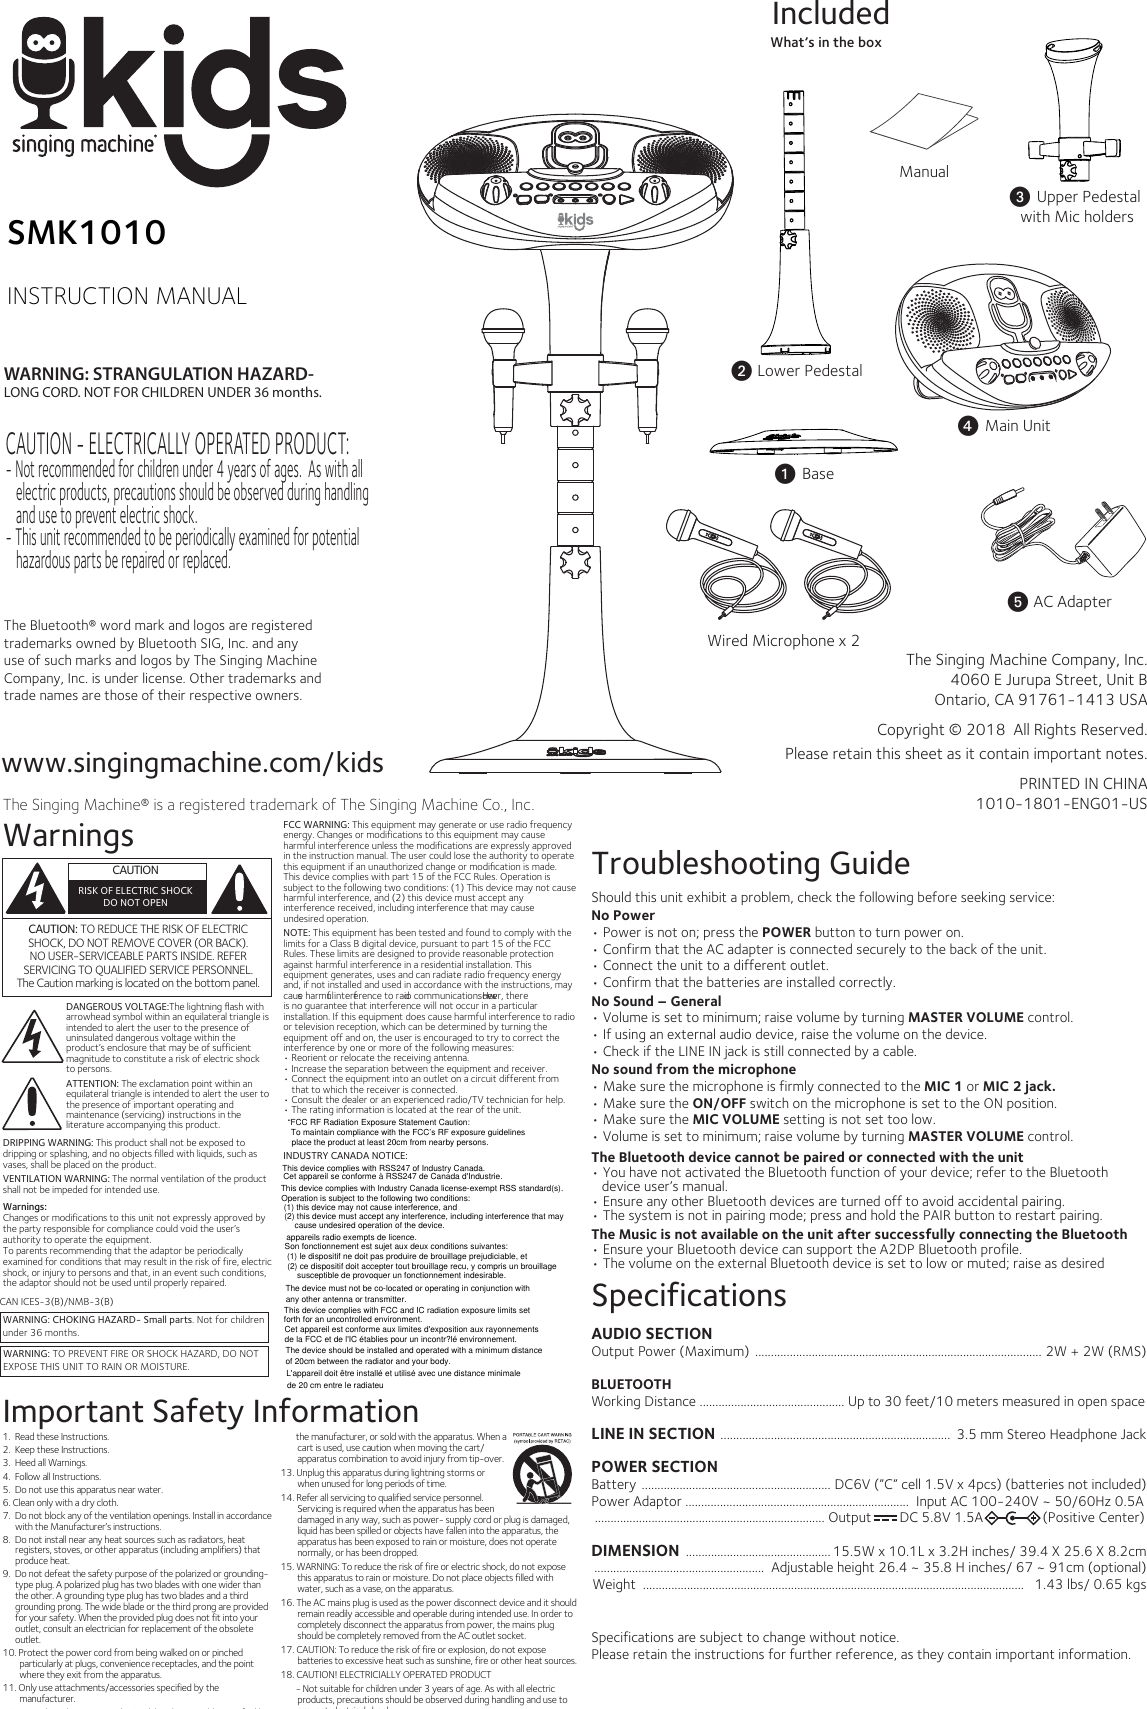
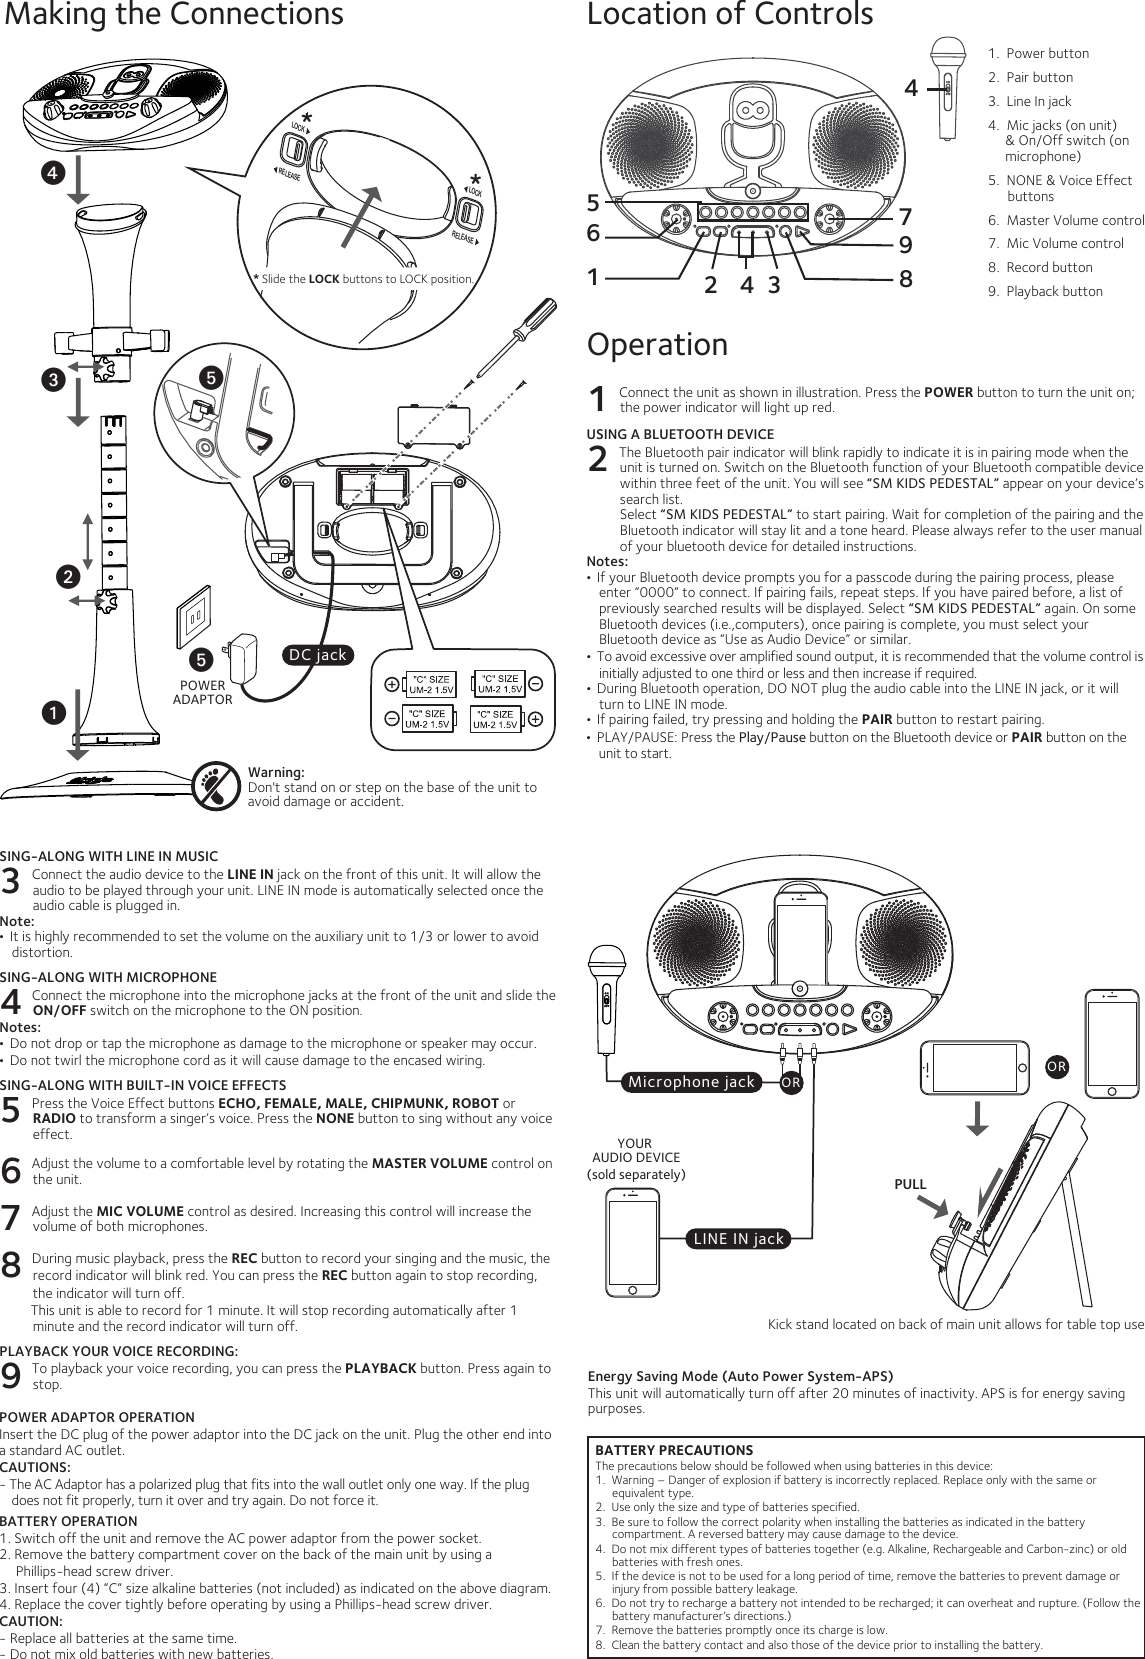
The Singing Machine SMK1010 PORTABLE SOUND CHANGER KARAOKE PLAYER WITH BLUETOOTH User Manual SMK1010 IB US ENG 180410

The Singing Machine Company, Inc. PORTABLE SOUND CHANGER KARAOKE PLAYER WITH BLUETOOTH SMK1010 IB US ENG 180410

User Manual

www.singingmachine.com/kidsThe Singing Machine® is a registered trademark of The Singing Machine Co., Inc.The Singing Machine Company, Inc.4060 E Jurupa Street, Unit BOntario, CA 91761-1413 USACopyright © 2018  All Rights Reserved.PRINTED IN CHINA1010-1801-ENG01-USManualv Lower PedestalWhat’s in the boxIncludedPlease retain this sheet as it contain important notes.SMK1010INSTRUCTION MANUALWarnings WARNING: CHOKING HAZARD- Small parts. Not for childrenunder 36 months.WARNING: TO PREVENT FIRE OR SHOCK HAZARD, DO NOT EXPOSE THIS UNIT TO RAIN OR MOISTURE.CAUTIONRISK OF ELECTRIC SHOCKDO NOT OPENImportant Safety InformationFCC WARNING: This equipment may generate or use radio frequency energy. Changes or modifications to this equipment may cause harmful interference unless the modifications are expressly approved in the instruction manual. The user could lose the authority to operate this equipment if an unauthorized change or modification is made.This device complies with part 15 of the FCC Rules. Operation is subject to the following two conditions: (1) This device may not cause harmful interference, and (2) this device must accept any interference received, including interference that may cause undesired operation.NOTE: This equipment has been tested and found to comply with the limits for a Class B digital device, pursuant to part 15 of the FCC Rules. These limits are designed to provide reasonable protection against harmful interference in a residential installation. This equipment generates, uses and can radiate radio frequency energy and, if not installed and used in accordance with the instructions, may cause harmful interference to radio communications. However, there is no guarantee that interference will not occur in a particular installation. If this equipment does cause harmful interference to radio or television reception, which can be determined by turning the equipment off and on, the user is encouraged to try to correct the interference by one or more of the following measures:• Reorient or relocate the receiving antenna.• Increase the separation between the equipment and receiver.• Connect the equipment into an outlet on a circuit different from that to which the receiver is connected.• Consult the dealer or an experienced radio/TV technician for help.• The rating information is located at the rear of the unit.INDUSTRY CANADA NOTICE:CAN ICES-3(B)/NMB-3(B)CAUTION: TO REDUCE THE RISK OF ELECTRIC SHOCK, DO NOT REMOVE COVER (OR BACK). NO USER-SERVICEABLE PARTS INSIDE. REFER SERVICING TO QUALIFIED SERVICE PERSONNEL.The Caution marking is located on the bottom panel.  1.  Read these Instructions.   2.  Keep these Instructions.3.  Heed all Warnings.4.  Follow all Instructions.5.  Do not use this apparatus near water.6. Clean only with a dry cloth.7.  Do not block any of the ventilation openings. Install in accordance with the Manufacturer’s instructions.8.  Do not install near any heat sources such as radiators, heat registers, stoves, or other apparatus (including amplifiers) that produce heat.9.  Do not defeat the safety purpose of the polarized or grounding- type plug. A polarized plug has two blades with one wider than the other. A grounding type plug has two blades and a third grounding prong. The wide blade or the third prong are provided for your safety. When the provided plug does not fit into your outlet, consult an electrician for replacement of the obsolete outlet.10. Protect the power cord from being walked on or pinched particularly at plugs, convenience receptacles, and the point where they exit from the apparatus.11. Only use attachments/accessories specified by the manufacturer.12. Use only with a cart, stand, tripod, bracket, or table specified by        the manufacturer, or sold with the apparatus. When a cart is used, use caution when moving the cart/ apparatus combination to avoid injury from tip-over.13. Unplug this apparatus during lightning storms or when unused for long periods of time.14. Refer all servicing to qualified service personnel. Servicing is required when the apparatus has been damaged in any way, such as power- supply cord or plug is damaged, liquid has been spilled or objects have fallen into the apparatus, the apparatus has been exposed to rain or moisture, does not operate normally, or has been dropped.15. WARNING: To reduce the risk of fire or electric shock, do not expose this apparatus to rain or moisture. Do not place objects filled with water, such as a vase, on the apparatus.16. The AC mains plug is used as the power disconnect device and it should remain readily accessible and operable during intended use. In order to completely disconnect the apparatus from power, the mains plug should be completely removed from the AC outlet socket.17. CAUTION: To reduce the risk of fire or explosion, do not expose  batteries to excessive heat such as sunshine, fire or other heat sources.18. CAUTION! ELECTRICIALLY OPERATED PRODUCT        - Not suitable for children under 3 years of age. As with all electric products, precautions should be observed during handling and use to prevent electrical shock.DRIPPING WARNING: This product shall not be exposed to dripping or splashing, and no objects filled with liquids, such as vases, shall be placed on the product.VENTILATION WARNING: The normal ventilation of the product shall not be impeded for intended use.Warnings:Changes or modifications to this unit not expressly approved by the party responsible for compliance could void the user’s authority to operate the equipment. To parents recommending that the adaptor be periodically examined for conditions that may result in the risk of fire, electric shock, or injury to persons and that, in an event such conditions, the adaptor should not be used until properly repaired.  SpecificationsAUDIO SECTIONOutput Power (Maximum)  ........................................................................................... 2W + 2W (RMS)BLUETOOTHWorking Distance .............................................. Up to 30 feet/10 meters measured in open spaceLINE IN SECTION  .........................................................................  3.5 mm Stereo Headphone JackPOWER SECTIONBattery  ............................................................ DC6V (”C” cell 1.5V x 4pcs) (batteries not included)Power Adaptor .......................................................................  Input AC 100-240V ~ 50/60Hz 0.5A ......................................................................... Output        DC 5.8V 1.5A                 (Positive Center)DIMENSION  .............................................. 15.5W x 10.1L x 3.2H inches/ 39.4 X 25.6 X 8.2cm......................................................  Adjustable height 26.4 ~ 35.8 H inches/ 67 ~ 91cm (optional)Weight  .........................................................................................................................   1.43 lbs/ 0.65 kgsSpecifications are subject to change without notice.Please retain the instructions for further reference, as they contain important information.Troubleshooting GuideShould this unit exhibit a problem, check the following before seeking service:No Power• Power is not on; press the POWER button to turn power on.• Confirm that the AC adapter is connected securely to the back of the unit.• Connect the unit to a different outlet.• Confirm that the batteries are installed correctly.No Sound – General• Volume is set to minimum; raise volume by turning MASTER VOLUME control. • If using an external audio device, raise the volume on the device.• Check if the LINE IN jack is still connected by a cable.No sound from the microphone• Make sure the microphone is firmly connected to the MIC 1 or MIC 2 jack.• Make sure the ON/OFF switch on the microphone is set to the ON position.• Make sure the MIC VOLUME setting is not set too low.• Volume is set to minimum; raise volume by turning MASTER VOLUME control. The Bluetooth device cannot be paired or connected with the unit• You have not activated the Bluetooth function of your device; refer to the Bluetooth device user’s manual.• Ensure any other Bluetooth devices are turned off to avoid accidental pairing.• The system is not in pairing mode; press and hold the PAIR button to restart pairing.The Music is not available on the unit after successfully connecting the Bluetooth• Ensure your Bluetooth device can support the A2DP Bluetooth profile.• The volume on the external Bluetooth device is set to low or muted; raise as desiredWARNING: STRANGULATION HAZARD-LONG CORD. NOT FOR CHILDREN UNDER 36 months.The Bluetooth® word mark and logos are registered trademarks owned by Bluetooth SIG, Inc. and any use of such marks and logos by The Singing Machine Company, Inc. is under license. Other trademarks and trade names are those of their respective owners. Wired Microphone x 2DANGEROUS VOLTAGE:The lightning flash with arrowhead symbol within an equilateral triangle is intended to alert the user to the presence of uninsulated dangerous voltage within the product’s enclosure that may be of sufficient magnitude to constitute a risk of electric shock to persons. ATTENTION: The exclamation point within an equilateral triangle is intended to alert the user to the presence of important operating and maintenance (servicing) instructions in the literature accompanying this product.y AC Adapterx Main Unitw Upper Pedestal with Mic holdersu BaseCAUTION - ELECTRICALLY OPERATED PRODUCT: - Not recommended for children under 4 years of ages.  As with all electric products, precautions should be observed during handling and use to prevent electric shock.- This unit recommended to be periodically examined for potential hazardous parts be repaired or replaced.“FCC RF Radiation Exposure Statement Caution:To maintain compliance with the FCC’s RF exposure guidelines place the product at least 20cm from nearby persons.This device complies with RSS247 of Industry Canada.This device complies with Industry Canada license-exempt RSS standard(s).Operation is subject to the following two conditions:  (1) this device may not cause interference, and (2) this device must accept any interference, including interference that maycause undesired operation of the device.  Cet appareil se conforme à RSS247 de Canada d'Industrie.  appareils radio exempts de licence. Son fonctionnement est sujet aux deux conditions suivantes: (1) le dispositif ne doit pas produire de brouillage prejudiciable, et(2) ce dispositif doit accepter tout brouillage recu, y compris un brouillage susceptible de provoquer un fonctionnement indesirable.The device must not be co-located or operating in conjunction with any other antenna or transmitter. This device complies with FCC and IC radiation exposure limits set forth for an uncontrolled environment.  Cet appareil est conforme aux limites d'exposition aux rayonnements de la FCC et de l'IC établies pour un incontr?lé environnement.  The device should be installed and operated with a minimum distance of 20cm between the radiator and your body. L'appareil doit être installé et utilisé avec une distance minimale de 20 cm entre le radiateu
POWERADAPTORBATTERY PRECAUTIONSThe precautions below should be followed when using batteries in this device:1.  Warning – Danger of explosion if battery is incorrectly replaced. Replace only with the same or equivalent type.2.  Use only the size and type of batteries specified.3.  Be sure to follow the correct polarity when installing the batteries as indicated in the battery compartment. A reversed battery may cause damage to the device.4.  Do not mix different types of batteries together (e.g. Alkaline, Rechargeable and Carbon-zinc) or old batteries with fresh ones. 5.  If the device is not to be used for a long period of time, remove the batteries to prevent damage or injury from possible battery leakage.6.  Do not try to recharge a battery not intended to be recharged; it can overheat and rupture. (Follow the battery manufacturer’s directions.)7.  Remove the batteries promptly once its charge is low.8.  Clean the battery contact and also those of the device prior to installing the battery.   Making the Connections Location of ControlsOperation1 Connect the unit as shown in illustration. Press the POWER button to turn the unit on; the power indicator will light up red.USING A BLUETOOTH DEVICE2 The Bluetooth pair indicator will blink rapidly to indicate it is in pairing mode when the unit is turned on. Switch on the Bluetooth function of your Bluetooth compatible device within three feet of the unit. You will see “SM KIDS PEDESTAL” appear on your device’s search list.Select “SM KIDS PEDESTAL” to start pairing. Wait for completion of the pairing and the Bluetooth indicator will stay lit and a tone heard. Please always refer to the user manual of your bluetooth device for detailed instructions. Notes:•  If your Bluetooth device prompts you for a passcode during the pairing process, please enter “0000” to connect. If pairing fails, repeat steps. If you have paired before, a list of previously searched results will be displayed. Select “SM KIDS PEDESTAL” again. On some Bluetooth devices (i.e.,computers), once pairing is complete, you must select your Bluetooth device as “Use as Audio Device” or similar.•  To avoid excessive over amplified sound output, it is recommended that the volume control is initially adjusted to one third or less and then increase if required.•  During Bluetooth operation, DO NOT plug the audio cable into the LINE IN jack, or it will turn to LINE IN mode.•  If pairing failed, try pressing and holding the PAIR button to restart pairing.•  PLAY/PAUSE: Press the Play/Pause button on the Bluetooth device or PAIR button on the unit to start.Energy Saving Mode (Auto Power System-APS)This unit will automatically turn off after 20 minutes of inactivity. APS is for energy saving purposes.Warning: Don't stand on or step on the base of the unit to avoid damage or accident.DC jackuwvyySING-ALONG WITH LINE IN MUSIC3 Connect the audio device to the LINE IN jack on the front of this unit. It will allow the audio to be played through your unit. LINE IN mode is automatically selected once the audio cable is plugged in. Note:•  It is highly recommended to set the volume on the auxiliary unit to 1/3 or lower to avoid distortion. SING-ALONG WITH MICROPHONE4 Connect the microphone into the microphone jacks at the front of the unit and slide the ON/OFF switch on the microphone to the ON position.Notes: •  Do not drop or tap the microphone as damage to the microphone or speaker may occur.•  Do not twirl the microphone cord as it will cause damage to the encased wiring. SING-ALONG WITH BUILT-IN VOICE EFFECTS5 Press the Voice Effect buttons ECHO, FEMALE, MALE, CHIPMUNK, ROBOT or RADIO to transform a singer’s voice. Press the NONE button to sing without any voice effect. 6 Adjust the volume to a comfortable level by rotating the MASTER VOLUME control on the unit.7 Adjust the MIC VOLUME control as desired. Increasing this control will increase the volume of both microphones.8 During music playback, press the REC button to record your singing and the music, the record indicator will blink red. You can press the REC button again to stop recording, the indicator will turn off.         This unit is able to record for 1 minute. It will stop recording automatically after 1 minute and the record indicator will turn off. PLAYBACK YOUR VOICE RECORDING:9 To playback your voice recording, you can press the PLAYBACK button. Press again to stop.**LOC KRELEASELOCKRELEASE* Slide the LOCK buttons to LOCK position.xPOWER ADAPTOR OPERATIONInsert the DC plug of the power adaptor into the DC jack on the unit. Plug the other end into a standard AC outlet. CAUTIONS: - The AC Adaptor has a polarized plug that fits into the wall outlet only one way. If the plug does not fit properly, turn it over and try again. Do not force it.BATTERY OPERATION1. Switch off the unit and remove the AC power adaptor from the power socket.2. Remove the battery compartment cover on the back of the main unit by using a Phillips-head screw driver.  3. Insert four (4) “C” size alkaline batteries (not included) as indicated on the above diagram.4. Replace the cover tightly before operating by using a Phillips-head screw driver.CAUTION:- Replace all batteries at the same time. - Do not mix old batteries with new batteries.Microphone jackLINE IN jackYOUR AUDIO DEVICE(sold separately)ORPULLORKick stand located on back of main unit allows for table top use16325487941.  Power button2.  Pair button3.  Line In jack4.  Mic jacks (on unit)     & On/Off switch (on      microphone)5.  NONE & Voice Effect        buttons6.  Master Volume control7.  Mic Volume control8.  Record button9.  Playback button

Navigation menu