The Singing Machine STVG890BT Karaoke System User Manual Users manual
The Singing Machine Company, Inc. Karaoke System Users manual
Users manual
TM
STVG890BTBK/W
INSTRUCTION MANUAL
www.singingmachine.com
The Singing Machine® is a registered trademark of The Singing Machine Co.,Inc.
888
1
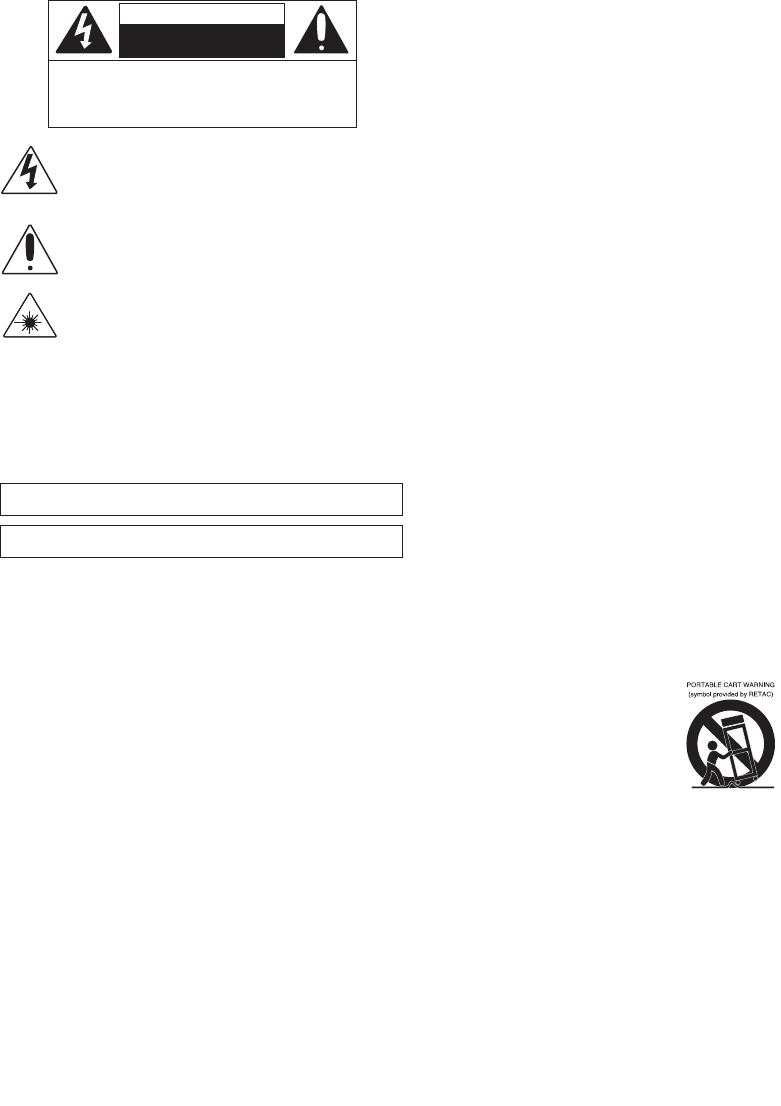
Warnings
CAUTION: TO REDUCE THE RISK OF ELECTRIC SHOCK, DO NOT
REMOVE COVER (OR BACK). NO USER-SERVICEABLE PARTS
INSIDE. REFER SERVICING TO QUALIFIED SERVICE PERSONNEL.
The Caution marking is located on the bottom panel.
CAUTION
RISK OF ELECTRIC SHOCK
DO NOT OPEN
DANGEROUS VOLTAGE: The lightning flash with arrowhead symbol
within an equilateral triangle is intended to alert the user to the
presence of uninsulated dangerous voltage within the product’s
enclosure that may be of sufficient magnitude to constitute a risk of
electric shock to persons.
CAUTION: TO PREVENT ELECTRIC SHOCK, MATCH WIDE BLADE OF PLUG TO
WIDE SLOT AND FULLY INSERT.
WARNING: TO PREVENT FIRE OR SHOCK HAZARD, DO NOT EXPOSE THIS UNIT
TO RAIN OR MOISTURE.
ATTENTION: The exclamation point within an equilateral triangle is
intended to alert the user to the presence of important operating and
maintenance (servicing) instructions in the literature accompanying
this product.
DANGER: This symbol is intended to alert the user to the risk of
exposure to invisible and hazardous laser radiation if the cover or
back is opened, the interlock fails or is defeated. Direct exposure to
the beam may damage your eyesight.
FCC WARNING: This equipment may generate or use radio frequency
energy. Changes or modifications to this equipment may cause harmful
interference unless the modifications are expressly approved in the
instruction manual. The user could lose the authority to operate this
equipment if an unauthorized change or modification is made.
This device complies with part 15 of the FCC Rules. Operation is subject
to the following two conditions: (1) This device may not cause harmful
interference, and (2) this device must accept any interference received,
including interference that may cause undesired operation.
LASER SAFETY: This unit employs a laser. Only qualified service personnel
should attempt to service this device due to possible eye injury.
CAUTION: USE OF CONTROLS, ADJUSTMENTS OR PERFORMANCE
PROCEDURE HEREIN MAY RESULT IN HAZARDOUS RADIATION
EXPOSURE.
INDUSTRY CANADA NOTICE:
This device complies with Industry Canada Iicense-exempt RSS standard(s).
Operation is subject to the following two conditions:
1. This device may not cause interference, and
2. This device must accept any interference, including interference that
may cause undesired operation of the device.
DRIPPING WARNING: This product shall not be exposed to dripping or splashing,
and no objects filled with liquids, such as vases, shall be placed on the product.
VENTILATION WARNING: The normal ventilation of the product shall not be
impeded for intended use.
SAFETY VERIFICATION: This device is made and tested to meet safety standards
of the FCC, requirements and compliance with safety performance of the
U.S. Department of Health and Human Services and also with FDA Radiation
Performance Standards 21 CFR Subchapter.
NOTE: This equipment has been tested and found to comply with the
limits for a Class B digital device, pursuant to part 15 of the FCC Rules.
These limits are designed to provide reasonable protection against harmful
interference in a residential installation. This equipment generates, uses
and can radiate radio frequency energy and, if not installed and used in
accordance with the instructions, may cause harmful interference to radio
communications. However, there is no guarantee that interference will
not occur in a particular installation. If this equipment does cause harmful
interference to radio or television reception, which can be determined by
turning the equipment off and on, the user is encouraged to try to correct
the interference by one or more of the following measures:
• Reorient or relocate the receiving antenna.
• Increase the separation between the equipment and receiver.
• Connect the equipment into an outlet on a circuit different from that to
which the receiver is connected.
• Consult the dealer or an experienced radio/TV technician for help.
• The rating information is located at the rear of the unit.
This equipment complies with the FCC RF radiation exposure limits set
forth for an uncontrolled environment. This equipment should be installed
and operated with a minimum distance of 20 centimeters between the
radiator and your body.
Important Safety Information
1. Read these Instructions.
2. Keep these Instructions.
3. Heed all Warnings.
4. Follow all Instructions.
5. Do not use this apparatus near water.
6. Clean only with a dry cloth.
7. Do not block any of the ventilation openings. Install in accordance
with the Manufacturer’s instructions.
8. Do not install near any heat sources such as radiators, heat
registers, stoves, or other apparatus (including amplifiers) that
produce heat.
9. Do not defeat the safety purpose of the polarized or grounding-
type plug. A polarized plug has two blades with one wider than the
other. A grounding type plug has two blades and a third grounding
prong. The wide blade or the third prong are provided for your
safety. When the provided plug does not fit into your outlet,
consult an electrician for replacement of the obsolete outlet.
10. Protect the power cord from being walked on or pinched
particularly at plugs, convenience receptacles, and the point where
they exit from the apparatus.
11. Only use attachments/accessories specified by the manufacturer.
12. Use only with a cart, stand, tripod, bracket, or table specified by
the manufacturer, or sold with the apparatus. When a cart is used,
use caution when moving the cart/apparatus
combination to avoid injury from tip-over.
13. Unplug this apparatus during lightning storms
or when unused for long periods of time.
14. Refer all servicing to qualified service
personnel. Servicing is required when
the apparatus has been damaged in any
way, such as power-supply cord or plug is
damaged, liquid has been spilled or objects
have fallen into the apparatus, the apparatus has been exposed to
rain or moisture, does not operate normally, or has been dropped.
15. WARNING: To reduce the risk of fire or electric shock, do not
expose this apparatus to rain or moisture. Do not place objects
filled with water, such as a vase, on the apparatus.
16. The AC mains plug is used as the power disconnect device and
it should remain readily accessible and operable during intended
use. In order to completely disconnect the apparatus from power,
the mains plug should be completely removed from the AC outlet
socket.
17. CAUTION: To reduce the risk of fire or explosion, do not expose
batteries to excessive heat such as sunshine, fire or other heat
sources.
CAN ICES-3(B)/NMB-3(B)
2
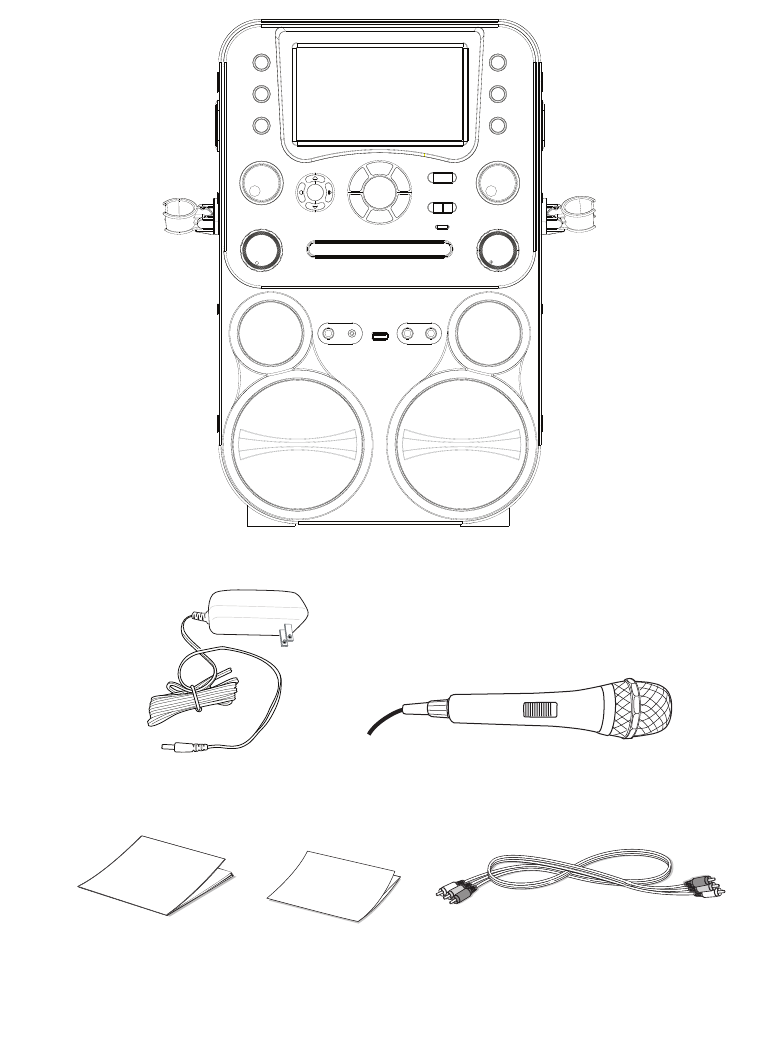
What’s in the box.
Wired Microphone
Main Unit
AC Adapter
Audio/Video Cables
Manual Welcome Kit
888
3
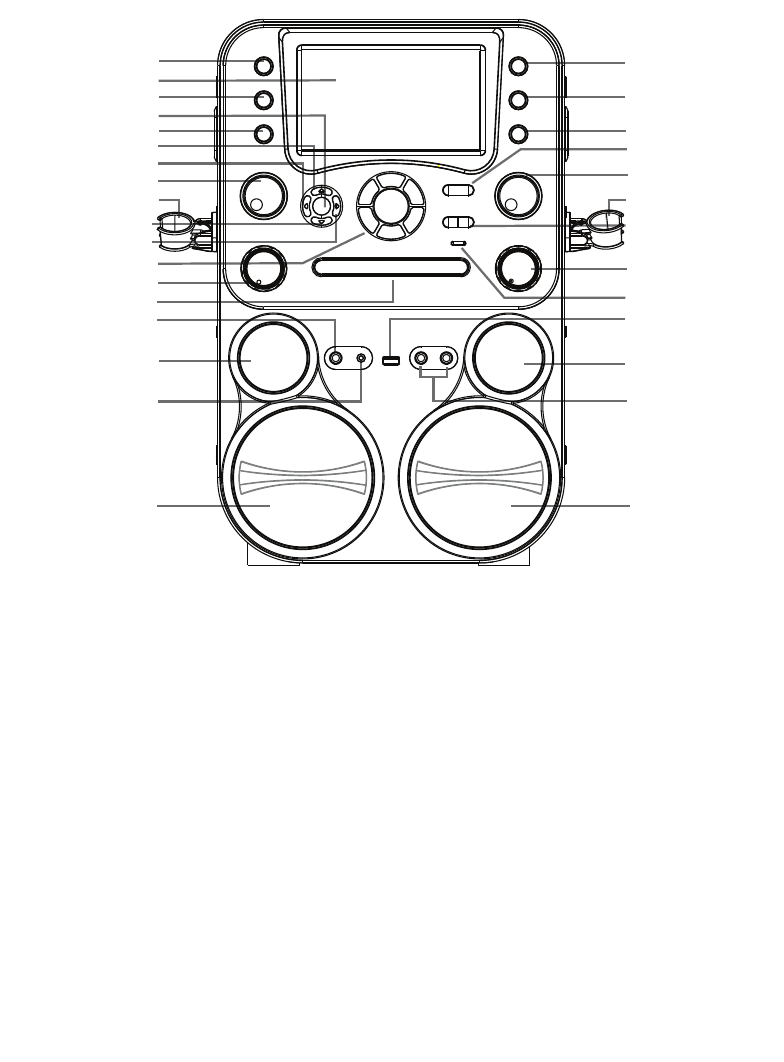
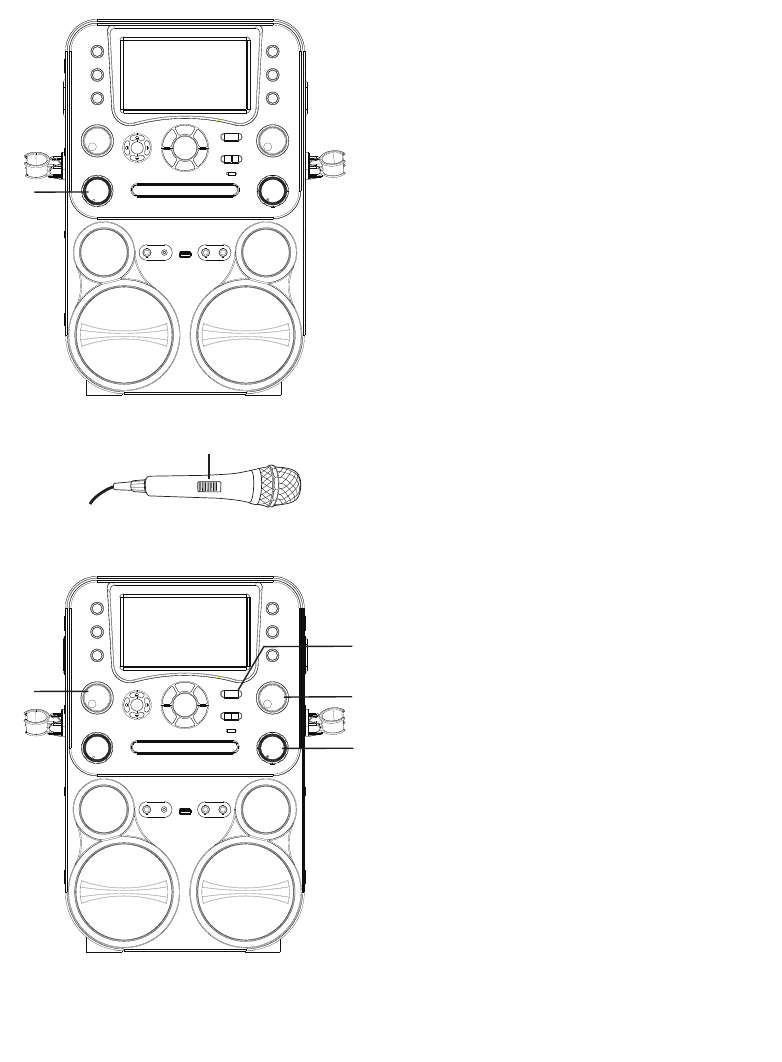
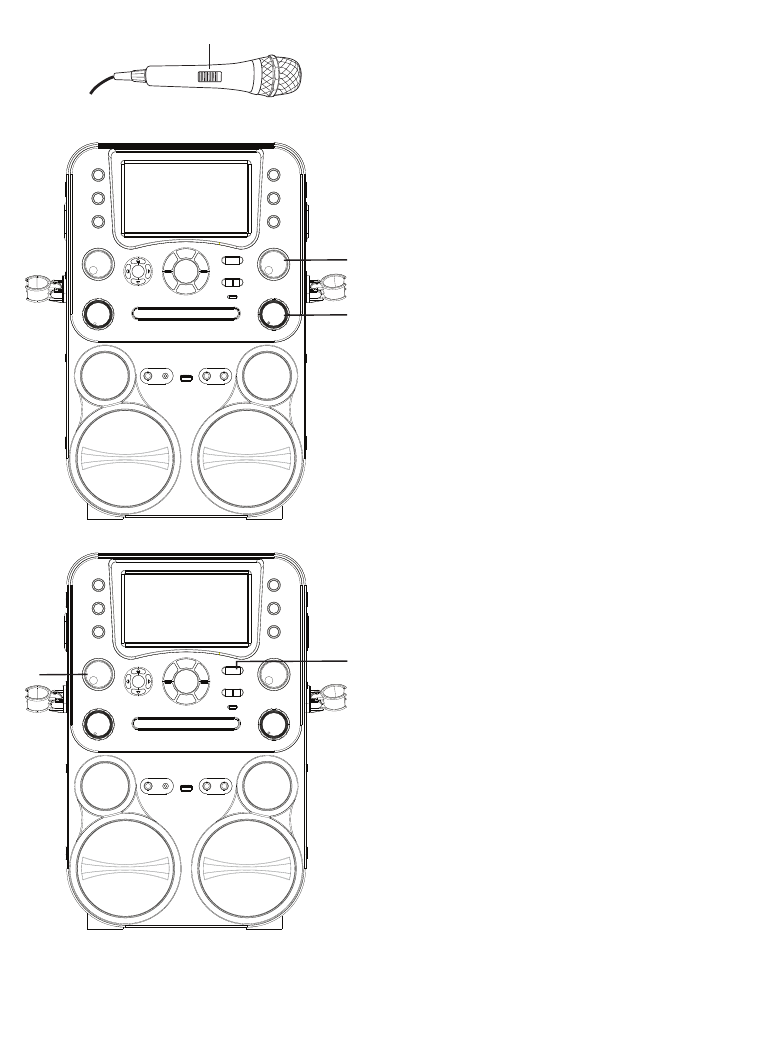
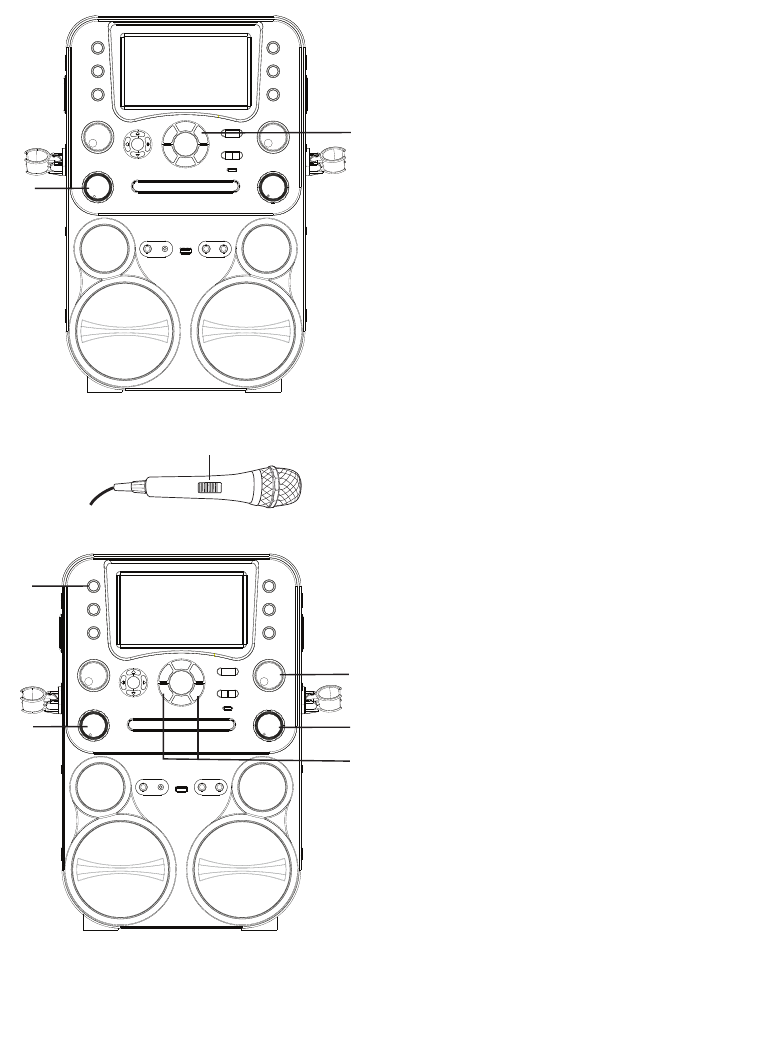
Location of Controls (Front)
1. STANDBY Button
2. Screen
3. BLUETOOTH Button
4. SKIP 10+ Button
5. RECORD Button
6. Navigation Up Button
7. Navigation Left Button
8. BALANCE Control
9. Mic Holders
10. Navigation Down Button
11. Navigation Right Button
12. Listed clockwise, from
top:
PROGRAM
Play/Pause 4; Button
Skip/Search Forward :
Button
REPEAT Button
Skip/Search Back 9
Button
Stop < Button
13. MASTER VOLUME
Control
14. CD Compartment
15. GUITAR/KEYBOARD IN
Jack
16. Tweeters
17. LINE IN Jack
18. Speakers
19. FUNCTION Control
20. MONITOR Control
21. LED Light Control
22. AVC (Auto Voice
Control) ON/OFF Button
23. ECHO Control
24. KEY –/+ Buttons
25. MIC VOLUME Control
26. CD Open/Close Button
27. USB Port
28. MIC 1/MIC 2 In Jacks
1
2
3
4
5
6
7
8
9
10
11
12
13
14
15
16
17
18
19
20
21
22
23
24
25
26
27
28
18
16
9
888
4
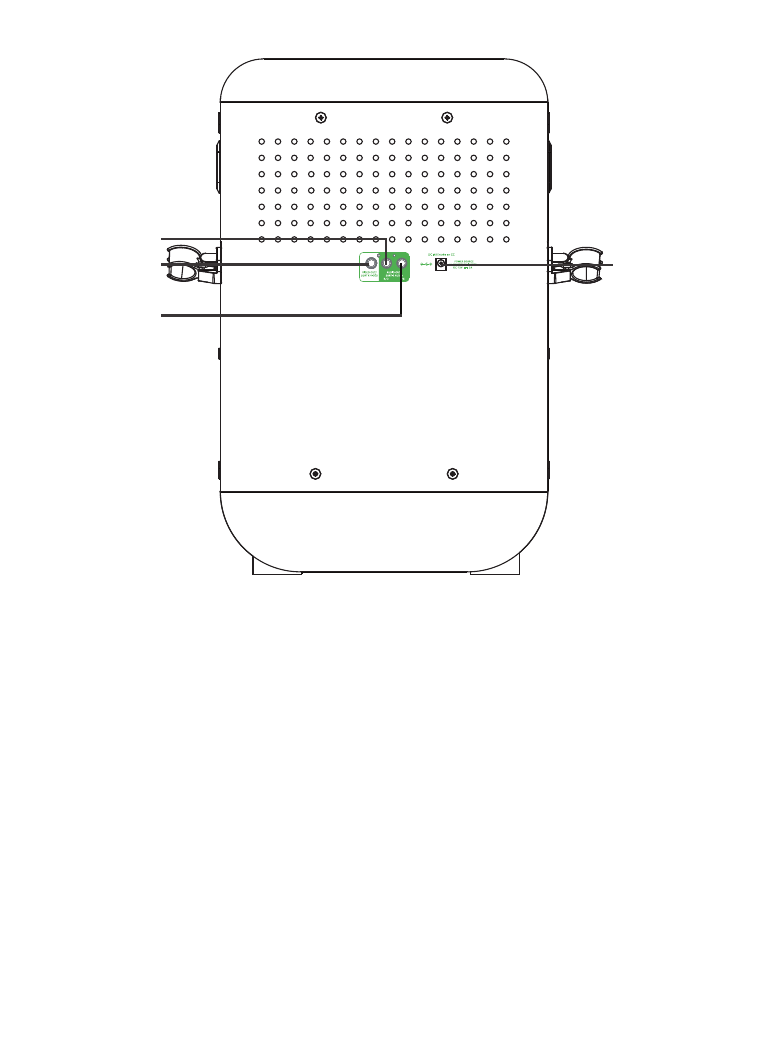
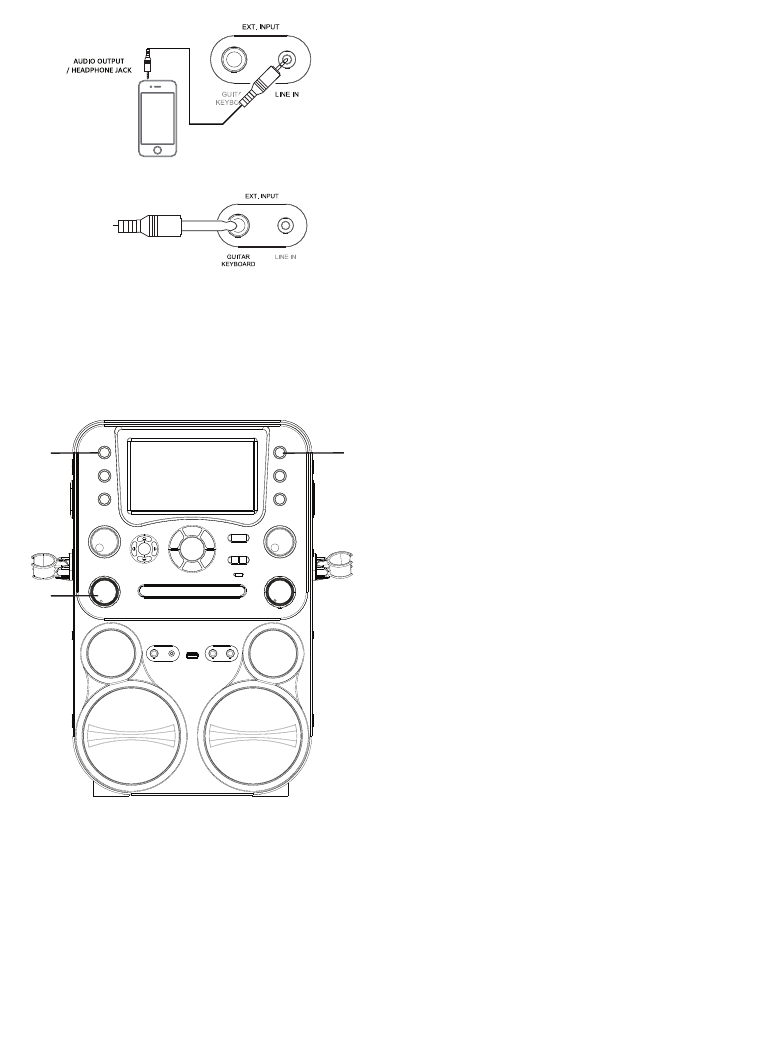
Location of Controls (Rear)
1. AUDIO OUT Right Jack
2. VIDEO OUT Jack
3. AUDIO OUT Left Jack
4. DC IN Jack
1
2
3
4
5
Connection
888
u v
VIDEO
INPUT AUDIO
INPUT
R L
RCA cables
VIDEO OUT
(yellow)
AUDIO OUT
(white - L
red - R)
REAR VIEW OF TV
Microphones:
Connect a microphone into MIC jack 1 as
well as MIC jack 2 (when desired).
Note: Do not drop or tap the Mic as
damage to the Mic or speakers may
occur. Do not twirl the microphone cord
as it will cause damage to the encased
wiring.
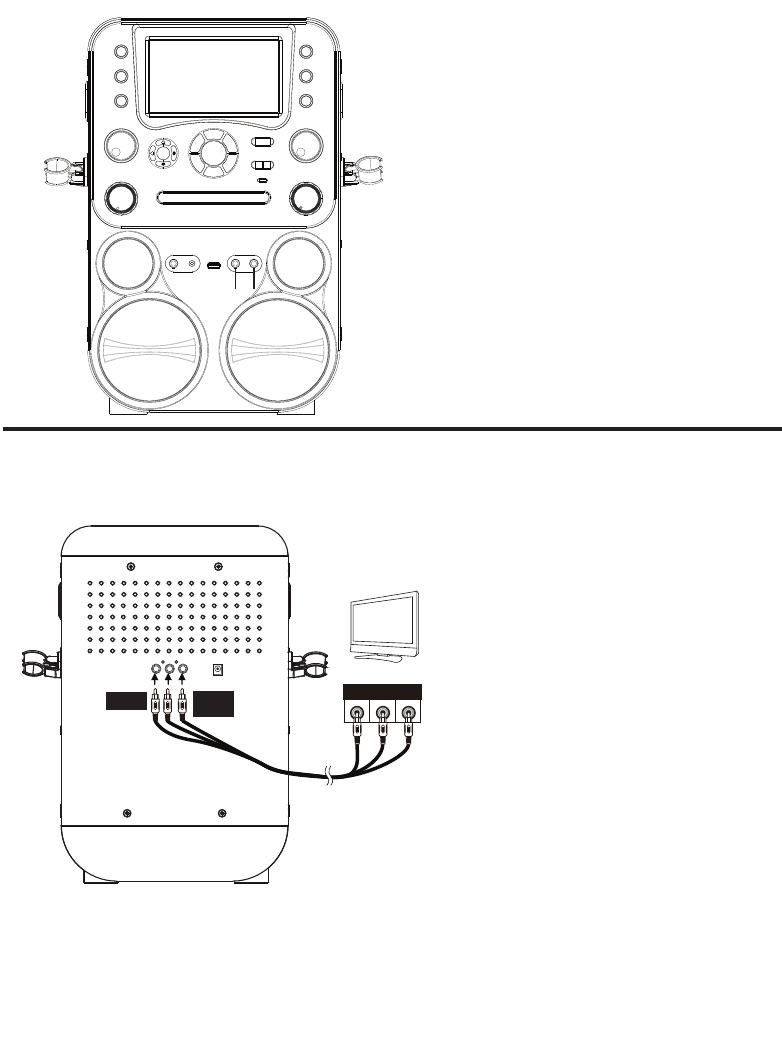
To output the video, lyrics and audio to
your TV, perform the following steps:
Connect the RCA video cable (Yellow) to
the VIDEO OUT jack and the audio cables
(White and Red) to the AUDIO OUT
jacks located on the back of the Singing
Machine.
Connect the opposite end of the RCA
video cable (Yellow) to the VIDEO IN jack
and the audio cables (White and Red) to
the AUDIO IN on your TV.
Connecting the Microphone(s)
Connecting the Unit to a TV
Notes:
• This unit can be used with or without a TV, but it is highly recommended to use a TV in order
to utilize all the features.
• Also refer to the TV’s User Guide.
• To see the lyrics on the screen, you must use a CD+G disc.
6
Connection
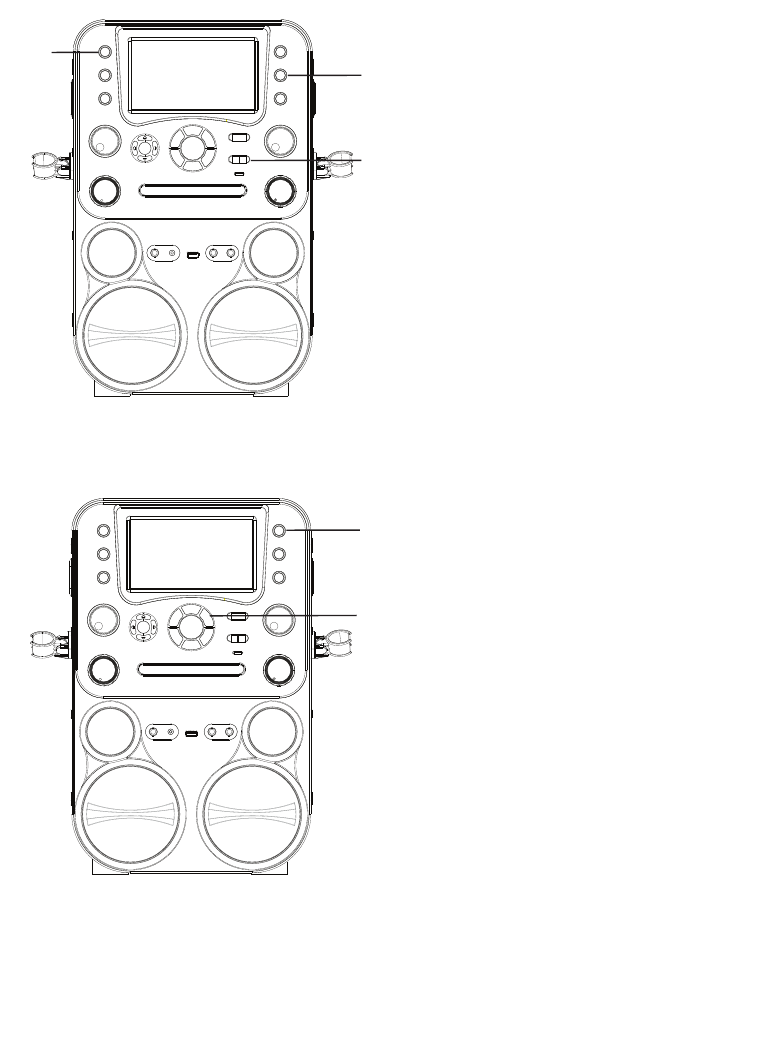
Connecting to LINE IN Jack
Speaker Lights
Connect an external device by using an
appropriate cable (3.5mm audio cable not
included) as shown.
Press the LIGHT button to switch on the
lighting effect, press again to switch off.
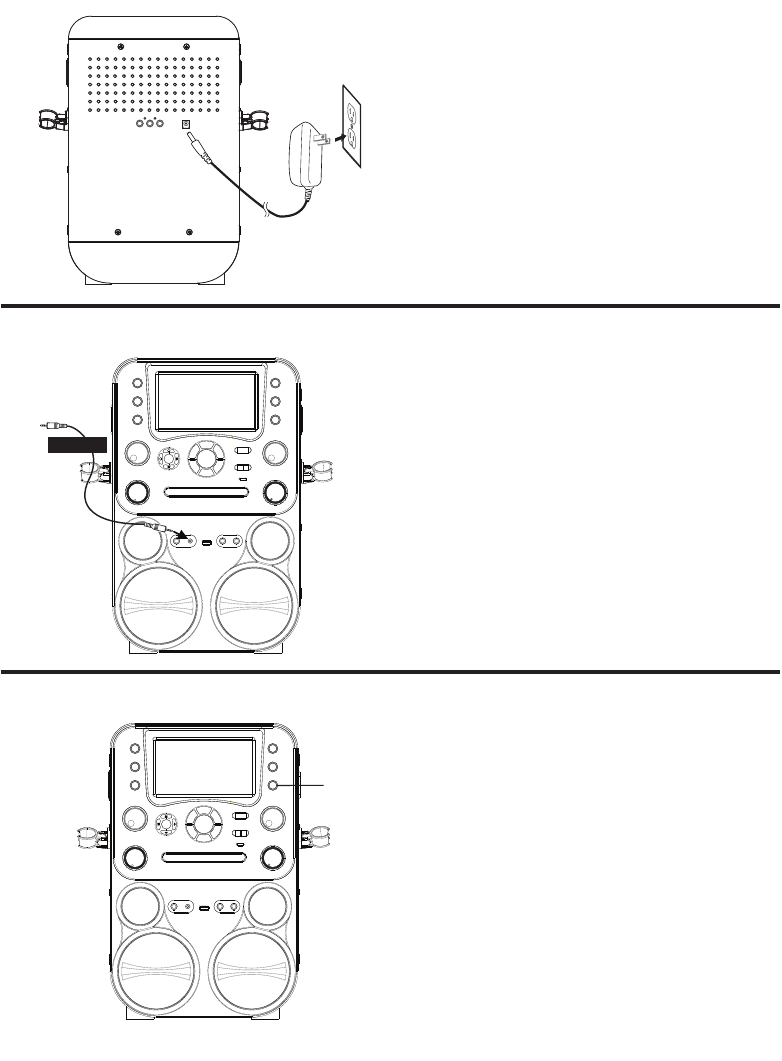
Insert the AC power cord into a conveniently
located AC outlet having 120V AC, 60Hz.
Note:
Make all connections before connecting to
AC power.
888
To External Unit
AUDIO OUTPUT
/ HEADPHONE JACK
888
u
Connecting to AC Power
7
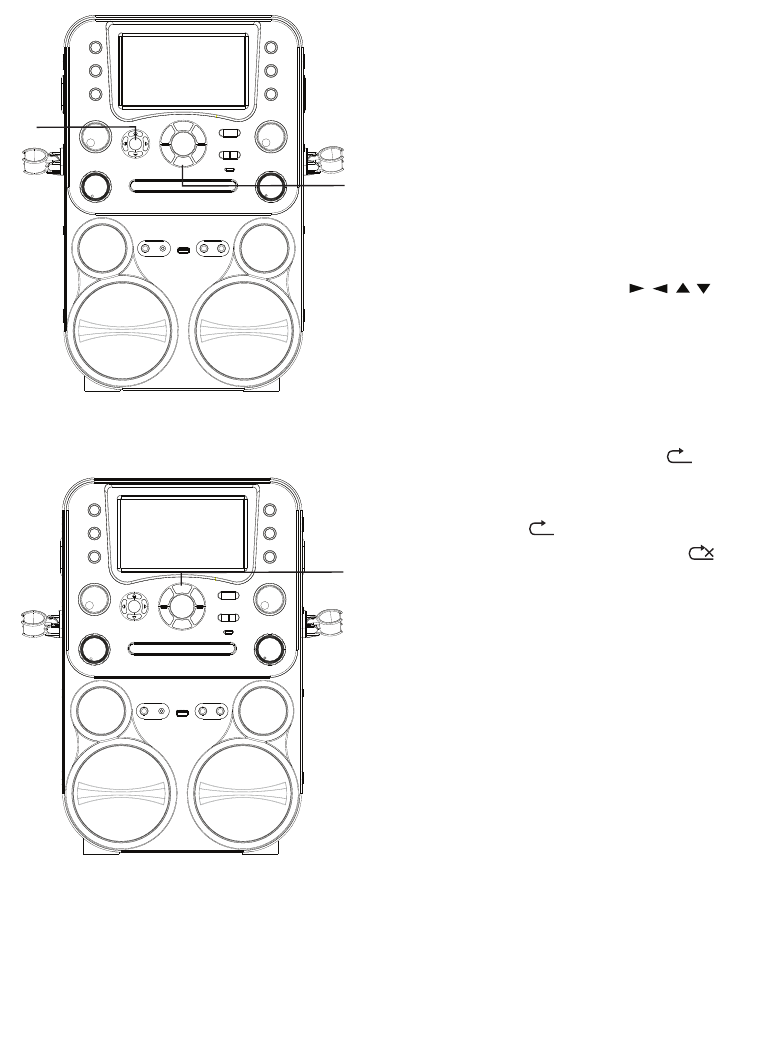
Operation
1 Connect the unit as described
previously; if using a CD+G, it is
recommended to connect to a TV.
Press the STANDBY button to turn
the unit on.
2 Press the MONITOR button to turn
the screen on.
3 Press the CD Open/Close button to
open the CD door and then insert a
CD (with standard or MP3+G files) or
CD+G. Close the CD door by pressing
the CD Open/Close button again.
Note:
• What is a CD+G?
A CD+G (CD+Graphics) is the standard
format for most karaoke discs that will
display the words on the screen.
• Never place anything other than a CD in
the compartment, as foreign objects can
damage the unit.
• If no disc is inserted, “no” will appear on the
display.
• If connected to a TV and/or other audio
source, adjust the volume of the external
unit using its own volume control.
4 Repeatedly press the FUNCTION
button to select the CDG mode; “---”
will appear when searching the disc
and then the total number of tracks
will appear.
5 Press the Play/Pause 4; button to
start playback.
Playing a CDG
888 w
v
u
888 y
x
8
Operation
6 Adjust the volume to a comfortable
level using the MASTER VOLUME
control.
7 Connect microphone(s) and slide the
ON/OFF switch on the microphone to
the ON position.
8 Rotate the MIC VOLUME control
as desired. Increasing this control
will increase the volume of both
microphones.
9 Rotate the ECHO control to add an
echo effect to your voice. Rotate
towards MAX to increase the echo
effect
10 AUTO VOICE CONTROL can be
activated by pressing the AVC
button. The vocals on the multiplex
recording will be muted when the
singer starts to sing through the
microphone. When the singer stops
singing, the recorded vocals on the
multiplex recording will resume to
normal.
11 Rotate the BALANCE control
clockwise to hear the music and
recorded vocals from a multiplex
recording or counterclockwise to
hear the music only from a multiplex
recording.
Note: To use the BALANCE control, a CD+G
disc must be used, otherwise it will operate as
a standard Balance control.
Playing a CDG (Continued)
888
at
ak X
W
888
U
V
9
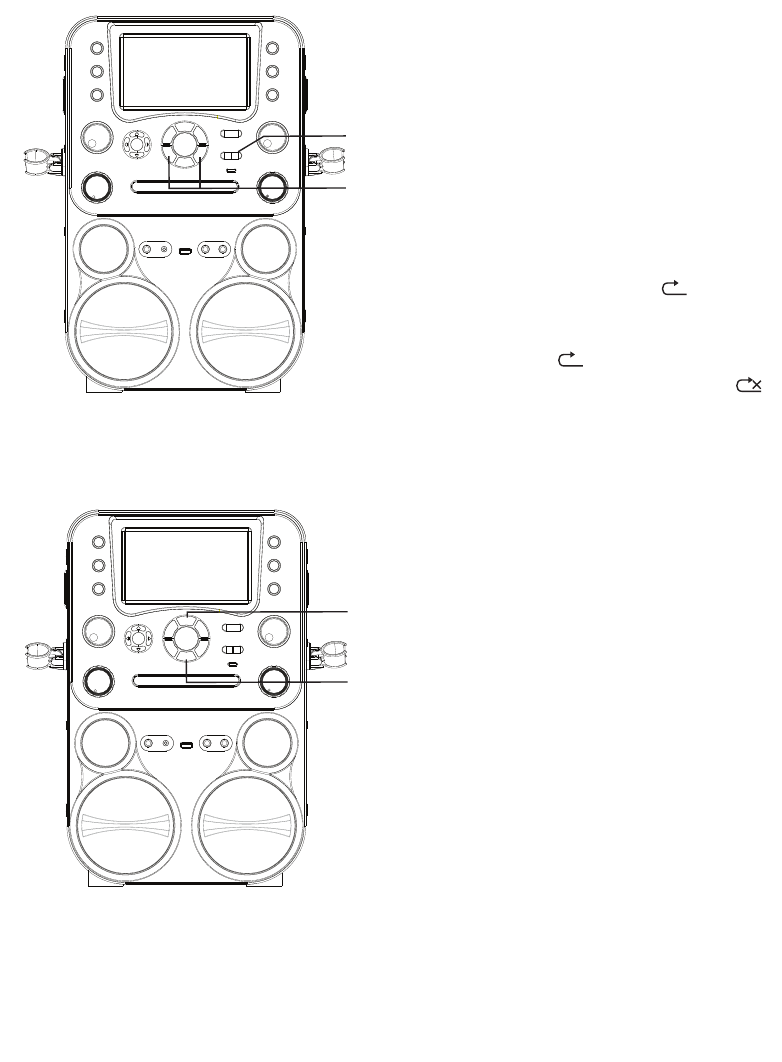
Operation
12 Adjust the Key to obtain the best key
for the singer on the track. Adjust
the key using the KEY – and KEY +
buttons.
13 SKIP: Advance or go back one track
by pressing the Skip Back 9/Skip
Forward : buttons.
14 REPEAT: During playback, press the
REPEAT button once to repeatedly
play the selected song 1 will
display. Press the REPEAT button a
second time to repeatedly play the
whole CD Awill display. Press it
again to cancel Repeat function
will display.
15 PROGRAM: You can program up to
20 tracks on any disc for playback
in any desired order. While in the
Stop mode, press the PROGRAM
button; the Program indicator first
track using the Skip Back 9/ Skip
Forward : buttons. Press the
PROGRAM button again to confirm
the entry. After selecting the desired
tracks the display will show P01, P02,
etc. recognizing the tracks selected
have been programmed.
Repeat to set up to 20 tracks into
memory. When done, press the Play/
Pause button to start playback.
Note:
• Press the Stop < button TWICE to stop
and clear the program.
Playing a CDG (Continued)
888 al
am
888
ao
an
10
Operation
During program playback, press the
REPEAT button once to repeatedly
play the selected song 1 will
display. Press the REPEAT button a
second time to repeatedly play the
whole CD Awill display. Press it
again to cancel Repeat function
will display.
16 PAUSE: During playback, if you wish to
pause the disc momentarily, press the
Play/Pause4; button. Press again to
resume normal playback.
17 Press the Stop < button to stop
playback.
18Press the STANDBY button to turn
the unit off.
Playing a CDG (Continued)
888
ap
aq
ar
11
Operation
1 Connect the unit as described
previously. Press the STANDBY
button to turn the unit on.
2 Insert a USB flash drive into the USB
port on the unit so it faces upward.
Make sure to download music from
the Karaoke store.
3 Repeatedly press the FUNCTION
button to select the USB mode; “USb”
will appear when searching the drive
and then the total number of files will
appear.
Note: The USB mode cannot be accessed
until a flash drive is inserted.
4 Press the Play/Pause4; button
to start playback; if listening to an
MP3+G file, the image and lyrics
will appear on the TV screen (if
connected).
5 Adjust the volume to a comfortable
level using the MASTER VOLUME
control.
Note: If connected to a TV or other audio
source, adjust the volume of the TV using its
own volume control.
Playing Songs from the USB
888
v
w
u
888 x
y
12
Operation
6 Connect microphone(s) and slide the
ON/OFF switch on the microphone to
the ON position.
7 Adjust the MIC VOLUME control
as desired. Increasing this control
will increase the volume of both
microphones.
8 Rotate the ECHO control to add an
echo effect to your voice. Rotate
towards MAX to increase the echo
effect.
9 AUTO VOICE CONTROL can be
activated by pressing the AVC button.
The vocals on the multiplex recording
will be muted when the singer starts
to sing through the microphone. When
the singer stops singing, the recorded
vocals on the multiplex recording will
resume to normal.
10 Rotate the BALANCE control clockwise
to hear the music and recorded
vocals from a multiplex recording or
counterclockwise to hear the music
only from a multiplex recording.
Playing Songs from the USB (Continued)
888 W
V
888
X
at
U
13
Operation
Playing Songs from the USB (Continued)
888
al
ak
888
am
11 SKIP: Advance or go back one track
by pressing the 9 or : buttons. You
can also skip ahead 10 files/ tracks
using the Skip10+ button.
SEARCH: When playing any audio
from the USB, press and hold the 9
or : buttons. The USB will search at
high speed in the forward or
backward direction. Normal play will
continue when you release the during
Stop mode you can also use the
navigation buttons to
scroll right/left and up and down to
select a folder or a vertain track..
12 REPEAT: During playback, press the
REPEAT button once to repeatedly
play the selected song 1 will
display. Press the REPEAT button a
second time to repeatedly play all
tracks A will display. Press it again
to cancel Repeat function will
display.
13 PROGRAM: You can program up to
20 tracks on any disc for playback in
any desired order. While in the Stop
mode, press the PROGRAM button;
the Program indicator “P00” will
appear. Select the first track using
the Skip Back 9/ Skip Forward
: buttons. Press the PROGRAM
button again to confirm the entry.
After selecting the desired tracks
the display will show P01, P02, etc.
recognizing the tracks selected have
been programmed. Repeat to set
up to 20 tracks into memory. When
done, press the Play/Pause4 ;
button to start playback.
14
Operation
Playing Songs from the USB (Continued)
888
ao
ap
an
Note: Press the Stop < button TWICE to
stop and clear the program.
14 PAUSE: During playback, if you wish to
pause the disc momentarily, press the
Play/Pause4; button. Press again to
resume normal playback.
15 Press the Stop < button to stop
playback.
16 Press the STANDBY button to turn the
unit off.
15
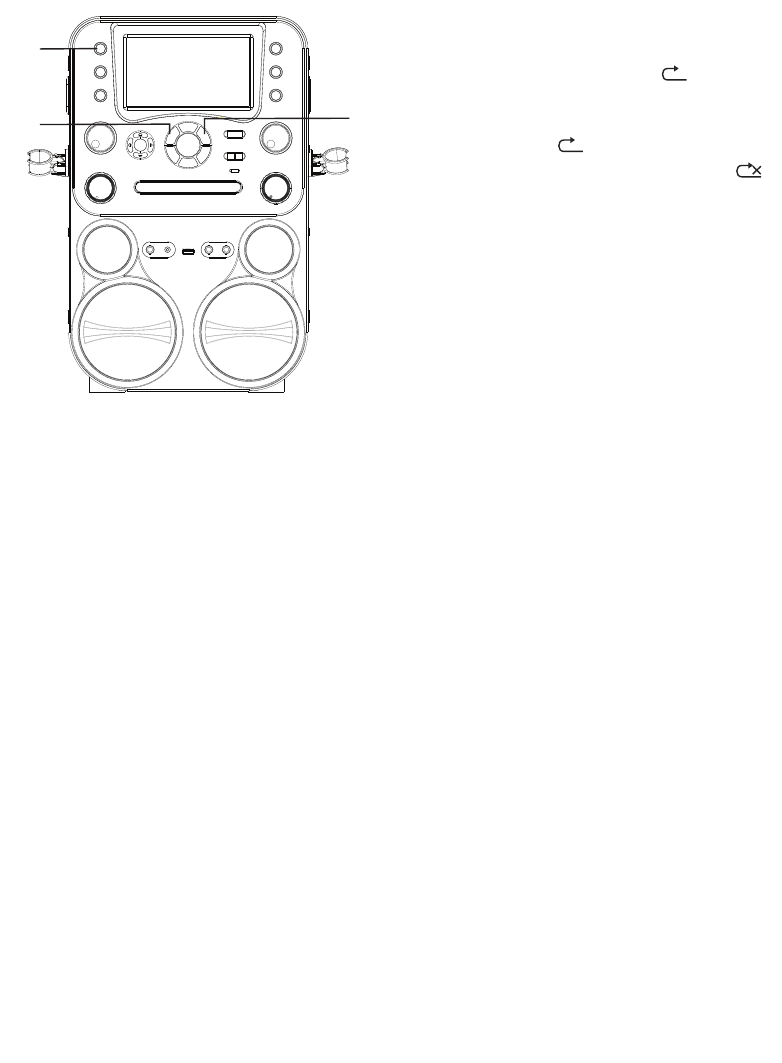
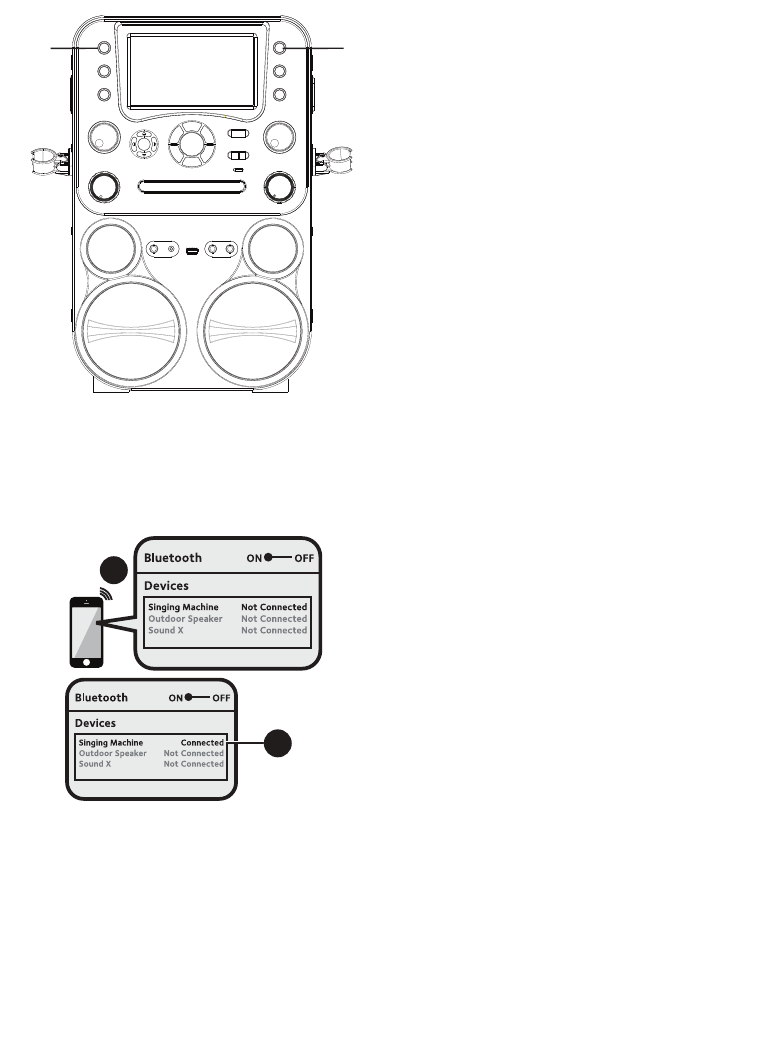
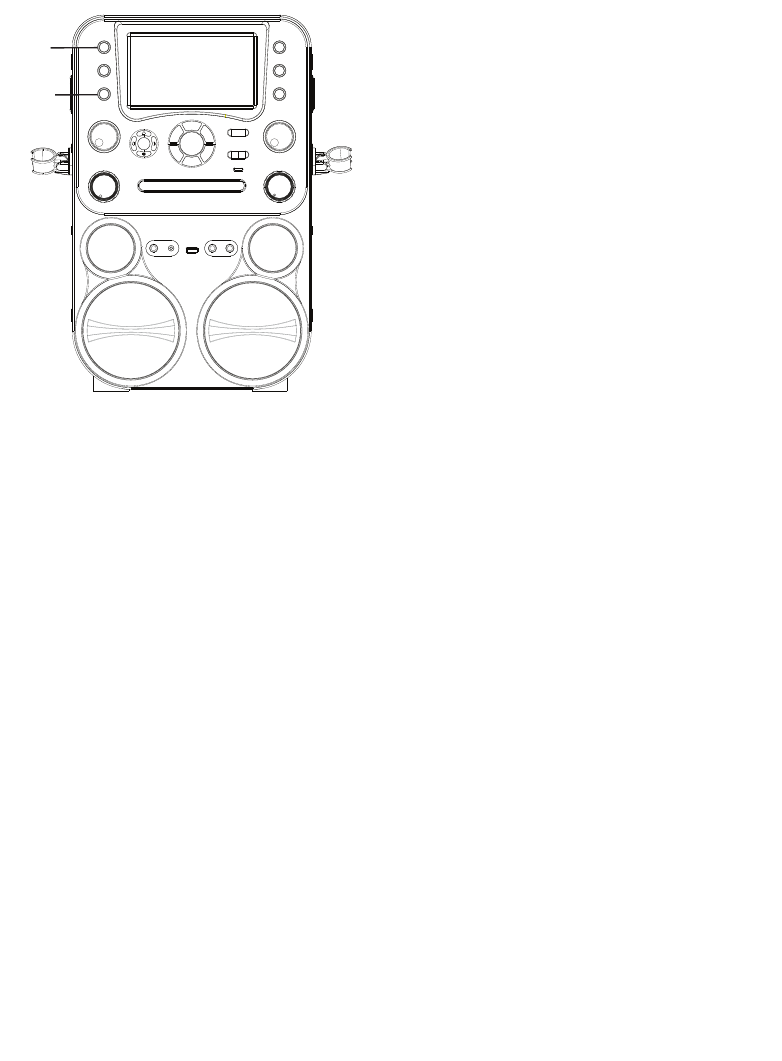
Operation
1 Connect the unit as described
previously. Press the STANDBY
button to turn the unit on.
2 Repeatedly press the FUNCTION
button to select the Bluetooth mode;
“bt” will blink on the display and
“Bluetooth” will blink on the monitor
as the unit automatically searches for
and pairs a previously paired Bluetooth
device (if previously paired). If no
previously paired devices are present,
connect as shown in the next step.
Note: You can also press the BLUETOOTH
button to disconnect any paired devices
in order to pair another device. Press the
BLUETOOTH button again to reconnect the
current device.
3 Turn on your device’s Bluetooth option
in settings to search for a discoverable
device with a Bluetooth signal. Select
“Singing Machine” from the device
results on the Bluetooth menu.
Note: Also refer to the user manual of your
Bluetooth device for detailed instructions.
4 “bt” will light solid in the display and a
successful pairing sound will be heard.
Notes:
• If your Bluetooth prompts you for a
passcode during the pairing process, please
enter “0000” to connect.
• On some Bluetooth devices, once pairing is
complete, select your Bluetooth device as
“Use as Audio Device” or similar.
• If connection is lost after successful pairing,
check to make sure the distance between
speaker and Bluetooth-enabled device does
not exceed 30 feet/10 meters.
•“Bluetooth” will blink on TV screen, and will
stop blinking after successful connection.
Using a Bluetooth Device
888
vu
3
4
16
Operation
5 To control your Bluetooth device from
this unit, press the Play/Pause4;
button to start playback. Press
the Play/Pause4; button during
playback to pause the song.
6 Adjust the volume to a comfortable
level using the MASTER VOLUME
control on this unit as well as the
volume on your Bluetooth device.
7 Connect microphone(s) and slide the
ON/OFF switch on the microphone to
the ON position.
8 Adjust the MIC VOLUME control
as desired. Increasing this control
will increase the volume of both
microphones.
9 Rotate the ECHO control to add an
echo effect to your voice. Rotate
towards MAX to increase the echo
effect.
10 Adjust the balance between the
speakers using the BALANCE control.
11
SKIP: Advance or go back one track
by pressing the Skip Back 9/Skip
Forward : buttons.
12Press the STANDBY button to turn
the unit off.
Using a Bluetooth Device (Continued)
888 y
U
888 X
ak
at
al
W
V
17
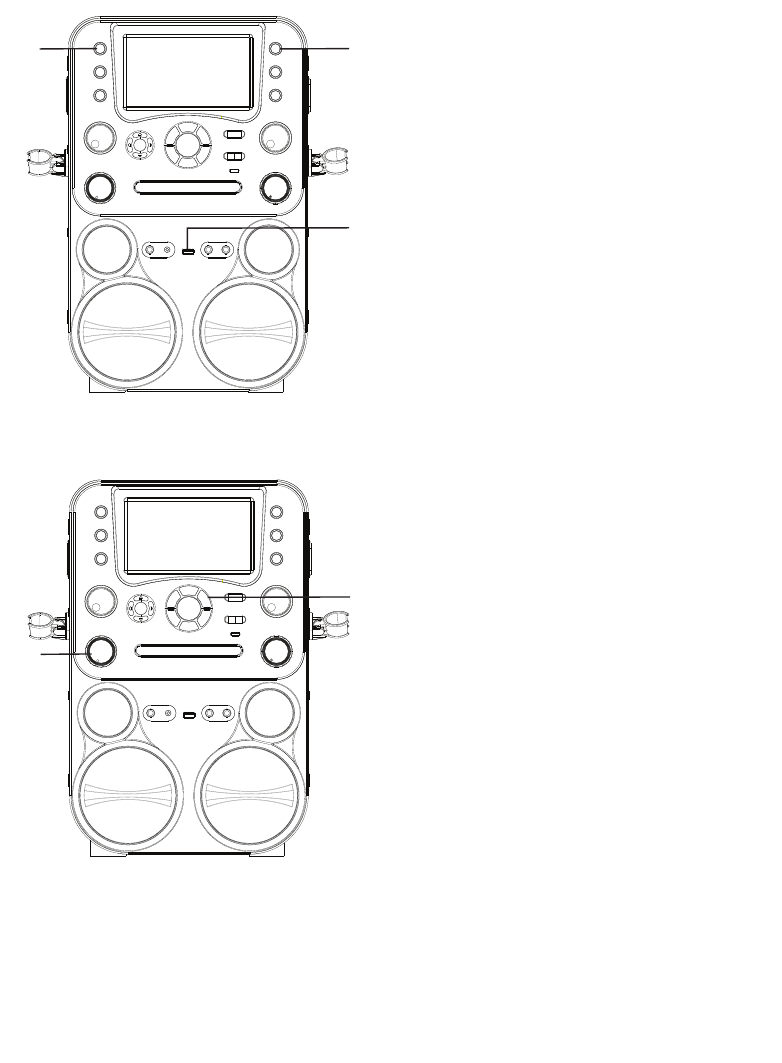
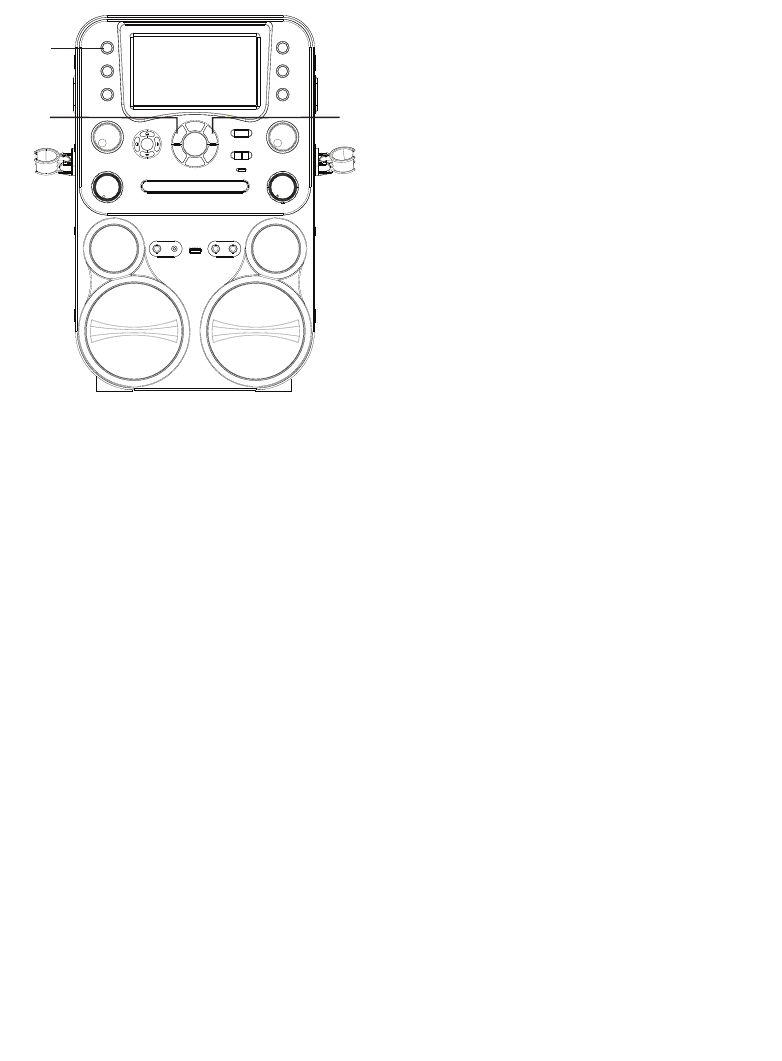
Operation
GUITAR
/KEYBOARD
1 Connect the unit as described
previously.
GUITAR/KEYBOARD: Connect the
Guitar or Keyboard to the GUITAR/
KEYBOARD Ext. Input jack.
LINE IN: Connect a music player using
a 3.5mm standard audio cable from
the external unit’s Audio Output/
Headphone jack to the unit LINE IN Ext.
Input jack.
2 Press the STANDBY button to turn
the unit on.
3 Repeatedly press the FUNCTION
button to select the LINE IN mode;
“AU” will display and ‘ “LINE IN” will
appear on the monitor.
4 Connect the external unit to the
LINE IN Jack on the front of this unit.
Connecting an external unit will allow
the audio to be played through your
Singing Machine.
Notes:
• It is highly recommended to set the volume
on the auxiliary unit to 1/3 or lower to avoid
distortion.
• Skipping files/tracks is not possible on this
unit when using an external device.
5 Adjust the volume using the MASTER
VOLUME control on this unit or your
external device’s volume control.
Using the LINE IN Jack (Guitar or Keyboard)
888
wv
y

18
Operation
6 Connect microphone(s) slide the ON/
OFF switch on the microphone to the
ON position.
7 Adjust the MIC VOLUME control
as desired. Increasing this control
will increase the volume of both
microphones.
8 Rotate the ECHO control to add an
echo effect to your voice. Rotate
towards MAX to increase the echo
effect.
9 Adjust the balance between the
speakers using the BALANCE control.
10 Press the STANDBY button to turn
the unit off.
Using the LINE IN Jack (Guitar or Keyboard) (Continued)
888 W
V
at
X
U
19
Operation
888
u
w
y
1 Connect the unit as described
previously. Press the STANDBY button
to turn the unit on.
RECORD CDG/CD MUSIC TO THE USB
2 Follow the “Playing a CDG” instruction
to start the CDG/CD music playback.
3 Insert a USB flash drive into the USB
port on the unit, press the RECORD
button; OPEN FILE will appear on
the monitor and recording will begin.
When recording is finished, press the
RECORD button again to stop.
RECORD BLUETOOTH MUSIC TO THE USB
4 Follow the “Using a Bluetooth Device”
instruction to start the Bluetooth
music playback.
5 Insert a USB flash drive into the USB
port on the unit, press the RECORD
button; OPEN FILE will appear on the
monitor and RECORDING will start.
When recording is finished, press the
RECORD button again to stop.
6 All recorded music or recorded singing
will be in the folder labeled REC, file
name labeled TRK.
Bluetooth music file labeled BT.
Note: You cannot record from the USB or
Line in, only from a CD, CDG or Bluetooth.
Recording CDG/CD. Bluetooth to the USB
20
Operation
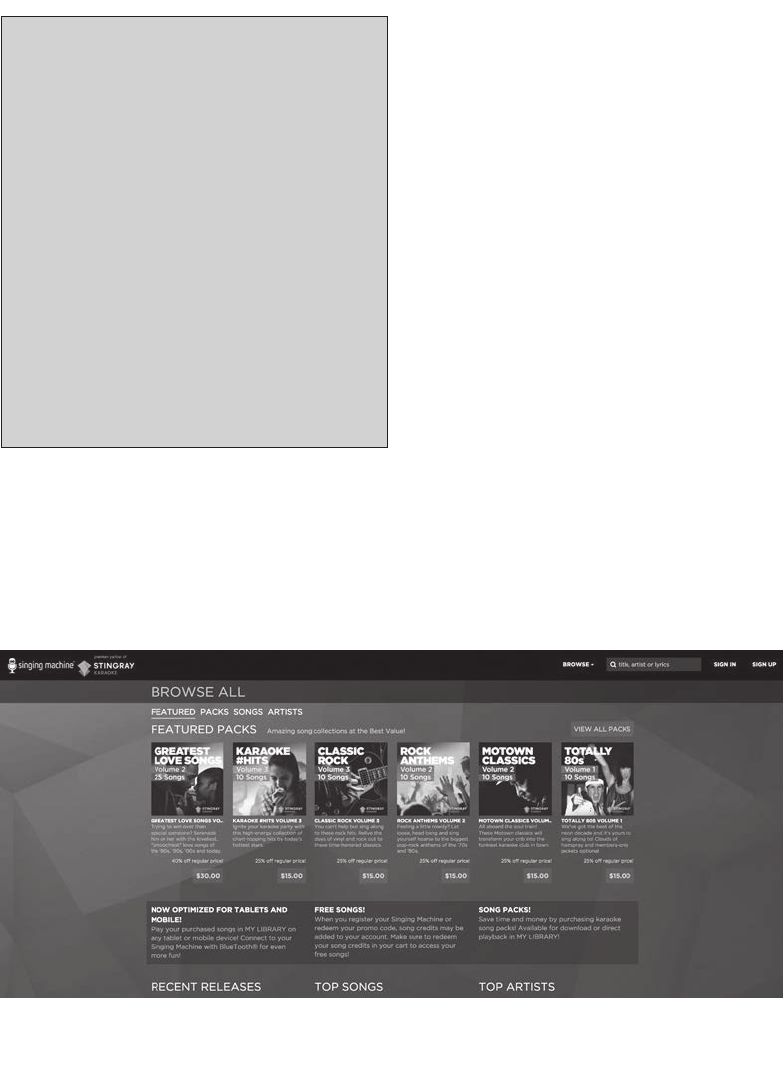
To purchase and download karaoke music,
please visit http://store.singingmachine.com to
access over 12,000 of your favorite karaoke
songs. You will need a USB flash drive (not
included) to transfer the downloads to this unit.
Follow these easy steps:
1 Go to http://store.singingmachine.com
using your internet browser, and then
register.
2 Select and purchase your favorite
karaoke music from the Singing
Machine Download Store.
3 Download your selected purchase(s)
from the Singing Machine Digital
Locker to your USB flash drive.
4 Insert the USB flash drive as shown on
page 11 and enjoy!
Note: Your downloaded songs can also be
burned to a blank CDR/CDRW.
Where to Download MP3+G Files
FAQ
• Where can I get additional help with the
file formats?
While on the Singing Machine Store’s web
page, simply click FILE FORMATS at the
lower left.
Helpful Hints:
The .mp3 and .cdg files are delivered for download
in a single, compressed MP3+G.zip file. The
MP3+G file cannot be played as a .zip file on a
USB flash drive. To play karaoke songs using a
USB flash drive, the MP3+G .zip file must be
unzipped as follows:
• Connect a USB flash drive to your computer.
• Download the MP3+G file from your Digital
Locker and save the .zip* file to a folder
on your computer.
• Double click the .zip file to open the .zip (you
will see the .mp3 and .cdg files).
• Drag and drop the .mp3 and .cdg files to the
USB flash drive.
• Remove (eject) the USB flash drive from your
computer.
Turn on the Singing Machine and connect the USB
flash drive.
21
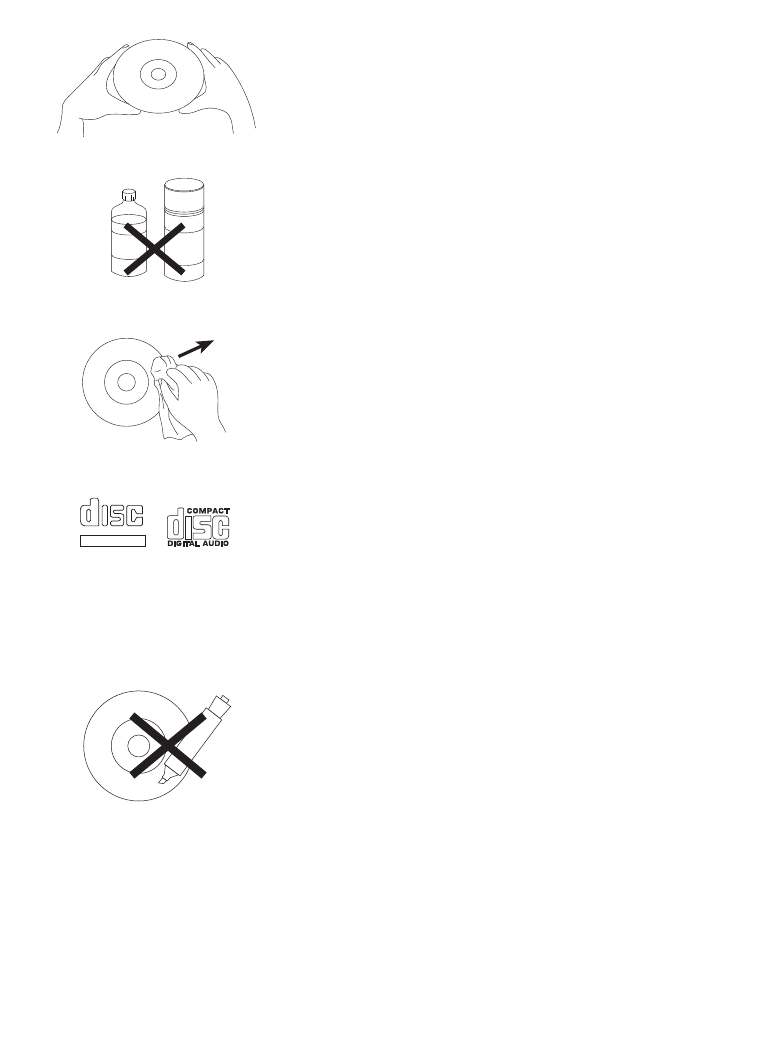
Care and Maintenance
Care for Compact Discs
Treat the compact disc carefully. Handle the compact
disc only by its edges. Never allow your fingers to come
in contact with the shiny, unprinted side of the compact
disc.
Do not attach adhesive tape, stickers, etc. to the
compact disc label. Clean the compact disc periodically
with a soft, lint-free, dry cloth. Never use detergents or
abrasive cleaners to clean the compact disc. If necessary,
use a CD cleaning kit.
If a disc skips or gets stuck on a section of the compact
disc, it is probably dirty or damaged (scratched).
When cleaning the compact disc, wipe in straight lines
from the center of the compact disc to the outer edge
of the compact disc. Never wipe in circular motions.
This unit is designed to play only compact discs bearing
the identification logos as shown here. Other discs
may not conform to the CD standard and may not play
properly.
Compact discs should be stored in their cases after each
use to avoid damage. Do not expose compact discs to
direct sunlight, high humidity, high temperatures or dust,
etc. Prolonged exposure or extreme temperatures can
warp the compact disc.
Do not stick anything on either side of the compact disc.
Also do not write on the shiny side of the disc, as sharp
writing instruments, or the ink, may damage the surface.
Cleaning the Unit
To prevent fire or shock hazard, disconnect your unit
from the AC power source when cleaning. The finish on
your unit may be cleaned with a dust cloth and cared for
as other furniture. Use caution when cleaning and wiping
the plastic parts.
B
E
N
Z
E
N
E
C
L
E
A
N
E
R
COMPACT
DIGITAL AUDIO
GRAPHICS

22
22
Troubleshooting Guide
Should this unit exhibit a problem, check the following before seeking service:
No Power
• Power is not on; press the STANDBY button to turn power on.
• Make sure the unit is connected to AC power.
No Sound – General
• Master Volume is set to minimum; raise volume.
• Correct Function was not selected; select using the FUNCTION button.
No Sound – If connected to a TV
• Volume on the TV is muted or too low.
• White and red audio plugs are not connected properly; see page 5.
• Correct source (usually AV) was not selected in the TV’s menu.
CD is not working properly.
• No disc inserted, or disc inserted upside down; insert disc correctly.
• Make sure to use a CD, CD+G, or when downloaded music has been burned, ensure the disc
is a CDR or CDRW.
• Lens is dirty. Disconnect the power and clean the lens with a CD lens cleaner.
• Moisture has formed. Turn the unit off, unplug the unit from the outlet and allow 20-30
minutes to dry.
No sound from the microphone.
• Make sure it is firmly connected to the MIC1 or MIC2 jack.
• Make sure the ON/OFF switch on the microphone is set to the ON position.
• Make sure the MIC VOLUME control is not on the lowest setting.
• MASTER VOLUME is set to minimum; raise volume.
File(s) on USB jack not playing.
• The file is corrupted; replace file.
• The file is not in a format this unit will play.
• The connected USB device is not supported by the product.
The Bluetooth device cannot be paired or connected with the unit.
• You have not activated the Bluetooth function of your device; see page 15 or refer to the
Bluetooth device’s user manual.
• The unit is not in pairing mode; see page 15 to pair.
The Music playback is not available on the unit after successfully connecting the Bluetooth.
• Ensure your Bluetooth device can support the A2DP Bluetooth profile.

23
23
Specifications
AUDIO
Output Power (Maximum) ..................................................................................................... 20W (RMS)
Output Impedance .............................................................................................................................6 Ohms
CD PLAYER
Frequency Response......................................................................................................... 100 Hz-20 KHz
Signal to Noise Ratio ............................................................................................................................. 50 dB
Sampling System .................................................................................................... 8 Times Oversampling
Disc Diameter ..................................................................4.72” (120 mm)/ 3.15” (80 mm) Single CD
BLUETOOTH
Bluetooth Version .......................................................................................................................V2.1 + EDR
Working Distance ................................................................Up to 10 meters measured in open space
GENERAL
Power ............................................................................................................... AC 100-240 V, 50/60 Hz
Dimensions ........................................ 11.85 x 9.35 x 18.65 inches / 301.0 x 237.5 x 473.8 mm
Weight ........................................................................................11.57 lbs / 5.25 kg (with accessories)
Microphone ............................ -68 dB 600 Ohms impedance with 6.3 mm Dynamic Microphone
Power ...............................................................................................DC12V, 3A Center Positive Adapter
USB ...........................................................................................................Supports USB Flash up to 32 GB
Specifications are subject to change without notice.
The Bluetooth® word mark and logos are registered trademarks owned by Bluetooth SIG, Inc.
and any use of such marks by The Singing Machine Company is under license. Other trademarks
and trade names are those of their respective owners.
The Singing Machine Company, Inc.
4060 E Jurupa Street, Unit B
Ontario, CA 91761-1413 USA
PRINTED IN CHINA
890BT-1708-ENG01
Visit Our Website: www.singingmachine.com