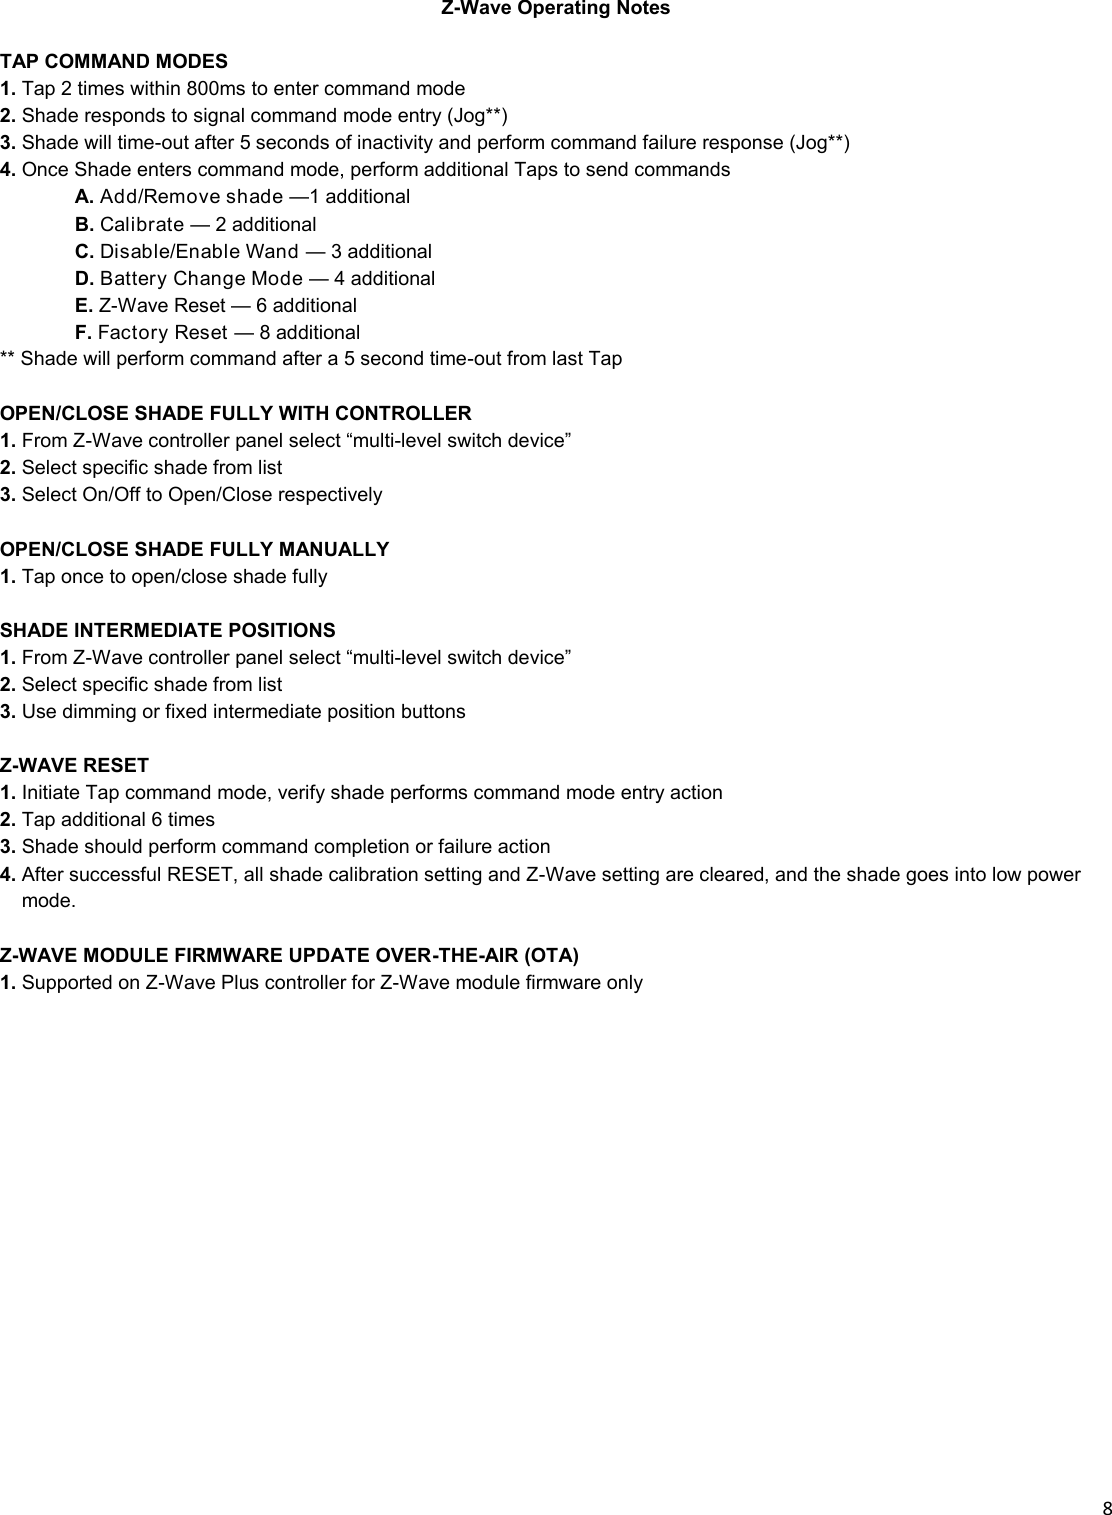
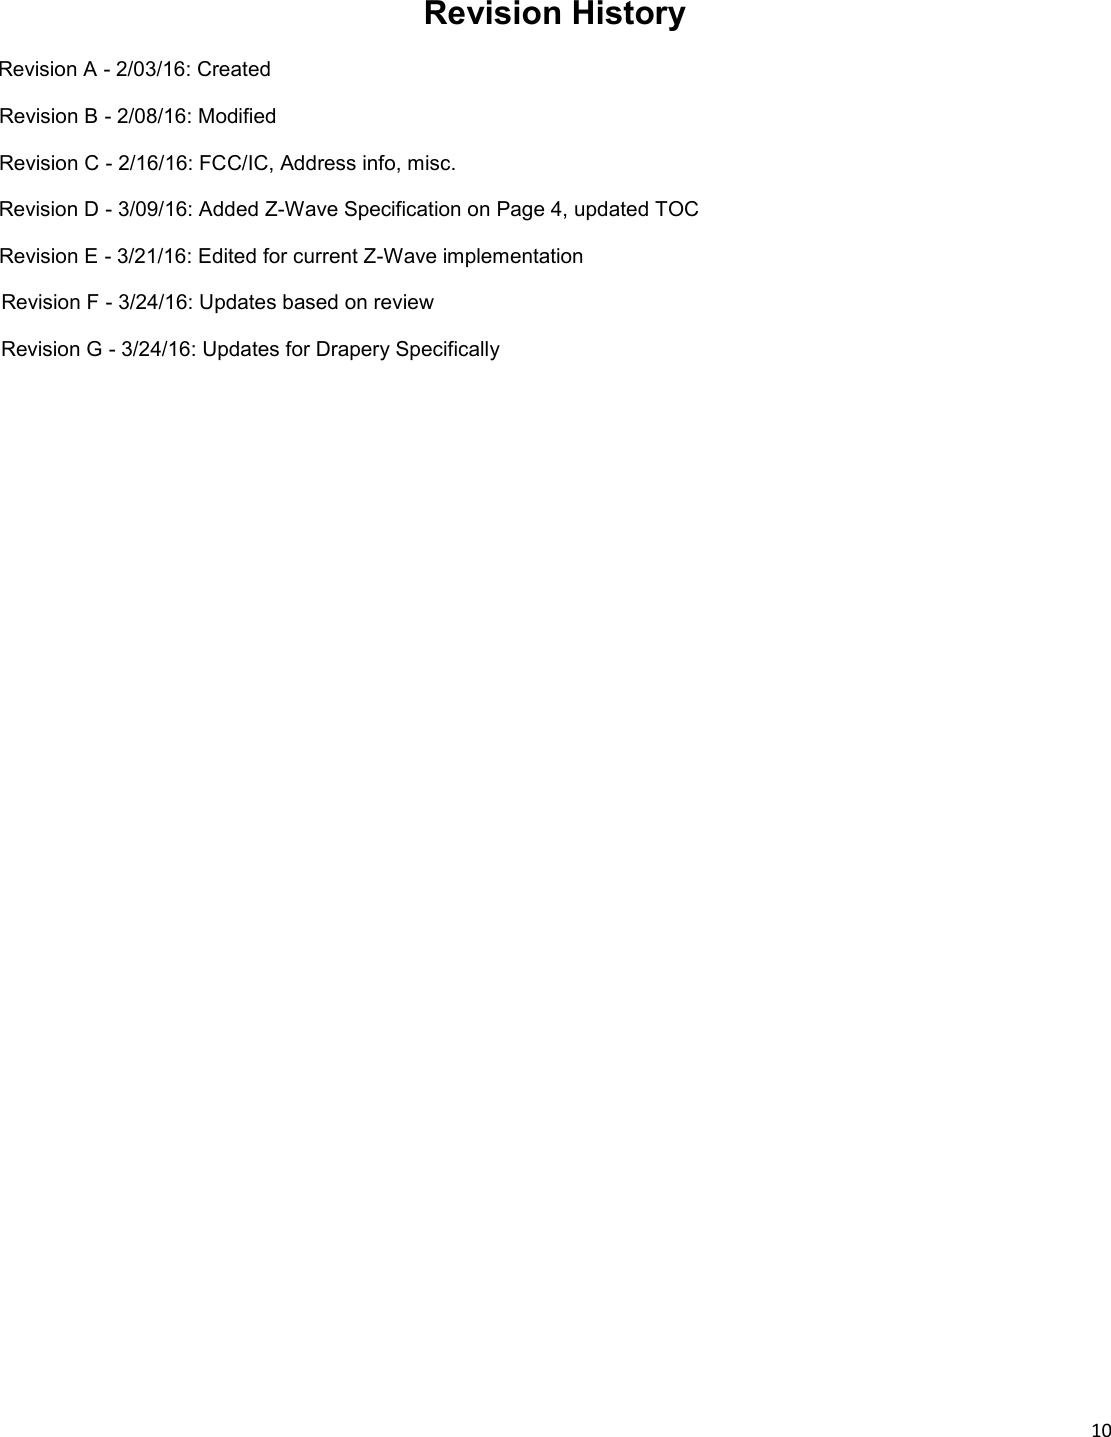
The Watt Stopper d b a Qmotion DR15-908 Z-Wave Motorized Drapery Rod 1.5 inch User Manual

The Watt Stopper, Inc. d/b/a Qmotion Z-Wave Motorized Drapery Rod 1.5 inch

User Manual

Z-Wave Automated Drapery Shade Operation Manual For model numbers DR15-908, DR20-908   FCC/IC IDs FCC ID: 2AHG4-DR15-908, IC: 21161-DR15-908 FCC ID: 2AHG4-DR20-908, IC: 21161-DR20-908  Revision G 3/28/2016
 2  TO OUR CUSTOMER  It is our mission to bring you a high quality product that ts our high standards for in-novaon, beauty and simplicity. To do so we have released our Second Generaon QMo-on® Automated Roller Shade to bring you a great shade experience. This design has many features that you may or may not have noced that will make your shade more reliable and ready for our future development plans.      If this is your rst me purchasing QMoon® shades, we invite you to view our rst me setup document located at the web address below:  hp://qmoonshades.com/support.php   QMoon® Customer Service  Contact us Monday-Friday  8:00a.m. – 6:00p.m. (U.S. Central Time) 1-877-849-6070
 3  Table of Contents Z-Wave Specifications …………………………………….…………………………….…………………...4 Z-Wave Programming Instructions……………………...……………………………….………………….5 Regulatory Information………………………………………………………………….………………..…...8 Revision History... ……………………………………………………………………….………………..…..9
 4  Qadvanced Roller Shade Z-Wave Z-Wave Specifications   Z-Wave® is a registered trademark of Sigma Designs Inc. and/or its subsidiaries.   This product can be included and operated in any Z-Wave network with other Z-Wave certified devices from other manufacturers and/or other applications. All non-battery operated nodes within the network will act as repeaters regardless of vendor to increase reliability of the network.    To Add this device to a Z-Wave Network: Please see the section titled “FIRST TIME SETUP (Z-Wave ADD)“ in this document.   To Remove this device from a Z-Wave Network: Please see the section titled “To REMOVE shade from con-troller (Z-Wave REMOVE)” in this document.   Replication is the process of copying or transferring your Z-Wave network from one controller to another.    ASSOCIATION: This product supports one Group with five Nodes for lifeline communication. Group 1 must be assigned the Node ID of the controller to which unsolicited notifications from the device will be sent. The Z-Wave controller should set this association automatically after inclusion. You can as-sociate up to five Z-Wave devices to Group 1. Lifeline association supports the “device reset locally” and "low battery notification" events.
 5  Qadvanced Roller Shade Z-Wave Programming Instructions Read and understand each section before performing required steps During FIRST TIME SETUP after Step 2. The shade will be in ADD mode immediately after power up for 3 minutes.  If not added the shade will time-out and require another attempt. JOG is a short back and forth movement.  The process should be  restarted if the expected results differ or a failure indication is received.  IMPORTANT  FIRST TIME SETUP (Z-Wave ADD)  1. INSTALL SHADE following the shade installation instructions. 2. Remove and replace the battery pack from the shade to cycle power  3. Remount the shade so that it is secure 4. Place the Z-Wave controller into ADD device mode.      (Within 3 minutes of power cycle) 5. Now the Z-Wave controller will query new device.      (Controller signals that a new device has been discovered) 6. The shade will now enter a calibration mode.        (Follow Setting Open/Close limit)  SETTING OPEN/CLOSE LIMIT (Only if shade has never been added to a control-ler) 1. Manually roll the drapery to the desired CLOSED position. __ (Shade should move smoothly to fully closed position and remain) 2. From the Z-Wave controller, select the newly added device. 3. Command shade to a position that is NOT On or Off. __ (Shade will perform a single jog from the closed position) 4. Manually roll the drapery to the desired OPEN position. __ (Shade should move smoothly to fully open position and remain) 5. From the Z-Wave controller, select the newly added device. 6. Command shade to On or Fully Closed position. __ (Shade will move to home position, then perform a double jog)         To REMOVE shade from controller (Z-Wave REMOVE) 1. Place the Z-Wave controller into REMOVE device mode. 2. Now perform two taps, short pause between them. __ (Shade will move to home position, then perform a single jog) 3. Now perform one tap and wait for 5 seconds. __ (Shade will move to home position, then perform a single jog) 4. Now the Z-Wave controller will remove the device.      (Controller signals that a device has been removed) 5. The shade will indicate successful REMOVE __ (Shade will move to home position, then perform a double jog)
 6   SETTING OPEN/CLOSE LIMIT  1. Perform two Taps, short pause between them.  _ (Shade will move to home position, then perform a single jog) 2. Now perform two Taps (pause between) and wait for 5 seconds.  _ (Shade will move to home position, then perform a single jog) 3. Set desired CLOSED position.  A. From Z-Wave Controller:     1. Use On/Off controls to nudge the shade towards the desired close position  B. Manually from shade:     1. Roll shade to desired closed position      (Shade should remain at the set location) 4. From the Z-Wave controller, select the device to calibrate. 5. Command shade to a position that is NOT On or Off. __ (Shade will move to home position, then perform a single jog) 6. Set desired OPEN position.  A. From Z-Wave Controller:     1. Use On/Off controls to nudge the shade towards the desired open position  B. Manually from shade:     1. Roll shade to desired open position      (Shade should remain at the set location) 7. From the Z-Wave controller, select the device to calibrate. 8. Command shade to a position that is NOT On or Off. __ (Shade will move to home position, then perform a double jog)  IMPORTANT Open/Close Position can be set after the first ADD of the device by using the calibration mode.  The triple jog action is an indi-cation of failure and the process is aborted.  If the expected results differ or a failure is indicated, restart the calibration pro-cess.
 7   BATTERY REPLACEMENT 1. Perform two Taps, short pause between them. __ (Shade will move to home position, then perform a single jog) 2. Now perform four Taps (pause between) and wait for 5 seconds.  _ (Shade will move to home position, then perform a single jog) 3. Shade will go into battery replacement mode and should not respond to taps.       (Battery replacement mode will be exited on next power up) 4. Proceed with battery replacement.        (As soon as batteries are installed the shade will not respond to taps for 3 minutes) 5. Insert your index finger into the battery tube’s end and press upward on Battery Release trigger         (See IMPORTANT information above) 6. Repeat step 5 until all batteries are removed. 7. Install new ALAKLINE batteries and reassemble shade.    (Shade will not respond to taps for 3 minutes after power up)            FACTORY (MASTER) RESET (Will remove ALL paired controllers and calibration settings) 1. Perform two Taps, short pause between them. __ (Shade will move to home position, then perform a single jog) 2. Now perform eight Taps (pause between) and wait for 5 seconds.  _ (Shade will move to home position, then perform a double jog) IMPORTANT When changing the batteries, be sure NOT to remove the battery release trigger.  The battery tube cap is spring loaded. Un-screw it cautiously.  Ensure the shade is supported adequately while performing the operation.
 8  Z-Wave Operating Notes  TAP COMMAND MODES 1. Tap 2 times within 800ms to enter command mode 2. Shade responds to signal command mode entry (Jog**) 3. Shade will time-out after 5 seconds of inactivity and perform command failure response (Jog**) 4. Once Shade enters command mode, perform additional Taps to send commands  A. Add/Remove shade —1 additional  B. Calibrate — 2 additional  C. Disable/Enable Wand — 3 additional  D. Battery Change Mode — 4 additional  E. Z-Wave Reset — 6 additional  F. Factory Reset — 8 additional ** Shade will perform command after a 5 second time-out from last Tap  OPEN/CLOSE SHADE FULLY WITH CONTROLLER  1. From Z-Wave controller panel select “multi-level switch device” 2. Select specific shade from list 3. Select On/Off to Open/Close respectively  OPEN/CLOSE SHADE FULLY MANUALLY  1. Tap once to open/close shade fully   SHADE INTERMEDIATE POSITIONS  1. From Z-Wave controller panel select “multi-level switch device” 2. Select specific shade from list 3. Use dimming or fixed intermediate position buttons  Z-WAVE RESET  1. Initiate Tap command mode, verify shade performs command mode entry action 2. Tap additional 6 times 3. Shade should perform command completion or failure action 4. After successful RESET, all shade calibration setting and Z-Wave setting are cleared, and the shade goes into low power    __mode.  Z-WAVE MODULE FIRMWARE UPDATE OVER-THE-AIR (OTA)  1. Supported on Z-Wave Plus controller for Z-Wave module firmware only
 9  REGULATORY INFORMATION  FCC & IC Noce This device complies with Part 15 of the FCC Rules and Industry Canada license exempt standard(s). Operation is subject to the following two conditions: (1) This device may not cause harmful interference, and (2) This device must accept any interference received, including interference received that may cause undesired operation. Le présent appareil est conforme aux CNR d’Industrie Canada applicables aux appareils radio exempts de licence. L’exploita-tion est autorisée aux deux conditions suivantes: (1) l’appareil ne doit pas produire de brouillage, et (2) l’utilisateur de l’appareil doit accepter tout brouillage radioélectrique subi, même si le brouillage est susceptible d’en com-promettre le fonctionnement.  This Class B digital apparatus complies with Canadian ICES-003 Cet appareil numérique de la classe B est conforme à la norme NMB-003 du Canada. This equipment has been tested and found to comply with the limits for a Class B digital device, pursuant to Part 15 of the FCC Rules. These limits are designed to provide reasonable protection against harmful interference in a residential installa-tion.  This equipment generates, uses, and can radiate radio frequency energy and, if not installed and used in accordance with the instructions may cause harmful interference to radio communications. However, there is no guarantee that interference will not occur in a particular installation. If this equipment does cause harmful interference to radio or television reception, which can be determined by turning the equipment off and on, the user is encouraged to try to correct the interference by one or more of the following measures:   Reorient or relocate the receiving antenna.    Increase the separation between the equipment and receiver    Connect the equipment into an outlet on a circuit different from that to which the receiver is connected    Consult the dealer or an experienced radio/TV technician to help.  WARNING: Changes or modifications not expressly approved by the manufacturer could void the user’s authority to operate the equip-ment.  CONTACT INFORMATION QMoon  3400 Copter Road Pensacola, Florida 32514 850-208-3400
 10  Revision History Revision A - 2/03/16: Created Revision B - 2/08/16: Modified Revision C - 2/16/16: FCC/IC, Address info, misc. Revision D - 3/09/16: Added Z-Wave Specification on Page 4, updated TOC Revision E - 3/21/16: Edited for current Z-Wave implementation  Revision G - 3/24/16: Updates for Drapery Specifically Revision F - 3/24/16: Updates based on review

Navigation menu