Thermo King 1E60326REB Radio Expansion Board - Telematics for Transport Refrigeration User Manual USERS MANUAL 2
Thermo King Corporation Radio Expansion Board - Telematics for Transport Refrigeration USERS MANUAL 2
Contents
- 1. INSTALLATION GUIDE
- 2. USERS MANUAL 1
- 3. USERS MANUAL 2
- 4. INSTALLATION MANUAL
USERS MANUAL 2
TK60178-8-OP-EN Rev.3.3 Page 61
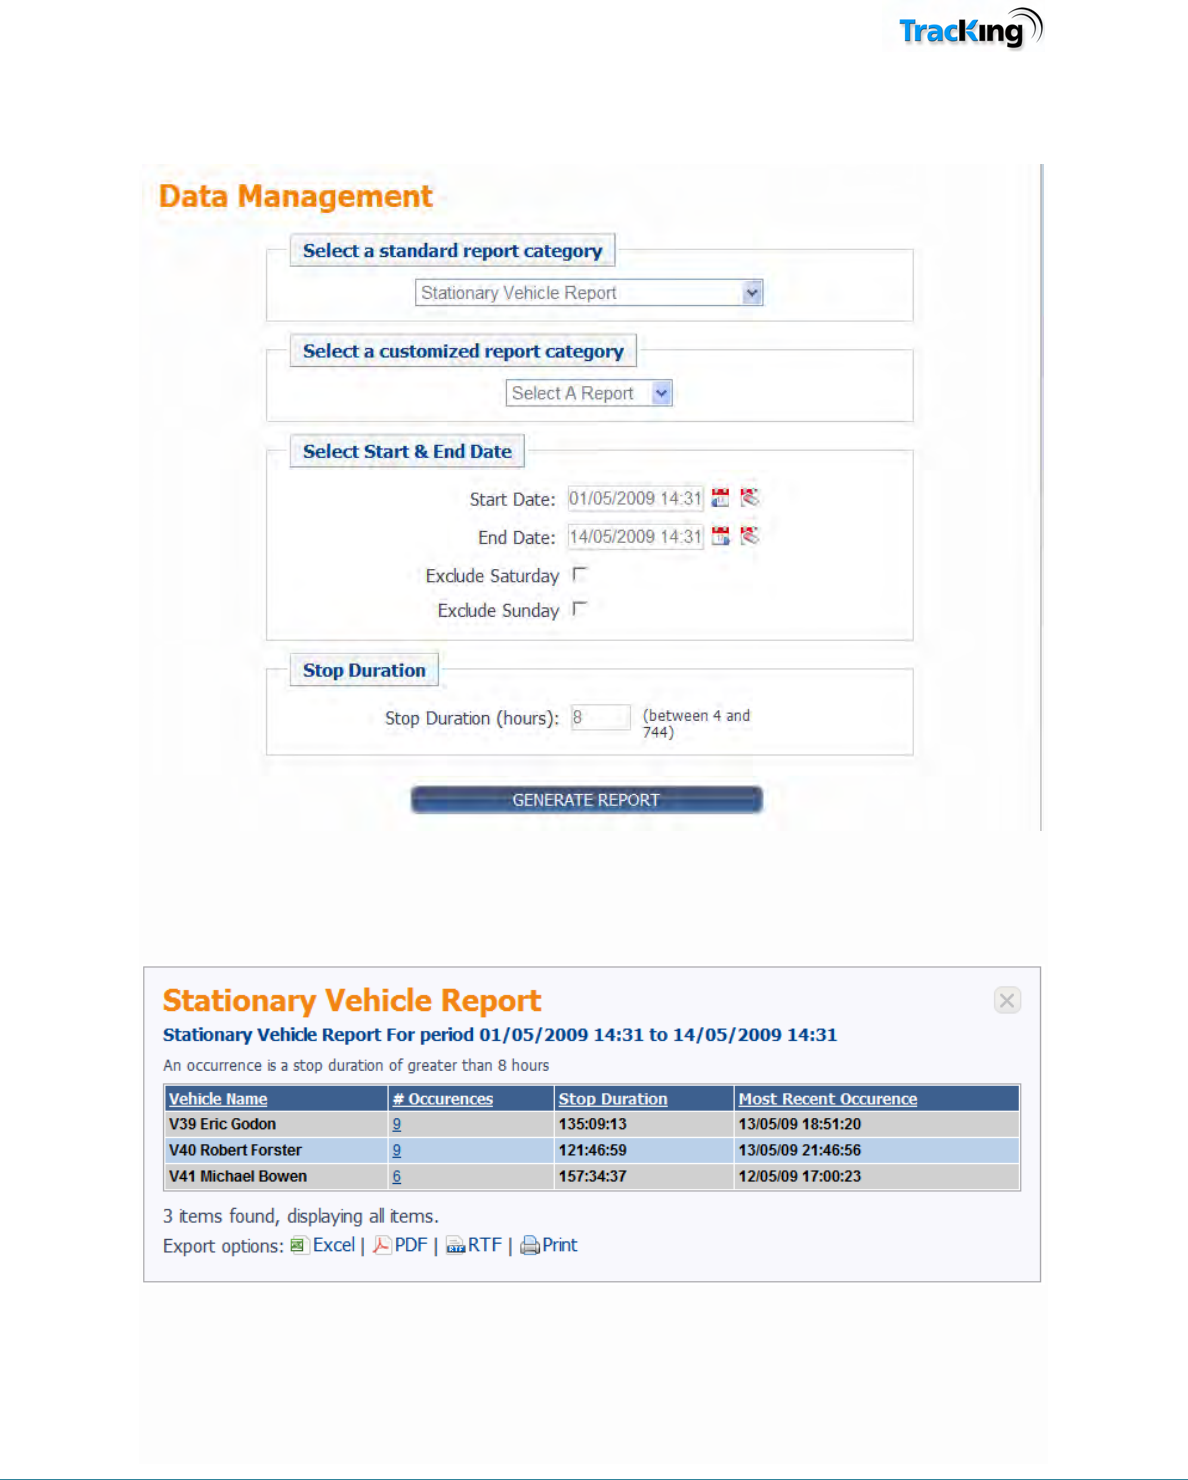
Stationary Vehicle Report
(Not available in Certain Markets including USA)
Note the user can define the stop duration. This is described as an occurrence of a stop of more than the
specified duration.
TK60178-8-OP-EN Rev.3.3 Page 62
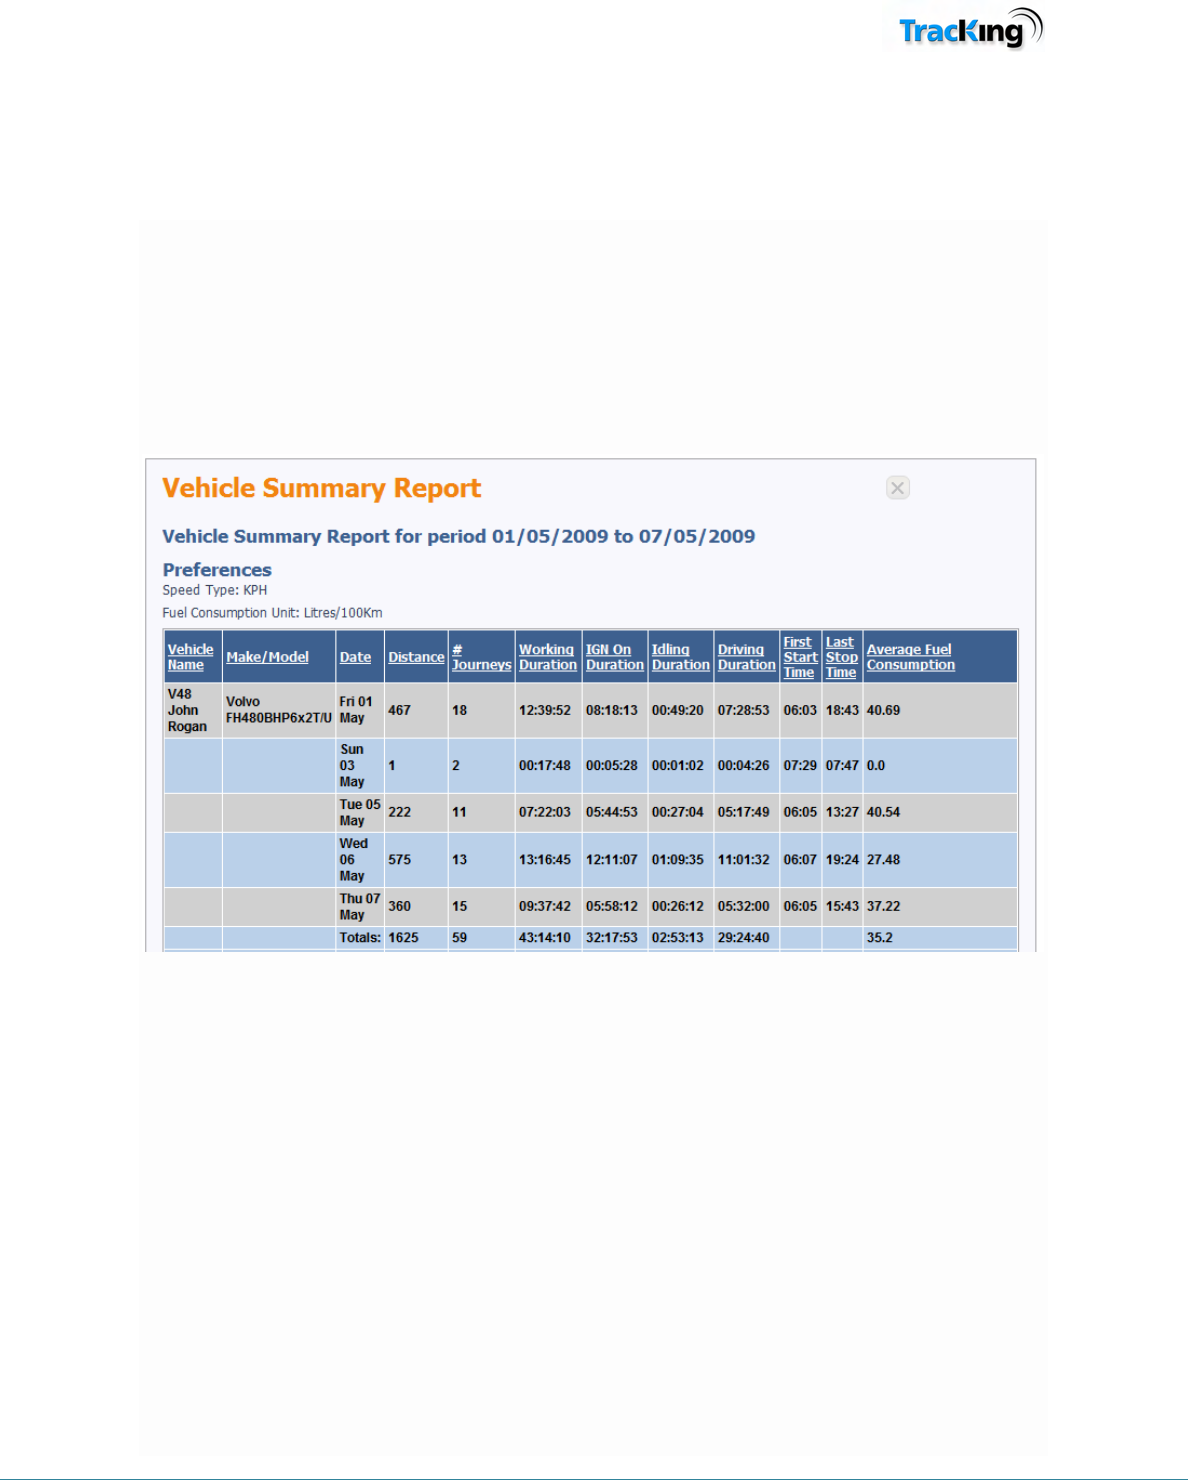
Vehicle Summary Report
(Not available in Certain Markets including USA)
The Vehicle summary report can be run for up to a month. This report provides a summary of the vehicle
Journeys by Day. This report also shows the average fuel consumption for the Vehicle.
Working Duration = Time from first Ign On to last Ign. Off in a day. Note that if the vehicle is on and remains
on past midnight then that journey is included in the first day
Ign. On duration =The length of time the Ign is on in the day.
Idling Duration = Length of time the Vehicle is moving at less than 15M per min (2kM/h) for at least 3Mins.
Driving Duration = Ign On duration – Idling Duration.
TK60178-8-OP-EN Rev.3.3 Page 63
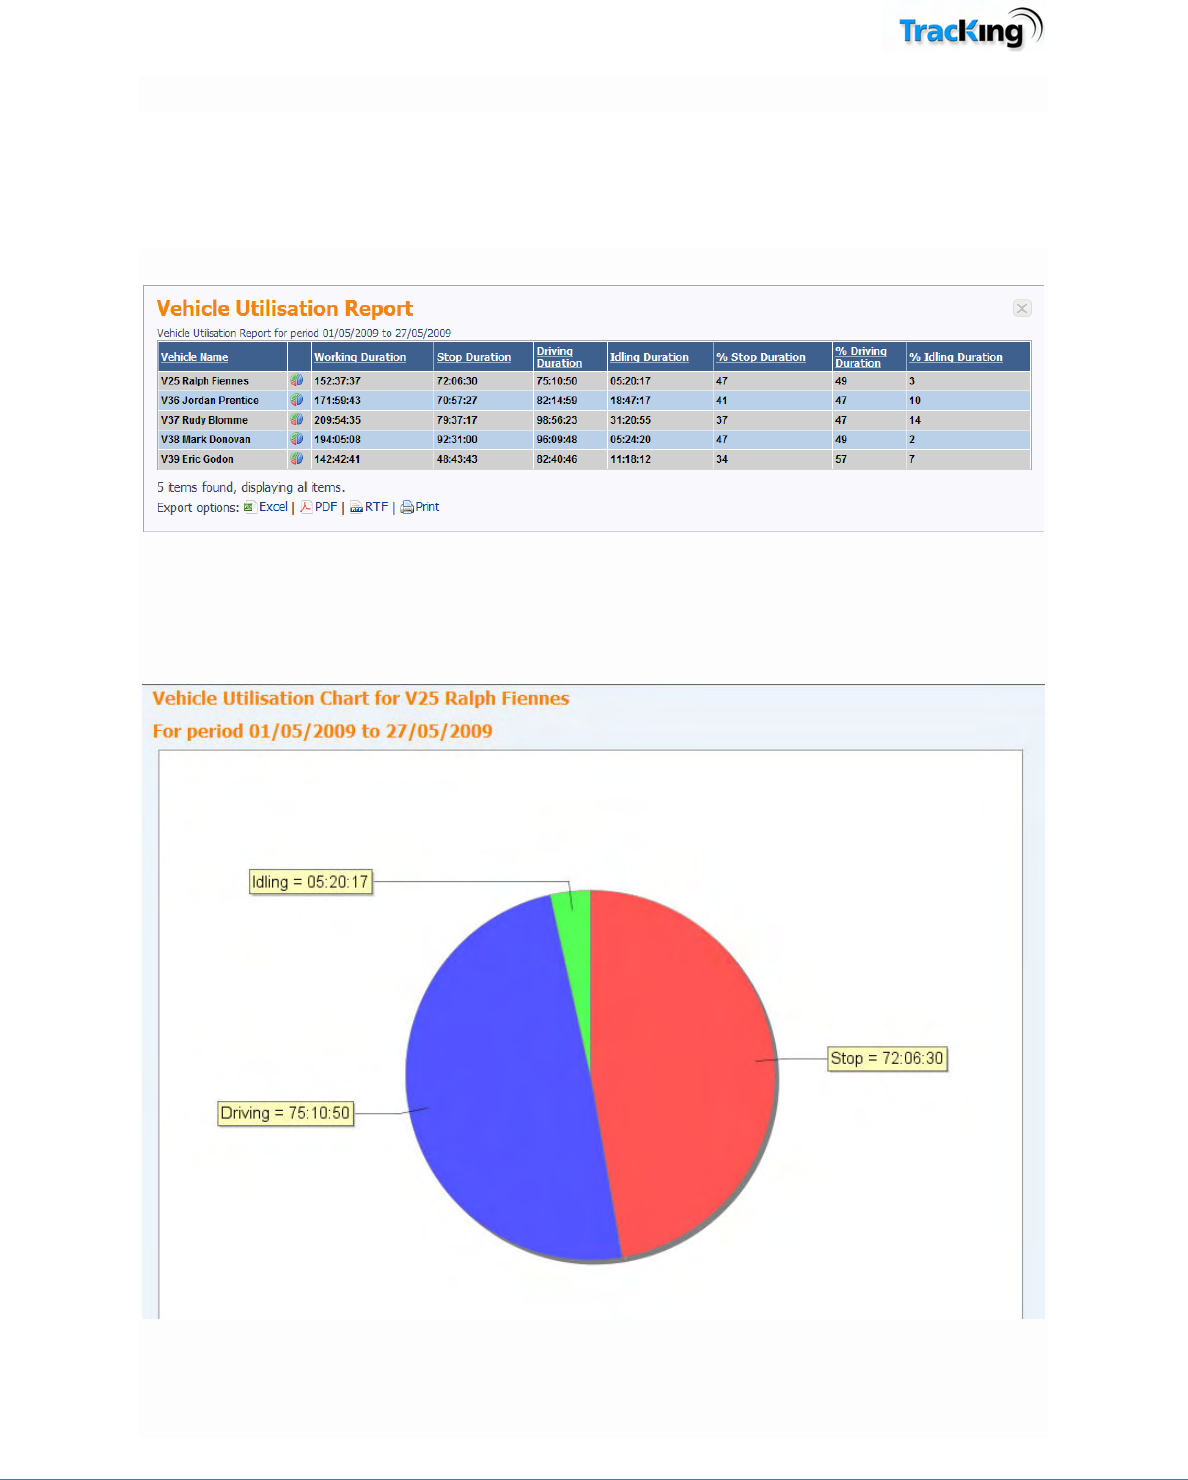
Vehicle Utilisation Report
(Not available in Certain Markets including USA)
The Vehicle Utilisation Report is a summary of the Vehicle Utilisation over a period of time.
Clicking on the Pie chart icon on the report shows the data in Pie Chart format.
TK60178-8-OP-EN Rev.3.3 Page 64
Key Performance Indicators Explained
(Not available in Certain Markets including USA)
Introduction
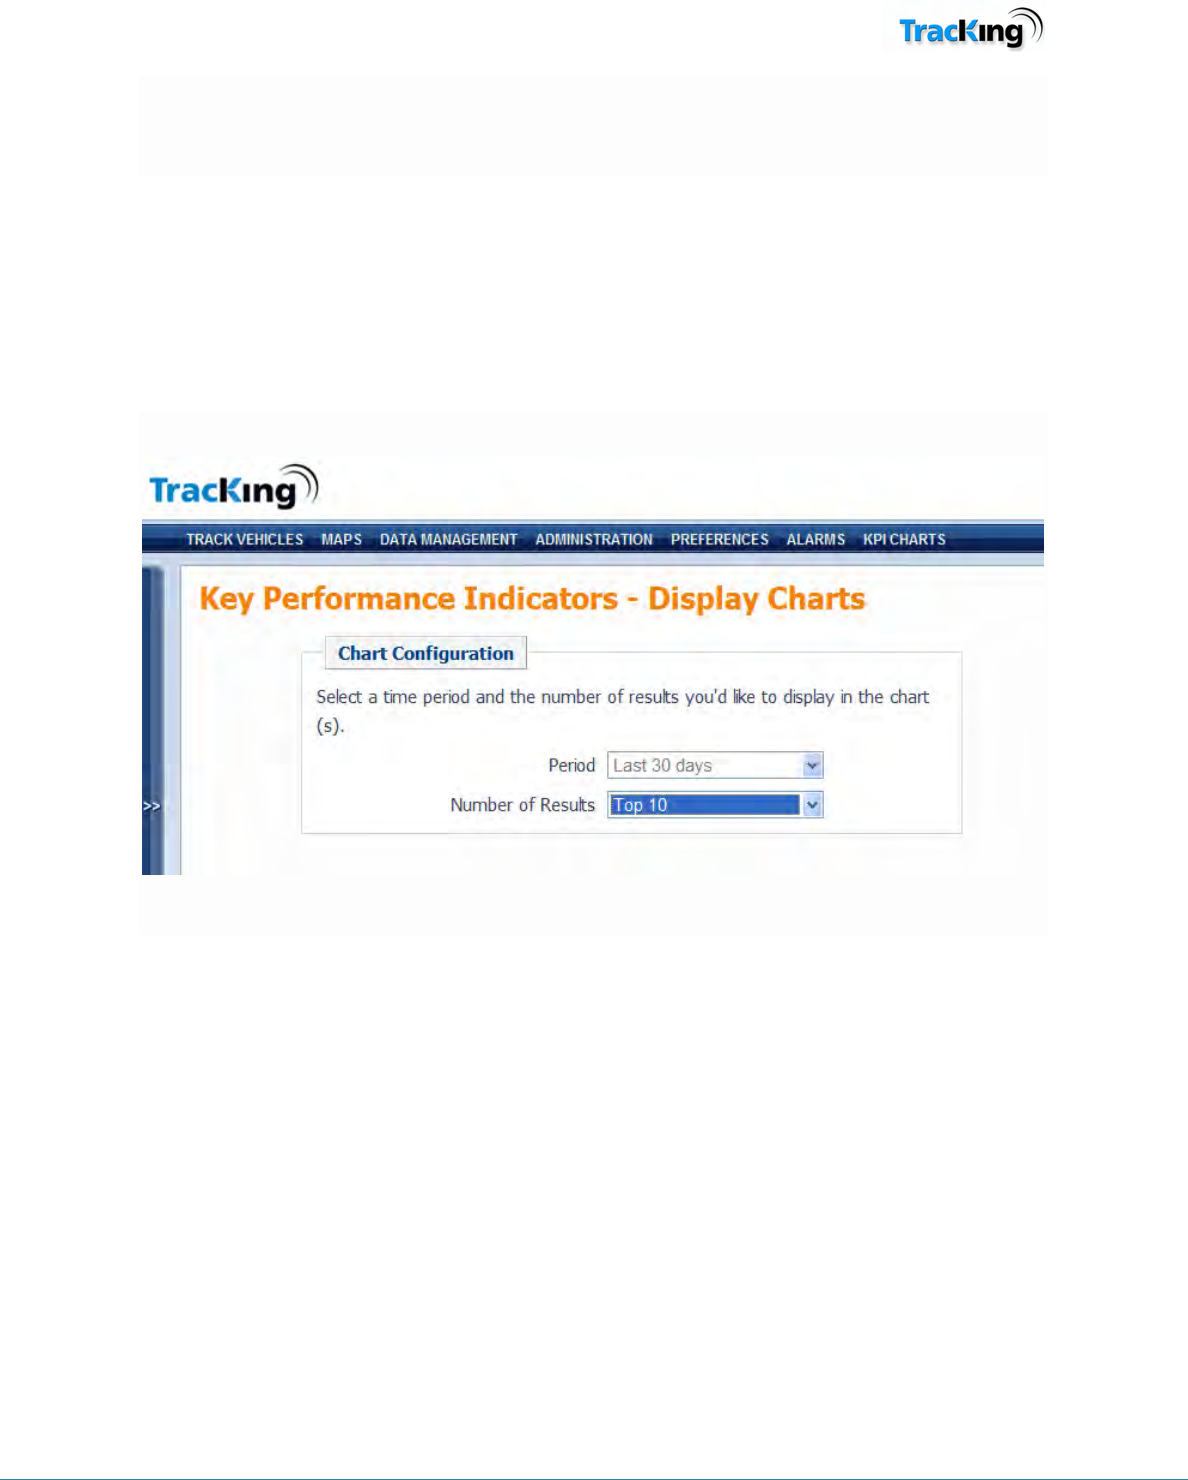
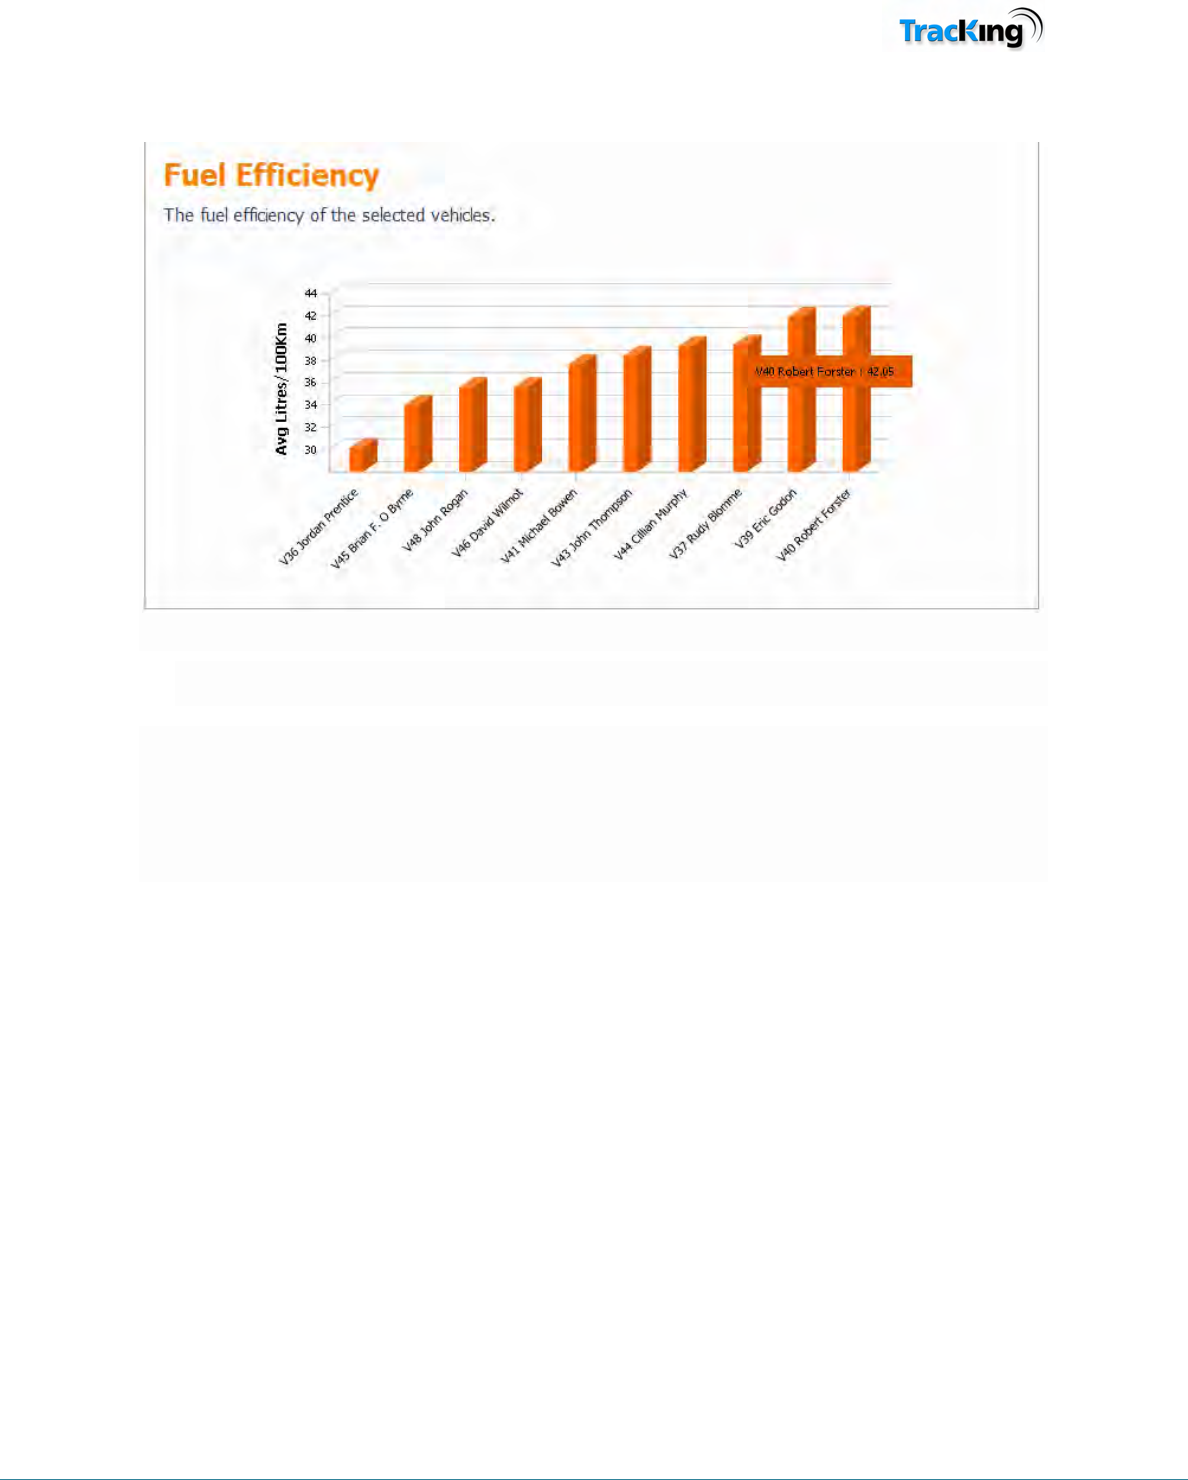
Key Performance Indicators are used to give a quick indication of Highest Hours Driven and Fuel Efficiency.
Initially the user can select the period of the charts and the number of Vehicles to be shown on the charts.
TK60178-8-OP-EN Rev.3.3 Page 65
Highest Hours Driven KPI
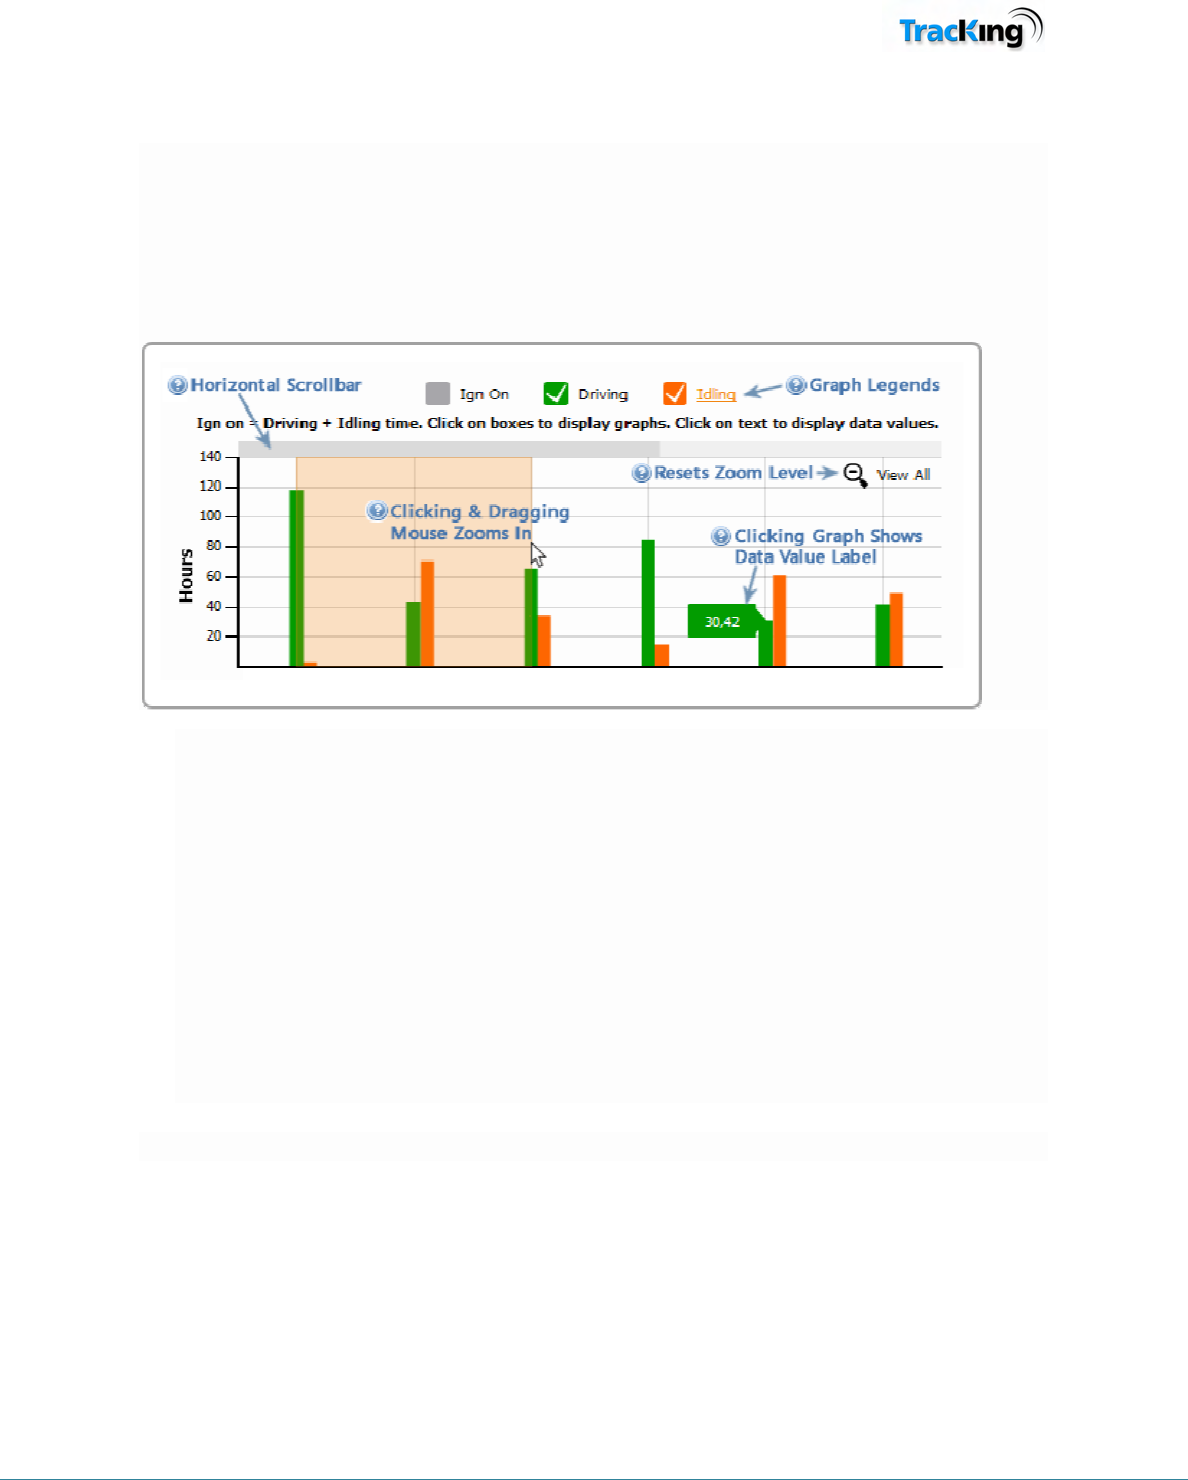
The Highest Hours Driven KPI is fully automated and will display available data for the vehicles selected in the
Vehicle Tree.
Users can interact with the chart in a number of ways:
• Graphs can be turned on and off by clicking on the coloured legend boxes
• Similarly, data value labels can be turned on and off by clicking either on the individual graph bars or
on the legend text
• When a large amount of data is displayed, users can click and drag their mouse to zoom in on an area
of interest and use the horizontal scrollbar at the top to view the next data series
• How do you zoom out on the KPI chart? A “View All” icon appears in the top right hand corner of the
graph. All right clicking provides a context menu with zoom function.
TK60178-8-OP-EN Rev.3.3 Page 66
Fuel Efficiency KPI
• Data for the fuel efficiency KPI is read from the CAN-bus.
TK60178-8-OP-EN Rev.3.3 Page 67
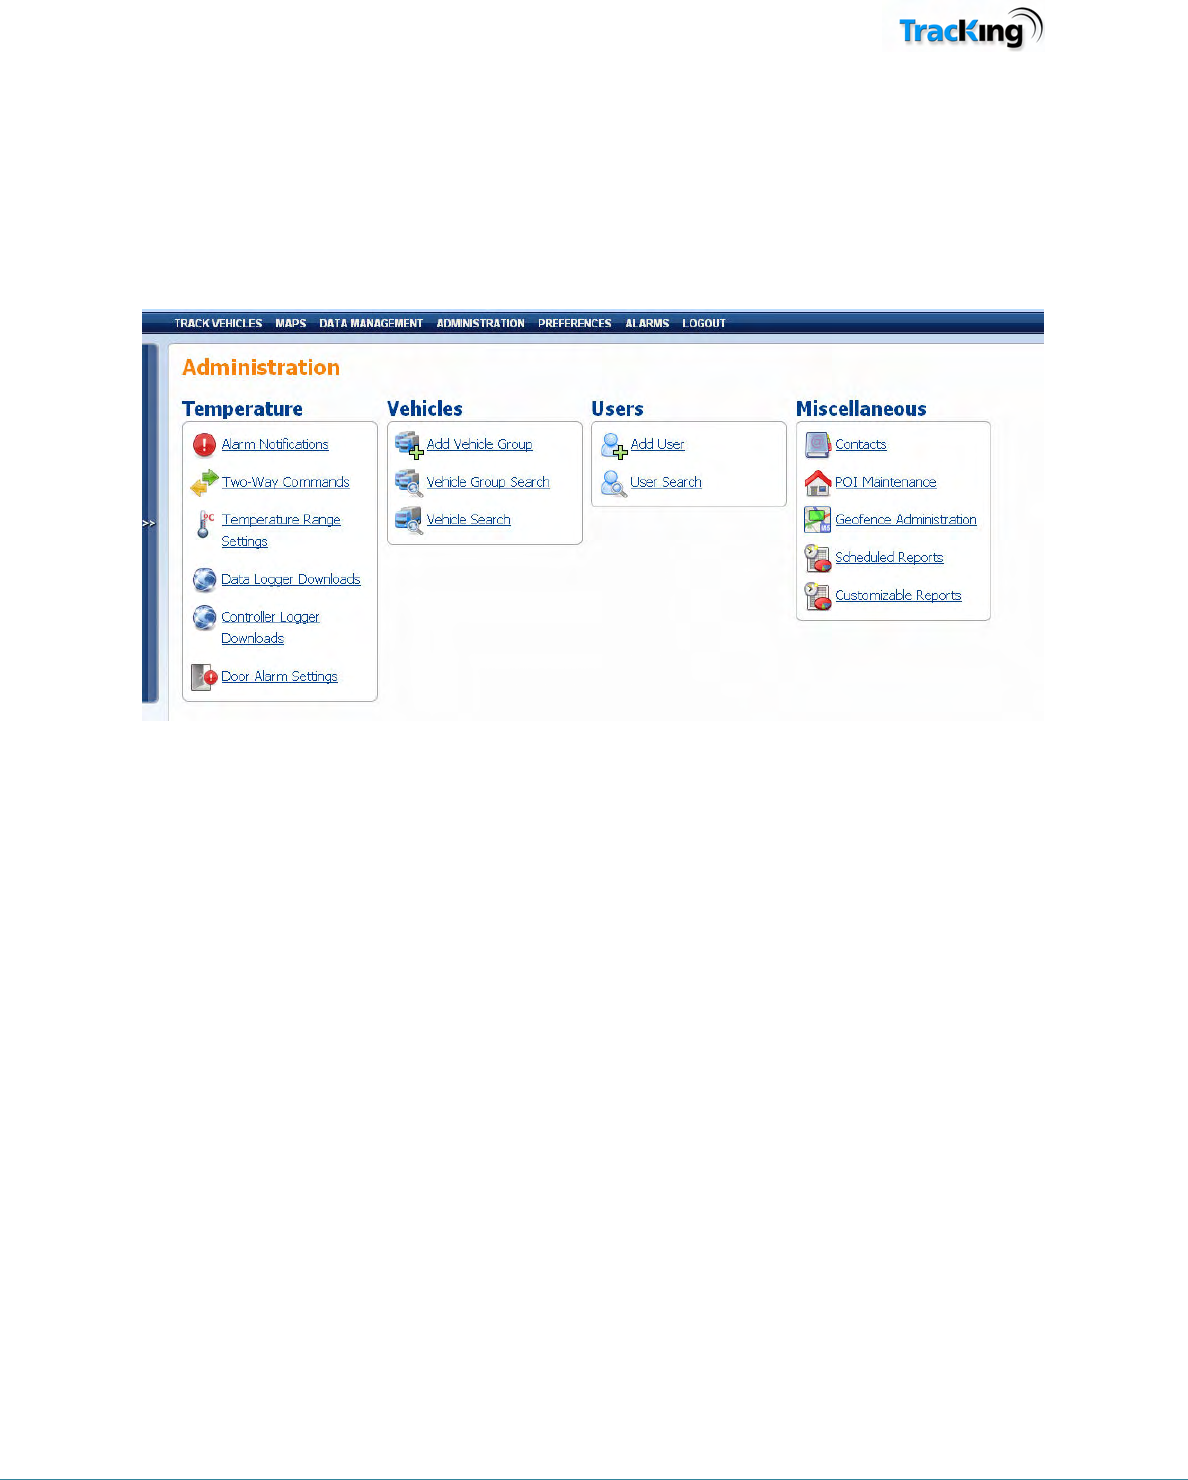
Administration
The administration page allows the user to manage their TracKing system. It provides links to configuration
pages to add users and vehicles.
Note that the degree of access a user has to administration features is determined by their user level.
The administration features are divided into four logical groups: Temperature; Vehicle administration; User
administration and Miscellaneous.
Temperature
This section of the Administration page allows the user to configure the main temperature features related to the
reefer and data logger.
• Alarm Notifications
• Two-Way Commands
• Temperature Range Settings
• Data Logger Downloads
• Controller Logger Download (available in certain markets only)
• Door Alarm Settings

TK60178-8-OP-EN Rev.3.3 Page 68
Vehicle Administration
In this section, the user can manage the details of vehicles in their fleet and arrange them into groups for effect
tracking and reporting. Click on a topic below for further information.
• Add Vehicle Group
• Vehicle Group Search
• Vehicle Search
User Administration
In this section, the user can manage the people involved in the TracKing system. Click on a topic for more
information.
• Add User
• User Search
Miscellaneous
Many TracKing features provide configuration options to allow the customer to set up the system as best suits
them. The administration of these features is handled in this section. Click on a topic for more information.
• Contacts
• POI Maintenance
• Geo Fence Administration
• Customizable reports
• Scheduled Reports
TK60178-8-OP-EN Rev.3.3 Page 69
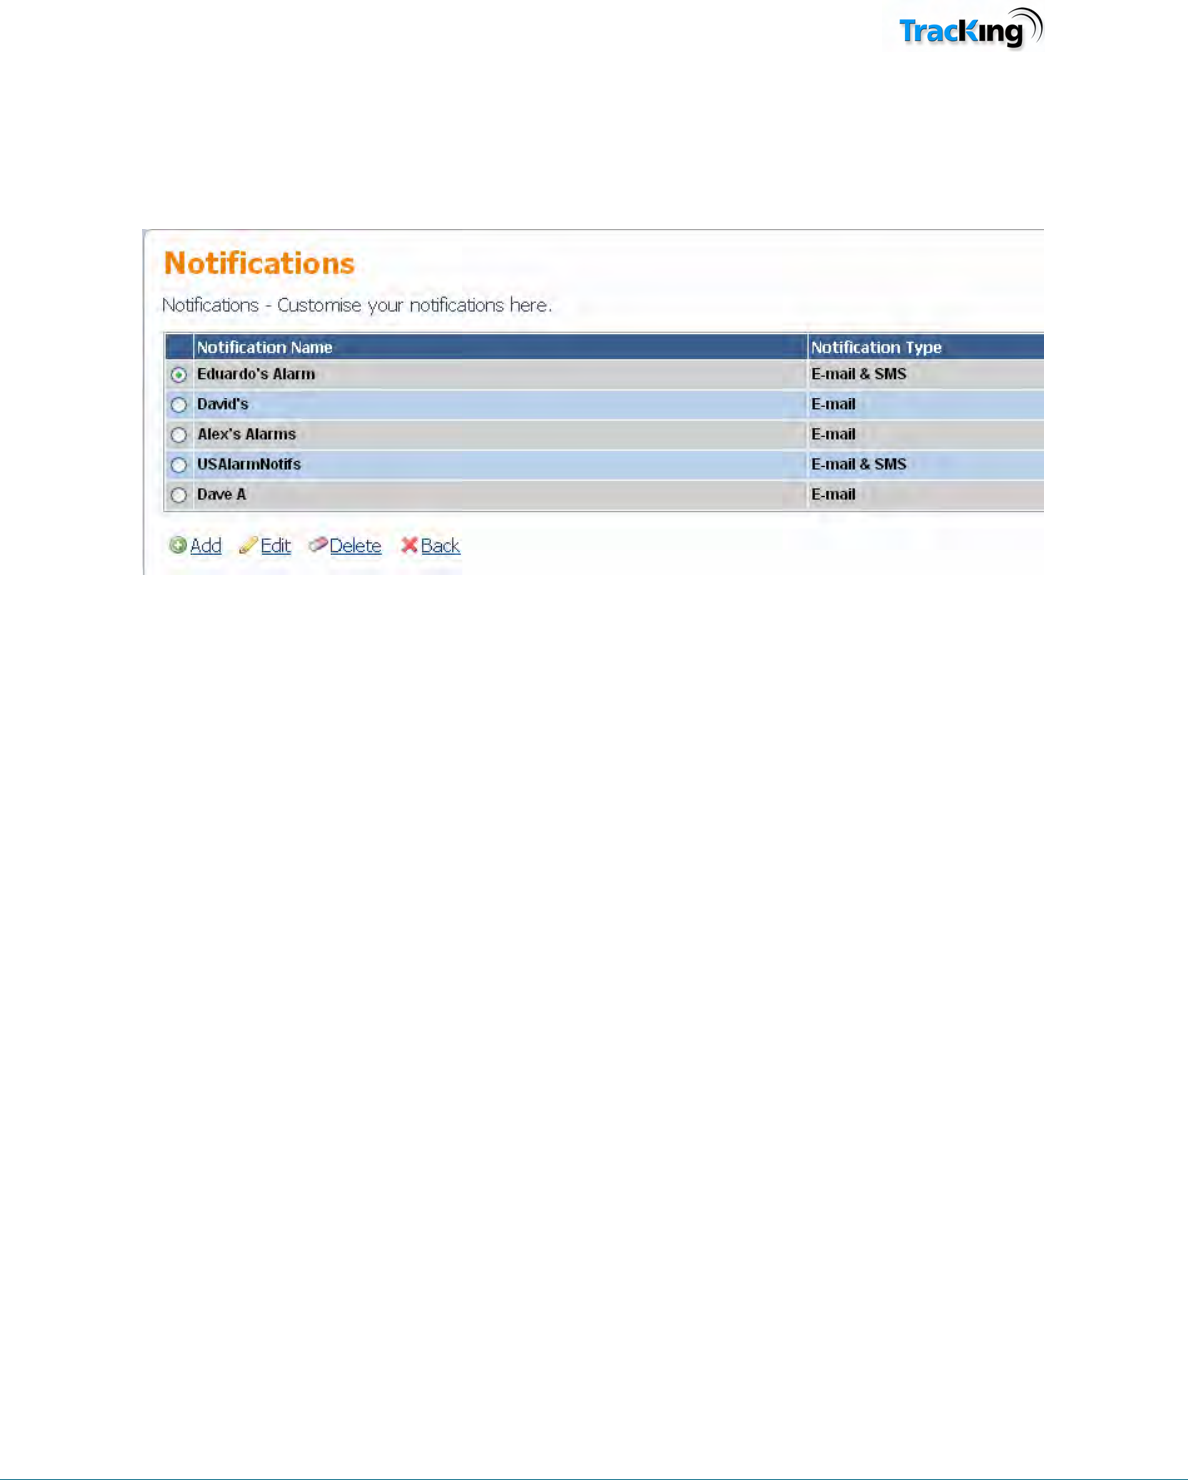
Alarm Notifications
TracKing can be configured to notify contacts when certain alarms occur. Any notifications which have been
configured are listed on this Alarm Notifications page, accessed from the Temperature section.
Add
Click the Add icon to add a new alarm notification. This will open the Add/Edit Alarm page.
Edit
To edit an alarm:
1. Select the alarm by clicking the radio button next to it.
2. Click the Edit icon to open the Add/Edit Alarm page.
Delete
To delete an alarm:
1. Select the alarm by clicking the radio button next to it.
2. Click the Delete icon.
Add/Edit Alarm
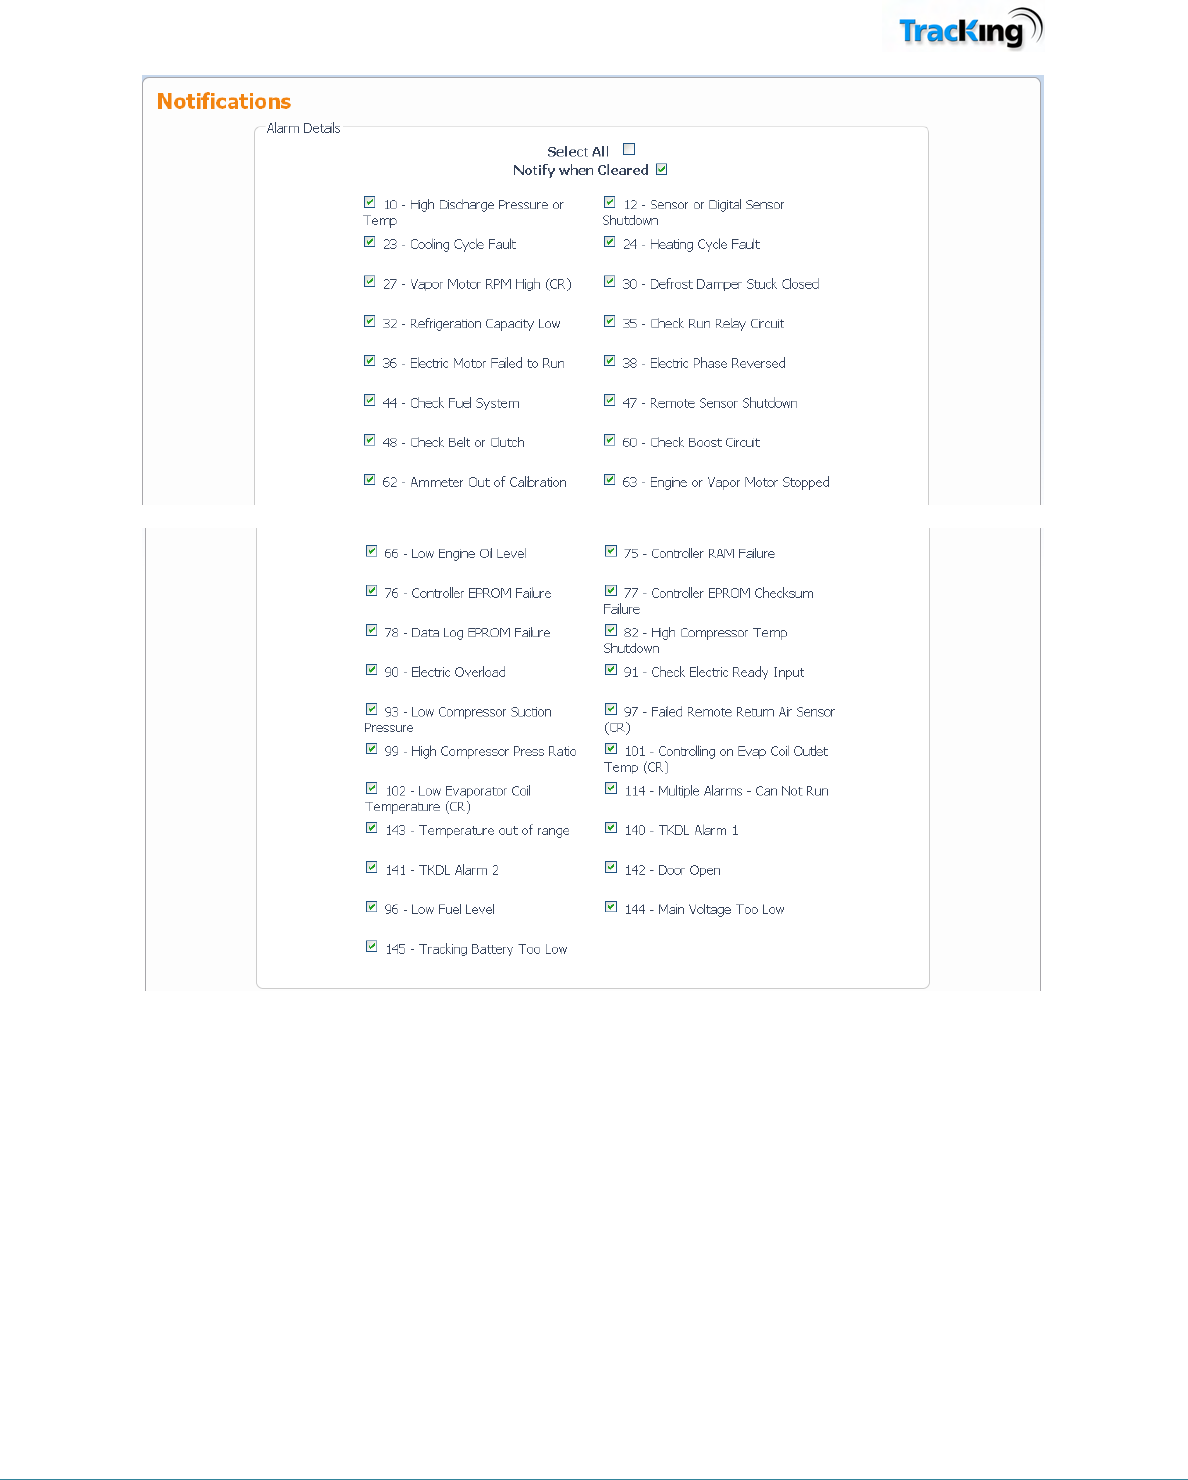
The Alarm Details section of this page allows the user to define the settings for an alarm. The options are
explained in more detail below.
Note: The screenshot below shows a subset of the alarm options available.
TK60178-8-OP-EN Rev.3.3 Page 70
Alarm Notification Name
This is the name by which the alarm will be identified in the Alarm Notification list and elsewhere in the
system.
Select
All
This enables all the alarms.
Alarm Conditions
The alarm conditions consist of a code (e.g. 96) and a description (e.g. Low Fuel Level). The full list of alarm
types will be displayed when the user opens the alarms notifications page.
Check the box next to the alarm condition which is to be included in this particular list.

TK60178-8-OP-EN Rev.3.3 Page 71
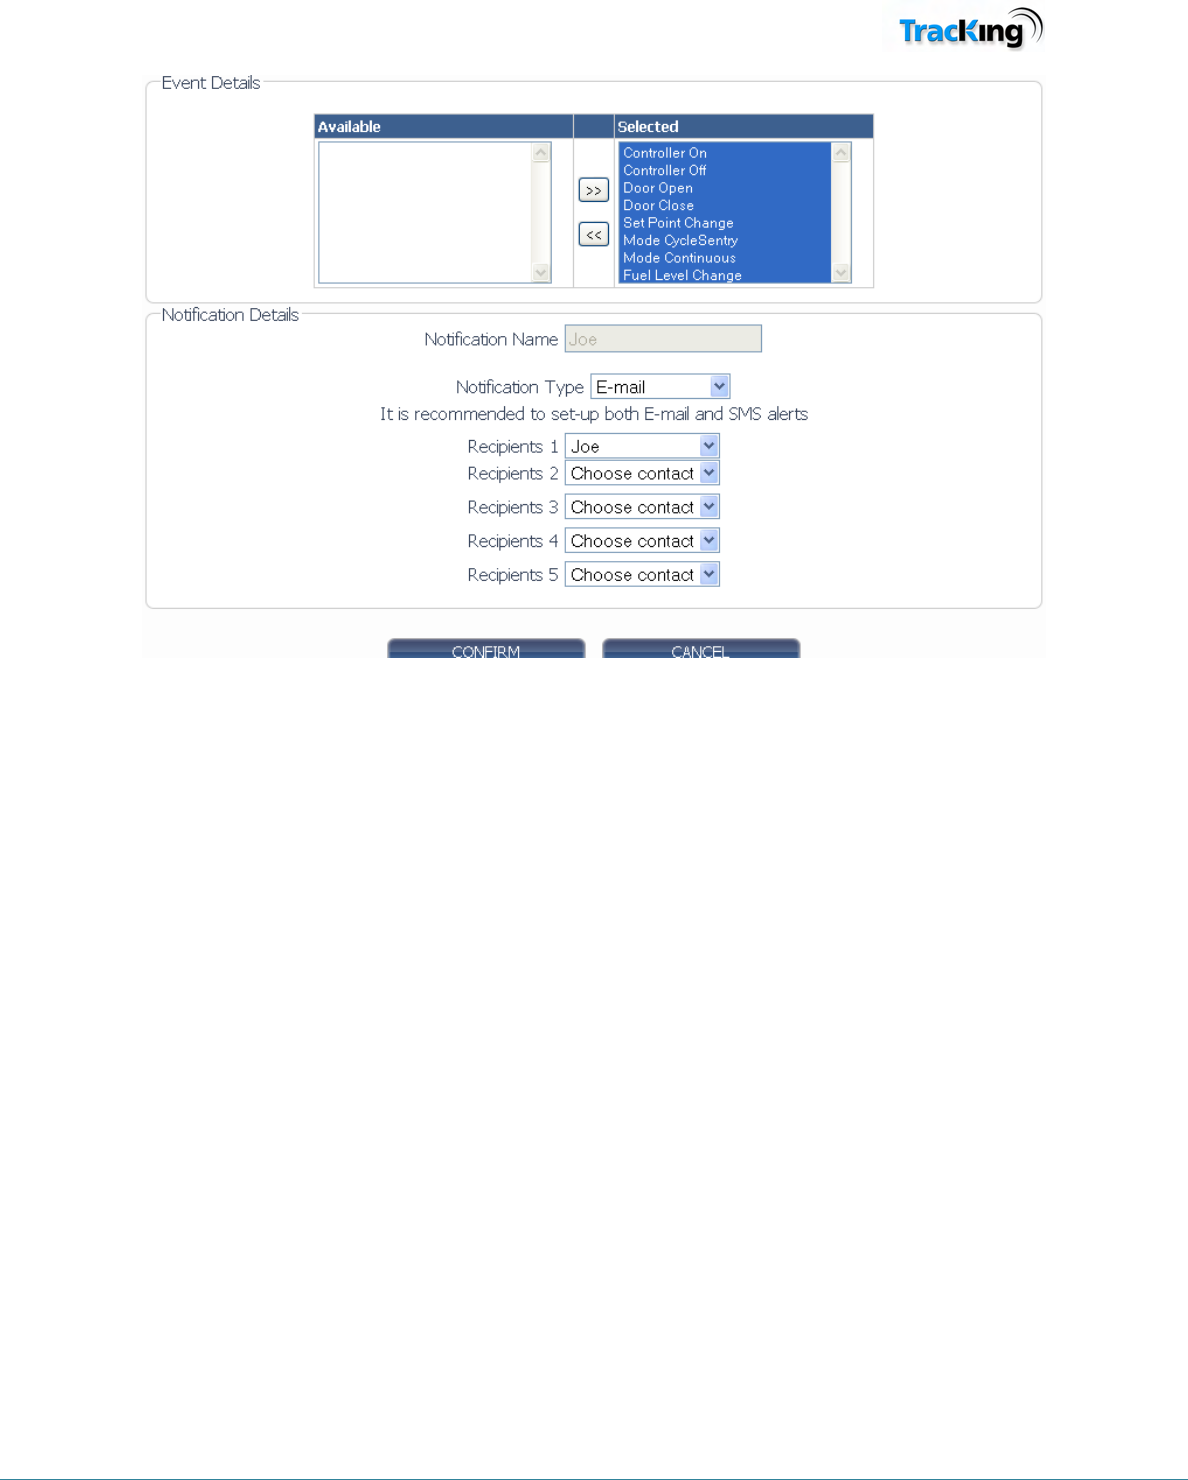
Notification Type
Notification can be via SMS or email, or a combination of both.
Recipients
Enter the people who should be notified in the event of this alarm. Recipient must be added as a contact in order
to appear in this list.
Confirm
Click 'Confirm' to save any changes.
How Alarm Notifications Work
When an alarm occurs that has a notification associated with it (defined in alarm notification list, Temperature
alarms and Door alarms), the notification will be sent once to the recipients and will not be resent until either the
alarm is cleared on the Reefer and re-occurs or the alarm clears automatically (e.g when Temperature comes
back in range) and re-occurs.
Event Notification
This feature allows users to be notified of specific events. These are
Controller On or Off: If the Controller is turned On or Off Locally or Remotely the user can be immediately*
notified by Email or SMS or both.
Door Open or Close: Should a door be opened or Closed the user(s) will be immediately* notified of the event
by Email or SMS or both.
Set Point Change: Any change in Set Point either Locally or Remotely will be immediately* notified to the
user(s) by Email or SMS or both.
Mode Change: Any change in Mode either Locally or Remotely will be immediately* notified to the user(s) by
Email or SMS or both.
Fuel Level Change: Should the fuel level change by more than 25% between 2 consecutive readings the user(s)
will be immediately* notified of the event by Email or SMS or both.
*Note the speed of notification is dependent on GSM coverage and may be significantly delayed if the units is
out of coverage
TK60178-8-OP-EN Rev.3.3 Page 72
TK60178-8-OP-EN Rev.3.3 Page 73
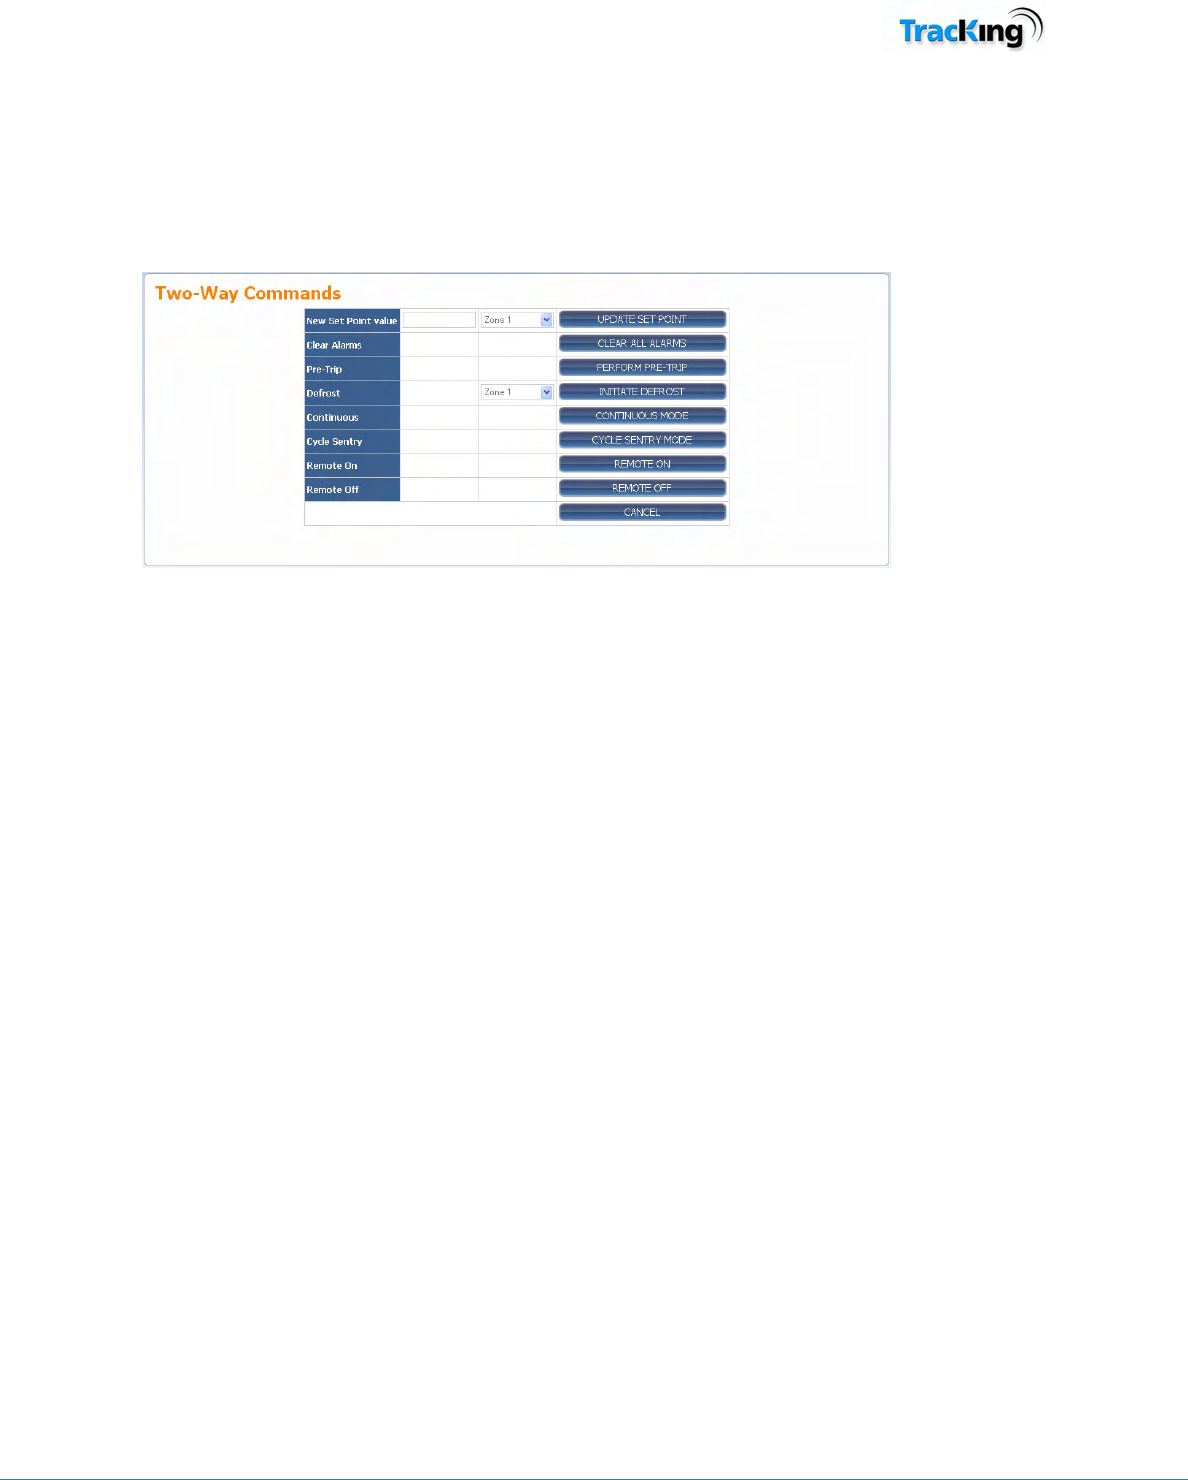
Two-Way Commands
Two-way commands allow the user to change a range of settings on the reefer/fridge. A detailed understanding
of these settings is required to select appropriate values. Please refer to the Thermo King Reefer manuals and
training notes for more detailed information.
When opened, the Two-Way Commands page displays the following information:
The user can manipulate the following features on the reefer:
•
Set Point
The user can select a new set point value for a specific zone. Clicking the Update Set Point button will
change the value on the reefer.
•
Clear Alarms
Click the Clear All Alarms button to clear all alarms.
•
Pre-Trip
Clicking the Perform Pre-Trip button will run a series of self-tests on the reefer to ensure that it is fully
functioning before beginning a trip.
•
Defrost
Select the relevant zone and click on Initiate Defrost to initiate a defrost on the reefer.
•
Continuous Mode
Click the Continuous Mode button to set the reefer's mode of operation to Continuous. This will
determine how the user can control the set points. Please refer to the reefer documentation for more
information.
•
Cycle Sentry Mode
Click the Cycle Sentry Mode button to set the reefer's mode of operation to Cycle Sentry. This will
determine how the user can control the set points. Please refer to the reefer documentation for more
information.
•
Remote On
This command remotely turns on the Controller.
Warning!!: This command allows the user to turn on the reefer remotely. Please ensure
operators and Drivers and anyone that may come in contact with the Reefer have been warned of
this possibility.
•
Remote Off
This command remotely turns off the Controller
TK60178-8-OP-EN Rev.3.3 Page 74
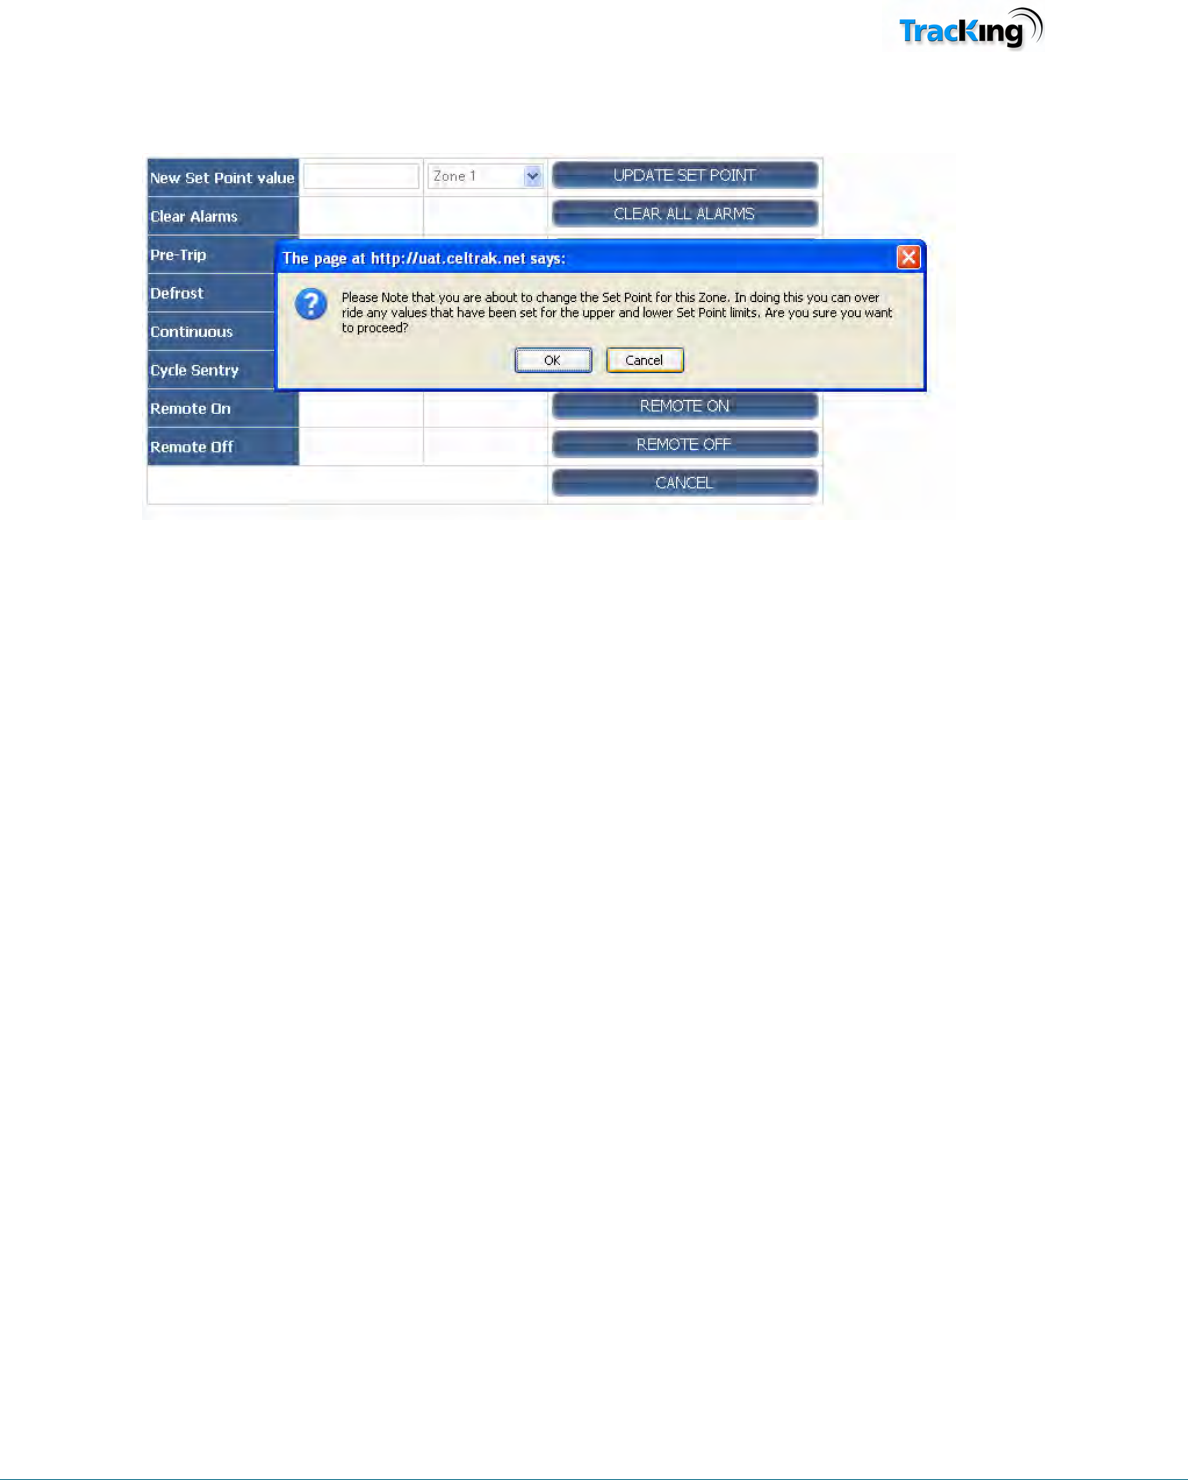
Note: The system will display a warning message before changing any of these settings on the reefer. Click OK
to proceed to change the settings.
Multiple Vehicle support
TracKing allows the user to select Multiple vehicles from the Vehicle Tree.
Warning!!: Please ensure you have selected the correct Vehicle or Vehicles before proceeding with the
command.
TK60178-8-OP-EN Rev.3.3 Page 75
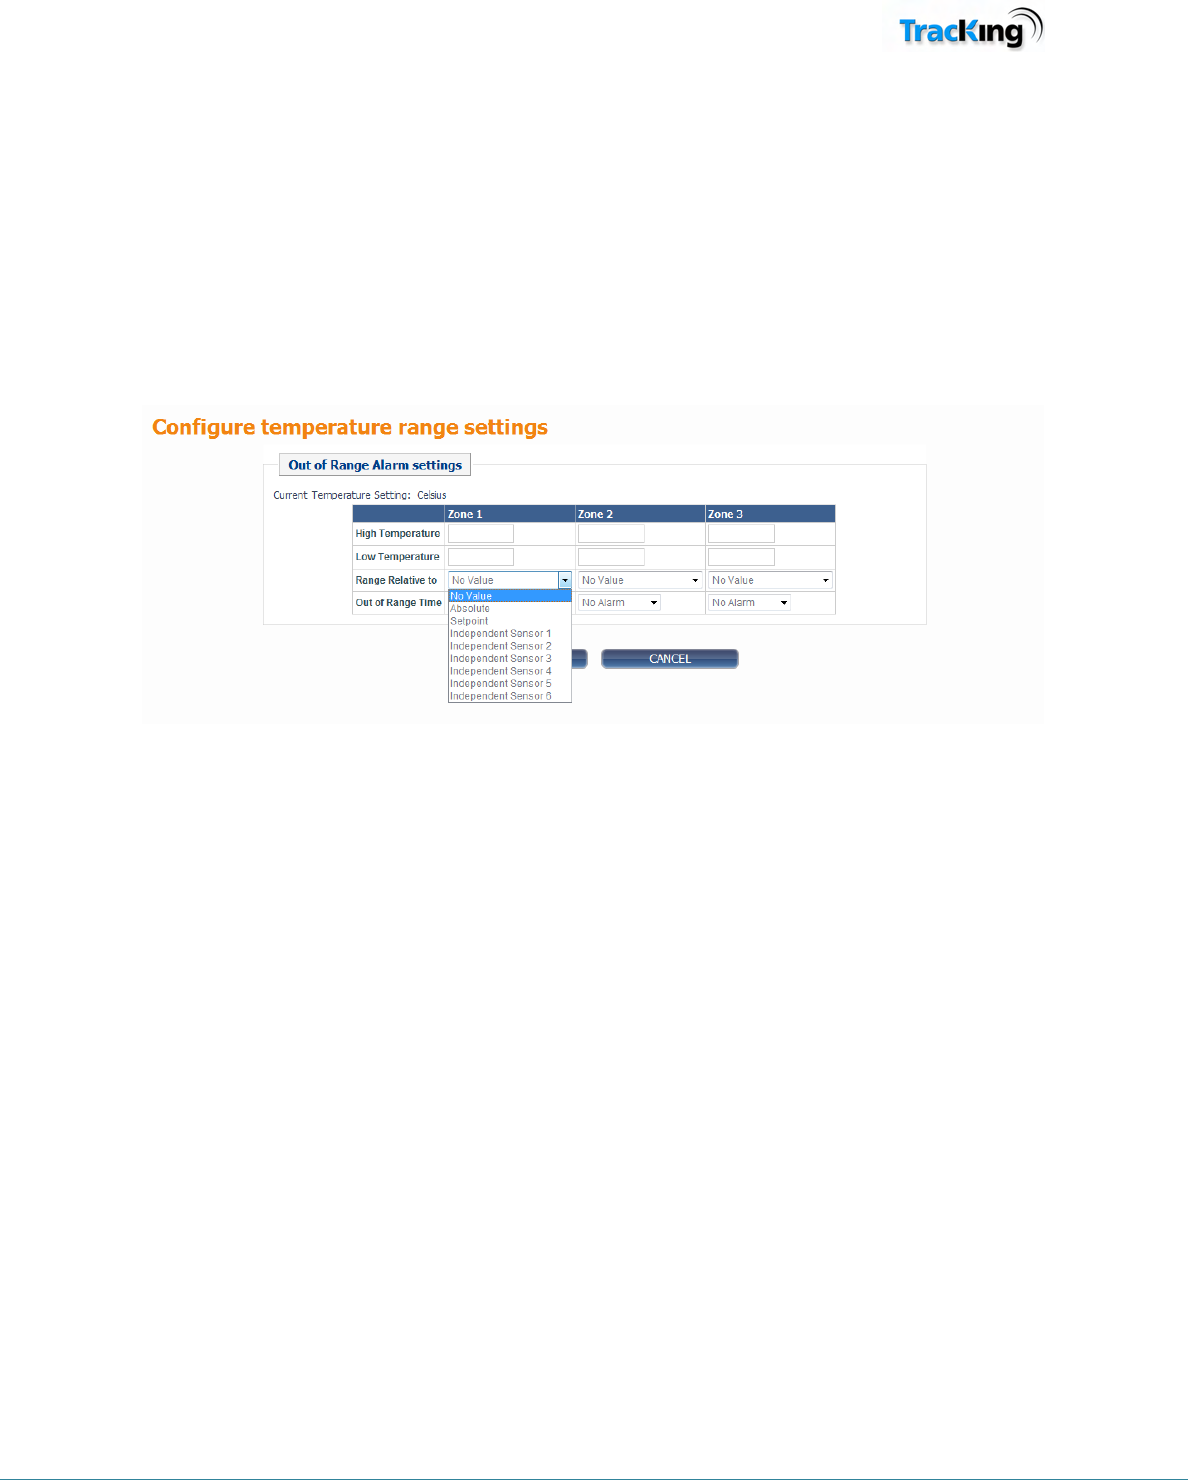
Temperature Range Settings
The Temperature Range Settings administration page allows the user to set the allowable
temperature ranges for different zones on a vehicle. Settings can be applied to a single vehicle, or to
a number of vehicles in a fleet.
Single Vehicle
To set the temperature range for a single vehicle:
1. Select the vehicle using the Vehicle Selection menu.
The following screen is presented for setting the temperature ranges:
2.
The user should complete the following fields:
• High Temperature
Upper temperature limit of Return Air Sensor (except where Independent Sensor is selected).
• Low Temperature
Lower temperature limit of Return Air Sensor (except where Independent Sensor is selected). The
Negative “-“ sign is only needed when Range is relative to absolute. Therefore for Range Relative
to Set point or Independent Sensors the sign is not needed. As an example to set the alarm range
to 2 degrees above and below a set point the High Temperature is set to 2 and the Low
Temperature is set to 2.
• Range Relative To
Select one of the following from the drop down menu:
Absolute Value: This is the actual value of return air checked against the High and Low
setting to determine an alarm.
Set point: This alarm will trigger when the Return Air Sensor varies outside the High and
Low limits relative to the set point.
Independent Sensor 1-6: This uses the independent sensor of DAS or CargoWatch to verify the
temperatures. The selected independent sensor is used to verify the temperature against Set Point,
so the alarm will trigger when the Independent Sensor varies outside the High and Low limits
• Out of Range Time
Set to with/without alarm. With alarm enabled, the Out of Range time can be set between 30
minutes and 8 hours.
3.
Once these fields have been completed for each zone, click the Confirm button to download the settings.
4.
Once an alarm occurs only one notification is sent until the alarm is reset or is cleared.
TK60178-8-OP-EN Rev.3.3 Page 76
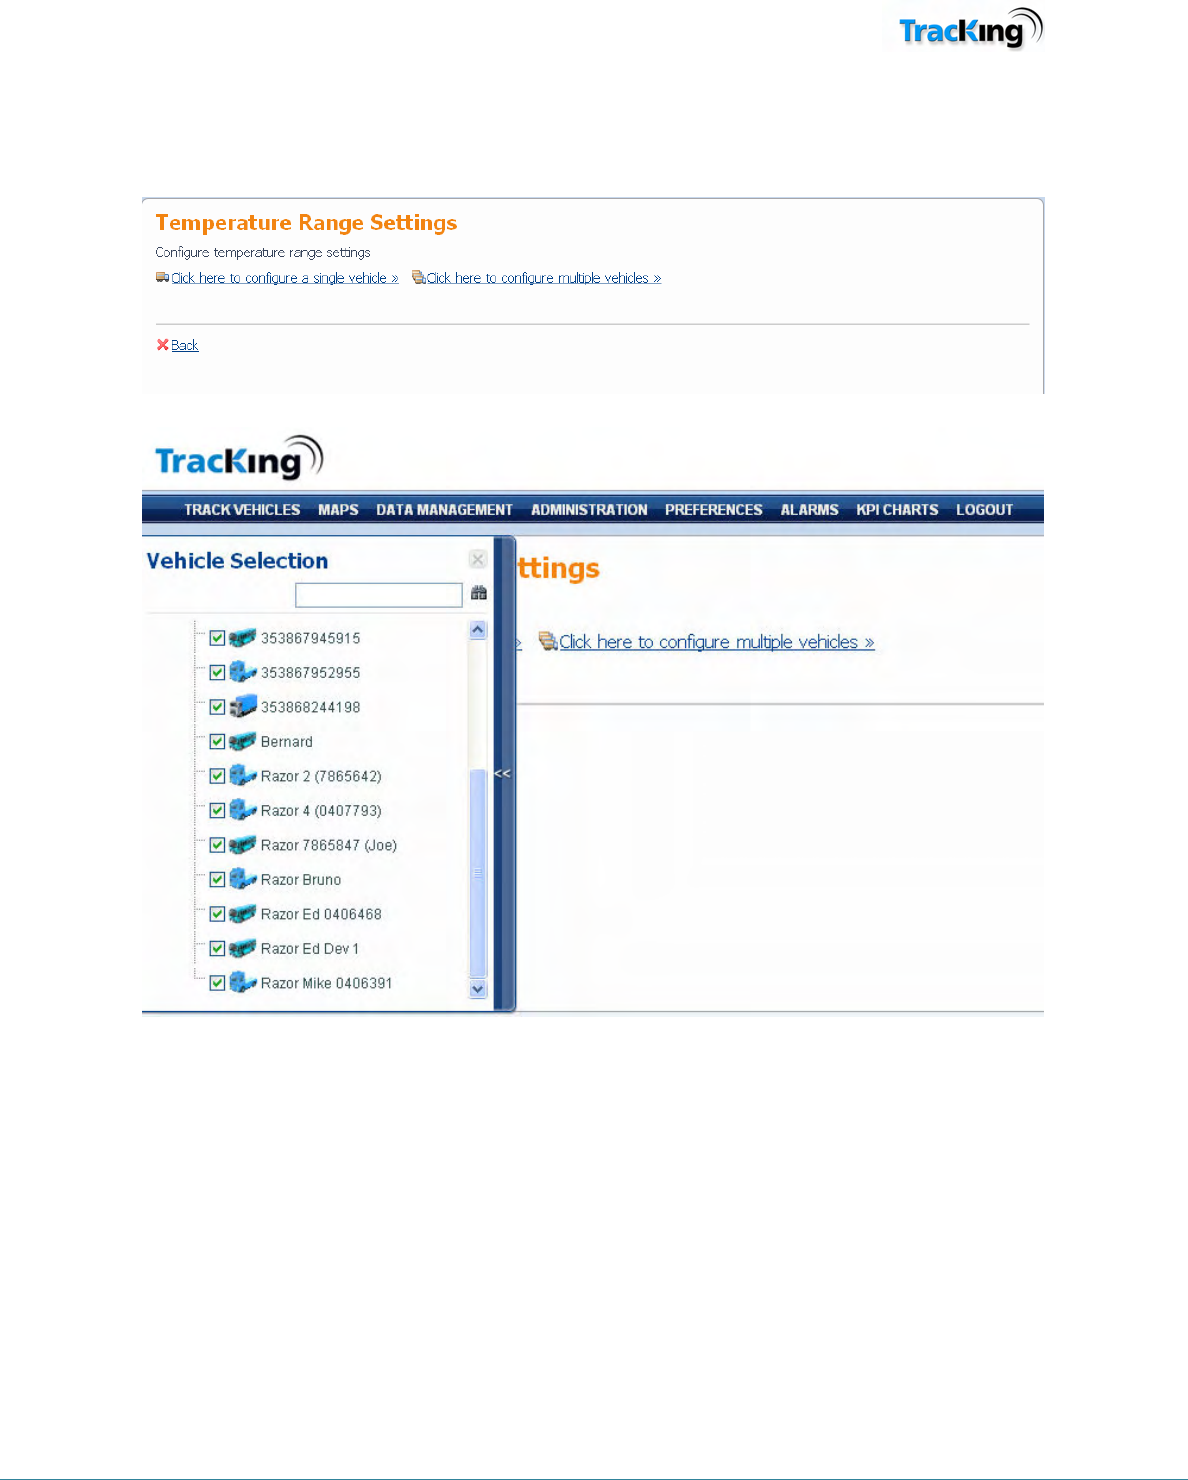
Multiple vehicles
Select multiple vehicles in the Vehicle Selection menu, and then follow steps 1 to 4 above. When confirmed, the settings are
downloaded to all the selected vehicles.
TK60178-8-OP-EN Rev.3.3 Page 77
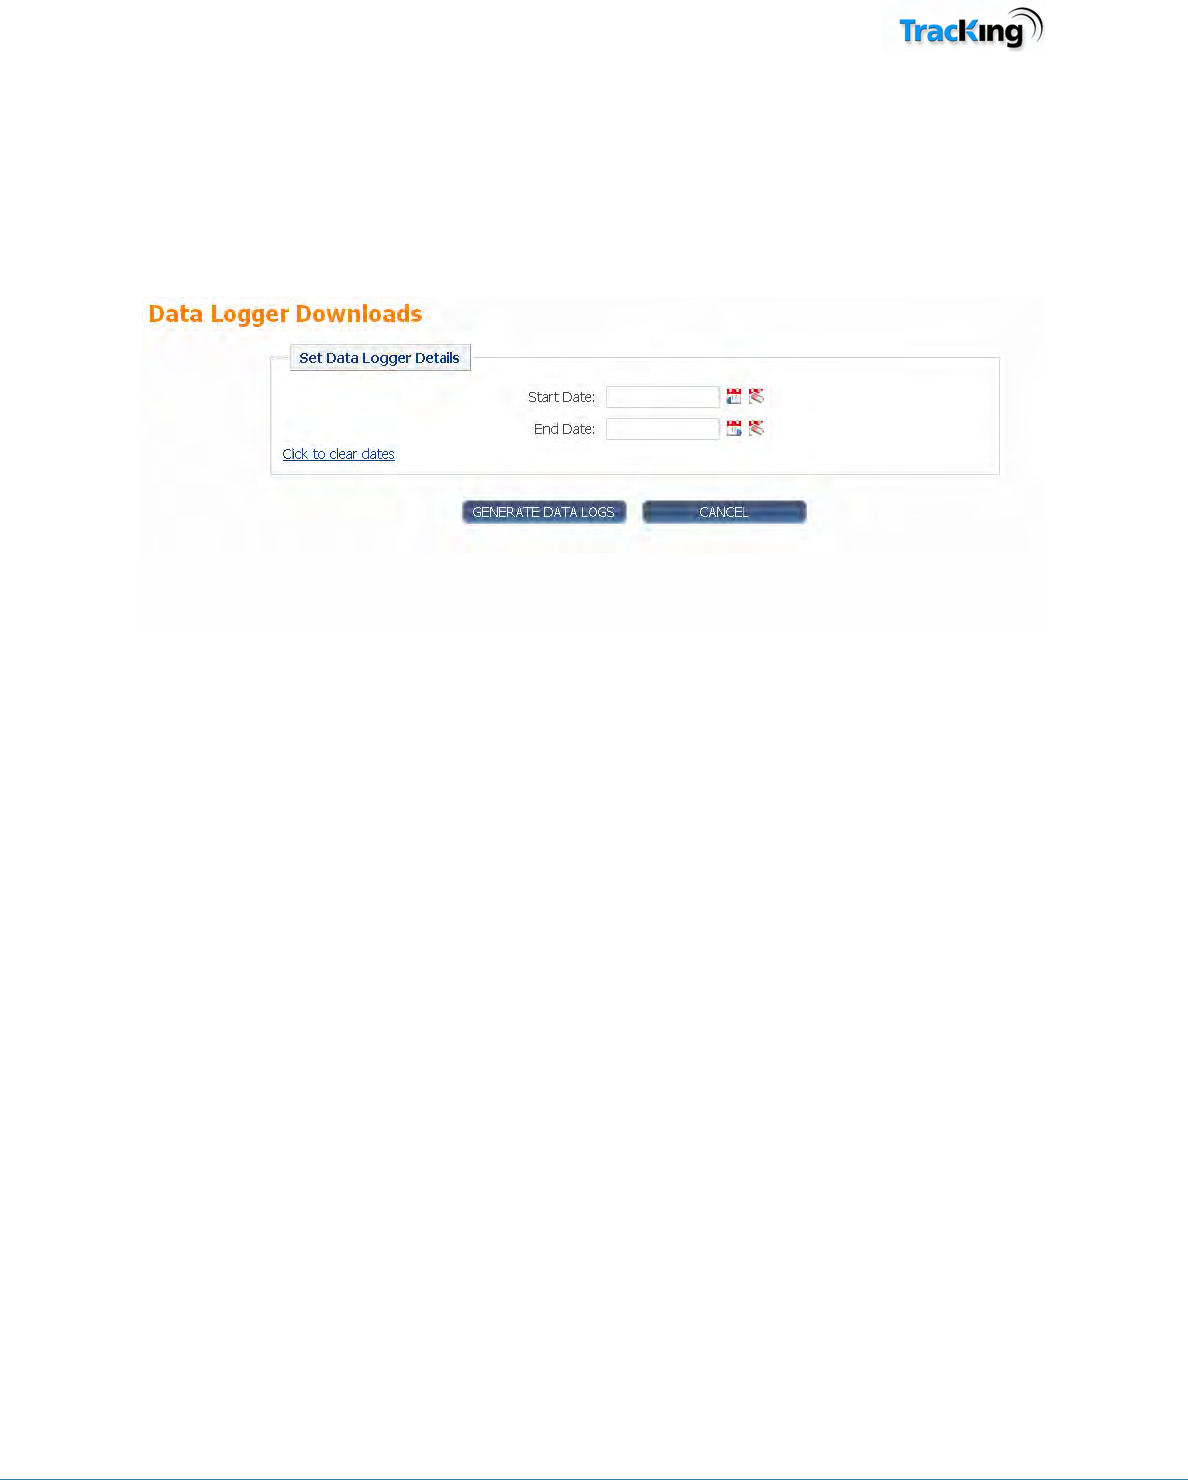
Data Logger Downloads
The Data Logger Downloads administration page allows the user to download data from the loggers installed on
the fleet. Reports can then be generated from the data and saved to a compressed folder on the local PC.
Note: Do not use this area for TKDL downloads.
When the administration page opens, the following information is displayed:
To generate data logs:
1) First, select the vehicle from which the data should be downloaded.
2) Set the timer period from which the data is to be used by typing values into the Start Date and End Date
boxes. Alternatively, use the calendar buttons.
3) Click the Generate Data Logs button.
4) This will allow the user access to a Zip file that contains the previously downloaded data (downloaded once a
day) that once extracted can be opened with Wintrac.
Controller Logger Downloads
Available in certain Markets only
This works in the exact same way as the Data Logger Downloads but is for the data from the Service Watch port
of the SR2 Controllers
TK60178-8-OP-EN Rev.3.3 Page 78
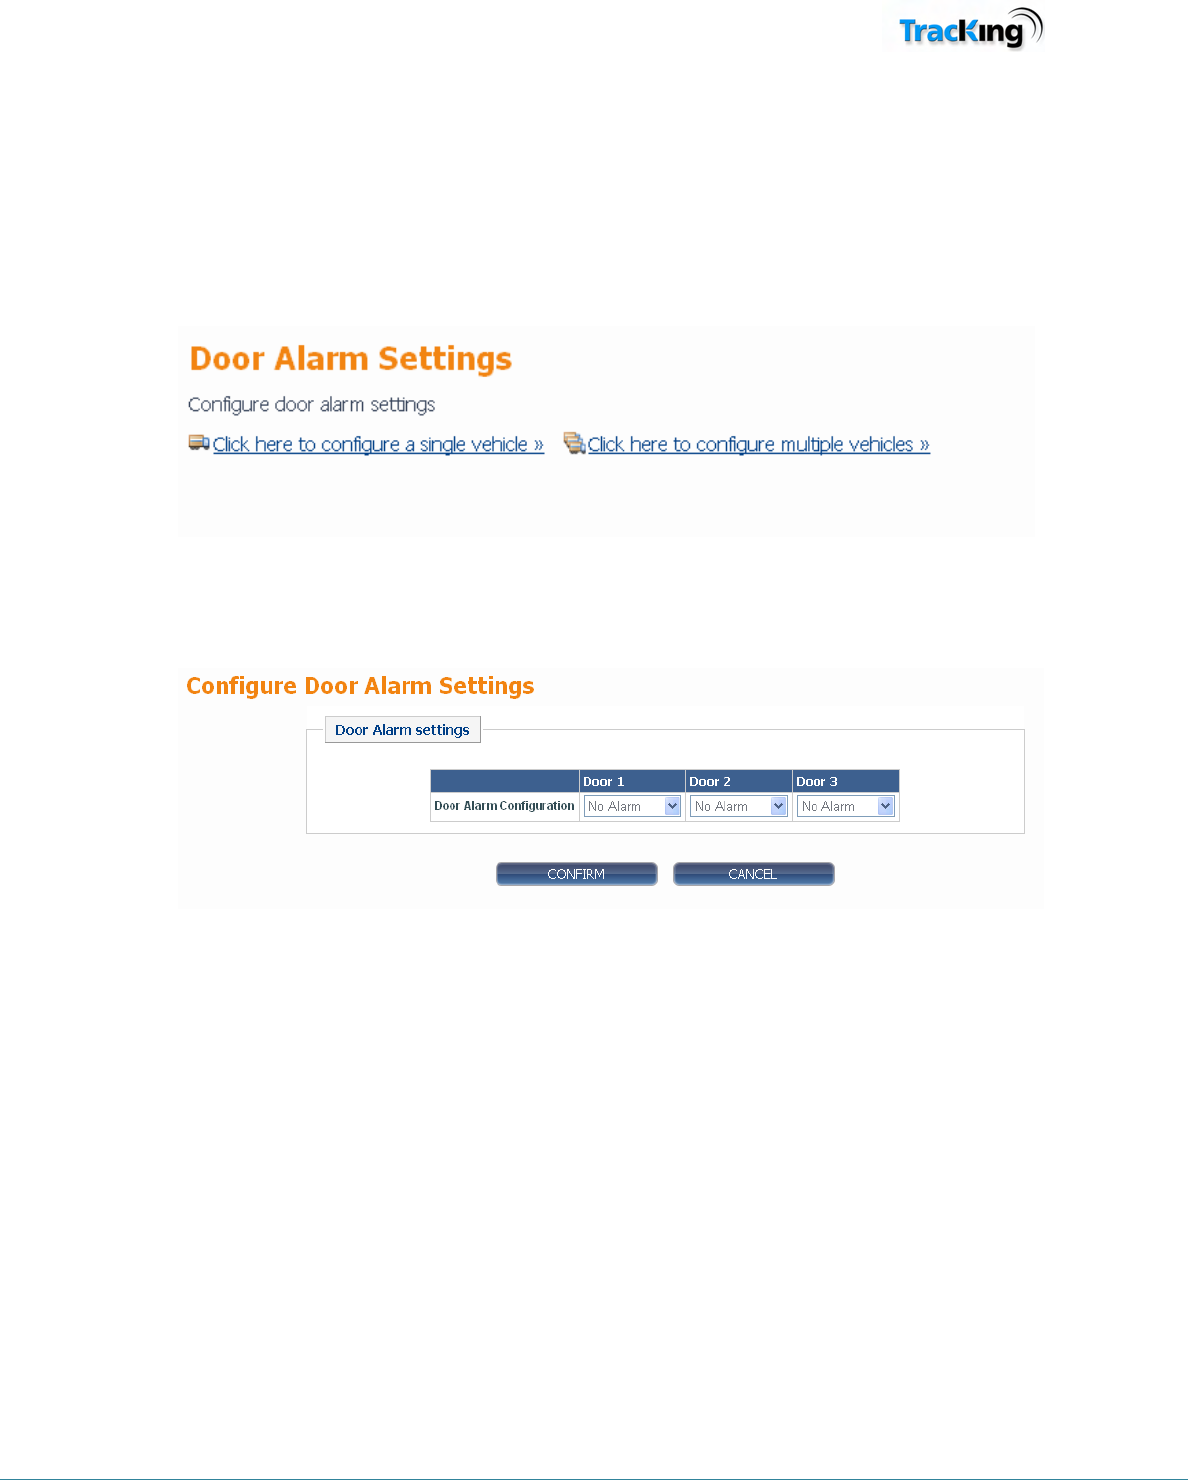
Door Alarm Settings
The door alarm settings section allows the user to configure the frequency that door alarms will be
generated. It applies to vehicles with door switch sensors installed. Configuration can be changed for one
vehicle or multiple vehicles at once.
Change time frequency of alarms. This allows the user to determine the dwell time before an alarm is
generated after a door opening. Time can be set between 10 and 240 minutes.

TK60178-8-OP-EN Rev.3.3 Page 79
Vehicle Administration
This section of the Administration page allows the user to edit vehicle and vehicle group details.
The options are:
• Add Vehicle Group
• Vehicle Group Search
• Vehicle Search

TK60178-8-OP-EN Rev.3.3 Page 80
Adding Vehicles
Once on your system, vehicles can be added/removed from groups and assigned to different users, and all their
downloaded data will be logged.
However, vehicles can only be added to the system by Thermo King - there is no Add Vehicle feature available
to the customer in the TracKing application.
This is necessary as new vehicles need to be configured on the server, and they must also have the correct
hardware installed.
Please contact support for assistance in adding new vehicles from your fleet to the system.
TK60178-8-OP-EN Rev.3.3 Page 81
Add Vehicle Group
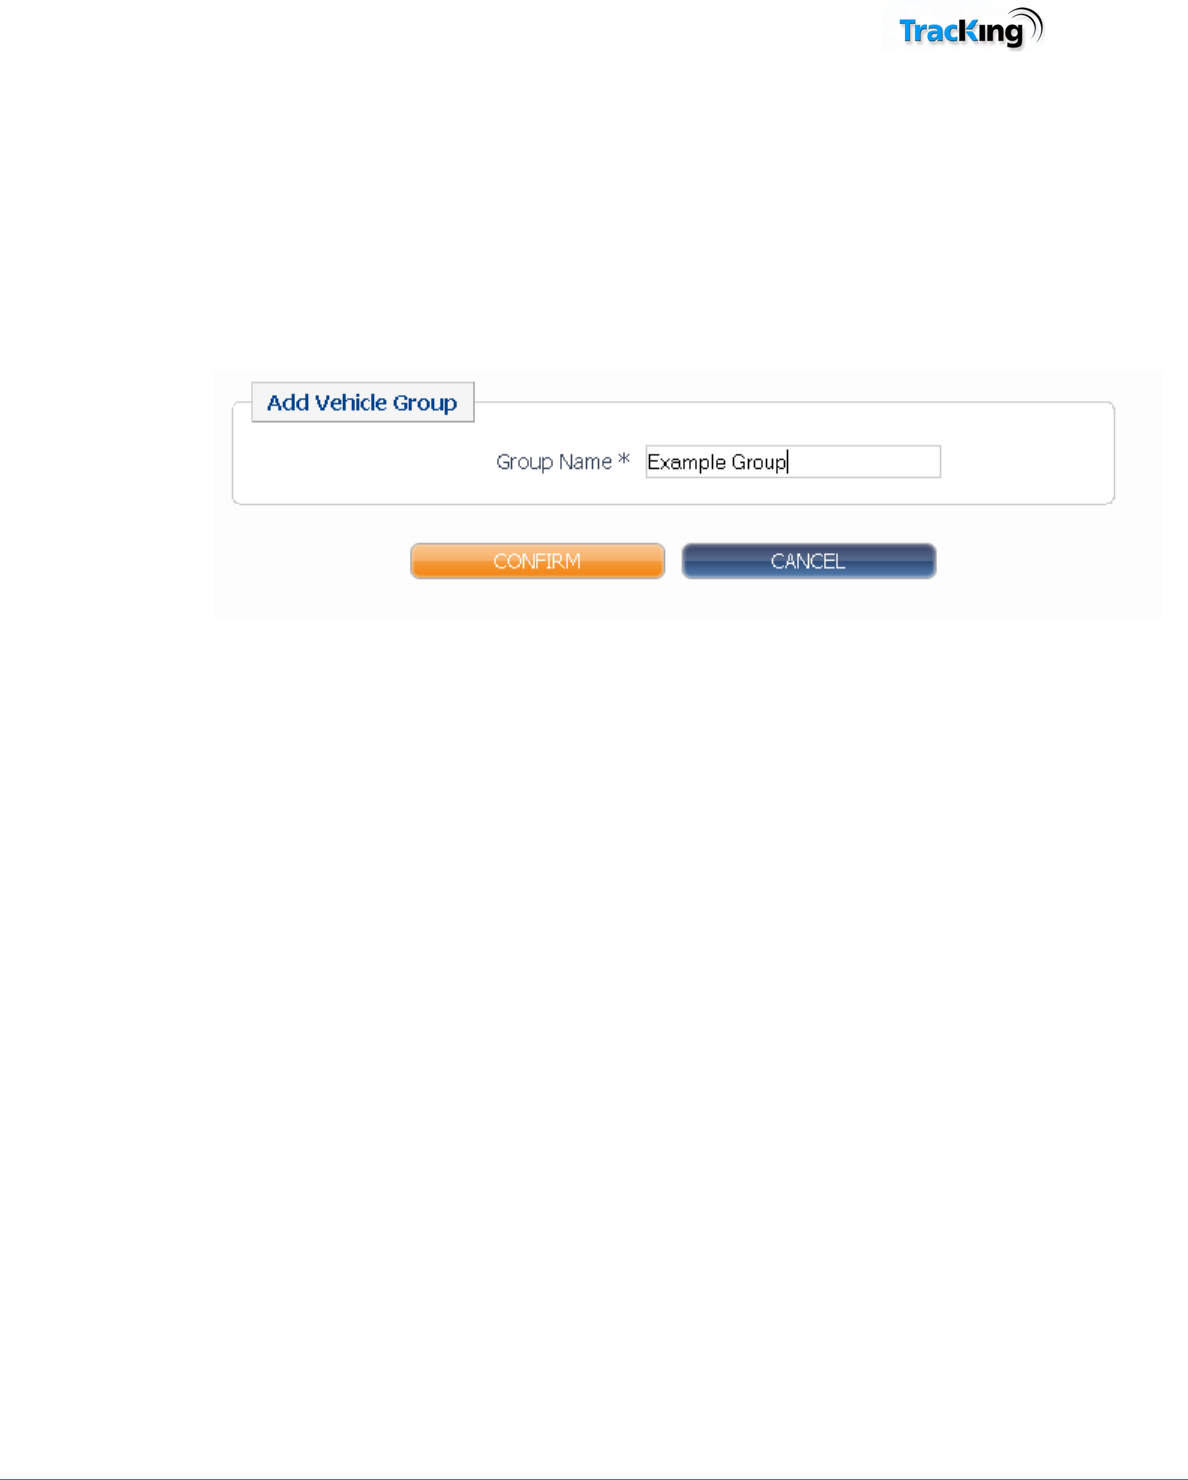
This page allows the user to add a new vehicle group. To do this:
1. Enter a group name.
2.
Click the 'Confirm' button.
When confirmed, the Vehicle Group List will be displayed with the new group added.
TK60178-8-OP-EN Rev.3.3 Page 82
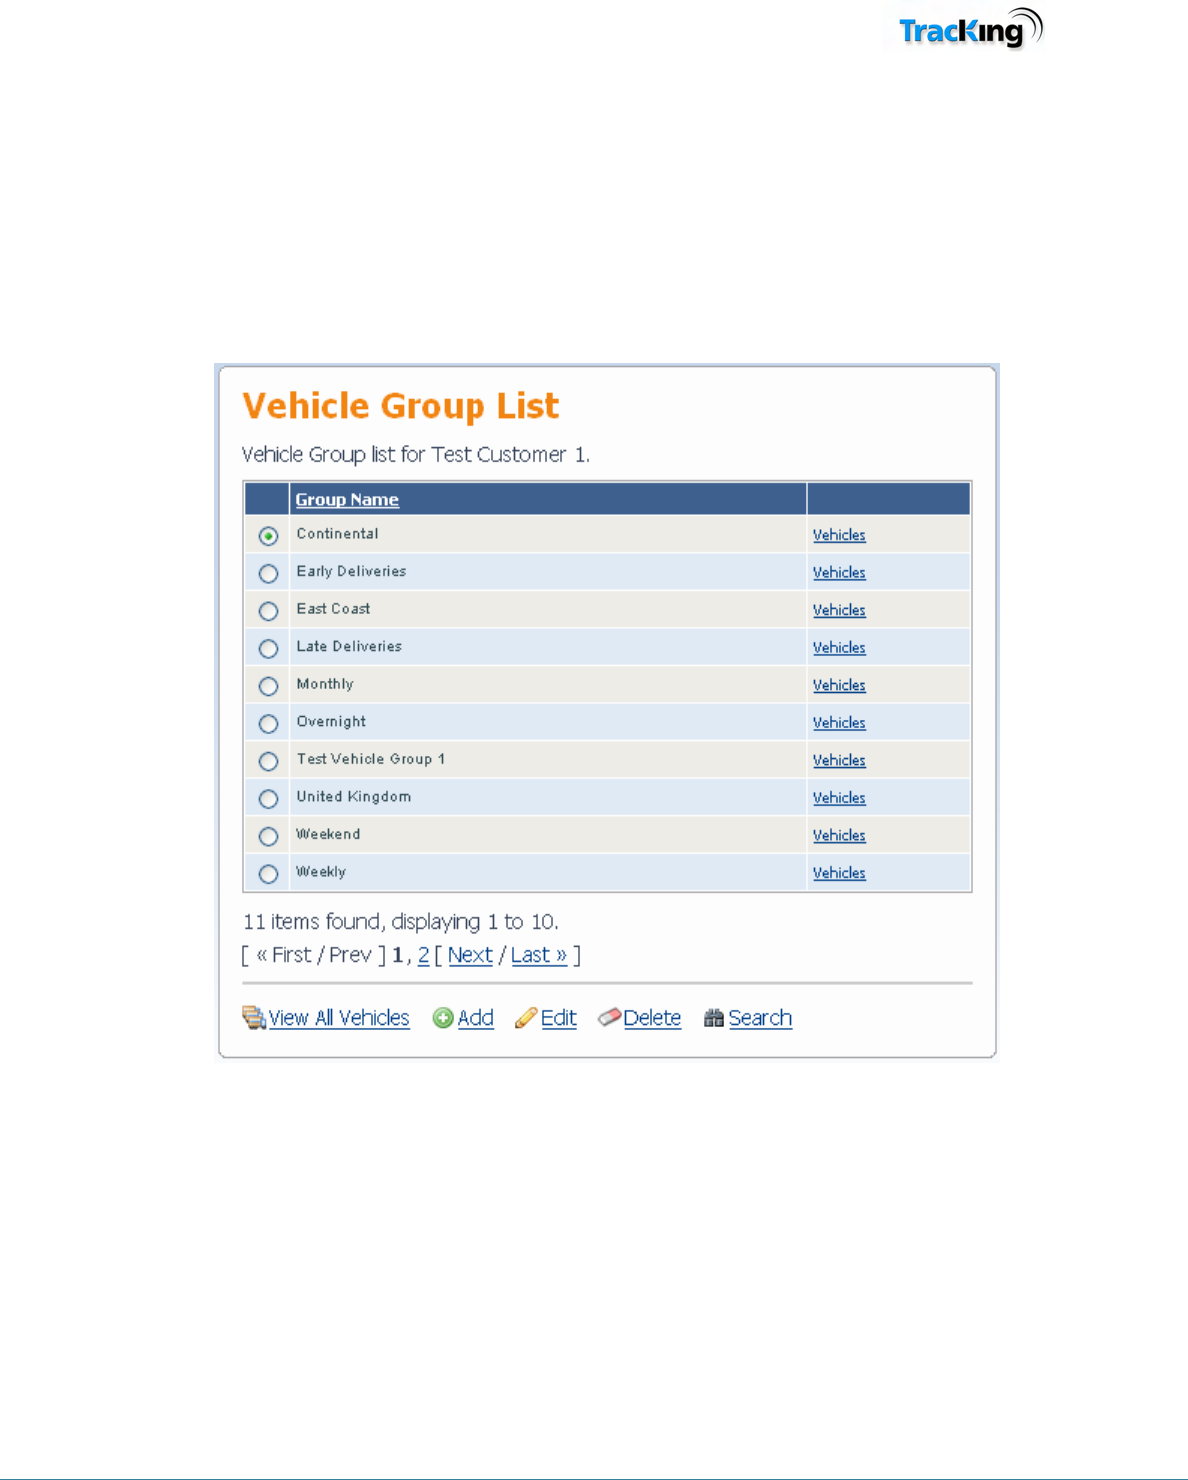
Vehicle Group List
The vehicle group list is displayed when:
1. The user adds a new vehicle group, or
2.
When a Vehicle Group Search is performed.
The page appears as follows:

TK60178-8-OP-EN Rev.3.3 Page 83
Navigating the List
Click on the 'Group Name' column heading to re-order the list in ascending/descending alphabetical order.
For more than ten groups, the list is split across multiple pages. Use the First/Prev, Next/Last or Page Number
links at the bottom of the list to navigate through the pages.
Vehicle Details
To see what vehicles are assigned to a particular group, click the 'Vehicles' link in-line with the group of
interest. This will open the Vehicle Details page.
Options Icons
View All Vehicles
Click the View All Vehicles icon to open a list containing all vehicles configured on the system.
Add
Click the Add icon to open the Add Vehicle Group page.
Edit
To change the details of a group:
1. Click the radio button next to the group name to select it.
2. Click the edit icon to open the user page.
3. Modify the group details as required
4. Click confirm.
Delete
Select the group to be deleted and click the delete icon. The user will be asked to confirm this action.
Note: A group cannot be deleted if it has vehicles assigned to it.
Search
Click the search icon to open the Vehicle Search page
TK60178-8-OP-EN Rev.3.3 Page 84
Vehicle Group Search
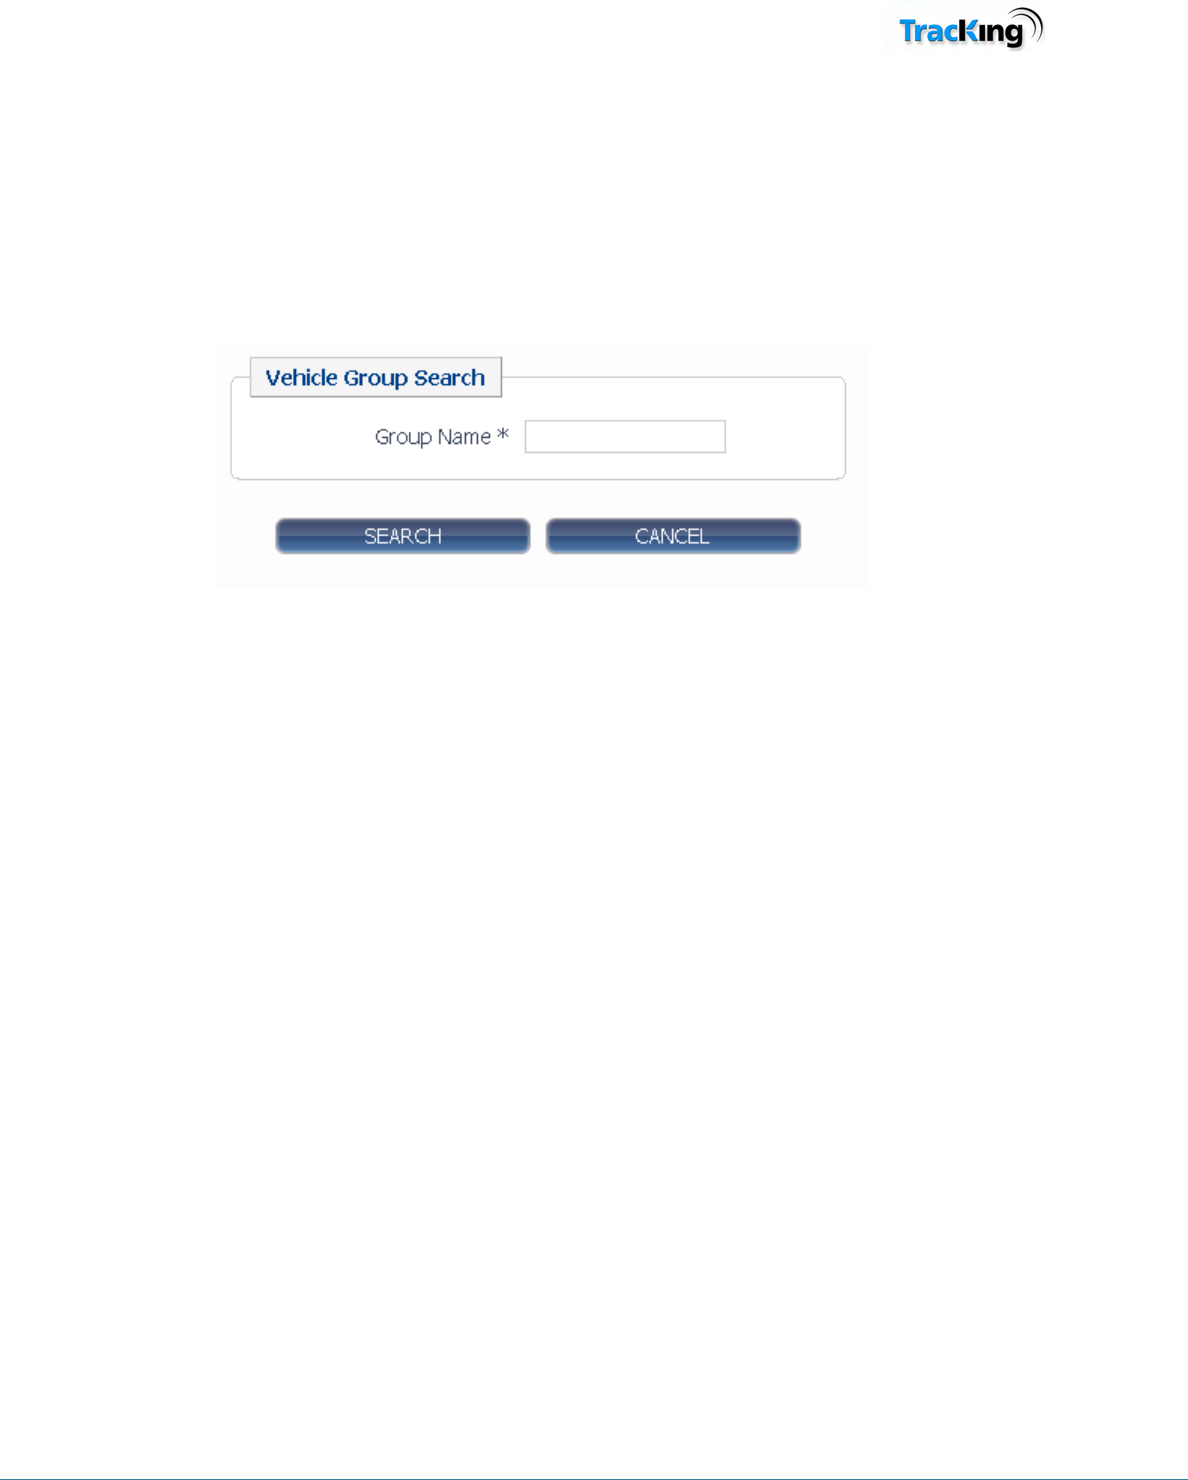
This search page enables the user to search for Vehicle Groups which are configured on the system.
1. Enter the name (whole or partial) to search for in the text box.
HINT: To see a list of all groups, leave the text box blank and click 'Confirm'.
2.
Click 'Confirm' to begin the search.
When the search is complete, the results will be displayed in the Vehicle Group List.
TK60178-8-OP-EN Rev.3.3 Page 85
Vehicle Search
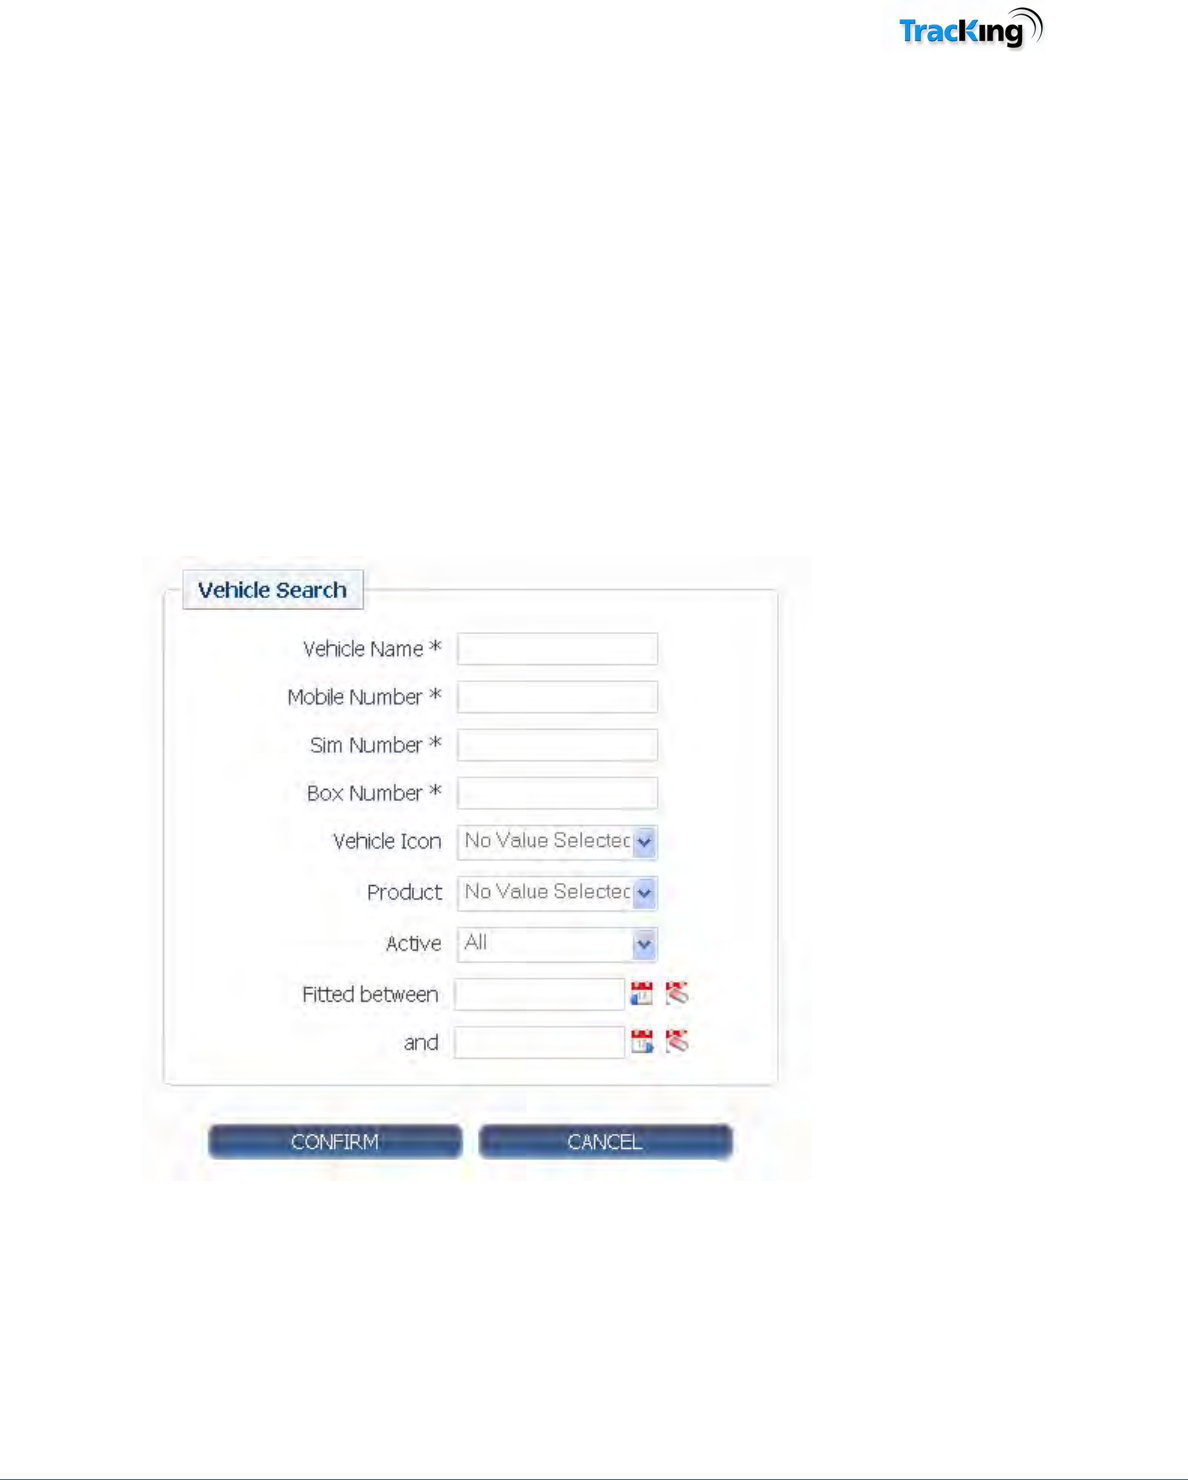
The vehicle search page allows the user to search for a vehicle using specific search criteria.
To find a vehicle:
1. Enter search values in the text boxes.
Note 1: The boxes marked with an asterix * may be partially filled or left blank if the exact information
is not known.
Note 2: To see a list of all groups, leave the text boxes blank and click 'Confirm'. A list of all vehicle
groups will appear.
2. Select values from the drop down menus.
3. If required, enter a date and time in the format dd/mm/yyy hh:mm, or select a date using the calendar
icons.
4. Click confirm to begin the search.
When complete, the results will be displayed in the Vehicle Details page.
The following fields are set by Celtrak and are rarely used in user searches:
Product: A number related to the hardware installed on fleet vehicles.
Fitted (between/and): The date on which the hardware was installed.
TK60178-8-OP-EN Rev.3.3 Page 86
Vehicle Details
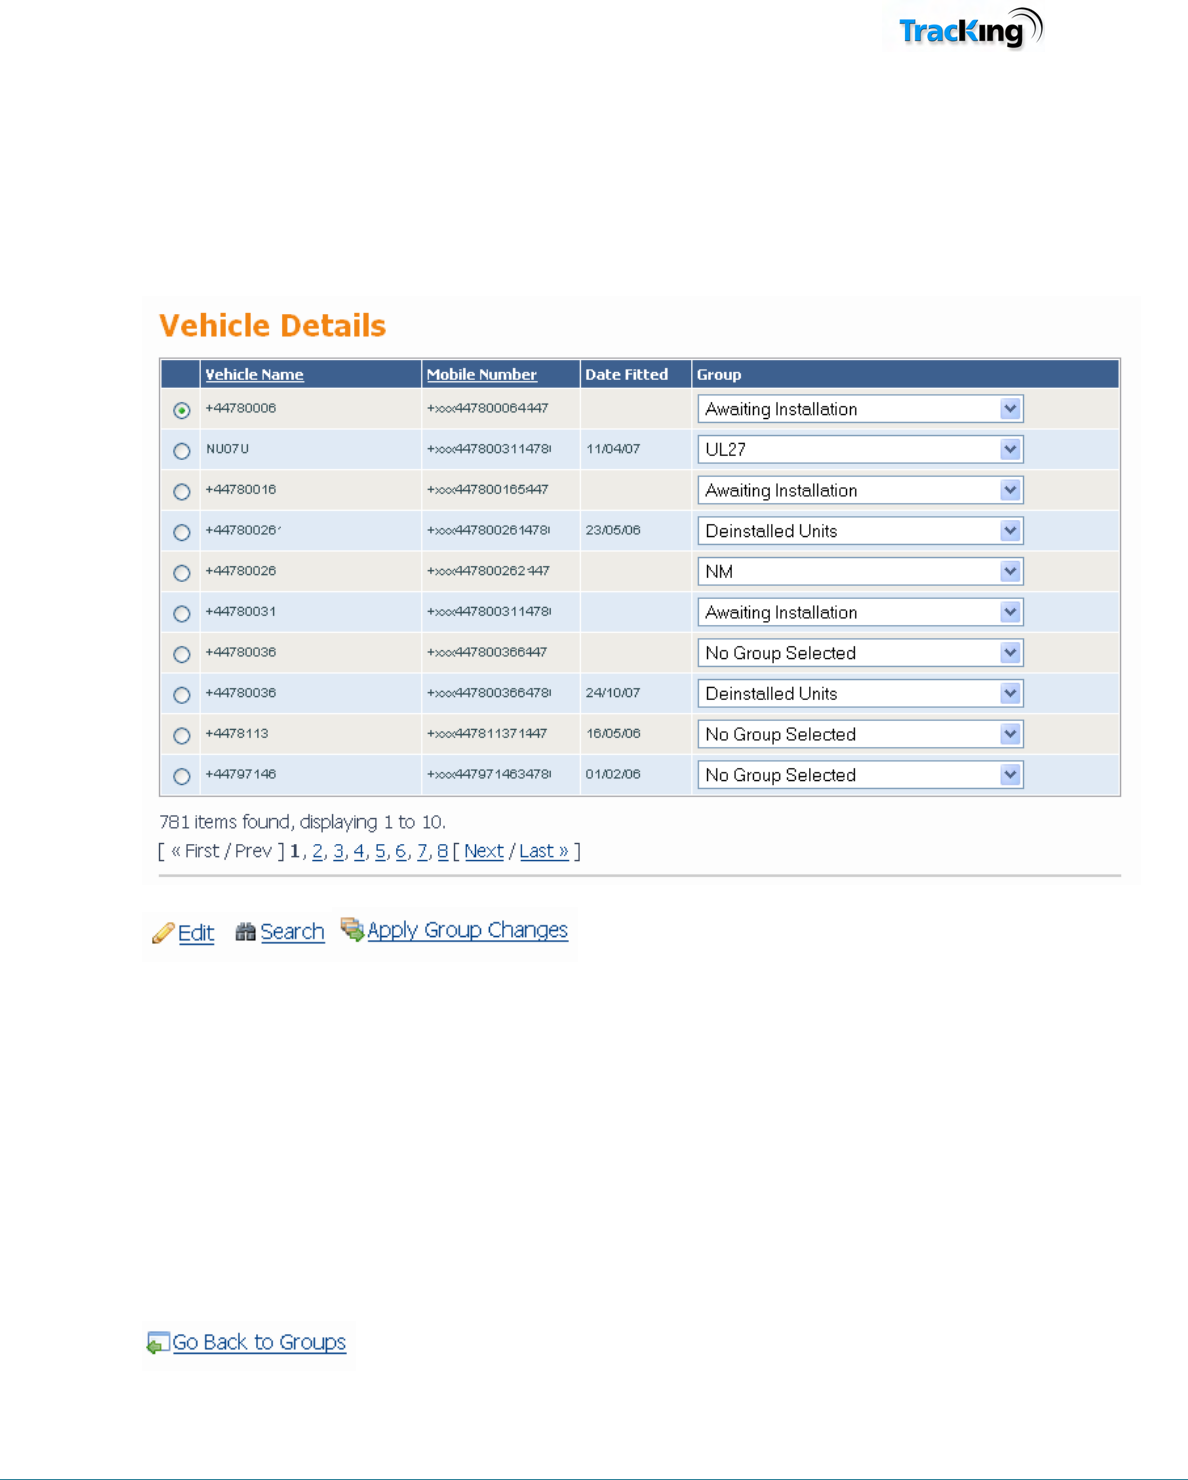
This page displays a list of vehicles configured on the current TracKing system.
The list is displayed as a result of a vehicle search, and appears as follows:
Navigating the List
Click on the 'Group Name' column heading to re-order the list in ascending/descending alphabetic/numerical
order relative to that column.
For more than ten vehicles, the list is split across multiple pages. Use the First/Prev, Next/Last or Page Number
links at the bottom of the list to navigate through the pages.
Icons
Go Back to Groups
Click to return to the Vehicle Group List page.
TK60178-8-OP-EN Rev.3.3 Page 87
Edit
Brings the user to the Vehicle Maintenance page.
Search
Click to open the Vehicle Search page
Apply Group Changes
The user can change which group a selected vehicle belongs to by choosing the new group from the drop down
menu and clicking of the 'apply Group Changes' icon.
TK60178-8-OP-EN Rev.3.3 Page 88
Vehicle Maintenance
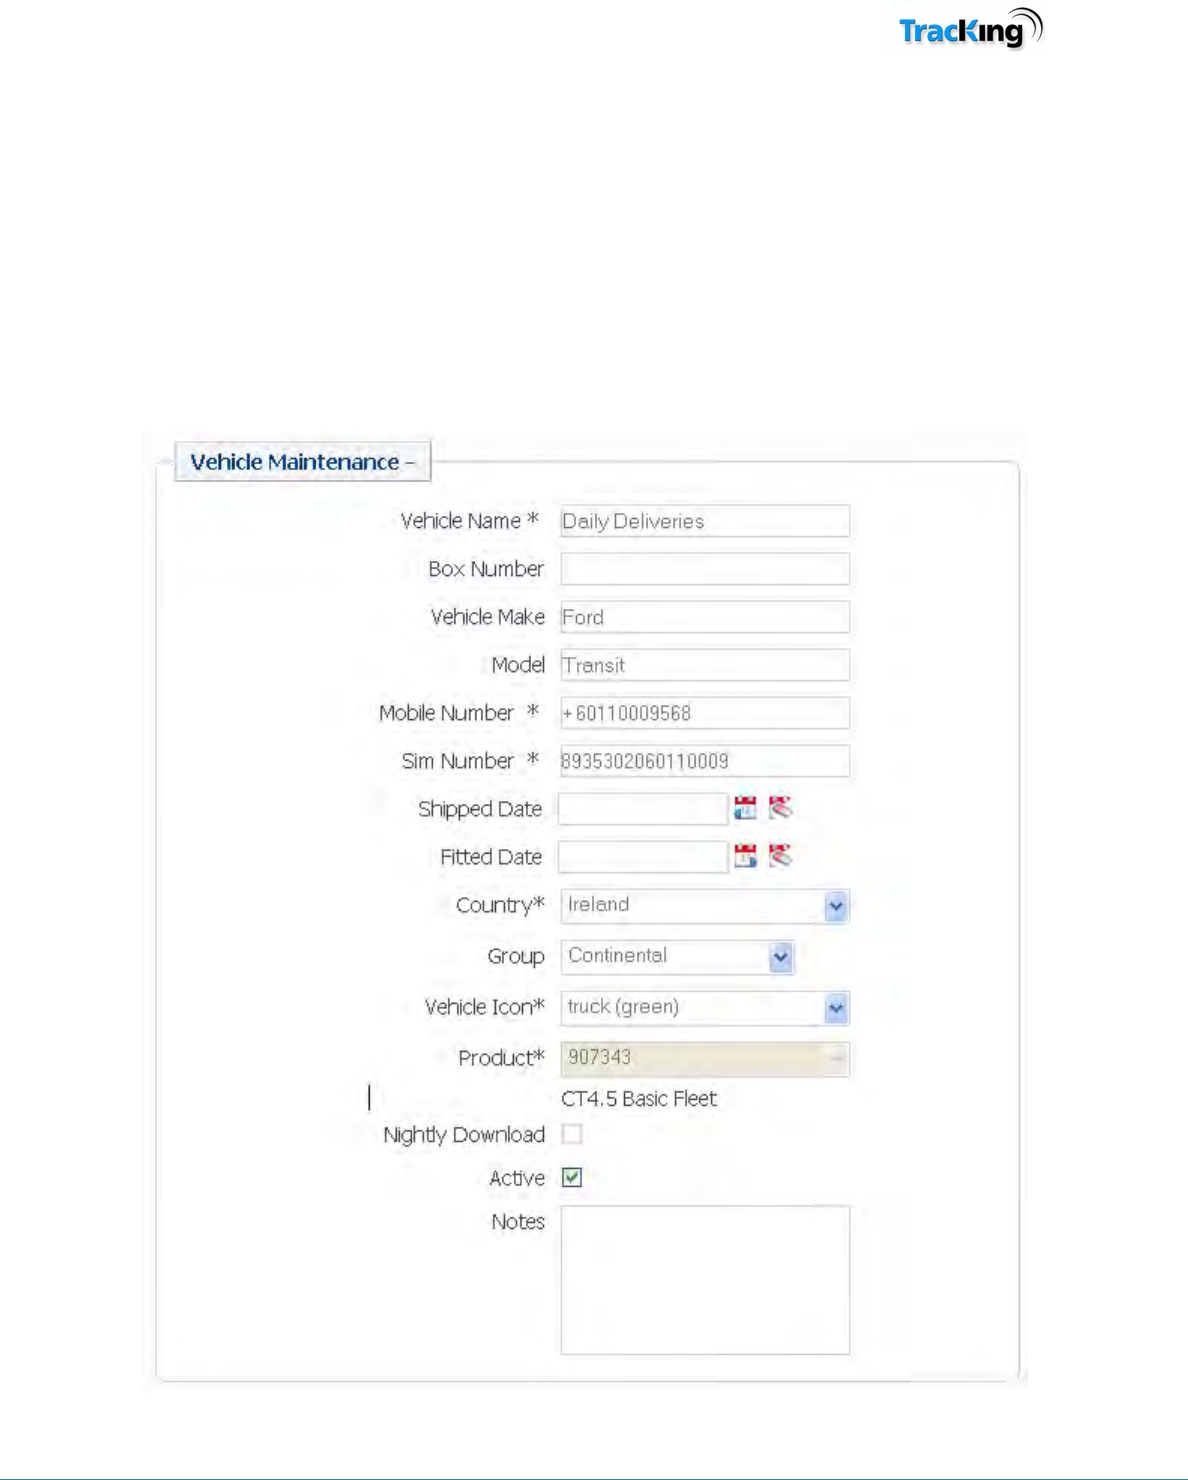
The vehicle maintenance page allows the user to update details about a particular vehicle when required. It is
accessed by selecting a vehicle in the Vehicle Details list, and then clicking the Edit link.
It is recommended that users only change the Vehicle name. If changes are required for any other field, please
contact support.
To update the vehicle name:
1.
Change the Vehicle name.
2. Click 'Confirm'
.
TK60178-8-OP-EN Rev.3.3 Page 89
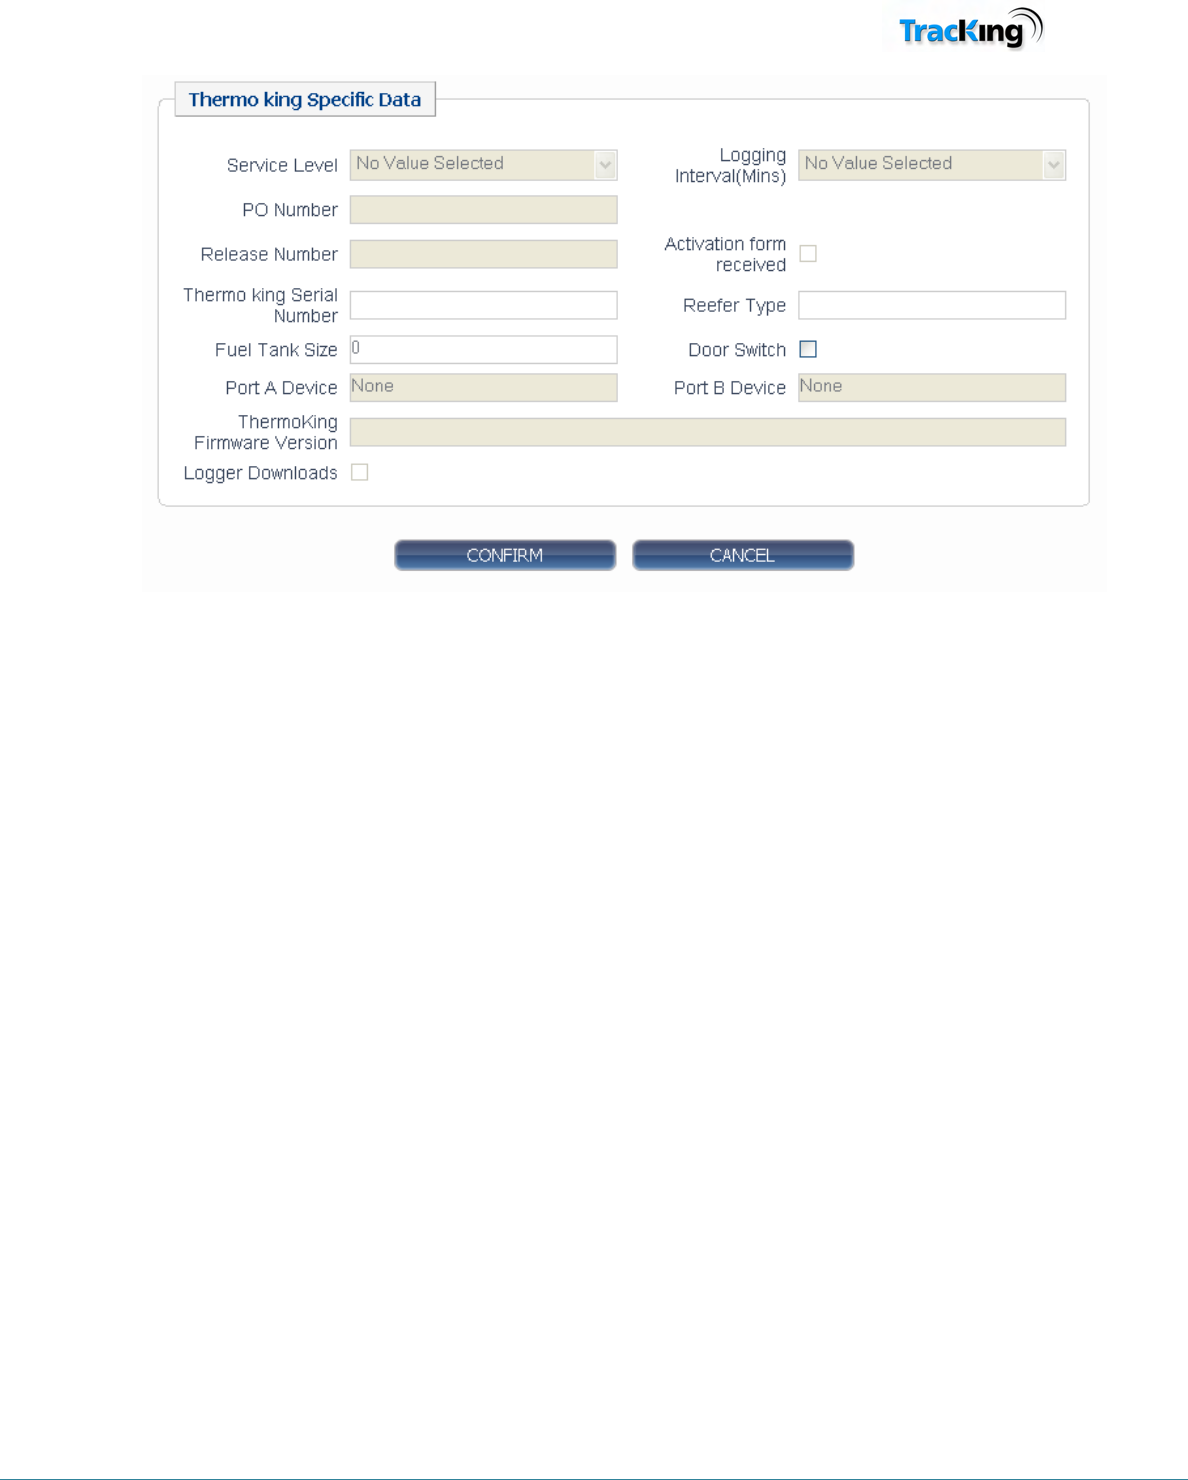
Please note that by setting the Fuel Tank size to zero means that there is no fuel sensor connected and that fuel
level will not be displayed on the Tracking page.

TK60178-8-OP-EN Rev.3.3 Page 90
User Administration
TracKing may be used by many different people across a customer organization as the tracking features and data
it provides are useful to a range of business functions.
This section of the Administration allows the addition of new users to the system, and searches for existing
users.
The two options are:
• Add User
• User Search
TK60178-8-OP-EN Rev.3.3 Page 91
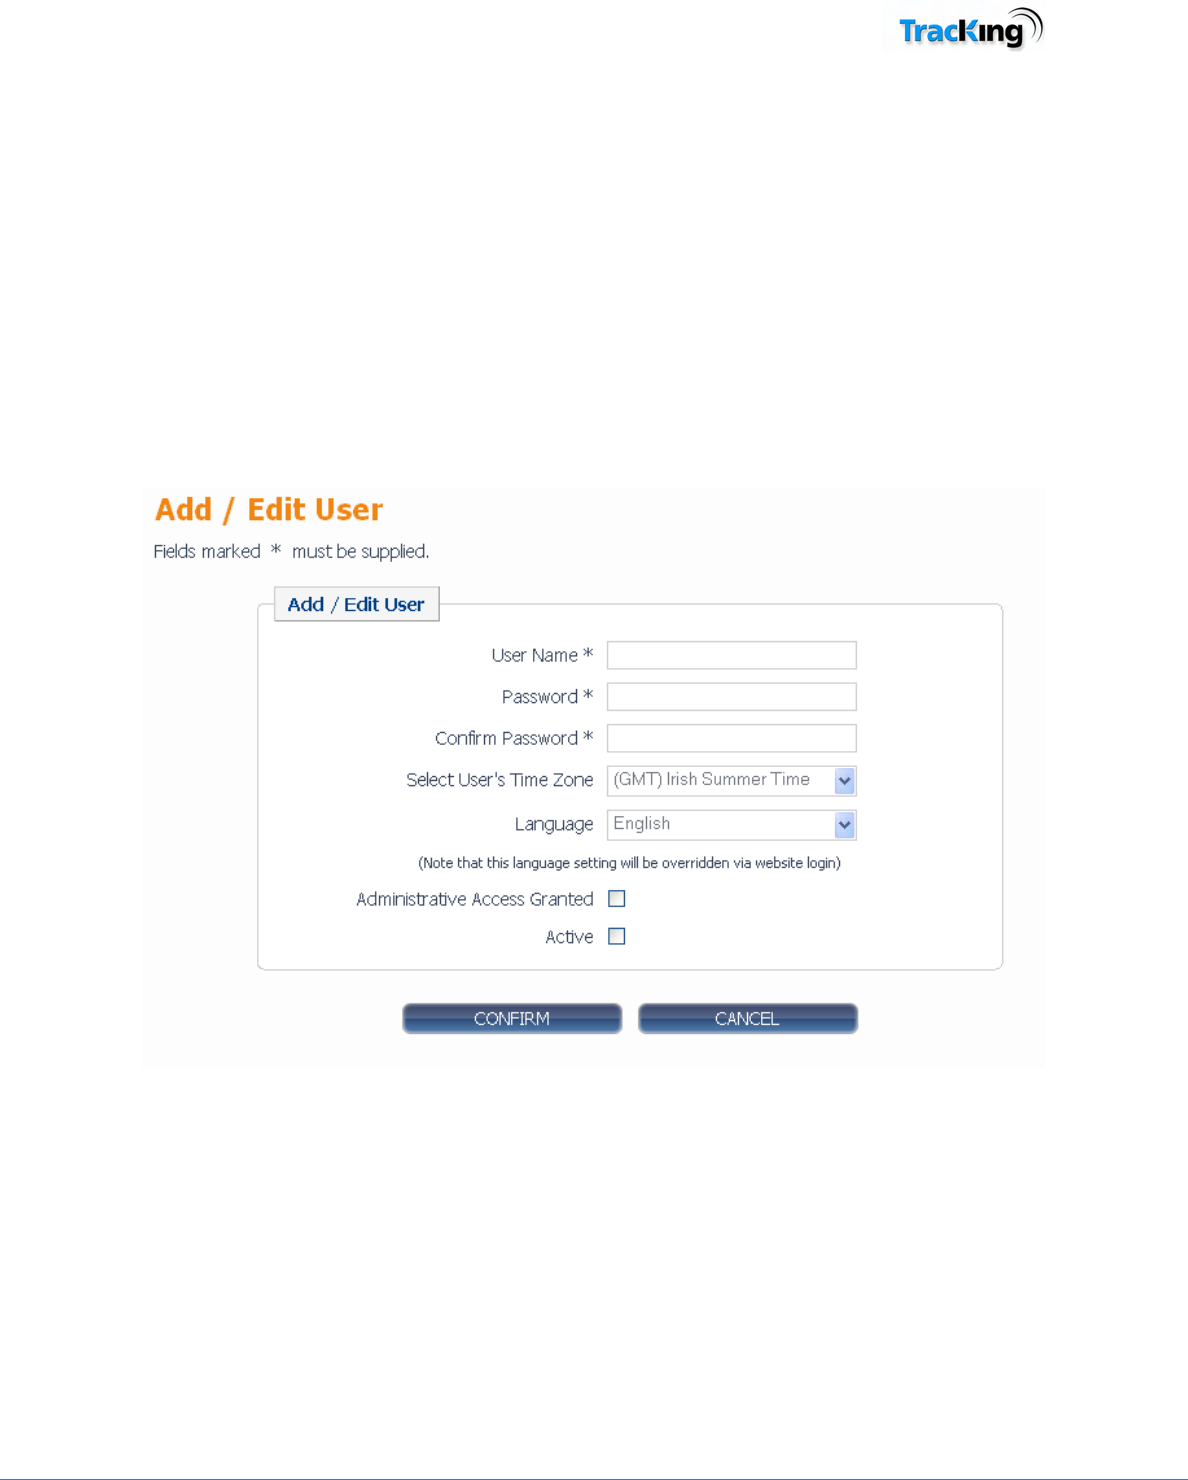
Add New User
This page enables the customer to add new users to their TracKing system.
To add a new user:
1. Complete the dialog box with the user name and password.
2. Set the user's Time Zone and Language via the drop-down menu.
3. Tick the 'Administrative Access Granted' tick box if the user is to have admin-level access rights.
Leave un-ticked if the user is to have basic-level access.
4.
Tick the 'Active' box to make the new user's account active.
5. Click 'Confirm' to complete the addition of the new user.
The user list is then displayed with the new user added
TK60178-8-OP-EN Rev.3.3 Page 92
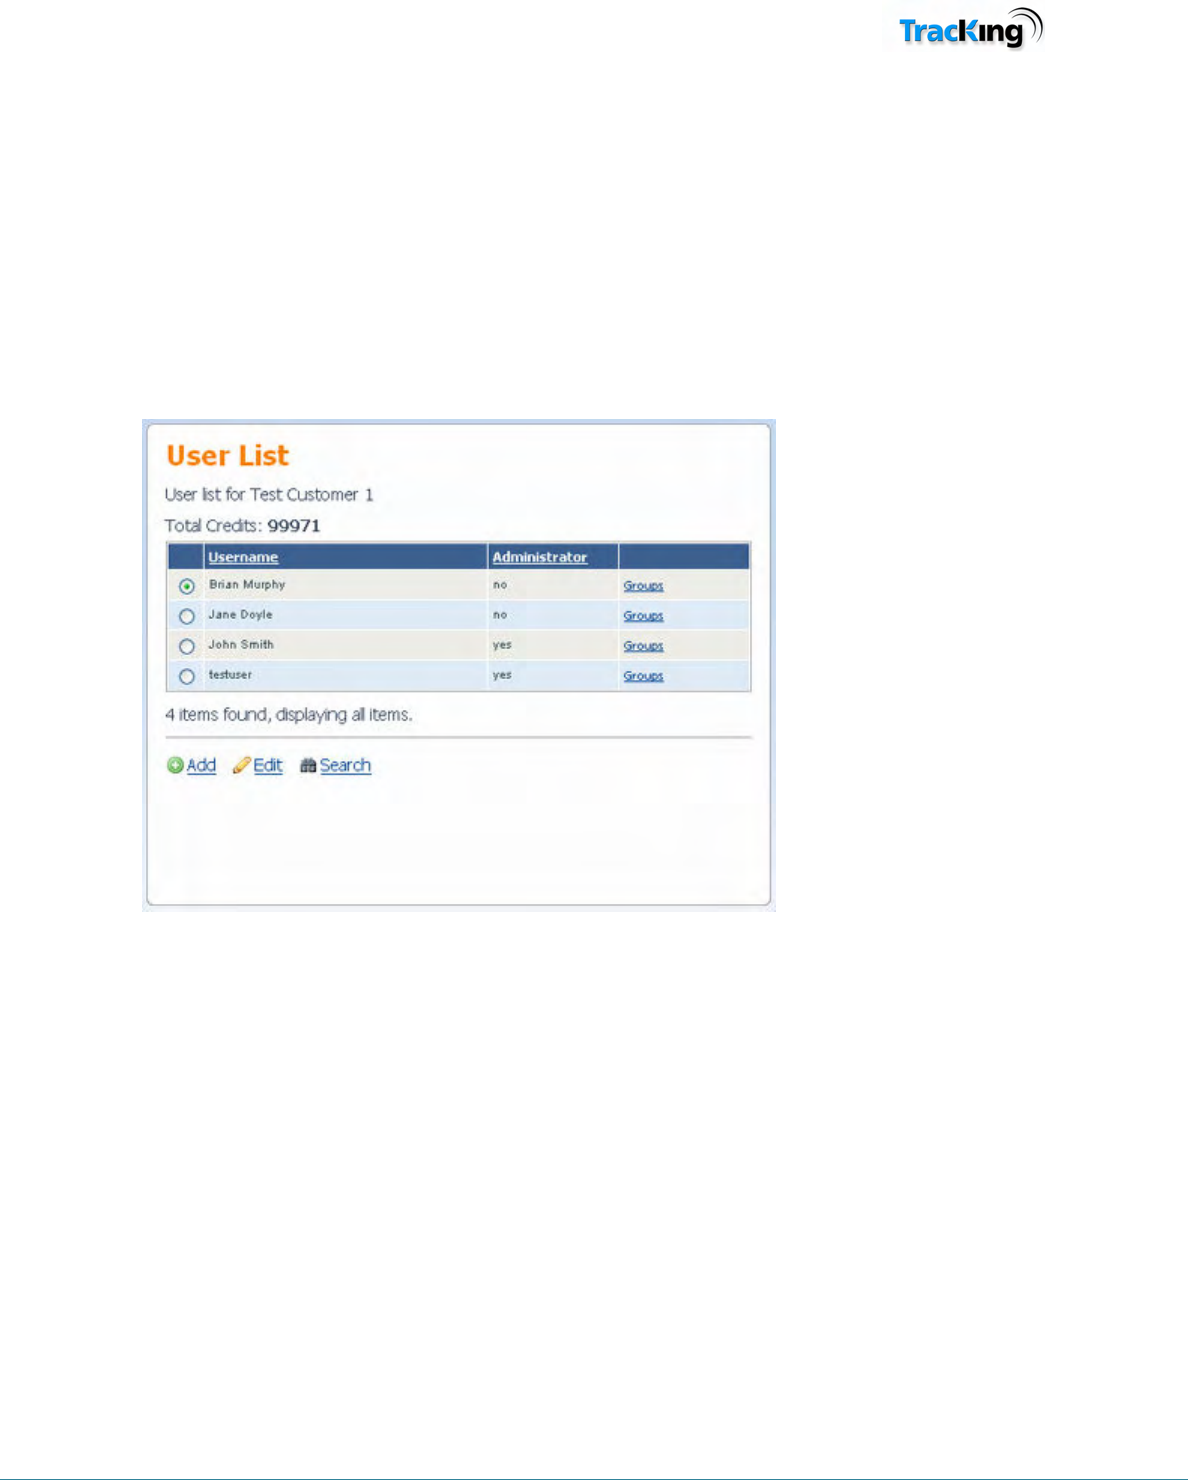
User List
This page displays a list of users configured on the system.
The list is displayed as a result of:
• Adding a new user, or,
• Performing a user search.
The list is displayed as follows:
Reordering the List
To reorder the list:
1. Click on the 'Username' column heading to arrange the list in alphabetical order.
2. Click on the 'Administrator' column heading to group the users with admin-level access.
Credits
The Total Credits value which is displayed is generated by Celtrak but is not applicable to system users and can be ignored.
TK60178-8-OP-EN Rev.3.3 Page 93
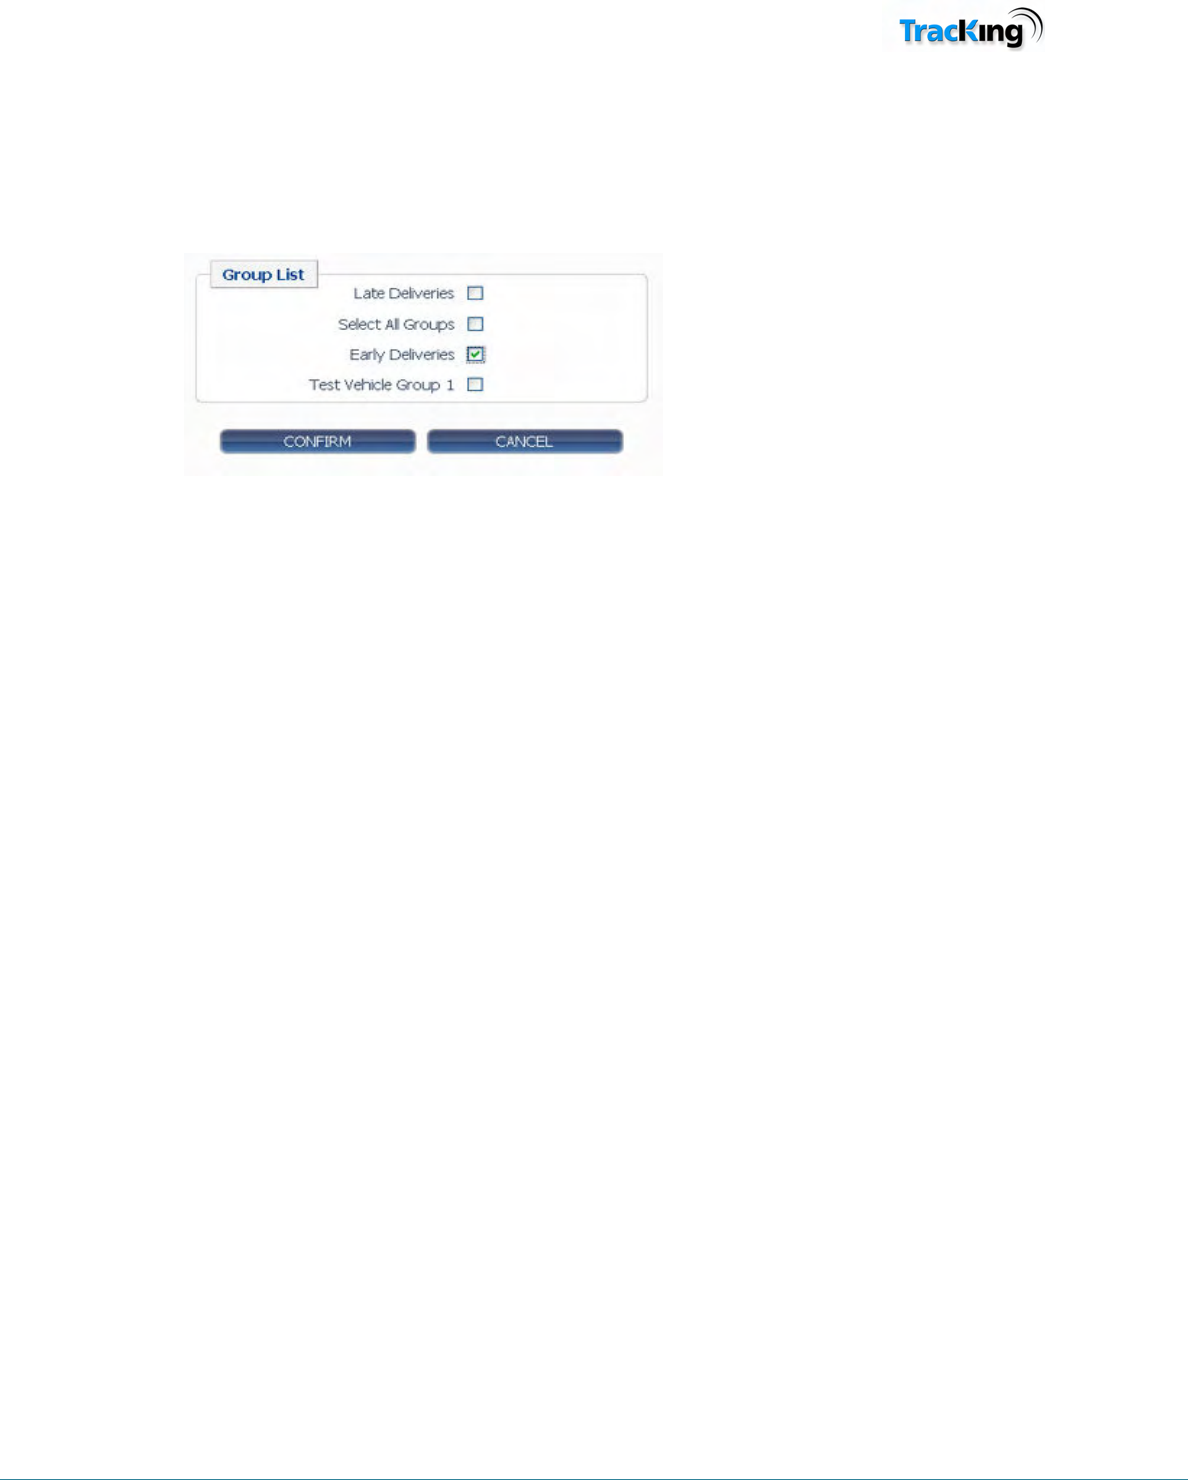
Groups
To add a user to a group:
1. Click on 'Groups'.
2. In the Group List window, check the boxes next to the groups they are to be assigned to.
3. Click confirm to save the settings and return to the User List.
For more information on knowing what groups are available, see the Vehicle Group Search page.
TK60178-8-OP-EN Rev.3.3 Page 94
Add
Click on the add icon to add a new user to the list.
Edit
To change the account details or access rights of a user:
1. Click the radio button next to their name to select them.
2. Click the edit icon to open the user page.
3. Modify the account details as required.
Search
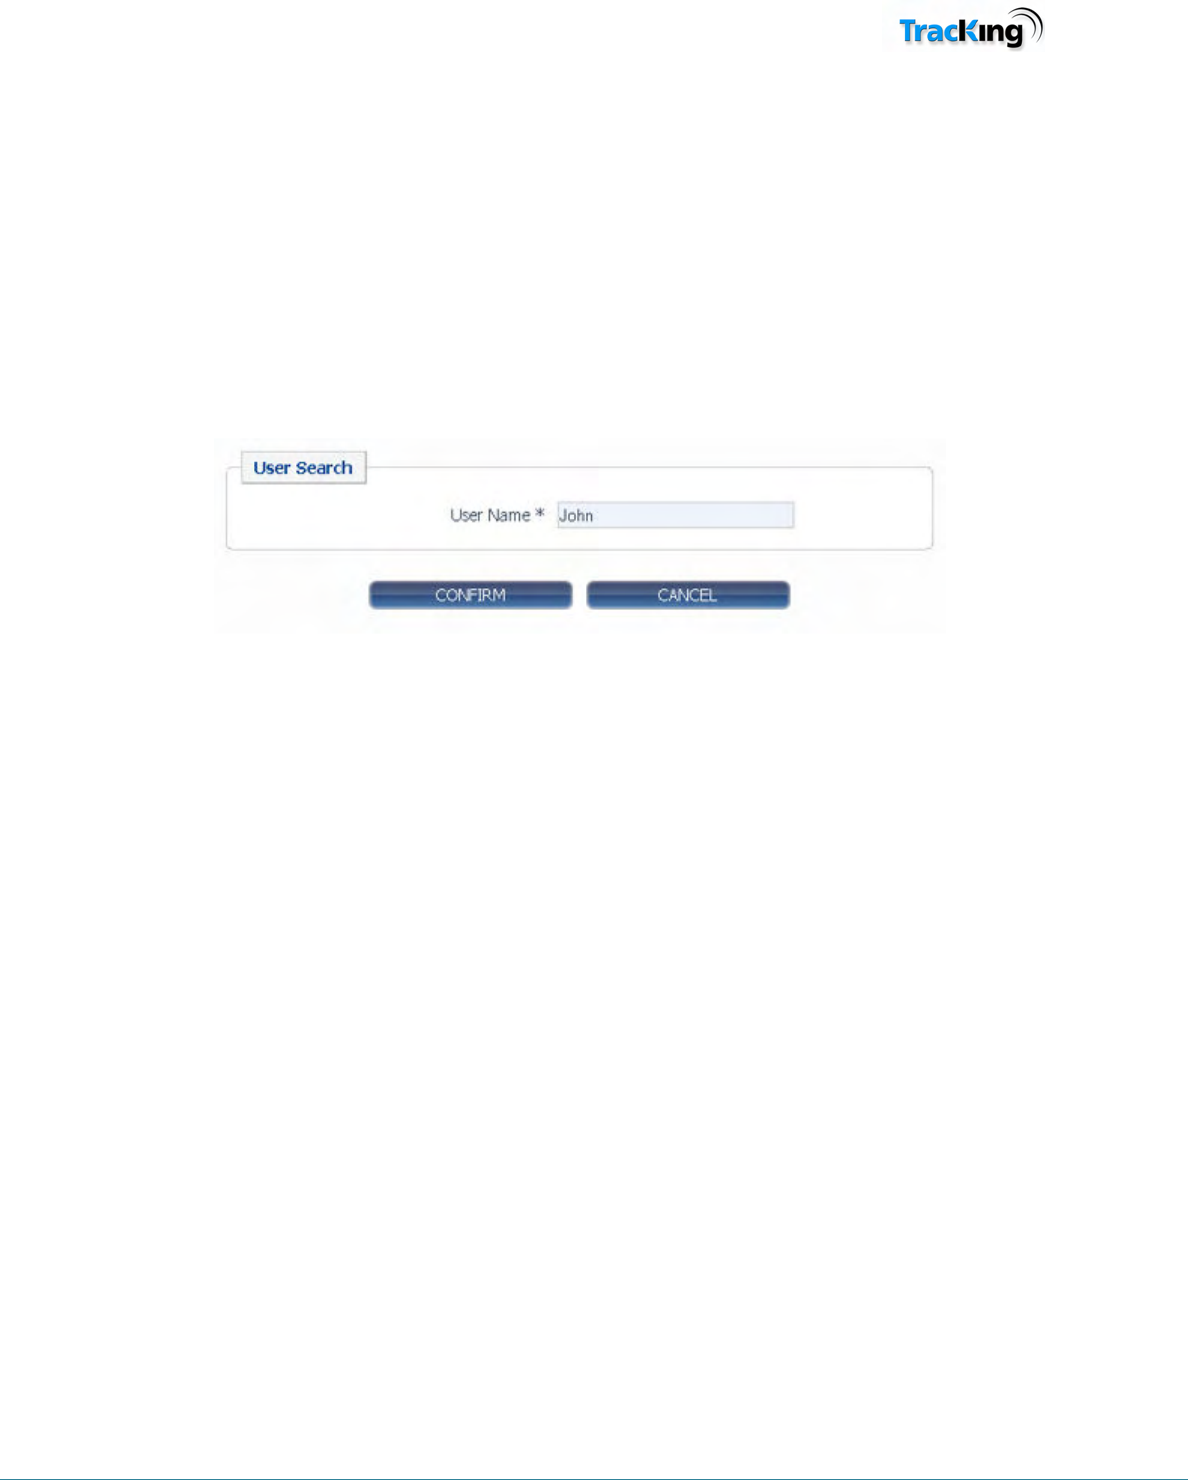
To search for a user, click the search icon and enter a user name (whole or partial).
HINT: To see a list of all users, leave the text box blank, then click 'Confirm' to perform the search.
TK60178-8-OP-EN Rev.3.3 Page 95
User Search
This search page enables the user to search for a user configured on the system.
1. Enter the name (whole or partial) to search for in the text box.
HINT: To see a list of all users, leave the text box blank and click 'Confirm'. A list of all the users will
appear.
2. Click 'Confirm' to begin the search.
When the search is complete, the results will be displayed in the User List.
Delete User
Customers cannot delete users from the system. To disable the account, edit the password to be something else
so that the user can no longer access the system.
Then email support to remove the user from the system completely.

TK60178-8-OP-EN Rev.3.3 Page 96
Miscellaneous Administration
The Miscellaneous Administration page provides access to configuration pages for a number of different
features of the TracKing system. These are listed below. Click on a link for more information on a particular
feature.
• Contacts Administration
• POI Maintenance
• Geo Fence Administration
• Customizable Reports
• Scheduled Reports
TK60178-8-OP-EN Rev.3.3 Page 97
Contacts
In the TracKing system, contacts are people who can be notified when certain events, e.g. alarms, occur.
Their details should include a contact telephone number and email address.
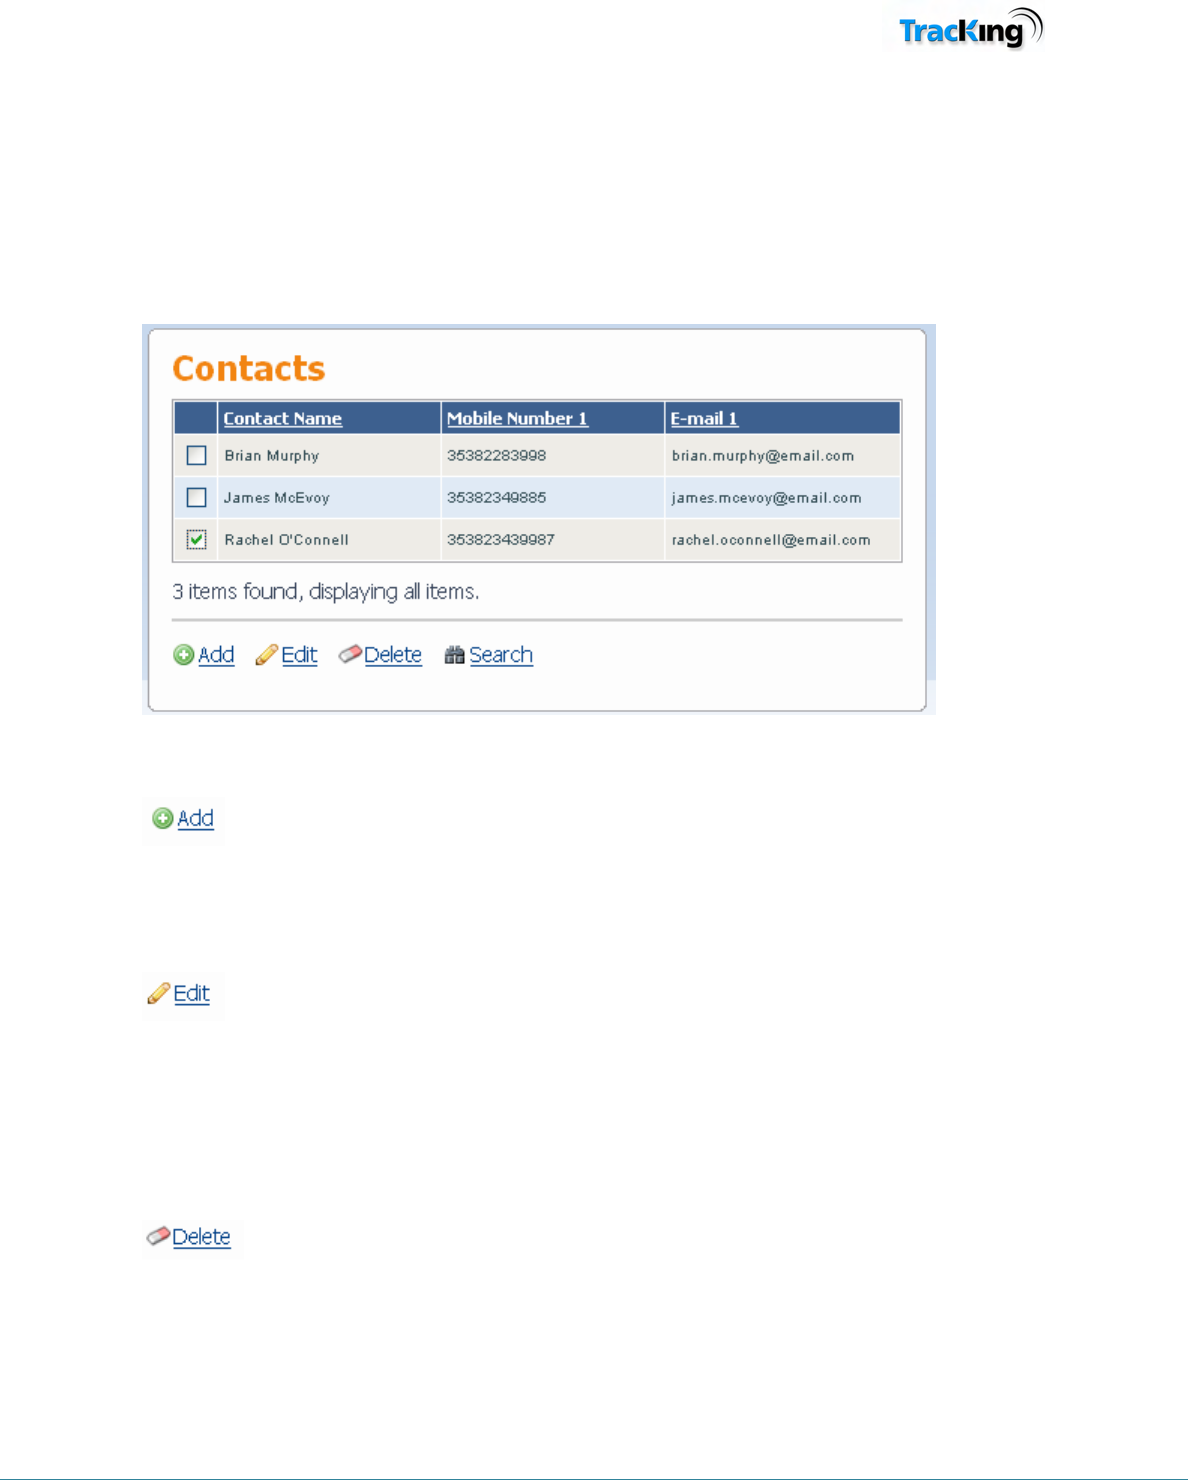
All of the contacts configured on the system are shown on the initial Contacts page, as shown in the screenshot
below.
Add
To add a new contact to the list, click the Add icon and fill in the details on the Add/Edit Contact page.
Edit
To edit a contact:
1. Select the contact by ticking the box next to their name.
2. Click the Edit icon and modify the details on the Add/Edit Contact page.
Delete
To delete a contact:
1. Select the contact by ticking the box next to their name.
2. Click the Delete icon.
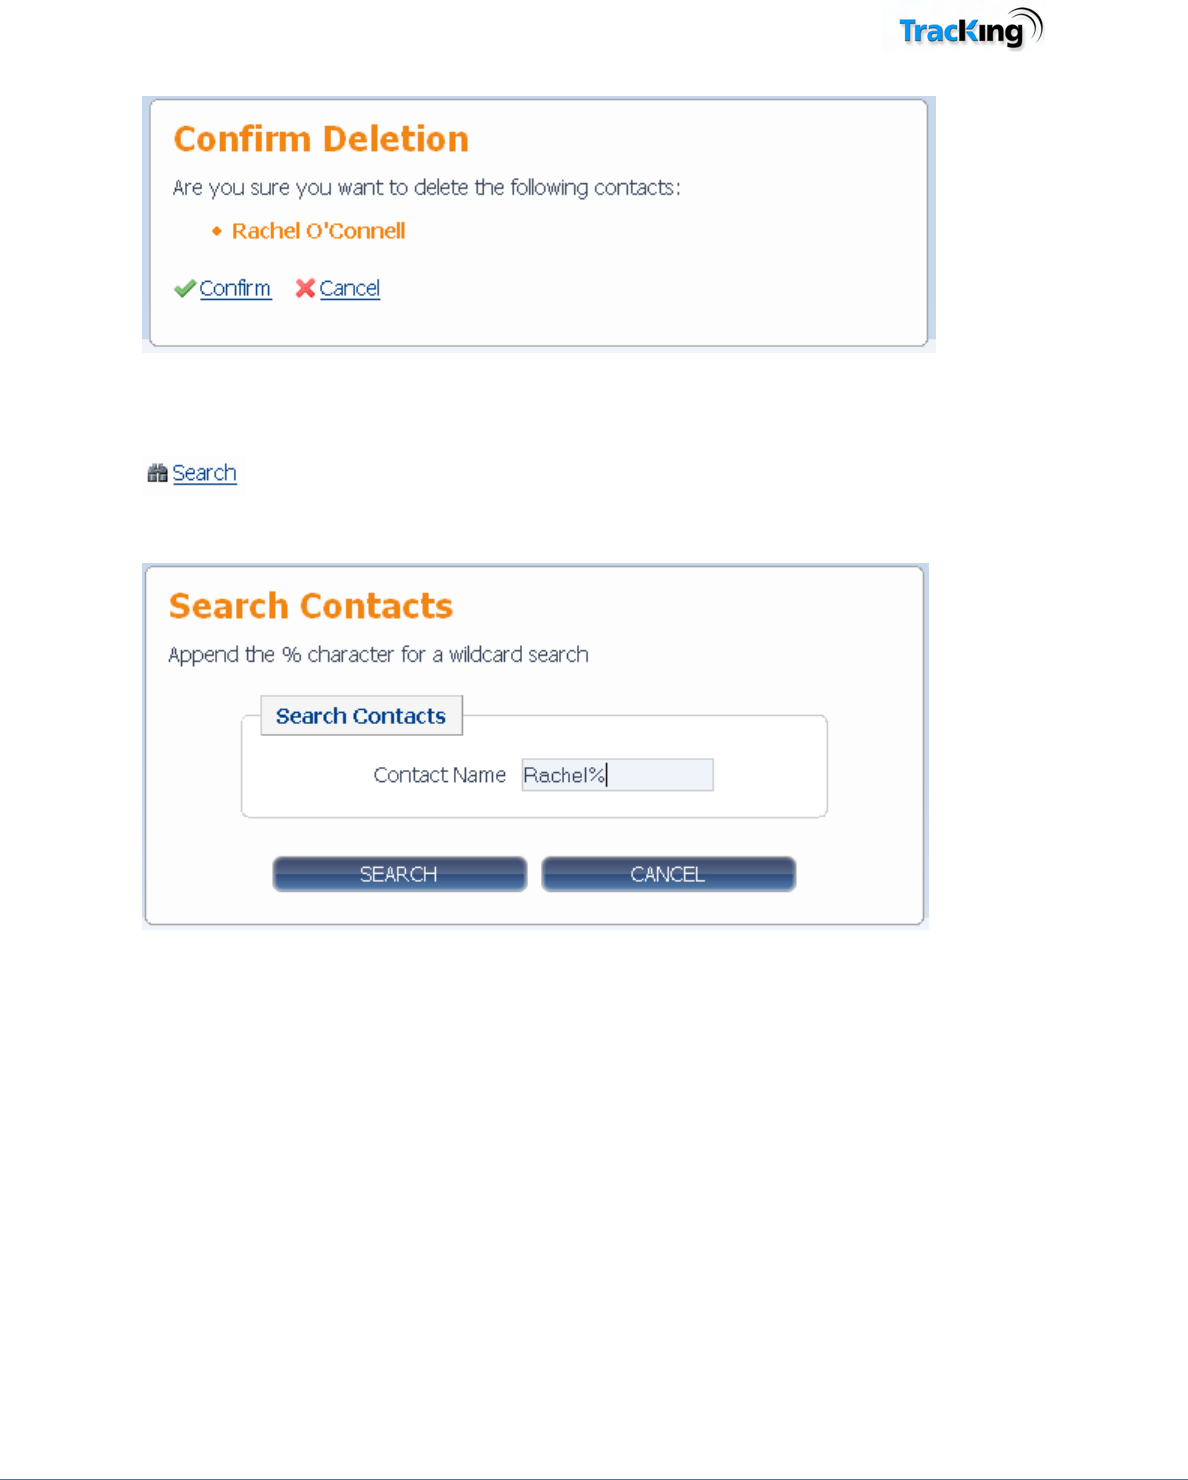
3. On the Confirm Deletion page, click 'Confirm'
TK60178-8-OP-EN Rev.3.3 Page 98
Search
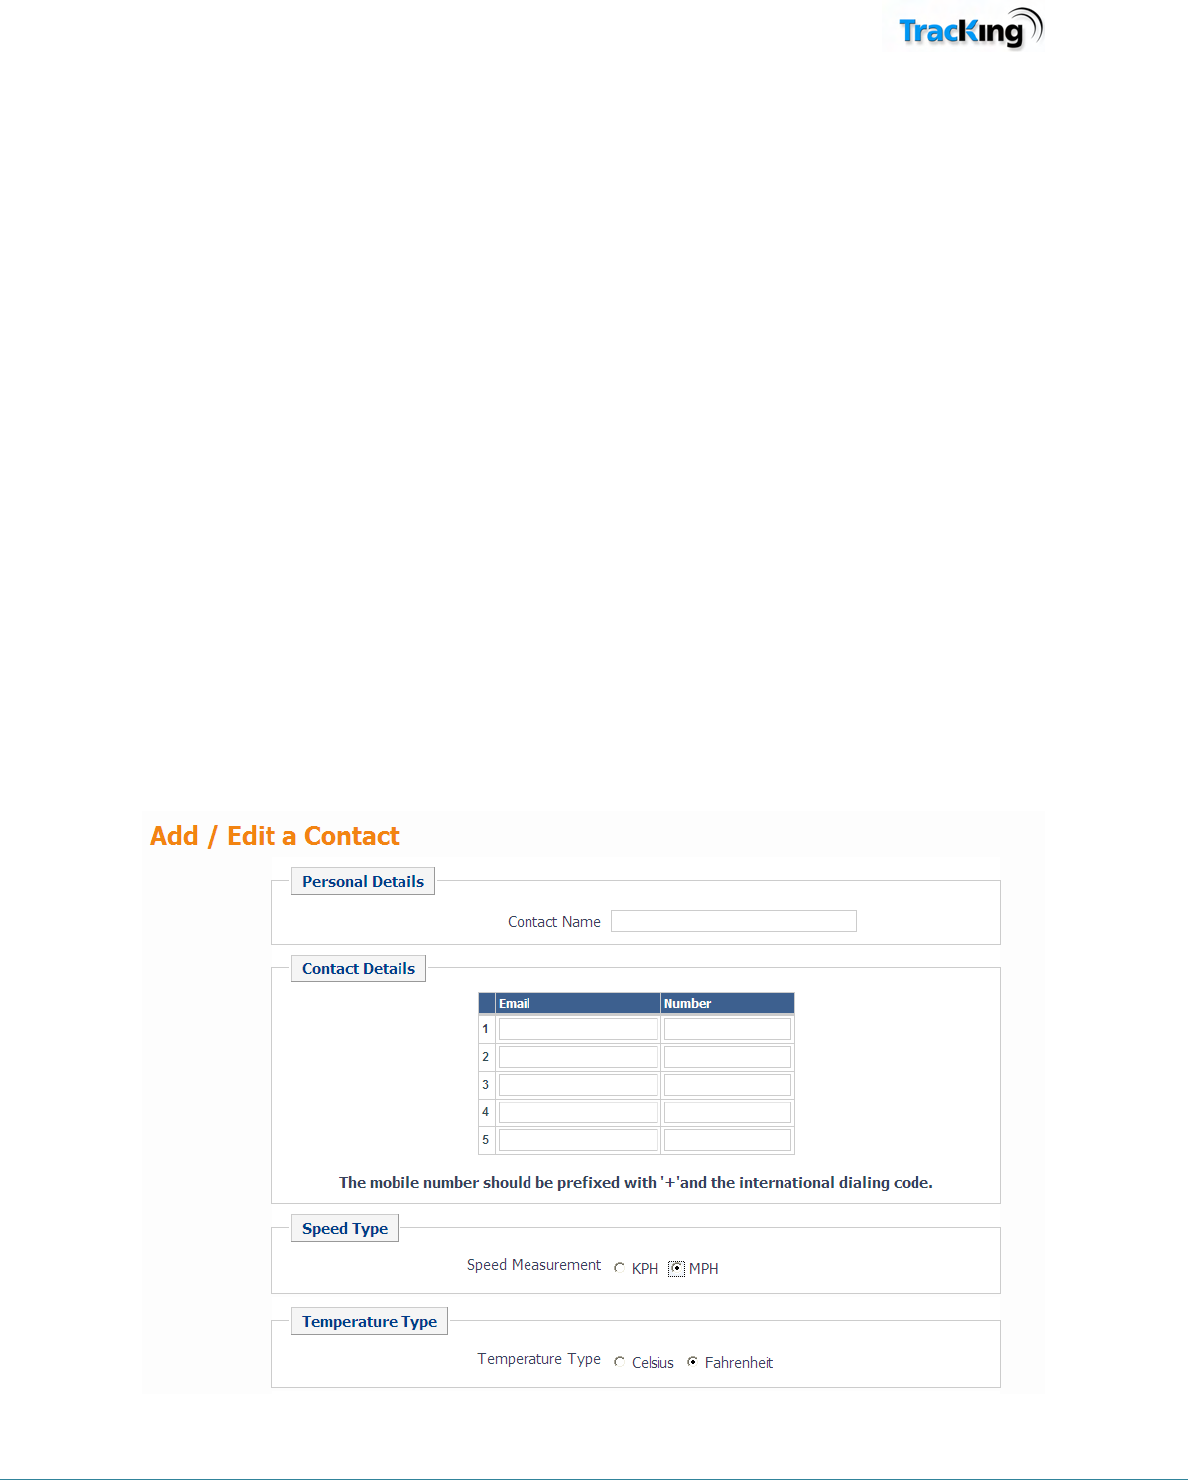
To search for a contact, click the Search icon, then enter the name to search for in the search box:
NOTE: The '%' character acts as a wildcard, i.e. the search will return all matches which begin with the letters
before the % character.
TK60178-8-OP-EN Rev.3.3 Page 99
Add / Edit Contact Details
This page allows the user to add a new contact to the system, or edit an existing contact's details.
To add a contact:
1. Enter the contact's name in the Personal Details section.
2. Enter their email address - this is the address alerts will be sent to if they are configured as a contact for
an alarm.
3. Enter a contact telephone number at which they can be contacted.
4. Choose Miles per hour (MPH) or Kilometers per hour (KPH) as the units in which their speed will be
measured where relevant.
5. Click 'Confirm' to add the contact to the system.
To edit existing contacts details:
1. Modify the fields which require change.
2. Click 'Confirm' to save the changes.
A screenshot of the Add/Edit Contact page is shown below.

TK60178-8-OP-EN Rev.3.3 Page 100
Note: Phone numbers are entered in the format + followed by the international dialing code and
then the numbers e.g. for a US number 611 123 1234 you should enter +16111231234, for a UK
number 0123 1234567 it should be entered as +441231234567 (note drop the leading “0” on
European numbers).
TK60178-8-OP-EN Rev.3.3 Page 101
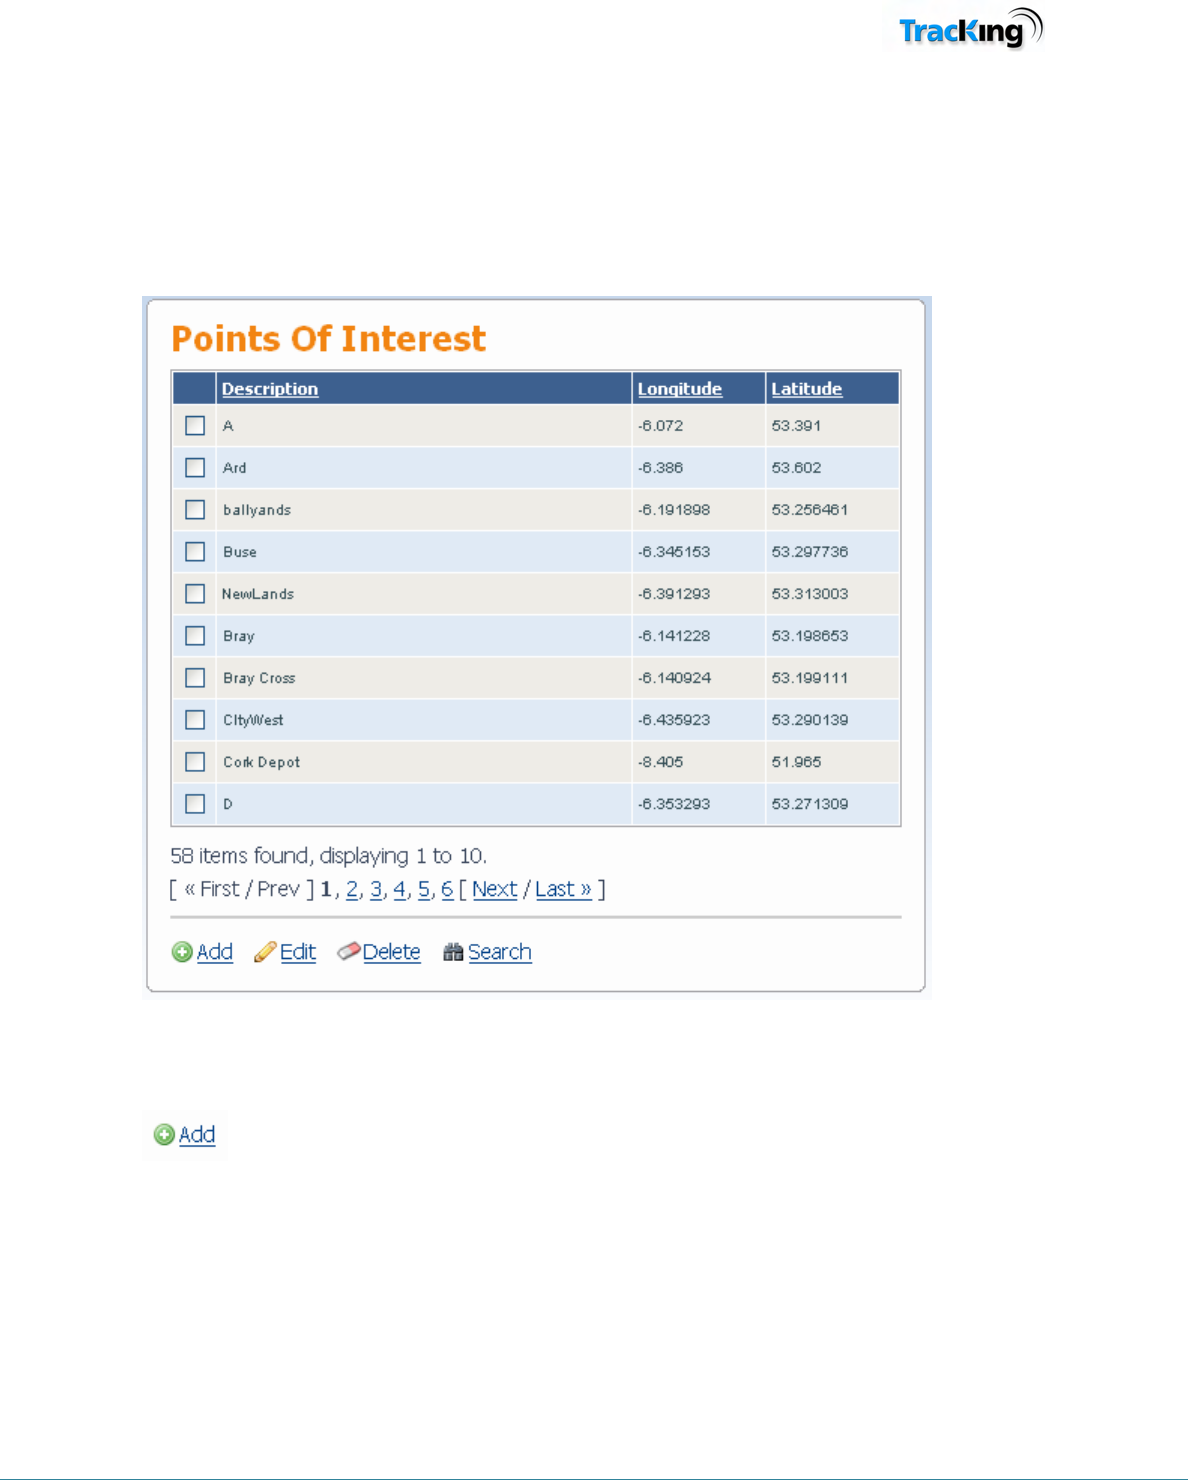
Points of Interest Maintenance
This menu displays a list of all the points of interest which are configured on the system. These are locations of
interest to the customer, such as depots or delivery points, and can be represented on the map as a POI icon.
Sort the list by description, longitude or latitude by clicking on the appropriate column heading.
Add
Click the Add icon to add a new POI. This will open the Add/Edit POI page. However, unless the longitude and
latitude is known in advance, it is better to use one of the approaches described in the Add New Point of Interest
page.
TK60178-8-OP-EN Rev.3.3 Page 102
Edit
To change the details of a Point of Interest:
1. Select the Point of Interest by ticking the box in the leftmost column.
Click the Edit icon to open the Add/Edit POI page.
Delete
To delete a Point of Interest:
1. Select the Point of Interest by ticking the box in the leftmost column.
2. Click the delete icon.
Search
To search for a particular POI, click the search icon to open the search page.
TK60178-8-OP-EN Rev.3.3 Page 103
Add New Point of Interest
To add a new point of interest, the system must know the latitude and longitude of the locations.
There are four ways of adding a point of interest:
1. if the user already knows the latitude and longitude of the location:
a) Open the Points of Interest page in the Administration Menu and click the 'Add 'icon.
b) In the Add/Edit Points of Interest page which then opens, type in the latitude and longitude values and
complete the remainder of the form.
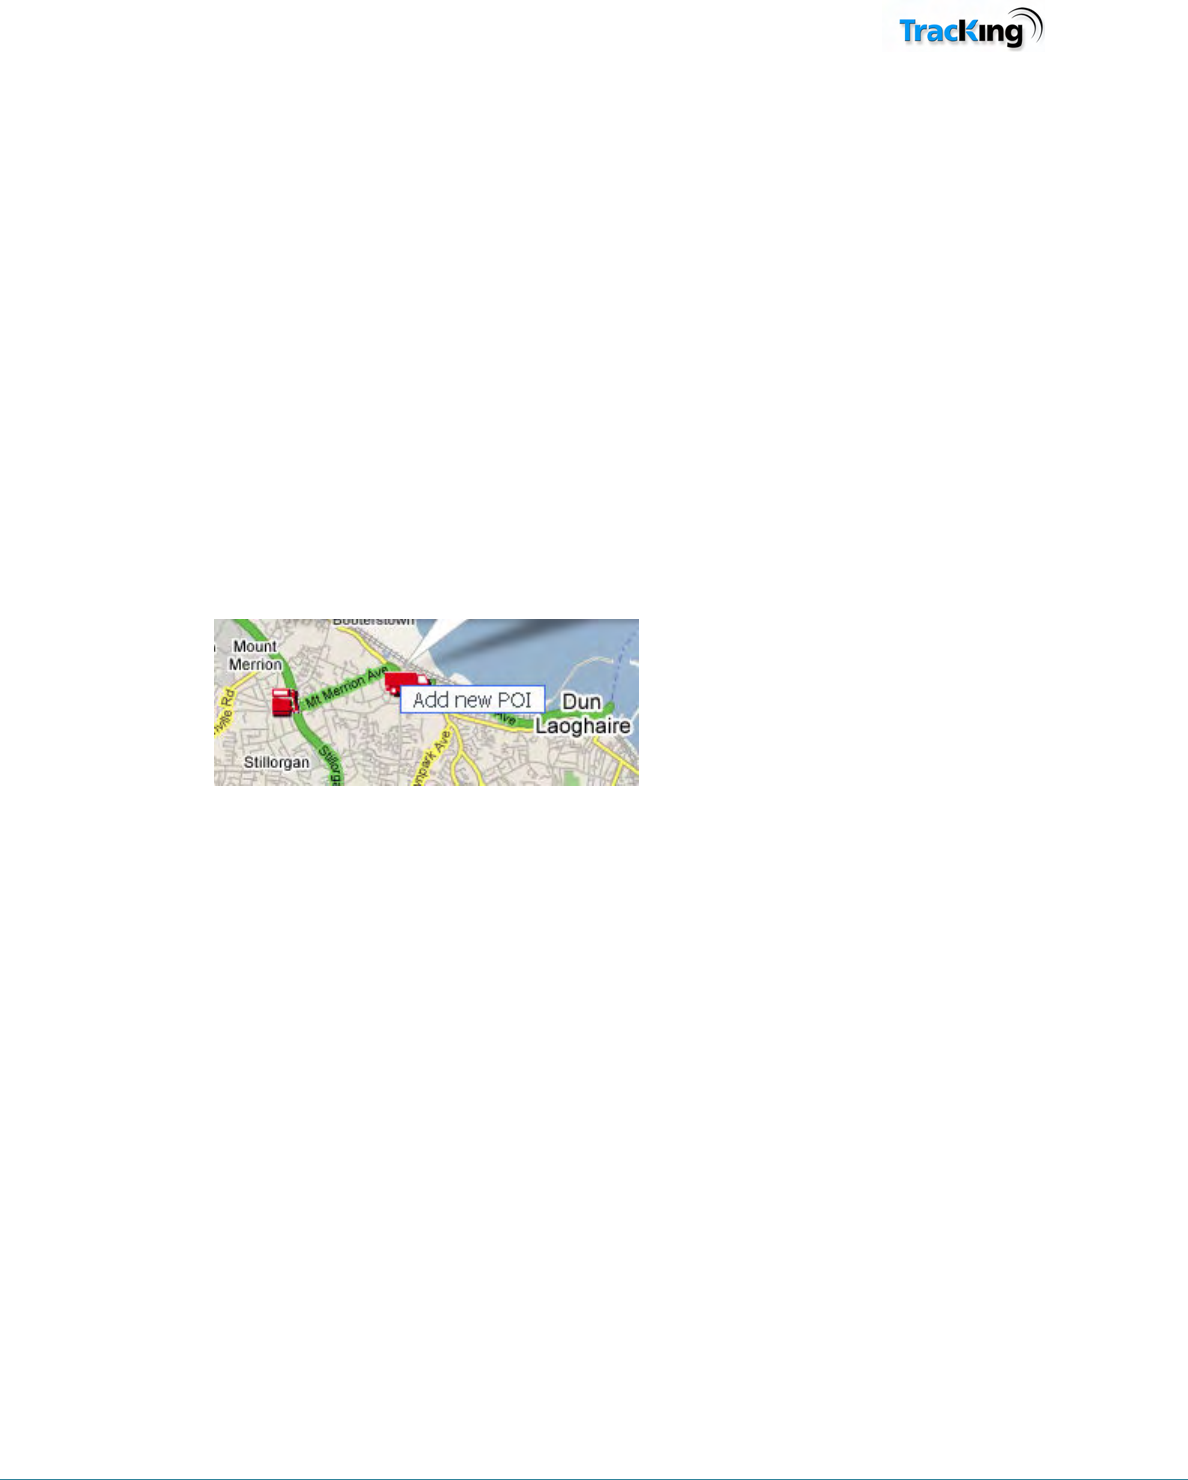
2. Using a vehicle location on a map:
a)
Right-click on the map to display the 'Add POI' button. Note you can right click on any part of the map
to create a new POI. You can use a specific vehicle position to create a POI.
b) Click the 'Add new POI' link.
c) The Add/Edit Points of Interest page will open with the latitude and longitude values already
populated.
d) Complete the remainder of the form.
3. Using a report [useful where a vehicle has visited POI at an earlier time]:
a) Open a report which logged a vehicle at the POI, for example, a position history report.
b) Scroll to the entry for that location.
c) Click on the location to display it on the map page - the map now has the longitude/latitude of this
point.
d) Right-click on the location to display the 'Add POI' button.
e) Click the Add POI button.
f) The Add/Edit Points of Interest page will open with the latitude and longitude values already
populated.
g) Complete the remainder of the form.
4. Select any position on the map
TK60178-8-OP-EN Rev.3.3 Page 104
a) Right-click on the location to display the 'Add POI' button.
b) Click the Add POI button.
c) The Add/Edit Points of Interest page will open with the latitude and longitude values already
populated.
d) Complete the remainder of the form.
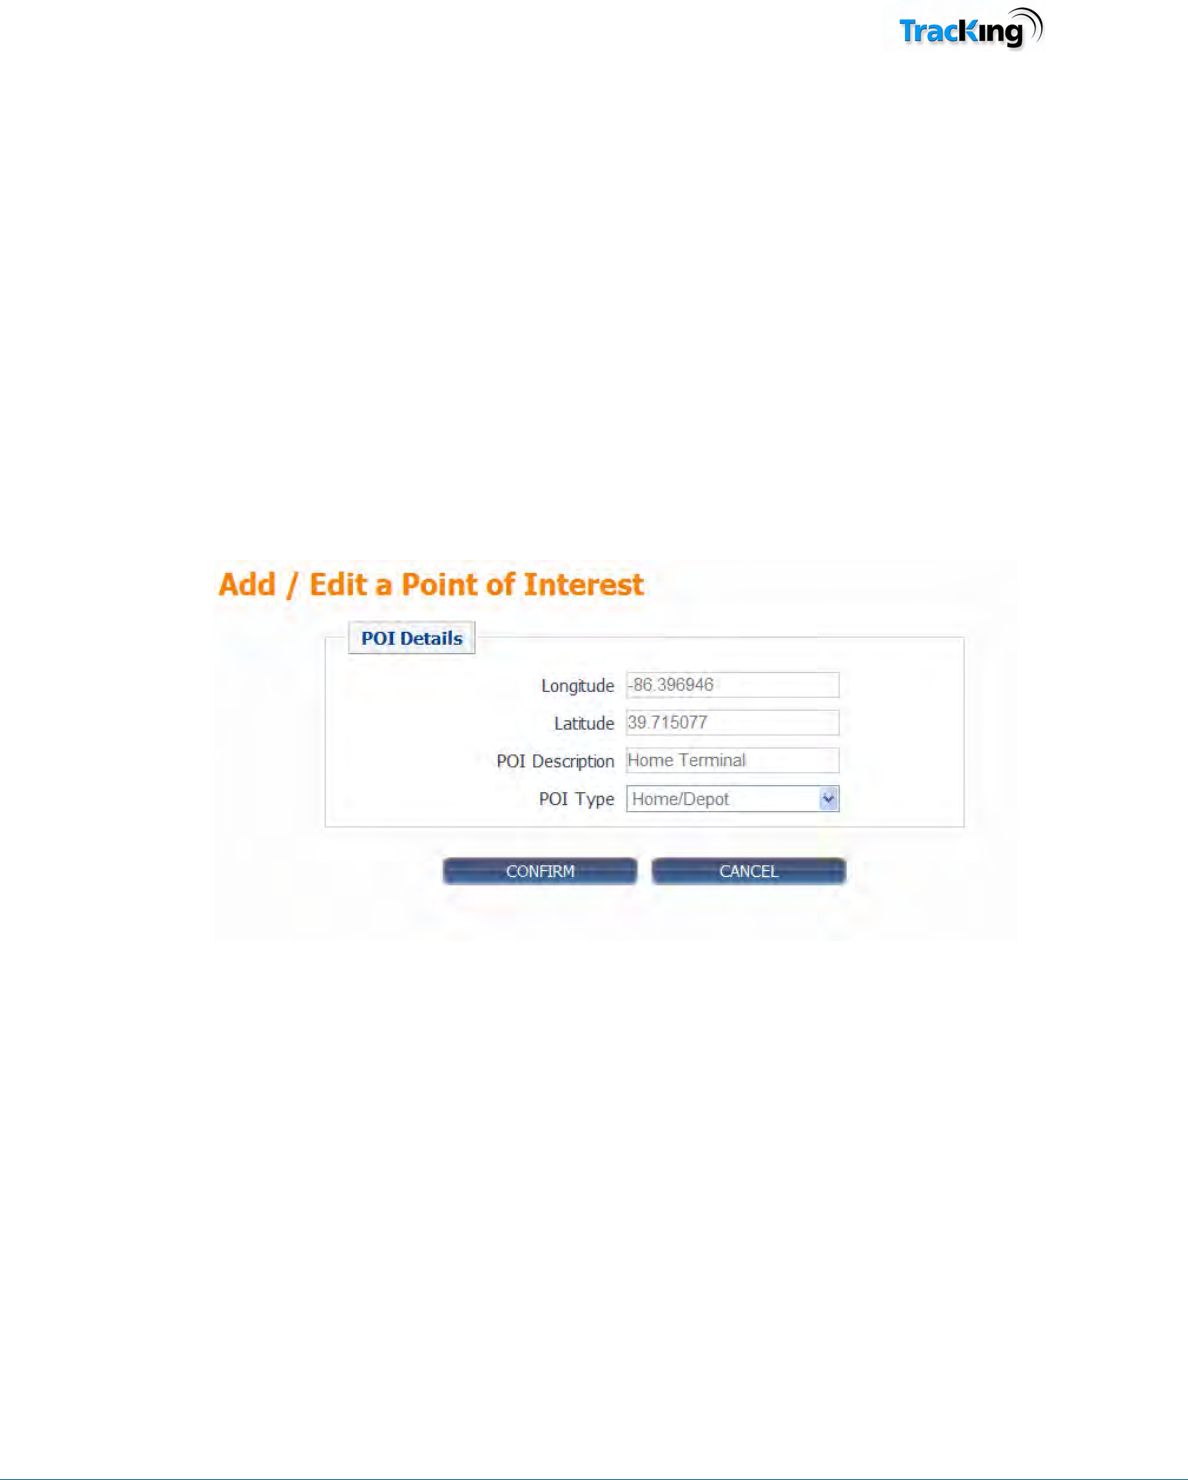
Add/Edit Point of Interest
When adding or editing a Point of Interest, the form shown in the screenshot below is displayed:
1. Make any required changes to the fields.
2. Click 'Confirm' to save the changes.
TK60178-8-OP-EN Rev.3.3 Page 105
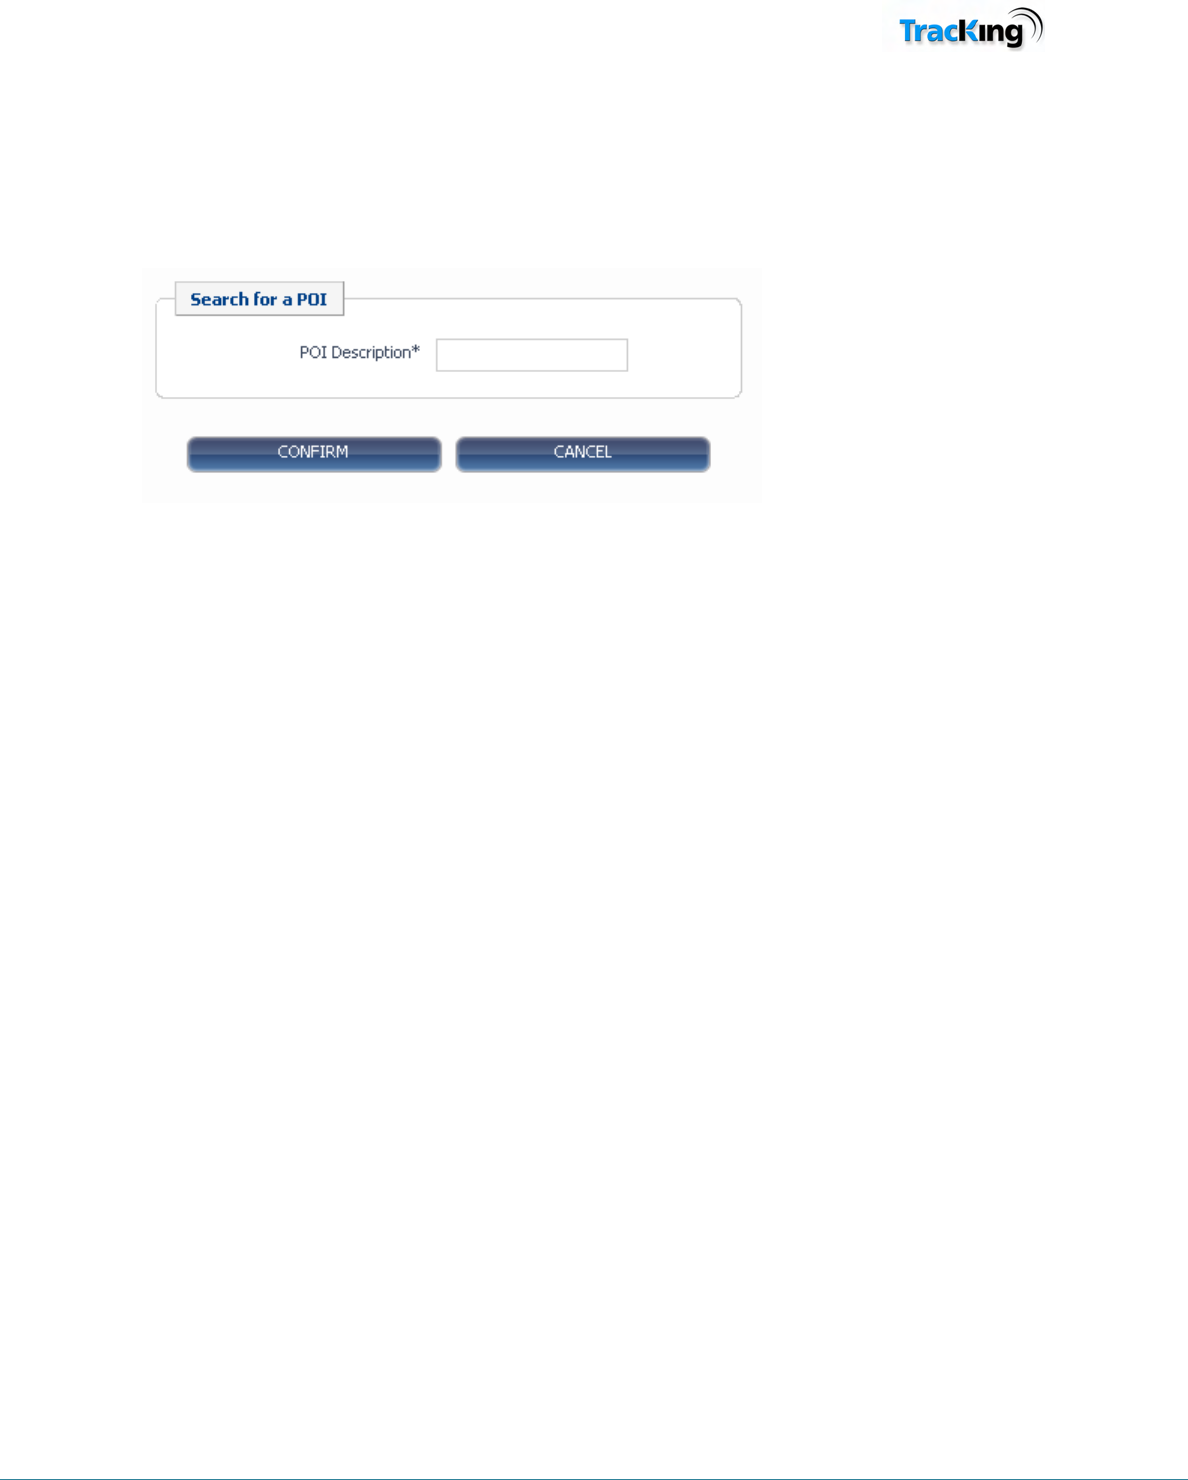
Search Points of Interest
This page allows the user to search for a particular Point of Interest by full or partial name.
Click 'Confirm' to begin the search. The results will be displayed in the Points of Interest list.
TK60178-8-OP-EN Rev.3.3 Page 106
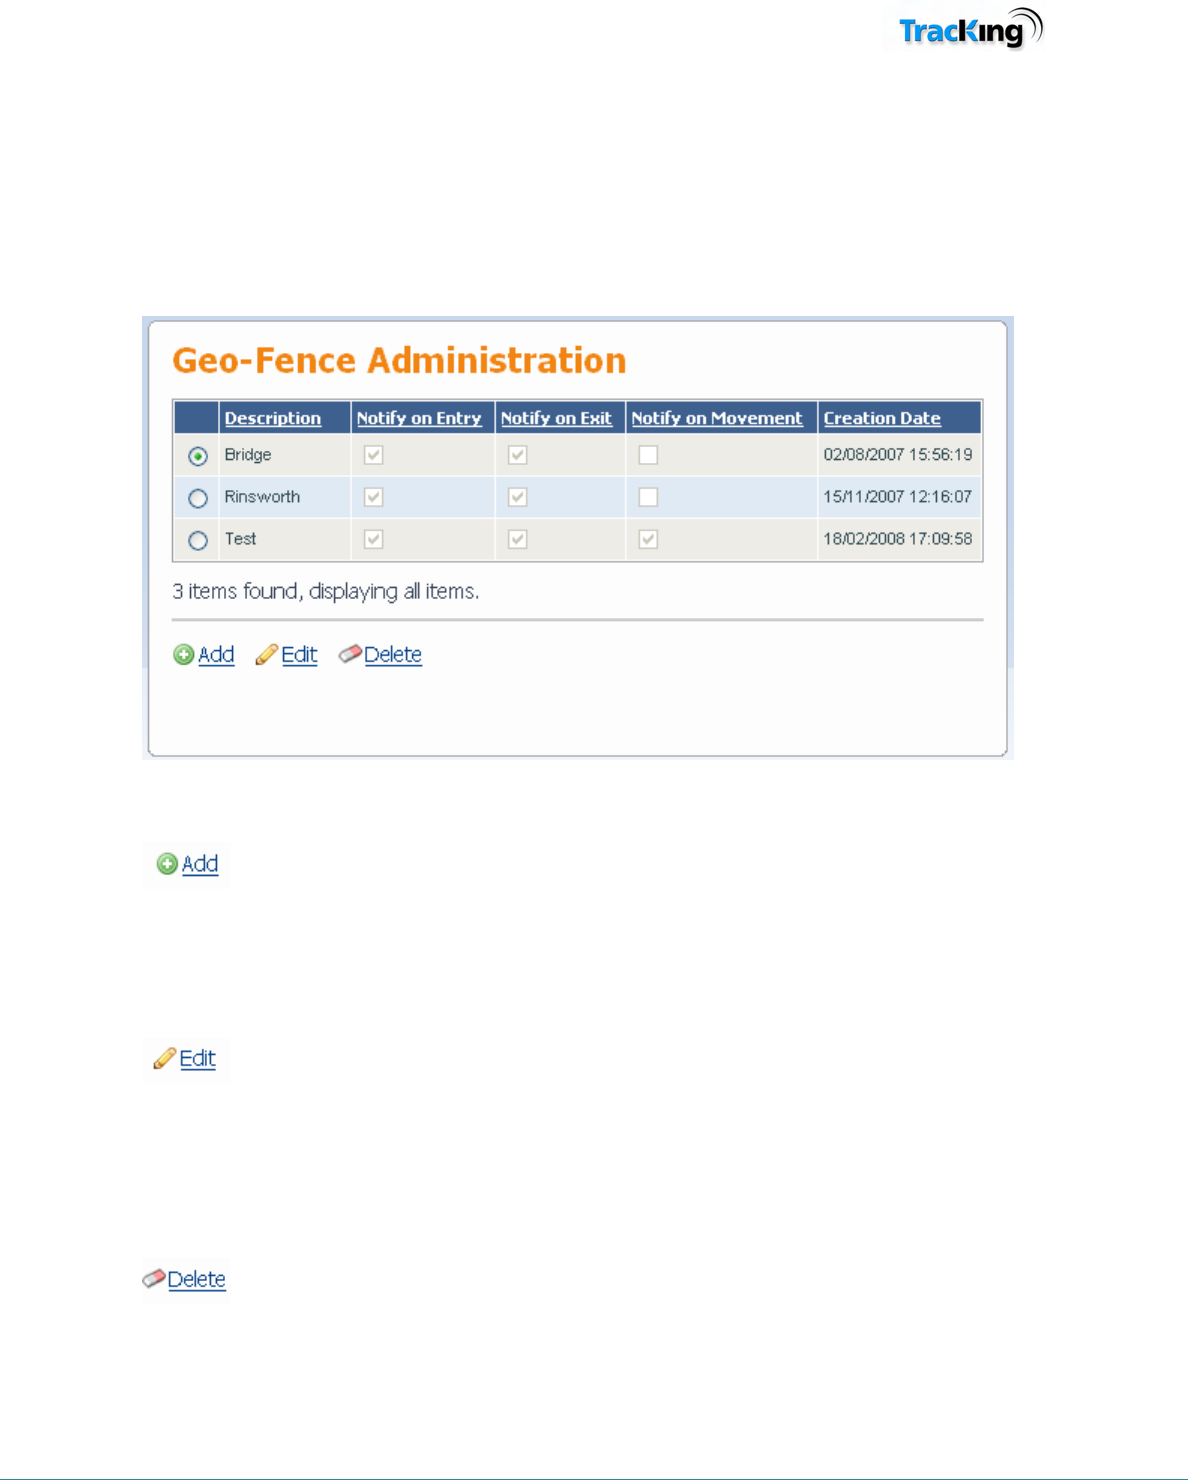
Geo Fence Administration
On the Geo Fence Administration page, all the Geo Fences which are currently configured on the system are
displayed. The list shows the Geo Fence name, and also the notification events that it is currently configured
for.
To re-order the list, click on any of the column headers.
Add
To add a new Geo Fence, click Add. This opens the map page and the user can then click the Geo Fence icon to
add a new Geo Fence.
Edit
To change any Geo Fence settings:
1) Select the Geo Fence by clicking the radio button next to it
2) Click the edit icon to edit the details of the Geo Fence and the boundaries
Delete
To remove a Geo Fence from the system:
1. Select the Geo Fence by clicking the radio button next to it.
2. Click the delete icon.
TK60178-8-OP-EN Rev.3.3 Page 107
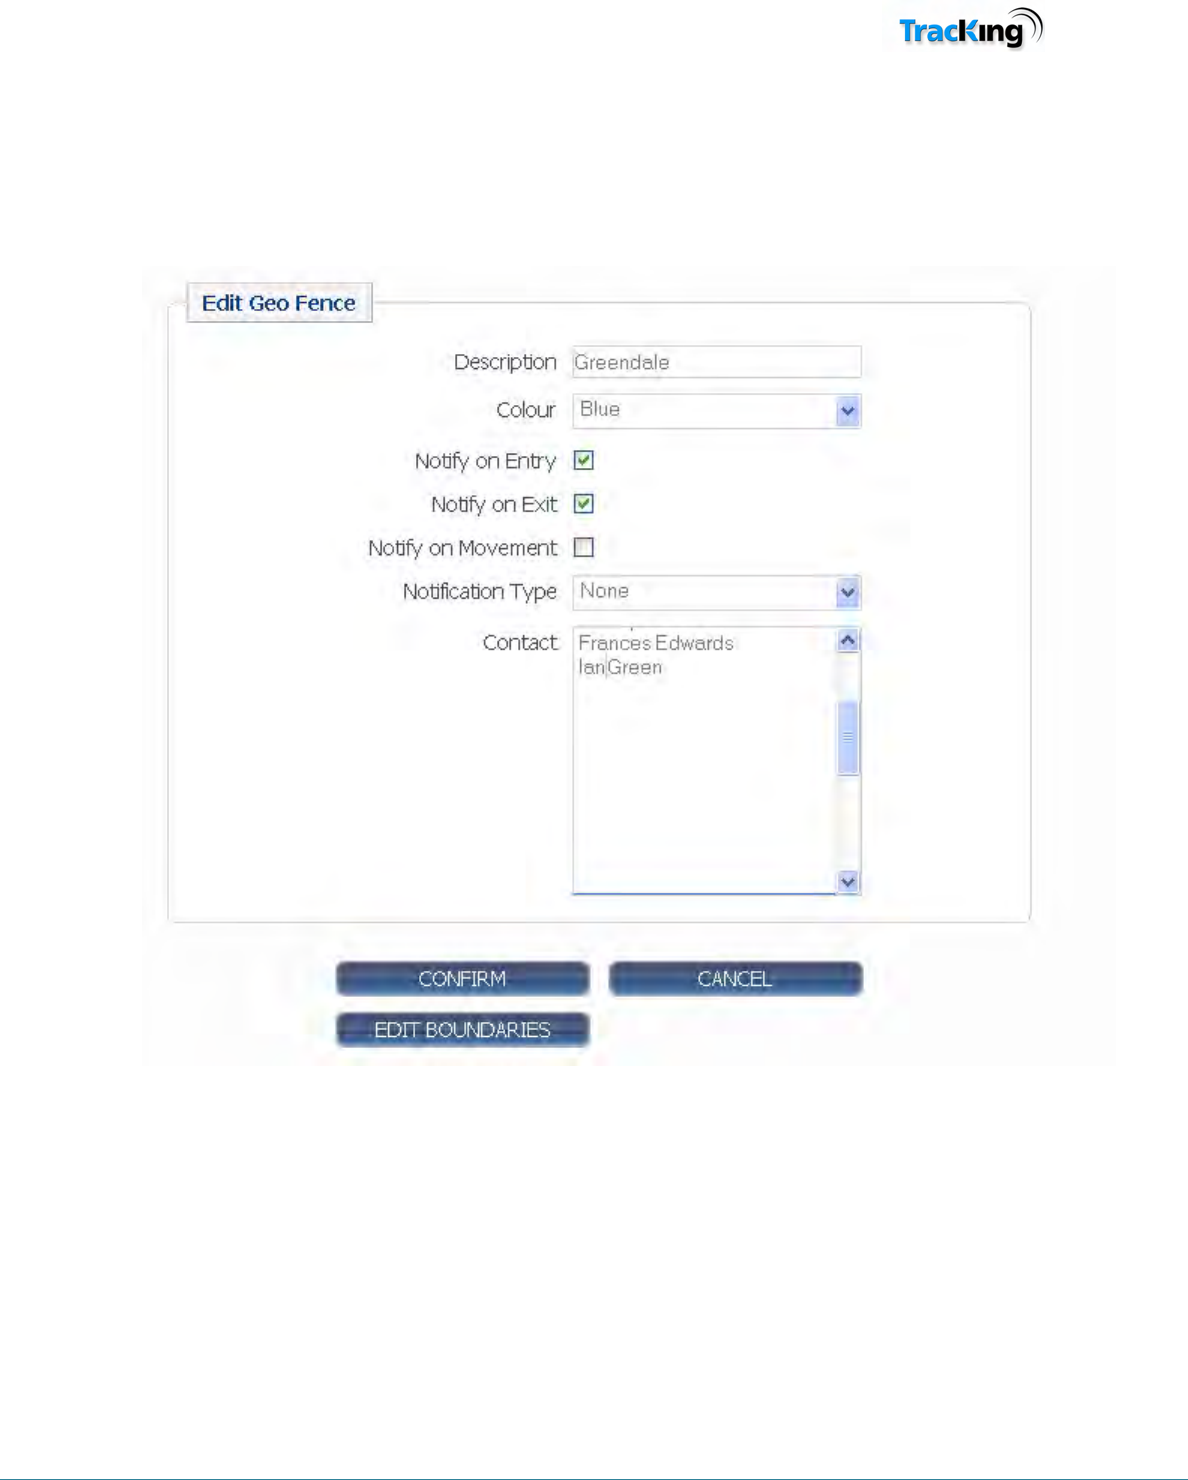
Edit Geo Fence
This page allows the user to modify the settings associated with a Geo Fence.
An example screenshot is shown below, followed by an explanation of the different fields.
Description
This is the description/name of the Geo Fence, and how it will be referenced on the Geo Fence list.
Color
This sets the color in which the Geo Fence will be displayed on the Maps page.
Notify On Entry
Tick this box if a notification should be generated when a vehicle enters the area defined by the Geo Fence.
Notify On Exit
Tick this box if a notification should be generated when a vehicle exits the area defined by the Geo Fence.

TK60178-8-OP-EN Rev.3.3 Page 108
Notify On Movement
Tick this box if a notification should be generated by any movement within the Geo Fence boundaries by the
vehicle/trailer when the controller is off.
Notification Type
Notification can be by SMS, email, or a combination of both.
Contact
Select the contacts from the list that should be notified in the event of a Geo Fence activity. This field is
automatically populated with the list of contacts from your Contacts section of the Administration screen. By
default no contacts are selected. To select a contact simply click on the contact name, to select multiple contacts
hold down the “Ctrl” key and click on the additional contacts. To select all contacts you hold down the “Shift”
key and select the first contact on the list then select the last contact on the list while holding down the “Shift”
key.
Confirm
Click 'Confirm' to save any changes.
Edit Boundaries
Click 'Edit Boundaries' to open the Geo Fence on the Maps page and adjust its size/location.
TK60178-8-OP-EN Rev.3.3 Page 109
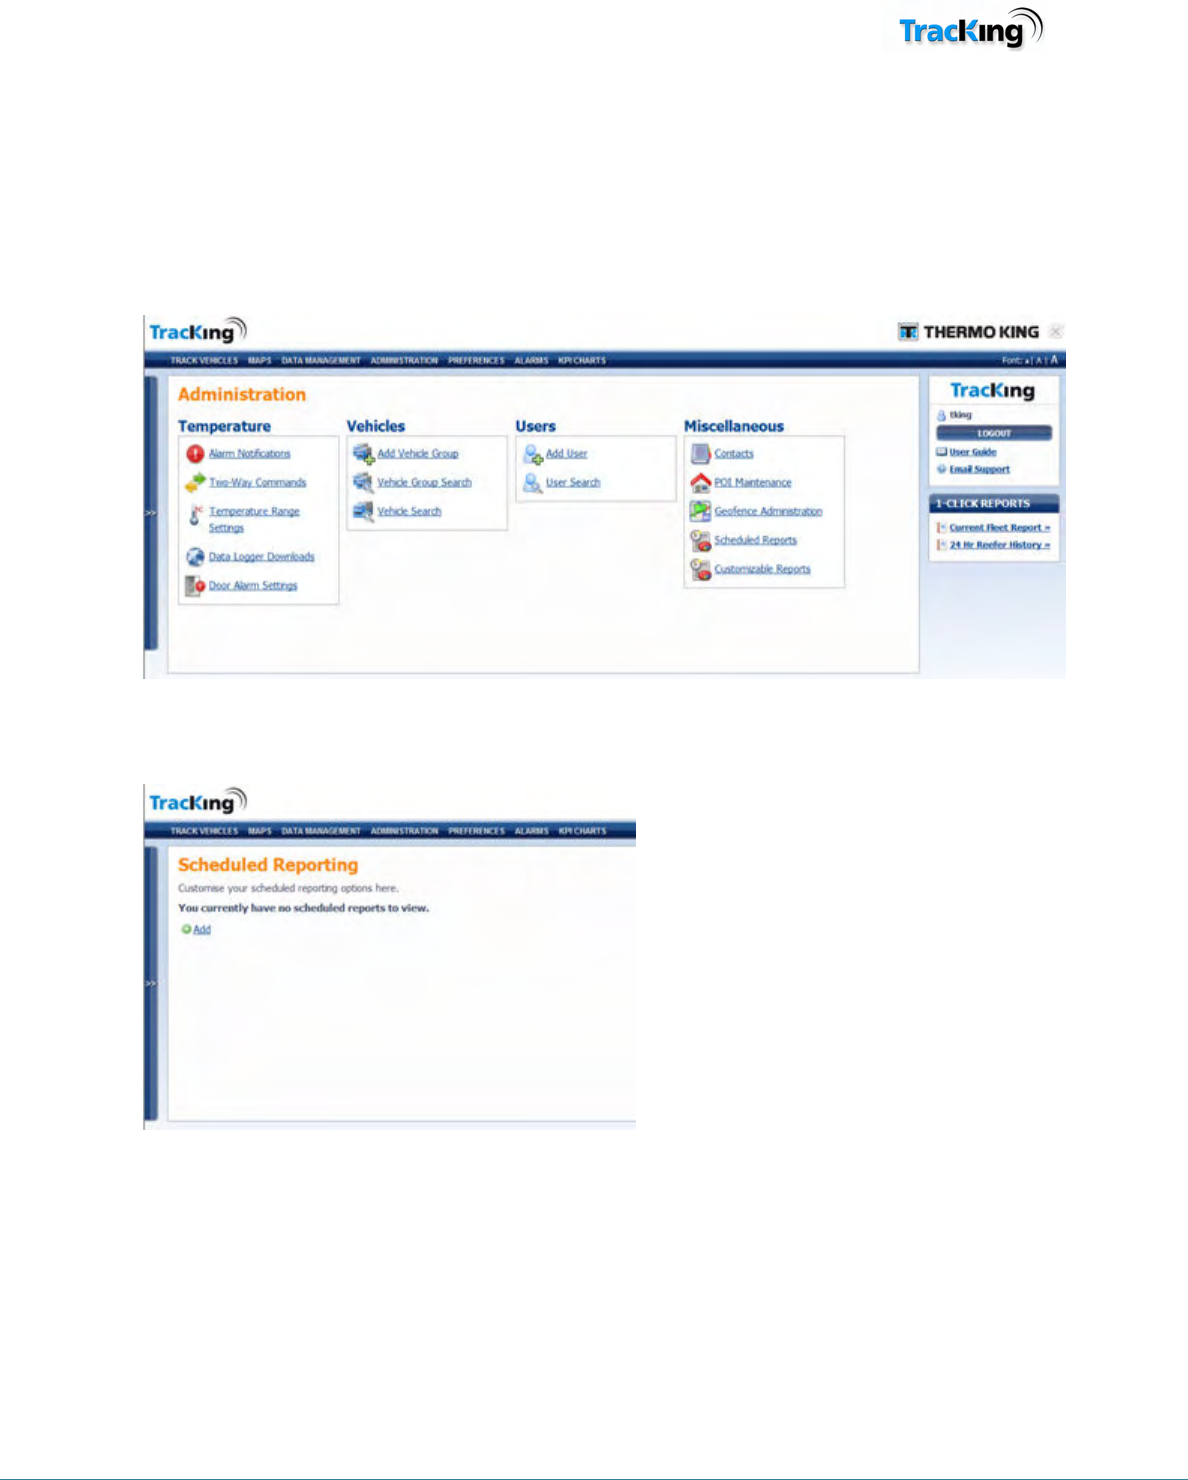
Scheduled Reports
The Scheduled reports feature allows the user to select one of the standard reports and email or FTP
this report to a specific list of people at a defined interval. The Scheduled reports feature of
TracKing is accessed through the administration menu.
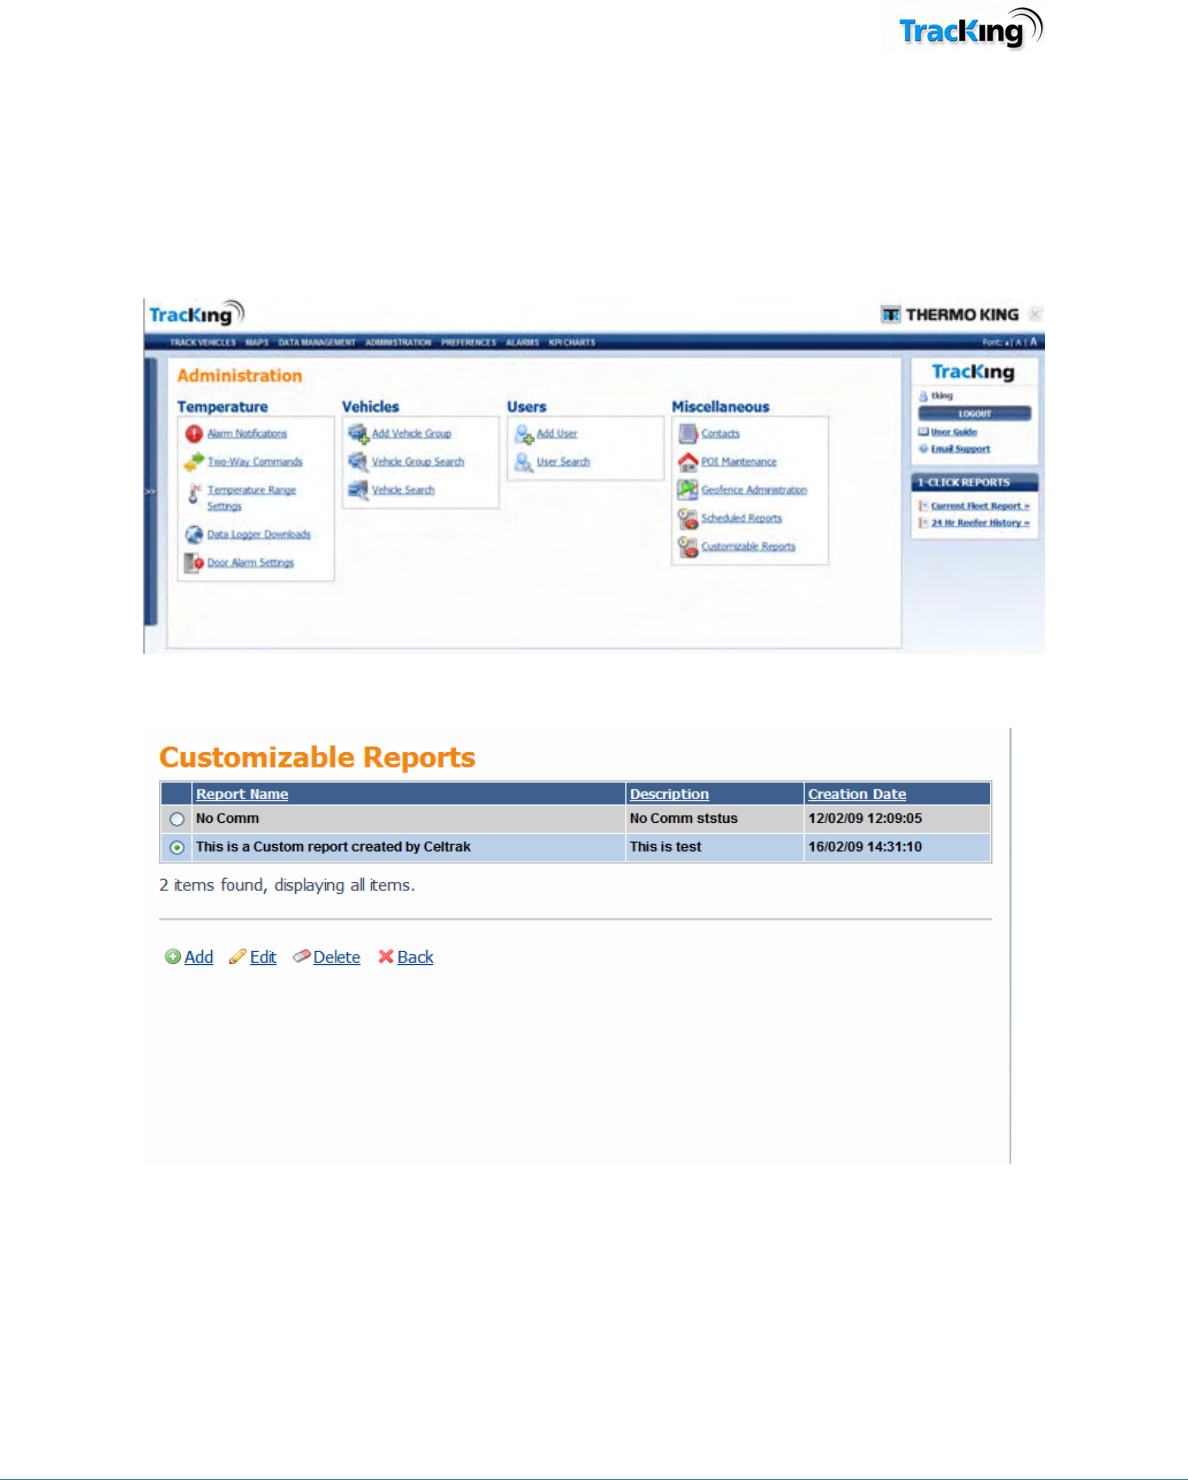
To create a scheduled report select Scheduled Reports from the Micellaneous section of the
Administration screen. This will open the following screen.
Click “Add” to create a new scheduled report.
TK60178-8-OP-EN Rev.3.3 Page 110
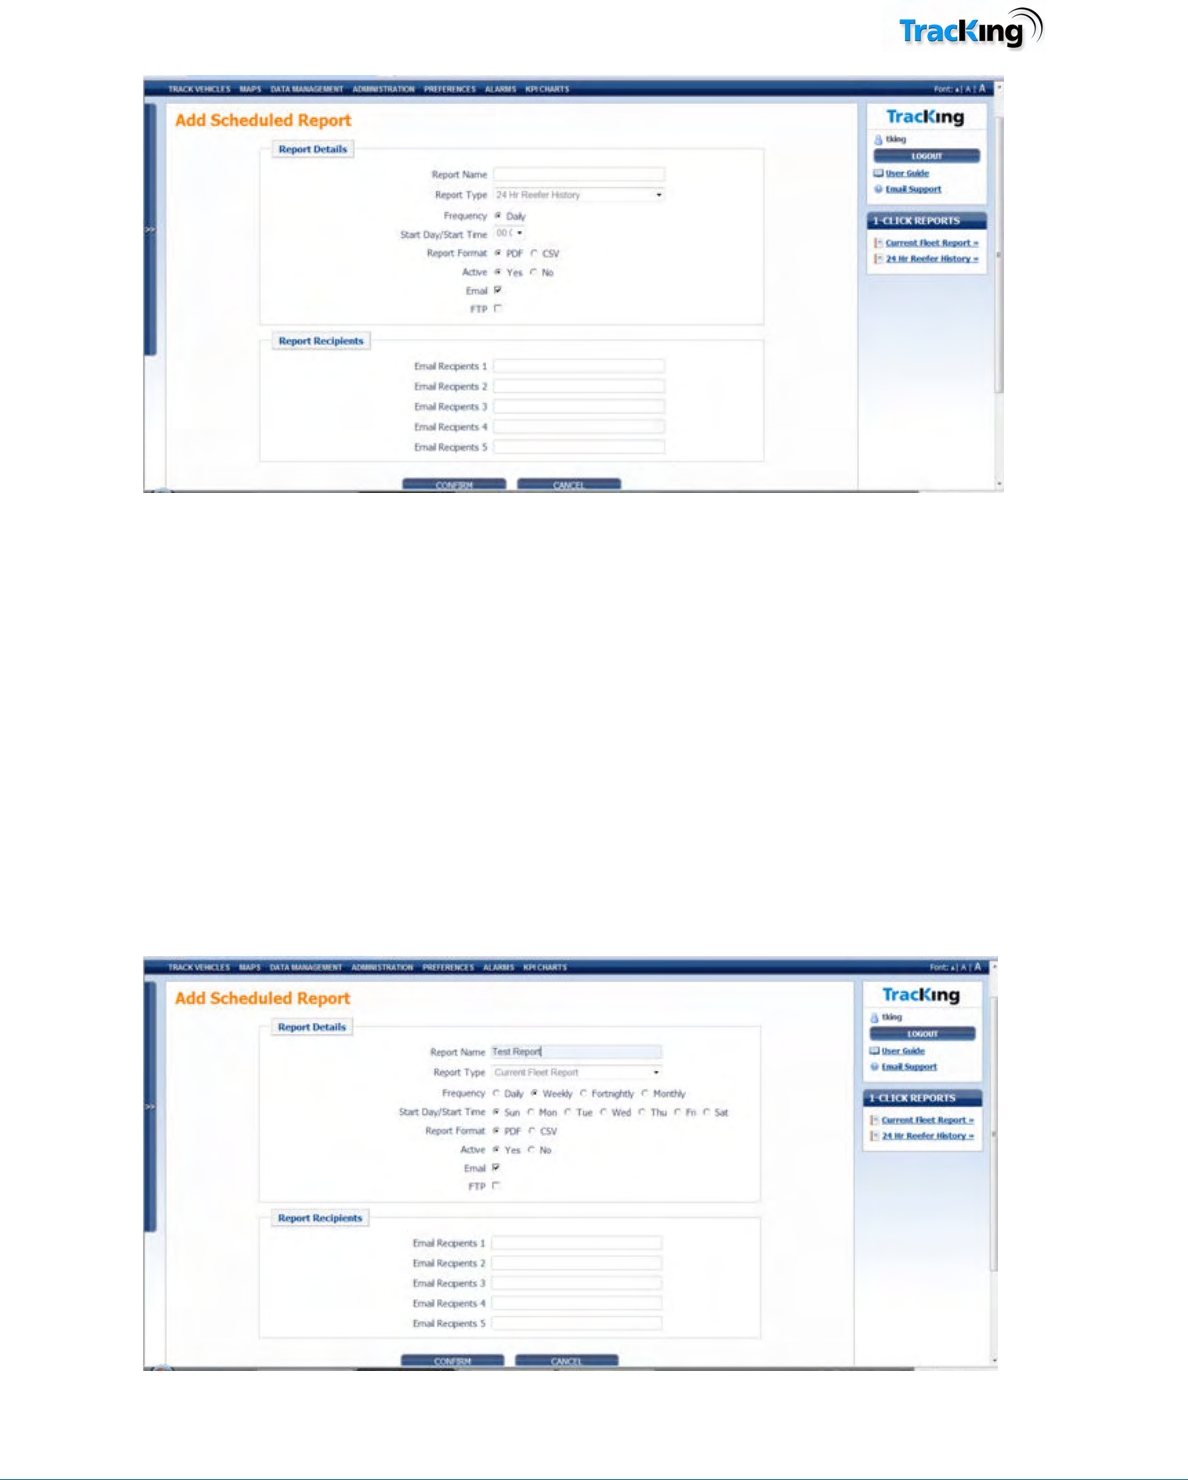
This is the screen that will appear. Please fill in the relevant fields to set up the report to be
scheduled.
Report Name: This is the name the user assigns to the scheduled report.
Report Type: This is a dropdown list of all reports available to be scheduled.
Frequency and Start Day/Time: These fields change based on the Report Type selected. E.g. A 24hr
Reefer History is only available as a daily report, so the user gets the option of only setting up the
time. However in the case of most other reports the user gets the option of selecting a frequency of,
Daily, Weekly, Fortnightly, or Monthly. This is the frequency at which the Report will be emailed to
the report receipients.
The start Day/Time will change dependant on the Frequency selected, e.g. if Monthly is selected you
get the option of selecting the day of the month that the report is to be sent.
Note the change of Frequency and Start Day/Start Time when a specific report is selected.
TK60178-8-OP-EN Rev.3.3 Page 111
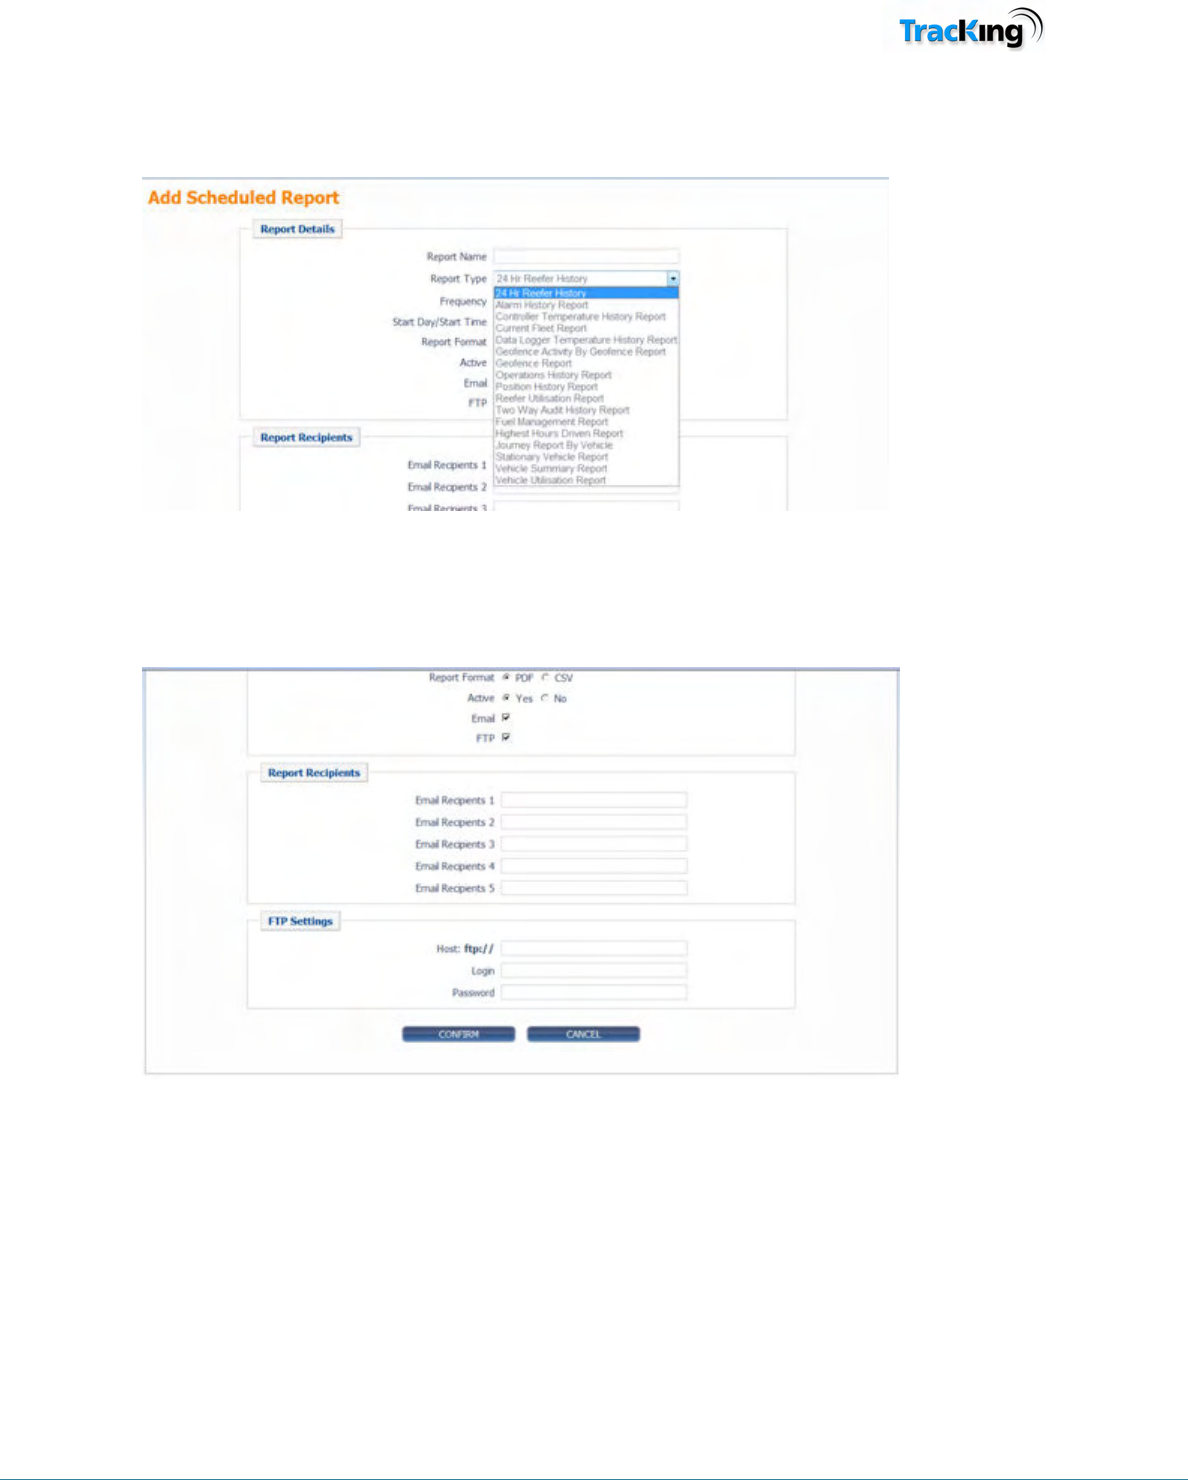
This screen shows the selection of Reports available. Note this selection is dependant on the type of
system purchased.
The user then selects the format of the report that is to be issued, CSV or PDF.
The Active flag allows the user to suspend the sending of the report for whatever reason, e.g. the
user is on vacation. This will default to Active.
Finally the user enters the email addresses of up to 5 recipients of the scheduled report. Note if the
user wants these reports sent via FTP they must select FTP and enter the details of the FTP site.
TK60178-8-OP-EN Rev.3.3 Page 112
Customizable Reports
The Customized reports feature allows the user to create a customized report from the selection of
available fields. The Customized Reports option is only available to users with administration access.
The Customized reports feature of TracKing is accessed through the administration menu.
Select Customized Reports in the miscellaneous section.
Select “Add” to create a new report, “Edit” to edit and existing report, and “Delete” to remove an
existing report.
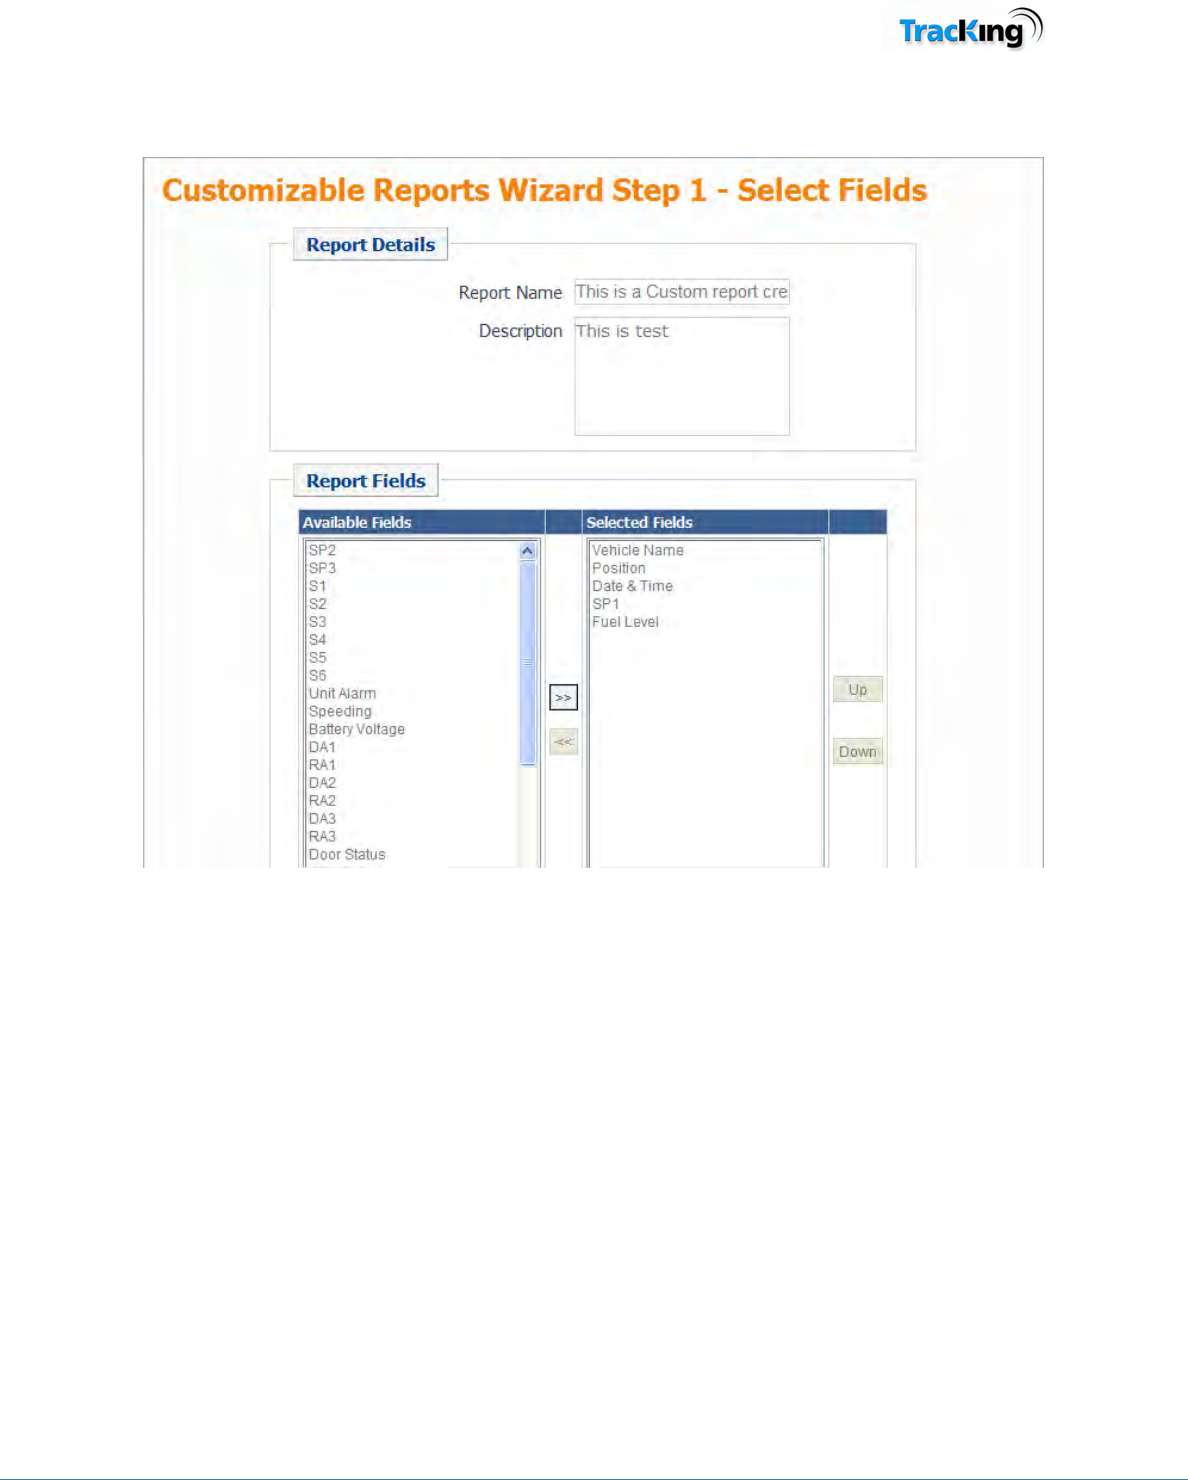
There are 3 steps to creating a report.
TK60178-8-OP-EN Rev.3.3 Page 113
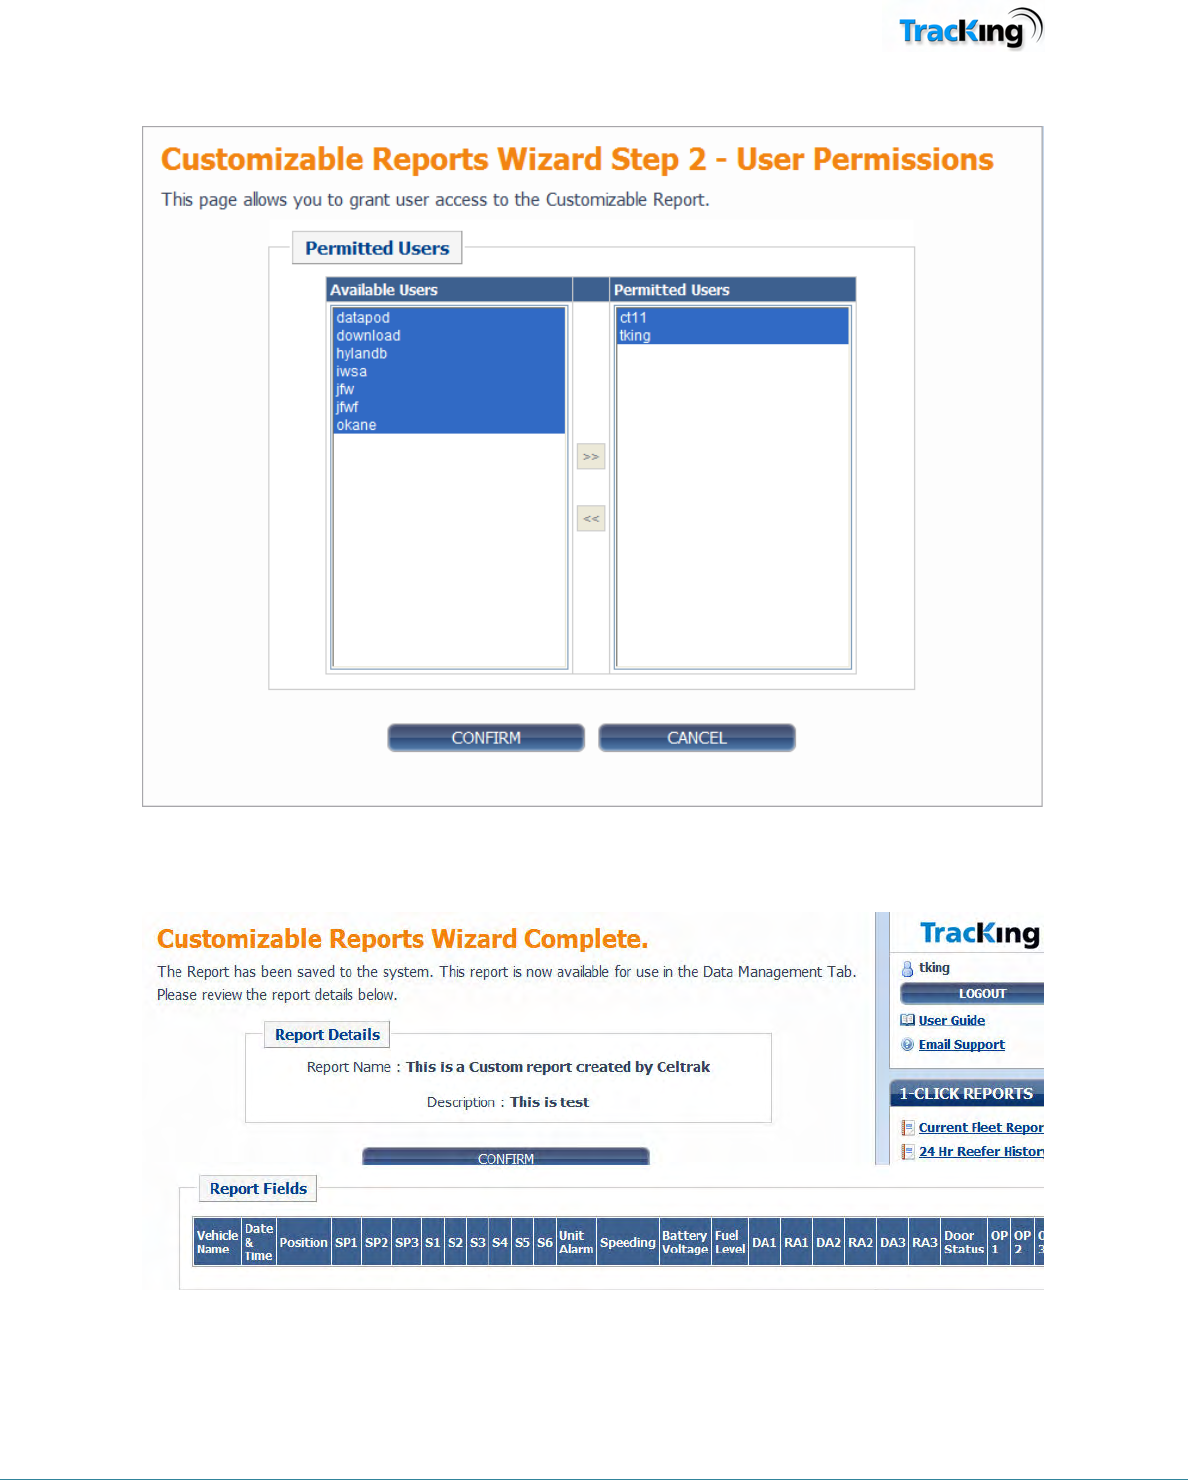
In step 1 the user names the report, enters a description of the report, and selects the fields to be
displayed.
TK60178-8-OP-EN Rev.3.3 Page 114
In step 2 the user selects which other users should be allowed to see this report.
Step 3 is simply a confirmation of the layout of the report. This new report is now available in Data
Management.
TK60178-8-OP-EN Rev.3.3 Page 115
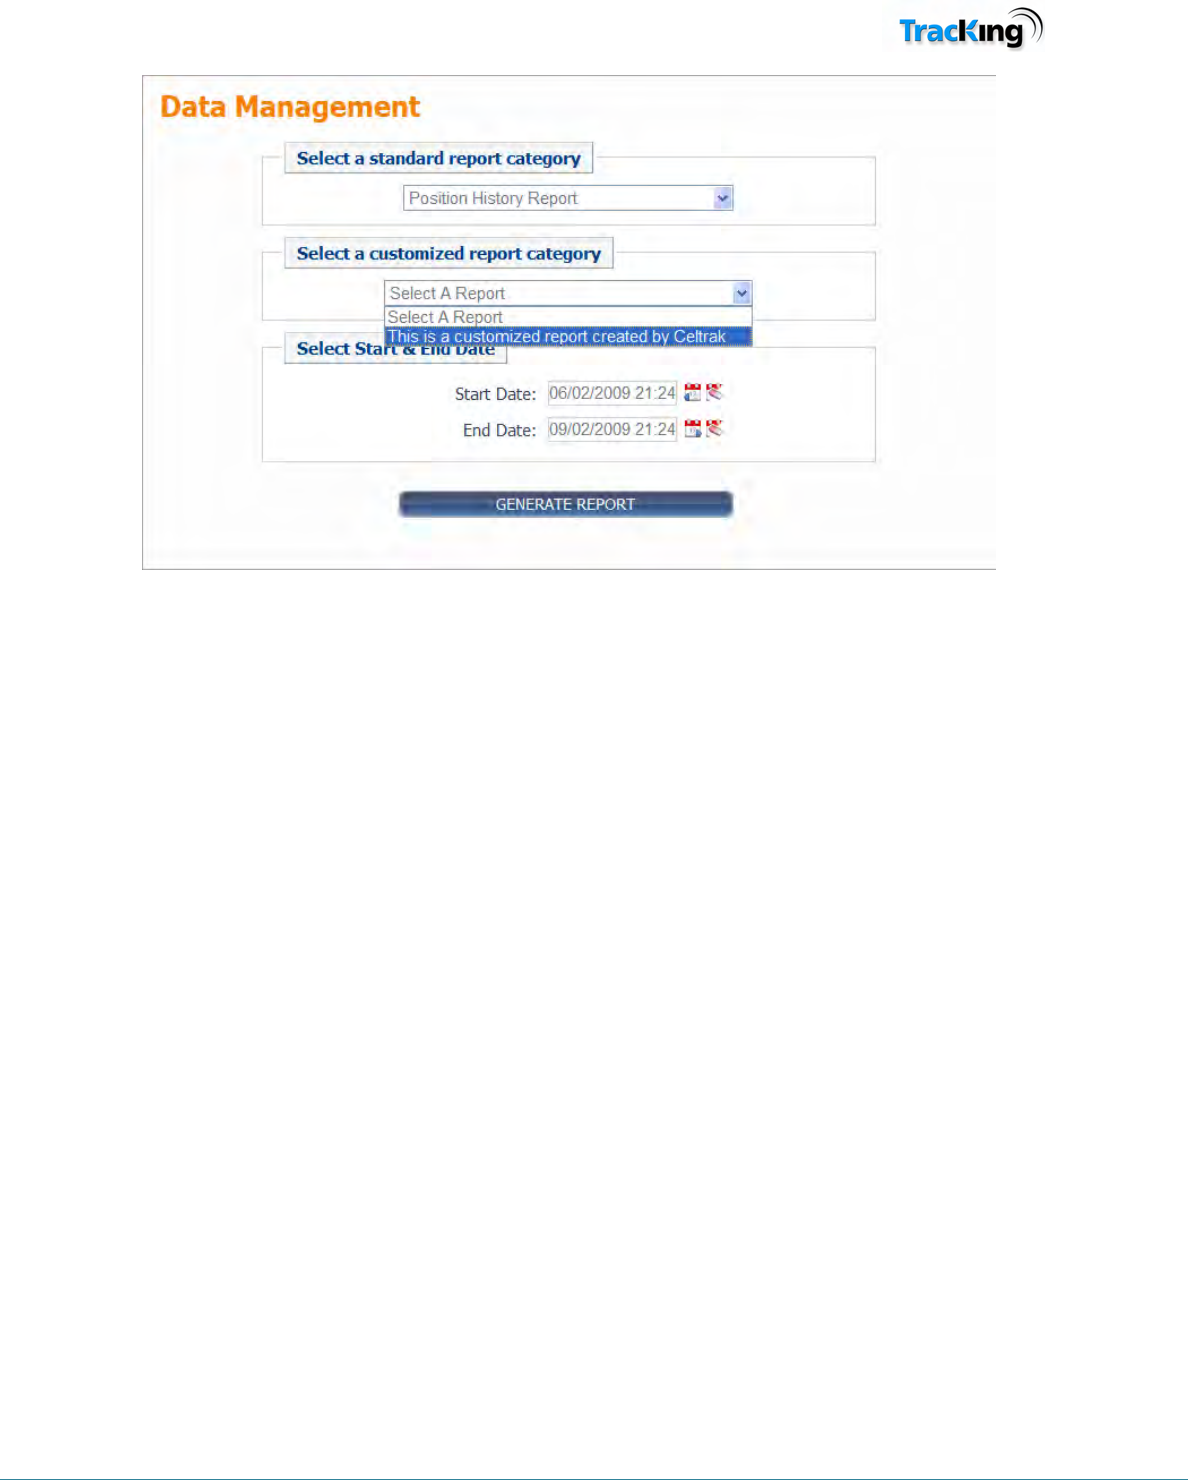
As can be seen from the screen shown above the new report is available in the Customized report
dropdown. The user must still select the vehicles/trailers before running the report.
TK60178-8-OP-EN Rev.3.3 Page 116
Preferences
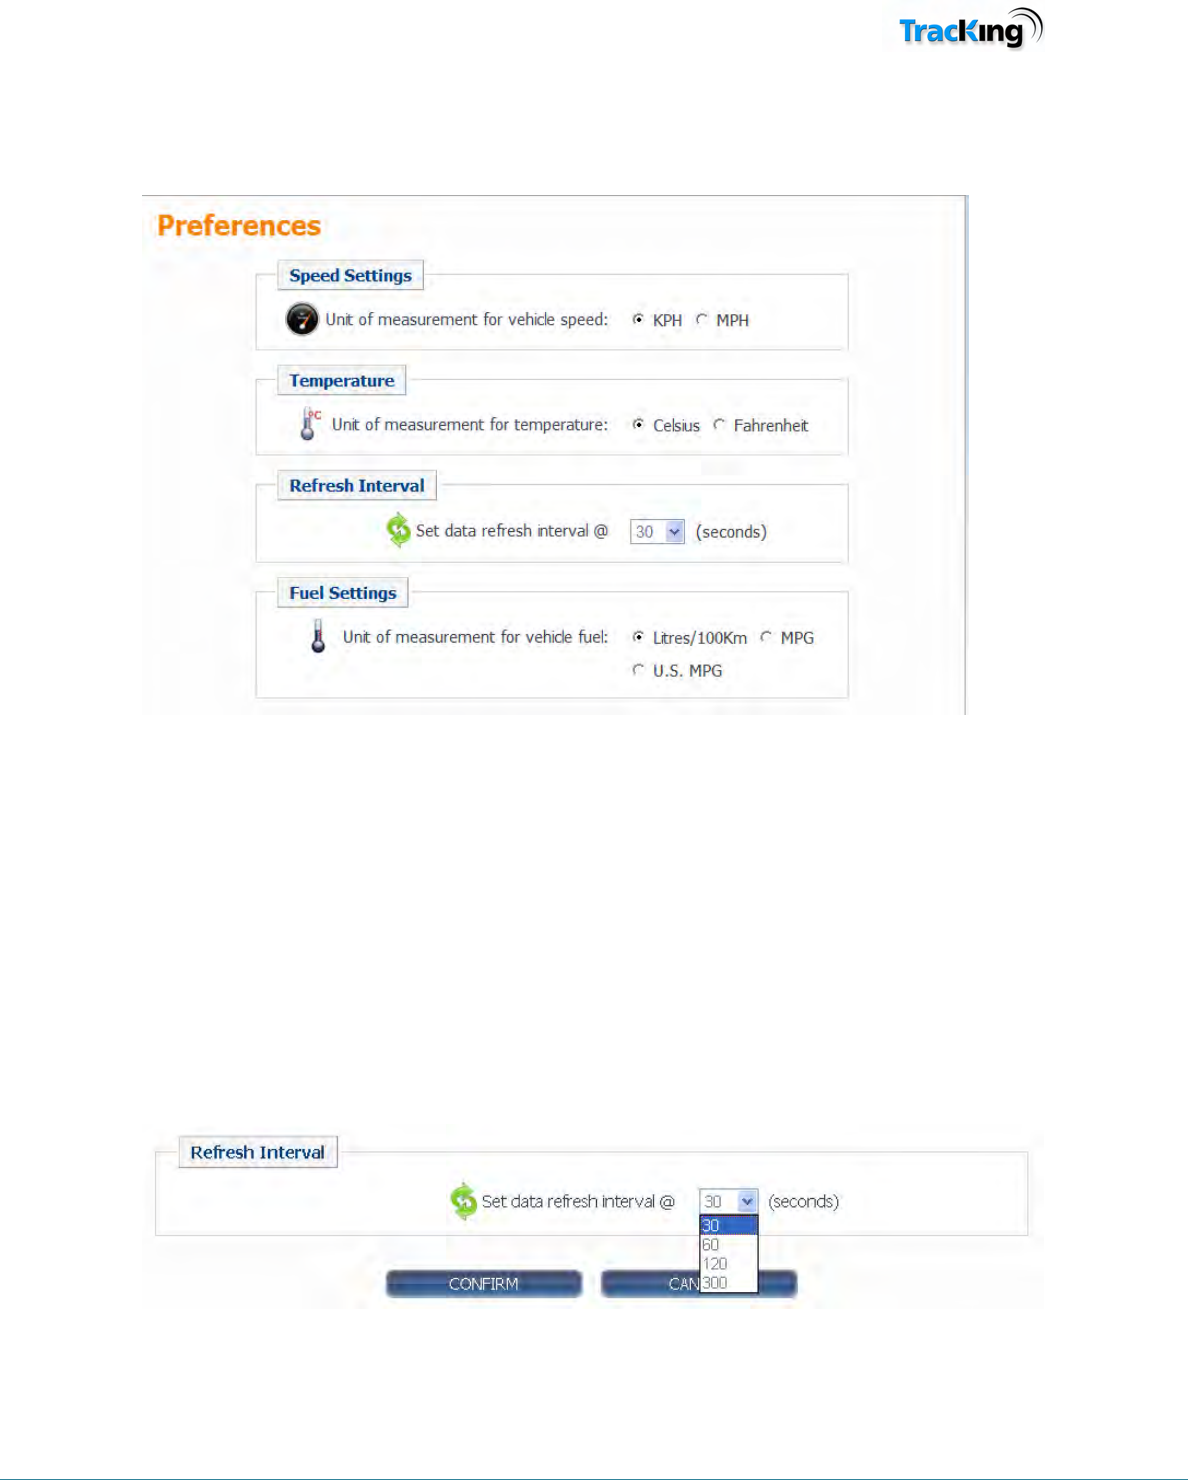
The preferences page gives the user the option of setting certain system parameters related to data display.
Speed Settings
Click the relevant radio button to display speed in miles per hour (MPH) or kilometers per hour (KPH).
Temperature
Click the relevant radio button to display temperature in Celsius or Fahrenheit.
Refresh Interval
Select a value from the drop down list to set the time, between 30 and 300 seconds, when the data is refreshed.
During a refresh, the application logs the latest data available from the server. This will include any periodic
updates that have been downloaded from vehicles since the last refresh. A refresh does not result in a download
request being sent to any vehicle(s).
Fuel Settings
Select the units of measurement for the fuel measurement. This will be reflected in the tracking page and
reports.
TK60178-8-OP-EN Rev.3.3 Page 117
Alarms List
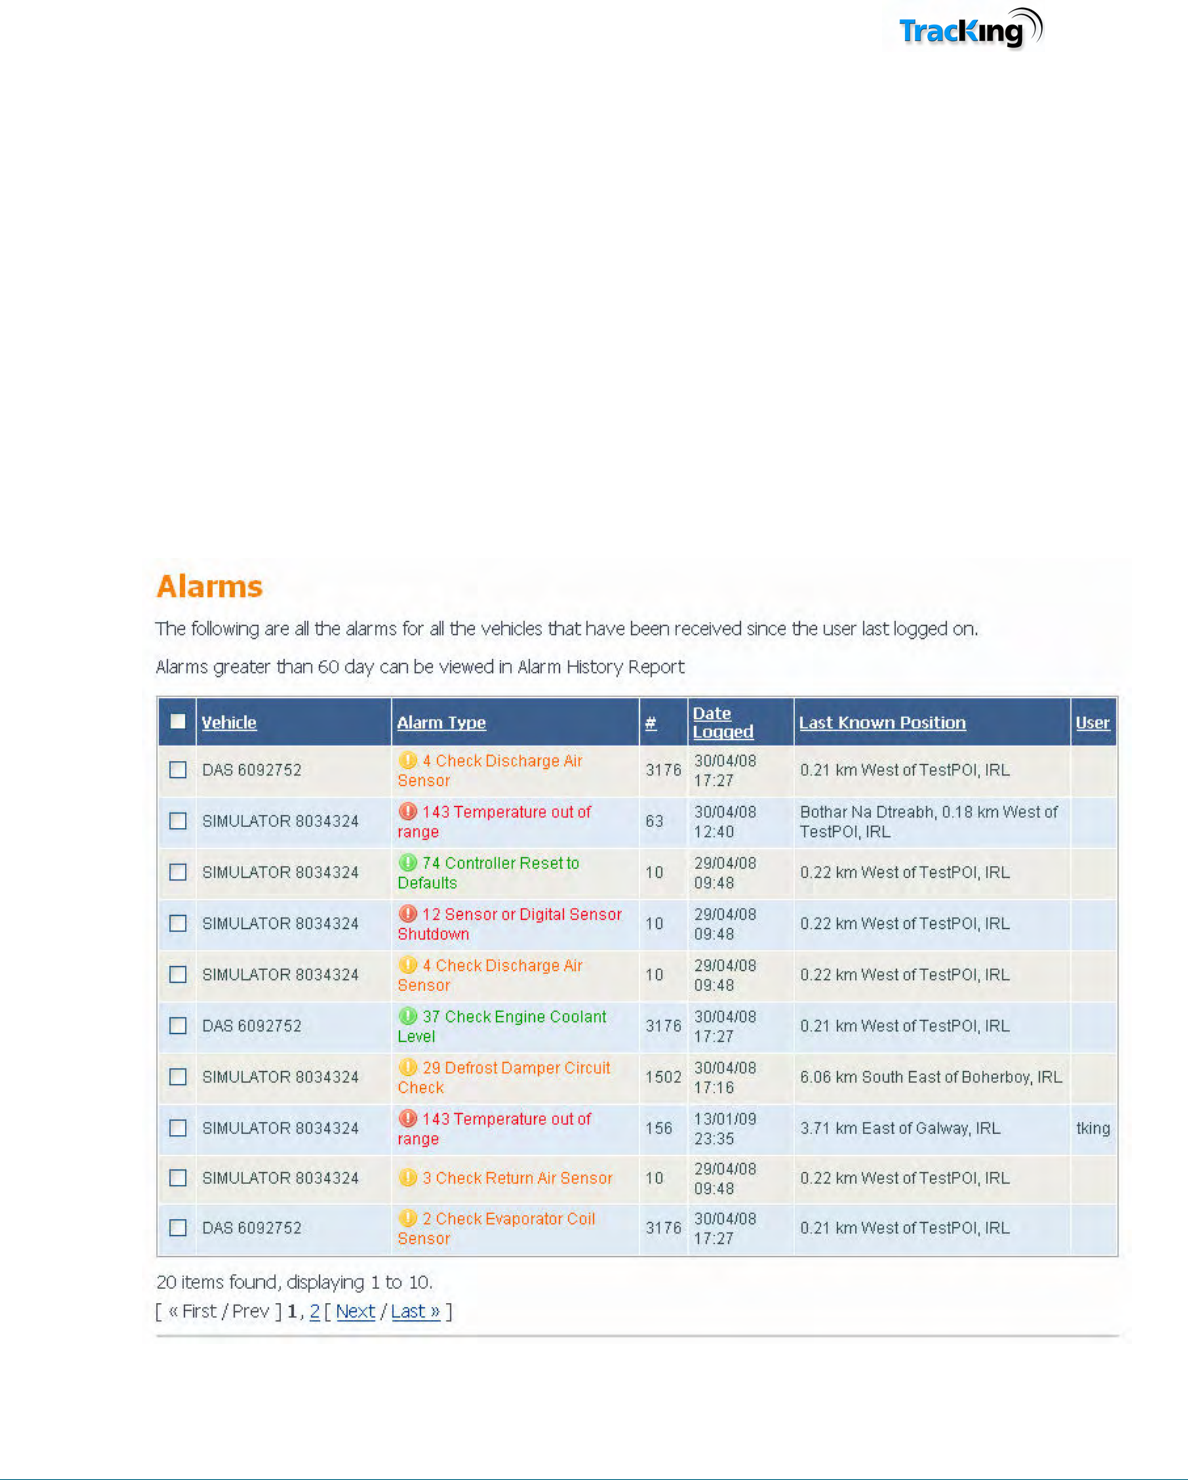
Clicking on the Alarms tab on the menu bar will display the Alarms page. The type and number of alarms which
appear will be determined by the system configuration.
If no new alarms have been generated since the user last logged on, no alarms will be displayed. If alarms have
occurred, they will be displayed in a table similar to the screenshot below.
To remove an alarm from the list, it must be acknowledged. To do this:
1. Select the alarm(s) to be acknowledged by ticking the box in the leftmost column.
2. Click the 'Confirm' icon at the bottom of the page.
Note: The “#” Column means the number of times this alarm has been recorded since it was last acknowledged.
The “Date Logged” is the last time and date that this alarm occurred.

TK60178-8-OP-EN Rev.3.3 Page 118
TK60178-8-OP-EN Rev.3.3 Page 119
Alarm Notification
Since alarms may occur at any time, it is important that TracKing users are made aware when they occur. As the
Track Vehicles and Maps pages are the most frequently used, notification of new alarms is displayed on these
pages.
Alarm notification will remain until all alarms have been acknowledged on the Alarms page. As no details are
displayed with the notification, the user must visit the Alarms page for more information on the type of alarm
which has occurred.
Tracking List Alarm Notification
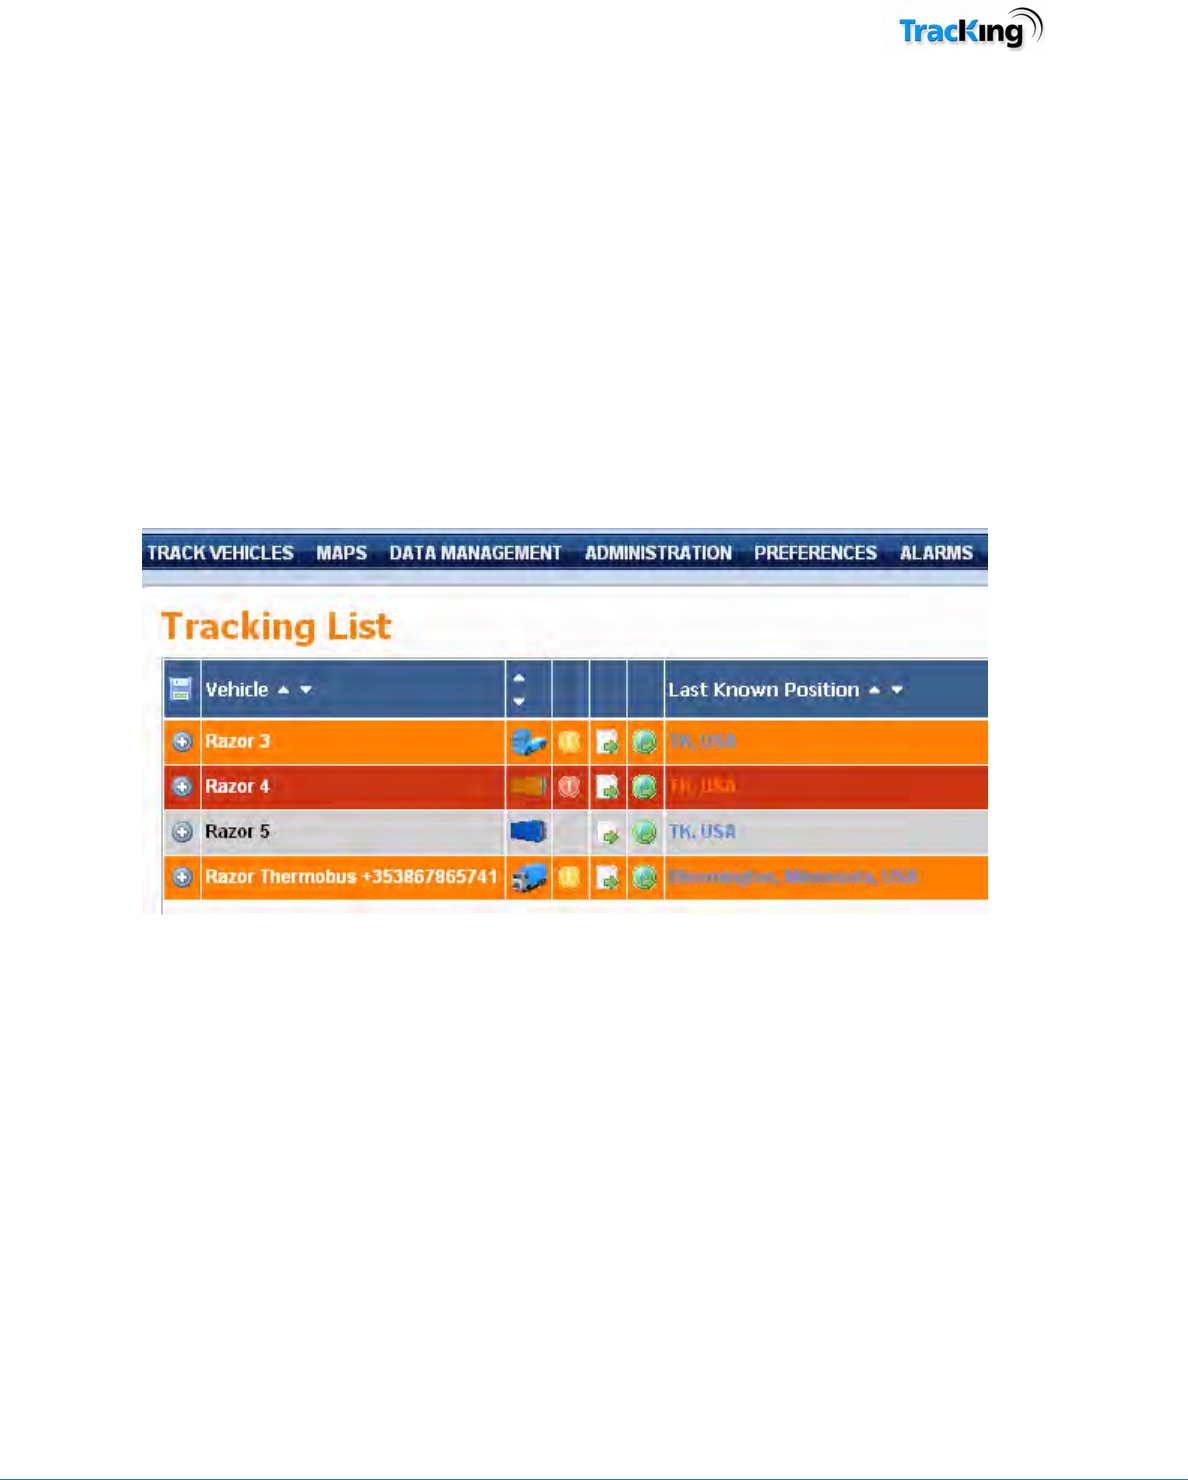
When an alarm occurs and the user is currently using the Track Vehicles page, a colored icon is displayed
beside the vehicle name on the tracking list, as shown in the screenshot below and the complete row changes
color.
TK60178-8-OP-EN Rev.3.3 Page 120
Maps Alarm Notification
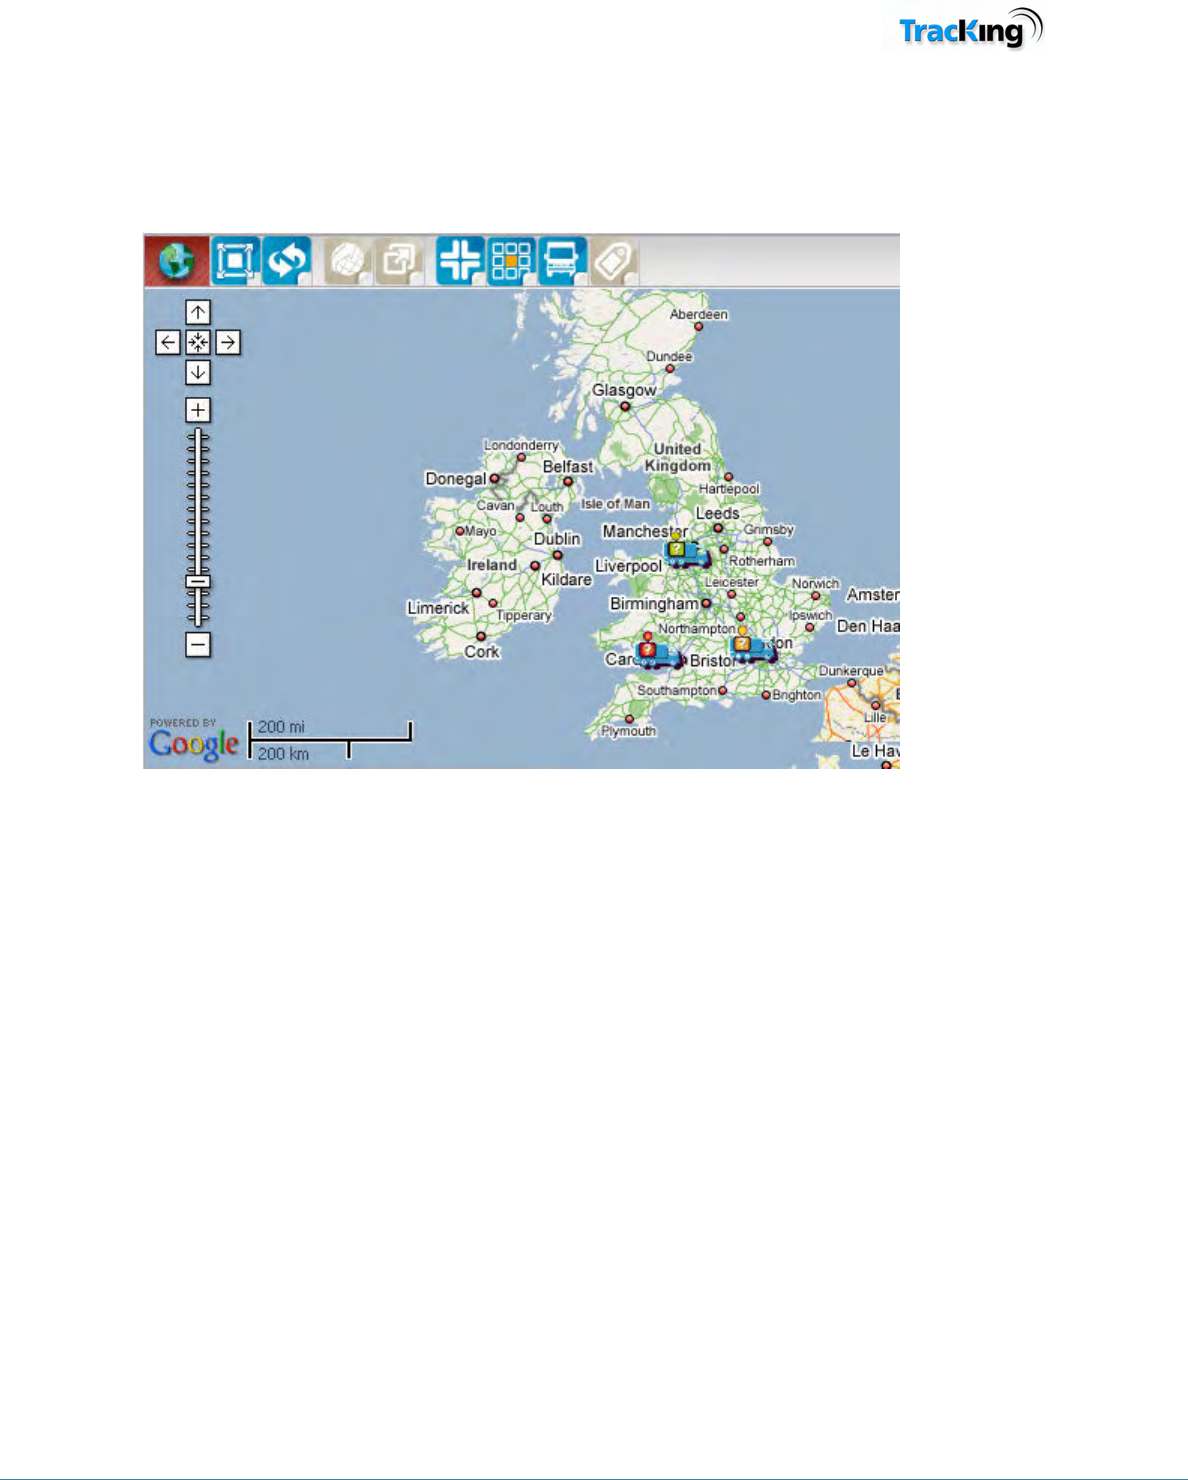
When an alarm occurs and the user is currently using the Maps page, a coloured question mark is displayed on
top of the vehicle icon, as shown in the screenshot below to notify the user of the alarm.
TK60178-8-OP-EN Rev.3.3 Page 121
Logout
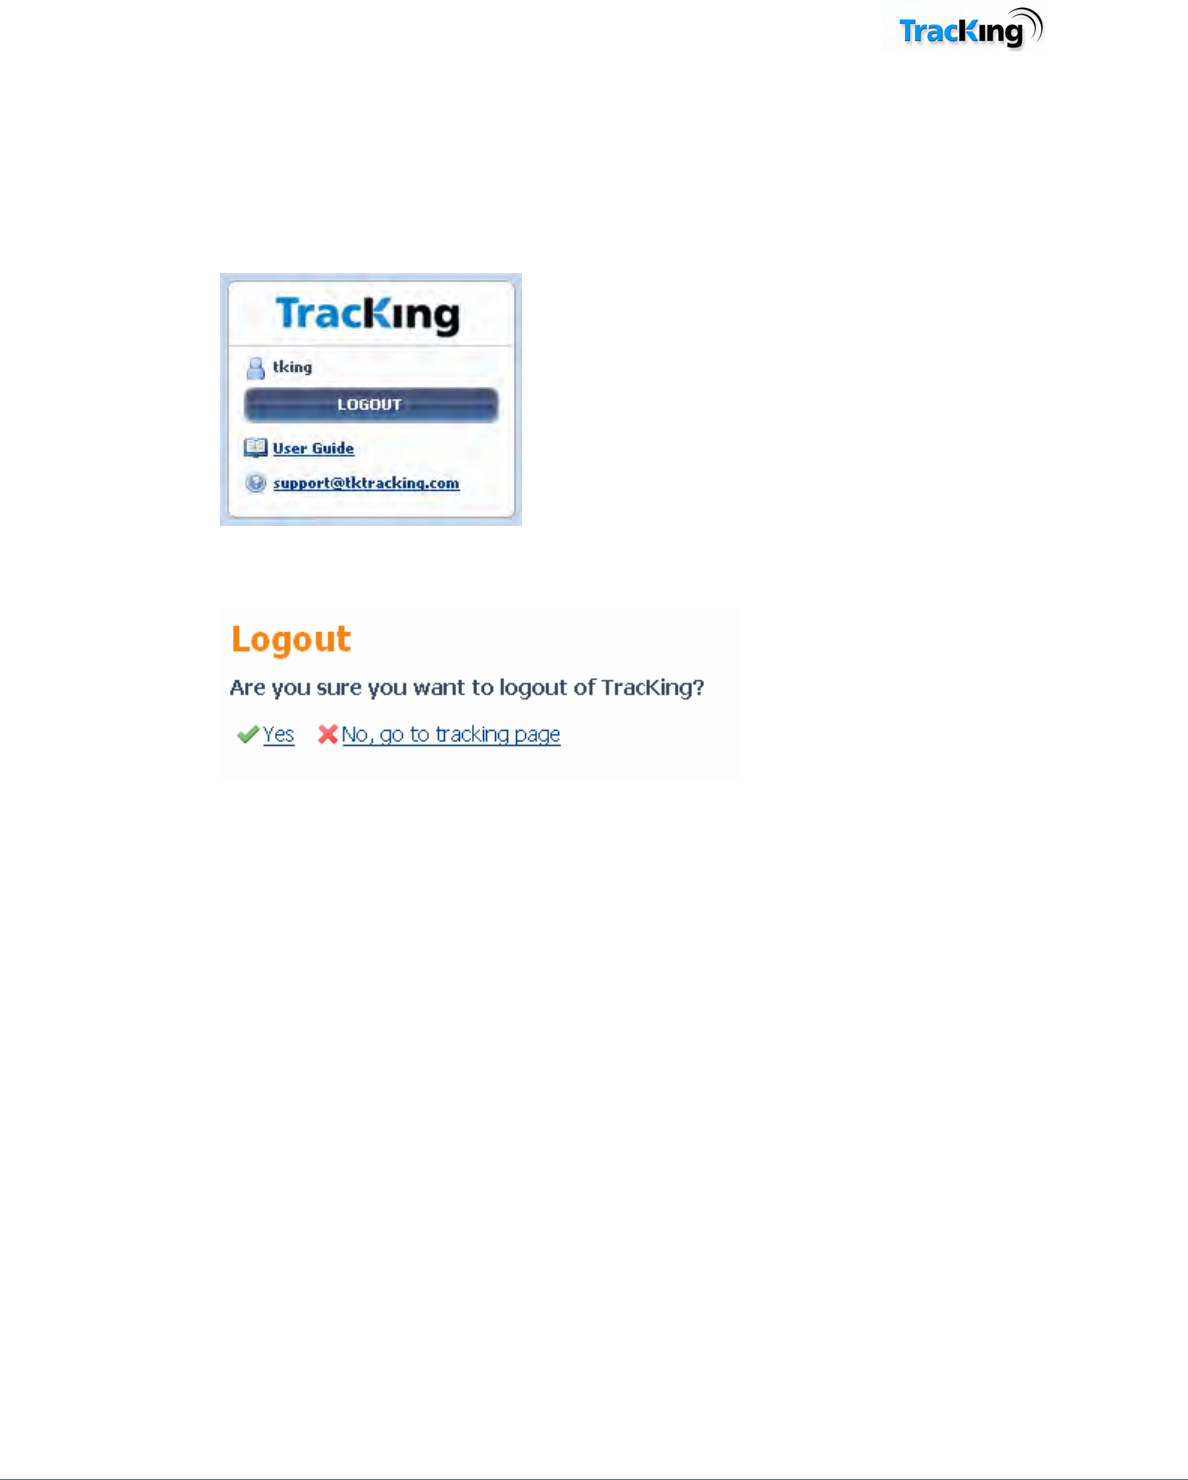
The user can log out from any page on the site by clicking on the customer panel on the right hand side of the
page.
1. Click the logout button
2. Click Yes to confirm that you wish to log out. Otherwise, click No to return to the Track Vehicles page.
TK60178-8-OP-EN Rev.3.3 Page 122
Page Footer Icons
The links in the footer displayed on each page of the application give the user one-click access to the following
items:
Contact Us
Click the Contact Us icon to send a mail to support. A new mail with the correct email address and subject will
be opened in your default email application.
User Manual
Click this icon to open the online help for this application. The help will open in a separate browser window.