Thermo King TKW40815 PCS1900 MHz vehicle tracking system User Manual Trac King Web Rev
Thermo King Corporation PCS1900 MHz vehicle tracking system Trac King Web Rev
Contents
- 1. Installation Guide with statements
- 2. Web based USer Guide
Web based USer Guide
Web User Manual Doc. Issue 08/03/02
Rev. 3.1
- 1 -
WEB USER MANUAL
for the
INTERNET BASED USER INTERFACE

Web User Manual Doc. Issue 08/03/02
Rev. 3.1
- 2 -
This document describes the use of the Trac-King Internet Interface as developed
jointly by Thermo King Corporation of headquarters 314 West 90th St, Minneapolis,
USA and CELtrak Ltd. of headquarters Dunmore Rd. Tuam, Co. Galway, Ireland.
This document provides a functional overview of the system and the features that
are available in conjunction with Trac-King hardware. Further information on Trac-
King and its related features is available from your Thermo King dealer and also
from the website www.trac-king.com

Web User Manual Doc. Issue 08/03/02
Rev. 3.1
- 3 -
TABLE OF CONTENTS
1. INTRODUCTION......................................................................................................................................................4
1.1 Logging In ...........................................................................................................................................................4
1.2 Homepage............................................................................................................................................................5
2. PHONEBOOK...........................................................................................................................................................6
2.1 Vehicle Address Books......................................................................................................................................6
2.2 Contacts...............................................................................................................................................................7
3. TOOLS.....................................................................................................................................................................9
3.1 Poll........................................................................................................................................................................9
3.2 Call-Back .......................................................................................................................................................... 10
3.3 Reset .................................................................................................................................................................. 11
3.4 Temperature..................................................................................................................................................... 12
4. COMMANDS.........................................................................................................................................................13
4.1 Odometer.......................................................................................................................................................... 13
5. SETTINGS.............................................................................................................................................................14
5.1 Tracking List.................................................................................................................................................... 14
5.2 Sorting............................................................................................................................................................... 15
5.3 Speed Limits..................................................................................................................................................... 15
5.4 Temperature..................................................................................................................................................... 16
6. MESSAGE.............................................................................................................................................................17
6.1 Send Message................................................................................................................................................... 17
6.2 Read Message.................................................................................................................................................. 18
6.3 Auto-Answer..................................................................................................................................................... 18
7. REPORTS..............................................................................................................................................................20
7.1 Report................................................................................................................................................................ 20
7.2 Reefer Utilisation............................................................................................................................................ 21
7.3 Trailer Utilisation ........................................................................................................................................... 22
7.4 Frequent Alarms.............................................................................................................................................. 22
7.5 Alarm History .................................................................................................................................................. 24
7.7 Temperature..................................................................................................................................................... 24
8. DEALER / HELP..................................................................................................................................................26
8.1 Online Help...................................................................................................................................................... 26
8.2 Download Help File....................................................................................................................................... 27
8.3 Dealer Details.................................................................................................................................................. 27
8.4 Customer Registration Forms....................................................................................................................... 28
8.5 Installation Instructions................................................................................................................................. 29
8.6 Spare Parts Order Forms .............................................................................................................................. 30
9. LOGOUT ..............................................................................................................................................................31
Web User Manual Doc. Issue 08/03/02
Rev. 3.1
- 4 -
1. INTRODUCTION
1.1 LOGGING IN
Username and password control access to Trac-King Internet tracking, asset and
temperature monitoring service.
To register for the Trac-King Service please contact your nearest Thermo King
dealer.
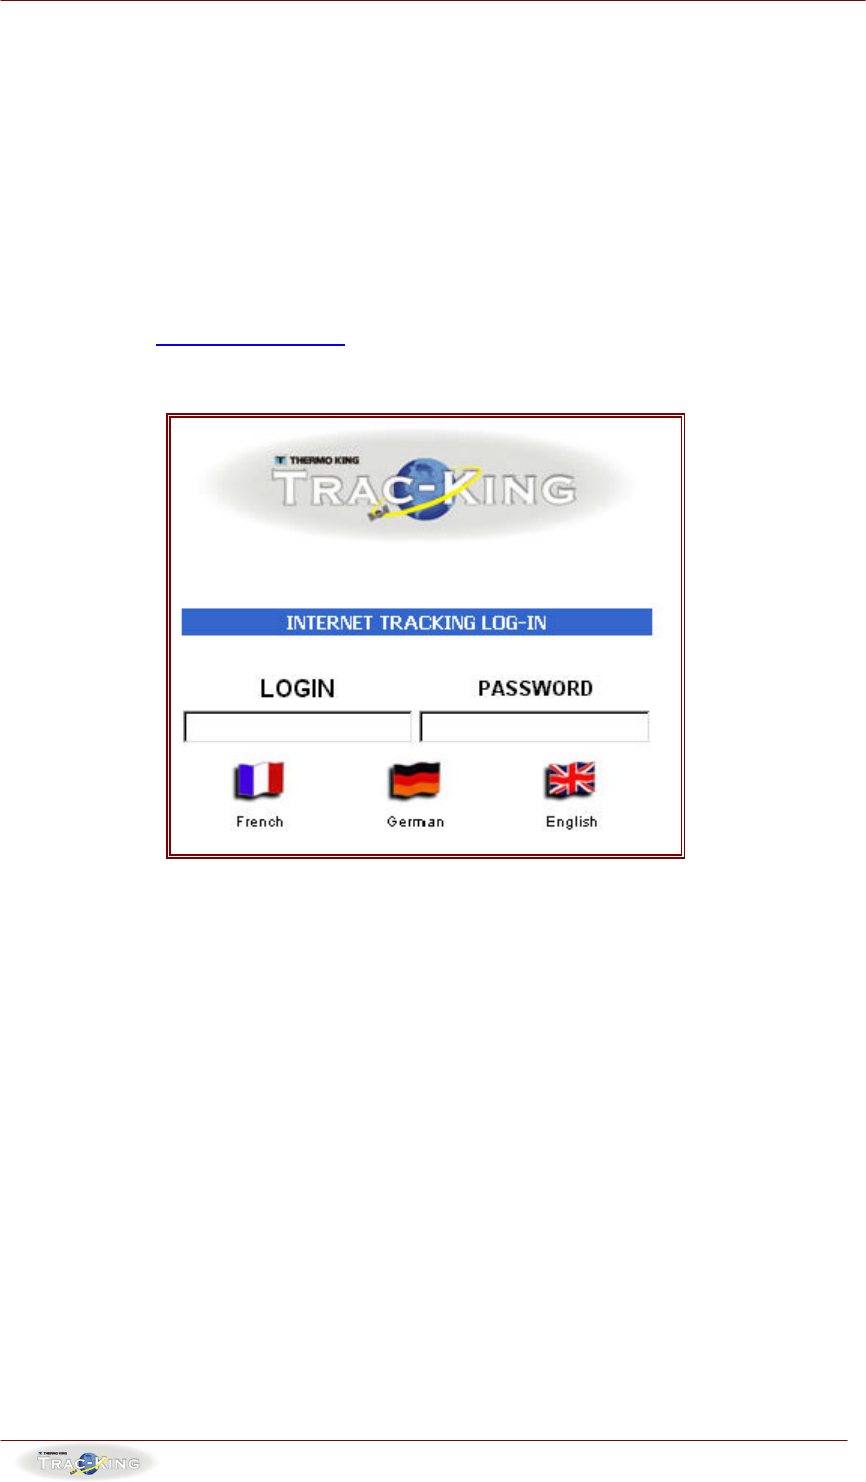
To Log in visit www.trac-king.com. The following will appear on the screen:
1. Type in your Username and Password in the spaces provided.
2. Click on the language button of your choice.
3. This will log you into the homepage.
Web User Manual Doc. Issue 08/03/02
Rev. 3.1
- 5 -
1.2 HOMEPAGE
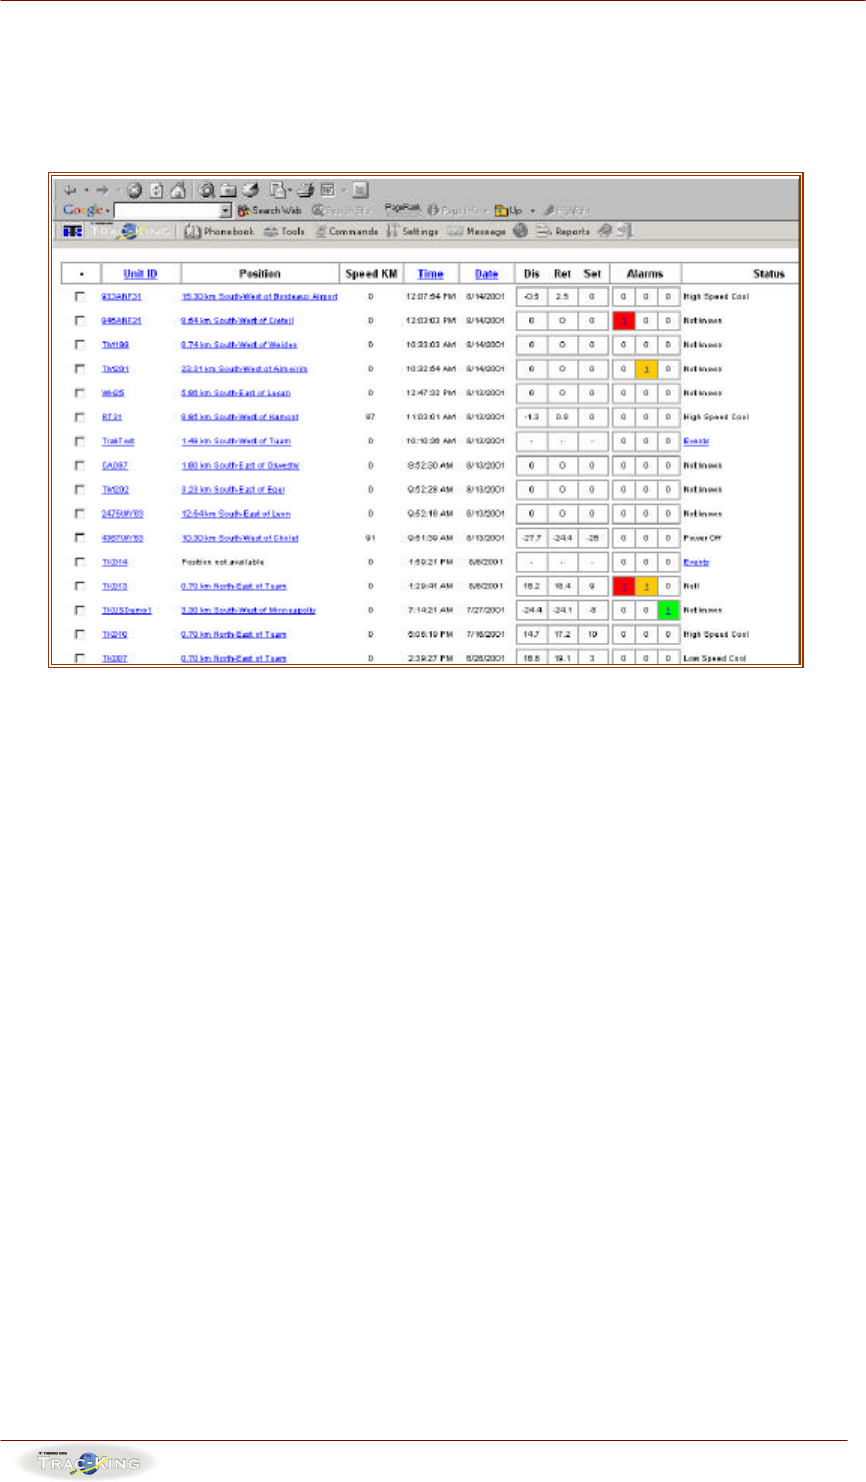
On logging in, the home page screen will appear:
From this screen a number of functions can be performed:
1. To Poll a vehicle:
Click on the Unit ID of the vehicle that you wish to poll. This will update the screen
with the current unit position highlighted in yellow.
2. To view a vehicle on a map:
Click on the “Position” of the vehicle. This will open up a new window displaying the
map.
3. To sort by “Unit ID”
Click on the “Unit ID” button.
4. To sort by “Time” or “Date”
Click on the “Time” or “Date” buttons
5. View Unit Alarms:
Any alarms on the units can be viewed by clicking on the “Alarms” box
corresponding to the unit.
To access all of the other functions that are available with the Trac-King service use
the menu that is provided at the top of the page:
Web User Manual Doc. Issue 08/03/02
Rev. 3.1
- 6 -
2. PHONEBOOK
There are two address books that are accessible by clicking on the address book
button. These are vehicle address book and contact address book.
2.1 VEHICLE ADDRESS BOOKS
These contain details of all of the units that are registered on the system.
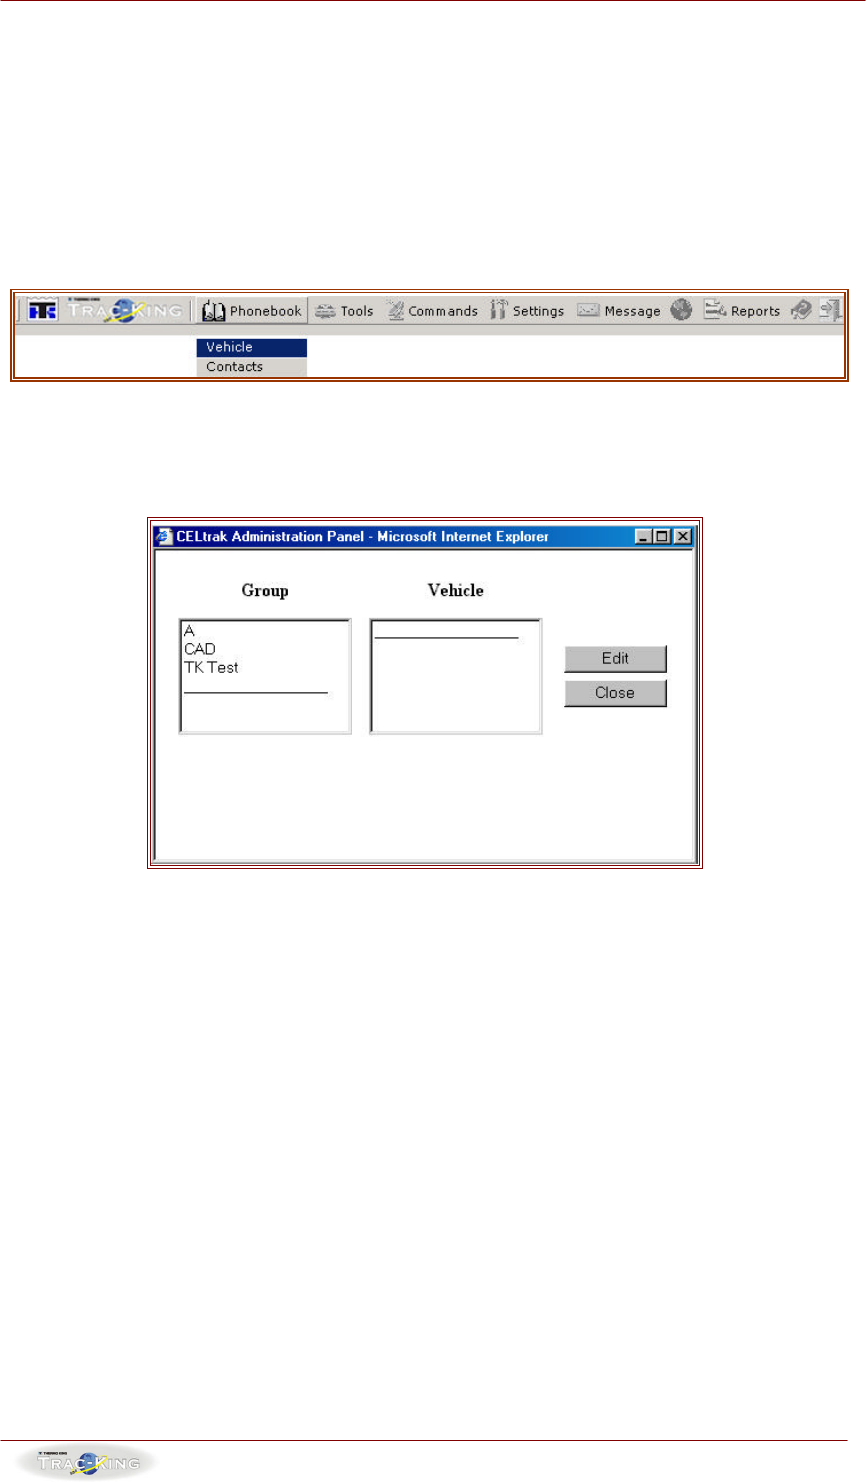
Access to this menu is available by clicking on the following button:
This will open up a menu as follows:
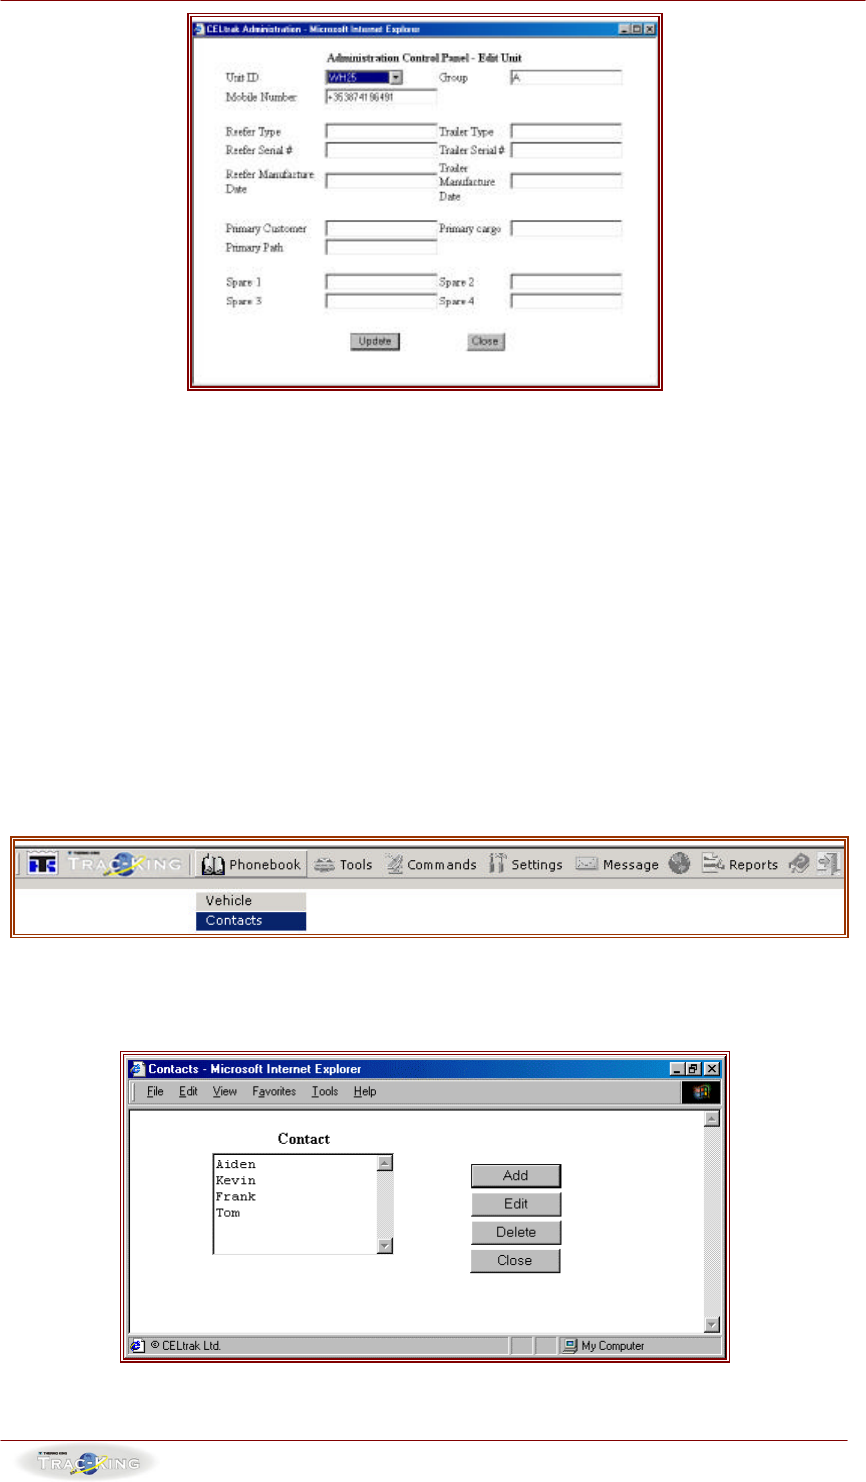
This feature will allow you to view, edit and delete units that are listed under the
various groupings. This feature will also allow you to move units between various
groups depending on your configuration requirements.
1. To view all of the units listed under a particular group, click on the group
name.
2. To edit or delete any of these units click on the appropriate button.
3. This will open up a new window as follows:
Web User Manual Doc. Issue 08/03/02
Rev. 3.1
- 7 -
4. Perform the required change / update and when finished close the window.
5. This will change unit or group details.
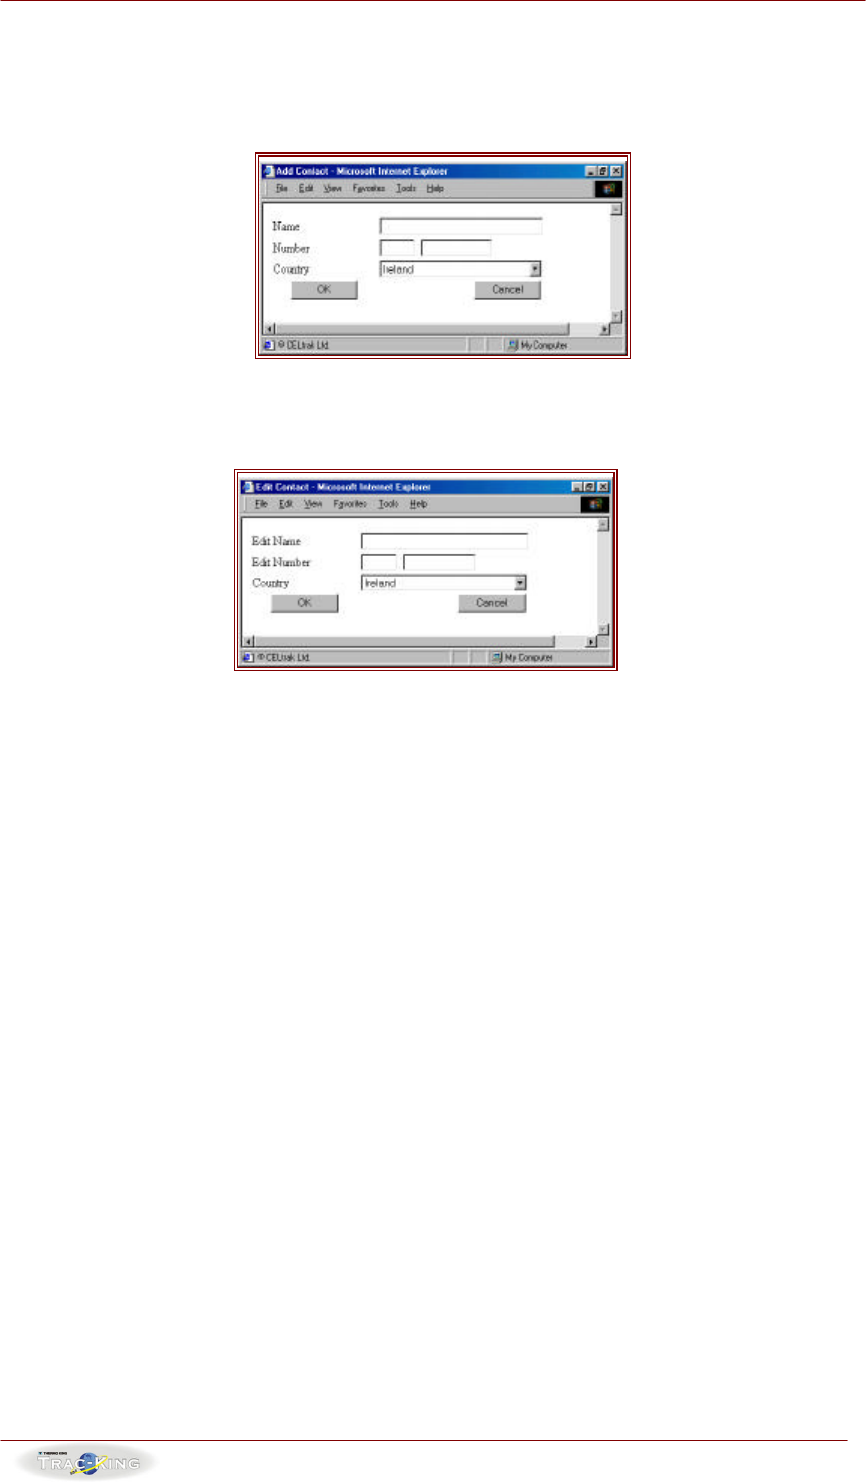
2.2 CONTACTS
This address book contains details of all of the personal contacts of the registered
user that are included in the system. This function can be used to facilitate text
messaging and voice calls to these contacts. Contact names and details can be
entered by the user unlike unit details which must be registered centrally.
This phonebook can be accessed by clicking on the icon as shown below:
This will open a window as follows:
Web User Manual Doc. Issue 08/03/02
Rev. 3.1
- 8 -
1. Contacts can be added or edited through the use of the buttons on the right
of the window.
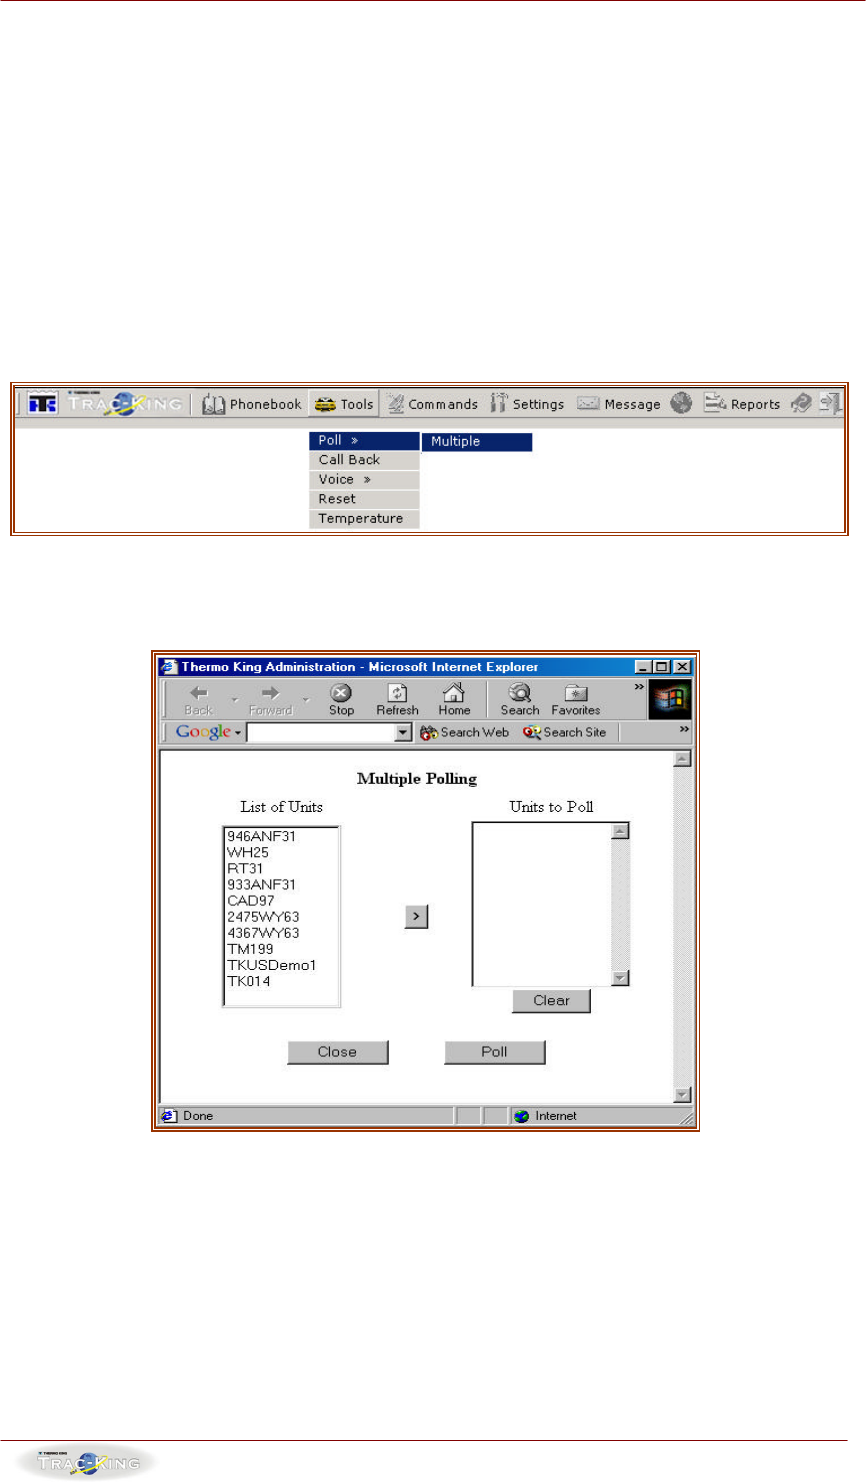
2. The corresponding windows are laid out below.
3. To add a unit enter new details as per below:
4. Editing contacts is completed by selecting the unit and clicking on the “Edit”
button. Edit as appropriate.
Web User Manual Doc. Issue 08/03/02
Rev. 3.1
- 9 -
3. TOOLS
This menu contains access to all of the main functions that are accessible with the
Trac-King service. These functions are; - Poll, Call Back, Voice, Reset, Temperature
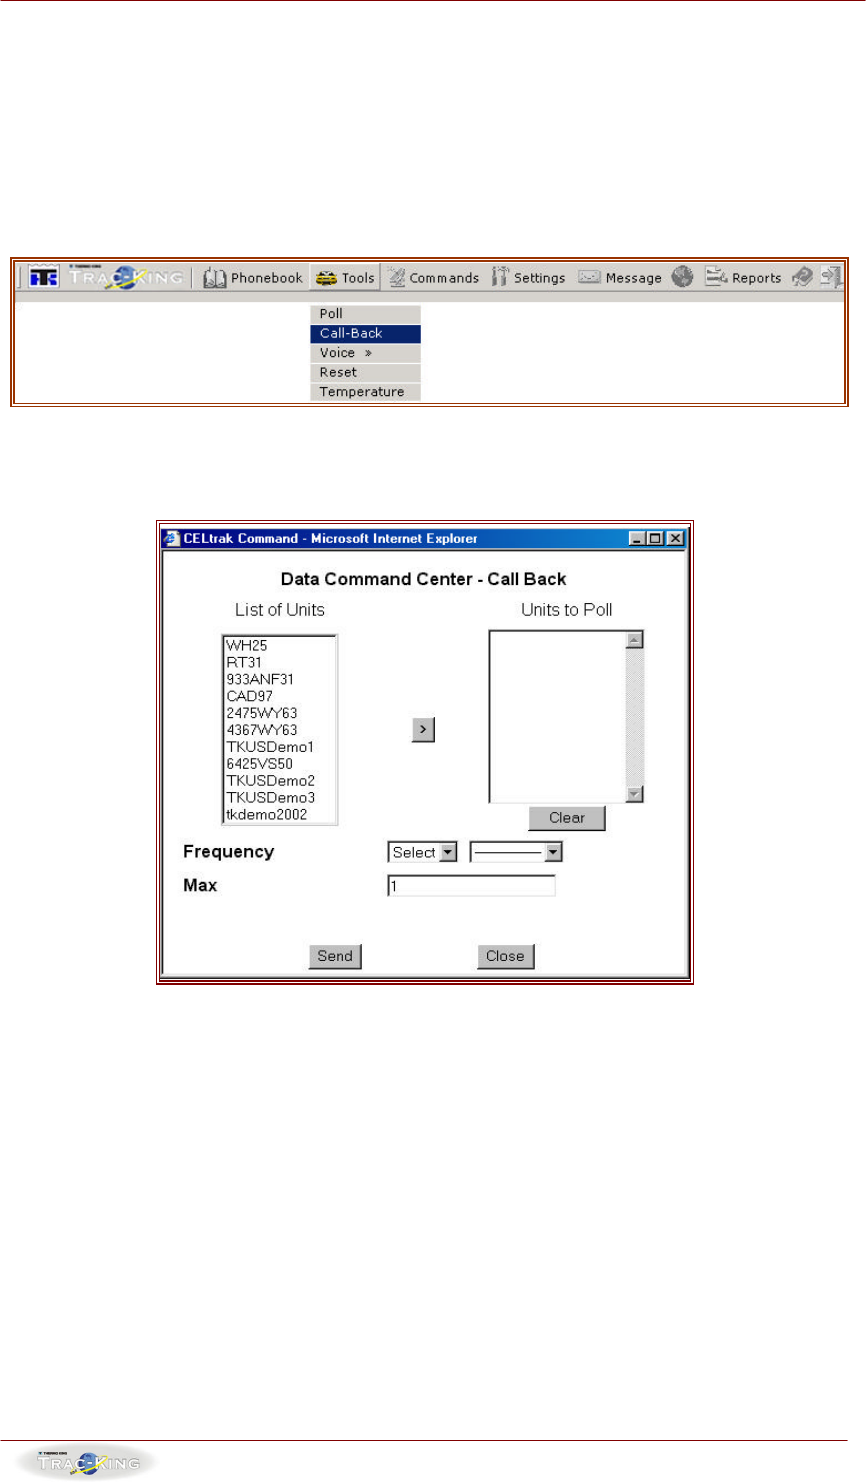
3.1 POLL
This function is available to all units. This function will poll all pre-selected units
simultaneously.
This function can be performed by clicking on the button below:
This will open up a window as follows:
1. Move all of the vehicles which you wish to poll to the “Units to Poll” window
using the > button.
2. Click on the “Poll” button. This will poll all of the selected units
simultaneously.
Alternatively a single unit can be polled from the main or homepage by clicking on
the “Unit ID” of the vehicle.
Web User Manual Doc. Issue 08/03/02
Rev. 3.1
- 10 -
3.2 CALL-BACK
This function allows the user to set a particular mobile unit to report back to the
base at regular specified intervals. This will return either position or temperature
information.
To access the Call Back Function click on the following button:
The following screen will appear:
1. Select the unit or units that you wish to place on call-back from the list of
units and move them to the “Units to Set” window.
2. You can select a number of units to set simultaneously by dragging the
mouse over the unit ID’s.
3. Select the frequency e.g. hour, day or minute and the interval e.g. every 2
minutes (frequency - minute, interval - 2). The select the maximum number
of call-back responses e.g. 20 call-backs and close the window.
Web User Manual Doc. Issue 08/03/02
Rev. 3.1
- 11 -
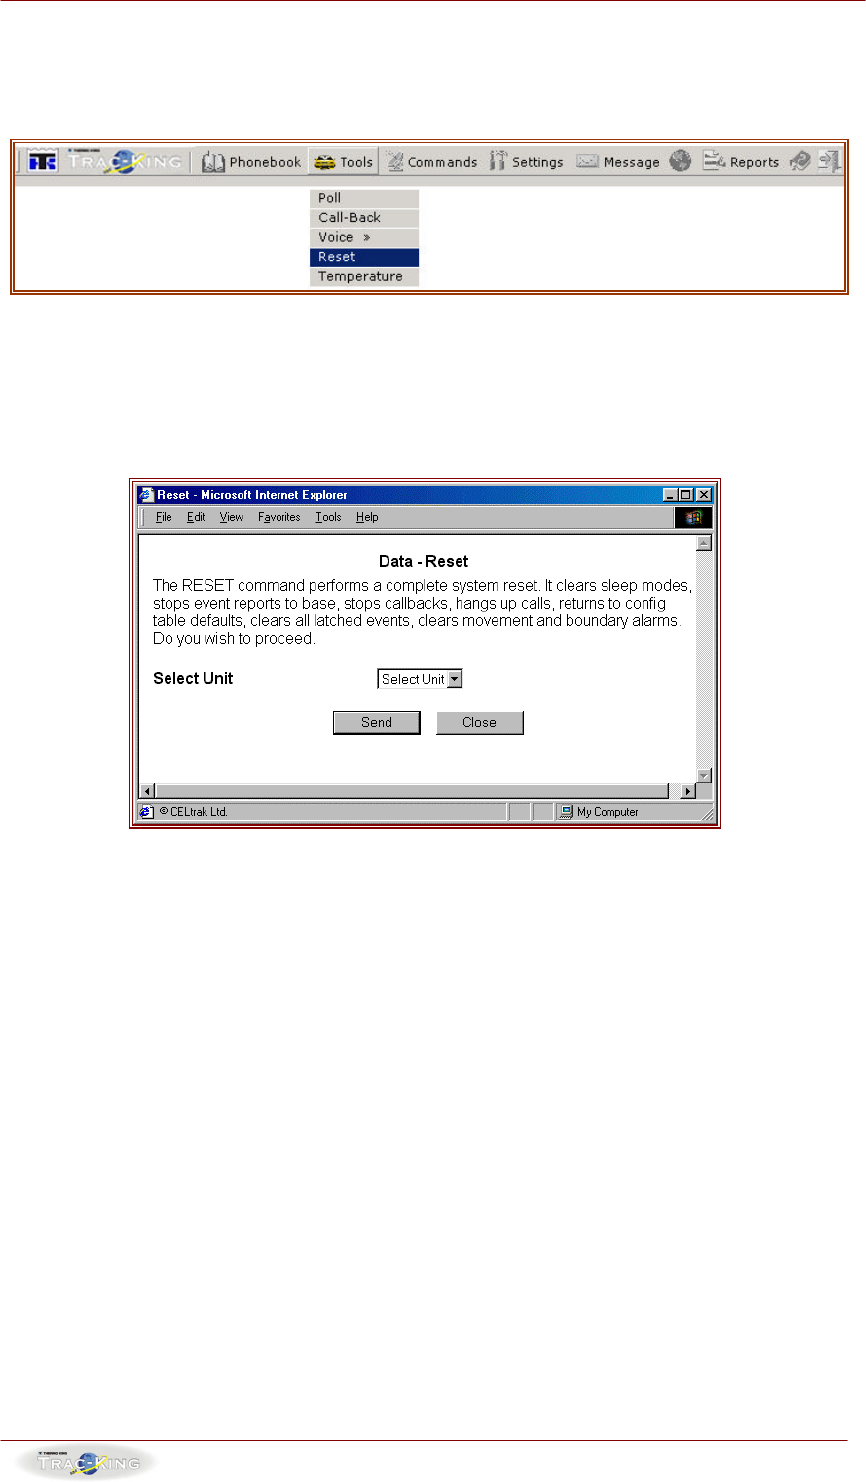
3.3 RESET
The reset command is available to all units and is issued following a confirmation
dialog box. The reset command can be accessed by selecting the following function:
On selecting this, the following screen will appear:
1. The description of what the reset doe s is given in the reset window.
2. To reset units select a unit from the “Select Unit” menu.
3. Following this click “Send”. A warning box will then appear. Clicking “OK”
on this warning box will reset the selected unit.
Web User Manual Doc. Issue 08/03/02
Rev. 3.1
- 12 -
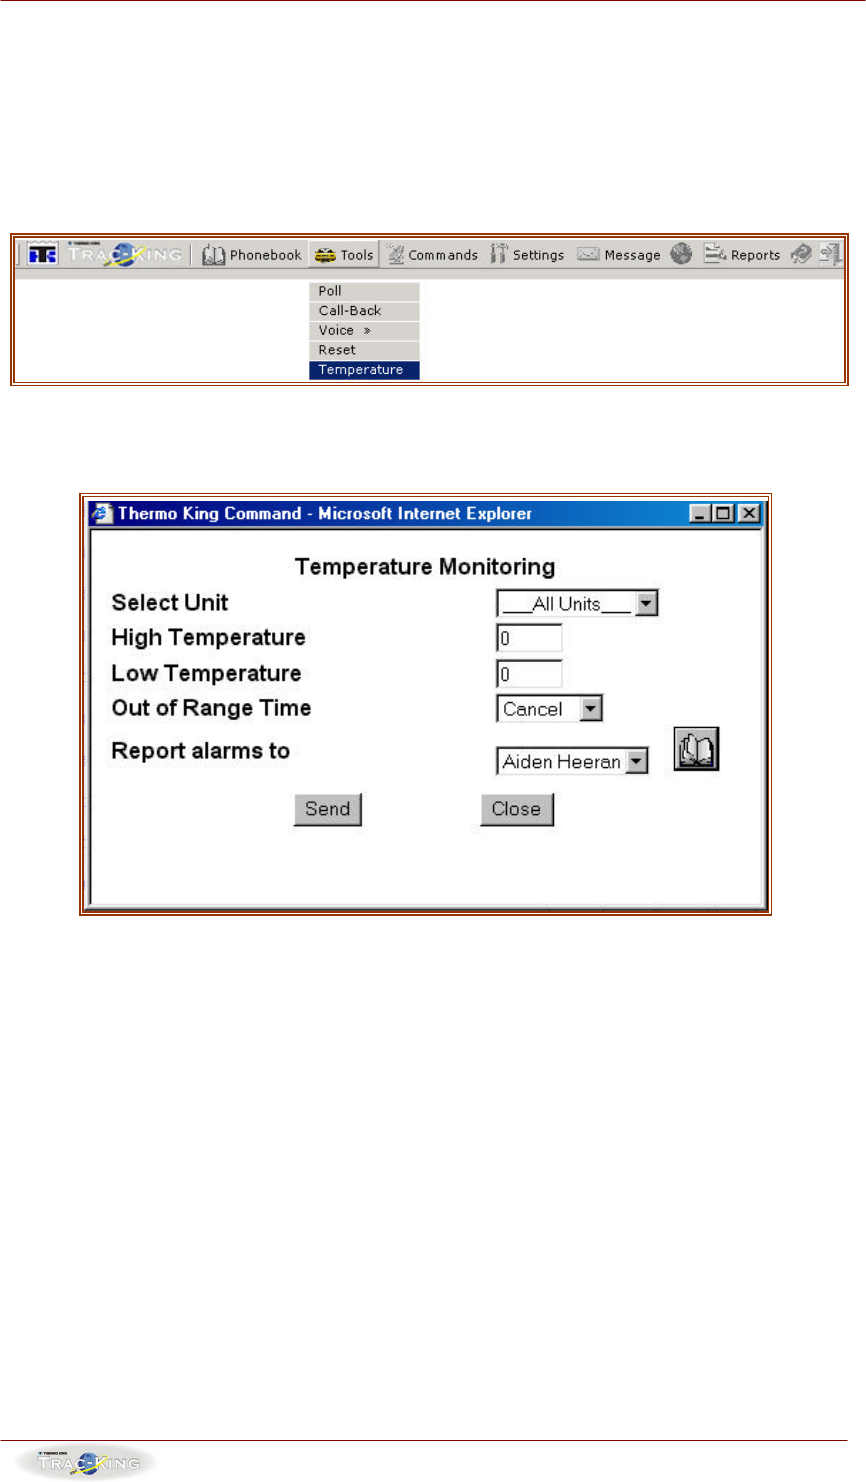
3.4 TEMPERATURE
This function allows you to set high and low temperatures for alarms and the period
of time that the unit can be out of these temperature ranges before an alarm is sent.
Clicking on the following button will access the temperature function.
1. Select the unit that you wish to set ranges for, from the “Select Unit” menu.
2. Set the high and low temperatures in the boxes provided.
3. Following this set the out of range time (i.e. the amount of time the unit can
be above or below the set temperature before an alarm is sent) and what
number you want the alarms to be forwarded to from the Phonebook menu
option.
4. Click on the “Send” button.
Web User Manual Doc. Issue 08/03/02
Rev. 3.1
- 13 -
4. COMMANDS
An additional command that is available with the Trac-King service is the ability to
set the Odometer value that is displayed on screen to a particular value.
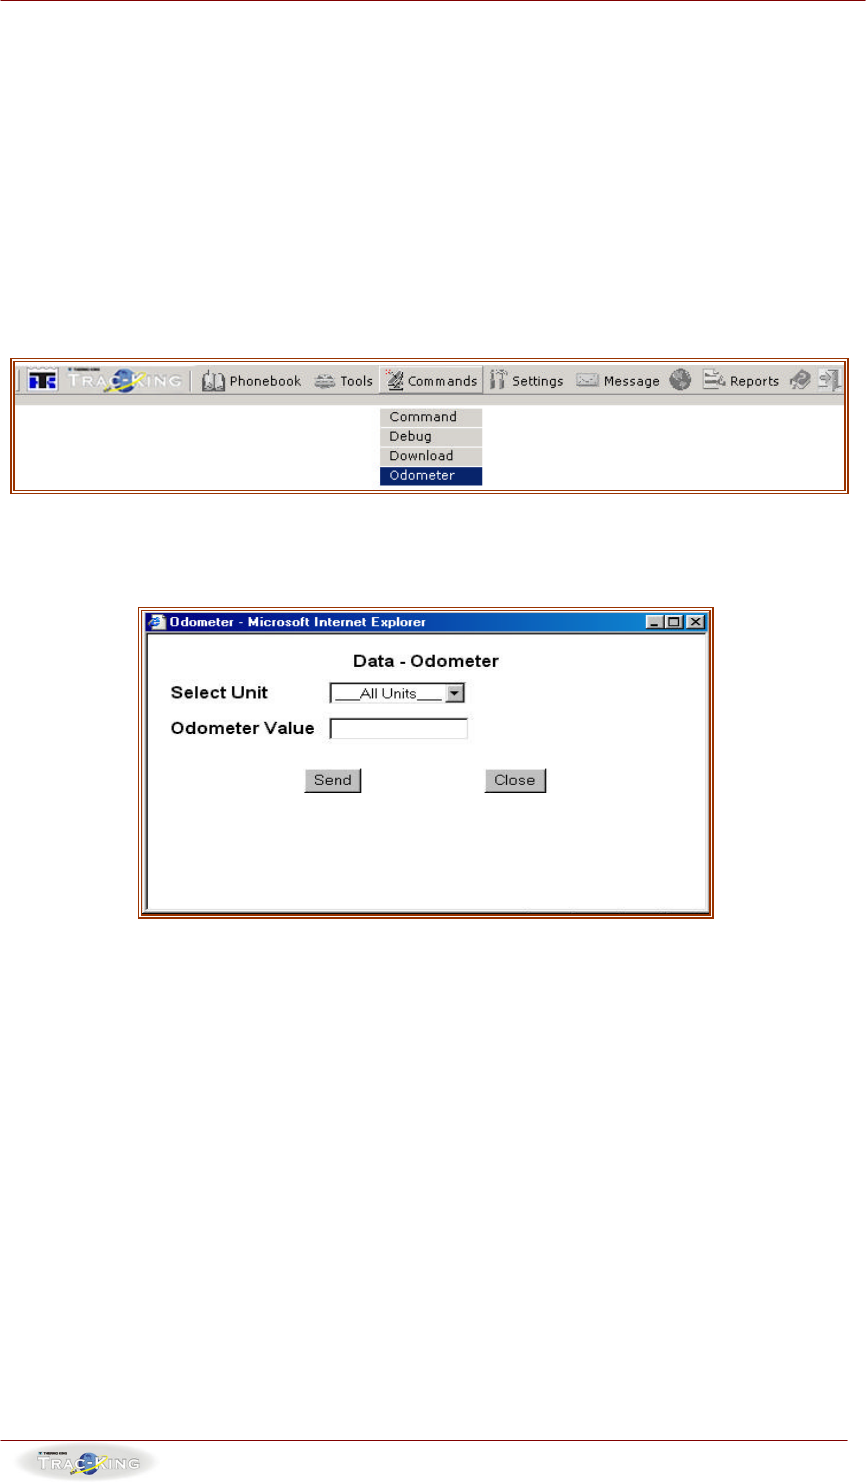
4.1 ODOMETER
This command is available to all units. The Set dialogue box allows the user to set
the odometer to any value.
1. To set an Odometer to a certain value enter the value in the “Odometer
Value” field and click on the “Set” button.
NOTE: You must Poll the unit when you have changed the Odometer Value to view
updates.
Web User Manual Doc. Issue 08/03/02
Rev. 3.1
- 14 -
5. SETTINGS
These functions will allow the user to set defaults for how the Trac-King service will
appear when the user is logged in. The default list contains options for setting
sound, sorting and speed units.
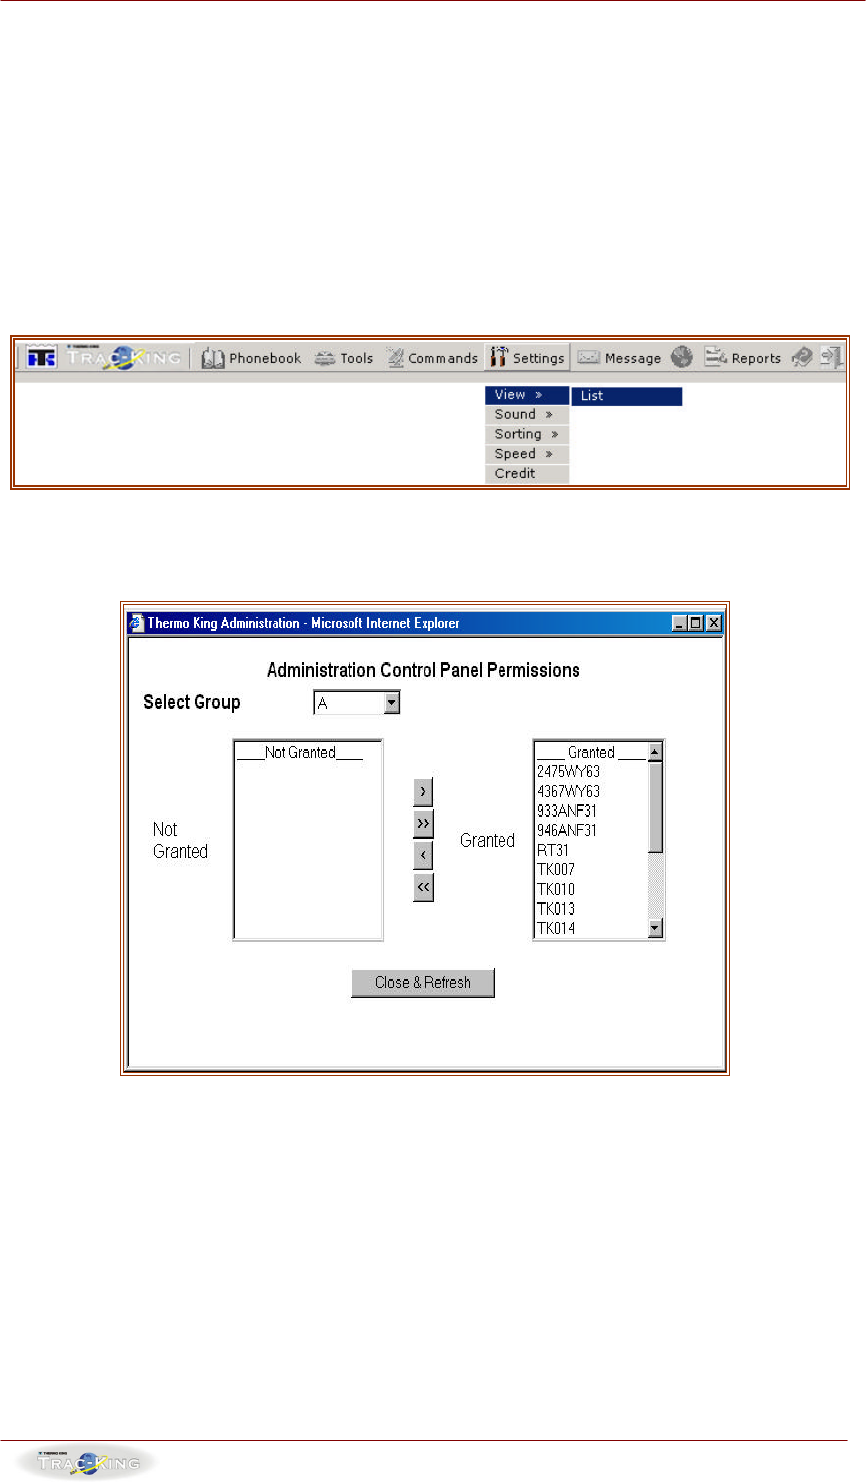
5.1 TRACKING LIST
To change the tracking list click on the menu option below:
The following window will open:
1. Select the Group that you wish to work with from the “Select Group” menu
option. This will display all of the units that are registered in that group.
2. To move a vehicle to the tracking screen click on the unit in the “Not Visible”
window and select the > button. This will move it to the “Visible” section
where they can be viewed on the tracking screen
3. To move a vehicle from the tracking screen select it in the “Visible” window
and move it using the < button to the “Not Visible” window.
4. To move all of the vehicles to or from the tracking page use the >> or <<
buttons.
Web User Manual Doc. Issue 08/03/02
Rev. 3.1
- 15 -
5.2 SORTING
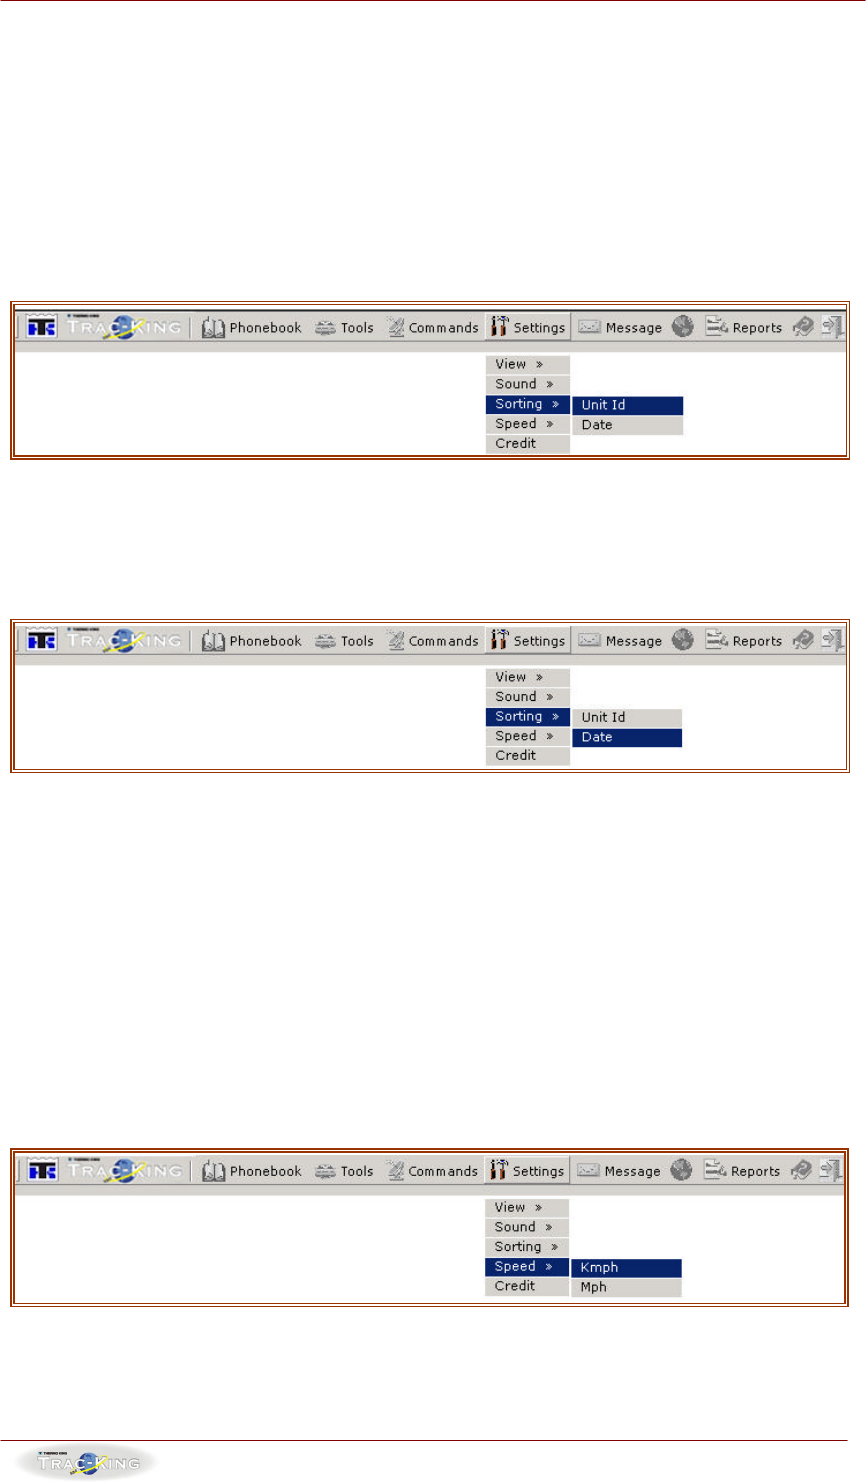
Sorting allows you to arrange the main screen or homepage by Unit ID or by Date.
Clicking on the options will automatically reset the Sorting Defaults.
5.2.1 SORT BY UNIT ID
To sort by Unit ID please click on the following option.
5.2.2 SORT BY DATE
To sort by date please click on the following option
5.3 SPEED LIMITS
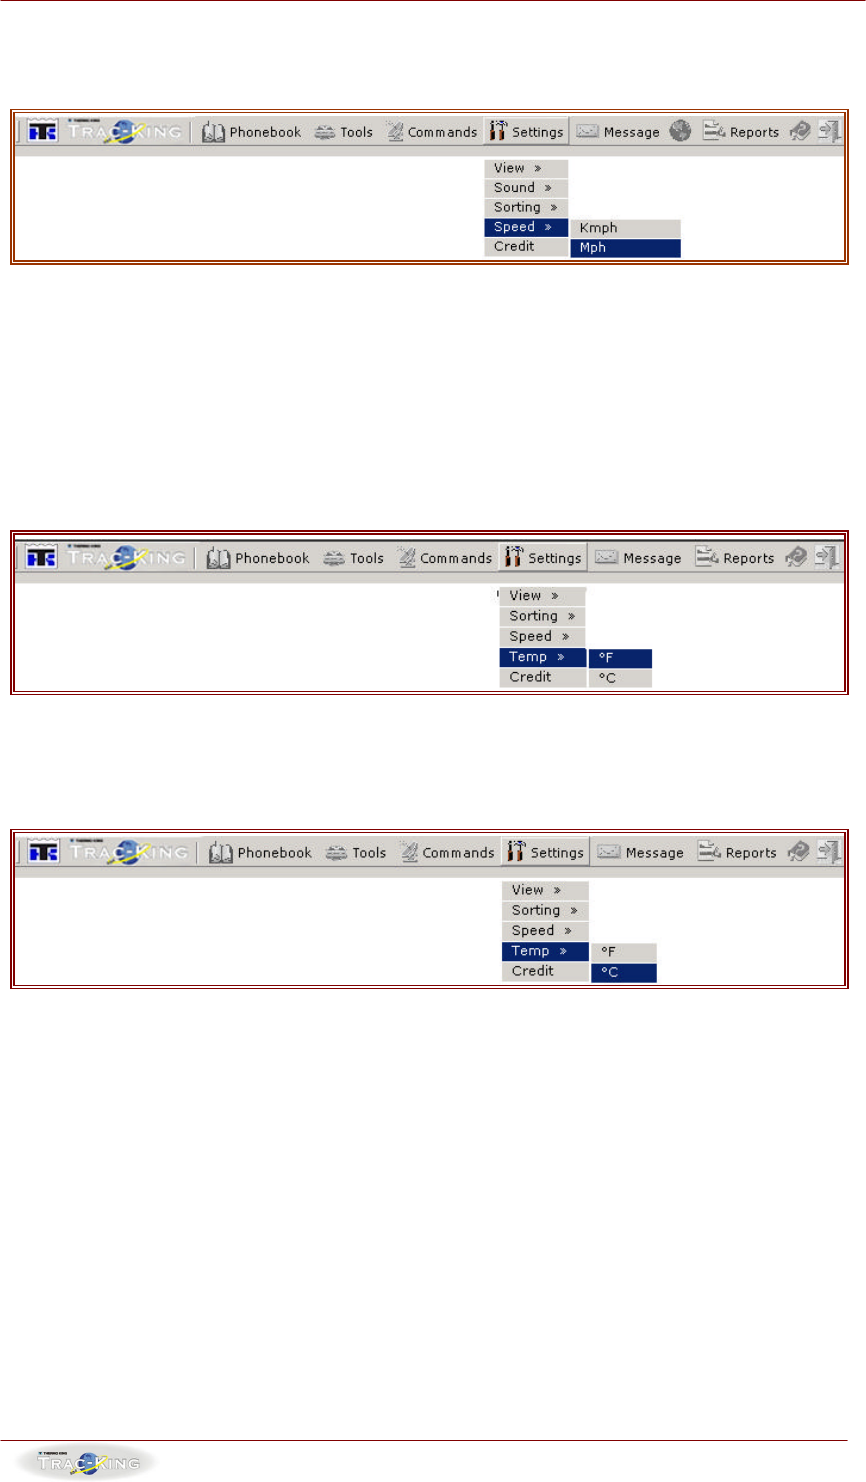
This configuration will set the speed on the main page to either miles per hour or
kilometres per hour based on the configuration selected. To set the either m/ph or
km / ph click on the required button below.
5.3.1 SET SPEED IN K/MPH
To set the speed in km / ph click on the following option:
Web User Manual Doc. Issue 08/03/02
Rev. 3.1
- 16 -
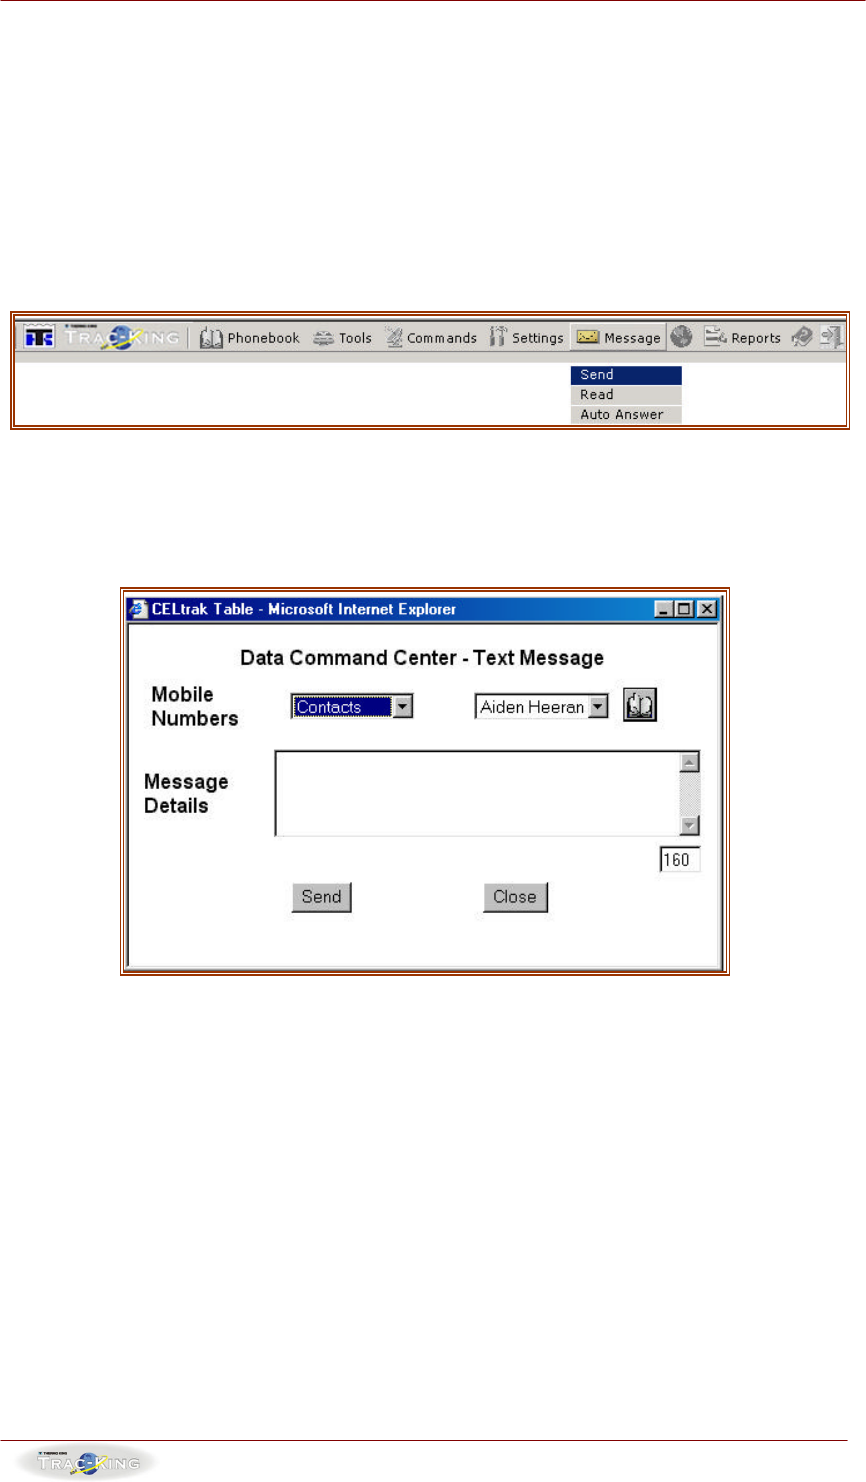
5.3.2 SET SPEED IN M/PH
To set the speed in m/ph click on the button as identified below:
5.4 TEMPERATURE
You can set the displayed temperature in Centigrade or in Fahrenheit.
5.4.1 SET TEMPERATURE IN FAHRENHEIT
To set the temperature in Fahrenheit click on the button as identified below:
5.4.2 SET TEMPERATURE IN CENTIGRADE
To set the temperature in Centigrade click on the button as identified below:
Web User Manual Doc. Issue 08/03/02
Rev. 3.1
- 17 -
6. MESSAGE
This function allows you to send and receive messages from any of the selected
vehicles on your list or a mobile phone. There are three separate options available
with the messaging service – Send Messages, Receive Messages and Auto Answer.
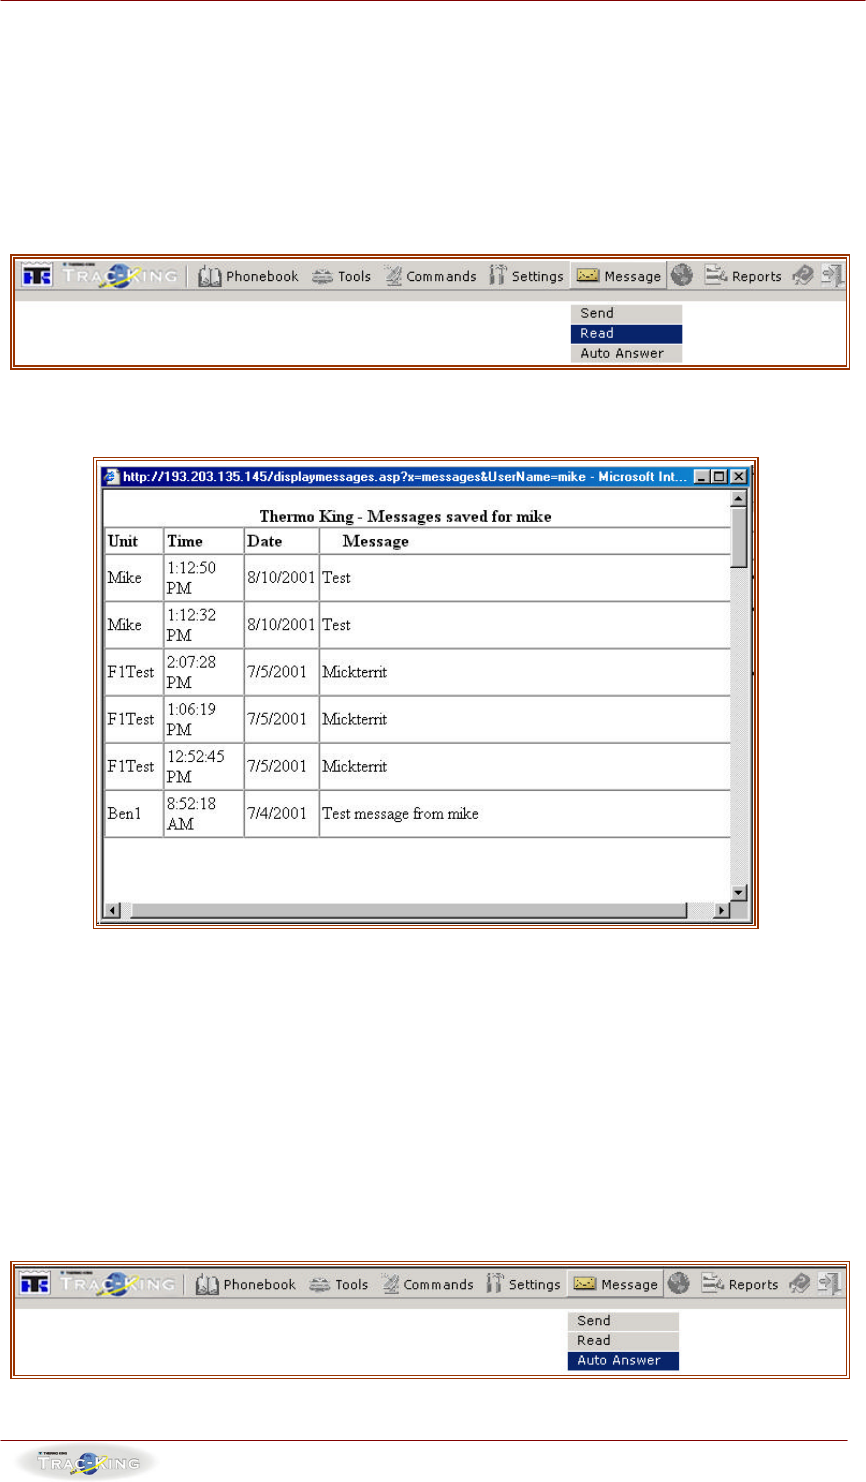
6.1 SEND MESSAGE
To send a message click on the icon as identified below:
This will open up a window as follows:
1. Choose the unit / person that you wish to send a message to by first,
selecting either the “Contact” or “Units” phonebook from the scroll down
menu option and following this selecting the unit or contact name from the
second menu option.
2. Type your message and press “Send”
3. A small window to the right will keep you informed of the number of
characters remaining in the SMS.
Web User Manual Doc. Issue 08/03/02
Rev. 3.1
- 18 -
6.2 READ MESSAGE
When this function is selected a window will open and display all received messages.
New messages in this window will be in bold. Also if a new message is received an
envelope will appear under the toolbar indicating that a new message has been
received.
Accessing the messages is done through the selecting the menu option below:
This will open up a window as follows:
This window contains the details of all of the messages that have been received into
the customer account.
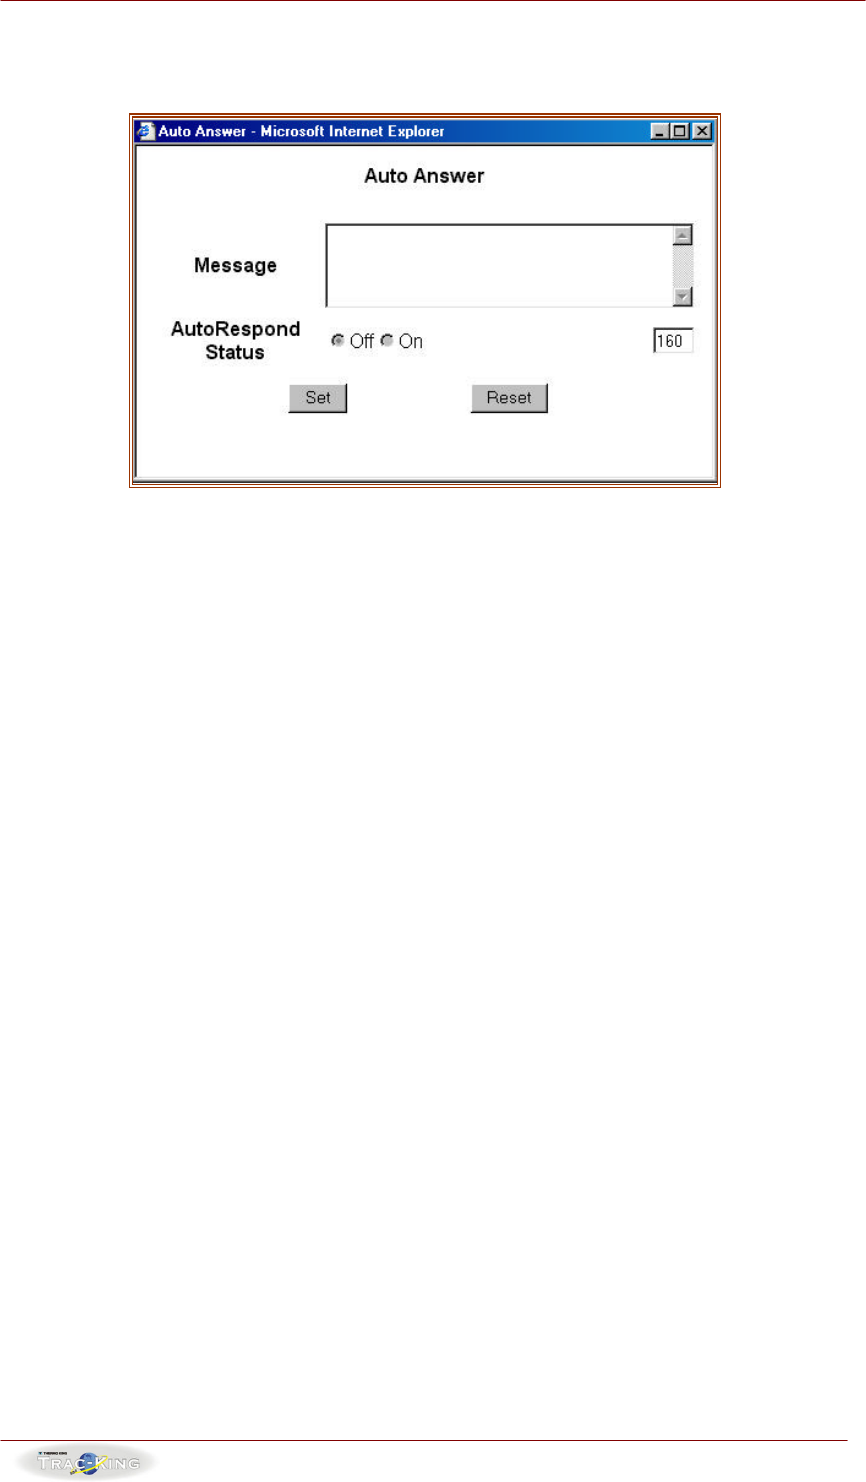
6.3 AUTO-ANSWER
This function allows you to auto answer messages that come in the base station.
For example if you are planning on being away from your base station you can have
a reply sent to all messages that are sent to the base station.
Access this function by selecting the option below:
Web User Manual Doc. Issue 08/03/02
Rev. 3.1
- 19 -
This will open up the following window:
1. Type in the message that you would like to be replied to all incoming
messages.
2. Choose the setting from “Off” or “On”. This will set the Auto-answer facility.
3. A small box in the right hand corner informs you of the number of characters
remaining.
Web User Manual Doc. Issue 08/03/02
Rev. 3.1
- 20 -
7. REPORTS
There are a number of reporting options available. These include:- Utilization,
Alarms, Performance and Temperature. Also there are a number of summary or
aggregate reports available.
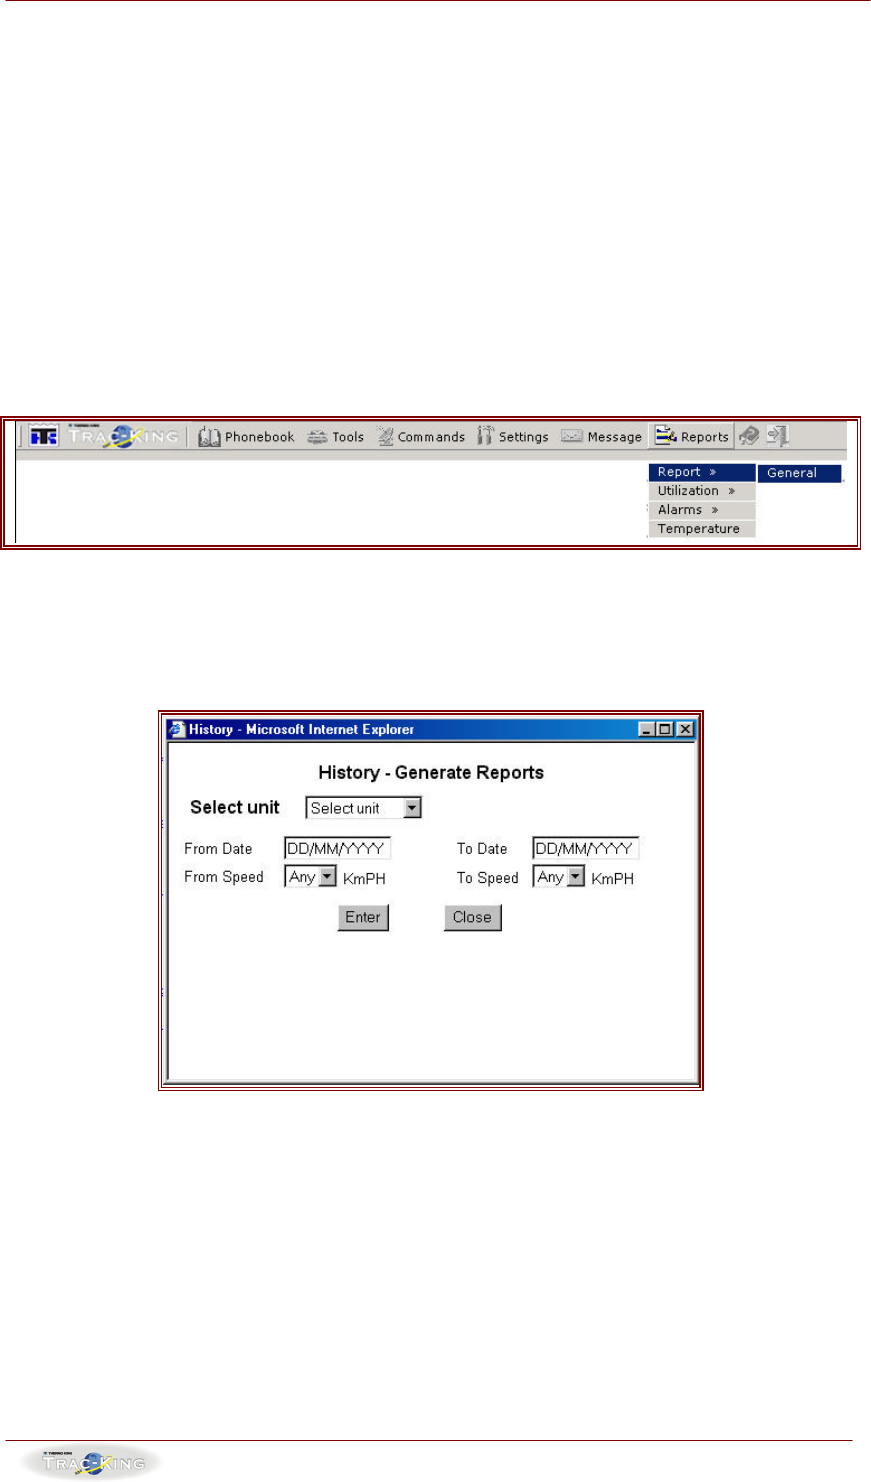
7.1 REPORT
This is a general report, which displays position, speed, time, date and temperature
information textually. It can be accessed by clicking on the following menu option.
This will open up a window with the following History options:
1. Select the unit that you wish to generate a report on.
2. Select the date and the speed intervals.
3. Clicking on the “Send” button will generate the history report.
Web User Manual Doc. Issue 08/03/02
Rev. 3.1
- 21 -
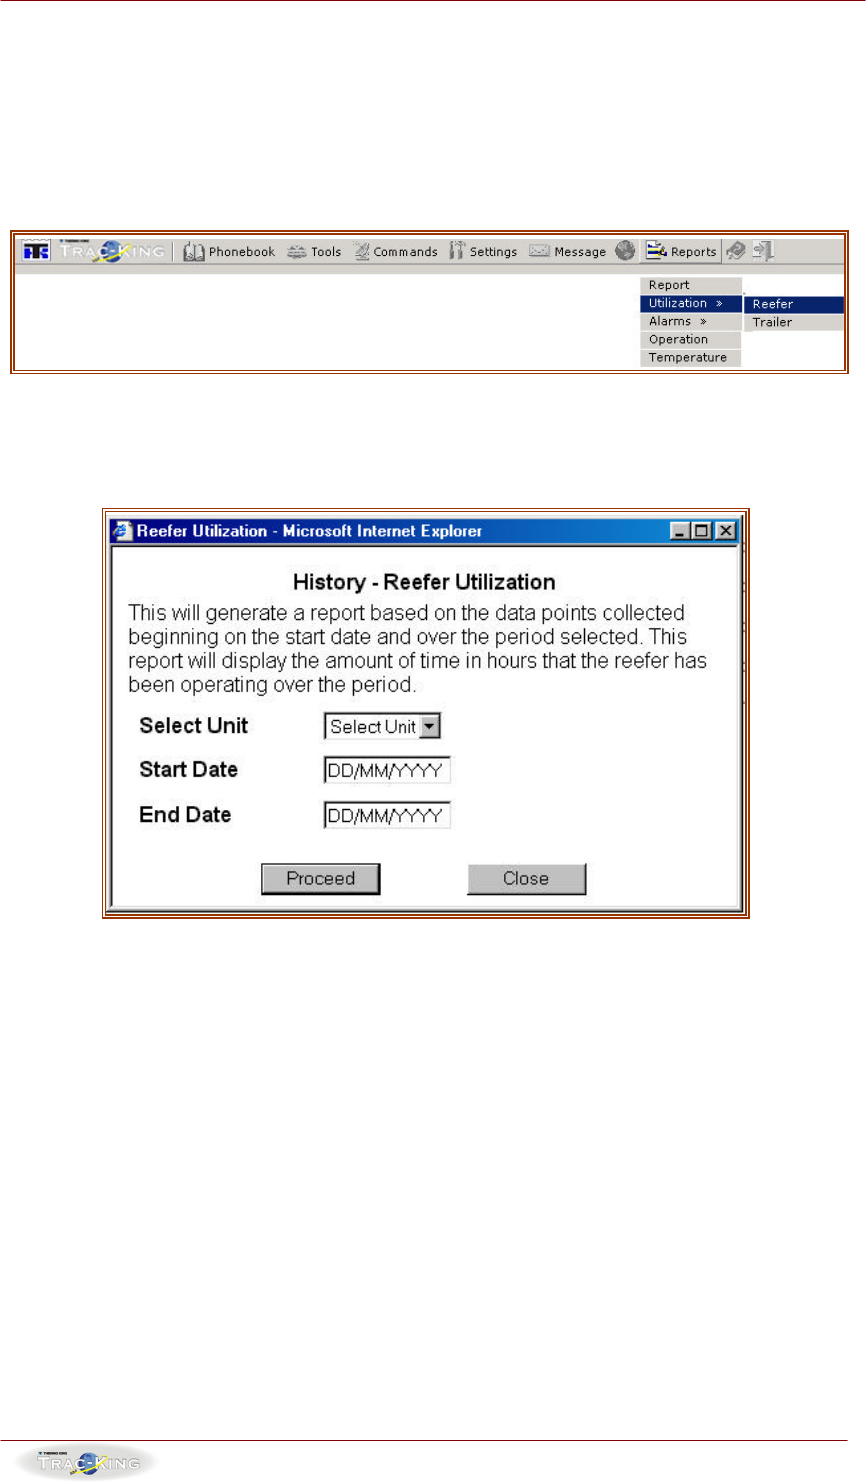
7.2 REEFER UTILISATION
This report is designed to show the amount of time that the refrigeration unit was
operating over a specified period of time. The reefer utilization history can be
accessed by clicking on the button as identified below:
This will open a new window as follows:
1. To generate a reefer utilisation report, select a unit from the “Select Unit”
option.
2. Following this enter the “Start Date” and the “End Date” that you would like
generate a report over.
3. Click on the “Proceed” button. This will open up a new window with the
requested report.
Web User Manual Doc. Issue 08/03/02
Rev. 3.1
- 22 -
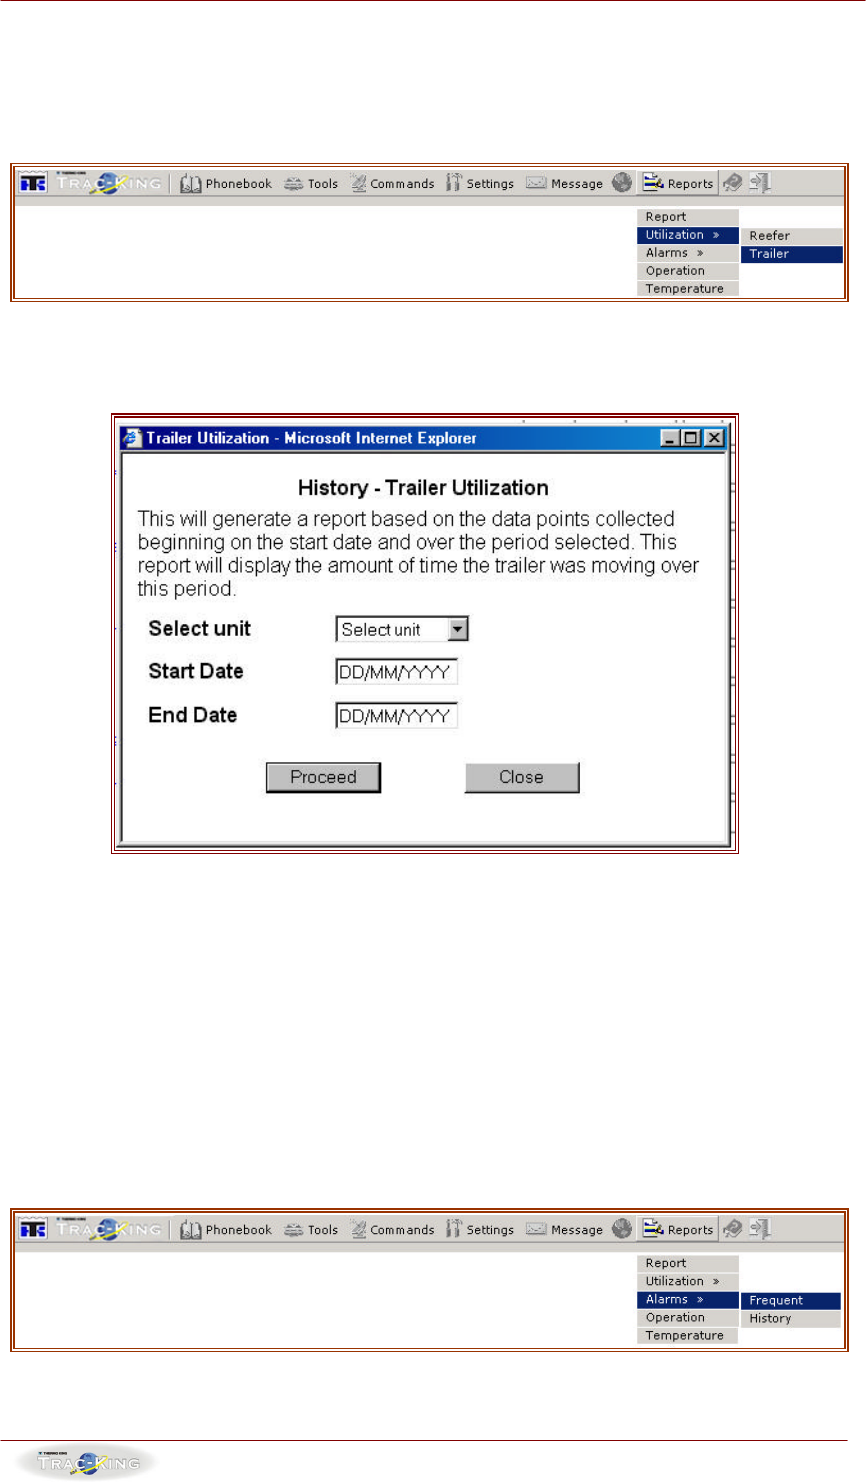
7.3 TRAILER UTILISATION
This report will show the number of hours that the trailer was used over a pre-
specified period. It is accessed by clicking on the button as identified below.
This will open a window as follows:
1. To generate a trailer utilization report, select a unit from the “Select Unit”
menu.
2. Following this select the “Start Date” and the “End Date” i.e. the dates
between which you require the trailer utilization report.
3. Click on the “Proceed” button. This will generate the required report.
7.4 FREQUENT ALARMS
This will provide you with details of the most frequent alarms that have occurred
over a specified period of time. You can generate daily or monthly reports.
Access to this function is through clicking on the button as identified below:
Web User Manual Doc. Issue 08/03/02
Rev. 3.1
- 23 -
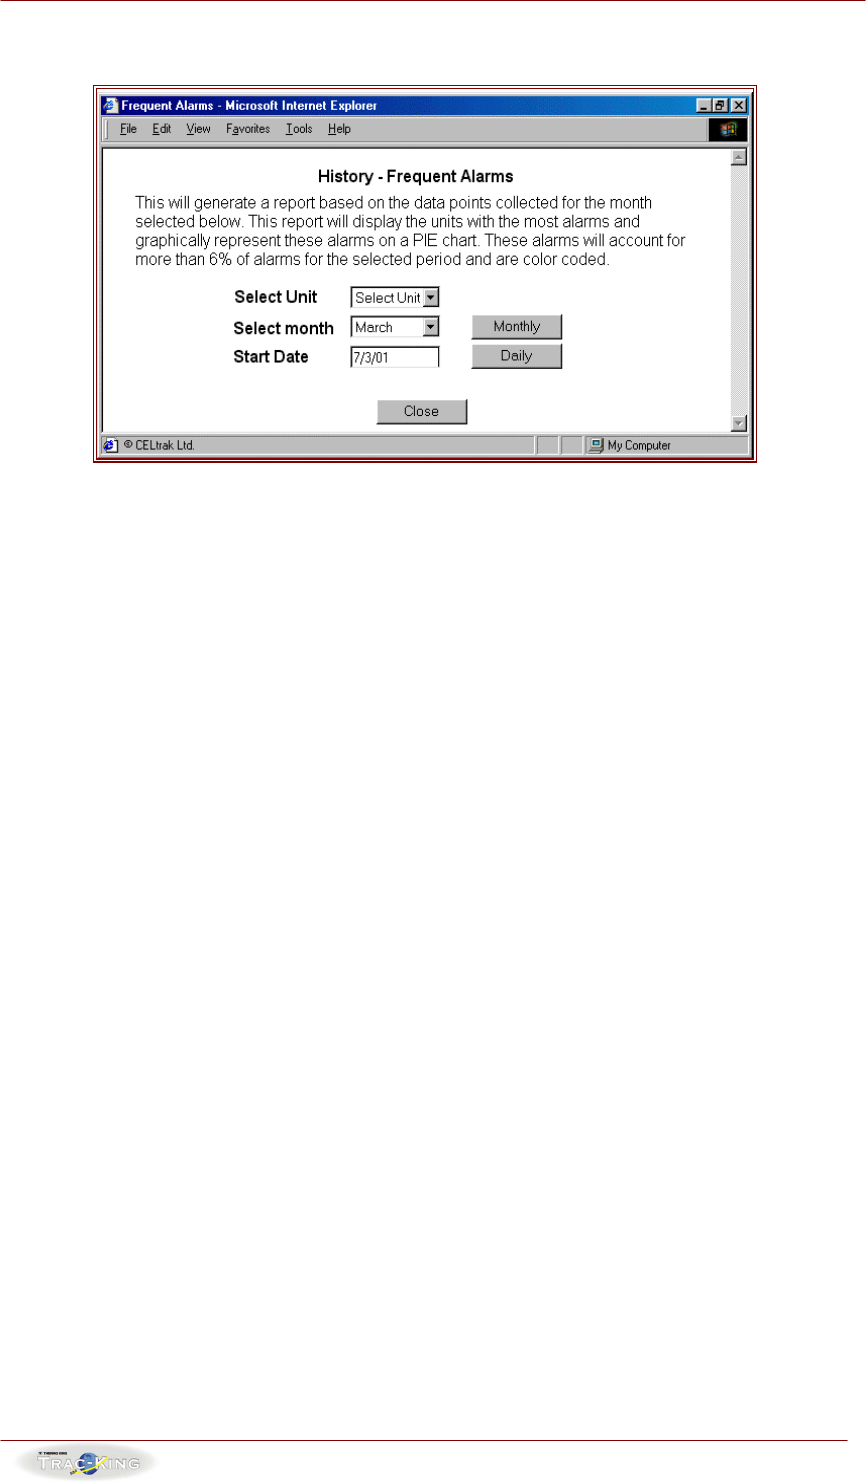
This brings up a window as below:
1. Select the month or the da te on which you would like the report of the most
frequent alarms.
2. Following this click on the corresponding button e.g. “Monthly” if you require
a monthly alarm or select a date and click on the “Daily” button.
3. This will generate the required report.
Web User Manual Doc. Issue 08/03/02
Rev. 3.1
- 24 -
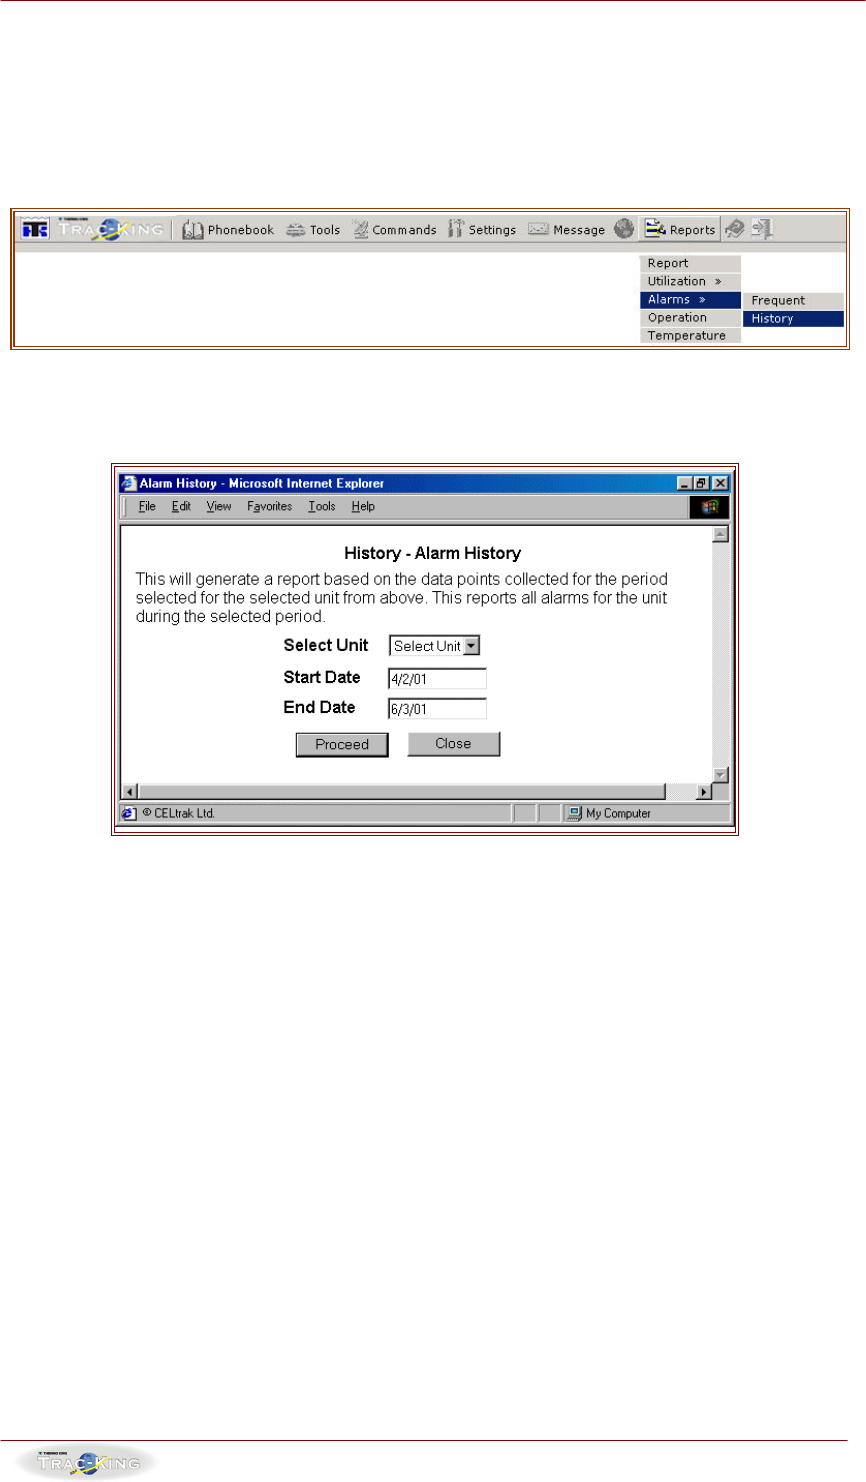
7.5 ALARM HISTORY
This function will generate a report on all of the alarms that have been activated
over the pre-specified period of time.
Access this function through clicking on the following button:
This will open a window as identified below:
1. Select a unit from the “Select Unit” menu
2. Select the “Start” and “End” Dates from the Menu options.
3. Click on the “Proceed” button to generate the alarm history report.
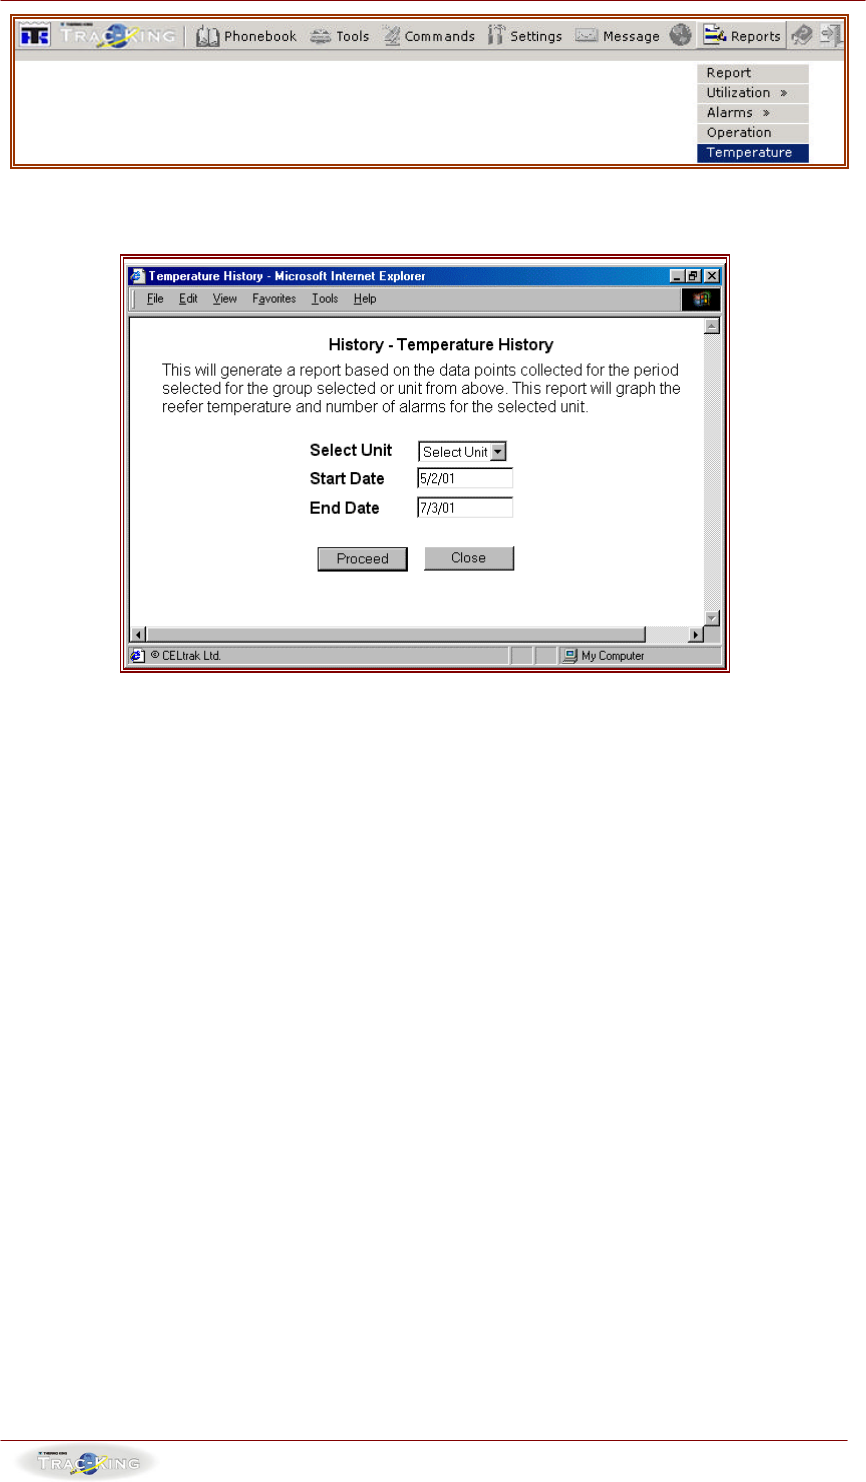
7.7 TEMPERATURE
This will generate a report on temperature history of a unit for the period in
question.
Access to this function is through clicking on the button as identified below:
Web User Manual Doc. Issue 08/03/02
Rev. 3.1
- 25 -
This will open a window as follows:
1. Select a unit from the “Select Unit” option.
2. Select the time interval over which you require the temperature history
information by specifying the “Start Date” and “End Date” in the provided
fields.
3. Click on the “Proceed” button to generate the required information.
Web User Manual Doc. Issue 08/03/02
Rev. 3.1
- 26 -
8. DEALER / HELP
This section will differ depending on whether you are a Trac-King customer or a
Trac-King dealer.
This provides the user with a full description of how to use all of the functions of the
Trac-King service. This is available in an online or a downloadable format. This
menu also contains a list of Thermo King dealers across Europe and their phone
and fax numbers. The Dealer Sections contain customer registration forms, spare
parts order forms and also Installation Instructions.
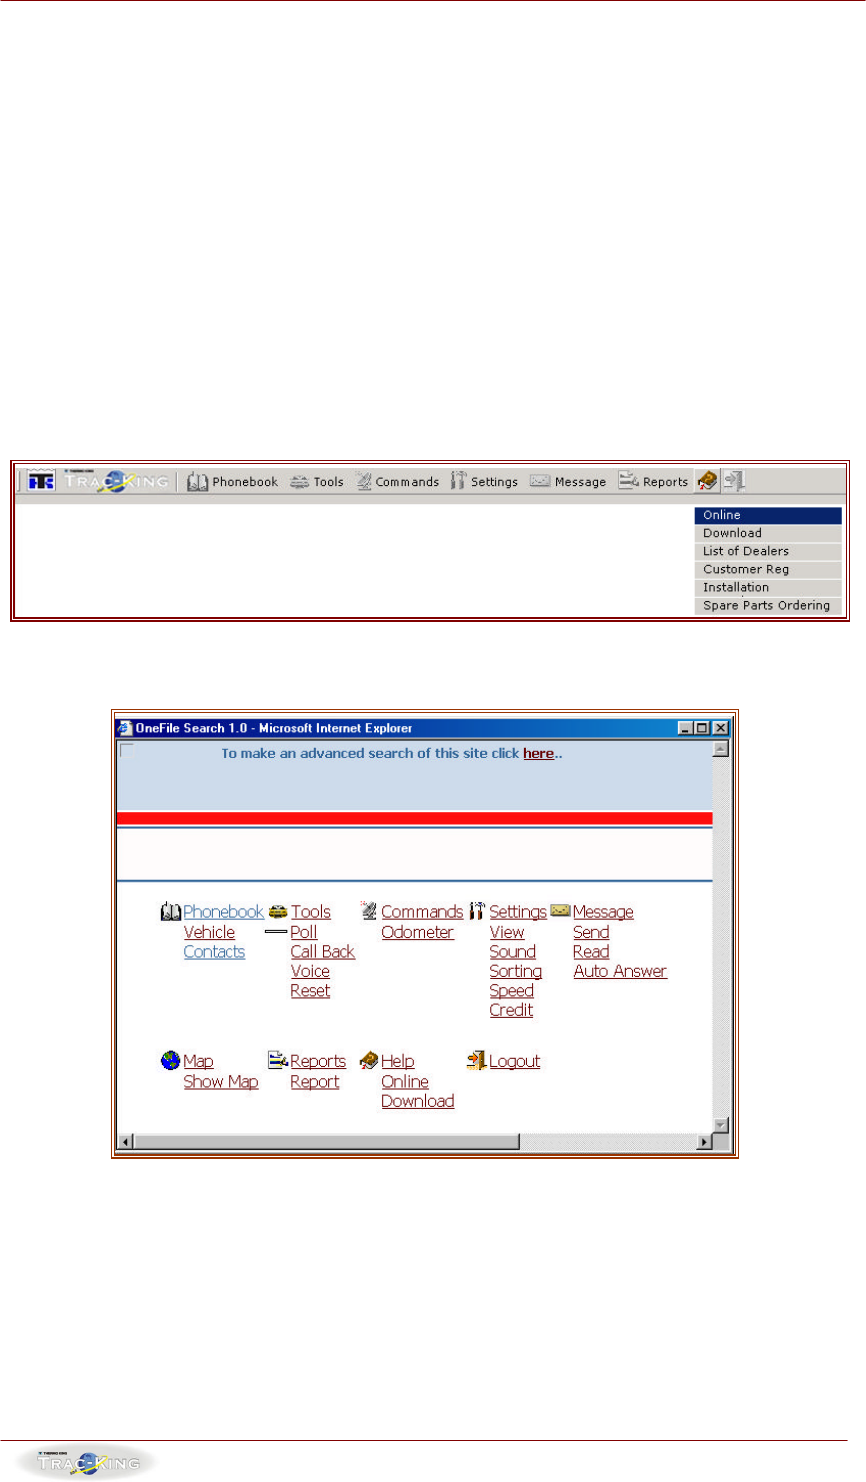
8.1 ONLINE HELP
This contains details of how features are used in a pop-up window. This is accessed
by clicking on the following menu option.
This will open a window as follows:
From this the user can choose the feature that information is required on or
alternatively you can use the search facility at the top of the window.
Web User Manual Doc. Issue 08/03/02
Rev. 3.1
- 27 -
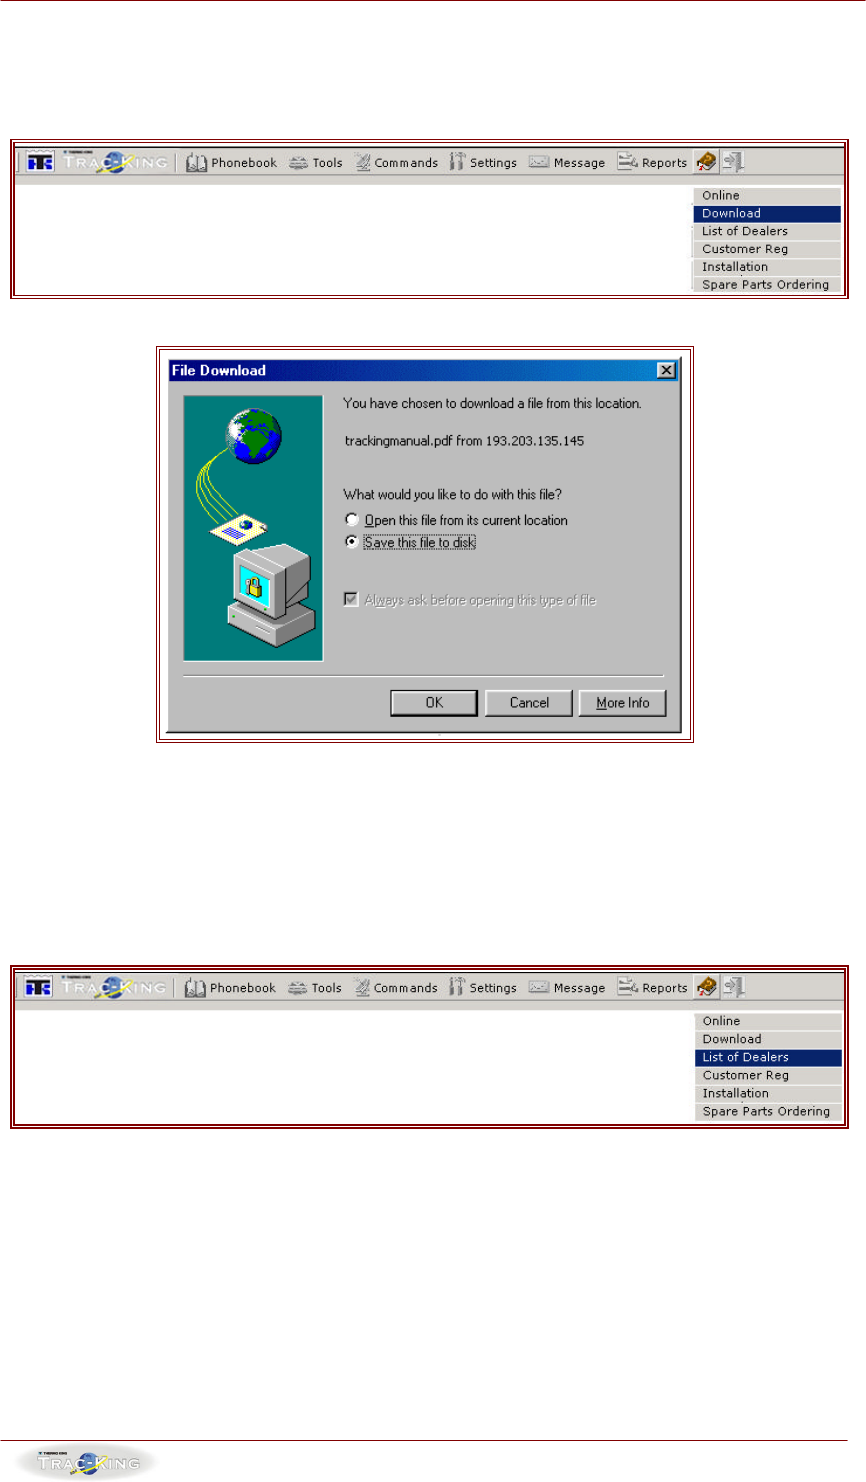
8.2 DOWNLOAD HELP FILE
This opens up a download dialog box with which to download the Help Manual in a
.pdf format. Click on the following menu option to access this file:
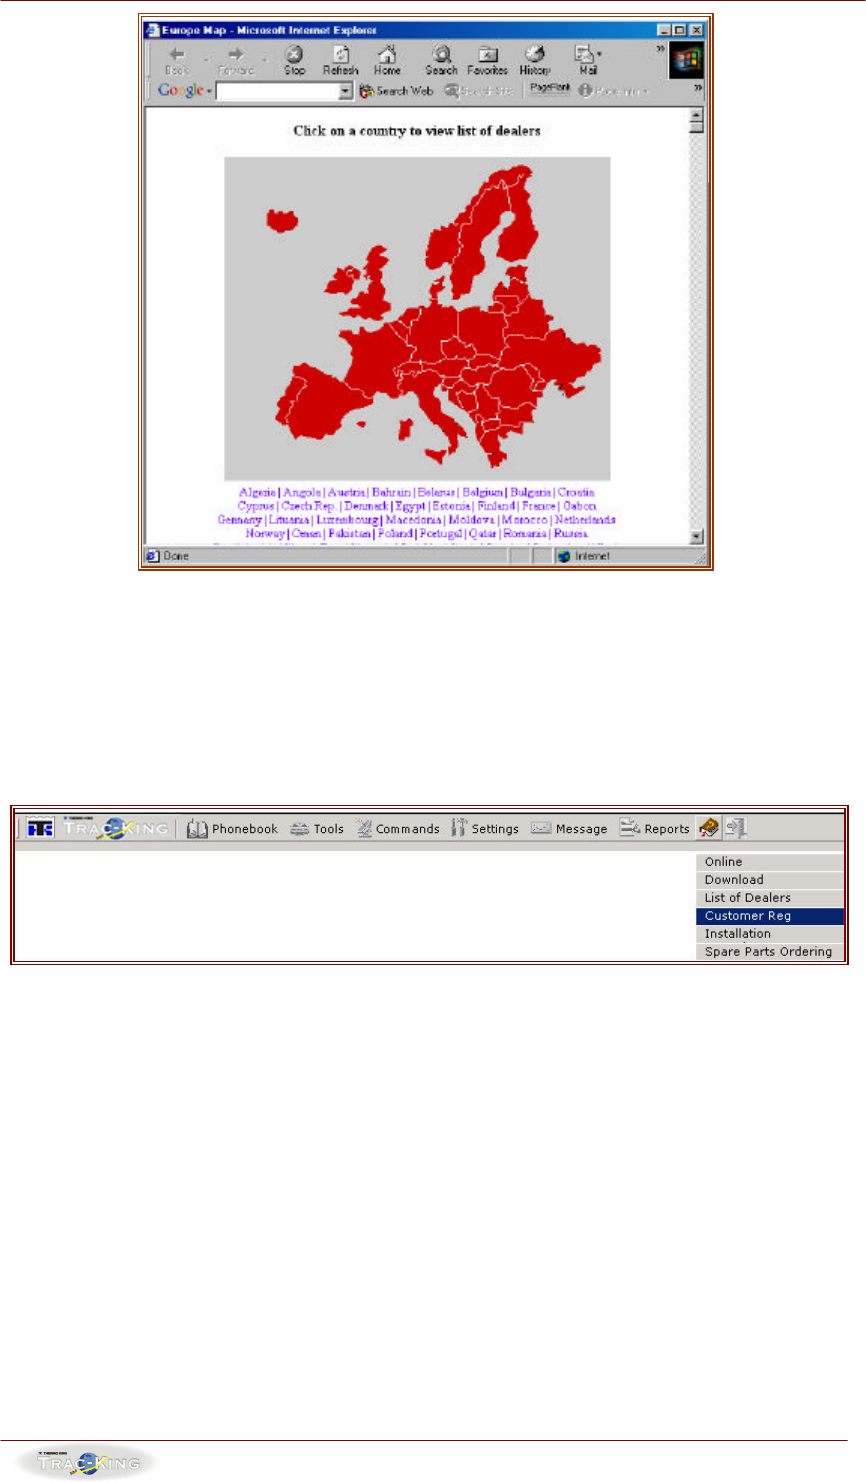
8.3 DEALER DETAILS
This section contains details of all of the Thermo Kin dealers in Europe and their
locations and contact information. Access to this feature is through selecting the
following menu option:
This will open up the following window:
Web User Manual Doc. Issue 08/03/02
Rev. 3.1
- 28 -
Click on the countries to obtain details of the dealers located in these countries.
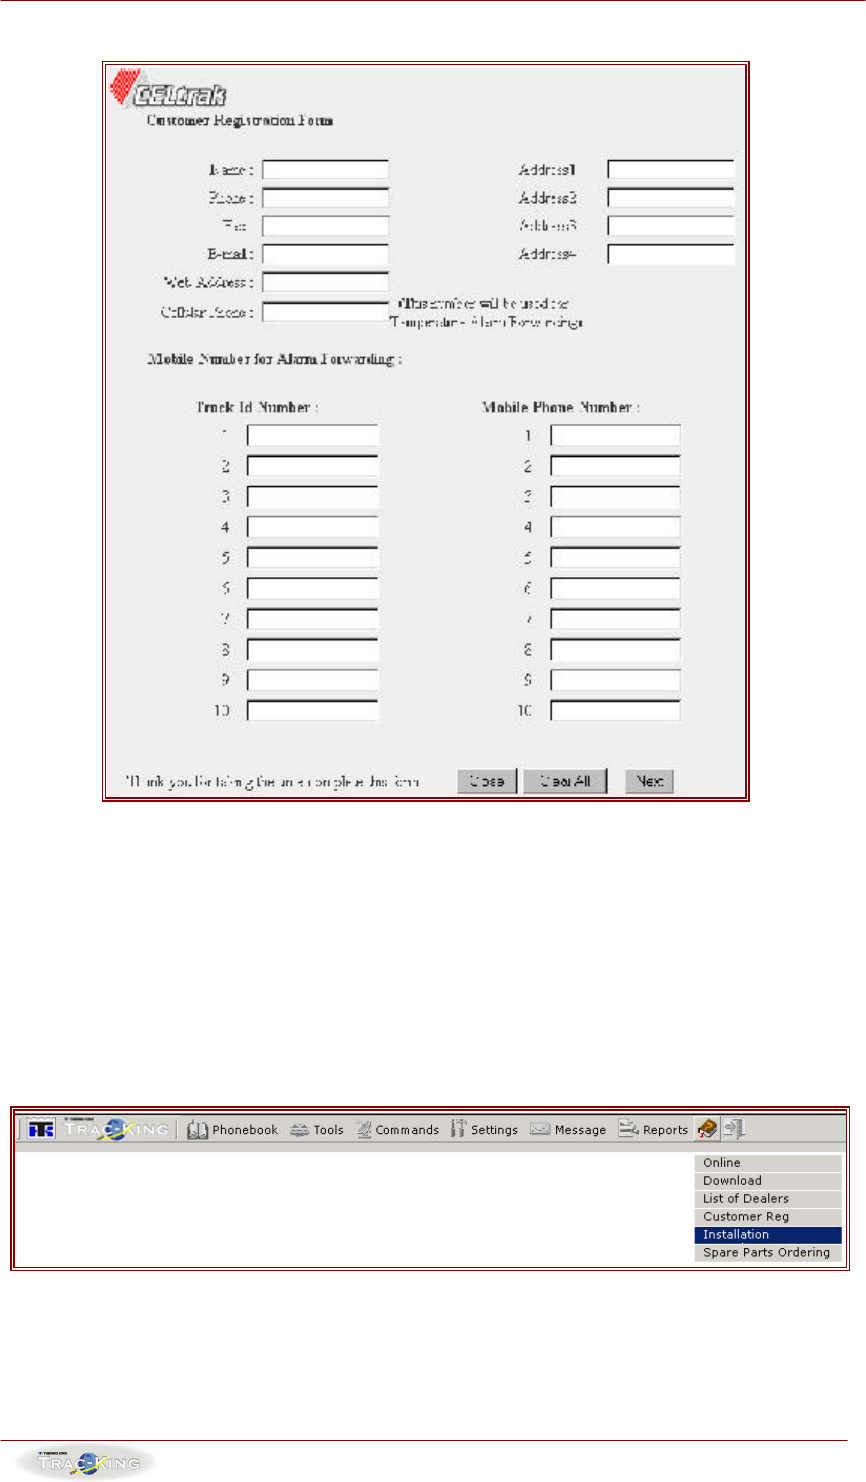
8.4 CUSTOMER REGISTRATION FORMS
This provides dealers with a registration form to register new customers and new
units on the central server for the purposes of polling and fleet management. This
can be accessed by clicking on the following menu option.
Web User Manual Doc. Issue 08/03/02
Rev. 3.1
- 29 -
This will open up the registration form as follows:
1. When all of the required fields have been completed click on the “Next”
button.
2. This will issue you a statement of information.
3. If this statement is correct click “Send” and the information will be submitted
for registration.
8.5 INSTALLATION INSTRUCTIONS
To download installation instructions for the different Trac-King units please click
on the following menu option.
Web User Manual Doc. Issue 08/03/02
Rev. 3.1
- 30 -
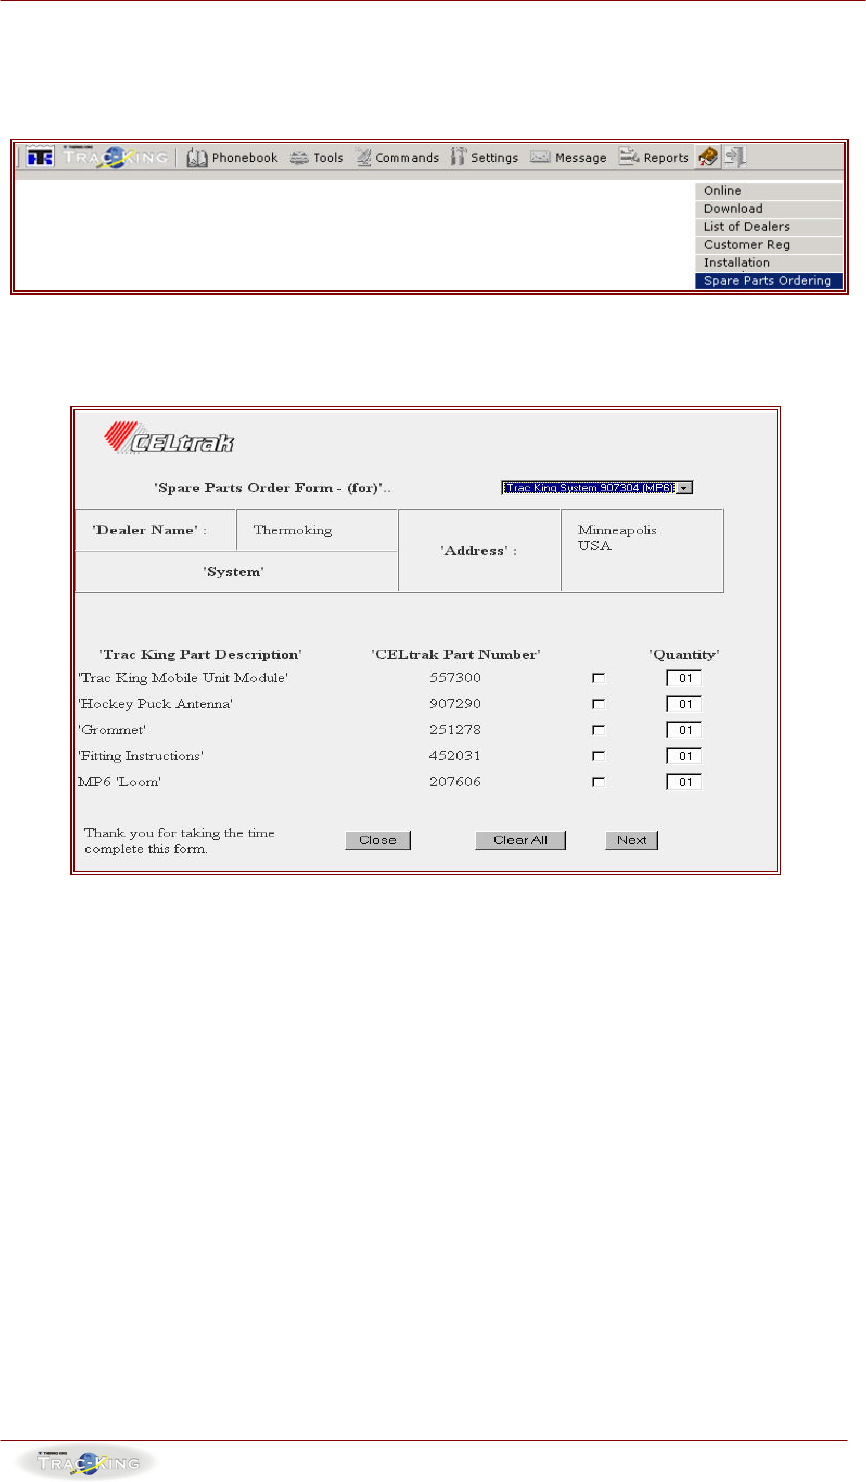
8.6 SPARE PARTS ORDER FORMS
This will allow you to submit orders for spare parts. Access to this function is
available by selecting the following menu option.
This will open up a window as follows:
1. Click on the “Checkboxes” and select the quantity of the items that you wish
to order.
2. When you have completed your selections click on the “Next” button.
3. This will provide you with a statement of the items ordered.
4. If this statement is correct click on the “Send” button and your order will be
submitted for processing.
Web User Manual Doc. Issue 08/03/02
Rev. 3.1
- 31 -
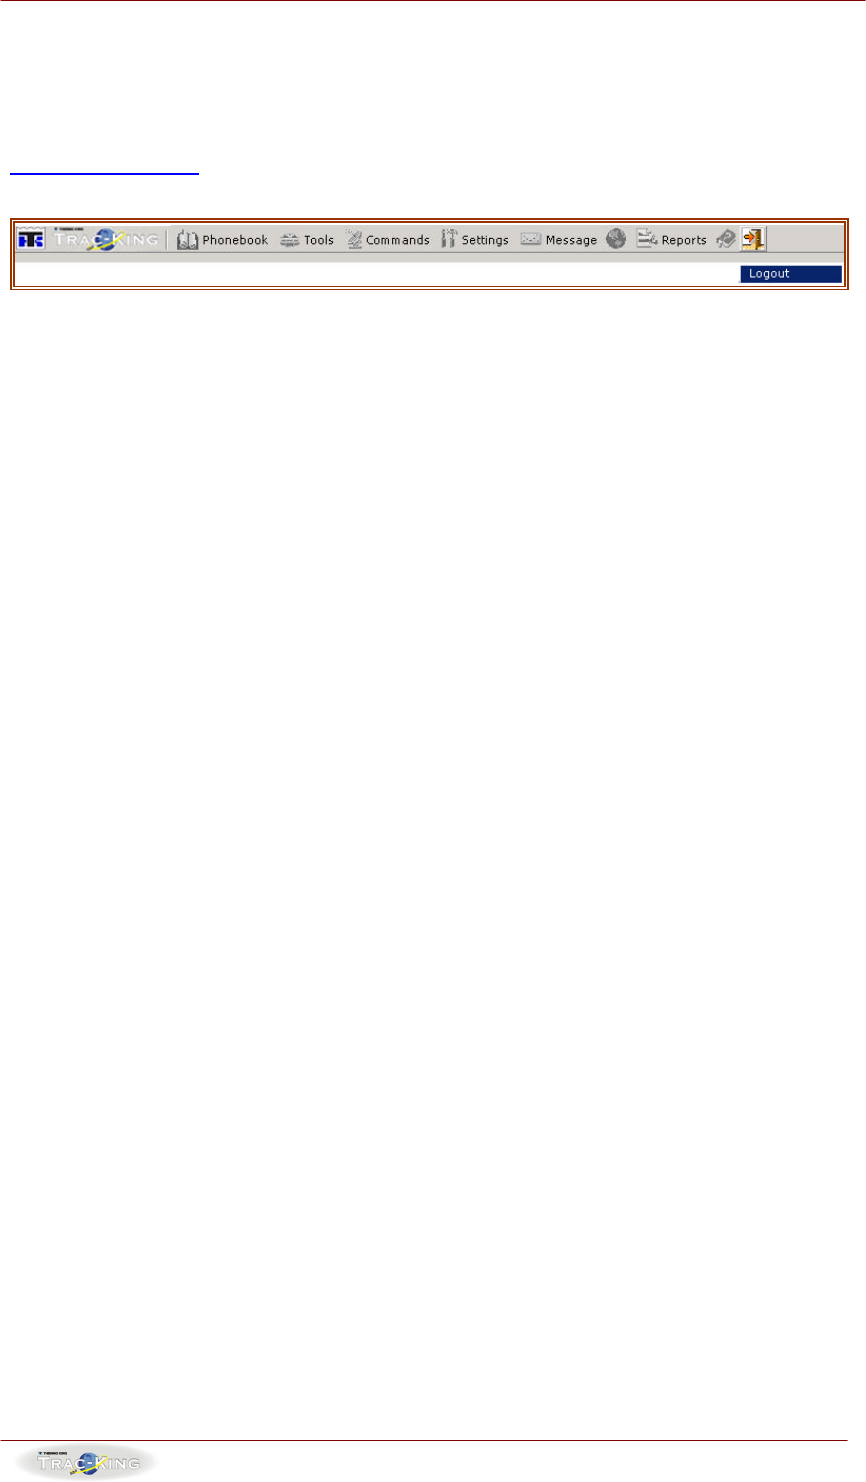
9. LOGOUT
This logs you out of the Trac-King service and brings you back to the homepage
www.trac-king.com. Clicking on the log out button as identified below will perform
this function.