Thermo Scientific TDFTI Toxic Substance Detector User Manual
Thermo Scientific, Inc. Toxic Substance Detector
User Manual
Thermo Scientific
TruDefender FT
TruDefender FTi
User Guide
110-00055-02
© 2011 Thermo Fisher Scientific Inc. All rights reserved.
TruDefender and GRAMS are registered trademarks of Thermo Fisher Scientific Inc. in the United States.
SureFire is a registered trademark of SureFire, LLC.
Thermo Fisher Scientific Inc. provides this document to its customers with a product purchase to use in the product
operation. This document is copyright protected and any reproduction of the whole or any part of this document is strictly
prohibited, except with the written authorization of Thermo Fisher Scientific Inc.
The contents of this document are subject to change without notice. All technical information in this document is for
reference purposes only. System configurations and specifications in this document supersede all previous information
received by the purchaser.
Thermo Fisher Scientific Inc. makes no representations that this document is complete, accurate or error-free and
assumes no responsibility and will not be liable for any errors, omissions, damage or loss that might result from any
use of this document, even if the information in the document is followed properly.
This document is not part of any sales contract between Thermo Fisher Scientific Inc. and a purchaser. This document shall
in no way govern or modify any Terms and Conditions of Sale, which Terms and Conditions of Sale shall govern all
conflicting information between the two documents.
P
Thermo Scientific TruDefender FT and TruDefender FTi User Guide 1
Preface
The Thermo Scientific TruDefender FT instrument is
an FTIR spectrometer designed for use by first
responders, homeland security, military, law
enforcement, and forensic chemistry personnel.
Compact and lightweight, this instrument is intended
for rapid field identification of unknown solid and
liquid samples.
This guide describes how to perform a scan with the
TruDefender® FT instrument, interpret scan results,
save and export results, and maintain the instrument. If
you own a TruDefender FTi model, you can also
wirelessly send a scan as an email or an SMS message.
Contacting Us
Contact Thermo Fisher Scientific any time for
information or assistance.
Telephone (USA) 1-800-374-1992
(International) +1-978-642-1100
Email support@chemid.thermofisher.com
Website www.thermoscientific.com/chemID-support
Mail 46 Jonspin Road, Wilmington, MA 01887
2 TruDefender FT and TruDefender FTi User Guide Thermo Scientific
Preface
Safety Notices
The TruDefender FT instrument is specifically
designed to be used in an everyday environment in the
field and is therefore considerably more rugged than a
laboratory instrument.
However, the user should recognize that this is a
precision scientific instrument that should be treated
with care. Abuse and mistreatment may lead to a
degradation of performance or premature failure.
CAUTION
Do not use the TruDefender FT instrument unless you have been trained in its use.
CAUTION
There are no user-adjustable components inside the instrument. The TruDefender FT battery
compartment door may be opened, but do not open the device or modify the electronics within. All
service operations must be performed by Thermo Fisher Scientific or an authorized service agent of
Thermo Fisher Scientific. Any attempt by the user to open the instrument will render the warranty
null and void.
CAUTION
Use of controls, adjustments or performance of procedures other than those specified herein or
those specified by Thermo Fisher Scientific personnel may result in a hazardous condition.
CAUTION
Follow your organization's procedure and regulations for the handling of unknown substances.
CAUTION
The TruDefender FT instrument is not certified to be intrinsically safe, and the user should take the
necessary precautions when using the unit.
CAUTION
When wireless transmission is enabled, maintain a distance of 7.9 inches (20 cm) between the
instrument and your head and body.
CAUTION
If there is a possibility that you may be sending messages wirelessly with the instrument, do not attach
the instrument to your belt clip or hang it on a shoulder strap.

Thermo Scientific TruDefender FT and TruDefender FTi User Guide 3
Start
1
Getting Started
4Instrument Front Diagram
4 Sample Crusher Diagram
5Instrument Bottom Diagram
5 Carrying Case Contents
6Powering the Instrument
6Opening and Closing the Access Door
7Changing the Rechargeable Battery
7 Inserting the Disposable Batteries
7Using the Wall Plug Adapters
8 Using the Memory Card
8Changing System Date or Time
8 Changing the System Language
4 TruDefender FT and TruDefender FTi User Guide Thermo Scientific
1 Getting Started
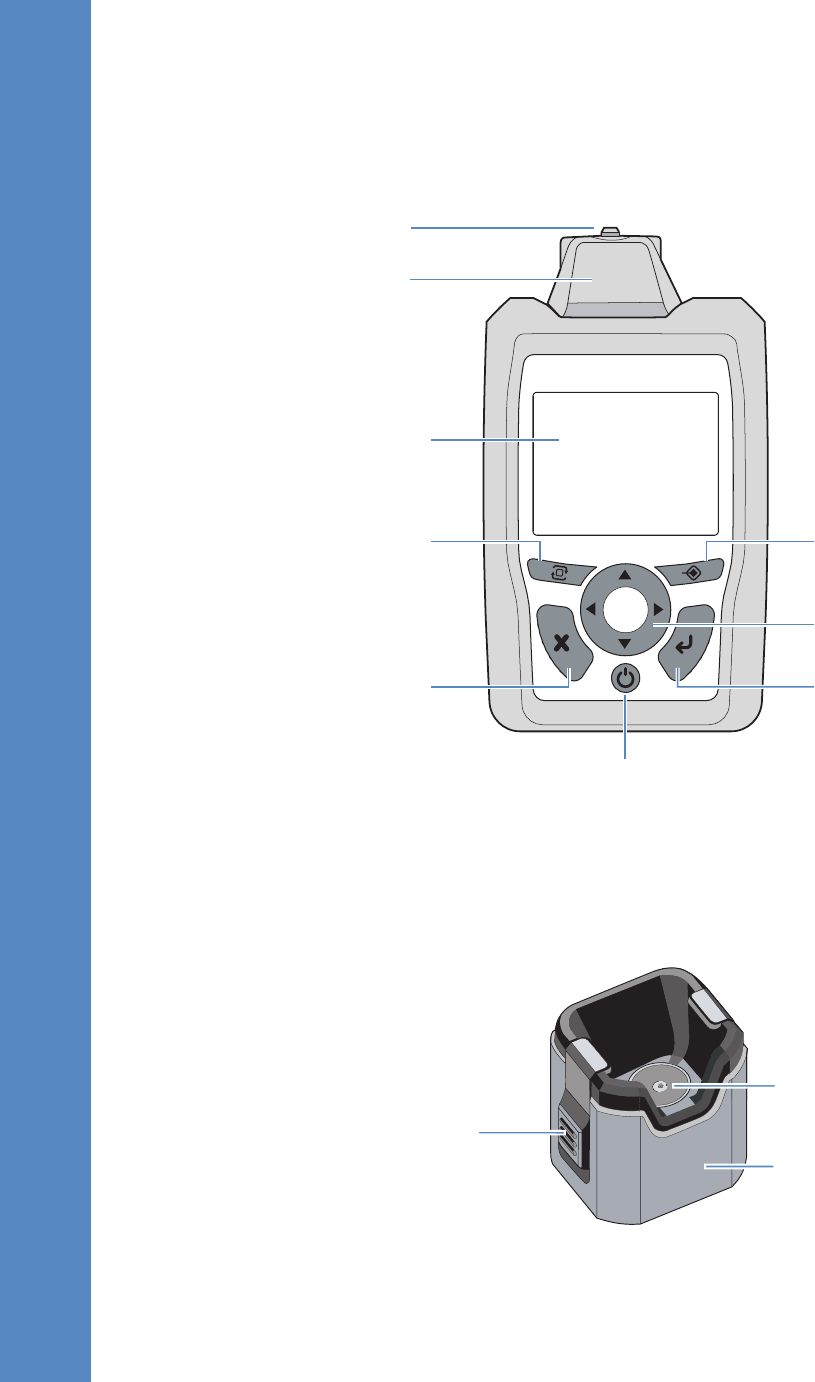
Instrument Front Diagram
Sampling tip
Display
Quick scan key
Displays the scan screen or
initiates a scan
Enter key
Enacts a menu selection or
accepts changes made to a screen
Wake/Sleep key
Turns instrument on or off
or puts it into sleep mode
Cancels a screen without
accepting any changes
made to it. Returns to the
previously displayed
screen. Press and hold to
return to the Main menu.
Escape key
Flips the display screen
Flip screen key
Arrow keys
Select menu items
Nose
Sample Crusher Diagram
Boot
Latch
Sampling platform
Thermo Scientific TruDefender FT and TruDefender FTi User Guide 5
1 Getting Started
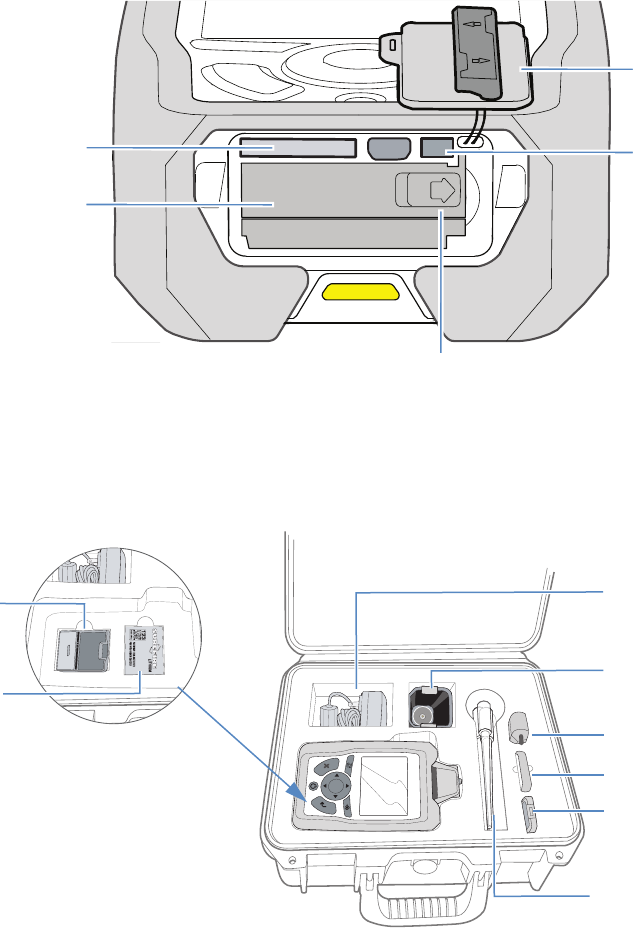
Instrument Bottom Diagram
Battery compartment
door
Open access door
Memory card slot
Slide door in direction of arrow to open
Power cable connector
Carrying Case Contents
Memory card reader
Memory card
Sample crusher
Spare rechargeable battery
Sampling sticks, pipettes,
spatulas, swabs, alcohol
wipes
Battery
charger
Disposable
batteries
Power cable
and adapters
6 TruDefender FT and TruDefender FTi User Guide Thermo Scientific
1 Getting Started
Powering the Instrument
The TruDefender FT instrument can be powered by:
• A rechargeable battery (provides about 4 hours in
normal use)
• Connection to an electrical outlet (plug the AC
power cable into the power cable connector,
which is behind the access door)
• Three disposable SureFire® batteries (provide
about 5 hours in normal use)
When the display illuminates, the instrument is fully
powered and ready for operation.
The instrument has three power states: On, off, and a
power-saving mode (“sleep mode”).
NOTE
The instrument enters sleep mode if it remains
idle for several minutes while on battery power.
NOTE
Use the SureFire disposable batteries when
operating below 32°F (0°C).
To turn on the instrument
Press and hold the Wake/Sleep key until the display
backlight turns on, then release the key.
To put the instrument into sleep mode
Briefly press the Wake/Sleep key.
To turn off the instrument
Press the Wake/Sleep key for several seconds.
Opening and Closing the Access Door
The access door is designed to securely seal the battery
compartment, to protect it from contaminants.
CAUTION
When the access door on the bottom of the
instrument is open, the environmental seal is
broken, and the system is no longer water-
and dust-resistant.
To open the access door
Place your thumbs on each side of the door bar and
push in the direction of the arrows on the bar. The tabs
on both ends of the bar will disengage from the slots on
either side of the door.
To close the access door
Press the door into the opening to completely seat the
door gasket into the bottom of the instrument. Push
the door bar into the horizontal position. Make sure
that both of the bar tabs are seated in their slots.
Thermo Scientific TruDefender FT and TruDefender FTi User Guide 7
1 Getting Started
Changing the Rechargeable Battery
Be sure to turn the instrument off before removing the
rechargeable battery or the disposable batteries.
CAUTION
If you remove the rechargeable battery or the
disposable batteries when the instrument is
turned on, the instrument software is very
likely to be damaged. This damage can cause
the instrument to behave unpredictably or
even to fail to turn on. If the software is
damaged, you will need to return the
instrument for servicing.
1Turn off the instrument by pressing and holding the
Wake/Sleep key for several seconds.
2Open the access door.
3Slide the battery compartment door to the right.
The door will spring open, and the battery will
slightly eject.
4Remove the battery and insert a charged one. Make
sure that “This side up” is on top and the arrow on
the battery label is pointing toward the instrument.
5Close the battery compartment door and slide it to
the left to latch it in place.
6Close the access door.
Inserting the Disposable Batteries
Be sure to turn the instrument off before removing any
batteries. See the caution notice above.
Follow the procedure for changing the rechargeable
battery, but remove the rechargeable battery and insert
three disposable batteries.
Orient the battery poles in this order: positive,
negative, positive. See the figure inside of the battery
compartment door, which shows the correct
orientation.
Using the Wall Plug Adapters
Your instrument comes with a set of international wall
plug adapters. To install an adapter, press it into the
recess in the power cord until the adapter clicks into
place. To remove an adapter, slide the release latch
down and pull the adapter out.

8 TruDefender FT and TruDefender FTi User Guide Thermo Scientific
1 Getting Started
Using the Memory Card
When you export data, the instrument stores the data
on a memory card, which may be placed in a memory
card reader and connected to a computer.
TIP
When not in use, keep the memory card in the
carrying case.
To insert the memory card
Hold the card with the arrow pointing toward the
instrument and the notched edge at the left (see the
figure at the left) and insert it into the memory card
slot. Press the card in until it catches in place.
To remove the memory card
Push the card in, then release. The card will eject
slightly from the slot. Remove the card, using the
fingernail groove on the top edge of the card to catch
the card’s edge.
Changing System Date or Time
You can change system date and time to synchronize
with your local time.
By default, your instrument uses the mm/dd/yyyy date
format. You can switch to the dd/mm/yyyy format.
1In the Main menu, select Tools > press the Enter
key.
2Select Date/Time > press the Enter key.
3Select Month, Day, Year, Hour, Minutes, Zone, or
Format, then press the right or left arrow key until
the value that you want to set appears. (Zone is the
time zone, in hours before or after Greenwich Mean
Time, GMT.)
4Press the Escape key.
Changing the System Language
You can change the system language at any time.
NOTE
To change to a translated library, you must install
the translated version of the software.
1In the Main menu, select Tools > press the Enter
key.
2Select Language > press the Enter key.
3Select a language > press the Enter key.
Thermo Scientific TruDefender FT and TruDefender FTi User Guide 9
Scan
2
Scanning
9Follow Safe Scanning Practices
10 The Keys to Getting a Good Scan
10 Cleaning the Sampling Tip
11 Best Practices for Scanning
13 Performing a Scan
15 Reading the Activity Indicator Light
15 Speeding Scan Time by Restricting the Library Search
16 Using the Sample Crusher
17 Scanning a Volatile Liquid
17 Using the Keyboard
Follow Safe Scanning Practices
CAUTION
If you own a TruDefender FTi model, keep
the instrument at least 7.9 inches (20 cm)
from your head and body when the wireless
radio is enabled. For information on how to
determine if the radio is enabled, see
page 30.
CAUTION
Use caution when scanning shock- or friction-
sensitive materials.
Shock- or friction-sensitive materials can pose a hazard
of explosion if mishandled during the scanning process.
Examples of materials known to be shock- and friction-
sensitive include (but are not limited to) TATP,
gunpowder, nitroglycerine, and match tips.
Follow these safety precautions when performing a scan
of a material that may be shock- or friction-sensitive:
1Scan the smallest possible amount of material
(<300 µL, 1 drop, or less than 300 mg).
2Wear all necessary personal protective gear.

10 TruDefender FT and TruDefender FTi User Guide Thermo Scientific
2 Scanning
The Keys to Getting a Good Scan
The FTIR light beam emerges from the center of the
sampling tip. Because the beam can only penetrate a
few microns into a sample, to get a good scan you must
ensure that sample materials are in very close contact
with the sampling tip.
The keys to getting a good scan are:
1When scanning powders or solids, use the sample
crusher or firmly press the instrument into the
material.
2Center the sample material on the sampling tip. The
Best Practices table (see page 11) shows proper
positioning for the most common scanning
situations.
3When possible, grind powders to a fine and even
consistency.
Whenever possible, use the sample crusher to scan
powders. The sample crusher exerts the firm and
constant pressure that is necessary to ensure good
contact.
TruDefender FT generally displays results in less than
30 seconds. Scans may be prolonged or may not
finish if:
• The sample material is not in close contact with
the sampling tip.
• The sample material interacts little or not at all
with infrared light (for example, pure elements).
TIP
Dilute solutions will return a positive match for
water because water strongly interacts with
infrared light.
Cleaning the Sampling Tip
Before every background check, clean the sampling tip
thoroughly.
To clean the tip, scrub it with an alcohol wipe, then
allow it to air dry, or wipe it with a clean paper towel or
cloth. If the tip is visibly dirty, wipe off as much of the
material as possible before scrubbing the tip with an
alcohol wipe.
If the sampling tip is contaminated with an oily
substance, scrub it with mineral spirits or paint thinner.
TIP
In very cold weather, liquid from the alcohol
wipe may freeze on the sampling tip and cause
inaccurate scan results. To prevent this, remove
any frozen residue by scrubbing the sampling tip
with a paper towel or cloth.

Thermo Scientific TruDefender FT and TruDefender FTi User Guide 11
2 Scanning
Best Practices for Scanning
For this situation Do these things
Puddled liquid
At least 1/4 inch (6 mm) deep
Immerse the sampling tip in the
puddle. The instrument may touch the
underlying surface.
Non-volatile liquid in a
container
Stand the instrument on its bottom.
Place a drop of liquid on the sampling
tip.
Volatile liquid See “Scanning a Volatile Liquid” on
page 17.
Thinly spread film or
droplets of liquid
Saturate a swab with the liquid.
Press the swab firmly on the center of
the sampling tip.
Thinly spread paste Collect some of the paste on a swab.
Press the swab firmly on the center of
the sampling tip.
12 TruDefender FT and TruDefender FTi User Guide Thermo Scientific
2 Scanning
Powders If the powder is coarse, grind it to a
fine and even texture.
For best results, use the sample crusher
(see page 16).
If you cannot use the sample crusher,
firmly press the sampling tip in
contact with the powder.
TIP
If possible, grind a powder until
the granules are no larger than
grains of table salt.
Solids If the material can be ground, grind it
to a fine powder and scan it with the
sample crusher (see page 16).
If the material cannot be ground, press
the sampling tip firmly into the
material.
NOTE
To scan the inside of a coated
tablet, scrape off the coating,
finely grind the remaining
material, and scan it with the
sample crusher.
To scan the coating, scrape it off
and scan separately.
For this situation Do these things
Thermo Scientific TruDefender FT and TruDefender FTi User Guide 13
2 Scanning
Performing a Scan
NOTE
If you own a TruDefender FTi model, you can
send scan results wirelessly via a cellular
connection to an email or SMS address. For
details, see page 29.
Step 1
Choose a scanning technique (see the Best Practices
table on page 11). See page 16 for guidelines on using
the sample crusher.
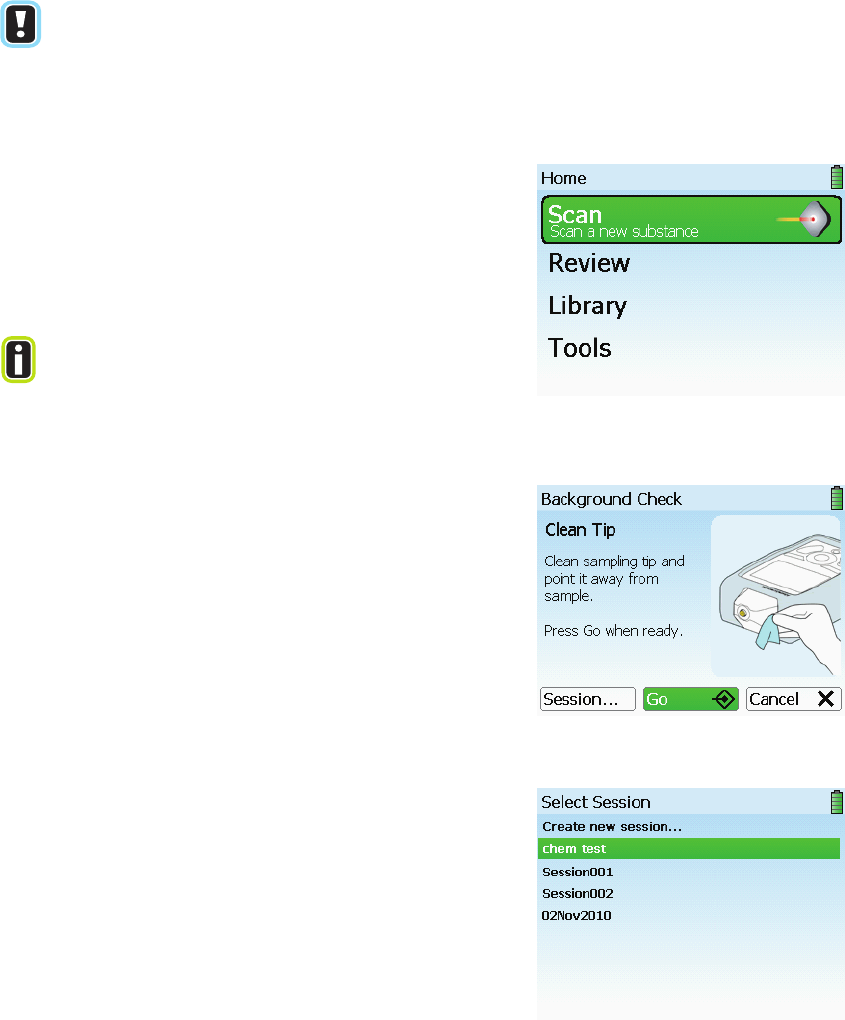
Press the Wake/Sleep key if the instrument is not
powered up. The Main menu appears.
TIP
If you are using the sample crusher or holding
the instrument upside down, press the Flip
Screen key.
Step 2
Press the Quick Scan key. The Background Check
screen appears. Clean the sampling tip now (see
page 10).
Step 3
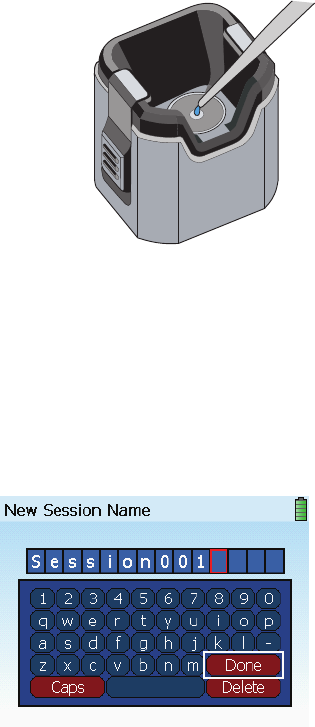
(Optional) Create a new session for the scan. Select
Session > Create new session > press the Enter key.
The New Session Name keyboard appears.
Enter a new name or accept the default name. (For help
with the keyboard, see page 17.)
14 TruDefender FT and TruDefender FTi User Guide Thermo Scientific
2 Scanning
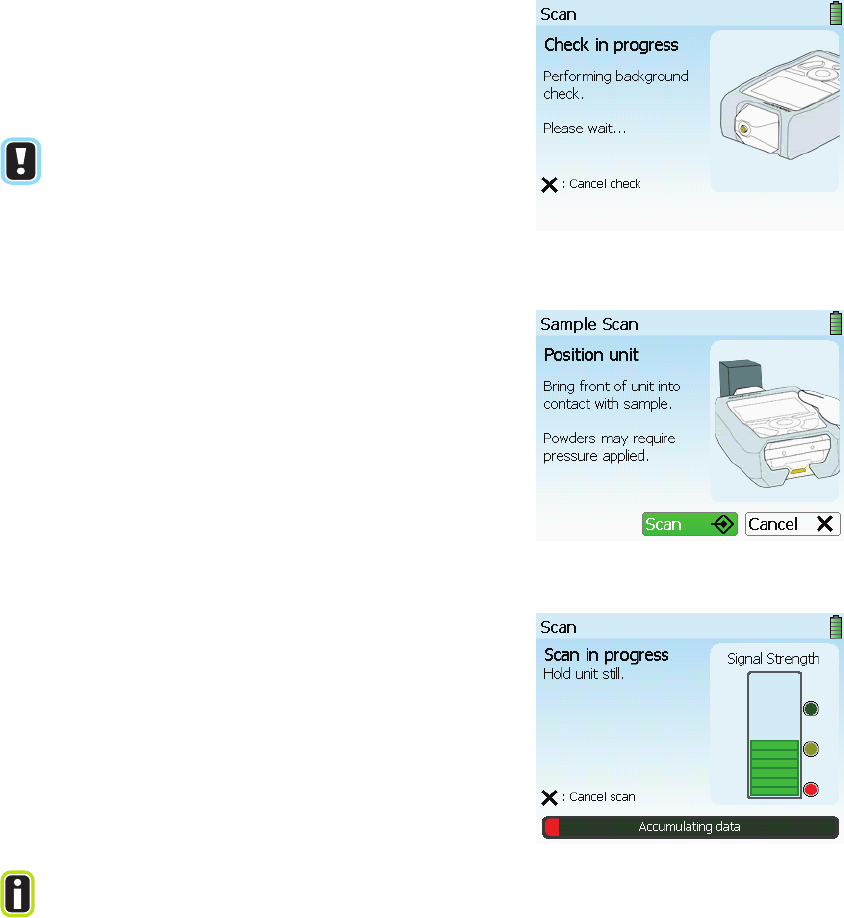
Step 4
Select Go > press the Enter key. The instrument
performs a background check. If the background has
changed since the last scan, the instrument
automatically performs a new background scan.
NOTE
Do not put the instrument in the sample
crusher for the background check. During a
background scan, the sampling tip must not be
in contact with any sample material.
Step 5
When the background check or the background scan
finishes, the Position Unit screen appears.
Place the sampling tip in contact with the sample (see
the Best Practices table on page 11). If you are using
the sample crusher, place a small amount of the test
substance on the sampling platform, then insert the
instrument (see page 16).
Step 6
To start the scan, select Scan > press the Enter key. The
Scan in progress screen appears. Hold the instrument
steady during the scan.
To monitor the progress of the scan, observe the
progress bar on the bottom of the scan screen and the
signal strength meter. The progress bar displays the
estimated time to scan completion.
When the scan finishes, the instrument displays a result
(see page 19).
TIP
If the scan time is lengthy and the signal
strength meter shows only a few or no bars, the
sampling tip may not be in good contact with the
sample, or the sample may not be scannable by
FTIR.
Thermo Scientific TruDefender FT and TruDefender FTi User Guide 15
2 Scanning
Reading the Activity Indicator Light
The activity indicator light on the bottom of the
instrument also indicates scan status:
•Blinking yellow: The scan has just begun or the
instrument is receiving adequate signal from the
sample.
•Blinking green: The instrument is receiving
strong signal from the sample.
•Blinking red: The instrument is not receiving any
signal.
•Solid green: The scan has successfully completed.
•Solid red: The scan has stopped because of some
error, or you pushed the Escape key to halt the
scan.
Speeding Scan Time by Restricting the Library Search
During the analysis phase of a scan, the instrument
normally searches the entire library to find the best
match for the scan data.
You can constrain this search to only factory-added
library items or only user-added library items.
Constraining the library search reduces scan time and is
most useful when you are only interested in detecting
the presence of particular user-added items.
For information on creating user-added library items,
see page 35.
1In the Main menu, select Tools > press the Enter
key.
2Select Libraries > press the Enter key.
3Select a display option > press the Enter key.
16 TruDefender FT and TruDefender FTi User Guide Thermo Scientific
2 Scanning
Using the Sample Crusher
CAUTION
DO NOT scan pressure-sensitive materials
with the sample crusher (see page 9).
Whenever possible, use the sample crusher to scan
powders, because it is difficult to manually apply
enough pressure to get a good scan. The sample crusher
holds a powdered sample in firm and close contact with
the sampling tip during the scan.
1Place the sample crusher on a level surface.
2Clean the sampling platform with an alcohol wipe.
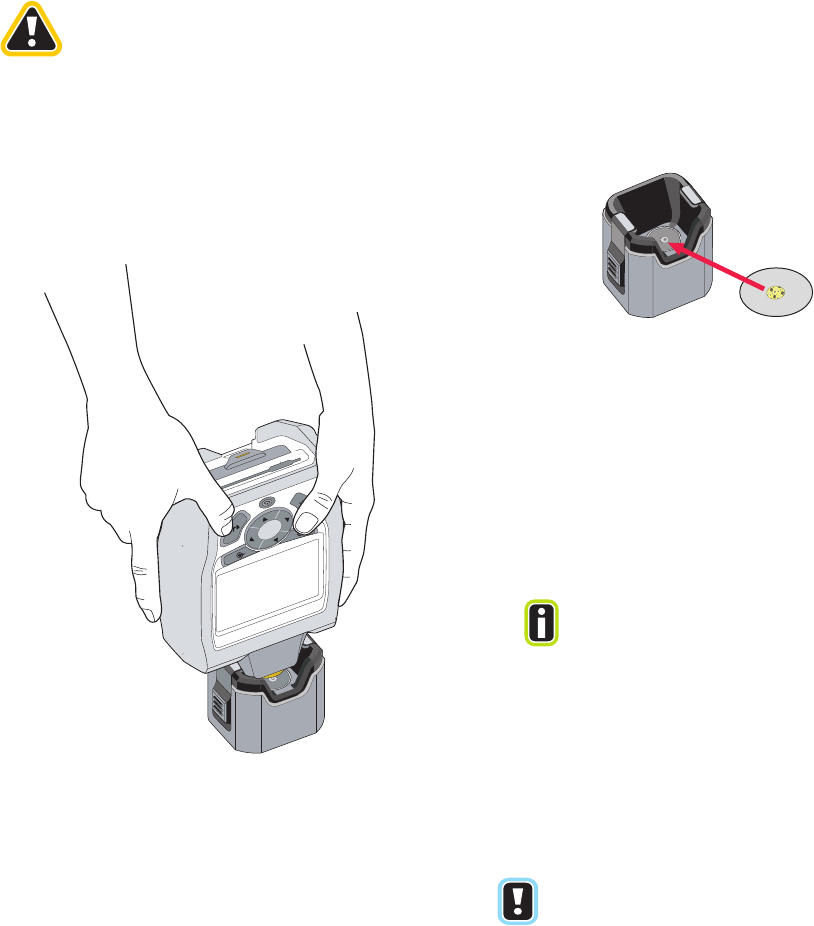
3Place a small amount of sample material in the
center of the sample platform. Use only enough
material to completely cover the center of the
platform.
4Perform steps 1 through 5 of the scanning procedure
(see page 13). Do not put the instrument into the
sample crusher until the instrument has finished
the background scan.
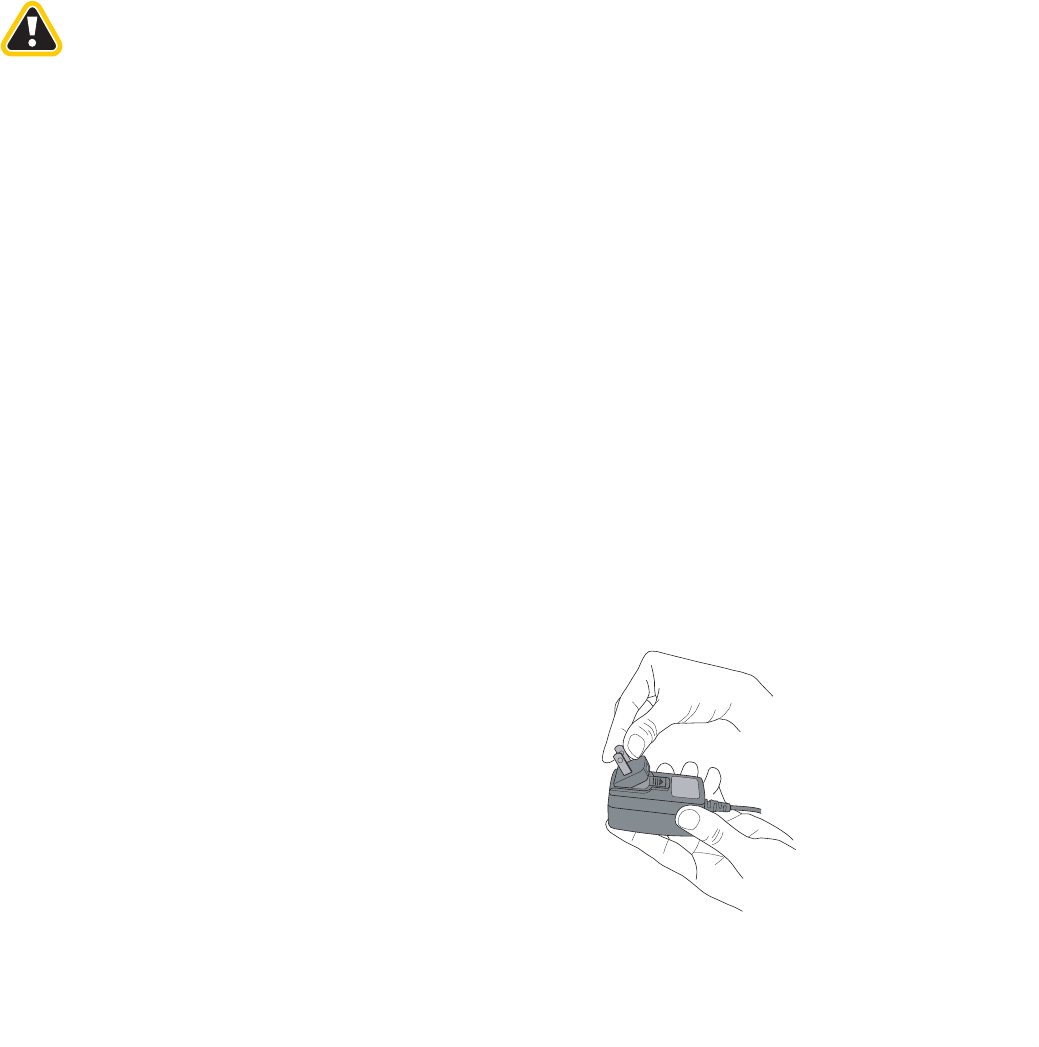
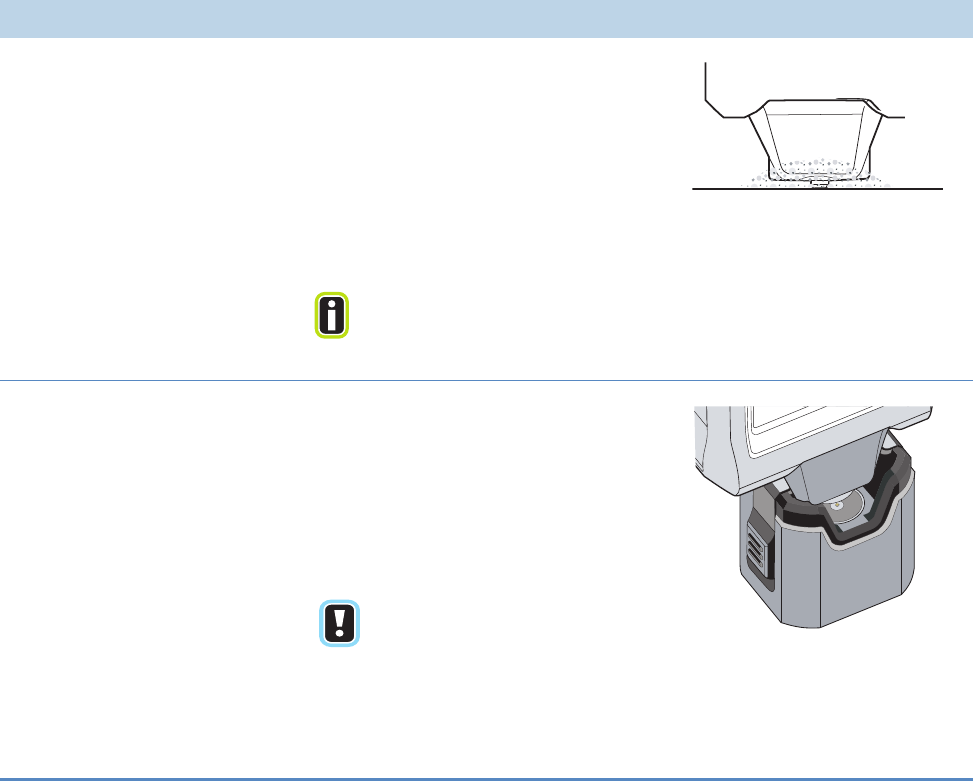
5Press the instrument into the sample crusher (see the
figure at the left) until the side latches snap into
place. If you have trouble inserting the instrument,
you may need to clean the sample crusher (see
page 42).
TIP
To minimize the risk of dislodging the sample
during insertion, hold the instrument at a
slight angle on the front-to-back axis and
insert the nose into the crusher, then
straighten the instrument and push it down
to complete the insertion.
6Initiate the scan (see step 6 on page 14).
7When finished, press the latches to release them, and
remove the instrument.
NOTE
If the scan progresses slowly, remove the
instrument and reinsert it into the sample
crusher. If scan time does not improve, stop the
scan, remove the instrument, and make sure
that the sample is centered on the sample
platform.
Thermo Scientific TruDefender FT and TruDefender FTi User Guide 17
2 Scanning
Scanning a Volatile Liquid
Use the sample crusher to scan a volatile liquid. This
will help prevent the liquid from evaporating before the
scan is complete.
1Clean the sampling platform with an alcohol wipe,
and place the sample crusher on a flat surface.
2Perform steps 1 through 4 of the procedure for
performing a scan (see page 13).
3When the Position Unit screen appears, use a pipette
to place drops of the liquid on the center of the
sample platform. The liquid must completely cover
the crystal tip in the center of the sample platform.
4Immediately place the instrument into the sample
crusher (see page 16). It is not necessary to latch the
sample crusher into place.
5Complete the scan (see step 6 on page 14).
6Remove the instrument from the sample crusher.
Using the Keyboard
The instrument displays a keyboard when you need to
enter data into the system, such as a session name.
To enter data into the keyboard
• Enter data one character at a time. When finished,
select Done > press the Enter key.
• To enter a character, use the arrow keys to select
the character > press the Enter key.
• To enter a space, select the space bar > press the
Enter key.
• To backspace delete characters, select Delete >
press the Enter key.
• To enter a capital letter or a symbol, select Caps >
press the Enter key, then select the character >
press the Enter key.
18 TruDefender FT and TruDefender FTi User Guide Thermo Scientific
2 Scanning
Thermo Scientific TruDefender FT and TruDefender FTi User Guide 19
Results
3
Understanding Results
19 Reading a Result Screen
20 Interpreting a Scan Result
22 Viewing Library Information for a Scan Result
22 Viewing the Spectrum for a Scan Result
23 Zooming and Rescaling a Spectrum
23 Overlaying a Spectrum
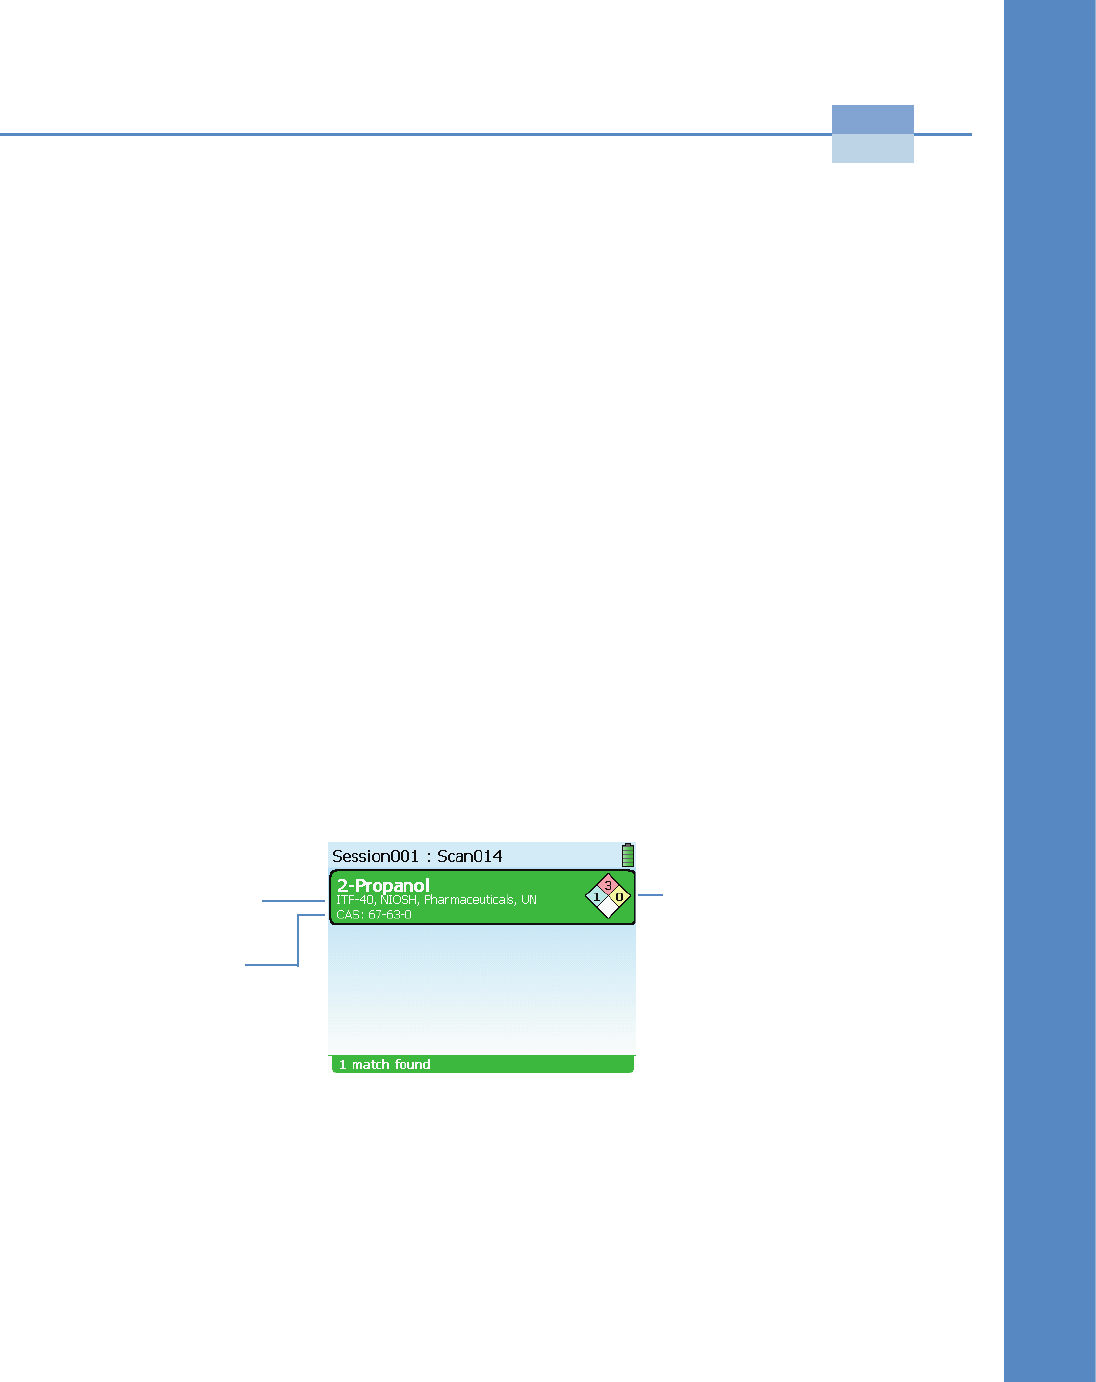
Reading a Result Screen
All result screens except the No Match result include
the information shown in the figure below.
The NFPA (National Fire Protection Association)
diamond identifies the type and level of risks that this
library item poses for emergency personnel, according
to specifications set forth in NFPA standard 704.
Library categories to which
the identified item is assigned
CAS (Chemical Abstracts
Service) number, an
international chemical naming
and categorization reference for
the library item
NFPA diamond
Color codes for the diamond:
Red: Flammability
Blue: Level of health hazard
Yellow: Chemical reactivity
White: Unique hazard codes
Number scale: 0 (no hazard) to 4
(severe risk)
20 TruDefender FT and TruDefender FTi User Guide Thermo Scientific
3 Understanding Results
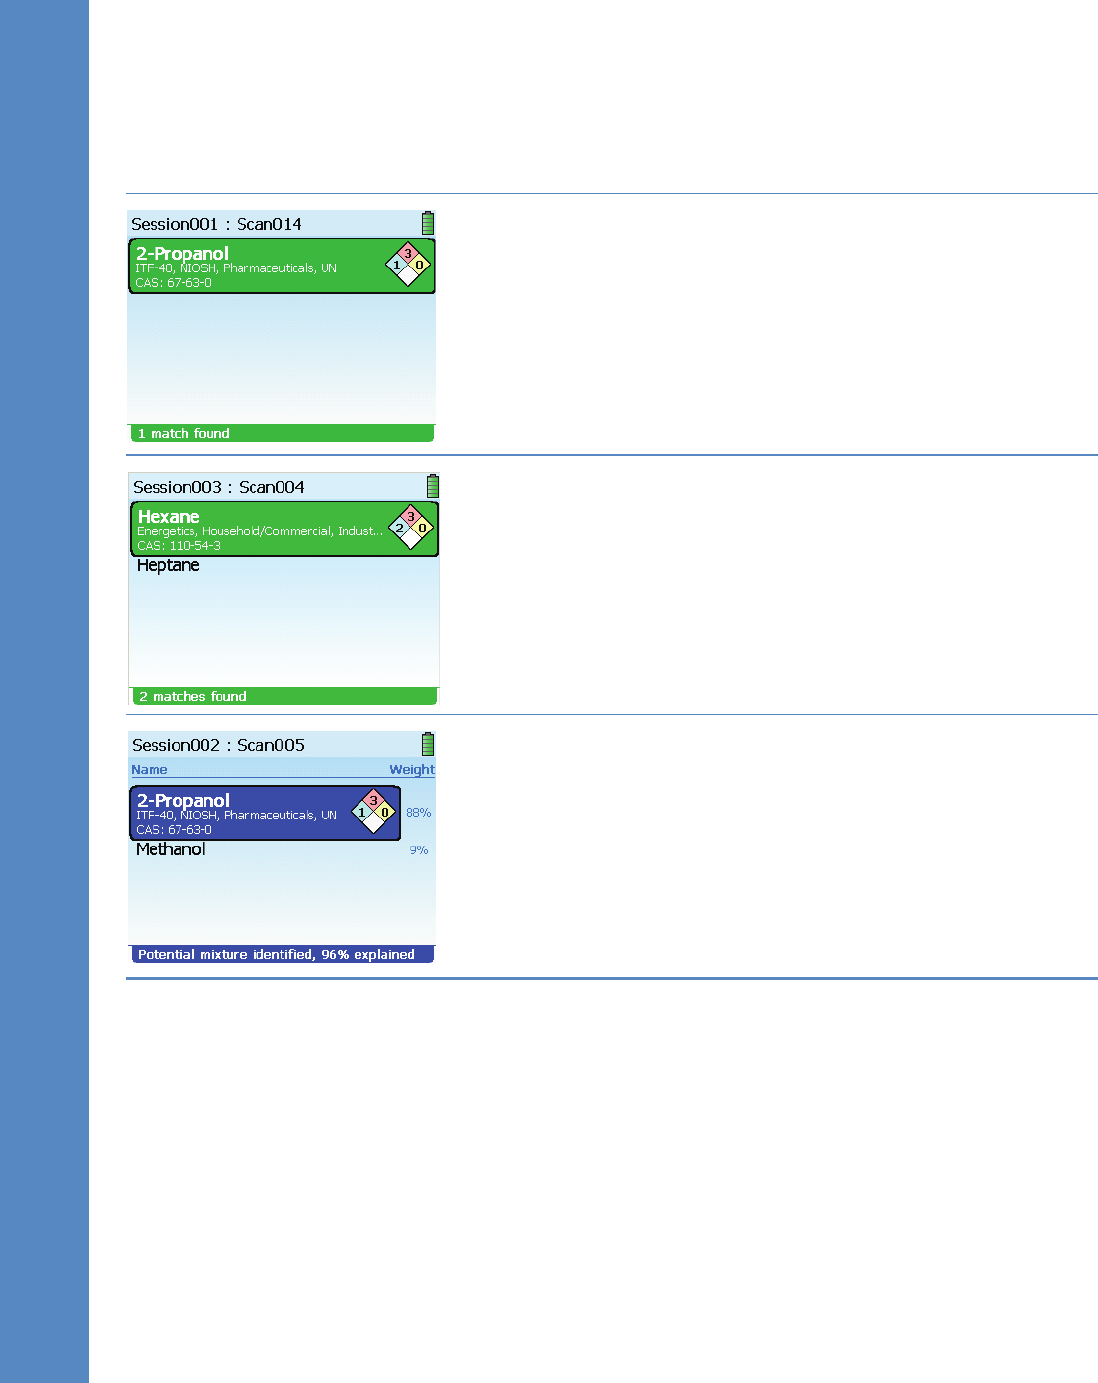
Interpreting a Scan Result
Single Positive Match
The data matches only one library item.
Multiple Positive Match
The data matches two or more library items, meaning that the sample
could be any one of them.
Mixture Match
The data matches a mixture of library items.
The percentages indicate the proportion of the data that matches the
individual items. The percentages are not concentrations.
The percentages will not add up to 100 if any of the data cannot be
matched.
Mixture identification is a complex analysis. It is more susceptible to false
positives than the Single Positive or Multiple Positive results.

Thermo Scientific TruDefender FT and TruDefender FTi User Guide 21
3 Understanding Results
Similar Item Match
The data is similar to one or more library items.
Be careful when interpreting this type of result! This screen does not mean
that the listed substances are present, only that the data resembles them in
some respects.
Possible reasons for a Similar Item match include the following:
• The sample is chemically interacting.
• The substance does not produce detectable levels of signal or is not
scannable.
• Your scanning technique was improper for the situation, so the
instrument could not collect enough data.
Consult the Best Practices table (page 11) and repeat the scan.
If this result persists, contact Thermo Fisher Scientific Customer Support.
No Match
The data did not match anything in the library, including mixtures of
library items.
The text on the No Match screen contains important information. Read
it carefully.
Possible reasons for a No Match result include the following:
• The substance does not produce detectable levels of signal or is not
scannable.
• Your scanning technique was improper for the situation, so the
instrument could not collect enough data.
Consult the Best Practices table (page 11) and repeat the scan.
If this result persists, contact Customer Support.
22 TruDefender FT and TruDefender FTi User Guide Thermo Scientific
3 Understanding Results
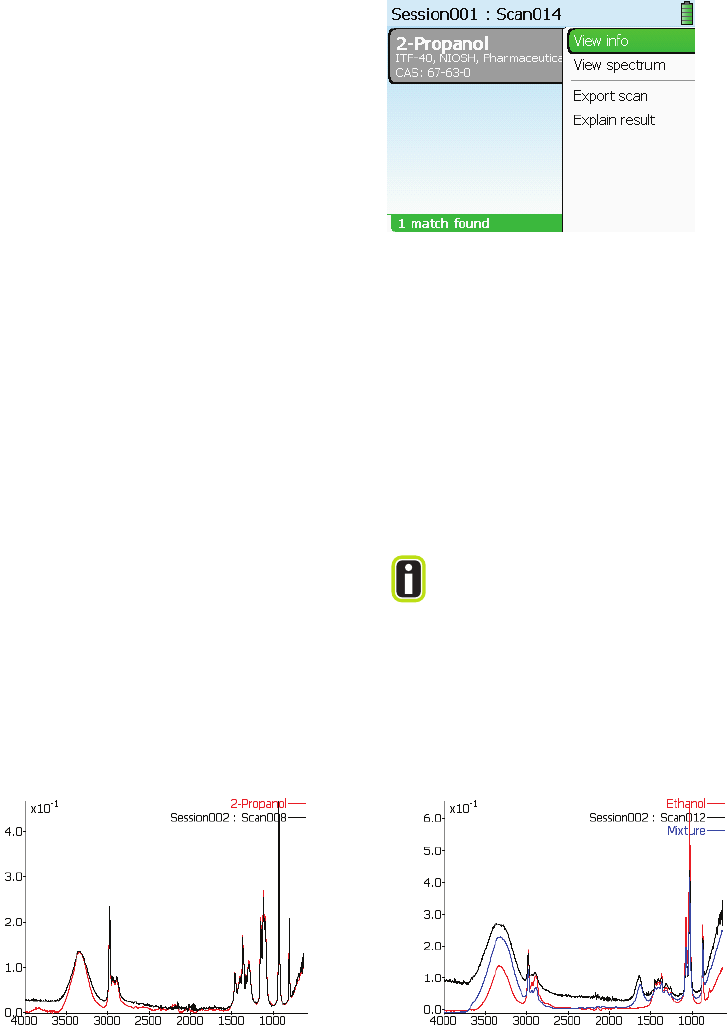
Viewing Library Information for a Scan Result
For Single Positive results, press the Enter key > select
View Info. Detailed library information for the
identified substance will appear in the display.
For result screens that identify more than one substance
(Multiple Positive, Mixture, and some Similar Match
results), use the down arrow key to select one of the
identified substances > press the Enter key > select
View Info.
Viewing the Spectrum for a Scan Result
When a scan result is inconclusive or confusing,
viewing the spectrum for the result can help you make
a positive identification.
The instrument superimposes the spectrum of the
identified substance on the spectrum of the library item
that matches the scan data.
The scan spectrum is colored black, and the library
spectrum is colored red. In the case of a Mixture result,
the instrument also displays a blue-colored spectrum
for the mixture itself.
1With the result displayed, press the Enter key.
2Select View spectrum > press the Enter key. The
spectrum appears.
3If you are viewing a Multiple Positive, Mixture, or
Similar Match result, press the down arrow to scroll
to the spectrum that you want to view.
TIP
For result screens that identify more than one
substance (Multiple Positive, Mixture, and some
Similar Match results), press the down arrow to
sequentially display the spectrum for each
substance.
Spectrum for Single Positive Match result Spectrum for Mixture result

Thermo Scientific TruDefender FT and TruDefender FTi User Guide 23
3 Understanding Results
Zooming and Rescaling a Spectrum
You can zoom a spectrum to improve the visibility of
crowded regions. Zooming shortens and widens the
peaks in a spectrum.
To make zoomed peaks more prominent, you can
rescale the spectrum. Rescaling increases the vertical
height of the spectrum peaks.
Use the arrow keys to pan to regions of interest in a
zoomed spectrum.
1With the spectrum displayed, press the Enter key.
2Select Zoom In or Zoom Out > press the Enter key
until the spectrum is magnified as you wish.
3To rescale the zoomed spectrum, press the Enter key
> select Autoscale Y > press the Enter key. The peak
heights will increase.
4Press the Escape key to close the menu.
Overlaying a Spectrum
To visually compare the patterns of the peaks in two
spectra, you can lay one spectrum on top of another.
The overlaid spectrum is colored light purple.
NOTE
An overlaid spectrum will appear on all spectra
that you display, until you clear the overlay.
To overlay a spectrum
1With a spectrum displayed (see page 22), press the
Enter key > select Overlay > press the Enter key.
2Select one of the overlay options. The spectrum for
the option that you select appears on top of the
previously displayed spectrum.
•Previous scan: The Review screen appears. Select
a stored scan > press the Enter key.
•Library item: The library appears. Manually
scroll to an item > press the Enter key. See page 35
for information on finding library items.
•Search library: The Library Search screen
appears. See page 36 for information on searching
the library.
To clear an overlay
With the spectrum and its overlay displayed, press the
Enter key > select Clear overlay.
24 TruDefender FT and TruDefender FTi User Guide Thermo Scientific
3 Understanding Results

Thermo Scientific TruDefender FT and TruDefender FTi User Guide 25
Review
4
Reviewing Stored Scans and Sending Messages
26 Viewing a Stored Scan
26 Renaming a Scan or a Session
27 Exporting Scans or Sessions
28 Printing a Report File
28 Viewing Exported SPC Files
29 Deleting Scans and Sessions
29 About Sending Email and SMS Messages
29 About the Wireless Radio Power States
30 Reading the Wireless Service Icons
30 Wirelessly Sending a Scan
31 Managing Contacts
31 Adding a Contact When You Send a Scan
32 Adding Contacts Via the Wireless Tools
32 Adding a Contact Via the Contact List Web Page
33 Editing or Deleting a Contact Via the Contact List Web Page
33 Synchronizing the Contact Lists
33 Specifying the Files That Are Attached to Emailed Scans
34 Manually Enabling and Disabling the Wireless Radio

26 TruDefender FT and TruDefender FTi User Guide Thermo Scientific
4 Reviewing Stored Scans and Sending Messages
Viewing a Stored Scan
Scans are stored in the session folder that is specified in
the Select Session screen (see page 13). If you never
create a new session, scans are stored in the default
session folder.
Use the left and right arrow keys to scroll through the
session folders. Use the up and down arrow keys to
scroll through stored scans.
1In the Main menu, select Review > press the Enter
key.
2Select a scan > press the Enter key.
3Select Open scan > press the Enter key. The scan
result appears.
Renaming a Scan or a Session
You can rename any single scan or session. 1In the Main menu, select Review > press the Enter
key.
2Select the scan or session > press the Enter key.
3Select Rename scan or Rename session > press the
Enter key.
4Enter a new name. For help with the keyboard, see
page 17.

Thermo Scientific TruDefender FT and TruDefender FTi User Guide 27
4 Reviewing Stored Scans and Sending Messages
Exporting Scans or Sessions
You can export scans to the memory card and transfer
them to a computer for analysis, printing, or emailing.
If you own a TruDefender FTi model, you can also
export a single scan wirelessly as an email or SMS text
message (see page 30).
The TruDefender FT instrument provides these export
formats:
•Report file (.jpg): A printable file that
summarizes information about a scan (for an
example, see page 28).
•Reachback file (.arb): A file that encodes scan
data, instrument calibration data, and the system
log. Thermo Fisher Scientific Customer Support
uses Reachback files to diagnose problems.
•Text file (.txt): A plain text file.
•SPC file (.spc): A special format that can be read
by data analysis packages.
NOTE
You can also export a single scan directly from a
result screen. Press the Enter key, then select
Export scan.
1Open the access door and insert the card into the
memory card slot. Be sure to orient the card
correctly: Arrow pointing toward the instrument and
notched edge at the left (see page 8).
2In the Main menu, select Review > press the Enter
key.
3Select either a session or an individual scan > press
the Enter key.
4Select Export Scan or Export Session > press the
Enter key.
5Select an export format > press the Enter key. The
instrument exports the selected scan or all scans in
the selected session to the memory card.
6Remove the memory card and place it in the card
reader, then attach the card reader to a USB port on
a computer.
28 TruDefender FT and TruDefender FTi User Guide Thermo Scientific
4 Reviewing Stored Scans and Sending Messages
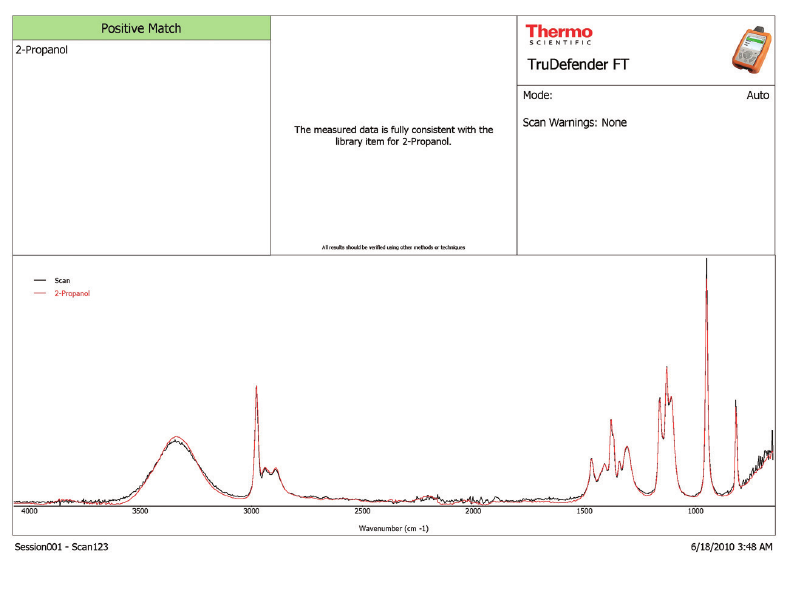
Printing a Report File
Export the scan as a JPEG file (see page 27) and print
the file from your computer. Here is a sample report
file for 2-propanol.
Viewing Exported SPC Files
To view SPC files on your computer, you must have
software that can read them. Thermo Fisher Scientific
recommends GRAMS® software, an integrated suite of
spectroscopic software tools that is available from
Thermo Fisher Scientific (see http://www.thermo.com/
grams). You can also use a freeware program called
SpekWin32, available at http://www.effemm2.de/
spekwin/index_en.html.
Thermo Scientific TruDefender FT and TruDefender FTi User Guide 29
4 Reviewing Stored Scans and Sending Messages
Deleting Scans and Sessions
When you delete all scans at once, the instrument
deletes all scans and all sessions except for the default
session. When finished, the instrument has one empty
session with the default session name.
NOTE
Deleted scans and sessions cannot be
recovered.
To delete a single scan or session
1In the Main menu, select Review > press the Enter
key.
2Select the scan or session > press the Enter key.
3Select Delete scan or Delete session > press the
Enter key > select Yes > press the Enter key.
To delete all scans
1In the Main menu, select Tools > press the Enter
key.
2Select Clear sessions > press the Enter key > select
Yes > press the Enter key.
About Sending Email and SMS Messages
If you own a TruDefender FTi model, you can
wirelessly send scans to:
• An email address
• An SMS number
• The Thermo Fisher Scientific Reachback team
(An SMS transmission is a text message. SMS stands
for “Short Message Service.”)
Wireless transmissions are sent over mobile phone
networks. Reception is governed by cell phone coverage
in your area. The instrument displays signal strength
bars to help you gauge reception.
NOTE
The instrument can only send messages. It
cannot receive incoming messages.
About the Wireless Radio Power States
The wireless radio is enabled when you turn on the
instrument after a complete power-down. If, though,
you wake the instrument from a sleep, the radio is not
enabled. (See “Powering the Instrument” on page 6 for
an explanation of the power states.)
When you initiate a scan, the instrument disables the
radio. The radio remains disabled until you send a
scan, which automatically enables the radio.
You can also enable and disable the radio manually (see
page 34).
NOTE
When the radio is disabled, a red X appears on
top of the signal strength bars:

30 TruDefender FT and TruDefender FTi User Guide Thermo Scientific
4 Reviewing Stored Scans and Sending Messages
Reading the Wireless Service Icons
When the radio is enabled, signal strength bars and
service icons appear at the top right of every screen.
The instrument uses different services for email and
SMS transmissions.
Just like a mobile phone, the signal strength bars
roughly indicate radio signal strength, not transmission
speed.
The service icons include:
• Reachback (an email service)
• Email
• SMS
Wirelessly Sending a Scan
You can send a scan to a contact immediately after the
result appears, or you can send a stored scan.
NOTE
By default, when you email a scan the
instrument attaches the scan report file to the
email. You can change this default to send other
types of files (see page 33).
TIP
You can add a new contact and immediately
send a scan to it (see page 31).
To send immediately after a scan finishes
1When the result appears, press the Enter key > select
Export Scan > press the Enter key.
2Select Wireless > press the Enter key.
The instrument enables the radio, and the contact
list appears. (The instrument disabled the radio
during the scan.)
3Select a contact > press the Enter key.
To send a stored scan
1In the Main menu, select Review > press the Enter
key.
2Select a scan to send > press the Enter key.
3Select Export Scan > press the Enter key.
4Select Wireless > press the Enter key.
If necessary, the instrument re-enables the wireless
radio.
5Select a contact > press the Enter key.

Thermo Scientific TruDefender FT and TruDefender FTi User Guide 31
4 Reviewing Stored Scans and Sending Messages
Managing Contacts
Your instrument can hold up to 25 contacts. A contact
consists of an email address or SMS number and an
optional contact name.
You can add one contact immediately before sending a
scan (see below) or multiple contacts at any time via
the Wireless Tools menu (see page 32).
NOTE
If your list is full and you enter another contact,
the least frequently used contact is dropped
from the list (excluding the Reachback contact).
You can also add one or more contacts by entering
them into a contact list on a special Customer Support
web page and then synchronizing your instrument
contact list with this web page (see page 32). The
synchronization process performs a two-way update,
resulting in an identical set of contacts on the
instrument and the web page.
Adding a Contact When You Send a Scan
To place the new contact on the Customer Support
contact list web page, synchronize the lists (see
page 33).
TIP
Use the arrow keys to scroll through the
instrument contact list.
1With the scan result displayed, press the Enter key >
select Export Scan > press the Enter key.
2Select Wireless > press the Enter key.
3Select New E-mail Address or New Phone Number
> press the Enter key.
4Enter the email address or the telephone number >
select Done. For help with the keyboard, see
page 17.
5(Optional) Enter a contact name.
6Select Send > press the Enter key.
32 TruDefender FT and TruDefender FTi User Guide Thermo Scientific
4 Reviewing Stored Scans and Sending Messages
Adding Contacts Via the Wireless Tools
To place the new contact on the Customer Support
contact list web page, synchronize the lists (see
page 33).
1In the Main menu, select Tools > Wireless Tools >
press the Enter key.
2Select Add Contact > press the Enter key > select
Contact Type > press the Enter key.
3Select E-Mail or Phone number > press the Enter
key.
4Select Address in the Add Contact screen > press the
Enter key > enter the address or telephone number
(for help with the keyboard, see page 17).
5Select Done > press the Enter key.
6(Optional) Select Name in the Add Contact screen >
press the Enter key > enter a contact name > select
Done > press the Enter key.
7Select Add Contact > press the Enter key.
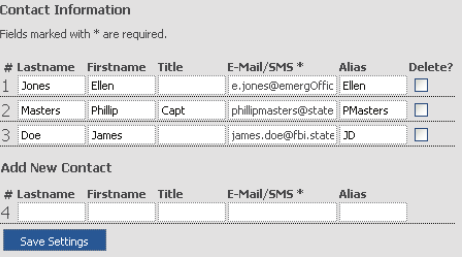
Adding a Contact Via the Contact List Web Page
The contact list web page provides a decentralized way
to add contacts to an instrument in the field.
Sample Contact List Web Page
To view the web page
1Navigate to the Customer Support website:
www.thermoscientific.com/chemID-support
> click TruDefender FT.
2Enter the serial number and support code for your
instrument > click Log On. The TruDefender FT
Customer Support page appears.
3Click Edit your customer and contact information.
To add a contact via the web page
1In the Add New Contact row, enter an email address
or SMS number for the contact.
2(Optional) Enter first and last name and an alias.
3Click Save Settings. The website adds the new
contact to the list.
4Synchronize the contact lists (see page 33).
Thermo Scientific TruDefender FT and TruDefender FTi User Guide 33
4 Reviewing Stored Scans and Sending Messages
Editing or Deleting a Contact Via the Contact List Web Page
To edit or delete a contact that is on your instrument,
you must make the change on the contact list web page
and then synchronize the two lists (see below). You
cannot edit or delete a contact directly on the
instrument.
1View the web site contact list (see page 32).
2To edit a contact, revise the displayed information.
To delete a contact, select its Delete check box.
3Click Save Settings.
4Synchronize the contact lists (see below).
Synchronizing the Contact Lists
When you synchronize the contact lists, the instrument
and the contact list web page exchange data, so that
each shows the same set of contacts.
In addition, if you have deleted or edited a contact on
the web page, synchronization makes those changes on
the instrument contact list.
1In the Main menu, select Tools > Wireless Options
> press the Enter key.
2Select Synchronize Contacts > press the Enter key.
Specifying the Files That Are Attached to Emailed Scans
You can attach any combination of the following types
of files to emailed scans:
• Report file (.jpg format)
• SPC file (.spc format)
• Reachback file (.arb format)
For an explanation of these file formats, see page 27.
1In the Main menu, select Tools > Wireless Options
> press the Enter key.
2Select Choose E-mail Attachments > press the
Enter key.
3Select the file types that you want to attach > press
the Enter key. You can select more than one type.

34 TruDefender FT and TruDefender FTi User Guide Thermo Scientific
4 Reviewing Stored Scans and Sending Messages
Manually Enabling and Disabling the Wireless Radio
The radio consumes energy when it is enabled. To
avoid running down your battery, you may choose to
disable the radio. You can do this two ways:
• Via the instrument software
• Via a lockout switch inside the battery
compartment
ON
Switch in ON position
To enable or disable the radio via the Wireless
Tools
1In the Main menu, select Tools > Wireless Tools >
press the Enter key.
2Select Wireless Power > press the Enter key > select
Disable or Enable > press the Enter key.
To enable or disable the radio via the lockout
switch
1Open the battery compartment door and remove the
battery if present (see page 7).
2Locate the small white switch at the side of the
battery compartment.
3Using the tip of a ballpoint pen or the end of a
wooden swab, move the switch:
• Toward the instrument nose to enable.
• Toward the end of the instrument to disable.
Thermo Scientific TruDefender FT and TruDefender FTi User Guide 35
Library
5
Using the Library
35 Using the Library
36 Searching for Library Items
36 Changing the Organization of the Library Tabs
36 Exporting Library Items
37 Adding a Library Item
37 Deleting a Library Item
Using the Library
The library contains detailed information about all the
chemicals that your instrument can detect.
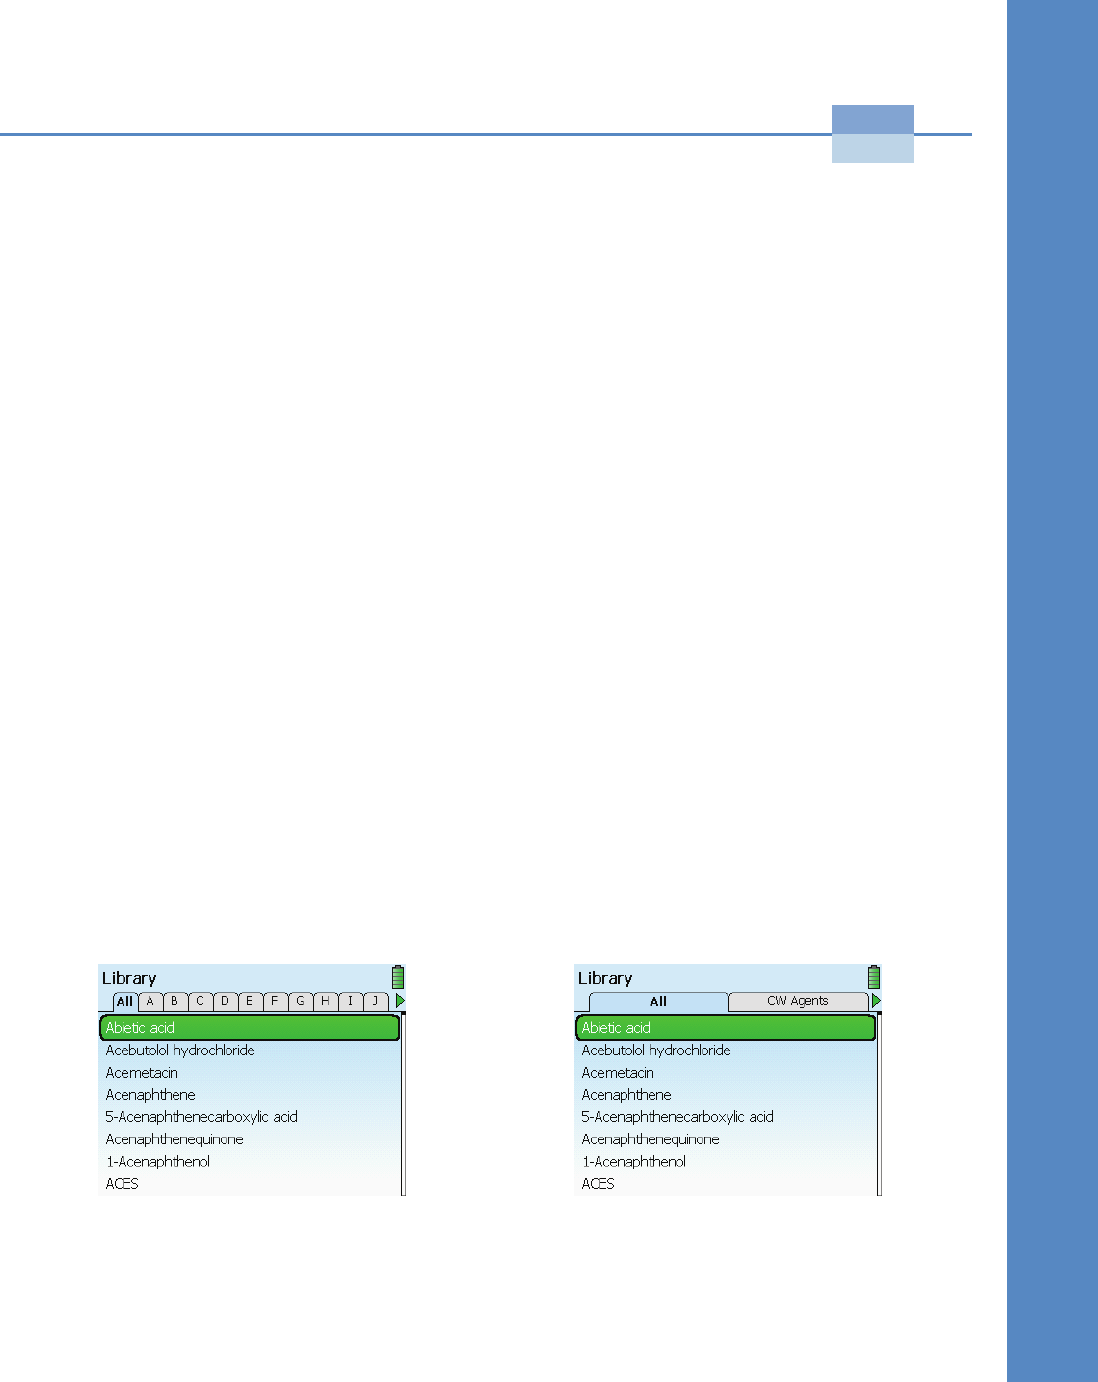
To help you locate items, the library is organized into
tabs. You can choose to view either alphabetical tabs or
category tabs (see page 36).
You can add custom items to the library (termed “user-
added items”), which appear in their own tab in
category view (see page 37).
To manually locate library items
1In the Main menu, select Library > press the Enter
key.
2Use the arrow keys to scroll to an item > press the
Enter key > select View Info.
Alphabetical tabs Category tabs

36 TruDefender FT and TruDefender FTi User Guide Thermo Scientific
5 Using the Library
Searching for Library Items
You can search for items by any part of their name. For
example, “ace” finds “acetone” and “acetate.”
TIP
To skip to the end of a long list of library items,
select the first item and press the up arrow. To
skip to the top, select the last item and press
the down arrow.
1In the library, press the Enter key > select Search
Items > press the Enter key.
2Enter a search term > select Done. For help with the
keyboard, see page 17.
3Select a search result > press the Enter key > select
View Info.
Changing the Organization of the Library Tabs
You can choose to view alphabetical library tabs or
category library tabs.
1In the library, press the Enter key > select View
> press the Enter key.
2Press the Enter key > select an option:
•Name: Displays alphabetical tabs.
•Type: Displays category tabs.
3Press the Enter key. The library tabs change
according to the setting.
Exporting Library Items
You can export user-added library items to a different
instrument by using the memory card to transfer the
data.
To easily find user-added items, switch the library to
show category tabs (see the preceding section).
NOTE
Don’t forget to remove the memory card from
the target instrument when you are done.
1Insert the memory card into the instrument (see
page 8). In the Main menu, select Library > press
the Enter key.
2Switch the library to show category tabs (see above)
> navigate to the User Items tab > select a user-added
item > press the Enter key.
3Select Export item > press the Enter key.
4Remove the memory card and place it in the target
instrument. On the target instrument, select Library
in the main menu > press the Enter key.
5Select Import Item(s) > press the Enter key. The
instrument loads all the library items that are on the
card.
Thermo Scientific TruDefender FT and TruDefender FTi User Guide 37
5 Using the Library
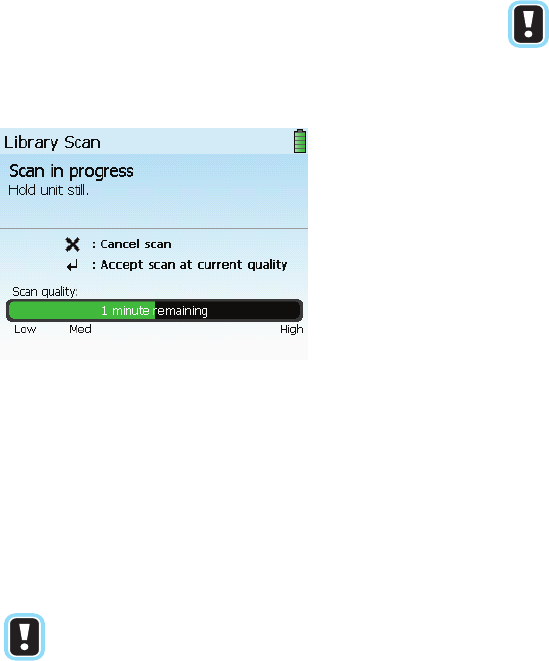
Adding a Library Item
Adding a custom library item involves performing a
library scan. A library scan is just like a regular scan
except that it collects more data and so requires more
time to complete.
The scale below the scan progress bar indicates the
quality level that the scan has reached at a given point
in time.
For the highest quality data, let the scan run until the
green bar reaches the High marker.
If a scan is taking a very long time to run, you may
press the Enter key to halt the scan at a lower level of
scan quality.
NOTE
Your scan will only be as good as your sample.
Crush solids or powders in a mortar, to a fine
and even consistency. Prepare the sample in a
clean area, and guard against contamination.
NOTE
Always use the sample crusher to perform a
library scan of a powder or a solid.
1Clean the sampling tip thoroughly (see page 10).
2In the Main menu, select Tools > press the Enter
key.
3Select Library Scan > press the Enter key.
4Select Background Scan > press the Enter key. The
instrument runs a full background scan.
5When the background scan finishes, position the
sample as required for the scan: Either place a drop
of liquid on the tip (see page 11) or put powdered
sample into the sample crusher (see page 16).
6Select Sample Scan > press the Enter key.
7Either allow the scan to complete, or press the Enter
key when the progress bar reaches the desired quality
level. A summary of scan data appears on the screen.
8Press the Enter key > select Add Scan to Library.
The keyboard screen appears. Name the new item.
For help with the keyboard, see page 17.
Deleting a Library Item
You can delete a user-added library item, but not a
factory-installed item.
1In the library, press the Enter key > select a
user-added item > press the Enter key.
2Select Delete Item > press the Enter key.
3In the confirmation screen, select Yes > press the
Enter key.
38 TruDefender FT and TruDefender FTi User Guide Thermo Scientific
5 Using the Library
Thermo Scientific TruDefender FT and TruDefender FTi User Guide 39
Maintain
6
Maintenance and Getting Help
39 Getting Help and Reachback Support
40 Sending a Reachback File Wirelessly
41 Performing a Self Test
42 Cleaning the Instrument
42 Cleaning the Sample Crusher
43 Decontaminating the Instrument and the Sample Crusher
43 Rebooting the Instrument
43 Recharging the Battery
44 About the System Card
44 Troubleshooting Wireless Transmissions
44 Testing the Wireless Service
45 Obtaining New Software
45 Returning the Instrument for Service
Getting Help and Reachback Support
Thermo Fisher Scientific Customer Support is available
by telephone or email 24/7, 365 days a year.
• United States: 1-800-374-1992
• International: +1-978-642-1100
• support@chemid.thermofisher.com
For general non-emergency support questions.
• reachback@chemid.thermofisher.com
For help with interpreting scan results or with
persistent No Match or Similar Match results.
NOTE
If you own a TruDefender FTi model, you can
wirelessly email a Reachback file (see
page 40).
Please contact Customer Support by telephone before
emailing a Reachback file. Your call will immediately be
escalated to a senior Customer Support specialist, who
will explain the Reachback process and help you to
email your scan results to us in Reachback file format.
(For information about the Reachback file format, see
page 27.) We will notify you by telephone that we have
received the Reachback file.
Our chemists begin analyzing your Reachback file as
soon as they receive it. In most cases, you will receive a
preliminary report of their findings within 1 hour.
Within 1 business day, Customer Support will send
you a final written report.

40 TruDefender FT and TruDefender FTi User Guide Thermo Scientific
6 Maintenance and Getting Help
Sending a Reachback File Wirelessly
If you own a TruDefender FTi model, you can
wirelessly send scan results to Customer Support in the
Reachback file format.
The process involves supplying a contact telephone
number, which the instrument sends to Customer
Support along with the Reachback file.
Customer Support will telephone this number as soon
as they receive the file, to discuss the results and collect
additional information as needed.
To send a Reachback file and select an existing
contact
1In the Main menu, select Review > press the Enter
key.
2Select the scan that you want to send to Reachback >
press the Enter key.
3Select Export Scan > press the Enter key.
4Select Wireless > press the Enter key.
5Select Reachback Support > press the Enter key.
6Select Continue > press the Enter key.
7Select a contact number > press the Enter key.
8Select Send > press the Enter key.
To send a Reachback file and add a new contact
1Follow steps 1 to 6 of the procedure above.
2Select New Phone Number > press the Enter key.
3Enter a new contact number > select Done > press
the Enter key. (For help with the keyboard, see
page 17.)
4(Optional) Enter a contact name.
5Select Send > press the Enter key.
Thermo Scientific TruDefender FT and TruDefender FTi User Guide 41
6 Maintenance and Getting Help
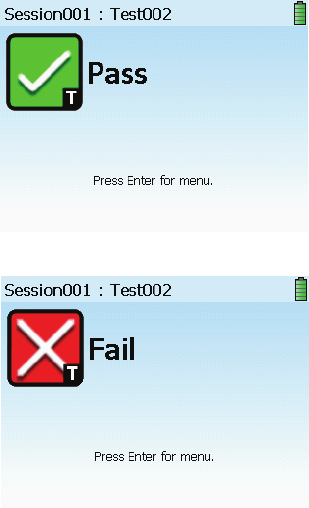
Performing a Self Test
Perform a self test at least daily to verify that the
instrument is operating properly. During the self test,
you will scan the silicone boot on the sample crusher.
The self test has two possible results:
• A Pass result means that the instrument correctly
identified the chemical properties of the silicone
boot. This result indicates that the instrument is
functioning properly and meets factory
specifications.
• A Fail result indicates a problem.
1Thoroughly clean one side of the silicone boot on
the sample crusher with an alcohol wipe and allow
the alcohol to completely dry.
2In the Main menu, select Tools > press the Enter
key.
3Select Self Test > press the Enter key. The
Background Check screen appears.
4Clean the sampling tip (see page 10), then press the
Enter key. The instrument performs a background
scan and then displays the Position Unit screen.
5Firmly press the sampling tip on the cleaned side of
the sample crusher boot, then press the Enter key to
start the self test. The Scan in progress screen
appears, followed by a result screen after a few
seconds.
6If you get a Pass result, press the Escape key to return
to the Main menu. If you get a Fail result, repeat the
self test. If you obtain another Fail result, contact
Customer Support.

42 TruDefender FT and TruDefender FTi User Guide Thermo Scientific
6 Maintenance and Getting Help
Cleaning the Instrument
To remove nonhazardous contaminants from the
outside of the instrument and the sample crusher, wipe
them with a soft cloth moistened with water or
isopropyl alcohol.
If the instrument is contaminated with potentially
hazardous substances, follow the instructions in
“Decontaminating the Instrument and the Sample
Crusher” on page 43.
Cleaning the Sample Crusher
Clean the sample crusher regularly, or whenever it
becomes difficult to insert the instrument.
Contaminants enter the sample crusher at its moving
parts (the spring-loaded sampling platform and the
latches) and eventually make it difficult to insert the
instrument.
A buildup of hardened accumulations in the recesses of
the top of the sample crusher can also prevent
instrument insertion.
To clean the sample crusher, disassemble it and clean its
parts with alcohol wipes, or with mineral spirits for oily
contaminants.
NOTE
Soaking the sample crusher without
disassembling it will not adequately clean its
internal parts.
To disassemble the sample crusher
1Remove the sample crusher boot.
2Unscrew and remove the large nut in the bottom of
the sample crusher and remove the spring.
3Push the sampling platform out.
4To remove the latches, insert a small tool in the holes
on the back side of the crusher and push out the pins
inside.
To clean the sample crusher
1Scrub the sample platform top and rim, especially
the crevices at the top and bottom of the black
O-ring.
2Scrub the top of the sample crusher, especially the
corner recesses.
3Scrub the hole that houses the spring.
4Wipe all other parts.
5Apply a small amount of a light lubricant to the
O-ring.
6Reassemble the sample crusher.
Thermo Scientific TruDefender FT and TruDefender FTi User Guide 43
6 Maintenance and Getting Help
Decontaminating the Instrument and the Sample Crusher
You may immerse the instrument and the disassembled
sample crusher for up to 1 hour in either water or a
solution of 1 part household bleach (5% sodium
hypochlorite) and 10 parts water.
NOTE
Be sure to follow your organization’s
decontamination guidelines.
NOTE
If you need to perform a self test after
decontaminating the sample crusher, make sure
that the crusher is completely dry first.
Before decontaminating the instrument, be sure to:
• Press the Wake/Sleep key to put the instrument to
sleep.
• Close the battery compartment door and the
access door, making sure that the access door
gasket is fully seated and the door is locked in
place (see page 6).
• Disassemble the sample crusher (see page 42).
You may want to remove the instrument boot before
decontamination. Although the boot fits tightly,
contaminants may enter along its edges. To remove the
boot, place your thumbs on either side of the boot at
the bottom end of the instrument and push the boot
off, then peel it away from the instrument.
Rebooting the Instrument
If the instrument becomes unresponsive, reboot it by
turning it off, then on again.
If the instrument still fails to reboot, contact Customer
Support.
NOTE
If you are rebooting because you are
experiencing problems with wireless
transmission, see page 44.
Recharging the Battery
You can recharge the battery in two ways:
• Connect the power cable to the instrument and
plug it into an electrical outlet. The battery will
automatically charge, even if the instrument is
powered down.
• Insert the battery into the battery charger and
plug the charger into an electrical outlet. The
battery charger light changes from red to green
when the battery is fully recharged.
TIP
Charge time for a depleted battery is less than
4 hours.
44 TruDefender FT and TruDefender FTi User Guide Thermo Scientific
6 Maintenance and Getting Help
About the System Card
The system memory card resides in a slot at the back of
the battery compartment. The card holds the
instrument software, chemical library, user-added
library items, and stored scans.
The system memory card does not hold any user-
modifiable software or data. Do not remove the card
unless instructed to do so by Customer Support.
Troubleshooting Wireless Transmissions
If you are having trouble sending wireless
transmissions, try the following troubleshooting
procedures:
• Make sure that the radio power switch is on (see
page 34).
• Use the Wireless Options to manually disable and
re-enable the radio (see page 34).
• If there are only a few or no reception bars, try
moving to a different location.
• Determine whether the instrument can find the
carrier: Select Tools > Wireless Options > Cell
Info. If the Network field says “Unknown,” the
instrument cannot find the carrier. Reboot the
instrument.
• Test your instrument’s connection to the
TruDefender FTi servers (see below).
• Try sending a different type of message.
• Try sending a scan to a different contact.
• Reboot the instrument.
• Contact Customer Support if none of these
suggestions fix the problem.
Testing the Wireless Service
If you are having difficulty sending messages, Customer
Support may ask you to test your connection to the
TruDefender FTi servers.
1In the Main menu, select Tools > Wireless Options
> press the Enter key.
2Select Wireless Test > press the Enter key. The
instrument will display a message indicating success
or failure.

Thermo Scientific TruDefender FT and TruDefender FTi User Guide 45
6 Maintenance and Getting Help
Obtaining New Software
Customer Support will notify you when a software
upgrade is available on the Customer Support website.
To log into this website, you must enter the support
code and serial number for your instrument.
The support code is listed in the About screen (select
Tools > About).
The serial number is printed on a label on the back of
the instrument and is also displayed in the About
screen.
NOTE
The support code changes on a daily basis. To
obtain a valid support code, the time, date, and
GMT zone fields must be set correctly on your
instrument (see page 8).
1Open the Customer Support website
(www.thermoscientific.com/chemID-support) and
click the picture that matches your instrument.
2Enter the serial number and support code for your
instrument.
3Follow the directions provided on the website.
Returning the Instrument for Service
Before returning the instrument, contact Customer
Support or your local distributor and request a return
material authorization (RMA) number.
NOTE
Packages that are not identified with an RMA
number will be returned to the shipper unopened.
1Clean the instrument and decontaminate it if
necessary. Both safety and common carrier
requirements require all returned instruments to be
clean and decontaminated.
2Package the instrument securely and write your
RMA number on the outside of the package.
3Mail the package to Customer Support or to your
local distributor.
46 TruDefender FT and TruDefender FTi User Guide Thermo Scientific
6 Maintenance and Getting Help

Thermo Scientific TruDefender FT and TruDefender FTi User Guide 47
A
Labels and Regulatory Statements
Export Regulation Statements
CAUTION
The technical information contained with this document is subject to the Export Administration Regulations.
Export of this technical information to foreign persons or foreign companies, within or outside the United
States, may require prior written authorization by the U.S. Department of Commerce, Bureau of Industry
and Security. Contact Thermo Fisher Scientific, Inc., prior to such a transfer.
WEEE Compliance
This product is required to comply with the European
Union’s Waste Electrical & Electronic Equipment
(WEEE) Directive 2002/96/EC. It is marked with the
following symbol:
Thermo Fisher Scientific has contracted with one or
more recycling or disposal companies in each European
Union (EU) Member State, and these companies
should dispose of or recycle this product. For further
information, contact Thermo Fisher Scientific or your
local representative.

48 TruDefender FT and TruDefender FTi User Guide Thermo Scientific
A Labels and Regulatory Statements
WEEE Konformität
Dieses Produkt muss die EU Waste Electrical &
Electronic Equipment (WEEE) Richtlinie 2002/96/EC
erfüllen. Das Produkt ist durch folgendes Symbol
gekennzeichnet:
Thermo Fisher Scientific hat Vereinbarungen mit
Verwertungs-/Entsorgungsfirmen in allen EU-
Mitgliedsstaaten getroffen, damit dieses Produkt durch
diese Firmen wiederverwertet oder entsorgt werden
kann. Weitere Informationen erhalten Sie bei Thermo
Fisher Scientific oder Ihrer örtlichen Vertretung.
Conformité DEEE
Ce produit doit être conforme à la directive européenne
(2002/96/EC) des Déchets d'Equipements Electriques
et Electroniques (DEEE). Il est marqué par le symbole
suivant:
Thermo Fisher Scientific s'est associé avec une ou
plusieurs compagnies de recyclage dans chaque état
membre de l’union européenne et ce produit devrait
être collecté ou recyclé par celles-ci. Pour de plus
amples renseignements, veuillez contacter Thermo
Fisher Scientific ou bien ses représentants locaux.

Thermo Scientific TruDefender FT and TruDefender FTi User Guide 49
B
Limited Warranty
Seller warrants that the Products will operate or
perform substantially in conformance with Seller's
published specifications and be free from defects in
material and workmanship, when subjected to normal,
proper and intended usage by properly trained
personnel, for the period of time set forth in the
product documentation, published specifications or
package inserts. If a period of time is not specified in
Seller’s product documentation, published
specifications or package inserts, the warranty period
shall be one (1) year from the date of shipment to
Buyer for equipment and ninety (90) days for all other
products (the “Warranty Period”). Seller agrees during
the Warranty Period, to repair or replace, at Seller's
option, defective Products so as to cause the same to
operate in substantial conformance with said published
specifications; provided that Buyer shall (a) promptly
notify Seller in writing upon the discovery of any
defect, which notice shall include the product model
and serial number (if applicable) and details of the
warranty claim; and (b) after Seller’s review, Seller will
provide Buyer with service data and/or a Return
Material Authorization (“RMA”), which may include
biohazard decontamination procedures and other
product-specific handling instructions, then, if
applicable, Buyer may return the defective Products to
Seller with all costs prepaid by Buyer. Replacement
parts may be new or refurbished, at the election of
Seller. All replaced parts shall become the property of
Seller. Shipment to Buyer of repaired or replacement
Products shall be made in accordance with the Delivery
provisions of the Seller’s Terms and Conditions of Sale.
Consumables are expressly excluded from this
warranty.
Notwithstanding the foregoing, Products supplied by
Seller that are obtained by Seller from an original
manufacturer or third party supplier are not warranted
by Seller, but Seller agrees to assign to Buyer any
warranty rights in such Product that Seller may have
from the original manufacturer or third party supplier,
to the extent such assignment is allowed by such
original manufacturer or third party supplier.
In no event shall Seller have any obligation to make
repairs, replacements or corrections required, in whole
or in part, as the result of (i) normal wear and tear, (ii)
accident, disaster or event of force majeure, (iii) misuse,
fault or negligence of or by Buyer, (iv) use of the
Products in a manner for which they were not
designed, (v) causes external to the Products such as,
but not limited to, power failure or electrical power
surges, (vi) improper storage and handling of the
Products or (vii) use of the Products in combination
with equipment or software not supplied by Seller. If
Seller determines that Products for which Buyer has
requested warranty services are not covered by the
warranty hereunder, Buyer shall pay or reimburse Seller
for all costs of investigating and responding to such
request at Seller's then prevailing time and materials
rates. If Seller provides repair services or replacement
parts that are not covered by this warranty, Buyer shall
pay Seller therefor at Seller's then prevailing time and
materials rates. ANY INSTALLATION,
MAINTENANCE, REPAIR, SERVICE,
RELOCATION OR ALTERATION TO OR OF, OR
OTHER TAMPERING WITH, THE PRODUCTS
PERFORMED BY ANY PERSON OR ENTITY
OTHER THAN SELLER WITHOUT SELLER'S
PRIOR WRITTEN APPROVAL, OR ANY USE OF
50 TruDefender FT and TruDefender FTi User Guide Thermo Scientific
B Limited Warranty
REPLACEMENT PARTS NOT SUPPLIED BY
SELLER, SHALL IMMEDIATELY VOID AND
CANCEL ALL WARRANTIES WITH RESPECT
TO THE AFFECTED PRODUCTS.
THE OBLIGATIONS CREATED BY THIS
WARRANTY STATEMENT TO REPAIR OR
REPLACE A DEFECTIVE PRODUCT SHALL BE
THE SOLE REMEDY OF BUYER IN THE EVENT
OF A DEFECTIVE PRODUCT. EXCEPT AS
EXPRESSLY PROVIDED IN THIS WARRANTY
STATEMENT, SELLER DISCLAIMS ALL OTHER
WARRANTIES, WHETHER EXPRESS OR
IMPLIED, ORAL OR WRITTEN, WITH
RESPECT TO THE PRODUCTS, INCLUDING
WITHOUT LIMITATION ALL IMPLIED
WARRANTIES OF MERCHANTABILITY OR
FITNESS FOR ANY PARTICULAR PURPOSE.
SELLER DOES NOT WARRANT THAT THE
PRODUCTS ARE ERROR-FREE OR WILL
ACCOMPLISH ANY PARTICULAR RESULT.

Thermo Scientific TruDefender FT and TruDefender FTi User Guide 51
I
Index
A
access door, opening and closing 6
B
battery
changing 7
recharging 40
best practices table 13
C
cleaning
instrument 39
sample crusher 39
sampling tip 12
D
decontamination guidelines 40
disposable batteries, inserting 7
E
export file formats 28
exporting scans 28
G
getting help 37
I
instrument diagrams
bottom 5
carrying case 5
front 4
sample crusher 4
international electrical adapters, using 7
K
keyboard, using 19
L
library
adding items 35
changing to alphabetical view 34
changing to category view 34
deleting items 35
exporting items 34
restricting a search to user-added items 17
searching 34
user-added items, definition of 33
viewing an item 33
viewing information for a result 24
library scans, performing 35
limited warranty 45
M
memory card, inserting and removing 8
Mixture Match result 22
Multiple Positive Match result 22
N
NFPA diamond, explanation of 21
No Match result 23
P
powering the instrument 6
prolonged scan, causes of 12
52 TruDefender FT and TruDefender FTi User Guide Thermo Scientific
Index
R
Reachback file
definition of 28
exporting 28
Reachback support 37
rebooting the instrument 40
rechargeable battery 7
report file
definition of 28
printing 30
returning the instrument for service 41
S
sample crusher
cleaning 39
disassembling 39
using 18
scan results
exporting 28
interpreting 22
printing 30
reading a result screen 21
viewing 27
viewing spectrum for 24
scanning
procedure 15
safety guidelines 11
scans
deleting 31
renaming 28
self test 38
serial number, location of 41
sessions
deleting 31
renaming 28
Similar Item Match result 23
Single Positive Match result 22
software upgrades, obtaining 41
SPC file, software for viewing 30
spectrum
overlaying 25
rescaling 25
viewing 24
zooming 25
support code, locations of 41
system date and time, changing 8
system language, changing 8
T
turning instrument on and off 6
U
unresponsive instrument, what to do 40
user-added items 33
W
wake/sleep mode 6
wall plug adapters 7
FCC Statement:
This device complies with Part 15 of the FCC Rules. Operation is subject to the following two
conditions:
1This device may not cause harmful interference, and
2This device must accept any interference received, including interference that may cause
undesired operation.
Any change or modification to the product not expressly approved by Thermo Fisher Scientific
could void the user's authority to operate the device.
This equipment complies with FCC radiation exposure limits set forth an uncontrolled
environment.
This equipment should be installed and operated with minimum distance 20cm between the
equipment and the user's body.
IC Statement
This device complies with Industry Canada license-exempt RSS standard(s). Operation is subject
to the following two conditions:
1this device may not cause interference, and
2this device must accept any interference, including interference that may cause undesired
operation of the device.
Le présent appareil est conforme aux CNR d'Industrie Canada applicables aux appareils radio exempts
de licence.
L'exploitation est autorisée aux deux conditions suivantes:
1l'appareil ne doit pas produire de brouillage, et
2l'utilisateur de l'appareil doit accepter tout brouillage radioélectrique subi, même si le brouillage est
susceptible d'en compromettre le fonctionnement.
This device has been designed to comply with safety requirements for exposure to radio waves
(SAR) in accordance with RSS-102.
This device should be installed and operated with minimum distance 20cm between the
equipment and your body.
Cet artifice a été conçu pour se plier à la sécurité les exigences pour l'exposition aux ondes
radioélectriques (SAR) dans conformité avec RSS-102.
Cet artifice devrait être installé et fait marcher avec la distance minimale 20 centimètres entre
l'équipement et votre corps.