Thermor 259RX Indoor/Ourdoor Wireless Almanac Thermometer User Manual 259
Thermor Ltd. Indoor/Ourdoor Wireless Almanac Thermometer 259
Thermor >
user manual
Main Specification:
1. Indoor temperature
2. Outdoor temperature
3. Recorded daily highest and lowest temperature
4. Recorded highest and lowest temperature with date within 5 years
5. ℃/℉ switchable(Fault:℉)
6. Time
7. Calendar
8. Day of week
9. Low battery indicator
Before You Begin:
1.0 Set up procedure
1. Insert batteries into the monitor first.
2. Place the monitor as close as possible next to the remote sensor and insert the batteries into the
remote sensor.
3. Position the monitor and remote sensor within effective transmission range, which in usual
circumstances no more than 45 meters. The range is affected by the building materials and where the
monitor and remote sensor are positioned; try various locations for the best results.
NOTE: The remote sensor should be placed in a shaded area for accurate readings
1.1 Getting Started
Once the remote sensor has been powered up, the monitor will attempt to search for the signal for 3
minutes.
Once the signal is received, the dashes (- -:-) on the monitor will change to the current outdoor
temperature. If after 3 minutes the screen does not change to show the outdoor temperature, press
“RE-SYNC” button in the monitor. The monitor will now attempt to search for the signal for another 3
minutes.
2.0 Troubleshooting
If monitor doesn’t receive the signal more than 2 minutes, your display shows dashes (- -:-). Press
“RE-SYNC” button in the monitor. The monitor will now attempt to search for the signal for another 3
minutes.
If monitor doesn’t receive the signal more than 60 minutes, the monitor will attempt to search for the
signal for another 3 minutes automatically.
If monitor doesn’t receive the signal all the time, the monitor will search for the signal for 3 minutes
every hour until signal received.
The maximum transmission range is 45 meters from the remote sensor to the monitor (in open space).
However, this depends on the surrounding environment and interference levels. The temperature
signal travels in a straight line from the remote sensor to the monitor. The signal will not curve around
an object. If no reception is possible, despite the observation of these factors, all units will have to be
reset.
3.0 Calendar and clock setup
1. Press and hold the “SET” button to activate the calendar and clock setup mode.
2. Press the “+” or “–“button to toggle to the correct year.
3. Press the “SET” button to confirm and turn to next setting.
4. Follow steps 2-3 to set the year, month, date, time and 12hr/24hr mode in sequence.
NOTE: Hold “+” or “–“ buttom, it can be quick setting.
No any action more than 20 seconds, it will quit to normal mode.
4.0 Recorded daily highest and lowest temperature
1. Press “MAN/MIN” button to check the daily highest and lowest temperature.
2. To clear the daily memory, press the “clear” button when the highest and lowest temperature is
displayed. It will clear the record of the shown field.
5.0 Recorded highest and lowest temperature with date
1. The recorded highest and lowest outdoor temperature within 5 years will always be displayed on
the screen. When the outdoor temperature becomes higher or lower than the current record, the
display immediately updates to the new record. This data will be retained in the unit memory even if
the battery is removed or unit is reset.
2. To clear this memory, press “MAX/MIN” and “CLEAR” together in the monitor.
IMPORTANT: The recorded highest and lowest temperature is stored by date, therefore the calendar
MUST be set correctly before use of the unit.
6.0 ºC/ºF Switchable
The default measurement for temperature is ºF, press the ºC/ºF button to toggle between °C and
ºF.
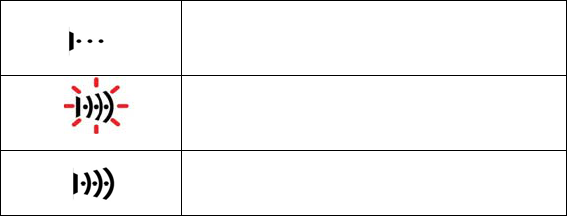
7.0 Signal Detection
The signal indicator on the monitor will display the following in the outdoor temperature window:
No Signal Detected
Signal Detected
Successful Reception

8.0 Specifications
Temperature Measuring Range
Monitor
-20℃ to 70℃ with 0.1℃ resolution
-4°F to 158°F with 0.1°F resolution
Remote Sensor
-50°C to 70°C with 0.1°C resolution
-58°F to 158°F with 0.1°F resolution
Temperature Checking Interval
Monitor Every 30 seconds
Remote Sensor Every 30 seconds
Power Source
(Alkaline batteries recommended)
Monitor 2 x AA batteries, 1.5V batteries
Remote Sensor 2 x AA batteries, 1.5V batteries
Battery life About 12 months
9.0 FCC and IC Statement:
This device complies with part 15 of the FCC rules. Operation is subject to the following two
conditions: (1) This device may not cause harmful interference, and (2) this device must accept any
interference received, including interference that may cause undesired operation.
This device complies with Industry Canada standard RSS-Gen.
This equipment has been tested and found to comply with the limits for Part 15 of the FCC rules.
These limits are designed to provide reasonable protection against harmful interference in a
residential installation. This equipment generates, uses and can radiate radio frequency energy and,
if not installed and used in accordance with the instructions, may cause harmful interference to radio
communications.
However, there is no guarantee that interference will not occur in a particular installation. If this
equipment does
cause harmful interference to radio or television reception, which can be determined by turning the
equipment off and on, the user is encouraged to try to correct the interference by one or more of the
following measures:
o Reorient or relocate the receiving antenna.
o Increase the separation between the equipment and receiver.
o Connect the equipment to an outlet on a circuit different from that to which the receiver is
connected.
)&&&DXWLRQ$Q\FKDQJHVRUPRGLILFDWLRQVQRWH[SUHVVO\DSSURYHGE\WKHSDUW\UHVSRQVLEOHIRU
FRPSOLDQFHFRXOGYRLGWKHXVHUVDXWKRULW\WRRSHUDWHWKLVHTXLSPHQW