Thermor 356RX Indoor/Outdoor Digital Thermometer with Color Screen User Manual RS8736LSPZ manual
Thermor Ltd. Indoor/Outdoor Digital Thermometer with Color Screen RS8736LSPZ manual
Thermor >
Manual

RS8736LSPZ Manual
Ⅰ. Main Functions:
1. Six function keys: TIME, UP, DOWN, ALM, CH, LIGHT/SNOOZE
2. Weather forecast for 5 states: sunny, semi-sunny, cloudy, rainy, storm
3. Eight moon phase
4. Indication of the comfort index
5. Snooze for 8 minutes. Adjustable for snooze time from 5 to 30 minutes.
6. 12/24 hour selectable
7. ℃/℉ selectable
8. MD/DM selectable; Digital time display: Hour, Minute, Second
9. Year range is 2000-2099, display: Month, Date, Week
10.Indoor temperature range: 0℃--+50℃.
11.Indoor humidity range: 20%-----99%.
12.Outdoor temperature range: -20℃--+60℃.
13.Outdoor humidity range: 20%-----99%.
14.Outdoor temperature/humidity: up to 3 channels
15.Pressure Bar Indicate History Trend
16.Double Alarm/Alert
17.Indoor/Outdoor trend indication of temperature/humidity.
18.LED backlight
II. The initial display when Power-on or Reset
1, The weather forecast: according to current pressure and temperature/humidity change.
2, Setting automatically quit: 8 seconds
3, Forward/backward: 8 steps / second
4, Year: 2009-1-1
5, Time: 0:00
6, Temperature: ℃ Pressure: hPa & mb
7, Alarm & Alert: closed
III. Power-on
1, When Power-On and reset, LCD full display for 3 seconds Æ enter the normal state after “Beep” Æ check
temperature, humidity and pressure.
2, It will then enter into RF registering/receiving for 3 minutes.
IV. Instruction of operating the KEYS
TIME ALARM UP DOWN SNZ/LGT CHANNEL
Click Time/ year
switchable
AL1 / AL2 /
Time
switchable
ON/ OFF ALARM
---- 8seconds Back
light / Enter
Snooze
Switchable between
CH1, 2, 3 and circled
display
standard mode
Hold enter into
calendar setting Alarm
setting
Switch the unit of
temperature and
pressure
---- Enter into
SNOOZE time
setting
clear current
registered CH
Function
Operation

Click Confirm the
setting and into
next setting
Confirm the
setting and into
next setting
one step
forward
One step
backward
Under the
SNOOZE setting
status, quit the
setting
-----
Settin
g
mode
Hold ----- ------ 8steps/second
forward
8steps/second
backward
-----
V. Operate Instruction
5.1 TIME
1. At normal status, press TIME to switch normal status and year. In year status, it will exit automatically if no key is
operated for 8 seconds.
2. At normal status and year display, hold TIME to enter into calendar setting.
3. At calendar time setting status, press TIME to confirm the setting.
5.2 ALARM
1. At normal status, press ALARM to switch normal status / ALARM1 / ALARM2. At ALARM time status, it will return to
normal status if no key is operated for 8 seconds.
2. At alarm status, press ALARM to confirm the setting.
5.3 UP
1. At normal status, turn on/off Alarm. Hold UP for 3 seconds to change the unit of temperature and pressure.
2. Insert the battery when holding UP, its initial display is pressure testing status and the pressure data flash. The unit of
pressure is Hpa.
3. At setting status, press “Up” one time, the setting will go ahead for one step; hold the keys for 3 seconds, it will run
forward by 8 steps/seconds.
5.4 DOWN
1. At setting status, press “DOWN” one time, the setting will backward for one step; hold the keys for 3 seconds, it will run
back by 8 steps/seconds.
2. At normal status, press DOWN one time, there will no any effect..
5.5 CHANNEL
At normal status, press CHANNEL to switch channels. Hold it for 3 seconds into outdoor RF re-registering.
5.6 SNOOZE/LIGHT
1. At normal status, press it to light the backlight for 8 seconds.
2. When ringing, press it to stop the alarm ringing and into SNOOZE function.
3. At normal status, hold it for 3 seconds into snooze time setting. The adjustable range is 5-30 minutes.
Notes:
There is BEE sound when all the keys are operated.
When ringing, press SNOOZE to into snooze status, and press other keys to stop alarm function.
VI Function
6.1 The function of time
At current normal status or year display, press TIME for 3 seconds into time setting. The setting item will flash. When setting
year, it shows YR. When setting hour, it shows Hr.
The sequence of setting is year – MD/DM – month – date – 12/24hour – hour – minute.
Press UP/DOWN to adjust it and press TIME to confirm the setting.
6.2 The function of alarm
1. At normal status, press ALM for 3 seconds into alarm setting. When it shows AL1, then hold ALM to enter into AL1 time
setting. When it shows AL2, then hold ALM to enter into AL2 time setting.
2. At setting status, the setting item will flash., and press ALM to enter into next setting. The sequence of setting is
ALARM hour –ALARM minute –exit.
3. At normal status, press UP to on/off ALARM function, the sequence is AL1 ON –AL2 ON –AL1&AL2 ON –AL1&AL2
OFF.
6.3 The function of temperature and humidity
1. the indoor temperature display range: 0℃ -- +50℃
2. the outdoor temperature display range: -20℃ -- 60℃
3. the indoor & outdoor humidity range: 20% --- 99%
6.4 Trend indicator indoor/ outdoor
a. The temperature trend indicator is based on the difference between a recorded temperature and the current
temperature. When the current temperature is at least 1°C higher than the recorded, the arrow will point up and the current
temperature becomes the recorded.
If the temperature is at least 1°C lower than the recorded value, the arrow will point down and the current temperature
becomes the recorded. In all other cases, the arrow will be flat.
b. The humidity trend indicator is based on the difference between a recorded humidity and the current humidity. When the
current humidity is at least 3% higher than the recorded, the arrow will point up and the current humidity becomes the
recorded.
If the humidity is at least 3% lower than the recorded value, the arrow will point down and the current humidity
becomes the recorded. In all other cases, the arrow will be flat.
c. The pressure trend indicator is based on the difference between a recorded pressure and the current pressure.
When the current pressure is at least 2mb higher than the recorded, the arrow will point up and the current pressure
becomes the recorded.
If the pressure is at least 2mb lower than the recorded value, the arrow will point down and the current pressure
becomes the recorded. In all other cases, the arrow will be flat.
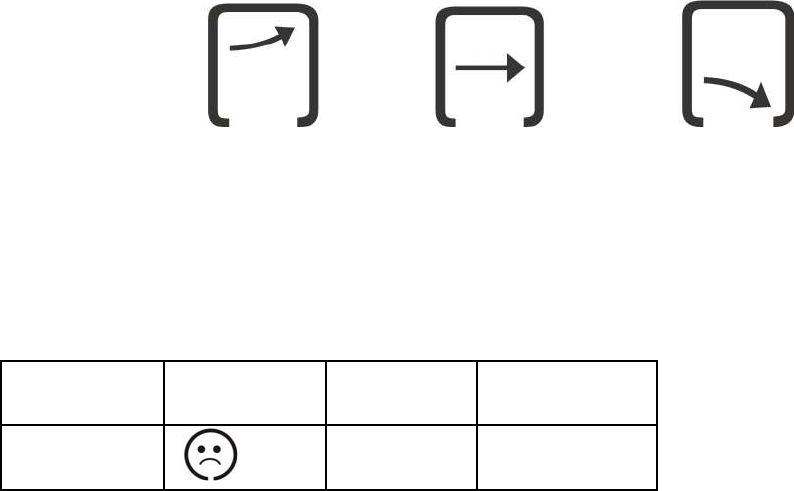
raising steady falling
6.5 Indication of the comfort index
1. Dry: when temperature range is any values, humidity range is under 40%
2. Comfort: when temperature range is between 20℃ to 28℃, humidity range is between 40% to 70%
3. Wet: when temperature range is any values, humidity range is up 70%
4. No indication: temperature range is less than 20℃ and more than 28℃, humidity range is between than 40% to70%
COMFORT
LEVEL ICON DISPLAY TEMPERATURE
RANGE HUMIDITY RANGE
DRY -5°C to +50
°C under 40 %

COMFORT +20 °C to +28
°C 40% to 70%
WET -5°C to +50
°C Over 70%
NO INDICATION -
Less than 20 °C
or more than 28
°C
Less than 40% or
more than 70%
6.6 The receiving function of RF
1. After installing the battery and checking temperature/humidity, it will enter RF receiving state automatically for 3
minutes.
2. under normal display mode, hold the “Channel” key for 3 seconds to clear out the channel information
3. If there is no effective signal with same ID code received for the current channel in one hour, the temperature of that CH
will shows “---“, the temperature display will resume back when the correct signal is received again
6.7 AIR PRESSURE FUNCTION
1. The range of air pressure: 800mb ~ 1100mb
2. After power on, hold UP for 3 seconds into the pressure testing status. There is useless to press any key. Reset it for
returning the normal status. When into pressure testing, there is BI sound. The unit is hPa/mb.
3. At normal status, hold UP for 3 seconds to switch the pressure unit mb, Hpa/inHg. (switch C/F at the same time).
4. Trend indication of air pressure. Air pressure record of last 12 hours.
Ⅶ Operating Frequency
Main unit: 32768HZ
RF sending and receiving: 433.92MHZ
FCC Statement:
This equipment has been tested and found to comply with the limits for Part 15 of the FCC rules. These limits
are designed to provide reasonable protection against harmful interference in a residential installation. This
equipment generates, uses and can radiate radio frequency energy and, if not installed and used in
accordance with the instructions, may cause harmful interference to radio communications.
However, there is no guarantee that interference will not occur in a particular installation. If this equipment does
cause harmful interference to radio or television reception, which can be determined by turning the
equipment
off and on, the user is encouraged to try to correct the interference by one or more of the following measures:
• Reorient or relocate the receiving antenna.
• Increase the separation between the equipment and receiver.
• Connect the equipment to an outlet on a circuit different from that to which the receiver is connected.
This device complies with part 15 of the FCC rules. Operation is subject to the following two conditions: (1) This
device may not cause harmful interference, and (2) this device must accept any interference received, including
interference that may cause undesired operation.
Note: Modifications to this product will void the user’s authority to operate this equipment.
IC Statement :
This device complies with Industry Canada licence-exempt RSS standard(s). Operation is subject to the following two
conditions: (1) this device may not cause interference, and (2) this device must accept any interference, including
interference that may cause undesired operation of the device."
IC Déclaration:
Le présent appareil est conforme aux CNR d'Industrie Canada applicables aux appareils radio exempts de licence.
L'exploitation est autorisée aux deux conditions suivantes : (1) l'appareil ne doit pas produire de brouillage, et (2)
l'utilisateur de l'appareil doit accepter tout brouillage radioélectrique subi, même si le brouillage est susceptible d'en
compromettre le fonctionnement.
Remarque: Toute modification de ce produit annule l'autorité de l'utilisateur à utiliser cet équipement.