Users Manual
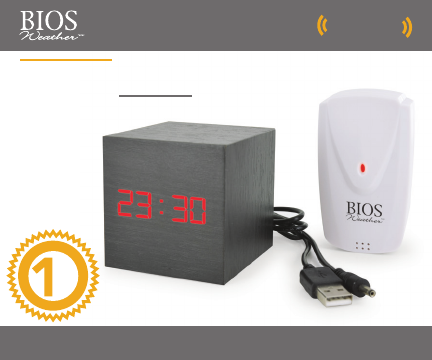
Instruction Manual
Wireless
Year
an
G
a
r
a
n
t
i
e
W
a
r
r
a
n
t
y
WEATHER CUBE
387BC
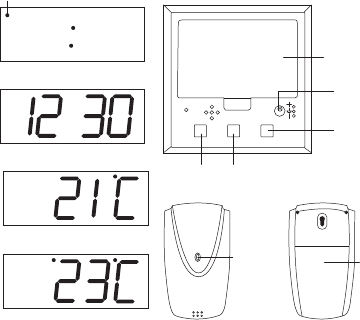
9 00
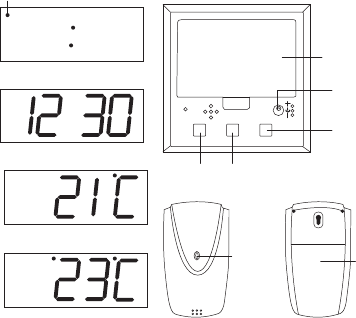
12 / 24 Hour Time
Outdoor Temperature
Indoor Temperature
Date
Battery compartment
BACK OF UNIT
USB adapter port
DOWN button
SET button UP button
SET
UP
DOWN
PM Indicator
FRONT OF
SENSOR
BACK OF
SENSOR
Transmission
Indication
LED
Battery
Compartment
1.0 Care of Device
• Avoid exposing units to extreme temperatures or severe shock.
• Avoid contact with any corrosive materials such as perfume, alcohol or cleaning agents.
• Do not subject the units to excessive force, shock, dust, temperature or humidity. Any of
these conditions may shorten the life of the units.
• Do no tamper with any of the internal components of these units. This will invalidate the
warranty and may cause damage.
• Damage caused by failure to comply with this instruction manual will invalidate any
warranty. The manufacturer and supplier will not be held liable for any damages due to
failure to comply with this instruction manual.
• In case of harm or damage to a person or property caused by improper handling or failure to
comply with this instruction manual, the manufacturer and supplier cannot be held liable.
• This product is not to be used for medical purpose or for public information.
1.1 Correct Usage of Batteries
• Do not mix standard and rechargeable batteries.
• Do not mix new and old batteries.
• Do not leave discharged batteries in the device as these may corrode and release
chemicals that may damage the unit.

2.0 Setup Procedure
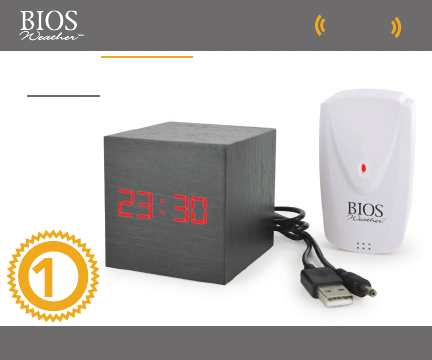
1. Insert the USB adapter into the Weather Cube, you can then plug the USB adapter into a
USB port. Or you can power the Weather Cube with 3 x AAA batteries.
2. The Weather Cube will go through a sequence of numbers and then will beep once and
display the TIME.
3. The Weather Cube will automatically be set to display the different screens in the following
sequence: TIME (10 seconds) – DATE (2 seconds) – INDOOR TEMPERATURE (7
seconds) – OUTDOOR TEMPERATURE (7 seconds).
3.0 Setting the Time
1. When the TIME is displayed on the Weather Cube, press and hold the SET button.
NOTE: If the Weather Cube is not displaying the TIME, press the SET button to go
through the different screens until TIME appears.
2. 12/24 hour will ash, press the UP or DOWN button to select the hour format. Once
selected, press the SET button to conrm.
3. Next the hour digits will ash, press the UP or DOWN button to select the hour digits.
Once selected, press the SET button to conrm. Follow the same steps to set the minute
digits. Once conrmed, the Weather Cube will go back to normal mode.
9 00 5 00
AM PM
PM indicator

4.0 Setting the Date
1. When the DATE is displayed on the Weather Cube, press and hold the SET button.
NOTE: If the Weather Cube is not displaying the DATE, press the SET button to go
through the different screens until DATE appears.
2. The year will ash, press the UP or DOWN button to select the year. Once selected, press
the SET button to conrm.
3. Next the month will ash, press the UP or DOWN button to select the month. Once
selected, press the SET button to conrm. Once conrmed, the Weather Cube will go back
to normal mode.
5.0 Setting the Alarm
There are 3 alarms that can be set on the Weather Cube.
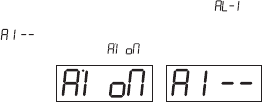
1. Press the SET button until you see “ ”, then press and hold the SET button.
2. “ “ will ash, press the UP or DOWN button to turn the alarm ON, the Weather
Cube will display “ ”. Press the SET button to conrm.
Alarm On Alarm Off
3. The hour digits will ash, press the UP or DOWN button to select the hour digits. Once
selected, press the SET button. Follow the same steps to set the minute digits.
4. Follow the same steps as above to set Alarm 2 and Alarm 3.
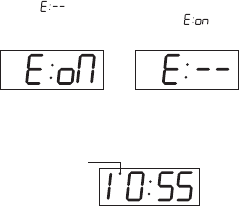
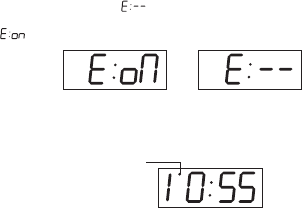
5. Once the alarms are set “ ” will ash. If you don’t want the alarms to activate on
Saturday and Sunday, press the UP or DOWN button until “ ” is displayed. Press
SET to conrm.
Alarm will not activate
on the weekend
Alarm will activate
on the weekend
6. Once the Weather Cube is in normal mode, the TIME screen will display differently, to
indicate that an alarm is ON.
Alarm ON indicator
7. When the alarm sounds, press any button to turn it off. The alarm will sound for 1 minute.
NOTE: the alarm will sound again the next day unless deactivated in the alarm
settings.
6.0 Indoor Temperature
1. When the INDOOR TEMPERATURE is displayed on the Weather Cube, press and hold the
DOWN button.
NOTE: If the Weather Cube is not displaying the INDOOR TEMPERATURE, press

the SET button to go through the different screens until INDOOR TEMPERATURE
appears.
2. The temperature will switch from Celsius to Fahrenheit.
7.0 Outdoor Temperature
1. When the OUTDOOR TEMPERATURE is displayed on the Weather Cube, press and hold
the SET button.
NOTE: If the Weather Cube is not displaying the OUTDOOR TEMPERATURE, press
the SET button to go through the different screens until OUTDOOR TEMPERATURE
appears.
2. “ ” will display on the screen. Insert 2 x AAA batteries into the outdoor sensor.
3. The transmission indication LED will ash on the outdoor sensor indicating that the signal
has been sent to the Weather Cube. Once the signal is received, the dashes will change to
the current outdoor temperature and the Weather Cube will go to normal mode.
7.1 Troubleshooting
If the outdoor temperature cannot be received, check:
1. The distance between the monitor or outdoor sensor should be at least 1.2 metres (4 feet)
away from any interfering sources such as computer monitors or TV sets.
2. Avoid placing the monitor onto or in the immediate proximity of metal
window frames.
3. Using other electrical products such as headphones or speakers operating on the same
frequency (433MHz) may prevent correct signal transmission and reception.

4. Neighbours using electrical devices operating on the 433MHz signal frequency can also
cause interference.
5. Signals from other household devices, such as door bells and home security systems,
may temporarily interfere with the units and cause reception failure. The transmission and
reception of temperature reading will resume once the interference has stopped.
The maximum transmission range is 30 metres (100 feet) from the remote sensor to
the monitor (in open space). However, this depends on the surrounding environment and
interference levels. The temperature signal travels in a straight line from the remote sensor to
the monitor. The signal will not curve around an object. If no reception is possible despite the
observation of these factors, all units will have to be reset.
8.0 Display Mode
In display mode you can set the unit to display all screens in a sequence or only display the
TIME screen.
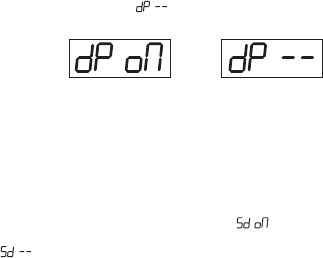
1. To turn the sequence ON in normal mode press the UP button, “ ” will display. To
turn the sequence OFF, press the UP button again, “ ” will display. Press the SET
button to conrm.
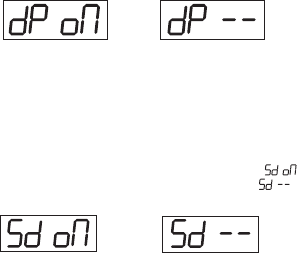
Sequence ON ---
TIME (10 seconds), DATE (2 seconds),
INDOOR TEMPERATURE (7 seconds),
OUTDOOR TEMPERATURE (7 seconds).
Sequence OFF
9.0 Power Saving Mode
In power saving mode you can have the Weather Cube turn ON for 10 seconds and than turn
OFF, or permanently stay ON.
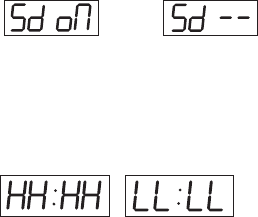
1. To turn the power saving mode ON, in normal mode press the DOWN button, “ ” will
display. To turn the power saving mode OFF, press the DOWN button again, “ ” will
display. Press the SET button to conrm.
Power Saving Mode ON --- Weather Cube
will turn ON for 10 seconds and then turn
OFF. To turn Weather Cube ON, clap, make
noise or touch the top of the cube.
Power Saving Mode OFF ---
Display will permanently
stay ON
10.0 LED Brightness
You can adjust the brightness of the LED screen, by pressing and holding the UP button,
when in normal mode. Press the UP button to switch between full brightness and half
brightness. Press SET button to exit and return to normal mode.
Full Brightness Half Brightness
11.0 Built in Battery
There is 1 x CR2032 battery built into the Weather Cube. The battery keeps the time running
when the Power Saving Mode is ON (see section 9.0). If the time doesn’t work, replace the
built-in battery located behind the battery compartment.
12.0 Product Specifications
Temperature Measurement Range
Weather
Cube
0°C to 50°C / 32°F to 122°F
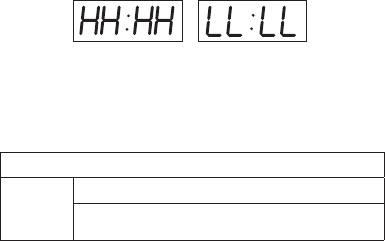
When temperature is above 50°C (122°F) screen will display HH.
When temperature is below 0°C (32°F) screen will display LL.
Outdoor
Sensor
-30°C to 60°C / -22°F to 140°F
When temperature is above 60°C (140°F) screen will display HH.
When temperature is below -30°C (-22°F) screen will display LL.
Accuracy +/- 2°C / 4°F
Power Source
Monitor 3 x AAA batteries 1.5V (not included), 1 x CR2032 (built-in), or USB
Adapter (included)
Outdoor
Sensor 2 x AAA batteries 1.5V (not included)
13.0 Limited One Year Warranty
If this product proves to be defective in material or workmanship within one year of purchase,
please return it to the address below. It will be repaired or replaced without charge upon receipt
of the unit prepaid with $5.00 to cover handling, packaging and return postage. Please include
proof of purchase, your full name, address, daytime phone number or email address.
This warranty does not apply if the defect or malfunction is a result of user abuse, misuse,
alteration or modication.
Thermor Ltd.
16975 Leslie Street
Newmarket, ON L3Y 9A1
1-800-387-8520
14.0 FCC and IC Statement
Operation is subject to the following two conditions: (1) this device may not cause interference,
and (2) this device must accept any interference, including interference that may cause
undesired operation of the device.
WARNING: Changes or modications to this unit not expressly approved by the party
responsible for compliance could void the user’s authority to operate the equipment.
NOTE: This equipment has been tested and found to comply with the limits for a Class B digital
device, pursuant to Part 15 of the FCC Rules. These limits are designed to provide reasonable
protection against harmful interference in a residential installation. This equipment generates,
uses and can radiate radio frequency energy and, if not installed and used in accordance with
the instructions, may cause harmful interference to radio communications.
However, there is no guarantee that interference will not occur in a particular installation. If
this equipment does cause harmful interference to radio or television reception, which can be
determined by turning the equipment off and on, the user is encouraged to try to correct the
interference by one or more of the following measures:
• Reorient or relocate the receiving antenna.
• Increase the separation between the equipment and receiver.
• Connect the equipment into an outlet on a circuit different from that to which the receiver is
connected.
• Consult the dealer or an experienced radio/TV technician for help.
This device complies with Industry Canada licence-exempt RSS standard(s). Operation is
subject to the following two conditions: (1) this device may not cause interference, and (2) this
device must accept any interference, including interference that may cause undesired operation
of the device.”
TH5051_387BC
Sans fil
Year
an
G
a
r
a
n
t
i
e
W
a
r
r
a
n
t
y
387BC
Mode d’emploi
CUBEMÉTÉO
9 00
Format de l’horloge 12/24 heures
Température extérieure
Température intérieure
Date
Compartiment de pile
VUE ARRIÈRE
DE L’INSTRUMENT
Port de
l’adaptateur USB
Bouton Bas
(DOWN)
Bouton réglage SET Bouton Haut (UP)
SET
UP
DOWN
Indicateur P.M.
VUE AVANT
DU CAPTEUR
VUE ARRIÈRE
DU CAPTEUR
Voyant
DEL de
transmission
Compartiment
de pile
1.0 Entretien de l’instrument
• Évitezd’exposerlesunitésdel’instrumentàdestempératuresextrêmesouàdeschocsviolents.
• Évitezlecontactavecdesmatièrescorrosivescommeduparfum,del’alcooloudesproduits
d’entretien.
• Nesoumettezpaslesunitésdel’instrumentàuneforceexcessive,choc,poussière,
températureouhumidité.N’importelaquelledecesconditionspeutréduireladuréedevie
utiledecesunités.
• Nefalsiezaucundescomposantsinternesdecesunités;celaannuleraitlagarantieenplus
d’endommagerl’instrument.
• Desdommagesoccasionnésparl’inobservationdecemoded’emploiannuleronttoute
garantie.Lefabricantetlefournisseurnepeuventêtretenusresponsablespourtous
dommagescausésparlenon-respectdumoded’emploidel’instrument.
• Danslecasdepréjudicesoudommagescausésàunepersonneouàunbienparune
manutentioninadéquateoul’inobservationdumoded’emploi,lefabricantetlefournisseur
nepeuventêtretenusresponsables.
• Ceproduitn’estpasconçupournmédicaleoupourl’informationpublique.
1.1 Utilisation adéquate des piles
• Nemélangezpasdespilesstandardsavecdespilesrechargeables.
• Nemélangezpasdespilesneuvesavecdesvieillespiles.
• Nelaissezpasdespilesdéchargéesdansl’appareilcarellespourraientcorroderetlibérer
desproduitschimiquesquipourraientendommagerl’instrument.

2.0 Procédure d’installation
1.Introduisezl’adaptateurUSBaucubemétéo;vouspouvezensuitebrancherl’adaptateur
USBàunportUSBoubienvouspouvezalimenterlecubemétéoavec3pilesAAA.
2.Lecubemétéoeffectuerauneséquencedechiffres,émettraunbipetafcheral’HEURE.
3.Lecubemétéoserarégléautomatiquementpourafcherlesdifférentsécransdansla
séquencesuivante: HEURE (10 secondes) – DATE (2 secondes) – TEMPÉRATURE
INTÉRIEURE (7 secondes) – TEMPÉRATURE EXTÉRIEURE (7 secondes).
3.0 Réglage de l’heure
1.Lorsquel’HEUREs’afchesurlecubemétéo,appuyezettenezenfoncéleboutonSET.
NOTE : Si le cube météo n’affiche pas l’HEURE, appuyez sur le bouton SET pour
passer les différents écrans jusqu’à ce que l’HEURE s’affiche.
2.Leformatdel’horloge12/24heuresclignotera;appuyezsurleboutonUPouDOWNpour
sélectionnerleformatdel’heure.Unefoisleformatsélectionné,appuyezsurlebouton
SETpourconrmer.
3.Puis,leschiffresdel’heureclignoteront;appuyezsurleboutonUPouDOWNpourchoisir
leschiffresdel’heure.Unefoissélectionnés,appuyezsurleboutonSETpourconrmer.
Suivezlesmêmesétapespourréglerleschiffresdesminutes.Unefoislaconrmation
faite,lecubemétéoretourneraaumodenormal.
9 00 5 00
AM PM
Indicateur P.M.
4.0 Réglage de la date
1.LorsquelaDATE s’afchesurlecubemétéo,appuyezettenezenfoncéleboutonSET.
NOTE : Si le cube météo n’affiche pas la DATE, appuyez sur le bouton SET pour
passer les différents écrans jusqu’à ce que la DATE s’affiche.
2.L’annéeclignotera;appuyezsurleboutonUP ouDOWNpoursélectionnerl’année.Une
foisl’annéesélectionnée,appuyezsurleboutonSETpourconrmer.
3.Puis,lemoisclignotera;appuyezsurleboutonUPouDOWNpourchoisirlemois.
Unefoislemoissélectionné,appuyezsurleboutonSETpourconrmer.Unefoisla
conrmationfaite,lecubemétéoretourneraaumodenormal.
5.0 Réglage de l’alarme
Ilyapossibilitéderégler 3alarmesaveccecubemétéo.
1.AppuyezsurleboutonSETjusqu’àl’afchagede“ ””;puisappuyezettenezenfoncé
leboutonSET.
2.“ ““clignotera,appuyezsurleboutonUPouDOWNpourACTIVERl’alarme.
Lecubemétéoafchera“ ”.AppuyezsurleboutonSETpourconrmer.
Alarme activée Alarme désactivée
3.Leschiffresdel’heureclignoteront.AppuyezsurleboutonUPouDOWNpour
sélectionnerleschiffresdel’heure.Unefoisleschiffressélectionnés,appuyezsurle
boutonSET.Suivezlesmêmesétapespourréglerleschiffresdesminutes.
4.Suivezlesmêmesétapesdécritesci-dessuspourréglerl’alarme2etl’alarme3.
5.Unefoislesalarmesréglées“ ”clignotera.Sivousnevoulezpasquelesalarmes
s’activentlesamedietledimanche,appuyezsurleboutonUPouDOWNjusqu’àceque
“ ”s’afche.AppuyezsurleboutonSETpourconrmer.
Alarme ne sera pas
activée la fin de semaine
Alarme sera activée
la fin de semaine
6.Quandlecubemétéoestenmodenormal,l’écranTIMEs’afcheraautrementpour
indiquerquel’alarmeestACTIVÉE.
Indicateur de
l’alarme activée
7.Quandl’alarmesonne,appuyezsurunboutonquelconquepourladésactiver.L’alarme
sonnerapendant1minute.
NOTE : L’alarme sonnera de nouveau le lendemain à moins qu’elle soit
désactivée dans le mode du réglage de l’alarme.

6.0 Température intérieure
1.QuandlaTEMPÉRATUREINTÉRIEUREs’afchesurlecubemétéo,appuyezettenez
enfoncéleboutonDOWN.
NOTE : Si le cube météo n’affiche pas la TEMPÉRATURE INTÉRIEURE, appuyez sur
le bouton SET pour passer les différents écrans jusqu’à ce que la TEMPÉRATURE
INTÉRIEURE s’affiche.
2.LatempératurecommuteradeCelsiusàFahrenheit.
7.0 Température extérieure
1.QuandlaTEMPÉRATUREEXTÉRIEUREs’afchesurlecubemétéo,appuyezettenez
enfoncéleboutonSET.
NOTE : Si le cube météo n’affiche pas la TEMPÉRATURE EXTÉRIEURE, appuyez
sur le bouton SET pour passer les différents écrans jusqu’à ce que la
TEMPÉRATURE EXTÉRIEURE s’affiche.
2.“ ”s’afcheraàl’écran.Insérez2pilesAAAdanslecapteurextérieur.
3.LevoyantDELdetransmissionclignoterasurlecapteurextérieurpourindiquerquele
signalaétéenvoyéaucubemétéo.Unefoislesignalreçu,lestiretschangerontàla
températureextérieureactuelleetlecubemétéoretourneraaumodenormal.
7.1 Dépannage
Silatempératureextérieurenepeutêtrereçue,vériezlespointssuivants:
1. Ladistanceentrelemoniteuroulecapteurextérieurdevraitêtreàunedistanced’umoins1,2
mètre(4pieds),loindetoutessourcesd’interférencecommedesmoniteursoudestéléviseurs.

2.Évitezdedéposerlemoniteursurouàproximitéimmédiatedechâssisdefenêtresmétalliques.
3.L’utilisationd’autresproduitsélectriquestelsquecasquesd’écouteouhaut-parleurs
fonctionnantsurlamêmefréquence(433MHz)peuventempêcherlatransmissionetla
réceptionnormalesdusignal.
4.Desappareilsélectriquesfonctionnantsurlamêmefréquencedesignalde433MHzdans
levoisinagepeuventaussicauserdel’interférence.
5.Lessignauxprovenantd’autresappareilsdomestiquescommedessonnettesoudes
systèmesdesécuritédomestiquespeuventtemporairementinterféreraveclesunitéset
entraîneruneinterruptionderéception.Latransmissionetlaréceptiondesmesuresdela
températurereprendrontlorsquel’interférencecessera.
Laportéedetransmissionmaximaleestde30mètres(100pieds)ducapteuràdistance
aumoniteur(dansunespacelibre).Cependantceladépenddumilieuenvironnantetdes
niveauxd’interférence.Lesignaldelatempératurevoyageenlignedroiteducapteurà
distanceaumoniteur.Lesignalnecontournepasunobjet.Siaucuneréceptionn’est
possiblemalgrél’observationdecesfacteurs,touteslesunitésdevrontêtreréinitialisées.
8.0 Mode d’affichage
Danslemoded’afchage,vouspouvezréglerl’instrumentpourqu’ilafchetouslesécrans
dansuneséquenceouseulementpourqu’ilafchel’écranHEURE.
1.Enmodenormal,appuyezsurleboutonUP.PourACTIVERlaséquence,appuyezsurle
boutonUPjusqu’àceque“ ”s’afche.PourDÉSACTIVERlaséquence,appuyez
surleboutonUPjusqu’àceque“ ”s’afche.Appuyezdenouveausurlebouton
SETpourconrmer.
Séquence ACTIVÉE ---
HEURE (10 secondes), DATE (2 secondes)
TEMPÉRATURE INTÉRIEURE (7 secondes)
TEMPÉRATURE EXTÉRIEURE (7 secondes)
Séquence DÉSACTIVÉE
9.0 Mode d’économie d’énergie
Danslemoded’économied’énergie,vousavezl’optiond’avoirlecubemétéoALLUMÉ
pendant10secondespuisFERMÉ,ouALLUMÉdefaçonpermanente.
1.Enmodenormal,appuyezsurlebouton DOWN.Pouractiverlemoded’économie
d’énergie,appuyezsurleboutonDOWNjusqu’àceque“ ”s’afche.Pour
désactiverlemoded’économied’énergie,appuyezsurleboutonDOWNjusqu’àceque
“ ”s’afche.AppuyezsurleboutonSETpourconrmer.
Mode d’économie d’énergie activé (ON---)
Le cube météo s’allumera pendant 10 secondes
puis s’éteindra. Pour activer le cube météo,
taper dans vos mains, faire du bruit ou toucher
la tête du cube.
Mode d’économie d’énergie
désactivé (OFF---)
L’afficheur demeurera activé
de façon permanente.
10.0 LUMINOSITÉ DEL
Enmodenormal,vouspouvezréglerlaluminositédel’écranDELenappuyantetentenant
enfoncéleboutonU P. AppuyezsurleboutonUPpourchangeruneforteintensitélumineuseà
uneintensitémoyenne.AppuyezsurleboutonSETpoursortiretretourneraumodenormal.
Pleine luminosité Demi-luminosité
11.0 Pile intégrée
LecubemétéocomporteunepileCR2032incorporée.Lapilemaintientl’heureconstante
lorsquelecubemétéoestenmoded’économied’énergieACTIVÉ.(Voirlevolet9.0).Sil’heure
nefonctionnepas,remplacezlapileincorporéesituéedanslecompartimentdelapile.

12.0 Spécifications du produit
Plage de mesure de la température
Cubemétéo
0°Cà50°C/32°Fà122°F
Silatempératureestsupérieureà50°C(122°F),l’écranafcheraHH.
Silatempératureestinférieureà0°C(32°F),l’écranafcheraLL.
Capteur
extérieur
-30°Cà60°C/-22°Fà140°F
Silatempératureestsupérieureà60°C(140°F),l’écranafcheraHH.
Silatempératureestinférieureà-30°C(-22°F),l’écranafcheraLL.
Précision ±2°C/4°F
Source d’alimentation
Moniteur 3pilesAAA1,5V(noncomprises),1pileCR2032incorporée,ouun
adaptateurUSB(compris)
Capteur
extérieur 2pilesAAA,1,5V(noncomprises)
13.0 Garantie limitée d’un an
Siceproduitserévèledéfectueuxenraisondevicesdematériauxoudefabricationdans
l’annéequisuitladated’achat,veuillezlerenvoyeràl’adressespéciéeci-dessous.Leproduit
seraréparéouremplacé,sansfrais,aprèsréceptionduproduitportpayéetd’unmontantde
5,00$pourcouvrirlesfraisdemanutention,emballageetportderetour.Veuillezinclureune
preuved’achat,vosnometprénom,adresse,numérodetéléphonedejourouvotreadresse
électronique.
Cettegarantienes’appliquepassiladéfectuositéoulefonctionnementdéfectueuxestcausé
parunusageabusif,unmauvaisusage,d’altérationsoudemodications.
ThermorLtd.
16975LeslieStreet
Newmarket,ONL3Y9A1
1-800-387-8520
14.0 Déclaration de conformité FCC et CI
Cetappareilestconformeàl’article15desrèglementsdelaFCC.Sonfonctionnementest
soumisauxdeuxconditionssuivantes:(1)Cetappareilnedoitcauseraucuneinterférence
néfasteet(2)Cetappareildoitacceptertouteslesinterférencesreçues,ycompriscellesqui
risquentd’entraînerunfonctionnementindésirable.
AVERTISSEMENT:Deschangementsoudesmodicationsapportésàcetappareilsans
l’autorisationexpressedelapartieresponsabledelaconformitéauxnormespeutentraîner
pourl’utilisateurl’annulationdudroitd’usagedefairefonctionnercetéquipement.
NOTE :CetéquipementaététestéetrencontreleslimitesdelaClasseBdesappareils
numériques,conformémentàlaClause15desrèglementsdelaFCC.Ceslimitesontété
établiespourfourniruneprotectionraisonnablecontreuneinterférencenuisibledansune
installationrésidentielle.Cetéquipementgénère,utiliseetpeutirradierdel’énergiefréquence
radioet,sicetappareiln’estpasinstalléetutiliséenrespectantcesinstructions,ilpourrait
causerdel’interférencenuisibleauxcommunicationsradio.
Cependant,iln’yapasdegarantiequel’interférenceneseproduirapaslorsd’uneinstallation
particulière.Sicetinstrumentcausevraimentdel’interférencenuisiblelorsdelaréception
àpartird’uneradiooud’unetélévision,quipeutêtredéterminéeenallumantoufermantcet
équipement,nousencourageonsl’utilisateurd’essayerdecorrigercetteinterférenceparune
ouplusieursmesures:
•Réorienterourelocaliserl’antennequireçoit.
•Augmenterladistanceentrel’équipementetlereceveur.
•Brancherl’équipementsuruncircuitdifférentdelaprisedurécepteur.
•Consulterundétaillantoudemanderl’aided’untechnicienexpérimentéenradio/TV.
LeprésentappareilestconformeauxCNRd’IndustrieCanadaapplicablesauxappareilsradio
exemptsdelicence.L’exploitationestautoriséeauxdeuxconditionssuivantes:(1)l’appareil
nedoitpasproduiredebrouillage,et(2)l’utilisateurdel’appareildoitacceptertoutbrouillage
radioélectriquesubi,mêmesilebrouillageestsusceptibled’encompromettrelefonctionnement.
Remarque: Toute modification de ce produit annule l’autorité de l’utilisateur à utiliser
cet équipement.