Thomas and Betts GC822843 Modular Nexus RF Modem User Manual
Thomas & Betts Corporation Modular Nexus RF Modem
User Manual
Thomas & Betts Tel: (888) 552-6467 ext. 547 or 255 Fax: (888) 867-1565 www.tnb.com 01/2008 750.1426 Rev A
1/6
Advanced Diagnostic Charger Board /
With Wireless NEXUS Option
OWNERS’S MANUAL
NOTE TO INSTALLER
This manual must be turned over to owner on completion of installation.
1. Installer
This manual must be turned over to owner on completion of
installation.
WARNING:
• Please RESET the system whenever you add or change
lamp load (refer to section 2.2.2.1)
• This device complies with Part 15 of the FCC Rules.
Operation is subject to the following two conditions:
(1) this device may not cause harmful interference
(2) this device must accept any interference
received, including interference that may cause
undesired operation.
IMPORTANT SAFEGUARDS
1. For product regulatory information see Section 6
2. When using electrical equipment, basic safety precautions
should always be followed including the following:
READ AND FOLLOW ALL SAFETY
INSTRUCTIONS
3. Do not use outdoors.
4. Do not let power supply cords touch hot surfaces.
5. Do not mount near gas or electric heaters.
6. Use caution when handling batteries. Avoid possible shorting
7. Equipment should be mounted in locations and at heights
where it will not readily be subjected to tampering by
unauthorized personnel.
8. The use of accessory equipment not recommended by the
manufacturer may cause an unsafe condition.
9. Caution: if optional halogen cycle lamp(s), symbol (H--), are
used in this equipment, to avoid shattering: do not operate
lamp in excess of rated voltage, protect lamp against abrasion
and scratches and against liquids when lamp is operating,
dispose of lamp with care.
10. Halogen cycle lamps operate at high temperatures. Do not
store or place flammable materials near lamp.
11. Do not use this equipment for other than intended use.
12. All servicing should be performed by qualified service
personnel.
SAVE THESE INSTRUCTIONS
2. Operation
2.1 General
• High power 8-bit microcontroller (MCU)
• Annual test sequence
• 120/277/347 volts 60 Hz input standard
• Temperature compensated
• Status indicator bi-color LED
• Low voltage battery disconnect
• Brownout detection
• Lockout
• Modular RF Nexus Modem
2.2 System operation
• The diagnostic/charger is a fully self-contained, fully
automatic microcontroller based system.
• When the installation is completed and the unit is powered,
the system is automatically functional. There is no need to
have the AC present at this time, only the battery needs to be
connected. The unit goes directly in lockout mode and waits
for AC to be restored.
2.3 Test / Silence test button
• Alarms are acknowledged by pushing the “TEST” switch less
than one half second. This action turns off the audible alarm.
Alarm indication can only be restored by correcting the fault
or by a system re-initialization.
• Manual forced tests are initiated by pushing and holding the
“TEST” switch more than one second. The 1 minute test will
start.
• System initialization is done by holding the “TEST” switch
for at least 6 seconds
Advanced Diagnostic Charger / NEXUS
Thomas & Betts Tel: (888) 552-6467 ext. 547 or 255 Fax: (888) 867-1565 www.tnb.com 01/2008 750.1381 Rev A
2/6
2.4 Diagnostic
Any fault condition produces an audible warning, if activated, that
consists of an intermittent beep, one second on, one second off.
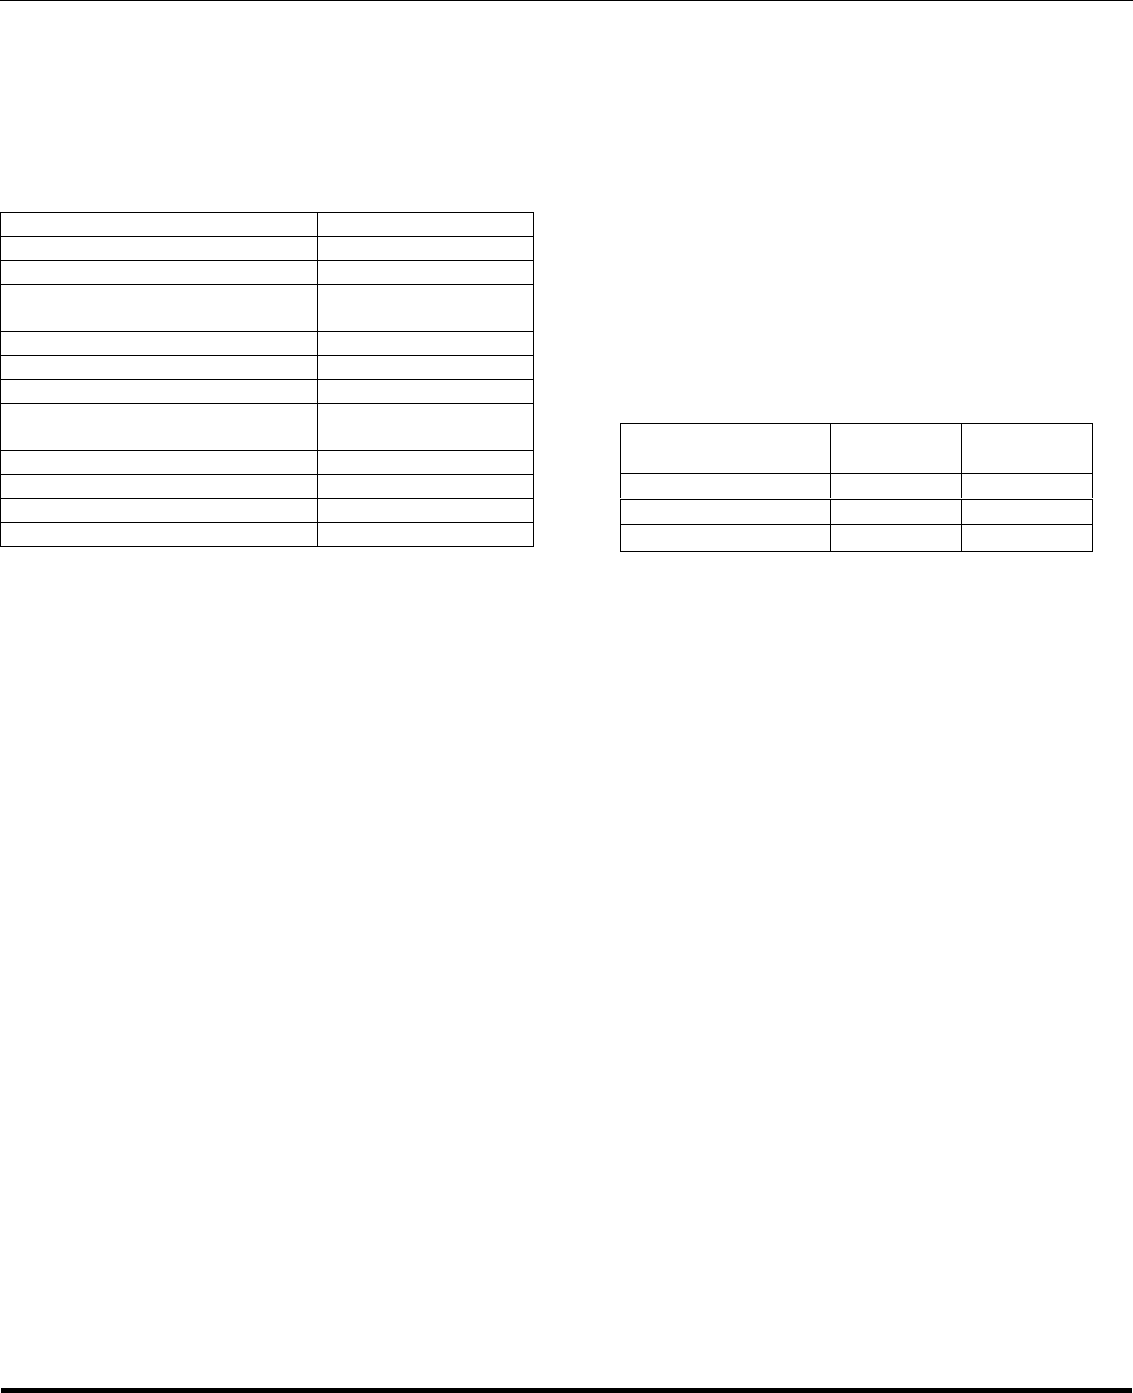
Status LED
See table
Indicator Meaning
Steady green AC On
Blinking green In Test
Steady red Battery disconnect OR
load disconnect
1 red blinks, pause of 5 seconds Battery failure
2 red blinks, pause of 4 seconds Charger failure
3 red blinks, pause of 3 seconds Lamp failure
4 red blinks, pause of 2 seconds LED strip failure
(combo version)
Nexus Status
Blinking yellow Wink mode
Blinking between yellow and green Unit not commissioned
Steady yellow Server failure
2.4.1 Open or short battery circuit
The status indicator displays steady red LED if the battery circuit
is opened or shorted.
2.4.2 Transfer module
When a transfer is initiated (brown-out, manual test or auto-test),
and the system fails to energize the lamp circuits, a system failure
is detected and the bi-color displayed a load disconnect indication.
2.4.3 Battery failure
This is a multi-function indicator all related to battery condition.
The status indicator displays 1 red blink and a pause of 5 seconds
when a wrong battery (ex: 12V battery on a 6V system). It will
also be displayed if the battery has failed a timed or forced test
(reached LVD level before the end of the test).
2.4.4 Charger monitoring
The status indicator displays 2 red blinks and a pause of 4 seconds
if the charging current does not fall within limits corresponding to
the charger command state.
2.4.5 Lamp testing (incandescent
only)
The test is fully automatic and because of that, there are some
limitations. To maintain accurate data, some conditions are to be
fulfilled prior to acquiring values from an all-good lamp circuit:
• The battery has to be at or nears full power. The program will
delay data capture for a minimum of 48 hours following any
discharge or reset.
• The charger will also wait for the charger to be in hysteresis
mode. Both conditions must be fulfilled.
2.4.5.1 Lamp capture sequence
The capture sequence is initiated only by a reset of the system.
This is done by holding the “TEST” switch for at least 6 seconds.
The reset also initializes the main counter. After 12 periods of 30
days, lamp capture data is renewed. This renewal takes place to
compensate for system variations when the unit ages. Renewal is
not allowed if there is a lamp failure alarm.
3. Options
3.1 Automatic unit test (30-day test)
Every 30 days, while in charging mode, the sequence generator
will generate a command to energize the transfer relay on the
emergency lighting circuit for a variable test period depending on
the yearly sequence.
• If the battery fails to complete the discharge test, the charger
will display a battery failure and the test will abort
• The 30 days automatic test sequence is reset every time the
lamps have been turned on included the manual test.
3.2 Lamp disconnect (battery energy saver)
When in energy mode, because of a power failure or a brown-out
condition, lamps can be turned “OFF” by pushing the “TEST”
switch. If LVD has not been detected, lamps can be turned back
“ON” by again pushing the “TEST” switch.
3.3 Audible alarm
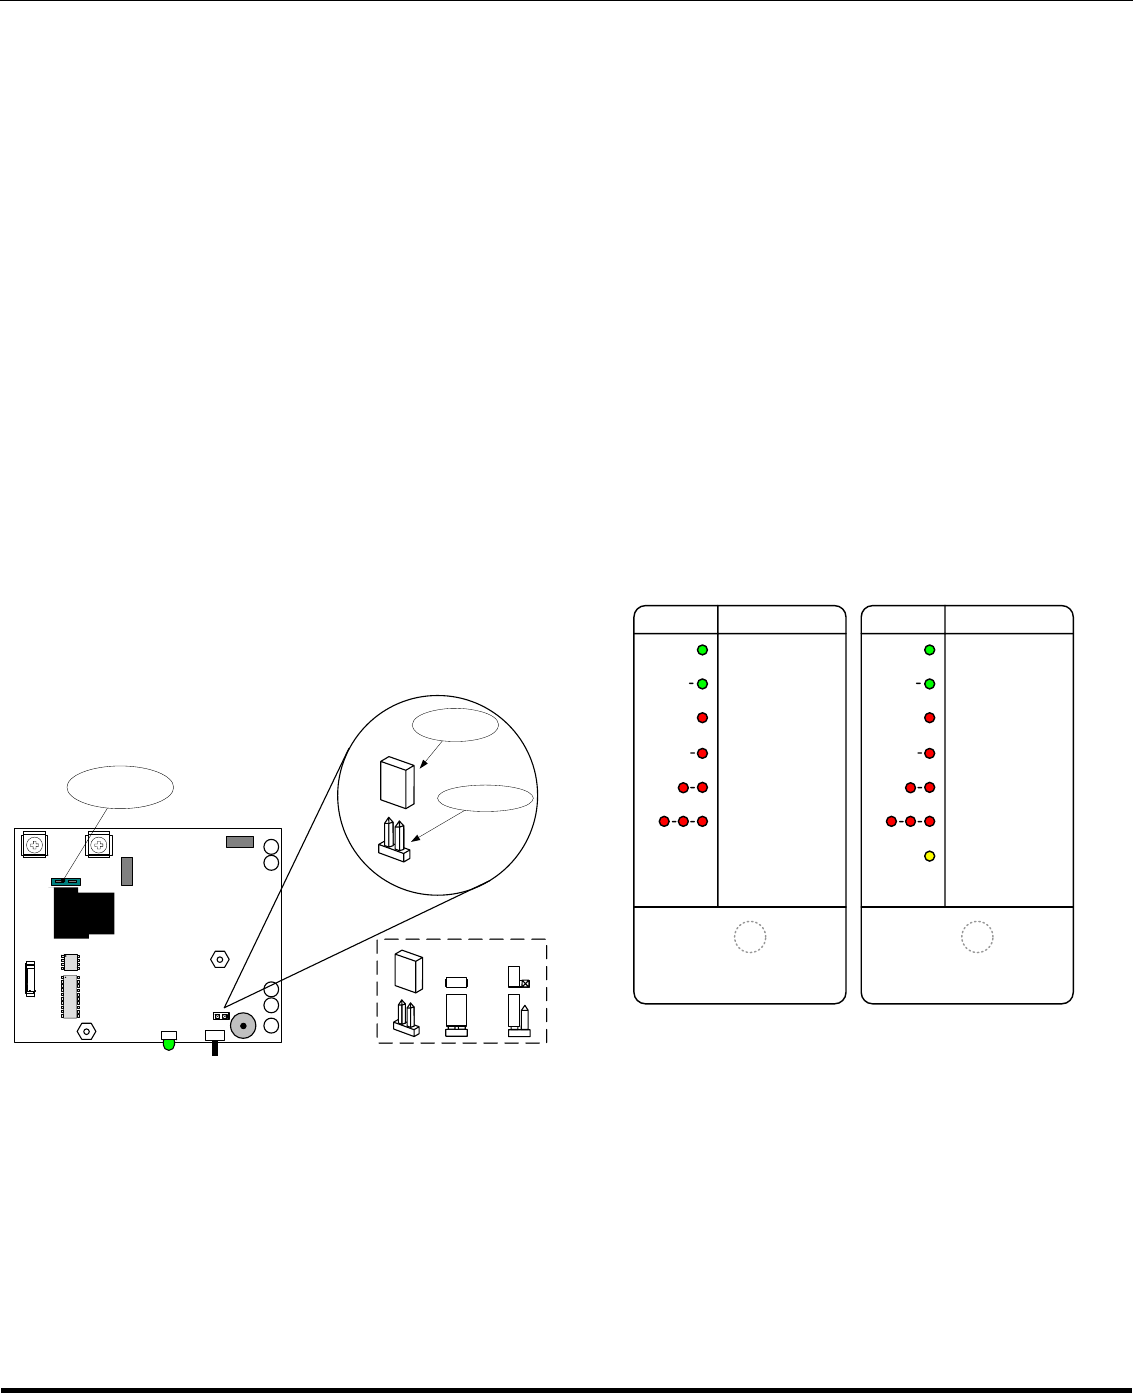
This option can be activated or not in the field. Refer to the
drawing on Figure 1 page 3 for positioning.
3.4 Remote diagnostic (Nexus)
Charger compatible with the Nexus communication system that
allows to monitor, in real time, the status of each unit from a
computer.
Canadian
(minutes) American
(minutes)
Monthly test 1 1
6th month test 10 30
12th month test 30 90
Advanced Diagnostic Charger / NEXUS
Thomas & Betts Tel: (888) 552-6467 ext. 547 or 255 Fax: (888) 867-1565 www.tnb.com 01/2008 750.1381 Rev A
3/6
4. Electrical specifications
4.1 Lamp filament detection
Resolution is 10% of the full-load circuit or 10 watts in a 100 watt
load (i.e.: one lamp out of ten). No more than 5% voltage drop is
allowed in the remote lead wires.
IMPORTANT: Reset the system after a load change. See section
2.3 (Test / Silence test button) for explanation.
4.2 LVD
Low voltage battery disconnects automatically shuts down lamp
load and circuitry when battery reaches 87% of nominal battery
voltage preventing deep discharge and permanent damage to the
battery.
4.3 Voltage drop protection
When remote fixtures are connected to emergency lighting units of
less than 50 volts, circuit runs must be sufficient size to maintain a
proper operating voltage to all lamps. The maximum allowable
voltage drop should no exceed 5%. For more information, please
contact the factory.
4.4 Advanced Diagnostic Charger / Microcontroller
Board
Charger Board
SHUNT
2 PINS
OPTION
‘’ON’’ OPTION
‘’OFF’’
Fuse
Figure 1
To select the option:
1. Remove all power sources to the board (AC and battery)
2. With long-nose pliers, pull on the shunt (little black box) until
it is free from the pins.
3. Put the shunt back in place according to the option selection.
4. Reconnect the AC and the battery.
4.4.1 Wireless Nexus option
1. When provided with the Wireless Nexus RF option, the unit
will automatically join the local Nexus RF Mesh network on
power-up. All diagnostic functions will be then monitored
through the network by the centralized Area Controller.
2. The Wireless Nexus system operates in the 915MHz ISM
band providing superior penetration through building
materials and ensuring network integrity.
3. A yellow/green flashing status LED indicates an un-
commissioned unit waiting to join the network.
4. For commissioning and networking details see the Wireless
Nexus manual.
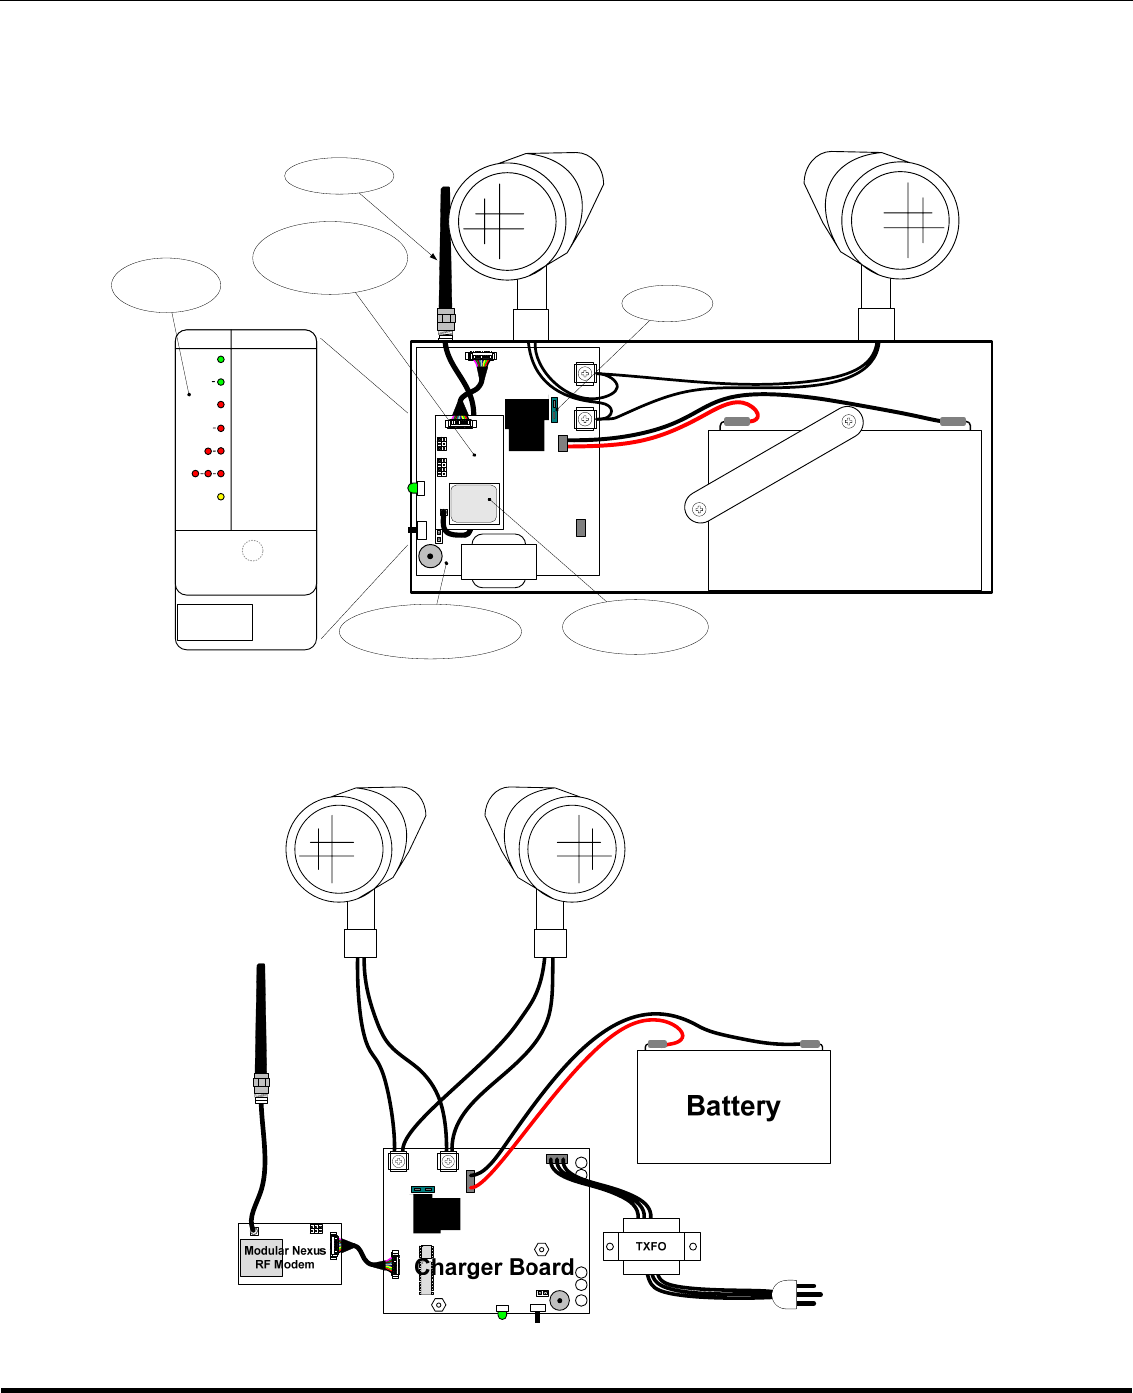
4.4.2 Wiring Diagram for AD charger
See picture Figure 4 (Typical wiring diagram) on next page
4.5 Name Plate for Advanced Diagnostic Charger
and Nexus version
STATUS
INDICATOR DESCRIPTION
AC ON
IN TEST
BATTERY / LAMP
DISCONNECT
BATTERY FAILURE
CHARGER FAILURE
LAMP FAILURE
NEXUS
STATUS
INDICATOR DESCRIPTION
AC ON
IN TEST
BATTERY / LAMP
DISCONNECT
BATTERY FAILURE
CHARGER FAILURE
LAMP FAILURE
NEXUS
Figure 2
Advanced Diagnostic Charger / NEXUS
Thomas & Betts Tel: (888) 552-6467 ext. 547 or 255 Fax: (888) 867-1565 www.tnb.com 01/2008 750.1381 Rev A
4/6
Figure 4 (Typical wiring diagram)
Battery
Modular Nexus
RF Modem
NEXUS
STATUS
INDICATOR DESCRIPTION
AC ON
IN TEST
BATTERY / LAMP
DISCONNECT
BATTERY FAILURE
CHARGER FAILURE
LAMP FAILURE
NEXUS
ALARM
SILENCE
TEST Charger Board
Antenna
Fuse
Status
Label
T&B:039059
FCC ID:
W3BGC822843
IC:
8100A-GC822843
FCC ID & IC ID
Label
Figure 3 (Typical unit assembly)

Advanced Diagnostic Charger / NEXUS
Thomas & Betts Tel: (888) 552-6467 ext. 547 or 255 Fax: (888) 867-1565 www.tnb.com 01/2008 750.1381 Rev A
5/6
5. Radio operations modes basic characteristics.
5.1 Mesh Network Mode (this is the normal mode of operation of the Wireless Nexus System)
• Lowest channel frequency: 918.6 MHz
• Highest channel frequency: 925.8 MHz
• Modulation Mode: GFSK
• Modulation frequency deviation: 19KHz
• Data Rate: 38 Kbits/s
• Maximum Output Power: -5.6 dBm
5.2 Backdoor Mode (used for close range communication for service purposes, using a mobile Area Controller)
• Channel frequency: 918.0 MHz
• Modulation Mode: MSK
• Data Rate: 125 Kbits/s
• Maximum Output Power: -14.4 dBm
Advanced Diagnostic Charger / NEXUS
Thomas & Betts Tel: (888) 552-6467 ext. 547 or 255 Fax: (888) 867-1565 www.tnb.com 01/2008 750.1381 Rev A
6/6
6. Product Regulatory Information
FCC Statement
This device complies with part 15 of the FCC rules.
FCC ID: W3BGC822843
This equipment has been tested and found to comply with the limits for a Class B digital device, pursuant to
Part 15 of the FCC rules. These limits are designed to provide reasonable protection against harmful
interference in a residential installation. This equipment generates, uses, and can radiate radio frequency energy
and, if not installed and used in accordance with the instructions, may cause harmful interference to radio
communications. However, there is no guarantee that interference will not occur in a particular installation. If
this equipment does cause harmful interference to radio or television reception, which can be determined by
turning the equipment off and on, the user is encouraged to try to correct the interference by one or more of the
following measures:
• Reorient or relocate the receiving antenna.
• Increase the separation between the equipment and receiver.
• Connect the equipment into an outlet on a circuit different from that to which the receiver is connected.
• Consult the dealer or an experienced radio/TV technician for help.
! IMPORTANT Changes or modifications not covered in this manual must be approved in
writing by the manufacturer’s Regulatory Engineering Department. Changes or modifications made without
written approval may void the user’s authority to operate this equipment.
Industry Canada
The term “IC:” before the certification/registration number only signifies that the Industry Canada technical
specifications were met.
IC: 8100A-GC822843
Canadian Wireless Regulatory Notice
This Class B digital apparatus meets all the requirements of the Canadian Interference Causing Equipment
Regulations. Operation is subject to the following two conditions: a) this device may not cause any interference,
and b) this device must accept any interference, including interference that may cause undesired operation of
the device. To prevent radio interference to the licensed service, this device is intended to be operated indoors,
and away from windows to prevent maximum shielding. Equipment (or its transmit antenna) that is installed
outdoors is subject to licensing.
Antenna Care/Unauthorized Modifications
Use only the supplied integral antenna. Unauthorized antenna modifications or attachments could damage the
unit and may violate FCC regulations. Any changes or modifications not expressly approved by the party
responsible for compliance could void the user's authority to operate the equipment.