Thomas and Betts RC3901T Remote Door Chime Transmitter User Manual Instructions
Thomas & Betts Corporation Remote Door Chime Transmitter Instructions
Instrunctions

Libra Wireless Door Chime with Light
Instructions for Model No. RC3920
IMPORTANT NOTICE – This device complies with Part 15 of the FCC Rules. Operation is subject to
the following two conditions: (1) this device may not cause harmful interference, and (2) this device
must accept any interference received, including interference that may cause undesired operation.
Enclosed you will find:
• Pushbutton Transmitter (RC3901T)
• Door Chime (RC3923R)
• Door Chime wall hanging bracket (including screws and wall plugs for mounting)
• Adhesive pad and screws for mounting the Transmitter
Tools/supplies needed:
• 2 (C size) alkaline batteries for the Door Chime. We recommend that only long-life
alkaline batteries are used (e.g. Duracell or Energizer). This product will not work
with NiCd rechargeable batteries.
• A small flathead screwdriver
• A Phillips crosshead screwdriver
Installation
Note: Positioning the transmitter or Door Chime on or near metal structures or other metallic
objects or doorframes may reduce the transmission range.
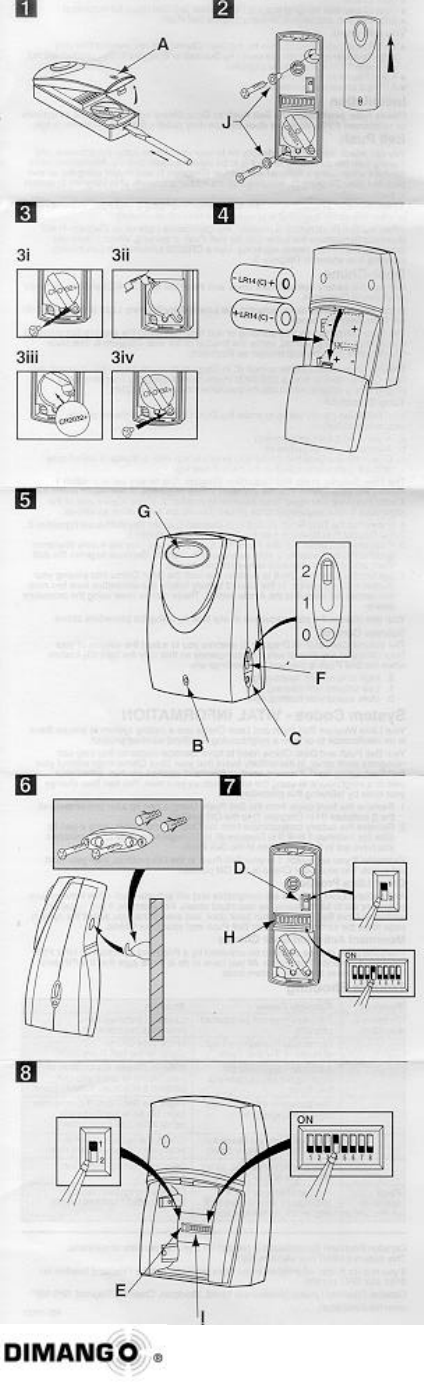
Pushbutton Transmitter
You can attach the transmitter directly onto your doorframe using the adhesive pad. Make
sure the surface on which it is to be placed is clean and dry. Alternatively open the front
cover using a flathead screwdriver (Illustration 1) and mount using the screws provided (See
Illustration 2), ensuring that the rubber grommets remain in place.
To ensure weatherproofing is maintained, always mount the Transmitter in the upright
position shown in Illustration 2 and replace the front cover securely.
When the Transmitter button is pressed, the Indicator Light (A on Illustration 1) will
illuminate to show that the Transmitter is working. When it does not illuminate, the battery
needs to be replaced. Use a CR2032 Lithium Coin Cell battery, inserting it as shown in
Illustration 3.
Door Chime Receiver
Remove the battery compartment cover and insert the two (C size) alkaline batteries as
shown in Illustration 4.
When these batteries need to be replaced, the Low Battery Warning Light (B in Illustration
5) will flash every 5 seconds.
The Door Chime can be freestanding or wall-mounted using the wall bracket provided.
If wall mounting is preferred, screw the bracket to the wall, Illustration 6. The Door Chime
hooks onto the wall bracket as shown.
There is an external adapter socket (C in Illustration 5) which allows you to power the
Door Chime receiver from a 120V receptacle, using a 3 .6 volt DC 800 milliamp plug-in low
voltage adapter which can be purchased separately with the appropriate 1.3 mm female
plug with negative center contact.
Tune Selection
Your Transmitter can be set up to make the Door Chime play a choice of note sequences as
follows:
a. A standard 2 note sequence or
b. A longer 4 note sequence or
c. One of three alternative 2 note sequences which offer a choice of sound tone and are
particularly suited to the hard of hearing.
The Tune Selector in the Transmitter (D in Illustration 7) is factory set to position 1 making
the Door Chime play the standard 2 note sequence. If you would prefer the 4 note
sequence, just move Tune Selector to position 2. If you require one of the alternative 2 note
sequences to be played, this can be easily done as follows:
1. Ensure that the Tune Select Control (D in Illustration 7) on the Transmitter is set to
position 2.
2. Set Control E in Illustration 8 on the Door Chime to position 1.
3. Each time you press the Transmitter, the door chime will play the 4 note sequence and
the three alternative 2 note sequences in rotation. Continue to press the pushbutton
until you hear the note sequence you would like to use.
4. Set Control E in Illustration 8 to position 2 to lock the Door Chime into playing your
chosen note sequence. The alternative two note sequences will default to the 4 note
setting, if the battery is replaced. These can be reset using the procedure above.
You can change the note sequence at anytime by using the procedure above.
Volume Control
The Volume Control (F in Illustration 5) enables you to adjust the volume of your Door
Chime at anytime or turn it off completely so that only the light (G) flashes when the
Transmitter is pressed. The settings are:
2 - High volume with flashing light
1 - Low volume with flashing light
0 - Mute sound with flashing light

System Codes - VITAL INFORMATION
Your Libra Wireless Transmitter and Door Chime use a coding system to ensure there is no
interference to or from a neighboring Dimango wireless product. Your Transmitter and Door
Chime need to have identical codes so that they can recognize each other. In the unlikely
event that your Door Chime rings without your Transmitter being used, it means another
Dimango wireless product, either your own or a neighbor's, is using the same code as your
own. You can then change your code by following this procedure:
1. Remove the front cover from the Transmitter. Using a pen tip alter one or more of
the 8 switches (H in Illustration 7) to the ON position.
2. Remove the battery compartment from the Door Chime. Again using a pen tip alter the
switches 1 to 8 (I in Illustration 8) to correspond exactly to the switches you have set in
the up position in the Transmitter.
Example: If you set switch 1 in your Transmitter to the ON position, then you must set
switch 1 in your Door Chime to the ON position.
Other Libra Products
All Dimango Libra products are compatible and will activate each other if the system
codes are set to be the same, as described above. For example, if you install an additional
Libra Transmitter (RC3901T) for your back door, just ensure that you adjust the system
code to be the same as your other Transmitter and your Door Chime.
Troubleshooting
Problem Possible Cause Solution
Chime not sounding Batteries may not be inserted correctly Check all batteries have been
inserted correctly
Chime may be positioned out of range Move your Chime closer to the
of the Transmitter Transmitter
A metallic object may be blocking the Experiment with the location of
signal from the Transmitter your Chime to see if you can
position it in a more suitable place
The battery in the Transmitter may need Press the Transmitter. If Indicator
replacing Light (A) does not illuminate, replace
the Transmitter battery
Your Transmitter and Chime may have Check the system codes in both your
different system codes Chime and Transmitter
Your volume control may be set to the Set volume control to position 1 or 2
mute setting
False activation of Another of your own or a neighbor's Change the system codes in both
the Chime wireless product may be using the same your Transmitter and Chime
code