Thomson 3-5811 Face Held FRS Transceiver User Manual Instruction Guide
Thomson Inc. Face Held FRS Transceiver Instruction Guide
Thomson >
Instruction Guide
GE 35811 – User Instruction Guide – Content Draft
TriSquare Communications Draft for content only – customer to define layout and additional graphics Page 1
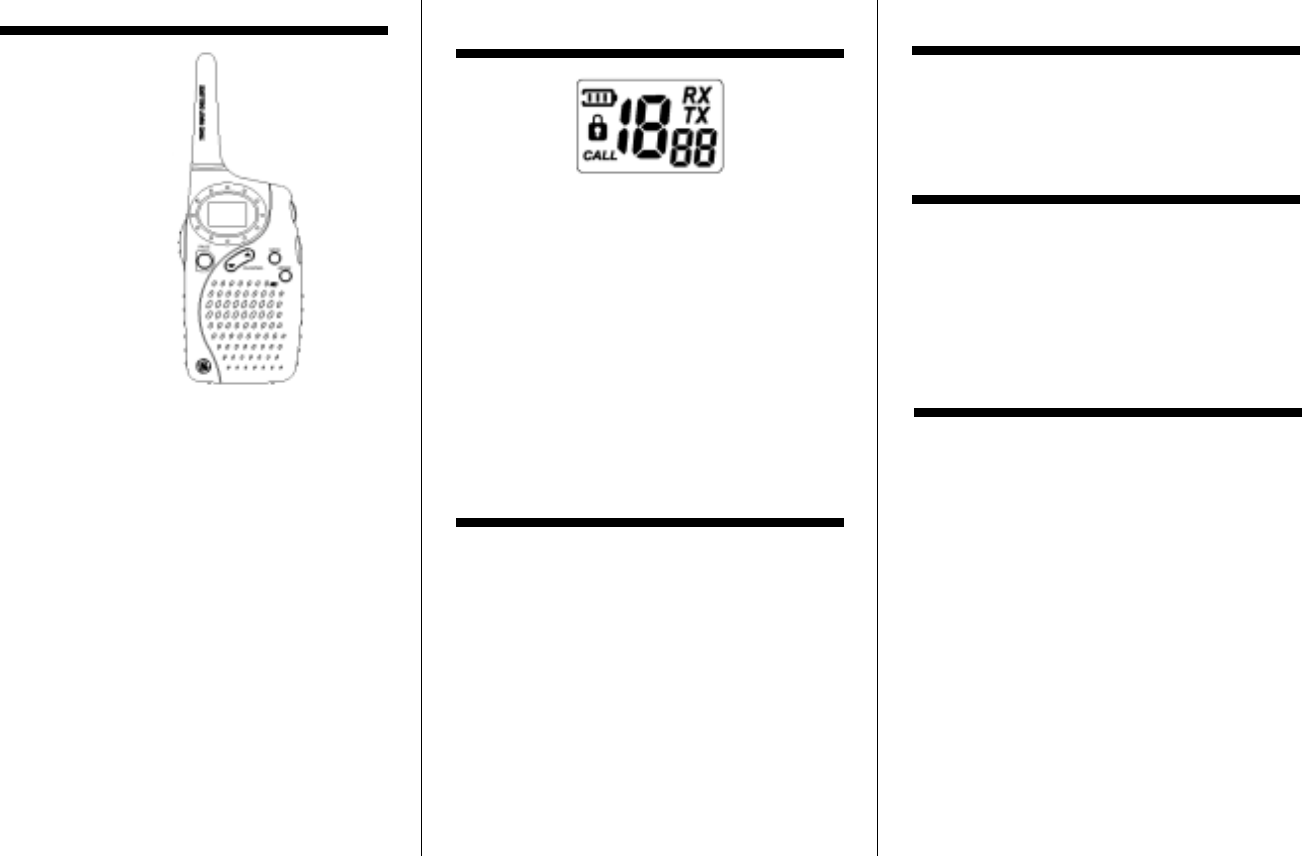
Buttons and Controls
1) On/Off/Volume – Turn
counter-
clockwise to power
ON and increase
listening volume. Rotate
clockwise to
decrease volume and turn
power OFF.
2) PTT (Push to Talk)
–
Press to transmit, release
to receive.
3) PAGE – Press to send a
call tone to other radios
tuned to the same
channel.
4) CHANNEL (up/down) – Press the up arrow to
increment and down arrow to decrement.
5) MON – Press to deactivate the automatic squelch
feature and listen to the air traffic on the current
channel before initiating transmission. Press the
MON button again to return to standby.
6) MODE – Use for setting individual CTCSS
codes and selecting call tones.
7) Accessory Jack – Insert optional headphones
into the accessory jack to listen to calls. This will
disable the built-in speaker.
8) MIC – Built-in microphone
9) Speaker – Built-in speaker
10)
Antenna
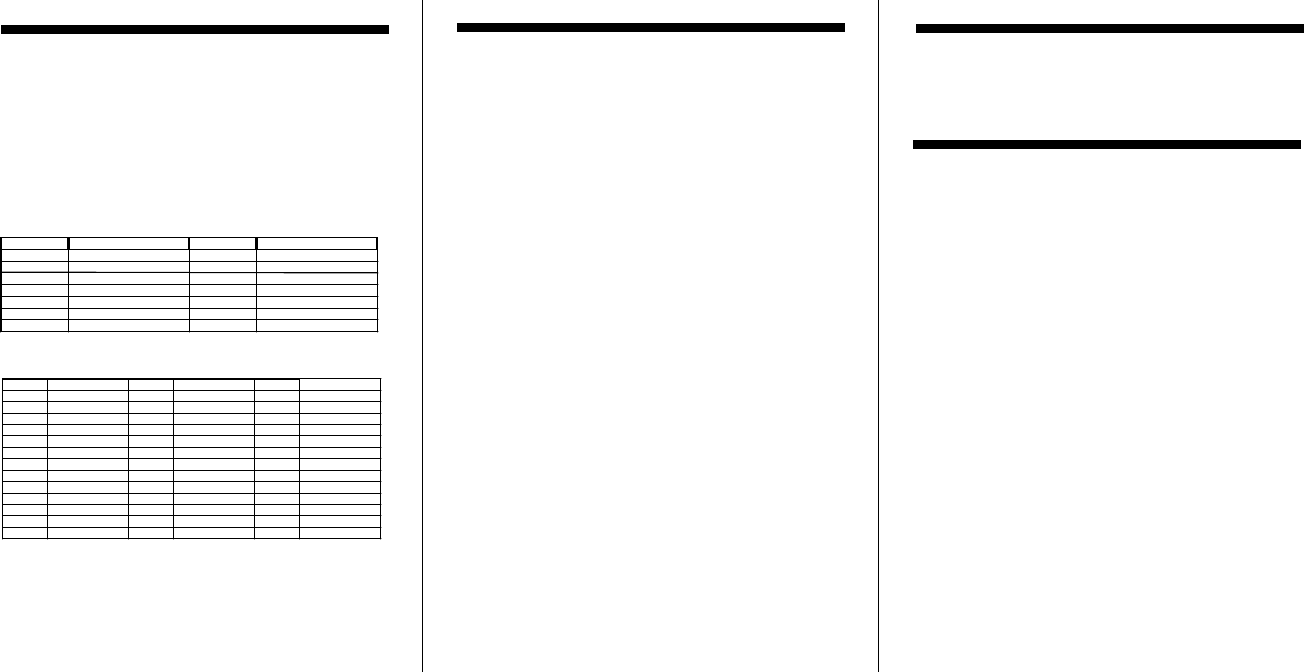
Display
1) Battery Icon – Indicates the battery level. When
the batteries are nearly drained, the icon will start
to blink, and the unit beeps peridically.
2) RX icon – Indicates when the unit is receiving a
transmission.
3) TX icon – Indicates when the unit is transmitting.
4) Subcode CTCSS icon – Shows the current sub
code number (0-38).
5) Channel number – Shows the current channel
(1-14).
6) CALL icon – Displays call tone number (1-5).
7) Lock Icon – Displays when the keypad lock is
turned on.
Battery Installation
Your radio uses 3 AA Alkaline batteries for power.
To install the batteries:
1) Remove the battery compartment door by
sliding it down from the unit.
2) Install 3 AA Alkaline batteries (not included)
into the battery compartment. Be certain to
follow the + and – symbols in the compartment.
Installing the batteries incorrectly will prevent
the unit from operating.
Note: In order to maintain your user settings
(CTCSS code assignment, current channel, etc.)
make sure the unit is off before removing the
batteries. Your settings will remain for
approximately 10 minutes while you install the new
batteries.
Low Battery Alert
When the batteries in the unit are low, the unit will
emit a “low battery” tone indication. Replace the
batteries immediately to continue using the radio.
Belt Clip Installation and Removal
To install the belt clip, line up the grooves on the
clip with the grooves on the back of the unit. Push
downward until it snaps into place.
To remove the belt clip, release the snap with your
finger or a tool while firmly pushing the clip upward.
Using Your Family Radio
1. Turn on power.
2. Check the battery condition on the display
3. Set to desired channel.
4. Adjust volume to comfortable level.
To Transmit
Press the PTT button. Speak slowly and clearly 2-3
inches from the microphone. To avoid cutting off
the first part of your transmission, pause slightly
after pressing the PTT button before you start
talking. The transmit symbol is displayed while the
unit is transmitting.
To Receive
When you are finished talking, release the PTT
button to listen to the transmission. The receive icon
is displayed while the unit is receiving.

GE 35811 – User Instruction Guide – Content Draft
TriSquare Communications Draft for content only – customer to define layout and additional graphics Page 2
Note: Remember if several family radios are in use
as a talk group, they must all be on the same channel
with the same CTCSS code setting to communicate.
(See advance features for selecting CTCSS codes)
Changing Channels
Press the CHANNEL (up/down) button to change
channels. The channel may only be changed during
receive mode and cannot be changed during PAGE
or PTT transmit mode.
Selecting a CTCSS Code
This feature uses a sub-audible tone to prevent
unwanted calls from interrupting your conversation
when there are other people using the same channel
you are on. The unit has 38 available CTCSS
(Continuous Tone Coded Squelch System) codes
which can be individually assigned to any of 14
channels. If code “0” is assigned, the CTCSS is not
turned on.
Once activated, the sub-audible tone is transmitted
each time the PTT button is pressed. Additionally,
the radio only responds to incoming signals using the
same CTCSS tone.
Note: This feature does not prevent other people
from hearing your conversations. It is intended to
prevent unwanted incoming conversations only.
To select a CTCSS code for the currently displayed
channel, press the MODE button once. Use the
CHANNEL (up/down) button to select the desired
code.
When finished, any of the following will return to
Standby Mode:
• Press the MODE button two times.
• Wait 12 seconds.
• Press the PTT or PAGE buttons.
Transmitting a Call Alert Tone
Press the PAGE button to initiate an Alert Tone
transmission. The Alert Tone will automatically be
transmitted for a fixed length of time.
You may choose from 5 distinct pre-programmed
call tones (1-5). Press the MODE button twice
followed by the CHANNEL (up/down) button to
select the desired tone. As you select the tone, you
will hear it through the speaker but it will not be
transmitted until the PAGE button is pressed.
When finished, any of the following will return to
Standby Mode:
• Press the MODE button one time.
• Wait 12 seconds.
• Press the PTT or PAGE buttons.
Adjusting Keypad Beeps
Your radio emits a beep each time one of the buttons
is pressed. To turn this sound OFF, press PAGE
while turning on the radio. To turn this sound ON,
press PAGE while turning on the radio again.
LCD Backlight
The LCD back light will automatically be turned on
with any key press. The LCD display will be
illuminated for 12 seconds before turning off.
Auto Squelch Feature
Your radio is equipped with an automatic squelch
system which shuts off weak transmissions and
unwanted noise due to terrain conditions or if you
have reached your range limit.
The Auto Squelch may be temporarily deactivated
by momentarily pressing the MON (Monitor)
button. Press the MON button again to re-engage
the Auto Squelch.
Automatic Power Save Feature
Your radio has a unique circuit designed to
dramatically extend the life of the batteries. If there
is no transmission within 12 seconds, your radio
switches to the Power Save mode. The radio is still
able to receive transmissions in this mode.
GE 35811 – User Instruction Guide – Content Draft
TriSquare Communications Draft for content only – customer to define layout and additional graphics Page 3
Specifications
Description
Channels 14
CTCSS Codes 38 Sub-Audible Tones
Operating Frequency UHF 462.550-467.725 MHz
Power Source 3AA Alkaline Batteries
Output Power 500mW ERP maximum
Battery Life 45 Hours (5/5/90 duty cycle)
Channel Frequency Chart (Mhz)
CTCSS Chart (Hz)
Code Frequency (Hz) Code Frequency (Hz) Code Frequency (Hz)
0 Disabled 13 103.5 26 162.2
1 67.0 14 107.2 27 167.9
2 71.9 15 110.9 28 173.8
3 74.4 16 114.8 29 179.9
4 77.0 17 118.8 30 186.2
5 79.7 18 123.0 31 192.8
6 82.5 19 127.3 32 203.5
7 85.4 20 131.8 33 210.7
8 88.5 21 136.5 34 218.1
9 91.5 22 141.3 35 225.7
10 94.8 23 146.2 36 233.6
11 97.4 24 151.4 37 241.8
12 100.0 25 156.7 38 250.3
FCC Information
• This device complies with Part 15 of the FCC
Rules. Operation is subject to the following two
conditions: (1) This device may not cause
harmful interference, and (2) this device must
accept any interference received, including
interference that may cause undesired operation.
• Important: Changes or modifications to this unit
not expressly approved by Thomson Consumer
Electronics could void your authority to operate
this unit. Your radio is set up to transmit a
regulated signal on an assigned frequency. It is
against the law to alter the settings inside the
radio to exceed those limitations. Any
adjustments to your radio must be made by
qualified technicians.
• To be safe and sure:
o Never open your radio’s case
o Never change or replace anything in your
radio except the batteries.
• Your radio might cause TV or radio interference
even when it is operating properly. To determine
whether your radio is causing the interference,
turn it off. If the interference goes away, your
radio is causing it. Try to eliminate the
interference by moving your radio away from the
receiver. If you cannot eliminate the
interference, the FCC requires that you stop using
the radio.
Service Information
Standard Service statement
Limited Warranty
Standard Warranty statement.
Channel
Frequency Channel
Frequency
1 462.5625 8 467.5625
2 462.5875 9 467.5875
3 462.6125 10 467.6125
4 462.6375 11 467.6375
5 462.6625 12 467.6625
6 462.6875 13 467.6875
7 462.7125 14 467.7125