TiVo Solutions d b a TiVo AN0100 Wireless 11n AP User Manual NADA installation guide 097 indd
TiVo Inc. Wireless 11n AP NADA installation guide 097 indd
user manual
20
SDOC-00118-000
Installation
Instructions
Wireless N
Network
Adapter
NADA_installation_guide_097.indd Spread 1 of 10 - Pages(20, 1)NADA_installation_guide_097.indd Spread 1 of 10 - Pages(20, 1) 10/9/2009 11:54:14 AM10/9/2009 11:54:14 AM
In order to avoid the possibility of exceeding the FCC radio frequency exposure limits, human proximity to the antenna shall not be less than 20cm (8 inches) during normal operation.
2
© 2009 TiVo Inc. Reproduction in whole or in part without written
permission is prohibited.
All rights reserved.
TiVo and the TiVo logo are trademarks or registered trademarks of
TiVo Inc. or its subsidiaries worldwide.
2160 Gold Street, P.O. Box 2160, Alviso, CA 95002-2160.
Printed in China.
Regulatory Information
FCC Statement
This equipment has been tested and found to comply with the limits
for a Class B digital device, pursuant to Part 15 of the FCC Rules.
These limits are designed to provide reasonable protection against
harmful interference in a residential installation. This equipment
generates, uses and can radiate radio frequency energy and, if
not installed and used in accordance with the instructions, may
cause harmful interference to radio communications. However,
there is no guarantee that interference will not occur in a particular
installation. If this equipment does cause harmful interference to
radio or television reception, which can be determined by turning
the equipment off and on, the user is encouraged to try to correct
the interference by one of the following measures:
• Reorient or relocate the receiving antenna.
• Increase the separation between the equipment and receiver.
• Connect the equipment into an outlet on a circuit different from
that to which the receiver is connected.
• Consult the dealer or an experienced radio/TV technician
for help.
FCC Caution: Any changes or modifi cations not expressly approved
by the party responsible for compliance could void the user’s
authority to operate this equipment.
This device complies with Part 15 of the FCC Rules. Operation
is subject to the following two conditions: (1) This device may
not cause harmful interference, and (2) this device must accept
any interference received, including interference that may cause
undesired operation.
FCC Radiation Exposure Statement
This equipment complies with FCC radiation exposure limits set forth
for an uncontrolled environment. End users must follow the specifi c
operating instructions for satisfying RF exposure compliance.
To maintain compliance with FCC RF exposure compliance
requirements, please follow operation instructions as documented
in this manual.
This transmitter must not be co-located or operating in conjunction
with any other antenna or transmitter.
SAR compliance has been established in typical laptop computer(s)
with USB slot, and this product could be used in typical laptop
computer(s) with USB slot. Other applications like handheld PC or
similar device have not been verifi ed and may not be in compliance
with related RF exposure rule and such use shall be prohibited.
The availability of some specifi c channels and/or operational
frequency bands are country dependent and are fi rmware
programmed at the factory to match the intended destination.
The fi rmware setting is not accessible by the end user.
Safety Notices
• Caution: To reduce the risk of fi re, use only No.26 AWG or larger
telecommunication line cord.
• Do not use this product near water, for example, in a wet
basement or near a swimming pool.
• Avoid using this product during an electrical storm. There may
be a remote risk of electric shock from lightning.
Industry Canada Statement
This Class B digital apparatus complies with Canadian ICES-003.
Cet appareil numérique de la classe B est conforme à la norme
NMB-003 du Canada.
This device complies with RSS-210 of the Industry Canada Rules.
Operation is subject to the following two conditions:
(1) This device may not cause harmful interference, and
(2) this device must accept any interference received, including
interference that may cause undesired operation.
Règlement d’Industry Canada
Les conditions de fonctionnement sont sujettes à deux conditions:
1 Ce périphérique ne doit pas causer d’interférence et.
2 Ce périphérique doit accepter toute interférence, y compris les
interférences pouvant perturber le bon fonctionnement de ce
périphérique.
IMPORTANT NOTE
Radiation Exposure Statement:
This equipment complies with IC radiation exposure limits set forth
for an uncontrolled environment. End users must follow the specifi c
operating instructions for satisfying RF exposure compliance. To
maintain compliance with IC RF exposure compliance requirements,
please follow operation instruction as documented in this manual.
REMARQUE IMPORTANTE
Exposition aux radiofréquences:
Ce matériel est conforme aux limites d’exposition aux
radiofréquences établies pour un environnement non contrôlé. Pour
assurer le maintien de cette conformité, l’utilisateur doit suivre les
consignes d’utilisation décrites dans le présent manuel.
Wireless Disclaimer
The maximum performance for wireless is derived from IEEE
Standard 802.11 specifi cations. Actual performance can vary,
including lower wireless network capacity, data throughput rate,
range and coverage. Performance depends on many factors,
conditions and variables, including distance from the access point,
volume of network traffi c, building materials and construction,
operating system used, mix of wireless products used, interference
and other adverse conditions.
Avis de non-responsabilité concernant les appareils
sans fi l
Les performances maximales pour les réseaux sans fi l sont tirées
des spécifi cations de la norme IEEE 802.11. Les performances
réelles peuvent varier, notamment en fonction de la capacité du
réseau sans fi l, du débit de la transmission de données, de la portée
et de la couverture. Les performances dépendent de facteurs,
conditions et variables multiples, en particulier de la distance par
rapport au point d’accès, du volume du trafi c réseau, des matériaux
utilisés dans le bâtiment et du type de construction, du système
d’exploitation et de la combinaison de produits sans fi l utilisés, des
interférences et de toute autre condition défavorable.
19
TiVo Wireless N Network Adapter Limited Warranty:
Limited Warranty
TiVo Wireless adapter
90 Days Free Parts and Labor
WHO IS COVERED?
You must have proof of purchase to receive warranty service. A sales receipt or other document showing that you purchased
the product is considered proof of purchase.
WHAT IS COVERED?
TiVo warrants that the Wireless adapter will be free from defects in materials and workmanship during the limited warranty
period described herein. The limited warranty coverage begins the day you purchase the product. For 90 days from the
purchase date, the Wireless adapter will be replaced with a repaired, renewed or comparable product (at TiVo’s discretion) if
it becomes defective or inoperable. This exchange is done without charge to you for parts and labor (except applicable taxes,
if any). You will be responsible for the cost of shipping. Contact Customer Support at 1-877-367-8486 for exchange. All
products, including replacement products, are covered only for the original warranty period. When the warranty on the original
product expires, the warranty on the replacement product also expires.
WHAT IS EXCLUDED?
Your warranty does not cover:
• Any taxes imposed on TiVo for units replaced or repaired under this warranty.
• Product replacement because of misuse, accident, unauthorized repair, or other cause not within TiVo’s control.
• Incidental or consequential damages resulting from the use of the product. (Some states do not allow the exclusion of
incidental or consequential damages, so the above exclusion may not apply to you.)
• A product that has been modifi ed or adapted to enable it to operate in any country other than the country for which it
was designed.
• A product used for commercial or institutional purposes.
MAKE SURE YOU KEEP...
Please keep your sales receipt or other document showing proof of purchase. Also keep the original box and packing material
in case you need to return your product.
TO GET WARRANTY SERVICE...
If you believe the product is defective, contact Customer Support at 1-877-367-8486. A representative will go through a
diagnostic checklist with you. If it is determined that the product needs to be exchanged, the representative will give you
complete shipping details. All implied warranties, including implied warranties of merchantability and fi tness for a particular
purpose, are limited in duration to the duration of this express warranty. Some states (or jurisdictions) do not allow limitations
on how long an implied warranty lasts, so the above limitation may not apply to you.
This warranty gives you specifi c legal rights. You may have other rights which vary from state
to state (or jurisdiction to jurisdiction). TIVO’S RESPONSIBILITY FOR MALFUNCTIONS AND DEFECTS IN WIRELESS
ADAPTERS IS LIMITED TO REPAIR AND REPLACEMENT AS SET FORTH IN THIS LIMITED WARRANTY. ALL EXPRESS AND
IMPLIED WARRANTIES FOR THE WIRELESS ADAPTER, INCLUDING BUT NOT LIMITED TO ANY IMPLIED WARRANTIES OF
AND ALL CONDITIONS OF MERCHANTABILITY AND FITNESS FOR A PARTICULAR PURPOSE, ARE LIMITED IN DURATION
TO THE LIMITED WARRANTY PERIOD SET FORTH ABOVE AND NO WARRANTIES, WHETHER EXPRESS OR IMPLIED, WILL
APPLY AFTER SUCH PERIOD. Some states (or jurisdictions) do not allow limitations on how long an implied warranty lasts, so
the above limitation may not apply to you.
TIVO DOES NOT ACCEPT LIABILITY BEYOND THE REMEDIES SET FORTH IN THIS LIMITED WARRANTY OR LIABILITY FOR
INCIDENTAL OR CONSEQUENTIAL DAMAGES, INCLUDING WITHOUT LIMITATION ANY LIABILITY FOR PRODUCTS NOT
BEING AVAILABLE FOR USE OR FOR LOST DATA. Some states (or jurisdictions) do not allow limitations on how long an
implied warranty lasts, so the above limitation may not apply to you.
NADA_installation_guide_097.indd Spread 2 of 10 - Pages(2, 19)NADA_installation_guide_097.indd Spread 2 of 10 - Pages(2, 19) 10/9/2009 11:54:17 AM10/9/2009 11:54:17 AM
In order to avoid the possibility of exceeding the FCC radio frequency exposure limits, human proximity to the antenna shall not be less than 20cm (8 inches) during normal operation.
18
Troubleshooting:
If you are having trouble connecting your TiVo Wireless N Network Adapter to your network:
• Make sure the adapter is within your router’s wireless range.
• Check the various wired connections (power cords, Ethernet cables, etc.) and that your
router is on and functioning properly.
• Try repeating the setup steps.
• If you have trouble connecting to your router using WPS, try confi guring the adapter
manually using the setup wizard:
1. Reset your TiVo Wireless N Network Adapter to its factory default settings by using a
paper clip to press the Restore Factory Settings button on the bottom of the adapter
until the power LED turns amber, then release. The adapter will restart with its factory
default settings.
2. Connect the adapter to your network-enabled computer using the instructions starting
on page 13.
3. In a web browser, go to 192.168.10.1 and run the setup wizard. If after you run the
setup wizard the adapter is still unable to connect to your wireless network, check the
following:
• Make sure the correct Network Name (SSID) is selected from the list of available
networks (the network name is case sensitive and must match exactly).
• If your network uses WPA or WPA-2 security, make sure you are using the same
passphrase used to connect other devices (note: the passphrase is case sensitive).
• If your network uses WEP, make sure that your security credentials match those set
up on your router.
• Update your adapter’s fi rmware.
Go to www.tivo.com/wirelessn for information on how to update your adapter’s fi rmware.
• If you’re changing your TiVo service connection from a phone line to a network connection,
go to TiVo Central, then ‘Messages & Settings’ > ‘Settings’ > ‘Phone & Network’, and choose
“Use network instead”.
• Make sure your Dynamic Host Confi guration Protocol (DHCP) address is correct.
If your adapter’s LEDs are showing solid and indicate a secure network connection but your
TiVo DVR still won’t connect, go to TiVo Central, then ‘Messages & Settings’ > ‘Settings’ >
‘Phone & Network’ > ‘Change Network Settings’ > ‘Get automatically from a DHCP server’ to
make sure you’re using the correct DHCP address.
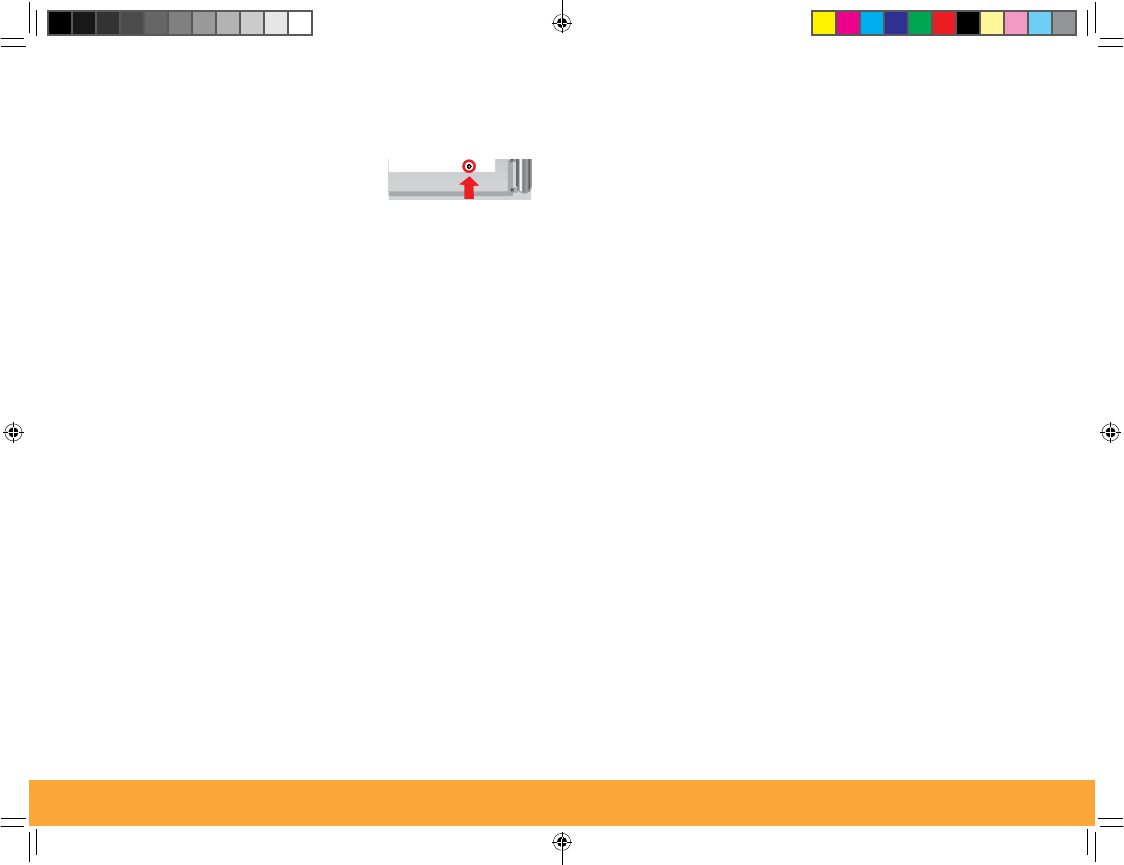
Reconfi guring your TiVo® Wireless N Network Adapter:
In order to reconfi gure your adapter, it must fi rst be reset to its factory default settings. To reset
your adapter, use a paper clip to press the Restore Fac tory Settings button on the bottom of the
adapter until the power LED turns amber, then release. The adapter will restart with its factory
default settings. Restore Factory Settings
g
3
Contents:
If you have a wireless N router with a WPS button .................................. 4
If you have a wireless G or B router and two adapters ............................ 8
Use these steps to create a dedicated wireless N network.
Manual confi guration of your wireless adapter ..................................... 13
These steps allow you to manually confi gure your TiVo® Wireless N
Network Adapter with a wireless N, G, or B network.
Reconfi guring your TiVo Wireless N Network Adapter ........................... 18
Troubleshooting ................................................................................... 18
Limited Warranty ................................................................................. 19
To Get Started:
• If you are setting up your TiVo DVR for the fi rst time,
follow the instructions in this guide to connect the TiVo
Wireless N Network Adapter.
• If your DVR already connects to the TiVo service online
using a network connection, fi rst disconnect any current
wired or wireless TiVo DVR connection(s), then follow the
instructions in this guide to connect the adapter.
• If your DVR currently connects to the TiVo service
through a telephone line:
1. Disconnect the phone line from your DVR.
2. Follow the instructions in this guide to set up the
adapter.
3. Turn on your television, press the TiVo button on your
remote control to go to TiVo Central, and follow the
prompted setup instructions. (If you are not prompted
to confi gure your adapter, go to ‘Messages & Settings
> Settings > Phone & Network’, and choose “Use
network instead”.)
NADA_installation_guide_097.indd Spread 3 of 10 - Pages(18, 3)NADA_installation_guide_097.indd Spread 3 of 10 - Pages(18, 3) 10/9/2009 11:54:17 AM10/9/2009 11:54:17 AM
In order to avoid the possibility of exceeding the FCC radio frequency exposure limits, human proximity to the antenna shall not be less than 20cm (8 inches) during normal operation.
4
If you have a wireless N router with a WPS button:
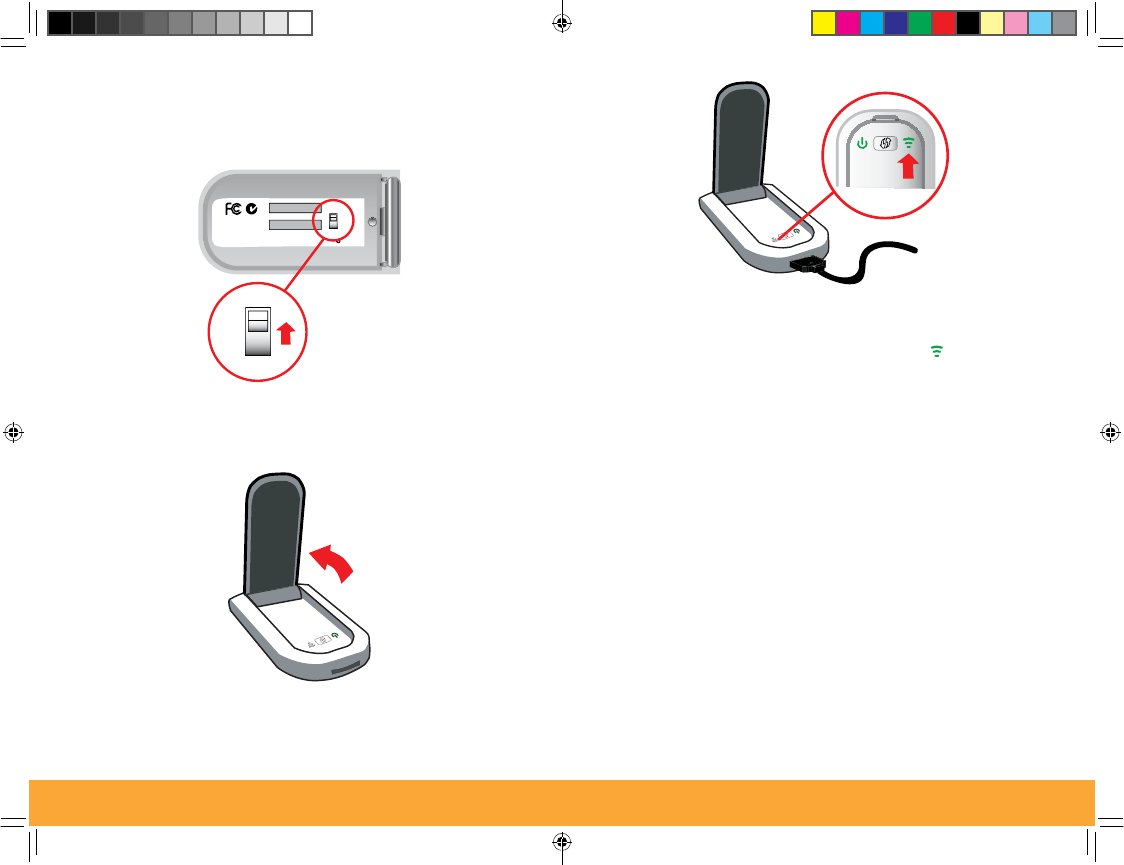
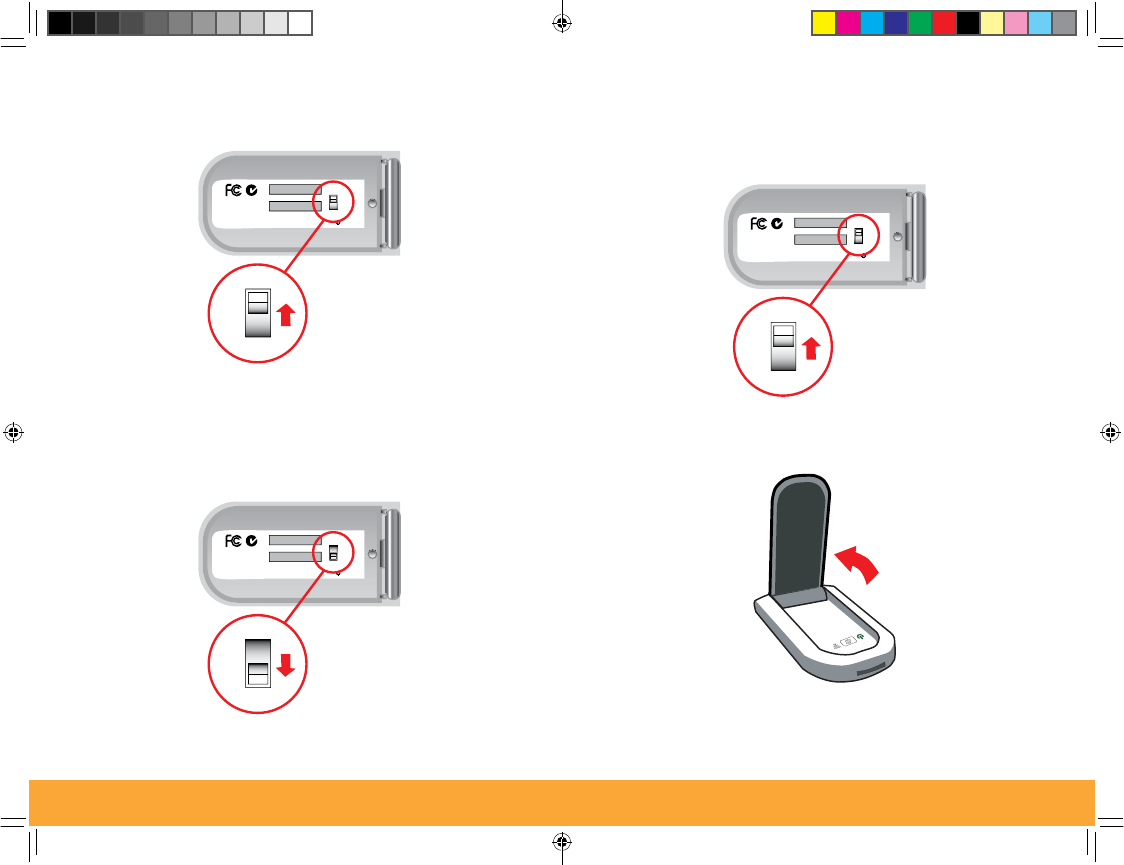
ᕡ Set the switch on the bottom of the TiVo® Wireless N
Network Adapter to “Client”.
Restore Factory Settings
Client
Bridge
Client
Bridge
ᕢ Open the adapter until it clicks into place.
Note: To avoid damaging the adapter, do not open it
beyond the “click”.
Note: If your wireless N router does not have a WPS button, use the manual
confi guration setup on page 13 instead.
If you have a wireless N router with a WPS button 17
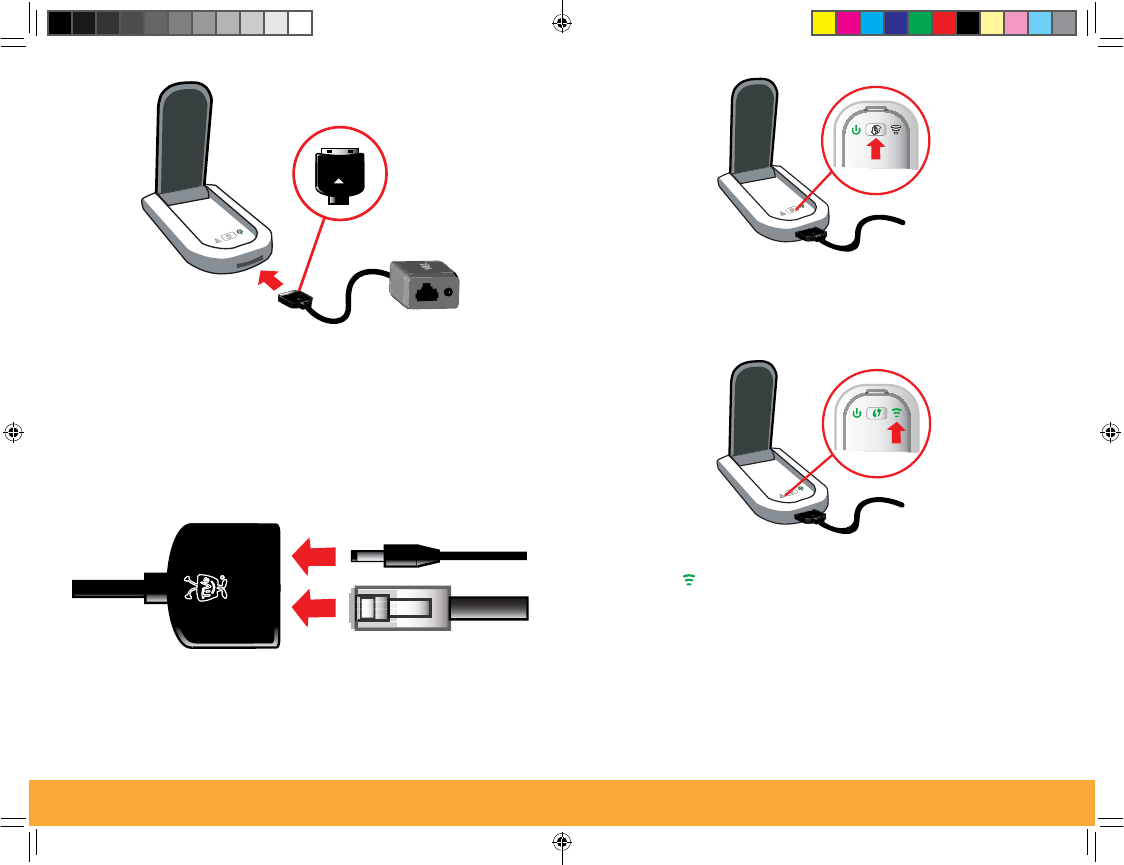
ᕩ After plugging the adapter into your DVR, the signal-
strength indicator will blink while connecting to the
router, then become solid green or blue ( ).
Congratulations! Your TiVo Wireless N Network Adapter
is now confi gured!
To confi rm that your network connection is complete, go
to TiVo Central, then ‘Messages & Settings’ > ‘Settings’
> ‘Phone & Network’ > ‘Connect to TiVo Service Now’.
Note: These steps must be repeated to connect
additional adapters to your network.
Manual confi guration of your wireless adapter
NADA_installation_guide_097.indd Spread 4 of 10 - Pages(4, 17)NADA_installation_guide_097.indd Spread 4 of 10 - Pages(4, 17) 10/9/2009 11:54:18 AM10/9/2009 11:54:18 AM
In order to avoid the possibility of exceeding the FCC radio frequency exposure limits, human proximity to the antenna shall not be less than 20cm (8 inches) during normal operation.
16
ᕧ The signal-strength indicator will blink while the
connection is being established. When the signal-
strength indicator turns solid green or blue ( ), the
connection has been established (the indicator’s color
depends on its connection speed:
green = 2.4 GHz; blue = 5 GHz).
ᕨ Your adapter is now confi gured and can be
disconnected from your computer and connected to the
Ethernet port on the back of your TiVo DVR (the adapter
will retain its settings even when it is powered down
between connections).
Manual confi guration of your wireless adapter 5
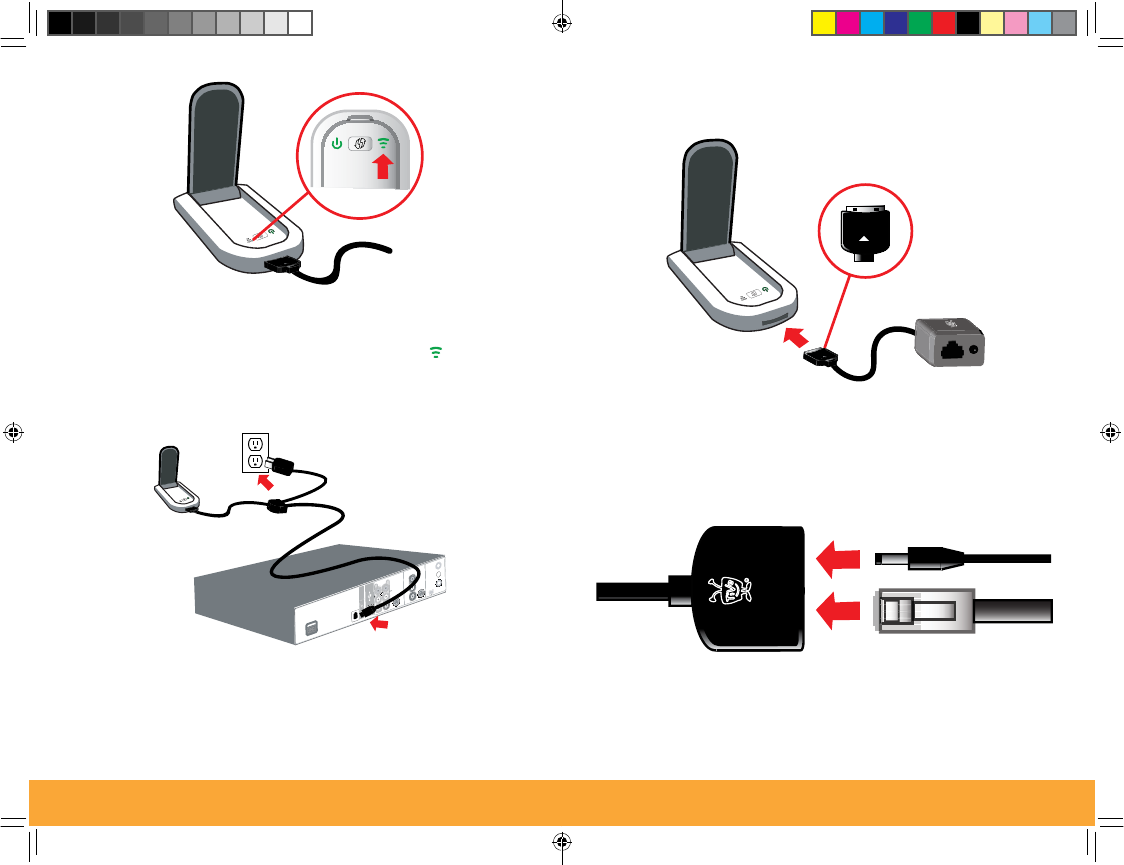
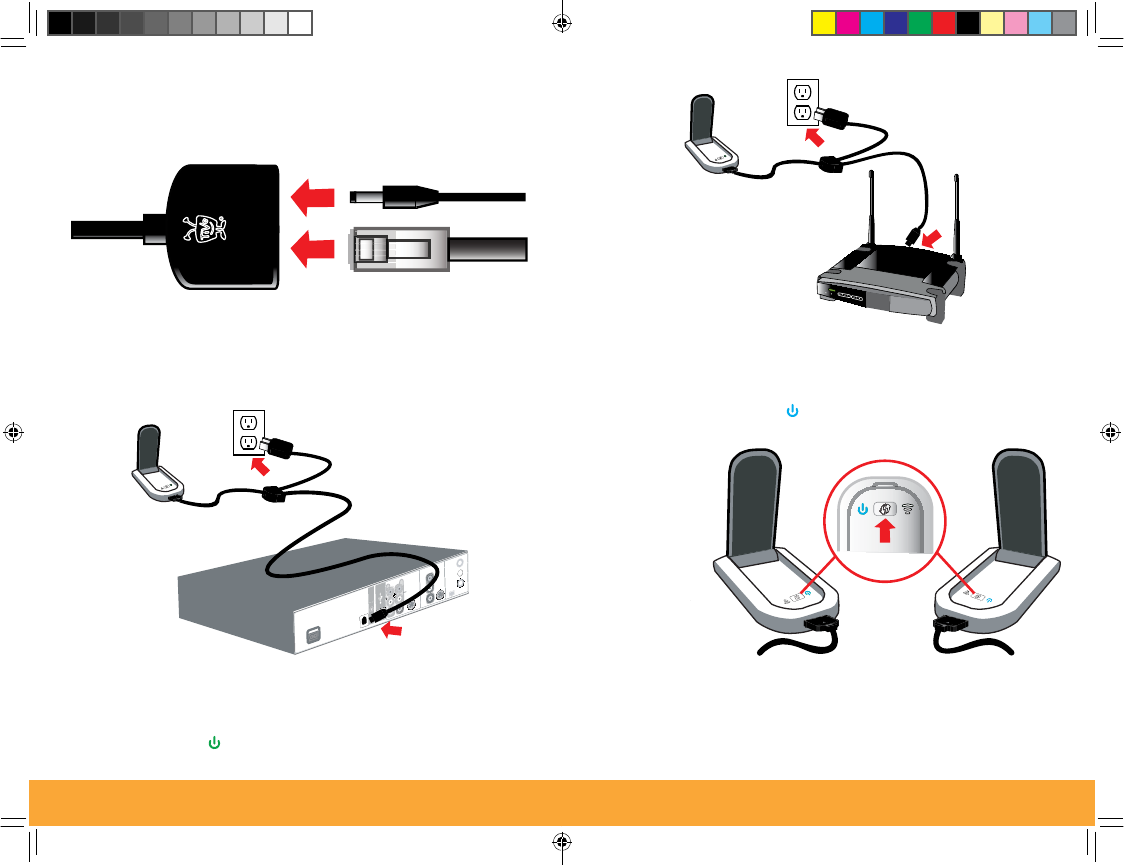
ᕤ Plug the provided Ethernet cable and power adapter into
the splitter.
ᕣ With the triangle facing up, plug the provided cable
splitter into the adapter.
If you have a wireless N router with a WPS button
NADA_installation_guide_097.indd Spread 5 of 10 - Pages(16, 5)NADA_installation_guide_097.indd Spread 5 of 10 - Pages(16, 5) 10/9/2009 11:54:19 AM10/9/2009 11:54:19 AM
In order to avoid the possibility of exceeding the FCC radio frequency exposure limits, human proximity to the antenna shall not be less than 20cm (8 inches) during normal operation.
6
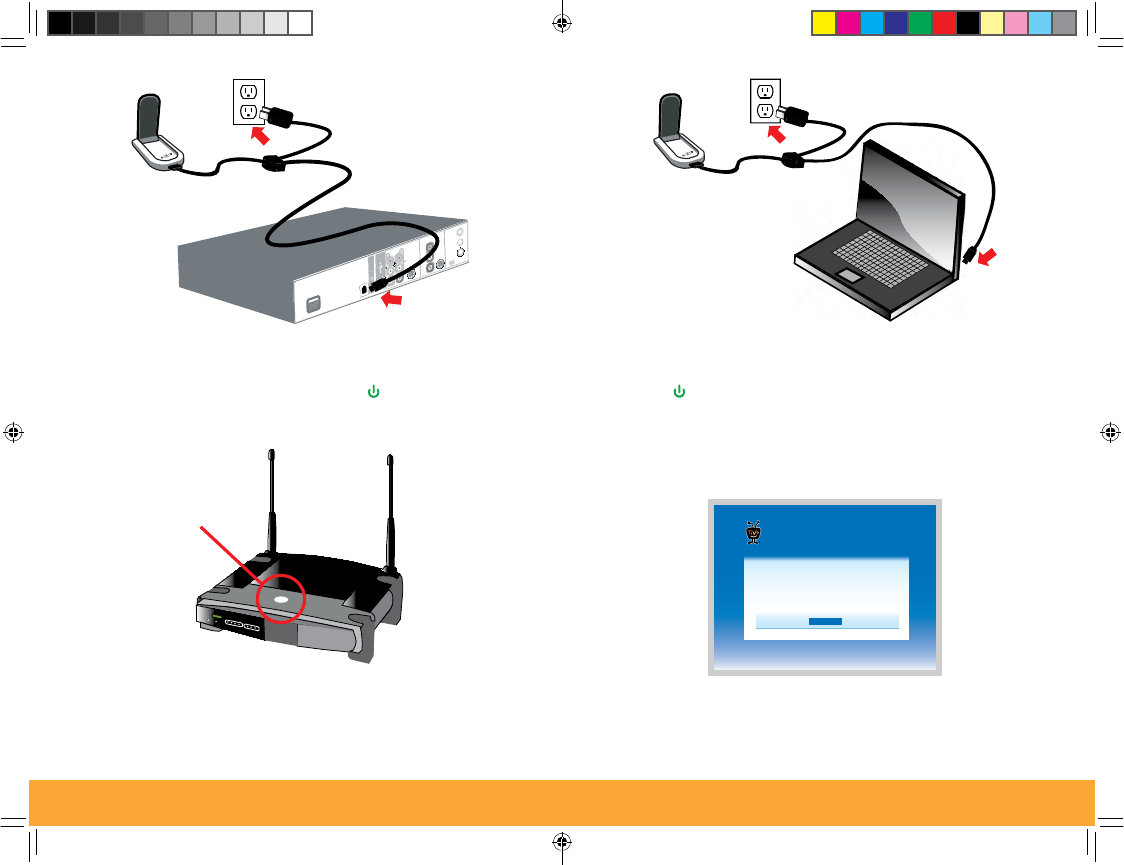
ᕥ Plug the adapter’s power cord into an AC outlet, then
connect the Ethernet cable to the back of your TiVo DVR
(wait until the power indicator LED [] is solid green
before continuing).
ᕦ Press and hold down the WPS button on your
wireless N router until it starts blinking.
Wireless - N
Press your router’s
WPS button until it
starts blinking
If you have a wireless N router with a WPS button 15
ᕥ Plug the power cord from the splitter into an AC outlet,
wait until the adapter’s power indicator LED is solid
green [] then connect the Ethernet cable to your
computer.
Note: You may need to disable your computer’s
wireless connection before proceeding.
ᕦ In a web browser, go to 192.168.10.1 where the setup
wizard will guide you through a series of confi guration
steps.
TiVo Network Adapter
Setup Wizard
Manual confi guration of your wireless adapter
NADA_installation_guide_097.indd Spread 6 of 10 - Pages(6, 15)NADA_installation_guide_097.indd Spread 6 of 10 - Pages(6, 15) 10/9/2009 11:54:20 AM10/9/2009 11:54:20 AM
In order to avoid the possibility of exceeding the FCC radio frequency exposure limits, human proximity to the antenna shall not be less than 20cm (8 inches) during normal operation.
14
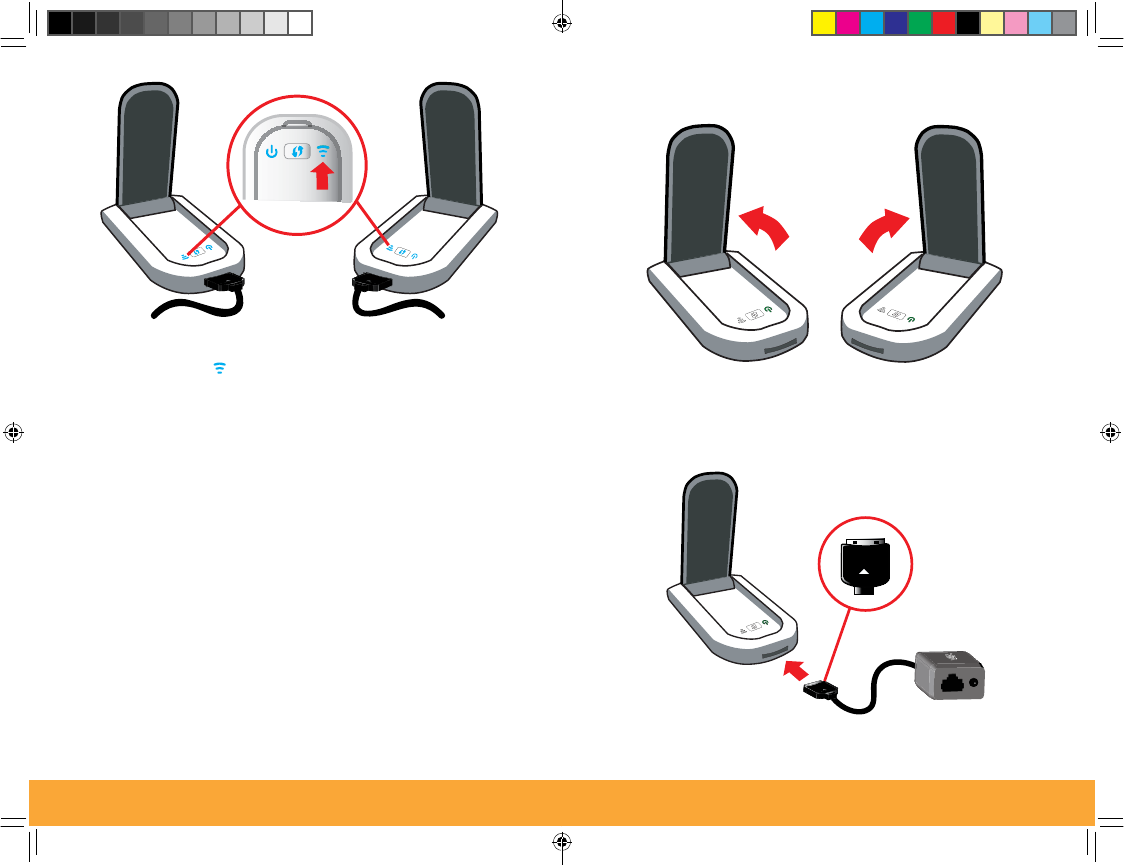
ᕣ With the triangle facing up, plug the provided cable
splitter into the adapter.
ᕤ Plug the provided Ethernet cable and power adapter into
the splitter.
Manual confi guration of your wireless adapter 7
ᕧ Within one minute of pressing the WPS button on your
router, press and hold down the WPS button on your
TiVo Wireless N Network Adapter until it starts blinking.
WPS will automatically sync your router’s security with
your adapter.
ᕨ When the signal-strength indicator turns solid green
or blue ( ), the connection has been established (the
indicator’s color depends on its connection speed:
green = 2.4 GHz; blue = 5 GHz).
Congratulations! Your TiVo Wireless N Network Adapter
is now confi gured!
To confi rm that your network connection is complete, go
to TiVo Central, then ‘Messages & Settings’ > ‘Settings’
> ‘Phone & Network’ > ‘Connect to TiVo Service Now’.
Press your
adapter’s WPS
button until it
starts blinking
If you have a wireless N router with a WPS button
NADA_installation_guide_097.indd Spread 7 of 10 - Pages(14, 7)NADA_installation_guide_097.indd Spread 7 of 10 - Pages(14, 7) 10/9/2009 11:54:22 AM10/9/2009 11:54:22 AM
In order to avoid the possibility of exceeding the FCC radio frequency exposure limits, human proximity to the antenna shall not be less than 20cm (8 inches) during normal operation.
8
If you have a wireless G or B router and two adapters:
ᕡ Set the switch on the bottom of the fi rst TiVo®
Wireless N Network Adapter to “Client”.
Restore Factory Settings
Client
Bridge
Client
Bridge
ᕢ Set the switch on the bottom of the second adapter to
“Bridge”.
Restore Factory Settings
Client
Bridge
Client
Bridge
If you have a wireless G or B router and two adapters
Note: Use these steps to create a dedicated wireless N network.
13
Manual confi guration of your wireless adapter:
ᕡ Set the switch on the bottom of the TiVo® Wireless N
Network Adapter to “Client”.
Restore Factory Settings
Client
Bridge
Client
Bridge
ᕢ Open the adapter until it clicks into place.
Note: To avoid damaging the adapter, do not open it
beyond the “click”.
Note: This procedure requires the use of a computer with the latest version of
one of the following web browsers: Internet Explorer, Firefox, Safari, Opera
or Chrome.
Manual confi guration of your wireless adapter
NADA_installation_guide_097.indd Spread 8 of 10 - Pages(8, 13)NADA_installation_guide_097.indd Spread 8 of 10 - Pages(8, 13) 10/9/2009 11:54:23 AM10/9/2009 11:54:23 AM
In order to avoid the possibility of exceeding the FCC radio frequency exposure limits, human proximity to the antenna shall not be less than 20cm (8 inches) during normal operation.
12
ᕩ When the signal-strength indicators on both adapters
turn solid blue ( ), the connection has been established.
Congratulations! Your TiVo Wireless N Network Adapters
are now confi gured!
To confi rm that your network connection is complete, go
to TiVo Central, then ‘Messages & Settings’ > ‘Settings’
> ‘Phone & Network’ > ‘Connect to TiVo Service Now’.
Note: To include additional TiVo DVR’s in your network,
set the new adapter to “Client”, press and hold down
the new adapter’s WPS button until the LED starts
blinking, then, on the adapter attached to you router (set
to “Bridge”), press and hold down WPS button until the
LED starts blinking. This must be done for each new
adapter.
If you have a wireless G or B router and two adapters 9
ᕣ Open both adapters until they click into place.
Note: To avoid damaging the adapters, do not open
them beyond the “click”.
ᕤ With the triangle facing up, plug the provided cable
splitter into each adapter.
If you have a wireless G or B router and two adapters
NADA_installation_guide_097.indd Spread 9 of 10 - Pages(12, 9)NADA_installation_guide_097.indd Spread 9 of 10 - Pages(12, 9) 10/9/2009 11:54:24 AM10/9/2009 11:54:24 AM
In order to avoid the possibility of exceeding the FCC radio frequency exposure limits, human proximity to the antenna shall not be less than 20cm (8 inches) during normal operation.
10
ᕦ Plug the power cord from the fi rst adapter (set to
“Client”) into an AC outlet, then connect the Ethernet
cable to the back of your TiVo DVR (wait until the power
indicator LED [] is solid green before continuing).
ᕥ Plug the provided Ethernet cable and power adapter into
each splitter.
If you have a wireless G or B router and two adapters 11
ᕧ Plug the power cord from the second adapter (set to
“Bridge”) into an AC outlet, then connect the Ethernet
cable to your router (the adapter is ready when the
power indicator LED [] is solid blue).
Wireless - N
ᕨ On the fi rst adapter, press and hold down the WPS
button until it starts blinking, then, within one minute,
press and hold down the WPS button on the second
adapter until it starts blinking.
Press your
adapter’s WPS
button until it
starts blinking
If you have a wireless G or B router and two adapters
NADA_installation_guide_097.indd Spread 10 of 10 - Pages(10, 11)NADA_installation_guide_097.indd Spread 10 of 10 - Pages(10, 11) 10/9/2009 11:54:25 AM10/9/2009 11:54:25 AM
In order to avoid the possibility of exceeding the FCC radio frequency exposure limits, human proximity to the antenna shall not be less than 20cm (8 inches) during normal operation.