Tippmann X7 E Grip Users Manual 07 03 ToJeffForReview X7EgripKitInst
2015-09-01
: Tippmann Tippmann-X7-E-Grip-Users-Manual-804718 tippmann-x7-e-grip-users-manual-804718 tippmann pdf
Open the PDF directly: View PDF ![]() .
.
Page Count: 2
1). Prepare E-GripTM for installation:
WARNING
TIPPMANN®
X7
TM
E-GRIP
TM
KIT PART# T210001
INSTALLATION & PROGRAMMING INSTRUCTIONS
KIT PN.
T210001
INCLUDES:
❏
1 - X7
TM
E-Grip
TM
❏
READ EACH STEP COMPLETELY BEFORE
PERFORMING STEP.
EYE PROTECTION DESIGNED FOR PAINTBALL
USE MUST BE WORN AT ALL TIMES WHEN
HANDLING THIS MARKER BY THE USER AND
ANY PERSON WITHIN RANGE. DO NOT
DISASSEMBLE THIS MARKER WHILE IT IS
PRESSURIZED WITH AIR. REMOVE AIR
SUPPLY CYLINDER OR CARTRIDGE BEFORE
DOING ANY DISASSEMBLY. DISASSEMBLING
THE RECEIVER WHILE UNDER AIR PRESSURE
CAN CAUSE PERSONAL INJURY & /OR
DAMAGE TO THE MARKER. DO NOT OPERATE
THIS MARKER WITH PARTS MISSING OR
DAMAGED. IF DURING THE COURSE OF THIS
INSTALLATION, A PART IS LOST OR FOUND TO
BE DAMAGED, OBTAIN A REPLACEMENT PART
BEFORE CONTINUING REASSEMBLY.
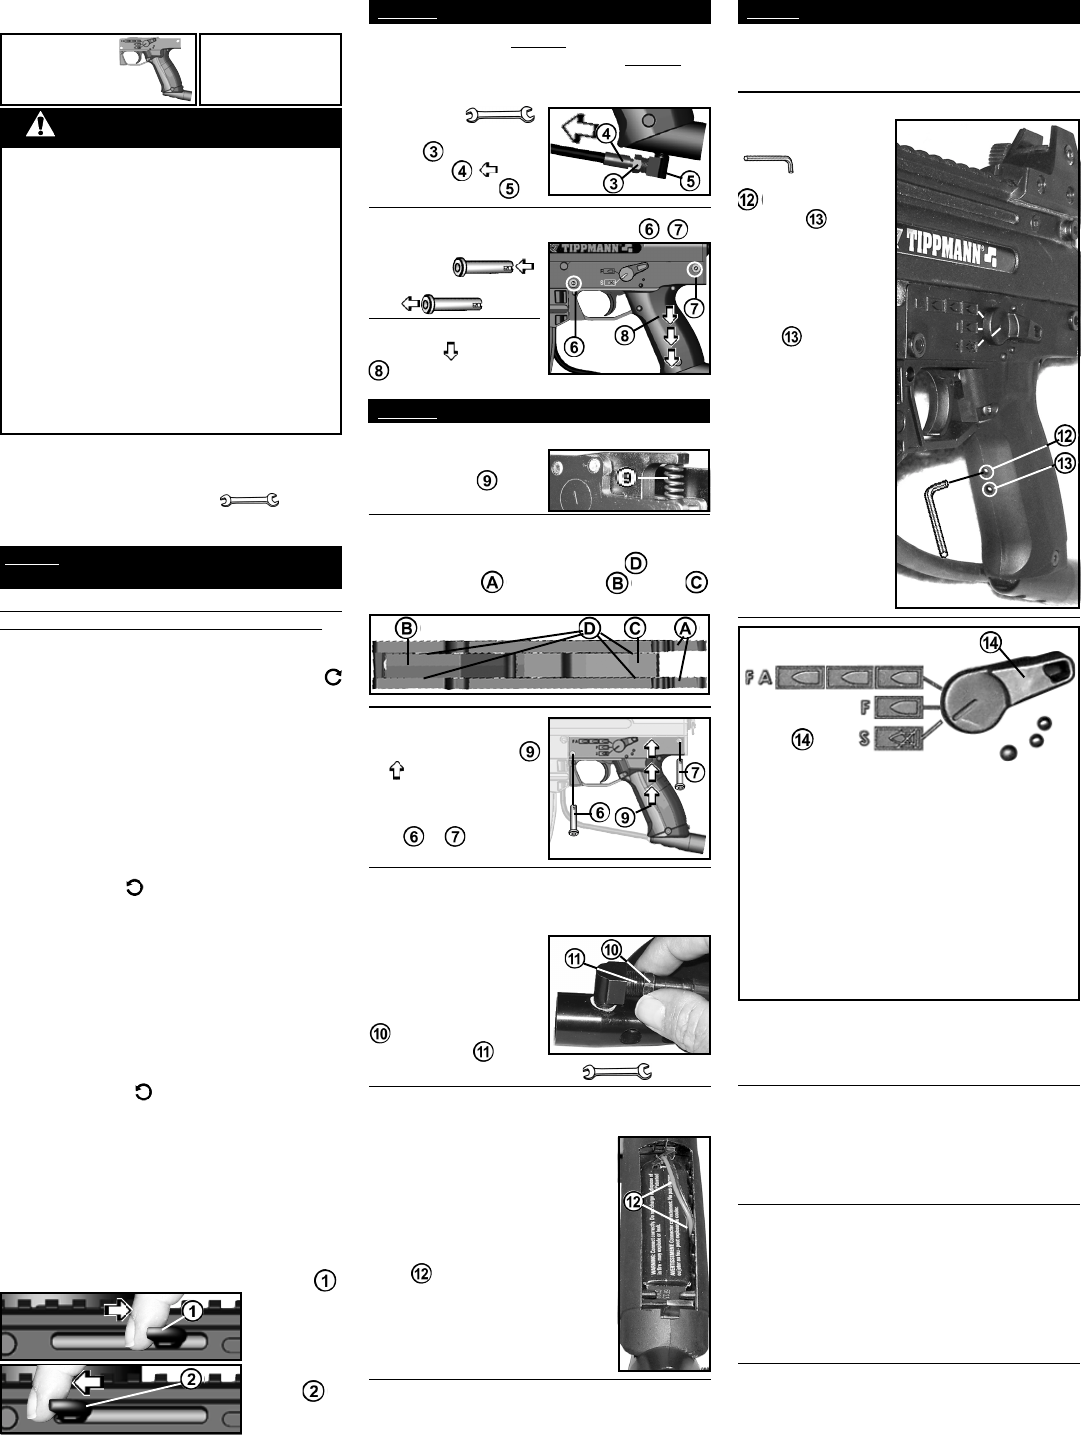
STEP 1: Prepare Marker for SAFE
Disassembly before beginning disassembly.
STEP 2: Remove stock grip from marker.
❏
Set up a table with plenty of space to work.
You will need a 7/16” wrench ( ) and a 9
volt battery. NOTE: Carefully hand start threaded
parts, do not over tighten and strip threads.
❏ ❏
❏ ❏
❏
Do Not perform STEP 2 before reading the
warning section and completing STEP 1.
(English - continued on page 2)
Eye protection designed for paintball use must be
worn by the user and any person within range.
1. Unload Your Marker - To unload your marker:
❏
1) Install the barrel sleeve.
❏
2) Empty and
remove the hopper (turn the hopper clockwise
and lift out).
❏
3) Go to a designated firing area
and remove the barrel sleeve.
❏
4) Point your
marker in a safe direction and fire several times to
be sure there are no balls lodged in the chamber and
/ or barrel.
❏
5) Visually inspect the CycloneTM Feeder and
chamber for paintballs.
2. Remove The Air Supply - To remove a charged
air supply cylinder:
❏
1)
Turn the cylinder approximately 3/4 of a turn
counterclockwise or out. This allows the air
supply pin valve to close so that no air will enter
the marker.
❏
2)
Point the marker in a safe direction and
discharge the remaining gas in the marker by
pulling the trigger until the marker stops firing. This
may take 4-5 shots.
If your marker continues to
fire the tank pin valve has not closed yet (because
of the variances in tank pin valve parts, each tank
varies slightly on exactly how far it should be
turned) and
❏
you will have to turn the tank
counterclockwise a little further and repeat
step-2) until the marker does not fire,
❏
then
remove the tank.
NOTE: If you turned the tank and it began to leak
before you pulled the trigger the tank o-ring should
be checked for damage before reassembly.
❏
3) After air tank is removed, point & fire the
marker in a safe direction until stored air is
completely discharged.
❏
4) Put marker in the uncocked position:
STEP 3: Install the new X7
TM
E-Grip
TM
.
❏
Slide the E-GripTM
up onto the marker and
align the push pin holes.
❏
Insert the two push
pins & .
❏ ❏
❏ ❏
❏
3) Install the gas line - Thread tape or paste
are not needed for this connection.
Step 4: Power On - Basic Operation
❏
Use a small object
like an allen wrench
() to press and
hold the power button
for 2 seconds.
The LED will light
orange then green
when the electronics
have been activated.
❏
Release the power
button and the green
LED will begin
flashing green to show
the power is on and
the battery is good.
(If LED begins flashing
red, see - Low Battery
Condition).
❏ ❏
❏ ❏
❏
2) Safety/Selector operation -
NOTE: 9V Battery
Not Included, but
Required
❏ ❏
❏ ❏
❏
1) Remove the gas line from the grip:
Press the ends of the 2
push pins ( )
in and then pull push pins
out ( ) .
❏
Pull and hold the bolt cocking handle back ;
S
F
FA
❏ ❏
❏ ❏
❏
1) To turn the X7TM E-GripTM power on:
❏ ❏
❏ ❏
❏
2) Remove the 2 grip push pins / :
❏ ❏
❏ ❏
❏
3) Remove the grip:
Pull down on the grip
to slide it off.
❏ ❏
❏ ❏
❏
4) Install the battery -
❏
Remove the battery door from
the back of the new grip by
pulling up and back on the tab.
❏
Plug a 9 volt battery into the
battery clip.
❏
TOURNAMENT LOCK: Because the E-Trigger
board requires a tool to turn it on and off, no
tournament lock is necessary for competition paintball.
❏ ❏
❏ ❏
❏
2). Install the E-GripTM:
Use a 7/16" ( )
wrench to loosen the gas
line nut and then pull
the gas line out of
the gas line elbow .
❏
Check to be certain the trigger plates have not
separated and the E-GripTM trigger assembly is
intact as shown. If there are gaps at between
the trigger plates and the trigger or sear
- squeeze plates together to look as shown.
❏
Check to be certain the
trigger spring is in
position as shown.
❏
Insert the gas line into the E-GripTM gas line elbow.
❏
Be careful that you do
not cross-thread the fitting
as you use your fingers to
align, start and finger
tighten the gas line nut
several turns onto the
gas line elbow .
Complete tigntening with a 7/16" ( ) wrench.
❏
To keep the battery from
rattling once it is in the E-GripTM,
turn the battery so the battery clip
wires hang against the side
of the battery, then Insert the
battery into the E-GripTM as shown.
NOTE: When removing a battery
from the E-GripTM, Do Not pull
the battery out by the wires.
❏ ❏
❏ ❏
❏
5) Re-install the battery door - Replace the
battery door with the tab down and listen for the
snap as it locks back into the E-GripTM.
The 3-position
safety/selector
switch has
three settings:
S = Safe ;
F = Semi-Auto (One pull/release of the
trigger fires 1 time.
FA = Special Firing Mode. The Special Firing
Mode can be set to any 1 of 5 firing options as
detailed on page 2 -
Special Firing Mode Options
.
This E-GripTM is set to the factory default setting:
Safe Full-Auto - Pulling the trigger three times
in less than one second will result in full-
automatic firing. Holding the trigger down on
the third pull will sustain this full-auto mode. The
default rate of fire for this mode is 13 bps.
❏
then pull
the trigger and
❏
release
the handle
slowly
forward
to uncock the
marker.
NOTE: If pressing the
power button failed to
turn on the LED light,
see
Troubleshooting
Section
on page 2.
❏ ❏
❏ ❏
❏
3) To fire the marker - select either the F or FA
position using the safety/selector switch and pull
the trigger. The LED will light orange with each
pull of the trigger.
❏ ❏
❏ ❏
❏
4) Turn power off - To turn the power off, hold
the power button for 2 seconds. The LED will
change from green to red when the power-off
condition has been achieved. (NOTE: The trigger
electronics are set to shut-off automatically after
a prolonged period of inactivity (120 minutes).
❏ ❏
❏ ❏
❏
5) Low battery condition -The E-TriggerTM Low
Battery Indicator Feature: When the battery has
begun to lose power and needs replaced, the LED
will stop flashing green and begin flashing red.
While performance will vary while the LED is
flashing red, the E-GripTM will still function under
this condition until the battery has lost power to
the point that it will not cycle the marker.
❏ ❏
❏ ❏
❏
6) Changing Special Firing Modes - To
change the Special Firing Mode - follow the
instructions in the Advanced User Programming
Section on page 2.
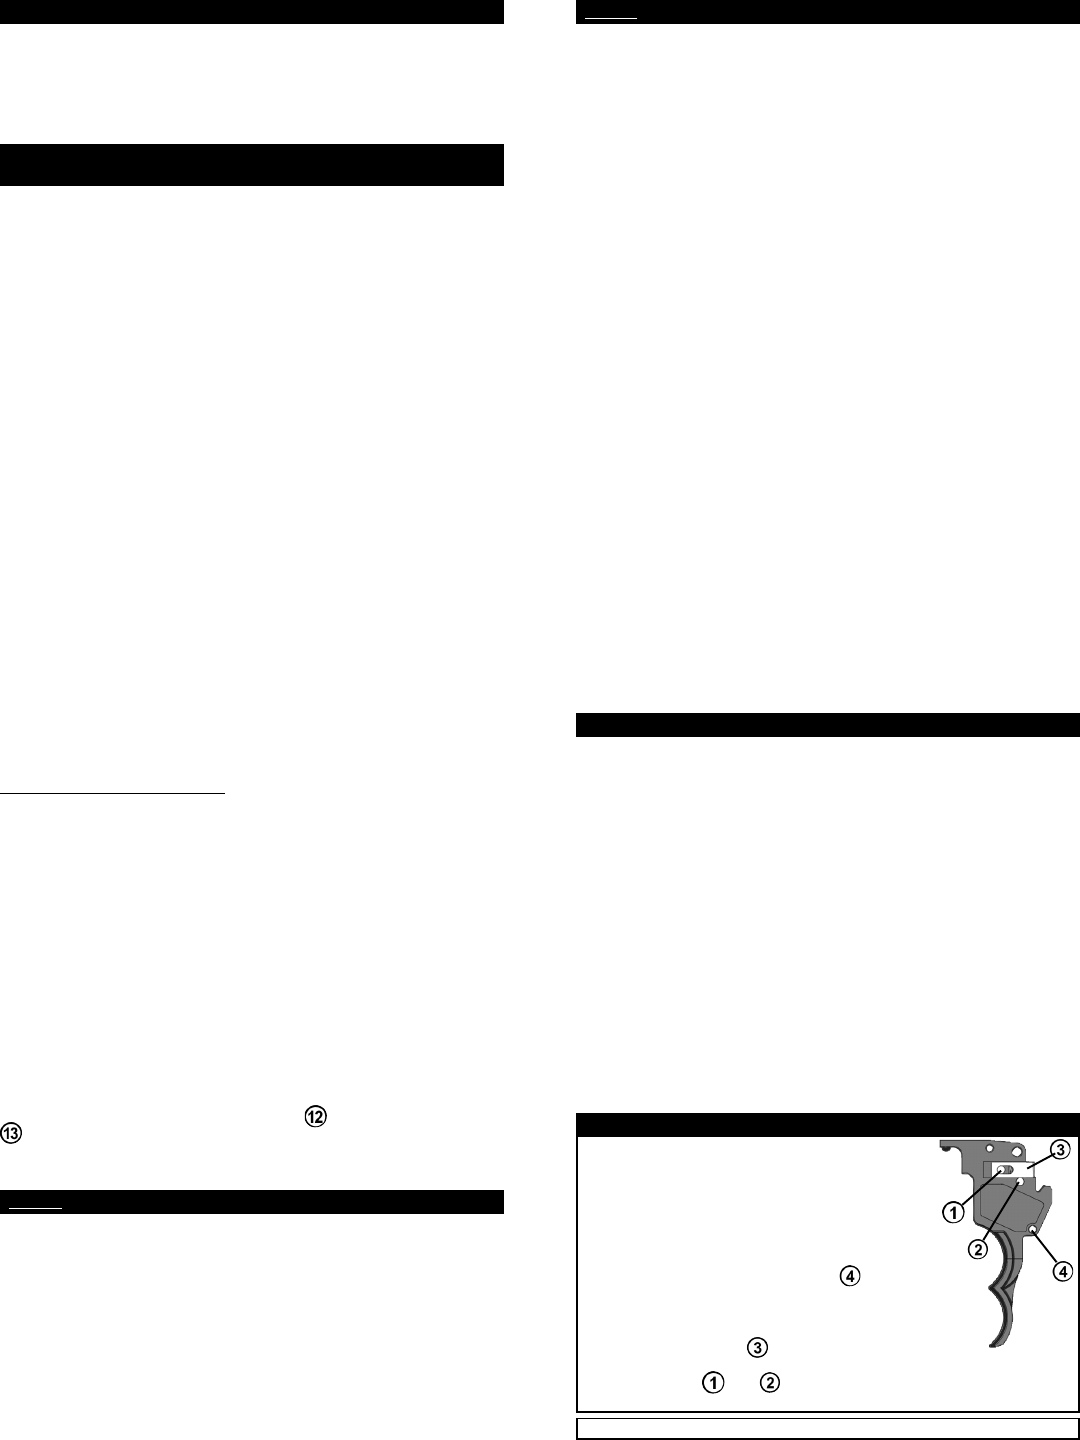
Double Trigger Kit (Optional, not included with X7TM E-GripTM Kit)
If installing a double trigger into the E-GripTM, it may
be necessary to use the magnet from the single trigger
that came with this kit if the double trigger does not
have a magnet. Before removing the magnet from
your single trigger, be sure to take note of which side
of the trigger has the red dot on the magnet. The
magnet will need to be inserted into the double trigger
in the same orientation into opening . The red
dot should be visible if the magnet is inserted into
the double trigger shown in the orientation of the
trigger as shown.
The trigger slider/spring will need to be removed before
installing the double trigger into the E-GripTM. This can be accomplished
by removing pins and from the double trigger. This will allow the
trigger slider and spring to be removed from the trigger.
IMPORTANT: Keep these instructions for future reference.
Menu Items-Dwell, DebounceTM, Rate-of-fire, and Special
Firing Mode Explained:
This section will discuss the four menu items in detail so that a user will
understand fully the purpose and use of each menu item.
Dwell - (Factory Default Value = 8 milli-seconds) The Dwell menu item is
used to change the amount of time that power is supplied to the solenoid.
The solenoid is the part of the electronics which actually contacts the sear of
the marker, allowing it to fire. This setting will directly affect the battery life of
the E-GripTM. If this is changed to a value less than 8 milli-seconds, your E-
GripTM battery will last longer, but this may not allow the solenoid enough time
to trip the sear properly. If this value is set greater than 8 milli-seconds, the
solenoid will have power supplied to it for a longer time, but will reduce the
life of the battery. Changing this value can cure or create performance issues
for the user. This menu item can only be updated with the values of 2-20
milli-seconds.
DebounceTM - (Factory Default Value = 50 milli-seconds) The DebounceTM
menu item is used to change the amount of time between accepted trigger
pulls. Quite simply, this adjusts the amount of time from one trigger pull
being accepted by the electronics to the next trigger pull which can be
accepted. If a DebounceTM setting is too low, a user may shoot more times
than they had expected. This can be explained by what is called "Trigger
Bounce." When a paintball marker is fired, the marker will move and vibrate
in a user's hand. This vibration can allow the trigger to reset itself and trip
without the user realizing that their finger has actually moved. NOTE: This
menu item can only be updated with the values of 25-65 milli-seconds.
Rate-of-Fire - (Factory Default Value = 13 bps) The Rate-of-Fire menu item
may be used to update the Safe Full-auto Firing mode. This is the only Special
Firing Mode which is affected by this menu item. All other Special Firing
modes cannot have their rate of fire adjusted. This menu item can only be
updated with the values of 8-30 bps. Please note that extremely high rates of
fire (over 20 bps), paint breakage can occur due to the maximum feed rate of
the Tippmann® CycloneTM Feed System.
Special Firing Mode - (Factory Default Setting = Safe Full-auto ) The Special
Firing Mode menu is used to select a default Special Firing Option. There
are 5 options so this menu item can only accept a value of 1, 2, 3, 4 or 5.
The 5 Special Firing Options are:
• 1 LED Flash = Safe Three-shot Burst- Pulling the trigger three times in
less than one second will result in a 3-shot burst at a rate of 13 balls per
second (bps) on the third trigger pull. Each pull of the trigger in less than
one second after this will result in another 3-shot burst.
• 2 LED Flashes = Safe Full-auto (Factory Default Setting)- Pulling the
trigger three times in less than one second will result in full-automatic firing.
Holding the trigger down on the third pull will sustain this full-auto mode.
The default rate of fire for this mode is 13 bps.
• 3 LED Flashes = Auto-Response- The marker will fire on the pull and the
release of the trigger. This mode effectively doubles your manual firing rate.
• 4 LED Flashes = Turbo Mode- Pulling the trigger three times in less than
one second will result in full-automatic firing at a rate of 15 bps. To sustain
this rate of fire, the trigger must be pulled at least once per second.
• 5 LED Flashes = Semi-automatic- One pull/release of the trigger fires 1
time. This semi-automatic Special Firing Mode is available for fields or
tournaments which restrict the use of automatic firing modes. This mode
is the same as selecting the F firing mode with the safety/selector switch.
Step 2: Choosing a menu item
The four menu items contained in the Advanced User Programming menu
are Dwell, DebounceTM , Rate-of-fire, and Special Firing Mode. Each of these
menu items has a corresponding color code as follows.
1. Solid Red - Dwell
2. Solid Green - DebounceTM
3. Flashing Green - Rate of fire
4. Alternating Red/Green - Special Firing Mode
❏ ❏
❏ ❏
❏
1) Cycling through the menu - To cycle through the menu, pull and
release the trigger. Each time the trigger is pulled and released, a different
color will be displayed on the LED in accordance with the list above.
❏ ❏
❏ ❏
❏
2) Enter a menu option - Once the LED displays the color of the menu
item that is needed, pull and hold the trigger for two seconds.
❏ ❏
❏ ❏
❏
3) Current Value - Upon entering a menu item, the LED will begin to
flash red. The flashes represent the current menu value. The current value
will be flashed twice with a short pause between the number flashes. If a
new value is not entered before the end of the second value display, the
electronics will automatically return to the main menu.
❏ ❏
❏ ❏
❏
4) Enter a new value - At any time while the menu is flashing the LED in
accordance with its current value, a new value can be entered by pulling
and releasing the trigger. Each pull and release of the trigger will count as a
1 when entering the new value. Example: To enter a number 5, pull and
release the trigger five times. Once the user is done entering the value,
release the trigger.
❏ ❏
❏ ❏
❏
5) Successfully updated menu confirmation - Once the user has
entered an a new value for a menu item, the LED will flash red/orange/
green twice to signify an acceptable value has been entered. The electronics
will then return to the main menu. If an unacceptable value has been entered,
the LED will quickly flash red and return to the main menu. The value of the
menu item will not be updated if this happens.
❏ ❏
❏ ❏
❏
6) Power off - Once a menu item has been changed, the user must
power-off the electronics before the change will take effect. Hold the power
button for 2 seconds. The LED will change to solid red. Release the power
button and the electronics will power off.
❏ ❏
❏ ❏
❏
7) Optional: Factory settings reset - A factory settings reset can be
accomplished by pressing and holding the power button for 10 seconds.
The board will appear to power on normally, but after 10 seconds, the LED
will flash red/orange/green twice, then the board will power-off. All factory
settings will be reset at this point.
Step 1: Accessing the Advanced User Programming
❏ ❏
❏ ❏
❏
1) Power off - To begin the Advanced User Programming, make sure the
power is off. If the power is on, press and hold the power button for 2 seconds.
The LED will change to a solid red color. The E-GripTM will power down when
the power button is released.
❏ ❏
❏ ❏
❏
2) Pull the trigger - Pull and hold the trigger down.
❏ ❏
❏ ❏
❏
3) Power on - Press and hold the power button down for 2 seconds. The
E-GripTM will appear to power on normally. Release the power button once
the LED turns green.
❏ ❏
❏ ❏
❏
4) Continue holding the trigger - Continue to hold the trigger down for 5
seconds. After 5 seconds, the LED will change to a solid red color.
❏ ❏
❏ ❏
❏
5) Release the trigger - Once the LED changes to the solid red color,
release the trigger. The E-GripTM is now in the main menu of the Advanced
User Programming.
Advanced User Programming Section
There are several programming options which affect the operation of the
Tippmann® X7TM E-GripTM. The Advanced User Programming has been
designed to allow users the maximum amount of customization possible for
their E-GripTM. There are four menu items in the Advanced User Programming:
Dwell, DebounceTM, Rate-of-fire, and Special Firing Mode. Read and familiarize
yourself with each of these items as they are explained in the following sections.
PROBLEM: The LED light does not light when you push the power button
to turn ON the E-Trigger.
1) Battery must be installed.
❏
Check that battery is installed.
2) Battery may be disconnected.
❏
Check battery clip connection.
3) Battery may be bad.
❏
Check battery, replace if bad.
4) Wire may be disconnected from battery clip -
❏
Inspect wire connections
to battery clip.
5) NOTE: If a problem still exists, call Tippmann® Service Department
at 1-300-533-4831.
Troubleshooting
PROBLEM: Battery life is very short.
❏
Dwell setting may be too high and
you need to reduce the Dwell time -
see details in Dwell Section
.
PROBLEM: Paint breakage occurs in Full Auto or Safe Full-Auto Modes.
❏
Current Rate-of-Fire may exceed maximum CycloneTM Feed Rate and you
need to reduce the Rate-of-Fire -
See details in Rate-of-Fire Section
PROBLEM: You can hear E-Trigger operating but marker does not fire.
❏
Check to be sure sufficient air supply is hooked up to the marker.
❏
Dwell setting may be too low and you need to increase the Dwell time -
see
details in Dwell Section.
❏
PROBLEM: Marker fires more times than expected.
❏
DebounceTM setting
may be to low causing “Trigger Bounce” and you need to increase the
Debounce time -
see details in DebounceTM section.
❏
To identify your current firing option setting: While the X7TM E-GripTM is
powered on, press and hold the power button for a ½ second. The LED
will flash orange to indentify the current Special Firing Mode Option and
then turn back to green. Repeat and count the number of orange flashes and
match that number to the options listing above to identify the current setting.
