Tobii Dynavox T10 DynaVox T10 User Manual S6 DynaVoxT10 Book
Dynavox Systems LLC DynaVox T10 S6 DynaVoxT10 Book
Contents
- 1. User Manual
- 2. Users Manual
User Manual
DynaVox T10 User’s Guide
DynaVox T10 User’s Guide
Copyright © 2013 DynaVox Systems LLC
All rights reserved. No part of this book may be reproduced, stored in a retrieval system, or transmitted in any form, by any means
(electronic, photocopying, recording, or otherwise) without the prior written permission of the publisher.
Copyright protection claimed includes all forms and matters of copyrightable material and information allowed by statutory or judicial
law or hereafter granted, including without limitation, material generated from the software programs which are displayed on the
screen such as screen displays, menus, etc.
Although every precaution has been taken in the preparation of this book, the publisher assumes no responsibility for errors or
omissions.
In North America:
For information, write to:
DynaVox Systems LLC
2100 Wharton Street, Suite 400
Pittsburgh, Pennsylvania 15203 USA
The European Authorized Representative is:DynaVox Systems Ltd.
Pure Offices Plato Close
Tachbrook Park
Leamington Spa
Warwickshire
United Kingdom
CV34 6WE
DynaVox® is a registered trademark of DynaVox Systems LLC.
DynaVoxT10™ is a registered trademark of DynaVox Systems LLC.
All other brand and product names mentioned are trademarks or registered trademarks of their respective holders.
First Edition
Published August 2013
Created in the United States of America


DynaVox T10 User’s Guide 1
Introduction
The DynaVox® T10 is an integrated hardware and software solution for AAC, which features
the DynaVox Compass™ communication software.
This User’s Guide provides an overview of the basic operation of your T10. It points out key
hardware features, briefly explains how to customize the pages and their content, and
describes the most frequently-used features and functions of your T10.
Resources
This User’s Guide is only a brief, introductory reference for your T10. Many other resources
are available.
NOTE
On your T10, select the Settings button on the Toolbar to open the Settings menu. Then select
Help. A menu will open with links to myDynaVox.com to access documentation, Help Videos, and
the Knowledgebase.
myDynaVox
myDynaVox.com is your personal online storage and administration website that you can use
to manage the Compass software running on your T10. It is available to you from anywhere via
the web.
Go to www.myDynaVox.com to register for an account.
Your myDynaVox account integrates you with a community of clinicians, technical experts, and
your peers and provides you with a responsive community of help and support.
After you set up your account, you can access it from anywhere on the web to:
•Register your T10
•Upload, download, and share communication pages
•Receive software updates and new communication content
•Backup and restore user data
•Access implementation and therapy supports and tools
•View and participate in discussion forums
•Find technical support and documentation resources
•Search the Knowledgebase
•View help videos
•Manage your user profile
2
Additional Documentation
A Quick Start Guide was shipped with your DynaVox T10. This guide provides an overview of
your T10, walks you through setting up and personalizing your new T10, and setting up and
logging in to your myDynaVox.com account.
Technical Support
NOTE
Before you contact DynaVox Technical Support, write down the serial number of your T10. It can
be found on the bottom edge of your device - or select the Settings button at the top of the Toolbar.
Then select Help from the Settings menu, and select the About button.
My T10 serial number is:______________________________
Technical Support
United States & Canada
1-866-DYNAVOX (396-2869)
M - F, 8:00 a.m. - 6:00 p.m. (EST)
www.dynavoxtech.com
Your DynaVox Sales Consultant:
1-888-697-7332
If you are not a resident of North America, please call the dealer from whom you
purchased your device.
DynaVox T10 User’s Guide 3
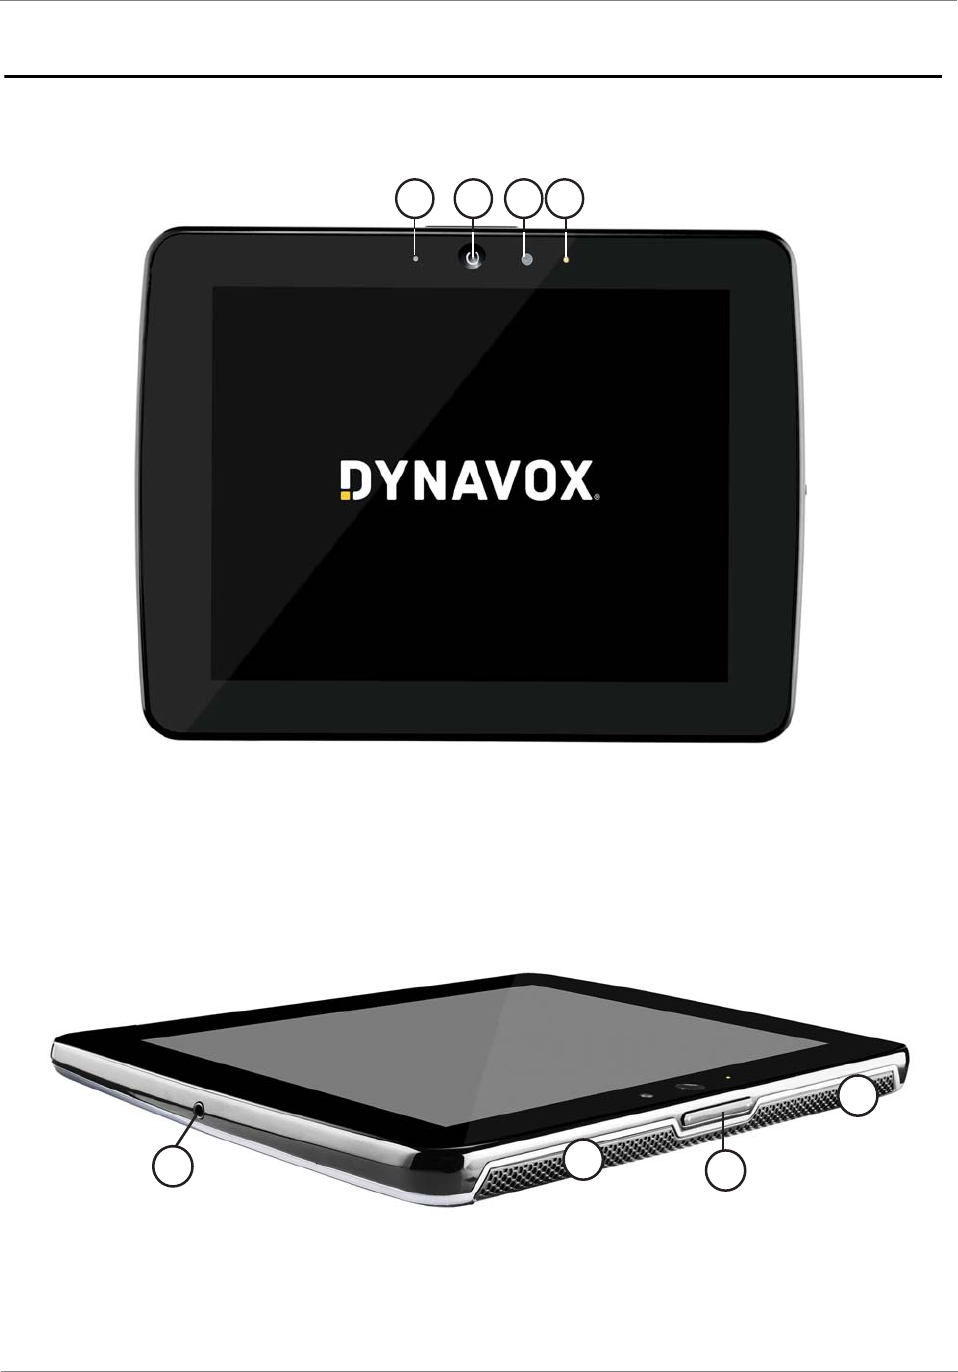
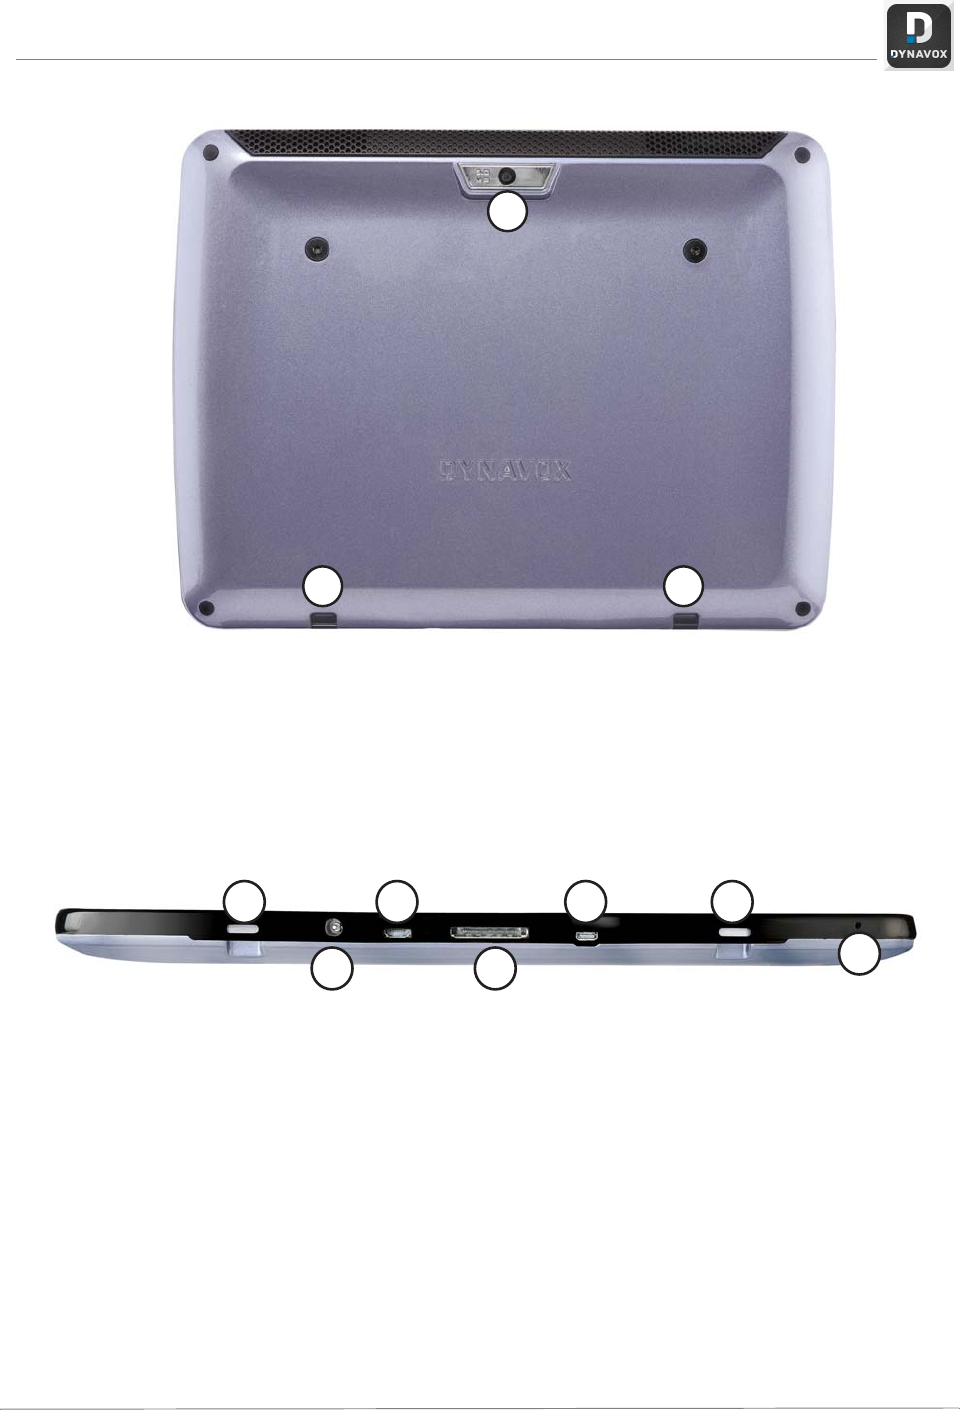
Hardware Overview
2 31 4
5
76
5
Front:
Top:
4
8
9 9
Back:
Bottom:
10
11
12
13
14
9 9
DynaVox T10 User’s Guide 5
CAUTION
The LCD may show "image persistence" if the same image or page is displayed for four (4)
consecutive hours or longer. The visual artifacts may or may not be noticeable or distracting. They
will not cause permanent damage to the LCD.
Front: 1Charging Indicator: Lit when the battery is charging. Turns off
when the battery is fully charged.
2 Power Button: To turn the T10 on, press and hold until the splash
screen appears. Press and release to put to sleep. To shut down the
T10, press and hold until the shutdown menu appears.
3Front-facing Camera: Takes photographs of people and objects in
view of the T10 screen - for example, self portraits.
4 Ambient Light Sensor: Adjusts the screen brightness based on
the surrounding light.
Top 5Speakers: Dual speakers provide an extensive range of volume.
6 Volume Rocker Switch: Press on the + side of the switch to
increase volume. Press on the - side of the switch to decrease
volume.
Right Side 7Speaker/Headphone/External Microphone Jack: Connect an
external speaker, headphones for private audio, or an external
microphone.
Back 8 Rear-facing Camera: Use for taking custom photos.
9Lanyard connections: Provide attachment points for the T10 strap.
Bottom 10 Charger Port: Plug in the adapter/charger to charge the battery.
11 Micro USB Port: Connect to a micro-USB to full-size USB cable
adaptor. (To connect to a PC.)
12 30-Pin Dock Connector: (for future use)
13 Micro HDMI Port: Connect an external monitor to your T10.
14 Microphone: Record custom sounds.
6
Charging the Battery
When the battery charge is low, the T10 will emit an audible beep. You should plug in your T10
and recharge the battery immediately.
1. Plug the charger into a wall outlet.
2. Connect the charger to the charger port on the device (Page 4, #10).
The charging indicator, (Page 3, #1) will illuminate while your T10 is charging. The
charging indicator will automatically turn off when it is fully charged.
3. After your T10 is fully charged, disconnect the charger.
You cannot overcharge the battery. It is fine to charge the battery overnight.
You can use the T10 while the battery is charging.
CAUTION
Because of internal chemical reactions, battery performance may deteriorate over time. In
addition, failure to keep the conditions of use (charge, discharge, ambient temperature, etc.)
within specified ranges may shorten the battery life expectancy, or damage your T10. If the battery
cannot maintain a charge for long periods of time, even when it is charged correctly, it may need
to be replaced.
DynaVox T10 User’s Guide 7
Temperature Ranges
For optimal device performance, the T10 should be kept within the following temperature
ranges:
NOTE
Run time will be shortened at the high and low ends of the temperature range.
Mounting/Transporting Your T10
If you use your T10 device while in a wheelchair, you should have it properly mounted for both
communication and transportation purposes. Wheelchair mounting systems are available
through DynaVox.
Protective and accessible carrying cases are also available. Consult the DynaVox website
(www.dynavoxtech.com) or your DynaVox sales consultant for more information.
Product Cleaning/Handling
To clean your T10, first turn it off and then wipe it gently with a damp cloth or soft paper towel.
You may dampen the towel with a mild window cleaner to remove fingerprints, food particles,
and dust.
Do not use tape or stickers on either the touch screen or the case, as they are difficult to
remove and may damage the device surface. Tape, stickers, and other sticky materials can
damage the touch screen and interfere with the operation of the device.
Be sure to avoid getting your T10 wet. Never submerge it in water (e.g., dishwasher). If your
unit accidentally gets wet, be sure to shut it down and allow it dry thoroughly. If after 24 hours
you find that the T10 seems to function normally, there is probably no damage. If it fails to
function or behaves abnormally, contact DynaVox Technical Support at 1-800-344-1778 for
instructions. You may need to ship it to DynaVox for repairs.
Be careful not to drop it. Such treatment is not recommended and can shorten the life of your
T10. Do not use a sharp object to make selections on the touch panel, as this can cause
damage. Use a special capacitive stylus.
CAUTION
Never, under any circumstances, disassemble your T10. Doing so for any reason will void the
warranty, and you will be responsible for the cost of any required repairs.
Activity Temperature Range
Using the T10 14°F - 113°F (-10°C - 45°C)
Charging the T10 battery 32°F - 113°F (0°C - 45°C)
Storing the T10 14°F - 113°F (-10°C - 45°C)
8
Turning the T10 On For The First Time
Press the Power button (p. 3 #2) to turn the T10 on. Select the DynaVox icon on your desktop.
DYNAVOX ICON ON DESKTOP
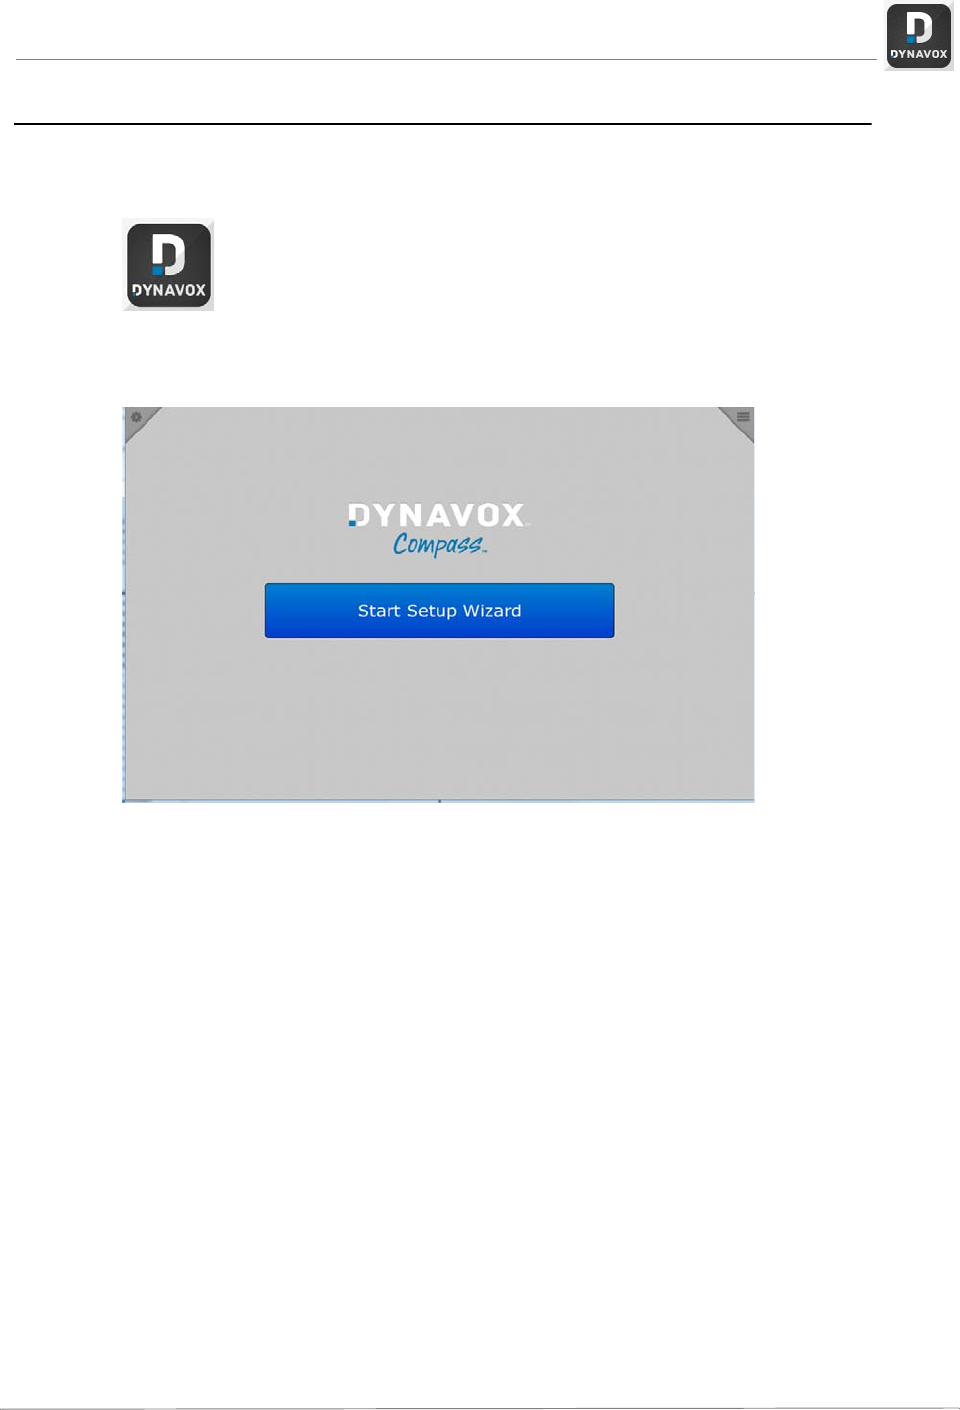
The Setup Wizard screen will open.
SETUP WIZARD SCREEN
The Setup Wizard will walk you through the steps to create a new user and choose an
appropriate page set and talk topics.
First, you will be asked a number of questions to help you choose an appropriate page set,
including your age range, gender, and a description of your condition. Next, you will be asked
for more information based on the page set that has been chosen.
When setup is complete, the Congratulations screen will open.
DynaVox T10 User’s Guide 9
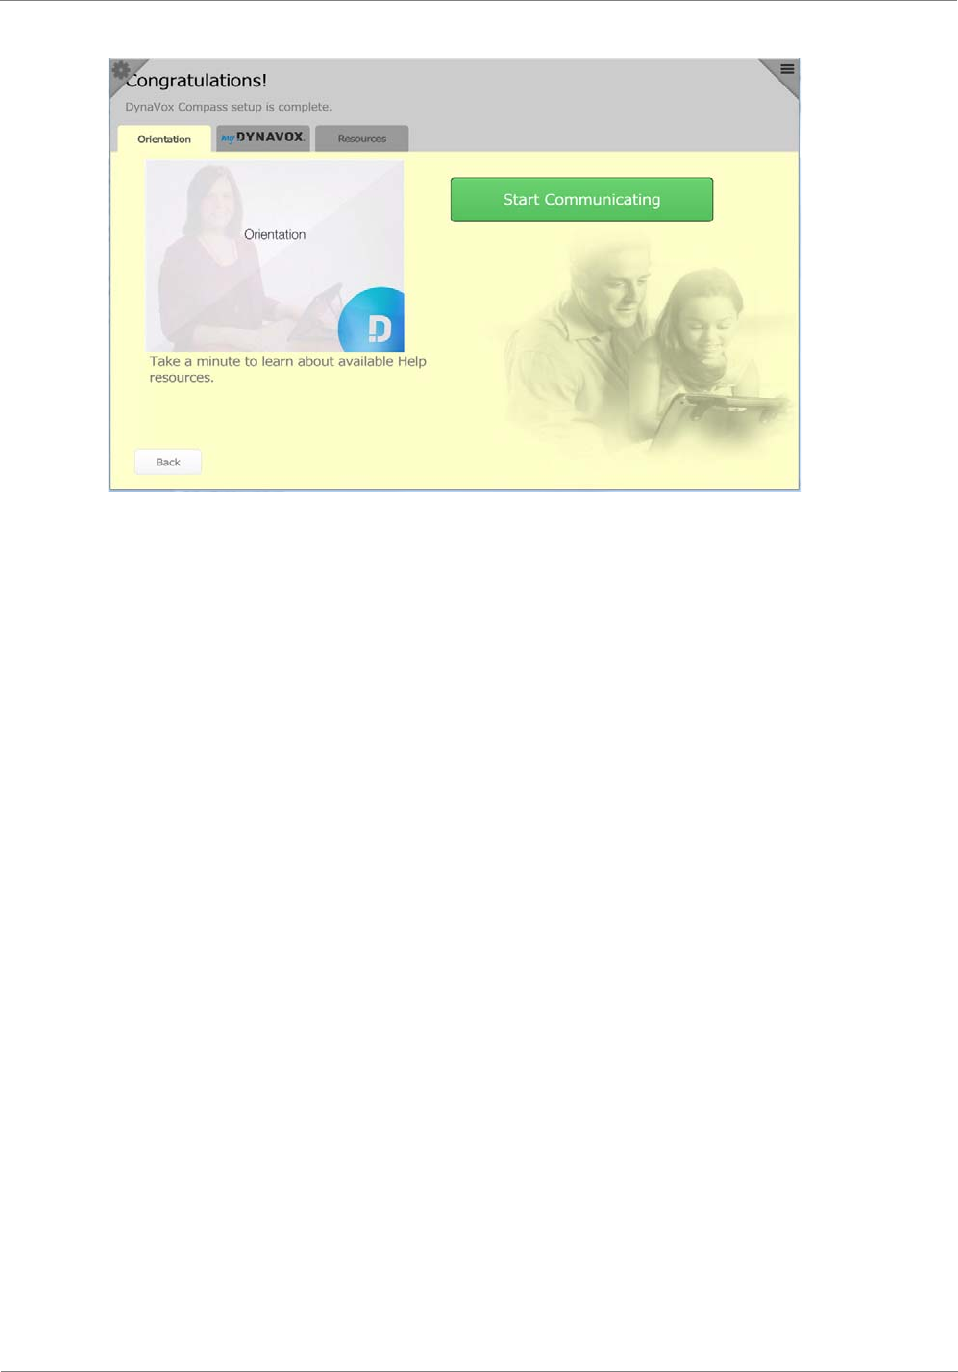
CONGRATULATIONS SCREEN
From the Congratulations screen, you can:
•View orientation videos. (The Orientation tab will, by default, be open. Select the video
thumbnail to launch the orientation videos.)
•Select the myDynaVox tab for information on the myDynaVox.com website. (See
myDynaVox.)
•Select the Resources tab for a list of resources available on the myDynaVox.com website
to support your use of the Compass software.
When you have viewed the videos and learned about the myDynaVox.com website, select the
Start Communicating button. You are now ready to start communicating with your DynaVox
T10!
10
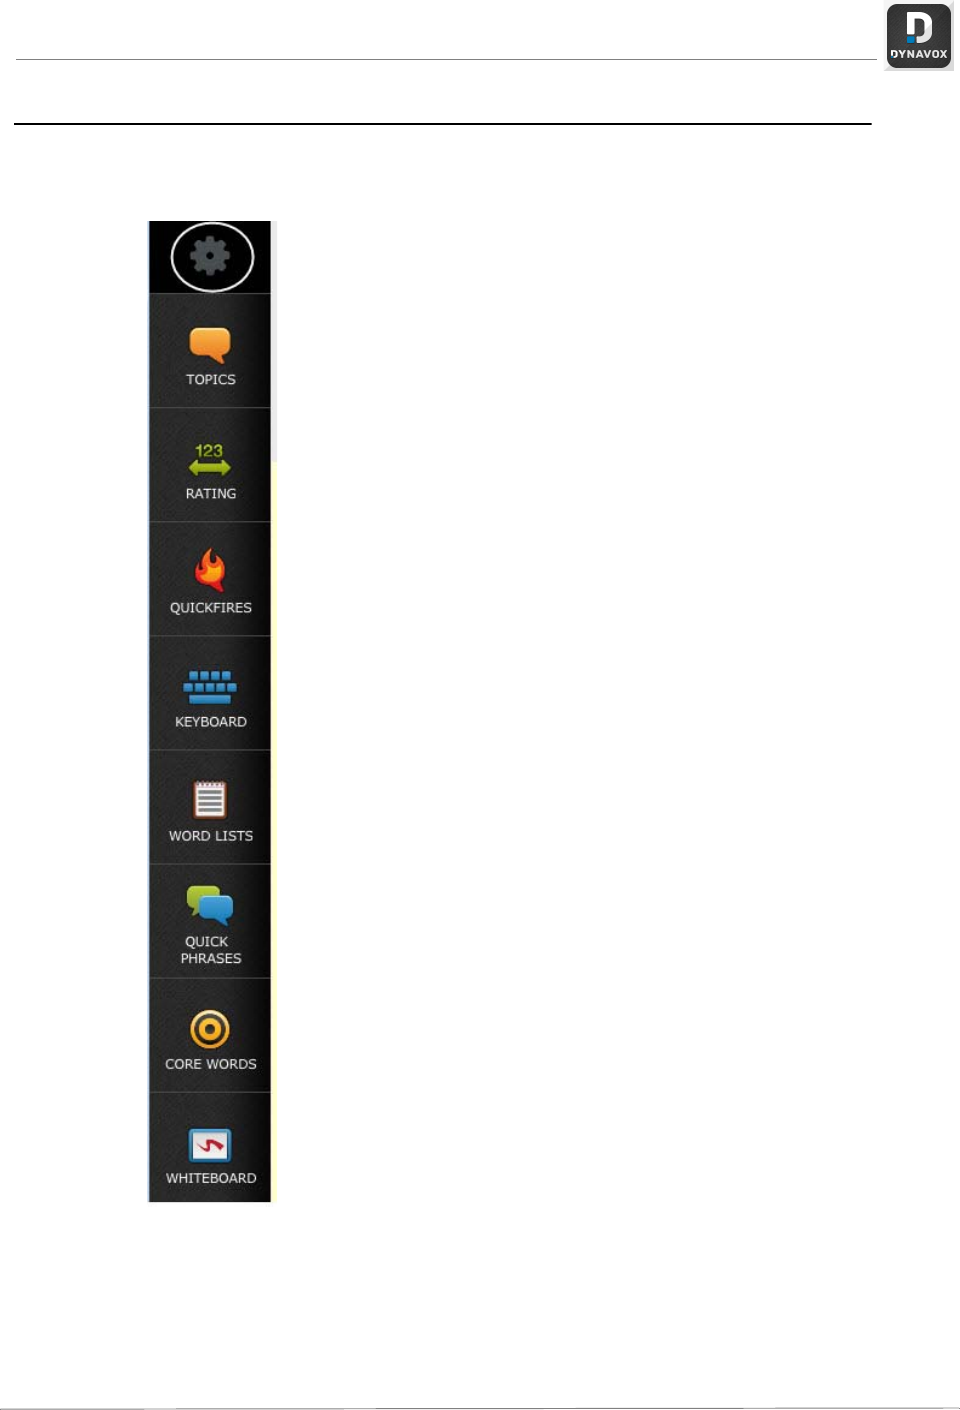
The Tool Bar
TOOLBAR (EXAMPLE)
The Toolbar is designed to give you quick access to your most-
used tools and page sets.
The appearance of the Toolbar may vary. It can be customized
and configured to your specifications - you can add or remove
buttons and folders, hide the Toolbar, and even move it from the
left side of the screen to the top, bottom, or left side of the screen.
(See Interface Settings.)
The Settings button at the top of the Toolbar (circled in the
illustration to the left) opens the Settings menu, which provides
you with easy access to the tools you need to customize the
Compass software. (See The Settings Menu below.)
DynaVox T10 User’s Guide 11
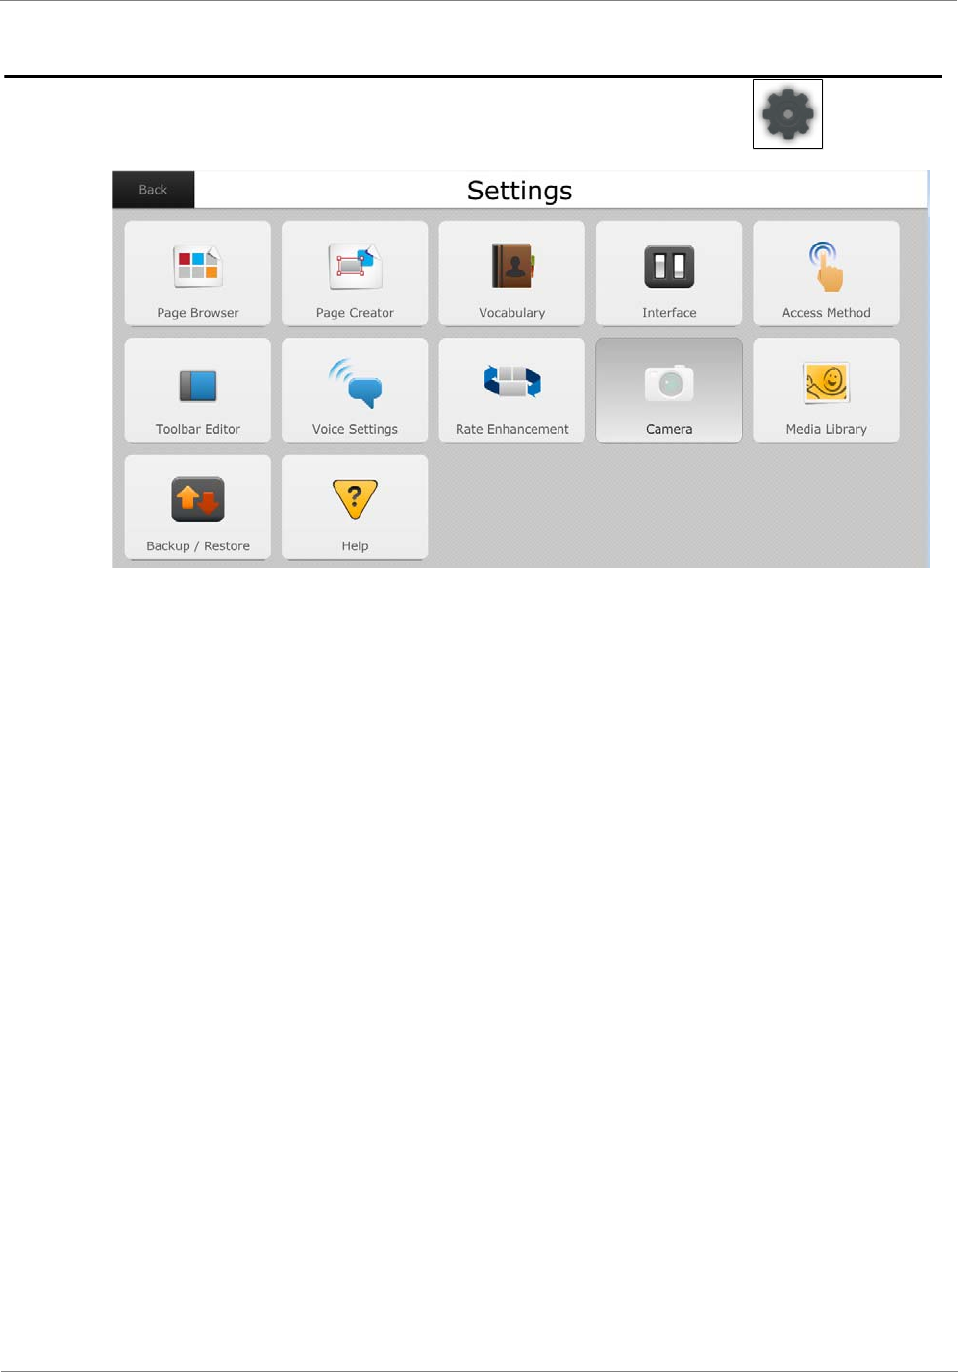
The Settings Menu
Select the Settings button on the Toolbar to open the Settings menu.
SETTINGS MENU
Simply select a button on the Settings menu to access the Page Browser or Page Creator,
Vocabulary, Interface and Toolbar settings, Voice Settings, Rate Enhancement components,
the camera and media library, access method settings, backup and restore functions, as well
as links to help documentation and videos.
12
Settings Menus
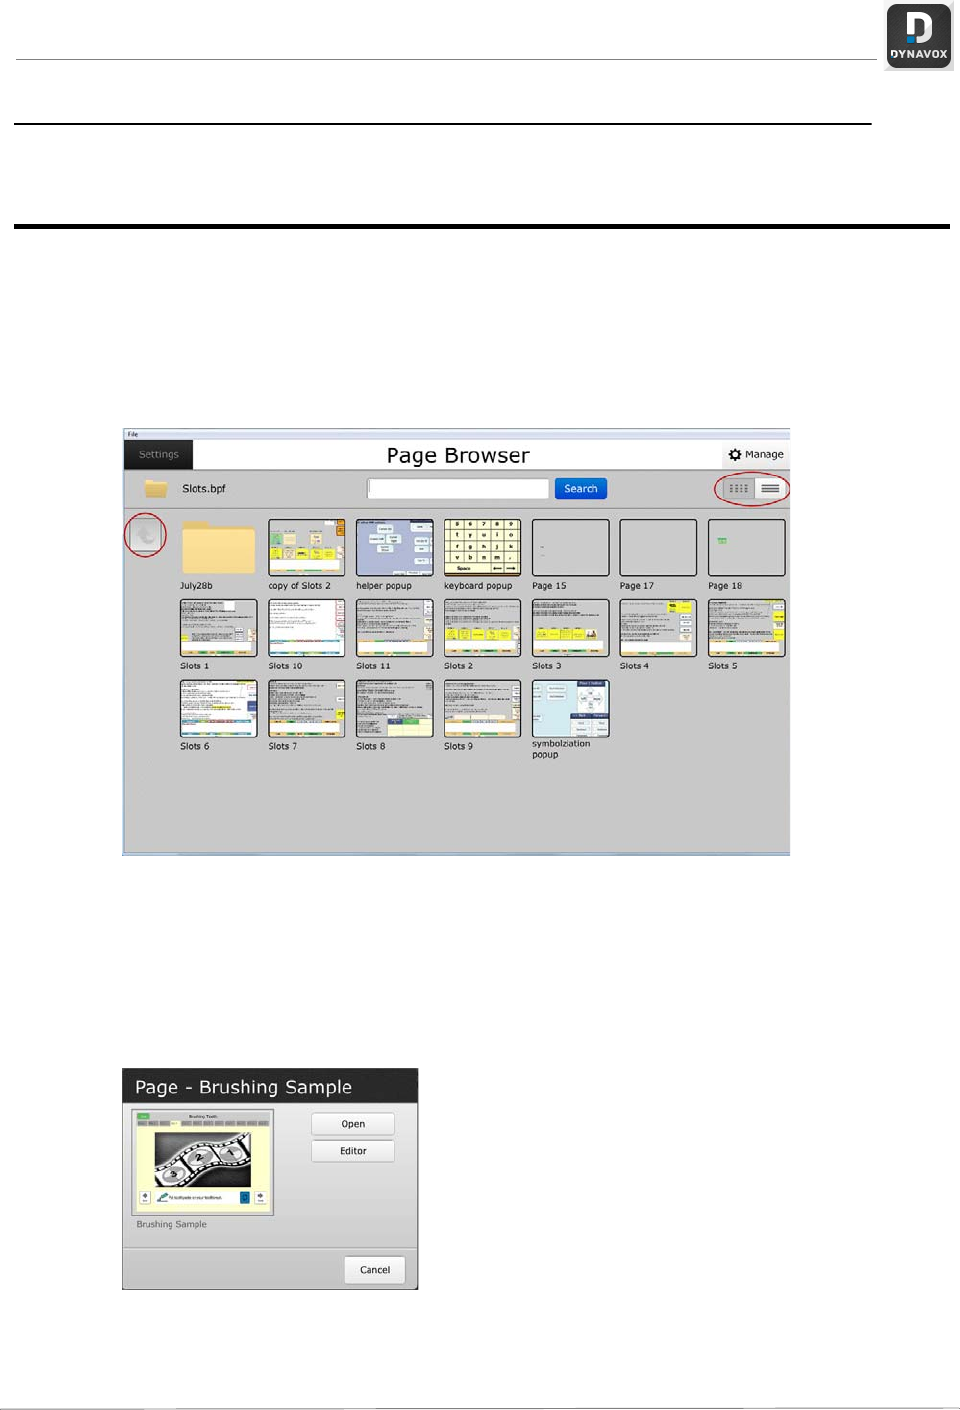
Page Browser
The Page Browser is the quickest way to open or edit a page. You can search for a page by
name, or look through the folders and see preview images of pages before opening them.
Select the Settings button at the top of the Toolbar, then select Page Browser from the
Settings menu.
PAGE BROWSER
The icons at the top right of the screen (circled in the illustration above) enable you to display
the pages and folders as a grid (default) or list.
Use the arrow button at the upper left of the screen (circled in the illustration above) to move
up through the layers of folders. Double-click on a folder to open it and display the pages
inside. Select a page, and a large thumbnail of the page will open.
SELECTED PAGE IN PAGE BROWSER
Simply select Open to open the selected page or Editor to edit the page.
DynaVox T10 User’s Guide 13
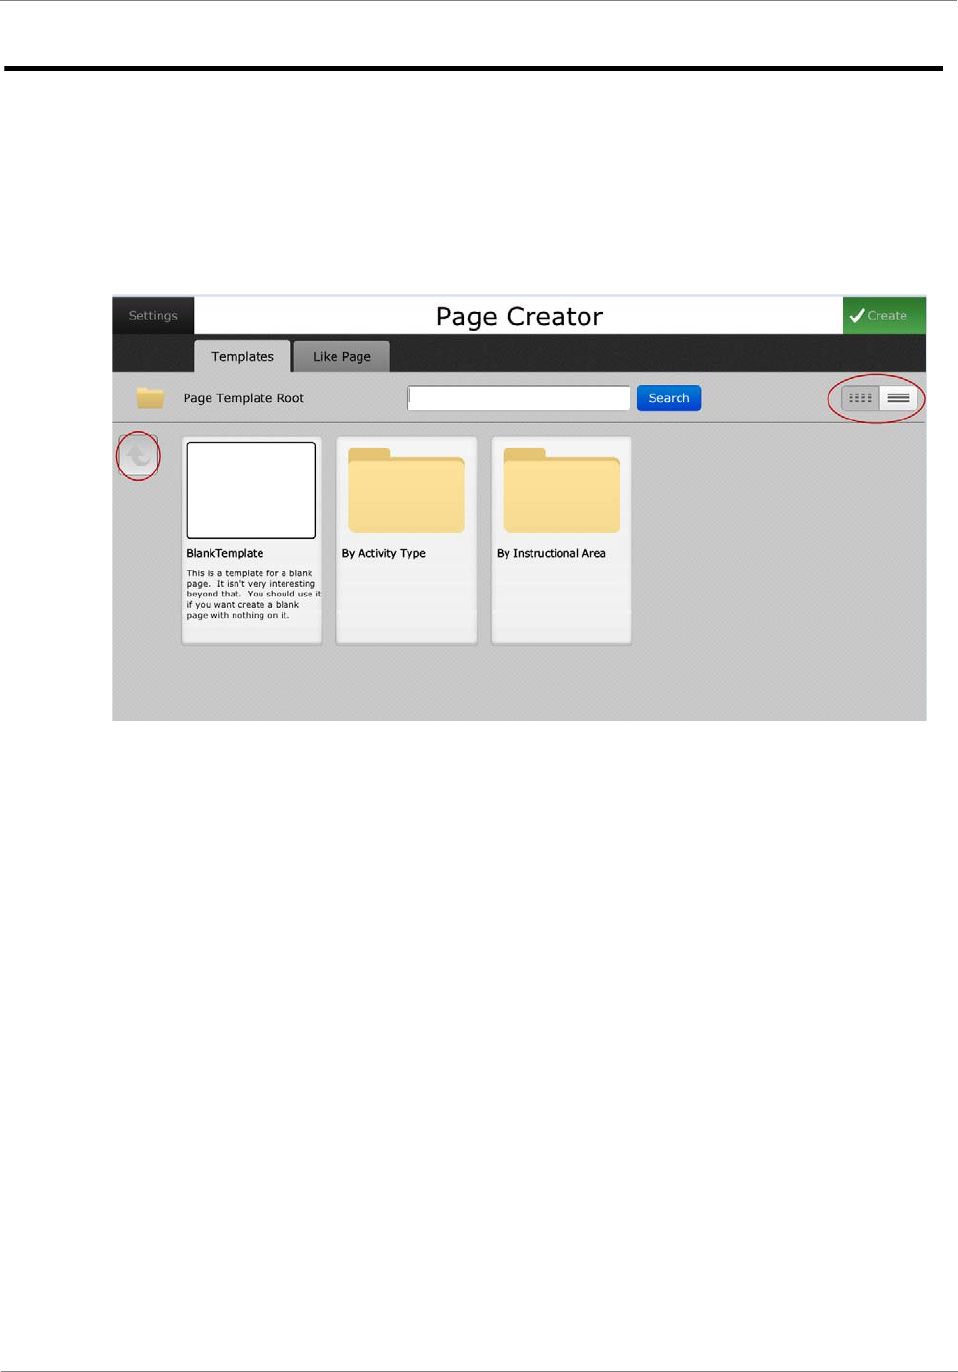
Page Creator
Create an entirely new page - either from a template or based on the layout of an existing
page. You can customize your new pages with your own content - vocabulary, symbols, media
files, etc.
Select the Settings button at the top of the Toolbar, then select Page Creator from the Settings
menu.
PAGE CREATOR
The icons at the top right of the screen (circled in the illustration above) enable you to display
the pages and folders as a grid (default) or list.
Select from a number of templates (blank or by activity type or instructional area) or select the
Like Page tab to create a new page using the layout of an existing page. You can also use the
Search text field to find a page you would like to use as a template.
Use the arrow button at the upper left of the screen (circled in the illustration above) to move
up through the layers of folders. Select a folder to open it and display the pages inside. Select
a page, and then select Create at the top right corner of the screen. A dialog will open - name
the page and browse for a location for it. You can then edit the page to your exact
specifications.
14
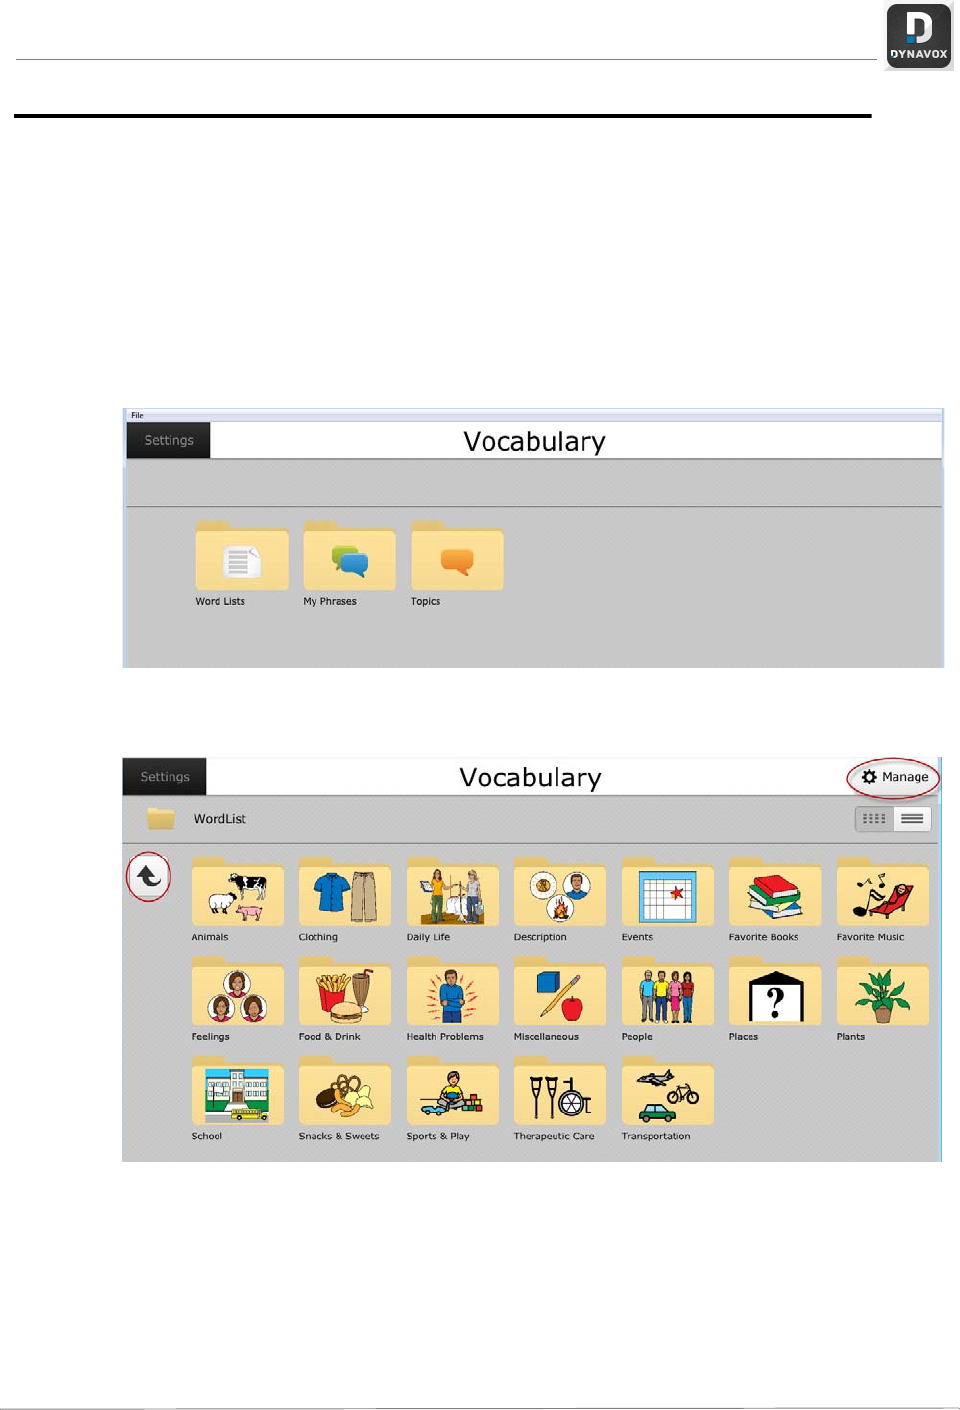
Vocabulary
Your vocabulary (your talk topic choices, word list, and phrases) was selected when you used
the Setup Wizard to set up your user account and is based on your input regarding your age,
gender, condition, and communication level.
Most vocabulary items are stored in folders. You can edit, copy, delete, change the order of
appearance onscreen, and add new vocabulary items using the Vocabulary menu.
Select the Settings button at the top of the Toolbar, then select Vocabulary from the Settings
menu.
VOCABULARY MENU
Select the Word Lists, My Phrases, or Topics button to open the Vocabulary screen.
VOCABULARY SCREEN - WORD LISTS (EXAMPLE)
Navigate through the folders (use the arrow button at the upper left of the screen - circled in
the illustration above) - to move up through the layers of folders. Select a folder to open it.
When you find the folder or item you wish to edit, select Manage at the top right corner of the
screen.
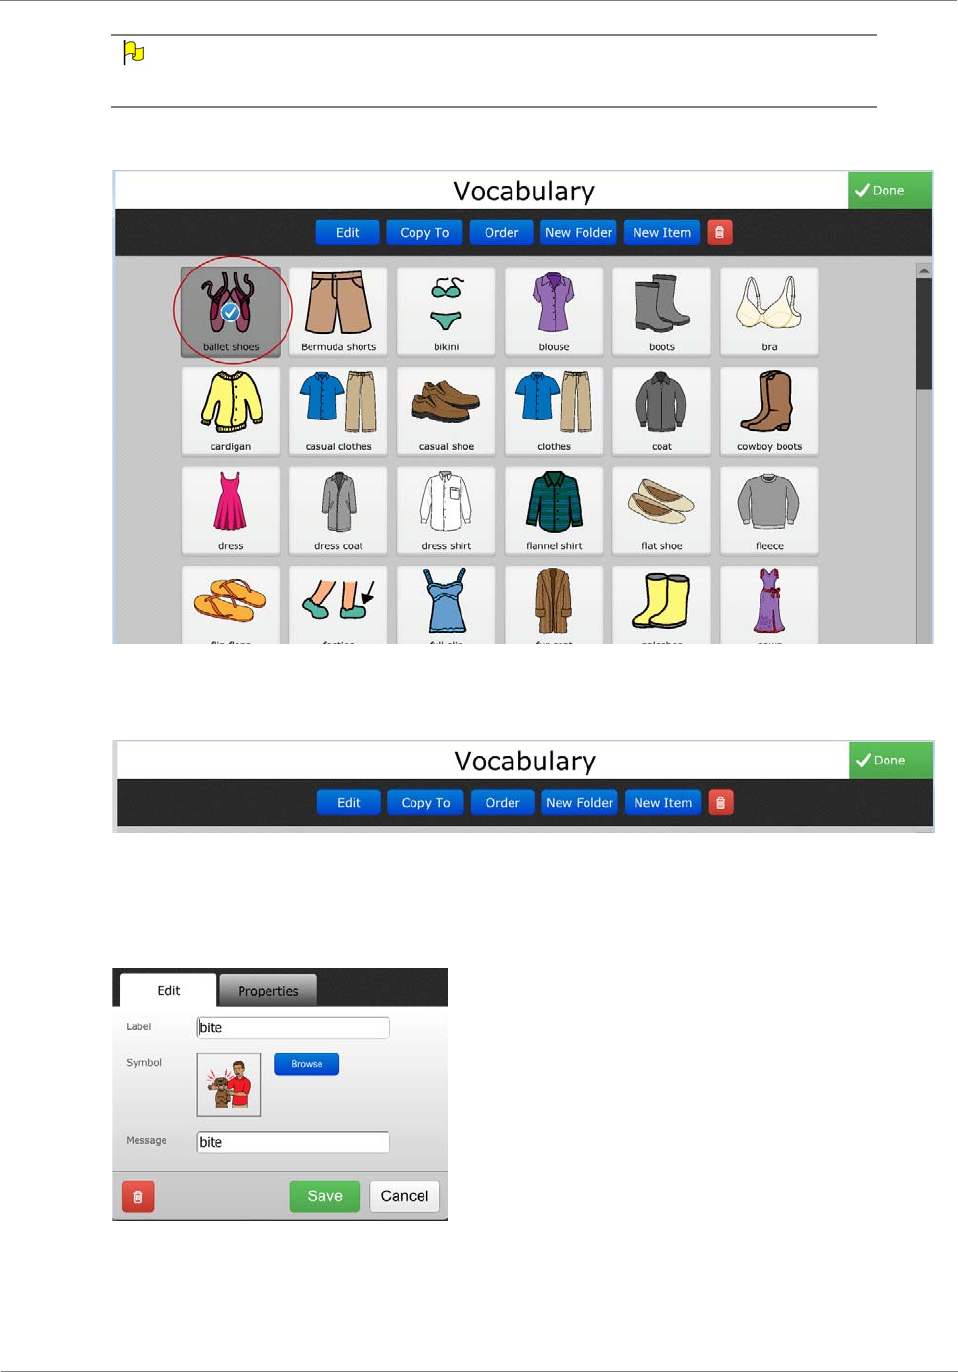
DynaVox T10 User’s Guide 15
NOTE
If you are adding a new folder or item, navigate to the level to which you want to add the folder or
item, then select Manage.
EDIT VOCABULARY SCREEN
When you select the Manage button, a button bar will open.
BUTTON BAR ON VOCABULARY SCREEN
Select the item you want to modify. Then select the applicable button on the button bar.
•Edit - The Vocabulary Properties menu will open.
VOCABULARY PROPERTIES MENU
Enter a new label, browse for a symbol, and add or change the message.

16
NOTE
The Message field will not be present when you are editing a folder.
•Copy To - The Select a Folder screen will open. Navigate through the levels to find the
destination folder.
•Order - Use the First, left arrow, right arrow, or Last buttons at the top of the screen to
reorder the selected item.
•New Folder - Create a new folder.
•New Item - Create a new item.
•Delete item - Select the trash can icon .
DynaVox T10 User’s Guide 17
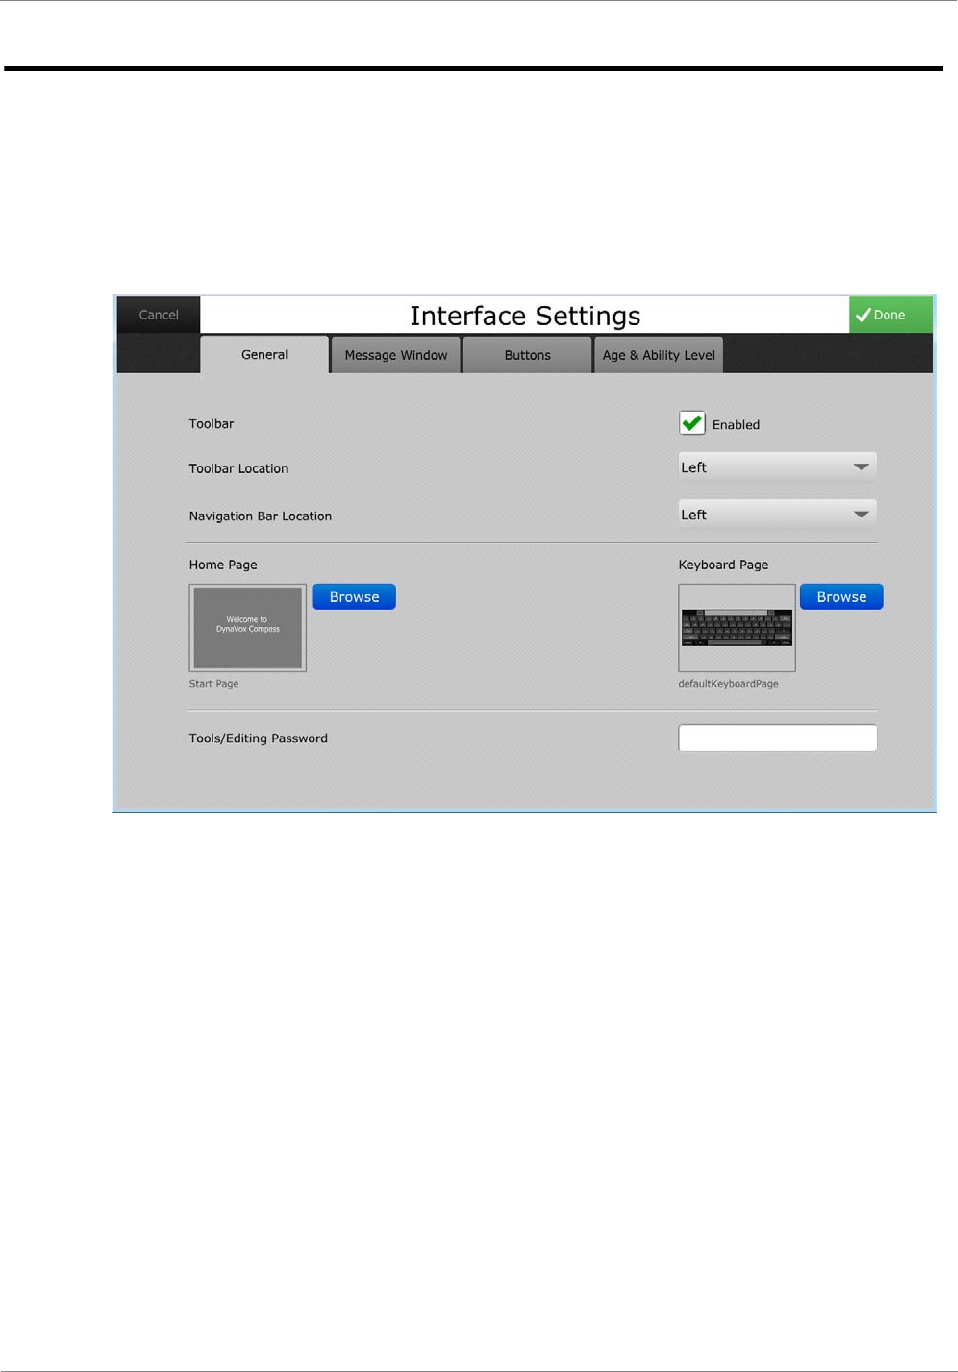
Interface Settings
The Interface Settings menu enables you to adjust or define how certain objects are presented
onscreen. The Interface Settings menu is organized by tab, with each tab pane presenting a
different group of controls and options.
Select the Settings button at the top of the Toolbar, then select Interface from the Settings
menu.
INTERFACE SETTINGS
•General Settings - Enable or disable (hide) the Toolbar, choose a location on the screen
for the Toolbar and the Navbar. Select a Home Page and Keyboard page. Password
protect page editing and access to the Settings menu.
•Message Window Settings - Customize the settings for your message window: use
symbols, auto-capitalize words at the beginning of a sentence, auto-space between words,
use a thicker, more visible cursor, clear the message window after speech, speak as words
are entered into the message window, and/or show misspellings.
•Button Settings - Animate the symbols on your buttons and track button usage.
•Age & Ability Level Settings - Changes the content based on your age and ability level
selections.
18
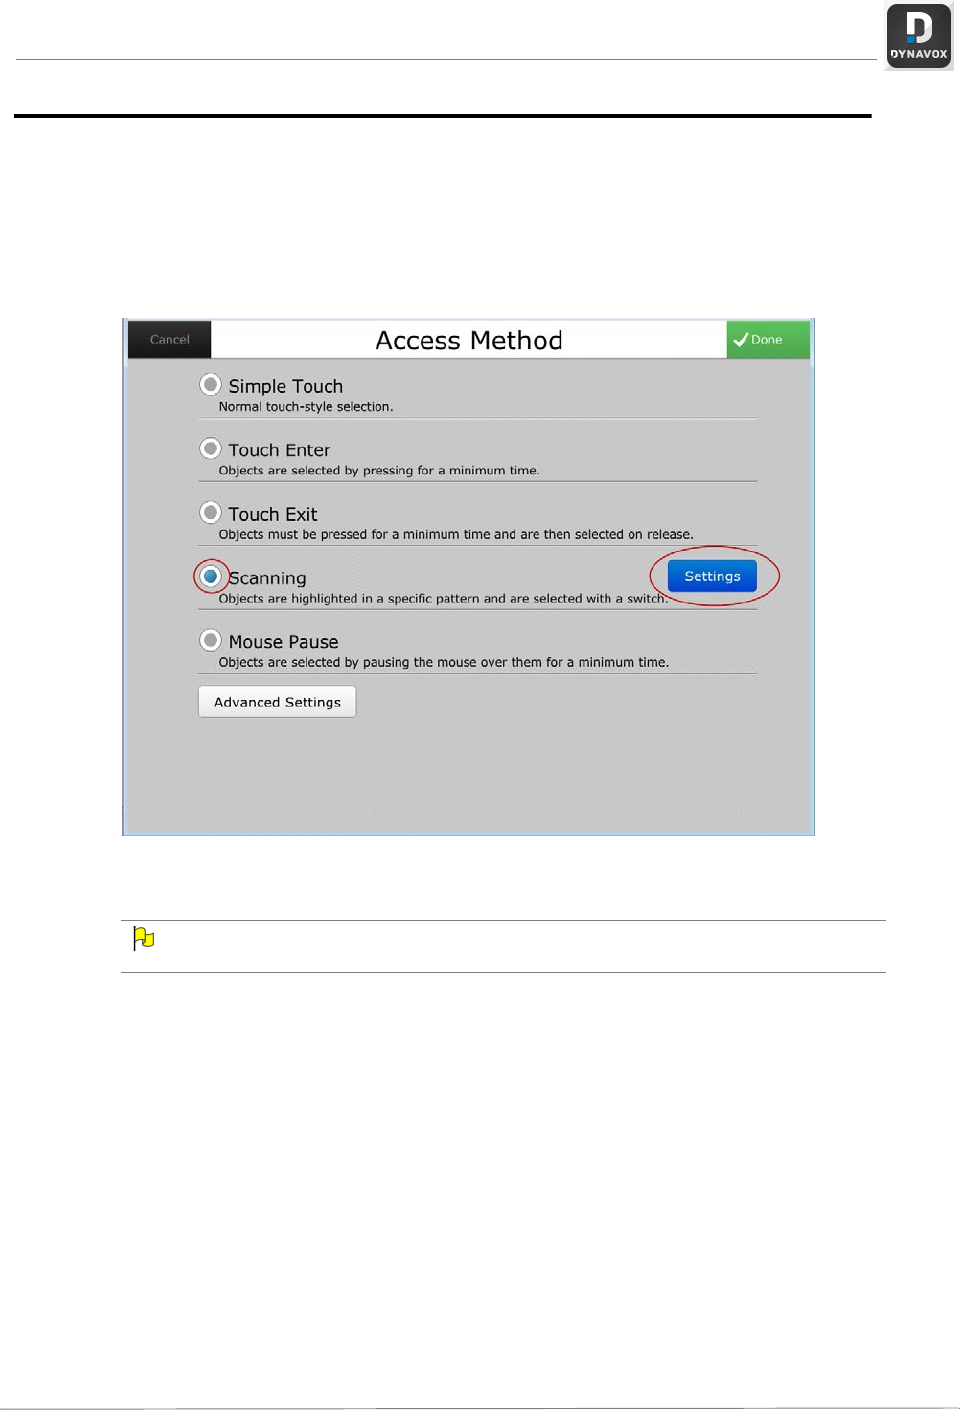
Access Method Settings
The DynaVox T10 allows you to choose and refine a selection method that best suits your
needs.
Select the Settings button at the top of the Toolbar, and then select Access Method from the
Settings menu.
ACCESS METHOD SETTINGS WITH SCANNING SELECTED
Simply select the access method that you would like to use.
NOTE
Simple Touch is the default selection method.
When you make a selection on the Access Method menu, a Settings button will appear
(circled in the above illustration). Select the Settings button to open an access method
Settings menu that will enable you to customize the settings for your selected selection
method. (For example, to set hold and release times for the Touch Enter and Touch Exit
selection methods.)
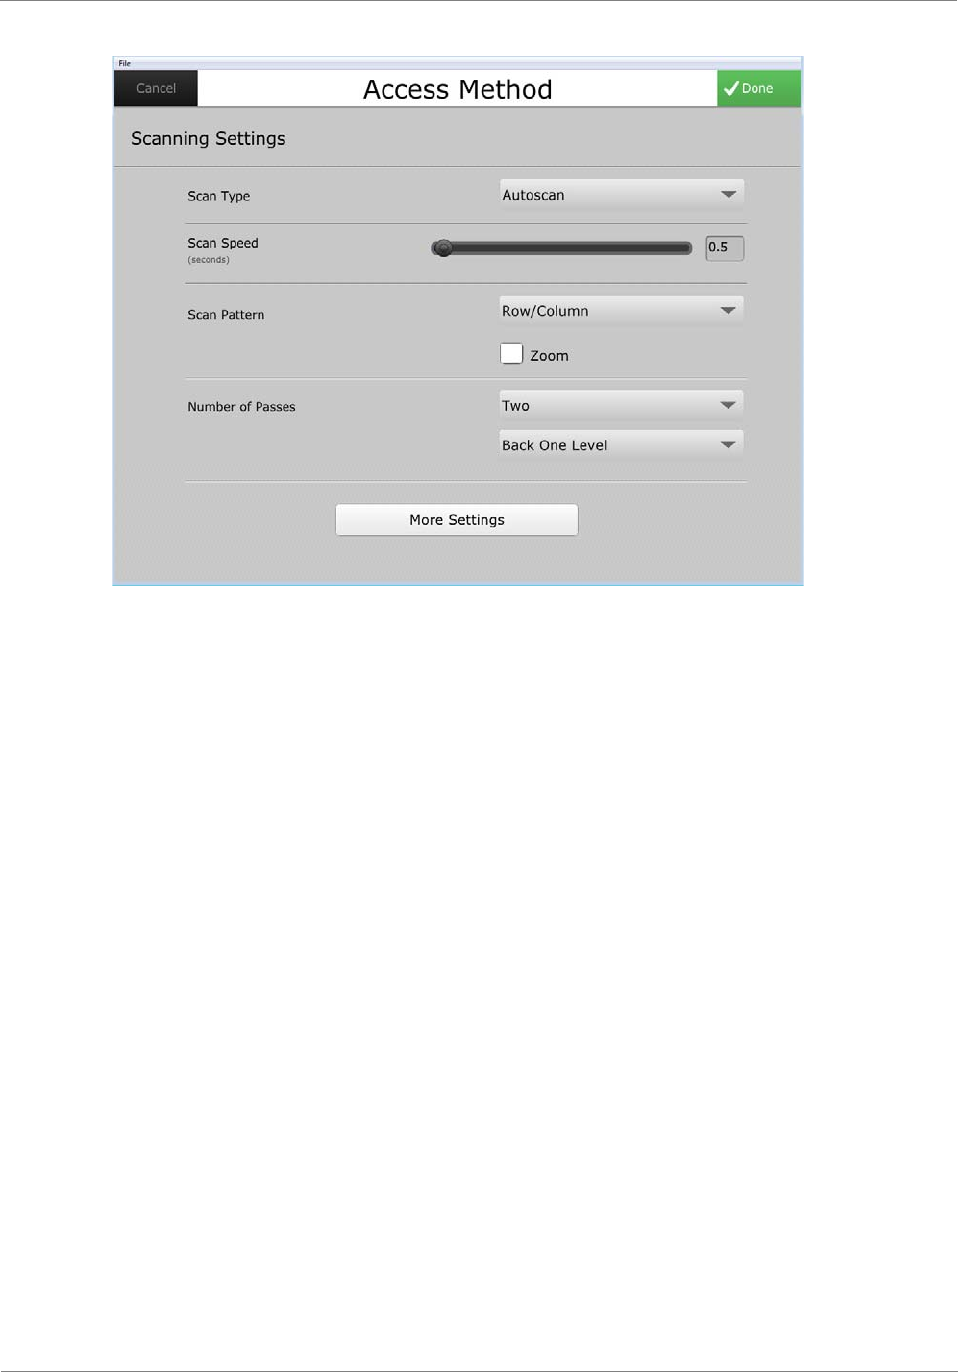
The Settings menu for the Scanning selection method is pictured below.
DynaVox T10 User’s Guide 19
EXAMPLE OF ACCESS METHODS SETTINGS MENU
Use the access method Settings menu to customize the access method you have selected.
When you have chosen your preferred settings, select Done at the top right corner of the
screen.
20
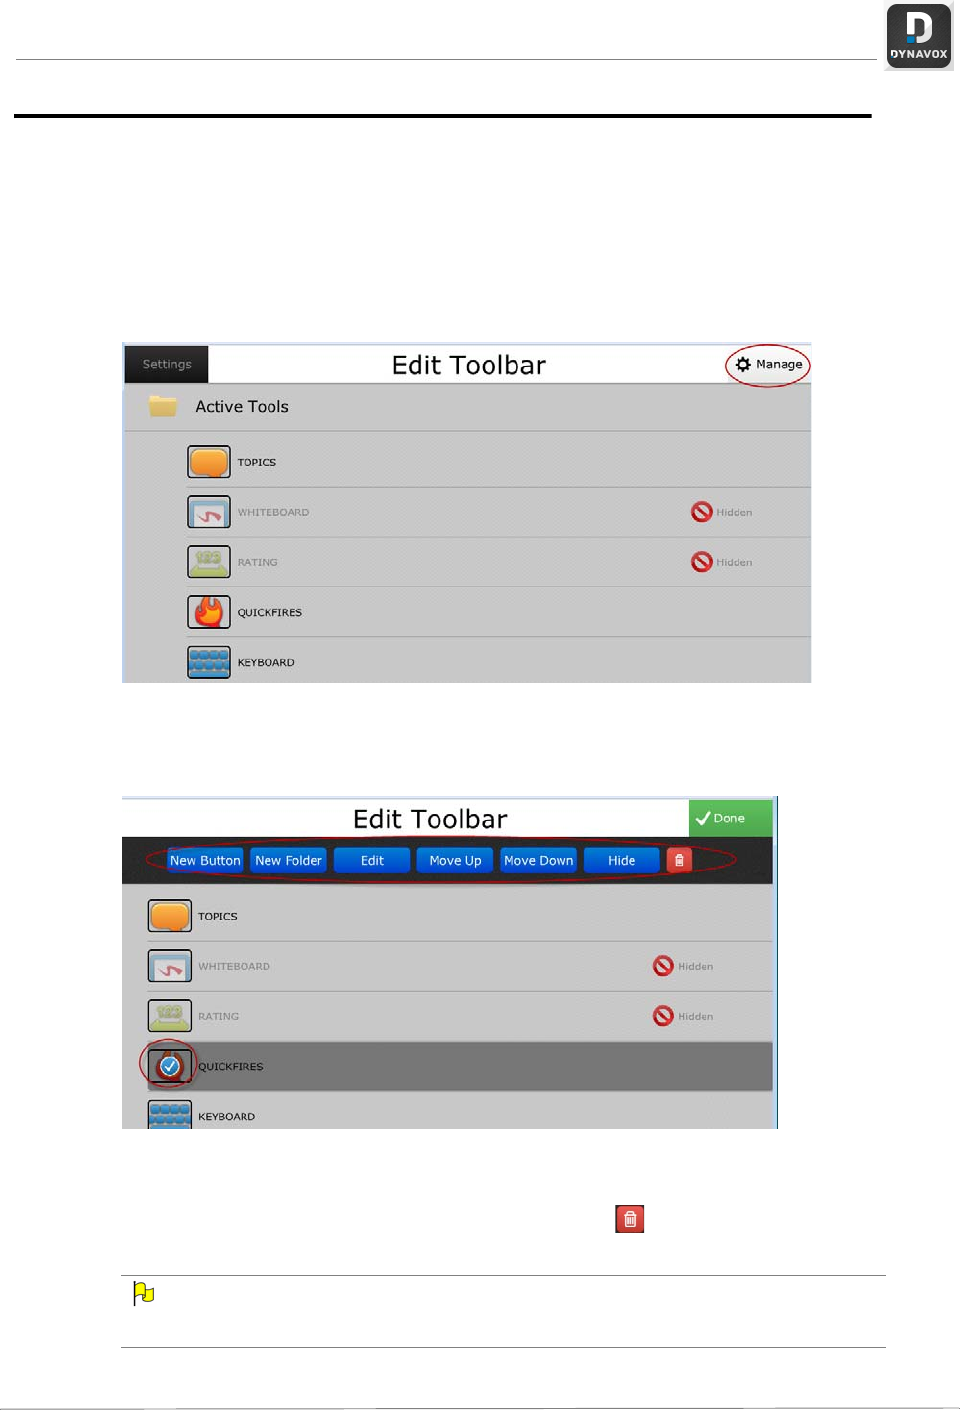
Toolbar Editor
You can personalize the Toolbar - add a new button or folder, edit or delete buttons or folders,
move them up or down the Toolbar, and hide items on the Toolbar.
Select the Settings button at the top of the Toolbar, and then select Toolbar Editor from the
Settings menu to open the Edit Toolbar menu. This menu shows all of the buttons and folders
- both hidden and visible in your Toolbar.
EDIT TOOLBAR SETTINGS
Select Manage at the top right corner of the screen to edit the Toolbar. A button bar will open
at the top of the Edit Toolbar menu that will let you edit your Toolbar.
BUTTON BAR ON EDIT TOOLBAR MENU
Select New Button or New Folder to open a dialog and add a new button or folder, or select a
folder or button (a blue check mark will appear on the item), and then select Edit, Move Up,
Move Down, Hide (Show), or select the trash can icon to delete the item.
NOTE
Selecting a hidden item in the list will change the Hide button to Show on the button bar of the
Edit Toolbar menu.

DynaVox T10 User’s Guide 21
Voice Settings
You can select and customize a speaking voice for your T10 as well as manage pronunciation
exceptions for frequently used words.
Select the Settings button at the top of the Toolbar, and then select Voice Settings from the
Settings menu.
VOICE SETTINGS
•Select the Engine drop-down list and choose one of the speech engine manufacturer
options.
•Select a speaking voice from the Voice drop-down list.
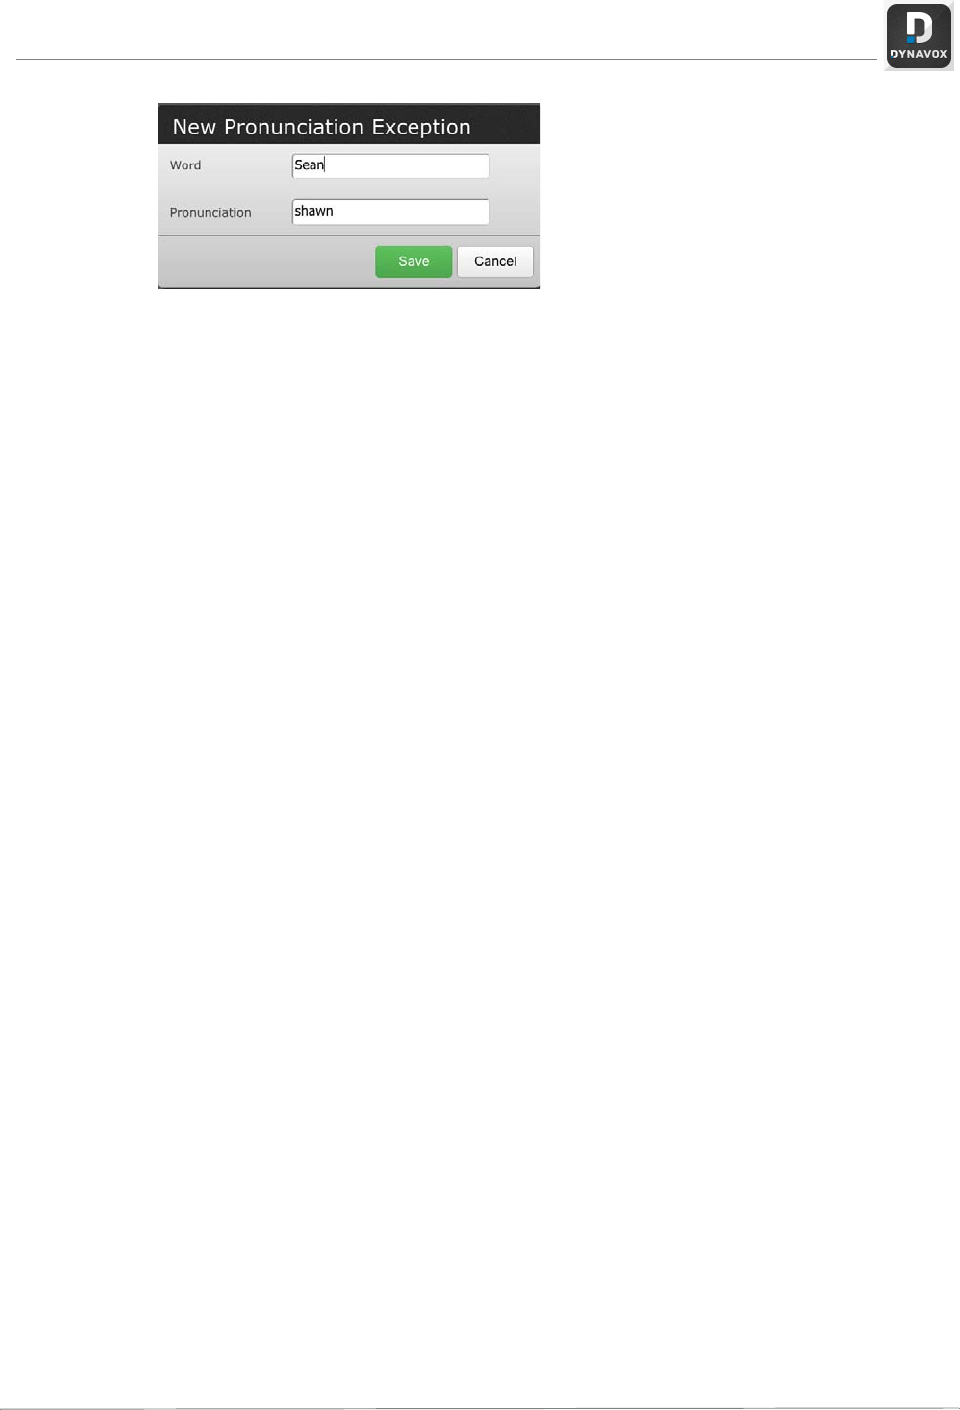
•Manage Pronunciations:
The voice on your T10 may not always say words correctly - especially in the case of
proper names and some foreign-derived words. You can save alternate text or phonetic
spellings of words to correct any pronunciation problems.
Select the Manage Pronunciations button to open the Pronunciation Exceptions dialog.
Select the Manage button at the top right corner of the screen and then select either the
New Text Exception or the New Phoneme Exception button. A dialog will open. Enter
the word, and then the text spelling (or select the appropriate phonemes). Then select
Save (or OK for phonemes) to close the dialog and save the pronunciation exception.
22
PRONUNCIATION DIALOG (EXAMPLE)
•Use the Volume slider to adjust the speaking volume.
•Use the Rate slider to adjust the speaking rate. Dragging the slider from left to right
increases the speech rate.
•Select the Speak button next to Voice Preview to hear how the voice sounds at the
selected volume and rate of speech.
•Words in the message window will, by default, be highlighted as they are spoken - select
Disabled from the Highlighting drop-down list if you don’t want spoken words to be
highlighted. To customize highlighting, select the Configure button. On the Highlighting
menu that opens, select a the highlighting type and style from the drop-down lists.
When you're satisfied, select the Done button in the upper right corner of the screen.
DynaVox T10 User’s Guide 23
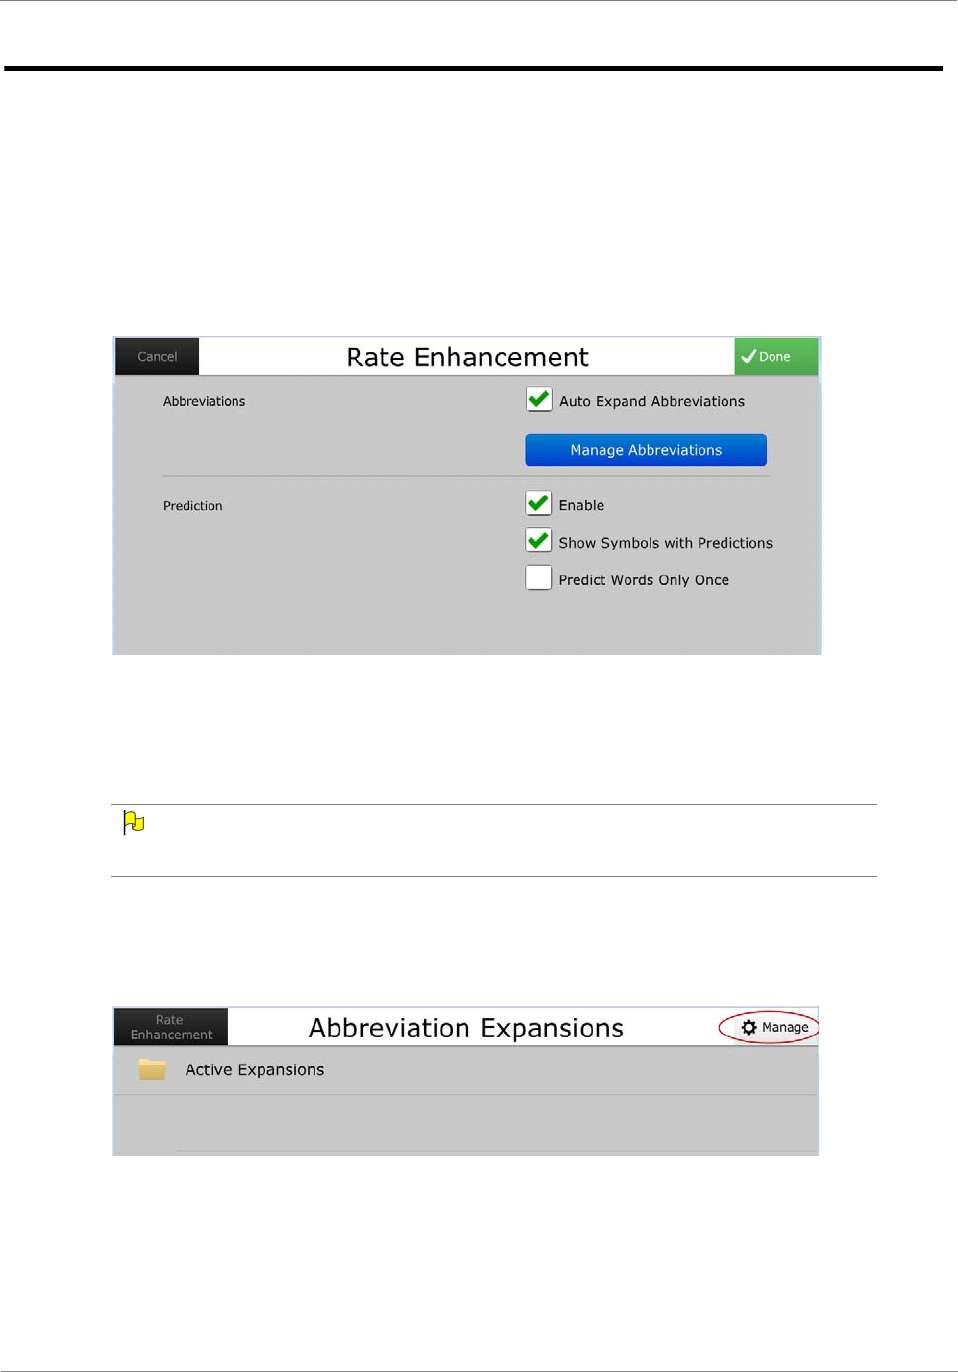
Rate Enhancement Settings
The DynaVox Compass software offers rate enhancement features that can help you
communicate more quickly and efficiently.
Both abbreviation expansions and word prediction allow you to use the keyboard to enter only
a few letters in the message window, and the software will anticipate word choices.
Select the Settings button at the top of the Toolbar, and then select Rate Enhancement from
the Settings menu.
RATE ENHANCEMENT SETTINGS
Abbreviation Expansions
You can compile your own list of abbreviations for frequently used words (for example, names
of friends, family, places, pets, etc.).
NOTE
Make sure that the Auto Expand Abbreviations check box is selected to use the abbreviations
you have created.
1. Select the Manage Abbreviations button, and the Abbreviation Expansions menu will
open.
ABBREVIATION EXPANSIONS MENU
2. Select the Manage button.
3. Select the New button, and the Edit Abbreviation Expansion dialog will open.
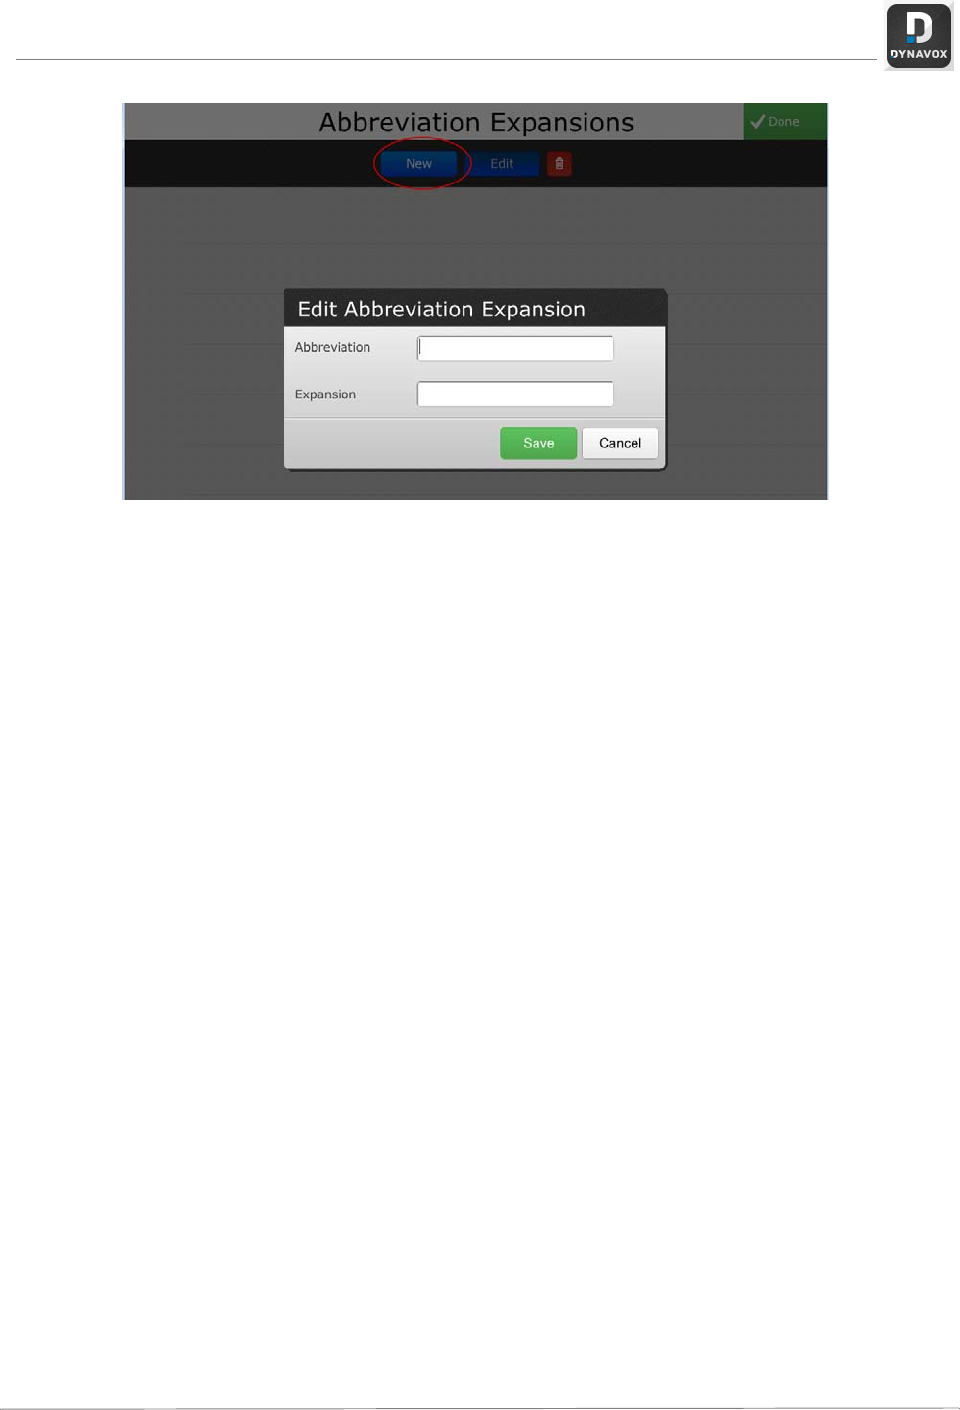
24
ABBREVIATION EXPANSIONS MENU WITH EDIT ABBREVIATION EXPANSION DIALOG OPEN
4. In the Abbreviation text box, enter a few letters that represent the word you are
abbreviating. (For example, enter "Fl" for "Fluffy."
5. Enter the entire word in the Expansion text box.
6. Select Save.
7. Select Done in the upper right corner of the screen.
Next time you enter the abbreviation - followed by a space - in the message window, the
software will recognize it and automatically expand the abbreviation.
Word Prediction
Word prediction can be used on any page that includes predictor buttons. As you compose a
message, the prediction feature anticipates your word choices and displays vocabulary
options for quick selection - these vocabulary options are displayed on the predictor buttons.
You can activate and deactivate prediction features using the Rate Enhancement Settings
menu. Select or clear the following check boxes on the Rate Enhancement Settings menu to
enable/disable the following word prediction features:
•Enable Prediction - Word prediction is enabled by default. Clear the check box to disable
automatic word prediction.
•Show Symbols with Predictions - This feature is also enabled by default. Clear the
check box to hide symbols.
•Predict Words only Once - When the Predict Words only Once check box is selected,
you have only one chance to select a word in a predictor button. If you do not select a
word, that word will not be predicted again until after you complete the word you are
entering - by adding ending punctuation or a space.
DynaVox T10 User’s Guide 25
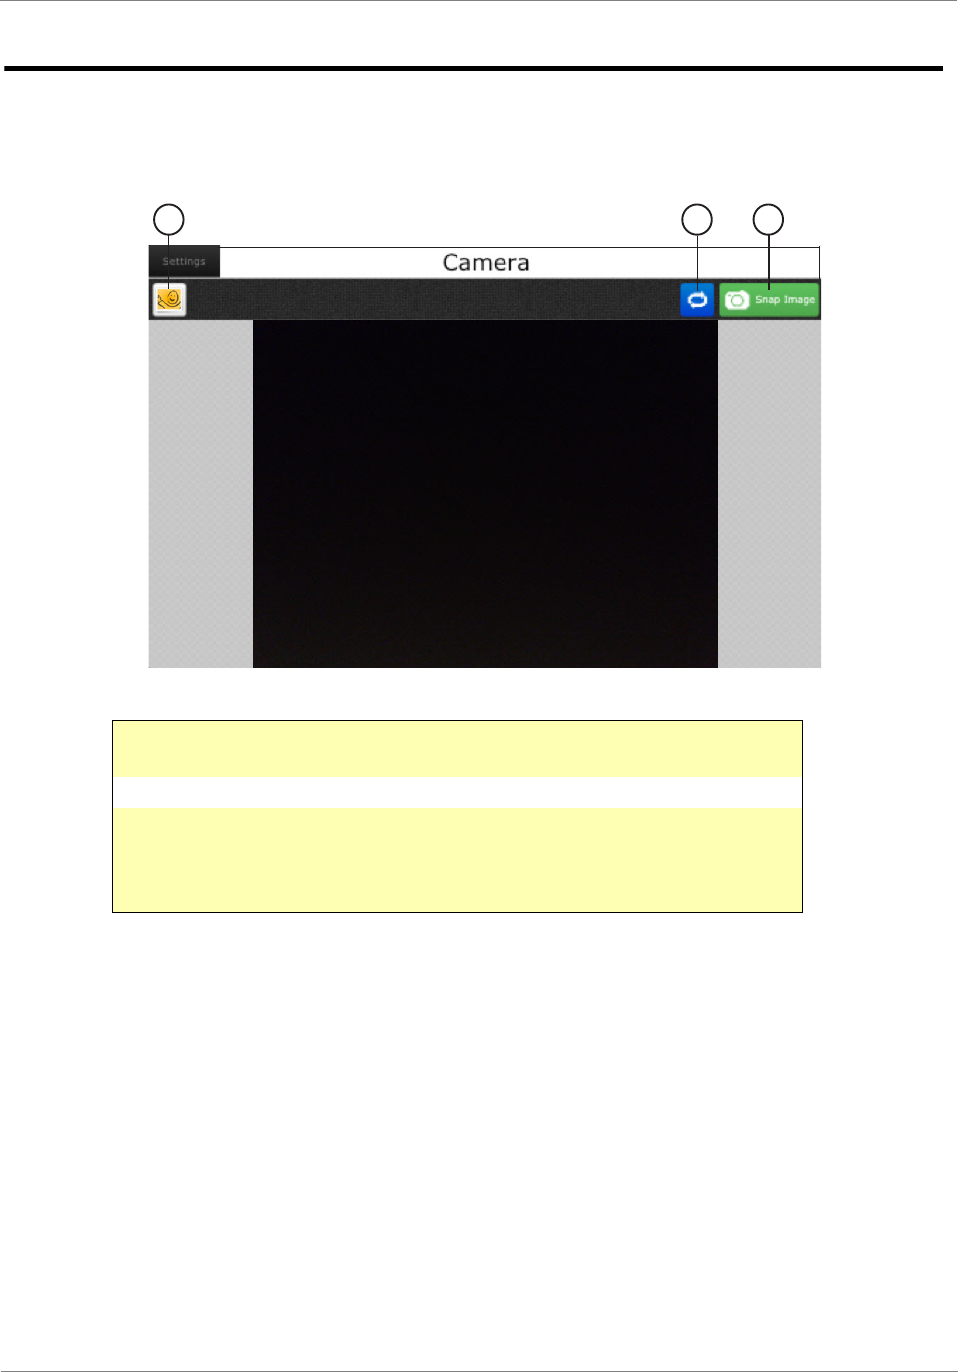
Camera Settings
Select Camera in the Settings menu to open the T10’s camera.
CAMERA.
1Opens your Media Library, and, if an image has been snapped, also
saves that image.
2Switches the camera from rear facing to front facing.
3Select to snap a photograph. After an image has been snapped, the
Snap Image button updates to New Image. Selecting New Image
saves the current image to your Media Library and snaps another
image.
1 2 3
26
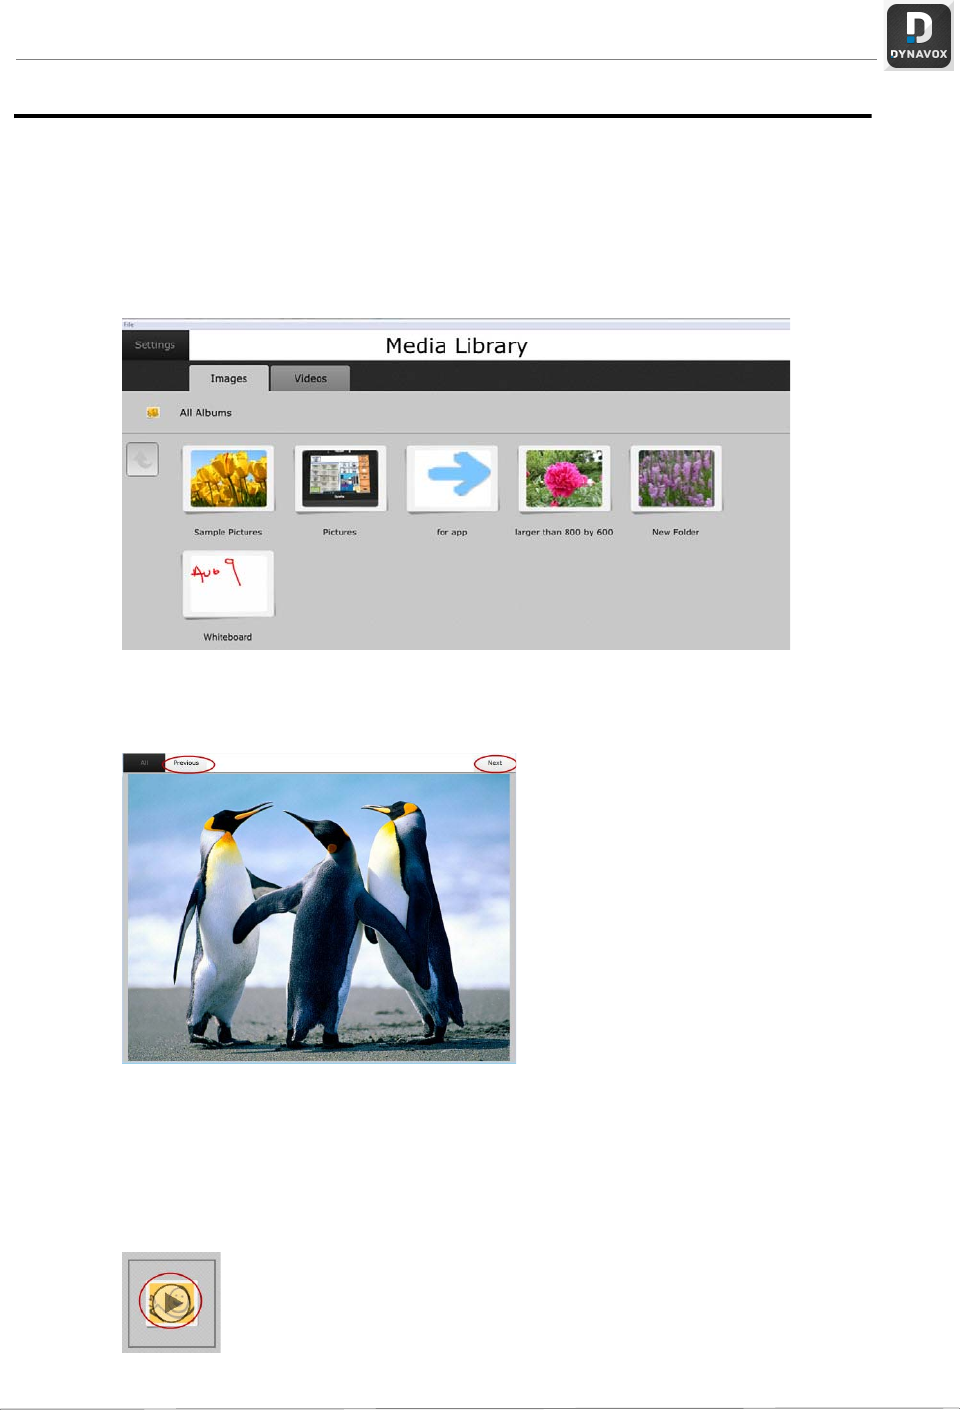
Media Library
The Media Library is a viewer for all of your photos and videos. Videos and any photos that
you take from your T10 camera will be displayed in folders under the Images and Videos tabs.
Select the Settings button at the top of the Toolbar, and then select Media Library from the
Settings menu.
MEDIA LIBRARY (EXAMPLE - IMAGES)
When you select a folder under the Images tab and click on a specific image, a full-screen
photo viewer will open
.
Use the Previous and Next buttons at the top of the screen to scroll through all of the images
in the folder.
Select the Videos tab to open your video library. Select a videos folder, and then select the
video file you want to play. Select the play icon on the video file, and then select Open on the
Options dialog.
PLAY ICON ON VIDEO FILE
DynaVox T10 User’s Guide 27
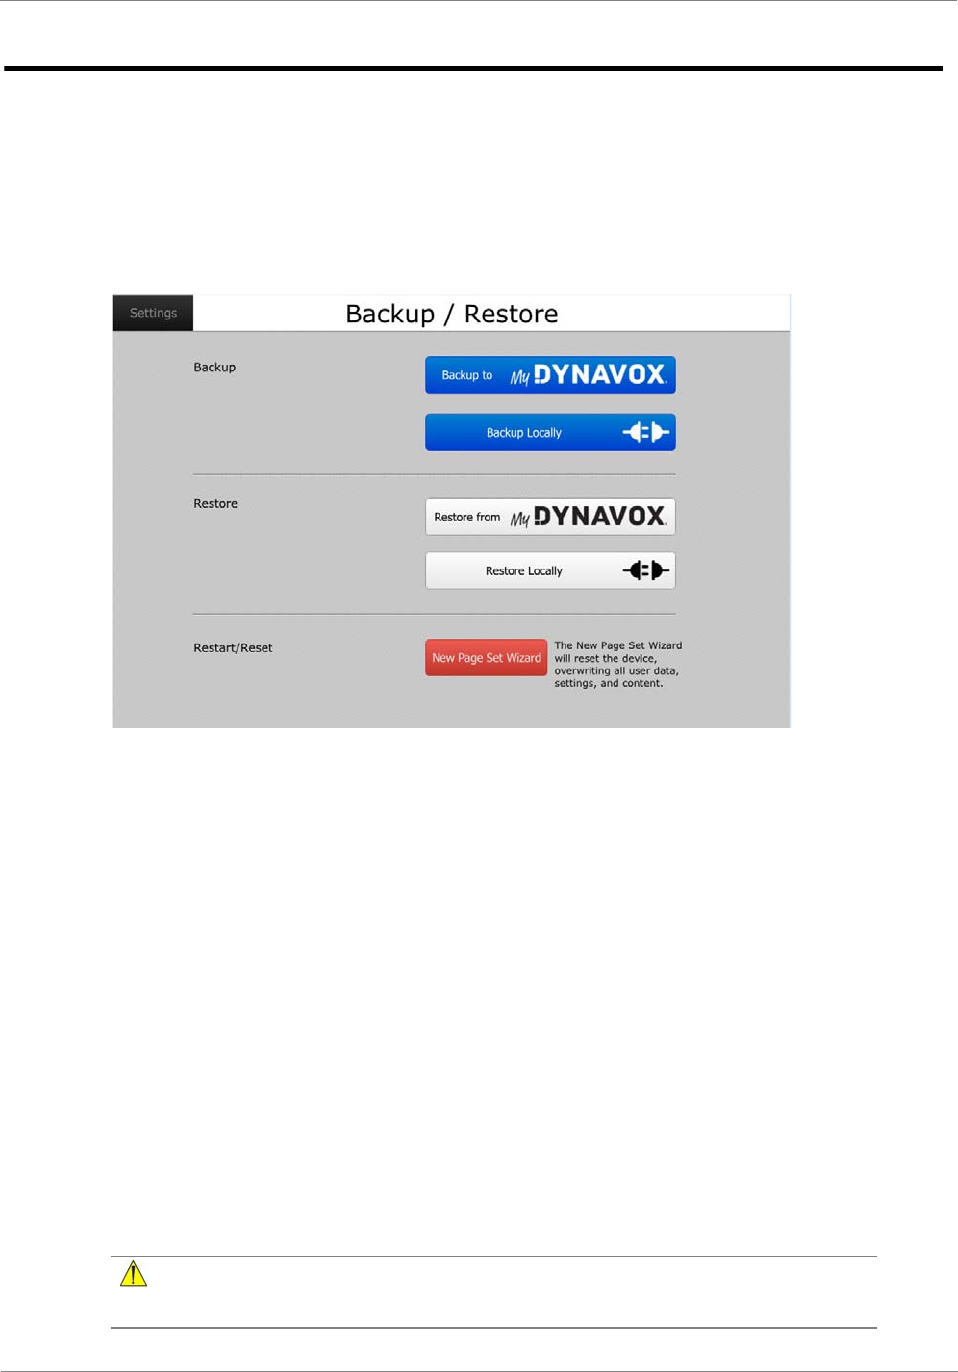
Backup/Restore Settings
When you completed the Setup Wizard, you named and created a "user." This "user" is a set
of files that includes your page set, vocabulary, media library, rate enhancement information,
selection method settings, etc. This set of files is saved as a user file.
Select the Settings button at the top of the Toolbar, and then select Backup/Restore from the
Settings menu.
BACKUP/RESTORE SETTINGS
You can backup and restore your user file either locally (to a folder on your T10) or to
myDynavox.
Backup to myDynaVox.com
1. Select the Backup to myDynaVox button.
2. If you are prompted, sign in to your account by entering your username and password.
3. Enter a name (and description [optional]) for your backup file in the text box. (It’s a good
idea to include the date in the file name.)
4. Select Save.
Backup Locally
1. Select the Backup Locally button. A dialog will open.
2. Enter a name for your backup file in the text box. (It’s a good idea to include the date in the
file name.)
3. Select Save.
CAUTION
Backing up locally does not save your file "off system" if your T10 is lost or damaged. It is
recommended to back up to myDynaVox.
28
Restore from myDynaVox.com
1. Select the Restore from myDynaVox button.
2. If prompted, sign in to your account by entering your username and password.
3. Select the backup file you want to restore.
4. Select OK. A progress bar will appear, and the device will restart.
NOTE
Selecting this option will reset the T10 and overwrite all user data, settings, and content.
Restore Locally
1. Select the Restore Locally button. A dialog will open, displaying all of the backup files in
the Backup Archive folder.
2. Select the backup file you want to restore.
3. Select OK.
Restart/Reset
Select the New Page Set Wizard button to open a wizard that will walk you through selecting
a new page set.
CAUTION
Selecting this option will reset the T10 and overwrite all user data, settings, and content.
DynaVox T10 User’s Guide 29
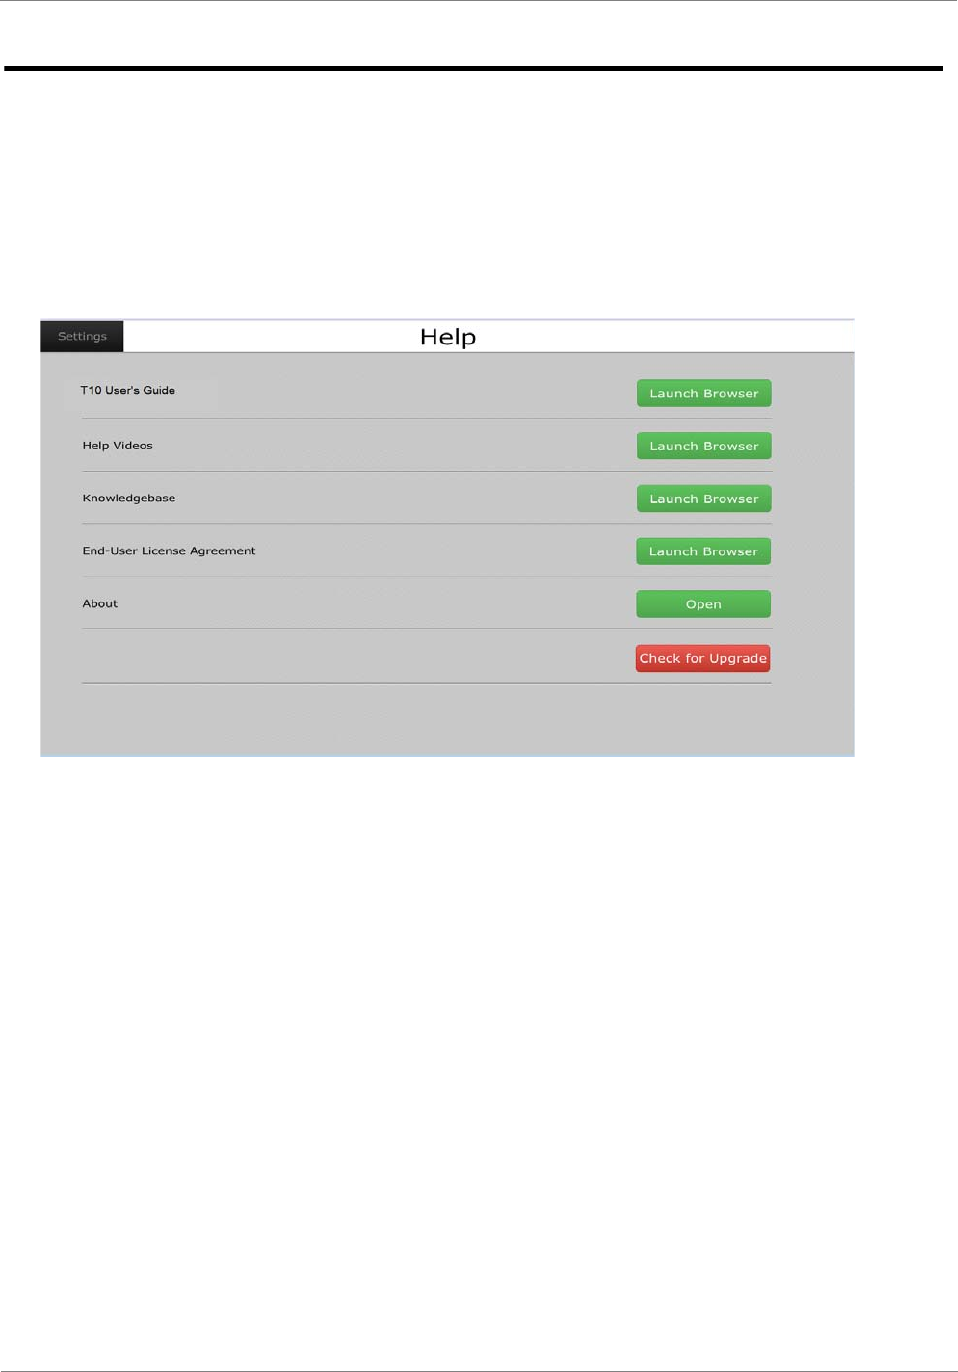
Help
Links to myDynaVox.com to access the documentation, help videos, and the Knowledgebase
are available on the Help menu. Use the Help menu to check for upgrades or find the End-
User License Agreement and information on the software version and serial number of your
Compass software.
Select the Settings button at the top of the Toolbar, and then select Help from the Settings
menu.
HELP MENU
30
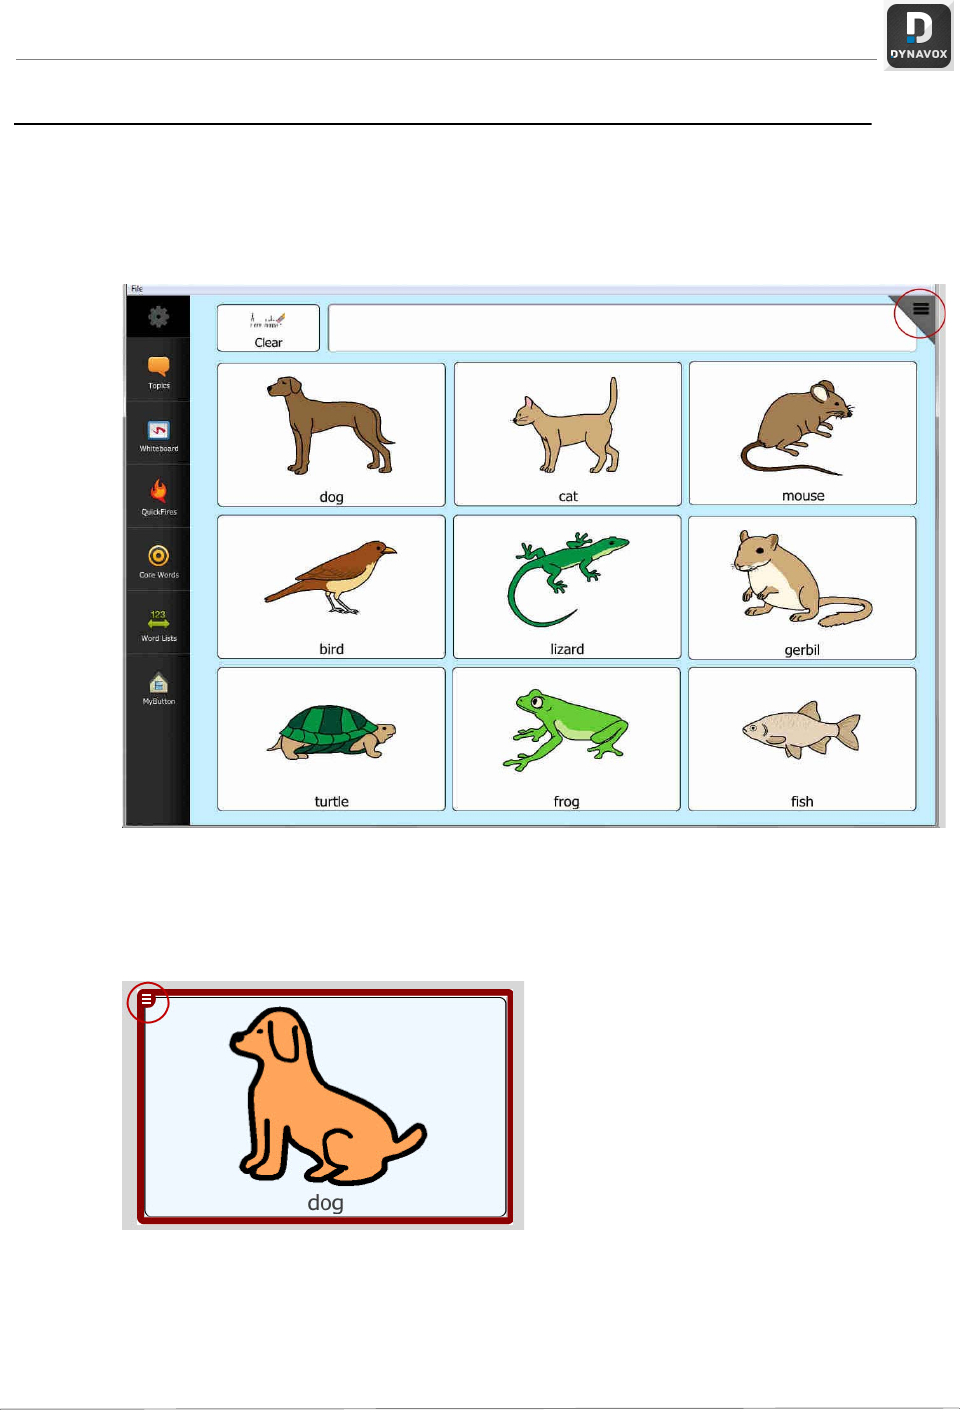
Editing a Button
Editing a button is a fast, easy way to quickly apply customizations to your pages. This
process will give you access to a wide array of settings for your buttons.
1. Select the Edit button in the top right corner of your screen.
EDIT BUTTON
2. Select the button to be modified.
3. Select the Edit button on the top left corner of the button.
SELECT THE EDIT BUTTON
The Button Properties menu will open.

DynaVox T10 User’s Guide 31
BUTTON PROPERTIES MENU - CONTENT TAB OPEN
The Button Properties menu contains five tabs:
Content Tab
On the Content tab, you can assign a label, a message, a symbol, and apply actions that will
execute when that button is selected.
1. Label - the label will appear on the face of the button.
a. Select the Label field.
b. Type the new label using the system keyboard.
c. Select OK.
2. Message
The message will not appear on the face of the button. Messages can be used for a more
lengthy or more complex line of text. For example, if the label of the button is "Address,"
the message could be the user's actual address. When using messages, be sure to assign
corresponding actions. See "Actions" below.
a. Select the Message field.
b. Type the new message using the system keyboard.
c. Select OK.
3. Symbol
Symbols help users associate concepts more quickly and easily. To assign a symbol:
a. Select the blue Select... button next to the Symbol field. Symbols based on the label
you entered will be suggested, but you can search for different symbols using the
search window at the top of the screen. Just select the Search field, and use the
system keyboard to type what you're searching for. When you've finished, select OK,
and new symbols will appear.
b. Touch the symbol to select it. When a symbol is selected, a blue check mark will
appear over the symbol. To choose a different symbol, just select a new one. The first
choice will automatically de-select.
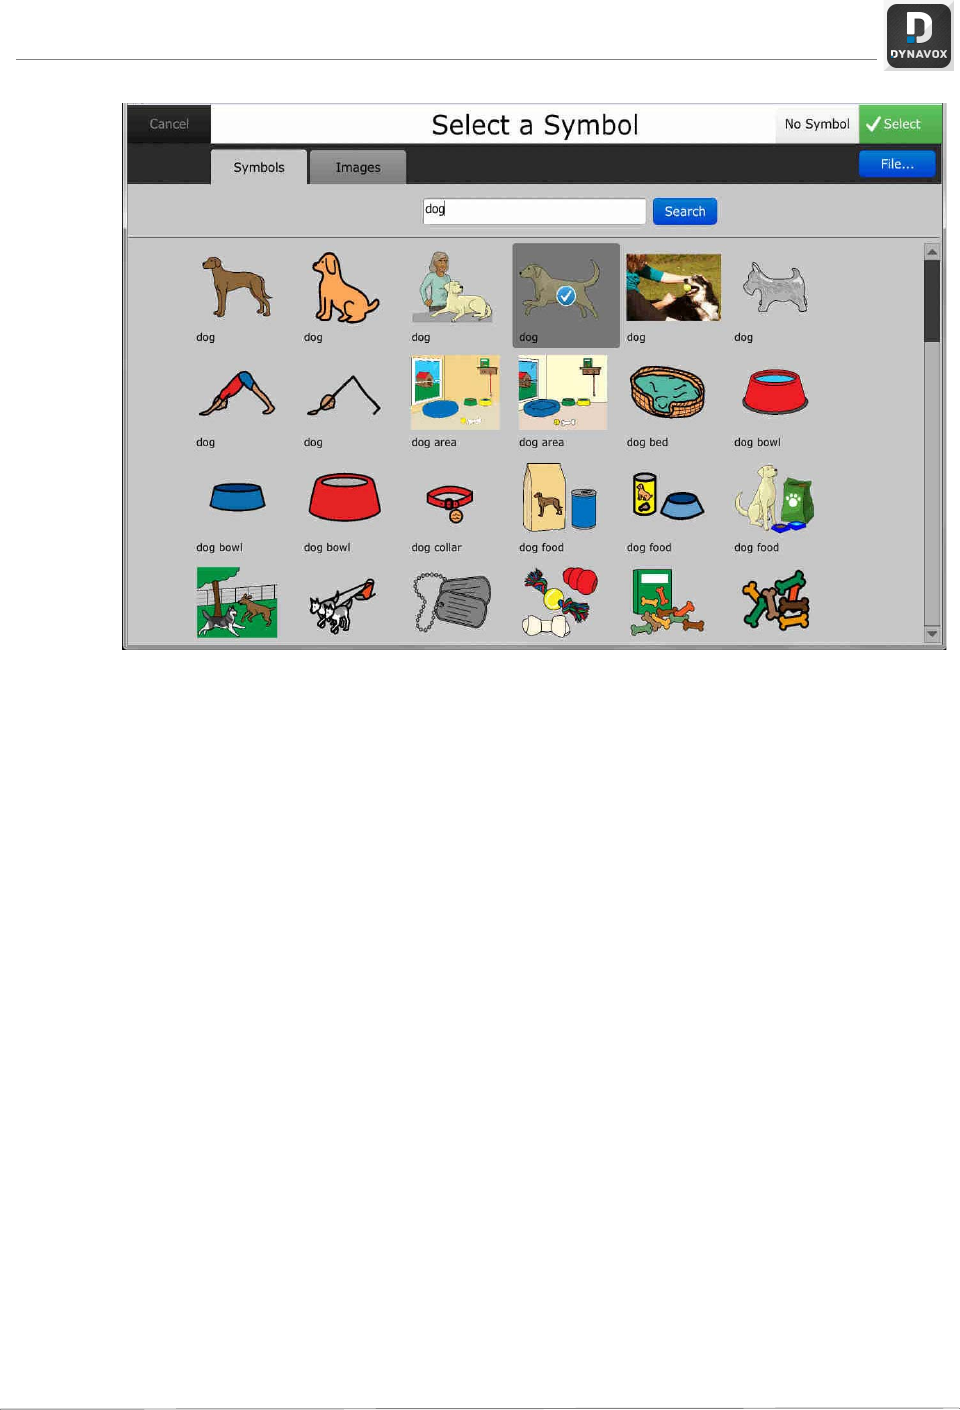
32
SELECT A SYMBOL
c. Select the green Select button at the top right of the screen.
4. Actions
Actions make the button do something. Whether you want to speak a label directly from a
button or compose text in a message window, you'll need to assign actions to your button.
To assign actions:
a. Select the Edit... button next to Actions.
b. From the drop-down list, select what kinds of actions you're looking for. For example,
if you're assigning actions to a button, select Buttons from the list. This will show you
a list of popular button actions.
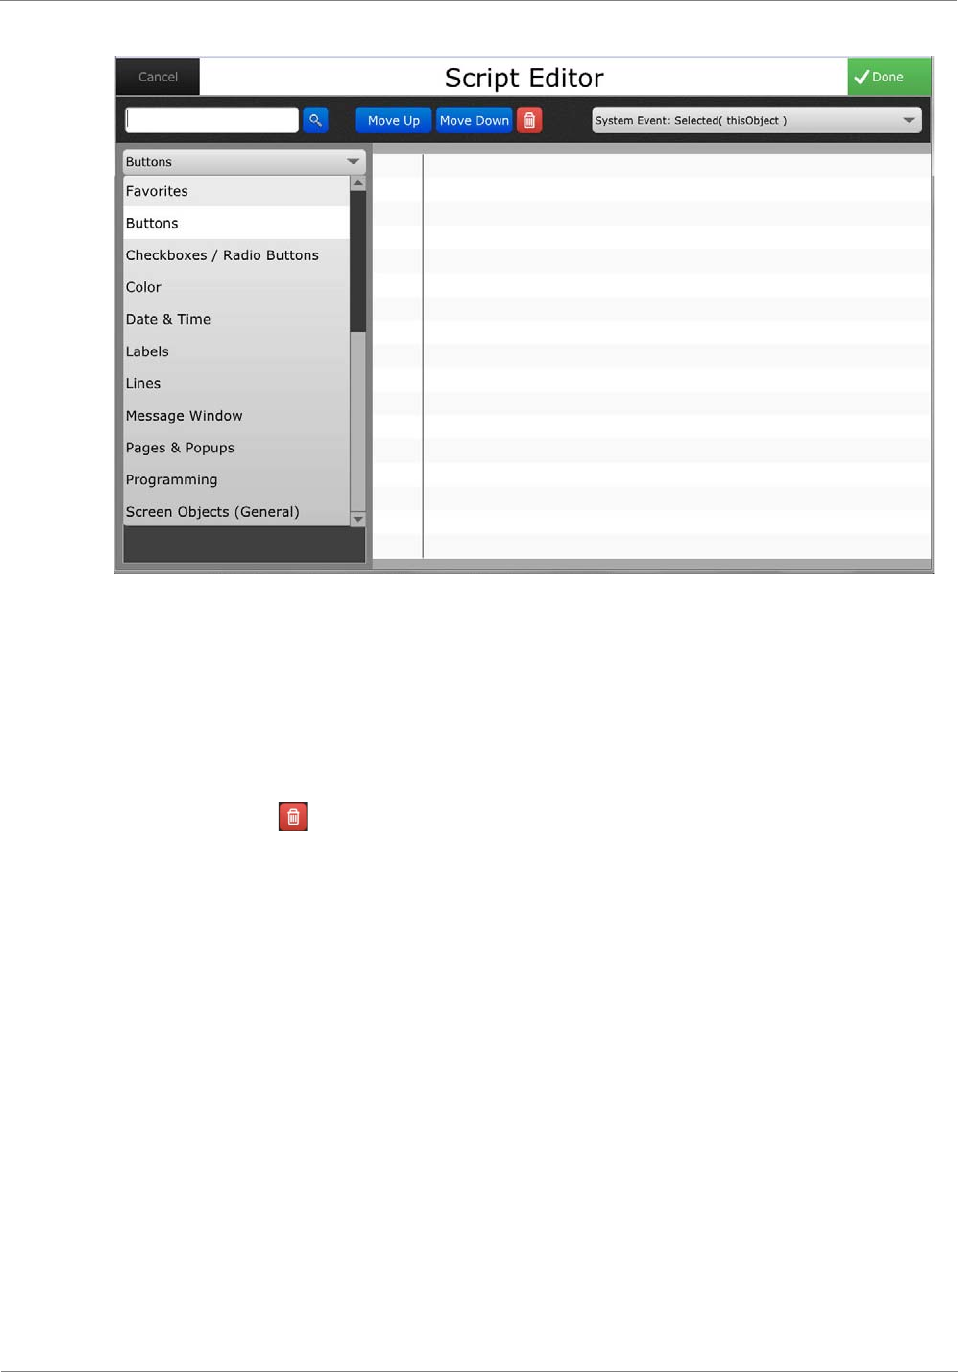
DynaVox T10 User’s Guide 33
SCRIPT EDITOR-PULL-DOWN MENU
c. A list of available actions will display on the window on the left. For example, if you
selected Buttons, button actions will be displayed with a brief description of each
action.
d. Select the action to assign to your button. As you make your selections, actions
assigned to your button will appear in a list in the window on the right.
To delete actions, make selections from the list of assigned actions, and select the red
trash can icon at the top of the screen.
e. After assigning actions, select the green Done button at the top right.
Font Tab
Font choices are available for all text, including button labels. Select the Font tab to choose
font types, styles, sizes, and colors.
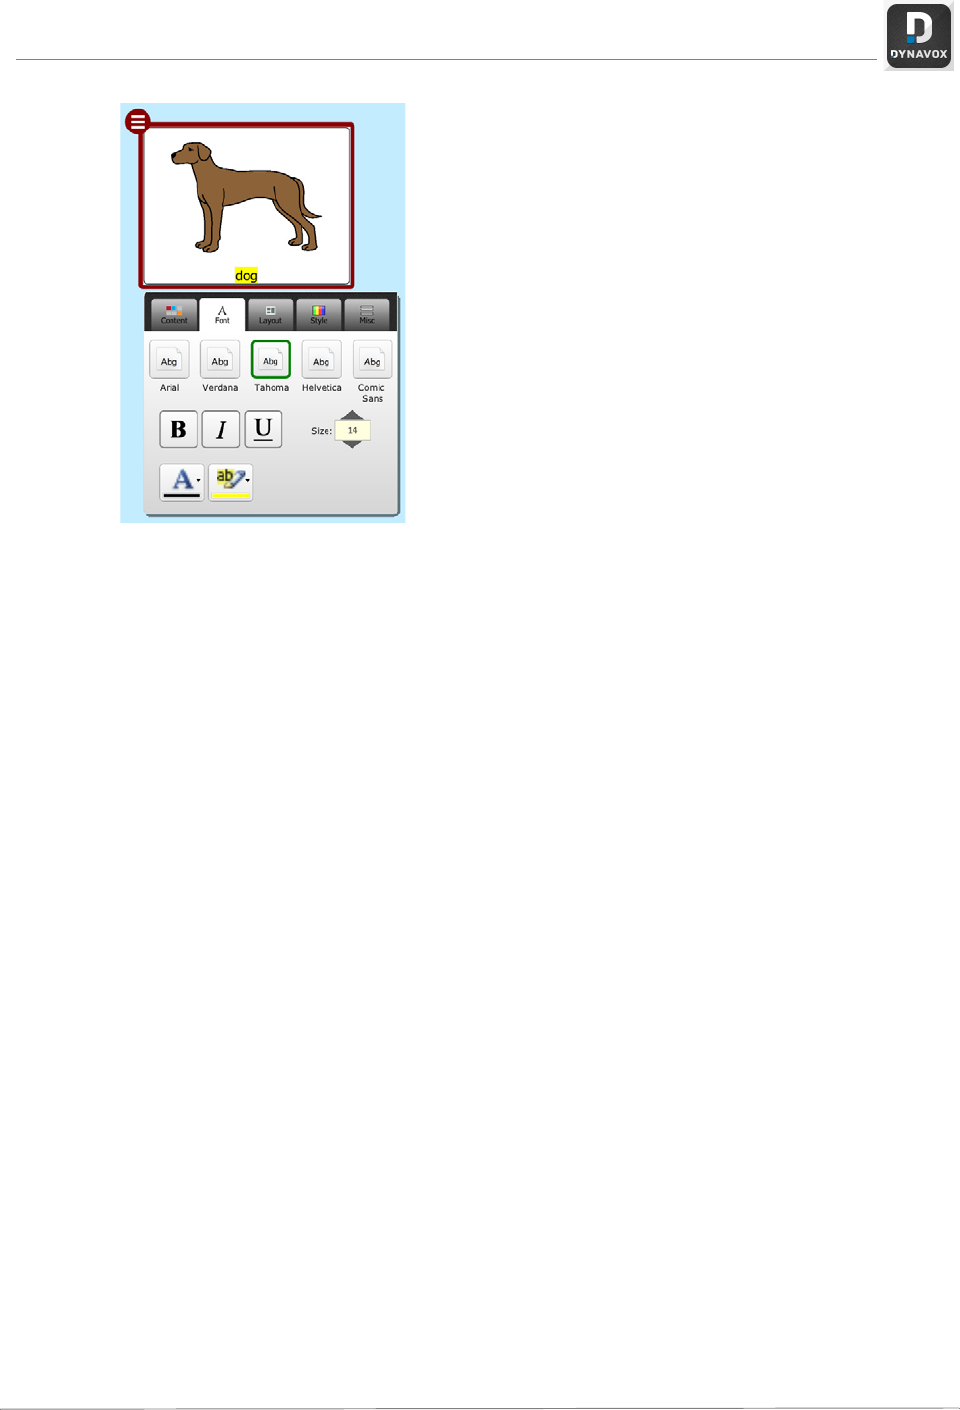
34
FONT TAB
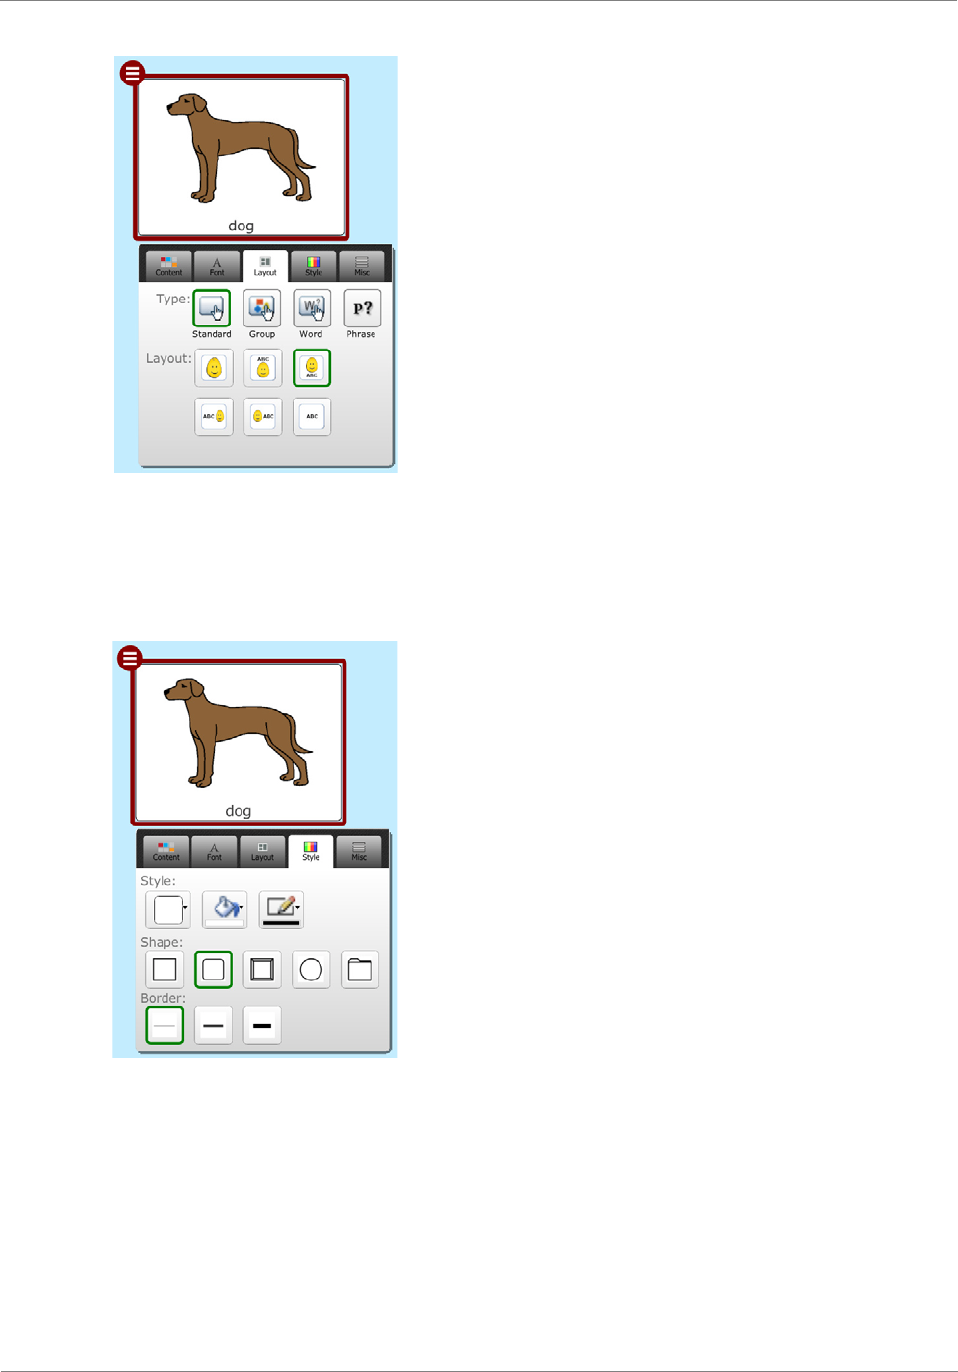
Layout Tab
Various layout options are available to accommodate the user's preferences and needs.
Additionally, the Layout tab includes the following Button Type choices:
•Standard - Standard buttons most often contain a label, a symbol, and have assigned
actions.
•Group - Group buttons contain multiple, smaller buttons. Using group buttons can often
help those who use the scanning access method easily make faster choices.
•Word Prediction - A Word Prediction button anticipates the next logical word choice and
displays various options for quick selection. Typically used on keyboard and spelling
pages, these buttons can greatly enhance the rate at which the user communicates.
•Phrase Prediction - Similar to Word Prediction, Phrase Prediction buttons anticipate
logical phrases.
DynaVox T10 User’s Guide 35
LAYOUT TAB
Style Tab
Many style choices are available, including theme styles and colors, border colors and
thickness, and button shapes.
STYLE TAB
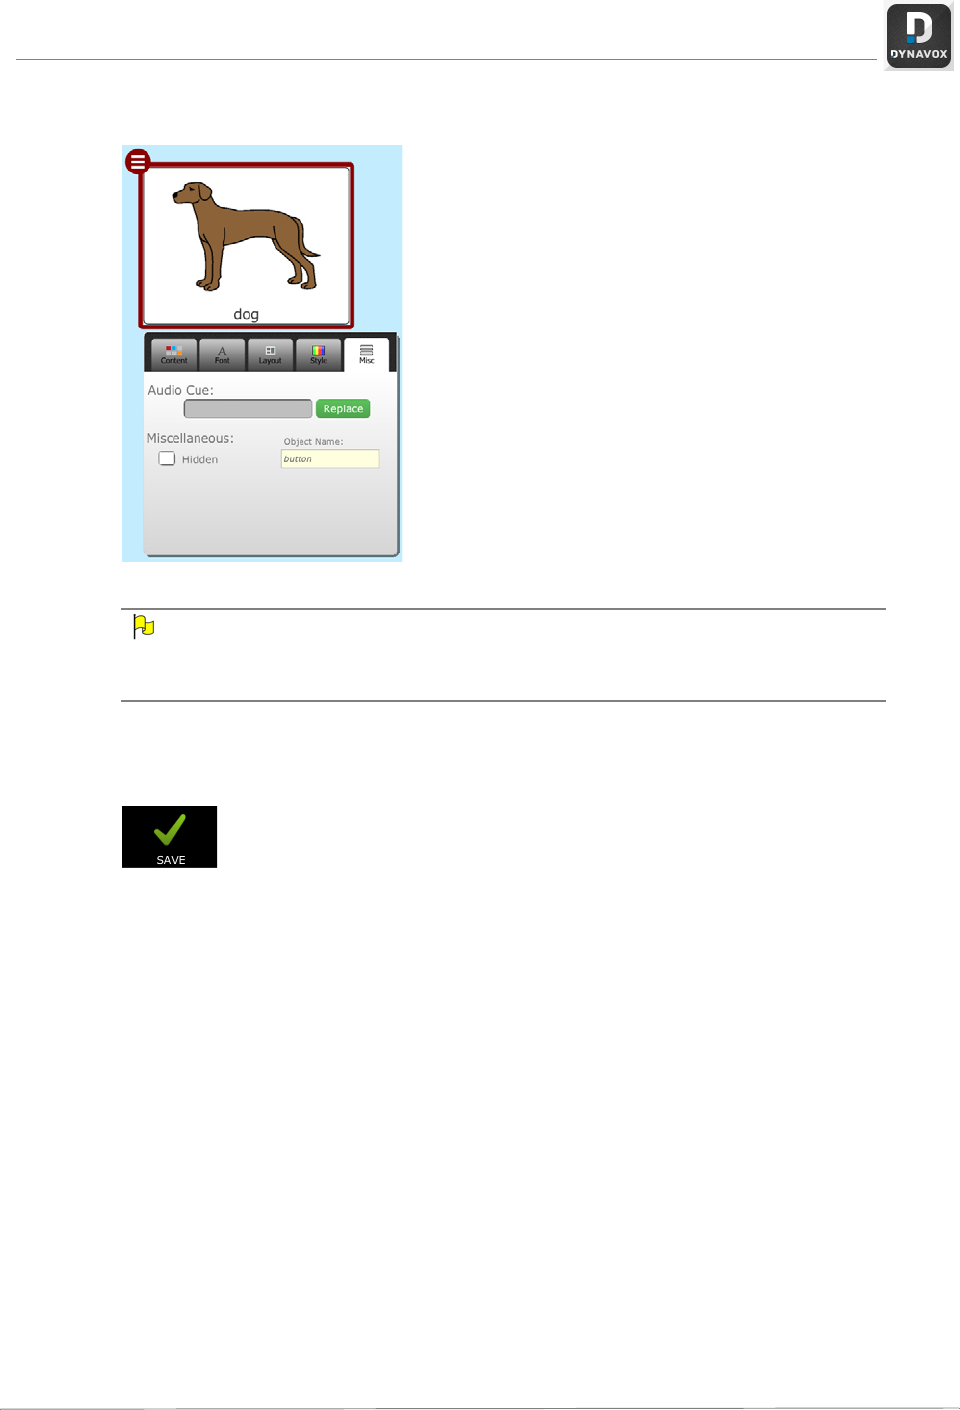
Misc Tab
For auditory scanning users, a field for an audio cue is provided. To enter an audio cue:
1. Select the Audio Cue field.
2. Type the new audio cue using the system keyboard.
3. Select OK.
36
To hide the button, select the check box next to Hidden.
MISC TAB
NOTE
Did you make a mistake? Just select Edit from the Editing Toolbar. You can Undo, Redo, or even
Duplicate a button. If you've made several changes, but want to revert back to the original state of
the page when you entered Edit mode, select File from the toolbar on the left, then select Revert.
After making button modifications, select the Save button at the top left of the screen.
SAVE BUTTON
DynaVox T10 User’s Guide 37
Important Information About Your DynaVox T10
Your DynaVox T10 device meets all necessary international safety standards and has been tested to
meet IEC 60601-1, UL/CSA 60950 and AS/NZ 60950 requirements. The DynaVox T10 system is
considered to be a portable device that is intended for continuous operation, not intermittent use. This
device has electrical input ratings of 12 VDC/3.0 Amps. The device complies with Part 15, Class B of the
FCC Rules. Operation is subject to the following two conditions: (1) this device may not cause harmful
interference, and (2) this device must accept any interference received, including interference that may
cause undesired operation. The device is also tested to Canadian standard ICES-003. To ensure safe
operation of your device, you should take care to note the following cautionary items:
CAUTION
Your DynaVox T10 contains a Lithium Ion battery. A safety hazard may develop when the battery
is placed in or near fires or stoves, or in locations with temperatures above 113° F (45° C). These
conditions may cause the battery to generate heat or explode.
CAUTION
Do not perforate, disassemble or modify the battery. If you must dispose of the battery, do so in
accordance with the local laws that apply to the area where you live.
CAUTION
For safe and proper operation of your DynaVox T10, use only chargers, batteries, and accessories
that have been approved by DynaVox Technologies.
CAUTION
This device presents a risk of electrical shock if the casing is opened. Do not open the casing that
surrounds the device.
CAUTION
The DynaVox T10 devices are not suitable for use in the presence of flammable anesthetics.
When you are charging your T10, remember that the main outlet that you will be using to
power the adapter must be accessible from within 6 feet (2 meters) of the device. There should
be no switches or disconnect devices in the ground conductor. The T10 devices require no
routine maintenance other than a periodic inspection of the power cords for signs of wear and
damage. If the power cords show signs of wear and damage, they should be replaced.

38
Intended Use of This Product
Your T10 device is intended for everyday communication situations. It should not be relied
upon as a means of communicating emergency medical information. We recommend having
multiple ways to communicate information during a medical emergency.

9
IC Caution.
RSS-Gen Issue 3 December 2010"&"CNR-Gen 3e éditionDécembre 2010:
- English:
This device complies with Industry Canada licence-exempt RSS standard(s).
Operation is subject to the following two conditions: (1) This device may not cause interference, and (2) This device must
accept any interference, including interference that may cause undesired operation of the device.
- French:
Le présentappareilestconforme aux CNR d'Industrie Canada applicables aux appareils radio exempts de licence.
L'exploitationestautorisée aux deux conditions suivantes:
(1) l'appareil ne doit pas produire de brouillage, et
(2) l'utilisateur de l'appareildoit accepter tout brouillageradioélectriquesubi, mêmesi le brouillageest susceptible
d'encompromettre le fonctionnement.
FCC Caution.
This device complies with part 15 of the FCC Rules. Operation is subject to the following two conditions: (1) This device may
not cause harmful interference, and (2) this device must accept any interference received, including interference that may
cause undesired operation.
Any Changes or modifications not expressly approved by the party responsible for compliance could void the user's authority
to operate the equipment.
Note: This equipment has been tested and found to comply with the limits for a Class B digital device, pursuant to part 15 of
the FCC Rules. These limits are designed to provide reasonable protection against harmful interference in a residential
installation. This equipment generates uses and can radiate radio frequency energy and, if not installed and used in
accordance with the instructions, may cause harmful interference to radio communications. However, there is no guarantee
that interference will not occur in a particular installation. If this equipment does cause harmful interference to radio or
television reception, which can be determined by turning the equipment off and on, the user is encouraged to try to correct the
interference by one or more of the following measures:
-Reorient or relocate the receiving antenna.
-Increase the separation between theequipment and receiver.
-Connect the equipment into an outlet on a circuit different from that to which the receiver is connected.
-Consult the dealer or an experienced radio/TV technician for help.
FCC RF Radiation Exposure and SAR Statements
The DynaVox T10 has been tested for body-worn Specific Absorption Rate (SAR) compliance. The radio module has been
evaluated under FCC Bulletin OET 65C (01-01) and found to be compliant to the requirements as set forth in CFR 47 Sections,
2.1093, and 15.247 (b) (4) addressing RF Exposure from radio frequency devices. This model meets the applicable
government requirements for exposure to radio frequency waves. The highest SAR level measured for this device was
1.25 W/kg.
Caution