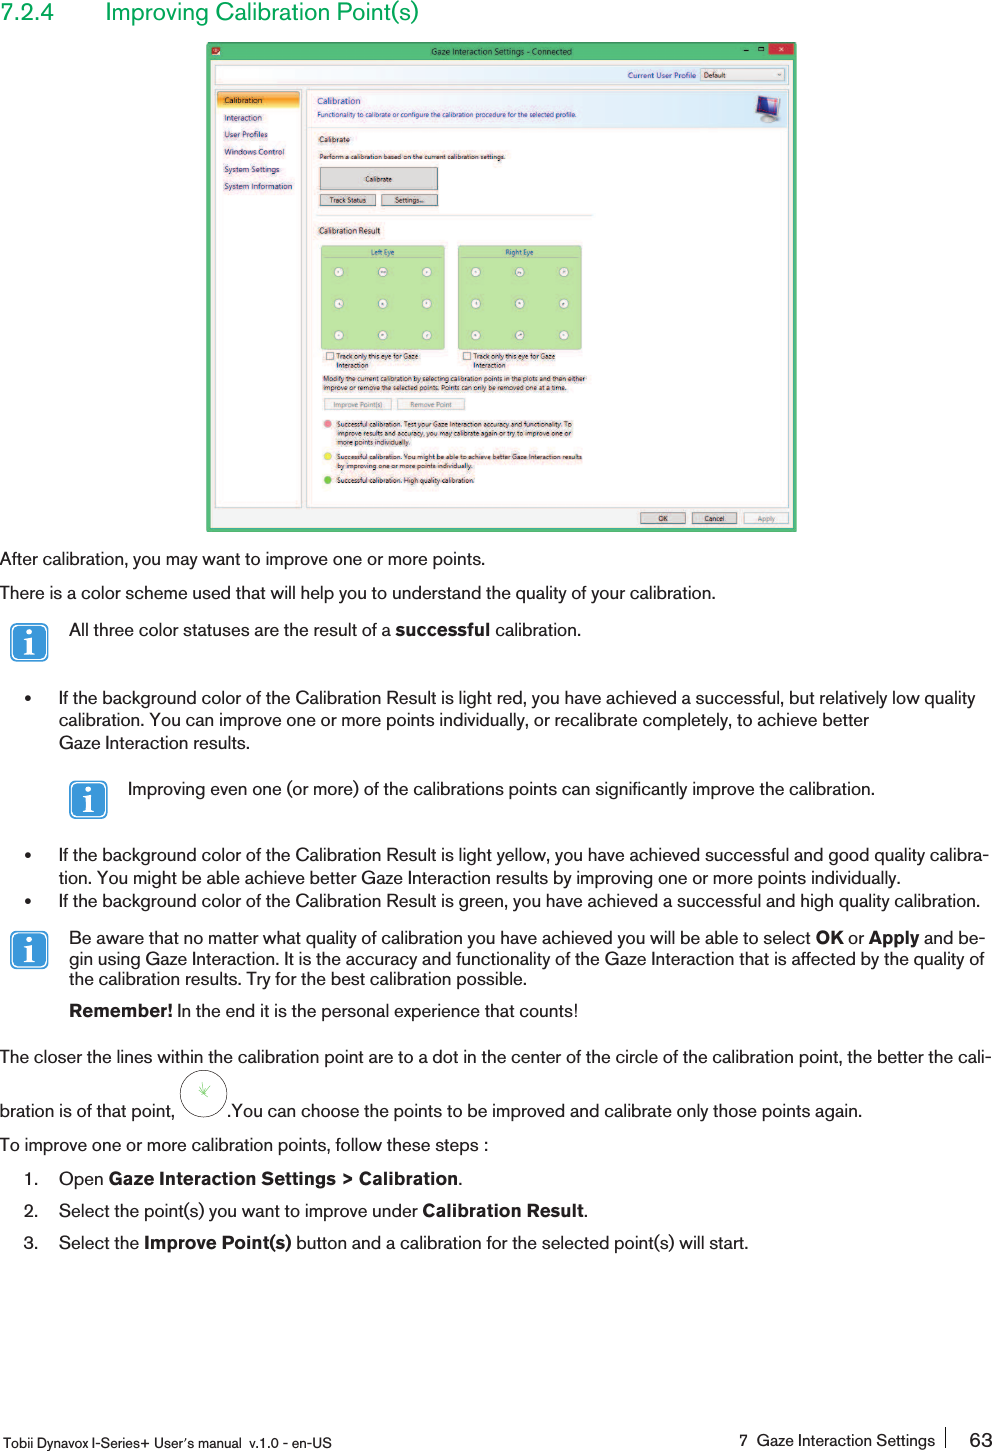
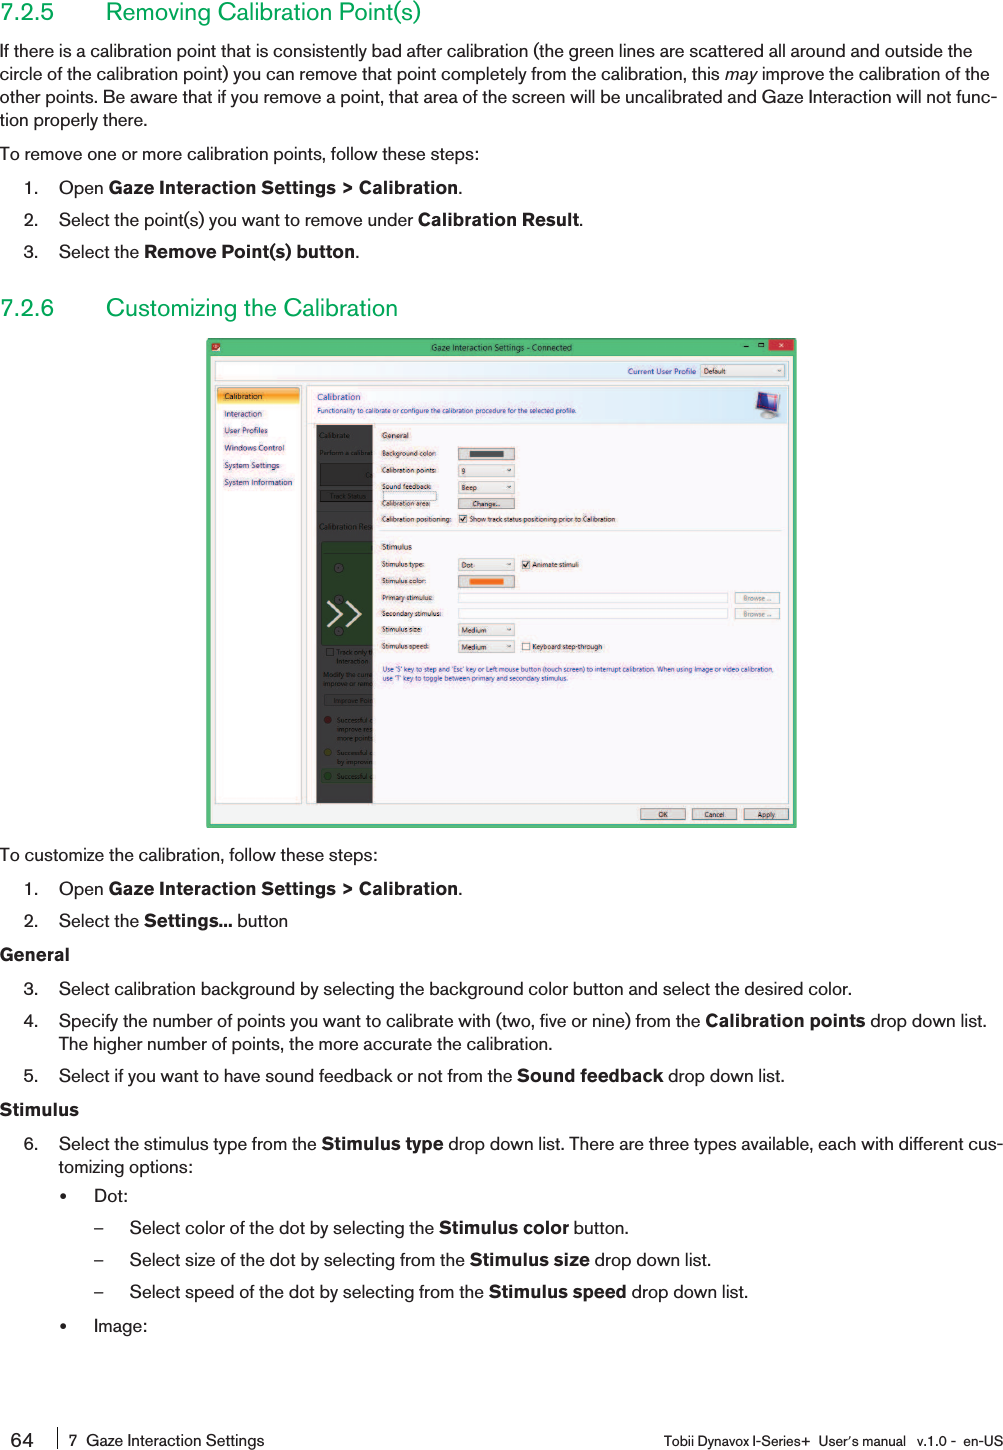
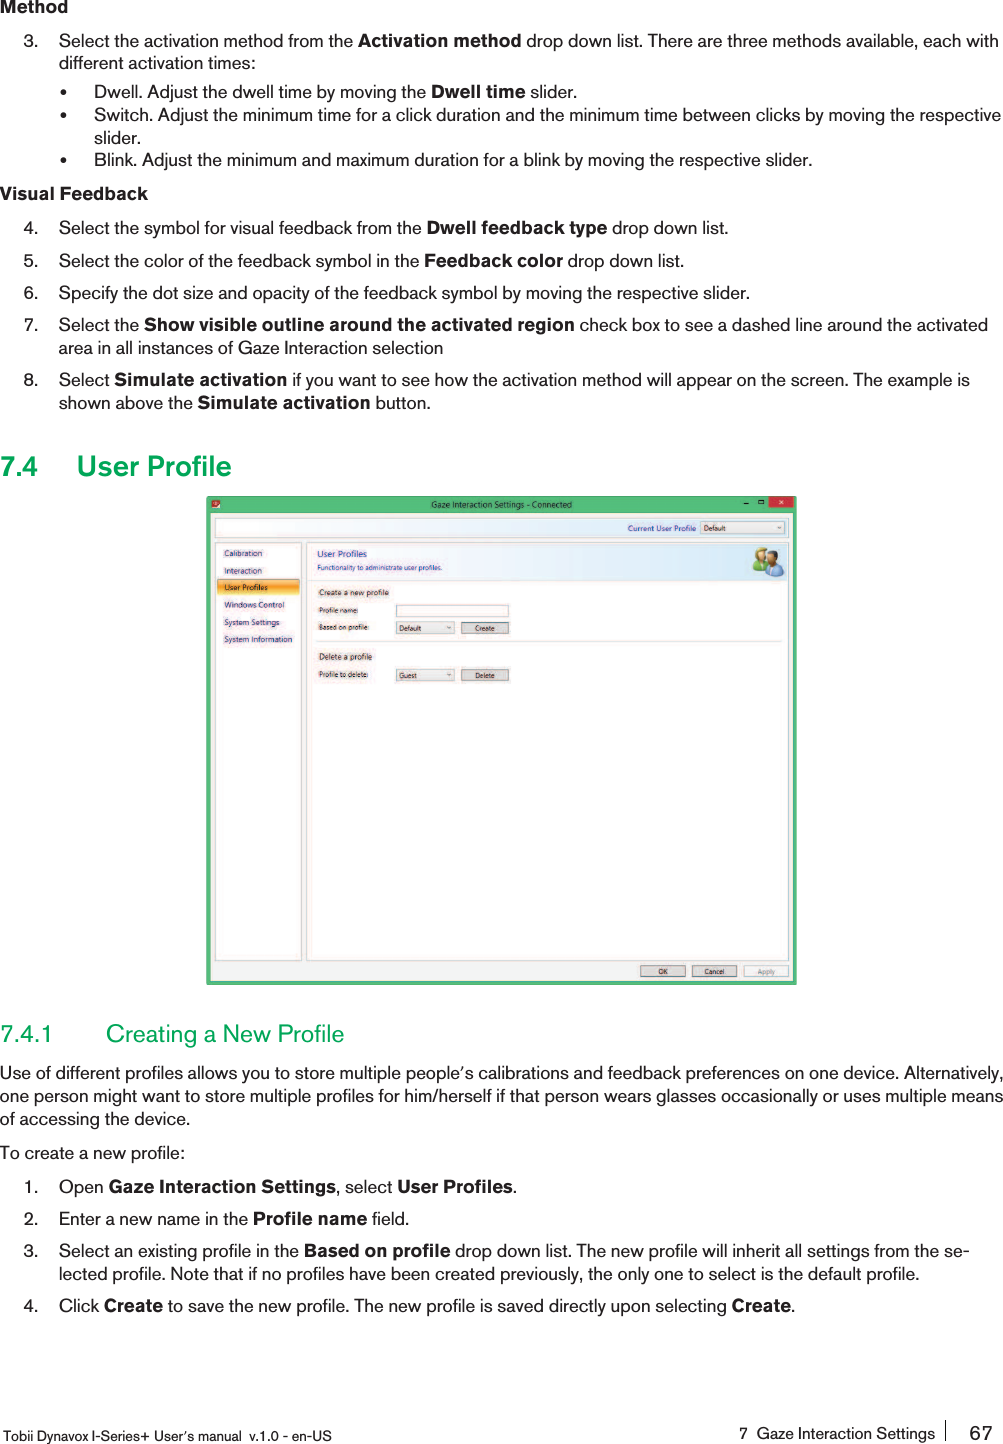
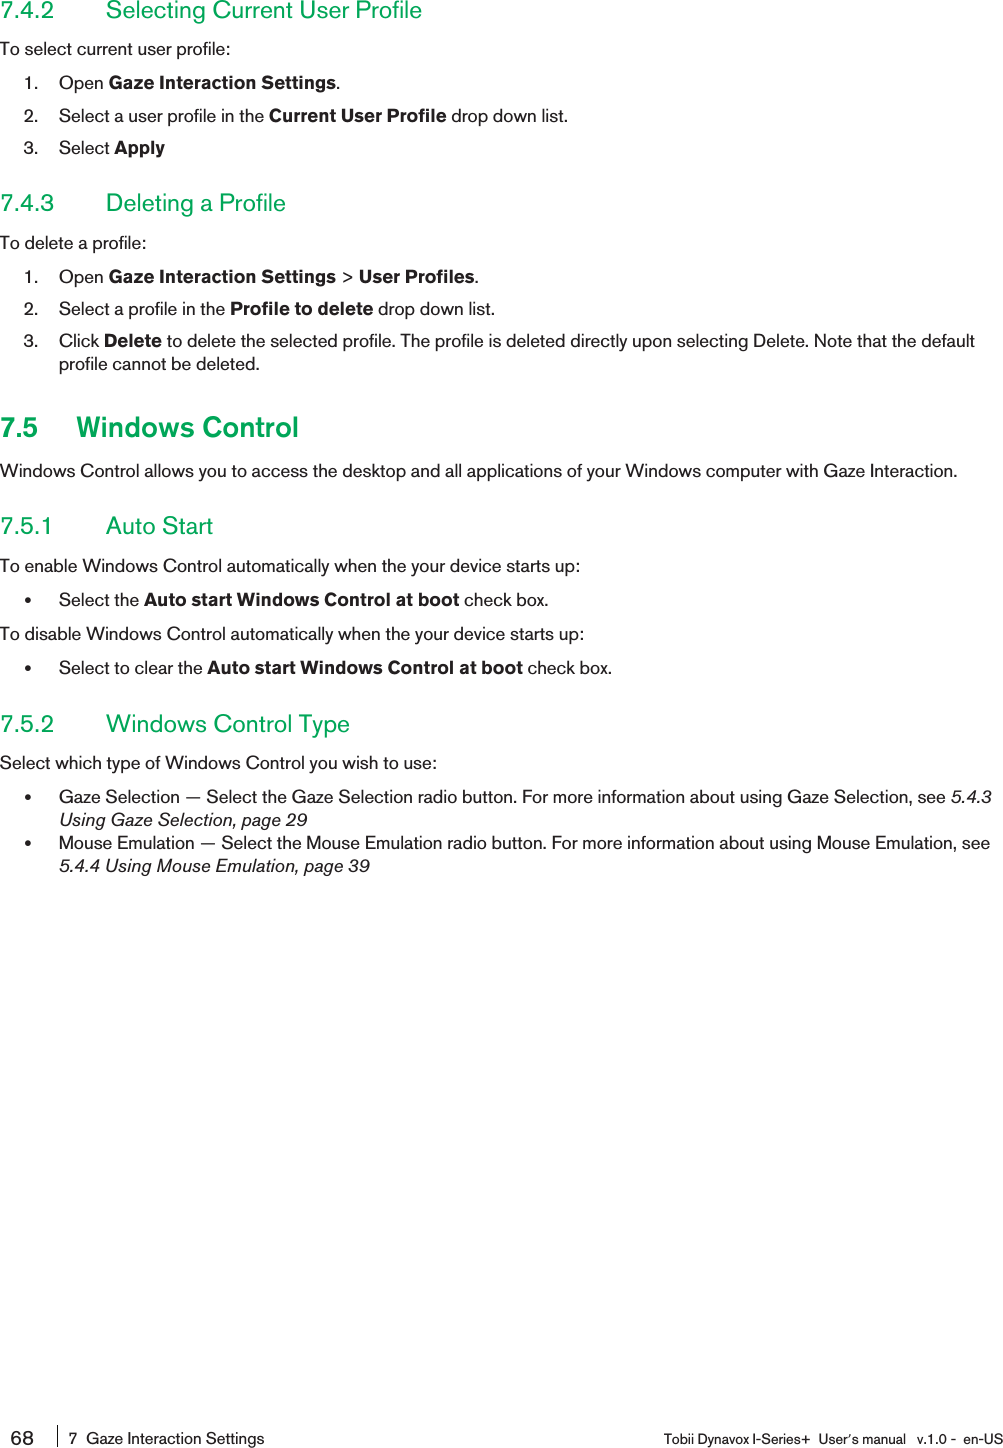
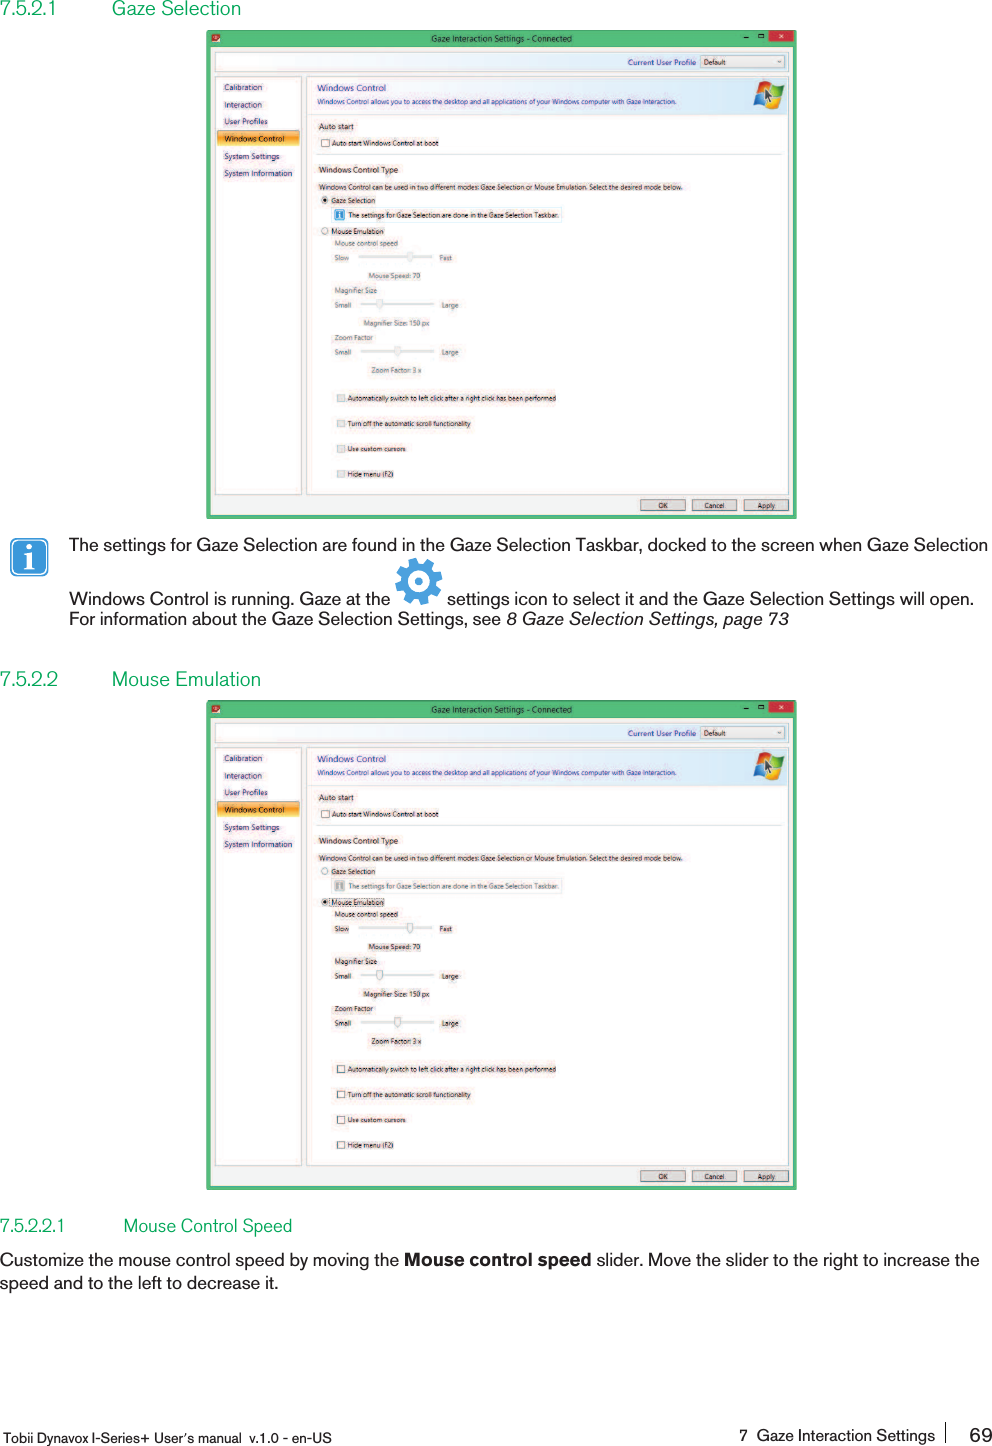
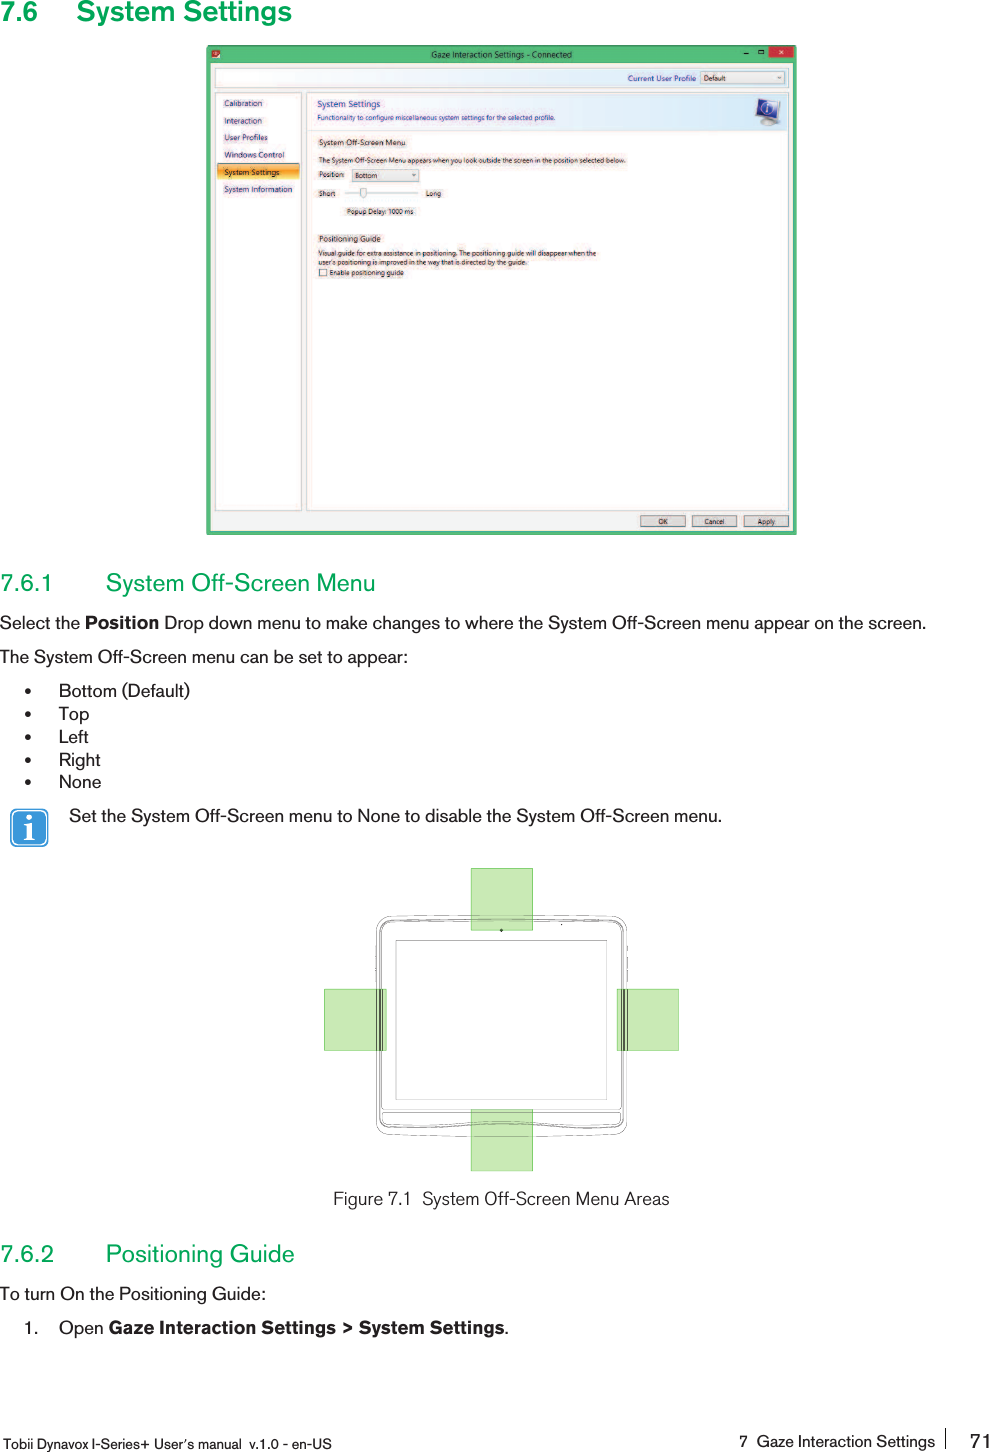
Tobii TDI15A Tobii Dynavox I-15+ User Manual 06 Users Manual 2

Tobii Technology AB Tobii Dynavox I-15+ 06 Users Manual 2

Contents

Users Manual (P.46-92)

6 Configuring the Tobii Dynavox I-Series+with the I-Series Control CenterThe I-Series Control Center is the program on your Tobii Dynavox I-Series+ Device where you can access and change the set-tings that you have chosen during your first setup with the I-Series Welcome Guide. You can also run the Welcome Guideagain at any time of your choosing.To open the I-Series Control Center:ͻDouble-click on the I-Series Control Center shortcut on the desktop, .or1. Go to Start menu >Control Panel.2. Double-click I-Series Control Center, , if the Control Panel is in Classic View.If the Control Panel is in Category view, select View by: > Small icons or Large icons, and Double-clickI-Series Control Centeror1. Go to Start menu > Tobii Dynavox.2. Click I-Series Control Center, .orͻThrough the communication software installed on the device46 6 Configuring the Tobii Dynavox I-Series+ with the I-SeriesControl Center Tobii Dynavox I-Series+ User͛s manual v.1.0 - en-US
6.1 ButtonsYou can create shortcuts to tasks, called actions, by programming the Quick Access buttons. The Quick Access buttons are lo-cated on the left side of the Tobii Dynavox I-Series+ device, named 1,2and Menu.For more information about how to program an action for a button, see 6.10 Creating Shortcuts to Actions, page 586.1.1 Play Sound when PressedTo enable Play sound when pressed:1. Open the I-Series Control Center > Button.2. Select the Play sound when pressed check box to allow Audio feedback when the button is activated.To disable Play sound when pressed:1. Open the I-Series Control Center > Button.2. Select to clear the Play sound when pressed check box.6.1.2 Disable All ButtonsTo avoid unintentional actions, all buttons on the Tobii Dynavox I-Series+ device can be disabled.To Disable all buttons:1. Open the I-Series Control Center > Button.2. Select the Disable All Buttons check box.The Power button will work for starting the device even if all buttons are disabled.Pressing the Power button for more than 7 seconds will shut down the device immediately, disregarding any unsavedchanges, even if all buttons are disabled.To Enable all buttons:1. Open the I-Series Control Center >Button.2. Select to clear the Disable All Buttons check box to allow all buttons again.Tobii Dynavox I-Series+ User͛s manual v.1.0 - en-US6 Configuring the Tobii Dynavox I-Series+ with the I-SeriesControl Center 47
6.2 Display6.2.1 Brightness AdjustmentThere is a sensor on the device which will automatically adjust the screen brightness according to the surrounding light, relativeto the selected level from Windows®.To disable Automatic Brightness Adjustment:1. Open the I-Series Control Center > Display.2. Select to clear the Enable automatic brightness adjustment (recommended) check box.To enable Automatic Brightness Adjustment:1. Open the I-Series Control Center > Display.2. Select the Enable automatic brightness adjustment (recommended) check box.To manually adjust Brightness:1. Open the I-Series Control Center > Display.2. Select the Windows Power Options link.3. Make the Brightness adjustmentsUsing a darker setting can improve battery runtime.6.2.2 Display RotationThe display can rotate automatically when turned 180 degrees, to facilitate using device in Upright orientation or Resting on thespeakers.With the Automatic display rotation activated, it could take a couple of seconds (the screen could also turn black) be-fore the display is rotated.To enable Automatic rotation according to device position:1. Open the I-Series Control Center > Display.2. Select the Automatic rotation according to device orientation radio button.48 6 Configuring the Tobii Dynavox I-Series+ with the I-SeriesControl Center Tobii Dynavox I-Series+ User͛s manual v.1.0 - en-US
The external display will rotate when the Tobii Dynavox I-Series+ is rotated if the Tobii Dynavox I-Series+ is set up likethis:ͻExternal display connected via HDMIͻThe Tobii Dynavox I-Series+ is set to Automatic rotation in I-Series Control CenterͻDual screens is set to Clone/Duplicate mode in WindowsTo be able to rotate the Tobii Dynavox I-Series+ without rotating the external display, set the Dual screen to Extendedmode in Windows. In Extended mode the rotation function is independent on each display.To set Fixed device position:1. Open the I-Series Control Center > Display.2. Select the Fixed in upright orientation or the Fixed in resting orientation radio button.Gaze Interaction is optimized to work properly in the Upright orientation.For more information about Upright orientation and Resting orientation, see 1.3.1 Portable Use, page 9.6.3 SwitchesYou can enable the switches to act as power ON (see 6.3.2 Configuring a Switch to Power On, page 50) or OFF (see 6.3.3Configuring a Switch to Power Off, page 50) button.Select the Play sound when pressed checkbox to allow Audio feedback when the switch is activated.Select actions for the switches by selecting Set action.For more information about how to program an action for a Switch, see 6.10 Creating Shortcuts to Actions, page 586.3.1 Play Sound when PressedTo enable Play sound when pressed:1. Open the I-Series Control Center >Button.2. Select the Play sound when pressed check box to allow Audio feedback when the button is activated.To disable Play sound when pressed:1. Open the I-Series Control Center > Button.Tobii Dynavox I-Series+ User͛s manual v.1.0 - en-US6 Configuring the Tobii Dynavox I-Series+ with the I-SeriesControl Center 49
2. Select to clear the Play sound when pressed check box.6.3.2 Configuring a Switch to Power OnTo enable a connected Switch to power on the device:1. Open the I-Series Control Center > Switches.2. Select the Enable switch ͞1 or 2͟to act as Power On Button check box.To disable a connected Switch to power on the device:1. Open the I-Series Control Center > Switches.2. Select to clear the Enable switch ͞1 or 2͟to act as Power On Button check box.6.3.3 Configuring a Switch to Power OffTo enable a connected Switch to power off the device:1. Open the I-Series Control Center > Switches.2. Select the Enable switch ͞1 or 2͟to act as Power Off Button check box.To disable a connected Switch to power off the device:1. Open the I-Series Control Center > Switches.2. Select to clear the Enable switch ͞1 or 2͟to act as Power Off Button check box.6.4 Wake-on-Gaze®The Tobii Dynavox I-Series+ device can be set to wake automatically from Sleep mode when your eyes are registered as lookingat the display.To enable Wake-on-Gaze for the device:1. Open the I-Series Control Center > Wake-on-Gaze.2. Select the Enable automatic Wake-on-Gaze check box.3. Select Windows Power Options link to adjust the Power Options (if needed)50 6 Configuring the Tobii Dynavox I-Series+ with the I-SeriesControl Center Tobii Dynavox I-Series+ User͛s manual v.1.0 - en-US
To disable Wake-on-Gaze for the device:1. Open the I-Series Control Center > Wake-on-Gaze.2. Select to clear the Enable automatic Wake-on-Gaze check box.For information about how to use Wake-on-Gaze®, see 5.5 Wake the Tobii Dynavox I-Series+ from Sleep withGaze Interaction, page 41.The Tobii Dynavox I-Series+ device can also be set to go to sleep using your gaze (to reduce battery consumption, or in situa-tions where the device is not needed).To enable Sleep-on-Gaze for the device:1. Open the I-Series Control Center > Wake-on-Gaze.2. Make sure Wake-on-Gaze is activated3. Select the Enable Sleep-on-Gaze check box.To disable Wake-on-Gaze for the device:1. Open the I-Series Control Center > Wake-on-Gaze.2. Select to clear the Enable Sleep-om-Gaze check box.For information about how to use Sleep-on-Gaze®, see 5.5 Wake the Tobii Dynavox I-Series+ from Sleep withGaze Interaction, page 41.6.5 Wireless6.5.1 WLANThe built-in WLAN (Wireless Local Area Network) support enables connection to wireless networks (such as Wi-FiΡnetworksand access points) in compliance with the standard 802.11 b/g/n for both the Iʹ12+ and the Iʹ15+.6.5.1.1 Handling Tobii Dynavox Product KeyTo be able to use WLAN communication, a I-Series Product Key is required. To view or enter a I-Series Product Key, go to theI-Series Product Key section in the I-Series Control Center. See 6.7 I-Series Product Key, page 54Tobii Dynavox I-Series+ User͛s manual v.1.0 - en-US6 Configuring the Tobii Dynavox I-Series+ with the I-SeriesControl Center 51
6.5.1.2 Enabling and Disabling the WLAN CommunicationTo enable WLAN communication:1. Open the I-Series Control Center > Wireless.2. Select the Enable Wireless Local Area Network (WLAN) check box.To disable WLAN communication:1. Open the I-Series Control Center > Wireless.2. Clear the Enable Wireless Local Area Network (WLAN) check box or select the Disable all wireless units checkbox for disabling all wireless units.6.5.1.3 Connecting to a WLAN1. Click on the WLAN icon, , in the Notification area on the Desktop.2. Select Connect to a network.3. Select a network to connect to.A wireless access point which supports antenna diversity is recommended when setting up a wireless network to usewith a Tobii Dynavox I-Series+ device, for reliable performance. Such access points are generally recognized by hav-ing two antennas on the router device.Using an antivirus program is strongly recommended.6.5.2 Bluetooth® for Mobile Phone CommunicationThe built-in Bluetooth® enables connection to a mobile phone which complies with mobile Bluetooth® standards.Only for use with Tobii Dynavox Communicator for mobile phone communication.For more information about how to use and program an Mobile phone to work with Bluetooth® on the Tobii Dynavox I-Series+device, see Tobii Dynavox Getting Started Communicator 5.For information about the Mobile phones that complies with the Tobii Dynavox I-Series+ device, see www.tobiidynavox.com6.5.2.1 Handling I-Series Product KeyTo use Bluetooth® communication in the device, a I-Series Product Key is required. To view or enter a I-Series Product Key, goto the I-Series Product Key section in the I-Series Control Center. See 6.7 I-Series Product Key, page 546.5.2.2 Enabling and Disabling Bluetooth® CommunicationTo enable Bluetooth® communication:1. Open the I-Series Control Center > Wireless.2. Select the Enable Bluetooth check box.To disable Bluetooth® communication:1. Open the I-Series Control Center > Wireless.2. Clear the Enable Bluetooth check box or select the Disable all wireless units check box for disabling all wirelessunits.52 6 Configuring the Tobii Dynavox I-Series+ with the I-SeriesControl Center Tobii Dynavox I-Series+ User͛s manual v.1.0 - en-US
6.5.2.3 Connecting to a Bluetooth® DeviceFor more information see Getting Started with Essentials for Communicator 4.6.6 SafetyUpon starting the device for the first time, the safety settings in the I-Series Control Center will be a part of the I-Series Wel-come Guide. To be able to run through the guide these safety settings must be confirmed. The safety settings exist for the safetyof the customer. Be sure to read the safety details before accepting any changes.6.6.1 AudioBefore you can use the speaker functionality and adjust speaker output settings you need to confirm the Audio safety details (ifnot already done during first start up).To confirm:1. Open the I-Series Control Center > Safety2. Click on the Audio safety details text. A new dialog box opens and displays the safety text. Please read thisthoroughly.3. Select the I have read and understand the safety details and I want to enable the speaker functionalitycheck box to confirm that you have read and understood the safety text.6.6.2 Temperature ControlBefore you can set the device usage in I-Series Control Center > Temperature Control you need to confirm the Tempera-ture control safety details (if not done during first start up).To confirm:1. Open the I-Series Control Center > Safety2. Click on the Temperature Control safety details text. A new dialog opens and displays the safety text. Please readthis thoroughly.3. Select the I have read and understand the safety details and I want to enable the temperature control func-tionality check box to confirm that you have read and understood the safety text.Tobii Dynavox I-Series+ User͛s manual v.1.0 - en-US6 Configuring the Tobii Dynavox I-Series+ with the I-SeriesControl Center 53
You can use the device in a portable or mounted mode. Your choice will affect the maximum allowed device tempera-ture. While having the device mounted, it is allowed to run at a higher temperature.Both the Iʹ12+ and the Iʹ15+ can be used both as a portable and mounted device and can be operated in both port-able and mounted mode.If the device is gets overheated the device will shut down. It may take a while before it can be restarted as the unitmay first need time to cool down. If the device is still too hot, the power button will flash purple for a couple of sec-onds when trying to restart the Tobii Dynavox I-Series+ device. For more information, see Appendix C Computer De-vice States of Operation, page 85 and Table D.1 Maximum Allowed Temperature, page 87.6.6.2.1 Device UsageSpecifying device usage mode takes place outside of the Safety settings but within I-Series Control Center.To specify device usage:1. Open the I-Series Control Center > Safety.2. Click on preferred option for Device usage.ͻPortable ͶPortable mode sets the maximum device temperature shut down limit to a lower temperature, reducingthe risk for permanent bodily harm cased by prolonged exposure to the skinͻMounted ͶMounted mode sets the maximum device temperature to a higher temperature shut down limitFor more information, see Table D.1 Maximum Allowed Temperature, page 876.7 I-Series Product KeyThe following features on the Tobii Dynavox I-Series+ needs a licence for use:ͻEye trackerͻBluetooth®ͻWLANͻIRͻTobii Dynavox CommunicatorͻTobii Dynavox CompassTo view existing I-Series Product Key:ͻOpen the I-Series Control Center > I-Series Product Key.54 6 Configuring the Tobii Dynavox I-Series+ with the I-SeriesControl Center Tobii Dynavox I-Series+ User͛s manual v.1.0 - en-US
If the symbol is visible after a feature, the I-Series Product Key(s) on the device are valid for that feature.To add a I-Series Product Key:1. Open the I-Series Control Center > I-Series Product Key.2. In the Enter a I-Series product key box, type the new I-Series Product Key.To type the I-Series Product Key use either a connected keyboard or enable the on-screen keyboard by selecting this button.6.8 Setup & UpdatesManage Tobii Dynavox applications related to setting up your device and updating to the latest software.6.8.1 I-Series Welcome GuideThe I-Series Welcome Guide guides the user through the setup procedure, such as License Agreement and Safety Setting etc.If the I-Series Welcome Guide is not finished, it will automatically start up next time the Tobii Dynavox I-Series+ ispowered up.To run the I-Series Welcome Guide at next start up, follow these step:1. Open the I-Series Control Center > Setup & Updates.2. Select the Run at next startup check box.To run the I-Series Welcome Guide at once, follow these steps:1. Open the I-Series Control Center > Setup & Updates.2. Select the Run now button.6.8.2 I-Series Update NotifierThe I-Series Update Notifier is a program that notifies you when the latest software updates for your Tobii Dynavox Software areavailable (either automatically, on a regular basis, or manually, at a time of your choosing) and assists you in installing theupdates.Tobii Dynavox I-Series+ User͛s manual v.1.0 - en-US6 Configuring the Tobii Dynavox I-Series+ with the I-SeriesControl Center 55
If you have chosen to "Enable automatic updates" in either the I-Series Welcome Guide or, later, in the I-Series Control Center,the I-Series Update Notifier will actively search Tobii Dynavox͛s sites for version Updates of your software.To keep your Tobii Dynavox I-Series+ device running properly it is highly recommended that you update yourTobii Dynavox Software on a regular basis and it is therefore highly recommended that you enable automatic updates.To Enable automatic search for updates:1. Open the I-Series Control Center > Setup & Updates.2. Select the Enable automatic search for updates (recommended) check box.If an update is found the following I-Series Update Notifier window will pop up:The update or updates available will show themselves in the Step One window of I-Series Update Notifier as large button with agreen check mark on the right side. You will also be able to see the version number of the software that you currently have andthe version number of the update.If you choose not to download one or more of the available updates you can click on the button of the update you do not wantand the check mark will turn into a red "X" mark.Proceed in the following way:ͻClick the Download button to download the updates to your Device and continue to Step Two.ͻIn Step Two, Click the Install button to install the chosen updates on your device and proceed to Step Three.ͻStep Three informs you that your system has been updated, select the Done button to close the I-Series UpdateNotifier.If you choose not to "Enable automatic updates" you can still check for updates for your Tobii Dynavox software and updatethem manually using the I-Series Update Notifier.To open and activate the I-Series Update Notifier manually (this opens the Step One window shown above and starts the sameautomatic update process):ͻNavigate in Windows from your desktop to Start Menu Tobii Dynavox and select the I-Series Update Notifier icon,.or1. Open the I-Series Control Center > Setup & Updates.2. Select the Run now button.56 6 Configuring the Tobii Dynavox I-Series+ with the I-SeriesControl Center Tobii Dynavox I-Series+ User͛s manual v.1.0 - en-US
6.9 System6.9.1 Version & ModelTo view the version and model of the device:ͻOpen the I-Series Control Center > System.Please have this information available if you have problems with the device and need to contact Customer Support.To save the version and model of the device to a file:1. Open the I-Series Control Center > System.2. Select the Save information to file button.You can attach the file containing all the information into a an e-mail.6.9.2 BackupThis is a system backup specific to your Tobii Dynavox software-related files. The device automatically and regularly, once aweek, backs up the data that is associated with your Tobii Dynavox communications applications (Tobii Dynavox Communicator /Tobii DynaVox Compass Page Sets, files, settings, etc.), your Gaze Interaction files (profiles, cali-bration settings, interaction settings, etc.) and your device specific settings from the I-Series Control Center. You can manuallystart the backup below and/or restore the data from one of the three latest backups. Be aware that the changes made since thelatest backup will be reverted if you choose to restore from a previous backup. All files in the My Documents folder will bebacked up as well, if space is available on the microSD-card, as a second priority after the Tobii Dynavox software-related files.To back up all files on your device please use Microsoft͛s own Windows Backup and Restore application.The backup process executes once a week (every Sunday at 15.00) and the three latest backups are saved on the microSD-card.If your Tobii Dynavox I-Series+ device is not up and running at this time the backup will be performed at next start up.The process backs up files for all users. If the backup drive does not have enough space some files will not be backedup. Image files have the lowest priority (backed up last). The largest file size for the backup of individual files is 100MB, files larger than this will be excluded.Tobii Dynavox I-Series+ User͛s manual v.1.0 - en-US6 Configuring the Tobii Dynavox I-Series+ with the I-SeriesControl Center 57
The backup files are placed in the directory Q:\Backup\<date> (On the microSD-card).Tobii Dynavox will not take responsibility for any other data than the ͞Tobii Dynavox applications data͟6.9.2.1 User Profile CardThe Tobii Dynavox I-Series+ device comes with a 32 GB microSD-card installed. The purpose of this card is to backup person-al settings and data. In the case of fatal damage to the Tobii Dynavox I-Series+ device. The microSD-card can be removed andinserted into a new device for quick and easy retrieval and restoration of personal data and settings.6.9.2.2 Backup Manually by the UserTo perform a manual backup of the system:1. Open the I-Series Control Center > System.2. Select the Backup now button.When the backup is finished, the following will show up on the screen: Backup finished.6.9.2.3 Restoring Backup Files by the UserTo restore one of the three last backup of the system:1. Open the I-Series Control Center > System.2. Select the Restore from backup button.3. Select the one of the last backups by selecting the Restore from this backup button next to the date of the storedbackup.When the restore is finished, the following text will show up on the screen: Restore finished and the symbol willshow up next to the date that was selected to restore from.Copies of these backup files can be saved anywhere you wish, to an external hard drive, for example, or to a USB stick. Copythe folders in the directory Q:\Backup\<date> to any external directory or drive of your choosing.6.9.2.4 Backup FailedOne likely reason that the backup failed is that there are too many files in the My Documents folder. Try moving the files that arenot backup- critical to another location (such as pictures, music files, etc).6.9.3 Eye TrackerTo enable the Eye tracker:1. Open the I-Series Control Center > System.2. Select the Enable Eye Tracker check box.To disable the Eye tracker:1. Open the I-Series Control Center > System.2. Clear the Enable Eye Tracker check box.6.10 Creating Shortcuts to ActionsYou can create shortcuts, called actions, by programming the Quick Access buttons and connected Switches. The Quick Ac-cess buttons are located on the left side of the Tobii Dynavox I-Series+ device, named 1,2and Menu.Switches are connected to the Switch connectors.58 6 Configuring the Tobii Dynavox I-Series+ with the I-SeriesControl Center Tobii Dynavox I-Series+ User͛s manual v.1.0 - en-US
6.10.1 Available ActionsThis is a short description of each action available to set:ͻSend input ʹAllows the user to send input to an alternative program (keystroke, mouse click or text).ͻStart Program ʹAllows the user to start a program.ͻVolume ʹAllows the user to adjust the volume up or down or to set mute on or off.ͻBacklight ʹAllows the user increase or decrease the backlight of the screen.ͻGaze Interaction ʹAllows the user to show and hide the track status window, calibrate or pause the Gaze InteractionON or OFF.ͻWireless ʹAllows the user to either set all radio connections on or off, or a specific wireless connection.ͻTobii Dynavox Communicator /Tobii DynaVox Compass ͶActions are set and customized inTobii Dynavox Communicator /Tobii DynaVox Compass.The available actions are the same for the Quick Access buttons and Switches.To create a shortcut to an action:1. Open the I-Series Control Center.2. Select Buttons or Switches, depending on which one you want to customize.3. Click Set action to view the dialog box where you can select the action you would like the button to perform. By select-ing one of the actions, the options for this action will be revealed below the chosen action.If you would like the Quick Access button to make a sound when pressed, select the Play sound check box afterhaving set an action.6.10.2 Selecting ActionsͻNo Action Selected ͶDefault Ͷchoose to delete a previous set taskͻSend Input ʹchoose either to send a keyboard input, a mouse click or specified text by selecting the option you wantthe device button or Switch to perform.ʹSend keyboard input ͶIn the Send keyboard input list, select the keystroke you want to send to an alternativeprogram.ʹSend mouse click ͶIn the Send mouse click list, select the desired mouse click: left, middle or right mouseclick.ʹSend text ʹIn the Send text box, type the text you want to send to an alternative program.ͻStart Program ͶClick Browse the first time you are using this option to find and select a program.Tobii Dynavox I-Series+ User͛s manual v.1.0 - en-US6 Configuring the Tobii Dynavox I-Series+ with the I-SeriesControl Center 59
The next time you select the Start Program option a list of previously selected programs will be displayed. You canthen directly select a program from the list or select Browse if you want to start a program not in the list.For the selected program it is possible to add program arguments. However, this is normally not required. If the programshould require program arguments and you do not know what to enter, please contact the company you purchased thesoftware from.ͻVolume Ͷchoose to increase, decrease or mute the volume by selecting the preferred option.ͻBacklight Ͷchoose to either increase or decrease the screen backlight by selecting the preferred option.ͻGaze Interaction ʹchoose to toggle track status window, calibrate Gaze Interaction, Pause the Gaze Interaction ortoggle Windows Control ON/OFF.To enable this option the Tobii Dynavox I-Series+ device must have an Eye Tracker and theTobii Dynavox Gaze Interaction Software installed.ͻWireless Ͷyou can either set all radio connections on/off or each individual wireless unit on/off one by one, by select-ing the options.ͻCommunicator /Compass ͶActions are set and customized inTobii Dynavox Communicator /Tobii DynaVox CompassIf actions for a Switch are customized both in the I-Series Control Center and inTobii Dynavox Communicator /Tobii DynaVox Compass or in alternative communication software all actionswill be performed simultaneously. Ensure that the specified action for a Switch does not conflict with an action set forthe same Switch in Tobii Dynavox Communicator /Tobii DynaVox Compass or in alternative communicationsoftware.To get back from slide in menus, just select the arrows in the greyed out areas.60 6 Configuring the Tobii Dynavox I-Series+ with the I-SeriesControl Center Tobii Dynavox I-Series+ User͛s manual v.1.0 - en-US
7 Gaze Interaction Settings7.1 Accessing the Gaze Interaction SettingsGaze Interaction Settings is a program for quick and easy access to control functions such as Track Status, Calibration andcommon settings.Start Gaze Interaction Settings for Windows 8.1 in one of the following ways:ͻGo to Start menu > Tobii Dynavox.ͻDouble-click on the Gaze Interaction Settings icon, , in the Notification area, or on the shortcut, , on theDesktop (if one has been made).ͻRight-click (long-hold finger on icon for touch screen right clicking) on the Gaze Interaction Settings icon, , inthe Notification area and then select Settings.ͻThrough the communication software installed on the device.In the list to the left in Gaze Interaction Settings, select which option you want to change. In the list to the right, the availableoptions will be revealed.Click OK to save changes. This will also close Gaze Interaction Settings.Click Cancel to cancel the changes. This will also close Gaze Interaction Settings.Click Apply to save changes. Gaze Interaction Settings will remain open.Anywhere you see this icon, , there is an information box with additional information for the feature.Tobii Dynavox I-Series+ User͛s manual v.1.0 - en-US 7 Gaze Interaction Settings 61
7.2 CalibrationThis section will describe how to calibrate an individual, enabling optimal Gaze Interaction with the Tobii Dynavox I-Series+device.7.2.1 Starting CalibrationThe calibration can be started in one of the following ways:ͻOpen Gaze Interaction Settings > Gaze Interaction and then select the Start Calibration... button.ͻRight-click (long-hold finger on icon for touch screen right clicking) on the Gaze Interaction Settings icon, , inthe Notification area and select Start Calibration.ͻThrough the communication software installed on the device.7.2.2 Interrupting CalibrationInterrupt the calibration in one of the following ways:ͻPress Esc.ͻLeft-click on the screen using a mouse.ͻTouch the screen (on a touch screen device).7.2.3 Customizing Active EyeBased on certain conditions, or disabilities, you may only have one eye that functions well with Gaze Interaction. In this case,and if you know which eye is most functional, you can select which eye to track for Gaze Interaction.To select the eye you want to be tracked by the eye tracker, follow these steps:1. Open Gaze Interaction Settings > Calibration.2. Select the Track only this eye for Gaze Interaction check box under Left or Right Eye Calibration Result box.62 7 Gaze Interaction Settings Tobii Dynavox I-Series+ User͛s manual v.1.0 - en-US
7.2.4 Improving Calibration Point(s)After calibration, you may want to improve one or more points.There is a color scheme used that will help you to understand the quality of your calibration.All three color statuses are the result of a successful calibration.ͻIf the background color of the Calibration Result is light red, you have achieved a successful, but relatively low qualitycalibration. You can improve one or more points individually, or recalibrate completely, to achieve betterGaze Interaction results.Improving even one (or more) of the calibrations points can significantly improve the calibration.ͻIf the background color of the Calibration Result is light yellow, you have achieved successful and good quality calibra-tion. You might be able achieve better Gaze Interaction results by improving one or more points individually.ͻIf the background color of the Calibration Result is green, you have achieved a successful and high quality calibration.Be aware that no matter what quality of calibration you have achieved you will be able to select OK or Apply and be-gin using Gaze Interaction. It is the accuracy and functionality of the Gaze Interaction that is affected by the quality ofthe calibration results. Try for the best calibration possible.Remember! In the end it is the personal experience that counts!The closer the lines within the calibration point are to a dot in the center of the circle of the calibration point, the better the cali-bration is of that point, .You can choose the points to be improved and calibrate only those points again.To improve one or more calibration points, follow these steps :1. Open Gaze Interaction Settings > Calibration.2. Select the point(s) you want to improve under Calibration Result.3. Select the Improve Point(s) button and a calibration for the selected point(s) will start.Tobii Dynavox I-Series+ User͛s manual v.1.0 - en-US 7 Gaze Interaction Settings 63
7.2.5 Removing Calibration Point(s)If there is a calibration point that is consistently bad after calibration (the green lines are scattered all around and outside thecircle of the calibration point) you can remove that point completely from the calibration, this may improve the calibration of theother points. Be aware that if you remove a point, that area of the screen will be uncalibrated and Gaze Interaction will not func-tion properly there.To remove one or more calibration points, follow these steps:1. Open Gaze Interaction Settings > Calibration.2. Select the point(s) you want to remove under Calibration Result.3. Select the Remove Point(s) button.7.2.6 Customizing the CalibrationTo customize the calibration, follow these steps:1. Open Gaze Interaction Settings > Calibration.2. Select the Settings... buttonGeneral3. Select calibration background by selecting the background color button and select the desired color.4. Specify the number of points you want to calibrate with (two, five or nine) from the Calibration points drop down list.The higher number of points, the more accurate the calibration.5. Select if you want to have sound feedback or not from the Sound feedback drop down list.Stimulus6. Select the stimulus type from the Stimulus type drop down list. There are three types available, each with different cus-tomizing options:ͻDot:ʹSelect color of the dot by selecting the Stimulus color button.ʹSelect size of the dot by selecting from the Stimulus size drop down list.ʹSelect speed of the dot by selecting from the Stimulus speed drop down list.ͻImage:64 7 Gaze Interaction Settings Tobii Dynavox I-Series+ User͛s manual v.1.0 - en-US
ʹSelect primary stimulus by selecting Browse and selecting an image.ʹSelect secondary stimulus by selecting Browse and selecting an image.ʹSelect size of the image by selecting from the Stimulus size drop down list.ʹSelect speed of the image by selecting from the Stimulus speed drop down list.ͻVideo:ʹSelect primary stimulus by selecting Browse and selecting a video.ʹSelect secondary stimulus by selecting Browse and selecting a video.ʹSelect size of the video by selecting from the Stimulus size drop down list.ʹSelect speed of the video by selecting from the Stimulus speed drop down list.7. Check the Animate stimuli check box if you want the stimuli to be animated (as opposed to static).8. If you want to control the calibration, i.e. decide when to move the calibration stimuli, with a keyboard, check the Key-board step-through check box.ͻFor Keyboard step-through, use the ͚S͛key to step (to move the calibration stimuli) and the ͚Esc͛key, the Leftmouse button or touching the touch screen to interrupt calibration. When using Image or Video calibration, use the͚T͛key to toggle between primary and secondary stimulus images.To get back from slide in menus, just select the arrows in the greyed out areas.7.2.7 Customizing the Calibration AreaCustomizing the calibration area can be useful if you have discovered that the user cannot access certain areas of the screenusing Gaze Interaction. By sizing the calibration area to exclude the areas that the user cannot access it can improve the overallcalibration.To customize the calibration area, follow these steps:1. Open Tobii Dynavox Gaze Interaction Settings > Calibration.2. Select the Setting͙button.3. Select the Calibration area: Change... button.Tobii Dynavox I-Series+ User͛s manual v.1.0 - en-US 7 Gaze Interaction Settings 65
4. A blue semi-transparent area is displayed on the desktop. You can move and resize the blue area to make it fit your pre-ferred calibration area.7.3 InteractionTo adapt the interaction method and visual feedback for Gaze Interaction, follow these steps:1. Open Gaze Interaction Settings > Interaction.ScopeIf different settings are needed for different Gaze Interaction applications, make the adaptations here.2. Select how the interactions settings should be reflected:ͻSelect Default settings of the currently selected user profile if you want to apply the new settings to thewhole user profile and not only to a particular application.ͻSelect Application specific settings of the currently selected user profile if you want to apply the new set-tings to a specific application of a user profile. Then select the available application in the Application drop downlist.66 7 Gaze Interaction Settings Tobii Dynavox I-Series+ User͛s manual v.1.0 - en-US
Method3. Select the activation method from the Activation method drop down list. There are three methods available, each withdifferent activation times:ͻDwell. Adjust the dwell time by moving the Dwell time slider.ͻSwitch. Adjust the minimum time for a click duration and the minimum time between clicks by moving the respectiveslider.ͻBlink. Adjust the minimum and maximum duration for a blink by moving the respective slider.Visual Feedback4. Select the symbol for visual feedback from the Dwell feedback type drop down list.5. Select the color of the feedback symbol in the Feedback color drop down list.6. Specify the dot size and opacity of the feedback symbol by moving the respective slider.7. Select the Show visible outline around the activated region check box to see a dashed line around the activatedarea in all instances of Gaze Interaction selection8. Select Simulate activation if you want to see how the activation method will appear on the screen. The example isshown above the Simulate activation button.7.4 User Profile7.4.1 Creating a New ProfileUse of different profiles allows you to store multiple people͛s calibrations and feedback preferences on one device. Alternatively,one person might want to store multiple profiles for him/herself if that person wears glasses occasionally or uses multiple meansof accessing the device.To create a new profile:1. Open Gaze Interaction Settings, select User Profiles.2. Enter a new name in the Profile name field.3. Select an existing profile in the Based on profile drop down list. The new profile will inherit all settings from the se-lected profile. Note that if no profiles have been created previously, the only one to select is the default profile.4. Click Create to save the new profile. The new profile is saved directly upon selecting Create.Tobii Dynavox I-Series+ User͛s manual v.1.0 - en-US 7 Gaze Interaction Settings 67
7.4.2 Selecting Current User ProfileTo select current user profile:1. Open Gaze Interaction Settings.2. Select a user profile in the Current User Profile drop down list.3. Select Apply7.4.3 Deleting a ProfileTo delete a profile:1. Open Gaze Interaction Settings >User Profiles.2. Select a profile in the Profile to delete drop down list.3. Click Delete to delete the selected profile. The profile is deleted directly upon selecting Delete. Note that the defaultprofile cannot be deleted.7.5 Windows ControlWindows Control allows you to access the desktop and all applications of your Windows computer with Gaze Interaction.7.5.1 Auto StartTo enable Windows Control automatically when the your device starts up:ͻSelect the Auto start Windows Control at boot check box.To disable Windows Control automatically when the your device starts up:ͻSelect to clear the Auto start Windows Control at boot check box.7.5.2 Windows Control TypeSelect which type of Windows Control you wish to use:ͻGaze Selection ͶSelect the Gaze Selection radio button. For more information about using Gaze Selection, see 5.4.3Using Gaze Selection, page 29ͻMouse Emulation ͶSelect the Mouse Emulation radio button. For more information about using Mouse Emulation, see5.4.4 Using Mouse Emulation, page 3968 7 Gaze Interaction Settings Tobii Dynavox I-Series+ User͛s manual v.1.0 - en-US
7.5.2.1 Gaze SelectionThe settings for Gaze Selection are found in the Gaze Selection Taskbar, docked to the screen when Gaze SelectionWindows Control is running. Gaze at the settings icon to select it and the Gaze Selection Settings will open.For information about the Gaze Selection Settings, see 8 Gaze Selection Settings, page 737.5.2.2 Mouse Emulation7.5.2.2.1 Mouse Control SpeedCustomize the mouse control speed by moving the Mouse control speed slider. Move the slider to the right to increase thespeed and to the left to decrease it.Tobii Dynavox I-Series+ User͛s manual v.1.0 - en-US 7 Gaze Interaction Settings 69
7.5.2.2.2 Magnifier Size and ZoomCustomize the size of the magnifier by moving the Magnifier Size slider. Move the slider to the right to increase the size andto the left to decrease it.Customize the zoom factor by moving the Zoom Factor slider. Move the slider to the right to increase the zoom factor and tothe left to decrease it.7.5.2.2.3 Auto Switch from Right to Left ClickCheck this check box if you want Windows Control Mouse Emulation mode to automatically switch the desired mouse click se-lection back to a left click, , after a right click, , has been chosen and performed.7.5.2.2.4 Turn off Scroll FunctionalityCheck the Turn off scroll functionality check box if you do not want Gaze Interactionscrolling to be active.7.5.2.2.5 Custom CursorsCustom cursors is a feature that turns the regular mouse cursor into a number of different cursors when using Windows Controlin Mouse Emulation mode.The different cursors visually represent the type of "mouse click" for Gaze Interaction that you have chosen from the Mouse Em-ulation Menu (for the definitions of the Mouse Emulation Menu symbols see 5.4.4.2 Clicking with Windows Control in MouseEmulation Mode, page 40,5.4.4.3 Magnifying with Windows Control in Mouse Emulation Mode, page 40 and 5.4.4.4 Select-ing Mouse Emulation Functions, page 40).or + = cursor type (move cursor, no clicking)+ = cursor type (single left click)+ = cursor type (single right click)+ = cursor type (double left click)+ = cursor type (double right click)or + = cursor types (drag) and (drop)or + = cursor type (no movement)Check the Custom cursors check box to activate custom cursors for Windows Control in Mouse Emulation mode.7.5.2.2.6 Hide MenuCheck the Hide Menu check box if you want the Mouse Emulation menu to be hidden during use. The (F2) key on thekeyboard can also be used to toggle On and Off (hide/show) the Mouse Emulation Menu instantly during use.70 7 Gaze Interaction Settings Tobii Dynavox I-Series+ User͛s manual v.1.0 - en-US
7.6 System Settings7.6.1 System Off-Screen MenuSelect the Position Drop down menu to make changes to where the System Off-Screen menu appear on the screen.The System Off-Screen menu can be set to appear:ͻBottom (Default)ͻTopͻLeftͻRightͻNoneSet the System Off-Screen menu to None to disable the System Off-Screen menu.Figure 7.1 System Off-Screen Menu Areas7.6.2 Positioning GuideTo turn On the Positioning Guide:1. Open Gaze Interaction Settings > System Settings.Tobii Dynavox I-Series+ User͛s manual v.1.0 - en-US 7 Gaze Interaction Settings 71
2. Select the Enable positioning guide check box.To turn Off the Positioning Guide:1. Open Gaze Interaction Settings > System Settings.2. Select to clear the Enable positioning guide check box.For more information about the Positioning Guide, see 5.3.4 Positioning Guide7.7 System InformationTo view the version and model of the device:Open the Gaze Interaction Settings > System Information.Please have this information available if you have problems with the device and need to contact Customer Support.By clicking Copy all information you can paste the information into a document (such as Notepad or WordPad) or directly in-to an e-mail.7.7.1 Upgrade Eye Tracker FirmwareIf there is a new Firmware for the Eye Tracker module, the Upgrade button will be selectable.Select the Upgrade button to start upgrading the Firmware for the Eye Tracker.A Pop up notification will be shown when starting the Tobii Dynavox Gaze Interaction Settings if there is a Upgradefor the Eye Tracker Firmware.72 7 Gaze Interaction Settings Tobii Dynavox I-Series+ User͛s manual v.1.0 - en-US
8 Gaze Selection SettingsThe Gaze Selection Settings Dialog is controlled by Gaze Interaction and the user can make all changes without using a key-board and/or a mouse.8.1 The General Settings TabSelectionͻGaze - Choose Gaze to use your gaze position to activate the zooming function that ends with the execution of the de-sired Task.ͻSwitch - Choose Switch to use a switch to activate the zooming function that ends with the execution of the desiredTask.PrecisionThe zoom precision can be set to 8 different levels, just look at the desired position to change the setting. Changing the Preci-sion will adjust how deep the zoom will go before executing the Task. The further to the right on the scale the deeper the zoom.If the Precision is set to zero, no zooming will happen. It will be an instant click with Primary Selection. With Secon-dary Selection it will still be a zoom.SpeedThe zoom speed can be set to 8 different levels, just look at the desired position to change the setting. Changing the Speed willaffect how fast the zoom is before the execution of the Task. The further to the right on the scale the faster the zoom.Tobii Dynavox I-Series+ User͛s manual v.1.0 - en-US 8 Gaze Selection Settings 73
8.2 The Keyboard Settings TabKeyboard layoutThe selected language keyboard layout is shown. Select the Change button to change the keyboard layout to another language.There are a number of different language keyboard layouts available.Gaze typing speedThe Gaze typing speed can be set to 8 different levels, just look at the desired position to change the setting. Changing theGaze typing speed will adjust how long the user must fix their gaze on a button before the Task is executed. The scale presentslower Gaze typing speeds to the left and higher to the right.Sound feedbackͻOn - Choose On to activate sound feedback when selecting a button on the Gaze keyboard.ͻOff - Choose Off to deactivate sound feedback when selecting a button on the Gaze keyboard.To finish, select OK to save or Cancel to abort you changes.8.3 The Taskbar Settings TabSelect which tasks to use on the Taskbar. For more information about the tasks, see 5.4.3.2 Task Buttons, page 31.Be aware that the more Tasks used on the Taskbar the more difficult they might become to select on smaller screens.Toggle the On/Off check box to On for each Task to enable it for use on the Taskbar.74 8 Gaze Selection Settings Tobii Dynavox I-Series+ User͛s manual v.1.0 - en-US
Toggle the On/Off check box to Off for each Task to disable its use and visibility on the Taskbar.8.3.1 Maximize Left Click/TapUse the Maximize Left Click/Tap feature to expand and emphasize the Left Click/Tap Task on the Taskbar. If it is toggled toOff, all selected Tasks will be spaced evenly along the Taskbar. If it is toggled to On, all Tasks other than Left Click/Tap will re-tain their original/smaller sizes and the Left Click/Tap Task will fill the remaining space on the Taskbar. Activating this featurecan greatly expand the active region of the Left Click/Tap Task making it much easier to select.Tobii Dynavox I-Series+ User͛s manual v.1.0 - en-US 8 Gaze Selection Settings 75
9 Product Care9.1 Temperature & Humidity9.1.1 General UseThe Tobii Dynavox I-Series+ is best kept in dry conditions at room temperature. The recommended range for temperature andthe humidity value for the device is as follows:Portable mode:ͻAmbient temperature: 0ഒto 30ഒ(32ഘto 86ഘ)ͻHumidity: Max 70% (no condensation on the device)Mounted mode:ͻAmbient temperature: 0ഒto 40ഒ(32ഘto 104ഘ)ͻHumidity: Max 70% (no condensation on the device)9.1.2 Transportation and StorageFor transportation and storage excluding batteries the recommended range for temperature and the humidity value for the de-vice is as follows:ͻTemperature: -40ഒto 70ഒ(-40ഘto 158ഘ)ͻHumidity: 20% to 70% (no condensation on the device)The Tobii Dynavox I-Series+ is not waterproof or fully water resistant. The device should not be kept in excessively humid, dampor otherwise wet conditions. Do not submerge the device in water or in any other liquid. Be careful not to allow liquids to bespilled upon the device especially in the connector areas without the I/O covers in place(Position 29 in Figure 3.2 Bottom, Leftand Right Side, page 17). The device is registered as IP Class 43 (with I/O covers in place).9.2 CleaningBefore cleaning the Tobii Dynavox I-Series+ device shut it down, unplug all cables, attach the I/O covers (Position 29 in Figure3.2 Bottom, Left and Right Side, page 17) and remove the batteries. Use a soft, slightly damp, lint-free cloth or Alcohol CleaningWipes (i.e. damp cloth with 96% alcohol). Avoid getting moisture in openings on the device. Don͛t use window cleaners, house-hold cleaners, aerosol sprays, solvents, alcohol, ammonia, or abrasives to clean the device.9.2.1 Cleaning of the SpeakersIf the openings for the speakers are clogged carefully use cotton sticks and/or a toothbrush to avoid damaging the IP-protectionfor Tobii Dynavox I-Series+ speakers.9.3 PlacementOnly use the recommended mounts specified by the your local reseller or sales represent and make sure that they are mountedand fastened correctly according to the instructions. Do not place the device on unstable and uneven surfaces.9.4 Transporting the Tobii Dynavox I-Series+ DeviceDisconnect all the cables and use the handle on the back side of the device to hold the device while carrying it.When you transport the device for repair, shipment or traveling, use the original casing and packaging materials.Keep the original packaging materials for the Tobii Dynavox I-Series+.In case the device needs to be returned to Tobii Dynavox for Warranty related issues or repair, it is required that theoriginal packaging (or equal equivalent) is used for shipping.76 9 Product Care Tobii Dynavox I-Series+ User͛s manual v.1.0 - en-US
9.5 Disposing of the BatteriesDo not dispose of the batteries in general household or office waste. Follow your local regulations for the disposal of batteries.9.6 Disposing of the Tobii Dynavox I-Series+ DeviceDo not dispose of the Tobii Dynavox I-Series+ Device in general household or office waste. Follow your local regulations for thedisposal of electrical and electronic equipment.Tobii Dynavox I-Series+ User͛s manual v.1.0 - en-US 9 Product Care 77
Appendix A Support, Warranty, TrainingResourcesA1 Customer SupportFor support, please contact your local representative or Support at Tobii Dynavox. In order to receive assistance as quickly aspossible, make sure you have access to your Tobii Dynavox I-Series+ device and, if possible, an Internet connection. Youshould also be able to supply the serial number of the device, which you find on the back of the device, in the I-Series ControlCenter or Gaze Interaction Settings, see 6.9 System, page 57 and 7.7 System Information, page 72.For further product information and other support resources, please visit the Tobii Dynavox website www.tobiidynavox.com.A2 WarrantyPlease read the Manufacturer͛s Warranty paper included in the package.Please read this User͛s Manual carefully before using the device. The warranty is only valid if the device is used according to theUser͛s Manual. Disassembling the Tobii Dynavox I-Series+ device will void the warranty.Keep the original packaging materials for the Tobii Dynavox I-Series+.In case the device needs to be returned to Tobii Dynavox for Warranty related issues or repair, it is required that theoriginal packaging (or equal equivalent) is used for shipping.A3 Training ResourcesTobii Dynavox offers a range of training resources for the Tobii Dynavox I-Series+ products and related communicationproducts. You can find them on the Tobii Dynavox website, www.tobiidynavox.com, including Getting Started Guides, webinarsand Quick guides. The Tobii Dynavox I-Series+ Quick Start Manual is delivered with, and stored on, theTobii Dynavox I-Series+ device.78 Appendix A Support, Warranty, Training Resources Tobii Dynavox I-Series+ User͛s manual v.1.0 - en-US
Appendix B Compliance InformationB1 FCC StatementThis device complies with Part 15 of the FCC Rules. Operation is subject to the following two conditions: (1) this device maynot cause harmful interference and (2) this device must accept any interference received, including interference that may causeundesired operation.Modifications not expressly approved by Tobii Dynavox could void the user͛s authority to operate the equipmentunder FCC rules.B1.1 For P15B EquipmentThis equipment has been tested and found to comply with the limits for a Class B digital device, pursuant to part 15 of the FCCrules. These limits are designed to provide reasonable protection against harmful interference in a residential installation. Thisequipment generates, uses and can radiate radio frequency energy and, if not installed and used in accordance with theinstructions, may cause harmful interference to radio communications.However, there is no guarantee that interference will not occur in a particular installation. If this equipment does cause harmfulinterference to radio or television reception, which can be determined by turning the equipment off and on, the user isencouraged to try to correct the interference by one or more of the following measures:ͻReorient or relocate the receiving antenna.ͻIncrease the separation between the equipment and receiver.ͻConnect the equipment into an outlet on a circuit different from that to which the receiver is connected.ͻConsult the dealer or an experienced radio/TV technician for help.B1.2 For Portable DevicesFCC RF Radiation Exposure Statement:1. This Transmitter must not be co-located or operating in conjunction with any other antenna or transmitter.2. This equipment complies with FCC RF radiation exposure limits set forth for an uncontrolled environment. This devicewas tested for typical hand held operations with the device contacted directly to the human body to the sides of thedevice. To maintain compliance with FCC RF exposure compliance requirements, avoid direct contact to thetransmitting antenna during transmitting.B2 Radio Wave Exposure and Specific Absorption Rate (SAR) InformationThe Tobii Dynavox I-Series+ device has been tested as a Class 1 Medical Device. Medical electrical equipment such as thisrequires special caution regarding Electro-magnetic Compatibility (EMC) and thus needs to be installed and placed into serviceaccording to the information provided in this manual.Using other cables and accessories other than those provided or that are integrated in the device may affect EMCperformance.The SAR (Specific Absorbtion Rate) limit as dictated by the FCC (in the USA) is 1.6W/kg averaged over 1 gram of tissue. InEurope/EU (CE regulations) it is 2.0 W/kg averaged over 10 grams of tissue. The Devices, Tobii Dynavox Iʹ12+ (FCC ID:W5MTDI12A) and Tobii Dynavox Iʹ15+ (FCC ID: W5MTDI15) have been tested against these SAR limits to maintaincompliance with FCC/CE RF exposure requirements.This equipment complies with FCC RF radiation exposure limits set forth for an uncontrolled environment.The highest SAR value for the Iʹ12+ device is 0.8 W/kg. The highest SAR value for the Iʹ15+ device is 0.8 W/kg.Tobii Dynavox I-Series+User͛s manual v.1.0 - en-US Appendix B Compliance Information 79
Guidance and manufacturer͛s declaration ʹelectromagnetic emissionsThe Tobii Dynavox I-Series+ is intended for use in the electromagnetic environment specified below. The customer or theuser of the Tobii Dynavox I-Series+ device should assure that it is used in such an environment.Emissions Test Compliance Electromagnetic environment ʹguidanceRF (Radio Frequencyemissions CISPR 11Group 1 The Tobii Dynavox I-Series+ must emitelectromagnetic energy in order toperform its intended function. Nearbyelectronic equipment may be affectedRF emissions CISPR 11 Class BHarmonic emissionsIEC 61000-3-2Not Applicable The product has an active power ofPч75 W at rated load conditions.Therefore no limits are applicable.Voltage Fluctuations/flickeremissions IEC 61000-3-3Not Applicable The product has an active power ofPч75 W at rated load conditions.Therefore it is not likely to producevoltage fluctuations or flicker above thelimit values.The Tobii Dynavox I-Series+ device should not be used adjacent to or stacked with other equipment.Guidance and manufacturer͛s declaration ʹelectromagnetic immunityThe Tobii Dynavox I-Series+ device is intended for use in the electromagnetic environment specified below. The customer orthe user of the Tobii Dynavox I-Series+ device should assure that it is used in such an environment.IMMUNITY test IEC 60601 test level Compliance level Electromagnetic environmentʹguidanceElectrostatic discharge(ESD)IEC 61000-4-2± 6 kV contact± 8 kV air± 6 kV contact± 8 kV airFloors should be wood,concrete or ceramic tile. Iffloors are covered withsynthetic material, therelative humidity should be atleast 30 %.Electrical fast transient/burstIEC 61000-4-4± 2 kV for power supplylines± 1 kV for input/output lines± 2 kV for power supplylines± 1 kV for input/output linesMains power quality shouldbe that of a typicalcommercial or hospitalenvironment.SurgeIEC 61000-4-5± 1 kV line to line ± 1 kV line to line Mains power quality shouldbe that of a typicalcommercial or hospitalenvironment.80 Appendix B Compliance Information Tobii Dynavox I-Series+ User͛s manual v.1.0 - en-US
Guidance and manufacturer͛s declaration ʹelectromagnetic immunityThe Tobii Dynavox I-Series+ device is intended for use in the electromagnetic environment specified below. The customer orthe user of the Tobii Dynavox I-Series+ device should assure that it is used in such an environment.IMMUNITY test IEC 60601 test level Compliance level Electromagnetic environmentʹguidanceVoltage dips, shortinterruptions and voltagevariations on power supplyinput lines.IEC 61000-4-11< 5 % UT (>95 % dip in UT)for 0.5 cycles.40 % UT (60 % dip in UT)for 5 cycles.70 % UT (30 % dip in UT)for 25 cycles.< 5 % UT (>95 % dip in UT)for 5 s< 5 % UT (>95 % dip in UT)for 0.5 cycles.40 % UT (60 % dip in UT)for 5 cycles.70 % UT (30 % dip in UT)for 25 cycles.< 5 % UT (>95 % dip in UT)for 5 sMains power quality shouldbe that of a typicalcommercial or hospitalenvironment. If the user ofthe Tobii Dynavox I-Series+device requires continuedoperation during mainsinterruptions, it isrecommended that theTobii Dynavox I-Series+device batteries are in placeor that the device bepowered from anuninterruptable power supply(UPS).UT is at 100 VAC 60 Hz or230 VAC 50 Hz.Power frequency (50/60 Hz)magnetic fieldIEC 61000-4-83 A/m 3 A/m Power frequency magneticfields should be at levelscharacteristic of a typicallocation in a typicalcommercial or hospitalenvironment.Guidance and manufacturer͛s declaration ʹelectromagnetic immunityThe Tobii Dynavox I-Series+ device is intended for use in the electromagnetic environment specified below. The customer ofthe user of the Tobii Dynavox I-Series+ device should assure that it is used in such an environment.Immunity test IEC 60601 test level Compliance level Electromagnetic environment- guidancePortable and mobile RFcommunications equipmentshould be used no closer toany part of theTobii Dynavox I-Series+device, including cables,than the recommendedseparation distancecalculated from the equationapplicable to the frequencyof the transmitter.Recommended separationdistanceConducted RFIEC 61000-4-63 Vrms 150 kHz to 80 MHz 3 Vfor 150 kHz to80 MHzRadiated RFIEC 61000-4-33 V/m 80 MHz to 2.5 GHz 3 V/mfor 80 MHz to800 MHzTobii Dynavox I-Series+User͛s manual v.1.0 - en-US Appendix B Compliance Information 81
Guidance and manufacturer͛s declaration ʹelectromagnetic immunityThe Tobii Dynavox I-Series+ device is intended for use in the electromagnetic environment specified below. The customer ofthe user of the Tobii Dynavox I-Series+ device should assure that it is used in such an environment.Immunity test IEC 60601 test level Compliance level Electromagnetic environment- guidancefor 800 MHz to2.5 GHzwhere "P" is the maximumoutput power rating of thetransmitter in watts (W)according to the transmittermanufacturer and "d" is therecommended separationdistance in meters (m).Field strengths from fixed RFtransmitters, as determinedby an electromagnetic sitesurvey,Ishould be less thanthe compliance level in eachfrequency range.iiInterference may occur in thevicinity of equipment markedwith the following symbol.NOTE 1 At 80 MHz and 800 MHz, the higher frequency range applies.NOTE 2 These guidelines may not apply in all situations. Electromagnetic propagation is affected by absorption andreflected from structures, objects and people.i. Field strengths from fixed transmitters, such as base stations for radio (cellular/cordless) telephones and land mobile radios, amateur radio, AM andFM radio broadcast and TV broadcast cannot be predicted theoretically with accuracy. To assess the electromagnetic environment due to fixed RFtransmitters, an electromagnetic site survey should be considered. If the measured field strength in the location in which the Tobii Dynavox I-Series+device is used exceeds the applicable RF compliance level above, the Tobii Dynavox I-Series+ device should be observed to verify normal operation. Ifabnormal performance is observed, additional measures may be necessary, such as reorienting or relocating the Tobii Dynavox I-Series+ device.ii. Over the frequency range 150 kHz to 80 MHz, field strengths should be less than 3 V/m.Recommended separation distances between portable and mobile RF (Radio Frequency) communications equipment andthe Tobii Dynavox I-Series+ device.The Tobii Dynavox I-Series+ device is intended for use in the electromagnetic environment in which radiated RFdisturbances are controlled. The customer or the user of the Tobii Dynavox I-Series+ device can help preventelectromagnetic interference by maintaining a minimum distance between portable and mobile RF communication equipment(transmitters) and the Tobii Dynavox I-Series+ device as recommended below, according to the maximum output power ofthe communications equipment.Rated maximum outputpower of transmitterWSeparation distance according to frequency of transmitter150 kHz to 80 MHz 80 MHz to 800 MHz 800 MHz to 2.5 GHz0.01 0.12 m 0.12 m 0.24 m0.1 0.37 m 0.37 m 0.74 m1 1.2 m 1.2 m 2.4 m10 3.7 m 3.7 m 7.4 m100 11.7 m 11.7 m 23.4 mUnder test specifications specified in 6.2.1.10 EN 60 601-1-2 (2007) the Tobii Dynavox I-Series+ device shall not:ͻExhibit component failure82 Appendix B Compliance Information Tobii Dynavox I-Series+ User͛s manual v.1.0 - en-US


Appendix C Computer Device States ofOperationTable C.1 Computer Device States of OperationAdvanced Configuration andPower Interface (ACPI)StateDescriptionS0 (Working) Normal operating state - Windows session is runningDisplay will dim and turn off after a time of idle. The 1, 2, Menu and Volume Up and Downbuttons are however always illuminated in state S0.S3 (Sleep) The device is sleeping. The Windows session is suspended to RAM, allowing a quickresume to state S0 by:1. Pressing the power button2. Pressing a button connected to a switch port configured to have power on functionality3. Wake on Gaze (if enabled)The device is consuming a small amount of power in state S3. Fully charged batteries (no ACadapter attached) will last a minimum of 24 h in state S3.Windows Critical battery level is monitored in state S3 to prevent the batteries from beingfully drained. The device will enter state S4 (Hibernate) if the critical value is reached.S4 (Hibernate) The device is in hibernation. The Windows session is suspended to the SSD (hard drive) andthe device is powered off. The session can be resumed to state S0 by:1. Pressing the power button2. Pressing a button connected to a switch port configured to have power on functionalityS5 (Soft Off) Windows is shut down. The device is powered off. Batteries (not drained) and/or AC adapterattached.G3 (Mechanical Off) All power sources removed (no batteries and no AC adapter attached).Table C.2 Power Button Normal Operation, LED BehaviorACPI StatePower Button Illumination Button 1, 2, Menu, VolumeUp and Volume DownButtonsWhite IlluminationNo Battery Charging Battery ChargingS0 (Working) Green Light Blue Light ONS3 (Sleep) Green Blinking Light Blue Blinking Light OFFS4 (Hibernate) OFF Blue Light OFFS5 (Soft off) OFF Blue Light OFFTobii Dynavox I-Series+User͛s manual v.1.0 - en-US Appendix C Computer Device States of Operation 85
Table C.3 Power Button Error or Warning, LED BehaviorError or Warning ACPI State and condition Power Button llumination CommentChassis near overheating In state ACPI S0(Working), when thechassis temperature is ч1degree Celsius from theMaximum Thresholdaccording to the SafetySettings specified in TableD.1 Maximum AllowedTemperature, page 87.Purple Light Purple light as a warning tothe user when the Device isclose to the overheatthreshold.Chassis overheats In state ACPI S0(Working), when thechassis temperature is > theMaximum Thresholdaccording to the SafetySettings specified in TableD.1 Maximum AllowedTemperature, page 87.Purple Quick Blinking Light The Device will blink the LEDduring the hibernate orshutdown process.Chassis overheated In state ACPI S4(Hibernate) and ACPI S5(Soft Off), when the powerbuttonIis pressed.Purple Quick Blinking Lightfor 5 seconds.The Device will blink the LEDand remain in the state ACPIS4 (Hibernate) or ACPI S5(Soft Off).The Device willstart up and beoperational for upto 9 minutes if thetemperature doesnot drop below theMaximumThresholdaccording to theSafety Settingsspecified in TableD.1 MaximumAllowedTemperature, page87 within the 9minutes.Low Battery Level forBattery PacksIn state ACPI S4(Hibernate) and S5 (Softoff), when the power buttonIis pressed and:1. No DC plug inserted,and2. Battery level is at orbelow the critical levelBlue Quick Blinking Light for5 seconds.i. Or a switch port configured to have power button functionality.86 Appendix C Computer Device States of Operation Tobii Dynavox I-Series+ User͛s manual v.1.0 - en-US
Appendix D Maximum AllowedTemperatureTable D.1 Maximum Allowed TemperatureAllowable maximum temperature for the Tobii Dynavox I-Series+ metal external surfaces which arelikely to be touchedMaximum Temperatureഒ/ഘPortableModeMountedModeMounted Mode temperature threshold:External surfaces temperature allowed 55/131External surfaces temperature allowed in an area unlikely to be touched, see position 1 in FigureD.1 Temperature Threshold Area, page 87 for the position of this area. 60/140Portable Mode temperature threshold:External surfaces temperature allowed 43/109External surfaces temperature allowed in an area unlikely to be touched, see position 1 in FigureD.1 Temperature Threshold Area, page 87 for the position of this area.46/115Figure D.1 Temperature Threshold AreaTobii Dynavox I-Series+User͛s manual v.1.0 - en-US Appendix D Maximum Allowed Temperature 87
Appendix E Technical SpecificationsE1 Standard Tobii Dynavox I-Series+Standard Tobii Dynavox Iʹ12+ Tobii Dynavox Iʹ15+Type/Model Iʹ12+ ETR Iʹ15+ ETRScreen 12.1഼, Aspect ratio: 4:3, LED BacklightUnit,White Luminance 500 cd/m215.0഼, Aspect ratio: 4:3, LED BacklightUnitWhite Luminance 400 cd/m2Screen Resolution 1024 × 768 pixels (XGA)Touch Panel Projected Capacitive Touch with Gorilla® Glass, 10 point multi touchDimensions (WxHxD) 30,7 × 27,4 × 10,5 cm12.1 × 10.8 × 4.1 inches36,9 × 32,6 × 11,2 cm14.5 × 12.8 × 4.4 inchesWeight 2,8 kg6.2 lbs3,8 kg8.4 lbsSpeakers 2 × 3 W Closed Box SpeakersMicrophone 1 × Analog MicrophoneProcessor Intel® Celeron Quad Core Processor J1900 (2M Cache, 2 Ghz)RAM 4 GB DDR3Operating system Microsoft Windows 8.1Hard disk drive 2.5഼SSD 120 GB minimumSD-Card MicroSD-Card 32 GBConnectors1 × Connector for an HDMI 1.3 Connector Type A cable2 × USB 2.0 (Current limit = 1000 mA)1 × USB 3.0 (Current limit 1500 mA)1 × RJ45 100/1000 Mbit/s (Ethernet)2 × 3.5 mm Switch connector interface, (Pin out for mono plug: Sleeve =Common ground, Tip = Signal)1 × 3.5 mm͟Headphone jack (stereo) with jack detection1 × 24 VDC in 2.5/5.5 mm (Power connector)Buttons 1 × Power On1 × Volume Up1 × Volume Down1 × Menu2 × ProgrammableWLAN (optional) IEEE 802.11 b/g/n Dual antenna diversity systemBluetooth® (optional) Bluetooth® 3.0+HSDedicated for Mobile Phone CommunicationIR Remote Control (EnvironmentalControl Unit)GEWA Programmable IR Remote Control (Environmental Control Unit),19 ʹ455 kHz, 940 nm, compatible with a wide range of remote controlsResting Orientation: 1 × IR filter window with 1 × IR Receive Sensor, 3 × IRTransmit Diodes and 1 × Red Status LEDUpright Orientation: 1 × IR filter window with 4 × IR Transmit Diodes88 Appendix E Technical Specifications Tobii Dynavox I-Series+ User͛s manual v.1.0 - en-US
Standard Tobii Dynavox Iʹ12+ Tobii Dynavox Iʹ15+Type/Model Iʹ12+ ETR Iʹ15+ ETRCamera User Camera (back) 5 MP AF (Auto Focus)Web Camera (front) 2 MP FF (Fixed Focus)Eye Tracker Tobii IS20 ModuleBattery Run TimeI~9 h ~9.5/8ii hBattery Charge Time Maximum 5.4 h (0-100%)Battery Storage Time Maximum 6 months @ charge ш40%Deskstand IntegratedMounting Systems Supported Tobii Dynavox QR adapter plate for Daessy and REHAdaptPower Supply Adapter Technology Co. Ltd, ATM065-A240Input: Universal 100 ~ 240 VAC / 50 ~ 60 HzOutput: +24VDC / 0~2.71AIP class IP 43 (with I/O covers in place)i. Indoor with continuous communication and with Gaze Interaction if applicable. ~24 hours with a Power optimized scenario.ii. 9.5 hours without the Eye tracker activated, 8 hours with the Eye tracker activatedE2 Battery packItem Specification RemarkBattery Technology Li-Ion rechargeable battery pack withgas gauge (SMBus v1.1 interface)Cell 6× Panasonic NCR18650 (3S2P)Battery Pack Capacity 62.64 Wh Initial capacity, new battery packNominal Voltage 10.8 VCharge Time Maximum 5.4 h Charge from 0 to 100%Cycle Life 500 cycles Minimum 75% of initial capacityremainingAllowable Operating Temperature 0ʹ45 ഒ, 45-85%RH Charge condition-20 ʹ60 ഒ, 45-85%RH Discharge conditionStorage Temperature -20 ʹ35 ഒ, 45-85%RH 1 year-20 ʹ40 ഒ, 45-85%RH 6 months-20 ʹ45 ഒ, 45-85%RH 1 month-20 ʹ50 ഒ, 45-85%RH 1 weekStorage TimeIMaximum 6 months @ charge ш40%Do not long time storebattery packs with less than40% charge leveli. Batteries shall not be stored in the deviceTobii Dynavox I-Series+User͛s manual v.1.0 - en-US Appendix E Technical Specifications 89
E3 Eye TrackerTechnical Specifications Tobii IS20 ModuleWorking Distance 40 - 90 cm18 - 35 inchesFreedom of Head Movementi@ 70 cm / 27.5 inches(Width x Height)50 × 36 cm20 × 14 inHead Movement Speed (optimal) 11.8 in/s30 cm/sGaze Data Rate 30 HzGaze AccuracyiiUnder ideal conditions 0.4° (Std dev 0.1°)Across 30 × 20 × 20 cm head box 0.5° (Std dev 0.2°)Screen Size <22഼Distance (from screen) 45 Ͷ85 cm17.7 Ͷ33.5 inTrack box size (Width × Height) 27 × 23 Ͷ52 × 44 cm10.6 × 9.1 Ͷ20.5 × 17.3 inTrack box depth 40 cm15.7 inGaze Precision (=sample to sample noise)iiiUnder ideal conditions, without filter, on artificial eyes PendingAcross head box, without filter, on human eyes 0.4° (Std dev 0.1°)Mounting Built inPower Supply Built ini. Freedom of head movement describes the volume in front of the tracker in which the user must have at least one of the eyes. The numbers arespecified parallell/orthogonal to screen surface, assuming eye tracker is at 20 degree angle to screen.ii. Gaze accuracy describes the angular average distance from the actual gaze point to the one measured by the eye tracker.Accuracy under ideal conditions is measured with users placed in the center of the eye tracker track box with the head resting on a chin rest, and theroom and screen illumination constant at 300 lux.Accuracy across head box is measured with users after calibration systematically positioned at varying positions ranging from center of the head boxup to +/- 15 cm horizontal, +/- 10 cm vertical and +/- 10 cm distance.Accuracy across varying background illumination is measured with users͛head resting on a chin rest, and after calibration modifying backgroundillumination from 1 to 1000 lux.iii. Gaze Precision describes the point-to-point variation between individual gaze samples (here specified with binocular data, ie both eyes, andmeasured on artificial eyes). Gaze Precision with Stampe filter is with Stampe stage 2 noise-reduction algorithm applied to raw data (Stampe ,Behavior Research Methods, Instruments & Computers 1993, 25 (2), 137-142).Precision without filter is based on raw data, without any de-noising filter applied, either inside or outside the eye tracker.Precision under ideal conditions is measured with users placed in the center of the eye tracker track box with the head resting on a chin rest, and theroom and screen illumination constant at 300 lux.Precision across head box is measured with users after calibration systematically positioned at varying positions ranging from center of the head boxup to +/- 15 cm horizontal, +/- 10 cm vertical and +/- 10 cm distance.90 Appendix E Technical Specifications Tobii Dynavox I-Series+ User͛s manual v.1.0 - en-US
Appendix F Approved AccessoriesDescription Model Tobii Dynavox Part No.Tobii Dynavox I-Series+ AC Adapter(Power Supply)AdapterTech ATM065ʹA240 12002664Battery pack TISB1 12004072For information about the latest approved Tobii Dynavox Accessories, please visit the www.tobiidynavox.com website or contactyour local Tobii Dynavox reseller.Tobii Dynavox I-Series+User͛s manual v.1.0 - en-US Appendix F Approved Accessories 91
Tobii Dynavox I-Series+ User͛s manual v.1.0 - en-USSupport for Your Tobii Dynavox DeviceGet Help OnlineSee the product-specific Support page for your Tobii Dynavox device. It contains up-to-date information about issues and tips & tricks related to the product. Find our Support pages online at:www.TobiiDynavox.com or www.myTobiiDynavox.com.Contact Your Sales Representative or ResellerFor questions or problems with your product, contact your Tobii Dynavox sales representative or authorized reseller for assistance. They are most familiar with your personal setup and can besthelp you with tips and product training. For contact details, visit www.TobiiDynavox.com/contactCopyright ©Tobii AB (publ). Illustrations and specifications do not necessarily apply to products and services offered in each local market. Technical specifications are subject to change without prior notice. All other trademarks are the property of their respectiveowners.

Navigation menu