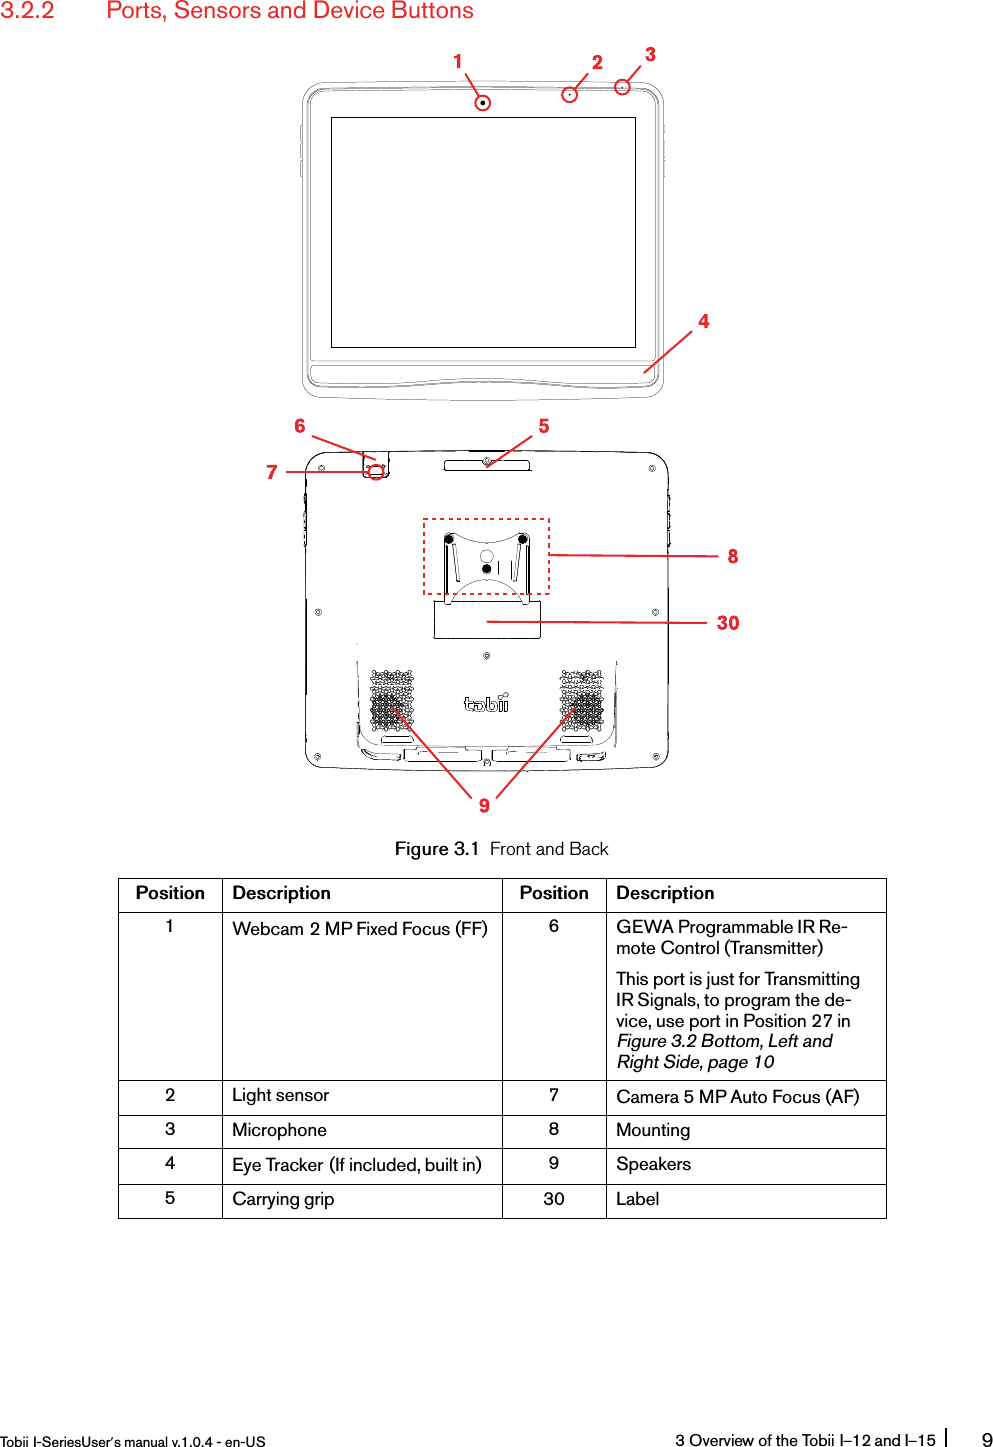
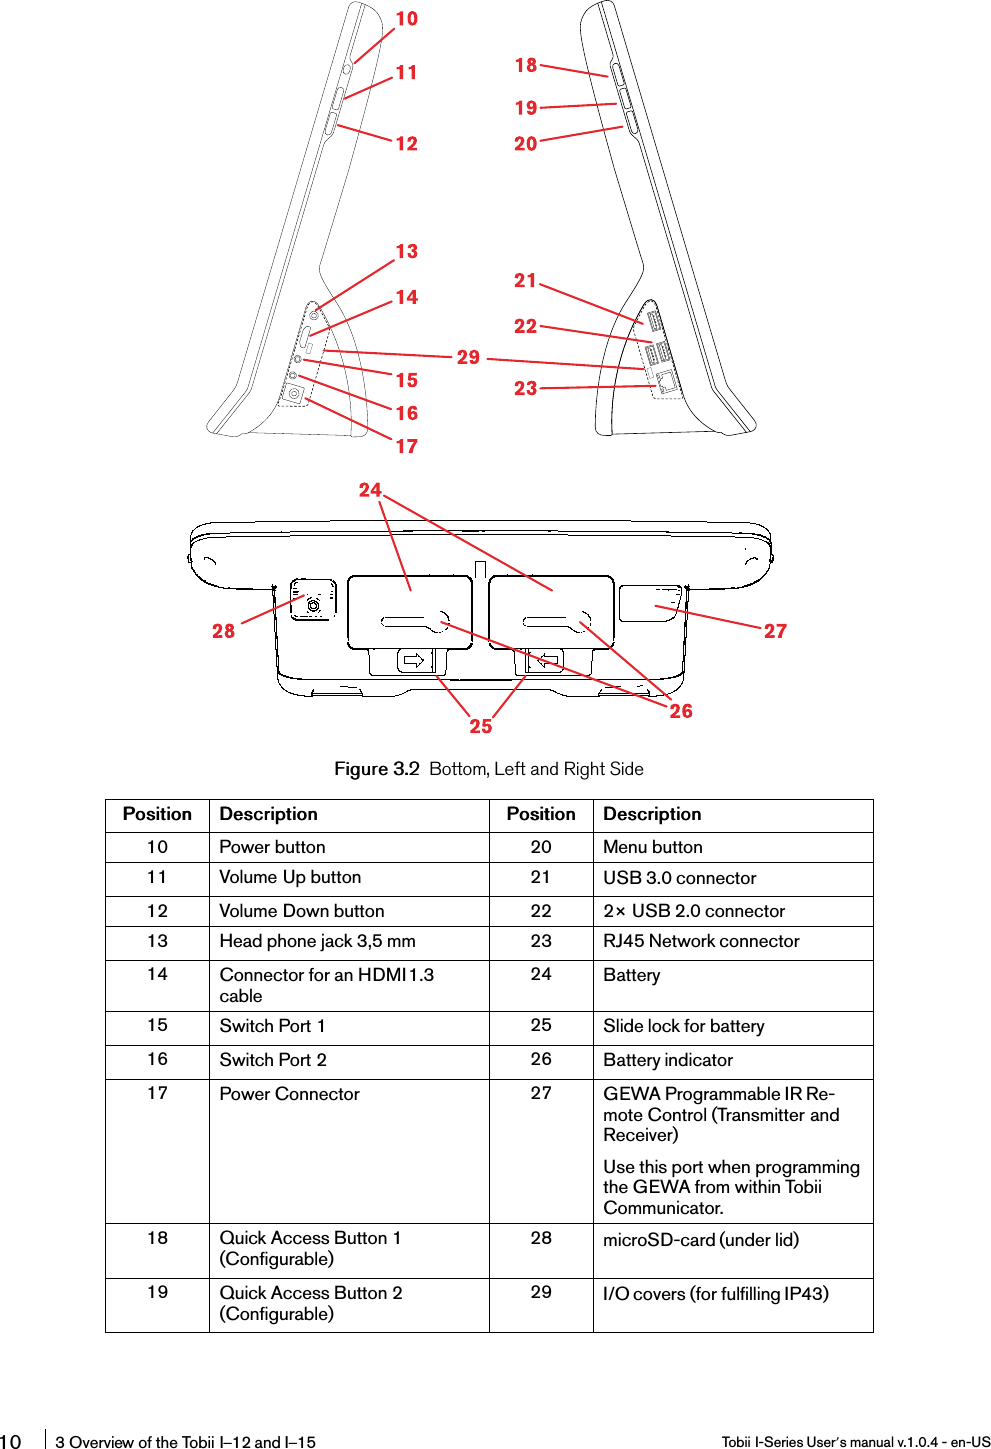
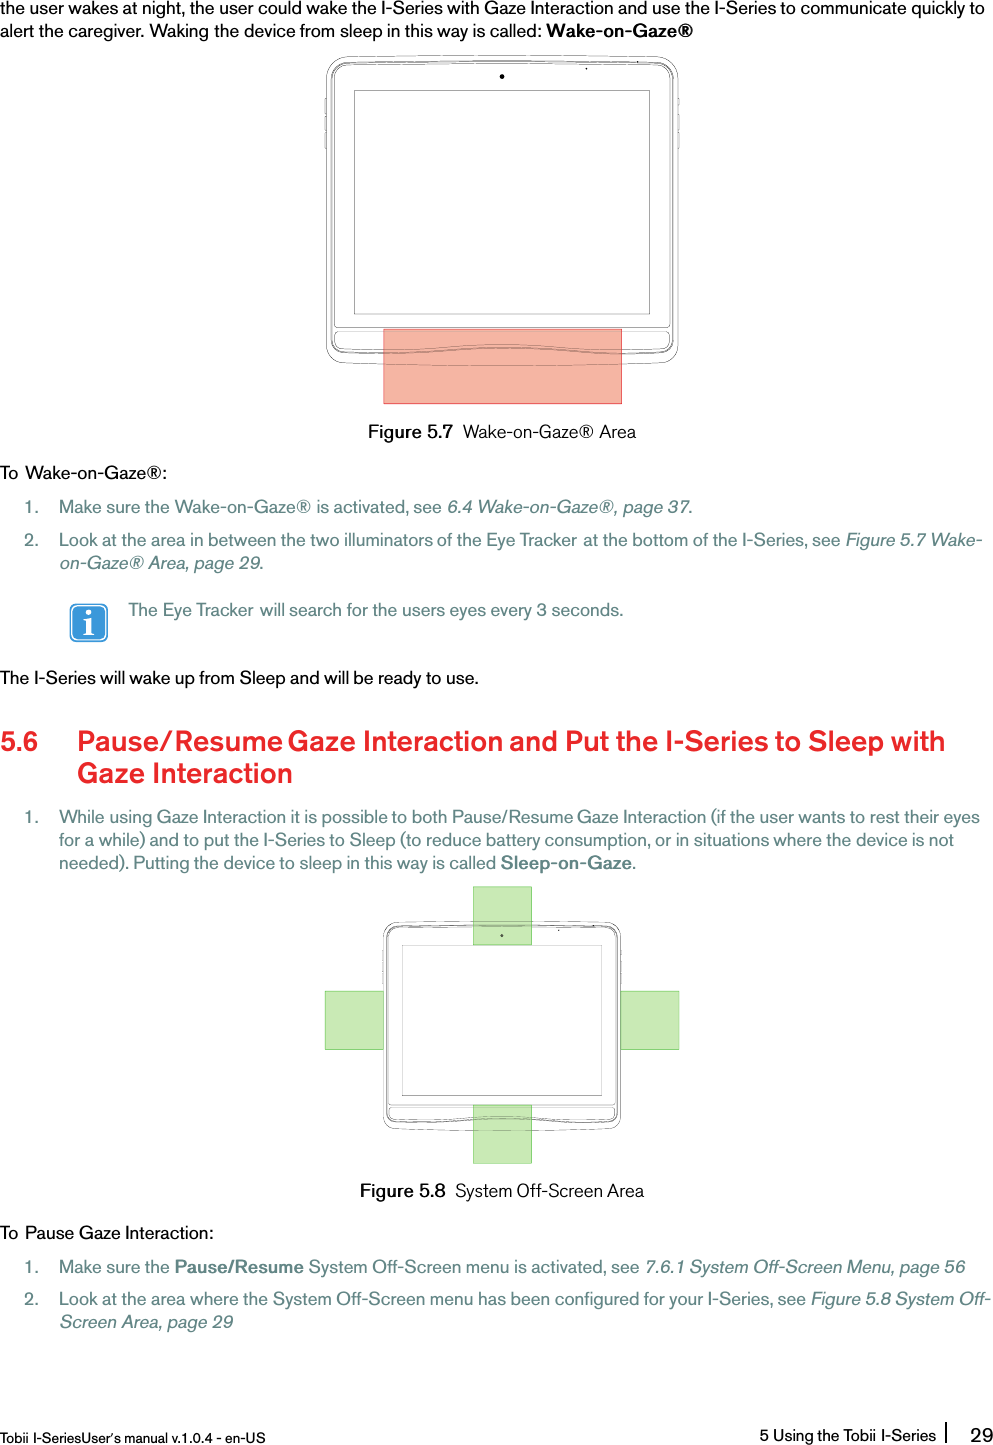
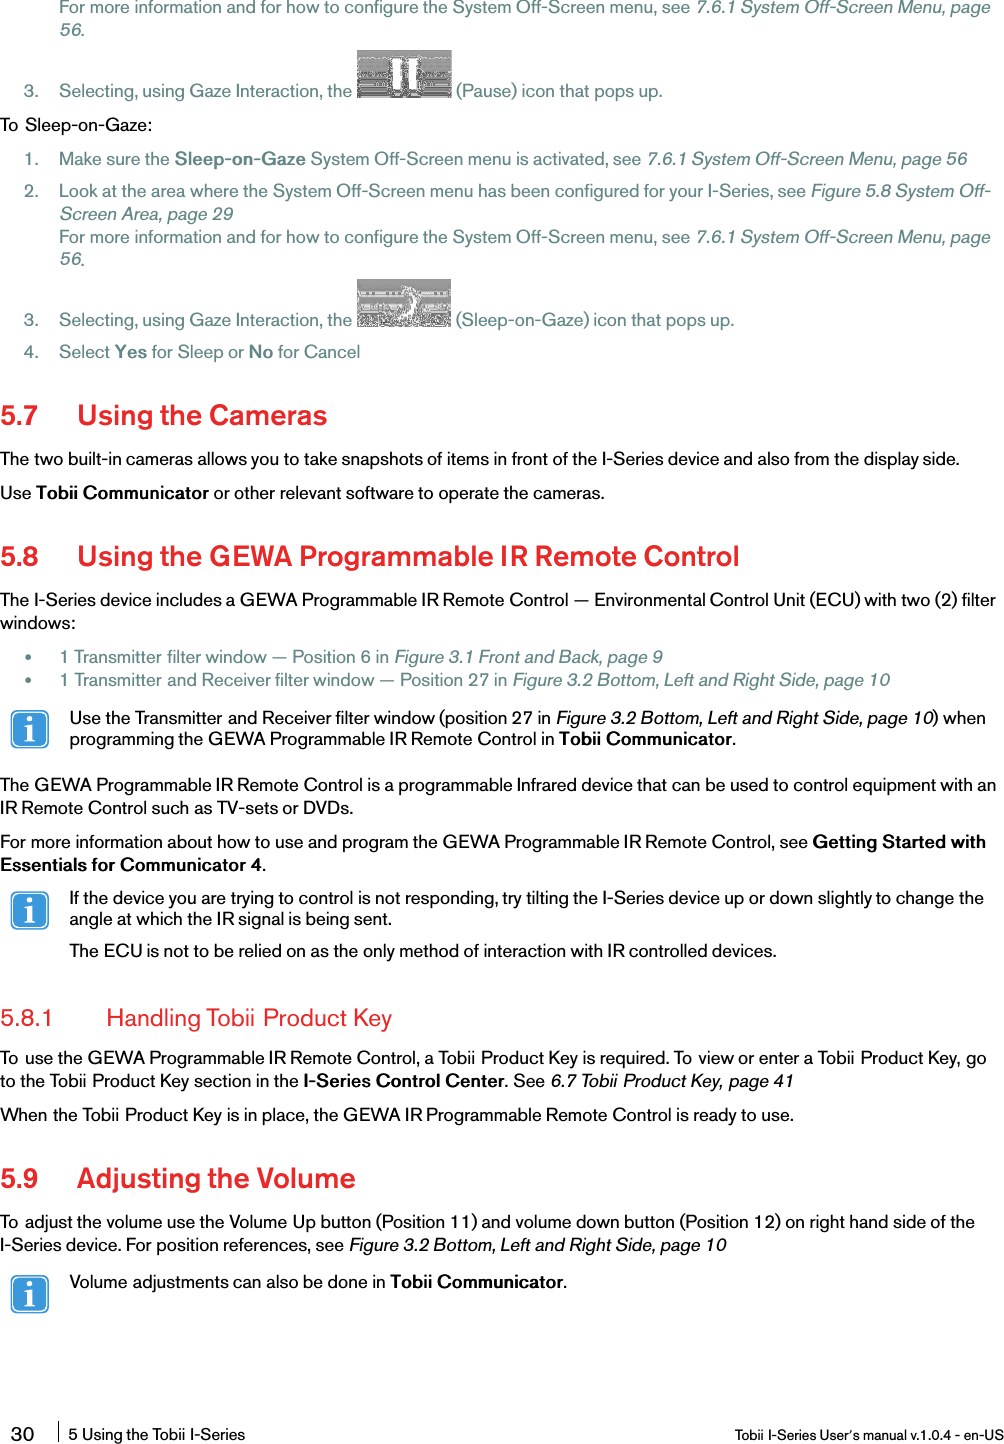
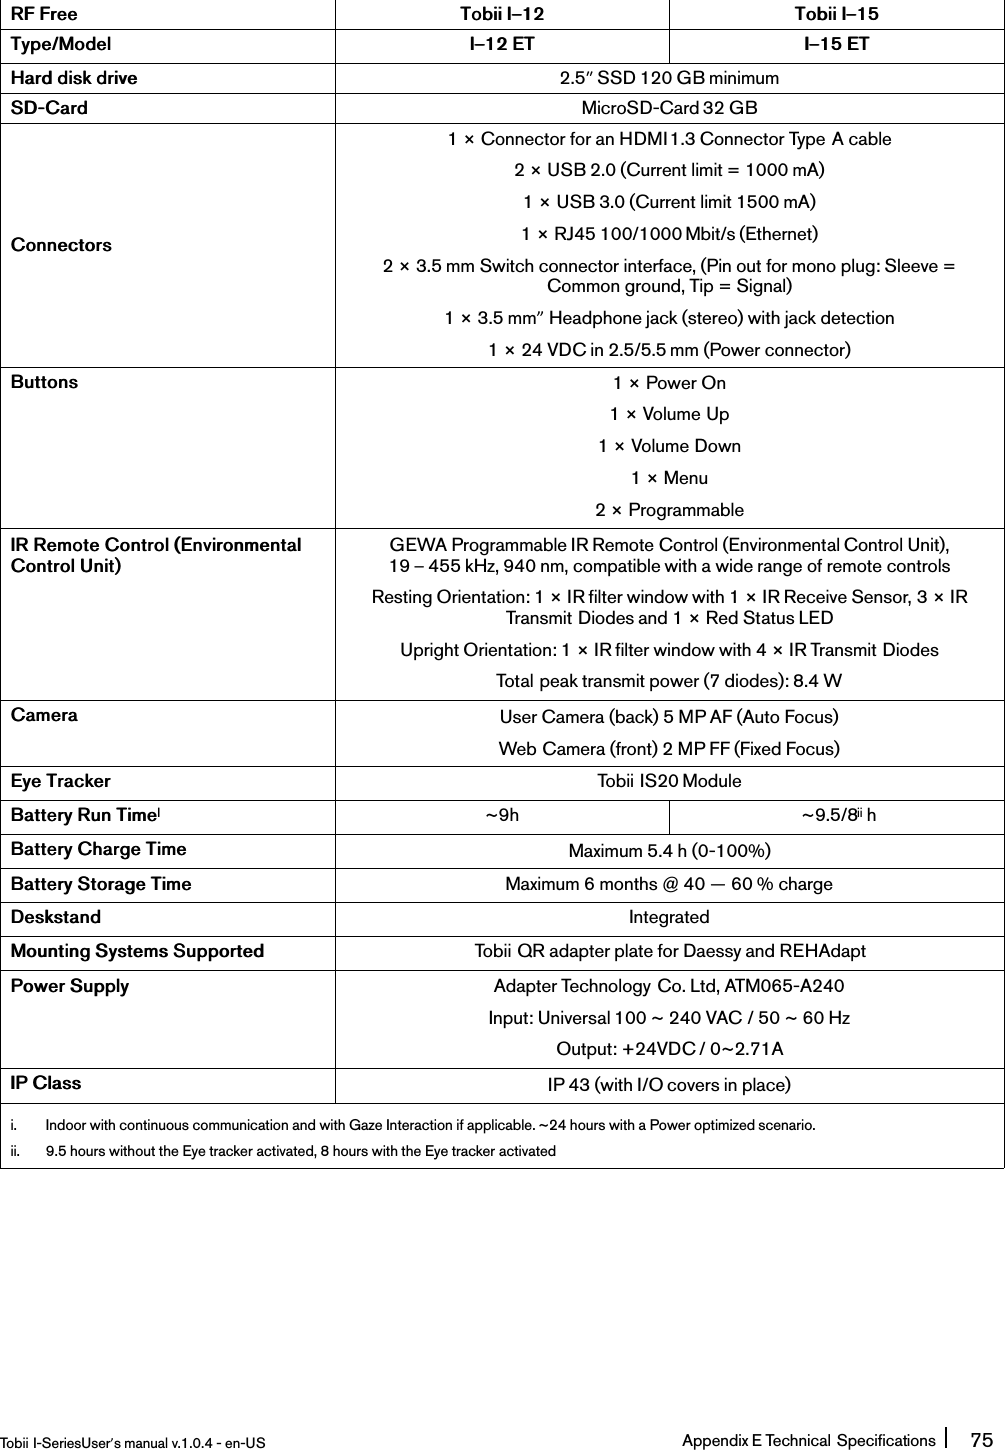
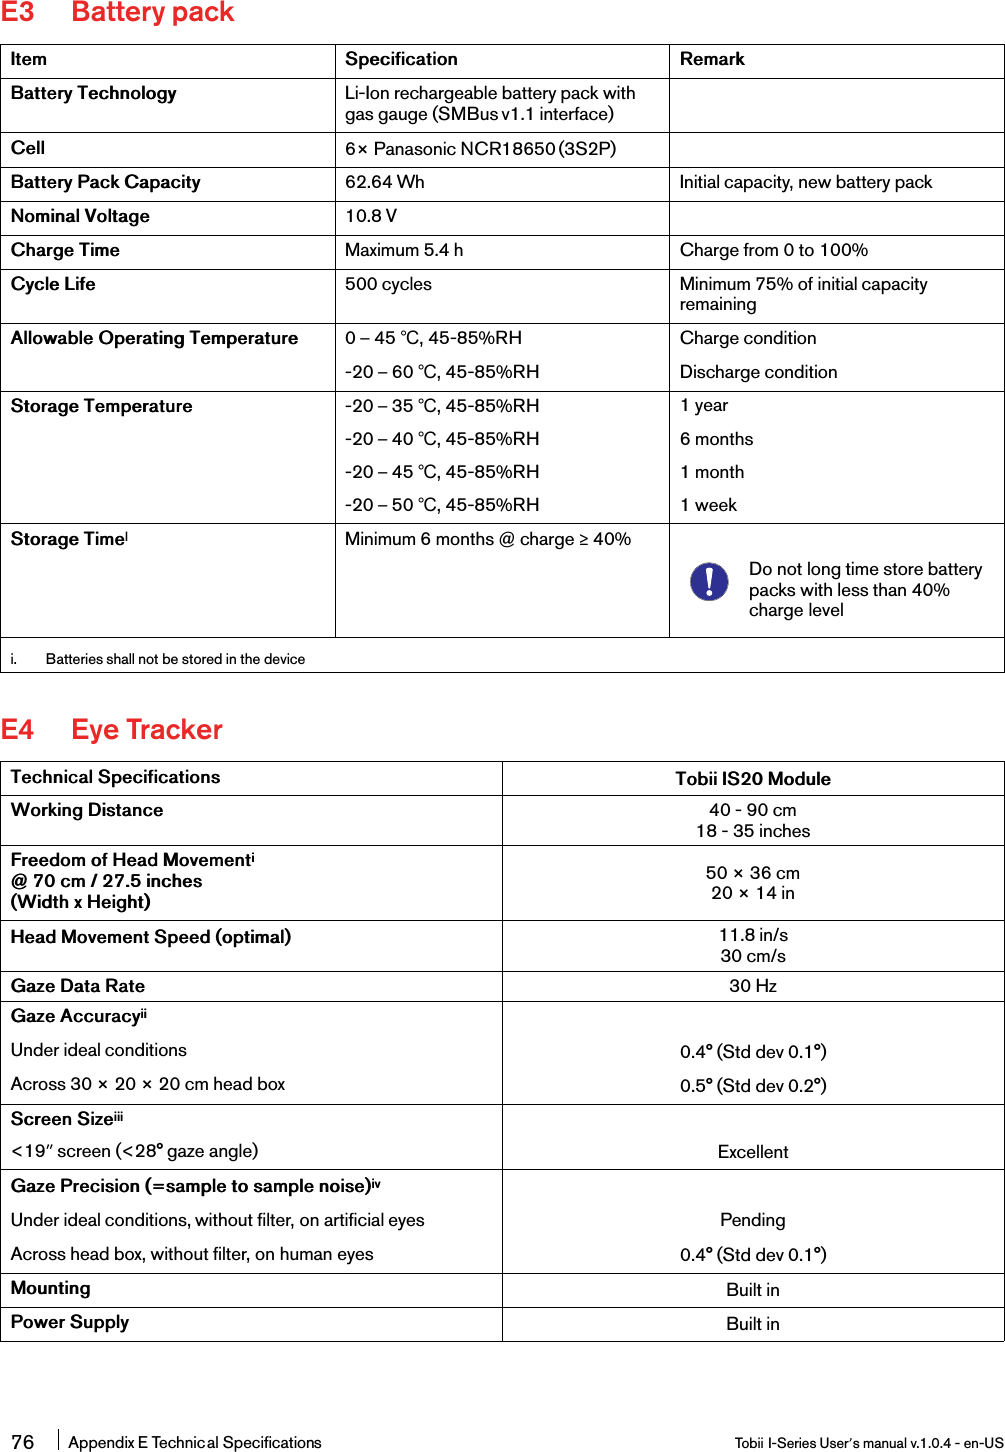
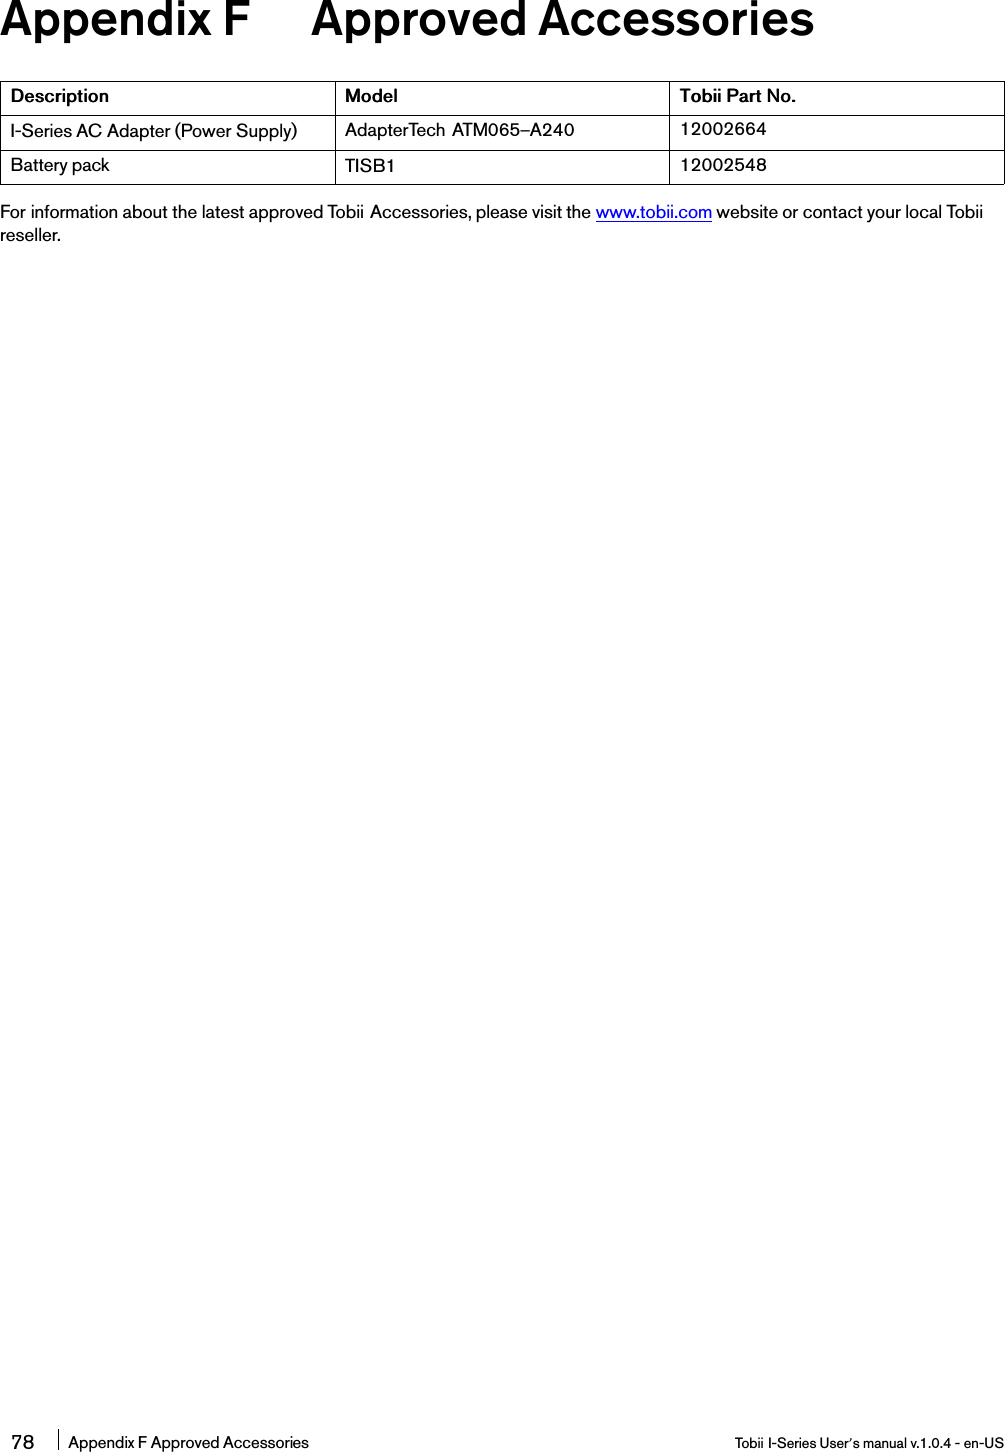
Tobii TOBIII15A Rugged tablet PC with 15 inch screen and an optional eyetracking module integrated User Manual

Tobii Technology AB Rugged tablet PC with 15 inch screen and an optional eyetracking module integrated

User Manual

UUsseerr’’ss MMaannuuaallTToobbiiii II--SSeerriieessI–12I–15
Tobii I-Series User’s manualVersion 1.0.405/2013All rights reserved.© Tobii Technology ABThe information contained in this document is proprietary toTobii Technology. Any reproduction in part or whole withoutprior written authorization by Tobii Technology is prohibited.Products that are referred to in this document may be eithertrademarks and/or registered trademarks of the respectiveowners. The publisher and the author make no claim to thesetrademarks.While every precaution has been taken in the preparation ofthis document, the publisher and the author assume noresponsibility for errors or omissions, or for damages resultingfrom the use of information contained in this document orfrom the use of programs and source code that mayaccompany it. In no event shall the publisher and the authorbe liable for any loss of profit or any other commercialdamage caused or alleged to have been caused directly orindirectly by this document.Content subject to change without notice.Please check Tobii web site www.tobii.com for updatedversions of this document.The following products are protected by U.S. Patent 7,572,008:•I–12 ET•I–12 ETR•I–15 ET•I–15 ETRYou can locate the Type of I-Series device on the label on the back side.
Table of Contents11 IInnttrroodduuccttiioonn .................................................................................................................................................................................................................................................................... 111.1 Explanation of Admonitions......................................................................................................11.2 Symbols and Markings ............................................................................................................11.3 Intended Use .........................................................................................................................31.3.1 Portable Use...........................................................................................................31.3.2 Mounted Use..........................................................................................................41.4 Package Contents..................................................................................................................422 SSaaffeettyy........................................................................................................................................................................................................................................................................................ 552.1 Avoiding Hearing Damage .......................................................................................................52.2 Temperature ..........................................................................................................................52.3 Power Supply and Batteries.....................................................................................................62.4 Mounting...............................................................................................................................62.5 Emergency ............................................................................................................................72.6 Infrared —Eye Tracker ............................................................................................................72.7 Epilepsy................................................................................................................................72.8 Electricity ..............................................................................................................................72.9 Child Safety...........................................................................................................................72.10 Environmental Control.............................................................................................................72.11 Gaze Interaction.....................................................................................................................733 OOvveerrvviieeww ooff tthhee TToobbiiii II––1122 aanndd II––1155 ...................................................................................................................................................................................... 883.1 Key Features..........................................................................................................................83.2 Product Layout.......................................................................................................................83.2.1 The Tobii I–12 and Tobii I–15....................................................................................83.2.2 Ports, Sensors and Device Buttons............................................................................93.3 PreinstalledSoftware............................................................................................................113.4 Configuring the Device..........................................................................................................113.5 Accessing the microSD-Card ................................................................................................123.5.1 Removing the microSD-card...................................................................................123.5.2 Inserting the microSD-Card....................................................................................133.6 Tobii Quick Release Adapter Plate..........................................................................................133.6.1 Mounting the Tobii QR Adapter Plate .......................................................................143.6.2 Removing the Tobii QR Adapter Plate ......................................................................1444 BBaatttteerriieess iinn tthhee TToobbiiii II--SSeerriieess........................................................................................................................................................................................................11554.1 Batteries .............................................................................................................................154.1.1 Hot Swappable.....................................................................................................154.2 Charging.............................................................................................................................154.2.1 Checking Charge Level..........................................................................................164.3 Inserting and Releasing the Batteries ......................................................................................164.3.1 Inserting the Batteries............................................................................................164.3.2 Releasing the Batteries..........................................................................................1655 UUssiinngg tthhee TToobbiiii II--SSeerriieess ..........................................................................................................................................................................................................................11885.1 Starting the Device...............................................................................................................185.1.1 Password Information ............................................................................................185.1.2 I-Series Welcome Guide........................................................................................185.2 Shutting Down the Device .....................................................................................................185.3 Using Tobii Gaze Interaction ..................................................................................................19
5.3.1 Positioning ...........................................................................................................195.3.2 Track Box.............................................................................................................195.3.3 Track Status Viewer...............................................................................................205.3.4 Positioning Guide..................................................................................................205.4 Using Windows Control ........................................................................................................215.4.1 Windows Control Type ..........................................................................................215.4.2 Starting and Disabling Tobii Windows Control...........................................................215.4.3 Using Gaze Selection ............................................................................................225.4.4 Using Mouse Emulation..........................................................................................265.5 Wake the I-Series from Sleep with Gaze Interaction..................................................................285.6 Pause/Resume Gaze Interaction and Put the I-Series to Sleep with Gaze Interaction.....................295.7 Using the Cameras...............................................................................................................305.8 Using the GEWA Programmable IR Remote Control .................................................................305.8.1 Handling Tobii Product Key.....................................................................................305.9 Adjusting the Volume ............................................................................................................305.10 Adjusting the Sound .............................................................................................................315.11 Performing a Factory Recovery ..............................................................................................315.12 Calibrating the Touch Screen.................................................................................................3266 CCoonnffiigguurriinngg tthhee II--SSeerriieess wwiitthh tthhee II--SSeerriieess CCoonnttrrooll CCeenntteerr............................................................................................................33336.1 Buttons...............................................................................................................................346.1.1 Play Sound when Pressed......................................................................................346.1.2 DisableAll Buttons................................................................................................346.2 Display................................................................................................................................356.2.1 Brightness Adjustment...........................................................................................356.2.2 Display Rotation....................................................................................................356.3 Switches.............................................................................................................................366.3.1 Play Sound when Pressed......................................................................................366.3.2 Configuring a Switch to Power On ..........................................................................366.3.3 Configuring a Switch to Power Off ..........................................................................376.4 Wake-on-Gaze® .................................................................................................................376.5 Wireless..............................................................................................................................386.5.1 WLAN .................................................................................................................386.5.2 Bluetooth® for Mobile Phone Communication...........................................................396.6 Safety.................................................................................................................................406.6.1 Audio...................................................................................................................406.6.2 Temperature Control..............................................................................................406.7 Tobii Product Key.................................................................................................................416.8 Setup & Updates..................................................................................................................426.8.1 I-Series Welcome Guide........................................................................................426.8.2 I-Series Update Notifier .........................................................................................426.9 System................................................................................................................................436.9.1 Version & Model....................................................................................................436.9.2 Backup................................................................................................................446.10 Creating Shortcuts to Actions................................................................................................456.10.1 Available Actions...................................................................................................456.10.2 Selecting Actions..................................................................................................4577 TToobbiiii GGaazzee IInntteerraaccttiioonn SSeettttiinnggss ................................................................................................................................................................................................44777.1 Accessing the Tobii Gaze Interaction Settings..........................................................................477.2 Calibration...........................................................................................................................47
7.2.1 Starting Calibration................................................................................................487.2.2 Interrupting Calibration...........................................................................................487.2.3 Customizing Active Eye..........................................................................................487.2.4 Improving Calibration Point(s) .................................................................................497.2.5 Removing Calibration Point(s).................................................................................507.2.6 Customizing the Calibration....................................................................................507.2.7 Customizing the Calibration Area.............................................................................517.3 Interaction...........................................................................................................................527.4 User Profile..........................................................................................................................537.4.1 Creating a New Profile...........................................................................................537.4.2 Selecting Current User Profile.................................................................................547.4.3 Deleting a Profile...................................................................................................547.5 Windows Control .................................................................................................................547.5.1 Auto Start ............................................................................................................547.5.2 Windows Control Type ..........................................................................................547.6 System Settings...................................................................................................................567.6.1 System Off-Screen Menu.......................................................................................567.6.2 Positioning Guide..................................................................................................577.7 System Information...............................................................................................................5788 GGaazzee SSeelleeccttiioonn SSeettttiinnggss........................................................................................................................................................................................................................55998.1 The General Settings Tab ......................................................................................................598.2 The Keyboard Settings Tab....................................................................................................6099 PPrroodduucctt CCaarree............................................................................................................................................................................................................................................................66119.1 Temperature & Humidity........................................................................................................619.1.1 General Use.........................................................................................................619.1.2 Transportation and Storage ....................................................................................619.2 Cleaning .............................................................................................................................619.2.1 Cleaning of the Speakers .......................................................................................619.3 Placement...........................................................................................................................619.4 Transporting the I-Series Device.............................................................................................619.5 Disposingof the Batteries......................................................................................................629.6 Disposingof the I-Series Device.............................................................................................62AAppppeennddiixx AA SSuuppppoorrtt,, WWaarrrraannttyy,, TTrraaiinniinngg RReessoouurrcceess........................................................................................................................................6633A1 Customer Support................................................................................................................63A2 Warranty .............................................................................................................................63A3 Training Resources...............................................................................................................63AAppppeennddiixx BB CCoommpplliiaannccee IInnffoorrmmaattiioonn..........................................................................................................................................................................................6644B1 FCC Statement....................................................................................................................64B1.1 For P15B Equipment.............................................................................................64B1.2 For Portable Devices .............................................................................................64B2 Radio Wave Exposure and Specific Absorption Rate (SAR) Information.......................................64B3 Industry Canada Statement....................................................................................................68B4 CE Statement......................................................................................................................68B5 Standards ...........................................................................................................................68AAppppeennddiixx CC CCoommppuutteerr DDeevviiccee SSttaatteess ooff OOppeerraattiioonn ..........................................................................................................................................7700AAppppeennddiixx DD MMaaxxiimmuumm AAlllloowweedd TTeemmppeerraattuurree..................................................................................................................................................................7722AAppppeennddiixx EE TTeecchhnniiccaall SSppeecciiffiiccaattiioonnss........................................................................................................................................................................................7733E1 Standard I-Series.................................................................................................................73E2 Radio Free I-Series...............................................................................................................74
E3 Battery pack ........................................................................................................................76E4 Eye Tracker. .........................................................................................................................76AAppppeennddiixx FF AApppprroovveedd AAcccceessssoorriieess ..............................................................................................................................................................................................7788
1 IntroductionThank you for purchasing a Tobii I-Series device from Tobii Technology!To ensure the optimal performance of this product, please take the time to read this manual carefully.The Tobii I-Series device is available in two different sizes: the Tobii I–12 with a 12.1" screen and the Tobii I–15 with a 15.0"screen. The Tobii I-Series is a Gaze Interaction device but can be ordered without the Gaze Interaction function.This User’s Manual covers:•The I-Series device, models Tobii I–12 and Tobii I–15.•The I-Series Control Center (for controlling the device and the Tobii Product Key).•The Tobii Gaze Interaction functions1.1 Explanation of AdmonitionsIn this manual we use three (3) levels of admonitions as follows:Is used for notifying the user of something important or of something that needs special attention.Is used to inform of something that could cause harm to, or malfunction of, the equipment.Is used to inform of something in which there is a conceivable risk of harm to the user if the Warning is ignored.Is used to inform of something that can cause damage to hearing.Is used to inform of something that cause permanent bodily harm with prolonged skin contact if the Warning isignored.1.2 Symbols and MarkingsThis appendix provides information about the symbols that are used on the I-Series, its accessories or packaging.SSyymmbbooll oorr MMaarrkkiinnggss DDeessccrriippttiioonnUSB 3.0 PortUSB 2.0 PortsPower OnRJ 45 Ethernet PortSW13.5 mm Switch port 1SW23.5 mm Switch port 2Tobii I-SeriesUser’s manual v.1.0.4 - en-US 1 Introduction 1
SSyymmbbooll oorr MMaarrkkiinnggss DDeessccrriippttiioonnPower ConnectorHead phone jack 3,5 mmConnector for an HDMI1.3 cableTo release the right batteryTo release the left batteryDispose of in accordance with your country's requirements.CE is the abbreviation of the European Communities and thismark tells customs officials in the European Union that theproduct complies with one or more of the EC DirectivesThis mark is a certification mark employed on electronic prod-ucts manufactured or sold in the United States which certifiesthat the electromagnetic interference from the device is underlimits approved by the Federal Communications Commission.China Compulsory CertificateUL Classification Marks for Canada and the United StatesRoHS CompliantConsult User´s ManualLi-IonLi-Ion rechargeable battery. Must be recycled or disposedproperlyRecyclable materialType L and Type R Listing Marks for Canada and the UnitedStatesConforms to relevant Australian EMC requirementsJapanese certification for electrical/electronic appliances andcomponents21 Introduction Tobii I-Series User’s manual v.1.0.4 - en-US
SSyymmbbooll oorr MMaarrkkiinnggss DDeessccrriippttiioonn5Recycling in ChinaRoHSDispose of in accordance with your country's requirements.Safety Class II equipment (reinforced insulation)This mark show the pin out polarity on the AC/DC PowerAdapter.Recognized component mark for Canada and the UnitedStatesIEC 60601-1EN 60601-1The most recognized International Safety mark. This safetylisting signifies that the product was tested to IEC 60601–1IP43Enclosure ingress protection code per IEC 605291.3 Intended UseThe Tobii I-Series is an Assistive and Alternative Communication (AAC) product, a purpose built Speech Generating Device(SGD) designed to provide to its users increased communication ability and greater independence.The Tobii I-Series is intended primarily to provide, and act as, a compliment to everyday communication for people that have chal-lenges in their ability to speak due to injury, disability or illness. This intended use is reflected in design features such as long last-ing batteries, superior sound quality, high durability, built in environmental control and connectivity features.The Tobii I-Series is a Gaze Interaction device with a built-in Tobii Eye Tracker (optional) and a capacitive touch screen for touchaccess. The device is intended to be used in two orientations: one, upright and mounted (or standing upright, vertically, on an ap-propriate surface) for Gaze Interaction use, and two, lying flat (resting in a horizontal orientation) for touch access optimization.Tobii Gaze Interaction and touch can be used in combination with switches, keyboard and/or scanning as additional inputmethods.The Tobii I-Series is designed primarily for face-to-face communication and secondarily for long distance communication, com-puter access and on-line social interaction. The Tobii I-Series allows the user to communicate via text or symbols to generatesynthesized (computer voice) or digitized (recorded voice) speech for face-to-face communication. The variety of communicationmethods allows Tobii I-Series users the ability to realize their full potential.The Tobii I-Series allows its user many options of communication through text message, chat and voice calls via Bluetooth® tocell phone, WiFi to Skype®, Internet to E-mail and other third party applications such as Facebook®.With the Tobii I-Series, users have the freedom and flexibility provided via the Microsoft® Windows environment, as well as theoption to control TV’s and other household appliances via the GEWA Programmable IR Remote Control.The Tobii I-Series meets the definition for durable medical equipment; and is registered as a Class 1 medical device. The TobiiI-Series is available in two (2) sizes; and is available as a dedicated (locked) Speech Generating Device.The I-Series device does not sustain or support life.In case of failure of the I-Series device, the user cannot communicate using it.1.3.1 Portable UseA portable I-Series can be used in two (2) different positions.Tobii I-SeriesUser’s manual v.1.0.4 - en-US 1 Introduction 3
•Upright orientation•Resting orientationUUpprriigghhtt OOrriieennttaattiioonn RReessttiinngg OOrriieennttaattiioonnThe UUpprriigghhtt orientation is optimized for Gaze Interaction users and the RReessttiinngg orientation is optimized for Touch or Scanusers.1.3.2 Mounted UseThe I-Series can be mounted on to several mounting systems. Mount the Tobii Quick Release (QR) adapter plate on to the de-vice. The Tobii QR adapter plate can be attached to the following support systems:•Daessy•REHAdaptFor more information, see3.6 Tobii Quick Release Adapter Plate, page 13andAppendix F Approved Accessories, page 78.1.4 Package ContentsThe items below are included with your I-Series package:•1 Device (12ʺor 15ʺ)•1 Eye tracker (built in)•1 Tobii QR adapter plate•2 Batteries•1 Power Supply•1 Windows 7 Home Premium license•1 Tobii Communicator (pre-installed)•1 Tobii Sono Suite (pre-installed)•1 USB stick with Tobii Communicator and Tobii Sono Suite•1 I-Series User’s Manual (on the device as a PDF document)•1 Quick Start Manual (printed)•1 Getting Started with Essentials TC 4.8 (printed)•Safety and Compliance documents•Warranty DocumentKKeeeepp tthhee oorriiggiinnaall ppaacckkaaggiinngg mmaatteerriiaallss ffoorr tthhee TToobbiiii II--SSeerriieess..In case the device needs to be returned to Tobii for Warranty related issues or repair, it is required that the originalpackaging (or equal equivalent) is used for shipping.41 Introduction Tobii I-Series User’s manual v.1.0.4 - en-US
2 SafetyThe I-Series device has been tested and approved as compliant to all the Specifications and Standards listed inAppendix BCompliance Information, page 64of this manual and in theAppendix E Technical Specifications, page 73– including, but notlimited to, the Medical Device Standard (Class 1/Type B). Nevertheless, in order to ensure safe operation of your Tobii I-Seriesdevice, there are a few safety warnings to bear in mind:NNoo mmooddiiffiiccaattiioonn ooff tthhiiss eeqquuiippmmeenntt iiss aalllloowweeddThe I-Series is not to be used as a life supporting Device, and it shall not be relied on in case of loss of function due topower loss or other causes.There could be a choking hazard risk if small parts detach from the I-Series device.The I-Series device shall not be exposed to or used in heavy rain or weather conditions outside the Technical Specifi-cation of the I-Series device.The I-Series device shall only be used with I-Series specific Accessories that have a mounting instruction includedwith the accessory.Young children or people with cognitive disabilities should not have access to, or the use of, the I-Series device with-out parental or guardian supervision.Do no attach any decorations, post it notes or similar on the screen side of the I-Series device, that may interfere withthe Gaze Interaction or touch screen performance.2.1 Avoiding Hearing DamagePermanent hearing loss may occur if earphones, headphones or speakers are used at high volume. To prevent this, thevolume should be set to a safe level. You can become desensitized over time to high sound levels which may thensound acceptable yet still could be damaging your hearing. If you experience symptoms such as ringing in your ears,please lower the volume or stop using the earphones/headphones. The louder the volume, the less time is required be-fore your hearing could be affected.Hearing experts suggest the following measures to protect your hearing:•Limit the amount of time you use earphones or headphones at high volume.•Avoid turning up the volume to block out noisy surroundings.•Turn the volume down if you cannot hear people speaking near you.To establish a safe volume level:•Set your volume control at a low setting.•Slowly increase the sound until you can hear it comfortably and clearly, without distortion.2.2 TemperatureThis device can be made to operate in two different modes, Portable and Mounted. When the device is in Mountedmode it is allowed to run at a higher temperature; it sets the maximum allowable environmental temperature to its high-est level. The risk with running the device in this mode is that it can reach temperatures in which prolonged use with di-rect skin contact may cause permanent bodily harm. Portable mode sets the maximum device temperature shut downlimit to a lower temperature, reducing the risk for permanent bodily harm caused by prolonged exposure to the skin.Only choose Mounted mode when the device is mounted on a wheelchair, table, etc, with a proper mounting system.Tobii I-SeriesUser’s manual v.1.0.4 - en-US 2 Safety 5
Due to use in direct sunshine or in any other hot environment the I-Series device may have hot surfaces. There is a builtin temperature sensor that monitors the temperature. If the sensor detects temperatures above the temperature speci-fied inTable D.1 Maximum Allowed Temperature, page 72for portable mode and mounted mode the device will auto-matically trigger a Windows Shut Down or Hibernate (depending on Windows Power Button configuration) to notcause the User any risk of harm. It may take a while before I-Series device can be restarted as the unit may first needtime to cool down.2.3 Power Supply and BatteriesThe I-Series device uses Lithium Ion batteries. These batteries have a storage temperature range of between -20℃/-4 ℉and 40 ℃/104 ℉within 6 months.If you are in a hot environment, be aware that it can affect the ability to charge the batteries. The internal temperaturehas to be between 0 ℃/32 ℉and 45 ℃/113 ℉for the batteries to charge. If the internal battery temperature raisesabove 45 ℃/113 ℉the batteries will not charge at all.Move the I-Series device and the batteries to a cooler environment to let the batteries charge properly.Avoid exposing the batteries to fire or to temperatures above 50 ℃/122 ℉. These conditions may cause a battery tomalfunction, generate heat, ignite or explode. Be aware that it is possible, in a worst case scenario, for temperatures toreach greater than those stated above in, for example, the trunk of a car on a hot day. So, storing the device, with bat-teries installed, in a hot car trunk could conceivably lead to a malfunction.Do not disassemble or harm the battery. Pay attention to the environmental laws and regulations which apply in yourarea when disposing of batteries.For safe operation of the I-Series device, use only charger, batteries and accessories approved by Tobii Technology.Do not open, or modify, the metal casing of the I-Series device or of the power supply, since you may be exposed topotentially hazardous electrical voltage. The device contains no serviceable parts. If the I-Series device or it’s accesso-ries are mechanically damaged, ddoo nnoott ttoo uussee tthheemm.If the batteries are not charged or the I-Series is not powered up by the power supply, the I-Series device will shutdown.If the Power Supply Cord is damaged, replaceable by Service Personnel onlyDo not connect any devices with a non-medical grade power supply to any connector on the I-Series device.The appliance coupler of the power supply or separable plug is used as the Mains Disconnection Device, please donot to position the I-Series device so that it is difficult to operate the disconnection device.Special regulations apply to shipping Lithium-ion batteries. If dropped, crushed, or short-circuited, these batteries canrelease dangerous amounts of heat and may ignite, and are dangerous in fires.Please reference IATA regulations when shipping lithium metal or lithium ion batteries or cells:http://www.iata.org/whatwedo/cargo/dangerous_goods/Pages/lithium_batteries.aspx2.4 MountingThe I-Series should be mounted according to MANUFACTURERinstructions of approved mounts. Tobii Technologyor its agents are not liable for damage or injuries to a person or its property due to a I-Series falling from a mountedconfiguration. The mounting of a I-Series is done entirely at the user’s own risk.62 Safety Tobii I-Series User’s manual v.1.0.4 - en-US
2.5 EmergencyDo not rely on the device for emergency calls or banking transactions. We recommend having multiple ways to com-municate in emergency situations. Banking transactions should only be carried out with a system recommended by,and approved according to the standards of, your bank.2.6 Infrared —Eye TrackerWhen activated, the Tobii I-Series emits pulsed infrared (IR) light. Certain medical devices are susceptible to disturb-ance by IR light and/or radiation. Do not use the I-Series when in the vicinity of such susceptible medical devices astheir accuracy or proper functionality could be inhibited.2.7 EpilepsySome people with PPhhoottoosseennssiittiivvee EEppiilleeppssyy are susceptible to epileptic seizures or loss of consciousness when ex-posed to certain flashing lights or light patterns in everyday life. This may happen even if the person has no medical his-tory of epilepsy or has never had any epileptic seizures.A person with Photosensitive Epilepsy would also be likely to have problems with TV screens, some arcade games,and flickering fluorescent bulbs. Such people may have a seizure while watching certain images or patterns on a moni-tor, or even when exposed to the light sources of an eye tracker. It is estimated that about 3-5% of people with epi-lepsy have this type of Photosensitive Epilepsy. Many people with Photosensitive Epilepsy experience an "aura" or feelodd sensations before the seizure occurs. If you feel odd during use, move your eyes away from the eye tracker.2.8 ElectricityDo not open the casing of the I-Series device, since you may be exposed to potentially hazardous electrical voltage.The device contains no serviceable parts.2.9 Child SafetyThe I-Series are advanced computer systems and electronic devices. As such they are composed of numerous sepa-rate, assembled parts. In the hands of a child certain of these parts have the possibility of being separated from the de-vice, possibly constituting a choking hazard or another danger to the child.Young children should not have access to, or the use of, the device without parental or guardian supervision.2.10 Environmental ControlThe GEWA Programmable IR Remote Control —Environmental Control Unit (ECU) is not to be relied on as the onlymethod of interaction with IR controlled devices.2.11 Gaze InteractionSome people may experience a certain amount of fatigue (due to intentional eye focusing and hard concentration) oreven a dryness of the eyes (due to less frequent blinking) when first getting used to Gaze Interaction. If you are experi-encing fatigue or dry eyes start off slowly and limit the length of your Gaze Interaction sessions to your comfort level.Remoisturizing eye drops can be helpful to combat dryness.Tobii I-SeriesUser’s manual v.1.0.4 - en-US 2 Safety 7
3 Overview of the Tobii I–12 and I–153.1 Key FeaturesThe I-Series has several built-in features. Some of these come standard and some can be ordered as additional features.SSttaannddaarrdd ffeeaattuurreess:: 2 × Camera, 1 × microphone, 2 × speakers, 1 × ECU (Environmental Control Unit), 1 × Bluetooth® (formobile phones etc) and 1 × WLAN (Wireless Local Area Network).RRaaddiioo FFrreeqquueennccyy ((RRFF)) FFrreeee ffeeaattuurreess:: SSttaannddaarrdd ffeeaattuurreess:: 2 × Camera, 1 × microphone, 2 × speakers and 1 × ECU (Envi-ronmental Control Unit)AAddddiittiioonnaall ffeeaattuurree:: Gaze Interaction.The additional feature can be purchased with the initial order or as an additional Tobii Product Key after delivery, except forGaze Interaction for the type I–12 R which needs to be sent in to Tobii for upgrade. To order a Tobii Product Key orGaze Interaction for the type I–12 R, please contact Tobii Customer Service, your re-seller or your sales representative.3.2 Product LayoutA I-Series device has a color Capacitive touch, LED Backlight screen. The Tobii I–12 has a 12.1ʺscreen with a 1024 × 768 pixelresolution. The Tobii I–15 has a 15.0ʺscreen with a 1024 × 768 pixel resolution.3.2.1 The Tobii I–12 and Tobii I–1512”15”83 Overview of the Tobii I–12 and I–15 Tobii I-Series User’s manual v.1.0.4 - en-US
3.2.2 Ports, Sensors and Device Buttons45830961723FFiigguurree 33..11 Front and BackPPoossiittiioonn DDeessccrriippttiioonn PPoossiittiioonn DDeessccrriippttiioonn1Webcam 2 MP Fixed Focus (FF) 6GEWA Programmable IR Re-mote Control (Transmitter)This port is just for TransmittingIR Signals, to program the de-vice, use port in Position 27 inFigure 3.2 Bottom, Left andRight Side, page 102Light sensor 7Camera 5 MP Auto Focus (AF)3Microphone 8Mounting4Eye Tracker (If included, built in) 9Speakers5Carrying grip 30 LabelTobii I-SeriesUser’s manual v.1.0.4 - en-US 3 Overview of the Tobii I–12 and I–15 9
1011121314151617181920212223272829242625FFiigguurree 33..22 Bottom, Left and Right SidePPoossiittiioonn DDeessccrriippttiioonn PPoossiittiioonn DDeessccrriippttiioonn10 Power button 20 Menu button11 Volume Up button 21 USB 3.0 connector12 Volume Down button 22 2× USB 2.0 connector13 Head phone jack 3,5 mm 23 RJ45 Network connector14 Connector for an HDMI1.3cable24 Battery15 Switch Port 1 25 Slide lock for battery16 Switch Port 2 26 Battery indicator17 Power Connector 27 GEWA Programmable IR Re-mote Control (Transmitter andReceiver)Use this port when programmingthe GEWA from within TobiiCommunicator.18 Quick Access Button 1(Configurable)28 microSD-card (under lid)19 Quick Access Button 2(Configurable)29 I/O covers (for fulfilling IP43)10 3 Overview of the Tobii I–12 and I–15 Tobii I-Series User’s manual v.1.0.4 - en-US
Never force a connector into a port. If the connector and port do not join with reasonable ease, they probably do notmatch. Make sure that the connector matches the port and that you have positioned the connector correctly in relationto the port.Be extra careful with the USB connectors.3.3 Preinstalled SoftwareThe I-Series device is delivered with all preordered and required software installed and ready to use. Should a reinstallation be-come necessary at any stage perform a Factory Recovery. For more information, see5.11 Performing a Factory Recovery , page31.The product number for Windows® can be found on the back of the I-Series device.3.4 Configuring the DeviceUse the preinstalled II--SSeerriieess CCoonnttrrooll CCeenntteerr to configure the hardware functions on the device. You can access II--SSeerriieessCCoonnttrrooll CCeenntteerr in one of the following ways:•Double-click on the II--SSeerriieess CCoonnttrrooll CCeenntteerr shortcut on the desktop, .or1. Go to SSttaarrtt mmeennuu >CCoonnttrrooll PPaanneell.2. Double-click II--SSeerriieess CCoonnttrrooll CCeenntteerr, , if the Control Panel is in Classic View.If the Control Panel is in Category view, select VViieeww bbyy:: >> SSmmaallll iiccoonnss oorr LLaarrggee iiccoonnss, and Double-click II--SSeerriieess CCoonn--ttrrooll CCeenntteerror1. Go to SSttaarrtt mmeennuu >> AAllll PPrrooggrraammss >> TToobbiiii >> II--SSeerriieess >> II--SSeerriieess CCoonnttrrooll CCeenntteerr.Tobii I-SeriesUser’s manual v.1.0.4 - en-US 3 Overview of the Tobii I–12 and I–15 11
2. Click II--SSeerriieess CCoonnttrrooll CCeenntteerr,, .In the list to the left, select which hardware configuration you want to change. In the area to the right, the different settings will berevealed. The changes are instantly executed.For more information about configuring the I-Series with the I-Series Control Center, see6 Configuring the I-Series with theI-Series Control Center, page 33.Anywhere you see this icon, , an information box is displayed when you briefly rest the mouse pointer on the iconor by touching the icon on the screen.3.5 Accessing the microSD-CardThe microSD-Card (position 28 inFigure 3.2 Bottom, Left and Right Side, page 10) is installed in the I-Series device by default.3.5.1 Removing the microSD-cardTo remove the microSD-card:1. Place the I-Series device face down on a flat surface.2. Use a Phillips screwdriver to remove the screw that fastens the lid in place.3. Remove the lid.4. Press to release the microSD-card.5. Pull the card out of the socket.6. Replace the lid.7. Tighten the screw with a Phillips screwdriver to fasten the lid in place.12 3 Overview of the Tobii I–12 and I–15 Tobii I-Series User’s manual v.1.0.4 - en-US
3.5.2 Inserting the microSD-CardTo install the microSD-card:1. Place the I-Series device face down on a flat surface.2. Use a Phillips screwdriver to remove the screw that fastens the lid in place.3. Remove the lid.4. Carefully push the microSD-card into the socket.Do not use force when pushing in the microSD-card. If the microSD-card and socket do not join with reason-able ease, they probably do not line up.5. Replace the lid.6. Tighten the screw with a Phillips screwdriver to fasten the lid in place.3.6 Tobii Quick Release Adapter PlateTobii QR adapter plate has two sides:Daessy REHAdaptMake sure the required side of the Tobii QR adapter plate is face away from the I-Series for the mounting system to use.Tobii I-SeriesUser’s manual v.1.0.4 - en-US 3 Overview of the Tobii I–12 and I–15 13
3.6.1 Mounting the Tobii QR Adapter PlateTo mount the Tobii QR adapter plate:1. Place the I-Series device face down on a flat surface.2. Select the required side of the plate, see1.3.2 Mounted Use, page 4.3. Place the plate onto the device with the required side facing away from the unit.4. Tighten the three (3) screws using a Torx T20 screwdriver to that fasten the plate to the unit.3.6.2 Removing the Tobii QR Adapter PlateTo remove the Tobii QR adapter plate:1. Place the I-Series device face down on a flat surface.2. Use a Torx T20 screwdriver to remove the three (3) screws that fasten the plate to the unit.3. Remove the plate.14 3 Overview of the Tobii I–12 and I–15 Tobii I-Series User’s manual v.1.0.4 - en-US
4 Batteries in the Tobii I-Series4.1 BatteriesThe I-Series device has two battery compartments. The batteries are of the same size and capacity for both the Tobii I–12 andI–15, seeAppendix E Technical Specifications, page 73.PushFFiigguurree 44..11 Battery with Indicator for Remaining Capacity4.1.1 Hot SwappableYou can remove/replace one battery without switching off the I-Series device, providing that the remaining battery is sufficientlycharged. The remaining battery requires being at least ~10% charged to maintain device operation.Please allow the I-Series device a few seconds to detect the newly inserted battery before removing the other battery.4.2 ChargingThe batteries shall only be charged using the included adapter, or by using the Tobii I-Series Table Charger (not included, sepa-rate purchase required). When the I-Series device is shut down and the adapter is plugged in, the charging of completely dis-charged batteries may take up to 5 hours. The device can be used while the batteries are being charged, though this may affectthe time a battery takes to reach full capacity.To be sure that charging takes place in both the I-Series device and when using the I-Series Table Charger, be sure toplug the adaptor into both the wall socket and the device or Charger BEFOREyou insert the batteries.The expected battery lifetime is 500 charge/discharge cycles. After that, the capacity of the battery will decrease by about 20%in usage time.For battery storage and charging temperatures, see2 Safety, page 5.Tobii I-SeriesUser’s manual v.1.0.4 - en-US 4 Batteries in the Tobii I-Series 15
4.2.1 Checking Charge LevelClick on the battery icon, , in the Notification area to see the remaining charge of the battery, which is installed in thedevice.You may also, at any time, check the status of a battery by pressing the indicator button on the face of the battery. Five LEDs(light-emitting diodes) will indicate the remaining charge level. For example, three lit LEDs indicate a 60% remaining charge, seeFigure 4.1 Battery with Indicator for Remaining Capacity, page 15.When charging, the highest capacity LED indicator will be blinking.The lowest capacity LED indicator (the "20" LED), will also blink when the indicator button is pressed if the battery’scapacity has dropped below 10%. So don’t rely upon the blinking of the 20% indicator as a guarantee for charging.If the batteries have been deeply discharged (this can happen by leaving an empty battery inserted in the I-Series de-vice without the power adapter connected) you may not see any indication of charging when you reconnect the adapt-er properly to the I-Series device or the Table Charger. It may take some time (even up to 20 minutes) before you seean LED indication that any charging is taking place. The battery IS being charged during this duration though it is a re-covery charge raising the level enough to begin normal charging.4.3 Inserting and Releasing the BatteriesFor safety reasons, the I-Series device is delivered without the batteries inserted. The batteries are delivered only partiallycharged. The I-Series device can be used right away. It is nevertheless recommended that the batteries are charged for at leasttwo hours before using the device.4.3.1 Inserting the BatteriesTo insert the batteries:1. Insert a battery in the battery compartment.2. Press the battery until it locks in place. You should hear a click that confirms that the battery is in a locked place.4.3.2 Releasing the BatteriesIf the I-Series is in Upright orientation:1. Press the battery slide lock to the side.16 4 Batteries in the Tobii I-Series Tobii I-Series User’s manual v.1.0.4 - en-US
2. Pull the battery out (the battery will stop after ~1 cm / 0.4ʺ).3. Push the battery up a little bit (Do not push the battery all the way in again).4. Pull the battery out of the battery compartment..If the I-Series is in Resting orientation:1. Place the I-Series device face down on a flat surface.2. Press the battery slide lock to the side.3. Pull the battery out of the battery compartment.Tobii I-SeriesUser’s manual v.1.0.4 - en-US 4 Batteries in the Tobii I-Series 17
5 Using the Tobii I-SeriesNo skill other then reading is necessary for setting up the device. Follow this User´s Manual and the Quick Start Guide.5.1 Starting the DeviceStart the device in one of the following ways:•Press the power button on the right side of the device. (Position 9 inFigure 3.2 Bottom, Left and Right Side, page 10)•Activate a configured Switch (see6.3 Switches).When you have started the device, the Power LED will shine blue or green depending on if the device is connected to AC or onbatteries. For more information about the LED Behavior, seeAppendix C Computer Device States of Operation, page 70.5.1.1 Password InformationThe I-Series device is configured to start up, using the operating system present, without a password. Though unusual, there aresituations in which the password window could plausibly pop up; for example, when creating a new user in the operating system,when returning from the operating system’s sleep mode or when downloading software updates from the internet.Creating a new windows user and downloading updates from the internet could possibly compromise the system andsoftware settings of the operating system that have been set and installed at Tobii Technology.Should the password window pop up, requiring a password, the default password on all I-Series devices is, "TToobbiiii" (case sensi-tive). In order to type in the password use the Windows On-Screen Keyboard or an external USB keyboard (not included).If you decide to change the password, be sure to write it down in a safe place for later use.Suggested place to keep new password: ________________________Without the operating system’s access password, Tobii Support may be unable to assist you with any future difficulties.5.1.2 I-Series Welcome GuideWhen you start your I-Series Device for the first time you will be greeted by the I-Series Welcome Guide. The guide is a setupwizard that will walk you through some steps that will help you make the most of your device.Follow the instructions and select on NNeexxtt to get to the next page of the Guide.5.2 Shutting Down the DeviceThe device should be shut down using one of the following ways:•Use the start menu in Windows (recommended when possible).•Press a configured Switch for two to seven seconds.Pressing the Switch for more than 7 seconds will shut down the device immediately, disregarding any unsavedchanges.Should you be unable to shut the device down using either of the above, you can hold the power button on the right side of thedevice down for seven seconds. The device will consequently shut down immediately, without waiting for open applications toclose.This will not work if the side buttons have been disabled in the I-Series Control Center. For more information, see6.1.2 Disable All Buttons, page 34.This is not considered a "clean" Windows shut down and is thus not recommended unless completely necessary.18 5 Using the Tobii I-Series Tobii I-Series User’s manual v.1.0.4 - en-US
5.3 Using Tobii Gaze InteractionThe Tobii I-Series operate with precision regardless of glasses, contact lenses, eye color or light conditions. Gaze Interaction en-ables you to control the computer with your eyes using either Gaze Enabled applications (like Tobii Communicator) or throughthe two types of Tobii Windows Control. See5.4.1 Windows Control Type, page 21.5.3.1 PositioningX cm / inchesFFiigguurree 55..11 PositioningThe Tobii I-Series is designed to work optimally when it is parallel to the user’s eyes at a distance of about 60 cm (23.5 inches),seeFigure 5.1 Positioning, page 19.X cm / inchesFFiigguurree 55..22 Positioning when Users Leaning Sideways or Those Lying DownThis means that for those users leaning sideways or those lying down the I-Series also needs to be tilted in order to keep theusers eyes parallel to the screen and at the optimal distance, seeFigure 5.2 Positioning when Users Leaning Sideways or ThoseLying Down, page 19.Make sure the user is placed comfortably in relation to the optimal positioning of, and distance from, the unit. Be awarealso that the user’s comfort, as well as the Gaze Interaction performance, will be enhanced if the sun is not shining di-rectly on the screen or into the user’s eyes.The user should be positioned at the optimal distance to allow for the best possible Gaze Interaction.5.3.2 Track BoxThe Tobii I-Series allows for extensive Freedom of Head Movement. Once the I-Series is properly calibrated and placed in frontof the user, no further adjustments are required.The Tobii I-Series produces an industry leading sized track box with the approximate dimensions of 30 cm × 20 cm × 20 cm /11.8 in × 7.9 in × 7.9 in (Width × Height × Depth). The Track Box is an invisible box positioned approximately 60 cm (23.5 in)straight out from a point just above the middle of the screen.At 70 cm (27.5 in) the I-Series allows for lateral Freedom of Head Movement in an area of about 50 × 36 cm (20 × 14 in).In order to function properly for Gaze Interaction the user needs at least one eye in the track box at all times.Tobii I-SeriesUser’s manual v.1.0.4 - en-US 5 Using the Tobii I-Series 19
5.3.3 Track Status ViewerUse the Track Status viewer (see5.3.3.1 Showing Track Status, page 20for more information on how to open the Track Statusviewer) to help determine the optimal height and horizontal positioning for Gaze Interaction with the I-Series.•Ideally, the two dots that represent the user’s eyes should be in the middle of the Track Status viewer.•Use the distance meter on the right hand side of the Track Status viewer to determine the optimal distance the usershould be from the I-Series.•The white triangle in the distance meter should hover near the center, within the green, when the optimal distance fromthe I-Series is reached.For information about calibration of the I-Series see7.2 Calibration, page 47. Also check the lighting conditions, re-lated to what is mentioned above, when calibrating.5.3.3.1 Showing Track StatusThe track status viewer is a window/dialog where you can verify that the Gaze Interaction recognizes your eyes and that you arewell positioned in front of the device.Open the track status viewer in one of the following ways:•Open TToobbiiii GGaazzee IInntteerraaccttiioonn SSeettttiinnggss >> CCaalliibbrraattiioonn and select the TTrraacckk ssttaattuuss button.•Right-click (long-hold finger on icon for touch screen right clicking) on the TToobbiiii GGaazzee IInntteerraaccttiioonn SSeettttiinnggss icon, ,in the Notification area and select SShhooww ttrraacckk ssttaattuuss.5.3.4 Positioning GuideFor extra assistance in positioning, there is a PPoossiittiioonniinngg gguuiiddee that will show itself automatically in the bottom-right corner ofyour monitor.The PPoossiittiioonniinngg gguuiiddee is a visual guide that combines the function of the Track Status viewer with six different image based in-structions to help the user with correct positioning.The 6 instructions direct the user to:1. Move head down.2. Move head up.3. Move head to the right.20 5 Using the Tobii I-Series Tobii I-Series User’s manual v.1.0.4 - en-US
4. Move head to the left.5. Move head closer to the monitor.6. Move head farther away from the monitorMove head closer to the monitor. Move head to the right.The PPoossiittiioonniinngg gguuiiddee will automatically disappear when the user’s positioning is improved in the way that is directed by theguide.Some users may not want the PPoossiittiioonniinngg gguuiiddee to pop up every time their eyes leave optimal positioning.To turn On or Off the automatic PPoossiittiioonniinngg gguuiiddee, see7.6 System Settings, page 565.4 Using Windows ControlWindows Control allows you to access the desktop and all applications of your Windows computer with Gaze Interaction.5.4.1 Windows Control TypeWindows Control can be used in two different modes•Gaze Selection•Mouse EmulationTo select which type of Windows Control you wish to use and to customize Windows Control:•Open TToobbiiii GGaazzee IInntteerraaccttiioonn SSeettttiinnggss >> WWiinnddoowwss CCoonnttrrooll, see7.5 Windows Control, page 54•Select your preferred type of Windows Control under WWiinnddoowwss CCoonnttrrooll TTyyppee5.4.2 Starting and Disabling Tobii Windows ControlTo start Windows Control, right-click on the TToobbiiii GGaazzee IInntteerraaccttiioonn SSeettttiinnggss icon, , in the Notification area and selectEEnnaabbllee WWiinnddoowwss CCoonnttrrooll.Tobii I-SeriesUser’s manual v.1.0.4 - en-US 5 Using the Tobii I-Series 21
OrDouble-click on the TToobbiiii WWiinnddoowwss CCoonnttrrooll shortcut on the desktop, , This will immediately start Windows Control.To disable Windows Control, right-click on the TToobbiiii GGaazzee IInntteerraaccttiioonn SSeettttiinnggss icon, , in the Notification area and selectDDiissaabbllee WWiinnddoowwss CCoonnttrrooll.You can also start Windows Control from Tobii Communicator or alternative communication software, which has implementedthe functions provided by the Tobii Eye Control SDKAAuuttoo ssttaarrtt•Open TToobbiiii GGaazzee IInntteerraaccttiioonn SSeettttiinnggss >> WWiinnddoowwss CCoonnttrrooll.•Check the AAuuttoo ssttaarrtt wwiinnddoowwss ccoonnttrrooll aatt bboooott check box if you want Windows Control to auto start when theTobii Gaze Interaction Software starts.5.4.3 Using Gaze SelectionThe Gaze Selection mode of Windows Control makes it possible for the user to control a standard Windows desktop operatingsystem with a two step selection method which reduces the risks of unwanted clicks. It also prevents the following of the mousecursor with your gaze as opposed to the controlling of it (there is no floating mouse cursor in Gaze Selection).1. The first step is to select the desired Task from the docked Taskbar by looking at it.2. The second step is to look at the desired portion of the screen (or icon on the screen) where you want to execute theTask. An automatic zoom function is enabled, ending in the selection of the icon or execution of the task.5.4.3.1 Gaze Selection TaskbarAt the top of the Gaze Selection Taskbar there is a Track Status viewer. It allows you to verify that the eye tracker recognizes youreyes and that you are well positioned in front of the device.The Task Buttons in the Gaze Selection Taskbar can be in three different modes as shown in the figure below.•NNoorrmmaall ((UUnnsseelleecctteedd)) - No Task Button for Gaze Selection is chosen.•SSeelleecctteedd ((BBlluuee)) - The marked Task Button is selected and the Task will be executed after the automatic zoom when theuser looks at the desired position on the screen or icon on it. If the selection method is set to Switch in the Gaze Selec-tion Settings Dialog, the chosen Task Button will still remain active after executing the Task.•HHiigghh PPrreecciissiioonn((OOrraannggee)) - Same as SSeelleecctteedd but with a higher precision. HHiigghh PPrreecciissiioonn means that the zoom willprogress deeper before the final execution of the Task, making the desired portion of the screen bigger and easier to se-lect within. Activate this mode by resting your gaze on the Task Button until the color changes according to the imagebelow.22 5 Using the Tobii I-Series Tobii I-Series User’s manual v.1.0.4 - en-US
NormalPlace CursorGaze Drag & DropGaze KeyboardLeft ClickDouble ClickRight ClickSettingsTrack StatusPlace CursorGaze Drag & DropGaze KeyboardLeft ClickDouble ClickRight ClickSettingsTrack StatusSelected High PrecisionGaze Scroll Gaze Scroll5.4.3.2 Task ButtonsTTaasskk BBuuttttoonn AAccttiioonn DDeessccrriippttiioonnPlace Cursor Task that places the mouse cursor on a desired point/position. Usedfor mouse over functions, etc (this is not a "click").Gaze Scroll Task that, if performed on a scrollable window, enables a gaze-con-trolled way to scroll the page•Select the Task•Look at any scrollable area and hold your gaze, the Gaze Scrollicon will appear where you looked•Look above the icon to scroll up•Look below the icon to scroll down•Look back at the Gaze Selection Taskbar (or outside of thescreen) to end scrollingLeft Click Task that performs a single left-clickDouble Click Task that performs a double left-clickRight Click Task that performs a single right-clickGaze Drag & Drop Task that performs two "clicks", where the first one represent thestarting position for the drag and the second the drop position (tomove objects or select areas).•Select the Task•Look at the object you want to move or the starting point for thearea selection•Execute the Gaze Selection (first "click") by Switch or Gaze•Look immediately at the drop position for the object or end pointfor the area selection.•Execute the second "click" by Switch or GazeTobii I-SeriesUser’s manual v.1.0.4 - en-US 5 Using the Tobii I-Series 23
TTaasskk BBuuttttoonn AAccttiioonn DDeessccrriippttiioonnGaze Keyboard Task that opens an on-screen Gaze enabled keyboard for GazetypingSettings Task that opens the Settings DialogFor more information, see8 Gaze Selection Settings, page 595.4.3.3 Selection MethodsThere are two methods to execute the chosen Task. The method of choice is set from within the Gaze Selection Settings Dialog.Before executing a selection you select a Task from the Taskbar to execute. Gaze at your chosen task until it is highlighted as"Selected" or "High Precision".•GGaazzee - To execute the chosen Task, rest your gaze at the desired portion of the screen (or icon on the screen) whereyou want to execute the Task. An automatic zoom function is enabled, ending in the selection of the icon or execution ofthe task.•SSwwiittcchh - Two different execution modes.–SSiinnggllee aaccttiivvaattiioonn ooff tthhee SSwwiittcchh - the zoom function will execute in the same way as with the Gaze method and ac-cording to the settings made in the Gaze Selection Settings Dialog.–AAccttiivvaattee aanndd hhoolldd tthhee SSwwiittcchh - the zoom function will zoom continuously and end only upon the release / deactiva-tion of the switch.When using the Gaze method, you have to look back to the Taskbar to select a new Task after the execution of theTask, even if it is the same as you have just used.5.4.3.3.1 Sticky Tasks for SwitchWhen using the Switch method, the Task buttons will become "sticky" once you select them. This means that you do not have tolook back at the Taskbar if you want to repeat the execution of a selected Task, only if you want to change the Task.This allows for excellent use cases such as quick/continual surfing of the internet by selecting the Left Click Task once and thenrepeatedly selecting anything desired, without having to choose the Left Click Task again.5.4.3.3.2 Activating a Task with a Keyboard button instead of a SwitchSelecting the “Right Click Keyboard Button”,, on an attached keyboard will activate a Task selection. It can be used inexactly the same way as a connected switch. For more information on Switches, see5.4.3.3 Selection Methods, page 24.5.4.3.4 Gaze KeyboardBy selecting the Gaze Keyboard button on the Taskbar, the Gaze Keyboard will launch as an on-screen keyboard. The GazeKeyboard will be positioned either at the top or at the bottom of the screen depending on where the user has placed the lastmouse click (or last cursor position) before launching the Gaze Keyboard. The keyboard will place itself on the opposite side fromwhere the mouse/cursor is.The Gaze Keyboard consists of four keyboard pages in a rotating loop. The user can easily switch between the different key-board pages by selecting the next page buttons located to the far left and right on all pages of the Gaze Keyboard.The key on the keyboard where the user is looking will be indicated by a light frame around the character/function on the key.While the user is typing, the last 5-10 characters will be displayed in blue on the indicated/highlightedkey. This feature assiststhe user in easily spotting misspellings and reduces the need for looking at the actual spot where the text is inserted, thus in-creasing typing speed.24 5 Using the Tobii I-Series Tobii I-Series User’s manual v.1.0.4 - en-US
The four keyboard pages are:FFiigguurree 55..33 Default Startup PageFFiigguurree 55..44 First Page to the RightFFiigguurree 55..55 Second Page to the Right or LeftFFiigguurree 55..66 First Page to the LeftThe Shift, Ctrl, Alt, Win and Alt Gr keys will become "sticky" once selected. This means that they will stay selected untilthe user selects a new key from the keyboard. They will stay sticky if the next selected key is another sticky key.To write a letter with an accent:1. Select the accent2. Select the character3. The character will appear with the chosen accent.To delete a full word at a time instead of one character at a time:1. Select the Ctrl key2. Select the Backspace keyTobii I-SeriesUser’s manual v.1.0.4 - en-US 5 Using the Tobii I-Series 25
5.4.3.5 Gaze Selection in Combination with Region Based KeyboardsGaze Selection can be used in combination with other eye controlled applications. "Gaze Enabled" regions in other applicationsare active as long as there is no active Task in the Gaze Selection Toolbar. If you are using Gaze Selection with switch the TaskButtons will be "sticky", if you need to deselect a Task just look back at the selected Task for a short moment.5.4.3.6 Gaze Selection with "Windows Full Screen Mode"When using Gaze Selection to view images, films, and files or to run programs in Windows Full Screen mode the Gaze SelectionTaskbar will be covered.To be able to exit Windows Full Screen mode without the Taskbar an "Esc" command has been emulated with a Gaze selectable"X" in the top left corner of anything that is run in Windows Full Screen mode.To exit Windows Full Screen mode:•Rest your Gaze for a few moments on the "X" in the top left corner of the screen. The "X" will be highlighted in red while itis being activated.•Windows Full Screen mode will then be exitedThe "X" might be difficult to see sometimes depending on the colors of what is being viewed in Windows Full Screenmode. It always starts out large and shrinks to draw your attention to it.5.4.4 Using Mouse EmulationThe Mouse Emulation mode makes it possible for the user to emulate and control a standard PC mouse pointer on the screen.To configure the Mouse Emulation, go to Tobii Gaze Interaction Settings. For more information, see7.5.2.2 Mouse Emulation,page 555.4.4.1 Placing the Mouse Emulation MenuThe menu can be placed anywhere on the desktop or docked along the edge of the screen. You dock the Mouse Emulation26 5 Using the Tobii I-Series Tobii I-Series User’s manual v.1.0.4 - en-US
Menu by dragging it to the edge of the screen. You can also do this by pressing and dragging the Move icon . When themenu is docked you have to look outside the screen to bring up the Mouse Emulation Menu items.5.4.4.2 Clicking with Windows Control in Mouse Emulation ModeSelect what type of mouse click you want to perform from the BBuuttttoonn drop down list in the Mouse Emulation Menu.Right-click simulates a right mouse click.Left-click simulates a left mouse click.5.4.4.3 Magnifying with Windows Control in Mouse Emulation ModeTo use the magnifier, select the magnifier icon, , in the Mouse Emulation Menu.If you want to perform a click with the magnifier:1. Select the magnifier.2. Select the other options as usual. The options will now have changed to reflect the magnification state.Right Click ZoomLeft Click Zoom5.4.4.4 Selecting Mouse Emulation FunctionsYou can set different functions for clicking:Mouse cursorNo cursor movement on screenSingle-clickDouble-clickDrag and dropTobii I-SeriesUser’s manual v.1.0.4 - en-US 5 Using the Tobii I-Series 27
5.4.4.5 Pausing Windows Control in Mouse Emulation ModeTo pause Windows Control select the Pause icon in the Windows Control Menu.PausePausing Gaze Interaction can also be accomplished by looking at (about) the Tobii logo at the bottom of the TobiiI-Series, then selecting, using Gaze Interaction, the pause icon that pops up.For more information, see7.6.1 System Off-Screen Menu, page 565.4.4.6 Scrolling with Windows Control in Mouse Emulation ModeThe scroll buttons appear automatically in the upper right corner in any object which can be scrolled. The buttons will only appearon the window which has focus. To activate the scroll press the icon. If the buttons are in the way you can use the iconto hide them.When scroll mode is activated you will see a shaded gradient over the window which will be scrolled.To scroll, look at the top or bottom of this gradient area.Scroll functionality can be turned off in TToobbiiii GGaazzee IInntteerraaccttiioonn SSeettttiinnggss >> WWiinnddoowwss CCoonnttrrooll >> TTuurrnn ooffff ssccrroollll ffuunnccttiioonnaalliittyy.5.5 Wake the I-Series from Sleep with Gaze InteractionIt is possible to wake the I-Series from sleep with Gaze Interaction. This makes it possible for the user to be more independentand secure while alone or without a caregiver; during the night for example. If the user wants attention from the caregiver when28 5 Using the Tobii I-Series Tobii I-Series User’s manual v.1.0.4 - en-US
the user wakes at night, the user could wake the I-Series with Gaze Interaction and use the I-Series to communicate quickly toalert the caregiver. Waking the device from sleep in this way is called: WWaakkee--oonn--GGaazzee®®FFiigguurree 55..77 Wake-on-Gaze® AreaTo Wake-on-Gaze®:1. Make sure the Wake-on-Gaze® is activated, see6.4 Wake-on-Gaze®, page 37.2. Look at the area in between the two illuminators of the Eye Tracker at the bottom of the I-Series, seeFigure 5.7 Wake-on-Gaze® Area, page 29.The Eye Tracker will search for the users eyes every 3 seconds.The I-Series will wake up from Sleep and will be ready to use.5.6 Pause/Resume Gaze Interaction and Put the I-Series to Sleep withGaze Interaction1. While using Gaze Interaction it is possible to both Pause/Resume Gaze Interaction (if the user wants to rest their eyesfor a while) and to put the I-Series to Sleep (to reduce battery consumption, or in situations where the device is notneeded). Putting the device to sleep in this way is called SSlleeeepp--oonn--GGaazzee.FFiigguurree 55..88 System Off-Screen AreaTo Pause Gaze Interaction:1. Make sure the PPaauussee//RReessuummee System Off-Screen menu is activated, see7.6.1 System Off-Screen Menu, page 562. Look at the area where the System Off-Screen menu has been configured for your I-Series, seeFigure 5.8 System Off-Screen Area, page 29Tobii I-SeriesUser’s manual v.1.0.4 - en-US 5 Using the Tobii I-Series 29
For more information and for how to configure the System Off-Screen menu, see7.6.1 System Off-Screen Menu, page56.3. Selecting, using Gaze Interaction, the (Pause) icon that pops up.To Sleep-on-Gaze:1. Make sure the SSlleeeepp--oonn--GGaazzee System Off-Screen menu is activated, see7.6.1 System Off-Screen Menu, page 562. Look at the area where the System Off-Screen menu has been configured for your I-Series, seeFigure 5.8 System Off-Screen Area, page 29For more information and for how to configure the System Off-Screen menu, see7.6.1 System Off-Screen Menu, page56.3. Selecting, using Gaze Interaction, the (Sleep-on-Gaze) icon that pops up.4. Select YYeess for Sleep or NNoo for Cancel5.7 Using the CamerasThe two built-in cameras allows you to take snapshots of items in front of the I-Series device and also from the display side.Use TToobbiiii CCoommmmuunniiccaattoorr or other relevant software to operate the cameras.5.8 Using the GEWA Programmable IR Remote ControlThe I-Series device includes a GEWA Programmable IR Remote Control —Environmental Control Unit (ECU) with two (2) filterwindows:•1 Transmitter filter window —Position 6 inFigure 3.1 Front and Back, page 9•1 Transmitter and Receiver filter window —Position 27 inFigure 3.2 Bottom, Left and Right Side, page 10Use the Transmitter and Receiver filter window (position 27 inFigure 3.2 Bottom, Left and Right Side, page 10) whenprogramming the GEWA Programmable IR Remote Control in TToobbiiii CCoommmmuunniiccaattoorr.The GEWA Programmable IR Remote Control is a programmable Infrared device that can be used to control equipment with anIR Remote Control such as TV-sets or DVDs.For more information about how to use and program the GEWA Programmable IR Remote Control, see GGeettttiinngg SSttaarrtteedd wwiitthhEEsssseennttiiaallss ffoorr CCoommmmuunniiccaattoorr 44.If the device you are trying to control is not responding, try tilting the I-Series device up or down slightly to change theangle at which the IR signal is being sent.The ECU is not to be relied on as the only method of interaction with IR controlled devices.5.8.1 Handling Tobii Product KeyTo use the GEWA Programmable IR Remote Control, a Tobii Product Key is required. To view or enter a Tobii Product Key, goto the Tobii Product Key section in the II--SSeerriieess CCoonnttrrooll CCeenntteerr. See6.7 Tobii Product Key, page 41When the Tobii Product Key is in place, the GEWA IR Programmable Remote Control is ready to use.5.9 Adjusting the VolumeTo adjust the volume use the Volume Up button (Position 11) and volume down button (Position 12) on right hand side of theI-Series device. For position references, seeFigure 3.2 Bottom, Left and Right Side, page 10Volume adjustments can also be done in TToobbiiii CCoommmmuunniiccaattoorr.30 5 Using the Tobii I-Series Tobii I-Series User’s manual v.1.0.4 - en-US
5.10 Adjusting the SoundYou can configure the built-in speakers using the WWiinnddoowwss 77 CCoonnttrrooll PPaanneell >> HHaarrddwwaarree aanndd SSoouunndd.We refer to Microsoft’s information on how to configure the sound in the Windows 7 Control Panel.Sound adjustments can also be done in TToobbiiii CCoommmmuunniiccaattoorr.5.11 Performing a Factory RecoveryEvery I-Series device has a factory image stored on the disk. If you need to restore the device back to its original state, this canbe done by using our OEM Factory Recovery Application.This will delete any personal data or software installed after the device was delivered.Factory Recovery means that the device will be reset to the factory mode, without anything installed. In this mode you have to re-enter your Tobii Product Key and licenses to perform the SW installation you have ordered.Make sure you’ve connected the Power Supply before you start the process - do not run the device on batteries, as itmight run out of power during the Factory Recovery. In such a scenario, you might have to send the unit back to Tobiifor repair.To perform a Factory Recovery for your I-Series device, follow this procedure:1. Backup your personal data such as documents and Tobii Communicator settings etc.2. Make sure you have the I-Series Product Key available3. Shut down the device4. Connect a keyboard5. Start up device again6. Hold down the (Arrow Down) keyboard button continually during startup until you get into “Windows BootManager”7. Select "Factory Reset”and press the (Enter) keyboard button.8. The I-Series Software Installation dialogue will be loaded9. Follow the instructions on the screen. These steps are identical to the initial setup you did when you first received thedevice.orTo perform a Factory Recovery for your I-Series device, follow this procedure:1. Backup your personal data such as documents and Tobii Communicator settings etc.2. Make sure you have the I-Series Product Key available3. Shut down the device4. Connect a keyboard5. Start up device again6. Hold down the (F8) keyboard button continually during startup until you get into “Advanced Boot Options”7. Press the (Esc) keyboard button to get to the “Windows Boot Manager”Tobii I-SeriesUser’s manual v.1.0.4 - en-US 5 Using the Tobii I-Series 31
8. Select "Factory Reset”and press the (Enter) keyboard button.9. The I-Series Software Installation dialogue will be loaded10. Follow the instructions on the screen. These steps are identical to the initial setup you did when you first received thedevice.The Factory Recovery process will now start. This will take about 40 minutes. After the restore process is finished, the device willbe reset to its original image as it was when you first received it from Tobii. If you have installed any additional Software or TobiiProduct Keys after you ordered the device, these will have to be manually installed again5.12 Calibrating the Touch ScreenThere are two ways of calibrating the Touch Screen depending on if the Windows Control Panel is in Category view or Classicview with Small/Large icon.To calibrate the Touch screen from Category View in Windows Control Panel, follow this procedure:1. Select SSttaarrtt >> CCoonnttrrooll PPaanneell2. Select HHaarrddwwaarree aanndd SSoouunndd3. Select TTaabblleett PPCC SSeettttiinnggss4. Select the CCaalliibbrraattee...... button under Display options5. Follow the on-screen instructionsTo calibrate the Touch screen from Classic View with small/Large icons in Windows Control Panel, follow this procedure:1. Select SSttaarrtt >> CCoonnttrrooll PPaanneell2. Select TTaabblleett PPCC SSeettttiinnggss3. Select the CCaalliibbrraattee...... button under Display options4. Follow the on-screen instructions32 5 Using the Tobii I-Series Tobii I-Series User’s manual v.1.0.4 - en-US
6 Configuring the I-Series with the I-SeriesControl CenterThe I-Series Control Center is the program on your I-Series Device where you can access and change the settings that you havechosen during your first setup with the I-Series Welcome Guide. You can also run the Welcome Guide again at any time of yourchoosing.To open the I-Series Control Center:•Double-click on the II--SSeerriieess CCoonnttrrooll CCeenntteerr shortcut on the desktop, .or1. Go to SSttaarrtt mmeennuu >CCoonnttrrooll PPaanneell.2. Double-click II--SSeerriieess CCoonnttrrooll CCeenntteerr, , if the Control Panel is in Classic View.If the Control Panel is in Category view, select VViieeww bbyy:: >> SSmmaallll iiccoonnss oorr LLaarrggee iiccoonnss, and Double-click II--SSeerriieess CCoonn--ttrrooll CCeenntteerror1. Go to SSttaarrtt mmeennuu >> AAllll PPrrooggrraammss >> TToobbiiii >> II--SSeerriieess >> II--SSeerriieess CCoonnttrrooll CCeenntteerr.2. Click II--SSeerriieess CCoonnttrrooll CCeenntteerr,, .Tobii I-SeriesUser’s manual v.1.0.4 - en-US 6 Configuring the I-Series with the I-Series Control Center 33
6.1 ButtonsYou can create shortcuts to tasks, called actions, by programming the Quick Access buttons. The Quick Access buttons are lo-cated on the left side of the I-Series device, named 11,22 and MMeennuu.For more information about how to program an action for a button, see6.10 Creating Shortcuts to Actions, page 456.1.1 Play Sound when PressedTo enable Play sound when pressed:1. Open the II--SSeerriieess CCoonnttrrooll CCeenntteerr >> BBuuttttoonn.2. Select the PPllaayy ssoouunndd wwhheenn pprreesssseedd check box to allow Audio feedback when the button is activated.To disable Play sound when pressed:1. Open the II--SSeerriieess CCoonnttrrooll CCeenntteerr >> BBuuttttoonn.2. Select to clear the PPllaayy ssoouunndd wwhheenn pprreesssseedd check box.6.1.2 Disable All ButtonsTo avoid unintentional actions, all buttons on the I-Series device can be disabled.To Disable all buttons:1. Open the II--SSeerriieess CCoonnttrrooll CCeenntteerr >> BBuuttttoonn.2. Select the DDiissaabbllee AAllll BBuuttttoonnss check box.The Power button will work for starting the device even if all buttons are disabled.Pressing the Power button for more than 7 seconds will shut down the device immediately, disregarding any unsavedchanges, even if all buttons are disabled.To Enable all buttons:1. Open the II--SSeerriieess CCoonnttrrooll CCeenntteerr >>BBuuttttoonn.2. Select to clear the DDiissaabbllee AAllll BBuuttttoonnss check box to allow all buttons again.34 6 Configuring the I-Series with the I-Series Control Center Tobii I-Series User’s manual v.1.0.4 - en-US
6.2 Display6.2.1 Brightness AdjustmentThere is a sensor on the device which will automatically adjust the screen brightness according to the surrounding light, relativeto the selected level from Windows®.To disable Automatic Brightness Adjustment:1. Open the II--SSeerriieess CCoonnttrrooll CCeenntteerr >> DDiissppllaayy.2. Select to clear the EEnnaabbllee aauuttoommaattiicc bbrriigghhttnneessss aaddjjuussttmmeenntt ((rreeccoommmmeennddeedd)) check box.To enable Automatic Brightness Adjustment:1. Open the II--SSeerriieess CCoonnttrrooll CCeenntteerr >> DDiissppllaayy.2. Select the EEnnaabbllee aauuttoommaattiicc bbrriigghhttnneessss aaddjjuussttmmeenntt ((rreeccoommmmeennddeedd)) check box.To manually adjust Brightness:1. Open the II--SSeerriieess CCoonnttrrooll CCeenntteerr >> DDiissppllaayy.2. Select the WWiinnddoowwss PPoowweerr OOppttiioonnss link.3. Make the Brightness adjustmentsUsing a darker setting can improve battery runtime.6.2.2 Display RotationThe display can rotate automatically when turned 180 degrees, to facilitate using device in Upright orientation or Resting on thespeakers.With the Automatic display rotation activated, it could take a couple of seconds (the screen could also turn black) be-fore the display is rotated.To enable Automatic rotation according to device position:1. Open the II--SSeerriieess CCoonnttrrooll CCeenntteerr >> DDiissppllaayy.2. Select the AAuuttoommaattiicc rroottaattiioonn aaccccoorrddiinngg ttoo ddeevviiccee oorriieennttaattiioonn radio button.Tobii I-SeriesUser’s manual v.1.0.4 - en-US 6 Configuring the I-Series with the I-Series Control Center 35
To set Fixed device position:1. Open the II--SSeerriieess CCoonnttrrooll CCeenntteerr >> DDiissppllaayy.2. Select the FFiixxeedd iinn uupprriigghhtt oorriieennttaattiioonn or the FFiixxeedd iinn rreessttiinngg oorriieennttaattiioonn radio button.Gaze Interaction is optimized to work properly in the Upright orientation.For more information about Upright orientation and Resting orientation, see1.3.1 Portable Use, page 3.6.3 SwitchesYou can enable the switches to act as power ON (see6.3.2 Configuring a Switch to Power On, page 36) or OFF (see6.3.3Configuring a Switch to Power Off, page 37) button.Select the PPllaayy ssoouunndd wwhheenn pprreesssseedd checkbox to allow Audio feedback when the switch is activated.Select actions for the switches by selecting SSeett aaccttiioonn.For more information about how to program an action for a Switch, see6.10 Creating Shortcuts to Actions, page 456.3.1 Play Sound when PressedTo enable Play sound when pressed:1. Open the II--SSeerriieess CCoonnttrrooll CCeenntteerr >>BBuuttttoonn.2. Select the PPllaayy ssoouunndd wwhheenn pprreesssseedd check box to allow Audio feedback when the button is activated.To disable Play sound when pressed:1. Open the II--SSeerriieess CCoonnttrrooll CCeenntteerr >> BBuuttttoonn.2. Select to clear the PPllaayy ssoouunndd wwhheenn pprreesssseedd check box.6.3.2 Configuring a Switch to Power OnTo enable a connected Switch to power on the device:1. Open the II--SSeerriieess CCoonnttrrooll CCeenntteerr >> SSwwiittcchheess.2. Select the EEnnaabbllee sswwiittcchh ““11 oorr 22”” ttoo aacctt aass PPoowweerr OOnn BBuuttttoonn check box.36 6 Configuring the I-Series with the I-Series Control Center Tobii I-Series User’s manual v.1.0.4 - en-US
To disable a connected Switch to power on the device:1. Open the II--SSeerriieess CCoonnttrrooll CCeenntteerr >> SSwwiittcchheess.2. Select to clear the EEnnaabbllee sswwiittcchh ““11 oorr 22”” ttoo aacctt aass PPoowweerr OOnn BBuuttttoonn check box.6.3.3 Configuring a Switch to Power OffTo enable a connected Switch to power off the device:1. Open the II--SSeerriieess CCoonnttrrooll CCeenntteerr >> SSwwiittcchheess.2. Select the EEnnaabbllee sswwiittcchh ““11 oorr 22”” ttoo aacctt aass PPoowweerr OOffff BBuuttttoonn check box.To disable a connected Switch to power off the device:1. Open the II--SSeerriieess CCoonnttrrooll CCeenntteerr >> SSwwiittcchheess.2. Select to clear the EEnnaabbllee sswwiittcchh ““11 oorr 22”” ttoo aacctt aass PPoowweerr OOffff BBuuttttoonn check box.6.4 Wake-on-Gaze®The I-Series device can be set to wake automatically from Sleep mode when your eyes are registered as looking at the display.To enable Wake-on-Gaze for the device:1. Open the II--SSeerriieess CCoonnttrrooll CCeenntteerr >> WWaakkee--oonn--GGaazzee.2. Select the EEnnaabbllee aauuttoommaattiicc WWaakkee--oonn--GGaazzee check box.3. Select WWiinnddoowwss PPoowweerr OOppttiioonnss link to adjust the Power Options (if needed)To disable Wake-on-Gaze for the device:1. Open the II--SSeerriieess CCoonnttrrooll CCeenntteerr >> WWaakkee--oonn--GGaazzee.2. Select to clear the EEnnaabbllee aauuttoommaattiicc WWaakkee--oonn--GGaazzee check box.For information about how to use Wake-on-Gaze®, see5.5 Wake the I-Series from Sleep with Gaze Interaction, page 28.Tobii I-SeriesUser’s manual v.1.0.4 - en-US 6 Configuring the I-Series with the I-Series Control Center 37
6.5 Wireless6.5.1 WLANNNoott aapppplliiccaabbllee ffoorr RRFF FFrreeee uunniittss..The built-in WLAN (Wireless Local Area Network) support enables connection to wireless networks (such as Wi-Fi™networksand access points) in compliance with the standard 802.11 b/g/n for both the I–12 and the I–15.6.5.1.1 Handling Tobii Product KeyTo be able to use WLAN communication, a Tobii Product Key is required. To view or enter a Tobii Product Key, go to the TobiiProduct Key section in the II--SSeerriieess CCoonnttrrooll CCeenntteerr. See6.7 Tobii Product Key, page 416.5.1.2 Enabling and Disabling the WLAN CommunicationTo enable WLAN communication:1. Open the II--SSeerriieess CCoonnttrrooll CCeenntteerr >> WWiirreelleessss.2. Select the EEnnaabbllee WWiirreelleessss LLooccaall AArreeaa NNeettwwoorrkk ((WWLLAANN)) check box.To disable WLAN communication:1. Open the II--SSeerriieess CCoonnttrrooll CCeenntteerr >> WWiirreelleessss.2. Clear the EEnnaabbllee WWiirreelleessss LLooccaall AArreeaa NNeettwwoorrkk ((WWLLAANN)) check box or select the DDiissaabbllee aallll wwiirreelleessss uunniittss checkbox for disabling all wireless units.6.5.1.3 Connecting to a WLAN1. Click on the WLAN icon, , in the Notification area on the Desktop.2. Select CCoonnnneecctt ttoo aa nneettwwoorrkk.3. Select a network to connect to.38 6 Configuring the I-Series with the I-Series Control Center Tobii I-Series User’s manual v.1.0.4 - en-US
A wireless access point which supports antenna diversity is recommended when setting up a wireless network to usewith a I-Series device, for reliable performance. Such access points are generally recognized by having two antennason the router device.Using an antivirus program is strongly recommended.6.5.2 Bluetooth® for Mobile Phone CommunicationNNoott aapppplliiccaabbllee ffoorr RRFF FFrreeee uunniittss..The built-in Bluetooth® enables connection to a mobile phone which complies with mobile Bluetooth® standards.Only for use with TToobbiiii CCoommmmuunniiccaattoorr for mobile phone communication.For more information about how to use and program an Mobile phone to work with Bluetooth® on the I-Series device, see GGeett--ttiinngg SSttaarrtteedd wwiitthh EEsssseennttiiaallss ffoorr CCoommmmuunniiccaattoorr 44.For information about the Mobile phones that complies with the I-Series device, see www.tobii.com6.5.2.1 Handling Tobii Product KeyTo use Bluetooth® communication in the device, a Tobii Product Key is required. To view or enter a Tobii Product Key, go to theTobii Product Key section in the II--SSeerriieess CCoonnttrrooll CCeenntteerr. See6.7 Tobii Product Key, page 416.5.2.2 Enabling and Disabling Bluetooth® CommunicationTo enable Bluetooth® communication:1. Open the II--SSeerriieess CCoonnttrrooll CCeenntteerr >> WWiirreelleessss.2. Select the EEnnaabbllee BBlluueettooootthh check box.To disable Bluetooth® communication:1. Open the II--SSeerriieess CCoonnttrrooll CCeenntteerr >> WWiirreelleessss.2. Clear the EEnnaabbllee BBlluueettooootthh check box or select the DDiissaabbllee aallll wwiirreelleessss uunniittss check box for disabling all wireless units.6.5.2.3 Connecting to a Bluetooth® DeviceFor more information see GGeettttiinngg SSttaarrtteedd wwiitthh EEsssseennttiiaallss ffoorr CCoommmmuunniiccaattoorr 44.Tobii I-SeriesUser’s manual v.1.0.4 - en-US 6 Configuring the I-Series with the I-Series Control Center 39
6.6 SafetyUpon starting the device for the first time, the safety settings in the II--SSeerriieess CCoonnttrrooll CCeenntteerr will be a part of the I-Series Wel-come Guide. To be able to run through the guide these safety settings must be confirmed. The safety settings exist for the safetyof the customer. Be sure to read the safety details before accepting any changes.6.6.1 AudioBefore you can use the speaker functionality and adjust speaker output settings you need to confirm the Audio safety details (ifnot already done during first start up).To confirm:1. Open the II--SSeerriieess CCoonnttrrooll CCeenntteerr >> SSaaffeettyy2. Click on the AAuuddiioo ssaaffeettyy ddeettaaiillss text. A new dialog box opens and displays the safety text. Please read this thoroughly.3. Select the II hhaavvee rreeaadd aanndd uunnddeerrssttaanndd tthhee ssaaffeettyy ddeettaaiillss aanndd II wwaanntt ttoo eennaabbllee tthhee ssppeeaakkeerr ffuunnccttiioonnaalliittyy check boxto confirm that you have read and understood the safety text.6.6.2 Temperature ControlBefore you can set the device usage in II--SSeerriieess CCoonnttrrooll CCeenntteerr >> TTeemmppeerraattuurree CCoonnttrrooll you need to confirm the Temperaturecontrol safety details (if not done during first start up).To confirm:1. Open the II--SSeerriieess CCoonnttrrooll CCeenntteerr >> SSaaffeettyy2. Click on the TTeemmppeerraattuurree CCoonnttrrooll ssaaffeettyy ddeettaaiillss text. A new dialog opens and displays the safety text. Please read thisthoroughly.3. Select the II hhaavvee rreeaadd aanndd uunnddeerrssttaanndd tthhee ssaaffeettyy ddeettaaiillss aanndd II wwaanntt ttoo eennaabbllee tthhee tteemmppeerraattuurree ccoonnttrrooll ffuunnccttiioonnaall--iittyy check box to confirm that you have read and understood the safety text.You can use the device in a portable or mounted mode. Your choice will affect the maximum allowed device tempera-ture. While having the device mounted, it is allowed to run at a higher temperature.Both the I–12 and the I–15 can be used both as a portable and mounted device and can be operated in both portableand mounted mode.If the device is gets overheated the device will shut down. It may take a while before it can be restarted as the unit mayfirst need time to cool down. If the device is still too hot, the power button will flash purple for a couple of secondswhen trying to restart the I-Series device. For more information, seeAppendix C Computer Device States of Opera-tion, page 70andTable D.1 Maximum Allowed Temperature, page 72.40 6 Configuring the I-Series with the I-Series Control Center Tobii I-Series User’s manual v.1.0.4 - en-US
6.6.2.1 Device UsageSpecifying device usage mode takes place outside of the SSaaffeettyy settings but within II--SSeerriieess CCoonnttrrooll CCeenntteerr.To specify device usage:1. Open the II--SSeerriieess CCoonnttrrooll CCeenntteerr >> SSaaffeettyy.2. Click on preferred option for DDeevviiccee uussaaggee.•Portable —Portable mode sets the maximum device temperature shut down limit to a lower temperature, reducingthe risk for permanent bodily harm cased by prolonged exposure to the skin•Mounted —Mounted mode sets the maximum device temperature to a higher temperature shut down limitFor more information, seeTable D.1 Maximum Allowed Temperature, page 726.7 Tobii Product KeyThe following features on the I-Series needs a licence for use:•Eye tracker•Bluetooth®•WLAN•IR•CommunicatorTo view existing Tobii Product Key:•Open the II--SSeerriieess CCoonnttrrooll CCeenntteerr >> TToobbiiii PPrroodduucctt KKeeyy.If the symbol is visible after a feature, the Tobii Product Key(s) on the device are valid for that feature.To add a Tobii Product Key:1. Open the II--SSeerriieess CCoonnttrrooll CCeenntteerr >> TToobbiiii PPrroodduucctt KKeeyy.2. In the EEnntteerr aa TToobbiiii pprroodduucctt kkeeyy box, type the new Tobii Product Key.To type the Tobii Product Key use either a connected keyboard or enable the on-screen keyboard by selecting this button .Tobii I-SeriesUser’s manual v.1.0.4 - en-US 6 Configuring the I-Series with the I-Series Control Center 41
6.8 Setup & UpdatesManage Tobii applications related to setting up your device and updating to the latest software.6.8.1 I-Series Welcome GuideThe I-Series Welcome Guide guides the user through the setup procedure, such as License Agreement and Safety Setting etc.If the I-Series Welcome Guide is not finished, it will automatically start up next time the I-Series is powered up.To run the I-Series Welcome Guide at next start up, follow these step:1. Open the II--SSeerriieess CCoonnttrrooll CCeenntteerr >> SSeettuupp && UUppddaatteess.2. Select the RRuunn aatt nneexxtt ssttaarrttuupp check box.To run the I-Series Welcome Guide at once, follow these steps:1. Open the II--SSeerriieess CCoonnttrrooll CCeenntteerr >> SSeettuupp && UUppddaatteess.2. Select the RRuunn nnooww button.6.8.2 I-Series Update NotifierThe I-Series Update Notifier is a program that notifies you when the latest software updates for your Tobii Software are available(either automatically, on a regular basis, or manually, at a time of your choosing) and assists you in installing the updates.If you have chosen to "Enable automatic updates" in either the I-Series Welcome Guide or, later, in the I-Series Control Center,the Update Notifier will actively search Tobii’s sites for version Updates of your software.To keep your I-Series device running properly it is highly recommended that you update your Tobii Software on a regu-lar basis and it is therefore highly recommended that you enable automatic updates.To Enable automatic search for updates:1. Open the II--SSeerriieess CCoonnttrrooll CCeenntteerr >> SSeettuupp && UUppddaatteess.2. Select the EEnnaabbllee aauuttoommaattiicc sseeaarrcchh ffoorr uuppddaatteess ((rreeccoommmmeennddeedd)) check box.If an update is found the following Update Notifier window will pop up:The update or updates available will show themselves in the Step One window of Update Notifier as large button with a greencheck mark on the right side. You will also be able to see the version number of the software that you currently have and the ver-sion number of the update.42 6 Configuring the I-Series with the I-Series Control Center Tobii I-Series User’s manual v.1.0.4 - en-US
If you choose not to download one or more of the available updates you can click on the button of the update you do not wantand the check mark will turn into a red "X" mark.Proceed in the following way:•Click the DDoowwnnllooaadd button to download the updates to your Device and continue to Step Two.•In Step Two, Click the IInnssttaallll button to install the chosen updates on your device and proceed to Step Three.•Step Three informs you that your system has been updated, select the DDoonnee button to close the Update Notifier.If you choose not to "Enable automatic updates" you can still check for updates for your Tobii software and update them manuallyusing the I-Series Update Notifier.To open and activate the I-Series Update Notifier manually (this opens the Step One window shown above and starts the sameautomatic update process):•Navigate in Windows from your desktop to SSttaarrtt MMeennuu >> AAllll PPrrooggrraammss >> TToobbiiii >> II--SSeerriieess and select the I-Series Up-date Notifier icon, .oorr1. Open the II--SSeerriieess CCoonnttrrooll CCeenntteerr >> SSeettuupp && UUppddaatteess.2. Select the RRuunn nnooww button.6.9 System6.9.1 Version & ModelTo view the version and model of the device:•Open the II--SSeerriieess CCoonnttrrooll CCeenntteerr >> SSyysstteemm.Please have this information available if you have problems with the device and need to contact Customer Support.To save the version and model of the device to a file:1. Open the II--SSeerriieess CCoonnttrrooll CCeenntteerr >> SSyysstteemm.2. Select the SSaavvee iinnffoorrmmaattiioonn ttoo ffiillee button.You can attach the file containing all the information into a an e-mail.Tobii I-SeriesUser’s manual v.1.0.4 - en-US 6 Configuring the I-Series with the I-Series Control Center 43
6.9.2 BackupThis is a system backup specific to your Tobii software-related files. The device automatically and regularly, once a week, backsup the data that is associated with your Tobii communications applications (Tobii Communicator Page Sets, files, settings, etc.),your Gaze Interaction files (profiles, calibration settings, interaction settings, etc.) and your device specific settings from the Con-trol Center. You can manually start the backup below and/or restore the data from one of the three latest backups. Be aware thatthe changes made since the latest backup will be reverted if you choose to restore from a previous backup. All files in the MyDocuments folder will be backed up as well, if space is available on the microSD-card, as a second priority after the Tobii soft-ware-related files. TToo bbaacckk uupp aallll ffiilleess oonn yyoouurr ddeevviiccee pplleeaassee uussee MMiiccrroossoofftt’’ss oowwnn WWiinnddoowwss BBaacckkuupp aanndd RReessttoorreeaapppplliiccaattiioonn..The backup process executes once a week (every Sunday at 15.00) and the three latest backups are saved on the microSD-card.If your I-Series device is not up and running at this time the backup will be performed at next start up.The process backs up files for all users. If the backup drive does not have enough space some files will not be backedup. Image files have the lowest priority (backed up last). The largest file size for the backup of individual files is 100MB, files larger than this will be excluded.The backup files are placed in the directory QQ::\\BBaacckkuupp\\<<ddaattee>> ((OOnn tthhee mmiiccrrooSSDD--ccaarrdd)).Tobii will not take responsibility for any other data than the “Tobii applications data”6.9.2.1 User Profile CardThe I-Series device comes with a 32 GB microSD-card installed. The purpose of this card is to backup personal settings and da-ta. In the case of fatal damage to the I-Series device. The microSD-card can be removed and inserted into a new device for quickand easy retrieval and restoration of personal data and settings.6.9.2.2 Backup Manually by the UserTo perform a manual backup of the system:1. Open the II--SSeerriieess CCoonnttrrooll CCeenntteerr >> SSyysstteemm.2. Select the BBaacckkuupp nnooww button.When the backup is finished, the following will show up on the screen: BBaacckkuupp ffiinniisshheedd.6.9.2.3 Restoring Backup Files by the UserTo restore one of the three last backup of the system:1. Open the II--SSeerriieess CCoonnttrrooll CCeenntteerr >> SSyysstteemm.2. Select the RReessttoorree ffrroomm bbaacckkuupp button.3. Select the one of the last backups by selecting the RReessttoorree ffrroomm tthhiiss bbaacckkuupp button next to the date of the storedbackup.When the restore is finished, the following text will show up on the screen: RReessttoorree ffiinniisshheedd and the symbol willshow up next to the date that was selected to restore from.Copies of these backup files can be saved anywhere you wish, to an external hard drive, for example, or to a USB stick. Copy thefolders in the directory QQ::\\BBaacckkuupp\\<<ddaattee>> to any external directory or drive of your choosing.6.9.2.4 Backup FailedOne likely reason that the backup failed is that there are too many files in the My Documents folder. Try moving the files that arenot backup- critical to another location (such as pictures, music files, etc).44 6 Configuring the I-Series with the I-Series Control Center Tobii I-Series User’s manual v.1.0.4 - en-US
6.10 Creating Shortcuts to ActionsYou can create shortcuts, called actions, by programming the Quick Access buttons and connected Switches. The Quick Ac-cess buttons are located on the left side of the I-Series device, named 11,22 and MMeennuu.Switches are connected to the Switch connectors.6.10.1 Available ActionsThis is a short description of each action available to set:•Send input –Allows the user to send input to an alternative program (keystroke, mouse click or text).•Start Program –Allows the user to start a program.•Volume –Allows the user to adjust the volume up or down or to set mute on or off.•Backlight –Allows the user increase or decrease the backlight of the screen.•Gaze Interaction –Allows the user to show and hide the track status window, calibrate or pause the Gaze Interaction ONor OFF.•Wireless –Allows the user to either set all radio connections on or off, or a specific wireless connection.•Tobii Communicator —Actions are set and customized in Tobii Communicator.The available actions are the same for the Quick Access buttons and Switches.To create a shortcut to an action:1. Open the II--SSeerriieess CCoonnttrrooll CCeenntteerr.2. Select BBuuttttoonnss or SSwwiittcchheess, depending on which one you want to customize.3. Click SSeett aaccttiioonn to view the dialog box where you can select the action you would like the button to perform. By select-ing one of the actions, the options for this action will be revealed below the chosen action.If you would like the Quick Access button to make a sound when pressed, select the PPllaayy ssoouunndd check box after hav-ing set an action.6.10.2 Selecting Actions•NNoo AAccttiioonn SSeelleecctteedd —Default —choose to delete a previous set task•SSeenndd IInnppuutt –choose either to send a keyboard input, a mouse click or specified text by selecting the option you wantthe device button or Switch to perform.–SSeenndd kkeeyybbooaarrdd iinnppuutt —In the SSeenndd kkeeyybbooaarrdd iinnppuutt lliisstt, select the keystroke you want to send to an alternativeprogram.–SSeenndd mmoouussee cclliicckk —In the SSeenndd mmoouussee cclliicckk lliisstt, select the desired mouse click: left, middle or right mouse click.Tobii I-SeriesUser’s manual v.1.0.4 - en-US 6 Configuring the I-Series with the I-Series Control Center 45
–SSeenndd tteexxtt –In the SSeenndd tteexxtt bbooxx, type the text you want to send to an alternative program.•SSttaarrtt PPrrooggrraamm —Click BBrroowwssee the first time you are using this option to find and select a program.The next time you select the SSttaarrtt PPrrooggrraamm option a list of previously selected programs will be displayed. You can thendirectly select a program from the list or select BBrroowwssee if you want to start a program not in the list.For the selected program it is possible to add program arguments. However, this is normally not required. If the programshould require program arguments and you do not know what to enter, please contact the company you purchased thesoftware from.•VVoolluummee —choose to increase, decrease or mute the volume by selecting the preferred option.•BBaacckklliigghhtt —choose to either increase or decrease the screen backlight by selecting the preferred option.•GGaazzee IInntteerraaccttiioonn –choose to toggle track status window, calibrate Gaze Interaction, Pause the Gaze Interaction or tog-gle Windows Control ON/OFF.To enable this option the I-Series device must have an Eye Tracker and the Tobii Gaze Interaction Softwareinstalled.•WWiirreelleessss —you can either set all radio connections on/off or each individual wireless unit on/off one by one, by selectingthe options.•TToobbiiii CCoommmmuunniiccaattoorr —Actions are set and customized in Tobii CommunicatorIf actions for a Switch are customized both in the II--SSeerriieess CCoonnttrrooll CCeenntteerr and in TToobbiiii CCoommmmuunniiccaattoorr or in alterna-tive communication software all actions will be performed simultaneously. Ensure that the specified action for a Switchdoes not conflict with an action set for the same Switch in TToobbiiii CCoommmmuunniiccaattoorr or in alternative communicationsoftware.To get back from slide in menus, just select the arrows in the greyed out areas.46 6 Configuring the I-Series with the I-Series Control Center Tobii I-Series User’s manual v.1.0.4 - en-US
7 Tobii Gaze Interaction Settings7.1 Accessing the Tobii Gaze Interaction SettingsTToobbiiii GGaazzee IInntteerraaccttiioonn SSeettttiinnggss is a program for quick and easy access to control functions such as Track Status, Calibrationand common settings.Start TToobbiiii GGaazzee IInntteerraaccttiioonn SSeettttiinnggss in one of the following ways:•Go to SSttaarrtt mmeennuu >> AAllll PPrrooggrraammss >> TToobbiiii >> GGaazzee IInntteerraaccttiioonn >> TToobbiiii GGaazzee IInntteerraaccttiioonn SSeettttiinnggss.•Double-click on the TToobbiiii GGaazzee IInntteerraaccttiioonn SSeettttiinnggss icon, , in the Notification area, or on the shortcut, , onthe Desktop (if one has been made).•Right-click (long-hold finger on icon for touch screen right clicking) on the TToobbiiii GGaazzee IInntteerraaccttiioonn SSeettttiinnggss icon, ,in the Notification area and then select SSeettttiinnggss.In the list to the left in TToobbiiii GGaazzee IInntteerraaccttiioonn SSeettttiinnggss, select which option you want to change. In the list to the right, the avail-able options will be revealed.Click OOKK to save changes. This will also close Tobii Gaze Interaction Settings.Click CCaanncceell to cancel the changes. This will also close Tobii Gaze Interaction Settings.Click AAppppllyy to save changes. Tobii Gaze Interaction Settings will remain open.Anywhere you see this icon, , there is an information box with additional information for the feature.7.2 CalibrationThis section will describe how to calibrate an individual, enabling optimal Gaze Interaction with the I-Series device.Tobii I-SeriesUser’s manual v.1.0.4 - en-US 7 Tobii Gaze Interaction Settings 47
7.2.1 Starting CalibrationThe calibration can be started in one of the following ways:•Open TToobbiiii GGaazzee IInntteerraaccttiioonn SSeettttiinnggss >> GGaazzee IInntteerraaccttiioonn and then select the SSttaarrtt CCaalliibbrraattiioonn...... button.•Right-click (long-hold finger on icon for touch screen right clicking) on the TToobbiiii GGaazzee IInntteerraaccttiioonn SSeettttiinnggss icon, ,in the Notification area and select SSttaarrtt CCaalliibbrraattiioonn..7.2.2 Interrupting CalibrationInterrupt the calibration in one of the following ways:•Press EEsscc.•Left-click on the screen using a mouse.•Touch the screen (on a touch screen device).7.2.3 Customizing Active EyeBased on certain conditions, or disabilities,you may only have one eye that functions well with Gaze Interaction. In this case, andif you know which eye is most functional, you can select which eye to track for Gaze Interaction.To select the eye you want to be tracked by the eye tracker, follow these steps:1. Open TToobbiiii GGaazzee IInntteerraaccttiioonn SSeettttiinnggss >> CCaalliibbrraattiioonn.2. Select the TTrraacckk oonnllyy tthhiiss eeyyee ffoorr GGaazzee IInntteerraaccttiioonn check box under Left or Right Eye Calibration Result box.48 7 Tobii Gaze Interaction Settings Tobii I-Series User’s manual v.1.0.4 - en-US
7.2.4 Improving Calibration Point(s)After calibration, you may want to improve one or more points.There is a color scheme used that will help you to understand the quality of your calibration.All three color statuses are the result of a ssuucccceessssffuull calibration.•If the background color of the Calibration Result is light red, you have achieved a successful, but relatively low quality cali-bration. You can improve one or more points individually, or recalibrate completely, to achieve better Gaze Interactionresults.Improving even one (or more) of the calibrations points can significantly improve the calibration.•If the background color of the Calibration Result is light yellow, you have achieved successful and good quality calibra-tion. You might be able achieve better Gaze Interaction results by improving one or more points individually.•If the background color of the Calibration Result is green, you have achieved a successful and high quality calibration.Be aware that no matter what quality of calibration you have achieved you will be able to select OOKK or AAppppllyy and beginusing Gaze Interaction. It is the accuracy and functionality of the Gaze Interaction that is affected by the quality of thecalibration results. Try for the best calibration possible.RReemmeemmbbeerr!! In the end it is the personal experience that counts!The closer the lines within the calibration point are to a dot in the center of the circle of the calibration point, the better the cali-bration is of that point, .You can choose the points to be improved and calibrate only those points again.To improve one or more calibration points, follow these steps :1. Open TToobbiiii GGaazzee IInntteerraaccttiioonn SSeettttiinnggss >> CCaalliibbrraattiioonn.2. Select the point(s) you want to improve under CCaalliibbrraattiioonn RReessuulltt.3. Select the IImmpprroovvee PPooiinntt((ss)) button and a calibration for the selected point(s) will start.Tobii I-SeriesUser’s manual v.1.0.4 - en-US 7 Tobii Gaze Interaction Settings 49
7.2.5 Removing Calibration Point(s)If there is a calibration point that is consistently bad after calibration (the green lines are scattered all around and outside thecircle of the calibration point) you can remove that point completely from the calibration, thismayimprove the calibration of theother points. Be aware that if you remove a point, that area of the screen will be uncalibrated and Gaze Interaction will not func-tion properly there.To remove one or more calibration points, follow these steps:1. Open TToobbiiii GGaazzee IInntteerraaccttiioonn SSeettttiinnggss >> CCaalliibbrraattiioonn.2. Select the point(s) you want to remove under CCaalliibbrraattiioonn RReessuulltt.3. Select the RReemmoovvee PPooiinntt((ss)) bbuuttttoonn.7.2.6 Customizing the CalibrationTo customize the calibration, follow these steps:1. Open TToobbiiii GGaazzee IInntteerraaccttiioonn SSeettttiinnggss >> CCaalliibbrraattiioonn.2. Select the SSeettttiinnggss...... buttonGGeenneerraall3. Select calibration background by selecting the background color button and select the desired color.4. Specify the number of points you want to calibrate with (two, five or nine) from the CCaalliibbrraattiioonn ppooiinnttss drop down list.The higher number of points, the more accurate the calibration.5. Select if you want to have sound feedback or not from the SSoouunndd ffeeeeddbbaacckk drop down list.SSttiimmuulluuss6. Select the stimulus type from the SSttiimmuulluuss ttyyppee drop down list. There are three types available, each with different cus-tomizing options:•Dot:–Select color of the dot by selecting the SSttiimmuulluuss ccoolloorr button.–Select size of the dot by selecting from the SSttiimmuulluuss ssiizzee drop down list.–Select speed of the dot by selecting from the SSttiimmuulluuss ssppeeeedd drop down list.•Image:50 7 Tobii Gaze Interaction Settings Tobii I-Series User’s manual v.1.0.4 - en-US
–Select primary stimulus by selecting BBrroowwssee and selecting an image.–Select secondary stimulus by selecting BBrroowwssee and selecting an image.–Select size of the image by selecting from the SSttiimmuulluuss ssiizzee drop down list.–Select speed of the image by selecting from the SSttiimmuulluuss ssppeeeedd drop down list.•Video:–Select primary stimulus by selecting BBrroowwssee and selecting a video.–Select secondary stimulus by selecting BBrroowwssee and selecting a video.–Select size of the video by selecting from the SSttiimmuulluuss ssiizzee drop down list.–Select speed of the video by selecting from the SSttiimmuulluuss ssppeeeedd drop down list.7. Check the AAnniimmaattee ssttiimmuullii check box if you want the stimuli to be animated (as opposed to static).8. If you want to control the calibration, i.e. decide when to move the calibration stimuli, with a keyboard, check the KKeeyy--bbooaarrdd sstteepp--tthhrroouugghh check box.•For KKeeyybbooaarrdd sstteepp--tthhrroouugghh,, use the ‘S’key to step (to move the calibration stimuli) and the ‘Esc’key, the Leftmouse button or touching the touch screen to interrupt calibration. When using Image or Video calibration, use the‘T’key to toggle between primary and secondary stimulus images.To get back from slide in menus, just select the arrows in the greyed out areas.7.2.7 Customizing the Calibration AreaCustomizing the calibration area can be useful if you have discovered that the user cannot access certain areas of the screen us-ing Gaze Interaction. By sizing the calibration area to exclude the areas that the user cannot access it can improve the overallcalibration.To customize the calibration area, follow these steps:1. Open TToobbiiii GGaazzee IInntteerraaccttiioonn SSeettttiinnggss >> CCaalliibbrraattiioonn.2. Select the SSeettttiinngg…… button.3. Select the Calibration area: CChhaannggee...... button.Tobii I-SeriesUser’s manual v.1.0.4 - en-US 7 Tobii Gaze Interaction Settings 51
4. A blue semi-transparent area is displayed on the desktop. You can move and resize the blue area to make it fit your pre-ferred calibration area.7.3 InteractionTo adapt the interaction method and visual feedback for Gaze Interaction, follow these steps:1. Open TToobbiiii GGaazzee IInntteerraaccttiioonn SSeettttiinnggss >> IInntteerraaccttiioonn..SSccooppeeIf different settings are needed for different Gaze Interaction applications, make the adaptations here.2. Select how the interactions settings should be reflected:•Select DDeeffaauulltt sseettttiinnggss ooff tthhee ccuurrrreennttllyy sseelleecctteedd uusseerr pprrooffiillee if you want to apply the new settings to the wholeuser profile and not only to a particular application.•Select AApppplliiccaattiioonn ssppeecciiffiicc sseettttiinnggss ooff tthhee ccuurrrreennttllyy sseelleecctteedd uusseerr pprrooffiillee if you want to apply the new settingsto a specific application of a user profile. Then select the available application in the AApppplliiccaattiioonn drop down list.MMeetthhoodd3. Select the activation method from the AAccttiivvaattiioonn mmeetthhoodd drop down list. There are three methods available, each withdifferent activation times:52 7 Tobii Gaze Interaction Settings Tobii I-Series User’s manual v.1.0.4 - en-US
•Dwell. Adjust the dwell time by moving the DDwweellll ttiimmee slider.•Switch. Adjust the minimum time for a click duration and the minimum time between clicks by moving the respectiveslider.•Blink. Adjust the minimum and maximum duration for a blink by moving the respective slider.VViissuuaall FFeeeeddbbaacckk4. Select the symbol for visual feedback from the DDwweellll ffeeeeddbbaacckk ttyyppee drop down list.5. Select the color of the feedback symbol in the FFeeeeddbbaacckk ccoolloorr drop down list.6. Specify the dot size and opacity of the feedback symbol by moving the respective slider.7. Select the SShhooww vviissiibbllee oouuttlliinnee aarroouunndd tthhee aaccttiivvaatteedd rreeggiioonn check box to see a dashed line around the activated areain all instances of Gaze Interaction selection8. Select SSiimmuullaattee aaccttiivvaattiioonn if you want to see how the activation method will appear on the screen. The example isshown above the SSiimmuullaattee aaccttiivvaattiioonn button.7.4 User Profile7.4.1 Creating a New ProfileUse of different profiles allows you to store multiple people’s calibrations and feedback preferences on one device. Alternatively,one person might want to store multiple profiles for him/herself if that person wears glasses occasionally or uses multiple meansof accessing the device.To create a new profile:1. Open TToobbiiii GGaazzee IInntteerraaccttiioonn SSeettttiinnggss, select UUsseerr PPrrooffiilleess.2. Enter a new name in the PPrrooffiillee nnaammee field.3. Select an existing profile in the BBaasseedd oonn pprrooffiillee drop down list. The new profile will inherit all settings from the selectedprofile. Note that if no profiles have been created previously, the only one to select is the default profile.4. Click CCrreeaattee to save the new profile. The new profile is saved directly upon selecting CCrreeaattee.Tobii I-SeriesUser’s manual v.1.0.4 - en-US 7 Tobii Gaze Interaction Settings 53
7.4.2 Selecting Current User ProfileTo select current user profile:1. Open TToobbiiii GGaazzee IInntteerraaccttiioonn SSeettttiinnggss.2. Select a user profile in the CCuurrrreenntt UUsseerr PPrrooffiillee drop down list.3. Select AAppppllyy7.4.3 Deleting a ProfileTo delete a profile:1. Open TToobbiiii GGaazzee IInntteerraaccttiioonn SSeettttiinnggss >UUsseerr PPrrooffiilleess.2. Select a profile in the PPrrooffiillee ttoo ddeelleettee drop down list.3. Click DDeelleettee to delete the selected profile. The profile is deleted directly upon selecting Delete. Note that the default pro-file cannot be deleted.7.5 Windows ControlWindows Control allows you to access the desktop and all applications of your Windows computer with Gaze Interaction.7.5.1 Auto StartTo enable Windows Control automatically when the your device starts up:•Select the AAuuttoo ssttaarrtt WWiinnddoowwss CCoonnttrrooll aatt bboooott check box.To disable Windows Control automatically when the your device starts up:•Select to clear the AAuuttoo ssttaarrtt WWiinnddoowwss CCoonnttrrooll aatt bboooott check box.7.5.2 Windows Control TypeSelect which type of Windows Control you wish to use:•Gaze Selection —Select the Gaze Selection radio button. For more information about using Gaze Selection, see5.4.3Using Gaze Selection, page 22•Mouse Emulation —Select the Mouse Emulation radio button. For more information about using Mouse Emulation, see5.4.4 Using Mouse Emulation, page 2654 7 Tobii Gaze Interaction Settings Tobii I-Series User’s manual v.1.0.4 - en-US
7.5.2.1 Gaze SelectionThe settings for Gaze Selection are found in the Gaze Selection Taskbar, docked to the screen when Gaze SelectionWindows Control is running. Gaze at the settings icon to select it and the Gaze Selection Settings will open.For information about the Gaze Selection Settings, see8 Gaze Selection Settings, page 597.5.2.2 Mouse Emulation7.5.2.2.1 Mouse Control Speed•Customize the mouse control speed by moving the MMoouussee ccoonnttrrooll ssppeeeedd slider. Move the slider to the right to increasethe speed and to the left to decrease it.Tobii I-SeriesUser’s manual v.1.0.4 - en-US 7 Tobii Gaze Interaction Settings 55
7.5.2.2.2 Magnifier Size and Zoom•Customize the size of the magnifier by moving the MMaaggnniiffiieerr SSiizzee sslliiddeerr. Move the slider to the right to increase the sizeand to the left to decrease it.•Customize the zoom factor by moving the ZZoooomm FFaaccttoorr slider. Move the slider to the right to increase the zoom factorand to the left to decrease it.7.5.2.2.3 Auto Switch from Right to Left Click•Check this check box if you want Windows Control Mouse Emulation mode to automatically switch the desired mouseclick selection back to a left click, , after a right click, , has been chosen and performed.7.5.2.2.4 Turn off Scroll Functionality•Check the TTuurrnn ooffff ssccrroollll ffuunnccttiioonnaalliittyy check box if you do not want Gaze Interactionscrolling to be active.7.5.2.2.5 Custom CursorsCustom cursors is a feature that turns the regular mouse cursor into a number of different cursors when using Windows Controlin Mouse Emulation mode.The different cursors visually represent the type of "mouse click" for Gaze Interaction that you have chosen from the Mouse Emu-lation Menu (for the definitions of the Mouse Emulation Menu symbols see5.4.4.2 Clicking with Windows Control in Mouse Emu-lation Mode, page 27,5.4.4.3 Magnifying with Windows Control in Mouse Emulation Mode, page 27and5.4.4.4 SelectingMouse Emulation Functions, page 27).or + = cursor type (move cursor, no clicking)+ = cursor type (single left click)+ = cursor type (single right click)+ = cursor type (double left click)+ = cursor type (double right click)or + = cursor types (drag) and (drop)or + = cursor type (no movement)•Check the Custom cursors check box to activate custom cursors for Windows Control in Mouse Emulation mode.7.6 System Settings7.6.1 System Off-Screen MenuSelect the PPoossiittiioonn Drop down menu to make changes to where the System Off-Screen menu appear on the screen.The System Off-Screen menu can be set to appear:•Bottom (Default)•Top•Left•Right•None56 7 Tobii Gaze Interaction Settings Tobii I-Series User’s manual v.1.0.4 - en-US
FFiigguurree 77..11 System Off-Screen Menu AreasSelect the AAvvaaiillaabbllee mmeennuu bbuuttttoonnss:: >> PPaauussee//RReessuummee GGaazzee IInntteerraaccttiioonn check box to activate the possibility to Pause/Re-sume Gaze Interaction. For information about how to use Pause/Resume, see5.6 Pause/Resume Gaze Interaction and Put theI-Series to Sleep with Gaze Interaction, page 29.Select the AAvvaaiillaabbllee mmeennuu bbuuttttoonnss:: >> SSlleeeepp--oonn--GGaazzee check box to active the possibility to put the device to sleep withGaze Interaction. For information about how to use Sleep-on-Gaze, see5.6 Pause/Resume Gaze Interaction and Put theI-Series to Sleep with Gaze Interaction, page 29.7.6.2 Positioning GuideTo turn On the Positioning Guide:1. Open TToobbiiii GGaazzee IInntteerraaccttiioonn SSeettttiinnggss >> SSyysstteemm SSeettttiinnggss.2. Select the EEnnaabbllee ppoossiittiioonniinngg gguuiiddee check box.To turn Off the Positioning Guide:1. Open TToobbiiii GGaazzee IInntteerraaccttiioonn SSeettttiinnggss >> SSyysstteemm SSeettttiinnggss.2. Select to clear the EEnnaabbllee ppoossiittiioonniinngg gguuiiddee check box.For more information about the Positioning Guide, see5.3.4 Positioning Guide7.7 System InformationTobii I-SeriesUser’s manual v.1.0.4 - en-US 7 Tobii Gaze Interaction Settings 57
To view the version and model of the device:Open the TToobbiiii GGaazzee IInntteerraaccttiioonn SSeettttiinnggss >> SSyysstteemm IInnffoorrmmaattiioonn.Please have this information available if you have problems with the device and need to contact Customer Support.By clicking CCooppyy aallll iinnffoorrmmaattiioonn you can paste the information into a document (such as Notepad or WordPad) or directly intoan e-mail.58 7 Tobii Gaze Interaction Settings Tobii I-Series User’s manual v.1.0.4 - en-US
8 Gaze Selection SettingsThe Gaze Selection Settings Dialog is controlled by Gaze Interaction and the user can make all changes without using a key-board and/or a mouse.8.1 The General Settings TabSSeelleeccttiioonn•GGaazzee - Choose Gaze to use your gaze position to activate the zooming function that ends with the execution of the de-sired Task.•SSwwiittcchh - Choose Switch to use a switch to activate the zooming function that ends with the execution of the desiredTask.PPrreecciissiioonnThe zoom precision can be set to 8 different levels, just look at the desired position to change the setting. Changing the Preci-sion will adjust how deep the zoom will go before executing the Task. The further to the right on the scale the deeper the zoom.SSppeeeeddThe zoom speed can be set to 8 different levels, just look at the desired position to change the setting. Changing the Speed willaffect how fast the zoom is before the execution of the Task. The further to the right on the scale the faster the zoom.Tobii I-SeriesUser’s manual v.1.0.4 - en-US 8 Gaze Selection Settings 59
8.2 The Keyboard Settings TabKKeeyybbooaarrdd llaayyoouuttThe selected language keyboard layout is shown. Select the Change button to change the keyboard layout to another language.There are a number of different language keyboard layouts available.GGaazzee ttyyppiinngg ssppeeeeddThe Gaze typing speed can be set to 8 different levels, just look at the desired position to change the setting. Changing the Gazetyping speed will adjust how long the user must fix their gaze on a button before the Task is executed. The scale presents lowerGaze typing speeds to the left and higher to the right.SSoouunndd ffeeeeddbbaacckk•OOnn - Choose On to activate sound feedback when selecting a button on the Gaze keyboard.•OOffff - Choose Off to deactivate sound feedback when selecting a button on the Gaze keyboard.To finish, select OOKK to save or CCaanncceell to abort you changes.60 8 Gaze Selection Settings Tobii I-Series User’s manual v.1.0.4 - en-US
9 Product Care9.1 Temperature & Humidity9.1.1 General UseThe Tobii I-Series is best kept in dry conditions at room temperature. The recommended range for temperature and the humidityvalue for the device is as follows:Portable mode:•Ambient temperature: 0℃to 24℃(32℉to 75℉)•Humidity: Max 70% (no condensation on the device)Mounted mode:•Ambient temperature: 0℃to 37℃(32℉to 99℉)•Humidity: Max 70% (no condensation on the device)9.1.2 Transportation and StorageFor transportation and storage excluding batteries the recommended range for temperature and the humidity value for the deviceis as follows:•Temperature: -40℃to 70℃(-40℉to 158℉)•Humidity: 20% to 70% (no condensation on the device)The Tobii I-Series is not waterproof or fully water resistant. The device should not be kept in excessively humid, damp or other-wise wet conditions. Do not submerge the device in water or in any other liquid. Be careful not to allow liquids to be spilled uponthe device especially in the connector areas without the I/O covers in place(Position 29 inFigure 3.2 Bottom, Left and RightSide, page 10). The device is registered as IP Class 43 (with I/O covers in place).9.2 CleaningBefore cleaning the I-Series device shut it down, unplug all cables, attach the I/O covers (Position 29 inFigure 3.2 Bottom, Leftand Right Side, page 10) and remove the batteries. Use a soft, slightly damp, lint-free cloth or Alcohol Cleaning Wipes (i.e. dampcloth with 96% alcohol). Avoid getting moisture in openings on the device. Don’t use window cleaners, household cleaners,aerosol sprays, solvents, alcohol, ammonia, or abrasives to clean the device.9.2.1 Cleaning of the SpeakersIf the openings for the speakers are clogged carefully use cotton sticks and/or a toothbrush to avoid damaging the IP-protectionfor I-Series speakers.9.3 PlacementOnly use the recommended mounts specified by the your local reseller or sales represent and make sure that they are mountedand fastened correctly according to the instructions. Do not place the device on unstable and uneven surfaces.9.4 Transporting the I-Series DeviceDisconnect all the cables and use the handle on the back side of the device to hold the device while carrying it.When you transport the device for repair, shipment or traveling, use the original casing and packaging materials.KKeeeepp tthhee oorriiggiinnaall ppaacckkaaggiinngg mmaatteerriiaallss ffoorr tthhee TToobbiiii II--SSeerriieess..In case the device needs to be returned to Tobii for Warranty related issues or repair, it is required that the originalpackaging (or equal equivalent) is used for shipping.Tobii I-SeriesUser’s manual v.1.0.4 - en-US 9 Product Care 61
9.5 Disposing of the BatteriesDo not dispose of the batteries in general household or office waste. Follow your local regulations for the disposal of batteries.9.6 Disposing of the I-Series DeviceDo not dispose of the I-Series Device in general household or office waste. Follow your local regulations for the disposal of elec-trical and electronic equipment.62 9 Product Care Tobii I-Series User’s manual v.1.0.4 - en-US
Appendix A Support, Warranty, TrainingResourcesA1 Customer SupportFor support, please contact your local representative or Support at Tobii. In order to receive assistance as quickly as possible,make sure you have access to your I-Series device and, if possible, an Internet connection. You should also be able to supply theserial number of the device, which you find on the back of the device, in the I-Series Control Center or Tobii Gaze InteractionSettings, see6.9 System, page 43and7.7 System Information, page 57.For further product information and other support resources, please visit the Tobii website www.tobii.com.A2 WarrantyPlease read this User’s Manual carefully before using the device. The warranty is only valid if the device is used according to theUser’s Manual and the warranty seal is not broken. Disassemblingthe I-Series device will void the warranty.Please read the Manufacturer’s Warranty paper included in the package.KKeeeepp tthhee oorriiggiinnaall ppaacckkaaggiinngg mmaatteerriiaallss ffoorr tthhee TToobbiiii II--SSeerriieess..In case the device needs to be returned to Tobii for Warranty related issues or repair, it is required that the originalpackaging (or equal equivalent) is used for shipping.A3 Training ResourcesTobii offers a range of training resources for the I-Series products and related communication products. You can find them onthe Tobii website, www.tobii.com, including Getting Started Guides, webinars and Quick guides. The I-Series Getting StartedGuide is delivered with, and stored on, the I-Series device.Tobii I-SeriesUser’s manual v.1.0.4 - en-US Appendix A Support, Warranty, Training Resources 63
Appendix B Compliance InformationB1 FCC StatementThis device complies with Part 15 of the FCC Rules. Operation is subject to the following two conditions: (1) this device may notcause harmful interference and (2) this device must accept any interference received, including interference that may causeundesired operation.Modifications not expressly approved by Tobii Technology could void the user’s authority to operate the equipmentunder FCC rules.B1.1 For P15B EquipmentThis equipment has been tested and found to comply with the limits for a Class B digital device, pursuant to part 15 of the FCCrules. These limits are designed to provide reasonable protection against harmful interference in a residential installation. Thisequipment generates, uses and can radiate radio frequency energy and, if not installed and used in accordance with theinstructions, may cause harmful interference to radio communications.However, there is no guarantee that interference will not occur in a particular installation. If this equipment does cause harmfulinterference to radio or television reception, which can be determined by turning the equipment off and on, the user isencouraged to try to correct the interference by one or more of the following measures:•Reorient or relocate the receiving antenna.•Increase the separation between the equipment and receiver.•Connect the equipment into an outlet on a circuit different from that to which the receiver is connected.•Consult the dealer or an experienced radio/TV technician for help.B1.2 For Portable DevicesFCC RF Radiation Exposure Statement:1. This Transmitter must not be co-located or operating in conjunction with any other antenna or transmitter.2. This equipment complies with FCC RF radiation exposure limits set forth for an uncontrolled environment. This devicewas tested for typical hand held operations with the device contacted directly to the human body to the sides of thedevice. To maintain compliance with FCC RF exposure compliance requirements, avoid direct contact to the transmittingantenna during transmitting.B2 Radio Wave Exposure and Specific Absorption Rate (SAR) InformationThe I-Series device has been tested as a Class 1 Medical Device. Medical electrical equipment such as this requires specialcaution regarding Electro-magnetic Compatibility (EMC) and thus needs to be installed and placed into service according to theinformation provided in this manual.Using other cables and accessories other than those provided or that are integrated in the device may affect EMCperformance.The SAR (Specific Absorbtion Rate) limit as dictated by the FCC (in the USA) is 1.6W/kg averaged over 1 gram of tissue. InEurope/EU(CE regulations) it is 2.0 W/kg averaged over 10 grams of tissue. The Devices, Tobii I–12 (FCC ID: W5MTOBIII12A)and Tobii I–15 (FCC ID: W5MTOBIII15A)have been tested against these SAR limits to maintain compliance with FCC/CE RFexposure requirements.This equipment complies with FCC RF radiation exposure limits set forth for an uncontrolled environment.The highest SAR value for the I–12 device is 0.501 W/kg. The highest SAR value for the I–15 device is 0.017 W/kg.64 Appendix B Compliance Information Tobii I-Series User’s manual v.1.0.4 - en-US
GGuuiiddaannccee aanndd mmaannuuffaaccttuurreerr’’ss ddeeccllaarraattiioonn –– eelleeccttrroommaaggnneettiicc eemmiissssiioonnssTThhee II--SSeerriieess iiss iinntteennddeedd ffoorr uussee iinn tthhee eelleeccttrroommaaggnneettiicc eennvviirroonnmmeenntt ssppeecciiffiieedd bbeellooww.. TThhee ccuussttoommeerr oorr tthhee uusseerr oofftthhee II--SSeerriieess ddeevviiccee sshhoouulldd aassssuurree tthhaatt iitt iiss uusseedd iinn ssuucchh aann eennvviirroonnmmeenntt..EEmmiissssiioonnss TTeesstt CCoommpplliiaannccee EElleeccttrroommaaggnneettiicc eennvviirroonnmmeenntt ––gguuiiddaanncceeRF (Radio Frequencyemissions CISPR 11Group 1 The I-Series must emit electromagneticenergy in order to perform its intendedfunction. Nearby electronic equipmentmay be affectedRF emissions CISPR 11 Class BHarmonic emissionsIEC 61000-3-2Not Applicable The product has an active power ofP≤75 W at rated load conditions.Therefore no limits are applicable.Voltage Fluctuations/flickeremissions IEC 61000-3-3Not Applicable The product has an active power ofP≤75 W at rated load conditions.Therefore it is not likely to producevoltage fluctuations or flicker above thelimit values.The I-Series device should not be used adjacent to or stacked with other equipment.GGuuiiddaannccee aanndd mmaannuuffaaccttuurreerr’’ss ddeeccllaarraattiioonn –– eelleeccttrroommaaggnneettiicc iimmmmuunniittyyTThhee II--SSeerriieess ddeevviiccee iiss iinntteennddeedd ffoorr uussee iinn tthhee eelleeccttrroommaaggnneettiicc eennvviirroonnmmeenntt ssppeecciiffiieedd bbeellooww.. TThhee ccuussttoommeerr oorr tthheeuusseerr ooff tthhee II--SSeerriieess ddeevviiccee sshhoouulldd aassssuurree tthhaatt iitt iiss uusseedd iinn ssuucchh aann eennvviirroonnmmeenntt..IIMMMMUUNNIITTYY tteesstt IIEECC 6600660011 tteesstt lleevveell CCoommpplliiaannccee lleevveell EElleeccttrroommaaggnneettiicceennvviirroonnmmeenntt –– gguuiiddaanncceeElectrostatic discharge(ESD)IEC 61000-4-2± 6 kV contact± 8 kV air± 6 kV contact± 8 kV airFloors should be wood,concrete or ceramic tile. Iffloors are covered withsynthetic material, the relativehumidity should be at least30 %.Electrical fast transient/burstIEC 61000-4-4± 2 kV for power supply lines± 1 kV for input/output lines± 2 kV for power supply lines± 1 kV for input/output linesMains power quality shouldbe that of a typicalcommercial or hospitalenvironment.SurgeIEC 61000-4-5± 1 kV line to line ± 1 kV line to line Mains power quality shouldbe that of a typicalcommercial or hospitalenvironment.Tobii I-SeriesUser’s manual v.1.0.4 - en-US Appendix B Compliance Information 65
GGuuiiddaannccee aanndd mmaannuuffaaccttuurreerr’’ss ddeeccllaarraattiioonn –– eelleeccttrroommaaggnneettiicc iimmmmuunniittyyTThhee II--SSeerriieess ddeevviiccee iiss iinntteennddeedd ffoorr uussee iinn tthhee eelleeccttrroommaaggnneettiicc eennvviirroonnmmeenntt ssppeecciiffiieedd bbeellooww.. TThhee ccuussttoommeerr oorr tthheeuusseerr ooff tthhee II--SSeerriieess ddeevviiccee sshhoouulldd aassssuurree tthhaatt iitt iiss uusseedd iinn ssuucchh aann eennvviirroonnmmeenntt..IIMMMMUUNNIITTYY tteesstt IIEECC 6600660011 tteesstt lleevveell CCoommpplliiaannccee lleevveell EElleeccttrroommaaggnneettiicceennvviirroonnmmeenntt –– gguuiiddaanncceeVoltage dips, shortinterruptions and voltagevariations on power supplyinput lines.IEC 61000-4-11< 5 % UT (>95 % dip in UT)for 0.5 cycles.40 % UT (60 % dip in UT) for5 cycles.70 % UT (30 % dip in UT) for25 cycles.< 5 % UT (>95 % dip in UT)for 5 s< 5 % UT (>95 % dip in UT)for 0.5 cycles.40 % UT (60 % dip in UT) for5 cycles.70 % UT (30 % dip in UT) for25 cycles.< 5 % UT (>95 % dip in UT)for 5 sMains power quality shouldbe that of a typicalcommercial or hospitalenvironment. If the user ofthe I-Series device requirescontinued operation duringmains interruptions, it isrecommended that theI-Series device batteries arein place or that the device bepowered from anuninterruptable power supply(UPS).UT is at 100 VAC 60 Hz or230 VAC 50 Hz.Power frequency (50/60 Hz)magnetic fieldIEC 61000-4-83 A/m 3 A/m Power frequency magneticfields should be at levelscharacteristic of a typicallocation in a typicalcommercial or hospitalenvironment.GGuuiiddaannccee aanndd mmaannuuffaaccttuurreerr’’ss ddeeccllaarraattiioonn –– eelleeccttrroommaaggnneettiicc iimmmmuunniittyyTThhee II--SSeerriieess ddeevviiccee iiss iinntteennddeedd ffoorr uussee iinn tthhee eelleeccttrroommaaggnneettiicc eennvviirroonnmmeenntt ssppeecciiffiieedd bbeellooww.. TThhee ccuussttoommeerr ooff tthheeuusseerr ooff tthhee II--SSeerriieess ddeevviiccee sshhoouulldd aassssuurree tthhaatt iitt iiss uusseedd iinn ssuucchh aann eennvviirroonnmmeenntt..IImmmmuunniittyy tteesstt IIEECC 6600660011 tteesstt lleevveell CCoommpplliiaannccee lleevveell EElleeccttrroommaaggnneettiicceennvviirroonnmmeenntt -- gguuiiddaanncceePortable and mobile RFcommunications equipmentshould be used no closer toany part of the I-Seriesdevice, including cables, thanthe recommendedseparation distancecalculated from the equationapplicable to the frequencyof the transmitter.Recommended separationdistanceConducted RFIEC 61000-4-63 Vrms 150 kHz to 80 MHz 3 Vd = 3,53Pfor 150 kHz to80 MHzRadiated RFIEC 61000-4-33 V/m 80 MHz to 2.5 GHz 3 V/md = 3,53Pfor 80 MHz to800 MHzd = 73Pfor 800 MHz to2.5 GHz66 Appendix B Compliance Information Tobii I-Series User’s manual v.1.0.4 - en-US
GGuuiiddaannccee aanndd mmaannuuffaaccttuurreerr’’ss ddeeccllaarraattiioonn –– eelleeccttrroommaaggnneettiicc iimmmmuunniittyyTThhee II--SSeerriieess ddeevviiccee iiss iinntteennddeedd ffoorr uussee iinn tthhee eelleeccttrroommaaggnneettiicc eennvviirroonnmmeenntt ssppeecciiffiieedd bbeellooww.. TThhee ccuussttoommeerr ooff tthheeuusseerr ooff tthhee II--SSeerriieess ddeevviiccee sshhoouulldd aassssuurree tthhaatt iitt iiss uusseedd iinn ssuucchh aann eennvviirroonnmmeenntt..IImmmmuunniittyy tteesstt IIEECC 6600660011 tteesstt lleevveell CCoommpplliiaannccee lleevveell EElleeccttrroommaaggnneettiicceennvviirroonnmmeenntt -- gguuiiddaanncceewhere "P" is the maximumoutput power rating of thetransmitter in watts (W)according to the transmittermanufacturer and "d" is therecommended separationdistance in meters (m).Field strengths from fixed RFtransmitters, as determinedby an electromagnetic sitesurvey,Ishould be less thanthe compliance level in eachfrequency range.iiInterference may occur in thevicinity of equipment markedwith the following symbol.NNOOTTEE 11 At 80 MHz and 800 MHz, the higher frequency range applies.NNOOTTEE 22 These guidelines may not apply in all situations. Electromagnetic propagation is affected by absorption and reflectedfrom structures, objects and people.i. Field strengths from fixed transmitters, such as base stations for radio (cellular/cordless) telephones and land mobile radios, amateur radio, AM and FMradio broadcast and TV broadcast cannot be predicted theoretically with accuracy. To assess the electromagnetic environment due to fixed RFtransmitters, an electromagnetic site survey should be considered. If the measured field strength in the location in which the I-Series device is usedexceeds the applicable RF compliance level above, the I-Series device should be observed to verify normal operation. If abnormal performance isobserved, additional measures may be necessary, such as reorienting or relocating the I-Series device.ii. Over the frequency range 150 kHz to 80 MHz, field strengths should be less than 3 V/m.RReeccoommmmeennddeedd sseeppaarraattiioonn ddiissttaanncceess bbeettwweeeenn ppoorrttaabbllee aanndd mmoobbiillee RRFF ((RRaaddiioo FFrreeqquueennccyy)) ccoommmmuunniiccaattiioonnsseeqquuiippmmeenntt aanndd tthhee II--SSeerriieess ddeevviiccee..The I-Series device is intended for use in the electromagnetic environment in which radiated RF disturbances are controlled.The customer or the user of the I-Series device can help prevent electromagnetic interference by maintaining a minimumdistance between portable and mobile RF communication equipment (transmitters) and the I-Series device as recommendedbelow, according to the maximum output power of the communications equipment.RRaatteedd mmaaxxiimmuumm oouuttppuuttppoowweerr ooff ttrraannssmmiitttteerrWWSSeeppaarraattiioonn ddiissttaannccee aaccccoorrddiinngg ttoo ffrreeqquueennccyy ooff ttrraannssmmiitttteerr115500 kkHHzz ttoo 8800 MMHHzz 8800 MMHHzz ttoo 880000 MMHHzz 880000 MMHHzz ttoo 22..55 GGHHzz0.01 0.12 m 0.12 m 0.24 m0.1 0.37 m 0.37 m 0.74 m1 1.2 m 1.2 m 2.4 m10 3.7 m 3.7 m 7.4 m100 11.7 m 11.7 m 23.4 mUnder test specifications specified in 6.2.1.10 EN 60 601-1-2 (2007) the I-Series device shall not:•Exhibit component failure•Exhibit changes in its programmable parameters•Reset unintentionally to factory defaults•Emit false alarms•Initiate any unintended operation, even if accompanied by alarmTobii I-SeriesUser’s manual v.1.0.4 - en-US Appendix B Compliance Information 67
With regard to the test specifications specified in 6.2.1.10 EN 60 601-1-2 (2007) the cessation or interruption of any intendedoperation, even if accompanied by an alarm, is allowed in the I-Series device due to it not performing any safety criticaloperations.Also with regard to the test specifications specified in 6.2.1.10 EN 60 601-1-2 (2007) errors of a displayed numerical valuesufficiently large to affect diagnosis or treatment is not applicable for the I-Series device.In order to maintain compliance as a Class 1 Medical device, the switches that are used in combination with the I-Series devicemust fulfill the isolation requirements of IEC/EN60601-1 based on 15 V DC. They must be electrically floating switches(switches that are not grounded).B3 Industry Canada StatementLow-power license-exempt radio communication devices (ICES-003)De faible puissance exempts de licence des appareils de communication radio (CNR-210)a. Common informationOperation is subject to the following two conditions:1. This device may not cause interference, and2. This device must accept any interference, including interference that may cause undesired operation of the device.b. Operation in 2.4 GHz bandTo prevent radio interference to the licensed service, this device is intended to be operated indoors and installationoutdoors is subject to licensing.a. Informations communesSon fonctionnement est soumis aux deux conditions suivantes:1. Ce dispositif ne peut causer des interférences, et2. Ce dispositif doit accepter toute interférence, y compris les interférences qui peuvent causer un mauvaisfonctionnement du dispositif.b. Le fonctionnement en bande de 2,4 GHzPour prévenir les interférences radioélectriques aux services sous licence, cet appareil est destiné à être exploité àl'intérieur et à l'extérieur d'installation est soumise à licence.This device has been tested to the safety requirements for exposure to radio waves (SAR) in RSS-102 to the General Public(Uncontrolled Environment) limits (1.6W/Kg). The highest SAR value for the I–12 device is 0.501 W/kg. The highest SAR valuefor the I–15 device is 0.017 W/kg. This device can be operated safely with a minimum distance 0 cm between the equipmentand the user’s body.Ce dispositif a été testé aux exigences de sécurité pour l’exposition aux ondes radio (SAR) dans le CNR-102à le grand public(environnement non contrôlé) des limites (1.6W/Kg). La valeur maximale mesurée de SAR pour le I–12 dispositif est: 0.501 W/kg. La valeur maximale mesurée de SAR pour le I–15 dispositif est: 0.017 W/kg. Ce dispositif peut être exploité en toute sécuritéavec un 0cm distance minimale entre le matériel et les corps de l’utilisateur.This Class B digital apparatus complies with Canadian ICES-003.Cet appareil numérique de la classe B est conforme à la norme CNR-210 du Canada.B4 CE StatementThis equipment complies with the requirements relating to electromagnetic compatibility, EN 300386 class B for ITE, theessential protection requirement of Council Directive 2004/108/ECon the approximation of the laws of the Member Statesrelating to electromagnetic compatibility and R&TTE Directive 1999/5/ECto meet the regulation of the radio equipment andtelecommunications terminal equipment.B5 StandardsThe Tobii Device complies with the following standards:68 Appendix B Compliance Information Tobii I-Series User’s manual v.1.0.4 - en-US
•Medical Device Directive (MDD) 93/42/EEC•Restriction of Hazardous Substances (RoHS) 2002/95/EC•Electromagnetic Compatibility Directive (EMC) 2004/108/EC•Low Voltage Directive (LVD) 2006/95/EC•Part 15 of the FCC Rules•CAN/CSA-C22.2No. 60601-1-08•ANSI/AAMI ES60601-1:2005•IEC 60601-1:2005•IEC/EN60601-1-6:2010•IEC 60601-1-11:2010•IEC/EN60601-1-11:2010•ISO 14971:2009•IEC 60601-1-2: 2007•IEC 60950-1:2005+A1:2009•GB4943-2011•GB9254-2008•GB17625.1-2003•AS/NZS 60950.1•AS/NZSCISPR22•SANS 60950•CISPR 22•FCC Part 18•FCC Part 15C (P15.247) - BT - WLAN•EN300328- BT•EN300328_2.4G- WLAN•RSS_210 - BT - WLAN•AS/NZS 4268 - BT - WLAN (2.4G)•FCC - SAR - OET65•SAR - EN62209_2•SAR - RSS_102•SAR - ACA EMR 2003.Schedules 1 and 2•EMC FCC - Part 15B•EMC EN301489_1/EN301489_17•EMC EN55022/EN55024•EMC EN60601_1_2•EMC ICES_003•ICES-001•EMC AS/N2S CISPR 22•FCC LPDTobii I-SeriesUser’s manual v.1.0.4 - en-US Appendix B Compliance Information 69
Appendix C Computer Device States ofOperationTable C.1 Computer Device States of OperationAAddvvaanncceedd CCoonnffiigguurraattiioonnaanndd PPoowweerr IInntteerrffaaccee((AACCPPII)) SSttaatteeDDeessccrriippttiioonnS0 (Working) Normal operating state - Windows session is runningDisplay will dim and turn off after a time of idle. The 1, 2, Menu and Volume Up and Downbuttons are however always illuminated in state S0.S3 (Sleep) The device is sleeping. The Windows session is suspended to RAM, allowing a quick resumeto state S0 by:1. Pressing the power button2. Pressing a button connected to a switch port configured to have power on functionality3. Wake on Gaze (if enabled)The device is consuming a small amount of power in state S3. Fully charged batteries (no ACadapter attached) will last a minimum of 24 h in state S3.Windows Critical battery level is monitored in state S3 to prevent the batteries from beingfully drained. The device will enter state S4 (Hibernate) if the critical value is reached.S4 (Hibernate) The device is in hibernation. The Windows session is suspended to the SSD (hard drive) andthe device is powered off. The session can be resumed to state S0 by:1. Pressing the power button2. Pressing a button connected to a switch port configured to have power on functionalityS5 (Soft Off) Windows is shut down. The device is powered off. Batteries (not drained) and/or AC adapterattached.S5 Overheat (Safety State) Special safety state for I-Series, entered if the chassis is overheated. It is not possible to startthe device until it has cooled down below the safety temperature level.G3 (Mechanical Off) All power sources removed (no batteries and no AC adapter attached).Table C.2 Power Button Normal Operation, LED BehaviorAACCPPII SSttaatteePPoowweerr BBuuttttoonn IIlllluummiinnaattiioonn BBuuttttoonn 11,, 22,, MMeennuu,, VVoolluummeeUUpp aanndd VVoolluummee DDoowwnnBBuuttttoonnssWWhhiittee IIlllluummiinnaattiioonnNNoo BBaatttteerryy CChhaarrggiinngg BBaatttteerryy CChhaarrggiinnggS0 (Working) Green Light Blue Light ONS3 (Sleep) Green Blinking Light Blue Blinking Light OFFS4 (Hibernate) OFF Blue Light OFFS5 (Soft off) OFF Blue Light OFF70 Appendix C Computer Device States of Operation Tobii I-Series User’s manual v.1.0.4 - en-US
Table C.3 Power Button Error or Warning, LED BehaviorEErrrroorr oorr WWaarrnniinngg AACCPPII SSttaattee aanndd ccoonnddiittiioonn PPoowweerr BBuuttttoonn lllluummiinnaattiioonn CCoommmmeennttCChhaassssiiss nneeaarr oovveerrhheeaattiinngg In state AACCPPII SS00((WWoorrkkiinngg)), when thechassis temperature is ≤1degree Celsius from theMaximum Thresholdaccording to the SafetySettings specified inTableD.1 Maximum AllowedTemperature, page 72.Purple Light Purple light as a warning tothe user when the Device isclose to the overheatthreshold.CChhaassssiiss oovveerrhheeaatteedd In state AACCPPII SS55 OOvveerrhheeaatt,when the power buttonIispressed.Purple Quick Blinking Lightfor 5 seconds.The Device will blink the LEDand remain in the state ACPIS5 Overheat.LLooww BBaatttteerryy LLeevveell ffoorrBBaatttteerryy PPaacckkssIn state AACCPPII SS44((HHiibbeerrnnaattee)) aanndd SS55 ((SSooffttooffff)), when the power buttonIis pressed and:1. No DC plug inserted (i.e.no charging possible)and2. Both battery packs aretotally drainedBlue Quick Blinking Light for5 seconds.i. Or a switch port configured to have power button functionality.Tobii I-SeriesUser’s manual v.1.0.4 - en-US Appendix C Computer Device States of Operation 71
Appendix D Maximum AllowedTemperatureTable D.1 Maximum Allowed TemperatureAAlllloowwaabbllee mmaaxxiimmuumm tteemmppeerraattuurree ffoorr tthhee II--SSeerriieess mmeettaall eexxtteerrnnaall ssuurrffaacceess wwhhiicchh aarree lliikkeellyy ttoobbee ttoouucchheeddMMaaxxiimmuummTTeemmppeerraattuurree ℃℃//℉℉PPoorrttaabblleeMMooddeeMMoouunntteeddMMooddeeMMoouunntteedd MMooddee tteemmppeerraattuurree tthhrreesshhoolldd::External surfaces temperature allowed 55/131External surfaces temperature allowed in an area unlikely to be touched, see position 1 inFigureD.1 Temperature Threshold Area, page 72for the position of this area. 60/140PPoorrttaabbllee MMooddee tteemmppeerraattuurree tthhrreesshhoolldd::External surfaces temperature allowed 43/109External surfaces temperature allowed in an area unlikely to be touched, see position 1 inFigureD.1 Temperature Threshold Area, page 72for the position of this area.46/1151FFiigguurree DD..11 Temperature Threshold Area72 Appendix D Maximum Allowed Temperature Tobii I-Series User’s manual v.1.0.4 - en-US
Appendix E Technical SpecificationsE1 Standard I-SeriesSSttaannddaarrdd TToobbiiii II––1122 TToobbiiii II––1122 TToobbiiii II––1155TTyyppee//MMooddeell II––1122 RR II––1122 EETTRR II––1155 EETTRRSSccrreeeenn 12.1ʺ, Aspect ratio: 4:3, LED Backlight Unit,White Luminance 500 cd/m215.0ʺ, Aspect ratio: 4:3, LEDBacklight UnitWhite Luminance 400 cd/m2SSccrreeeenn RReessoolluuttiioonn 1024 × 768 pixels (XGA)TToouucchh PPaanneell Projected Capacitive Touch with Gorilla® Glass, 10 point multi touchDDiimmeennssiioonnss ((WWxxHHxxDD)) 30,7 × 27,4 × 10,5 cm12.1 × 10.8 × 4.1 inches36,9 × 32,6 × 11,2 cm14.5 × 12.8 × 4.4 inchesWWeeiigghhtt 2,8 kg6.2 lbs3,8 kg8.4 lbsSSppeeaakkeerrss 2 × 3 W Closed Box SpeakersMMiiccrroopphhoonnee 1 × Analog MicrophonePPrroocceessssoorr Intel® Atom™Dual Core Processor N2800 (1M Cache, 1.86 GHz)CChhiippsseett Intel® NM10 Express ChipsetRRAAMM 4 GB DDR3OOppeerraattiinngg ssyysstteemm Microsoft Windows 7HHaarrdd ddiisskk ddrriivvee 2.5ʺSSD 120 GB minimumSSDD--CCaarrdd MicroSD-Card 32 GBCCoonnnneeccttoorrss1 × Connector for an HDMI1.3 Connector Type A cable2 × USB 2.0 (Current limit = 1000 mA)1 × USB 3.0 (Current limit 1500 mA)1 × RJ45 100/1000 Mbit/s (Ethernet)2 × 3.5 mm Switch connector interface, (Pin out for mono plug: Sleeve = Common ground,Tip = Signal)1 × 3.5 mm”Headphone jack (stereo) with jack detection1 × 24 VDC in 2.5/5.5 mm (Power connector)BBuuttttoonnss 1 × Power On1 × Volume Up1 × Volume Down1 × Menu2 × ProgrammableWWLLAANN ((ooppttiioonnaall)) IEEE802.11 b/g/n Dual antenna diversity systemBBlluueettooootthh®® ((ooppttiioonnaall)) Bluetooth® 3.0+HSTobii I-SeriesUser’s manual v.1.0.4 - en-US Appendix E Technical Specifications 73
SSttaannddaarrdd TToobbiiii II––1122 TToobbiiii II––1122 TToobbiiii II––1155TTyyppee//MMooddeell II––1122 RR II––1122 EETTRR II––1155 EETTRRIIRR RReemmoottee CCoonnttrrooll((EEnnvviirroonnmmeennttaall CCoonnttrroollUUnniitt))GEWA Programmable IR Remote Control (Environmental Control Unit),19 –455 kHz, 940 nm, compatible with a wide range of remote controlsResting Orientation: 1 × IR filter window with 1 × IR Receive Sensor, 3 × IR Transmit Diodesand 1 × Red Status LEDUpright Orientation: 1 × IR filter window with 4 × IR Transmit DiodesTotal peak transmit power (7 diodes): 8.4 WCCaammeerraa User Camera (back) 5 MP AF (Auto Focus)Web Camera (front) 2 MP FF (Fixed Focus)EEyyee TTrraacckkeerr N/A Tobii IS20 ModuleBBaatttteerryy RRuunn TTiimmeeI~10.5 h ~9 h ~9.5/8ii hBBaatttteerryy CChhaarrggee TTiimmee Maximum 5.4 h (0-100%)BBaatttteerryy SSttoorraaggee TTiimmee Maximum 6 months @ 40 —60 % chargeDDeesskkssttaanndd IntegratedMMoouunnttiinngg SSyysstteemmssSSuuppppoorrtteeddTobii QR adapter plate for Daessy and REHAdaptPPoowweerr SSuuppppllyy Adapter Technology Co. Ltd, ATM065-A240Input: Universal 100 ~ 240 VAC / 50 ~ 60 HzOutput: +24VDC / 0~2.71AIIPP ccllaassss IP 43 (with I/O covers in place)i. Indoor with continuous communication and with Gaze Interaction if applicable. ~24 hours with a Power optimized scenario.ii. 9.5 hours without the Eye tracker activated, 8 hours with the Eye tracker activatedE2 Radio Free I-SeriesRRFF FFrreeee TToobbiiii II––1122 TToobbiiii II––1155TTyyppee//MMooddeell II––1122 EETT II––1155 EETTSSccrreeeenn 12.1ʺ, Aspect ratio: 4:3, LED BacklightUnit,White Luminance 500 cd/m215.0ʺ, Aspect ratio: 4:3, LED BacklightUnitWhite Luminance 400 cd/m2SSccrreeeenn rreessoolluuttiioonn 1024 x 768 pixels (XGA)TToouucchh PPaanneell Projected Capacitive Touch with Gorilla® Glass, 10 point multi touchDDiimmeennssiioonnss ((WWxxHHxxDD)) 30,7 × 27,4 × 10,5 cm12.1 × 10.8 × 4.1 inches36,9 × 32,6 × 11,2 cm14.5 × 12.8 × 4.4 inchesWWeeiigghhtt 2,8 kg6.2 lbs3,8 kg8.4 lbsSSppeeaakkeerrss 2 × 3 W Closed Box SpeakersMMiiccrroopphhoonnee 1 × Analog MicrophonePPrroocceessssoorr Intel® Atom™Dual Core Processor N2800 (1M Cache, 1.86 GHz)CChhiippsseett Intel® NM10 Express ChipsetRRAAMM 4 GB DDR3OOppeerraattiinngg ssyysstteemm Microsoft Windows 774 Appendix E Technical Specifications Tobii I-Series User’s manual v.1.0.4 - en-US
RRFF FFrreeee TToobbiiii II––1122 TToobbiiii II––1155TTyyppee//MMooddeell II––1122 EETT II––1155 EETTHHaarrdd ddiisskk ddrriivvee 2.5ʺSSD 120 GB minimumSSDD--CCaarrdd MicroSD-Card 32 GBCCoonnnneeccttoorrss1 × Connector for an HDMI1.3 Connector Type A cable2 × USB 2.0 (Current limit = 1000 mA)1 × USB 3.0 (Current limit 1500 mA)1 × RJ45 100/1000 Mbit/s (Ethernet)2 × 3.5 mm Switch connector interface, (Pin out for mono plug: Sleeve =Common ground, Tip = Signal)1 × 3.5 mm”Headphone jack (stereo) with jack detection1 × 24 VDC in 2.5/5.5 mm (Power connector)BBuuttttoonnss 1 × Power On1 × Volume Up1 × Volume Down1 × Menu2 × ProgrammableIIRR RReemmoottee CCoonnttrrooll ((EEnnvviirroonnmmeennttaallCCoonnttrrooll UUnniitt))GEWA Programmable IR Remote Control (Environmental Control Unit),19 –455 kHz, 940 nm, compatible with a wide range of remote controlsResting Orientation: 1 × IR filter window with 1 × IR Receive Sensor, 3 × IRTransmit Diodes and 1 × Red Status LEDUpright Orientation: 1 × IR filter window with 4 × IR Transmit DiodesTotal peak transmit power (7 diodes): 8.4 WCCaammeerraa User Camera (back) 5 MP AF (Auto Focus)Web Camera (front) 2 MP FF (Fixed Focus)EEyyee TTrraacckkeerr Tobii IS20 ModuleBBaatttteerryy RRuunn TTiimmeeI~9h ~9.5/8ii hBBaatttteerryy CChhaarrggee TTiimmee Maximum 5.4 h (0-100%)BBaatttteerryy SSttoorraaggee TTiimmee Maximum 6 months @ 40 —60 % chargeDDeesskkssttaanndd IntegratedMMoouunnttiinngg SSyysstteemmss SSuuppppoorrtteedd Tobii QR adapter plate for Daessy and REHAdaptPPoowweerr SSuuppppllyy Adapter Technology Co. Ltd, ATM065-A240Input: Universal 100 ~ 240 VAC / 50 ~ 60 HzOutput: +24VDC / 0~2.71AIIPP CCllaassss IP 43 (with I/O covers in place)i. Indoor with continuous communication and with Gaze Interaction if applicable. ~24 hours with a Power optimized scenario.ii. 9.5 hours without the Eye tracker activated, 8 hours with the Eye tracker activatedTobii I-SeriesUser’s manual v.1.0.4 - en-US Appendix E Technical Specifications 75
E3 Battery packIItteemm SSppeecciiffiiccaattiioonn RReemmaarrkkBBaatttteerryy TTeecchhnnoollooggyy Li-Ion rechargeable battery pack withgas gauge (SMBus v1.1 interface)CCeellll 6× Panasonic NCR18650 (3S2P)BBaatttteerryy PPaacckk CCaappaacciittyy 62.64 Wh Initial capacity, new battery packNNoommiinnaall VVoollttaaggee 10.8 VCChhaarrggee TTiimmee Maximum 5.4 h Charge from 0 to 100%CCyyccllee LLiiffee 500 cycles Minimum 75% of initial capacityremainingAAlllloowwaabbllee OOppeerraattiinngg TTeemmppeerraattuurree 0–45 ℃, 45-85%RH Charge condition-20 –60 ℃, 45-85%RH Discharge conditionSSttoorraaggee TTeemmppeerraattuurree -20 –35 ℃, 45-85%RH 1 year-20 –40 ℃, 45-85%RH 6 months-20 –45 ℃, 45-85%RH 1 month-20 –50 ℃, 45-85%RH 1 weekSSttoorraaggee TTiimmeeIMinimum 6 months @ charge ≥40%Do not long time store batterypacks with less than 40%charge leveli. Batteries shall not be stored in the deviceE4 Eye TrackerTTeecchhnniiccaall SSppeecciiffiiccaattiioonnss TToobbiiii IISS2200 MMoodduulleeWWoorrkkiinngg DDiissttaannccee 40 - 90 cm18 - 35 inchesFFrreeeeddoomm ooff HHeeaadd MMoovveemmeennttii@@ 7700 ccmm // 2277..55 iinncchheess((WWiiddtthh xx HHeeiigghhtt))50 × 36 cm20 × 14 inHHeeaadd MMoovveemmeenntt SSppeeeedd ((ooppttiimmaall)) 11.8 in/s30 cm/sGGaazzee DDaattaa RRaattee 30 HzGGaazzee AAccccuurraaccyyiiiiUnder ideal conditions 0.4° (Std dev 0.1°)Across 30 × 20 × 20 cm head box 0.5° (Std dev 0.2°)SSccrreeeenn SSiizzeeiiiiii<19ʺscreen (<28° gaze angle) ExcellentGGaazzee PPrreecciissiioonn ((==ssaammppllee ttoo ssaammppllee nnooiissee))iivvUnder ideal conditions, without filter, on artificial eyes PendingAcross head box, without filter, on human eyes 0.4° (Std dev 0.1°)MMoouunnttiinngg Built inPPoowweerr SSuuppppllyy Built in76 Appendix E Technical Specifications Tobii I-Series User’s manual v.1.0.4 - en-US
i. Freedom of head movement describes the volume in front of the tracker in which the user must have at least one of the eyes. The numbers arespecified parallell/orthogonal to screen surface, assuming eye tracker is at 20 degree angle to screen.ii. Gaze accuracy describes the angular average distance from the actual gaze point to the one measured by the eye tracker.Accuracy under ideal conditions is measured with users placed in the center of the eye tracker track box with the head resting on a chin rest, and theroom and screen illumination constant at 300 lux.Accuracy across head box is measured with users after calibration systematically positioned at varying positions ranging from center of the head box upto +/- 15 cm horizontal, +/- 10 cm vertical and +/- 10 cm distance.Accuracy across varying background illumination is measured with users’head resting on a chin rest, and after calibration modifying backgroundillumination from 1 to 1000 lux.iii. Gaze angles describe the quality of gaze accuracy when user looks at the upper two corners of 16:9 ratio screens, @ 60 cm user distance to EyeTracker.iv. Gaze Precision describes the point-to-point variation between individual gaze samples (here specified with binocular data, ie both eyes, and measuredon artificial eyes). Gaze Precision with Stampe filter is with Stampe stage 2 noise-reduction algorithm applied to raw data (Stampe , Behavior ResearchMethods, Instruments & Computers 1993, 25 (2), 137-142).Precision without filter is based on raw data, without any de-noising filter applied, either inside or outside the eye tracker.Precision under ideal conditions is measured with users placed in the center of the eye tracker track box with the head resting on a chin rest, and theroom and screen illumination constant at 300 lux.Precision across head box is measured with users after calibration systematically positioned at varying positions ranging from center of the head box upto +/- 15 cm horizontal, +/- 10 cm vertical and +/- 10 cm distance.Tobii I-SeriesUser’s manual v.1.0.4 - en-US Appendix E Technical Specifications 77
Appendix F Approved AccessoriesDDeessccrriippttiioonn MMooddeell TToobbiiii PPaarrtt NNoo..I-Series AC Adapter (Power Supply) AdapterTech ATM065–A240 12002664Battery pack TISB1 12002548For information about the latest approved Tobii Accessories, please visit the www.tobii.com website or contact your local Tobiireseller.78 Appendix F Approved Accessories Tobii I-Series User’s manual v.1.0.4 - en-US
79
Support for Your Tobii DeviceGet Help OnlineBefore contacting us, see the product-specific Support page for your Tobii device. It contains up-to-date information about issues and tips & tricks related to the product. Find our Support page onlineat: http://www.tobii.com/assistivesupport.Contact Your ResellerFor questions or problems with your product, contact Customer Support at your Tobii Reseller for assistance. They are most familiar with your personal setup and can best help you with tips andproduct training. For our Resellers contact details, see http://www.tobii.com/en/assistive-technology/global/Contact/EEuurrooppee,, AAffrriiccaa,, SSoouutthh AAmmeerriiccaa CCeennttrraall EEuurrooppee NNoorrtthh AAmmeerriiccaa CChhiinnaa PPaacciiffiicc,, SSoouutthh AAssiiaaTobii Technology AB Tobii Technology GmbH Tobii ATI Tobii Electronics Technology Suzhou Co.,LtdTobii TechnologyKarlsrovägen 2D Niedenau 45 333 Elm Street No. 678, Fengting Avenue 69 Cumming StreetS-182 53 Danderyd D-60325 Frankfurt am Main Dedham, MA 02026 Land Industrial Park Craigburn Farm SA 5051Sweden Germany USA Weiting, Suzhou 2, Post code: 21512 AustraliaPhone : +46 8 663 69 90 Phone: +49 69 24 75 03 40 Phone: +1-781-461-8200 China Phone: +61 (0) 450 460 668Fax: +46 8 30 14 00 Fax: +49 69 24 75 03 429 Fax: +1-781-461-8213 Phone: +86 (0) 13585980539 Fax: +61 (0) 8 8278 8671www.tobii.com www.tobii.com www.tobiiATI.com www.tobii.com www.tobii.comsales@tobii.com sales.de@tobii.com sales.us@tobii.com sales.cn@tobii.com sales@tobii.com©Tobii®. Illustrations and specifications do not necessarily apply to products and services offered in each local market. Technical specifications are subject to change without prior notice. All other trademarks are the property of their respective owners.Tobii Support OfficesNNoorrtthh EEuurrooppee CCeennttrraall EEuurrooppee NNoorrtthh AAmmeerriiccaa CChhiinnaasupport@tobii.com support@tobii.com techsupport@tobiiATI.com support.cn@tobii.comPhone: +46 8 522 950 20 Phone: +49 69 24 75 03 4-28 Toll-Free: +1-800-793-9227 Phone: +86 512 6936 2880-814Support hours: 8 AM - 6 PM Support hours: 8 AM - 6 PM Phone: +1-781-461-8200 Support hours: 9 AM –5:30 PMBetween July-August: 9 AM - 5 PM Between July-August: 9 AM - 5 PM Support hours: 9 AM - 9 PM (China Standard Time, UTC +8)(Central European Time, UTC +1) (Central European Time, UTC +1) (US Eastern Standard Time, UTC -6)

Navigation menu