Tokyo Hy Power Labs HL-45B 45 W Linear Power Amplifier User Manual Instruction Manual
Tokyo Hy-Power Labs, Inc. 45 W Linear Power Amplifier Instruction Manual
Instruction Manual
Instruction Manual
Solid-State HF/50MHz Band
45W Linear Power Amplifier
Model HL-45B
TOKYO HY-POWER LABS., INC.

- 1 -
( 1 ) FEATURES
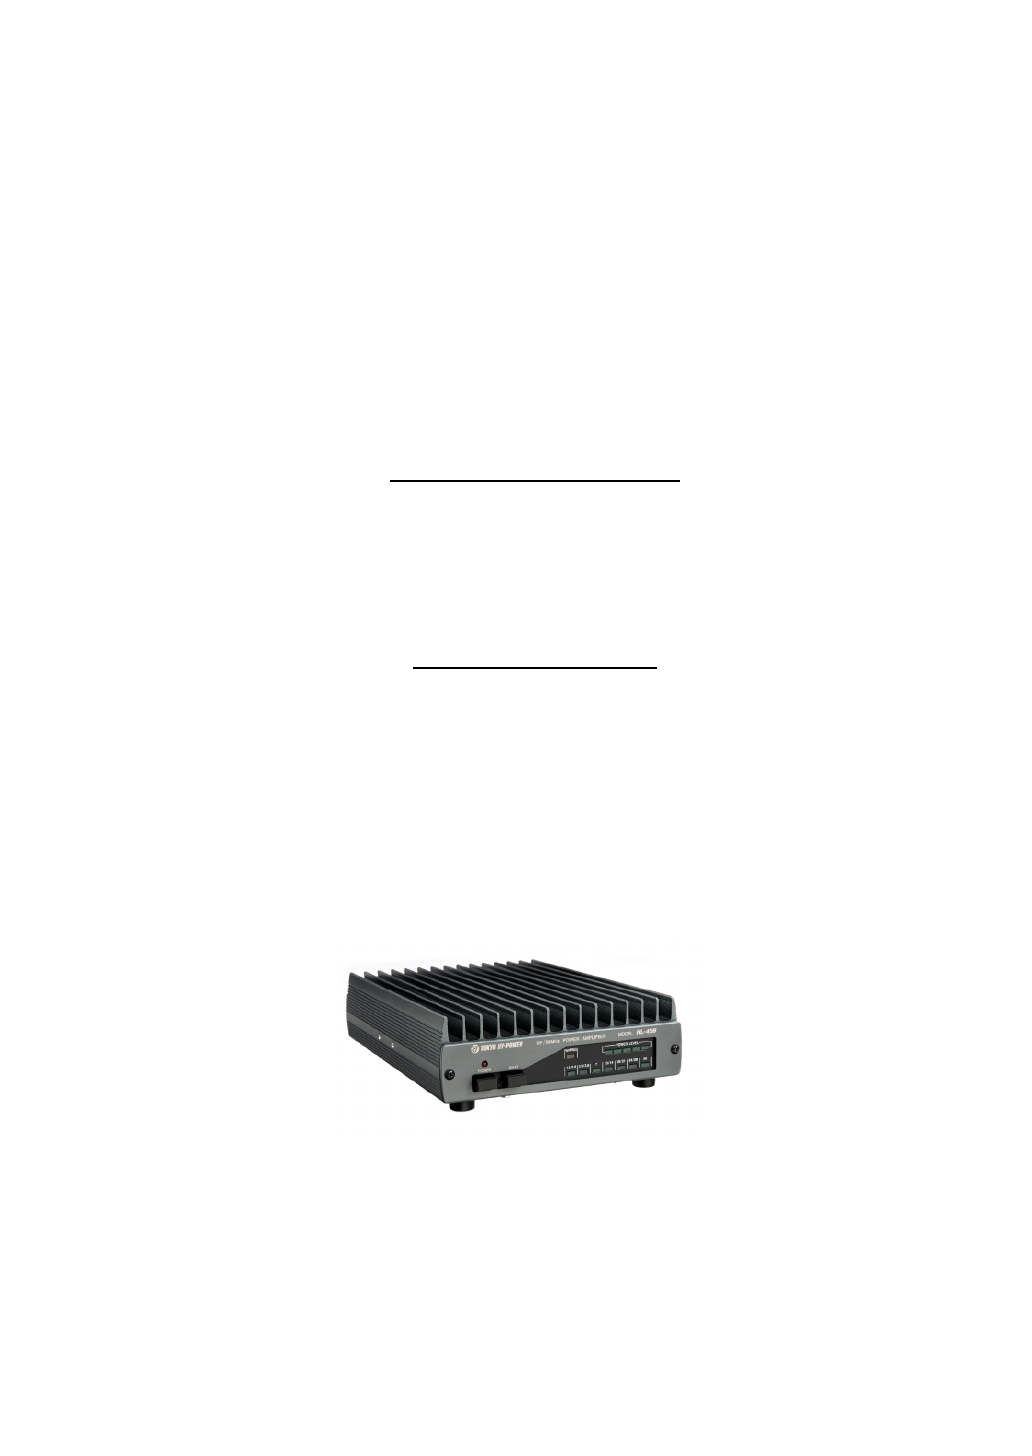
HL-45B is a solid-state HF/50MHz band linear power amplifier with the
maximum output power of 45W. Designed RF drive power is 5W.
This amplifier is particularly designed for the use with popular portable radio
of YAESU FT-817. When combined with FT-817, you can enjoy a unique and
very comfortable feature of automatic band selection as well as send-receive
switching, by connecting the amp and radio with the supplied special control
cable. (When combined with other transceivers, the band selection can only be
made manually. See page 3, ②BAND. Also prepare an optional control cable
for your radio. Some modification may be necessary to meet the sockets of your
radio.)
A pair of RF MOS FET power transistors (RD30HVF1) are used in a broad
band push-pull form gaining high reliability and stability.
Over-voltage and over-drive protection circuits are provided. Also when the
amp is driven by signal frequencies between 26.000 and 28.000 MHz (11 meter
band), amp is shut down to comply with FCC rule, Part 97.
LED power level meter will always indicate the relative output power level for
the convenience of the operator.

- 2 -
( 2 ) SPECIFICATIONS
Frequency : HF Band (1.8 ~ 28MHz and 50MHz Amateur Bands)
Mode : SSB(A3E), CW(A1A), FM(F3E)
RF Output Power : SSB (PEP)/CW 45W (Typical maximum output)
RF Drive Power : 5W max.
Duty Cycle 3 minutes (Continuous carrier transmission)
DC Power : DC 13.8V, 8.5A max.
In/Out Impedance : 50Ω
In/Out Connectors : SO-239
Major Circuits and Functions
:
① Class AB wide band linear power amp
② Automatic/manual switching output low pass filters
③ WARNG
(Protection circuit for over-voltage and over-drive)
④ LED meter for indicating transmitting power level
⑤ Send-receive switching remote terminal
⑥ ALC
Final RF Power Transistor
: RD30HVF (by Mitsubishi Electric) x 2
Accessory Parts : DC Power cord (Red/Black) x 1
Coax jumper cable with PL-259 connectors x 1
Remote control cable for FT-817 x 1
Spare fuse 10A x 2
Dimensions : 150(W) x 47(H) x 211(D) mm (5.9 x 1.9 x 8.3 inches)
Weight : Approx. 1.6kgs. (3.4lbs.)
Optional Parts : Remote control cable with 45B mini DIN/RCA phono
jacks (for non FT-817 radios)
- 3 -
( 3 ) FRONT and REAR PANELS
<FRONT PANEL>
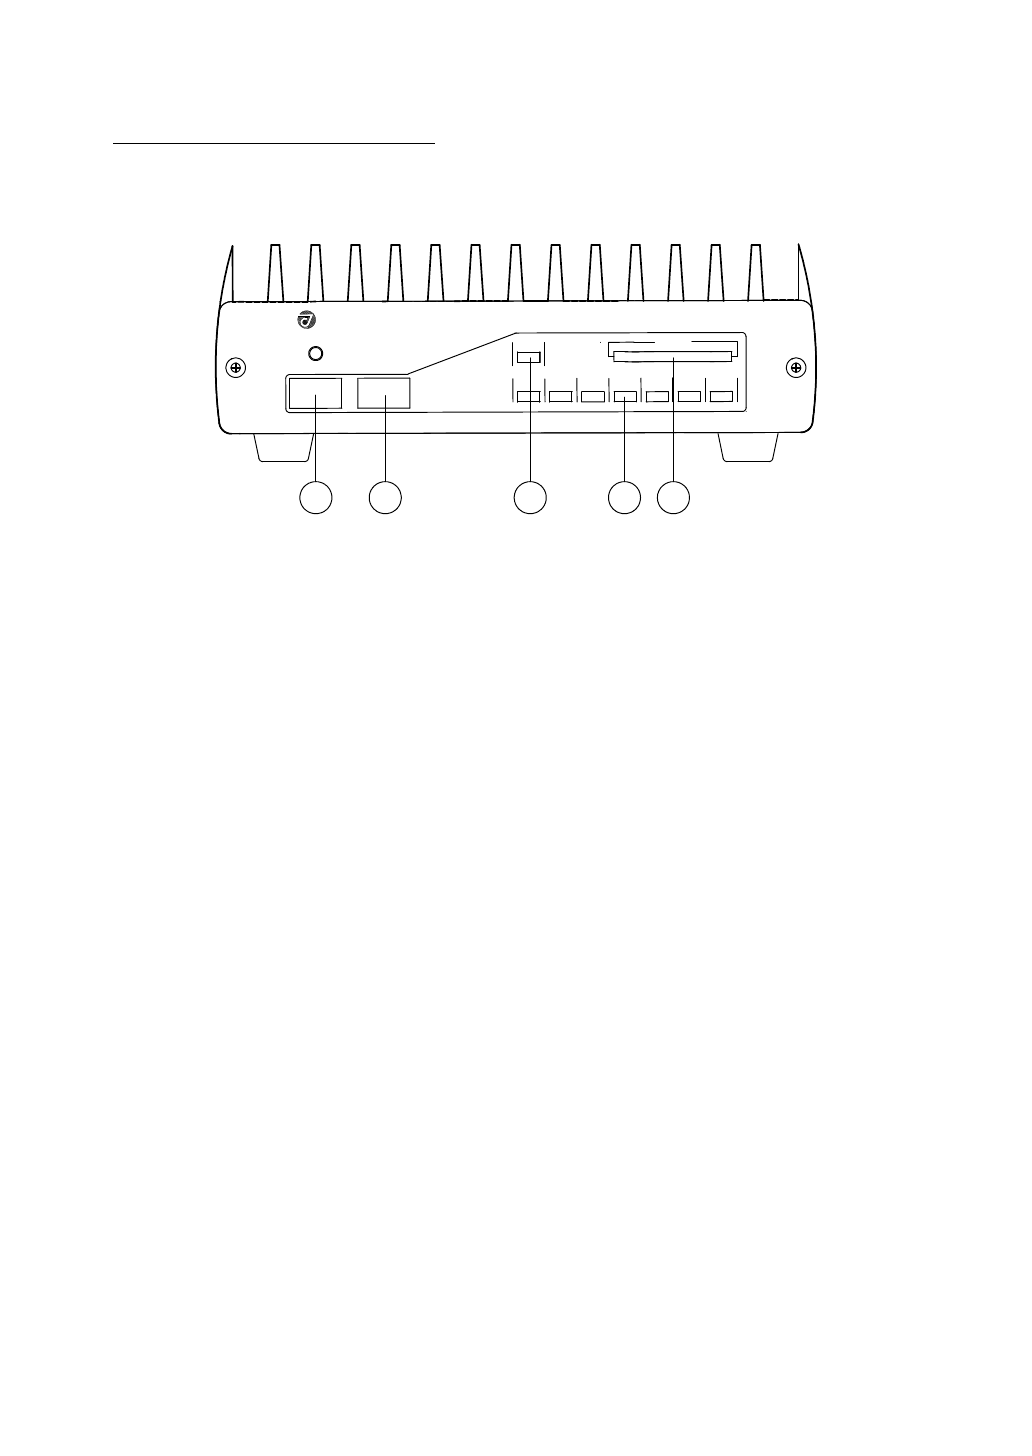
1.8/1.93.5/3.8710/1418/2124/2850
WARNG
TOKYOHY-POWER
HF/50MHzPOWERAMPLIFIER
POWERBAND
POWERLEVEL
HL-45B
MODEL
1 2 3 4 5
① POWER :
ON/OFF switch for DC power.
When it is first pushed, the switch is locked to turn DC power “ON”.
If it is pushed again, the lock will be reset to turn DC power “OFF”.
② BAND (Manual Band Select Switch) :
As you press this button, BAND will be shifted to upper band.
( 1.8/1.9 → 3.5/3.8 → 7 → 10/14 → 18/21 → 24/28 → 50 )
(This operation is only required for other than YAESU FT-817 radios.)
③ WARNG (Protection):
When the protection circuit works, WARNG LED lamp will light to shut down
the amp.
There are built-in protection circuits for RF over-drive and DC over-voltage.
To reset, after checking the causes of troubles, push the ①POWER switch
again.
④ BAND (Indicator LED) :
As the desired band is selected, the LED lamp indicates the current band in
operation.
⑤ POWER LEVEL :
Five LEDs indicate the relative transmitting power level.
- 4 -
<REAR PANEL>
TOKYO HY-POWER LABS.,INC.
PAWER AMP
HL-45B
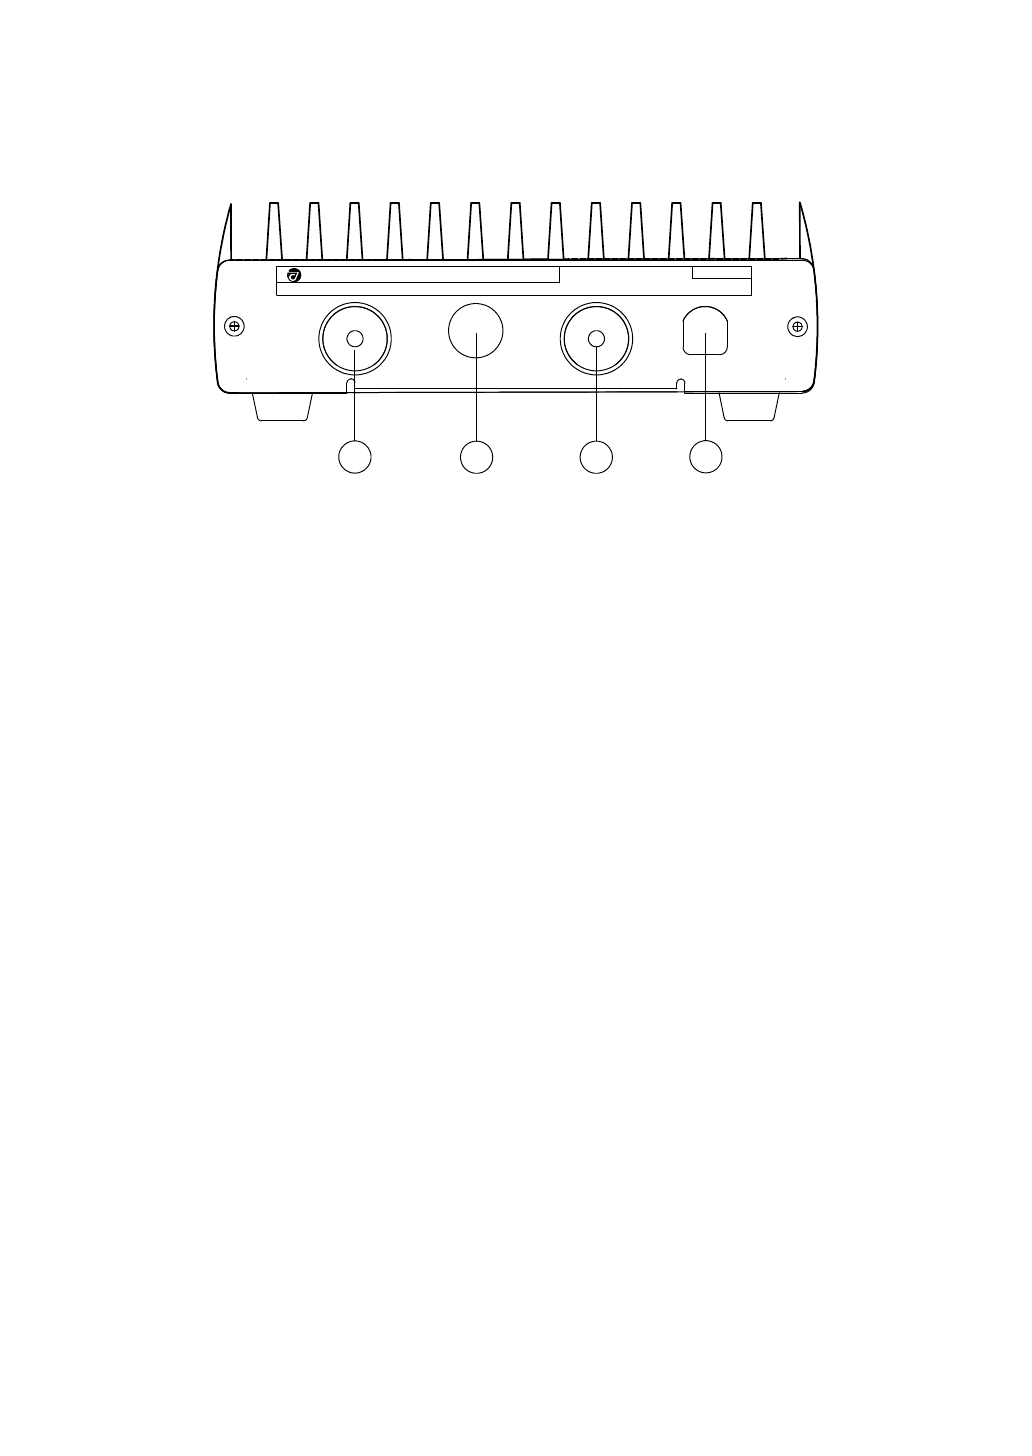
TX(IN) REMOTE ANT(OUT) DC13.8V
S/N
MADE IN JAPAN
0000000
67 8 9
⑥ TX (RF Input connector) :
Connector to apply RF drive signal from the transceiver.
Connect the coaxial jumper cable from the transceiver “ANT”.
Please note that input power for HL-45B is 5W max.
⑦ REMOTE :
Socket for remote cable from the transceiver.
To work hard-key (Standby), ALC feedback, and auto band-set (FT-817 only).
Refer to (4) TYPICAL CONNECTION AND SETTING.
⑧ ANT (RF Out connector) :
Connector to connect the antenna cable.
Use a 50Ω coaxial cable with PL-259 plug.
⑨ DC13.8V terminal :
Connect the supplied DC power cord to either regulated DC power supply or DC
12V battery.
RED is for positive (+), and BLACK is for negative (-).
Current capacity of the power supply should be 10A or more.
- 5 -
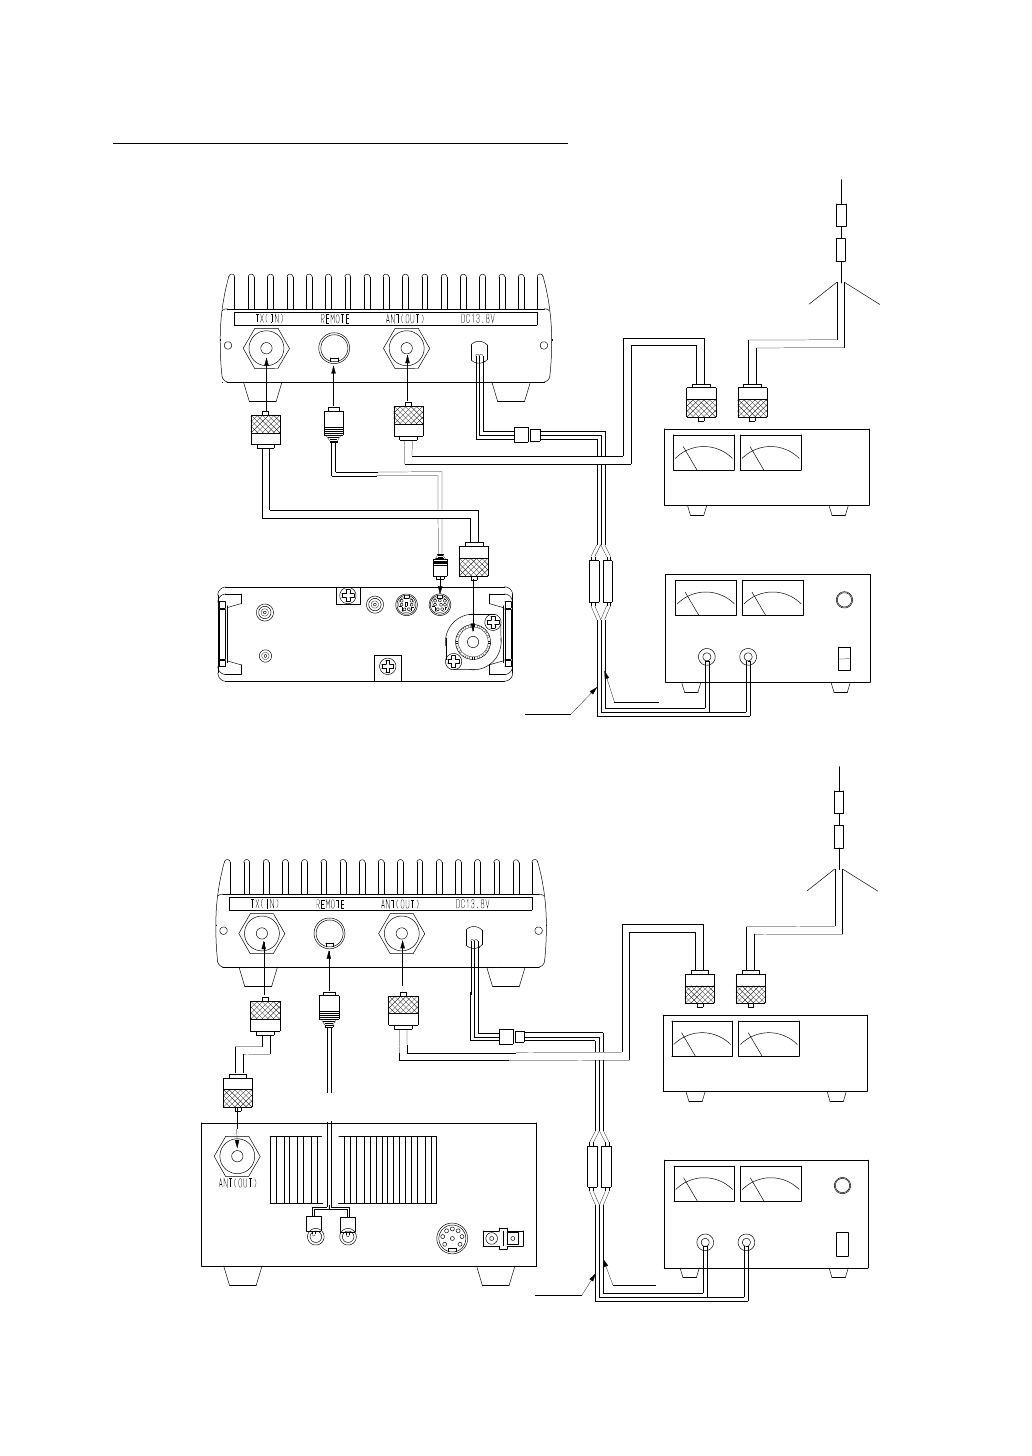
( 4 ) TYPICAL CONNECTION AND SETTING
KEY
ANT
DATA
ACC
Antenna
HF/50MHz Band
Coaxial Cable 50Ω
SWR Meter or
13.8V Power Supply or Battery
Fuse
Red(+) (−)
HF/50MHz Band Transceiver
Powermeter
Black
FT-817
HL-45B
A. <Connections for FT-817 Combination>
Remote Control Cable
STBY ACC
ALC
RCA型
SWR Meter or
Powermeter
Coaxial Cable 50Ω
HF/50MHZ Band
Antenna
13.8V Power Supply or Battery
Fuse
Optional Cable
HL-45B
HF/50MHz Band Transceiver
(5W Output max.)
(−)
Red(+) Black
B. <Connections for Transceivers other than FT-817>
(or Accessory cable modified by User)

- 6 -
( 5 ) OPERATION
1) Referring to the illustration per (4) TYPICAL CONNECTION AND SETTING,
connect your transceiver, amp, power supply (or battery), SWR/Power meter,
antenna etc. properly.
Turn on the power switch of the transceiver.
In receiving state, the signal from the antenna will bypass the amplifier, and
receiving signal can be heard from the transceiver.
2) Find a frequency channel that is not occupied by other stations, and key the
transceiver to transmit mode to check the antenna SWR.
It is recommended that antenna is well adjusted for a good SWR value such as
1.5 or lower.
3) After setting the antenna correctly, turn ON the ①POWER switch.
4) If you key (transmit) the transceiver, HL-45B will also be automatically keyed
to transmit. Then the amplified signal is emitted from the antenna. At this time,
LEDs of POWER LEVEL INDICATOR will light according to the transmitting
signal level.
Check the SWR again at this time. SWR may get worse if the power handling
capacity of the antenna is not good enough.
5) When you wish to run the transceiver only and do not need to amplify, simply
turn off the POWER of HL-45B. The signal to and from the radio will bypass
the amplifier, so you do not need to remove the cables.
* When you are using transceivers other than FT-817, connect the amplifier as
shown in B. of (4) TYPICAL CONNECTION AND SETTING, and connect a
remote control cable to **STBY jack (grounded when transmitting) of your
radio accordingly.
(**Also called SEND, REMOTE etc. according to the manufacturer.)
* Maximum input power (RF drive) to HL-45B is 5W.
Do not apply more than five watts of drive power to the amplifier.

- 7 -
( 6 ) REMOTE (Remote Control Socket)
Pin assignment of REMOTE socket is shown in the following table for your
convenience. You can connect the supplied control cable for FT-817 to this ACC
socket. Or prepare a suitable control cable for your own radio using the supplied 8
pin DIN plug.
75
2
1
34
68
When combining other than FT-817 radio, pin②(TX GND), pin③(GND), and pin⑦
(ALC) must be properly connected to your radio using an optional control cable,
and/or modified control cable.
Pin No. Sign Description
① N/C -
② STBY When grounded, amp will become TX state.
③ GND Ground terminal.
④ N/C -
⑤ N/C -
⑥ AUTO To receive band switching signal (DC 0-5V max.).
⑦ ALC ALC voltage (negative DC), to be fed back to radio, will
appear.
⑧ N/C -
- 8 -
( 7 ) ALC POT ADJUSTMENT
If the drive power from the radio exceeds the designed limit of 5W, output of the
amplifier will also exceed the designed value of 45W, and output signal wave form
may get distorted, especially in SSB mode. In order to keep the output within the
maximum limit and to avoid signal distortion, ALC connection is most effective.
Negative DC voltage of 0∼8V max. will appear according to the amp output level.
When this voltage (ALC voltage) is fed back to the radio, it works to have the
radio’s output power suppressed according to the ALC voltage applied to the radio.
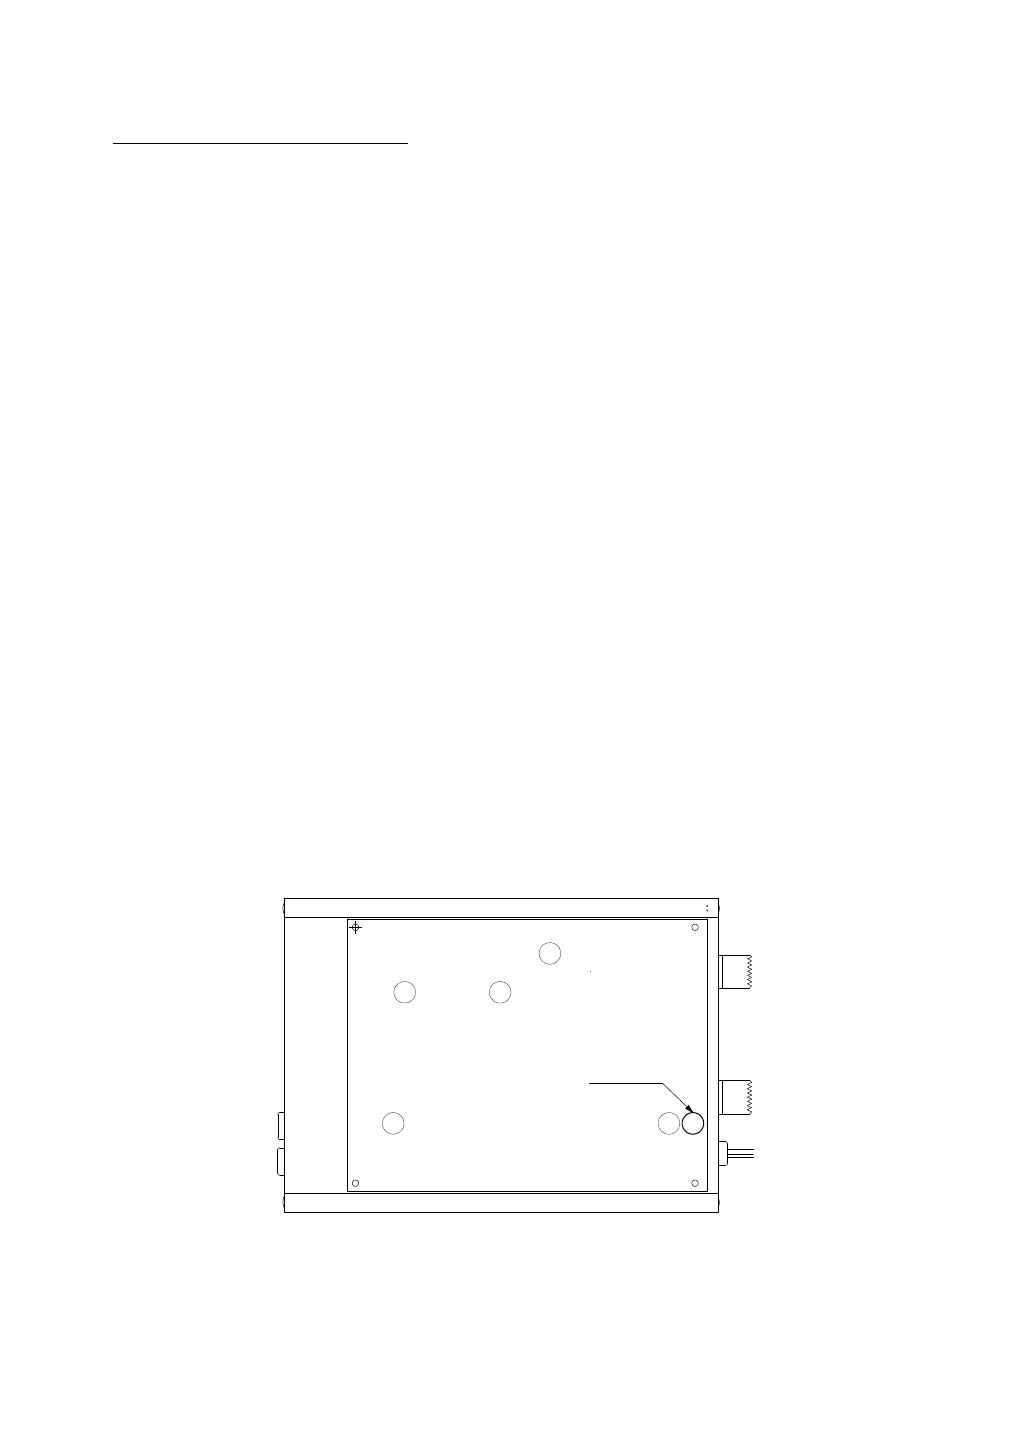
To adjust ALC voltage, look at the bottom plate to find a small hole to access to the
ALC adj. pot.
When this pot is turned fully counter-clockwise, ALC voltage becomes zero. If it is
turned clockwise, absolute DC voltage value of ALC will become higher and output
power will start to decrease at some point.
To set the ALC pot, try to find the point where output level will start to decline.
Referring to RF power meter placed at antenna side, adjust the pot for 45W output,
or set the pot at the point where the maximum output is just about to decrease.
(If you do not wish to apply any ALC, turn the pot fully counter-clockwise and leave
it there.)
ALC Pot
*Do not touch other pots, for they are pre-adjusted with specialized test equipments.

- 9 -
( 8 ) PROTECTION
1) Over-drive Protection
When the RF driving power from the radio exceeds 5W, this amplifier will be in the
through mode (bypass).
WARNG LED lamp on the front panel will light.
2) Over-voltage Protection
When the supplied DC voltage exceeds 16V, this amplifier will become “bypass”
state and WARNG LED will light.
3) Reset
To reset, push the POWER switch twice after checking the possible cause of
protection shutdown.
(First push to turn POWER off, second push to turn POWER on newly.)
( 9 ) CAUTIONS and SOME ADVICE
1) The heat sink temperature may gradually become very high, as you keep
transmitting. Do not put anything on top of the heat sink, or ventilation will be
degraded. Also do not place the power amplifier under direct solar rays.
2) Refrain from operating with high SWR antenna, such as 2.0 or over. Tune the
antenna well for lower SWR (ideally 1.5 or lower). Manual or auto antenna
tuner may help achieve low SWR conditions. Antenna system must solidly be
connected through good 50 ohm coaxial cable and connectors with IN/OUT
terminals of HL-45B.
3) Do not exceed the RF input limit of 5W.
4) Rated DC power supply voltage is 13.8V. Higher voltage will give stress to the
expensive RF power MOS FETs. Never apply AC100V, DC24V, etc. or HL-45B
will be seriously damaged at once.
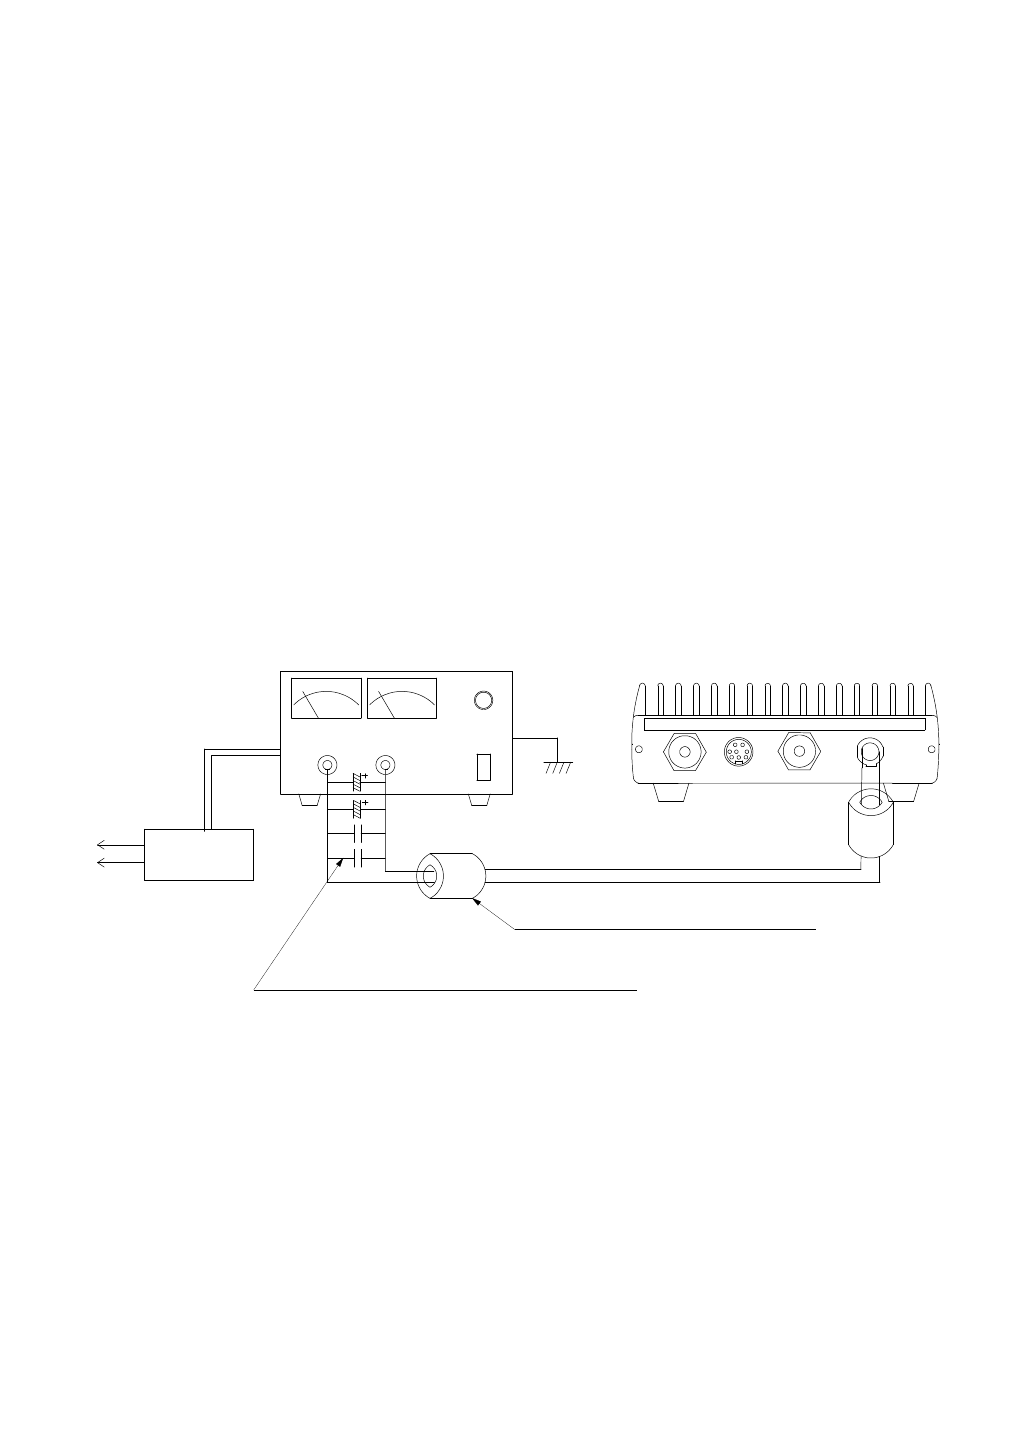
5) There is a case when DC output voltage of regulated DC power supply swings
up due to RF intrusion to internal control circuit of power supply. Choose the
stable power supply for RF stray having current capacity of more than 10A.
- 10 -
Depending on SWR condition of your antenna system, there may appear some
RF stray on the DC power cord connecting rear socket and DC power supply. If
the voltage meter of your DC power supply shows an unstable behavior as you
key the radio and HL-45B amp, insert ferrite cores or clip both ends of DC
power cable with clip-on ferrite cores. (For further details, consult with your
local radio dealer or manufacturers of respective equipments.)
(*Visit websites of “Amidon Associates”, “Palomar Engineerings” on ferrite
cores for RFI.)
LF
+
-
13.8V POWER SUPPLY
Power Supply.
Ground the
HL-45B
Ceramic Capacitor 50V 0.1uF∼0.001uF
25V 10uF∼100uF
Insert line filter.
Electrolytic Capacitor
1. Insert capacitors of several capacitance values to the output terminal of the power supply.
2. Put a clip-on type ferrite core on the power supply cable.
(Bundle both + and - cables and clip them tight.
Core's inner diameter should be equal to outer size of two combined DC cords.)
CLIP-ON FERRITE CORE by TDK, Amidon, Palomar etc.
HOW TO PREVENT RF INTRUSION TO DC POWER SUPPLY