User Manual

TomTom
Action
Camera
Reference
Guide
1.0

Contents
Welcome
3
CAMERA
4
Camera Quick Start................................................................................................ 5
What's in the box.............................................................................................. 5
Charging your camera ......................................................................................... 5
Inserting a memory card...................................................................................... 6
Setting up ....................................................................................................... 7
Using the universal camera mount......................................................................... 8
Switching on and off
........................................................................................ 11
Recording...................................................................................................... 11
Tagging a video.............................................................................................. 12
Your camera ...................................................................................................... 13
Getting started ............................................................................................... 13
About your camera .......................................................................................... 14
What's on the screen ........................................................................................ 15
Charging your camera ....................................................................................... 16
Inserting a memory card.................................................................................... 18
Camera modes................................................................................................ 19
Camera status ................................................................................................ 20
Sensors built in to your camera ........................................................................... 21
Switching on and off
........................................................................................ 21
Resetting your camera ...................................................................................... 22
Receiving updates ........................................................................................... 23
Caring for your camera ..................................................................................... 23
Using peripherals ................................................................................................ 24
Using the universal camera mount....................................................................... 24
Using the optional remote control
........................................................................ 27
Using lens covers............................................................................................. 28
Adding sensors................................................................................................ 29
Recording videos ................................................................................................. 31
About recording videos ..................................................................................... 31
About video modes .......................................................................................... 31
Recording a video ............................................................................................ 32
Taking photos..................................................................................................... 33
About photo modes .......................................................................................... 33
Taking single photos......................................................................................... 33
Taking burst photos ......................................................................................... 33
Taking continuous photos .................................................................................. 33
Settings ............................................................................................................ 35
About settings ................................................................................................ 35
Photo and video settings ................................................................................... 35
General settings.............................................................................................. 37
Glossary
of
Terms
40
Addendum
41
Copyright notices
45
2

Welcome
This Reference Guide explains everything you need to know about your new TomTom Action Camera.
Your camera lets you easily record your action adventures:
Record videos.
Automatically tag action shots using action metrics, or manually tag your video.
Easily create videos from your video tags using the TomTom Mobile Camera app or TomTom
MyCamera computer program.
Use your smartphone to quickly and easily publish your edited videos online, within moments of
the action.
Take single photos or burst photos.
If you just want to read the basics about your camera, we recommend that you read the Camera Quick
Start. This covers all parts of the camera system, including the mobile app and the desktop app.
To collect, edit and share your videos and photos on the move, download the TomTom Mobile Camera
app from tomtom.com/app.
To collect, edit and share your videos and photos from your computer, download TomTom MyCamera
program from tomtom.com/app.
Important
: Before using the Camera app on your smartphone, you need to link your camera to your
MySports account using a computer. This needs to be done only once.
To quickly get to know your Action Camera, go to:
About your camera
Using the universal mount
Recording a video
Taking single photos
Settings
Tip
: There are also frequently asked questions (FAQs) at tomtom.com/support. Select your product
model from the list or enter a search term.
We hope you enjoy reading about and, most importantly, having fun with your new Action Camera!
3
CAMERA
4
Camera
Quick
Start
What's
in
the
box
Camera
IPX7 lens cover
2000 mAh Battery stick
Adhesive mount
Universal disc x 2
Disc adapter
Optional bicycle mount
Optional remote control
Optional IPX8 waterproof lens cap
Optional power cable
Charging
your
camera
You can charge your Action Camera in the following two ways:
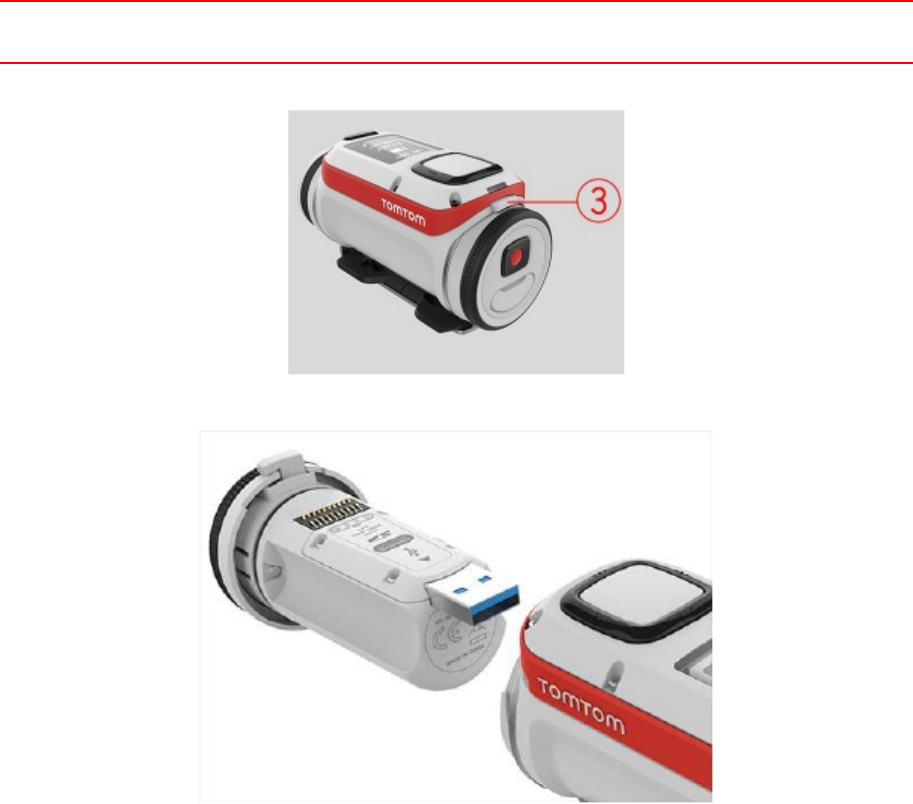
Charging
the
battery
stick
using
a
USB
socket
Important
: If you remove the battery stick be extra careful not to let dirt or water enter the camera
or the battery stick. Only remove the battery stick in clean and dry conditions.
Press the battery stick release button as shown below (button 3).
Turn the battery stick to remove it from your camera.
Insert the battery stick USB connector into your computer's USB socket or a standard USB wall-charger.
5
Tip
: While the battery stick is charging, the LEDs show the charge level and one LED flashes.
To see the power level of the battery stick, remove the USB connector from the USB charging socket,
then press the START button. The LEDs light up to show the power level.
When the battery stick is charged, insert the battery stick into the camera and turn it until it locks.
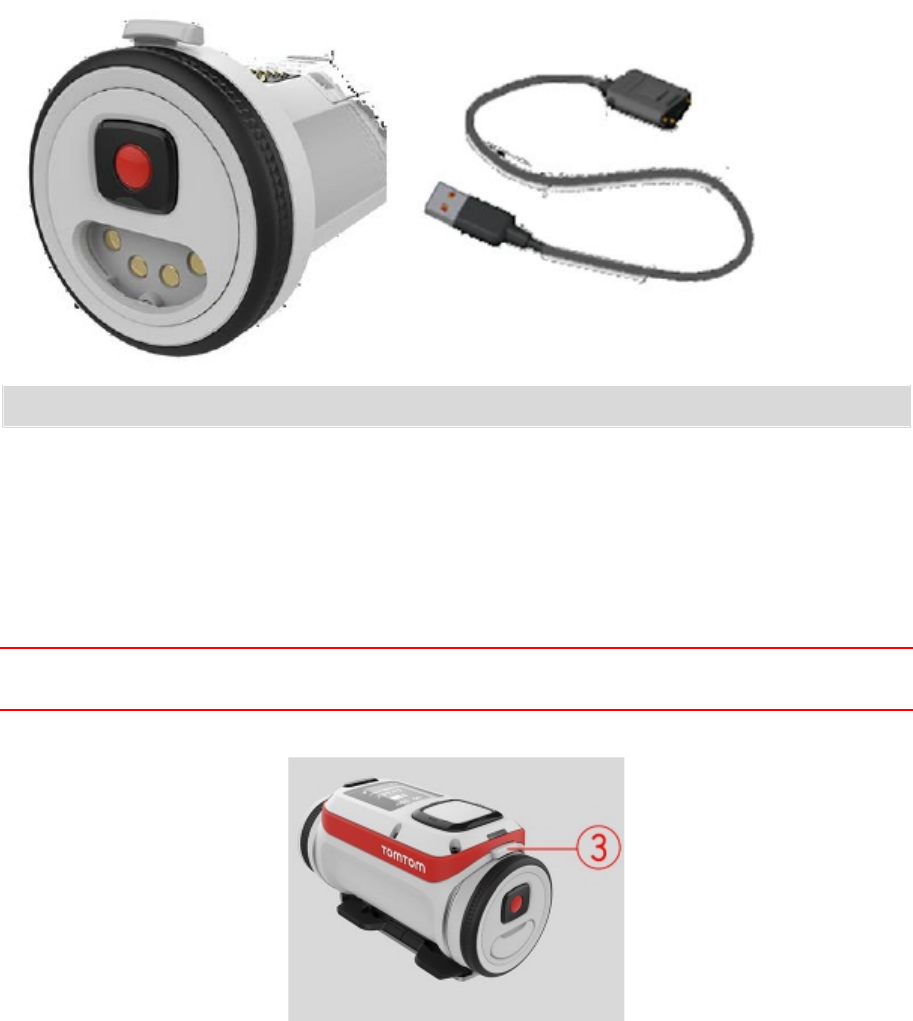
Charging
the
camera
using
the
optional
power
cable
Open the connector cap on the back of the battery stick.
NOTE TO GERRY: we need to replace this image with a cleaner one :-)
Tip
: You don't have to remove the battery stick from the camera.
Connect the power cable to the battery stick connector and to a USB socket.
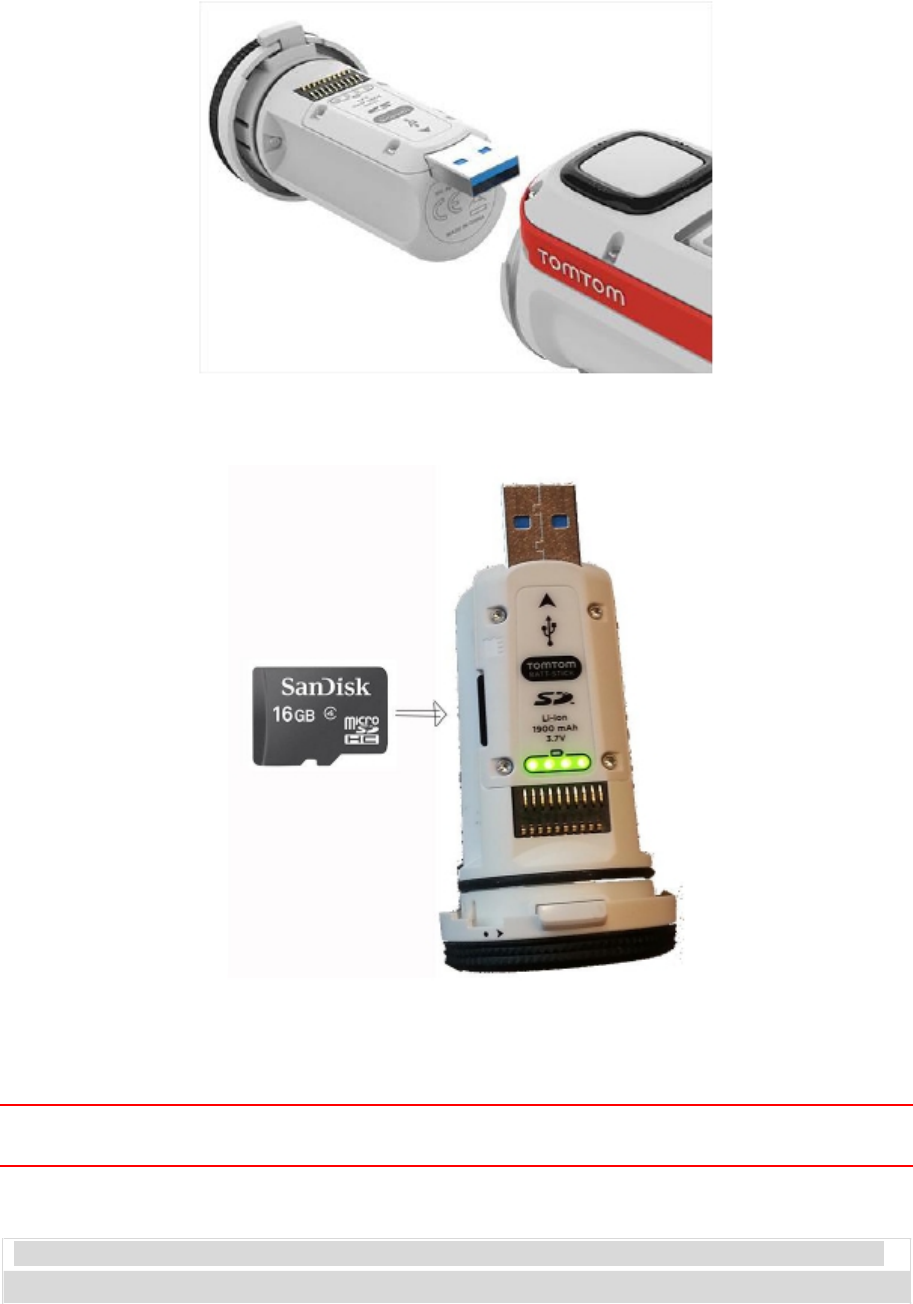
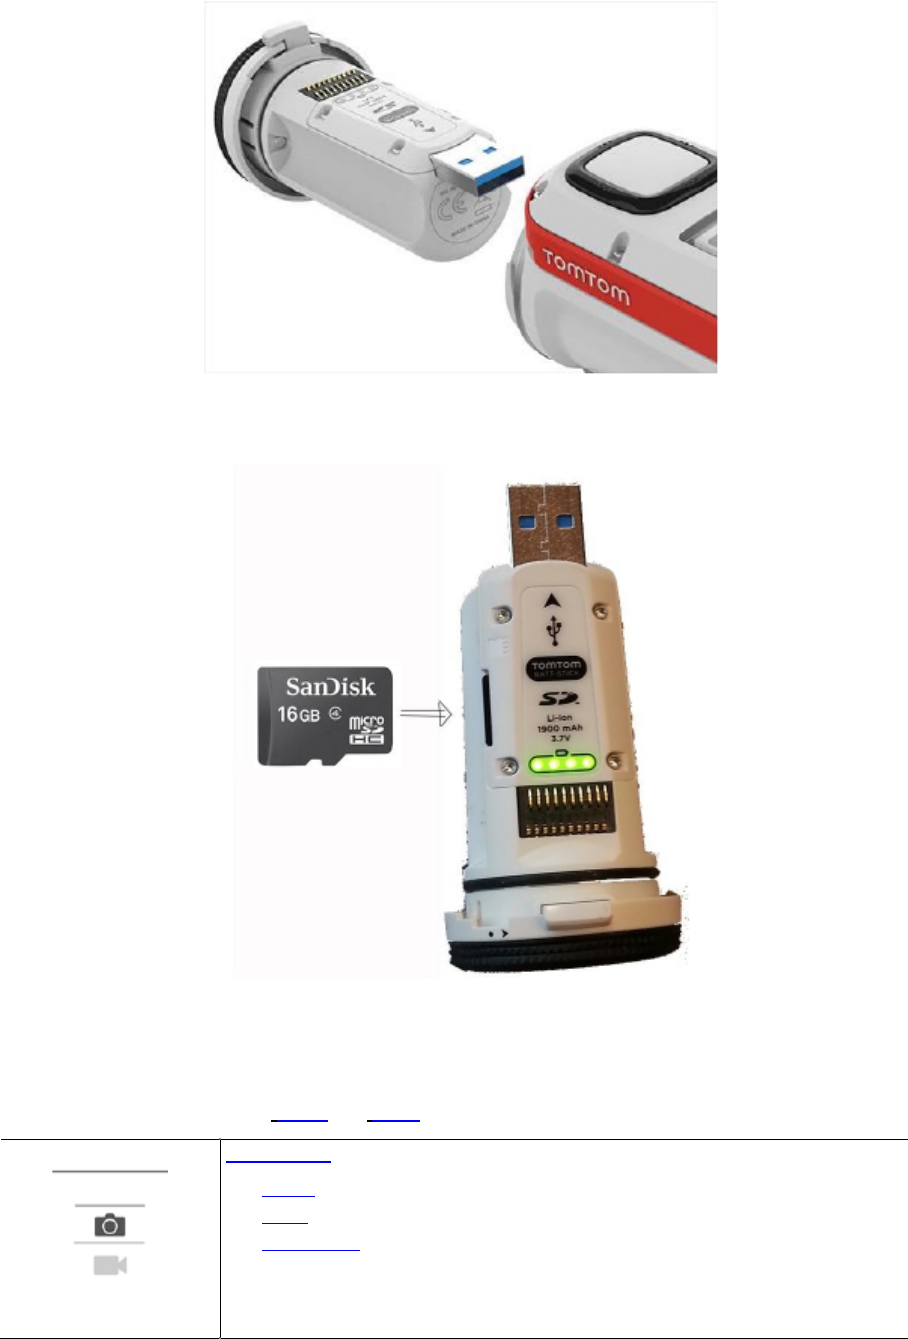
Inserting
a
memory
card
The photos you take and the videos you record are stored on a micro-SD memory that is located in the
battery stick.
Inserting
a
micro-SD
memory
card
into
the
battery
stick
Important
: If you remove the battery stick be extra careful not to let dirt or water enter the camera
or the battery stick. Only remove the battery stick in clean and dry conditions.
Press the battery stick release button as shown below (button 3).
6
Turn the battery stick to remove it from your camera.
Insert the micro-SD memory card into the memory card slot in the battery stick.
NOTE TO GERRY: we need to replace this image with a cleaner one :-)
Insert the battery stick into the camera and turn it until it locks.
Setting
up
Note
: The language you choose will be used for all text on the screen. You can always change the
language later in Language and Units in the
Settings
menu.
When you first switch on your Action Camera, you have to answer a few questions to set it up. Answer
the questions by pressing the button to move up, down, left or right on the screen.
Tip
: You do not need to connect you camera to the internet or to the mobile application to set it up
for first use.
7
Using
the
universal
camera
mount
Hi, Claire-
We can use:
Universal Mount
Bike Mount
Adhesive discs (FYI: used with Universal Mount)
You can mount your camera in many places, for example on your helmet or on the handlebars using the
optional bike mount. Once mounted you can move your camera in the following ways:
You can lift it up and down by 90 degrees, known as the pitch.
You can twist it around by 360 degrees, know as yaw.
You can roll the whole camera by 100 degrees to the left or right.
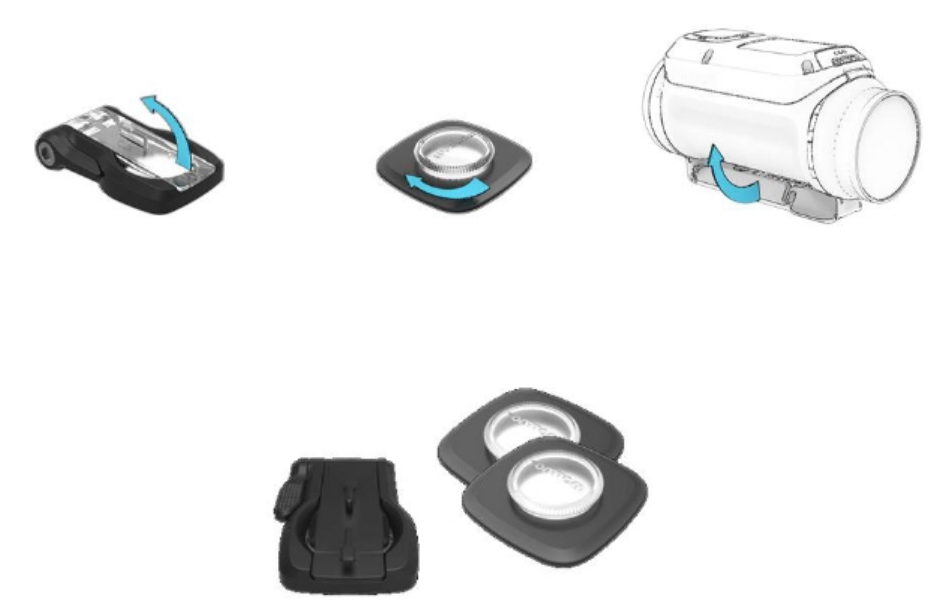
Using
a
disc
adapter
to
mount
your
camera
The disc adapter kit lets you mount your camera on a helmet or other flat or slightly curved surface.
The kit contains 2 adhesive discs and a universal adapter.
1.
Attach the adhesive disc to your chosen surface. Firmly press it into place to ensure full contact
over its entire surface.
Follow these tips to make sure that the adhesive disc is secure:
Apply the adhesive disc only to a clean and dry surface. Wax, oil, dirt and moisture reduce
adhesion, which can result in a weak bond.
Attach the adhesive disc in dry, room-temperature conditions. The adhesive disc won't be
secure if you attach it in damp and cold conditions.
Attach the adhesive disc only to a smooth and hard surface. The adhesive disc won't securely
attach to porous, textured or soft surfaces.
When you attach the adhesive disc, Regularly check the security of the adhesive disc.
8
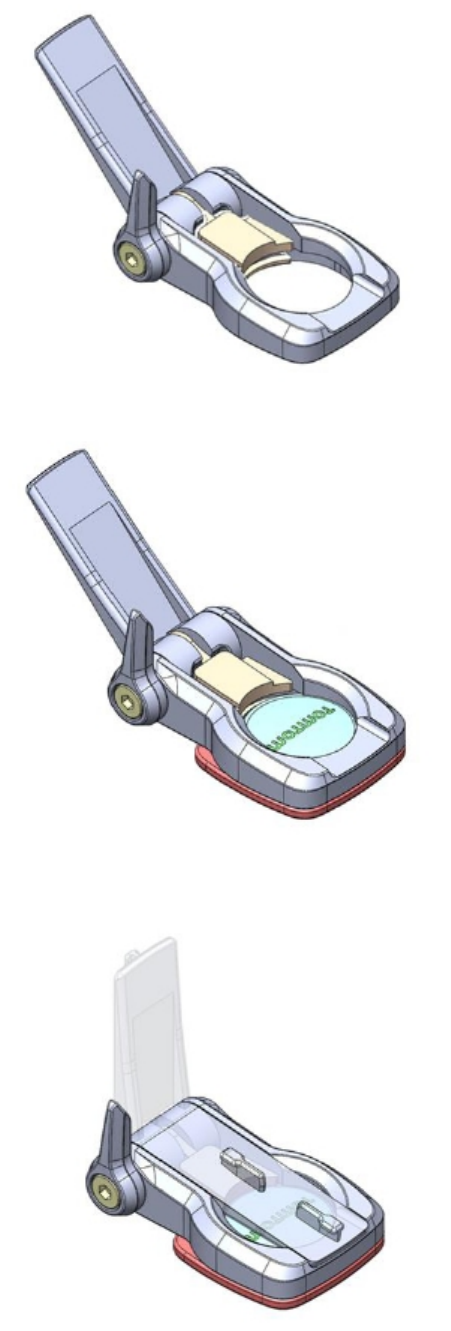
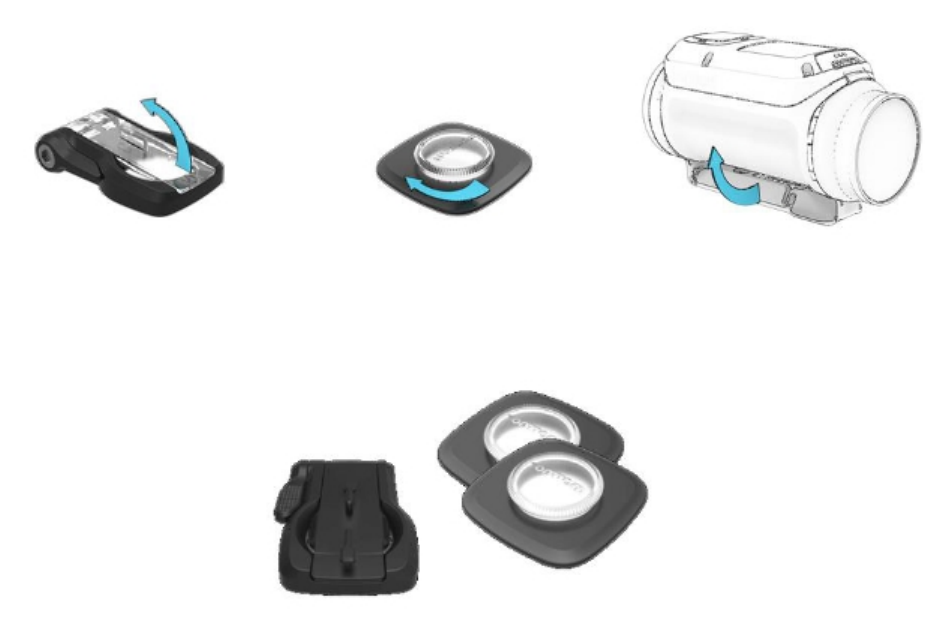
2.
Attach the universal disc adapter to the adhesive disc by first fully opening the mount.
3.
Push the mount onto the disc at any yaw angle until you hear a click.
4.
Fold down the camera platform to any angle between 90 degrees to horizontal and fully closed.
This locks the mount to the disc.
9

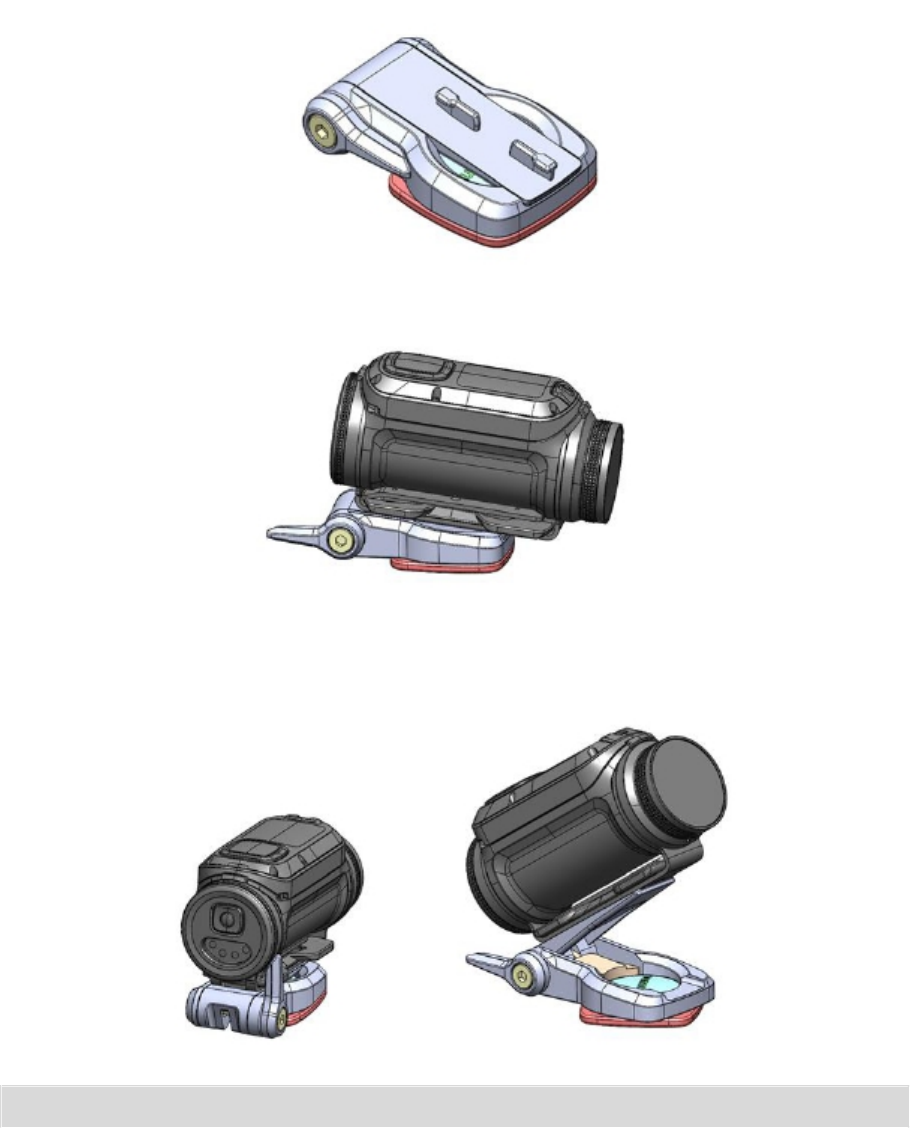
5.
Push down the lever to lock the mount.
6.
Mount the camera on the camera platform.
7.
Set the desired angle of shot. Explain pitch, yaw and roll here? You can see from amlibu app what
you are focusing on/pointing on.
Note
: To remove the mount, reverse the above instructions.
10
Switching
on
and
off
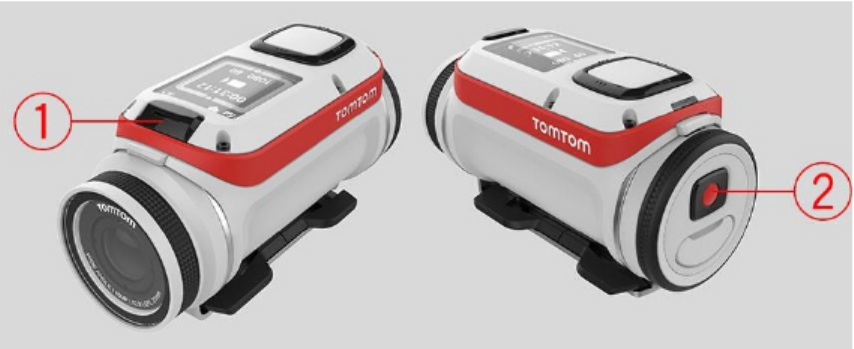
Switching
on
your
Action
Camera
Press the START button (button 2) at the back of the camera for 2 seconds to switch your camera on.
If no SD card is inserted into the battery stick, you are asked to insert one so that the camera can
switch on.
If the camera is in standby mode, press the control button to wake up the camera.
Switching
off
your
Action
Camera
Press the STOP button (button 1) at the front of the camera for 2 seconds to switch off the camera.
Recording
Start
recording
When your camera is switched on or in standby mode, press the START button (button 2) to start
recording in your currently selected mode, for example video recording or photo burst. When you
camera is recording, red LEDs in the START and STOP buttons flash.
Press the START button again to tag your video.
Stop
recording
Press the STOP button (button 1) to stop recording and go back to standby mode.
11
Tagging
a
video
During recording, you can add a tag to your video.
You can add a tag when something exciting or memorable happens such as reaching a fast speed, or
crashing. Or you could tag a beautiful view or the highest peak on a walk. You can easily create videos
from your video tags using the TomTom Mobile Camera app or TomTom MyCamera computer program.
Automatic tags can be added to your video using action metrics, for example speed, crashes and
jumps.
To add a tag manually, press the START button (button 2).
12
Your
camera
Getting
started
Before you start making videos, it's a good idea to charge your camera, download any software updates
and download QuickGPSfix.
Note
: QuickGPSfix helps your camera get a GPS fix and find your location quickly.
1.
Download TomTom MySports Connect from tomtom.com/getstarted/sports and install it on your
computer. TomTom MySports Connect is available for free.
2.
Place your camera in the desk dock and connect the dock to your computer.
Follow the instructions that TomTom MySports Connect gives you.
After your camera is charged, you can recording a video.
Tip
: Your camera is fully charged when the battery animation stops moving and shows a full battery.
You should connect your camera to your computer regularly to charge it, upload videos and photos,
download software updates and download QuickGPSfix information.
Battery
life
When the battery is fully charged, your camera can be used for up to XX hours of activities that need
GPS reception, such as running and cycling. The battery is used more quickly if you use the backlight
on your camera frequently or all the time, or connect the camera to sensors, such as the Heart Rate
Monitor or Cadence Sensor.
The following tips will help your camera go longer on a battery charge:
Turn off night mode and touch the screen to turn on the back light only when you need it.
Turn off sensors that you are not using. Your camera keeps searching for sensors even if you are
not using a sensor.
13
TomTom
MySports
app
Important: Before usng the MySports app on your smartphone, you need to link your camera to your
MySports account using a computer. This needs to be done only once.
You can download the TomTom MySports app for free from your usual app store or by going to
tomtom.com/app.
To learn more, go to TomTom MySports mobile app in this guide.
Pairing
your
camera
with
your
phone
To learn more, go to Phone in this guide.
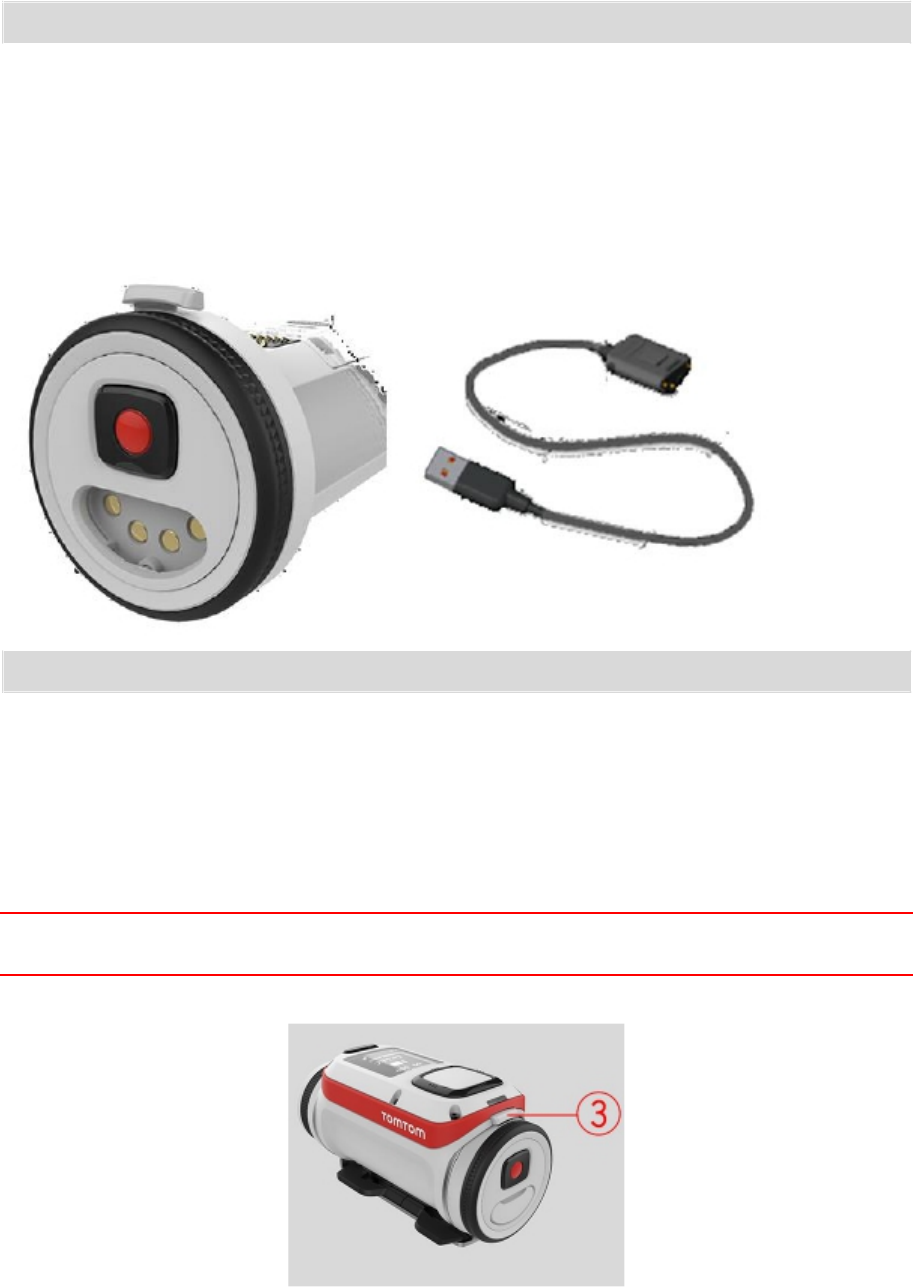
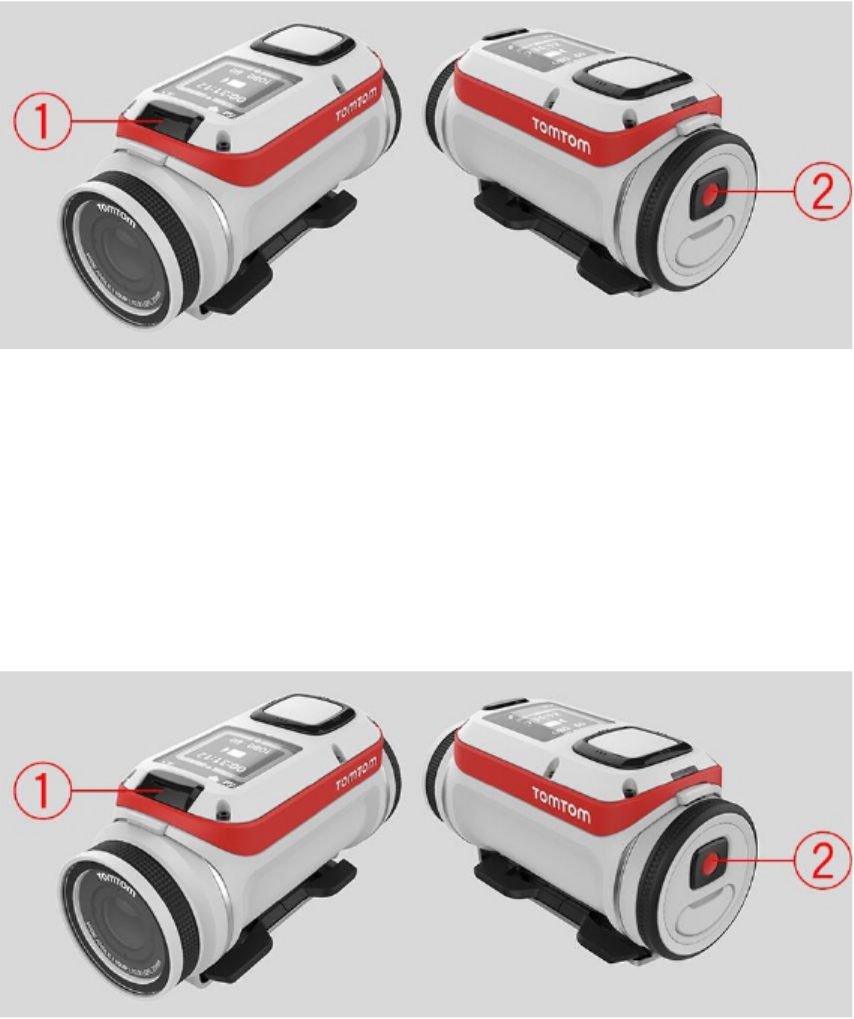
About
your
camera
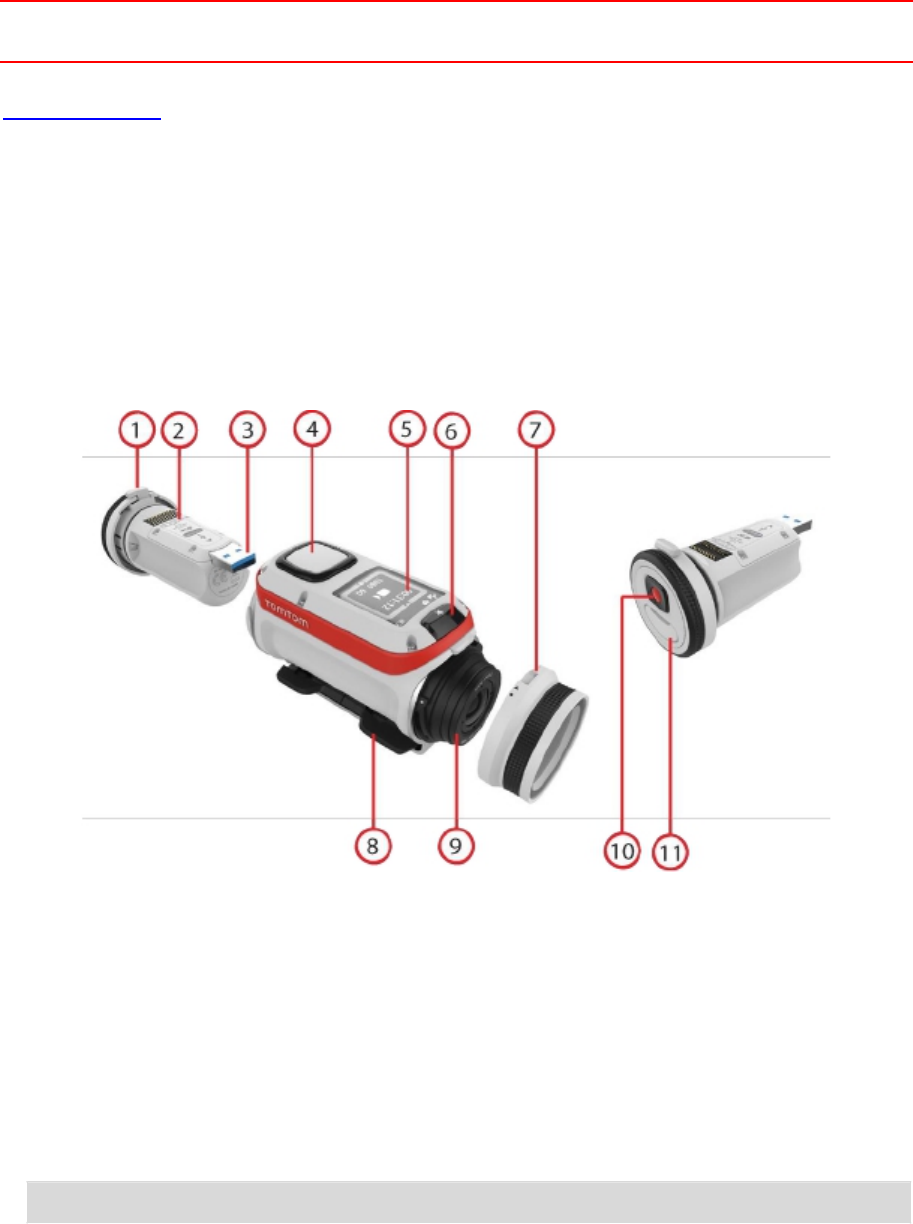
Your Action Camera is a modular construction that is easily disassembled so you can swap parts, for
example to install a new battery stick or replace the lens cover.
1.
Battery stick.
2.
Power indicator.
3.
USB connector.
4.
Control button to move up, down, left or right to other screens on your camera display:
Move up or down to select items in a menu.
Move right to select an item and open the menu for that item.
Move left to exit a menu.
To select an option in a menu, make sure it is highlighted when you leave the menu. Your
camera remembers the option you highlighted.
If an option in a menu switches on and off, move right to change the setting.
Note
: The control button is disabled when you use the camera deep underwater.
5.
Screen.
6.
STOP button.
7.
Lens cover. The camera is waterproof with the standard IPX7 lens cover. If you want to use the
camera underwater to depths down to 50 m, install the optional IPX8 lens cover.
14

8.
Camera mount.
9.
Lens.
10. START button
11. Connector for optional power cable.
What's
on
the
screen
The camera screen lets you select the type of video or photos you want to record, and let's you change
the settings for each video and photo mode. You move to other screens using the control button:
Move up or down to select items in a menu.
Move right to select an item and open the menu for that item.
Move left to exit a menu.
To select an option in a menu, make sure it is highlighted when you leave the menu. Your
camera remembers the option you highlighted.
If an option in a menu switches on and off, move right to change the setting.
Note
: The control button is disabled when you use the camera deep underwater.
You can see the following screens:
Camera Status
screen
The Camera Status screen is shown when you are not recording videos or
photos. This screen shows the mode and the specific settings you have
selected.
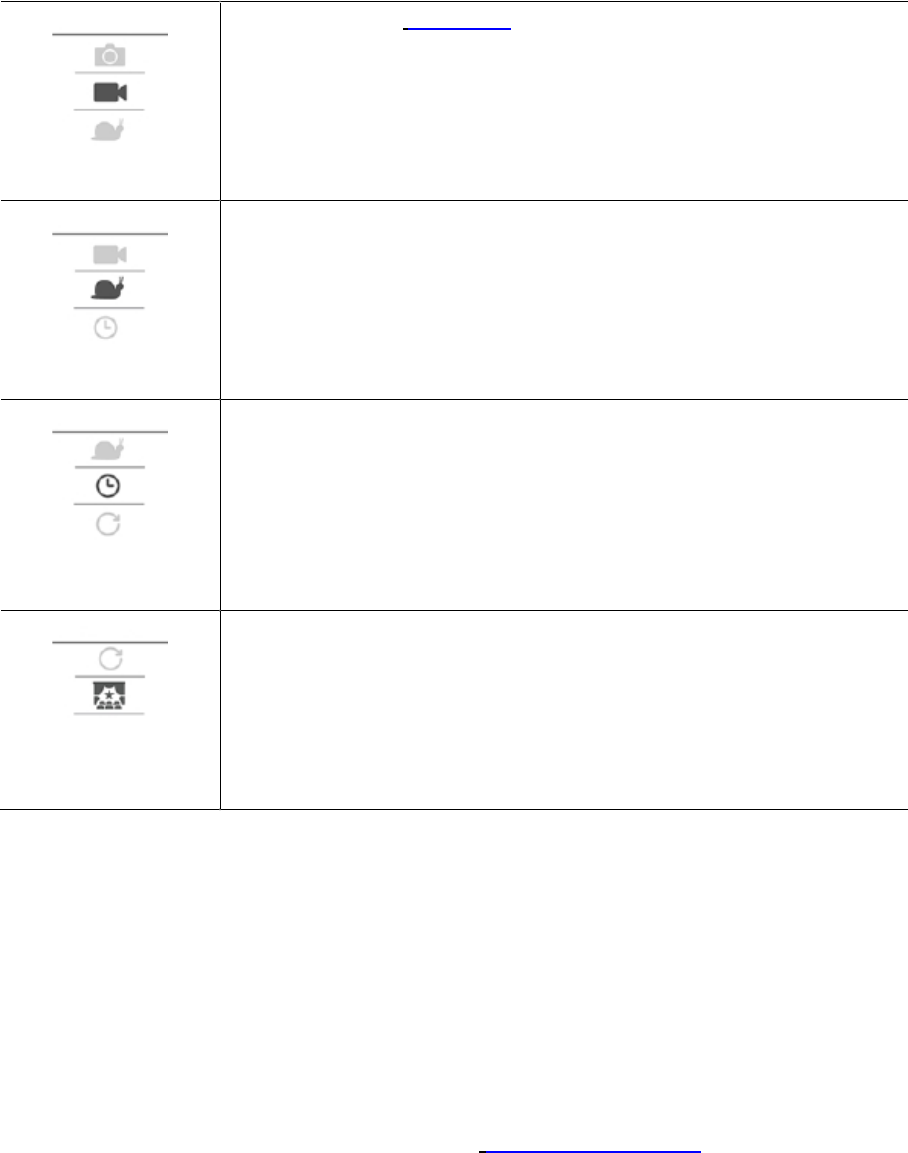
Mode screen The Mode screen lets you choose the mode you want use. The modes are
Photo, Video, Slow Motion, Time Lapse, and Cinematic.
Recording screen The Recording screen is shown when you are recording a video or taking
photos. The screen shows you the remaining time you can still record, and
the time you have already recorded, or the number of photos taken.
Settings screen The Settings screen lets you changes the settings for the selected mode and
the general settings for the camera.
Selecting Status will shown you the status of the camera.
Video and Photo
settings
For each Video and Photo mode you can set different settings to customize
the video or photo. For example, you can set the frame rate, the lens angle,
and the scene.
General settings The General settings set the options for the camera, for example Language,
Units and Sound.
15
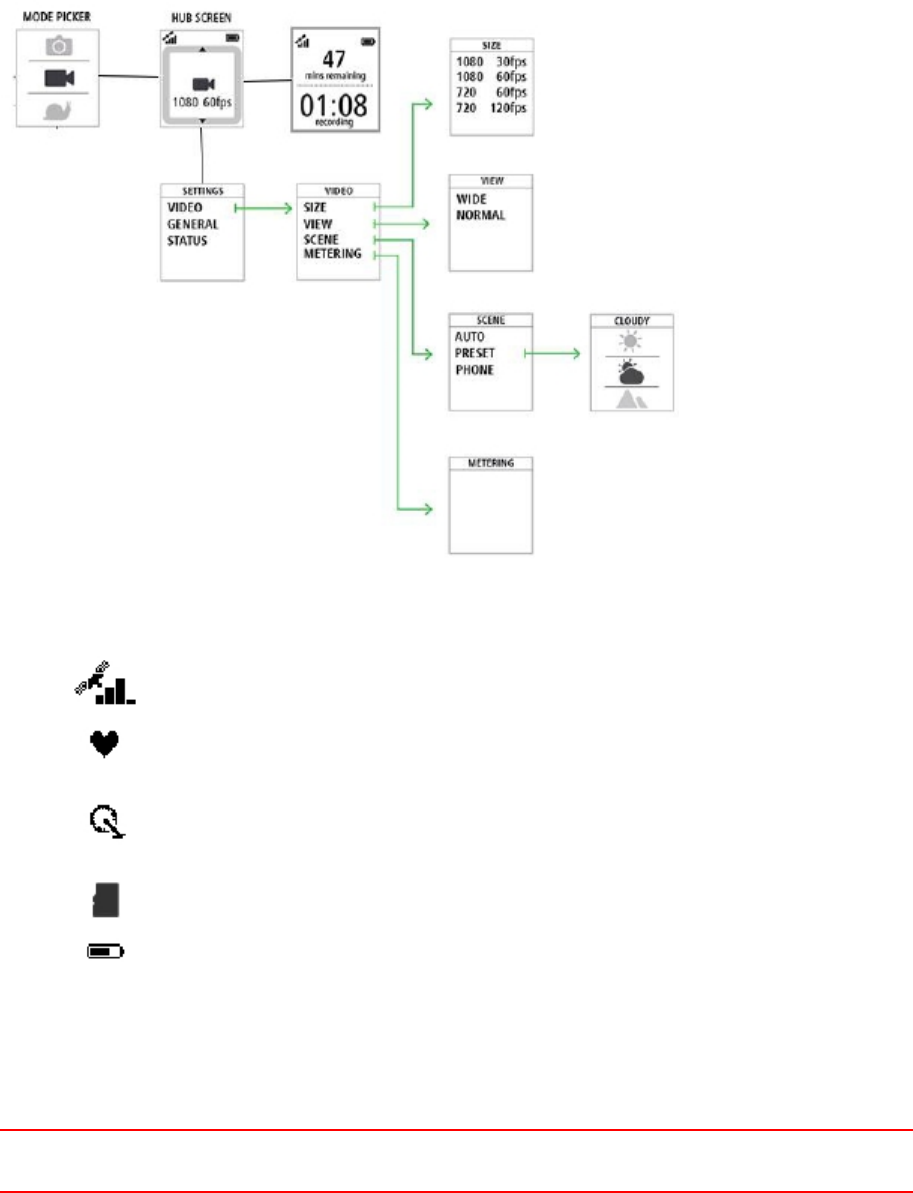
Icons
on
the
Hub
screen
The following icons can be shown along the top of the Hub and Recording screens:
This symbol shows the strength of GPS reception. While your camera is
looking for GPS satellites, the satellite images flashes.
The heart symbol shows that your camera is connected to a Heart Rate
Monitor. When your camera is trying to connect to the Heart Rate Monitor,
the heart flashes.
The chainring symbol shows that your camera is connected to a Cadence
Sensor. When your camera is trying to connect to the Cadence Sensor, the
chainring flashes.
This symbols shows that a memory card is inserted.
This symbol shows the battery status.
Charging
your
camera
You can charge your Action Camera in the following two ways:
Charging
the
battery
stick
using
a
USB
socket
Important
: If you remove the battery stick be extra careful not to let dirt or water enter the camera
or the battery stick. Only remove the battery stick in clean and dry conditions.
Press the battery stick release button as shown below (button 3).
16

Turn the battery stick to remove it from your camera.
Insert the battery stick USB connector into your computer's USB socket or a standard USB wall-charger.
Tip
: While the battery stick is charging, the LEDs show the charge level and one LED flashes.
To see the power level of the battery stick, remove the USB connector from the USB charging socket,
then press the START button. The LEDs light up to show the power level.
When the battery stick is charged, insert the battery stick into the camera and turn it until it locks.
Charging
the
camera
using
the
optional
power
cable
Open the connector cap on the back of the battery stick.
17
NOTE TO GERRY: we need to replace this image with a cleaner one :-)
Tip
: You don't have to remove the battery stick from the camera.
Connect the power cable to the battery stick connector and to a USB socket.
Inserting
a
memory
card
The photos you take and the videos you record are stored on a micro-SD memory that is located in the
battery stick.
Inserting
a
micro-SD
memory
card
into
the
battery
stick
Important
: If you remove the battery stick be extra careful not to let dirt or water enter the camera
or the battery stick. Only remove the battery stick in clean and dry conditions.
Press the battery stick release button as shown below (button 3).
18
Turn the battery stick to remove it from your camera.
Insert the micro-SD memory card into the memory card slot in the battery stick.
NOTE TO GERRY: we need to replace this image with a cleaner one :-)
Insert the battery stick into the camera and turn it until it locks.
Camera
modes
The camera has the following photo and video modes:
Photo mode has the following options:
Single - For taking a single photograph.
Burst - For taking a series of photos in a very short time.
Continuous - For taking a series of photos at a pre-set interval. This is
also called photo logging.
Photo
19
Video
Slow
Mo
Timelapse
Normal high-quality video mode. You can set the video quality to 1080p or
720p, and the frame rate to 30 fps or 60 fps.
*** ADD LINKS TO GLOSSARY
HERE for 1080p etc ****
In SLOW MO or slow motion mode, the camera records at a multiple of the
normal frame rate (2x, 4x, 8x), but stores the video with the normal frame
rate (30 fps) for playback, which results in slow motion video.
Audio and sensor data are also recorded in the slow motion mode.
The
available slow motion rate depends on the video resolution you choose.
When in TIMELAPSE MODE, the camera records a time-lapse video directly as
a video recording at the currently set resolution and at the normal frame
rate.
You can choose the interval between recording. Time-lapse recording stops
when the battery level is low, when the memory card is full or when you
press the STOP button.
No audio is recorded during a time-lapse video, but sensor information is
recorded.
CINEMATIC is the highest resolution mode, capturing video at 4K or 2.7K. For
normal use, you should find that 1080p offers sufficiently high quality video.
Cinematic
Camera
status
FOR REVIEWERS: What about certification info? as per below for the Fitness watch?
To see certification information on your watch, move down from the clock screen to open the
Settings
menu.
Select
Standards
and then move right to scroll through the certification information.
-------------------------------------------------------------------------------------
From the Camera Status screen, move down to open the
SETTINGS
screen. Select
STATUS
then move
right.
The status screen shows the following information:
Battery
- the battery power left on your camera. Charge the battery stick if the power is low.
Storage
- the amount of free space available on your camera.
If you are running out of space, connect your camera to your computer. TomTom MySports
Connect transfers the videos and photos to your computer.
QuickGPS
- the status of the QuickGPSfix information on your camera.
QuickGPSfix helps your camera find your precise location quickly so that you can start your
activity. To update the QuickGPSfix information on your camera, connect your camera to your
computer. TomTom MySports Connect automatically updates QuickGPSfix on your camera.
QuickGPSfix information is valid for three days after you download it.
20

These symbols are used to show the status of QuickGPSfix:
QuickGPSfix on your camera is up-to-date.
QuickGPSfix on your camera is out-of-date. If the QuickGPSfix
information on your camera is out-of-date, your camera still works as
usual. It may, however, take longer to get a GPS fix when you want to
or start an activity.
If you see this icon, you are using a very old version of the software and
should update your camera as soon as possible.
Version
- the software version number of your camera. You may need this information if you
contact Customer Support. Every time you connect your camera to your computer, TomTom
MySports Connect checks if a software update is available for your camera.
Serial
number
- The serial number of your Action Camera.
Sensors
built
in
to
your
camera
Your Action Camera has the following sensors built-in to the camera:
3D accelerometer
Rate-gyro
Compass
GPS
Barometer
Temperature
The sensors are used for action metrics to show you full details of your activities on your videos and
photos. The data is stored with your videos and photos.
You can also use peripheral sensors, for example a heart-rate monitor, to enhance your action
metrics.
An optional external mono microphone can also be connected to your camera.
Switching
on
and
off
Your Action Camera can be on, off, or in standby. You can only switch the camera on and off using the
buttons on the camera.
Switching
on
your
Action
Camera
Press the START button at the back of the camera for 2 seconds to switch your camera on. If no SD card
is inserted into the battery stick, you are asked to insert one so that the camera can switch on.
The camera stays on for any of the following conditions:
1.
The camera is recording a video or you are taking photos.
2.
You are using the screen to set-up the camera.
3.
You are operating the camera from your mobile phone using Wi-Fi or Bluetooth.
Switching
off
your
Action
Camera
Press the STOP button (button 1) at the front of the camera for 2 seconds to switch off the camera.
The camera can also be off in any of the following conditions:
1.
No battery is installed in the camera.
2.
The battery is empty. If the camera is in on or in standby mode, it will switch itself off if the
battery level becomes too low.
21

Standby
To save power the camera automatically switches to standby after a few minutes if it's not being used.
You can wake up the camera by pressing the control button or by using Bluetooth to connect to the
camera from your smartphone.
Resetting
your
camera
You can reset your Action Camera in the following ways:
Soft reset - Switches the camera off and then back on.
Hard reset - Clears the camera memory and settings.
Factory reset - Returns your camera to the original factory settings.
Soft
reset
A soft reset is performed each time you disconnect your camera from a wall charger or computer.
To perform a soft reset on your camera, follow these steps:
1.
Connect your camera to a wall charger or computer.
Wait until your camera shows a battery symbol.
If you are using a computer, wait until MySports Connect finishes updating your camera.
2.
Disconnect your camera from the wall charger or computer.
The software on your camera restarts. This performs a soft reset on your camera.
Hard
reset
The hard reset allows you to reinstall the software on your camera without deleting any personal data
and settings.
To perform a hard reset on your camera, follow these steps:
1.
Connect your camera to your computer and wait until MySports Connect finishes updating your
camera.
2.
On your camera, move DOWN but keep the button pressed.*
3.
Disconnect the USB cable from your computer.*
4.
Keep pressing the button until your camera shows a camera connected with a computer and
tomtom.com/reset.
5.
Release the button and connect camera to your computer.
6.
Click
Update
in MySports Connect.
Factory
reset
Important
: When you perform a factory reset in MySports Connect, all personal data and settings,
including your export settings for MySports Connect, are deleted from your camera. This action cannot
be undone.
You should only use a factory reset as a last resort to restore your camera or if you really want to
remove all your data and settings.
A factory reset reinstalls the software on your camera and this removes the following:
Your activities.
Your settings on the camera.
Your settings for uploading activities in MySports Connect.
Important
: When you perform a factory reset, do not disconnect your camera before MySports
Connect has finished restoring your camera. This takes several minutes. Check any messages shown in
MySports Connect and on your camera before you disconnect your camera.
22

To perform a factory reset on your camera, follow these steps:
1.
Connect your camera to your computer and wait until MySports Connect finishes updating your
camera.
2.
Expand
SETTINGS
in MySports Connect.
3.
Click
FACTORY
RESET
at the bottom of MySports Connect.
MySports Connect downloads the latest version of the software for your camera.
4.
Keep your camera connected when the window for MySports Connect closes.
MySports Connect installs the software on your camera.
5.
Keep your camera connected when the window for MySports Connect opens again.
6.
Follow the instructions in MySports Connect to setup your camera.
Note
: The settings for exporting and uploading activities in MySports Connect are stored on your
camera. If you had set up your camera to transfer activities to additional sports websites or file
formats, you need to set these up again on the UPLOAD & EXPORT tab.
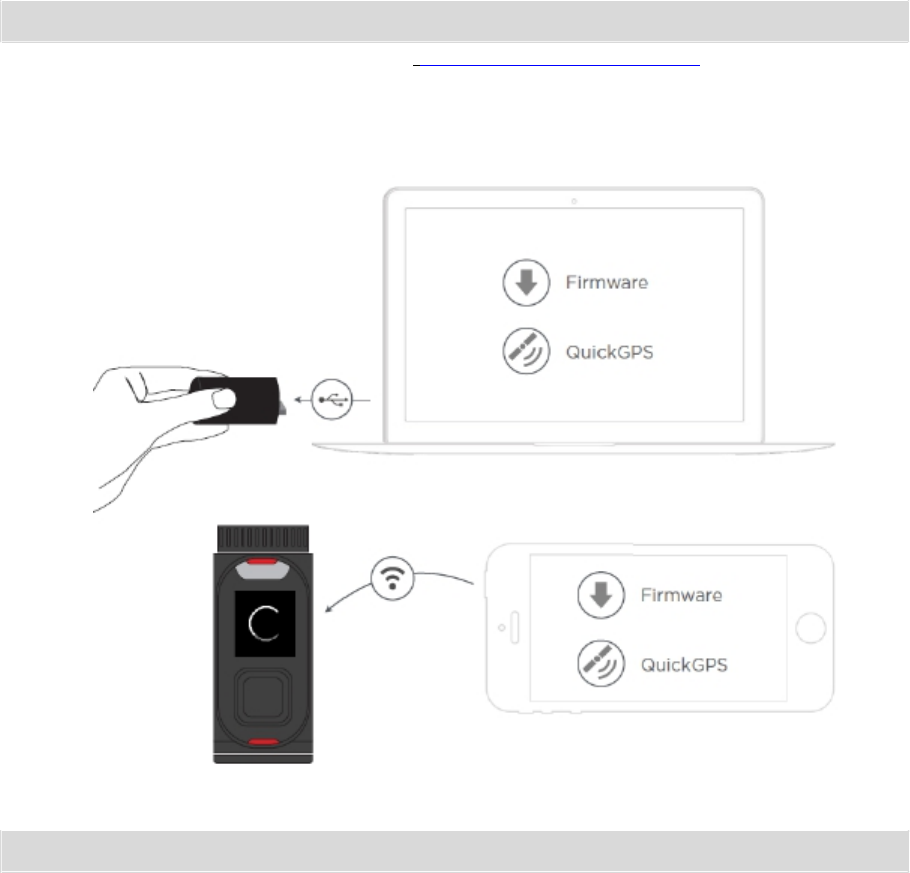
Receiving
updates
Firmware
Updates
The camera may find a new firmware version on the microSD card after the battery stick is
re-inserted.
Caring
for
your
camera
It is recommended that you clean your camera once a week if you use it frequently.
Wipe the camera with a damp cloth as needed. Use mild soap to remove oil or dirt.
Important
: Do not clean the lens or lens cover with a normal cloth. Use only a cloth and spray
specifically made for cleaning camera lenses.
Clean the lens cover and the lens using a cloth and spray specifically made for cleaning camera
lenses.
Do not expose your camera to strong chemicals such as gasoline, cleaning solvents, acetone,
alcohol, or insect repellents. Chemicals can damage the camera's seals, case, and finish.
After using your camera in water, rinse your camera with tap water and dry it with a soft cloth.
Important
: If you remove the battery stick be extra careful not to let dirt or water enter the camera
or the battery stick. Only remove the battery stick in clean and dry conditions.
23
Using
peripherals
Using
the
universal
camera
mount
Hi, Claire-
We can use:
Universal Mount
Bike Mount
Adhesive discs (FYI: used with Universal Mount)
You can mount your camera in many places, for example on your helmet or on the handlebars using the
optional bike mount. Once mounted you can move your camera in the following ways:
You can lift it up and down by 90 degrees, known as the pitch.
You can twist it around by 360 degrees, know as yaw.
You can roll the whole camera by 100 degrees to the left or right.
Using
a
disc
adapter
to
mount
your
camera
The disc adapter kit lets you mount your camera on a helmet or other flat or slightly curved surface.
The kit contains 2 adhesive discs and a universal adapter.
1.
Attach the adhesive disc to your chosen surface. Firmly press it into place to ensure full contact
over its entire surface.
Follow these tips to make sure that the adhesive disc is secure:
Apply the adhesive disc only to a clean and dry surface. Wax, oil, dirt and moisture reduce
adhesion, which can result in a weak bond.
Attach the adhesive disc in dry, room-temperature conditions. The adhesive disc won't be
secure if you attach it in damp and cold conditions.
Attach the adhesive disc only to a smooth and hard surface. The adhesive disc won't securely
attach to porous, textured or soft surfaces.
When you attach the adhesive disc, Regularly check the security of the adhesive disc.
24

2.
Attach the universal disc adapter to the adhesive disc by first fully opening the mount.
3.
Push the mount onto the disc at any yaw angle until you hear a click.
4.
Fold down the camera platform to any angle between 90 degrees to horizontal and fully closed.
This locks the mount to the disc.
25
5.
Push down the lever to lock the mount.
6.
Mount the camera on the camera platform.
7.
Set the desired angle of shot. Explain pitch, yaw and roll here? You can see from amlibu app what
you are focusing on/pointing on.
Note
: To remove the mount, reverse the above instructions.
26

Using
the
optional
remote
control
The remote control can be used to start and stop recording, and to manually tag your video. Use the
remote control when you can't easily or safely reach your camera.
You can hold the remote control in your hand, or you can attach it to a place you can easily reach.
Note
: The remote uses Bluetooth Smart to connect to your camera and can only be used with one
camera at a time.
Connecting
the
remote
control
1.
From the Camera Status screen on your camera, move down to open the
SETTINGS
screen.
2.
Select
GENERAL
, then move right.
3.
Select
CONNECT
, then move right.
4.
Select
REMOTE
, then move right.
5.
Move up or down to turn it on.
Note
: When connecting the camera to the remote control for the first time, any button press on the
remote control tells the camera that the remote control is out there and ready for connection.
Tip
: The Viewfinder of the Mobile App also has remote control features – see MOBILE APP.
The remote control can control up to 50 cameras simultaneously from up to 180m in optimal
conditions. It has a small LCD screen which mirrors what is shown on the Camera Status screen.
The remote control can only be used with one camera at a time. If you want to connect your remote
control to a different camera, repeat the instructions above with the remote control in range of the
new camera.
Note
: To change settings on the camera using the remote control, the camera needs to be in Wi-Fi
mode.
Changing
the
battery
in
the
remote
control
***THIS
SECTION
WAS
MADE
UP
BY
CLAIRE!!!***
The remote control uses a button cell CR2032 battery.
To change the battery do the following:
1.
Using a small flat-head screwdriver, gently lever the back off the remote control.
2.
Gently lever out the round battery cell.
3.
Replace the battery with a new one.
4.
Replace the cover and snap it back into place on the remote control.
Using
the
remote
control
to
record
a
movie
**** INSERT IMAGE HERE WITH CALLOUTS FOR START/TAG/STOP BUTTONS ***
Press the START button to start recording. The LED blinks red when the camera is recording.
Press the START button to tag any exciting moments.
To wake up the remote, press the START button for 2 seconds until the LED blinks twice in green.
Squeeze the remote, ie. press the STOP button to stop recording. The LED stops flashing red.
27

Remote
control
straps
and
mounts
The remote control is supplied a strap which will fit both around your bare wrist and around a winter
coat during snow sports. Other straps are available, as well as mounts for handlebars and dashboards.
Tip
: The remote control is waterproof to a depth of 3 m.
WHY IS THERE A CHARGING CABLE FOR THE REMOTE IF IT USES BATTERIES?
Using
lens
covers
The camera is waterproof with the standard IPX7 lens cover (black and white). If you want to use the
camera underwater to depths down to 50 m, fit the optional IPX8 lens cover (black).
Note
: When using the IPX8 lens cover, the microphone and barometer are concealed and hence
don't work with this lens cover.
To remove the lens cover, press the release button (button 4 below) and turn the lens cover.
To fit a lens cover, put the lens cover on the camera lens and turn it until it locks.
Important
: Store the lens cover in its storage bag when you are not using it.
Important
: To prevent damage to the camera lens, never use the camera without a lens cover.
Important
: Do not clean the lens or lens cover with a normal cloth. Use only a cloth and spray
specifically made for cleaning camera lenses.
28
Adding
sensors
About
sensors
Sensors are used by your Action Camera to record data simultaneously with your video, audio or
photos. This makes it easier for you to find the highlights in the video when reviewing it and adds
context like your GPS trace or a speed graph.
There are two types of sensors for your camera - built-in sensors and external sensors.
Built-in
sensors
For more information about built-in sensors, see Sensors in your camera.
External
sensors
External sensors are external devices that you can link to your camera to provide extra information
about your activity.
You can attach an external heart rate monitor using a Bluetooth Smart (BLE) connection. This sensor
measures your heart rate during your sport or activity. The external TomTom Heart Rate Monitor is
available as an accessory.
Your camera tries to connect to external sensors when recording starts and/or when you look at a
Metrics screen. When recording stops, or the Metrics screen is closed, the connection to the sensor is
dropped.
Note
: Your camera stores a .GPX and a .KML file for each recorded video. These files make it easy
for you to access sensor data directly using a computer. See Using KML and GPX file data - Camera.
The
heart
rate
monitor
To use the external TomTom Heart Rate Monitor with your camera, do the following:
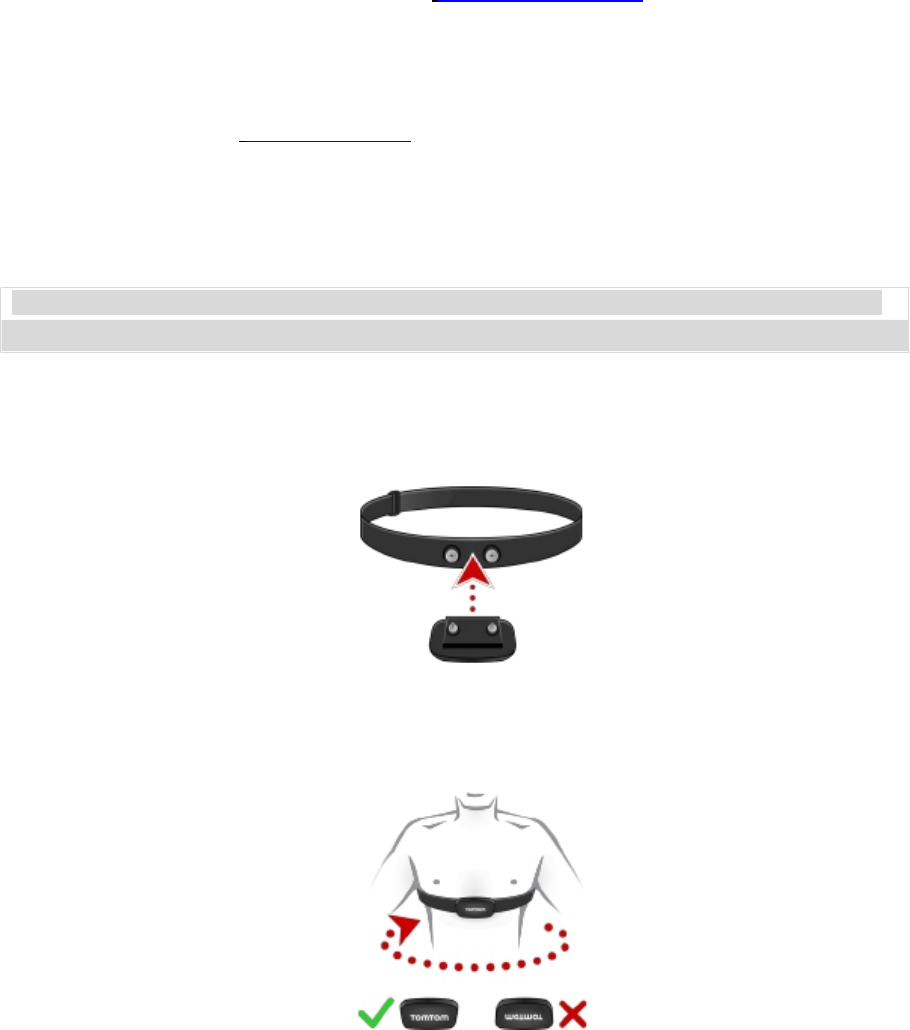
1.
Attach the monitor to the strap.
2.
Attach the strap around your chest, so the monitor sits just above the base of your chest bone.
Make sure the monitor is the right way up so that the word 'TomTom' is the right way up for
someone standing in front of you.
29

Tip
: Wet the sensors on the inside of the strap before placing it around your chest. This makes it
easier for the monitor to pick up your heartbeat.
3.
From the Camera Status screen on your camera, move down to open the
SETTINGS
screen.
4.
Select
GENERAL
then select
CONNECT
.
5.
Select
SENSORS
then move right.
6.
Select
HEART
, then move right to turn it on.
7.
When you begin an activity, your camera connects to the monitor and you see a heart icon at the
top of the screen.
When your camera is trying to connect to the monitor, the heart flashes.
The first time your camera tries to connect to your monitor, if it finds more than one monitor, your
camera doesn't know which monitor to connect to. Move to a place where there are no other
monitors within range of your camera.
When you have connected to your monitor once, your camera always reconnects to your monitor.
You can also use the external Heart Rate Monitor with other Bluetooth® Smart Ready devices and
apps. See the documentation that comes with your product or app for more information.
To change the CR2032 battery on the monitor, use a coin to open the back of the monitor. The battery
must be recycled or disposed of according to local laws and regulations.
Note
: The TomTom Heart Rate Monitor is not waterproof.
30

Recording
videos
About
recording
videos
You can use your Action Camera to take videos in the following modes:
Video - Use this mode to record normal high-quality videos.
Slow Mo - This mode records slow-motion videos at high-qulaity.
Timelapse - This mode creates videos from time-lapse recordings taken at set intervals.
Cinematic - Very high quality video mode for the video specialist.
Use the control button to select the mode.
About
video
modes
The different video modes allow you to select a mode that's perfect to record your sports activity.
Video
Mode
Summary
The following table shows the settings options available for each video mode:
Mode Resolution Capture rate Playback Field of view
Video 1080p 30 fps 30 fps Wide or Normal
Video 1080p 60 fps 60 fps Wide or Normal
Video 720p 60 fps 60 fps Wide or Normal
Video 720p 120 fps 120 fps Wide or Normal
SlowMo (x2) 1080p 60 fps 30 fps Wide or Normal
SlowMo (x4) 720p 120 fps 30 fps Wide or Normal
SlowMo (x6) WVGA 180 fps 30 fps Wide
1 per sec
1 every 5 sec
Timelapse 1080p 1 every 10 sec
1 every 15 sec 30 fps
Wide
1 every 30 sec
1 every 60 sec
Cinematic 4k 15 fps 15 fps Wide
Cinematic 2.7k 30 fps 30 fps Wide
Videos are recorded using h.264 encoding and audio is recorded using AAC encoding (at 128kbps). The
output is stored as an MP4 file.
Sensor data is stored with your videos.
Normal
In normal mode, the camera records and stores video at the same frame-rate, in either 1080p or 720p
resolution, at up to 120 fps. Audio, GPS and sensor data are recorded. Automatic tagging can be used,
and you can manually tag your video.
Slow
motion
A slow motion video is recorded at a multiple of the normal frame rate, for example 2x, 4x, or 6x, but
the video is stored with the normal frame rate of 30 fps for playback. Audio, GPS and sensor data are
recorded. Automatic tagging can be used, and you can manually tag your video.
31

Timelapse
This camera records a time-lapse video directly as a video recording, using the currently set resolution
and at the "normal" frame rate. You can choose the interval.
A time lapse video does not have audio recording. GPS data is recorded, but sensor data will not be
recorded. You can manually tag your video.
Cinematic
The Cinematic mode allows you record videos at very high resolutions of 4k and 2.7k.
Recording
a
video
1.
Go left from the Hub screen and select the mode for the type of video you want to record. Go right
back to the Hub screen.
Tip
: To change settings for the selected mode, move down from the Hub screen to Settings, then
move left to the settings for that mode.
2.
Aim the camera at the subject.
3.
Press the START button to start recording.
Tip
: You can press the START button at any time to manually tag your video.
4.
Press the STOP button to stop the recording.
32

Taking
photos
About
photo
modes
You can use your Action Camera to take photos in the following modes:
Single - A single photo is taken.
Burst - A series of photos are taken in a very short time.
Continuous - A series of photos are taken at a pre-set interval (also called photo logging).
Photo
Mode
Summary
Mode Resolution Capture rate
Field
of
view
Single 16MP 1 per sec Wide
5 per sec
Burst 16MP
Burst 8MP
10 per sec
Wide
5 per sec
10 per sec
Wide
1 per sec
1 every 5 sec
Continuous 16MP 1 every 10 sec
1 every 15 sec Wide
1 every 30 sec
1 every 60 sec
Photos are saved in the JPEG/Exif format.
Taking
single
photos
1.
Go left from the Hub screen and select
Photo
. Go right back to the Hub screen.
Tip
: To change settings for the selected mode, move down from the Hub screen to Settings, then
move left to the settings for that mode.
2.
Aim the camera at the subject.
3.
Press the START button to take a photo.
Taking
burst
photos
1.
Go left from the Hub screen and select
Photo
. Go right back to the Hub screen.
Tip
: To change settings for the selected mode, move down from the Hub screen to Settings, then
move left to the settings for that mode.
2.
Aim the camera at the subject.
3.
Press the START button to take a photo burst.
The screen shows the number of photos taken.
Taking
continuous
photos
1.
Go left from the Hub screen and select
Photo
. Go right back to the Hub screen.
Tip
: To change settings for the selected mode, move down from the Hub screen to Settings, then
move left to the settings for that mode.
2.
Aim the camera at the subject.
3.
Press the START button to take continuous photos.
33
The screen shows the number of photos taken.
4.
Press STOP to stop taking photos.
34
Settings
About
settings
To change settings that you use frequently like WHAT, move WHERE from the Camera Status screen.
To access other settings that you may need to change less frequently, use the Settings menu. These
settings determine the overall behaviour of your camera, and are used to adjust the mode settings for
each photo and video mode.
From the Camera Status screen, move down to open the
Settings
menu. The Settings menu has the
following items:
Video
or
Photo
- Use these settings to adjust the mode settings for the Photo or Video mode you
have selected.
General
- These settings determine the overall behaviour of your camera
Status
- This screen shows you the general status of your camera.
Important
: You can also change a large range of settings using the TomTom Mobile Camera App on
your smartphone.
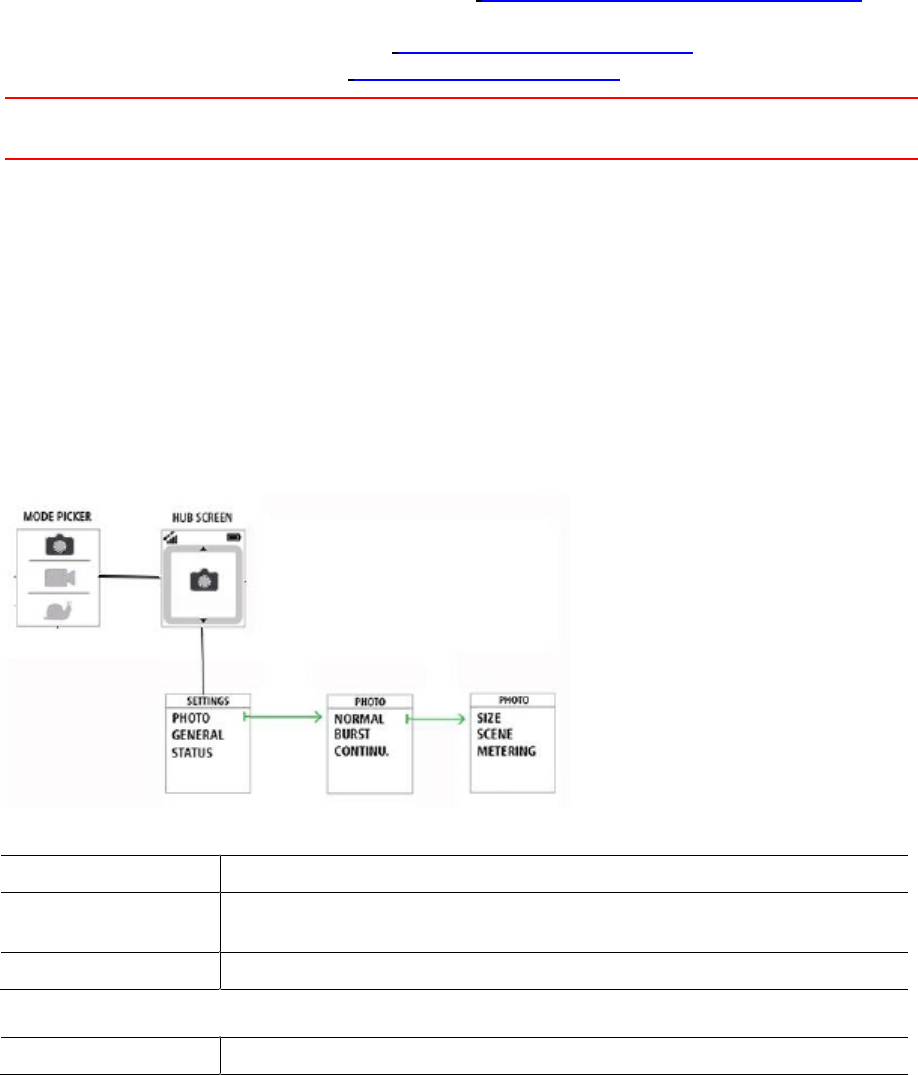
Photo
and
video
settings
Each video and photo mode has its own settings.
Photo
Use the photo settings to select a photo mode. Once a mode has been chosen, you can then select
settings for that photo mode.
From the Camera Status screen, move down to the
SETTINGS
screen and select, for example
PHOTO
.
Move right to select a mode, for example
BURST
, then select the settings you want to change.
THIS IMAGE WILL NOT BE USED IN THE FINAL BOOK AND IS INCLUDED FOR AUTHOR and REVIEWER
REFERENCE ONLY!
Normal
settings
Size 16 MP
Scene Auto
Preset: Sun, Cloudy, Mountain
Metering
Burst
settings
Size 16 MP
35
8 MP
Burst 5 per sec
10 per sec
Scene Auto
Preset: Sun, Cloudy, Mountain
Metering
Continuous
settings
Size 16 MP
Interval 1s, 5s, 10s, 15s, 30s, 60s
Scene Auto
Preset: Sun, Cloudy, Mountain
Metering
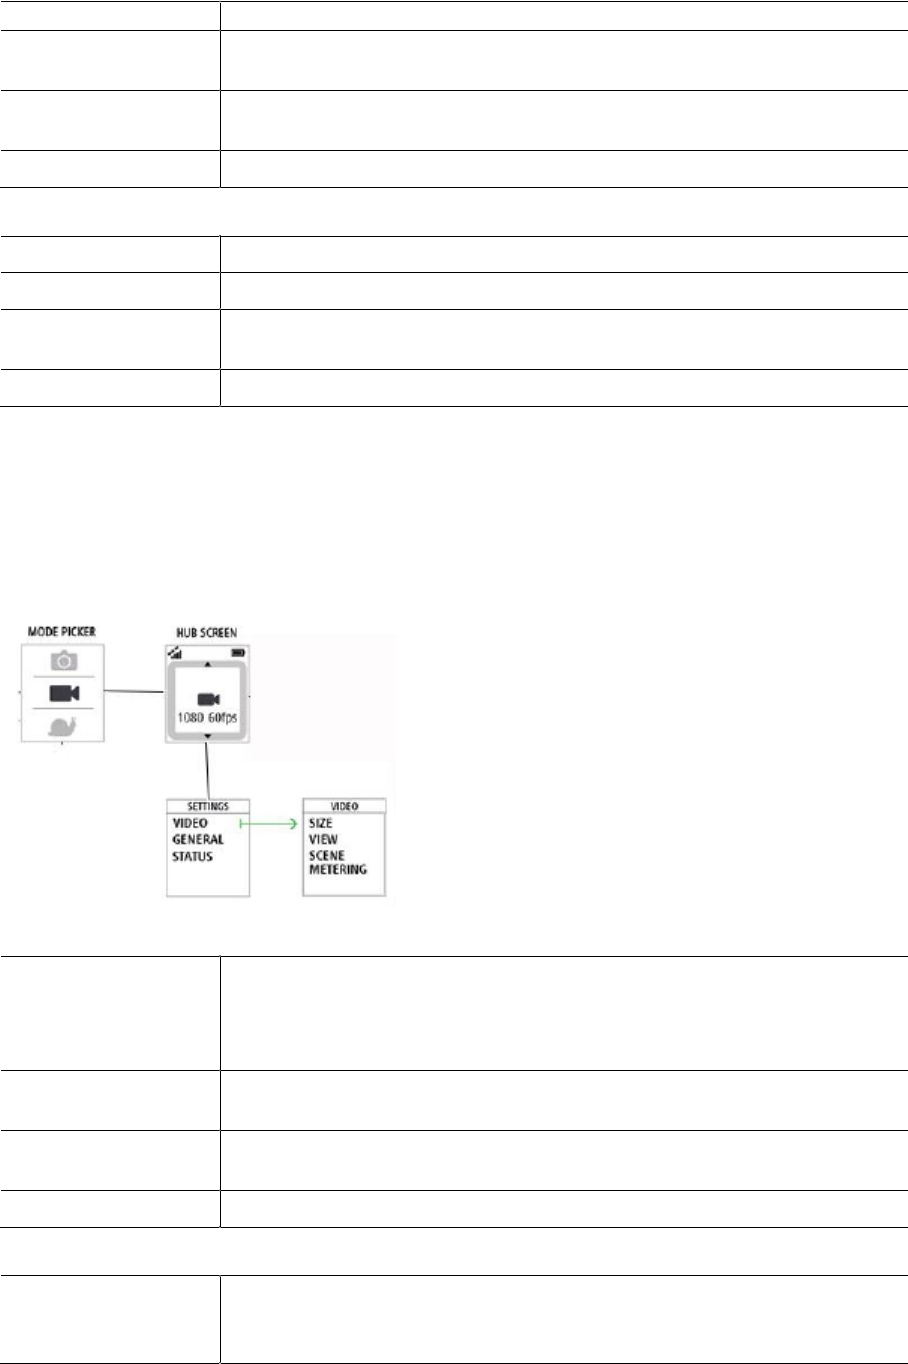
Video
Each video mode has its own settings.
From the Camera Status screen, move down to the
SETTINGS
screen and select the mode settings, for
example
VIDEO
. Move right, then select the settings you want to change.
THIS IMAGE WILL NOT BE USED IN THE FINAL BOOK AND IS INCLUDED FOR AUTHOR and REVIEWER
REFERENCE ONLY!
Video
settings
Size 1080p at 30 fps
1080p at 60 fps
720p at 60 fps
720p at 120 fps
View Wide
Normal
Scene Auto
Preset: Sun, Cloudy, Mountain
Metering
Slo
Mo
settings
Size 1080p at 2x speed
720p at 4x speed
WVGA at 6x speed
36

View Wide
Normal
Scene Auto
Preset: Sun, Cloudy, Mountain
Metering
Cinematic
settings
Size 4k at 15 fps
2.7k at 30 fps
WVGA at 6x speed
Scene Auto
Preset: Sun, Cloudy, Mountain
Metering
Timelapse
settings
Size 4k
1080
Interval 1s, 5s, 10s, 15s, 30s, 60s
Scene Auto
Preset: Sun, Cloudy, Mountain
Metering
General
settings
These settings determine the overall behaviour of your camera.
Connect
From the hub screen on your camera, move right then move down to open the
Settings
screen. Select
General
then select
Connect
.
Use these settings to connect your camera to your smartphone, a remote control or external heart or
bicycle cadence sensors.
Flight
Mode
From the Camera Status screen on your camera, move down to open the
SETTINGS
screen. Select
GENERAL
then select
FLIGHT
MODE
.
Move up or down to switch on flight or airplane mode.
To switch flight mode off, move up or down again.
Tip
: When airplane mode or flight mode is switched on, an airplane icon is shown on the Camera
Status screen and all Bluetooth low energy (also known as BLE or Bluetooth® Smart) connectivity is
disabled.
Options
From the Camera Status screen on your camera, move down to open the
SETTINGS
screen. Select
GENERAL
then select
OPTIONS
.
37

Use these settings to select the general options for your camera, such as language and units.
Language
Select
LANGUAGE
to set the language used for menus and messages on your camera.
Units
Select
UNITS
to set the units to
KM
(metric) or
Miles
(imperial).
REVIEW QUESTION: NO nautical miles for this release?
Sound
Select
SOUND
to switch the buzzer sound on the camera
ON
or
OFF
.
When the camera is out of your sight, for example when mounted on your helmet, the buzzer tells you
when the camera has started and stopped recording, when the power is switched on or off, and if a
camera notification arrives.
You may wish to turn the buzzer off if you need silence when recording, for example, when riding
through a landscape with wildlife.
Note
: This setting does not control the audio recordings made while videoing.
Light
Select
LIGHT
to switch the LED lights on the camera
ON
or
OFF
.
Tip
: Switching the LEDs off will save battery power.
Reset
Select
RESET
to reset your camera to the factory settings.
Note
: A reset does not delete your photos and videos stored on the memory card.
Storage
Using the
STORAGE
settings you can delete items from the memory card and format the memory card.
Deleting
the
last
file
1.
From the Camera Status screen on your camera, move down to open the
SETTINGS
screen.
2.
Select
GENERAL
then select
STORAGE
.
3.
Select
DELETE
LAST
.
This selection deletes only the last file that was stored on the memory card.
Deleting
all
photos
and
videos
1.
From the Camera Status screen on your camera, move down to open the
SETTINGS
screen.
2.
Select
GENERAL
then select
STORAGE
.
3.
Select
DELETE
ALL
.
This selection deletes all the photos and videos you made with your Action Camera from the
memory card.
Formatting
the
memory
card
1.
From the Camera Status screen on your camera, move down to open the
SETTINGS
screen.
2.
Select
GENERAL
then select
STORAGE
.
3.
Select
FORMAT
SD
.
This selection formats your memory card.
38

Important
: Formatting a memory card deletes all files stored on the memory card.
Tip
: When a memory card is formatted by the camera, the volume name is chosen by the camera,
for example "TOMTOMCAM" and you cannot change the name.
39
Glossary
of
Terms
G
Glossary
Term
Wi-Fi - 802.11n, Wi-Fi is in Wi-Fi Direct (or as a fallback ad-hoc) mode. Range will be minimum 10
meters and bandwidth will be at minimum 10Mbps.
Bluetooth
720p
1080p
Burst
Camera
Frames per second (fps)
Photo
Video
40

Addendum
How
TomTom
uses
your
information
Information regarding the use of personal information can be found at tomtom.com/privacy.
FCC
information
for
the
user
THE DEVICE COMPLIES WITH PART 15 OF THE FCC RULES
Federal
Communications
Commission
(FCC)
Statement
This equipment radiates radio frequency energy and if not used properly - that is, in strict accordance
with the instructions in this manual - may cause interference to radio communications and television
reception.
Operation is subject to the following two conditions: (1) this device may not cause harmful
interference and (2) this device must accept any interference, including interference that may cause
undesired operation of the device.
This device has been tested and found to comply with the limits for a Class B digital device, pursuant
to part 15 of the FCC rules. These limits are designed to provide reasonable protection against harmful
interference in a residential installation. This equipment generates, uses and can radiate radio
frequency energy and, if not installed and used in accordance with the instructions, may cause
harmful interference to radio communications. However, there is no guarantee that interference will
not occur in a particular installation. If this equipment does cause harmful interference to radio or
television reception, which can be determined by turning the equipment off and on, the user is
encouraged to try to correct the interference by one or more of the following measures:
Reorient or relocate the receiving antenna.
Increase the separation between the equipment and receiver.
Connect the equipment into an outlet on a circuit different from that to which the receiver is
connected.
Consult the dealer or an experienced radio/TV technician for help.
Changes or modifications not expressly approved by the party responsible for compliance could void
the user's authority to operate the equipment.
FCC ID: S4L4LB00, S4L4LBA2
IC: 5767A-4LB00, 5767A-4LBA2
The transmitters within this device must not be co-located or operating in conjunction with any
other antenna or transmitter.
Radiation
Exposure
Statement
for
the
CAMERA:
This device meets the government’s requirements for exposure to radio waves. This device is designed
and manufactured not to exceed the emission limits for exposure to radio frequency (RF) energy set by
the Federal Communications Commission of the U.S. Government.
The exposure standard for wireless device employs a unit of measurement known as the Specific
Absorption Rate, or SAR. The SAR limit set by the FCC is 1.6W/kg. *Tests for SAR are conducted using
standard operating positions accepted by the FCC with the device transmitting at its highest certified
power level in all tested frequency bands.
41

A minimum separation distance of 1.2 cm must be maintained between the user’s body and the
device, including the antenna during body-worn operation to comply with the RF exposure
requirements in Europe.
FCC
Country
Code
Selection
The Country Code Selection feature is disabled for TomTom Action Cameras marketed in the US or
Canada. Per FCC regulations, all WiFi products marketed in US must be fixed to US operation channels
only.
Responsible
party
in
North
America
TomTom, Inc., 24 New England Executive Park, Suite 410, Burlington, MA 01803
Tel: 866 486-6866 option 1 (1-866-4-TomTom)
Emissions
information
for
Canada
Operation is subject to the following two conditions:
This device may not cause interference.
This device must accept any interference, including interference that may cause undesired operation
of the device.
Operation is subject to the condition that this device does not cause harmful interference.
This Class B digital apparatus complies with Canadian ICES-003. CAN ICES-3(B)/NMB- 3(B).
Cet appareil numérique de la classe B est conforme à la norme NMB-003 du Canada. ICES-003
CAN
ICES-3(B)/NMB-3(B).
This device complies with Industry Canada licence-exempt RSS standard(s). Operation is subject to the
following two conditions:
this device may not cause interference, and
this device must accept any interference, including interference that may cause undesired operation
of the device.
Le présent appareil est conforme aux CNR d'Industrie Canada applicables aux appareils radio exempts
de licence. L'exploitation est autorisée aux deux conditions suivantes:
l'appareil ne doit pas produire de brouillage, et
l'utilisateur de l'appareil doit accepter tout brouillage radioélectrique subi, même si le brouillage est
susceptible d'en compromettre le fonctionnement.
This device and its antenna(s) must not be co-located or operating in conjunction with any other antenna
or transmitter, except tested built-in radios. The County Code Selection feature is disabled for products
marketed in the US/ Canada.
Cet appareil et son antenne ne doivent pas être situés ou fonctionner en conjonction avec une autre
antenne ou un autre émetteur, exception faites des radios intégrées qui ont été testées. La fonction de
sélection de l'indicatif du pays est désactivée pour les produits commercialisés aux États-Unis et
au Canada.
42
IMPORTANT
NOTE:
IC
Radiation
Exposure
Statement
for
the
CAMERA
The product comply with the Canada portable RF exposure limit set forth for an uncontrolled
environment and are safe for intended operation as described in this manual. The further RF exposure
reduction can be achieved if the product can be kept as far as possible from the user body or set the
device to lower output power if such function is available.
Déclaration
d'exposition
aux
radiations
pour
la
caméra
Le produit est conforme aux limites d'exposition pour les appareils portables RF pour les Etats-Unis et
le Canada établies pour un environnement non contrôlé.
Le produit est sûr pour un fonctionnement tel que décrit dans ce manuel. La réduction aux expositions
RF peut être augmentée si l'appareil peut être conservé aussi loin que possible du corps de l'utilisateur
ou que le dispositif est réglé sur la puissance de sortie la plus faible si une telle fonction est disponible.
Battery
and
Environmental
information
This product uses a lithium polymer battery that is not user accessible or user replaceable. Do not
open the case or (attempt to) remove the battery. Substances in the product and/or battery may be
harmful to the environment or your health if disposed of improperly. The battery contained in the
product must be recycled or disposed of properly according to the local laws and regulations and
always kept separate from household waste.
CAUTION:
RISK
OF
EXPLOSION
IF
BATTERY
IS
REPLACED
BY
AN
INCORRECT
TYPE.
DISPOSE
OF
USED
BATTERIES
ACCORDING
TO
THE
INSTRUCTIONS.
WEEE
directive
The wheelie bin symbol on the product or its packaging indicates that this product shall not be treated
as household waste. In line with EU Directive 2012/19/EU for waste electrical and electronic
equipment (WEEE), this electrical product must not be disposed of as unsorted municipal waste.
Please dispose of this product by returning it to the point of sale or to your local municipal collection
point for recycling. By doing this you will help conserve the environment.
R&TTE
directive
Hereby, TomTom declares that TomTom products and accessories are in compliance with the essential
requirements and other relevant provisions of the EU Directive 1999/5/EC. The declaration of
conformity can be found here: tomtom.com/legal.
43

Battery
operating
temperatures
Operating temperatures for camera battery: -20°C (-4°F) to 40°C (104°F). Do not expose to
temperatures beyond this.
Regulatory
Compliance
Mark
This product displays the Regulatory Compliance Mark (RCM) to show that it complies with relevant
Australian regulations.
Notice
for
New
Zealand
This product displays R-NZ to show it complies with relevant New Zealand regulations.
Notice
for
Singapore
IDA
This product displays the Singapore IDA licence number show it complies with relevant Singapore
regulations.
Customer
support
contact
Australia: 1300 135 604
New Zealand: 0800 450 973
Model
names
Camera: 4LB00, Battery Stick: 4LB02, Remote Control: 4LBA2
44

Copyright
notices
© 2015 TomTom. All rights reserved. TomTom and the "two hands" logo are registered trademarks of
TomTom N.V. or one of its subsidiaries. Please see tomtom.com/legal for limited warranty and end
user licence agreements applying to this product.
© 2015 TomTom. All rights reserved. This material is proprietary and the subject of copyright
protection and/or database rights protection and/or other intellectual property rights owned by
TomTom or its suppliers. The use of this material is subject to the terms of a licence agreement. Any
unauthorised copying or disclosure of this material will lead to criminal and civil liabilities.
Linotype, Frutiger and Univers are trademarks of Linotype GmbH registered in the U.S. Patent and
Trademark Office and may be registered in certain other jurisdictions.
MHei is a trademark of The Monotype Corporation and may be registered in certain jurisdictions.
The software included in this product contains copyrighted software that is licensed under the GPL. A
copy of that licence can be viewed in the Licence section. You can obtain the complete corresponding
source code from us for a period of three years after our last shipment of this product. For more
information, visit tomtom.com/gpl or contact your local TomTom customer support team via
tomtom.com/support. Upon request, we will send you a CD with the corresponding source code.
AES
code
The software included in this product contains AES code under Copyright (c) 1998-2008, Brian
Gladman, Worcester, UK. All rights reserved.
Licence terms:
The redistribution and use of this software (with or without changes) is allowed without the payment
of fees or royalties provided that the following conditions are adhered to:
Source code distributions include the above copyright notice, this list of conditions and the following
disclaimer.
Binary distributions include the above copyright notice, this list of conditions and the following
disclaimer in their documentation.
The name of the copyright holder is not used to endorse products built using this software without
specific written permission.
45