TomTom GO700 GPS Tracking System User Manual 3 7045 TT QSG EUR def indd
TomTom International BV GPS Tracking System 3 7045 TT QSG EUR def indd
TomTom >
users manual

3
UK
3
TomTom GO Quick Start Guide
UK
DK
NL
FI
FR
DE
IT
NO
PT
ES
SE
Contents
What's in the box? 4
Unpacking 4
Your TomTom GO 5
Remote control 6
Docking shoe 6
Installation 7
Assembly 7
Switching on for the first time 8
Starting up 8
Using TomTom GO 8
Using the remote control 9
How to plan your first route 10
Helping with your journey 12
What's on the screen? 13
Finding alternative routes 14
Advanced planning 15
Preferences 16
Use night colours 16
Manage POI 17
Hide POI 17
Change Home location 17
THE SMART CHOICE IN PERSONAL NAVIGATION
Connecting to your phone 18
More information 20
TomTom PLUS 20
General information 20

4
UK
4
Unpacking
Unpack your TomTom GO box and identify the
contents. The model number of your TomTom
GO can be found on the bottom of the device
itself. You should have:
• TomTom GO (1). Its main features are a
touch-sensitive LCD screen, a power (On/
Off) button, a release button (for removing
TomTom GO from its cradle) and a Secure
Digital (SD) memory card slot (included in
GO 500 and GO 300 models).
• A pre-installed SD card (2) (included with
GO 500 and GO 300 models). The GO 700
includes a pre-installed hard disk.
• The component parts (3/4) of a suction-mount
cradle, for attaching to your windscreen.
• A DC power lead (5), with 12V cigarette
lighter adaptor. This is the normal way of pro-
viding power to TomTom GO when it’s in your
vehicle.
• An installation poster (6), showing how to
assemble the cradle, how to fix it to your
windscreen and how to insert TomTom GO.
• A carry case (7), for storing TomTom GO when
it’s not in your vehicle.
• A USB data cable (8) for connecting TomTom
GO to a Windows PC or Mac.
• A Microsoft® Windows® and Mac®
compatible CD (9) containing documentation
and optional extras.
• A Product Code Card (10) for product
activation, support and future map
upgrades.
• This Quick Start Guide (11).
• An AC adaptor (12) , included for you to char-
ge and work with TomTom GO even when it’s
not in your vehicle (included with GO 700 and
GO 500 models). Note that this comes with
several international pin adaptors, for use any-
where in the world. When you use the adaptor,
please make sure it is cooled by placing it in a
ventilated area.
• A remote control (13) (included with GO 700
model), for operating TomTom GO when out
of reach. This is available as an accessory for
GO 700 and GO 500 models.
What's in the box?
1
1
6
7
8
9
5
2
3
4
2345
78910 11 12 13
6
5
UK
5
What's in the box?
NOTE: Do not expose TomTom GO to high or low temperatures. We recommend that you do not leave TomTom GO in
direct sunlight for long periods or in an unattended car on sunny days. High or low temperatures can cause permanent
damage. Do not attempt to service TomTom GO yourself! Do not open, puncture or disassemble it. Doing so may be
dangerous and will invalidate your warranty. Do not leave your TomTom GO in your glove box when driving.
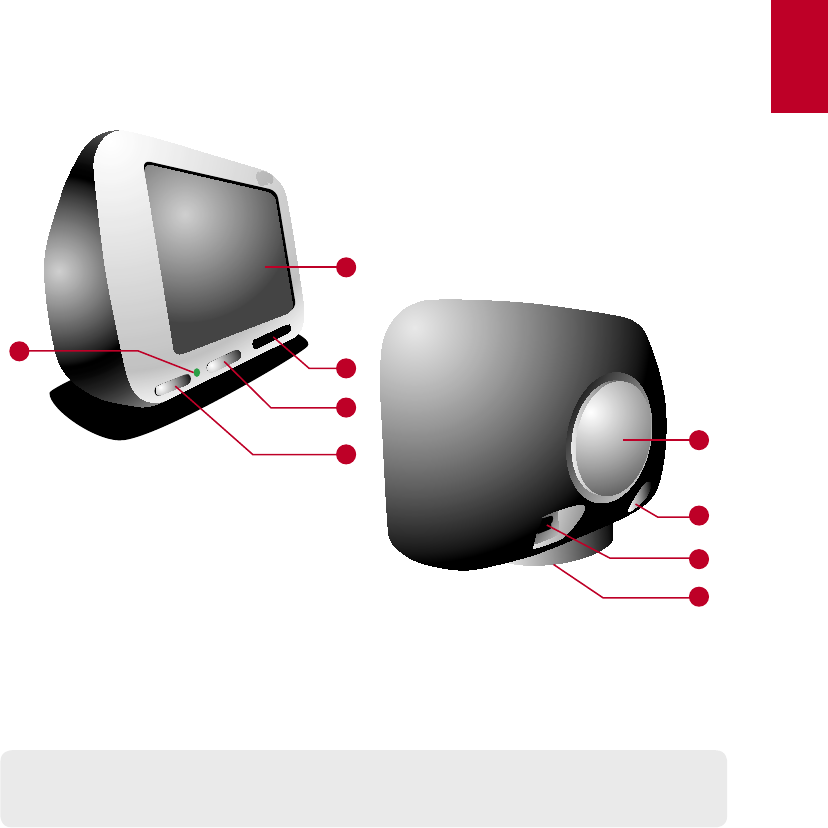
Your TomTom GO
1. Touchscreen
2. SD card slot (included on GO
500 and GO 300 models)
3. Release button
4. On/Off button
5. Charging LED
6. Speaker
7. AC-connector
8. USB-connector
9. Docking connector
6
UK
6
What's in the box?
Docking Shoe
1. Integrated microphone (included with
GO 700 and GO 500 models).
2. Charger socket
3. External microphone socket
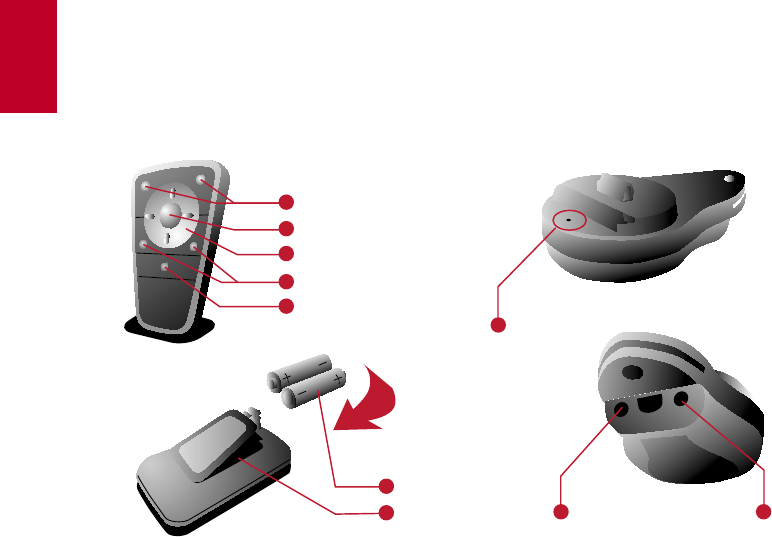
Remote control
1. Volume up/down
2. OK button
3. Arrow buttons
4. Left and Right soft buttons
5. Keyboard button
6. Batteries
7. Battery compartment

7
UK
SE
7
Assembly
1. Assemble the suction-mount cradle as shown
in the installation poster.
2. Plug the small plug end of the DC power lead
into the socket on the back of the
cradle. Plug the other end into your vehicle’s
12V (cigarette lighter) socket.
3. Ease TomTom GO onto its cradle by locating
its front edge first and then rotating back firmly
until you hear a click. You’ll feel TomTom GO
lock into place. The green LED on TomTom
GO’s front panel will light up if the cradle is
also connected to your vehicle’s 12V socket.
4. Clean the inside of your windscreen (or side
window), to remove any dust and grease.
Place the cradle in a suitable location on your
windscreen and push the black plastic lever
to the right, fixing the cradle in position.
NOTE: Some newer vehicles may have a heat reflec-
tive shield embedded in the windscreen. In some
cases this can prevent proper GPS signal reception.
If this turns out to be a problem in your vehicle,
you will need to purchase and install the TomTom
External Antenna Kit (available as an accessory).
Tip:You don’t have to use the cradle if you don’t want
to. If necessary, TomTom GO can be positioned on its
own anywhere that’s convenient, provided that it’s safely
secured.
Under normal journey conditions, the suction
mount is perfectly sufficient to hold the cradle
in position. Note that suction may be lost if
left overnight, due to condensation and low
Installation
temperature. For this reason, and for security,
we recommend removing both the suction
mount cradle and TomTom GO when leaving
your vehicle overnight. To remove the cradle,
pull the suction mount lever to the left. If the
cradle still doesn’t detach from your wind-
screen, tug gently on the clear plastic tab at
the edge of the suction mount, to break the
vacuum seal.
Tip: To activate your 12V socket, you may need to set
your ignition key in an ‘Accessories’ position. Please
consult your vehicle handbook. In addition, TomTom GO
contains a rechargeable battery and can be used for up
to 4 hours without charging, so for short journeys it may
be possible to do without the DC power lead for simpler
and tidier operation.
To adjust the angle of TomTom GO, slacken
the adjustable knobs on the cradle and then
turn it gently. In addition to tilting the cradle
up and down and from side to side, you can
also rotate TomTom GO in the cradle, from
left to right, ±45°. When you’re happy, tighten
up the knobs again.
Tip: After using TomTom GO, remove it from the cradle
by pressing the release button while rotating the unit
forward gently. Put it in the supplied bag. If you want
to clean it, use a soft, dry cloth. Do not use water or a
solvent.
8
UK
8
Switching on for the first time
Starting up
1. Refer to your installation poster for setup
instructions.
2. Follow the on-screen instructions, using your
finger on the touchscreen to select your
preferences.
Using TomTom GO
Note: Your TomTom GO does not transmit your location,
so others cannot use it to track you while driving.
TomTom GO starts by displaying the navigation
view. The screen will appear in black and white
until your TomTom GO locates your current
position. Once this is done, the navigation view
is shown in full colour. In future, your position
will be found much faster, normally within a few
seconds. Everything on TomTom GO can be
accomplished easily using just your finger on the
touchscreen. Importantly, you can bring up the
main options menu by tapping your
finger somewhere in the middle of the screen.
Note: When you use the GO for the first time we advise
you to make a backup of your SD card using the backup
option on the CD.
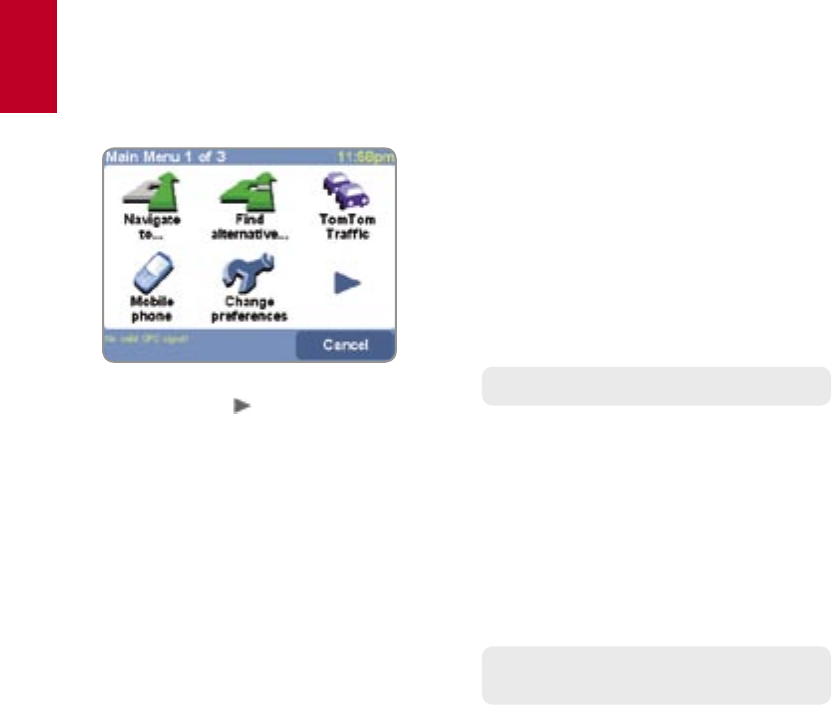
As with many of the menus in TomTom GO, there
are more options than can be shown on one
screen. Try tapping on a few times, to cycle
through all the different things you can do.
Note that this image of the main menu may vary per
model and region.

9
UK
9
Switching on for the first time
Using the remote control
The remote control is included with the GO 700
model and is also available as an accessory for
GO 700 and GO 500 models.
You can use the TomTom remote control instead
of the main touchscreen in circumstances where
you’d rather not reach over and tap the screen
directly. The remote control uses radio waves so
you don’t need to point it at your TomTom GO.
Use the arrow buttons to select something on the
screen and the central ‘OK’ button to activate the
selected command button or icon.
You can change the loudness of the GO speaker
by using the volume buttons. The two keys near
the bottom of the remote control can be used
to mimic the buttons appearing at the bottom
left and right of the TomTom GO screen. Finally,
you can use the keyboard button to make an
on-screen keyboard appear or disappear, if
appropriate, allowing you to search for something
by name.

10
UK
10
How to plan your first route
How to plan your first route
1. Move outside, if you haven’t already done
so, so that the GPS hardware can locate
your position. This may take some time,
and will happen more quickly if you remain
stationary. The screen displays your current
position on its map, represented in a ‘3D’
navigation view, from a driver’s perspective.
When you start moving, the navigation view
will match the streets outside as you would
see them through your windscreen.
Your position (and direction) is indicated by the
icon.
2. Bring up the main menu as explained previ-
ously. Use a few times to browse through
all the different things you can do, then
choose ‘Navigate to...’ to start plan-
ning your first route.
Remember that always means that there’s
more to see on the next page, in this case
extra ways of choosing a destination.
3. Choose ‘Address’ . You’ll see a
standard keyboard, used for entering place
names (e.g. towns, streets and favourite
locations). Above the keyboard is a small
browser window in which your TomTom GO
will present locations from its database.
Don’t worry if some of the icons are ‘greyed out’,
this just indicates that these menu options aren’t
available yet. E.g. as you haven’t yet planned a
route then ‘Find alternative...’, ‘
View route’ and ‘Clear route’ are all greyed out.
11
UK
SE
11
How to plan your first route
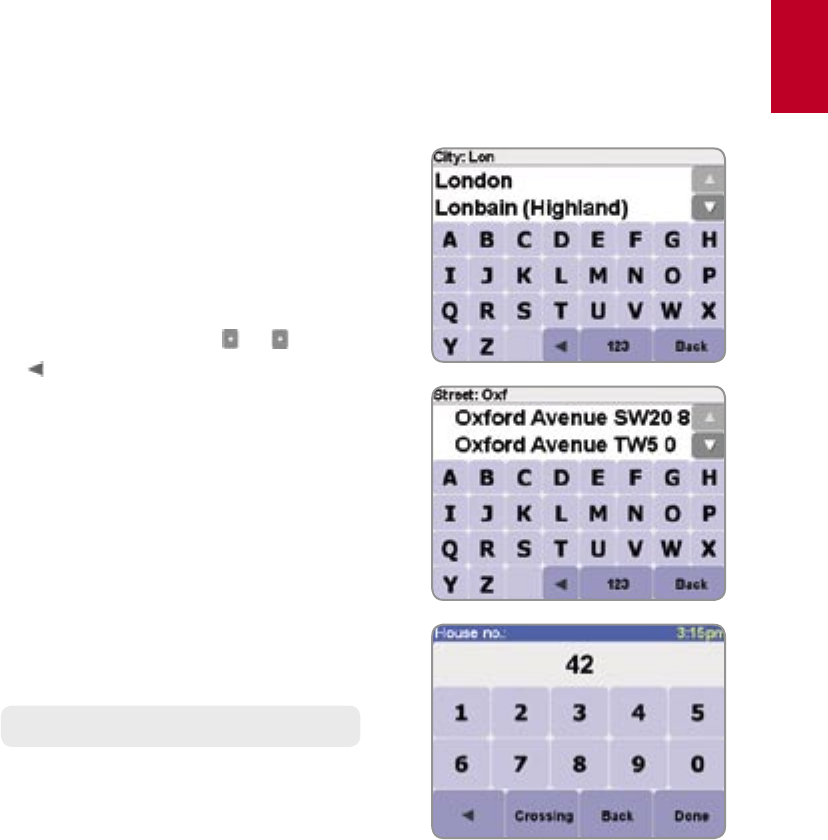
4. The best way to see how your TomTom GO
works is to use it for real, so think of the
address that you want to visit and enter the
first few letters of the city, town or village.
Be as specific as possible. As you type, the
letters are compared to the built-in list of
possible names and any matches appear in
the browser window.
Quick-matching a town name. Use and to scroll
through other possible matches. If you make a mistake,
use to delete the last letter entered.
5. When you see the name of the place you
want, select it by tapping on the name. A
new browser window is now shown, this time
with the prompt ‘Street:’ at the top.
Again, start entering the road name of your
destination, selecting it when the full name
is shown among the matches.
6. A third and final keyboard and browser are
shown, this time for you to select a house
number. For some roads (such as those that
don’t have house numbers), you’ll be asked
to select a particular ‘Crossing:’ (i.e. an
intersection). Select a crossing, or enter the
house number and then choose ‘Done’.
If you’d rather pick a crossing than a house number,
just select the ‘Crossing’ button.
12
UK
12
How to plan your first route
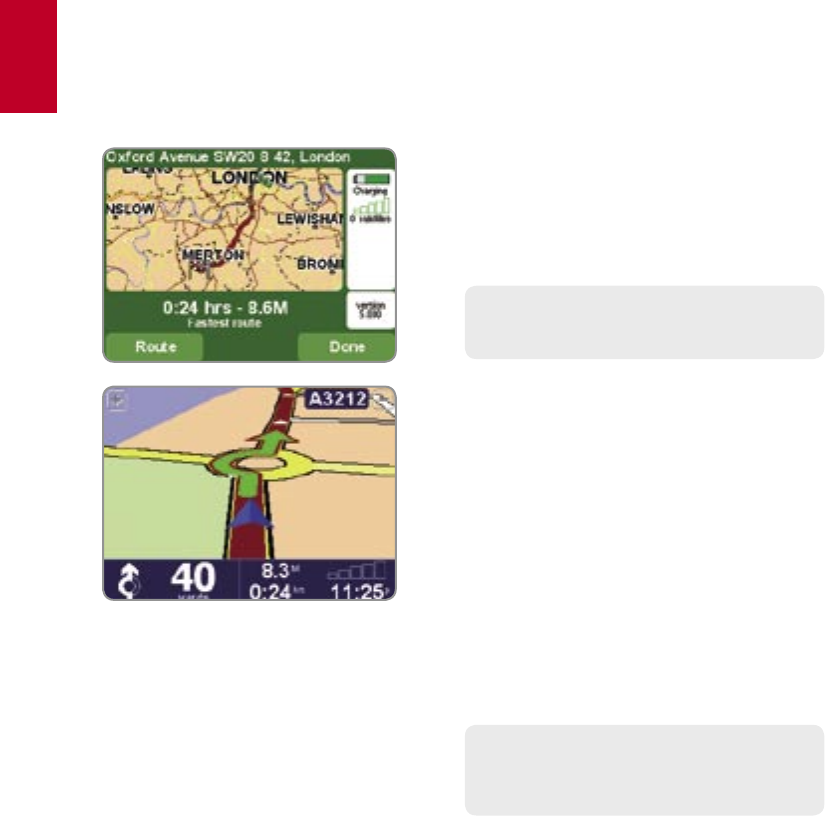
7. The fastest route from your current position
to your destination is then calculated.
This should only take a few seconds and
its progress is shown on the screen. When
done, a summary is shown, on a suitably
scaled map.
Studying this summary can be useful for you to get a
feel for your journey’s scope and to check if the route
includes roads that you’d rather avoid (in which case,
see ‘Finding alternative routes’, below).
8. Select ‘Done’ and you’ll find yourself back
at the main navigation view, but with the
route now clearly coloured in for you.
Helping with your journey
That’s the planning all done, so simply buckle
your seat belt and drive. As you approach a
specific turn in the calculated route, your chosen
voice will tell you what to do. For example,
“In 100 metres, turn left”, followed by “Turn left”,
without you having to take your eyes off the road.
As you travel, following the voice instructions,
you’ll notice that the navigation view is updated
constantly, always showing coming roads and
junctions and presenting the best route to you.
Don’t worry if you miss a turn or drive down the wrong
road. A new fastest route will be calculated automati-
cally, based on your new position and direction of travel.
Wherever you go, it will always give you instructions
that will take you to your chosen destination.

13
UK
13
What’s on the screen?
What’s on the screen?
Much of the information on the main navigation
view is configurable (see the ‘Preferences’ chap-
ter for details).
If you miss a voice instruction, tap on the turn
instruction in the bottom left hand corner to
generate a new one. And if you’d like to view the
route summary again, tap anywhere in the journey
information panel in the bottom right hand corner.
Most of the time, the voice and turn instructions
are all you need to navigate successfully, which
means never having to take your eyes off the road.
At complicated junctions, where simple instructi-
ons aren’t adequate to describe the path to take,
the navigation view comes into its own. A quick
comparison between the screen and the world in
front of you should be all you need.
Tip: No instruction is shown or spoken at junctions which
require no action. In towns and cities especially, don’t be
concerned that you are passing side-roads and driving
over crossroads without any instruction.
Your next turn instruction.
The name of the next street to turn
onto.
Configurable journey information inclu-
ding arrival time, time to destination
and distance to destination.
Your current GPS position.
'Zoom out' and 'Zoom in" buttons.
'Next motorway' indicator, if applicable.
See 'Name preferences' in the manual
on CD, if you want to turn this off.
A 'phone-style' signal indicator to give
an idea of how good or bad the GPS
reception is in your current location.
The more bars, the better.
14
UK
DK
SE
14
Finding alternative routes
Perhaps a route has been planned that you’re
not happy with? Perhaps you have been routed
via a busy junction? Perhaps you have spotted
roadworks up ahead?
Or perhaps you really wanted to go ‘via’ one
particular location? In each of these cases,
‘Find alternative...’ can help you. Again,
you’ll see it on the main menu, right next to
‘Navigate to...’.
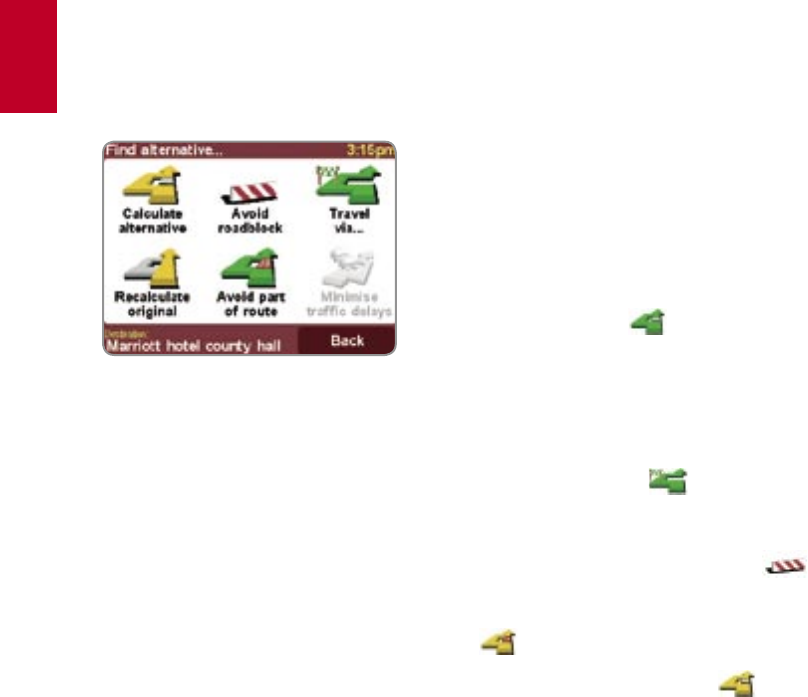
Which ‘Find alternative’ option you go for
depends on why you’re dissatisfied with the
first route.
Choose ‘Travel via...’ if you want to
make sure the planned route goes past one
particular location, perhaps to collect (or
drop off) a letter or person. If you spot signs
of trouble, choose ‘Avoid roadblock’ .
Or if you want to avoid a particular road
junction, perhaps because it’s a known traf-
fic black spot, choose ‘Avoid part of route’
. Finally, if you want an alternative route
because you simply don’t like the original,
choose ‘Calculate alternative’ .
Tip: If you want to include more than a single ‘via’ location
in your journey, use the comprehensive ‘Itinerary planning’
feature instead, described in the manual on CD.
Finding alternative routes
15
UK
15
Advanced planning
Advanced planning
Although navigating from your current position
is the function that you’ll use most often, there
may be times when you want to plan ahead.
Choosing ‘Advanced planning’ on the
main menu lets you look at the best route and
journey time between any two given locations
or get directions that will help someone else
get to your current position.
Tip: You may need to use in order to see the
‘Advanced planning’ icon.
If you’d like this choice every time you navigate,
or if you’d like to change the default setting,
see ‘Planning preferences’ in the ‘Change
preferences’ menu.
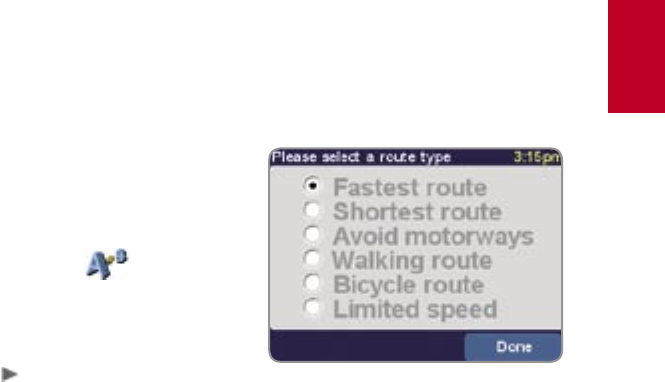
Rather than use your GPS position, with
‘Advanced planning’ you choose your
departure location using either an address, a
Point Of Interest, a favourite location, and so
on. You then pick a destination in the same
way and finally choose a planning option
(fastest, shortest, walking, etc.)
16
UK
SE
16
Preferences
Preferences
You can change much of the look and feel of
your TomTom system to your own liking by using
the main menu option ‘Change preferences’
. Use to cycle through the different
pages of preferences. Here are some of the
most important ones (you’ll find the full set in the
manual on CD).
Tip: The icons shown for some preferences will change,
depending on the state the preference is currently in.
For example, choosing ‘Turn off sound’
disables
the voice instructions. Once disabled, the option and icon
change to ‘Turn on sound’ , reflecting the action to
take when it is next selected.
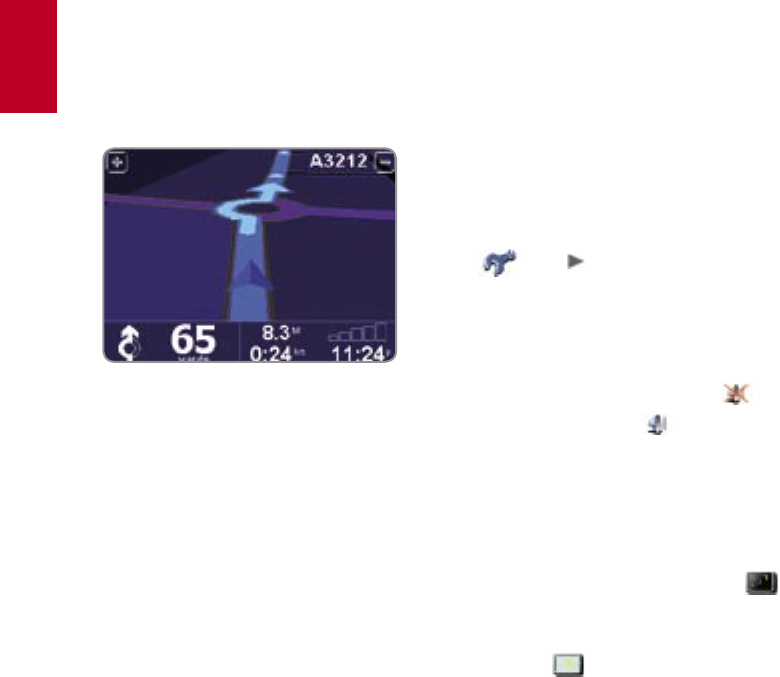
Use night colours
Bright colours are normally used in the maps so
that you can see them clearly even in sunlight.
When it is dark outside, you may want to use
the preference ‘Use night colours’ , to
show the map in (by default) dark and subdued
colours that will not interfere with your night
vision. You can use the preference ‘Use day
colours’
to revert to the original colour
scheme.
The default night colours, designed not to
affect your night vision.
17
UK
17
Preferences
Manage POI
POI is an abbreviation you’ll see a lot, standing for
‘Point Of Interest’. Dozens of categories of POIs
are built-in, from airports to petrol stations, from
restaurants to theatres. Most importantly, POIs can
be used as destinations, can be shown on the
map and can even warn you of their proximity (for
example, looking for a car park or petrol station
while driving in a strange city).
You can choose which Points Of Interest catego-
ries you’re interested in by selecting the option
‘Enable/Disable POI’
, or set up a warning
(you can have as many as you like) with the
option ‘Warn when near POI’ .
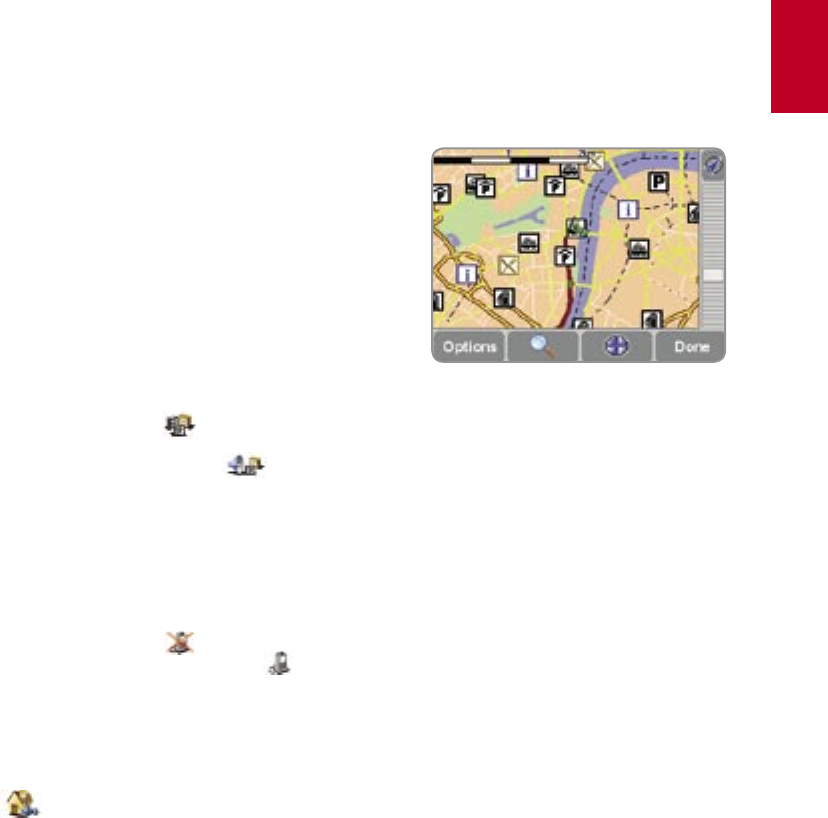
Hide POI
Once you’ve spent time carefully browsing
through the categories in ‘Manage POI’ and
have chosen the ones you need, you can hide
all of them from the main navigation view in one
stroke with ‘Hide POI’
and then show your
preferred set again with ‘Show POI’ .
Change Home location
You can set or change your ‘Home’ location
at any time by using ‘Change home location’
. You will then be able to select this quickly
later as a departure or destination point.
A typical selection of POIs from the categories
selected in the ‘Manage POI’ preference.
18
UK
18
NL
Connecting to your phone
Using GO 700 or GO 500
If you have a Bluetooth-capable mobile phone
then you can use your TomTom GO 700 or GO
500 as a hands-free car kit. Although some func-
tions are dependent on your phone’s capabilities,
you should usually be able to:
• Accept incoming calls on the TomTom GO
screen with a single tap of the screen.
• See that a new SMS message has arrived and
read its contents, again with a single tap.
• Dial out, using contact details retrieved from
your phone’s SIM card.
• Get your call history, contact phone numbers
and SMS messages from your phone.
Visit www.tomtom.com/phones for a list of compatible
Bluetooth-enabled phones.
This is the very first time you have used TomTom
GO with your phone and there are a few steps
needed to ‘pair’ the two devices, i.e. make a con-
nection.
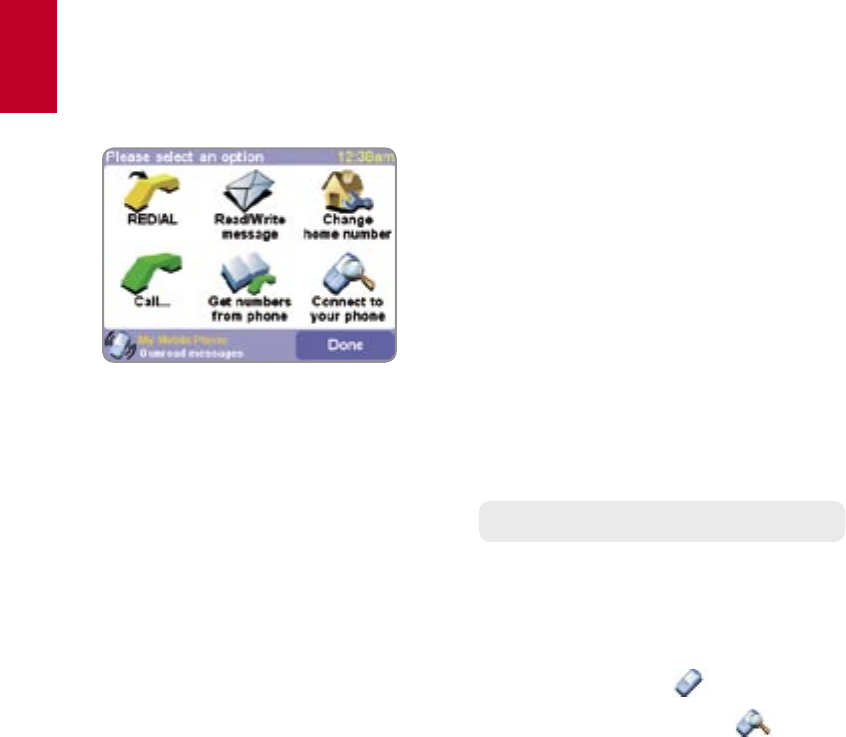
1. Choose ‘Mobile phone’
to get started.
2. Select ‘Connect to your phone’ and
TomTom GO will search for your mobile phone.
3. Pick your phone from the list displayed.
Here’s the main mobile phone ‘hands-free’
menu. The connection to your phone is also
used when communicating with our Internet-
based TomTom PLUS service using GPRS
(see the manual on CD for more details).

19
UK
19
Connecting to your phone
4. When prompted to connect, enter a passcode
(password) of ‘0000’ on the phone.
5. You will then be asked to set up a wireless
Internet connection. Do this if you want to use
TomTom PLUS services.
6. Finally, you can copy your phone book to the
TomTom GO. You cannot use hands-free fea-
tures while this is happening.
Tip: To allow automatic connection from now on, make the
TomTom GO a ‘trusted’ device on your phone.”
Use ‘Call’
and then ‘Number’
to
make your first hands-free call. It’s also easy to
phone a contact from your SIM card or the
number of a particular Point Of Interest.

20
UK
SE
20
More information
TomTom PLUS
In addition to voice-guided satellite navigation,
our optional TomTom PLUS service can give
you various additional services like weather,
entertaining voices, useful POIs, map colors
and our real time information on traffic con-
gestion, helping you plan around it. Please go
to www.tomtom.com to see what’s available in
your territory. Full details of the TomTom PLUS
service can be found on the CD.
Note: To use TomTom PLUS, you need a GPRS-ready
mobile phone with Bluetooth. If you already pick up
email or browse the Internet on your phone, then it’s
probably already GPRS-ready; if you’re not sure, ask
your network provider.
General information
All the features of your TomTom GO are fully
explained in the manual included on the CD.
The manual is available in UK and US English,
Dutch, German, French, Italian, Spanish,
Portuguese, Danish, Swedish, Finnish,
Norwegian, Polish, Czech, Hungarian, Turkish,
Latvian, Estonian and Lithuanian.
For technical support information please visit
our website at www.tomtom.com
Our “Frequently Asked Questions” (FAQs)
section contains answers to all the most fre-
quent requests from our customers, providing
a quick and easy way to get the information
you need. You can also access the support
section of our website to find product
documentation and contact details for our
customer support department. We primarily
supply support via email, as this allows us to
explain solutions in the most effective way.

147
147
Addendum
Important Safety Notices and Warnings
1. Global Positioning System
The Global Positioning System (GPS) is a satellite-based
system that provides location and timing information
around the globe. GPS is operated and controlled under
the sole responsibility of the Government of the United
States of America, who are responsible for its availability
and accuracy. Any changes in GPS availability and accu-
racy, or in environmental conditions, may impact the ope-
ration of your TomTom GO. TomTom B.V. cannot accept
any liability for the availability and accuracy of GPS.
2. Use with Care
Use of TomTom GO for navigation still means that you
need to drive with due care and attention.
3. Aircraft and Hospitals
Use of devices with an antenna is prohibited on most
aircraft, in many hospitals and in many other locations.
TomTom GO must not be used in these environments.
4. Battery
This product uses a Lithium-Ion battery. Do not use it in
a humid, wet and/or corrosive environment. Do not put,
store or leave your product in or near a heat source, in
a high temperature location, in strong direct sunlight, in
a microwave oven or in a pressurized container, and do
not expose it to temperatures over 60 C (140 F). Failure
to follow these guidelines may cause the Lithium-Ion
battery to leak acid, become hot, explode or ignite and
cause injury and/or damage. Do not pierce, open or
disassemble the battery. If the battery leaks and you
come into contact with the leaked fluids, rinse thoroughly
with water and seek medical attention immediately.
For safety reasons, and to prolong the lifetime of the
battery, charging will not occur at low (below 0 C/32 F) or
high (over 45 C/110 F) temperatures.
Temperatures: Standard operation: - 10 C to + 55 C (GO 300
and GO 500), 0 C to + 55 C (GO 700); short period storage:
- 20 C to + 60 C; long period storage: - 20 C to + 25 C.
THE LITHIUM-ION BATTERY CONTAINED IN THE
PRODUCT MUST BE RECYCLED OR DISPOSED
OF PROPERLY. USE TOMTOM GO ONLY WITH
THE SUPPLIED DC POWER LEAD AND AC
ADAPTER FOR BATTERY CHARGING.
To recycle your TomTom GO unit, please see your local
approved TomTom service centre.
FCC Information for the User
FCC Information for the User
The device used for this transmitter must not be co-located
simultaneously operating in conjunction with any other
transmitter.
Exposure to Radio Frequency Radiation
To comply with RF exposure requirements please maintain
a separation distance of at least 20 cm from any part of the
product.
Radio and Television Interference
This equipment radiates radio frequency energy and if not
used properly - that is, in strict accordance with the

148
DK
148
Addendum
instructions in this manual - may cause interference to radio
communications and television reception.
It has been tested and found to comply with the limits for
a Class B digital device pursuant to part 15 of the FCC
Rules. These are designed to provide reasonable protection
against harmful interference in a residential installation.
However, there is no guarantee that interference will not
occur in a particular installation. If this equipment does
cause harmful interference to radio or television reception,
which can be determined by turning the equipment off and
on, the user is encouraged to try to correct the interference
by one or more of the following measures:
• Reorient or relocate the receiving antenna.
• Increase the separation distance between the equip-
ment and the receiver.
• If you are using the equipment with a mains adapter,
plug it into an outlet which is on a different circuit from
that to which the receiver is connected.
• Consult an experienced radio/TV technician for help.
Important
This equipment was tested for FCC compliance under
conditions that included the use of shielded cables and
connectors between it and the peripherals. It is important
that you use shielded cable and connectors to reduce the
possibility of causing radio and television interference.
Shielded cables, suitable for the product range, can be
obtained from an authorised dealer. If the user modifies the
equipment or its peripherals in any way, and these modifica-
tions are not approved by TomTom, the FCC may withdraw
the user’s right to operate the equipment. For customers
in the USA, the following booklet prepared by the Federal
Communications Commission may be of help: “How to
Identify and Resolve Radio-TV Interference Problems”. This
booklet is available from the US Government Printing Office,
Washington, DC 20402. Stock No 004-000-00345-4.
FCC Declaration of Conformity
Tested to Comply with FCC Standards for Home or
Office Use.
TomTom GO has been tested to – and complies with – part
15 of the FCC rules. Operation is subject to the following
two conditions:
1. This device may not cause harmful interference.
2. This device must accept any interference received,
including interference that may cause undesired
operation.
Responsible party in North America:
TomTom, Inc., 150 Baker Ave, Concord, MA 01742
Tel: 978 287 9555 option 1
Fax: 978 287 9522
Toll Free: 866 4 TOMTOM (866 4 866 866)
(The Toll Free number does not work outside of the US)
Emissions information for Canada
This Class B digital apparatus complies with Canadian
ICES-003. Cet appareil numérique de la classe B est
conforme à la norme NMB-003 du Canada.
CE Marking
This equipment complies with the requirements for CE
marking when used in a residential, commercial or light
industrial environment.
149
149
Addendum
R&TTE Directive
This equipment complies with the essential requirements
of EU Directive 99/5/EC (declaration available at
www.tomtom.com).
Diese Ausrüstung erfüllt die wesentlichen Anforderungen der
EU-Richtlinie 99/5/EC (Erklärung verfügbar unter
www.tomtom.com).
Cet équipement remplit les conditions édictées dans
la Directrive EC/99/5 (document disponible sur
www.tomtom.com).
Deze apparatuur is conform de eisen van de EU-
richtlijnen 99/5/EC (verklaring beschikbaar op
www.tomtom.com).
Questa apparecchiatura soddisfa le condizioni
essenziali della Direttiva Europeea 99/5/EC (dichiarazione
disponibile su www.tomtom.com).
Este equipo cumple con los requisitos esenciales de
la Directiva 99/5/EC de la EU (declaración disponible
en www.tomtom.com).
Dette udstyr overholder de grundlæggende krav i
EU-direktiv 99/5/EC (erklæring herom kan findes på
www.tomtom.com).
Denna utrustning rättar sig efter de nödvändiga
krav från EU direktiv 99/5/EC (deklaration finns på
www.tomtom.com).
This Document
Great care was taken in preparing this manual. Constant
product development may mean that some information is
not entirely up-to-date. The information in this document is
subject to change without notice.
TomTom BV shall not be liable for technical or editorial
errors or omissions contained herein; nor for incidental or
consequential damages resulting from the performance or
use of this material. This document contains information
protected by copyright. No part of this document may be
photocopied or reproduced in any form without prior writ-
ten consent from TomTom B.V.

© 2005 TomTom BV, The Netherlands. Patents pending. All rights reserved.
TomTom and the TomTom logo are registered trademarks of TomTom B.V.
The Netherlands. All other trademarks are the property of their respective
owners. The use of TomTom products is governed by a license agreement
which is included in this package and/or the products. This license
contains a limited warranty and limitation of liability. You can review the license
conditions at www.tomtom.com
Data Source © 2005 Tele Atlas N.V. Based upon:
Topografische ondergrond Copyright © dienst voor het kadaster
en de openbare registers, Apeldoorn 2005.
© Ordnance Survey of Northern Ireland.
© IGN France.
© Swisstopo.
© BEV, GZ 1368/2003.
© Geonext/DeAgostini.
© Norwegian Mapping Authority, Public Roads Administration /
© Mapsolutions. © DAV.
This product includes mapping data licensed from Ordnance Survey
with the permission of the Controller of Her Majesty’s Stationery Office.
© Crown copyright and/or database right 20nn. All rights reserved. Licence
number 10002692.
Copyright © 2005 AND International Publishers N.V.
All rights reserved