Tomtom Automobile V2 Users Manual TATA XETA LPG OMSB.p65
V2 to the manual 6bced8b0-2055-4089-b7aa-3c95303e23e4
2015-02-02
: Tomtom Tomtom-Tomtom-Automobile-V2-Users-Manual-449885 tomtom-tomtom-automobile-v2-users-manual-449885 tomtom pdf
Open the PDF directly: View PDF ![]() .
.
Page Count: 174 [warning: Documents this large are best viewed by clicking the View PDF Link!]

1
( This owner's manual is advised to be kept in the vehicle at all times )
Passenger Car Business Unit
• Mumbai • Pune •
Tata Indica - V2
XETXET
XETXET
XETA LPGA LPG
A LPGA LPG
A LPG
Owner's Manual & Service Book

2
zShould any question or query exist regarding any
aspect of your car, please contact the nearest TATA
MOTORS dealers, who will be pleased to assist
wherever possible.
zThe recommended routine maintenance servicing along
with any running repairs that may be required, should
be entrusted to TATA MOTORS dealerships or to TATA
MOTORS Authorised Service Centres (TASCs) or
TATA MOTORS Authorised Service Points (TASPs)
to ensure that only latest methods and genuine TATA
MOTORS replacement parts are used for the
continued reliability, safely and performance of the
vehicle.
©Copyright 2004 TATA MOTORS'
All rights reserved. The material in this manual may
not be reproduced or copied, in whole or in part, in
any form without written permission from TATA
MOTORS.
zIn the event of the vehicle being sold, please ensure
that this manual is left in the vehicle for the reference
of the new owner.
zThis Owner's manual and service book includes
information of the operation and maintenance of various
equipment installed on the different versions of Tata
Indica V2 car. Please note that this manual applies
to all the models and explains all equipment including
options not installed on your car.

3
Dear Customer,Dear Customer,
Dear Customer,Dear Customer,
Dear Customer,
Thank you for selecting Tata Indica V2 XETA LPG - an Eco Friendly car of your choice
We welcome you to the world of advanced automotive engineering in a form especially suited to your operating
conditions. Tata indica LPG incorporates the latest generation LPG Injection Technology.
This Supplement gives you all the information necessary for making your ownership of this car a thoroughly
satisfying and enjoyable experience.
To assist you in maintaining your car as per recommended schedule, we have a widespread network of dealers
and service centres. The list is included in this book for your convenience.
If you need any special assistance, please call on our Regional / Zonal level offices which are also listed
in this book.
Please note that by adhering to the correct operating procedures and by availing the scheduled maintenance
services at our authorised service centres, you can obtain the maximum performance from your car.
We request you to go through the book and derive many miles of motoring pleasure.
We wish you Safe and Happy DrivingWe wish you Safe and Happy Driving
We wish you Safe and Happy DrivingWe wish you Safe and Happy Driving
We wish you Safe and Happy Driving

4

5
VALUE ADDED SERVICE 9
TAKING CARE OF THE ENVIRONMENT
17
We request you to spend a few minutes in going
through our environmental concern
WARRANTY 19
INFORMATION AT A GLANCE 21
• Filling Station Information
• Car Dimensions
INTRODUCTION - LPG 23
• Know your Indica LPG • Safety
• Compliance to Motor Vehicle rules
• Location of LPG system • Location of fuses
BEFORE DRIVING 33
• Controls • Instrument Panel
• Heating, Ventilation & Air Conditioning
• Interiors and Accessories
STARTING & DRIVING THE CAR 75
• Check List • Starting & Stopping
• Preparing to Drive • Fuel Economy
• Driving in adverse conditions
• Driving Petrol cars • Driving safety
CONTENTS
INTRODUCTION 7MAINTENANCE & CAR CARE 91
• Engine Compartment Lamp
• Windshield Washer
• Air Filter • Engine Cooling System
• Engine Belt Tension • Oil & Oil Filter
• Fuel Filter • Transaxle • Fuel Filling Cap
• Clutch & Brakes • Power Steering
• Battery • Catalytic Converter
• Spark Plug • EGR System (Diesel Engine)
• Fuses & Relays • Wheels & Tyres
EMERGENCY SERVICE TIPS 129
• Engine • Clutch • Transaxle • Brakes
• Steering System • Electrical • Suspension
IMPORTANT INFORMATION 137
• Location of Aggregate Numbers
• Fuel, Coolants & Lubricants
• Technical Specifications
• Service Schedule
• Car Record Sheet
LIST OF LPG FILLING STATIONS 155
CUSTOMER SUPPORT NETWORK
175
• Tata Motors Offices & Network
•Names & Address of Tata Motors Main Dealers
(MDs), Tata Motors Authorised Service Centres
(TASCs), Tata Motors Authorised Service
Points (TASPs)
6
1-800-209-6688

7
Congratulations on acquiring the Tata Indica V2 XETA
LPG and welcome to the family of Tata Indica car owners.
This owner's manual has been prepared to acquaint you
with the operation and maintenance of your new Tata Indica
V2 XETA LPG and to provide you with important safety
information and tips for effective driving. Please refer to it
from time to time for enjoyable, safe and troublefree driving
pleasure.
This manual is an essential part of your car and should
always be kept in the car.
Regular servicing of your car ensures its road worthiness
and troublefree operation.
To assist you in maintaining your Tata Indica V2 XETA
LPG we have a network of dealers and Service Centres
throughout the country. The list is included in this manual
for your convenience.
Happy motoring
Tata Indica V2 XETA LPG is a safe car designed for
quality performance. In order to maintain the level of
performance and reliability, it is important that only Tata
Motors genuine accessories are to be fitted. Any accessory
that is fitted or modification that is carried out without
authorisation can hamper the safety & performance of
the car besides depriving you of your warranty benefits.
Use of genuine parts, designed and manufactured to our
exacting standards, is the best way to maintain your Tata
Indica V2 XETA LPG in peak operating condition. Please
do not use substitutes. They always prove costlier in the
long run.
Failure to use genuine parts can invalidate warranty
claims.
The information and specifications given in this book are
valid as on the date of printing. Tata Motors reserves the
right to make changes in design and specifications and/
or to make additions to or improvements in this product
without obligation to install them on products previously
sold.
Indicates "CAUTION"
INTRODUCTIONINTRODUCTION
INTRODUCTIONINTRODUCTION
INTRODUCTION

8

9
Dear Customer,
It is our never ending responsibility and endeavor to ensure that our customer’s expectations are fulfilled
comprehensively. To fulfill your vehicle service needs, we recommend the following :
1) Extended Warranty
2) Anti Rust / Sound Deadening / Engine waxing treatment
3) Iftex Fuel Additive : System D (For diesel) and System G (For Petrol)
4) Car detailing programming : Exterior Enrichment and Interior Enrichment Program
These products shall help maintain optimum vehicle performance and shall enhance vehicle life.
We have tied up with best in the Class companies, who would bring you the above world class products at
affordable prices. The above products are available with all our Dealers, TASCs and TASPs.
Our Dealer Service marketing executive shall explain to you the benefits of the above mentioned products.
VALUE ADDED SERVICE

10
EXTENDED WARRANTY
Tata Motors recommends the purchase of Extended Warranty,a product of M/s Global Administration Services and
United India Insurance.
Coverage : Mechanical + Electrical + Emission
Benifits :
zInsures you against unforeseen break down repair bills.
zDocumentation is simple and hassle free.
zNear cashless & speedy claim settlement.
Term :
z18 + 18 or 150000 kms whichever occurs first (For Indica, Indigo & Sumo).
z18 + 30 or 150000 kms whichever occurs first (For Indica, Indigo, Sumo and Safari Dicor).
z50000 kms + 50000 kms or 36 months whichever occurs first (For Taxis).
z50000 kms + 100000 kms or 36 months whichever occurs earlier (for Taxis-Indica,Indigo,Marina).
EMISSION WARRANTY : Emission warranty is limited to the period of the Extended Warranty or 80,000 kms which-
ever is earlier.
Extended Warranty available in the dealership from where you have purchased your vehicle. We strongly recommend
purchase of Extended Warranty at time of purchase of your vehicle. Surcharge applicable on purchase of Extended
Warranty after 30 days of purchase of vehicle. The Dealer Service Marketing Executive shall explain to you the Terms
and conditions, Coverage and Owner’s responsibility.
Extended Warranty Booklet & Cover Note :
The Extended Warranty booklet and cover note is the basis of the contract between United India Insurance Co. and the
Owner of the vehicle shown on the Extended Warranty Cover note. The Customer to retain this booklet and the same to be
produced to the dealer while claiming benefits under Extended Warranty.

11
I / We have been explained the Terms and conditions, Coverage and Owner’s responsibility by the Dealer Service
Marketing Executive.
I wish to avail / Do not wish to avail extended warranty
Customer’s Sign Dealer’s Sign
Note :
zThe 18 / 30 month extended warranty does not follow the 18 month Manufacturer's warranty.
zThe extended warranty comes into force once the manufacturer’s warranty expires e.g. after 18 Months.
zIt is more restrictive as by the time it comes into force the vehicle is already 18 months old.
What is covered ?
zMechanical / Emission / Electrical break down as defined in this warranty and confirmed by the dealer within the stipulated
terms and conditions.
zTata Motors dealer shall either repair or replace any part found to be defective with a new part or an equivalent at no
cost to the owner for parts or labour.
zSuch defective parts which have been replaced will become property of United India Insurance Company.
zComprehensive list of parts covered is mentioned in the page 9-12 of the Extended Warranty Booklet.
What is not covered ?
Pages 6 – 7 of the Extended Warranty Booklet provided details of the exclusion list.
Owner’s Responsibility :
zProper use, maintenance and care of the vehicle in accordance with the instructions contained in the Owner’s
Manual and Service Booklet. The records of the same to be ensured in Owner’s Manual.
zRetention of maintenance service bills.
zAlways produce extended warranty booklet while servicing & claim in a waaranty..
EXTENDED WARRANTY

12
IFTEX: Triple action diesel additive :
One Additive, multiple benefits
zFor diesel cars: Iftex System D z For Petrol cars: Iftex System G
Benefits:
zCleans injector and fuel system.
zMaintains peak engine performance.
zSaves diesel / petrol and maintenance cost.
zReduces smoke and harmful emission.
zHelps Smooth running of the engine
zReduces deposit on intake manifold and combustion chamber.
zReduces deposit on injector tips.
Approved for use in TATA INDICA, INDIGO, SUMO & SAFARI
TREAT YOUR CAR TO EXPERIENCE, THE ULTIMATE PERFORMANCE
Directions of use :
zRemove cap, squeeze lightly till dispenser fills to 10 ml mark. Add before filling up the tank.
zUse at the rate of 1 ml per litre of fuel. For best results, regular use is recommended.
FUEL ADDITIVES
I / We have been explained the Terms and conditions, Coverage and Owner’s responsibility by the Dealer Service
Marketing Executive.
I wish to use / Do not wish to use this treatment
Customer’s Sign Dealer’s Sign

13
Why are Corrosion Protection Waxes necessary?
Corrosion is caused by:
Water / salt water acid rain & atmospheric fallouts.
Critical areas are:
Cavities: joints, crevices, spot welds, underbody
zCorrosion is the most important factor when we talk about the vehicle life. If you treat your car you can
prolong the life.
zIt is very dangerous to drive around in a corroded car.
zThe corrosion creeps onto the car from the inside and from the outside. The most dangerous kind of
corrosion is often not discovered until it is too late.
Benefits of Anti -Rust treatment :
zA professionally applied range of world class products offering real value to the new and used car customer.
zThe treatment has been developed to withstand the harshest environmental and climatic conditions (rst.
Pollutants, stone and gravel impact, etc)
zInsulate cabin space from external noises.
zExpensive tin work and Denting / Painting avoided.
zHigher resale value for the car.
zHigher safety – uncorroded vehicle
zUpto 60 months warranty & 10 free checkups available
ANTI RUST, SOUND DEADENING & ENGINE WAXING

14
Engine Wax Treatment :
Engine Wax is a beige coloured transparent lacquer coating on the engine compartment.
zCorrosion Prevention for the Engine compartment
zNeat, clean and New Look to Engine compartment
zNo effect on MPFI vehicles
zEngine wax can withstand upto 200 degrees temp
zNo need of cleaning the engine compartment with diesel once engine wax is sprayed
zLife of over a year
Sound Deadening System :
Door vibration deadeners - These pads when stuck on the insides of the sheet metal increase sheet metal rigidity,
reduce vibrations and increase riding comfort.
zUsed for reducing the sheet metal vibration in a vehicle.
zProduct to be used once in the life of the vehicle - Life Time Warranty
zEffect is Life long i.e. until & unless pads are physically removed.
zNegligible increase in Weight & hence no effect on fuel consumption.
zAreas covered - four doors, rear quarter panels & dicky. In case of diesel vehicles, can be used in the bonnet.
Tata Motors has tied up with M/s Wuerth and M/s STS Chemicals (Dinitrol for this world class treatment at afford-
able prices. This treatment is available in all authorized workshops. The Dealer Service Marketing Executive will
explain to you the benefits and terms and conditions of this treatment.
ANTI RUST, SOUND DEADENING & ENGINE WAXING
I / We have been explained the Terms and conditions, Coverage and Owner’s
responsibility by the Dealer Service Marketing Executive.
I wish to avail / Do not wish to avail these treatment
Customer’s Sign Dealer’s Sign

15
Vehicle Exterior Enrichment :
Why vehicles are painted?
zFor Corrosion protection of the metal surfaces.
zEase of application from other corrosion protection treatments.
zCheaper than other corrosion protection methods eg.galvanizing, anodizing.
zFor decoration and identification.
Various Environmental Hazards affecting paints :
zEnvironmental hazards: destroy your vehicle's finish.
zEven as your new vehicle rolls off the assembly line, the paint is not protected.
The enemy :
Ultraviolet Rays, Pollution, Tree Sap, Bird Droppings, Car Wash Chemicals, Road Salt, Acid Rain.
Benefits: Vehicle Exterior Enrichment
zRemoval of medium scratches, orange peel, oxidation , dust nibs etc & swirl marks from painted surface.
zRestoration of original gloss levels UV protection after gloss is restored.
zCleaning & dressing of tyres, Bumpers & all exterior plastic moldings/trims.
Tata Motors has tied up with M/s Opulent (Waxoyl brand) and M/s 3M for this world class treatment at affordable
prices. This treatment is available in all authorized workshops. The Dealer Service Marketing Executive will explain to
you the benefits and terms and conditions of this treatment.
EXTERIOR AND INTERIOR ENRICHMENT PROGRAM

16
Vehicle Interior Enrichment
Why protect your new car’s fabric interior ?
zSomeone will soil your vehicle's fabric carpet or seats.
zA significant detractor from your vehicle's resale value.
zA permanent stain on your vehicle's interior fabric.
The enemy :
Drink Spills - Food Stains - Mud - Ultraviolet Rays Pets - Traffic
Benefits: Vehicle Interior Enrichment
zRemoval of medium stains and dirt from all interior parts of the car i.e carpet, upholstery and roof lining.
zCleaning of windshield and all windows (inside and outside)
zDressing of all internal plastics (eg: door pad trims )and rubber parts.
zThe treatment involves cleaning and dressing of All parts of the exposed interiors.
zSpecialised protection for seat fabric from liquid spills.
Tata Motors has tied up with M/s Opulent (Waxoyl brand and M/s 3M for this world class treatment at affordable
prices. This treatment is available in all authorized workshops. The Dealer Service Marketing Executive will explain to
you the benefits and terms and conditions of this treatment.
EXTERIOR AND INTERIOR ENRICHMENT PROGRAM
I / We have been explained the Terms and conditions, Coverage and Owner’s responsibility by the Dealer Service
Marketing Executive.
I wish to avail / Do not wish to avail these treatment
Customer’s Sign Dealer’s Sign

17
Taking care of the Environment
Tata Motors is committed to producing cars using
environmental friendly technology. A number of features
have been incorporated in our passenger cars which are
specifically designed to ensure environmental compatibility
throughout the life cycle of the car. We would like to inform
you that your car meets Emission norms and is being
regularly validated at the manufacturing stages to keep up
with the stringent emission norms.
As a user you too can protect the environment by operating
your car in a proactive manner. A lot depends on your
driving style and the way you maintain your car. Listed
below are few tips that will help you do so.
WHILE DRIVING :
¾Avoid frequent and violent acceleration.
¾Do not carry any unnecessary weight on the vehicle
as it overloads the engine.
¾Avoid using devices requiring high power consumption
during slow traffic condition.
¾It is not advisable to warm up the engine during the
first start of the day by idling, as cold temperatures
within the engine could cause rise in the emission
such as CO & HC particulate.
¾Monitor the car’s fuel consumption regularly. If it shows
a rising trend get the car immediately attended to at
the TATA MOTORS Authorised Service Centre.
¾Switch off the engine during long stops at traffic jams
or signals. If you need to keep the engine running,
avoid unnecessarily revving or stopping and starting.
¾Use only unleaded fuel in petrol cars.
¾It is not necessary to rev up the engine before turning
it off as it unnecessarily burns the fuel.
¾For petrol cars switch off the ignition only when engine
is at idling and when the vehicle is stationary, not when
the vehicle is running.
¾Shift to higher gears as soon as it is possible. Use
each gear upto 2/3rd of it’s maximum engine speed. A
chart indicating gear shifting speeds is given in this
book.
MAINTENANCE OF THE CAR :
¾Ensure that recommended maintenance is carried out
on the car regularly at the TATA MOTORS Authorised
Service Outlets.
ENVIRONMENTAL PROTECTION Taking Care of the Environment

18
ENVIRONMENTAL PROTECTION Taking Care of the Environment
¾As soon as you notice any leakage of oil or fuel in the
car we recommend that you get it attended
immediately.
¾Use only recommended brands and grades of
lubricants & coolants and clean/uncontaminated fuels.
¾Get your vehicle checked for emission periodically
by our authorised dealer and regularly renew the
P.U.C. Certificate.
¾Ensure that fuel filter, oil filter, breathers are periodically
checked and if required, replace the same using only
genuine recommended brands.
¾Do not pour used oils or coolants into sewage drains,
garden soil or open streams. Dispose of the used filters
and batteries in compliance with the current legislation.
¾Do not allow any unauthorised person to tamper with
the engine settings or to carry out modifications on
the car.
¾Never allow the vehicle to run out of fuel. This will
result in misfiring of the engine and could cause harm
to the catalytic converter.
¾Parts like brake liners and clutch disc should be
vacuum cleaned. Do not use compressed air for
cleaning these parts which may spread the dust in
the atmosphere.
While carrying out the servicing or repairs of your car,
you should pay keen attention to some of the important
engine aggregates which greatly affect emission. These
components are :-
1. Fuel pump, Injectors / LPG Fuel System
2. Air intake & Exhaust system especially for leakages
3. Cylinder head for valve leakage
4. All filters such as air, oil & fuel filters (check
periodically)
5. Catalytic converter
6. Ignition system - Spark plug gap
This Owner’s Manual & Service Book contains further
information on driving precautions and maintenance care
leading to environment protection. Please familiarise
yourself with these aspects before driving.

19
WARRANTY Terms and Conditions
We WARRANT each Tata Indica Xeta
LPG car and parts thereof manufactured
by us to be free from defect in material
and workmanship subject to the following
conditions -
1. This warranty shall be for 18 months
from the date of sale of the car
irrespective of the distance covered.
However, for the cars used for
commercial applications (used for
hire or reward viz those operating
with a yellow number plate), the
warranty shall be limited to 18
months or 50,000 kms, whichever
occurs earlier.
2. Our obligation under this warranty
shall be limited to repairing or
replacing, free of charge, such parts
of the car which, in our opinion, are
defective, on the car being brought
to us or to our dealers within the
warranty period. The parts so
repaired or replaced shall also be
warranted for quality and
workmanship but such warranty shall
be co-terminus with this original
warranty.
3. Any part which is found to be
defective and is replaced by us
under the warranty shall be our
property.
4. As for such parts as tyres,
batteries, electrical equipment, fuel
injection equipment,etc.not
manufactured by us but supplied
by other parties, this warranty shall
not apply, but buyers of the car
shall be entitled to, so far as
permissible by law, all such rights
as we may have against such
parties under their warranties in
respect of such parts.
5. This warranty shall not apply if the
car or any part thereof is repaired
or altered otherwise than in
accordance with our standard
repair procedure or by any person
other than from our sales or
service establishments, our
authorised dealers, service
centres or service points in any
way so as, in our judgement which
shall be final and binding, to affect
its reliability, nor shall it apply if,
in our opinion which shall be final
and binding, the car is subjected
to misuse, negligence, improper
or inadequate maintenance or
accident or loading in excess of
such carrying capacity as
certified by us, or such services
as prescribed in our Owner's
Manual and Service Book are not
carried out by the buyer through
our sales or service
establishments, our authorised
dealers, service centres or service
points.
6. This warranty shall not cover
normal wear and tear or any
inherent normal deterioration of
the car or any of its parts arising
from the actual use of the car or
any damage due to negligent or
improper operation or storage of
the car. This warranty shall not
apply to normal maintenance
services like oils & fluid changes,

20
WARRANTY Terms and Conditions
head lamps focussing, fastener
retightening, wheel balancing, tyre
rotation, adjustment of valve
clearance, fuel timing, ignition
timing and consumables like bulbs,
fuel filters & oil filters, etc. This
warranty shall not apply to any
damage or deterioration caused
by environmental pollution or bird
droppings. This warranty shall not
apply to V-belts, hoses and gas
leaks in case of air conditioned
cars.Slight irregularities not
recognised as affecting the
function or quality of the vehicle
or parts, such as slight noise or
vibration, defects appearing only
under particular or irregular
operations are items considered
characteristic of the vehicle.
7. This warranty shall be null and
void if the car is subjected to
abnormal use such as rallying,
racing or participation in any other
competitive sport. This warranty
shall not apply to any repair or
replacements as a result of
accident or collision.
8. This warranty is expressly in lieu
of all warranties, whether by law
or otherwise, expressed or implied,
and all other obligations or
liabilities on our part and we neither
assume, nor authorise any person
to assume on our behalf, any
other liability arising from the sale
of the car or any agreement in
relation thereto.
9. The buyer shall have no other
rights except those set out above
and have, in particular, no right to
repudiate the sale, or any
agreement or to claim any
reduction in the purchase price
of the car, or to demand any
damages or compensation for
losses, incidental or indirect, or
inconvenience or consequential
damages, loss of car, or loss of
time, or otherwise, incurred or
accrued.
10. Any claim arising from this
warranty shall be recognised only
if it is notified in writing to us or
to our authorised dealer without
any delay soon after such defects
as covered and ascertained under
this warranty.
11. This warranty shall stand
terminated if the car is transferred
or otherwise alienated by the
buyer without our prior written
consent.
12. We reserve our rights to make
any change or modification in
design of the car or its parts or
to introduce any improvement
therein or to incorporate in the
car any additional part or
accessory at any time without
incurring any obligation to
incorporate the same in the cars
previously sold.

21
IMPORTANT : For petrol cars fitted with catalytic converter always use only unleaded petrol with an octane rating not
less than RON 87.
TRANSAXLE OIL 3.3 Ltrs.
For recommended oil grades and change intervals, refer lubricants chart and service schedule
Windshield Washer
reservior Capacity= 3.5
Litres (for GLX) and 1.5 Litre
(for GL/GLE/GLS/GLG)
Brake fluid = 0.265 Lires
TYRE PRESSURE 33 PSI (2.3 bar) / 30 PSI (2.1 bar)
FRONT / REAR
INFORMATION AT A GLANCE Filling Station Information
ENGINE OIL UPTO DIPSTICK MAX.MARK ~ 4.0 Ltrs. FUEL TANK CAPACITY PETROL 37 Ltrs.
LPG 31 Ltrs.
* *
* *
* Premixed ready
to use Engine
Coolant = 6 Litres
22
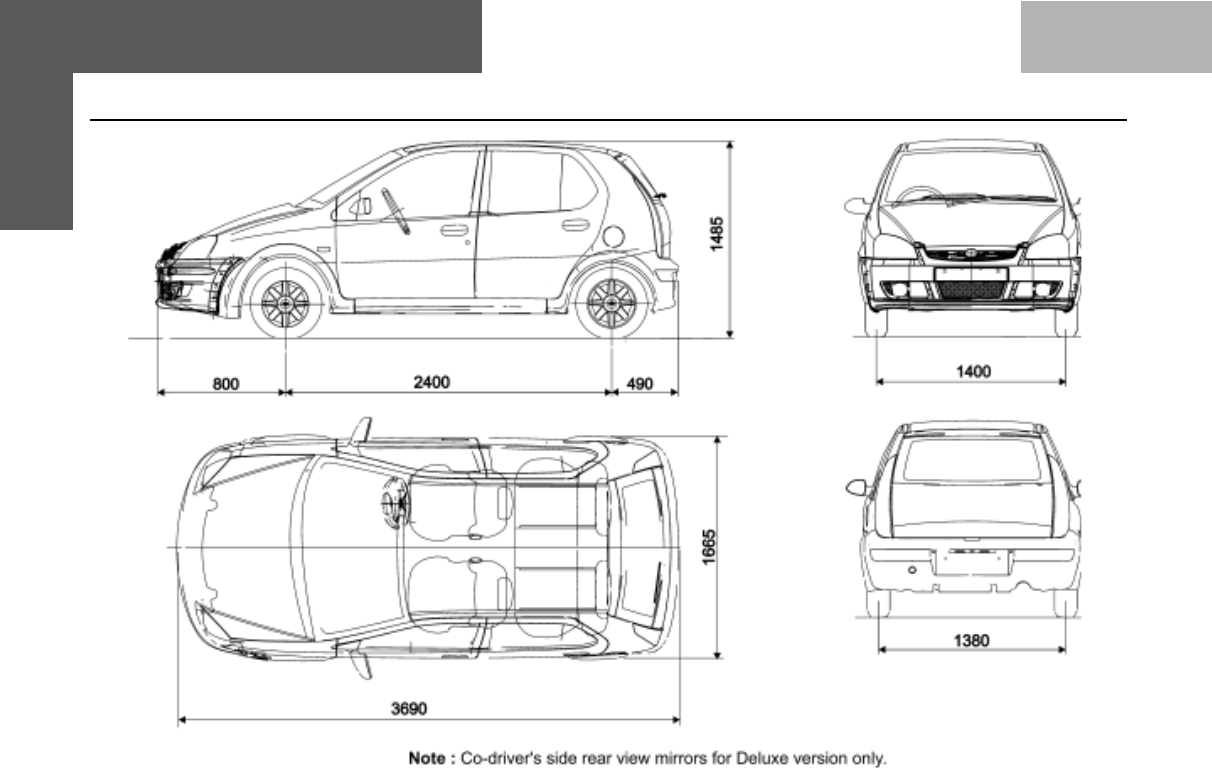
INFORMATION AT A GLANCE Dimensions

23
INTRODUCTION - LPG
••
••
•INTRODUCTION - LPG
••
••
•KNOW YOUR INDICA LPG
Starting the engine
Fuel (LPG) filling
Running on LPG
Fuel Selector Switch
Shifting the fuel mode
Do’s and Dont’s
••
••
•SAFETY
In case of gas leakage
Fire Extinguisher
Manual shut off knob / lever
Level Indicator
••
••
•COMPLIANCE TO MOTOR VEHICLE RULES
••
••
•LOCATION OF LPG SYSTEM COMPONENTS
••
••
•LOCATION OF FUSES

24
In addition to the full capacity of petrol the Indica Xeta now
comes with LPG as additional fuel choice.
WHAT IS LPG?
LPG or Liquefied Petroleum Gas is a safe and environment
friendly fuel. It is a liquid under pressure and turns into
gaseous state when exposed to the atmospheric pressure.
LPG is a non-toxic, non-corrosive; lead-free gas and is
produced by refinery fractionation of oil or is stripped from
naturally occurring Natural Gas.
LPG fuel system and the components are as safe as those
in other fuel systems.
For LPG operation, press the Fuel Selector Switch provided
on the dashboard, for approximately 3 seconds. The fuel
change over happens automatically.
The switching between fuels (Petrol-LPG-Petrol) can be done
at any time, even on the move.
Your car always starts in petrol / auto mode only. Hence it
is a must to have petrol at all times during running.
WARNING
DO NOT USE DOMESTIC GAS CYLINDERS IN CAR
because…
•Domestic cylinders are NOT designed for Car
application and this makes them vulnerable in a crash
situation.
•The chemical composition of domestic LPG is different
from that of Auto LPG, which may lead to premature
failure of engine and its related components
•The gas outlet ‘valve’ arrangement on the domestic
cylinder doesn’t meet the car fuel supply standards
and hence makes them more dangerous in the car.
For example the valve is not provided with excess flow
protection.This means that if the valve or supply line
gets disconnected in a crash situation, there will be an
uncontrolled flow of LPG into the car interior.
•When using domestic gas cylinder, your car’s engine
gets less supply of fuel when load on engine is
increased (e.g. while climbing a ghat). This is because
the cylinder cannot supply adequate LPG from the tank
to the engine.
INTRODUCTION
25
KNOW YOUR INDICA LPG
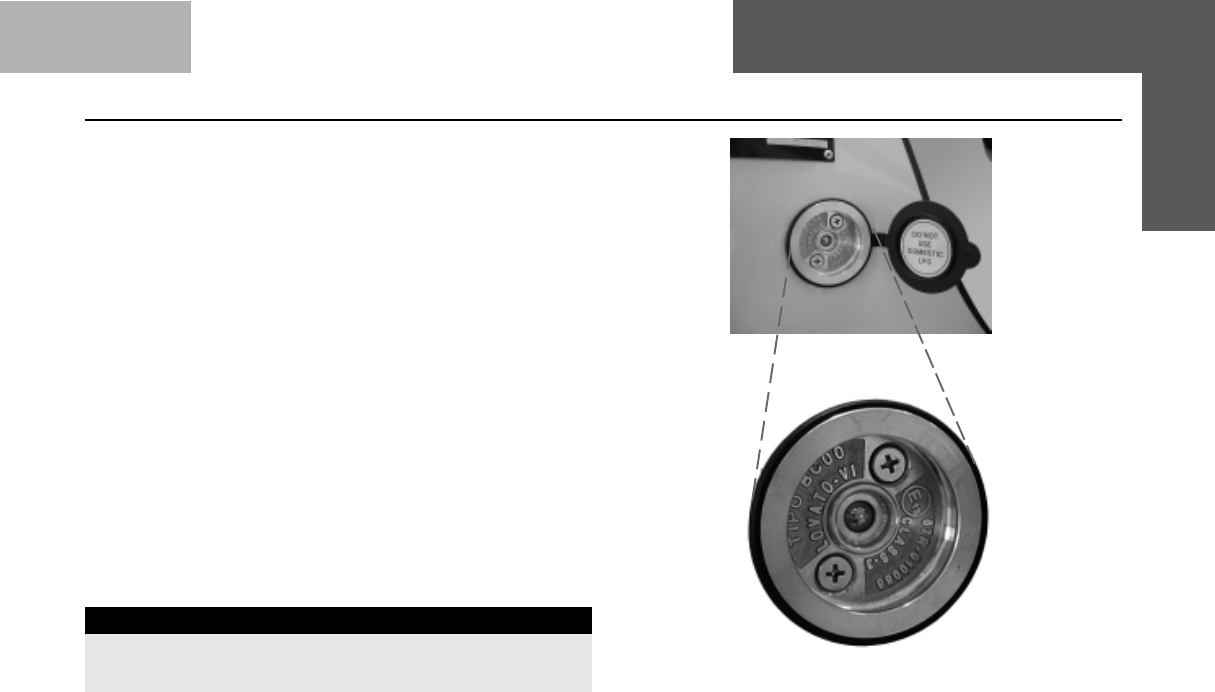
LPG Fuel Filling Cap
STARTING THE ENGINE
Irrespective of the position of the Selector switch (Petrol
or LPG), your car’s engine will always starts using petrol
by default and switch over to LPG later incase of LPG
mode.
To start, turn the ignition “ON” and crank without pressing
accelerator pedal.
LPG FILLING
LPG filler valve is located at the rear on the right hand body
side of your car. LPG filling will stop automatically once the
LPG tank is filled to 80% of its capacity.
LPG TANK CAPACITY
The LPG cylinder capacity of your car is 31 litres. If the
LPG is filled after service / repairs of the LPG system, please
check all joints for leakage by applying soap solution or by
using an electronic instrument, (Example: Leakator - 10’).
NOTICE
Keep the Ignition switch in “OFF” condition during
LPG refilling
PETROL TANK CAPACITY
Your car has a petrol tank having a capacity of 37 litres
26
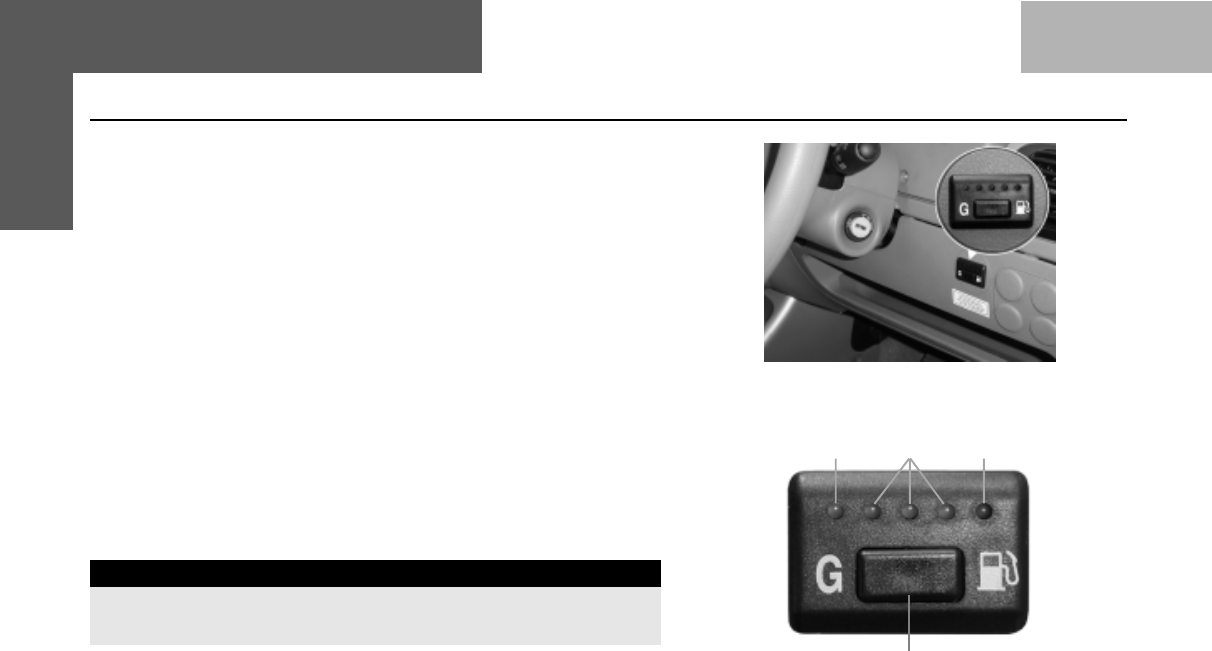
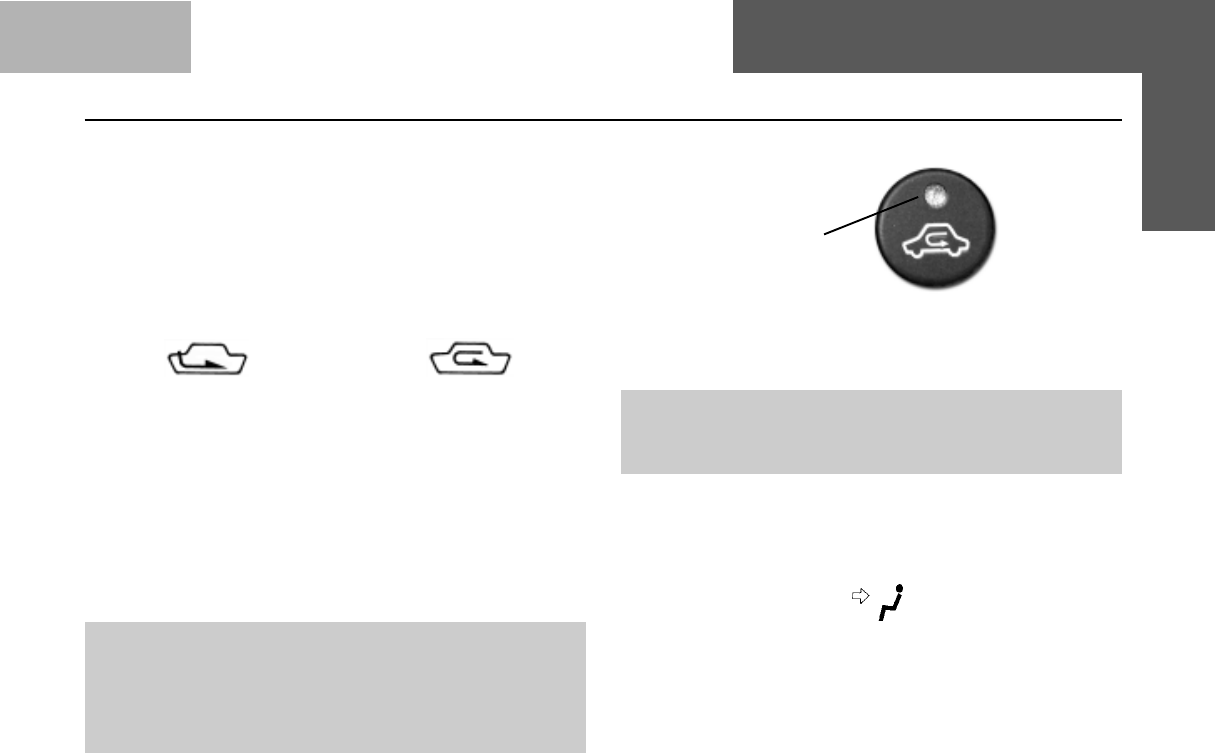
Petrol Mode : Only Red light is ON
LPG Mode : Amber light is ON
KNOW YOUR INDICA LPG Running on LPG
LPG
( Amber) PETROL
( Red )
Green
Fuel Selector Switch
RUNNING ON LPG
A Fuel Selector Switch is provided on the dashboard. By
operating this switch you can choose your fuel option for running.
The Fuel Selector Switch has following functions :
1. Fuel mode request (Petrol, LPG).
2. LPG level indication
3. Fuel mode indication
4. LPG System fault indication
The Fuel Selector Switch has two modes :
1. Petrol Mode : The Red LED comes ON
2. LPG Mode: The Amber LED comes ON
In Petrol Mode Engine starts and runs by using petrol as the fuel.
In LPG Mode, the engine starts by using Petrol and switches to
LPG automatically.
IMPORTANT
Ensure that your car has sufficient Petrol in the tank as petrol
is used for starting always
Fuel Selector Switch
27
KNOW YOUR INDICA LPG Fuelling Modes
Sr.No. Approximate LPG LED indication on Change Equivalent quantity
Volume (Litres) Over Switch (COS) of LPG in tank (%)
1 Up to 11 Litres Amber Below 25%
2 12 - 15 Litres Amber + 1 Green LED 25%
3 16 - 20 Litres Amber + 2 Green LED 50%
4 20+ Litres Amber + 3 Green LED 80%
HOW TO SHIFT THE FUELLING MODES :
Petrol to LPG Mode :
You can switch to LPG fuel mode by pressing and holding
the Fuel Selector Switch at least for 3 seconds till the LED
on the Switch starts toggling between two LEDs. On
completion of the successful transition to the LPG mode,
the Amber (LPG) LED glows permanently, indicating that
the car is now in LPG mode
LPG to Petrol Mode:
Similarly you can switch from LPG to petrol mode by
pressing the Fuel Selector Switch until the red light (Petrol)
on the Fuel Selector Switch starts glowing permanently.
This indicates that car is now running in petrol mode
NOTICE
1. In case of fuel mode switching from Petrol to LPG
mode during normal running, initially the LEDs toggle
indicating the transition and when the LED glows
permenantly, this indicates the completion of the
transition to the required fuel mode.
2. Fast toggling of the LEDs (amber to red) indicates
fault in the LPG system. Car will automatically switch
to Petrol mode. Please get car checked/repaired at
the nearest Authorised TATA service center.
3. Very slow toggling of the LEDs (amber to red) indicates
the empty tank / no LPG supply (loss of pressure).
Get the LPG tank re-filled.

28
DO’S
•Always get the car repaired/serviced at the Authorised
TATA Service center only.
•Never carry out any repair work on your own or from
any other personnel other than from Authorised TATA
Service center.
•Check LPG fuel system periodically for leakages
Even though the Safety Solenoid valve (on tank &
pressure regulator) closes automatically when you switch
off Ignition, it is recommended to close the manual
service valves during any service/repair activity on the
car.
•Ensure adequate ventilation around the car during repair
works.
•Ensure the LPG in the pipe lines is consumed by running
the engine with closed manual service valves before any
repair work on the gas lines/joints.
•Remove the LPG tank during the welding/brazing work
on the Car.
•Fast toggling of fuel mode LED’s on the Fuel Selector
Switch means fault in the LPG system, please get the
car repaired at the nearest Authorised TATA Service
center.
•Immediately repair/replace any damaged fuel or system
component.
•Use the fire extinguishers provided with the car in case
of unlikely event of fire. These are provided, one near
driver seat and the other one in the boot. Read
instructions on Fire extinguisher to know how to use it.
DON’TS
•Over filling the LPG Tank can cause safety issues
like gas leakage . Please DONOT over fill the tank
beyond its capacity of 31 litres.
•Keep the car away from any Fire source.
•Never use naked flame/fire to check gas leakages.
•Never carry out any welding/brazing on the LPG tanks.
•Avoid direct contact with LPG as it may cause frost
burns.
•Wash instructions - Do not direct high pressure washer
fluid/water jets at electrical devices & their connectors
during washing. This is to prevent malfunction / failure
of electrical system due to water ingress.
•Do not tamper any electrical or mechanical settings.
• Do not scrap / gas cut the LPG cylinder as it contains
pressurised gas which is flamable.
• Do not leave the LPG tank cover open.
For any clarifications please contact the Authorised
TATA Service center
KNOW YOUR INDICA LPG Do’s & Dont’s
29
IN CASE OF GAS LEAKAGE :
• Do not panic.
• The ECU automatically switches-off the LPG supply from
the tank.
• As a safety precaution, close the manual shut - off valves
provided on the ‘Multifunction valve’ located on the LPG
tank. Ensure that the tank cover is properly fitted.
• Roll down all the windows and keep the doors fully open.
• The ECU will automatically switch the fuel mode to Petrol.
• The ECU will not allow you to switch to LPG mode until
the leakage is rectified.
• Contact the nearest Tata Authorised service station and
get car repaired.
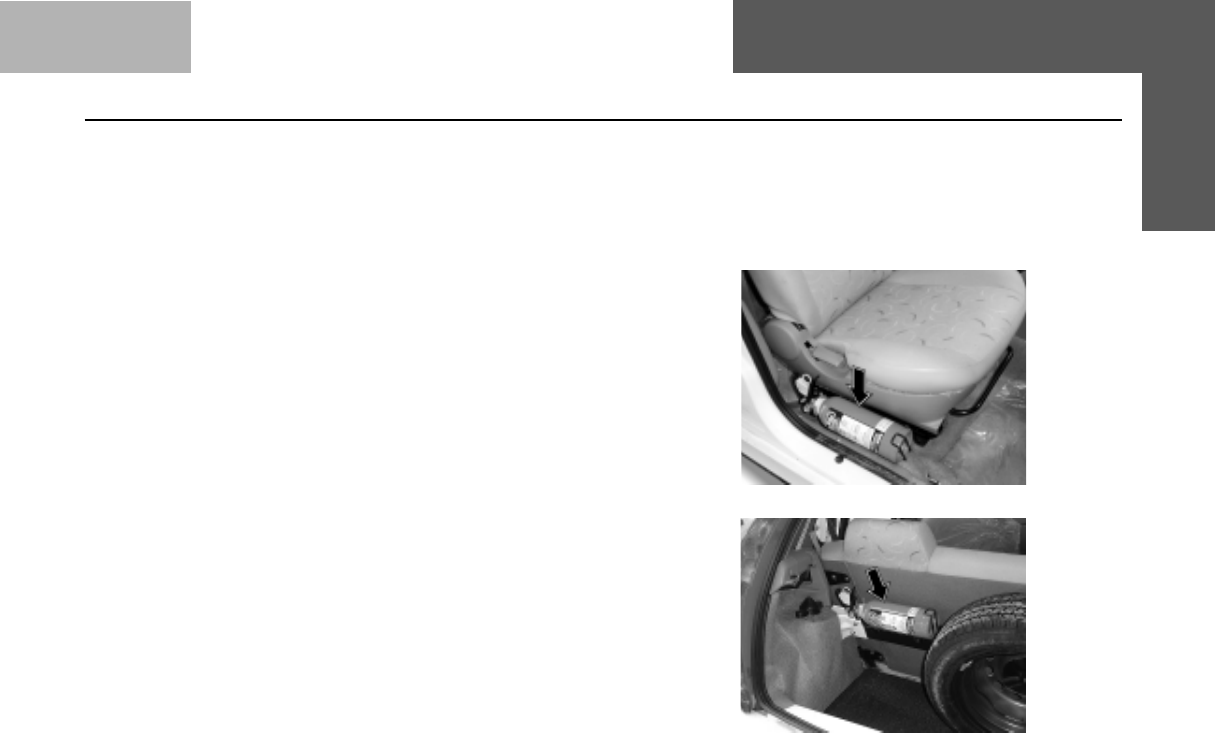
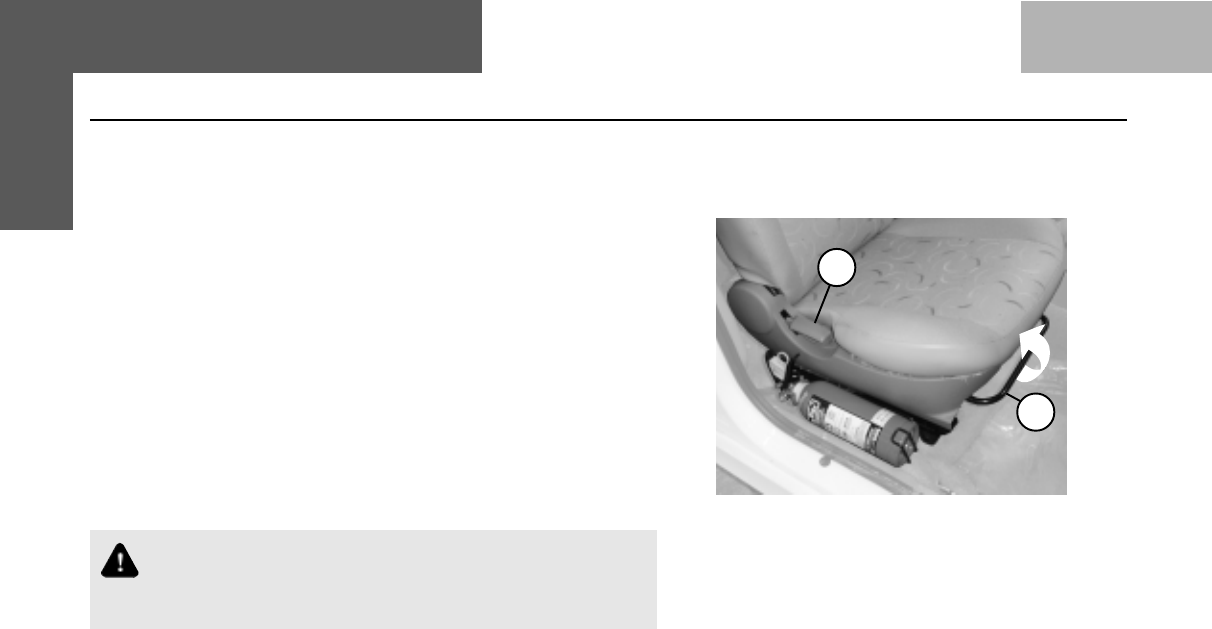
FIRE EXTINGUISHER :
Two fire extinguishers are provided on the car, one near
driver seat and another in the luggage compartment.
Method of operation:
1. Check if the pressure gauge needle in green zone.
2. Hold upright and pull the pin.
3. Press the lever.
4. Direct discharge at base of flame with rapid sweeping
motion.
5. Recharge the fire extinguisher after use.
Maintenance :
Check pressure on the gauge every week, needle should
remain in green region. If it comes to red region, please
send for recharging. The Fire Extinguisher is to be
refilled every three years even if it is not used.
KNOW YOUR INDICA LPG Safety
Fire extinguisher near Driver's Seat
Fire extinguisher behind Rear Seat
30
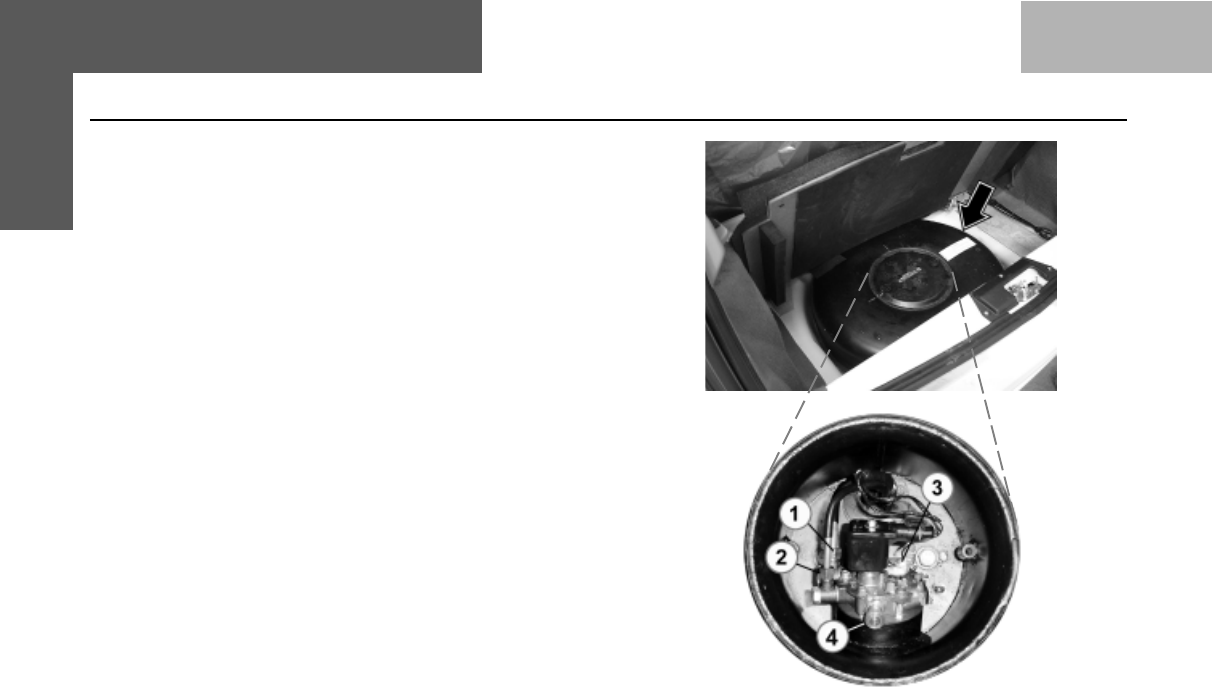
MANUAL SHUT OFF KNOB / LEVER
This knob is used to shut OFF LPG flow & is located on the
Multifunction valve, on the Auto LPG Tank. This valve should
always be in open position (as per figure), so that there is
unrestricted flow of LPG to the engine. When the valve is in
the closed position, LPG flow to the engine is stopped.
This shut off valve must be closed in case some repairs
need to be carried out on the LPG Tank. Ensure that the
tank’s cover is tightened /closed properly.
LEVEL INDICATOR
A multivalve is mounted on the LPG tank that also has a
gauge that shows LPG level in the tank. LPG level can also
be known by the three green coloured lights on the Fuel
Selector Switch. When the LPG tank is full, all three green
lights will glow. As the level of LPG goes down, the green
lights will also go off one by one.
NOTE : The LED indication is an additional indication of LPG
quantity in tank.
1. Inlet
2. Outlet
3. Level Indicator (Dial type)
4. Manual Shut Off Valve
LPG Tank
KNOW YOUR INDICA LPG Safety

31
KNOW YOUR INDICA LPG Compliance to Motor Vehicle rules
Your car’s LPG tank needs to be recertified every five years
as per CMVR (AIS 24, 25 and 26)
Please ensure that it is done by a TATA Authorised
Service Outlet and the new date is engraved on the
plate.
32
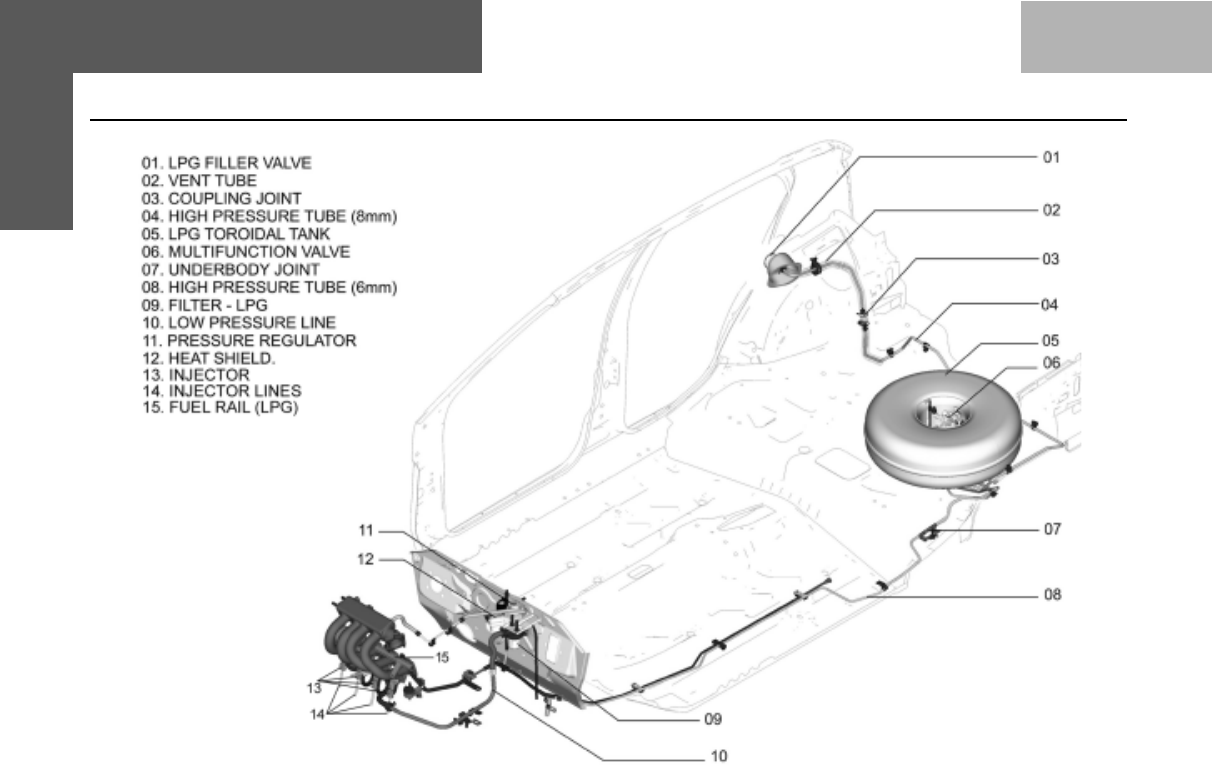
KNOW YOUR INDICA LPG Location of LPG system components

33
BEFORE DRIVING
••
••
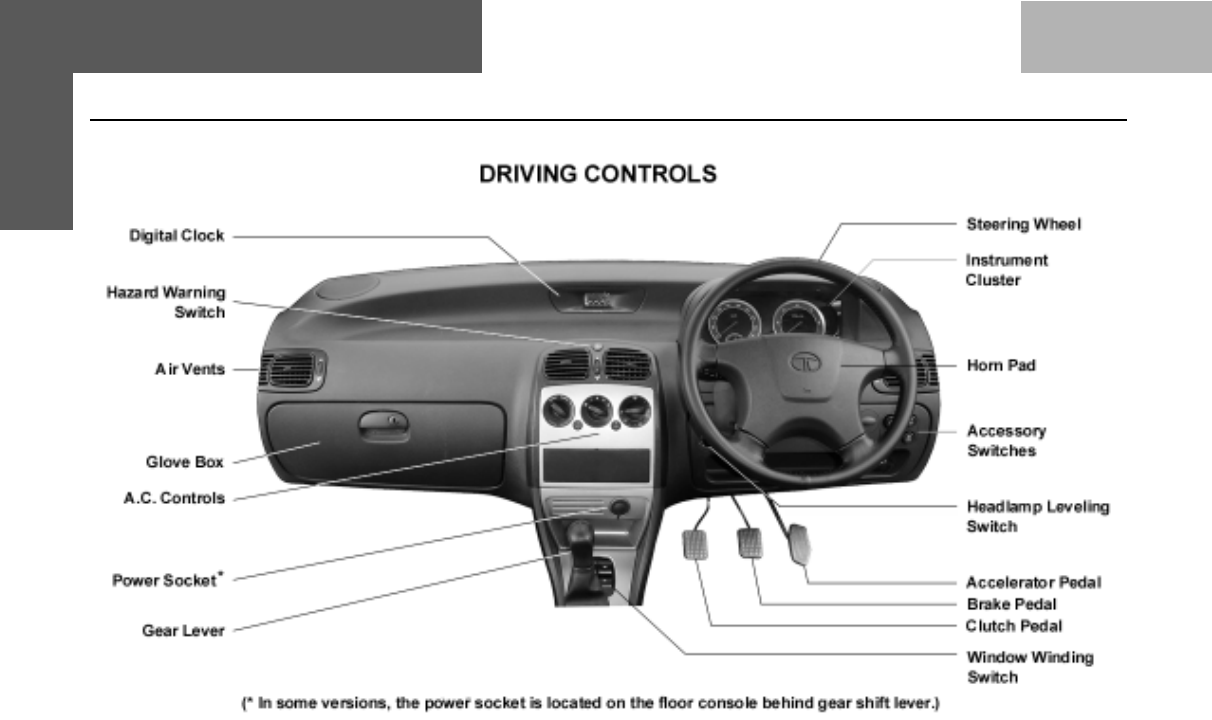
•CONTROLS
••
••
•INSTRUMENT PANEL
••
••
•HEATING, VENTILATION &
AIR CONDITIONING
••
••
•INTERIORS & ACCESSORIES
Rear View Mirrors
Sunvisors
Glove Box
Window Winding
Power Windows
Tray Cover with Coin Holder
Plug Socket
Rear Ashtray
Digital Clock
Roof Mounted Interior Lights
Front Seat & Seat Adjustments
Head Rest
Rear Seat
Seat Belt Adjustment
Tailgate Opening
Fuel Flap Opening
Music System
Electrical Accessories
Fitment
Load Area Lamp
Front Fog Lamps
Head Lamp Leveling Switch
34
BEFORE DRIVING Controls

35
BEFORE DRIVING Controls
Keys :
Your car comes with two identical keys.
With this key, you can operate 1.Door Locks
2.Steering Lock cum ignition switch
3.Tail gate Lock 4. Glove box
It is advisable to keep one of the keys in a safe place for use in
case of an emergency.
Do not use a locally made key, but obtain a duplicate through
your Tata Motors dealer.
Do not leave the key inside the car.
Door Locks :
The front doors can be locked and unlocked from outside with the
key or from inside using the door lock lever. In your car, the driver's
door & co-driver's door have separate locking facilities. To lock from
inside turn the lever towards the inner hinged handle.
Where the central locking system is provided, if you lock/unlock
the driver door with the key, the remaining three doors get locked/
unlocked at a time. The tail gate door is not a part of the central
locking provision.
To open the door from outside use the swing handle. After unlocking
the door with the key, pull the swing handle upward. The swing
handles are provided on each door.
To open the door from inside pull the hinged handle outward.
Outside swing handle
To open
Inside door handle
To open
Hinged handle
Locking /
Unlocking
lever
Lock Unlock
36
BEFORE DRIVING Controls
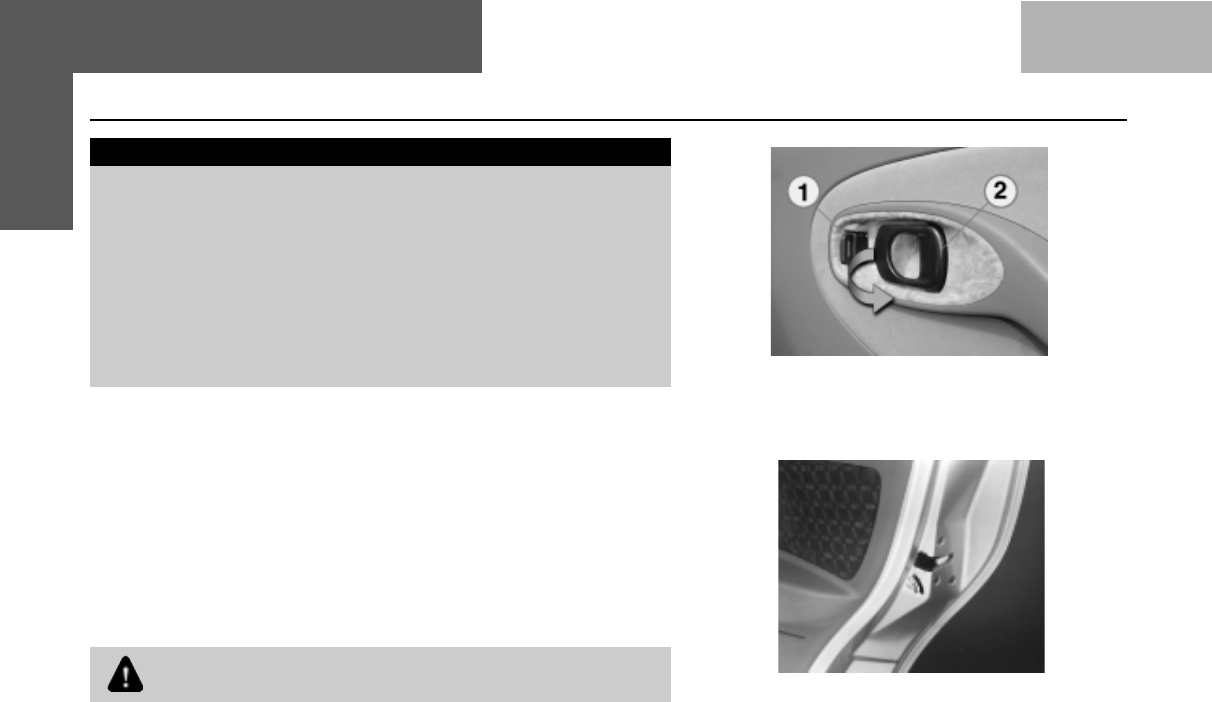
IN CASE OF EMERGENCY
1) The electirically operated devices (like central locking, power
window) may malfunction in the event of flood/fire, due to temporary
or permanent damage to the device. Excerise approriate
precautions for safety of yourself and other occupants.
2) If the central locking system malfunctions and is unable to unlock
doors electrically, the door can still be opened by manually
unlocking knob '1' and opening the door using lever '2'. The
mechanical system overrides the electrically operated system.
Childproof Lock :
Both the rear doors of the car are provided with childproof locks.
Push the lock lever located on the vertical face near the rear lock
downward before closing the door. The door which has been locked
can no longer be opened from inside.
When child lock on rear door is 'LOCKED', the door can only
be opened from outside. Use front doors to exit or take help of
front occupants
Deactivate the childproof lock when not required.
37
BEFORE DRIVING Controls
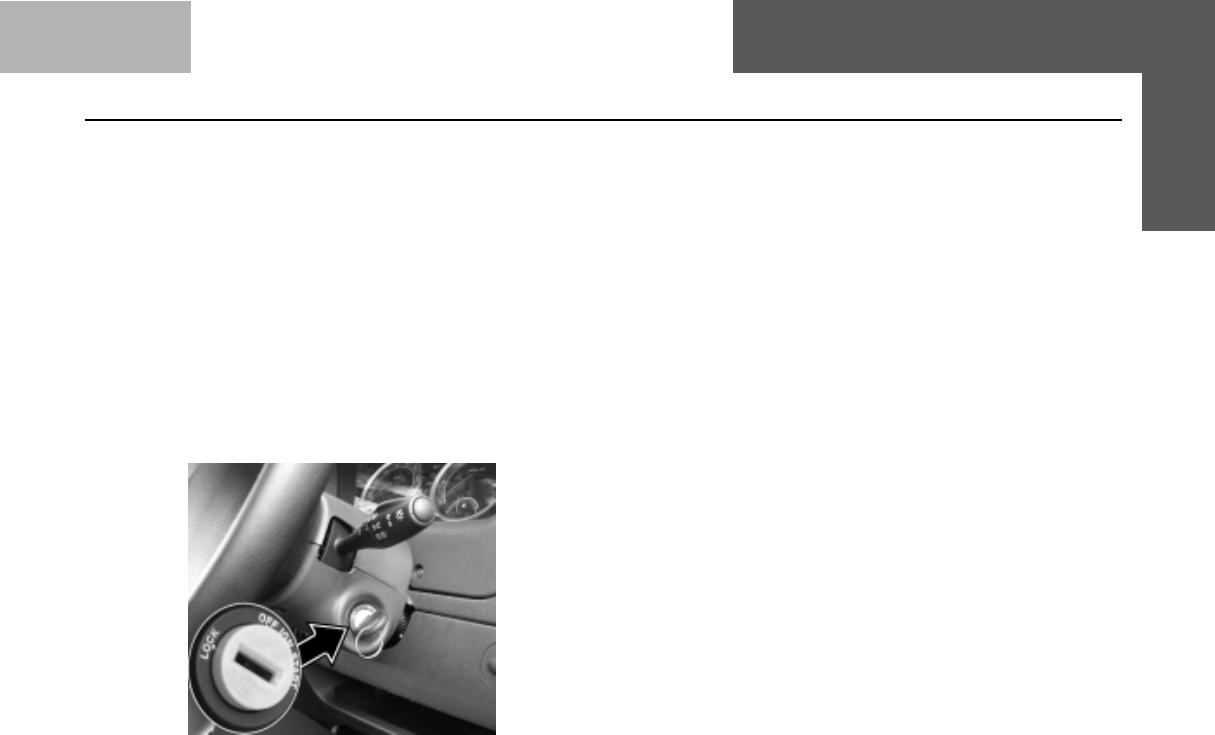
Steering lock cum ignition switch :
The steering column lock cum ignition switch has the
following four positions and is operated with the key.
1. LOCK POSITION - The key can be inserted or taken out
only in this position. When the key is removed from the
switch, the steering is locked. To unlock the steering,
insert the key and also turn it to the 'OFF' (Steering unlock)
position.
2. 'OFF' POSITION - In this position, the steering lock opens
and the music system is powered.
3. 'IGN' POSITION - This is for switching 'ON' the power
supply to the following items :
• Blower & A/C (if fitted)
• Engine cooling fan
• Horn
• Power Socket
• Power window (if provided)
• Head Lamp Leveling Switch
• Head lamps
• Front fog lamps (if provided)
• Load Area Lamp
• Music system (if provided)
• Digital clock
• Engine ignition & fuel supply
• Turn signal lamps
• Wash and wiper system
• Reverse light
• Instruments and gauges and tell tale warning lamps
• Audio warning unit
• Fog Lamps
4. 'START' POSITION - In this position, which is
momentary, the switch cranks the engine. When the
switch is in this position momentarily, the devices listed
under "Accessories supply" above, are switched 'OFF'.
Ignition SwitchIgnition Switch
Ignition SwitchIgnition Switch
Ignition Switch

38
BEFORE DRIVING
Controls
The following items are operated/powered without the key in
the ignition switch :
Hazard warning system, Stop lamps, Position lamps, Registration
plate lamps, Illumination of A.C. control panel, Odometer display
(LCD) of Instrument Panel, Roof lamp, Reading lamps, Engine
lamp,Load Area Lamp, Central door locking, Audio warning unit,
Memory of digital clock and Music System, Rear Windshield
Demister.
The switch symbol lamps may come 'ON' without the key in the
'IGN' position on ignition switch.
Note : When the key is returned from 'OFF' position to LOCK
position, the music system continues to be powered until the
key is removed from the switch. This also helps to remind the
driver if the key is inadvertantly left in the vehicle when aligting
from the vehicle, where this is provided.
I) Do not remove the key, while the car is in motion, as the
steering will get locked and the car cannot be steered.
II) While turning the key from `LOCK 'position to `OFF'
position slightly rotate steering wheel to relieve pressure
on steering spindle for easy operation of the key. Also
ensure the key is inserted fully before turning the key.
iii) Do not operate to START position when the engine is
running. This may damage the ring gear of the starter
motor.
39
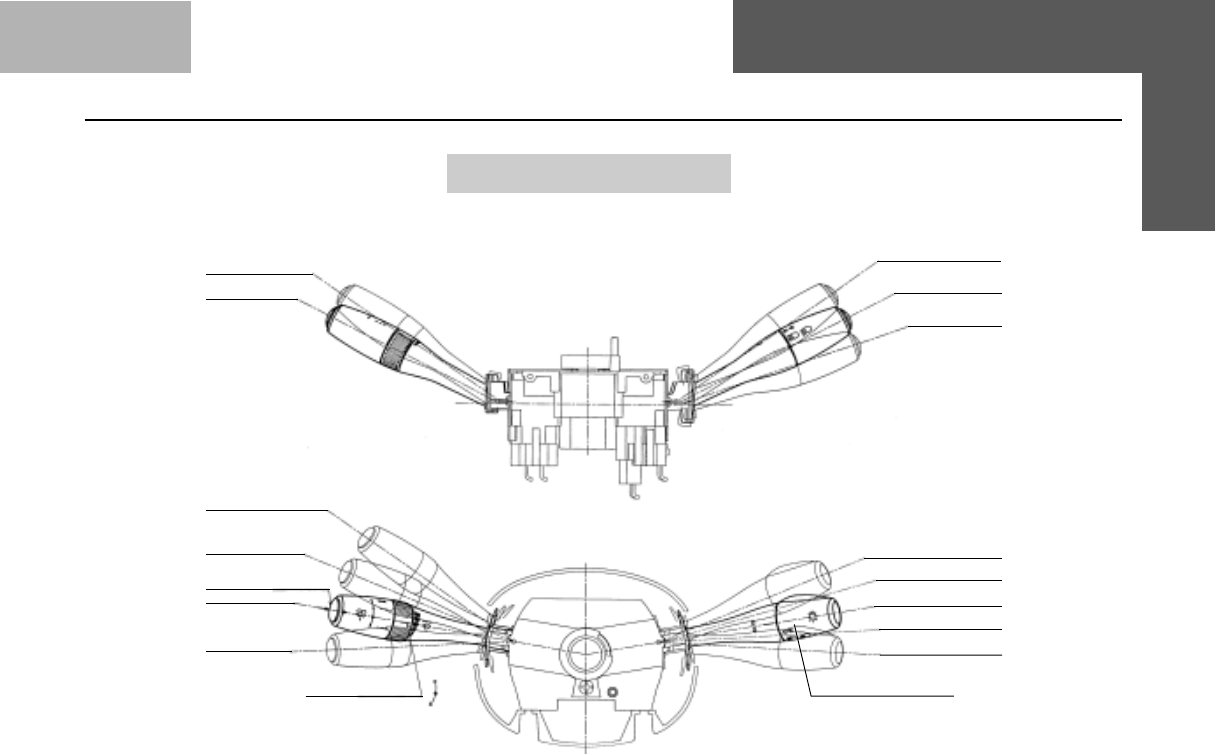
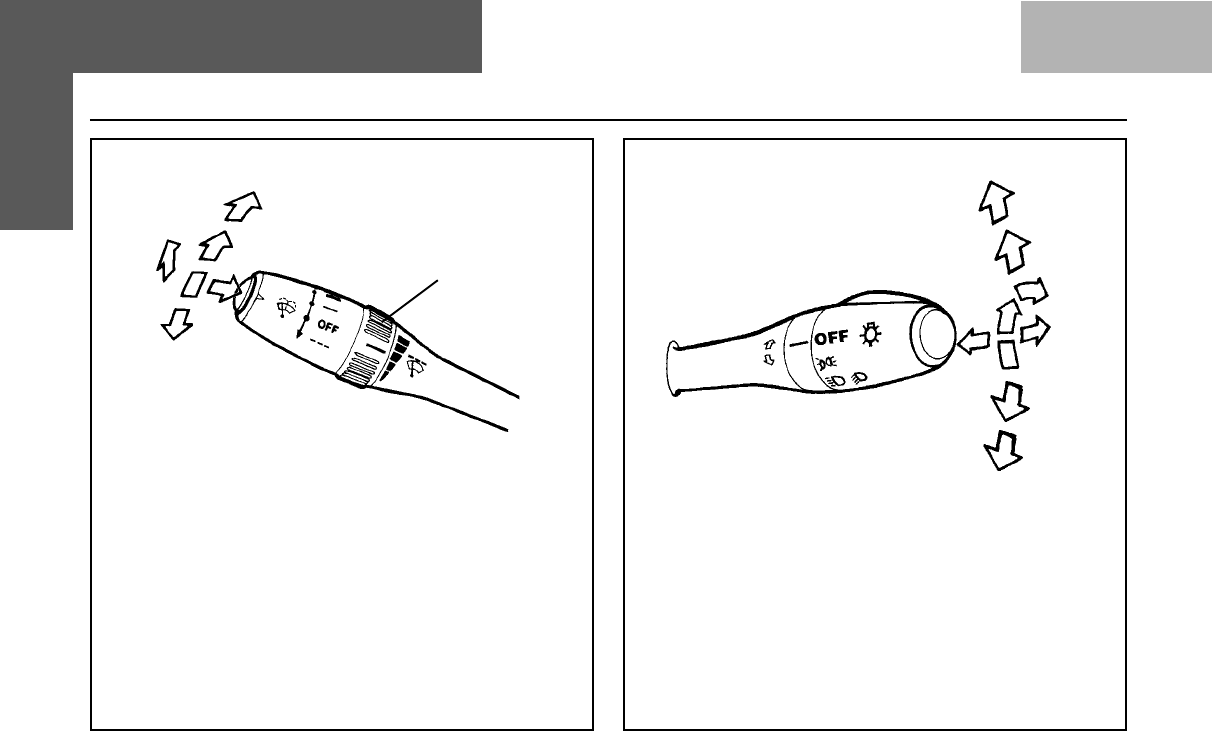
Combi-switch
BEFORE DRIVING Controls
FLICK WIPE
SPRING RETURN
OFF
FLASH HIGH BEAM
SPRING RETURN
DIP BEAM
(NORMAL
POSITION)
HIGH BEAM
WIPER STALK LIGHT STALK
LEFT TURN
(SIGNAL SELF CANCELLING)
OFF
RIGHT TURN
(SIGNAL SELF CANCELLING)
OFFOFF
OFFOFF
OFF
FAST WIPE
SLOW WIPE
PUSH SWITCH
FOR WASH & WIPE
OFF
INT. WIPE
DELAY TIMING FOR
INTERMITTENT WIPE
MIN.
MAX.
LANE CHANGE LEFT (SPRING RETURN)
LANE CHANGE RIGHT (SPRING RETURN)
LIGHTS CONTROL
SWITCH
OFFOFF
OFFOFF
OFF
40
BEFORE DRIVING Controls
WIPER CONTROL COMBI-SWITCH LEVER - LEFT
Wiper Control Combi-switch Lever - Left
A. Wiper 'OFF' position
B. Slow Wipe
C. Fast Wipe
D. Intermittent wipe *
E. Pull up for windshield wipe
(Flick Wipe Spring Return)
F. Press side knob for wash
* Rotate selector to set delay timing for intermittent wipe
CC
CC
C
BB
BB
B
AA
AA
A
DD
DD
D
EE
EE
E
FF
FF
F
SelectorSelector
SelectorSelector
Selector
LIGHTS CONTROL COMBI-SWITCH LEVER - RIGHT
Lights Control Combi-switch Lever - Right
A. Head lamp 'OFF' position
B. Position lamp 'ON'
C. Position lamp & head lamp 'ON'
D. Push down the lever for high beam
E. Pull up the lever (spring return) for high beam flash
F. Lane change left (spring return)
G. Side Indicator - LH
H. Lane change right (spring return)
I. Side Indicator - RH
FF
FF
F
EE
EE
E
BB
BB
B
AA
AA
A
CC
CC
C
DD
DD
D
IIII
I
GG
GG
G
HH
HH
H
41
BEFORE DRIVING Controls
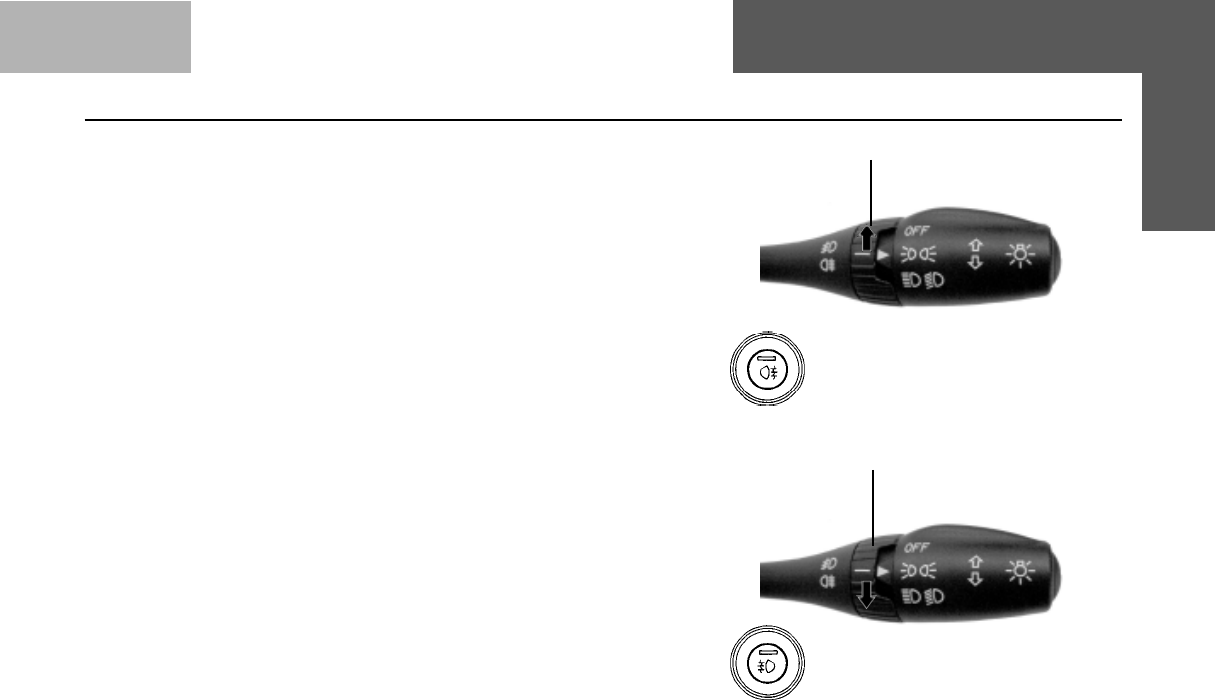
Fog lamps : (if fitted)
Front and Rear fog lamps can be switched ON/OFF by operating
the switch on the Combi-Switch.
Front fog lamp : Rotate the switch clockwise to switch 'ON' the
fornt fog lamp. Front fog lamps are operative only when the position
lamps are switched 'ON'. Rotate the switch to same direction to
switch 'OFF' the front fog lamp.
The indicator on the instrument cluster comes 'ON' when the front
fog lamps are switched 'ON'.
Rear fog lamp : Rotate the switch anticlockwise to switch 'ON' the
rear fog lamp. Rear fog lamps are operative only when the head
lights are swithed 'ON' or front fog lamps are switched 'ON'. Rotate
the switch to same direction to switch 'OFF' the rear fog lamp.
The indicator on the instrument cluster comes 'ON' when the rear
fog lamps are switched 'ON'.
Selector
Selector

42
BEFORE DRIVING Controls
3. Rear windshield wash & wipe (unlatched switch):
Push and hold the switch knob for the
operation of the wash function on the rear
windshield glass for rear visibility through
glass. The function indicator lights up in
green when wash function in 'ON'. Along with
the wash fluid getting sprayed, the wiper also operate
with a delay to wipe the glass surface, through timer
control unit.
Accessory Switches : (if installed)
Accessory switches have been provided on the dash board
near the steering column on the right hand side.
1. Rear windshield demister (unlatched
switch)
The switch is pushed and released to switch
'ON' and the knob returns to the normal
position.The function indicator lights up in amber
indicating that the demister heater is 'ON'. The function
is controlled through a timer and operates for 15 minutes
(approximately) and goes 'OFF' automatically at the end
of the duration. The heater can be switched 'OFF' anytime
by once again pushing and releasing the switch knob.
Note : Switching 'ON' and 'OFF' can be done only with
key in 'IGN' position. The demister heater remains 'ON'
even after removal of ignition switch key and goes 'OFF'
at the end of 15 minutes period, In case you are missed
to switched 'OFF'.
2. Rear windshield wiper (latched switch)
Push to switch 'ON' - Push to switch 'OFF'
The function indicator on the knob lights
up in green when the wiper function is 'ON'.
Accessory SwitchesAccessory Switches
Accessory SwitchesAccessory Switches
Accessory Switches
43
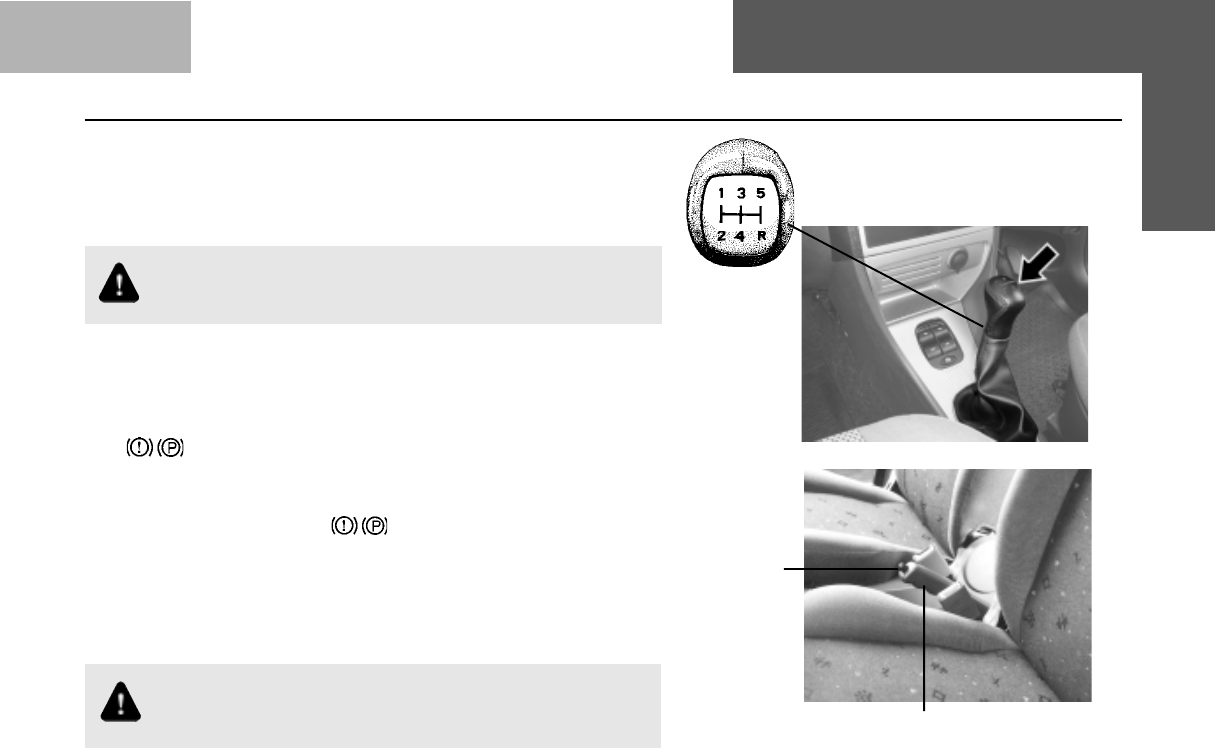
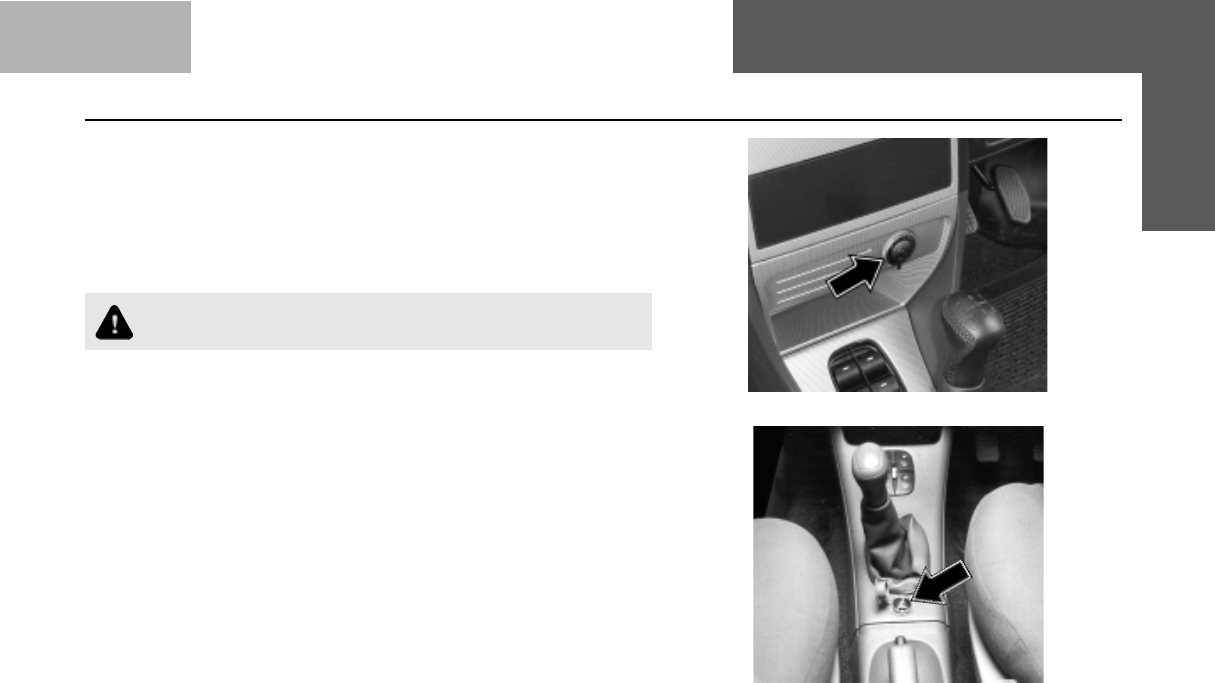
Gearshift lever & Shifting pattern :
The gearshift lever is mounted on the central console between the
two front seats. The gearshift pattern is shown on the gear lever
knob.
The reverse gear should be engaged only when the car
is stationary. Wait for 5 seconds after declutching to
ensure smooth engagement of the reverse gear.
Parking brake :
A mechanical parking brake acting only on the rear wheel is provided
on your car. The parking brake lever is located behind the gearshift
lever. To apply the parking brake, pull the lever up fully . The indicator
light on the instrument panel will come `ON'. To release it,
pull the lever up slightly, press the release button and push the
lever down.
The parking brake indicator on the instrument panel will go
'OFF' when the parking brake lever is fully released.
When parking on level ground, place the gear lever in the 'Neutral'
position. When parking on a downhill gradiant, place the gear lever
in 'Reverse' position. When parking on uphill gradiant, place the
gear lever in the '1st' position
Apply the parking brake properly before leaving the car &
release it before moving. Use the parking brake for holding
the car on a gradient.
BEFORE DRIVING Controls
Parking Brake LeverParking Brake Lever
Parking Brake LeverParking Brake Lever
Parking Brake Lever
ReleaseRelease
ReleaseRelease
Release
ButtonButton
ButtonButton
Button
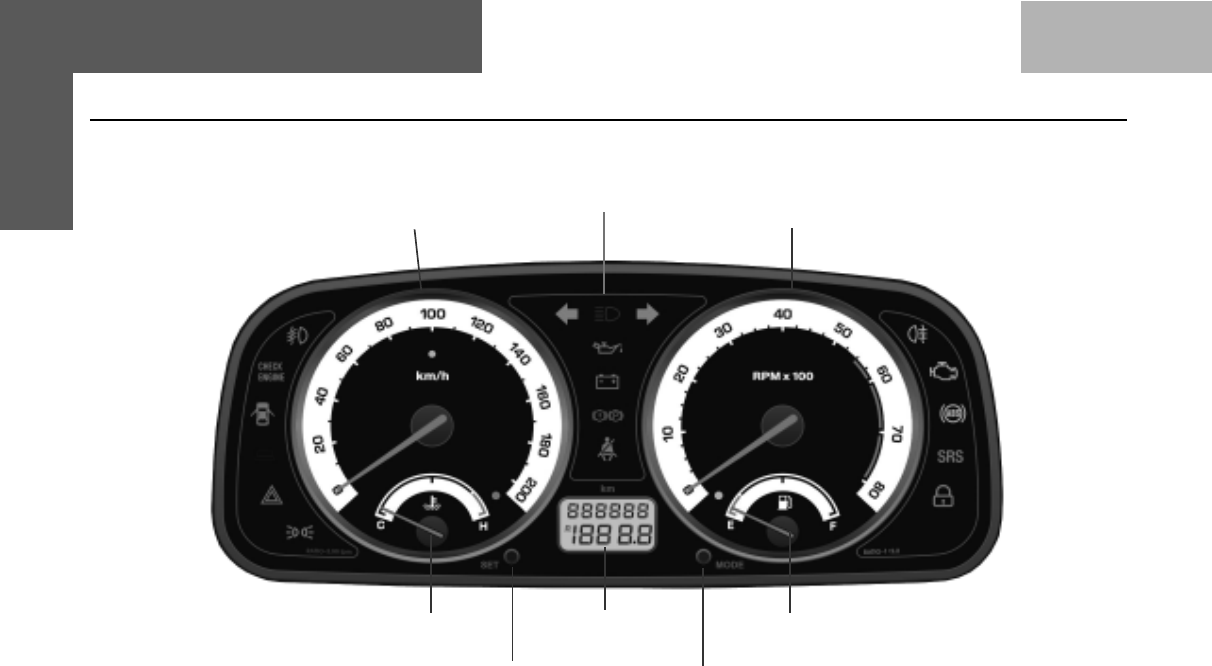
44
INSTRUMENT PANEL
BEFORE DRIVING Instrument Panel
Engine RPM
Meter
Speedometer
Fuel Gauge
Temperature Gauge
Indicators*
LCD
Set Knob Mode Selector
Knob
* All indicators may not be provided on some clusters.
45
BEFORE DRIVING Instrument Panel
Hazard Warning SwitchHazard Warning Switch
Hazard Warning SwitchHazard Warning Switch
Hazard Warning Switch
Turn Signal and Hazard Warning
I) Turn Signal :
Turn signal lamps can be operated only when the ignition supply
is 'ON by using the turn indicator switch on the combiswitch.
The direction indicator (LHS) and (RHS) on the instrument
cluster flashes along with external indicator lights as selected.
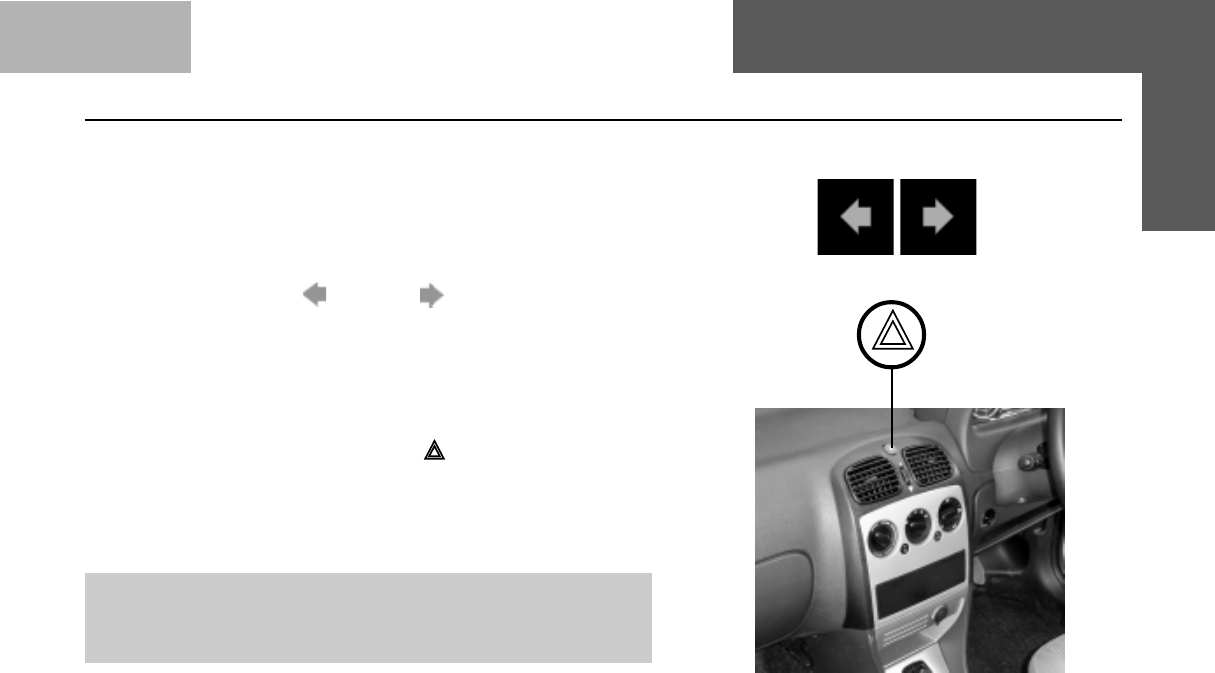
II) Hazard Warning :
This can be operated without ignition 'ON'. Press the hazard
warning switch (red knob) on the centre of the dash board, all
side indicator lights and indicator , LHS and RHS turn
indicators on the instrument cluster will flash simultaneously to
warn the other road users about any hazardous condition of
the car. Depress the knob again to switch 'OFF' the hazard
function.
Note : If light does not blink or blinks rapidly, it is an indication
of fault in the blinker electrical system or the indicator bulb at
front or rear has fused. Get it rectified immediately.
46
BEFORE DRIVING Indicators
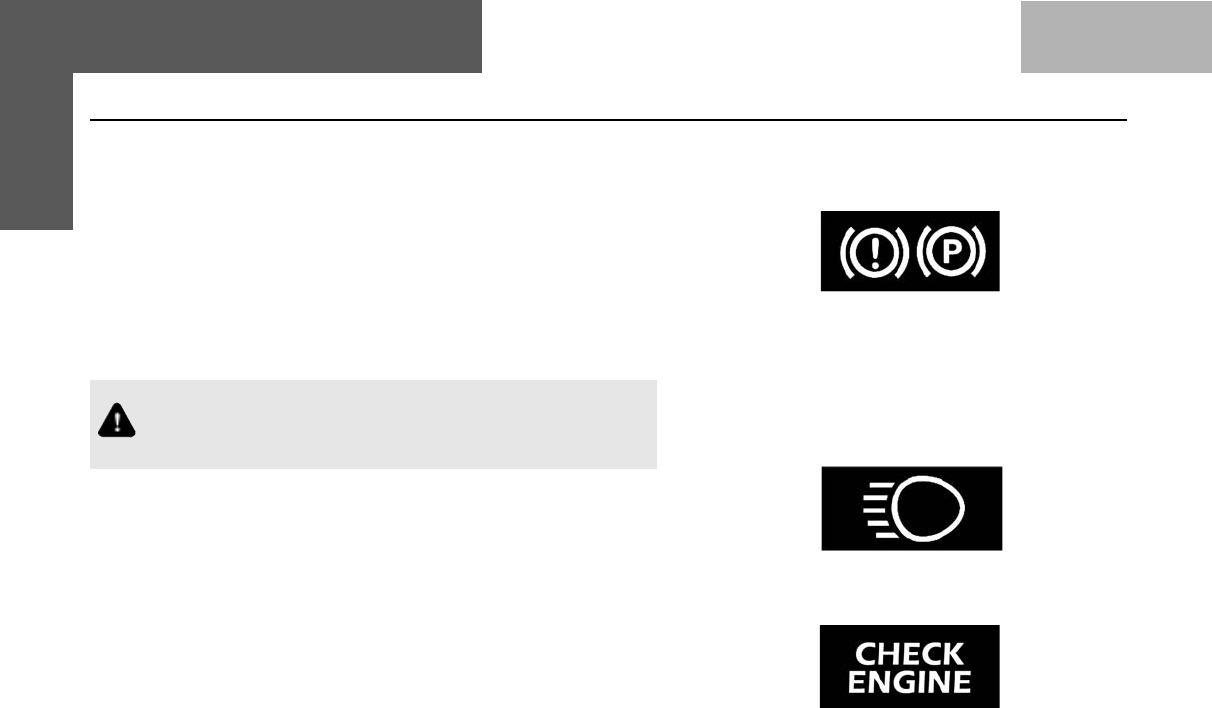
Parking Brake Indicator cum Low Brake Fluid Warning Light
When the ignition key is turned to the 'IGN' position, the symbols
light up for the following :
i) when the parking brake is applied, and/or
ii) when the brake fluid level in the container is low.
Else the indication goes 'OFF' after few seconds.
If the lamp glows while engine is running, then check the parking
brake or brake fluid oil level.
Do not drive the car if this indicator remains 'ON'. Get the
problem attended to immediately at an Authorised Service
outlet.
High Beam Indicator :
Symbol lights up when the headlamp high beam is 'ON'.
Engine Check Indicator :
This lamp indicates engine condition. When a malfunctioning occurs
in Engine or EMS, this lamp indicates as below :
1. Remains "OFF" in "IGN" position.
OR
2. Remains "ON" in running position.

47
Position Lamp Indicator :
Symbol lights up when the position lamps are switched 'ON'.
Illumination lamps for AC, HVAC or ventilation panel and switch
illumination lamps comes 'ON', when the position lamps are 'ON'.
Position lamps can be used as parking lamps.
Instrument cluster illumination turns 'ON' with key in 'IGN' position
and position lamps 'ON'.
Note : Position lamps also remain 'ON' while head lamps are
'ON' and in this condition instrument cluster illumination lamp
will not be 'ON'.
Low Oil Pressure Indicator :
When the ignition key is turned to the 'IGN' position, symbol lights
up and goes off as soon as the required engine oil pressure is
developed after starting the engine.
If the low oil pressure indicator does not glow or remains
'ON' with the 'IGN' on and engine is running, it indicates a
fault in the electrical circuit/lubrication system. Check &
get the problem attended to at an Authorised Service outlet.
BEFORE DRIVING Indicators

48
Battery Charging Indicator :
Symbol lights up when the 'IGN' is turned 'ON' and should go 'OFF'
after the engine starts.
If it remains 'ON' while the engine is running, it indicates
that the battery is not being charged. Switch off all
unnecessary electrical equipment and get the problem
attended to at an Authorised Service outlet.
Front Fog Lamp Indicator (if provided) :
This symbol lights up when the front fog lamps are switched 'ON'
Rear Fog Lamp Indicator (if provided) :
This symbol lights up when the rear fog lamps are switched 'ON'
BEFORE DRIVING Indicators
49
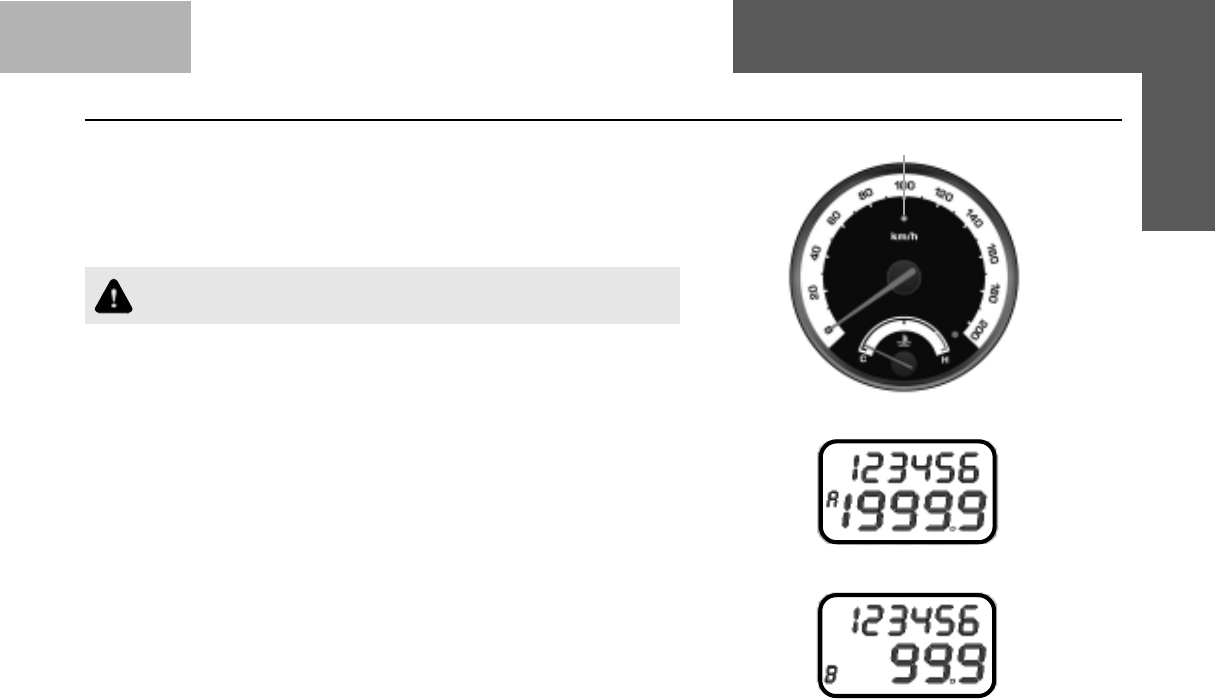
Speedometer, Main Odometer and Tripmeter (on LCD) :
The speedometer indicates the car speed in km/hr. The odometer
records the total distance the car has been driven. The tripmeter can
be used to measure the distance travelled on each trip or between
fuel fillings.
Keep track of the odometer reading & follow the maintenance
schedule regularly for meeting service requirements.
Odometer, Tripmeter and Illumination intensity control on
instrument panel (LCD) :
The instrument panel has an LCD to display the following :
Main Odometer (Non- resettable)- Counts upto 999999 kms
Tripmeter A (Resettable) - Counts upto 1999.9 kms
Tripmeter B (Resettable) - Counts upto 1999.9 kms
Intensity level of instrument panel illumination - selection among preset
levels.
LCD has two line display.The first line displays the Odometer count.The
second line displays either of Tripmeter A, Tripmeter B, Intensity level
of panel illumination.
The selection and control of functions are done through 'MODE' and
'SET' push buttons (knobs) provided on either side of the LCD.
The 'MODE' knob is used to select one of Tripmeter A, Tripmeter B or
Intensity level of panel illumination. Switching among the above three
functions can be done by pressing the knob.
BEFORE DRIVING Gauges
Display for Trip - B
Display for Trip - A
Speedometer
Over speed warning indicator

50
BEFORE DRIVING Gauges
Intensity Level Indicator
Over Speed Warning
Indicator
The 'SET' knob is used to control the chosen function. Pressing the
knob for a few seconds resets the chosen tripmeter and varies the
intensity level of instrument panel illumination.
The panel illumination intensity varies among preset levels as follows :
= Min
= = = = Max
This display returns to Trip A after a few seconds of intensity level
selection, if left in this mode.
NOTICE
Main odometer and tripmeter A indication will remain on display
even if the ignition key is removed.
Reduced contrast in display may occur at low and high temperature.
Over speed warning indicator (if provided) :
When the vehicle speed reaches more than 120 kmph, over speed
warning indicator will come 'ON'.
51
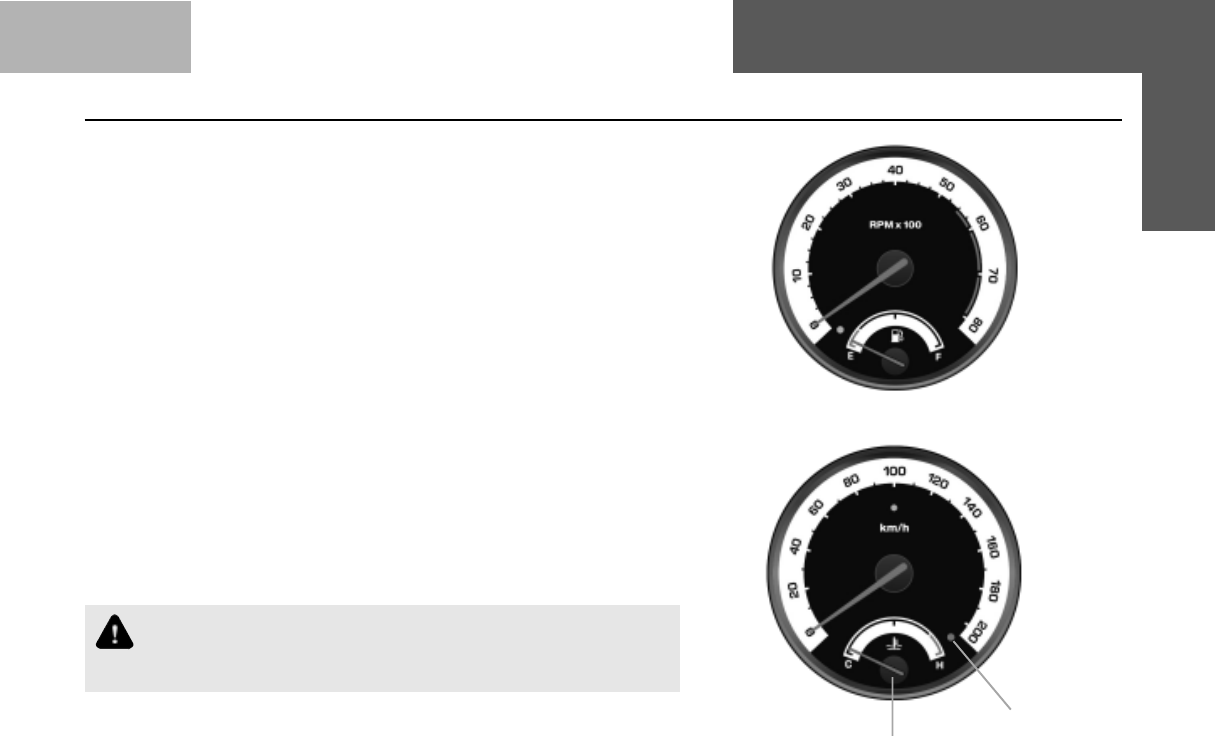
RPM meter :
The meter indicates engine speed in revolutions per minute (rpm)
Change gears at appropriate engine rpm and car speed to get optimum
fuel economy.
The permitted engine rpm upper limit is the start of Red Zone on the
dial.
If RPM meter does not indicate during initial cold starting, gently raise
the engine rpm till the battery charge lamp goes 'OFF'.
Temperature gauge :
The gauges indicates the temperature level of the engine coolant. The
red zone at 'H' indicates temperatures higher than normal. A visual
warning indication (Red coloured) comes 'ON' indicating that when
the coolant temperature is higher than normal.
Avoid driving, when the pointer is in the red zone. It indicates engine
overheating, which may be due to insufficient coolant in the radiator
or due to any other defect. Take the car to the nearest Authorised
Service outlet for necessary attention.
Never remove the cap from the coolant reservoir when the
engine is hot. Do not restart the engine until the problem has
been duly attended.
BEFORE DRIVING Gauges
Temperature Gauge
High
Temperature
Warning
RPM Meter

52
BEFORE DRIVING Audio Warning
Fuel Gauge :
The fuel gauge indicates the approximate fuel level in the tank.
Refill the fuel tank at the earliest, when the needle touches the red
band (indicating reserve capacity has been reached.), a visual
warning indication (Amber coloured) comes 'ON' indicating the
fuel level is low.
Audio Warning Unit
Seat Belt Reminder (Beeper) : (If installed)
When the key is in the 'IGN' position and the driver's seat belt has
not been fastened, an audio warning comes 'ON'. Please fasten
the seat belt. The warning goes 'OFF' automatically after a few
seconds, even if the seat belt is not fastened.
'Key in' Warning Beeper : (if installed)
When the ignition is turned to 'OFF' position and the key is not
removed from the switch, an audio beep comes on if driver door is
open. The beeper will go 'OFF' after a few seconds automatically if
warning is ignored or if the key is removed/door is closed.
FF
FF
Fuel Guel G
uel Guel G
uel Gaugeauge
augeauge
auge
LowLow
LowLow
Low
FF
FF
Fueluel
ueluel
uel
WW
WW
Warar
arar
arningning
ningning
ning
53
BEFORE DRIVING Audio Warning / Tail Lamps
Lamps 'ON' Reminder (if installed)
An audio warning (beeper) is provided to inform the driver that the
headlamps/position lamps are left 'ON'. This comes 'ON' when the
driver removes the key and opens the door. Switch 'OFF' the lamps,
before leaving the car. However the lamps can be kept 'ON' ignoring
the warning, if desired.
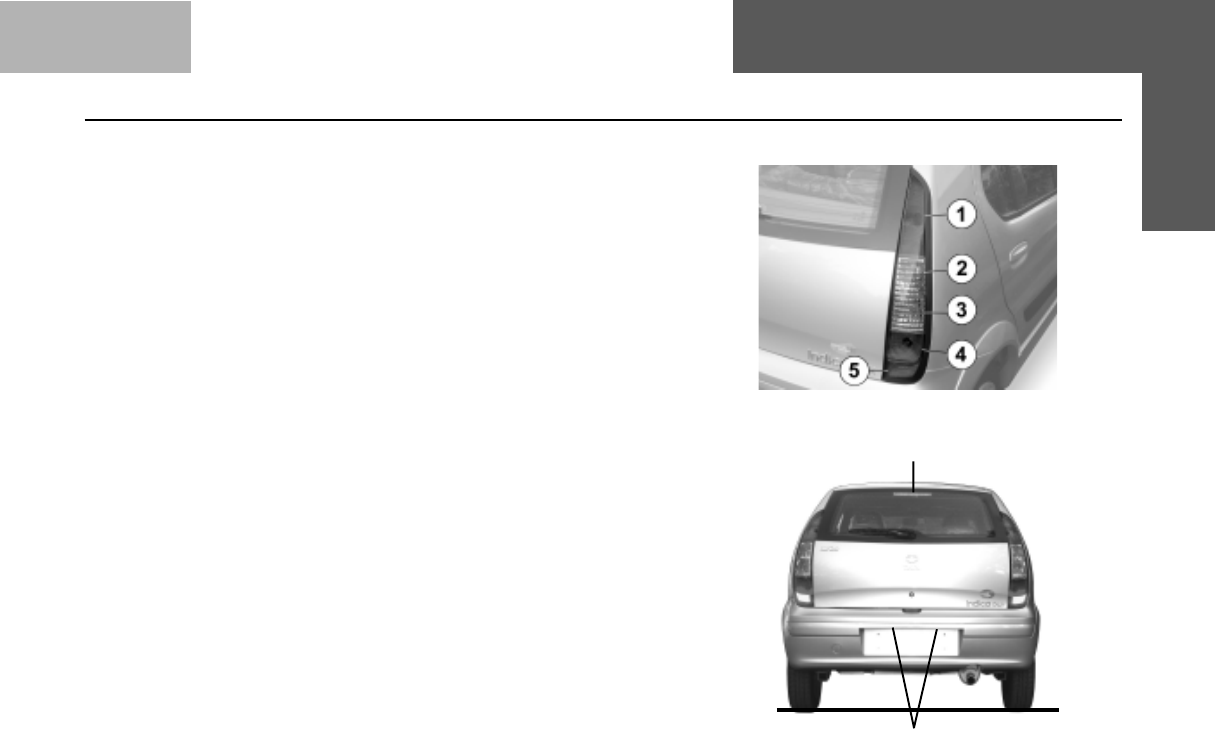
Tail Lamp : The tail lamp assembly incorporates the following-
1. Stop cum position lamp
2. Turn Indicator
3. Reverse Lamp
4. Fog lamp (provided in Deluxe version only)
5. Reflex reflector
Registration Plate Lamps :
Two concealed lamps are provided for illumination of the rear
registration number plate.
High Mounted Stop Lamp :
High mounted stop lamp is provided at the rear of vehicle and it
glows whenever the service brake is applied.
High Mounted Stop Lamp
Registration Plate Lamps
54
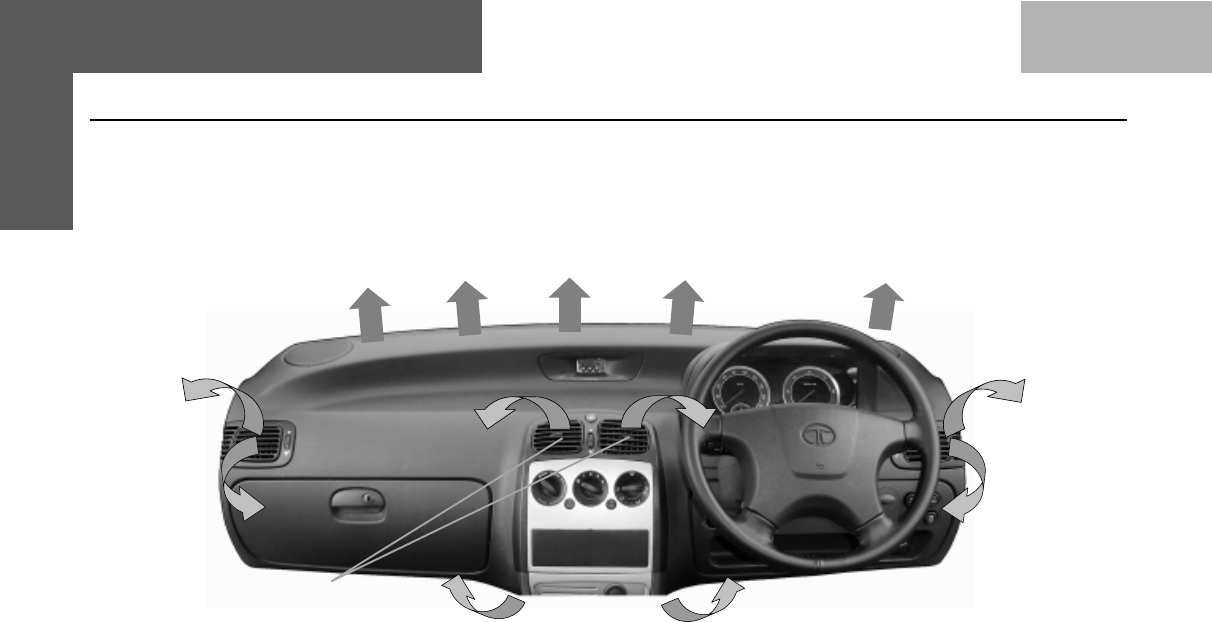
BEFORE DRIVING Heating, Ventilation & Air Conditioning
Air Flow Pattern
Towards Windscreen (Defrost)
Towards
Foot Board
Central
Air Vents
Side Air
Vents
Towards
Foot Board
55
BEFORE DRIVING Heating, Ventilation & Air Conditioning
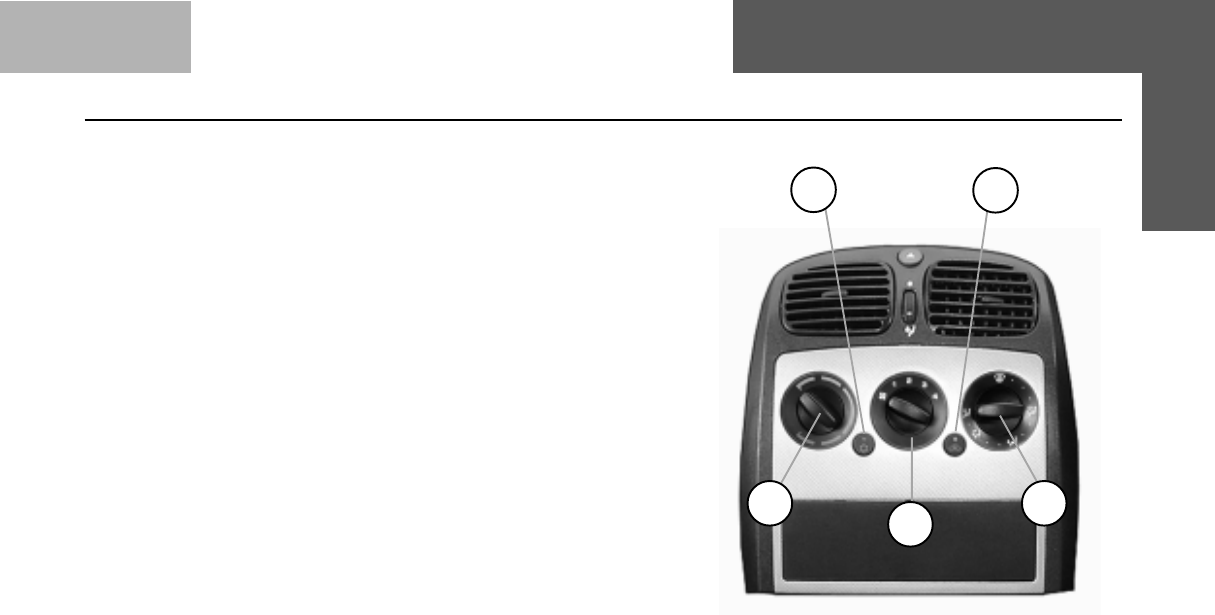
HEATING, VENTILATION & AIR CONDITIONING
(if installed)
A. Temperature Control Knob :
The air temperature in the car can be controlled by operating
the temperature control knob (A) at the left hand side of the
control panel. The temperature can be increased by rotating
the knob towards the red segment and decreased by rotating
it towards the blue segment.
B. Blower Speed Regulation Knob :
The ventilation system has a three/four speed blower. The
blower speeds can be regulated to any one of the following
speeds by operating the knob (B) at the centre of the control
panel.
LOW • MEDIUM • HIGH • VERY HIGH
DE
A C
B
HVAC CONTROLS
56
BEFORE DRIVING Heating, Ventilation & Air Conditioning
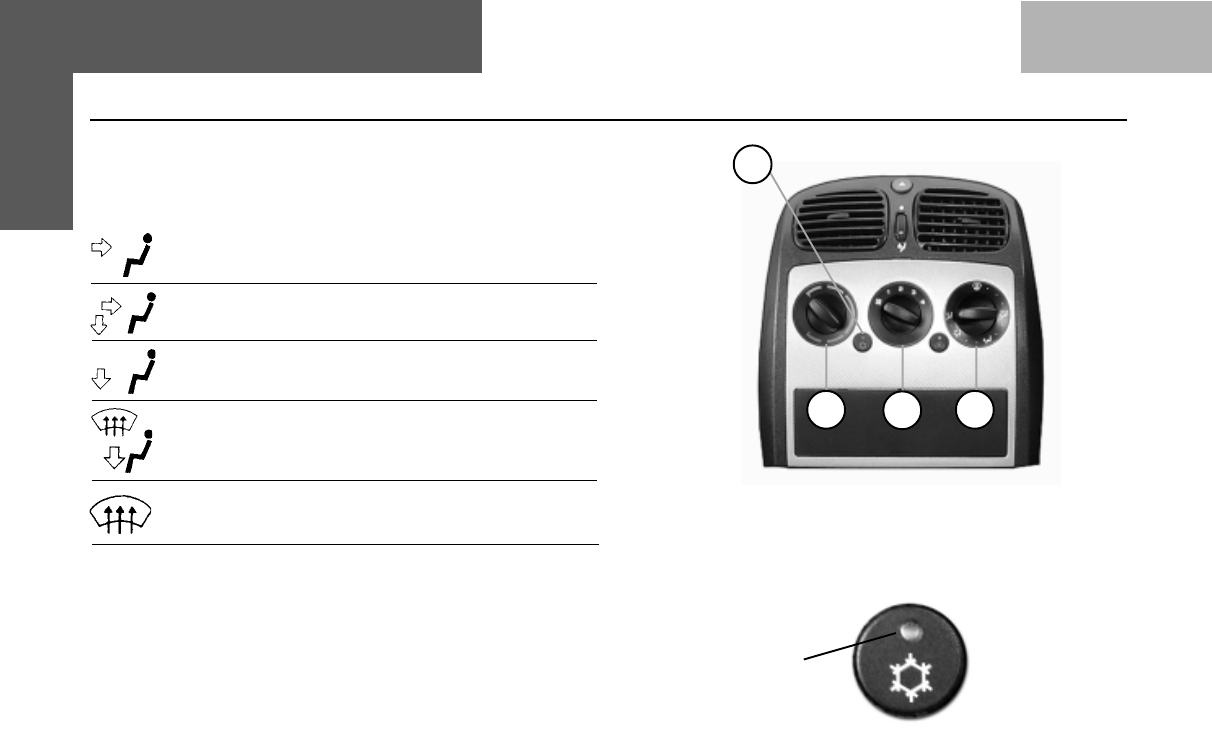
C. Air Direction Control Knob :
The air flow can be changed by turning the switch (C) to
the desired direction.
Towards face
Towards face and feet
Towards feet
Towards feet and windshield
(Recommended for clearing fogging on windshield)
Air demist / defrost windshield
(Recommended for clearing heavy fog and snow)
D. A.C. ON/OFF Switch :
The A.C. can be switched 'ON' by pressing the switch (D)
on the A.C. control panel provided the blower is `ON' and
the engine is running. The indicator lamp will show that the
A.C. is `ON'.
D
A.C. ON / OFF Switch
Indicator
A.C. CONTROLS
AA
AA
ABB
BB
BCC
CC
C
D
57
E. Air Circulation Switch :
• In HVAC version to put air circulation mode in
recirculation, press switch 'E'. The indicator lamp will
show air circulation is in recirculation.
To put vehicle in Fresh mode release switch 'E'. Indicator
lamp will be 'OFF'.
• In A.C. version, air circulation mode can be selected
by rotating knob 'E'.
Fresh Recirculation
• In recirculation mode, air inside the vehicle is circulated
again and again. In Fresh mode, air is taken from
atmosphere and circulated in the vehicle.
Recirculation mode can be used
• While driving in dusty condition
• To avoid traffic pollution
• To get quick cooling/heating as required.
Whenever discomfort is felt switch air circulation mode to
fresh.
Notice : The A.C. can be switched `ON' only if the blower
is 'ON' and engine is running. When A.C. is switched
'ON' engine idling RPM increases marginally, to adjust
to the A.C. compressor load. When desired temperature
is achieved A.C. trips 'OFF' automatically.
Air Recirculation
Knob
E
Indicator
Notice : The A.C. compressor gets switched 'OFF'
automatically when engine gets overheated. The A.C. is
automatically switched 'ON' when the engine cools down.
Normal Cooling :
A.C. - ON
Knob 'B' - Desired speed position
Knob 'C' - Towards face
Switch 'E' - Suitably as explained
Quick Cooling :
If your car is left in the sun with window closed inside
temperature increases.
BEFORE DRIVING Heating, Ventilation & Air Conditioning

58
To achieve quick cooling effect, open the windows briefly
while you operate the air conditioner, with air circulation
switch is in Fresh mode, fan at higher speed and air direction
towards 'FACE'. All vents to be opened completely.
Once temperature inside has come down sufficiently, close
the windows and change air circulation suitably to fresh/
recirculation.
Demisting :
In rainy season or in areas of high humidity, mist formation
inside windshield glass is observed. To clear mist
dehumidified air is passed on the windshield glass.
The position of control knobs should be adjusted as follows:
A.C. - ON
Knob 'B' - Desired speed position
Knob 'C' - Towards windshield
Knob 'A' (for vehicles fitted with HVAC) - at suitable
temperature
Air circulation - at suitable position
Notice : When mist gets cleared switch the knob "C'
position to Face mode.
In high humidity areas, if cold air continues to flow over
windshield, it may cause sudden fogging on outside
surface of windshield.
Defrosting :
(For vehicles fitted with HVAC unit)
In low temperature areas, to clear frost formation outside
the windshield glass, this setting is used.
First start the engine and accelerate to warm up.
Knob 'A' - Maximum hot position
Knob 'B' - Very High
Knob 'C' - Towards windshield
Switch 'E' - Fresh air mode condition
Once the windscreen has become clear, move the fan switch
to desired speed.
Notice : Electric heater coil is provided for demisting of
tail gate glass for deluxe versions.
Normal Heating :
( For vehicles fitted with HVAC )
Knob 'A' - Suitable temperature position
Knob 'B' - Suitable blower speed
Knob 'C' - Towards face & feet
A.C. - OFF
Air Circulation- Fresh switch
BEFORE DRIVING Heating, Ventilation & Air Conditioning
59
Quick Heating :
All settings as explained before except air circulation switch
to recirculation.
Once vehicle is heated, switch back to fresh mode.
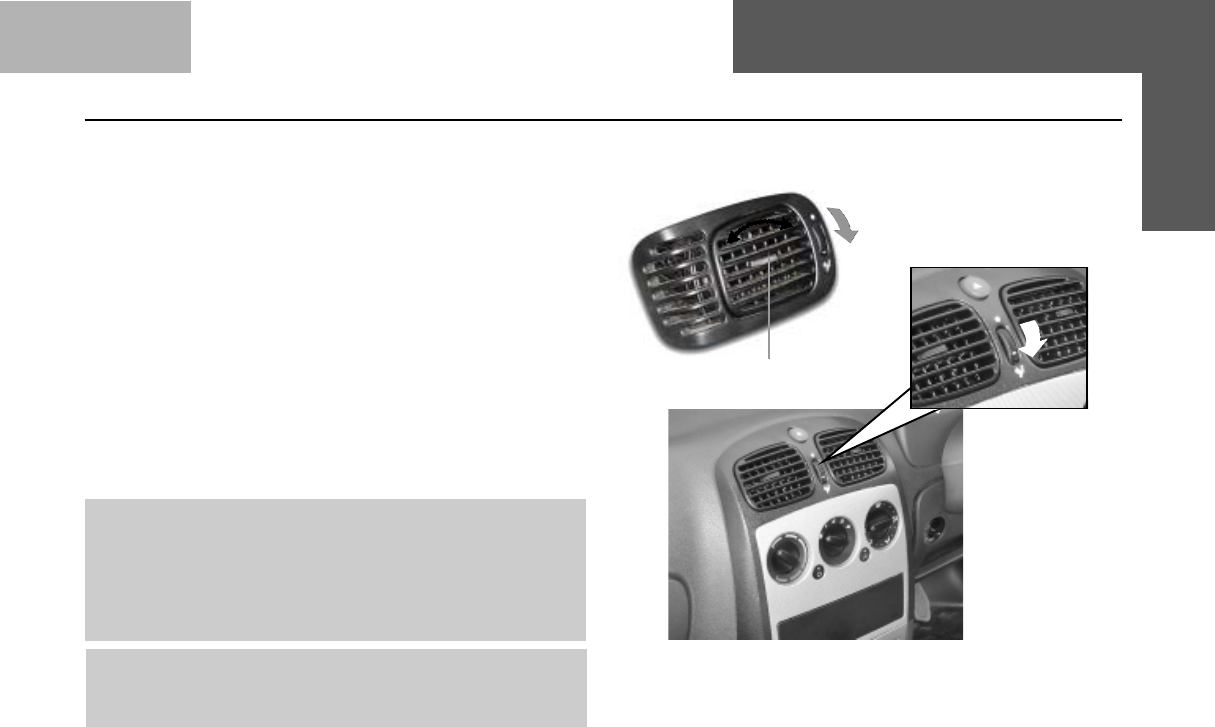
Ventilator :
The air flow can be adjusted continuously with the rotary
control knob at the vents on the dash board. The air vents
can be adjusted upward and downward. This is common
for HVAC, AC and ventilation.
Notice : Refrigerant charged in the air conditioning
circuit has been identified on the label over front body
member. Use only refrigerant as given in the label for
topping up or recharge, i.e. do not charge R12 (CFC) in
the vehicle earlier charged with R134a (Non CFC) or
vice versa.
Notice : Fresh air is taken from the grill opening provided
at base of windshield glass outside the vehicle. Keep
these openings clear and free from fallen leaves etc.
Air Flow Direction Control
Knob
CLOSE
OPEN
BEFORE DRIVING Heating, Ventilation & Air Conditioning

60
REAR VIEW MIRRORS
Door mirrors : Driver side only (alternate) Both sides (if fitted)
The rear view mirror is fitted on the door from the outside and can
be adjusted by the lever provided inside the door. In some versions
the mirrors are provided on both the doors.
Inner Rear View Mirror :
Plain mirror (Alternate)
Antiglare mirror (if fitted)
If an antiglare mirror has been fitted inside the cab. Provision has
been made for two positions :
1. Normal position
2. Antiglare position
Use antiglare position only when necessary, as it reduces rear
view clarity.
Normal Mirror (if fitted)
In some versions, a normal mirror has been fitted inside the cab.
Sunvisors :
Two adjustable sunvisors are provided inside the cab above the
windshield to prevent sun glare.
Lower the sunvisors to protect the eyes from bright sunlight. The
sunvisor also moves sideways towards the door.
A vanity mirror has been provided on the back of the co-driver's
sunvisor. Vanity Mirror
ANTIGLARE MIRROR
(Only on deluxe version)
Operating
Knob
BEFORE DRIVING Interiors and Accessories
61
When not in use keep the sunvisors in their stowed position
otherwise they may block the driver's vision.
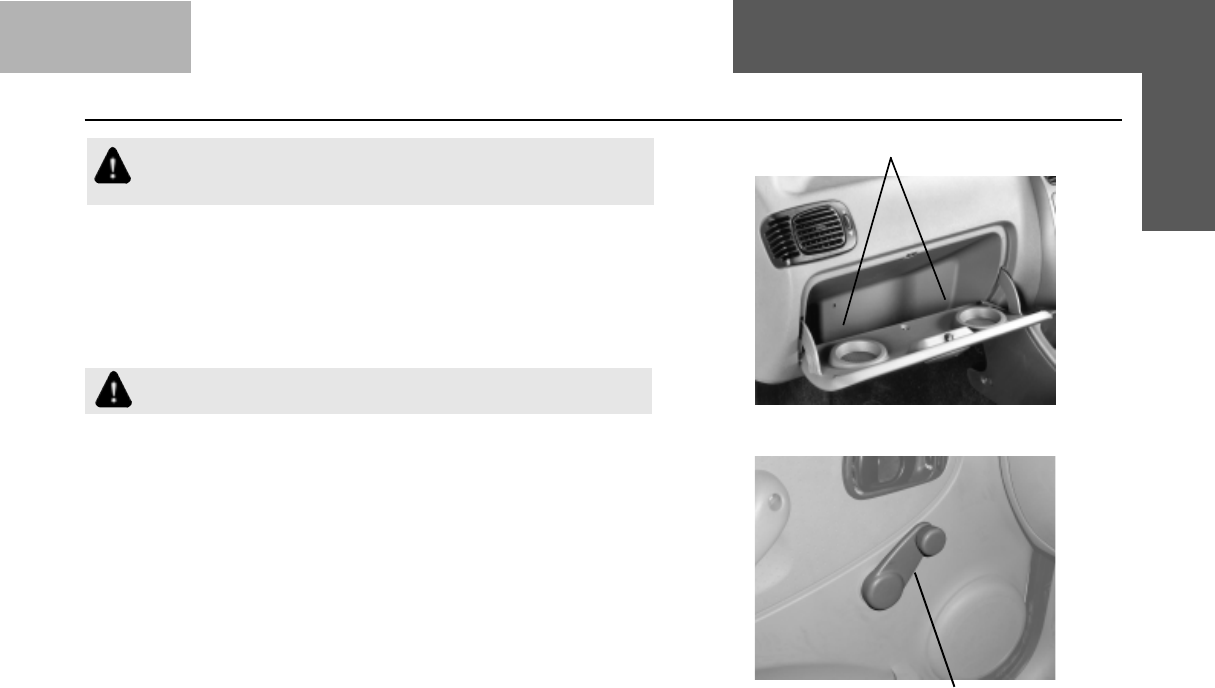
Glove Box :
The glove box is located on the dash board in front of the co-
driver's seat. The glove box can be locked with the ignition key.
Cup holders are provided on the inner face of glove box flap.
Do not use the cup holder while the car is in motion.
Window Winding :
Manually Operated Window Winding :
Window winding in the standard version is manually operated.
Rotate the handle on the door pad to raise or lower the window
glass.
Cup Holders
Glove Box
Window Winding Lever
BEFORE DRIVING Interiors and Accessories
62
BEFORE DRIVING Interiors and Accessories
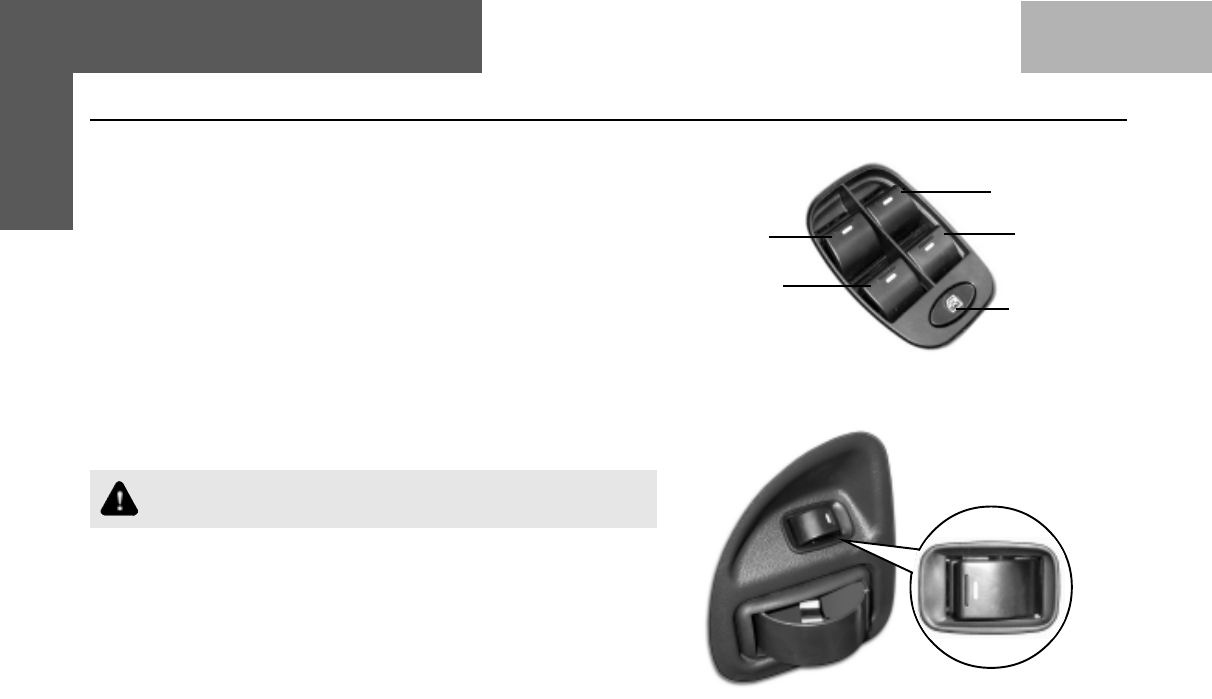
Power Windows : (if installed)
Four seperate knobs are provided on the switch to operate the
four door window glasses individually and electrically.
To open the door window glass, push the respective knob down.
To close the door window glass, pull the respective knob up.
In the locked position, the rear window switches on rear doors
become inoperative. However the rear windows can be operated
by the switches on the floor console. Illumination on rear window
switches goes 'OFF' in locked position. Press down the lock button
to unlock.
Individual window winding switches have been provided only on
the rear doors.
While raising the glass take care to avoid fingers/hands
getting trapped between the glass and the frame.
Window Winding Switch
On floor Console
Window Winding Switch On Rear Door
Front
Right
Push type
Lock/Unlock
button
Front
Left
Rear
Left
Rear
Right
63
BEFORE DRIVING Interiors and Accessories
Power Socket (Deluxe version)
Power Socket : (if provided)
Power socket is provided on the floor console behind the gear
shift lever (for standard versions). A Plug socket is provided on
central facia (for Deluxe versions). This can be used for connecting
loads upto 10A maximum like the mobile charger, cigarette lighter
etc. To use this socket, remove the cap first.
Always keep this socket covered with the cap when not
in use.
Power Socket (Standard version)
64
BEFORE DRIVING Interiors and Accessories
H M Z
Rear Ash trayRear Ash tray
Rear Ash trayRear Ash tray
Rear Ash tray
Rear Ash Tray : (if fitted)
Ash trays are provided on both rear doors for the occupants at
the rear.
To open the rear ash tray press the lid, it will rotate outward.
To remove the ashtray open fully and press down to disengage the
top pivot pin.
To refit the ashtray, locate the bottom piot pin and push the top
pivot pin in to place.
Do not forget to extinguish the cigarette butts, before putting
them in the ash tray.
Do not put paper or other flammable material in the ash
trays.
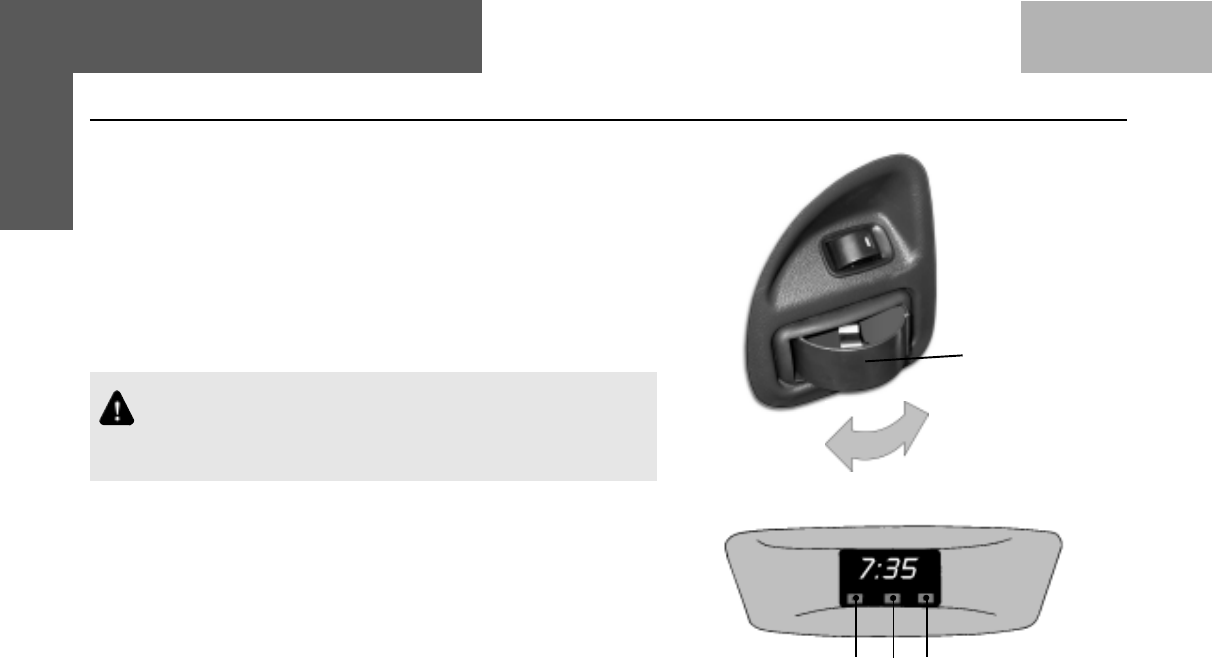
Digital Clock :
A digital clock is provided in the middle of the dash board. It displays
the time when the steering lock cum ignition switch is in 'IGN'
position.
Three push knobs 'H', 'M' and 'Z' are provided for setting the time
and for resetting the display to zero - 'H' for hours setting, 'M' for
minute setting and 'Z' for setting minutes to zero.
65
BEFORE DRIVING Interiors and Accessories
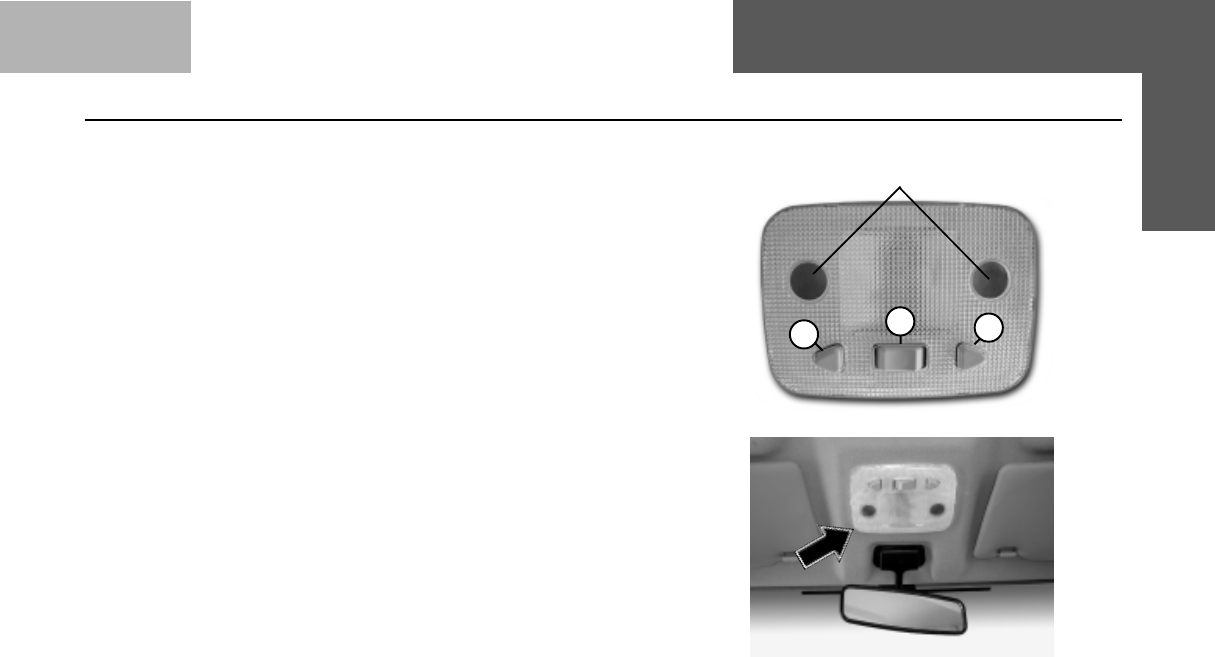
Roof Mounted Interior Light & Reading Lamps :
Interior roof light and reading lamps with inbuilt switches are
provided on the roof near the rear view mirror.
The central rectangular toggle switch (1) has three positions :
zWhen the central rectangular toggle switch is in the MIDDLE
position, the light will come ‘ON’ only when any of the doors are
opened.
zWhen this switch is in the RIGHT position, the light will remain
‘OFF’ in all conditions.
zWhen this switch is in the LEFT position, the light will be
continuously ‘ON’ irrespective of whether any of the doors are
open.
Two more triangular push type switches (2) are provided to operate
the individual reading lamps.
Reading Lamps
Roof Mounted Interior Lamp and
Reading Lamps
1
22
66
Front Seats and Seat Adjustments :
Front Seats : Both the driver and co-driver seats are of bucket
type to provide maximum riding comfort.
Moving the seats forward and backward :
To adjust the seat position, lift the lever under the seat cushion
front, then move the seat to the desired position and release the
lever.
Make sure the seat is locked in position.
Adjusting the angle of the seat back :
To adjust the angle of the seat back, a lever has been provided on
the sides of the front seats. By lifting the lever, you can adjust the
angle of the backrest.
Do not adjust the seat when the car is in motion.
Always adjust the seat back to an upright position and sit
well back in the seat.
BEFORE DRIVING Interiors and Accessories
2
1
Front Seat Adjustment Levers
1. Lever for backward & forward movement
2. Lever for Seat Backrest angle
67
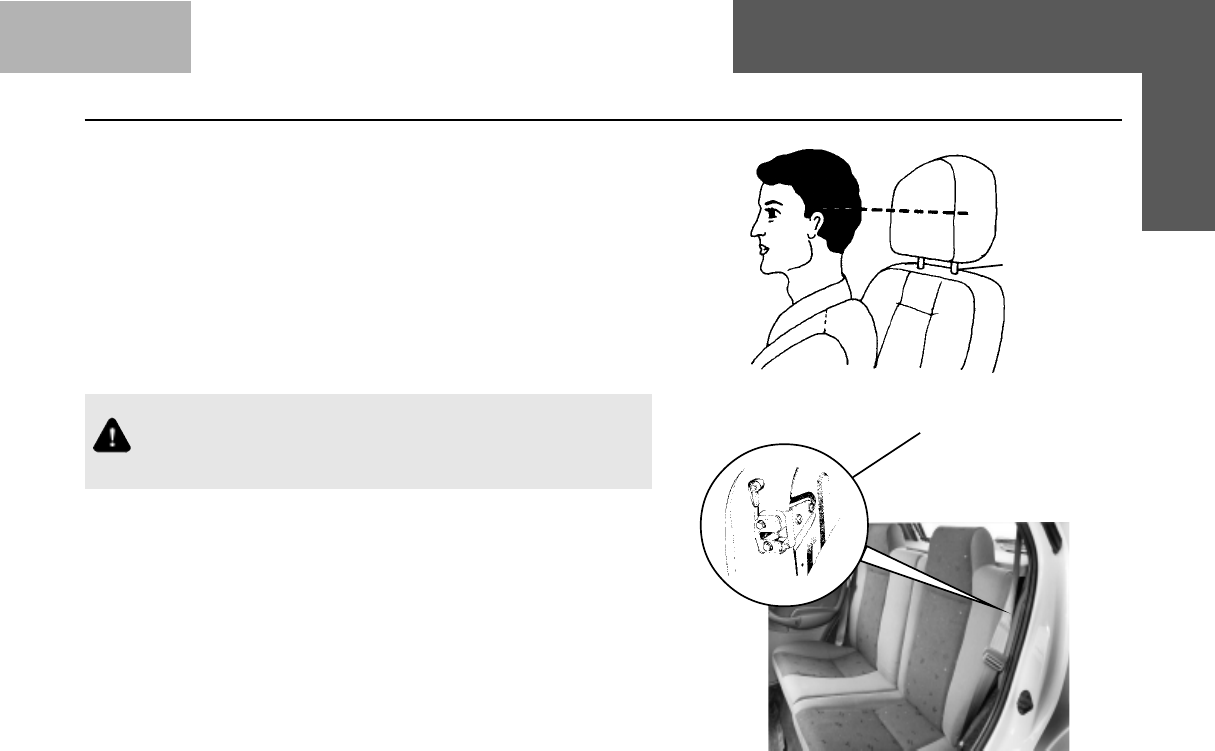
Head-rest : (Adjustable on the front seat & fixed on the rear seat)
Head-rests are designed to help reduce the risk of neck injuries in
case of accidents. For best protection, adjust the top of the headrest,
so that it is in level with one's ears. To adjust the head-rest pull /
push it to the desired position until it clicks. The head-rest can be
adjusted up to 64 mm in steps of 16 mm.
If headrest is required to be removed (for cleaning fabric etc.) pull
the headrest fully up, then push notch button with a thin punch
while pulling the headrest up. To install proceed in reverse.
Avoid driving the car with the head-rest removed as it is a
safety item. Do not attempt to adjust the head-rest while
driving the car.
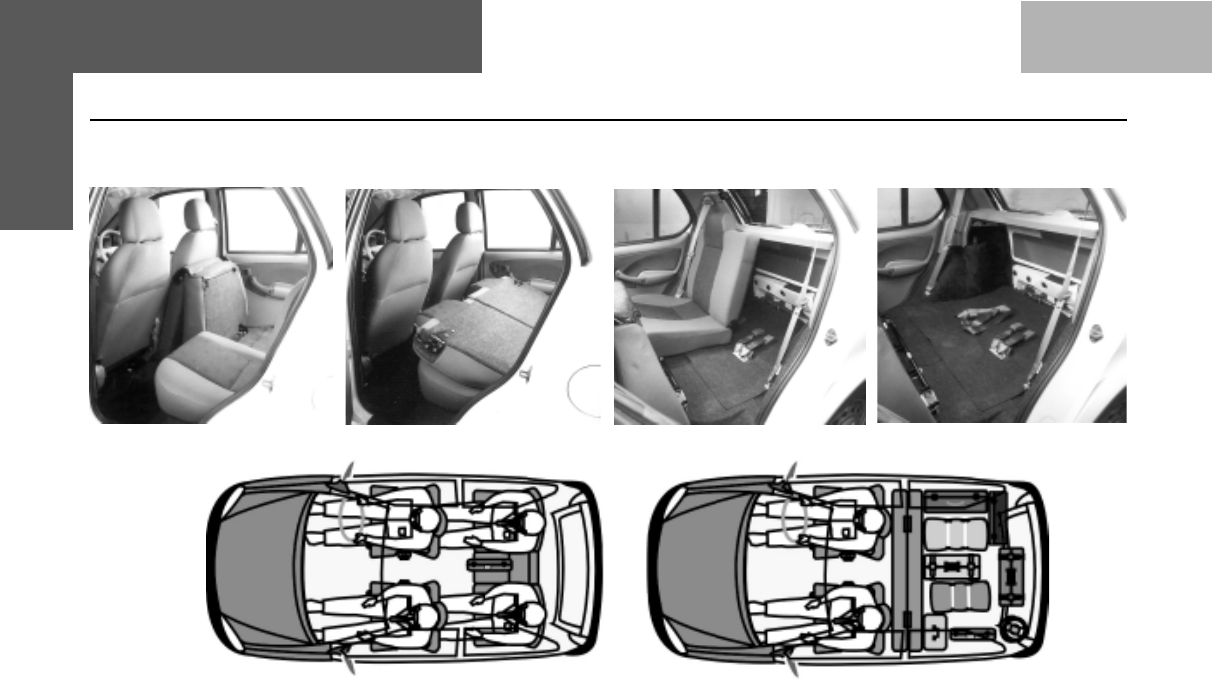
Rear Seat : (Split 60 : 40)
A cushion bench 60 : 40 split seat has been provided for the rear
passengers. Any one of the split seat back can be folded by
releasing the latch, on both the 'C' pillars simultaneously. For making
more luggage space, the folded rear seat can be somersaulted
further. Before summersaulting ensure that the front seats are at
3/4 the full travel towards rear.
For fixing the seat back upright, just push back the seat in position.
It will get locked by itself.
Seat Release Latch on 'C' pillar
Release
Button
BEFORE DRIVING Interiors and Accessories
68
SOMERSAULTED POSITION
Lugguage space before somersault
operation Lugguage space after somersault
operation
BEFORE DRIVING Interiors and Accessories
69
BEFORE DRIVING Interiors and Accessories
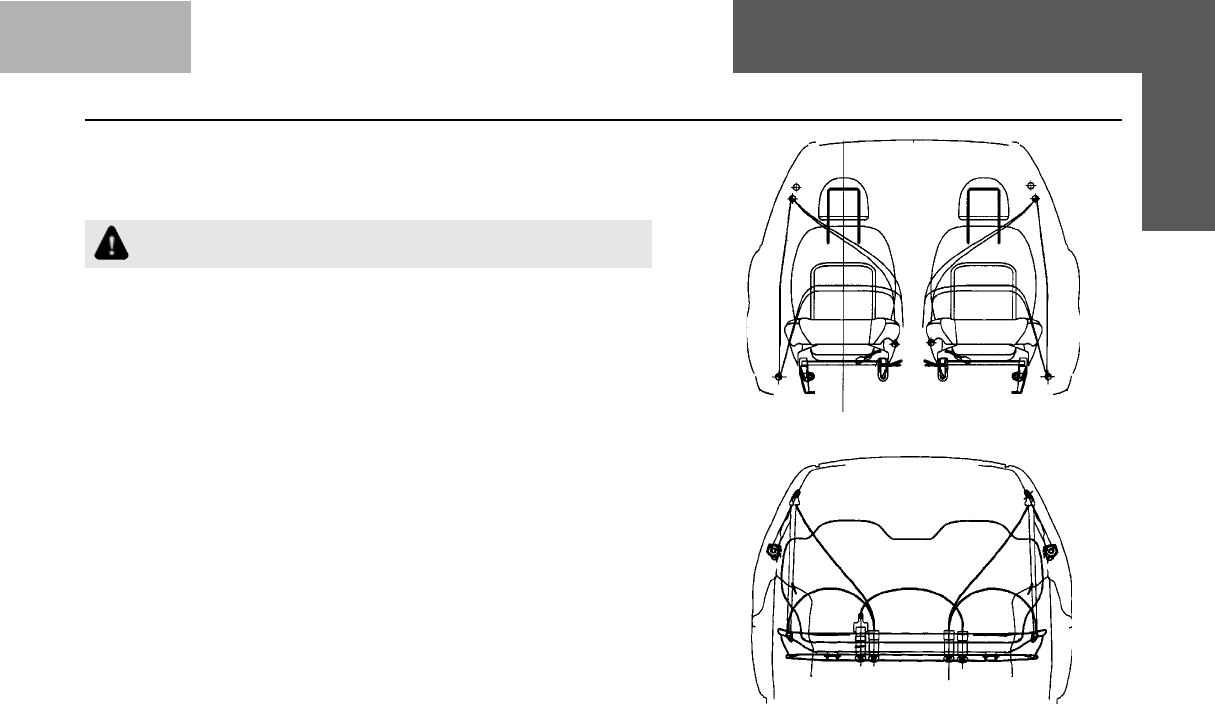
Seat Belt
Seat belts have been provided on the front seats (with micro swtich
on driver's side for the deluxe model)
Always wear seat belts, while driving.
Seat belt adjustment :
1. Pull the tongue across your body and insert it into the buckle.
2. Check and ensure that the belt is not twisted.
3. Position the lap portion of the belt as low as possible across
your hip bone.
4. Pull up the shoulder part of the belt to remove the slack.
5. Make sure that the belt goes over your collar bone and across
the chest.
6. To unlatch the belt, press the red button on the buckle. Guide
the belt to the pillar as it retracts.
7. Each belt should be used by one occupant only (such as front
LH/RH, Rear outboard passenger LH/RH & Rear lap belt-location
as per sketch). The belt must not be put round a child, seated
on passenger's lap.
8. When the belt has been use in a serious accident or shows
signs of severe fraying or of having been cut, replace the belt
kit.
9. The belt must not be altered or modified during use.
10.The belts are meant (intended) for adult occupants only.
Rear seat seat-belts arrangement
viewed from rear
Front seat seat-belts arrangement
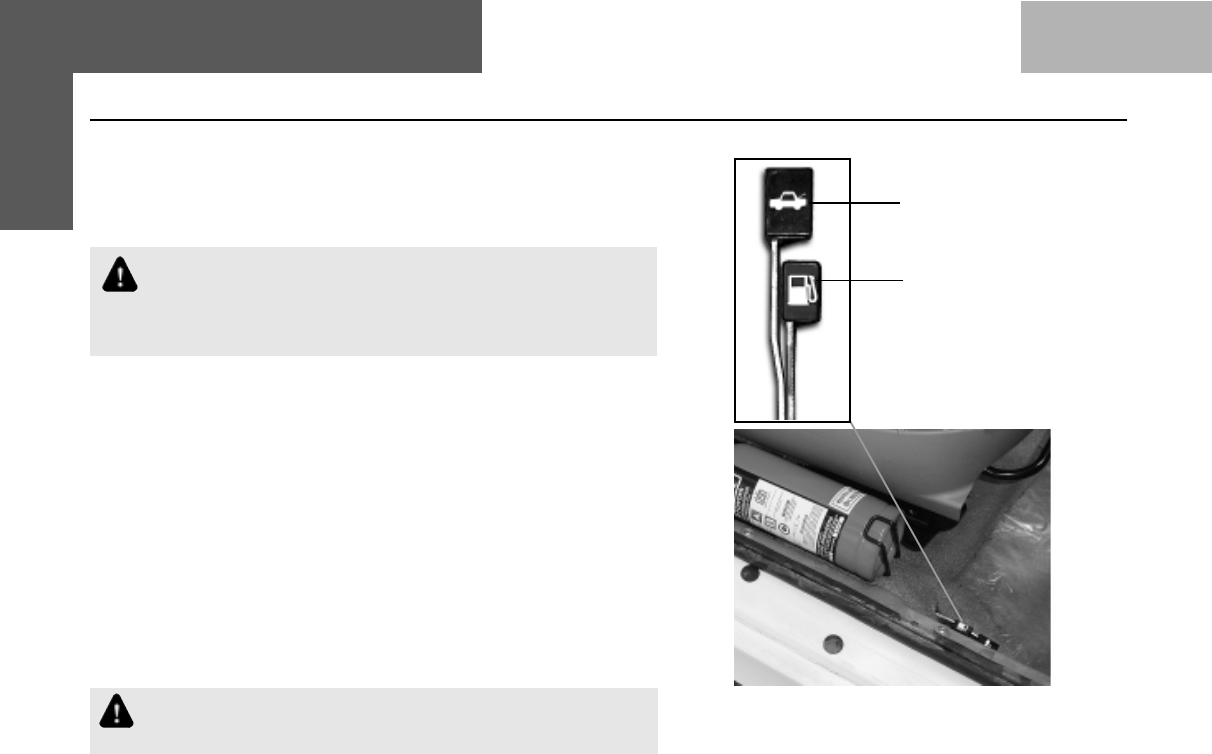
70
11.The belts if required should be repaired, by authorised
personnel only.
12.The belts should not be disassembled, if required, authorised
personnel only should carry out disassembly and assembly.
Do not wear your seat belt over hard or breakable objects
in pockets or on your clothing. If an accident occurs, objects
such as glasses, pens, etc. under the seat belt can cause
injury.
Tailgate opening :
A tailgate opening lever is provided on the floor between the driver's
seat and door.
Pull the lever up to unlock the tailgate.
Lift the tail gate by hand using the recess in the centre, near the
bumper. The two telescopic balancers will open the door
automatically.
To close and lock the tailgate push it down.
The tailgate can also be opened with the key.
While tailgate opening the parcel shelf also gets lifted up by the
lifting cords and parcel shelf closes back while closing the tailgate.
Ensure proper closing of parcel shelf while closing the
tailgate.
Tailgate opening
lever
Fuel flap opening
lever
BEFORE DRIVING Interiors and Accessories
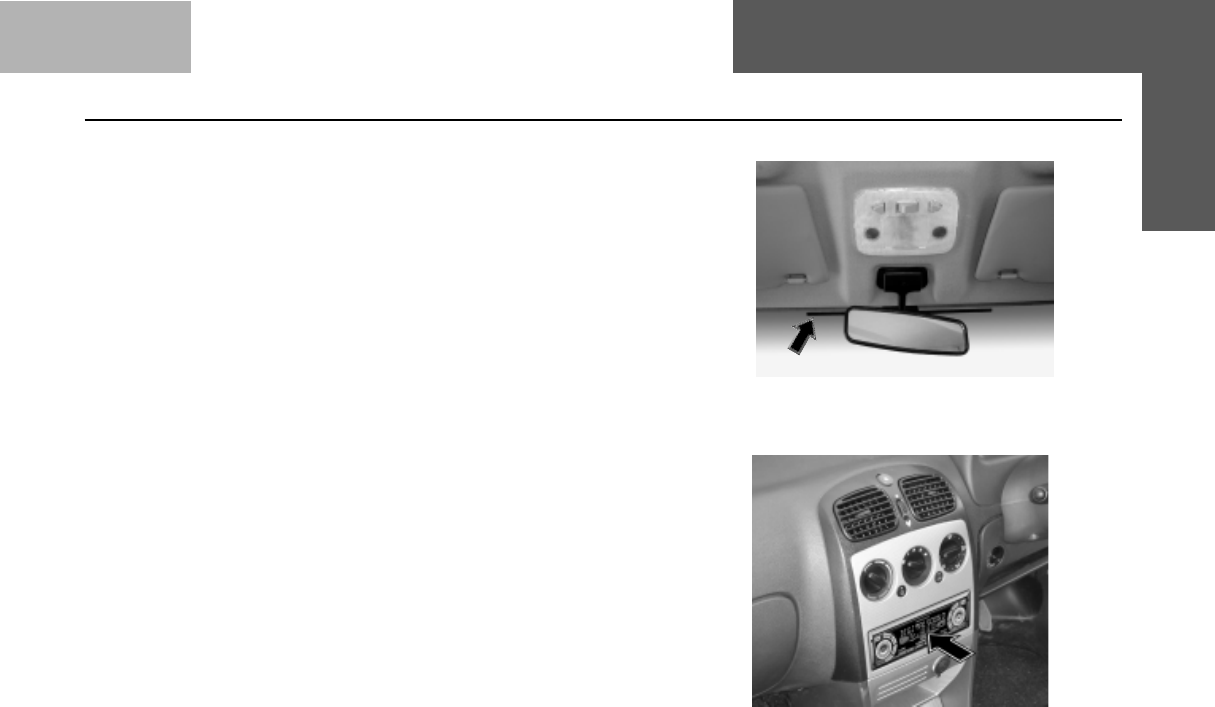
71
BEFORE DRIVING Interiors and Accessories
Fuel flap opening :
The fuel flap is located on the left rear side of the car. The fuel flap
can be opened by pulling the opening lever located near the tailgate
opening lever and can be locked by simply closing the flap.
Music System :
A provision has been made for fitment of music system.
An internal antenna comes fitted on the front windshield glass on
the inner side near the rear view mirror. Provision for the installation
of speakers is made on the dash board on both the sides and on
each of the front doors.
If the music system is originally provided in your vehicle, please
refer manufacturer's manual for operation of the music system.
Electrical Accessory fitment :
Provision has been made in your car wiring to fit the following
electrical accessories :
1. Engine Compartment Lamp
2. Front Fog lamp
3. Additional Horn (on LH side)
4. Reversing buzzer
5. Music System
6. Speakers
7. Immobilizer for vehicle security
For details of fitment please contact our nearest authorised service
outlet. Provision for Music System
Antenna
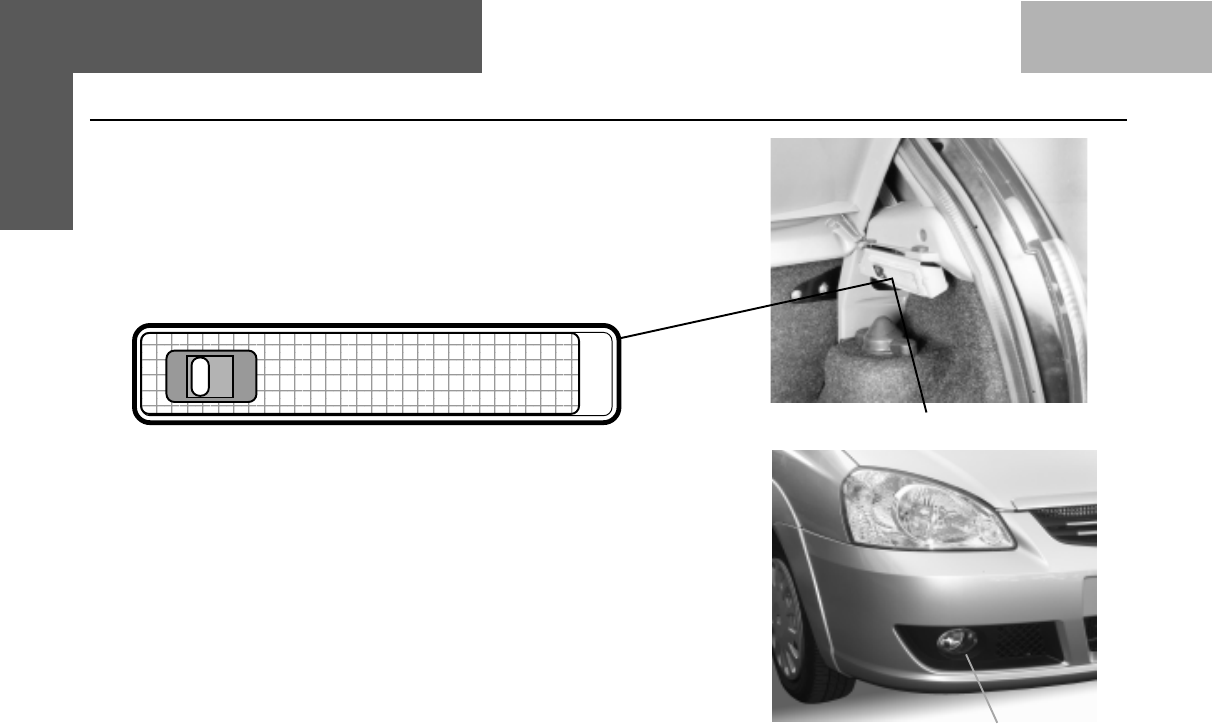
72
Load Area Lamp (if installed)
A lamp is fitted in the luggage compartment to illuminate the luggage
area, when required. To operate this lamp, a simple ON/OFF switch
is provided along with this lamp. For the lamp to come 'ON' with the
opening of tailgate, the switch should be in 'ON' position.
Load Area Lamp
ONON
ONON
ON
OFFOFF
OFFOFF
OFF
Front Fog Lamps (if installed)
The Front fog lamps are provided with halogen lamps of H11 type
to provide adequate light in the vehicle front. This enables to drive
the vehicle during rains, fog, etc.
Fog Lamp
BEFORE DRIVING Interiors and Accessories
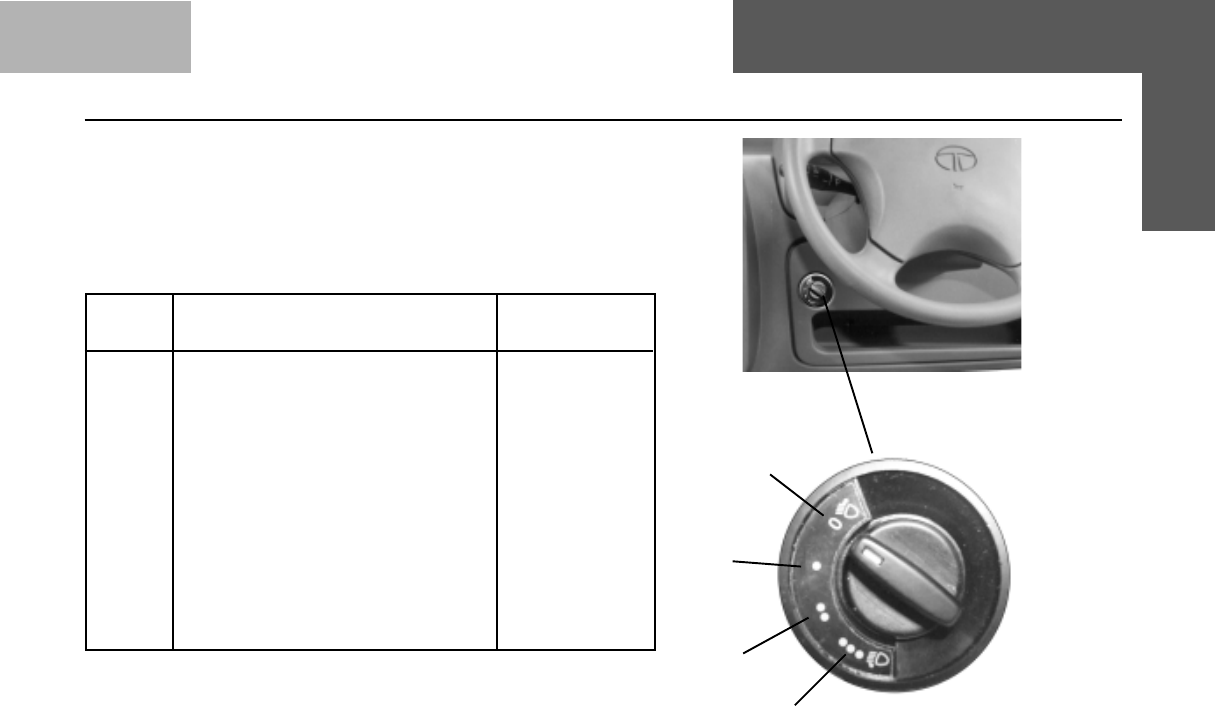
73
BEFORE DRIVING Interiors and Accessories
22
22
2
00
00
0
11
11
1
33
33
3
Headlamp leveling switch (if installed) :
A motorised headlamp leveling arrangement with the setting knob
at the dash board is provided on the LH side of steering column.
As and when required, head lamp leveling, setting is done by
rotating the knob to select one of the 3 levels marked in the switch
depending upon the loading of the vehicle.
Sw. position/
Marks assigned*
1 One person in Driver seat 0
2 Driver + One passenger in front 1
3 Driver + One passenger in front +
All the seats at rear occupied 2
4 All the seats occupied 2
5 All the seats at rear occupied +
Luggage in boot space to achieve 3
permissible load on the rear axle**
6 Driver + Luggage in boot space to
achieve permissible load on the 3
corresponding axle**
*Switch position / Marks assigned is for highest ULW.
** If the maximum permissible laden mass is obtained befire the
permissible load on the axle, the loading of the boot shall be
limited to the figure, which enables that mass to be reached.
Sl. No. Loading condition

74

75
STARTING & DRIVING
•Opening & closing the bonnet
•Check list
•Fuel level
•Engine oil level
•Engine coolant level
•Brake fluid level
STARTING & STOPPING
•Starting the engine
•Stopping the engine
PREPARING TO DRIVE
•Preparing to drive
•Running in instructions
•Gear shifting
FUEL ECONOMY
•Instructions to improve fuel economy
DRIVING IN ADVERSE CONDITIONS
•Driving through water
•Driving on a rainy day
•Night driving
•Towing the vehicle
DRIVING A DIESEL / PETROL CAR
DRIVING SAFETY
CAR SAFETY CHECKS
STARTING AND DRIVING THE CAR
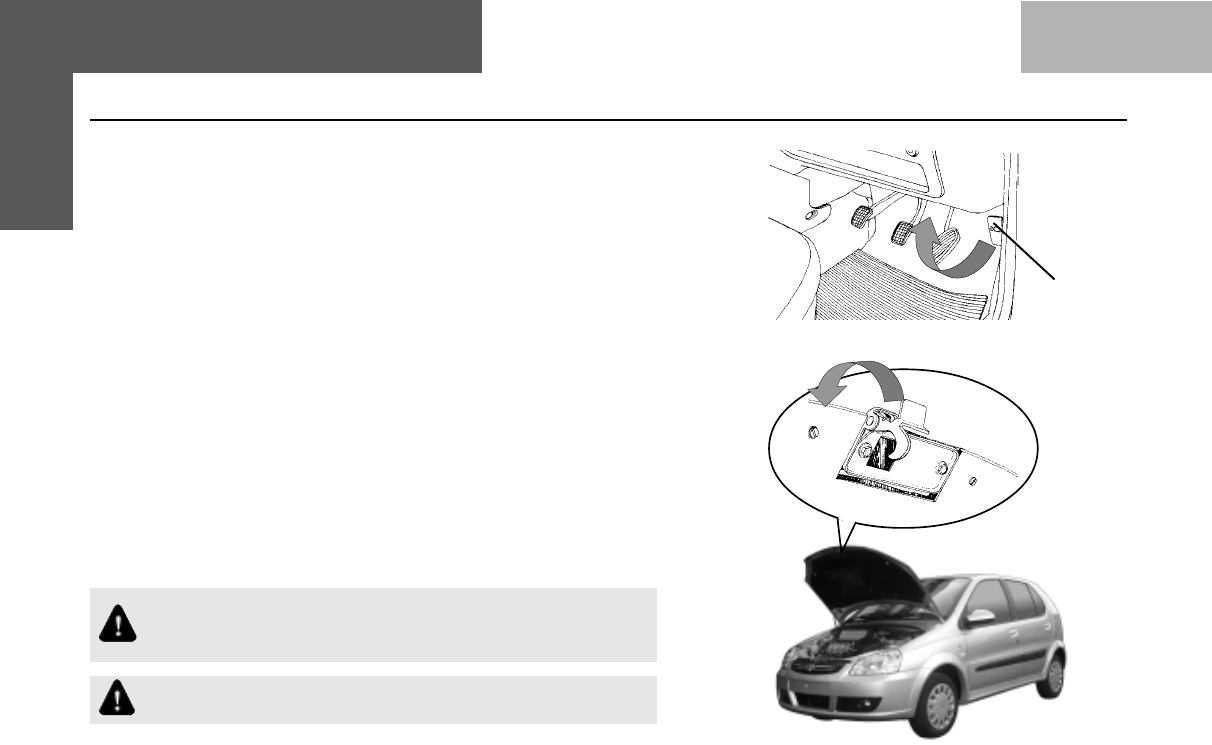
76
OPENING & CLOSING THE BONNET
Opening :
1. Ensure that the car is in neutral gear with the parking brake
applied.
2. Pull the bonnet release lever located under the right hand corner
of the dash board. The bonnet will pop up slightly.
3. Raise the bonnet slightly and with your finger lift the secondary
lock lever located under the bonnet centre.
4. Lift the bonnet up. Pull the bonnet stay rod from its clip and
insert the free end into the slot in the bonnet, slide stay rod
outward to secure.
Closing :
1. To close the bonnet disengage the stay rod & clamp it properly.
2. Lower the bonnet and drop it from a short height to shut.
Ensure that the bonnet is properly locked before driving.
Do not press the bonnet onto the bonnet lock.
Do not leave the engine running in a closed garage.
STARTING & DRIVING Opening & Closing the Bonnet
BonnetBonnet
BonnetBonnet
Bonnet
releaserelease
releaserelease
release
leverlever
leverlever
lever

77
Check Adjust Ensure
1. Tyre pressure 1. Front seat 1. Bonnet is fully closed
2. Coolant level 2. Rear view mirrors 2. All doors are properly closed
3. Engine oil level 3. Seat belts are fastened
4. Brake fluid level 4. All switches & lamps are
5. Water in windshield washer reservoir working
6. Power steering oil level (if installed) 5. Gear shift lever is
7. Battery electrolyte level in neutral position
8. Fuel level 6. Parking brake is released
STARTING & DRIVING Check List
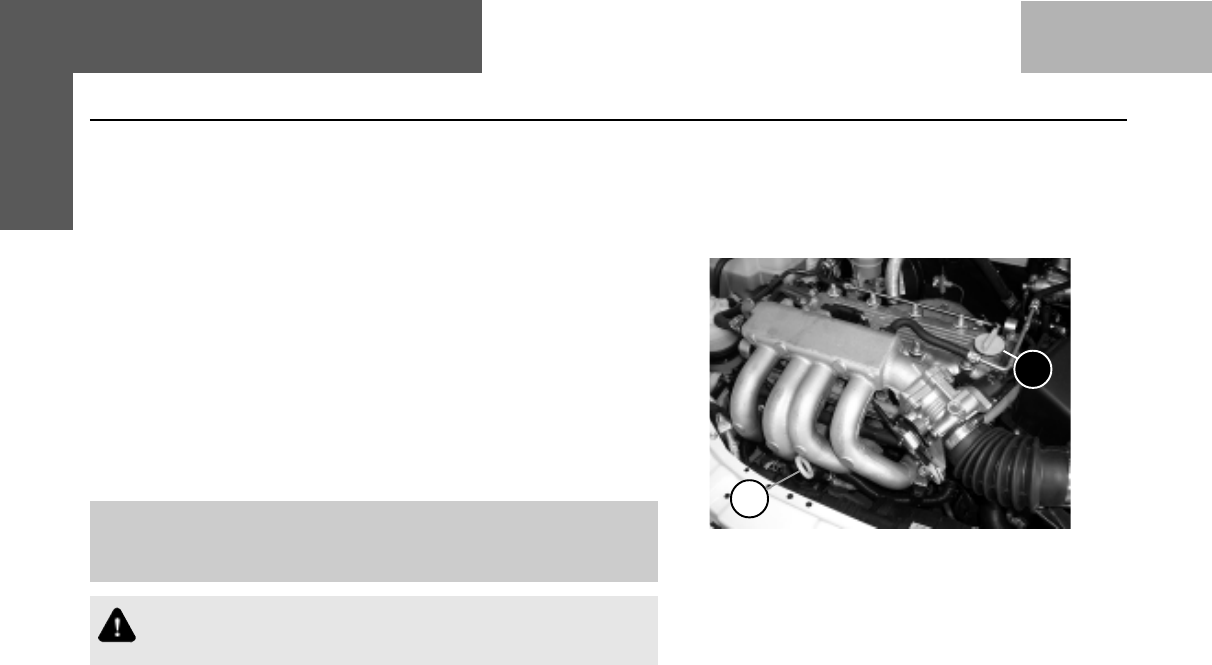
78
Fuel Level :
Check fuel level on the gauge in the instrument panel. If the pointer
is in the red zone and/or visual low fuel level warning indicator
(Amber colour LED) glows. , please ensure fuel filling at the earliest.
Avoid driving with fuel at minimum level.
Engine Oil Level :
1. Open the bonnet. Pull out the dipstick and wipe it with a clean
cloth or a paper napkin.
2. Insert it again to its original position.
3. Pull out the dipstick again and observe the oil level on the
dipstick.
4. Top up oil if the oil level is below the mid point of min. and max.
marks.
Note : Oil level should not exceed the max. mark. Always check
the oil level when the car is on level ground and the engine is
cold.
Check the engine oil level if low oil pressure warning comes
'ON' while driving.
STARTING & DRIVING Fuel Level & Engine Oil Level
2
1
1. Engine oil filling cap 2. Dip stick
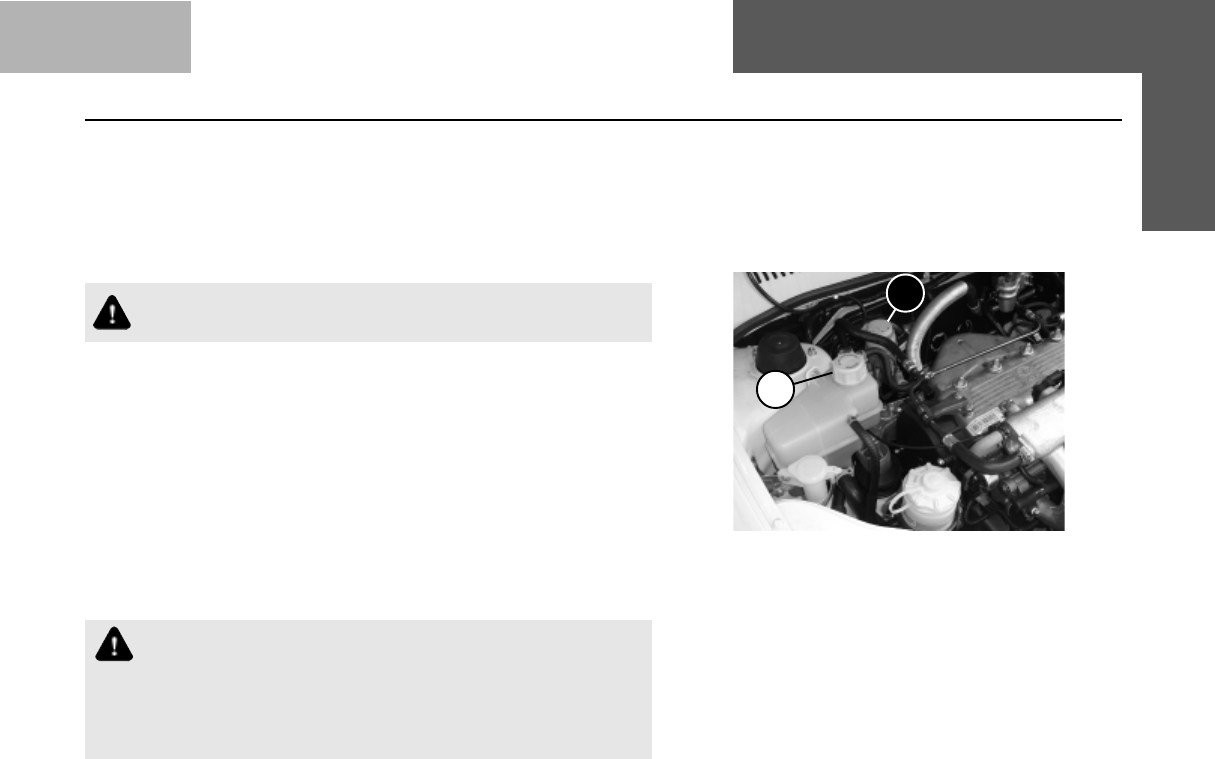
79
Engine Coolant Level :
The coolant level is visible through the translucent reservoir. It should
be between max. & min. marks. If it seems less, add premixed
coolant into the auxiliary tank upto the max. mark. Put the cap
back properly.
Never remove the filler cap when the engine is hot. Use
only branded premixed ready to use coolant.
In case of an emergency, normal water can be used, but the system
should be flushed & filled with proper coolant mixture at the earliest.
Brake Fluid Level :
The level of the brake fluid must be between the min. & max. marks
on the side of the brake fluid container. If the level falls below the
min. mark, add recommended brake fluid. (Refer chapter - Fuels,
coolants & lubricants)
In case of spongy or hard pedal or low brake efficiency, please
contact the nearest Authorised Service outlet.
1. Do not allow brake fluid to make contact with the skin or
eyes.
2. Do not allow brake fluid to splash or spill on the paint
surface as it will damage the paint. In case of spillage,
wipe it off immediately.
STARTING & DRIVING Engine Coolant & Brake Fluid Level
1
2
1. Engine Coolant filling cap
2. Brake Fluid filling cap
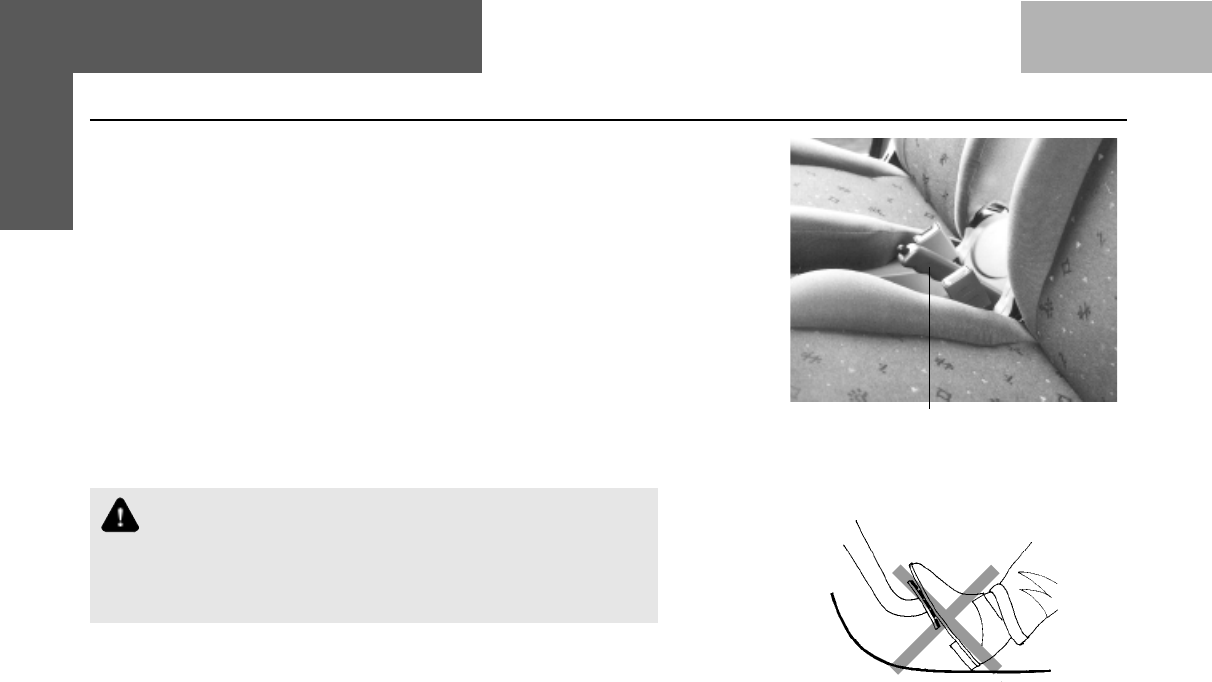
80
STARTING & DRIVING Starting & Stopping
STARTING THE ENGINE
Before starting the engine :
• Apply the parking brake fully.
• Ensure that the gear lever is in neutral position.
Starting the engine :
• Press the clutch pedal & turn the ignition key to 'IGN' position.
Ensure the "Check Engine" lamp is "ON".
• Do not press the accelerator.
• Crank the engine, if the engine starts but fails to run then repeat
the above procedure. Release the key as soon as the engine
starts to return to IGN position. Ensure the "Check Engine" lamp
is "OFF". This is a normal phenomenon of "Check Engine" lamp.
Do not crank the engine for more than 10 sec. continuously.
If the engine does not start, wait for 30 sec. before cranking
it again. Release the key immediately after starting the
engine, otherwise the starter motor/flywheel ring may get
damaged.
Starting the engine with a malfunction :
• Press the clutch pedal and turn the ignition key to 'IGN' position.
• Press the accelerator pedal by 1/4th of full travel. Do not depress
the accelerator pedal fully down.
Parking Brake

81
• Crank the engine. If the engine starts, car may be driven
to nearest authorised service outlet, even though "Check
Engine" lamp is indicating a malfunction.
• In the above condition engine may stall if the accelerator
pedal is released back to idle position.
• If engine stalls, repeat the above procedure from
beginning & drive the car without releasing the
accelerator pedal to "Idle" position.
STARTING & DRIVING
Brake Fluid Level & Stopping the engine
Stopping the Engine :
• Let the car come to a stop and engine to idle.
• Turn the key to 'OFF' position.
Parking :
• Park the car in a safe place. Switch on the indicator
signal before turning to park.
• Apply the parking brake.
• Ensure that all window glasses are closed and all lamps
are turned 'OFF'.
• At night, put on the parking lights if required.
• Remove the key from the ignition switch.
• Place wheel chokes at the wheels if parked on a slope.
Do not leave the key inside the car.
Do not leave children unsupervised in the car.
Avoid parking the car over inflammable materials,
such as dry leaves, grass etc., as the exhaust
system is hot enough to initiate "FIRE".

82
STARTING & DRIVING Preparing To Drive
Preparing to Drive :
The following checks and adjustments should be carried out
before you start driving the car.
• Ensure that the windshield, all mirrors, windows and
outside lights are clean. Check & adjust rear view mirrors.
• Ensure that the windshield washer reservoir is full.
• Ensure that the bonnet is properly closed.
Do not put excessive pressure on top of bonnet to
avoid damage.
• Release the parking brake.
• Check that any items that you may be carrying
inside, are fully secured.
• Check & adjust seat.
• Ensure that all doors are locked properly.
• Fasten seat belt properly.
• Ensure that all gauges and indicator lights are
working.
• Check for blind areas being unobstructed in front
and rear of the car.
• Before driving off check in the rear view mirror,
for oncoming traffic. Switch on side indicator
signal when getting into main stream of traffic.
Running-in instructions :
During running-in period i.e. first 1000 km. follow the running-
in instructions given below :
A. 1. After starting the engine do not rev it up.
Warm up gradually at idling speed.
2. Avoid sudden acceleration and full throttle.
3. It is always preferred not to rev up a cold engine lest
engine bearings get affected.
B. Recommended car speeds during running-in period :
Gear Speed (kmph)
1st 20
2nd 40
3rd 60
4th 80
5th 90
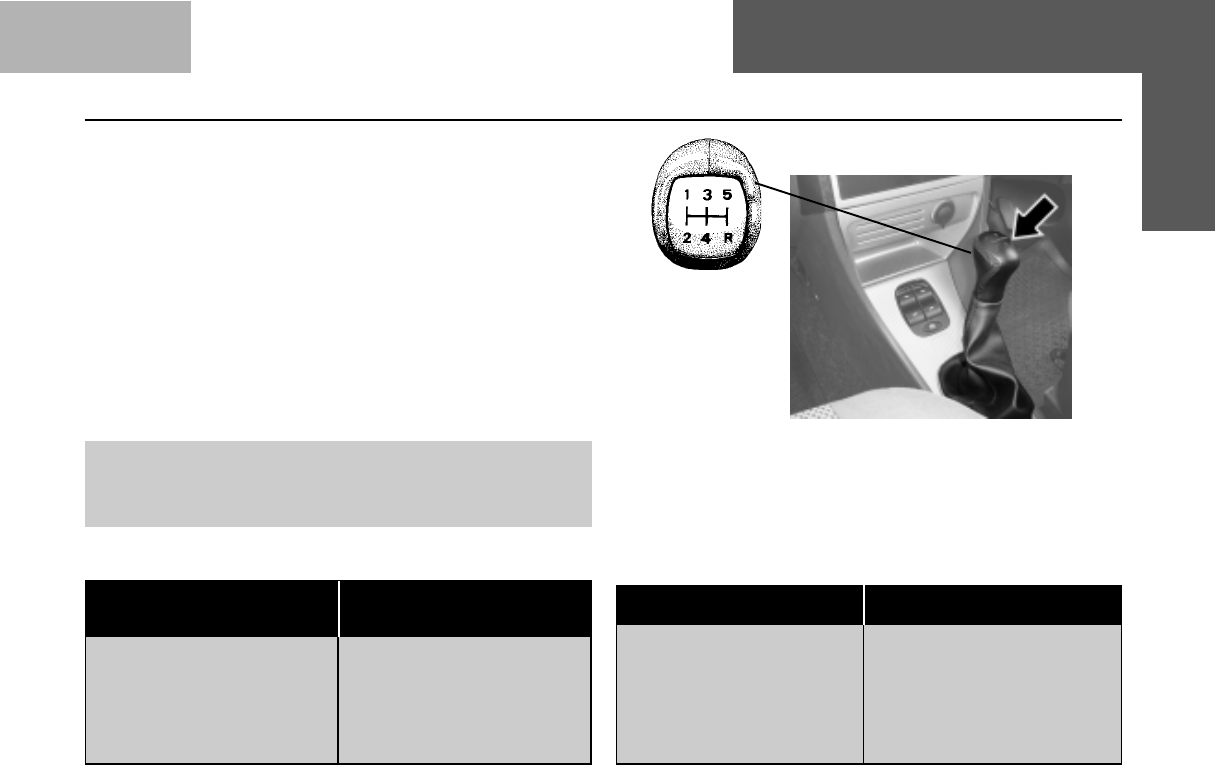
83
Gear Shifting :
All forward gears being synchronised, provide for easy and
effortless gear shifting. Always remember to press the clutch
pedal fully while shifting the gears and also to release the
clutch pedal gently.
Avoid sudden clutching i.e. abrupt release of depressed
clutch pedal.
Do not shift into reverse gear when the car is moving forward
or when the engine is not at idling r.p.m. A 5 second pause
after declutching will ensure smooth engagement of the
reverse gear. Change gears at appropriate gear change
speeds.
Note : There is an interlock provided between fifth and
reverse gear to prevent accidental shift from 5th gear to
reverse gear. (Shifting from reverse gear to 5th gear is
STARTING & DRIVING Preparing To Drive
Recommended maximum speed, during normal
operation.
Gear Speed (kmph)
135
260
385
4 120
5 125
Appropriate gear change speeds for good pick-up :
Speed (kmph) Speed (kmph)
Upshift Downshift
1st to 2nd - 25 2nd to 1st - 15
2nd to 3rd - 50 3rd to 2nd - 40
3rd to 4th - 70 4th to 3rd - 70
4th to 5th - 85 5th to 4th - 80

84
INSTRUCTIONS TO IMPROVE FUEL ECONOMY :
Your car's fuel economy is mainly dependent on your style
of driving.
To operate your car as economically as possible, use the
following driving suggestions.
Avoid Excessive Idling :
Stop the engine and start it again, if you have to wait for
more than a minute while you are stopped.
Avoid fast starts & unnecessary stops :
Start off slowly from traffic lights or stop signs to prevent
increased fuel consumption and shortening of engine life.
Avoid unnecessary deceleration (stopping or slowing down)
and then acceleration which uses more fuel.
Always maintain clean air-cleaner :
The amount of air supplied will reduce due to clogged air-
cleaner, resulting in waste of fuel due to incomplete
combustion.
Avoid incorrect tyre pressures :
Under-inflated tyres result in increased running resistance
of the tyres, leading to wastage of fuel.
STARTING & DRIVING Fuel Economy
Always have the engine tuned correctly through
recommended maintenance at an Authorised Service
outlet.
Proper Driving Practices :
Keep a safe distance from other vehicles to avoid braking
suddenly.
Do not rest your foot on the clutch pedal. It does not allow
full engine power to be transmitted to the vehicle and reduces
clutch life.
Fuel economy speeds :
Gear Speed (kmph)
1st 10
2nd 25
3rd 35
4th 50
5th 60
MPFI System
The multi point fuel injection system has been
designed to meet various load and speed conditions
of the engine and doesn't require any regular
maintenance. MPFI system should be serviced by
authorised service personnel only, if required.

85
STST
STST
STARAR
ARAR
ARTING & DRIVINGTING & DRIVING
TING & DRIVINGTING & DRIVING
TING & DRIVING Fuel EconomyFuel Economy
Fuel EconomyFuel Economy
Fuel Economy
TIPS RELATED TO FUEL SYSTEM MAINTENANCE :
Basically, the fuel system of the vehicle consists of the
following main components :
1. Fuel tank 2. Fuel Filter 3. Fuel Pump 4. Fuel Rail
5. Fuel pressure regulator and 6. Fuel injector.
The following instructions are to be followed for reducing
problems related to the fuel system.
a) Avoid keeping the fuel tank empty and preferably keep it
topped up as frequently as possible.
Empty fuel tank may lead to inner corrosion of the
tank. The rust particles thus formed may result in
frequent clogging of fuel filters. The rust particles
enter the system, resulting in malfunctioning of the
MPFI system.
b) Replace clogged fuel filters to prevent inconsistent fuel
delivery from the fuel pump.

86
STARTING & DRIVING Driving In Adverse Conditions
Driving Through Water :
•Never venture to drive through water when it flows above
the stone guard or above the tyre centre line.
•The engine may get seriously damaged if attempts are
made to cross through deep water.
•If at all the situation demands that you have to drive through
water even at great risk then,
•Keep the engine in fast idling and 'crawl' in low gear.
•After driving through water apply the brakes several times
to dry the liners and to regain original braking.
•Check the engine and transaxle for any water ingress.
Do not attempt to start the engine if the car gets flooded
due to water.
•Tow the car to a safe place.
•Take the car to the nearest Authorised Service outlet to
check for entry of water in the engine.
•Lubricants in the engine and transaxle need to be changed
in case of water entry.
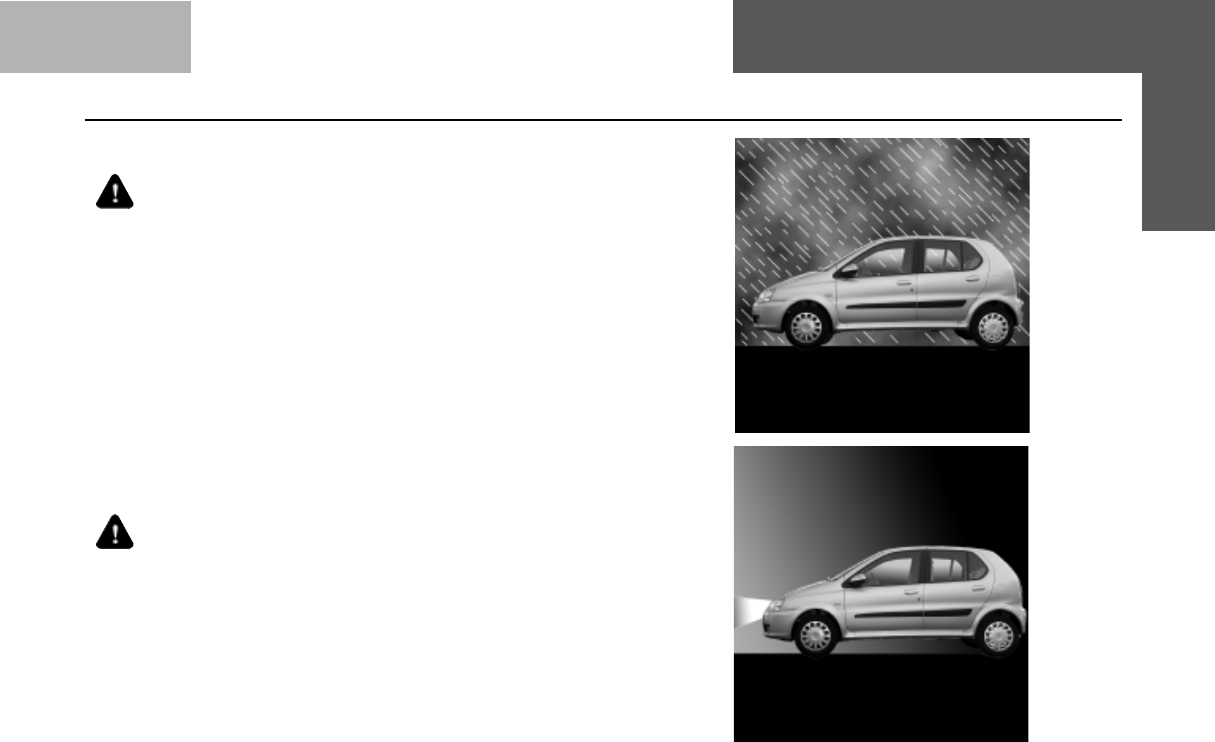
87
Driving on a Rainy Day :
•Check wiper blades for proper functioning.
•Check brakes, steering and windows.
•Check tyres for wear and tyre pressure. Worn out tyres
are unsafe on wet roads.
•Avoid harsh braking and sharp turns. It may cause loss
of steering control and lead to the car skidding.
•For slowing down, shift to lower gears and apply brakes
gently.
•Keep lights on if visibility is poor.
•Use heater and demister if required to clear off mist on
the windshield.
Night Driving :
•Dip the head lamp for oncoming traffic during night driving.
•Maintain a speed such that you can stop within illuminated
distance of the head lamps.
•Use head lamp main/dip beam to alert other users on
turns/cross roads, etc.
•Use side indicators to indicate lane change or turning.
•Put on the hazard warning switch in case of hazardous
parking or if your car is disabled to warn passing traffic.
Put on the fog lamps (for Deluxe version) if required.
STARTING & DRIVING Driving In Adverse Conditions
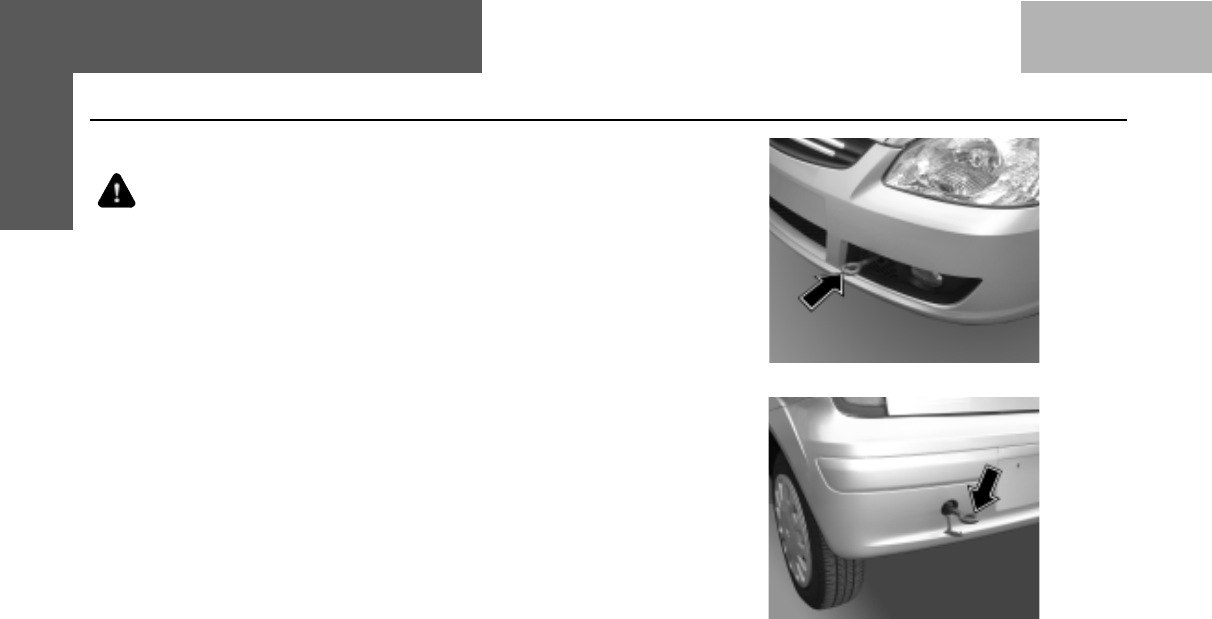
88
STARTING & DRIVING Driving In Adverse Conditions
Towing the Vehicle :
•For towing a car, the best way is to use a wrecker.
•Alternatively use a rigid tow bar.
•Avoid using a flexible cable or rope as your car may crash
into the car towing your car when it stops suddenly.
•Switch ‘ON’ the hazard warning signals of both the cars
to warn other road users.
•Where possible, keep the engine idling so that power
steering assistance and brake vacuum are available.
•Limit the speed to 20-30 kmph.
•In case of brake failure, use the parking brake to control
the car.
Rear Towing Hook
Front Towing Hook
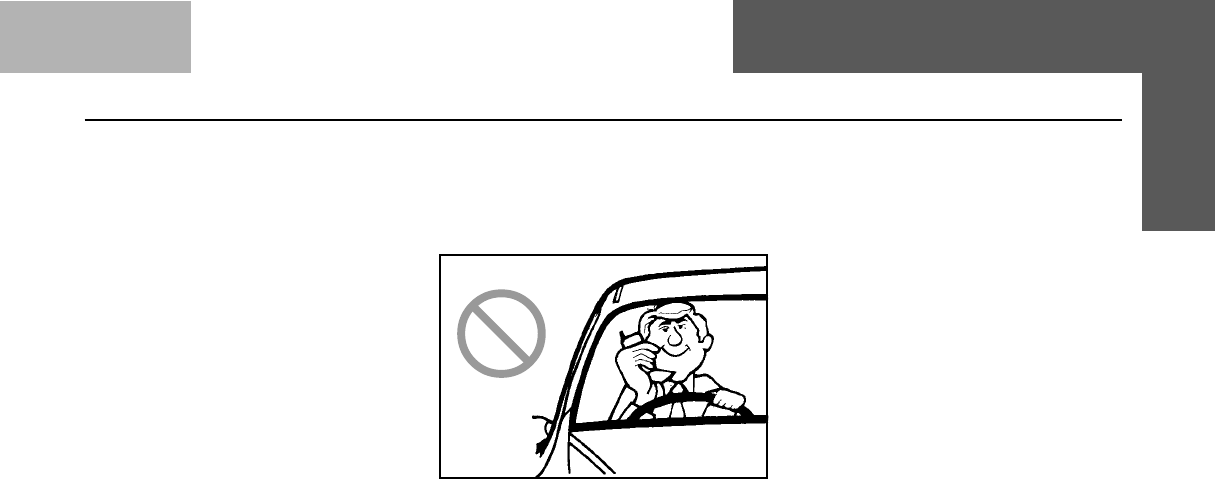
89
DRIVING SAFETY
Seat-Belt
Seat-belts are life saving equipment
and their use reduces the chance of
injury and severity of injury in case of
an accident. It is strongly
recommended that all the car occupants
should always wear the seat-belt, while
car is in motion.
Influence of Alcohol
Avoid driving under the influence of
alcohol or drugs. Alcohol and drugs will
severely impair your control on the
vehicle and increase the risk of injury
to yourself and others.
Mobile phones
Avoid using mobile phones while driving.
This could divert your attention from
the road and result in an accident.
Fatigue 'Rest Revive Survive'
Do not attempt driving when you feel
tired or sleepy. Long distance driving
can tire you very much and fatigue can
dull your reflexes and judgment. Take
a break and get refreshed at intervals.
CAR SAFETY CHECKS
Windshield/wiper/windshield
washer
Always keep windshield glass clean to
avoid any distraction in visibility. Ensure
proper working of wipers and condition
of wiper blade. Ensure that windshield
washer reservoir is full. Do not operate
wiper alone when the windshield glass
is dry, which would damage the
windshield.
Headlights
Keep headlight lenses clean. Check
for operation of headlamp in both high/
low beam conditions. Check for correct
focusing of headlamps. Use only
recommended type of bulbs. Do not
use the high beam unless it is
inevitable. Its dazzle may glare the
driver of the oncoming car thus causing
an accident.
STARTING & DRIVING Driving Safety
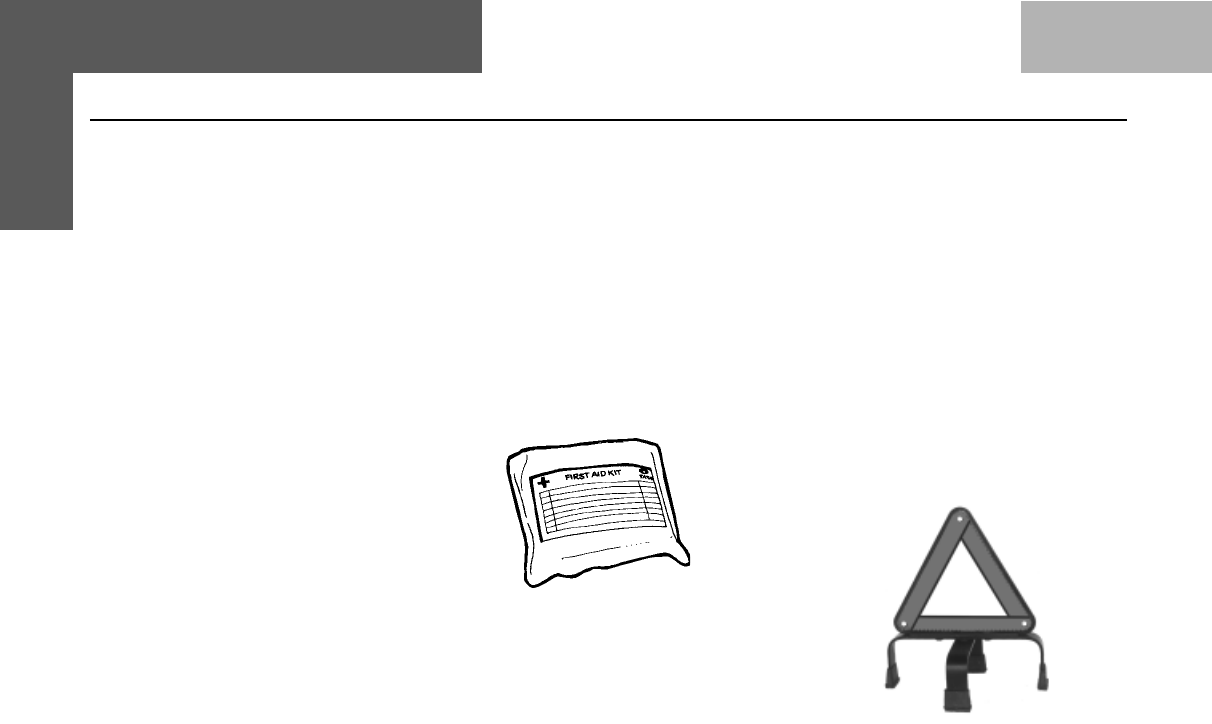
90
Side indicators / Hazard warning
Ensure that all side indicators/hazard
warning lights are always in working
condition and they are used when
required.
Horn
Ensure the horn is working properly.
Horn provides safety to other road
users by alerting your presence.
Brakes
Ensure the brakes are in working
condition. Check brake fluid level in
reservoir. Do not drive the car when
brake warning lamp is 'ON'.
Tyres
Check the condition of tyres for any
abnormalities. Maintain correct tyre
pressure, it is very important
particularly when subjected to extreme
conditions, such as high speed, high
load and high outside temperature. Do
not use worn or bald tyres on the front
wheels.
First Aid Kit :
First aid kit is provided in your car.
This is for use in case of minor injuries.
It is to be regularly checked for any
disintegration and should be updated
regularly.
Advance Warning Triangle :
There is an advance warning triangle
provided along with your vehicle. In
case there is a breakdown and the
vehicle is parked at the side of road,
then the triangle is to be kept as per
instructions given below :
Remove advance warning triangle from
case and assemble.
Place the triangle on the road behind
the vehicle when it stranded on the
road. The triangle must be at least 50
meters behind the vehicle in the same
lane of traffic.
Increase the distance to 150 meters
on a highway or if a bad/hill top
obscures the view.
STARTING & DRIVING Driving Safety

91
MAINTENANCE POINTS
zEngine compartment
zEngine compartment lamp
zWindshield washer
zAir Filter
zEngine cooling system
zEngine oil and oil filter
zBelt tension
zFuel system
zTransaxle oil
zCluth & clutch adjustment
zBrake & brake adjustment
zPower steering
zBattery
zCatalytic Converter
zSpark plug
zCarbon canister
zLPG filter
zLPG pressure regulator diaphragm
MAINTENANCE & CAR CARE
zStarting the engine with jump leads
zWheel change
zWheel alignment
zWheel balancing
zTyres & tyre rotation
zSpare wheel
zRepairing a tyre / tube
zFuses & Relays
zHead lamp and head lamp adjustment
CAR CARECAR CARE
CAR CARECAR CARE
CAR CARE
zWashing
zPolishing
zCleaning of carpets
zCleaning of glass
zWiper care
zPaint care
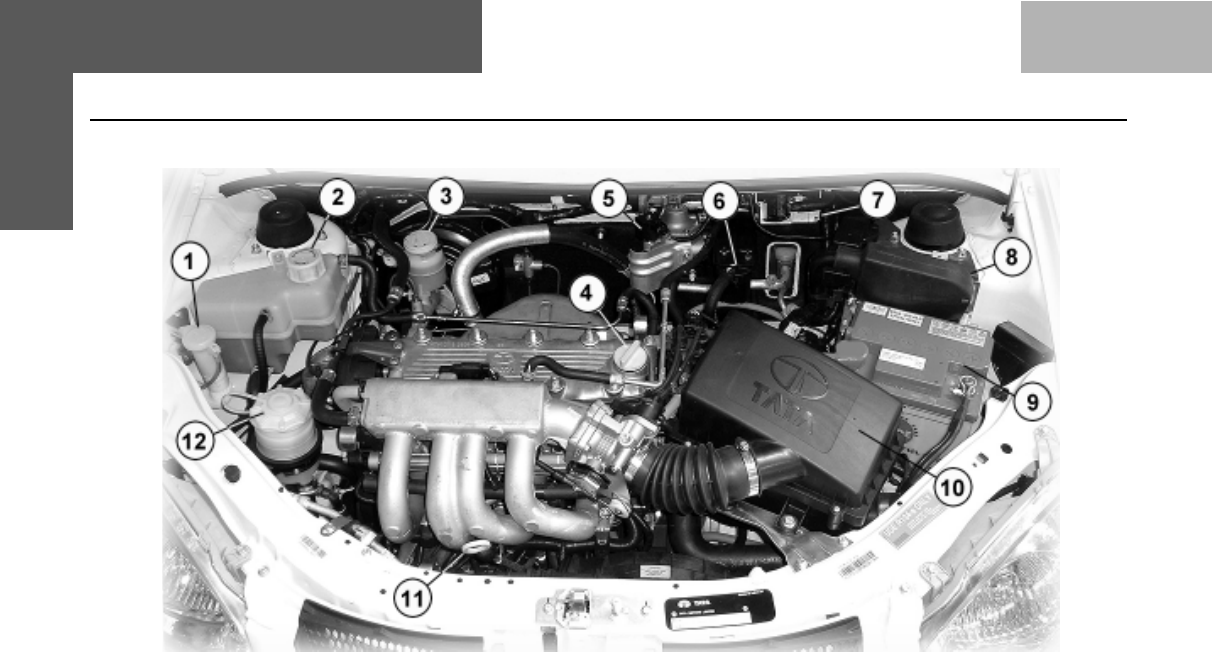
92
MAINTENANCE POINTS Engine Compartment
ENGINE COMPARTMENT - INDICA LPG
1 Window Washer Fluid container 2 Engine Coolant Tank 3 Brake Fluid Container
4 Engine Oil Filling Cap 5 LPG Regulator 6 LPG Fuel Filter
7 LPG - ECU 8 Main ECU 9 Battery
10 Air Filter 11 Dip Stick 12 Power Sterring Fluid Container
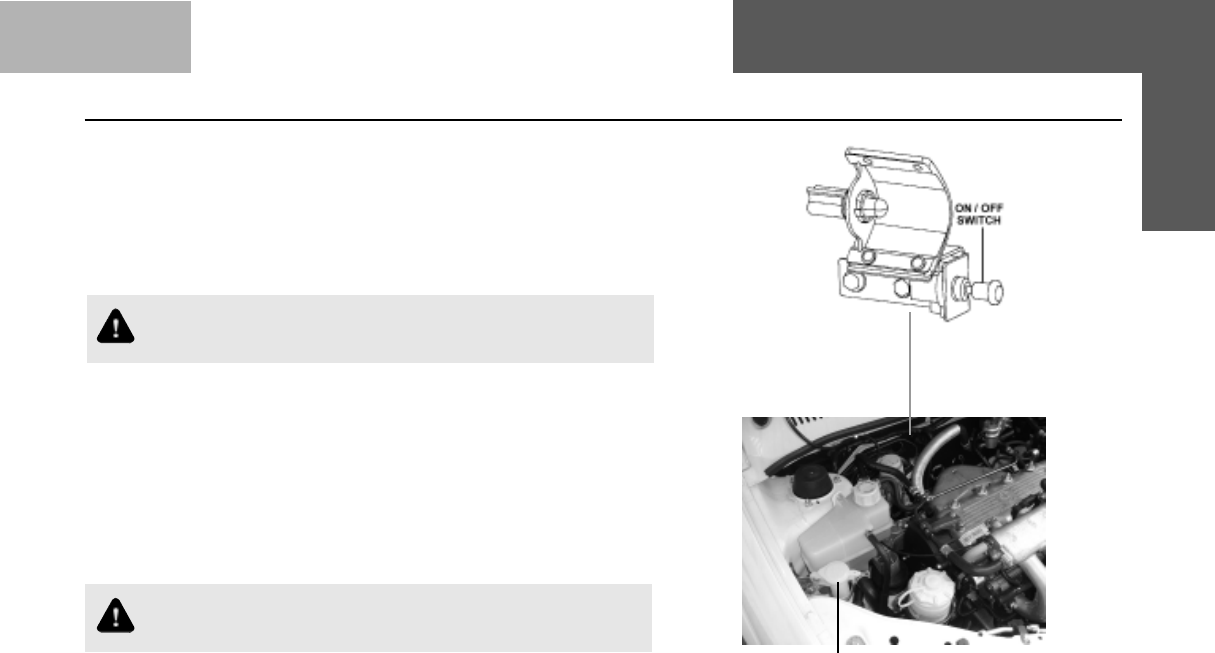
93
MAINTENANCE & CAR CARE Engine Compartment Lamp & Windshield Washer
ENGINE COMPARTMENT LAMP : (if fitted)
Engine compartment lamp is provided to illuminate the engine
compartment.
A push - pull type switch is provided to operate the lamp.
Do not forget to switch 'OFF' the engine compartment lamp
before closing the bonnet.
A provision has been made for installation of engine compartment
lamp in standard version.
WINDSHIELD WASHER :
Windshield washer fluid container is located behind the front right
hand side panel and its filler neck is provided near auxiliary tank in
the engine compartment.
Do not add detergent or any solvent in the windshield
washing water.
Windshield Washer Fluid Container
Engine Compartment
Lamp
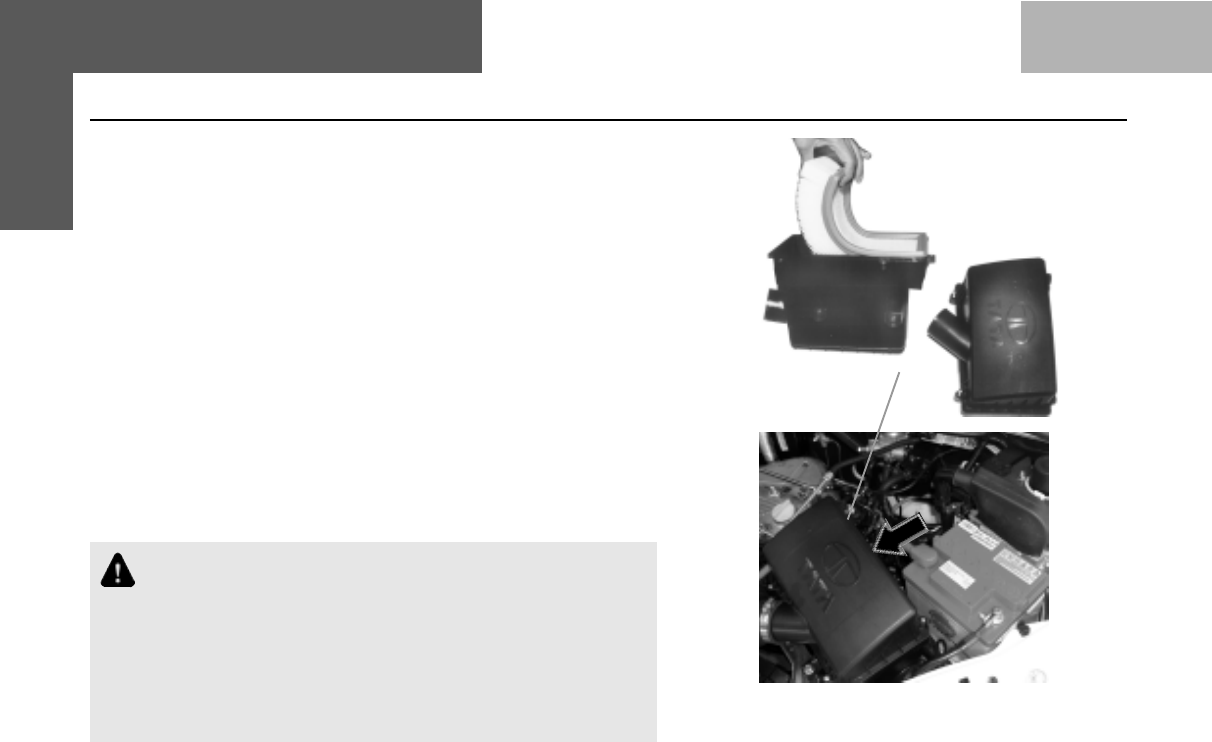
94
AIR FILTER :
The air filter element should be periodically cleaned. Replace the
air filter element with a new one, if necessary.
Always use a genuine air filter element.
The air filter is located on the LH side of the engine compartment.
Replacement of Air Filter Element :
a) Remove the cover of the air filter, by loosening the screws.
b) Remove the air filter element.
c) Clean it gently by tapping. Clean air filter cover and air ducting.
d) Check the element for puncture or pin holes by holding against
a bright light source.
e) If found to be OK, reinstall the filter element. Fit the cover with
screws.
a) When a car is driven under dusty conditions, frequent
replacement of the air-cleaner element is necessitated.
b) Clogged air-cleaners lead to greater intake resistance
and result in increased fuel consumption. Using low
pressure compressed air, blow off dust on the air cleaner
element. If the air cleaner element appears to be choked,
replace it with a new one.
MAINTENANCE & CAR CARE Air Filter
Air Filter
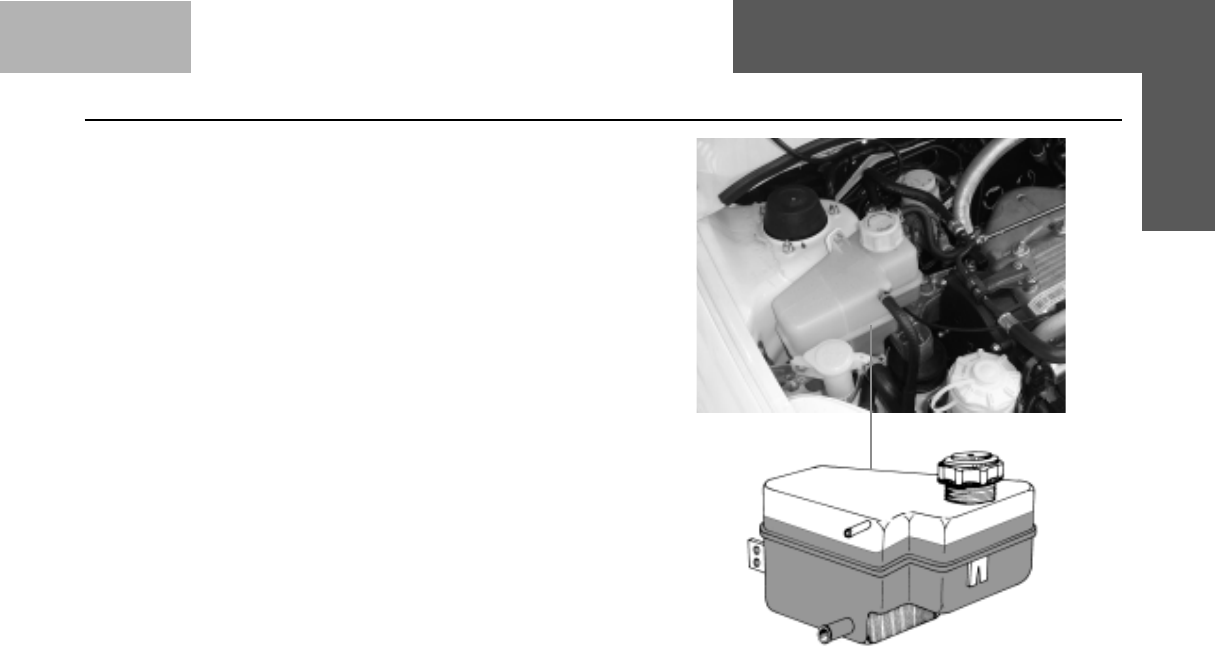
95
ENGINE COOLING SYSTEM :
If engine overheating occurs, there could be a fault in the cooling
system which may be due to :
1. Insufficient coolant in the cooling system or dirt/scales having
accumulated inside the cooling water passages especially in
the radiator core.
2. Choking or damage of radiator passages.
3. Defective thermostat.
4. Non operation of electrically operated fan. (40 Amp. fuse blown)
5. Coolant leakage.
6. Auxiliary tank cap not sealing properly.
7. A.C. condenser fan not working.
8. Excessive refrigerant charging in the A.C. system.
9. Improper bleeding of the cooling system.
Prevention of Rust Formation :
To prevent rust formation use the branded premixed engine coolant
in the radiator.
This is sufficient to operate the car upto -400C.
MAINTENANCE & CAR CARE Engine Cooling System
Engine Coolant Tank

96
Replacing Engine Coolant :
The cooling system should be completely drained and refilled with new coolant
at specified intervals
1. Touch the engine and radiator only after ensuring that they are cold.
2. Remove the auxiliary tank cap.
3. Loosen the drain plug at the bottom of the radiator.
4. Remove the auxiliary tank from its holder, drain the coolant and refit it.
5. Flush the radiator by using reverse flow i.e. radiator drain plug to auxiliary
tank with clean water and close the drain plugs.
6. Pour the premixed ready to use engine coolant into the radiator until it is
full.
7. Fill the auxiliary tank upto the 'MAX' mark and fit the cap.
8. Ensure that there is no leakage in the system.
Do not touch the engine and radiator when hot.
MAINTENANCE & CAR CARE Engine Cooling System
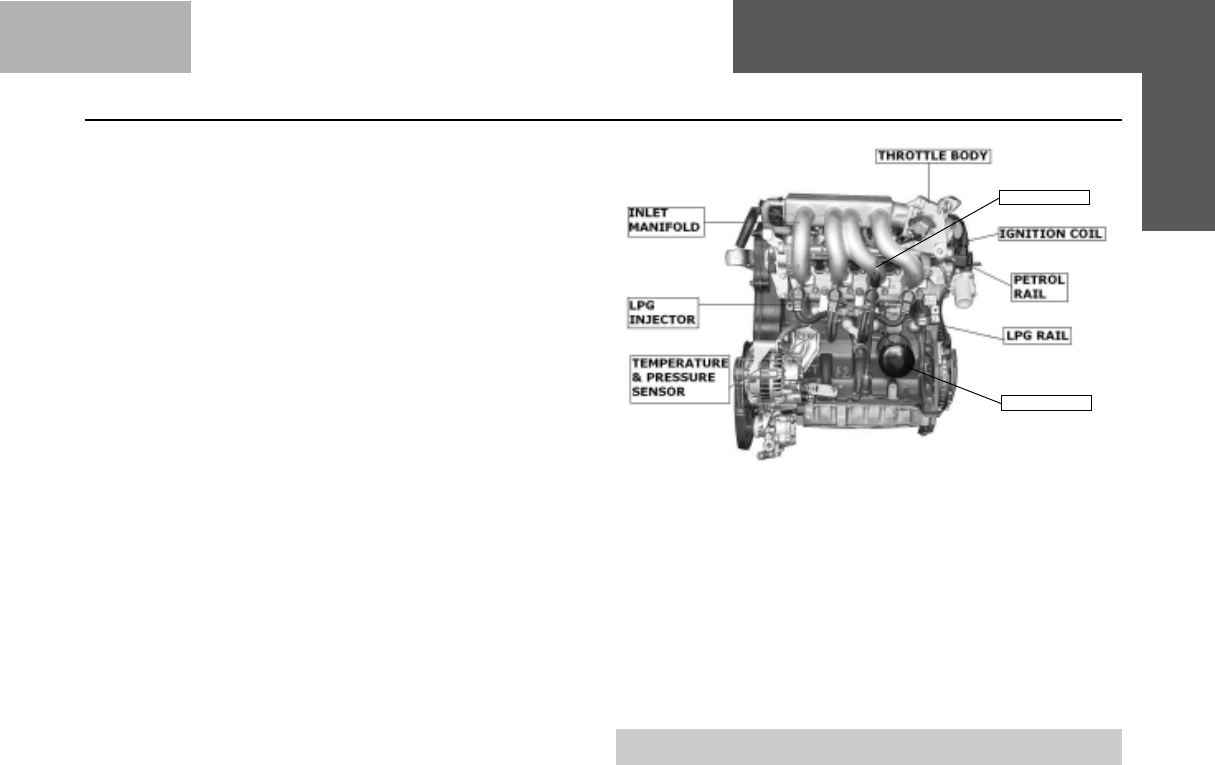
97
Changing of Engine Oil and Oil Filter :
Change the oil and oil filter cartridge at specified intervals
(Engine oil and oil filter cartridge may be changed earlier if
the car is operating in sandy/dusty conditions). Changing of
oil and oil filter requires access from underneath the body.
The car should be raised on a hoist at a service station or
should be parked on a service pit.
1. Run the engine until it reaches normal operating
temperature. Then shut it off.
2. Open the bonnet and remove the engine oil filler cap.
Remove the drain plug of the oil sump from the bottom of
the engine. Drain the oil into an appropriate container.
Take proper care as the engine oil will be hot.
3. Remove the oil filter with the help of a special wrench.
Destroy the filter to avoid reusage of the same.
4. Smear a little fresh engine oil on the rubber gasket of the
new engine oil filter. Hand tighten the engine oil filter and
give a further three fourth turn with the special tool.
Do not over tighten engine oil filter as this may
damage oil filter and oil may leak out.
5. Before filling in fresh oil in the engine, clean the drain
plug and threads on the sump. Apply Maxifix sealant on
the threads.
6. Refit the drain plug using a new sealing washer.
Tighten the drain plug to 3.5 mkg. torque.
7. Fill recommended quantity of fresh engine oil in the crank
case and secure the oil filler cap in its place.
8. Start the engine and run for a few minutes. Do not heat
up the engine. The engine oil pressure lamp should go
‘OFF’. after starting the engine.
9. Check for engine oil leakages, rectify if any.
10.Stop the engine and recheck the engine oil level after a
few minutes. If necessary add oil to bring the level to the
upper mark on the dip stick.
Note : Use of reclaimed oil is not recommended.
MAINTENANCE & CAR CARE Engine Oil & Oil Filter
OIL FILTER
DIP STICK

98
MAINTENANCE & CAR CARE Engine Belt Tension
Belt Tension :
Check the condition of belts on the engine. Examine the edges
of the belt for cracks or fraying.
Check the tension of the belt by pushing on it with your thumb
midway between the pulleys for the alternator belt, power
steering pump belt and A.C. compressor belt. If the belt tension
is not proper i.e. it gets deflected more than specified, get it
attended to at the nearest Authorised Service outlet.
Belt tension adjustment :
a. Loosen bottom mounting bolt of the alternator.
b. Loosen bolt holding upper mounting of alternator to the
clamping piece.
c. Loosen the lock nut.
d. Adjust belt tension by turning the adjusting nut i.e. by
turning the alternator away from the engine.
e. Tighten lock nut and the bolt holding the clamping piece to
alternator.
f. Tighten bottom mounting bolt.
g. Recheck belt tension.
1. Alternator mounting bottom bolt
2. Alternator mounting upper bolt
3. Clamping piece
4. Clamping bolt
5. Adjusting nut
6. Lock nut
Engine with Alternator
10-11mm10-11mm
10-11mm10-11mm
10-11mm
3456
2
1Alternator
Crankshaft
Pulley
Engine with A.C., Alternator and Power Steering
A.C. Compressor
Tensioner
8-9mm8-9mm
8-9mm8-9mm
8-9mm
8-9mm8-9mm
8-9mm8-9mm
8-9mm
Alternator
Crankshaft
Pulley
3456
2
1
Power Steering Pump
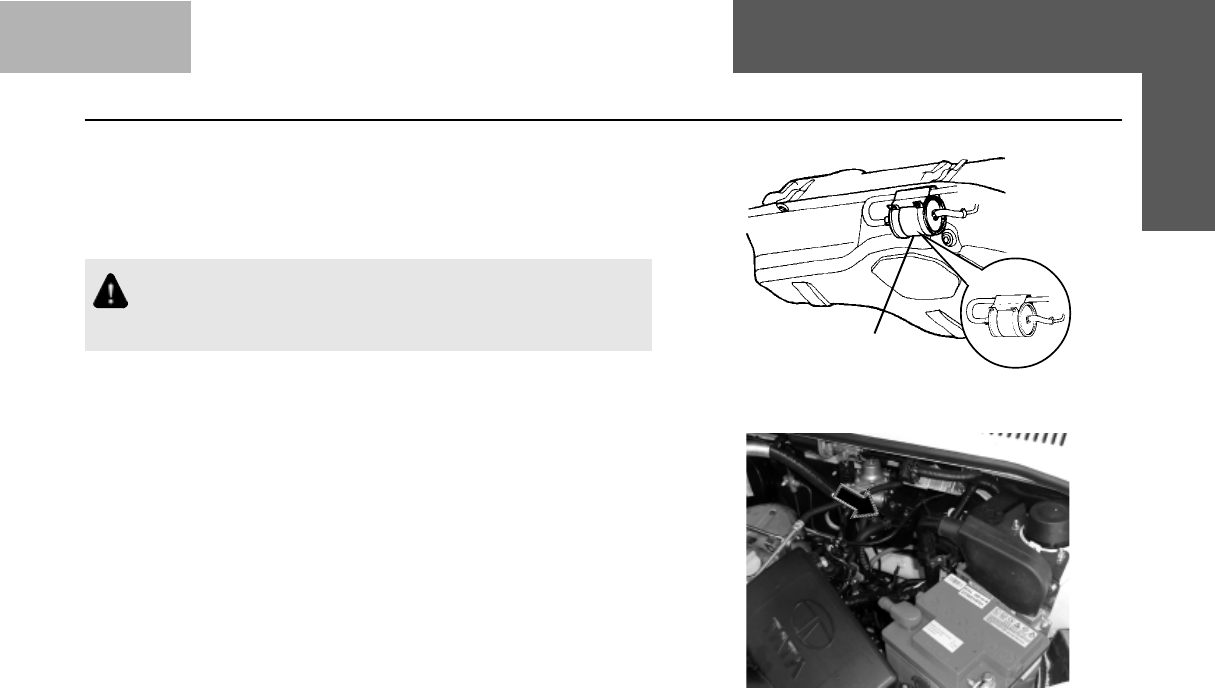
99
Changing Fuel Filter Element :
The fuel filter is transparent and located near the fuel tank (under
the body). Inspect and replace the fuel filter at specified intervals.
Replace the fuel filter if dirt is observed in it.
The fuel filter should be replaced at any Authorised Service
outlet as the fuel system is under pressure and petrol can
spurt out from fuel line connections.
MAINTENANCE & CAR CARE Fuel Filter
Fuel Filter
on Petrol
System
Fuel Filter on LPG System
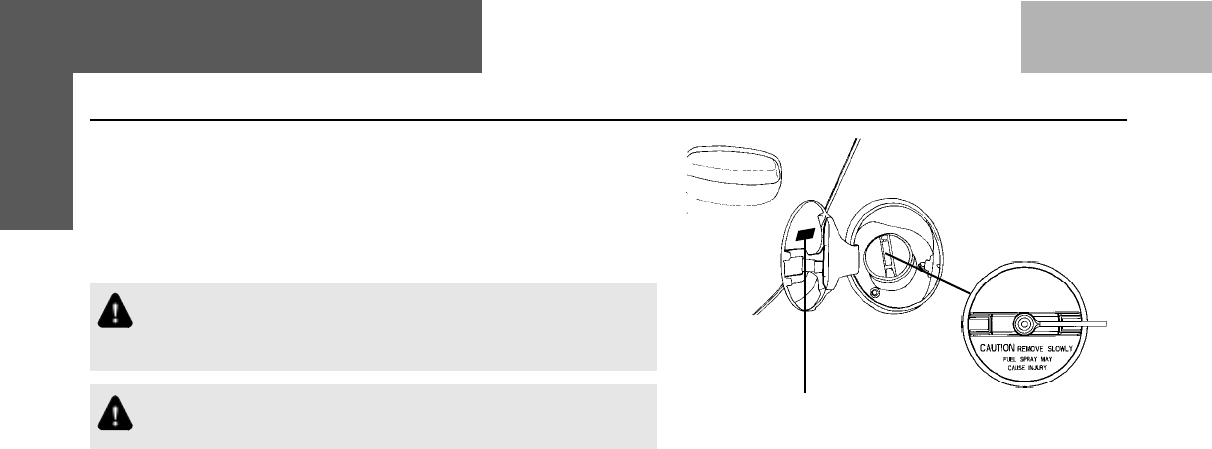
100
PETROL FUEL FILLING :
The fuel filler cap is located on the left rear side of the car. The fuel
filler lid can be unlocked by pulling the opening lever located on the
out-board side of the driver's seat and locked by simply closing the
lid.
Remove the fuel filler cap slowly. The fuel may be under
pressure & may spray out, causing injury if the cap is opened
suddenly.
The fuel cap is of the non vented type. Use correct genuine
cap for replacement.
• To remove the fuel filler cap turn the cap anti-clockwise. Turn the
cap slowly to allow any residual pressure to escape.
• To install turn the cap clockwise till a click sound is heard.
Petrol is extremely flammable. Do not smoke when refuelling and
make sure there are no open flames or sparks nearby.
If you need to replace the fuel cap, use only a cap specified for
your car. Using an improper fuel cap can cause a serious
malfunctioning of the fuel system. You can get the correct
replacement from an Authorised Service outlet.
MAINTENANCE & CAR CARE Petrol Fuel Filling Cap
STICKERSTICKER
STICKERSTICKER
STICKER
UNLEADED PETRUNLEADED PETR
UNLEADED PETRUNLEADED PETR
UNLEADED PETROL ONLOL ONL
OL ONLOL ONL
OL ONLYY
YY
Y - FOR PETROL
VERSION WITH CATALYTIC CONVERTER
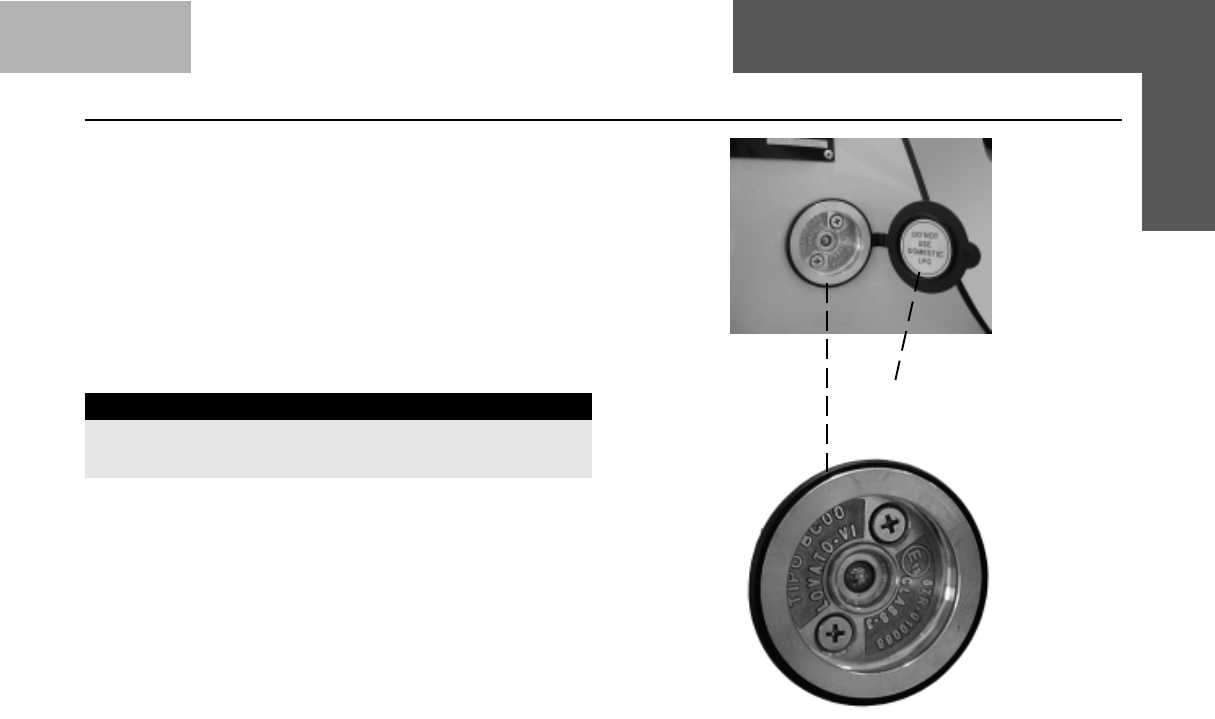
101
LPG Fuel Filling Cap
LPG FILLING :
LPG filler valve is located at the rear on the right hand
body side of your car. LPG filling will stop automatically
once the LPG tank is filled to 80% of its capacity.
The LPG cylinder capacity of your car is 31 litres. If the
LPG is filled after service / repairs of the LPG system, please
check all joints for leakage by applying soap solution or by
using an electronic instrument. Example -‘Leakator - 10’.
or equivalent.
NOTICE
Keep the Ignition switch in “OFF” condition during
LPG refilling
FUEL TANK CAPACITY :
Petrol tank capacity = 37 Litres
MAINTENANCE & CAR CARE LPG Fuel Filling
STICKER :
DO NOT USE DOMESTIC LPG
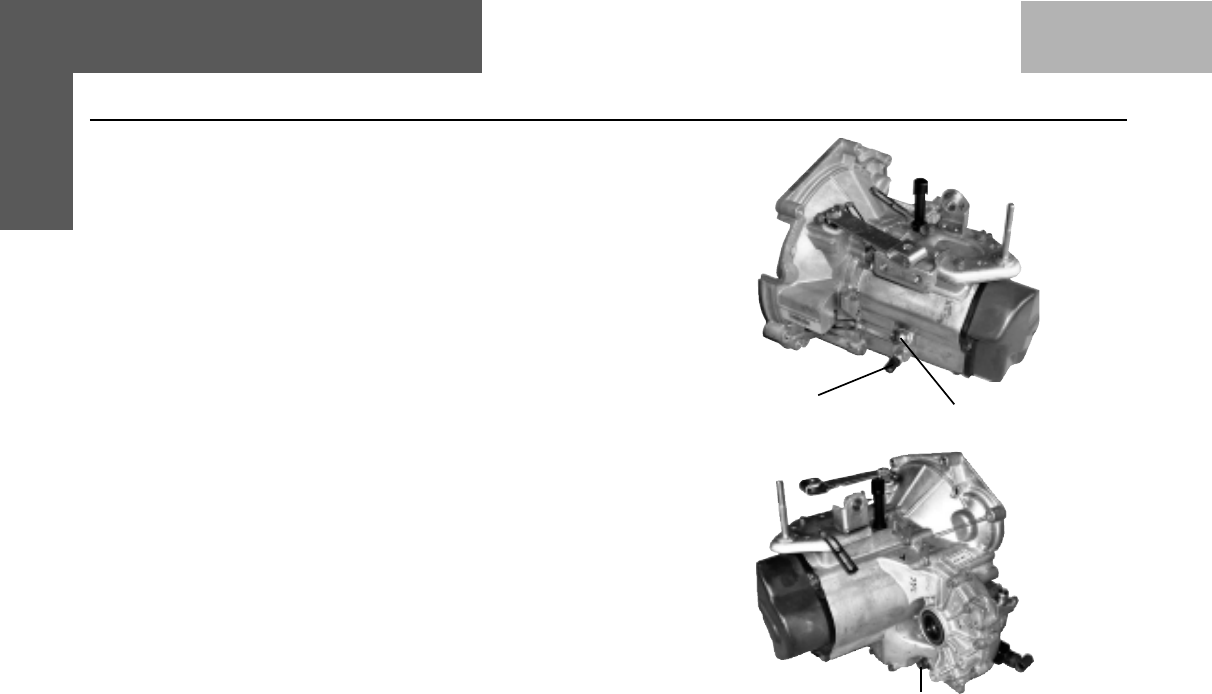
102
Transaxle Oil :
Checking of Oil Level :
1. Clean the oil level plug and the surrounding area.
2. Remove the oil level plug and check whether oil is dripping out.
The oil level must not be below the filler plug.
Add oil to bring it to the required level.
3. Tighten the oil level plug to 3 - 4 mkg. torque.
Changing Oil in Transaxle :
1. Let the engine idle for about 5 min. in neutral gear, so that the
Transaxle is warmed up.
2. Clean the oil level plug, drain plug and surrounding area.
3. Place a container under the transaxle to collect the oil.
4. Remove the oil level plug.
5. Remove the drain plug and let the oil drain out fully.
6. Refit the drain plug with a new sealing washer. Tighten the oil
drain plug and fill new recommended oil through the oil level
plug. Tighten both the oil drain plug and oil level plug (with new
sealing washer) to 3 - 4 mkg. torque.
MAINTENANCE & CAR CARE Transaxle
Oil Filler / Level Plug
Reverse Light
Switch
Drain Plug
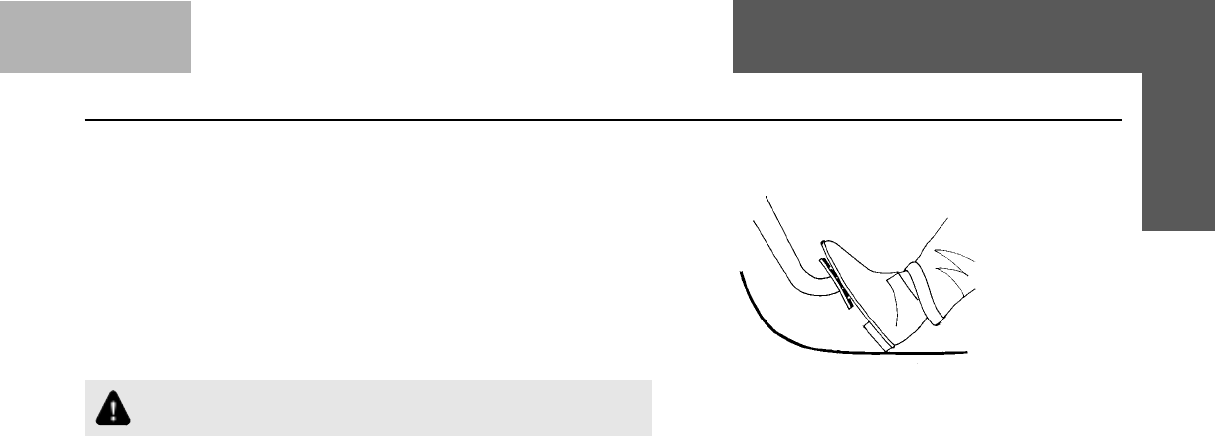
103
MAINTENANCE & CAR CARE Clutch & Brakes
CLUTCH :
Your car is provided with a single plate dry friction diaphragm type,
pre-loaded release bearing clutch which is mechanically actuated
by a cable connecting the clutch pedal & the clutch release lever.
There is no free play in the system and hence no clutch pedal free
play adjustment is required although the clutch pedal height from
the floor has to be adjusted as clutch lining wears. The clutch pedal
height from the floor keeps on increasing as the clutch lining wears.
However, ensure that clutch pedal has free movement when lifted
upward
Do not ride the clutch. It will cause premature clutch wear.
Do not release the clutch suddenly.
BRAKES :
Dual circuit, diagonal split hydraulic brakes through tandem master
cylinder have been provided. The front brakes are disc brakes with
floating type calipers while the rear brakes are drum brakes with
automatic adjustment.
No adjustments are required for front & rear brakes.
The parking brake is a mechanical lever type, console mounted,
cable operated, acting on rear wheels.
To operate, pull up.
To release pull up, press the button, lower handle then release the
button & handle.
Pressure reducing valves are provided on both circuits for the rear
brakes to avoid locking of wheels & skidding of the car.
XX
XX
X
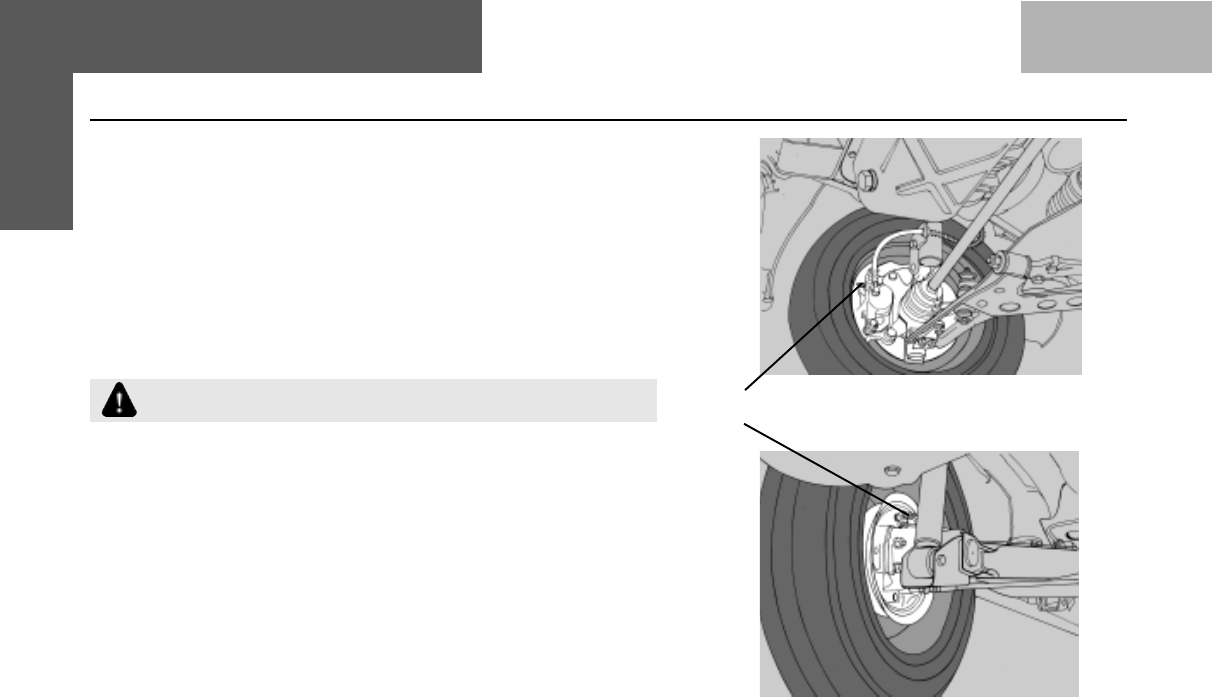
104
MAINTENANCE & CAR CARE Clutch & Brakes
Front wheel
Bleeding Nipple
Rear wheel
NOTE : Vacuum Assistance : The hydraulic brake system of your
car is assisted by a vacuum booster which reduced the effort of
driver during braking. In the unlikely event of disruption in supply of
vacuum to the booster (e.g. stoppage of engine, or failure of vacuum
hose) this assistance will still be available but only for one or two
brake applications to bring the vehicle to a stop. Beyond this, vacuum
assistance will not be felt by the driver and brakes will appear to be
hard/ineffective. In order to stop the vehicle effectively the driver will
have to apply a much higher force on the brake pedal (roughly 5
times the normal effort)
Never drive the vehicle in engine switched "OFF" condition.
BLEEDING PROCEDURE FOR BRAKE SYSTEM :
1. Clean all dirt from around reservoir filler cap.
2. Fill reservoir with fresh brake fluid to lower
edge of filler neck.
3. Attach bleed tube to left front caliper bleed screw and dip the
other end in jar of fresh brake fluid.
4. Start engine and open the bleed screw by 1/2 to 3/4 of turn.
5. Depress foot pedal slowly and fully. After tightening the bleed
screw, allow it to return slowly.
6. Wait for 3-4 seconds before next stroke.
7. Repeat until bubbles stop emanating from bleed tube.
8. Close bleed screw immediately after the last downward stroke
of pedal and hold pedal.
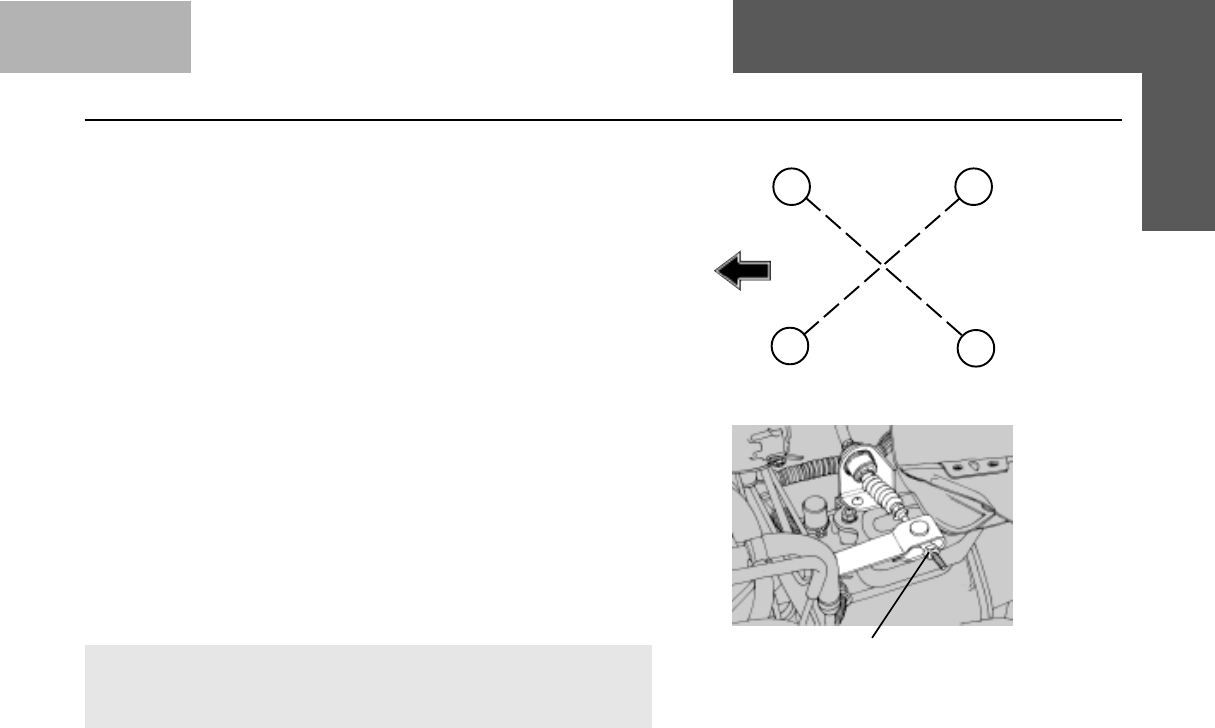
105
9. Tighten bleed screw and remove tube.
10. Replace dust cap on bleed screw.
11. Repeat same procedure on rear right, front right and then rear
left.
12. If bleeding continues without success it means air is being
drawn in past the bleed screw threads.
13. Close bleed screw at the end of each downward stroke of pedal.
14. Allow pedal to return fully and slowly.
15. Tighten bleed screw finally after last downward stroke of pedal.
16. Replace the dust cap on the bleed screw.
17. Apply brake pedal hard and check for any leaks.
Brake and clutch pedal adjustment :
1. Ensure that clutch pedal height is the same as the brake pedal
height.
2. Connect the front end of the clutch cable to the clutch release
lever and adjust the cable by setting the nut by hand so as to
get clutch pedal height same as brake pedal height, and cable
is tight.
3. Due to wear of the clutch disc, the pedal lever will lift up. Readjust
the pedal height again, using clutch cable.
NOTE : Brake pedal height adjustment is required only in case
of component removal, etc. Adjustment is not required during
normal maintenance.
Clutch Adjustment NutClutch Adjustment Nut
Clutch Adjustment NutClutch Adjustment Nut
Clutch Adjustment Nut
1
23
4
FRONT REAR
MAINTENANCE & CAR CARE Clutch & Brakes
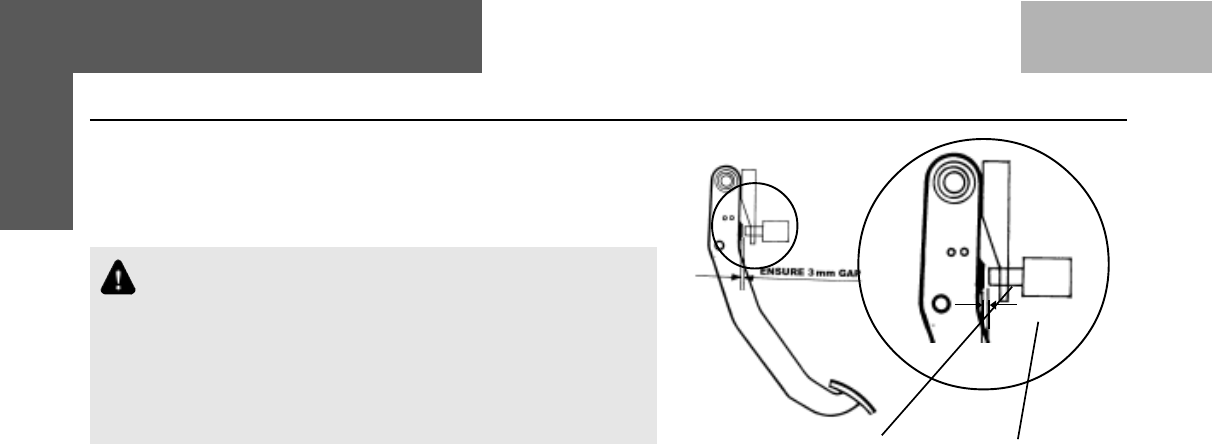
106
Brake Light Switch
4. Adjust brake light switch, gap of 3 mm to be maintained as
shown in the fig. after loosening the lock nut on the switch.
Tighten the nut after adjustment. This should be done with brake
pedal in complete released condition.
Do not apply tightening force over the switch body/terminal
block as it may damage the switch. Electrical supply for
brake lights is 'ON' without ignition switch. Under normal
condition the switch shall be 'OFF' and the lights are not
glowing.
Any improper adjustment may result in either brake grabbing
unneccessarily or spongy brakes.
MAINTENANCE & CAR CARE Clutch & Brakes
Lock Nut
3 mm
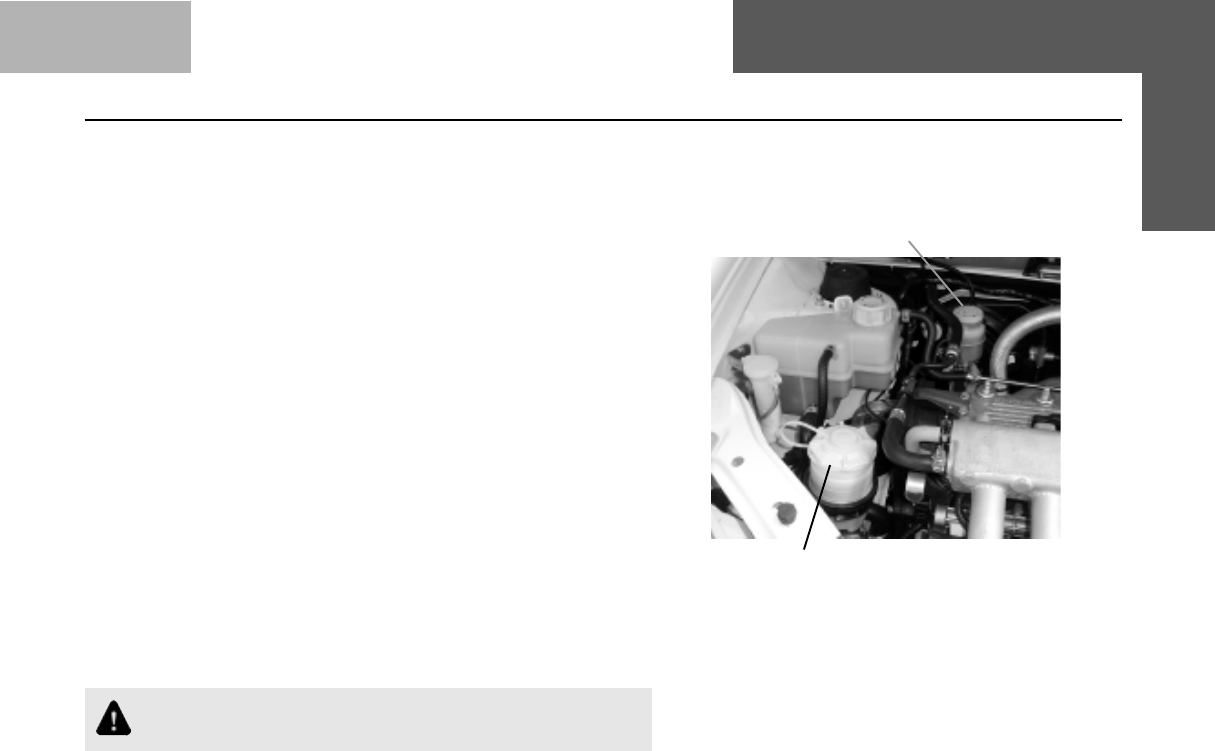
107
MAINTENANCE & CAR CARE Brake Fluid & Power Steering
Brake Fluid :
Check the level of brake fluid in the brake fluid container.
It should be between the Min. and Max. marks.
If not, then add brake fluid. Clean the area surrounding the cap
before opening the cap. Always use fresh brake fluid and tighten
the cap fully, otherwise moisture from the atmosphere will be
absorbed by the brake fluid, making it unserviceable.
In case of spongy or hard pedal or low brake efficiency, please
contact the nearest Authorised Service outlet and get the defect
rectified.
POWER STEERING (if installed)
Power steering is fitted for lighter steering effort and easy
manoeuverability, during driving and also help absorb the road
shocks. The system consists of steering gear box, hydraulic pump
and hydraulic tank. Pump drive is through the poly ‘V’ belt from the
engine. Power assistance is available during normal operating
conditions. In case of failure in the hydraulic system, the steering
can be operated mechanically to bring the car to an Authorised
Service outlet.
Drive slowly as vacuum assistance for brake would not be available.
Report any external leakage to the nearest Authorised
Service outlet.
Brake Fluid Container
Power Steering Fluid Container
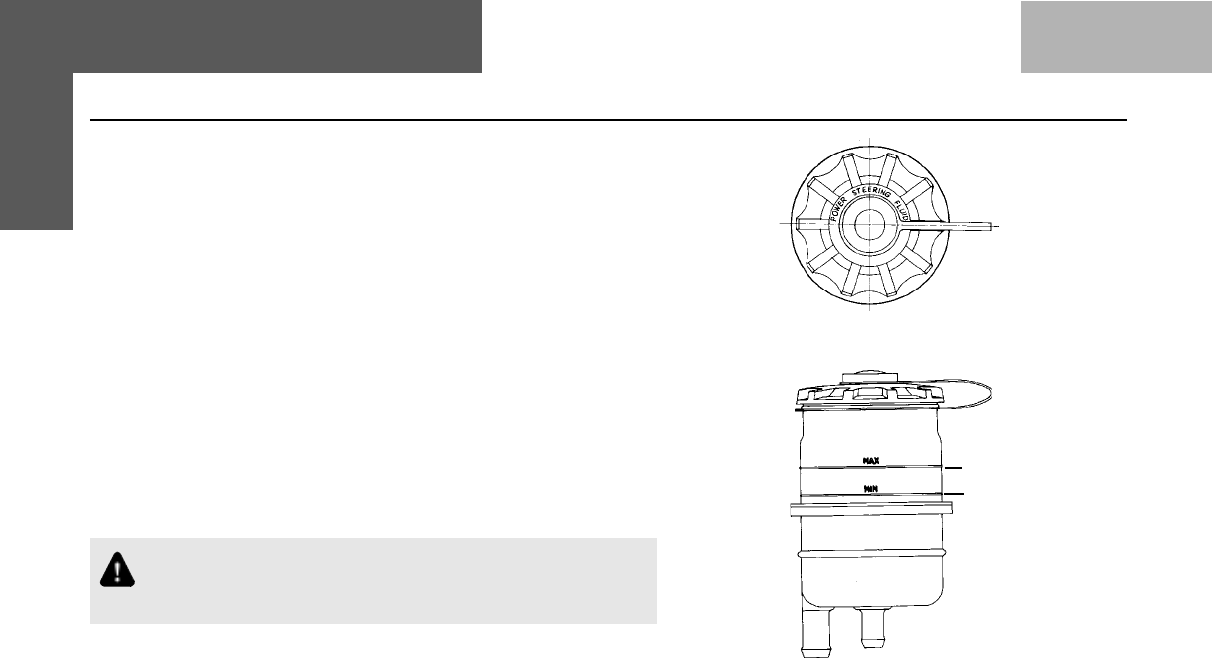
108
MAINTENANCE & CAR CARE Power Steering
Procedure for Oil Filling and Bleeding of Power Steering
(Ensure that the Power Steering fluid reservoir is clean before
starting any work)
1. Fill the reservoir till it is nearly full, when the system is newly
installed otherwise fill up to 'Max' mark on reservoir. Crank the
engine for 10 seconds without allowing it to start (if possible). If
engine does start, shut the engine immediately.
Check & refill the reservoir. Repeat at least three times, each
time checking & refilling the reservoir.
2. Check for any leakage in the system and if noticed take corrective
action.
3. Start the engine & steer the car from full left to full right turn 3-4
times.
4. Add fluid if necessary to maintain the level upto 'Max' mark on
reservoir.
Do not force the wheel in lock position either to the extreme
left or right. The power steering pump may get damaged.
Hold it gently.
5. When the engine is at steady speed, check for bubbles or foaming
in the oil. If present it indicates that air is getting sucked into the
system. Check the suction line/fittings and correct if necessary.
MAX
MIN
Power Steering Fluid Container

109
6. Once the system is bled properly and free from foaming,
there should not be any appreciable change in the oil
level in the reservoir, when the engine is started or stopped
repeatedly.
7. Now the car is ready to be driven.
Final oil level should be upto 'Max' mark of reservoir.
Do not allow fluid level to drop significantly or run out
of the reservoir during the above operation. This may
induce air into the system.
Severe damage could occur to the power steering
pump due to dry running (Running without sufficient
oil and due to severe cavitation on account of air
entry due to low oil level). This could lead to loss of
power assistance, damage and failure of the power
steering system.
Do not start the engine without oil in the power
steering system. This will result in serious damage
to the pump. In case of an emergency, disconnect
the pump drive belt and then start the engine or drive
slowly as vacuum assistance for brake would not be
available.
Always use recommended oil from sealed
containers. Any contaminated oil poured in the
system will result in damage to the pump and gear
box.
Avoid mixing of different brands of oils.
MAINTENANCE & CAR CARE Power Steering & Battery
BATTERY :
Check the battery for proper electrolyte level and corrosion
on the terminals.
During normal operation, the battery generates gas
which is explosive in nature, a spark or open flame
can cause the battery to explode causing very
serious injuries.
Keep all sparks & open flames and smoking
materials away from the battery.
Getting electrolyte in your eyes or on the skin can
cause severe burns. Wear protective clothing and
a face shield or have a skilled technician to do the
battery maintenance.
The battery contains sulphuric acid (electrolyte)
which is poisonous and highly corrosive in nature.
1. Check the battery for electrolyte level against the marking
on the battery outer case.
2. Check the battery terminals for corrosion (a white or
yellowish powder). To remove it, cover the terminals with
a solution of baking soda. It will bubble up and turn brown.
When this stops wash it off with plain water. Dry off the
battery with a cloth or paper towel.
Coat the terminal with petroleum jelly to prevent future
corrosion.
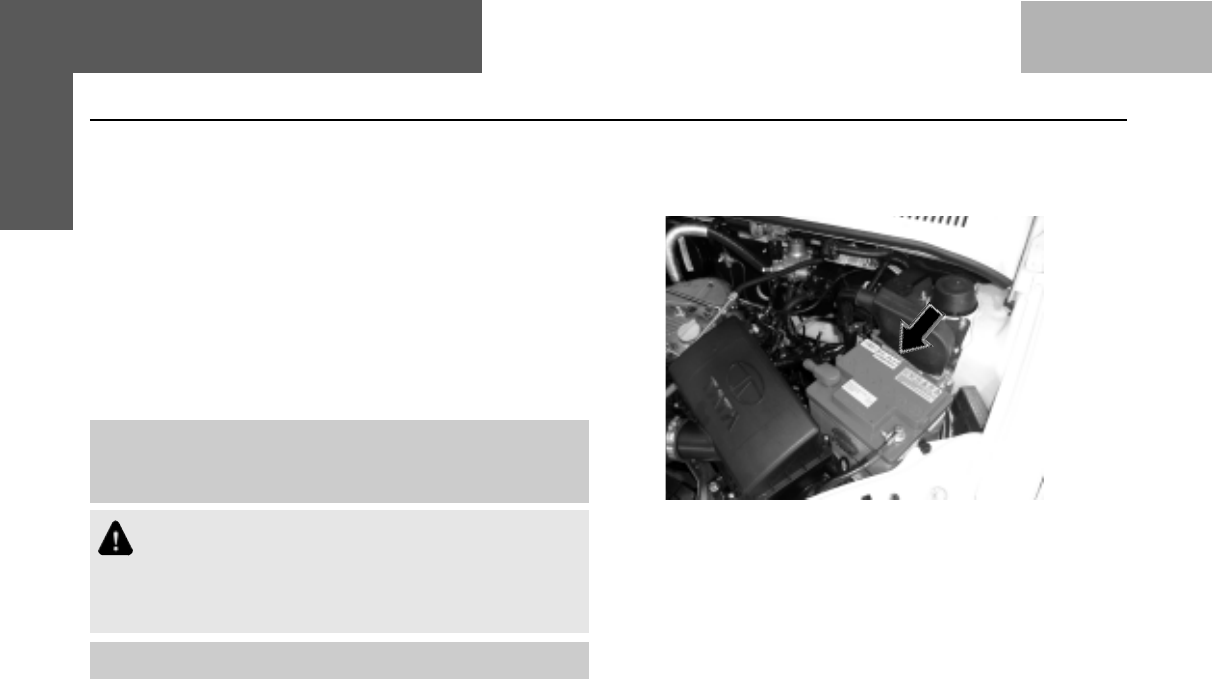
110
MAINTENANCE & CAR CARE Battery
Use a proper wrench to loosen and remove cables from the
terminals. Always disconnect the negative (-ve) cable
first and reconnect it last.
Clean the battery terminals with a terminal cleaning tool or
wire brush.
Reconnect and tighten the cables, coat the terminals with
petroleum jelly.
If you need to connect the battery to a charger, disconnect
both cables to prevent damage to the vehicle’s electrical
system.
Note : Charging the battery with the cables connected
can seriously damage your vehicle's electrical/electronic
equipment.
Swallowing electrolyte can cause fatal injury if
immediate action is not taken.
Do not reverse the battery connection on the vehicle
as it may damage the vehicle electricals.
Note : -ve terminal is connected to the body/cab.
Battery
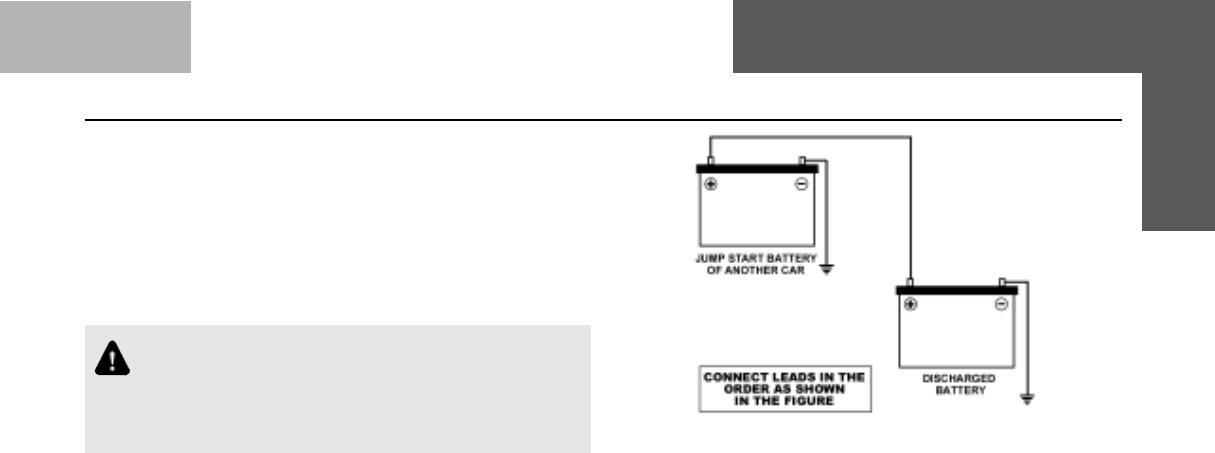
111
MAINTENANCE & CAR CARE Battery
Connect leads in the order as shown in the sketch :
• Do not connect the lead to the negative terminal of the
discharged battery.
• The connection of the -ve lead point should be as far
away from the discharged battery as possible and close
to the starter motor on engine/transaxle.
• Route the leads so that they cannot get caught by the
rotating parts in the engine compartment.
• The engine of the car providing the jump start can be
allowed to run during starting.
Attempts to start the engine of the car with the discharged
battery should be made at intervals of one minute and should
not last more than 15 seconds. After starting, allow both
engines to idle for approximately 3 minutes with the leads
still connected.
Starting the Engine with Jump Leads :
The engine with a discharged battery may be started by
transferring electrical power from a battery in another car.
This may be dangerous as any deviation from the following
instructions could lead to personal injury resulting from any
battery explosion, as well as damage to the electrical
systems in both cars.
Do not allow battery electrolyte to come in contact
with eyes, skin, fabrics or painted surfaces. The fluid
contains sulphuric acid which can cause injury and
severe damage. Wear rubber gloves, to avoid risk of
contact.
• To lessen the risk of injury, wear eye protection when
working near any battery.
• Make sure that the battery providing the jump start has the
same voltage as the battery in your car (12 V). Its capacity
must be approximately the same as the original battery
capacity. The voltage and capacity are given on the batteries.
• Do not disconnect the discharged battery from the car.
• Switch off all unnecessary electrical loads.
• Do not lean over the battery during jump starting.
• Do not allow the terminals of one lead to touch those of
the other lead.
• Apply the hand brake. Keep the gearshift lever in neutral.
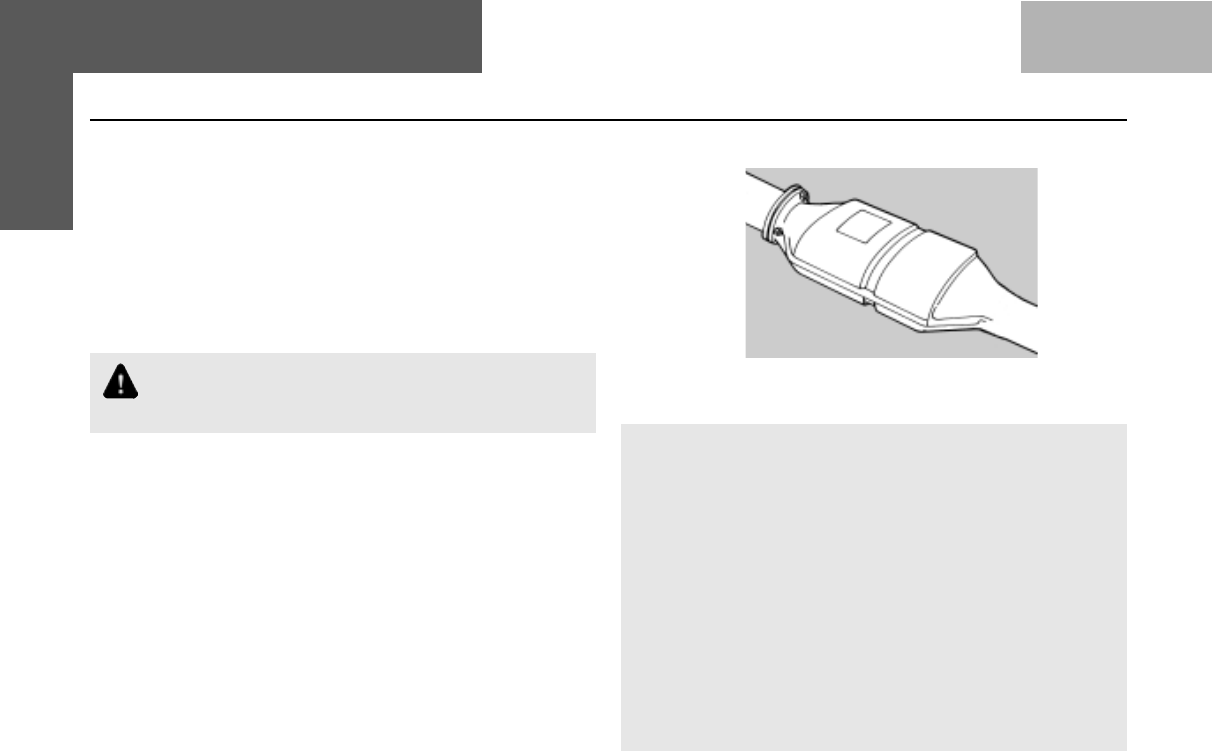
112
MAINTENANCE & CAR CARE Catalytic Converter
Catalytic Converter :
The catalytic converter is fitted on your car to reduce exhaust
pollution. The catalytic converter will quickly heat up after
starting to ensure that it operates correctly during the warm
up phase of the engine. On a car with a catalytic converter,
the fuel tank filler neck is of reduced diameter
compatible with standard unleaded petrol supply
nozzle.
Even one time use of leaded petrol may cause
permanent damage to the catalytic converter. Hence
use unleaded petrol only.
Care & Maintenance :
•Use Unleaded Petrol only, since use of Leaded Petrol
will damage (poison) the Catalytic Converter permanently.
•Consult an Authorised Service Outlet at the earliest when,
• Engine misfires or runs irregularly, following a cold start,
• A significant loss of Power is noticed.
•In the event of above symptoms, drive the car at slow
speed without rapid acceleration. If the vehicle is
continuously run with misfiring, it may cause overheating
of shell, carpet etc. resulting into fire.
Catalytic Covertor
Avoid
• Push start or tow-starting the vehicle. (Use jump leads).
• Long (not more than 10 sec.) repeat (not more than 3
times) starting of the Vehicle. Investigate the cause for
difficulty in starting & rectify the same.
• Long idling (to warm-up). If the engine is running rough,
after a cold start.
• Switching "off" the ignition when driving down the hill.
(This will not save fuel).
• Fuel tank getting almost empty.
• Idling the engine with any of the Spark Plug Cable
disconnected, manually, during diagnostic test. (Use
appropriate test equipment).
• Pre-Coating/Painting of Catalytic Converter.
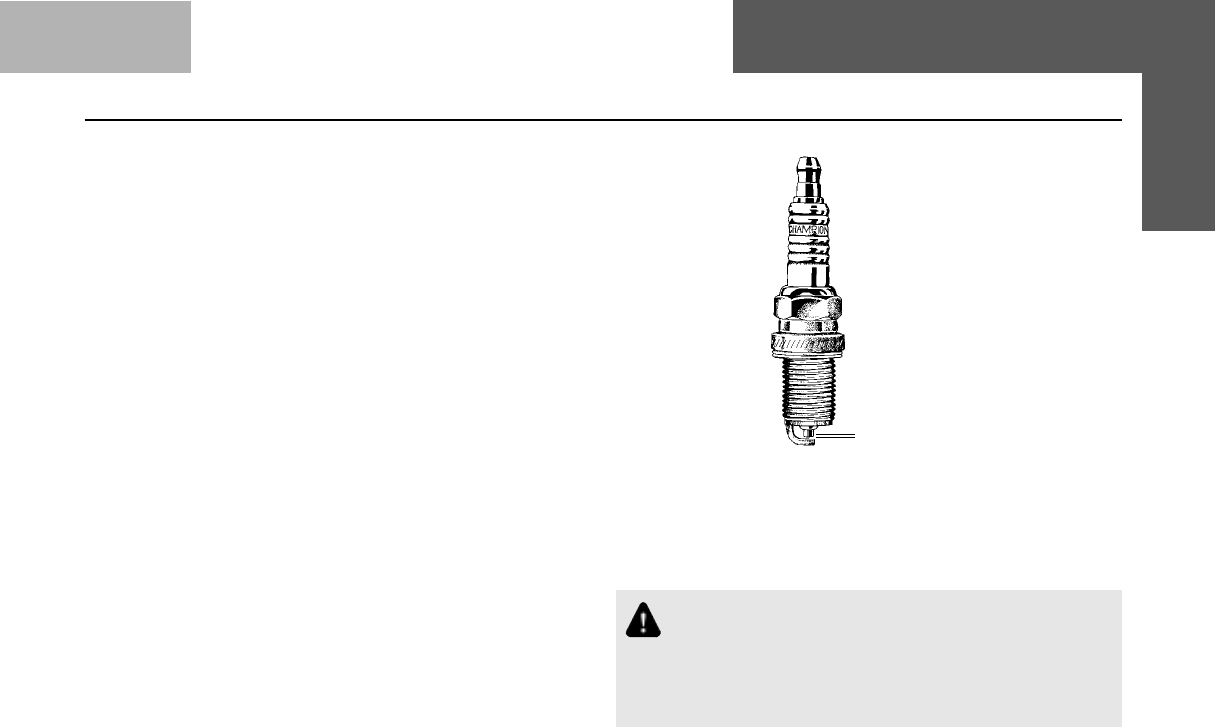
113
MAINTENANCE & CAR CARE Spark Plug
ÇÇ
ÇÇ
Ç
Parking Warning :
Avoid parking the vehicle over inflammable materials, such
as dry leaves, grass, etc., as the exhaust system is hot
enough to initiate "FIRE".
SPARK PLUG (Petrol Engine) :
Spark Plug - Champion / MICO*
Spark Plug No. - C9YC / FR 6 DC 4
Spark Plug Gap - 0.7 mm to 0.8 mm
You should inspect the spark plugs periodically for carbon
deposits. When carbon accumulates on the spark plug, a
strong spark will not be produced. Remove carbon deposits
using a spark plug cleaner.
Spark Plug Replacement :
1. Clean up any dirt or oil that is collected around the spark
plug caps.
2. Pull out the spark plug cables by gripping at the
connector.
3. Remove the spark plug with the help of a special socket.
4. Check and adjust the gap, it should be 0.7 mm to 0.8
mm.
5. Replace the spark plug if the gap is more than 1.2 mm.
6. Fix the spark plug and tighten it to the torque of 25 Nm
(dry).
7. Fit the spark plug cable, until a "click" sound is heard.
Repeat the procedure for the other spark plugs.
Tighten the spark plug carefully. Overtightening can
damage the threads in the cylinder head. A loose
spark plug or loose spark plug cable can affect
combustion and cause damage to engine and
catalytic converter.
ÇÇ
ÇÇ
Ç
0.7mm to 0.8mm
Saprk plug
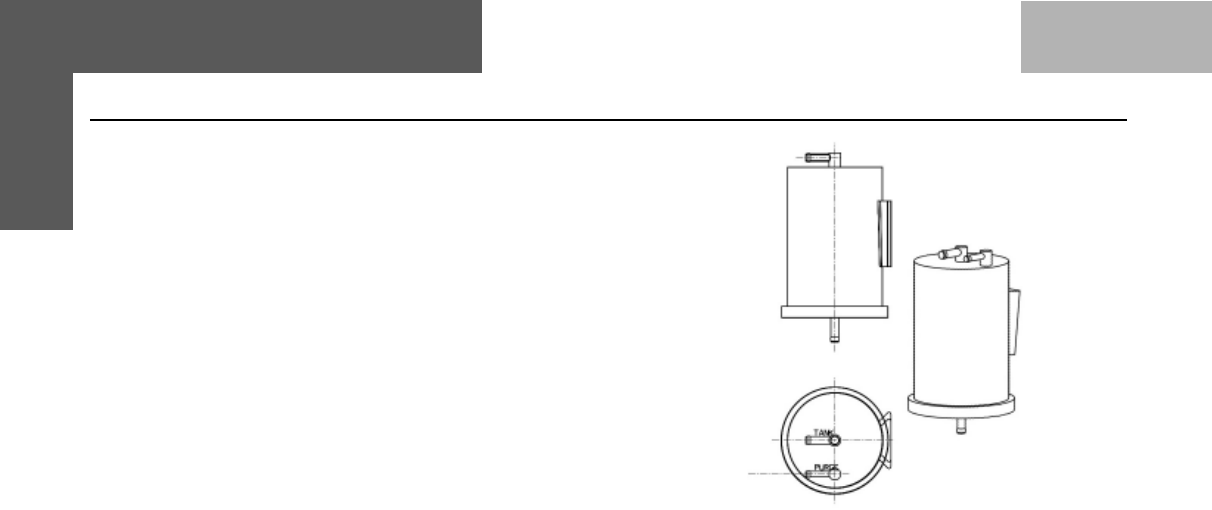
114
MAINTENANCE & CAR CARE Carbon Canister
CARBON CANISTER
As petrol evaporates in the fuel tank, hydrocarbons are discharged
into the atmosphere. The carbon canister stores these hydrocarbons
from the fuel tank.
Air drawn through the carbon canister into the engine should be
controlled to maintain exhaust emissions within desired limits as
well as to ensure good driveability.
The carbon canister should be replaced at an Authorised Service
outlet.
Carbon canister is located LH side crash member in the engine
compartment Replace canister with a new one as per
recommendation.
Carbon Canister
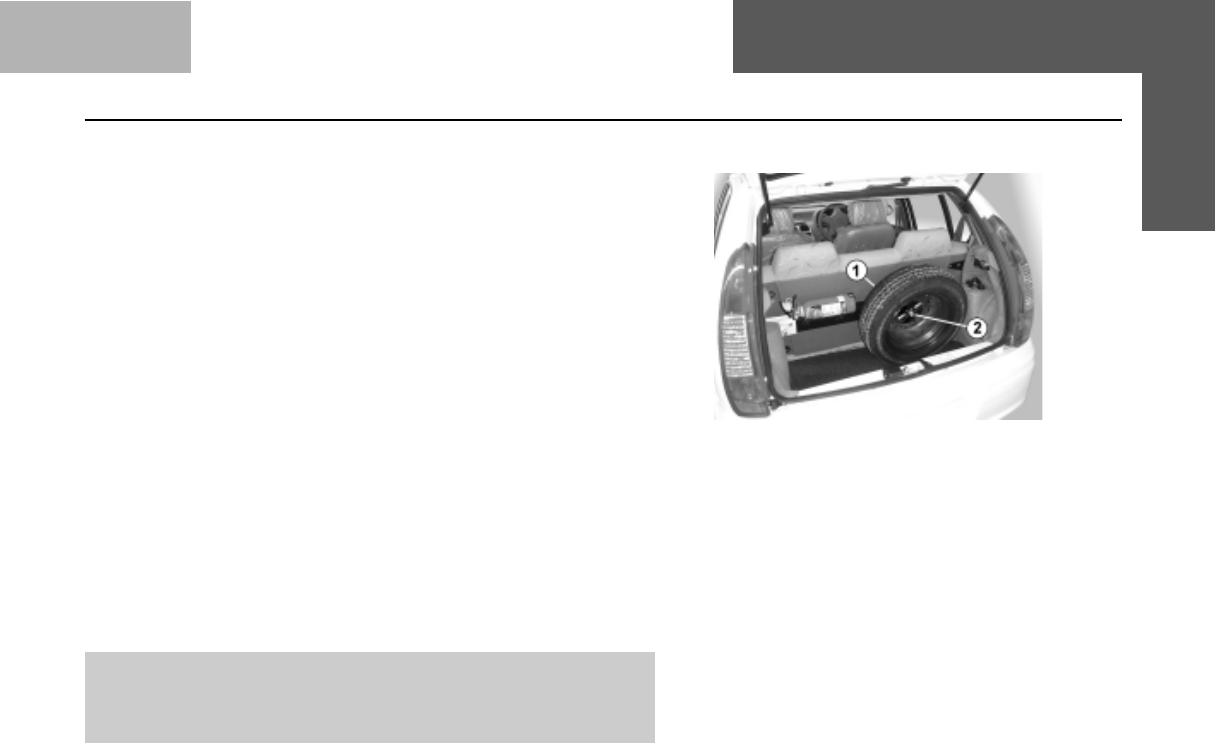
115
WHEELS & TYRES :
Always use only the recommended size of wheel rims & tyres. Use
of non-recommended rims and tyres may have an adverse effect
on car safety and furthermore could infringe on car regulations.
Spare Wheel Location :
Your car’s spare wheel is mounted as shown in figure on a cross
member that is located just behind the rear seat and has its
mounting on the rear suspension towers. It is held in place by a
single stud and tightened using a nut. Ensure that the wheel is
seated properly on the bracket & is resting on the plyboard floor.
Spare Wheel removal procedure :
Follow these steps to remove the spare wheel of your car
a. Remove the nut on plate that holds the spare wheel with the
cross member.
b. Once this nut is removed, the wheel that is resting on the ply
board covering the LPG tank is now free.
c. The wheel can now be lifted and taken out.
NOTE : Once the spare wheel is repaired and is ready to be
refitted, keep the direction of the air filling nozzle outwards for
easy air filling.
MAINTENANCE & CAR CARE Wheels & Tyres
1. Spare Wheel
2. Spare Wheel Mounting Nut
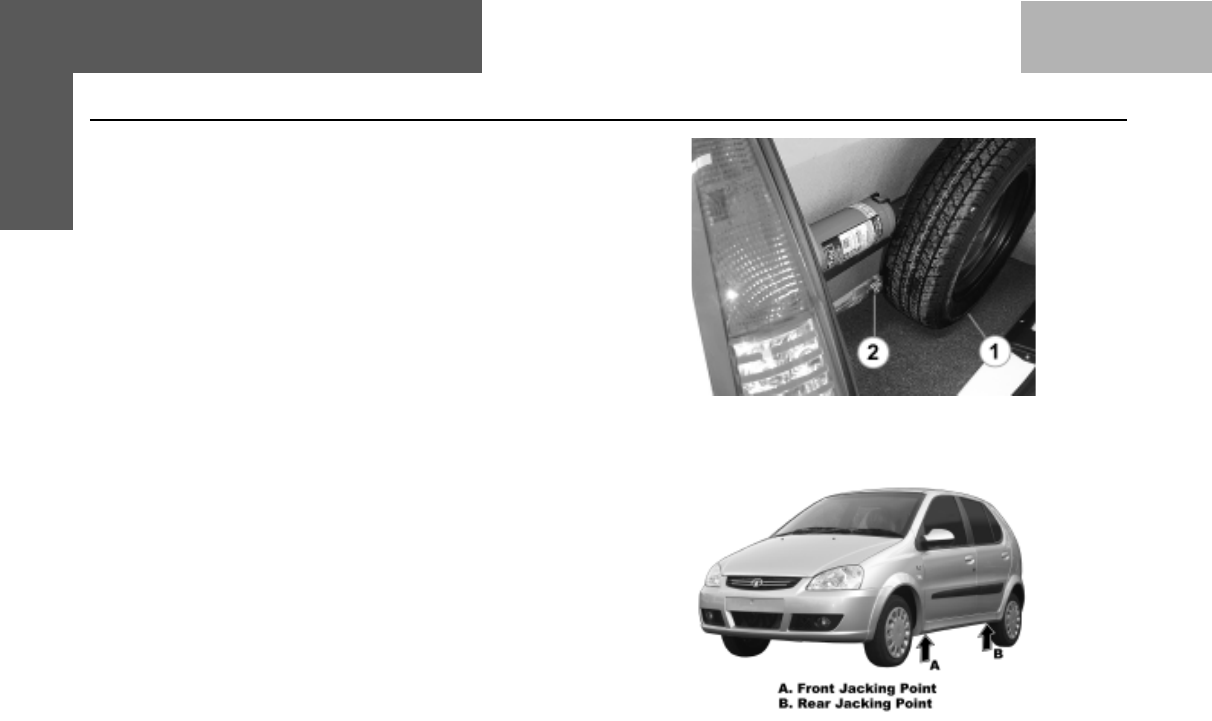
116
Jack removal procedure :
Your car’s jack is located behind the spare wheel and is
mounted on the floor. You can have access to the jack
once the spare wheel is removed. To remove the jack, first
unscrew the hook end. While refitting, position the jack
below the support rod & screw the jack till it is firmly fitted.
Wheel Change :
When changing wheels, use the jack provided with the car.
The jack with handle is located on tailgate inner sill.
• Park the car on a safe level ground. Engage 1st gear
and also apply the parking brake. Place wheel chocks
behind the rear wheels and in front of the front wheels.
• Loosen the wheel pins of the wheel to be changed slightly.
Keep the spare wheel to be fitted nearby.
• Jack up the car by placing the jack at the appropriate
location.
• Remove the wheel pins, the wheel rim cover and the
wheel.
• Fit the new wheel, wheel rim cover and tighten the wheel
pins.
• Lower the jack and tighten the wheel pins to 8 mkg.
torque.
MAINTENANCE & CAR CARE Wheels & Tyres
1. Spare Wheel 2. Jack & Handle

117
MAINTENANCE & CAR CARE Wheels & Tyres
NOTE : The jack should never be supported on any of
the body sheet metal components. This can cause
damage to the body.
Do not apply oil on the wheel pins. Wipe off the oil if
present.
• The jack should be placed below the body sill behind the
front wheel tyre for front wheel changing and before the
rear wheel tyre for rear wheel changing. Please refer to
the sticker (Jack location) fixed on the jack.
Do not work under the jacked up car without proper
support.
Correct wheel alignment helps to ensure uniform tyre wear.
You should get your car’s wheel alignment checked regularly
as per recommendation.
In case uneven tyre wear is observed, the vehicle’s wheel
alignment should be checked as soon as possible.
Wheel Balancing :
Wheels are balanced at the factory. They may need to be
rebalanced at some time.
The wheels should be checked for balance if a tyre or tube
is repaired.
Whenever a tyre or wheel rim is changed, the tyre needs to
be balanced.
1. Permissible imbalance for tyre with rim = 125 gm. cm.
(max.)
2. Total balance weight should be within 80 gm on each
side.
3. Relocate the tyre on the wheel rim if the weight required
to balance is more than 80 gm.
4. Balance weights are available from 5 gm to 80 gm, in
steps of 5 gm.
5. Do not use more than one balance weight on one side.
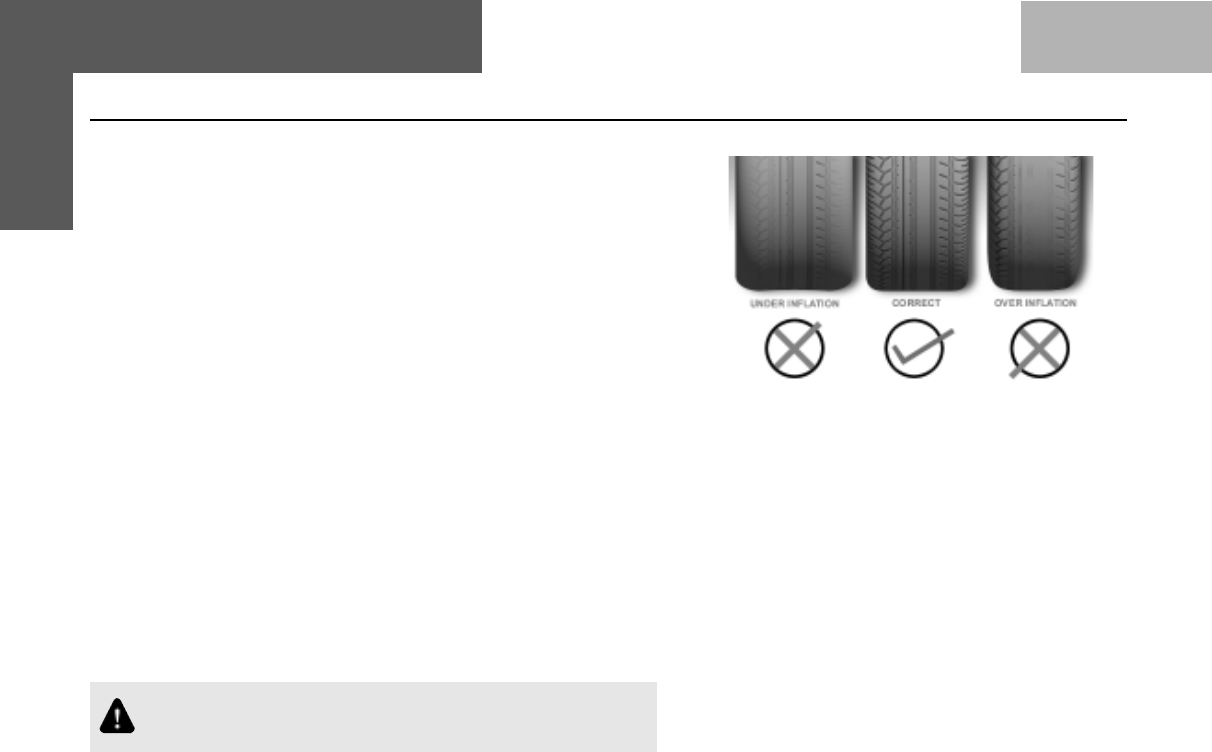
118
Tyres :
Check for inflation and condition of your car tyres periodically.
Inflation :
Check the pressure in the tyres when they are cold.
Refer to the tyre information label fitted on the driver side doorpost
for correct cold tyre pressure.
Recommended Tyre Pressures : (with cold tyres)
Refer page no. 12
You should have your own tyre pressure gauge and use it at all
times. This makes it easier for you to tell if pressure loss is caused
by a tyre problem and not by variation between gauges.
Keeping the tyres properly inflated gives you the best combination
of riding comfort, handling and tyre life.
Over inflation of tyres makes the car ride bumpy and harsh. Tyres
are more prone to uneven wear and damage from road hazards.
Under inflated tyres reduce your comfort in car handling and are
prone to failures due to high temperature. They also cause uneven
wear and more fuel consumption.
Inspection :
Every time you check inflation pressure, you should also
examine tyres for leakage, damage, foreign objects & wear.
EXCESSIVEEXCESSIVE
EXCESSIVEEXCESSIVE
EXCESSIVE
CENTRE THREADCENTRE THREAD
CENTRE THREADCENTRE THREAD
CENTRE THREAD
WEARWEAR
WEARWEAR
WEAR
EXCESSIVEEXCESSIVE
EXCESSIVEEXCESSIVE
EXCESSIVE
SIDE THREADSIDE THREAD
SIDE THREADSIDE THREAD
SIDE THREAD
WEARWEAR
WEARWEAR
WEAR
UNIFORMUNIFORM
UNIFORMUNIFORM
UNIFORM
TYRE WEARTYRE WEAR
TYRE WEARTYRE WEAR
TYRE WEAR
MAINTENANCE & CAR CARE Wheels & Tyres

119
MAINTENANCE & CAR CARE Wheels & Tyres
You should look for :
•Bumps or bulges in the tread or the side of the tyre.
Replace the tyre if you find either of these conditions.
•Cuts, splits or cracks in the side of the tyre. Replace
the tyre if you notice this on the fabric or cord.
•Excessive tread wear or non uniform tyre wear.
Tyre Rotation :
To help increase tyre life and distribute wear more evenly you
should have tyres rotated at specified intervals or earlier depending
on the operation of car and tyre wear pattern.
The illustration shows how to rotate tyres when a normal spare
wheel is included in tyre rotation. Tyre Rotation

120
Your car’s LPG system is protected against short circuit /
overload by a fuse (15 A) fitted in the fuse box that is located
behind the dash board on the right hand side.
To replace a blown fuse :
1. Open fuse box cover.
2. Identify blown fuse from its melted wire.
3. Remove the blown fuse & replace with one of similar
amperage.
(For location of the fuse refer next page)
Take your car to a TATA Authorised service centre to find
out the reason for the fuse to blow & repair the problem.
fuse replacment should prefrebly be done only at TATA
Authorised service centre
When the fuse blows OFF, the following may occur
•All LEDs on the switch will go OFF.
•If your car is running in LPG mode when fuse blows
OFF, the LPG system will shut down and will automatically
shift to Petrol mode.
•In such a case, you can start the car only in Petrol
mode
•If your car is running in Petrol mode when fuse blows
OFF it will keep running in the Petrol mode
MAINTENANCE & CAR CARE Fuse & It’s Location
WARNING
Always replace blown fuse with a fuse of correct
amperage.Never use a substitute like aliminum coil or
wire to replace a blown fuse.When you replace a fuse
and the new fuse also blows OFF instantly, have the car
inspected at a TATA authorised service centre.
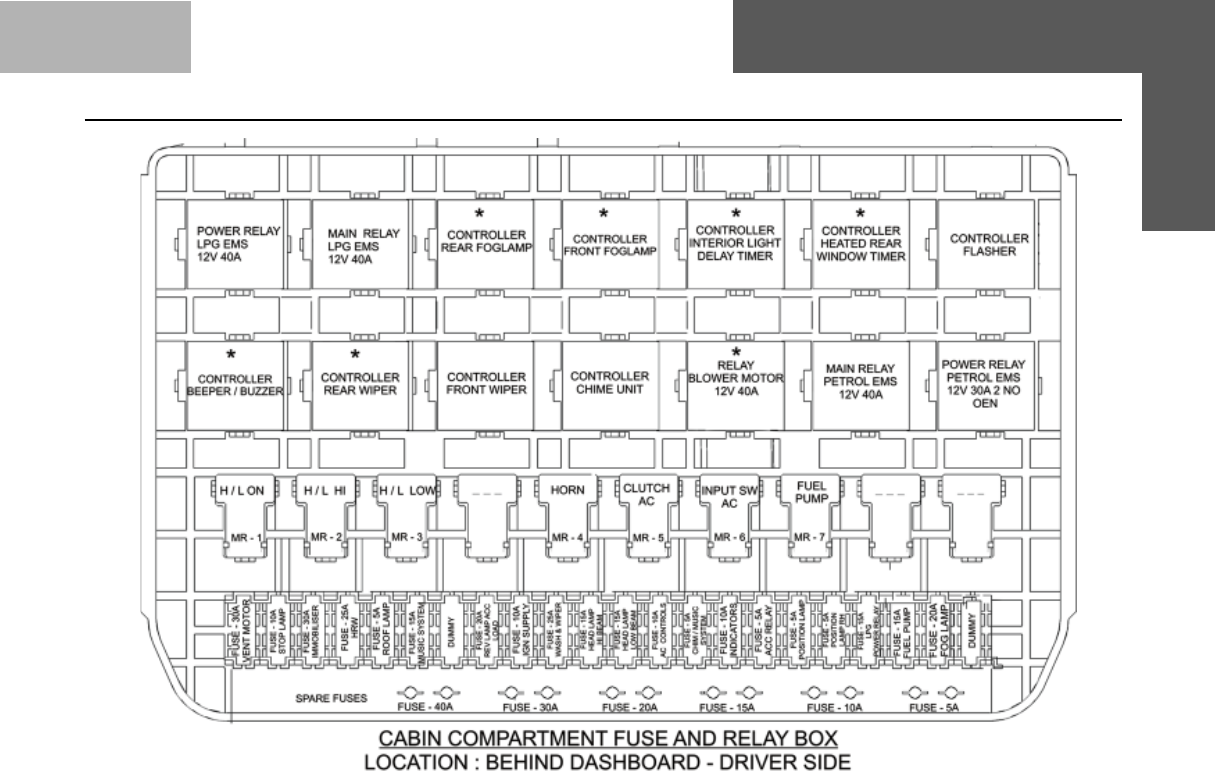
121
MAINTENANCE & CAR CARE Fuse & It’s Location
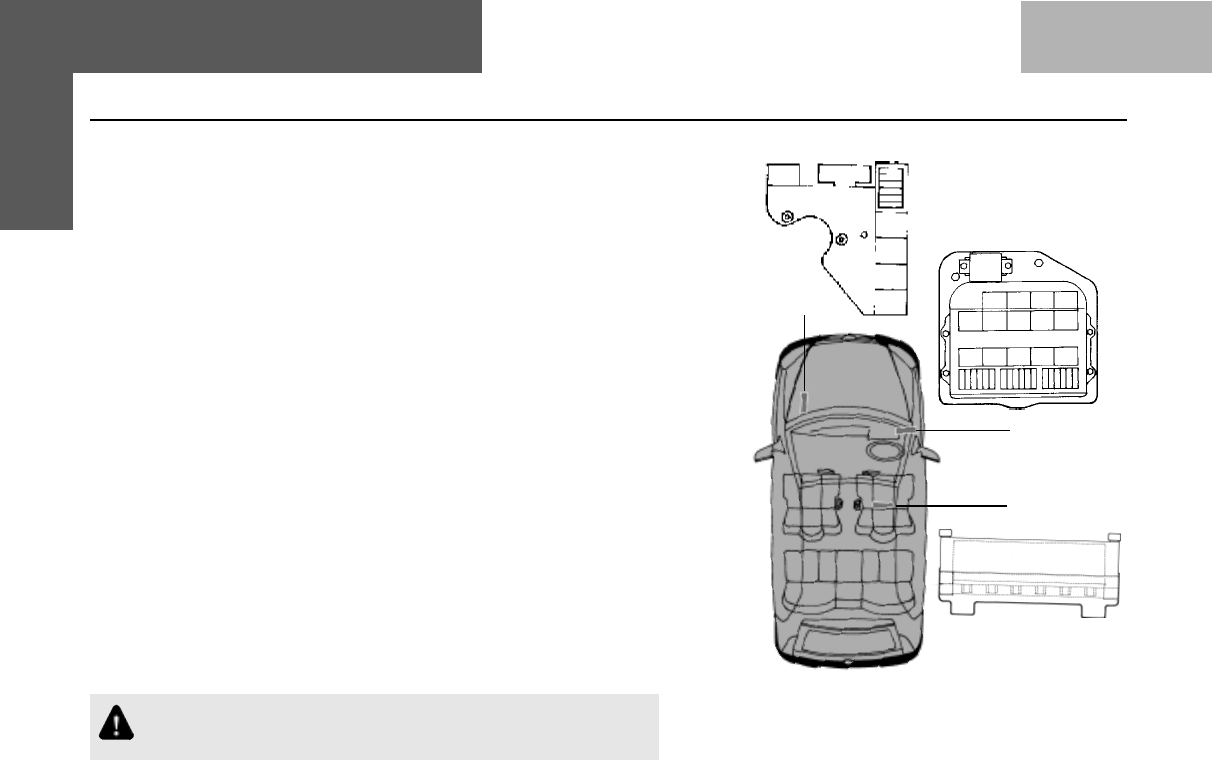
122
11
11
1
22
22
2
33
33
3
1. Engine compartment.
2. Cabin compartment under dashboard.
3. Cabin compartment under driver's seat
(if installed).
LOCATION OF FUSE BOX & RELAYS
Fuses & Relays :
The electrical circuits in your car have fuses to protect the wiring
from accidental short circuit or sustained overload. Fuses and
relays are located at 3 locations in your car as shown in the sketch.
Circuit connected through fuses and relays and the amperage of
the fuse is printed on the fuse box covers.
Checking and replacing fuses :
If any electrical unit in your car has stopped functioning, the fuses
should be checked first.
•Turn the ignition key to 'LOCK' position.
•Remove the fuse box cover, locate the fuse for the function.
•Remove the fuse & look for the fuse element inside the fuse. If
it is damaged replace it with a fuse of same rating and type.
Push the fuse firmly into the holder.
•Check that all other fuses are firmly in position and fix the
cover back in position. Spare fuses are provided in the fuse
box in the cabin.
If the replaced fuse of the correct rating burns out in short time,
there is probably a serious electrical problem in your car. Get the
car attended to at the nearest our Authorised Service outlet.
If any of the function relays is found defective, replace it by a
genuine relay.
Never use a fuse of higher rating than specified.
Always ensure that spare fuses are replenished.
MAINTENANCE & CAR CARE Fuse & It’s Location

123
Head Lamps :
The head lamps are provided with halogen lamps of H4 type with
double filament for providing straight ahead illumination of the road
for long distance or a dip beam which illuminates the road
immediately ahead for short distance visibility. Use dip beam to
avoid inconvenience / blinding the drivers of oncoming vehicles.
The head lamps must be properly aligned in order to obtain maximum
road illumination and reduced glare for oncoming traffic. It is
recommended to check alignment of head lamp beams periodically.
Focusing of Head Lamps & Front Fog Lamps :
Provision is made for focusing of head lamps and front fog lamps.
This should be done at the Authorised Service outlets.
Head Lamp Bulb Replacement :
•Switch 'OFF' the head lamps & ensure that the bulb is not hot.
•Open the bonnet and remove the lamp connector from the head
lamp bulb.
•Remove rubber cap. Unlock the locking clip and take out the
bulb from the holder. This should be done carefully, otherwise it
may lead to breakage of the bulb holder / holding clip.
•Note the instructions on the bulb carton.
MAINTENANCE & CAR CARE Head Lamps
Fog Lamp
Head Lamp
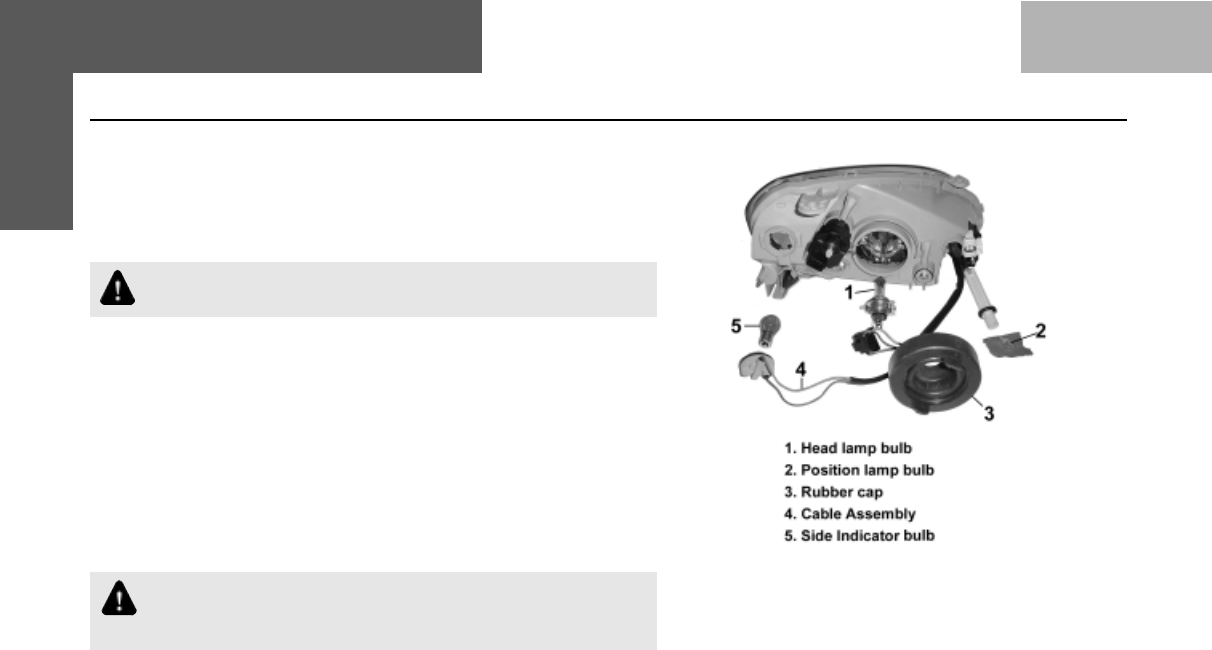
124
Replace the bulb with a new one of the same type with right
orientation in the holder.
•Lock the clip, fit the rubber cap and fix the connector.
•Switch 'ON' the head lamps and check the lighting.
Do not clean or touch the head lamp reflector as it will
damage the mirror finish of the surface.
The horizontal and vertical adjustment screws are located on the
back of the reflector.
Precise adjustment can be carried out only in the authorised
workshops.
When replacing the head lamp bulb, handle it by gripping the cap.
Protect the glass from contact with your skin or hard object. If you
touch the glass, clean it with spirit & a clean cloth. After replacement
of the bulb in any emergency get the head lamp adjustment done
at an Authorised Service outlet at the earliest.
Halogen head lamp bulbs get very hot when illuminated.
Oil, perspiration or a scratch on the glass can cause the
bulb to break due to the heat.
MAINTENANCE & CAR CARE Head Lamps

125
MAINTENANCE & CAR CARE Car Care
of the finish coat. Polish your car if the finish does not
regain its original shine after using wax.
Cleaning of Carpets :
Vacuum clean the carpet regularly to remove dirt. Dirt will
make the carpet wear out faster. Periodically shampoo the
carpet to keep it looking new.
Use carpet cleaners (preferably foam type). Follow the
instructions that come with the cleaner, applying it with a
sponge or soft brush. Keep the carpeting as dry as possible
by not adding water to the foam.
CAR CARE :
The car is subjected to many external influences such as
climate, road conditions, industrial pollution and proximity
to the sea. These conditions demand regular care of the
car body. Dirt, insects, bird droppings, oil, grease, fuel and
stone chippings should be removed as soon as possible.
Washing :
Do not wash the car in direct sunlight, wash in shade. Spray
the car thoroughly with a cold water jet (car on a washing
pit or hoist). Mix car shampoo in the wash water. No solvent
(fuel, thinners) need be used.
NOTICE
Avoid wiping of painted surface in dry condition as it
may leave scratches on the painted surface.
Use a soft bristle brush, sponge or soft cloth and rinse it
frequently while washing. When you have washed the whole
exterior, dry it with a chamois or soft cloth. After drying the
car, inspect it for chips and scratches that could allow
corrosion to start. Apply touch up paint where necessary.
Polishes :
Polishes and cleaners can restore shine to the painted
surface that has oxidised and become dull. They normally
contain mild abrasives and solvents that remove the top layer
CC
CC
Car on ar on
ar on ar on
ar on WW
WW
Washing Pashing P
ashing Pashing P
ashing Pitit
itit
it
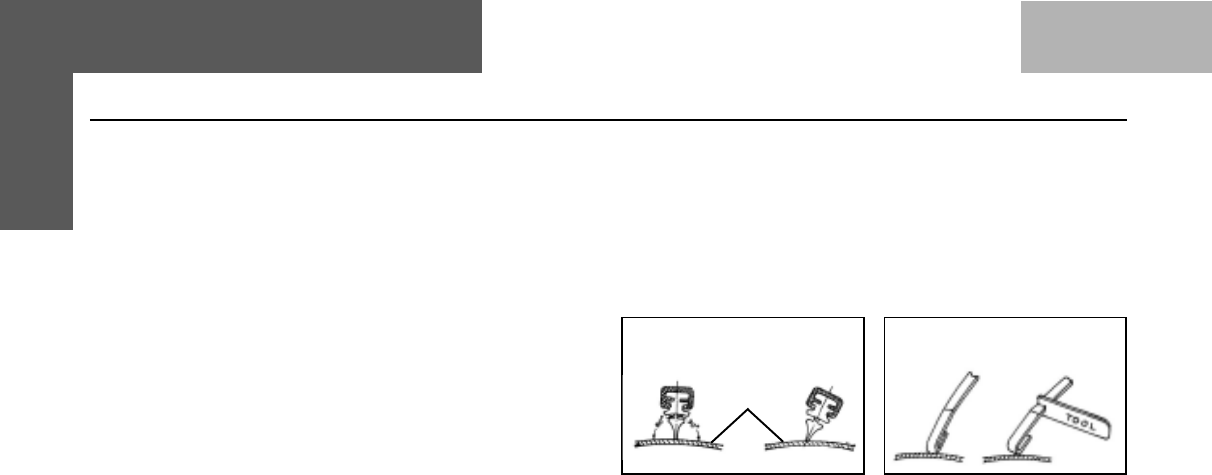
126
MAINTENANCE & CAR CARE Car Care
Cleaning of Windows, Front & Rear Glass :
Clean the windows inside and outside with commercially
available glass cleaners.
This will remove the haze that builds up on the inside of
windows. Use a soft cloth or paper towels to clean all glass
and plastic surfaces.
Maintaining the car when not in extended use :
Park the car in covered, dry and if possible well-ventilated
premises.
Engage a gear.
Remove the cables from the battery terminals (first remove
the cable from the negative terminal).
Make sure the handbrake is not engaged.
Clean and protect the painted parts using protective wax.
Clean and protect the shiny metal parts using commercially
available special compounds.
Sprinkle talcum powder on the rubber windscreen wiper
and rear window wiper blades and lift them off the glass.
Slightly open the windows.
Cover the car with a cloth or perforated plastic sheet. Do
not use sheets of imperforated plastic as they do not allow
moisture on the car body to evaporate.
Inflate the tyres to 0.5 bar above the normal specified
pressure and check it at regular intervals.
Check the battery charge every six weeks.
Do not drain the engine cooling system.
Wiper Care :
Wiper blade attack angle on windshield glass should be
900 i.e. perpendicular.
Remove wiper blade and root wiper arm on windshield glass
in the centre position. Check the gap between arm strip
and glass.
Adjust by twisting wiper arm as shown in the figure.
FOR CHATTERING & NOISY PROBLEMS
Windshield
Glass
OK NOT OK
VIEW WITHOUT WIPER BLADE

127
FOLLOWING GUIDELINES WILL HELP YOU TO
BETTER PROTECT YOUR CAR FROM CORROSION
PROPER CLEANING :
In order to protect your car from corrosion it is
recommended that you wash your car thoroughly and
frequently in case :
1. There is an heavy accumulation of dirt and mud
especially on the underbody.
2. It is driven in areas having high atmosphere pollution
due to smoke, soot, dust, iron dust & other chemical
pollutants.
3. It is driven in coastal areas.
4. The underbody must be thoroughly pressure washed
after every three months.
In addition to regularly washing your car, the following
precautions need to be taken.
PERIODIC INSPECTION :
1. Regularly inspect your car for any damage in the paint
film such as deep scratches and immediately get them
repaired from an Authorised Service Center, as these
defects tend to accelerate corrosion.
2. Inspect mud liners for damages.
3. Keep all drain holes clear from clogging.
PROPER PARKING :
Always park your car in shade to protect it from harsh
sunlight or in a well-ventilated garage so that there is no
dampness on any part of the car.
WASHING YOUR CAR :
Follow these tips while washing your car.
HAND WASH :
1. Always wash your car in shade and when the surface is
at room temperature.
2. Wash with mild car wash soap like "Car Shampoo" and
use a soft 100% cotton cloth to avoid scratches. Please
take help of your dealer to buy the right products.
3. Please be sure that you remove your wristwatch and
wear soft gloves to avoid scratches due to finger rings
or nails.
4. To remove stubborn stains and contaminants like tar,
use turpentine or cleaners like "Stain Remover" which is
safe for painted surfaces. Again your dealer can help
you in selecting the right product.
5. Avoid substances like petrol, diesel, kerosene, benzene
or other solvents that cause damage to paint.
6. Dry your vehicle thoroughly to prevent any damp spots.
7. Rinse all surfaces thoroughly to prevent any traces of
soap and other cleaners as this may lead to the
formation of stains on the painted surface later.
MAINTENANCE & CAR CARE Car Care

128
MAINTENANCE & CAR CARE Car Care
WAXING :
Waxing and polishing is recommended to maintain the gloss
and wet-look appearance of your paint finish.
1. Use a good quality polish and wax for your car.
2. Re-wax your car when the water does not slip off the
surface and collects over the surface in patches.
Further tips for the care of your new INDICA finish :
We recommend that you do not use an automatic car wash
as the stiff brushes or sponges could mar the finish and
damage the surface of your car. Wash the vehicle by hand
with cool and clean water using a soft cloth or sponge.
Please do not use soap but a car shampoo recommended
by your dealer.
Please take the following precautions :
1. Always wash your car in shade, avoiding direct exposure
to sunlight during washing.
2. Dry wiping your car may lead to the formation of
scratches and hence always use a soft cloth and clean
water while wiping your car.
3. Always keep your car parked in a well ventilated shade.
Exposure to heat with entrapped moisture promotes
corrosion.
4. Avoid driving on gravel roads, as the possibility of paint
chip off due to the impact of stones is high. If you are
driving on freshly tarred road, check immediately
afterwards for any stains & clean them.
5. External contamination in the form of sap or industrial
fall-out may mar or develop spots on a new finish. Hence
avoid parking your car near trees, which are known to
drop sap, or near factories, which give out heavy smoke.
6. The acid content in bird droppings may damage the
newly painted finish and hence any bird dropping must
be immediately washed off.
7. The paint finish is susceptible to damage in case petrol,
brake fluid, liquid from car battery, oil, antifreeze,
transmission fluid or windshield solvent spills onto the
painted surface. In case of such a spillage immediately
rinse the affected area with water. Avoid wiping the area
far as possible, however if wiping is required, ensure
that you wipe the area gently with soft cotton cloth.
8. Avoid using sharp objects to scrap off tar or mud from a
painted surface as it may develop scratches or may
peel off the paint.

129
••
••
•ENGINE
••
••
•CLUTCH
••
••
•TRANSAXLE
••
••
•BRAKES
••
••
•STEERING SYSTEM
••
••
•ELECTRICAL
••
••
•SUSPENSION
EMERGENCY SERVICE TIPS

130
EMERGENCY SERVICE TIPS Engine
These tips are given for your guidance. These preliminary jobs are to be carried out in an emergency. In normal cases the
problems should be attended to in an Authorised Service outlet by following the repair procedures given in the Workshop
Manual.
SR. NO. PROBLEM OBSERVED PROBABLE CAUSE ACTION TO BE TAKEN
ENGINE (LPG)
1. Engine not cranking Dead battery, loose or improper •
Get battery checked and/or changed
battery/electrical connections •Jump start using another battery
•Clean & tighten connections
Engine stop solenoid fuse blown •Replace the fuse
2. Engine overheats Coolant level low, coolant leakages •Check and correct leakages
Top up coolant
Hose collapsed/torn •Get the hose replaced
Low engine oil level •Add oil
Cap not sealing properly •Fit the auxiliary water tank cap
correctly
A.C. condenser fan not working •Get defect rectified
Brakes binding •Get defect rectified
Electric fan not working •Get defect rectified
High delivery pressure in A.C. •Get defect rectified
refrigerant circuit
Radiator fins clogged •Clean it
Radiator water passage clogged •Get it rectified
Thermostat defective •Get it rectified

131
SR. NO. PROBLEM OBSERVED PROBABLE CAUSE ACTION TO BE TAKEN
3. Poor pickup Accelerator cable loose •Get it adjusted correctly
Air in the fuel system •Remove the air
Clogged fuel filter •Clean / Replace the element
Clogged air filter •Clean / Replace the element
Clutch slipping/out of adjustment •Get it rectified
Brakes grabbing •Get it rectified
4. Does not accelerate Accelerator cable broken •Get cable replaced
Fuel filter choked •Replace
5. Belt squeal Loose belt •Get belt tension adjusted
Belt glazed •Get belt replaced
6. Low engine oil pressure indicator Pressure transducer faulty, •Do not run the engine extensively.
'ON' when engine is running even and/or oil pump faulty Take the car to the nearest
though engine oil level is within Authorised Service outlet & get
maximum/minimum marking the fault rectified
7. Engine not cranking Discharged battery, Loose or dirty •Get battery changed / charged
battery connections. •
Clean & tighten battery
connections
8. Engine cranks but does No fuel •Get the unleaded fuel filled
not start Fuel filter chocked •Get the fuel filter replaced
•Check fuse for fuel pump & EMS
Inertia Switch tripped off •Reset Inertia switch
EMERGENCY SERVICE TIPS Engine

132
EMERGENCY SERVICE TIPS Engine, Clutch & Transaxle
SR. NO. PROBLEM OBSERVED PROBABLE CAUSE ACTION TO BE TAKEN
9. Check engine lamp continues Some faults are detected by the •Get the vehicle checked and
to glow, even after start fuel injection & ignition system rectified at Authorised Workshop
CLUTCH
1. Clutch slipping Improper pedal travel •Adjust pedal travel
Rusted clutch cable •Replace cable
Oil on clutch disc •Clean or replace disc at
Authorised Service outlet
2. Noisy clutch Pressure plate & diaphragm •Get car attended to by
spring rattling Authorised Service outlet
Release bearing broken/worn out •Replace
Broken damper spring of clutch disc •Replace
TRANSAXLE
1. Gears slipping out of mesh Worn/damaged grooves on shifter •Replace
shaft
Worn shift fork or synchroniser sleeve •Replace
Weak or damaged detent springs •Replace
Worn bearings on input shaft or
layshaft •Replace
Worn dog teeth on sleeve and gear •Replace sleeve and gear
2. Hard shifting Inadequate lubricant •Replenish
Inadequate clutch pedal travel •Adjust
Distorted or broken clutch disc •Replace

133
SR. NO. PROBLEM OBSERVED PROBABLE CAUSE ACTION TO BE TAKEN
Damaged clutch pressure plate •Replace clutch cover/disc
Worn synchrocones •Replace
Worn dog teeth on sleeve or gear •Replace sleeve or gear
Distorted shift shaft/Linkages •Replace
3. Noise Inadequate or insufficient lubricant •Replenish
Damaged or worn bearing(s) •Replace
Damaged or worn gear(s) •Replace
Damaged or worn synchroniser
parts •Replace
BRAKES
1. Poor brakes Insufficient brake fluid •Get the brake fluid filled
Air in the system •Get the air removed
Pedal travel excessive due to •Rectify automatic adjuster
excessive shoe gap
Vacuum leakage •Rectify the leakage
Brake oil (line) leaking •Replace the leaking line
Oil on the drum/liners •Get the liners cleaned/
Replace seals if leaking
Worn brake lining •Get the liners replaced
Defective/worn parts •Get them replaced
2. Brake pulling to one side Oil on the brake lining •Clean the brake lining
One side shoe/pad worn •Get the shoe/pad replaced
Loose brake anchor plate •Tighten the bolts
EMERGENCY SERVICE TIPS Brakes

134
SR. NO. PROBLEM OBSERVED PROBABLE CAUSE ACTION TO BE TAKEN
One side brake pipe clogged •Get the brake line cleaned
Defective tandem master cylinder •Rectify/Replace tandem master
cylinder
3. Brake Squeal Defective brake lining •Replace
Glazed lining •Clean or replace lining
Loose rivets. •Install rivets properly
Wrong lining •Install correct lining
Shoe return spring broken •Replace
Front pads rubbing on the disc •Get it corrected
STEERING SYSTEM
1. Hard steering (Mechanical) Wheel alignment disturbed •Check & adjust
Rack & pinion need adjustment •Check & replace if necessary
Low tyre pressure •Adjust to correct value
Grabbing of linkages •Check & rectify
2. Poor Returnability Grabbing of linkages •Check & rectify
Steering gear disturbed •Check & adjust
3. Excessive play in steering Rack & pinion attachment loose •Get it tightened
4. Hard steering Less fluid in the power •Get the fluid topped up to
(For power steering) steering tank the correct level
Air in the system •Get the air removed by bleeding
the system
Loose pump belt •Get the belt correctly adjusted
Low tyre pressure •Adjust to correct value
EMERGENCY SERVICE TIPS Steering System

135
EMERGENCY SERVICE TIPS Electrical/Suspension
SR. NO. PROBLEM OBSERVED PROBABLE CAUSE ACTION TO BE TAKEN
ELECTRICAL
1. Battery charge & engine oil Battery terminal loose or •Check connections
pressure lamp in cluster not disconnected
operating when key is in 'IGN' Battery completely dead •Get the battery properly
position connected
Fuse blown •Get the battery charged
Loose/open connections •Get the alternator & charging
circuit checked
2. Non functioning electrical Fuse blown in the circuit •Replace the fuse if blown
accessories such as power Loose connectors. •Get the connection properly
windows, head lamps, fuel & tightened/Fixed
temperature gauge, RPM meter,
Circuit relay/controllers loose in the base
•Fix the relay firmly
wiper & washer unit and all Defective components •Get the defective components
lamps etc. replaced at an Authorised
Service outlet
SUSPENSION
1. Abnormal or excessive tyre wear Tyre out of balance •Check balance and/or adjust if
required
Steering geometry disturbed •Adjust steering geometry
Tyres not adequately inflated •Adjust tyre pressure

136
EMERGENCY SERVICE TIPS Suspension
SR. NO. PROBLEM OBSERVED PROBABLE CAUSE ACTION TO BE TAKEN
Wobbly wheel or tyre •Replace wheel or tyre
Defective tyre •Replace tyre
Hub play not proper •Adjust hub play
Brake grabbing •Check and rectify
Excessive braking •Modify driving habit
2. Abnormal noise from front end Worn, sticky or loose tie •Replace tie rod end, suspension
rod ends, lower ball joints, arm, tie rod or drive shaft joints
tie rod in side ball joints or
drive shaft joints
Warning noise for pad wear •Replace pad
Damaged struts or mounting •Repair mounting or replace struts
Worn suspension arm bushings •Replace
Loose wheel nuts •Tighten wheel nuts
Loose suspension bolts or nuts •Tighten suspension bolts or nuts
Broken or damaged wheel bearing •Replace
Poorly lubricated or worn strut •Lubricate or replace strut bearings
bearings
Excessive hub play •Adjust
Loose caliper housing bolts •Check & tighten
3. Ride too soft / bumpy Faulty struts •Replace strut
4. Suspension bottoms Over loaded •Check loading
Faulty struts •Replace struts

137
••
••
•AGGREGATE NUMBERS
••
••
•FUEL, COOLANTS & LUBRICANTS
••
••
•TECHNICAL SPECIFICATIONS
••
••
•SERVICE SCHEDULE
••
••
•CAR RECORD SHEET
IMPORTANT INFORAMTION
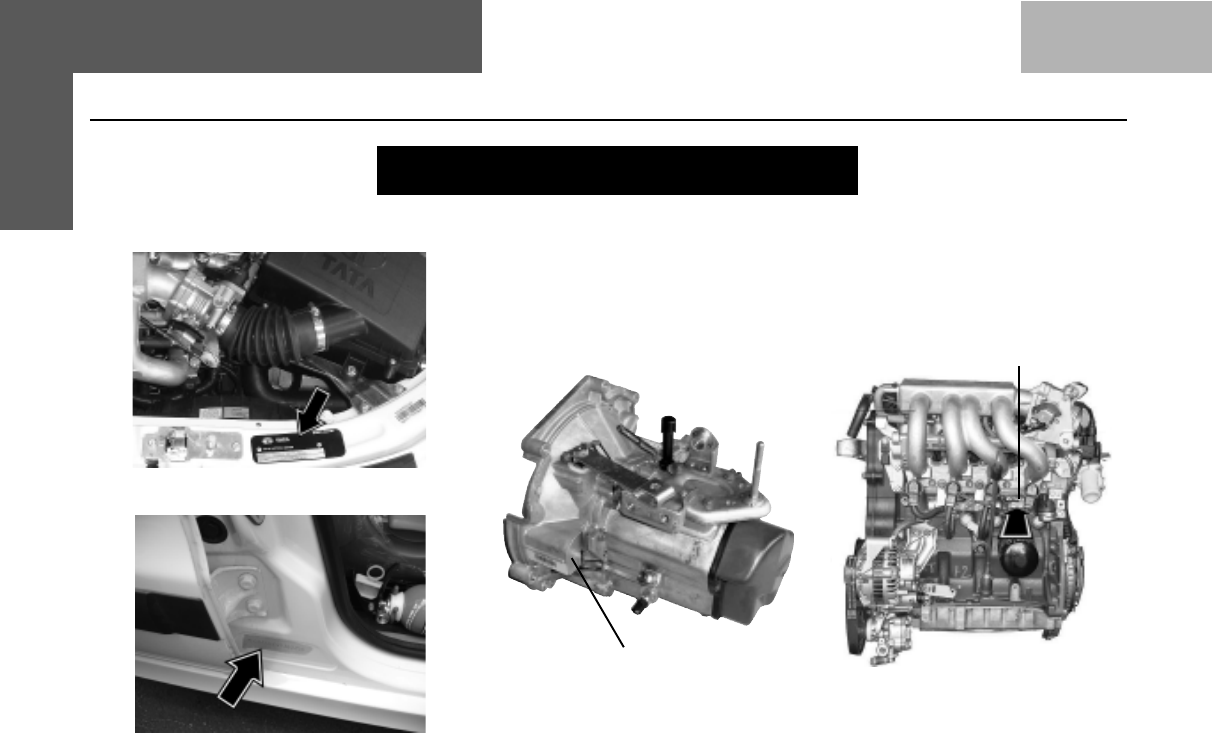
138
LOCATION OF AGGREGATE NUMBERS
IMPORTANT INFORMATION Aggregate Numbers
Chassis Number Plate
Engine Number
Chassis Number Plate
Transaxle Number
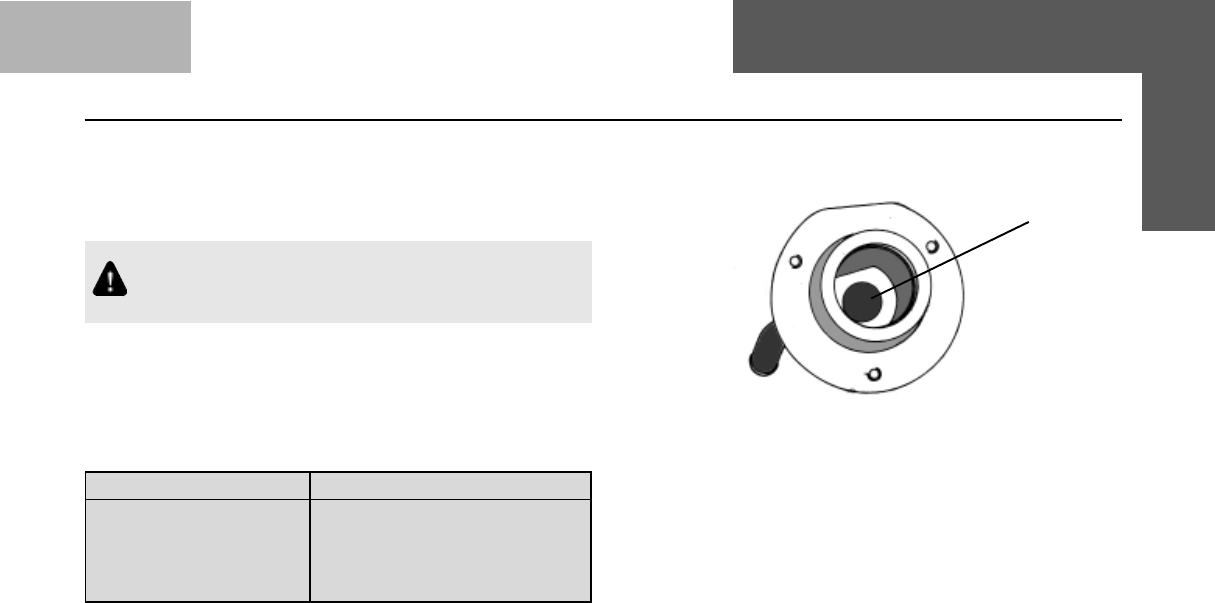
139
IMPORTANT INFORMATION Fuel, Coolants & Lubricants
Filler Neck
For Unleaded Petrol Version
Small Dia. Filler Hole
Vehicles with catalytic converter :
Unleaded regular grade petrol conforming to IS 2796-1994/
DIN 51607 (or equivalent) and RON not less than 87 is
recommended to be used as fuel.
Do not use leaded petrol in a car fitted with catalytic
converter. Even single fill of leaded petrol will
seriously damage the catalytic converter.
Lubricants : (Petrol)
Engine oil : Recommended grade of engine oil conforming
to API-SF/CC specification and range of ambient
temperature at which these can be used are given in the
table below.
Ambient temp. in deg. C Engine oil grade
-10 deg. & above SAE 20W/40 or SAE 20W/50
-15 deg. to 40 deg. SAE 15W/40 or SAE 15W/50
-20 deg. to 40 deg. SAE 10W/40 or SAE 10W/50
-35 deg. to 40 deg. SAE 5W/30

140
Brand names :
As per chart given in the manual.
Transaxle :
Use recommended brand of EP 80 gear oil.
Grease for axle bearings :
Lithium base grease IPOL IPLEX LC Grease 2
Brake fluid :
IS 8654/DOT 3
Power Steering :
ATF Type A, Suffix A
Coolants :
Presence of dirt in the coolant chokes up passages in the
radiator, cylinder head and cylinder block, thereby causing
insufficient cooling of engine.
To prevent rust formation and freezing of coolant inside the
passages of radiator, cylinder block and cylinder head,
use branded premixed coolant (ready to use).
IMPORTANT INFORMATION Fuel, Coolants & Lubricants
141
IMPORTANT INFORMATION Fuel, Lubricants & Coolants
PLEASE USE ONLY GENUINE ENGINE OILS, COOLANTS, LUBRICANTS, ANTI RUST & SOUND
DEADENING COATS, WINDSCREEN SEALANT, ADHESIVES & FUEL ADDITIVES BRANDED BY
TATA MOTORS FOR OPTIMUM PERFORMANCE OF YOUR TATA INDICA LPG...
ITEM COMPANY BRAND QTY
ENGINE OIL CASTROL Castrol GTX 20 W/40 4.0 Litres
HPCL HP ESMO 20 W/40
COOLANT SUNSTAR Golden Cruiser 1400 M
HPCL HP Thanda Raja P 6 Litres
TRANSMISSION OIL HPCL Gear Oil EP 80 3.3 Litres
CASTROL Castrol Extreme Pressure 80 EP
STEERING OIL HPCL HP ATF 1.2 Litres
CASTROL Castrol Transpower TQ
BRAKE FLUID HPCL Super Duty Brake Fluid DOT-3 0.265 Litres
CASTROL Castrol Universal Brake Fluid DOT-3
HUB GREASE CASTROL Castrol Grease AP2
ANTI RUST TREATMENT DINITROL Dinitrol —
& SOUND DEADENING WUERTH Wuerth —
WIND SCREEN SEALANT ANCHEMCO Terostat 8590 Kit Form —
METAL & PLASTIC ADHESIVE ANCHEMCO Terostat 930 310 ml Cartridge

142
2. CLUTCH
Type : Single plate dry
friction diaphragm type
Outside diameter : 190 mm
of clutch lining
Friction area : 285 sq.cm.
3. TRANSAXLE : Front wheel drive through
constant velocity joints.
Model : TA65-5 / 4.06
with overdrive
Type : Synchromesh on all forward
gears. Sliding mesh for
reverse gear.
No. of gears : 5 Forward, 1 Reverse
Gear ratios : 1st - 3.64
2nd - 1.95
3rd - 1.27
4th - 0.88
5th - 0.714
Rev. - 3.58
Final drive ratio : 4.06
IMPORTANT INFORMATION Technical Specifications
1. ENGINE
Model : Bi-fuel (MPFI) TATA 475 SI”58
Type : Water cooled, Bi-fuel (MPFI)
Petrol Engine
No of cylinders : 4 inline
Bore/Stroke : 75 mm x 67.5 mm
Capacity : 1193 cc
Max. engine output : Petrol : 65 PS at 5000 rpm as
per IS - 14599
LPG : 62 PS at 5000 rpm as
per IS - 14599
Max. Torque : Petrol : 102 Nm at 2600 rpm
as per IS - 14599
LPG : 100 Nm at 2600 rpm as
per IS - 14599
Compression ratio : 10 : 1
Firing order : 1-3-4-2

143
Gear Shift : Floor mounted with
International "H" pattern,
with Fifth and Reverse inline.
with interlock to prevent
accidental engagement from
5th to reverse
4. REAR AXLE : Non driven axle
Independently suspended
5. SUSPENSION
Front : Independent, Lower
wishbone, McPherson Strut
type.
Rear : Independent, Semi-trailing
arm with coil spring
mounted on hydraulic shock
absorbers.
Antiroll bar : At front
IMPORTANT INFORMATION Technical Specifications
6. STEERING
GL / GLE : 1) Manual Rack & Pinion
Version Steering Gear with
collapsible steering column
GLS / GLG : 2) Hydraulic Power assisted
Version Rack & Pinion Steering
Gear with collapsible
steering column
Steering Wheel : 380 mm dia
7. BRAKES
Service brakes : Dual circuit, diagonal split
hydraulic brakes through
tandem master cylinder.
Front : 231 mm dia disc brake
Rear : 180 mm dia drum brake
Parking brake : Lever type, Console mounted,
Cable operated mechanical
linkages acting on rear wheels

144
12. PERFORMANCE
(kmph)
Max. speed at rated : 140 (PETROL mode)
GVW 135 (LPG mode)
13. MAIN CHASSIS DIMENSIONS AS PER ISO:612 IN
MM (Nominal) TOLERANCES AS PER
INTEREUROPE STVZO
Wheel base : 2400
Track front : 1400
Track rear : 1380
Front Overhang : 785
Rear Overhang : 490
Overall length : 3675
Max. Width :
Over body : 1665
Over outer rear view mirrors
in open condition: : 1915
Overall height - unladen : 1485
Min. turning circle dia : 9.8 m
Min. turning clearance circle dia : 10.2 m
Ground clearance - unladen : 166
8. WHEELS & TYRES
Tyres : 165/65 R13
Wheel rims : 4.50 J x 13 stylised steel rims
No. of wheels : Front - 2
Rear - 2
Spare - 1
9. FUEL TANK
Capacity : 37 litres (PETROL)
: 31 litres (LPG)
10. BODY : Semi-mono Volume, Mini size
5 door hatch-back, steel
monocoque body.
11. ELECTRICAL SYSTEM
System Voltage : 12 Volts -ve earth
Battery : 12V, DIN 44
Alternator : 12 V 90 Amps
IMPORTANT INFORMATION Technical Specifications

145
14. WEIGHT (kg) (TOLERANCE AS PER EEC 92/21)
Complete Vehicle For GL 1045
kerb weight as per For GLE 1060
ISO : 1176 (with For GLS 1065
sparewheel and tools ) For GLG/GLX 1070
Gross vwhicle weight For GL 1445
For GLE 1460
For GLS 1465
For GLG/GLX 1470
Pay load For all 400
15. PASSENGER CAPACITY : 2 front + 3 rear
16. LUGGAGE SPACE
Net inside loading space : 0.16 cubic metre
upto rear seat backrest
0.55 cubic metre
upto front seat backrest
when rear seat folded
IMPORTANT INFORMATION Technical Specifications

146
IMPORTANT INFORMATION Service Schedule
Service Instructions
The Tata Indica has been manufactured to give you economical and trouble
free performance. To achieve this please follow the instructions as stated.
Your Car is entitled to four free services (labour only). The free service
coupons are attached to the sales invoice. Please present these
coupons to the servicing dealer while availing free services.
1st free service - At 1000-1500 km. OR 1 month whichever is eariler
2nd free service - At 10000-10500 km. OR 12 months whichever is eariler
3rd free service - At 20000-20500 km. OR 24 months whichever is eariler
4th free service - At 30000-30500 km. OR 36 months whichever is eariler
All services other than free services are chargeable.
Servicing of the car can be done at
any TATA MOTORS Authorised
Dealer Workshop, TATA MOTORS
Authorised Service Centre (TASC)
or TATA MOTORS Authorised
Service Point (TASP). The details of
their locations are given in this
manual.
Warranty claims can be settled by
any Tata Motors Authorised Dealer
for all failures, while all warranty
claims excluding the consideration
on the replacement of major
aggregates, can be settled by any
TASC which is authorised for
handling warranty claims. TASPs will
not handle warranty repairs.
147
IMPORTANT INFORMATION Service Schedule
SR.
NO. OPERATION FREQUENCY
IN km
GENERAL
1. Wash the vehicle & clean condenser fins Every Service z zzzzzzz zzz
2. Check & top up fluids (if required) : Transaxle oil, coolant, Brake fluid, Every Service z zzzzzzz zzz
Battery Electolyte, Wind screen washer fluid, Power steering oil (if fitted)
3. Check fuel lines for leakages 10000 zzzzzzz zzz
4. Check rubber boots & bushes for damage 30000 zzz
ENGINE ( LPG SYSTEM )
1. LPG lines and joints (LPG leakage) Every service zzzzzzzz zzz
2. Clean the LPG filter zzzzz
First at 10000 km & thereafter at every 20000 km
3. Replace the LPG filter / Cartridge paper 20000 zzzzz
4. Check saftey solenoid valve on vaporiser 10000 zzzzzzz zzz
5. Check pressure regulator for mountings, leakges,damages, proper 10000 zzzzzzz zzz
functioning, Rectify if any
6. Replace the pressure regulator diaphragm 40000 zz
7. LPG rail - check mountings,leakages -Rectify if any zzzzz
First at 10000 km & thereafter at every 20000 km
8. Drain oil if any from regulator zzzzz
First at 10000 km & thereafter at every 20000 km
9. Multifunction valve - Clean ‘O’ Ring & core Assy. 20000 zzzzz
10 Multifunction valve - Replace 100000
z
11. Check filler valve seals 100000
z
1000-1500
10000-10500
20000-20500
30000-30500
40000-40500
50000-50500
60000-60500
70000-70500
80000-80500
90000-95500
100000-100500
148
IMPORTANT INFORMATION Service Schedule
SR.
NO. OPERATION FREQUENCY
IN km
ENGINE ( PETROL SYSTEM)
1. Clean air filter element ( more frequently for vehicle operating as TAXI ) 10000 zzzzzzz zzz
2. Change engine oil and oil filter ( 10000 km OR 12 months whichever is earlier) 10000 zzzzzzz zzz
3. Change fuel filter 10000 zzzzzzz zzz
4. Check all drive belts for tension, adjust if necessary 10000 zzzzzzz zzz
5. Check timing belt, adjust tension if necessary, replace if defective 20000 zzzzz
6. Replace air filter element ( more frequently for vehicle operating as TAXI ) 40000 zz
7. Change coolant ( 40000 km OR two years whichever is earlier ) 40000 zz
8. Replace timing belt 100000 z
9. Replace Spark Plug (MPFI) 30000 zzz
TRANSAXLE
1. Change Transaxle oil 20000 zzzzz
BRAKES
1. Check front brake pads and rear brake linings. Replace if necessary 20000 zzzzz
2. Replace brake fluid (OR 2 years whichever is earlier) and check brake system 40000 zz
components for leakages
WHEELS AND TYRES
1. Rotate tyres 20000 zzzzz
FRONT & REAR SUSPENSION
1. Check and adjust wheel alignment 20000 zzzzz
STEERING
1. Repalce power steering oil 80000 z
1000-1500
10000-10500
20000-20500
30000-30500
40000-40500
50000-50500
60000-60500
70000-70500
80000-80500
90000-95500
100000-100500

149
IMPORTANT INFORMATION Service Schedule
SR.
NO. OPERATION FREQUENCY
IN km
ELECTRICAL
1. Check specific gravity of battery electrolyte (10000 kmOR Every 6 months) 10000 zzzzzzz zzz
2. Check headlamp focussing 30000 zzz
A.C. SYSTEM
1. Check air-conditioning / HVAC system for satisfactory performance Every Service z zzzzzzz zzz
1000-1500
10000-10500
20000-20500
30000-30500
40000-40500
50000-50500
60000-60500
70000-70500
80000-80500
90000-95500
100000-100500

150
IMPORTANT INFORMATION Service Schedule
Fuel filled Fuel consumption Remarks / Complaints
Km. readingDate

151
IMPORTANT INFORMATION Service Schedule
Fuel filled Fuel consumption Remarks / Complaints
Km. readingDate
152
IMPORTANT INFORMATION Record of Services Performed
* Labour free, material chargeable* Labour free, material chargeable
* Labour free, material chargeable* Labour free, material chargeable
* Labour free, material chargeable
Recommended Date Odometer Repair Servicing
Service reading Order Dealer's
km. No. Signature &
At km. Stamp
PDI Free Labour
1,000 *
10,000 *
20,000 *
30,000 *
40,000
50,000
60,000
70,000
80,000
Recommended Date Odometer Repair Servicing
Service reading Order Dealer's
km. No. Signature &
At km. Stamp
90,000
1,00,000
1,10,000
1,20,000
1,30,000
1,40,000
1,50,000
1,60,000
1,70,000
1,80,000

153
Record of Warranty repairs carried out Chassis No._____________________
Repair
Order No. Particulars of Repair Servicing Dealer's Signature & Stamp
Odometer
reading (km)
Date

154
Record of Warranty repairs carried out Chassis No._____________________
Repair
Order No. Particulars of Repair Servicing Dealer's Signature & Stamp
Odometer
reading (km)
Date

155
LIST OF LPG FILLING STATION

156
6. Hindustan Petroleum Corporation Ltd.
(HPCL)Dealer: Kamal LubesMIDC,
Butibori, Nagpur
7. Vanaz Engineers Limited.Dealer:
Transwell Automall Plot no. 35 A,
Babulban, Old Bagadganj Road, Nagpur
- 440 008
Phone: 0712-2708439 / 3268439 /
9823011639
8. Indian Oil Corporation Ltd. (IOCL)Dealer:
Gargi Automobiles Yerla Islampur
9. Aegis Logistics Ltd.Dealer: Aegis
Logistics Ltd.920, Peth-Sangli Road,
Ashta Naka, Urun, Islampur-415 409, Tal.
Walwa, Dist. Sangli
Khedshivapur
10. Reliance Industries Ltd. (RIL)Dealer:
Reliance Industries Ltd. (RIL)Survey no.
542 & 543, Post -Kelawade Chainage, No.
813/200, At Village, -Kelawade, Taluka-
Bhor, Dist-Pune.
Phone: 02113-284785
Bhayander
11. Company: Reliance Industries Ltd.Dealer:
Reliance Industries Ltd.Old survey no.
365, New Survey no. 71, H. No. 1,7, 21 ,
Bhayander-401 101.
Phone: 022-65143056
Amreli
12. Vanaz Engineers LimitedDealer: Shree
Ganesh Petroleum16,17,18, Varsada
road, Near Utsav Garden Restaurant, PO
Ishvariya, Dist. Amreli.
Phone: 02792-240888 / 9824055333
Mumbai
13. Hindustan Petroleum Corporation Ltd.
(HPCL)Dealer: Lachmandas Service
Stn.S.V.Road, Irla, Ville Parle (W),
Mumbai
Phone: 022-26713698
14. Hindustan Petroleum Corporation Ltd.
(HPCL) Sakinaka Petroleum
Services,Kurla Andheri Rd, Next to Bank
of Baroda, Sakinaka, Mumbai-400 072
Phone: 022-28506025
15. Hindustan Petroleum Corporation Ltd.
(HPCL) Baxi Singh & Co.Next to Kalpana
Cinema, Lal Bahadur Sashtri Margh,
Kurla West, Mumbai- 400 070
Phone: 022-25038468, 25039865
16. Bharat Petroleum Corporation Ltd.
(BPCL)Manhas AutoAcharya Done Marg
(King Edward Road), Sewree, Mumbai-
400 015
Phone: 022-24131240
17. Bharat Petroleum Corporation Ltd.
(BPCL),Chedda Service Station, Shastri
Marg, Mulund, Mumbai-400 080
Phone: 022-25681548
LIST OF LPG FILLING STATIONS
ASSAM
Guwahati
1. Indian Oil Corporation Ltd. (IOCL)Dealer :
Kishore & Co.Adabari, Guwahati-12
Phone: 0361-2571490 / 98864027833
GOA
2. Elf Gas India Ltd.Dealer: West Coast Auto
LPG StationNH-4A, By-pass, Bainguinim
Village, Tiswadi (Iihas) Taluk, Old Goa.
Phone: 9326106875
MAHARASHTRA
Ahmednagar
3. Indian Oil Corporation Ltd.(IOCL)Dealer :
Om Matoshri Petroleum,Nagar-Pune
Road,
Phone: 0241-2322971
Nagpur
4. Reliance Industries Ltd. (RIL)Dealer:
Reliance Industries Ltd. (RIL)Survey no.
104/2, Village Bothli, PO Butibori, NH-7,
Wardja Road, Nagpur.
Phone: 07104-329468
5. Company: Vanaz Engineers Limited.Dealer:
Maa Sharda AutoLPG StationPlot no. 1,
Manewada Square, Ullas Nagar, Ring Road,
Nagpur-440 027
Phone: 712-2731964 / 9823026860 /
9370022110

157
18. Bharat Petroleum Corporation Ltd. (BPCL)
Auro Petroleum305, Sion Trombay Road,
Nr Diamond Garden, Chembur, Mumbai-
400 071
Phone: 022-25575337
19. Bharat Petroleum Corporation Ltd. (BPCL)
Famous AutoSwami Vivekanand Road,
Kapadia Baug, Plot No.1, Survey No. 7,
Borivli (W), Mumbai- 400 092
Phone: 022-28053849
20. Indian Oil Corporation Ltd. (IOCL) Raj
AutoNear Juhu Airport, SV Road,Mumbai
Phone: 022-26133700
21. Indian Oil Corporation Ltd. (IOCL)
Poonam AutoOpp Reliance Park, Nr
Suman Nagar, Sion Trombay, Chembur
Phone: 022-25282052
22. Indian Oil Corporation Ltd. (IOCL)
Joquium Petroleum Deonar Mumbai
Phone: 022-25569948
23. Indian Oil Corporation Ltd. (IOCL)
Intel Carporation, Sahar Airport,
Andheri (E)
Phone: 022-26829353 / 26829247 /
26828353
24. Indian Oil Corporation Ltd. (IOCL) Asha
AutoKurla, Mumbai
Phone: 022-26505338
25. Hindustan Petroleum Corporation Ltd.
(HPCL)Hind Automobiles, 29, Sewri
Vadala Road, Near Arora Cinema, Kings
Circle, Mumbai-400 019
Phone: 022-24096544
26. Hindustan Petroleum Corporation Ltd.
(HPCL)Chaman Automobiles, 277, Reay
Road, Opp Dock Yard Road, Railway
Station, Mumbai-10
Phone: 022 - 23717925
27. Hindustan Petroleum Corporation Ltd.
(HPCL)Cadel AutoCadel Auto, Opp.
Shivaji Park, Dadar, Mumbai
Phone: 022 -24453191, 24467829
28. Hindustan Petroleum Corporation Ltd.
(HPCL)Automobile Resort, Sion Trombay
Road, Deonar, Mumbai - 88
Phone: 022-25580869 / 25558102
29. Bharat Petroleum Corporation Ltd.
(BPCL)Taj Automobiles96, Lamington
Road, Bhadkamkar Road, Mumbai-07
Phone: 022-23084015
Dhule
30. Hindustan Petroleum Corporation Ltd.
(HPCL)SSP S. Sethi & Bros.Agra Road,
Dhule, Maharashtra
31. Aegis Logistics Ltd.Gat no. 322/2, Opp.
Abhay Yuva College, NH 3, Mumbai-Agra
Highway, Dhule-424 001
Ulhasnagar
32. Reliance Industries Ltd. (RIL), DMK Ent.,
Plot no. 3, Sheet no. 30, Vithalwadi
Station Road, Opp. Ramgirdhar Indl.
Estate, Dist. Ulasnagar
Phone: 0251-3257934
Kalyan
33. Reliance Industries Ltd.(RIL), Kalyan
Bhiwandi Road,Village: Kon, Kalyan
Phone: 025522-2645309
Khopoli
34. Reliance Industries Ltd. (RIL), Village Hal
Budrak,Taluka Khalapur, Old NH-4,
(Mumbai-Pune), KopholiPhone: 01292-
320131
Rahata
35. Reliance Industries Ltd. (RIL), Survey no.
229 (P), Nagar Manmmad RD Village,
Pimplas, Rahata , Dist. Ahmednagar
Phone: 02423-329500
Jalgaon
36. Vanaz Engineers Limited. Shree Auto
LPG PumpsGhat no. 2, NH- no. 6,
Nashirabad, Jalgaon-Bhusaval Road,
Jalgaon
Phone: 0257-2232612 / 5623146
37. Aegis Logistics Ltd., Gate no. 88,
Chincholi Shivar Ajanta Road, Jalgaon-425
003
Phone: 9827258690
LIST OF LPG FILLING STATIONS

158
Yavatmal
38. Reliance Industries Ltd. (RIL), 54/1,
Pobaru Layout, Pandharawada Road,
Yavatmal
Phone: 07232-329365
Nasik
39. Bharat Petroleum Corporation Ltd. (BPCL)
Cidco Taj
40. Reliance Industries Ltd. (RIL) Nasik-VI
Survey no. 207/6C/7, Plot no. 6+7A, At
Village-Mhasrul,Taluka-Nasik
Phone: 0253-2532408
41. Reliance Industries Ltd. (RIL), Anandwalli
Shah Road,Satpur , Nasik-422 007
Phone: 0253-2355778
42. Company: Hindustan Petroleum
Corporation Ltd. (HPCL)Dealer: Bela Auto
ServicesDwarka Circle, Nasik
Phone: 0253-2591514 / 3092522
Pune
43. Indian Oil Corporation Ltd (IOCL)Dealer:
Indian OilTirupati Petroleum, Nasik - Pune
Road, Pune.
44. Hindustan Petroleum Corporation Ltd.
(HPCL) Bhosale Petroleum, Chikhali,
Near Tata Indica Plant, Pune
Phone: 9822041392
45. Vanaz Engineers Limited. Choudhari’s
Auto LPG Gas StationS.No. 130/4/1/1, on
Mumbai-Bangalore By-pass service Road,
Warje, Pune - 411 058
Phone: 9371124136
46. Indian Oil Corporation Ltd. (IOCL) Ganga
Auto, Hadapsar
47 Indian Oil Corporation Ltd. (IOCL) D’ Mello
S/Stn.46, Nagar Road, Pune-14
Phone: 020-27031728
48. Hindustan Petroleum Corporation Ltd.
(HPCL) Shivaji Service StationManjari,
Pune
Phone: 020-26993479
49. Hindustan Petroleum Corporation Ltd.
(HPCL)A.J. Modi & Sons, 206, Wellesly
Road, Mangalwar Peth, Pune -11
Phone: 020-26054020
50. Bharat Petroleum Corporation Ltd.
(BPCL), BP-Pune 1, Near RTO Office,
Wellsely Road, Pune-1
Phone: 020-26059756
51. Hindustan Petroleum Corporation Ltd.
(HPCL)Sangoi Service Station 1, 160,
Ganeshkind Road, Opp, Rahul Theatre,
Shivaji Nagar, Pune- 411 005
Phone: 020-25535651 / 25533573
52. Bharat Petroleum Corporation Ltd. (BPCL
Saraswati Auto, Shankarshet Rd,Pune- 1
Phone: 020- 24441238 / 5264
53. Hindustan Petroleum Corporation Ltd.
(HPCL) Swami Samath EnterprisesPune
Nasik Road, Bhosari, Pune
Ichalkaranji
54. Aegis Logistics Ltd. Plot no. 45, Station
Road, Ichalkaranji-416 115
Chandrapur
55. Hindustan Petroleum Corporation Ltd.
(HPCL)OM Traders, Padoli, Chandrapur,
Maharashtra
Aurangabad
56. Vanaz Engineers LimitedShri Ram Auto
LPG Pump, Gat No.393.Sundarwadi,Jalna
Road,Aurangabad431001.
Phone: 0240-2100217/9422202669/
09960002255
Miraj
57. Reliance Industries Ltd. (RIL) Suyash
Petroleum, Miraj-Sangli Road, Tal-Miraj,
Dist. Sangli
Phone: 0233-3207172 Navi Mumbai.
58. Reliance Industries Ltd. (RIL) Plot No. 7,
Sector-18, Off Palm Beach Road, Besides
Full Stop Mall, Sanpada, Navi-Mumbai
Phone: 9820008753,022-65141745
59. Indian Oil Corporation Ltd. (IOCL) Vashi
Petroleum Sector-17, Vashi, Navi Mumbai
Phone: 022-2767079
LIST OF LPG FILLING STATIONS

159
60. Hindustan Petroleum Corporation Ltd.
(HPCL)Subham Auto, Plot no. 8, Sector
-4A,Koperkhairane, Navi Mumbai
Phone: 022-27552175 / 56161285
61. Hindustan Petroleum Corporation Ltd.
(HPCL)Shree Om Sai Auto Care Station,
P/130, TTC, MIDC Village-Digha, Navi
Mumbai- 400 708
Phone: 022-25401998 / 25397618
62. Hindustan Petroleum Corporation Ltd.
(HPCL)Gain Auto, PlotPlot No. 15,
Sector -25, Nerul, Navi Mumbai
Phone: 022-27718052
Thane
63. Indian Oil Corporation Ltd. (IOCL) Royal
Auto, Kalyan-Bhiwandi Road, Village
Ranjivileegove
Phone: 9820066866 - Mr. Raju
64. Indian Oil Corporation Ltd. (IOCL) Anjur S/
Stn.Village Dapode, Bombay-Agra, NH-3,
Bhiwandi-421 303
Phone: 022-65850596 / Mr. Shukla
65. Hindustan Petroleum Corporation Ltd.
(HPCL)Hind Automobiles, Wada Road,
Shellar, Bhiwandi, District Thane
Phone: 02522-244900
Vasai
66. Reliance Industries Ltd. (RIL) Survey no.
235 & 241, Village Palhar, NH-8, Tal
Vasai, Dist. Thane
Phone: 9890036371
Kolhapur
67. Aegis Logistics Ltd. 1/K , NH-
4,Sarnobatwadi, Tal. Karveer, Dist.
Kolhapur
68. Reliance Industries Ltd. (RIL) Survey no.
335 & 336/1, Kasabe Vadgaon, NH-4, Tal.
Hatkangale, Dist. Kolhapur
Phone: 9422605905 , 0230-6450102
69. Bharat Petroleum Corporation Ltd.
(BPCL)Dealer: Konduskar AutoShivaji
Vidyapeeth Road, 12th Lane,
Rajarampuri, Taluka Karvir
Satara
70. Vanaz Engineers Limited.Gourav Auto
LPG Pump, Gut no. 268/1A/1 of Village,
Taluka Karad, Dist. Satara
Phone: 02162-233957 / 237857 /
9822006474 / 9822755858
71. Vanaz Engineers Limited. Madhavrao Auto
LPGS. no. 44/1A, A/P, Govare Village,
Taluka Karad, Dist. Satara
Phone: 02164-271392 / 9890362783
Ratnagiri
72. Aegis Logistics Ltd. Sr. no. 395, Hissa no.
1/3/3, Opp. Ganesh Colony, MIDC,
Sawant Estate, Hatkhamba-Ratnagiri
Highway, Ratnagiri- 415 639
Phone: 9825244070
LIST OF LPG FILLING STATIONS
Solapur
73. Aegis Logistics Ltd.T.P.N.o. 4, Final Plot
no. 56, Plot no. 21 & 22, Budhwar Peth,
Near Old Pune Naka, Solapur-413 002
Phone: 02164-271392/ 9890362783
GUJARAT
Gandhinagar
74. Hindustan Petroleum Corporation Ltd.
(HPCL)Yogi Petroleum, NH-8C, Sarkhej,
Gandhinagar Highway, Gandhinagar
Phone: 079-23234583
75. Vanaz Engineers Limited.Shreeji Auto
LPG, Block no 195/37, Dhanap, Dist.
Gandhinagar
Phone: 9825563816
76. Vanaz Engineers Limited. Riddhi GasE-
19/10, Electronic Zone, GIDC Sector 26,
Near K7, Gandhinagar,
Phone: 9825328331/ 079-23244321/
09925041331
Baroda
77. Reliance Industries Ltd.(RIL)Baroda
Express Way, Survey No. 437,438,439,
431 & 418 at Village Poicha,Taluka Savli,
Dist. Baroda, Poicha- 3911780
Phone: 02692-325502
78. Reliance Industries Ltd.(RIL)Hightension
Road, SubhanpuraBaroda- 390023
Phone: 0265-3255039

160
Ahmedabad
79. Indian Oil Corporation Ltd.(IOCL)
Dhanalxmi PetroleumNear Sanghvi High
School, Vijaynagar
Phone: 079-27456878
80. Hindustan Petroleum Corporation
Ltd.(HPCL) HP Auto Care Centre, T & E
Station, Bodakdev, Near Satyagrah
Chhavani, Bodakdev, Ahmedabad
81. Reliance Industries Ltd.(RIL) Sardar Patel
Ring Road, Bhopal , Ahmedabad
Phone: 02717-234303
82. Indian Oil Corporation Ltd.(IOCL)
Shreenathji Auto Point,Rakhial,
Ahmedabad
Phone: 079-30980612
83. Reliance Industries Ltd.(RIL) Opp. Old
Nirma Bharat Bobbin, Garibnagar Char
Rasta,Rakhiya,Ahmedabad-380 021
Phone: 079-32988766
84. Reliance Industries Ltd.(RIL) Near Anand
Bus Stand-Satellite, Vejalpur, Ahmedabad
Phone: 079-26930770
85. Reliance Industries Ltd.(RIL) NH-8 (Narol-
Naroda), Isanpur, Ahmedabad
Phone: 079-25735733
86. Hindustan Petroleum Corporation
Ltd.(HPCL)HP COCO Rakhial,
Ahmedabad
Phone: 079-2773072
94. Bharat Petroleum Corporation Ltd.(BPCL)
Neelu Motors, Ashram Road, Nava Wadaj,
Ahmedabad- 13
Phone: 079-27553660 / 9824161069
Mehsana
95. Reliance Industries Ltd. (RIL) Mehsana-
Ahmedabad Highway, Village: Nagalpur,
Mehsana
Phone: 02762-324009
96. Aegis Logistics Ltd. Block no.199/2/P,
Village Heduva-Hanumant, Besides Hotel
Janpath, Opp. ONGC Palavasna, Dist.
Mehsana
Phone: 0452-3203859
Navsari
97. Aegis Logistics Ltd..Survey No. 989,
Itarawa, Navsari-396 424
Deesa
98. Reliance Industries Ltd. (RIL)Survey no.
27/A/2, Near Vishwakarma Temple,
Deesa - Radhanpur Highway, Deesa -
385 535
Phone: 02744-645519
Vadodara
99. Aegis Logistics Ltd.Survey no. 60,
Sayajipura, Near Kamla Nagar, Ajwa
Road, Vadodara-390 019
100. Indian Oil Corporation Ltd. (IOCL) Omkar
PetroleumSubhanpura
Phone: 0265-2399294
LIST OF LPG FILLING STATIONS
87. Hindustan Petroleum Corporation
Ltd.(HPCL)Jasbhai Patel & Co., Opp.
Halim Khadki, Shahpur, Ahmedabad
Phone: 079-25623246
88. Bharat Petroleum Corporation Ltd(BPCL)
Agarwal Automobiles, Sabarmati-
Chandkheda Road, Opp. ONGC,
Sabarmati, Ahmedabad-5
Phone: 079-27501479 / 9879584170
89. Reliance Industries Ltd.(RIL) Naranpura,
132 ft. Road,Ahmedabad- 380 013
Phone: 079-32985885
90. Indian Oil Corporation Ltd (IOCL) Sharda
Petroleum Highway Road, Chandkheda,
Ahmedabad - 382 424
Phone: 079-23298022/ 23296777 /
232913777/ 9824387777
91. Indian Oil Corporation Ltd (IOCL) Sainik
Seva Services132 Ft. Ring Road, Near
Ashwamegh Bunglows Satelite,
Ahmedabad-380 015
Phone: 079-26924842 / 9227214842
92. Indian Oil Corporation Ltd (IOCL)
Rashtriya Petroleum Behrmpura, Opp.ST
Workshop, Ahmedabad-380 022
Phone: 079-25323576 / 2532357
93 Indian Oil Corporation Ltd (IOCL) Shree
Gokulesh PetroleumNH 8 , Opp.
Transport Nagar, Near Narol Circle,
Ahmedabad-382 405
Phone: 079-25712370/1922 / 9824021861

161
Ankleshwar
101. Reliance Industries Ltd. (RIL)Gujarat
Cable Company Compound, Old NH 8,
Ankleshwar
Phone: 02646-320777
Surendranagar
102. Indian Oil Corporation Ltd. (IOCL) Servo
Point, 105 A, GIDC, Wadhwan City
Phone: 02752-241140
Rajkot
103. Vanaz Engineers Limited.Vachhraj
Petroleum, Plot no. 17, 18 & 19, Jamna
Nagar Vanari(Virpur) Tal. Ranavav, Dist.
Porbandar-Rajkot
Phone: 2214331 / 98242270000
104. Vanaz Engineers Limited. Laxmi Auto
LPG, S.No.151(part),At Village: Pithadiya,
on NH-8B, Opp.GEB Stn, Dhareshwar,
Tal:Jetpur, Dist - Rajkot
Phone: 987981544
105. Vanaz Engineers Limited.Dhaka
Enterprises Auto LPG, S.No. 239, P2
Atkot, On Rajkot-Bhavnagar State
Highway no. 25, Near Hotel Taj, Tal.
Jasdan, Dist. Rajkot
Phone: 9825244070
106. Reliance Industries Ltd. (RIL) Reliance
Petro Marketing Pvt Ltd, NH-8,
Ahmedabad- Rajkot Highway, Near Toll
Plaza, Moti Moldi, Taluka Chotila
Phone: 9374119402
107. Reliance Industries Ltd. (RIL), RIL Retail
OutletNear Dhakan Hospital, Kuvadva
Road, Rajkot- 360 002
Phone: 0281-2455780
108. Aegis Logistics Ltd. Patel Estate, Plot no.
24/25, Morbi-Rajkot Highway, At Post
Virpar, Tal. Tankara, Dist. Rajkot-363 650
Phone: 0233-3207172
109. Indian Oil Corporation Ltd. (IOCL) Balahi
S/Stn.80 ft. Ring Road, Sorathiyawadi
Phone: 0281-2224830
Junagarh
110. Vanaz Engineers Limited.Relliable Auto
Gas Filling Pump, Plot no. 1 & 2 Part,
R.S. no. 35/6, Rajkot Highway, Dist.
Junagarh
Phone: 0285-2661316 / 94269157777 /
5541935
111. Vanaz Engineers Limited.Aum
Corporation Auto LPG Gas Station, At Plot
No. 51, Near By Marketing Yard Junagarh
Highway, Keshod Dist - Junagadh 362220
Phone: 09924496699/09825635241 0287-
1233699
Bavla
112. Aegis Logistics Ltd. Plot no. 819/P, NH-
8A, At Rajoda-Bavla, Tal. Bavla, Dist.
Ahmedabad-382 220
Bhavnagar
113. Aegis Logistics Ltd..Plot no. 5, to 10,
Opp. Akhlol Octroi Naka, Bhavnagar-
Rajkot Road, Bhavnagar-364 002
Anand
114. Vanaz Engineers Limited,Ganesh Auto
LPG, Survey no 502+501/ IP, Baroda
Bagodara road, Tarapur chowkdi, Tarapur,
Dist Anand
Phone: 02698- 256807
Naidad
115. Reliance Industries Ltd. (RIL)Survey no.
515, Near Dabhan Bus Station, National
Highway no. 8, Tal. Nadiad, Dist Kheda
Phone: 0268-3291351
Dahod
116. Aegis Logistics Ltd.Plot No. 206, Nani
Sarsi ,Dahod Kasba,NH-59, Near
Muvaliya Farm, Dahod- 389151
Dharmaj
117. Reliance Industries Ltd. (RIL)Survey no.
2405, Straight Highway 8, Milestone 6,
Village Dharmaj, Tehsil Petlad, Dist.
Anand
Phone: 0269-7245958
Vijapur
118. Aegis Logistics Ltd. Survey no. 32/P,
Himmatnagar-Vijapur Highway, Opp. Suraj
Dairy, At Vijapur, Tal. Vijapur, Dist.
Mehsana-382 870
LIST OF LPG FILLING STATIONS

162
Sabarkhantha
119. Vanaz Engineers Limited.Tirupati
Petroleum, Ambiliyar, Ahemdabad State
Highway, Bayad, Dist - Sabarkantha
Phone: 91-9426013692 / 9825590436
120. Vanaz Engineers Limited. Patang Auto
LPG Pump, Plot no. 140/3, Sapawada Tal
Idar, Dist. Sabarkantha
Phone: 02778-253105 / 9427687075
121. Vanaz Engineers Limited.Riddhi Gas
Petro Pvt. Ltd., Block no. 862/2/P, Sayra
Modasa, Modasa, Dist. Sabarkantha
Phone: 9898769944
122. Vanaz Engineers Limited. Dhvanish &
Devang Petro Pvt. Ltd. Block no. 293/P,
Near Sabar Dairy , NH-8, At-Post-Hajipur,
Himmatnagar, Dist. Sabarkantha- 383 001
Phone: 02772-396464 / 9825611308 /
226464
Surat
123. Aegis Logistics Ltd.Phone: T.P.no.21,
F.P.no. 63, Opp. Navin Fluorine Industrial,
Surat-Navsari Road, Bhestan
124. Indian Oil Corporation Ltd. (IOCL) Swati
Petroleum, FP no. 150 , TP no. 5, (Umra
North), Ichchanath, Surat- 395 007
Phone: 2253748 / 2254282 / 9824151909
125. Vanaz Engineers Limited.Roshni
Corporation Plot no. 4, Block no. 160,
Mouse Sarthana Village, Taluka Kamerj,
Surat , Phone: 0261-2572255
126. Vanaz Engineers Limited. Shri OM Sai
Auto LPGAt Post Barasadi, Tal Palsana,
NH-6, Kadodara-Bardoli Road, Barasadi,
Dist. Surat-394 310
Phone: 02622-222203 / 9825170775 /
2622-255199
127. Vanaz Engineers Limited. Drasti Group
Filling Station, N.H. 6, Near Nandida
(namdurbar), Char Rasta, Block no. 56,
Tal Bardoli, Dist. Surat
Phone: 02622-228110 / 9824128639 /
9426746159
128. Reliance Industries Ltd. (RIL)NH-8, RS no.
149-152, Kim Char Rasta, Mangrol
Phone: 02621-329940
129. Company: Reliance Industries Ltd.
(RIL)Dealer: Reliance Industries Ltd.
(RIL)Opp. SVR College,Piplod, Surat-395
007Phone: 0261-3204353
Jamnagar
130. Vanaz Engineers Limited.Radhika
Petroleum Agency, Survey no. 48/P,
Ambika Bhuvan, Rajkot-Jamnagar
Highway, Jamnagar
Phone: 0288-2550999 / 9824228232 /
2570444
131. Reliance Industries Ltd. (RIL)Plot no. 16
(City survey 6235 & 6236), Jamnagar
City- 361 008
Phone: 0288-2710178 / 9228002414
LIST OF LPG FILLING STATIONS
KERALA
Alwaye
132. Auto Gas Energy India Ltd.Dealer: Auto
Gas Energy India Ltd., N.H.Road, Alwaye
Allappuzha
133. Indian Oil Corporation Ltd.(IOCL)
Chandra’s, Kerala
Sulthan Bathery
134. Auto Gas Energy India Ltd.Chulliyode
Road, Sulthan Bathery
Changaramkulam
135. Auto Gas Energy India Ltd.N.H.Road,
Changaramkulam
Chenganassery
136. Reliance Industries Ltd. (RIL)Survey no.
32/5 & 32BA, Plot no. 6.7.8,
Chenganassery, Dist. Kottayam
Phone: 0481-3259444
Kanjirappally
137. Auto Gas Energy India Ltd.K.K.Road,
Kanjirappally
Perumbavoor
138. Indian Oil Corporation Ltd. (IOCL), Baby
Verghese Trincole
Phone: 0484-2523247 / 9847042516
139. Auto Gas Energy India Ltd.M.C. Road,
Perumbavoor

163
Nileshwar
140. Indian Oil Corporation Ltd. (IOCL) NGM
Prabhu, NH-17, Nileshwar
Phone: 0467-2280636 / 9447090636
Perumthuruthy
141. Indian Oil Corporation Ltd. (IOCL) J & J
Auto FuelsMC Road, Perumthuruthy, P.O.
Thiruvalla, Dist. Pathanmthitta
Phone: 0469-2645850 / 9847031646
Harippad
142. Auto Gas Energy India Ltd.Mavelikkara
Road, Harippad
143. Indian Oil Corporation Ltd. (IOCL) Ashoka
Fuels Harippad
Kodimatha
144. Indian Oil Corporation Ltd. (IOCL)
Malyalam Fuels, MC Road, Kodimatha,
Kottayam-686 039
Phone: 0481-3090848 / 9447897359
Challakudy
145. Indian Oil Corporation Ltd. (IOCL), KA
Kumaran & Co
Mannarkad
146. Indian Oil Corporation Ltd. (IOCL)
Srikrishna Petroleum
Muttathara
147. Indian Oil Corporation Ltd. (IOCL) Simi’s
Fuel, NH Bypass, Trivandrum-8
Phone: 2456111 / 2317111
Kottarakara
148. Indian Oil Corporation Ltd. (IOCL)
Raddission FuelsMC Road, Pulamon,
Kottarakara, Quilon
Phone: 0474-2652393 / 9447270190
Palakkad
149. Reliance Industries Ltd.
(RIL)Kalamadapm, Kozhikode Bypass
Road, Manali, Palakkad-678 001
Phone: 0491-3251700
Thodupuzha
150. Auto Gas Energy India Ltd. Muvattupuzha
Road, Thodupuzha
Tripunithra
151. Reliance Industries Ltd. (RIL), EVS Fuels,
30/1084 A, Tripunithra Road, Thykoodam
Vytilla, Cochin- 682 019
Phone: 04822-6462498
Trivandrum
152. Indian Oil Corporation Ltd. (IOCL)Dealer:
Happy Fuels Pallichal
Phone: 0471-2390232
Ernakulam
153. Bharat Petroleum Corporation Ltd.
(BPCL)Thazhekattu Fuels, Ernakulam
154. Hindustan Petroleum Corporation Ltd.
(HPCL)Kwality Auto Service HPC Dealer,
Vytylla, Ernakulam-682 019, Kerela
Phone: 9847054361
155. Hindustan Petroleum Corporation Ltd.
(HPCL)PKC Nair & Co.HPC Dealer,
Tripunthara, Ernakulam- 682 301
Phone: 9847477661
Kottayam
156. Indian Oil Corporation Ltd. (IOCL)
Aswathy FuelsNH-47, Kollam
Phone: 9387319587 / 2533068
Pala
157. Reliance Industries Ltd. (RIL), Lalam
Village, Meenachil Taluk, Palaettumamoor,
Pala Municipality, Pala,
Phone: 04822-2216456
Piravom
158. Auto Gas Energy India Ltd.Kottayam
Road, Piravoam
Angamaly
159. Reliance Industries Ltd.(RIL)On NH-47,
Near Mile Stone 315/0, Karukutty, Aluva,
Ernakulam
Phone: 0484-3226111
160. Auto Gas Energy India Ltd.Bank Junction
Attingal
161. Aegis Logistics Ltd. Venjaramoodu Road,
Attingal
Calicut
162. Elf Gas India Ltd.Dealer: JK LPG
Dispensing StationNH-17, Kolathara,
Calicut-673 655 Phone: 0495-2481766
LIST OF LPG FILLING STATIONS

164
Cherthala
163. Auto Gas Energy India Ltd. Kumaragom
Road, Cherthala.
Thriprayar
164. Auto Gas Energy India Ltd. Thrissur Road,
Thriprayar
Nilambur
165. Auto Gas Energy India Ltd.CNG Road
Oachira
166. Indian Oil Corporation Ltd. (IOCL)
Paranrdhmam Petroleum Oachira
Phone: 0476-2690757 / 9447206918
Perumpilavu
167. Indian Oil Corporation Ltd. (IOCL)
Khayam Petroleum Thrissur-680 519
Phone: 04885-289397 / 9895028020
Kollengode
168. Auto Gas Energy India Ltd. Puthunagaram
Road, Kollengode
Cochin
169. Bharat Petroleum Corporation Ltd. (BPCL)
Kerela Oil Co. Pathirapally, Alappuzha-
688 521
Phone: 0477-2258088
170. Indian Oil Corporation Ltd. (IOCL) George
FuelsNH-47, Aroor, Ernakulam
Phone: 9846030477
171. Indian Oil Corporation Ltd. (IOCL), Sree
Narayana Sales & Service, Edapally,
Kochi-24
Phone: 0484-2540647
Malappuram
172. Hindustan Petroleum Corporation Ltd.
(HPCL)Kundupuzhakkal Fuels HPC
Dealers,PO. Okmuri, Vengara,
Malappuram - 676 515 (Kerela)
Phone: 9947300030
173. Hindustan Petroleum Corporation Ltd.
(HPCL) Vee Pee Petroleum HPC Dealers,
Chandakunnu, Nilambur, Malappuram -
679 342 (Kerela)
Phone: 04931-225923 / 9447287283
Moovattupuzha
174. Indian Oil Corporation Ltd. (IOCL) AMA
Transports Neelima Garden, Puthuoppady
P.O.
Phone: 2812328 / 9447315233
Kolenchery
175. Auto Gas Energy India Ltd.NH Road,
Kolenchery
Pathanamthitta
176. Indian Oil Corporation Ltd. (IOCL) Excel
Fuels
Thiruvalla
177. Auto Gas Energy India Ltd.T.K. Road,
Thiruvalla
LIST OF LPG FILLING STATIONS
Tirur
178. Indian Oil Corporation Ltd. (IOCL)
P Hamza Haji Sons, Kuttipuram Rd-1
Phone: 0494-2424126 / 9447125726
Thrissur
179. Indian Oil Corporation Ltd. (IOCL) Anidya
Petrol Café Kalathode, Ollukara, Thrissur-
680 655
Phone: 0487-2370535 / 9895327706
Kayakulam
180. Auto Gas Energy India Ltd.K.P.Road,
Kayamkulam
Ettumanoor
181. Auto Gas Energy India Ltd.MC Road,
Ettumanoor
Kotakkal
182. Reliance Industries Ltd. (RIL)Opp.
Ayurveda College, Edrai Code, Kottaikal,
Malapuram Dist., Kottaikal-676 501
Phone: 0483-32520062 / 2742479
TAMIL NADU
Coimbatore
183. Indian Oil Corporation Ltd. (IOCL) Sri
Santhi Social
184. Bharat Petroleum Corporation Ltd. (BPCL)
VSMErode
185. Bharat Petroleum Corporation Ltd. (BPCL)
Roots Auto Spares, Mettupalaya Road

165
Chennai
186. Bharat Petroleum Corporation Ltd.
(BPCL)COCO MKB Nagar Kasturi
AgenciesUnit II, Plot No.3 74, West
Avenue, MKB Nagar, Vyasarpadi,
Chennai- 600 039
Phone: 25517444 / 25513536
187. Bharat Petroleum Corporation Ltd.
(BPCL)DS Rajammal Agencies, 10,11, 12
Manall Road, Korukkupet
Phone: 044-25923700
188. Bharat Petroleum Corporation Ltd.
(BPCL)Tamilnadu Lorry Owners
Federation, 16, Poonamalle High Road,
Koyembedu
Phone: 044-24752854
187. Bharat Petroleum Corporation Ltd.
(BPCL)COCO, Ambattur, 94 B,Ambattur
Industrial Estate, Ambattur
Phone: 044-26358411
188. Bharat Petroleum Corporation Ltd.
(BPCL)AG AgencyNo. 2, Old
Mahabalipuram Road, Sholinganallur,
Phone: 044-28602087
189. Hindustan Petroleum Corporation Ltd.
(HPCL)Victory Enterprises, 359/E, C.T.H.
Road, Thirumuliavoyal, Chennai-600 062
Phone: 9884670129
190. Hindustan Petroleum Corporation
Ltd.(HPCL)Brindavan Service Station, No.
2, Gauntz Road, Vyasarpadi, Chennai-
600 039
Phone: 044-25517132
191. Hindustan Petroleum Corporation
Ltd.(HPCL)Sarath Agency, No. 72/123,
Kuntathur Road, Porur, Chennai-600 116
Phone: 9840331975
192. Hindustan Petroleum Corporation Ltd.
(HPCL)Balaji Agencies, New No.
187(R21/2), Ambattur Industrial Estate
Road, Anna Nagar West, Mugappair,
Chennai - 600 101
Phone: 9444620838
193. Bharat Petroleum Corporation Ltd.(BPCL)
DS Rajammal Agencies, 10,11, 12 Manall
Road, Korukkupet
Phone: 044-25923700
194. Bharat Petroleum Corporation
Ltd.(BPCL)Sree Vari Enterprises1/76,
East Coast Road, Kotivakkam
Phone: 044-65256625
195. Indian Oil Corporation Ltd. (IOCL)
Thirumurgan Agencies, 349, Waltax
Road, Chennai-600 079
Phone: 044-25202222 / 25203333
196. Indian Oil Corporation Ltd. (IOCL) Sri
Thirumurugan Agencies, Korukkupet
Kathivakkam High Road, Korukkupet
Phone: 044-25921166
197. Indian Oil Corporation Ltd. (IOCL) Sarojini
Oil Dealers, 90-C Fishing Harbour
Complex, S N Chetty Street, Royapuram,
Chennai- 600 013
Phone: 25951804 / 25978424
198. Indian Oil Corporation Ltd. (IOCL) Pathy
Agencies Nerkundram, Chennai - 600107
Phone : 044-24871706
199. Indian Oil Corporation Ltd. (IOCL) Oviya
F/Stn., Koyambedu, Opposite to Flower
Market, Koyambedu,Chennai-600 107
Phone: 24797317 / 24779447
200. Indian Oil Corporation Ltd. (IOCL) COCO
Ambattur Sree Sakthi Agencies, S.
No.304, MTH Road, Opp. TI
Miller,Ambathur, Chennai- 600 053
Phone: 044-26248567
201. Indian Oil Corporation Ltd. (IOCL) Chennai
Autorickshaw Co.Op. Society, 849,
Periyar EVR High Road, Kilpauk,
Chennai- 600 010
Phone: 044-26411073
202. Hindustan Petroleum Corporation Ltd.
(HPCL)Saran Agencies, No. 120/122, P.H.
Road, Opp MGR Engg. College,
Maduravoyal, Chennai-600095
Phone: 9841290439
203. Hindustan Petroleum Corporation Ltd.
(HPCL)Anna Auto Co-operative Society,
No.242,Ropettah High Road, Royapettah,
Chennai-600 014 Phone: 9380643055/
044-65853081
LIST OF LPG FILLING STATIONS

166
204. Bharat Petroleum Corporation Ltd.
(BPCL)Sridevi Enterprises, 639, MTH
Road, Avadi,
Phone: 044-26380585
205. Bharat Petroleum Corporation Ltd.
(BPCL)MCLOA24 B, Anna Salai, Saidapet
Phone: 044-22353599
206. Bharat Petroleum Corporation Ltd.
(BPCL)Shanmuga Sundaram219,GST
Road,Tambaram Sanitorium, Chrompet
Phone: 044-22402173
207. Bharat Petroleum Corporation Ltd.
(BPCL)Car Care Centre, 97, Anna Salai,
Near LIC
Phone: 044-28602087
Salem
208. Indian Oil Corporation Ltd. (IOCL)Malur
Main Road, Narasothipatti,Salem-636 004
Phone: 0427-2448409
Madurai
209. Hindustan Petroleum Corporation Ltd.
(HPCL) Madurai Filling Station, 159/2,
Kamarajar Salai, Teppakulam, Madurai -
625 009
Phone: 0452-2311106 / 09843050460
210. Hindustan Petroleum Corporation Ltd.
(HPCL)Suganya F/St.RS No. 172/1 BP,
Opp. Maduthavanu Bus Stand, Melur Main
Road, Madurai - 625 007
Phone: 0452-2586055 /4392839/
09842162308
211. Bharat Petroleum Corporation Ltd. (BPCL)
MKT MotorsS no. 13/10, Alagarkovil Main
Road, Moondrumavady
Phone: 0452-2560410
212. Indian Oil Corporation Ltd. (IOCL ) Sree
Harivelmurugam Enterprise47-C, T B
Road, Arasaradi, Madurai-10
Phone: 0452-2603902 / 2607039 /
9894866663
213. Reliance Industries Ltd. (RIL)24, TPK
Road, Pasumalai, Madurai-625 004
Phone: 0452-6459094
Melmaruvathur
214. Indian Oil Corporation Ltd. (IOCL),
ACMEC Trust Melmaruvathur- 603 319
Phone: 044-27529384
Kancheepuram
215. Bharat Petroleum Corporation Ltd.
(BPCL)COCO BPT ambaram, Velachery
Road, Gowrivakkam, Post Pallikaranai
Phone: 044-22462590
Erode
216. Reliance Industries Ltd. (RIL) Veerapan
Chathiram Panchayat, Erode Taluka,
Erode Phone: 0424-6454639
Tiruppur
217. Reliance Industries Ltd. (RIL)Bharathi
Nagar, Veerapandi, Tirupur-Palladam
Road, Tirupur-641 605
Phone: 0421-6453581KARNATAKA
LIST OF LPG FILLING STATIONS
Chennaryapatana
218. Reliance Industries Ltd. (RIL) Opp.
Nisarga Dhaba, BM Road,
Chennaryapatana
Phone: 08176-254234
KARNATAKA
Gulbarga
219. Hindustan Petroleum Corporation Ltd.
(HPCL)Gulbarga Auto Links, Gulbarga
Auto Links HPC Dealers, Station Road,
Gulbarga (Karnataka)
Phone: 08472-222026 / 9844049214
Mangalore
220. Indian Oil Corporation Ltd. (IOCL) KG
Bhat Kankanady, Mangalore - 575 002
Phone: 0824-2435314 / 667364
230. Indian Oil Corporation Ltd. (IOCL) Vishnu
Enterprises. NH-17, Panambur - 575 010
Phone: 0824-2409868 / 988161619
231. Hindustan Petroleum Corporation Ltd.
(HPCL)Maco Co-op Society Lower
Bendoorwell Road, Mangalore ,
Phone: 0824 - 2421113
Davangere
232. Aegis Logistics Ltd.No. 856/81, S.J.M.
Nagar, Behind Sitara Hotel, Near
P.B.Road, Davangere-577 002

167
Shimoga
233. Indian Oil Corporation Ltd. (IOCL)
Bhargavi Motor Fuels Sagar Road,
Shimoga-577 204
Phone: 250888 / 250999 / 9844090888
Puttur
234. Elf Gas India Ltd.Puttur Petroproducts
Nehru Nagar, Puttur - 574 203
Phone: 08251-236105 / 236106
Bangalore
235. Elf Gas India Ltd.Dars Automobiles,
Venkasteshpura, Nagawara Main Road,
Bangalore- 560 045
Phone: 080-25800415 / 25790280
236. Indian Oil Corporation Ltd. (IOCL) Swathi
S/Stn.
237. Indian Oil Corporation Ltd. (IOCL) Bowring
S/Stn.
238. Indian Oil Corporation Ltd. (IOCL) SP
Agencies
239. Indian Oil Corporation Ltd. (IOCL) Jai
Hanuman Fuel Station.
240. Hindustan Petroleum Corporation Ltd.
(HPCL)Srinivasa Service Station, .59/2,
Bansawadi Main Road, Jaibharathinagar,
Bangalore- 560 033
Phone: 080-25474254 / 25479901
241. Elf Gas India Ltd.B M Energy Hosahalli
Main Rd, Vijayanagar, Banglore-560 023
Phone: 9886179988
242. Elf Gas India Ltd.R K Autogs, Magadi
Main Road, Kamakshipalya, Banglore-
560 079
243. Bharat Petroleum Corporation Ltd. (BPCL)
P.R.K. AutoPlot no. 2, Mysore Road
Phone: 9448068599 / 26759499
244. Bharat Petroleum Corporation
Ltd.(BPCL)Shrestha Outer Ring Road,
HRVR layout
Phone: 25496688 / 9448084559
245. Bharat Petroleum Corporation Ltd. (BPCL)
Udaya Fuel Station. Sirsi circle, Bangalore
Phone: 9845722337
246. Bharat Petroleum Corporation Ltd.
(BPCL)Advaitha 4, T Block, Jayanagar,
Bangalore
Phone: 9844013042 / 22443341
247. Bharat Petroleum Corporation Ltd.
(BPCL)ChandersIST Main Road,
Gandhinagar
Phone: 9845013901 / 22263260
248. Bharat Petroleum Corporation Ltd.
(BPCL)Gurukrupa Fuel JunctionSRI,
Gurukrukripa Layout, Nagarvhavi
Phone: 9448537366 / 23218570
249. Indian Oil Corporation Ltd. (IOCL) Jalahalli
Service Station
250. Reliance Industries Ltd.(RIL)Industrial
Suburb, 2nd Stage, Yeshwanthpur,
Nandini Layout, Bangalore-560 022
Phone: 080-64522464
251. Reliance Industries Ltd.(RIL) B.M.
Shankarappa Estate, Sunkadakatte,
Magadi, Rd. Bangalore
Phone: 080-64520178
252. Hindustan Petroleum Corporation
Ltd.(HPCL)Favourite Auto Service,
Madiwala, Koramangala Post,Next to
St.John’s Hospital,Hosur Road,
Bangalore-560 034
Phone: 080-25530397
253. Bharat Petroleum Corporation Ltd.(BPCL)
Federation of Lorry Owners (FLOA) Devraj
Urs Truck Terminal, Peenya Industrial
Suburb, II Stage, Yeshwantpur, Bangalore
Phone: 080-23478898
254. Bharat Petroleum Corporation
Ltd.(BPCL)Anurag Family Trust
Koramangala, Inner Ring Road
Phone: 2705623 / 9845685897
255. Bharat Petroleum Corporation Ltd. (BPCL)
Sri Laxmi Service StationM.s.Ramaiah
Road, Gokula,Jalhalli
Phone: 23452077 / 9 / 886643548
256. Bharat Petroleum Corporation
Ltd.(BPCL)Matushree SS Subbanapalaya
Main Road, Banaswadi
Phone: 9845245186 / 25428868
257. Bharat Petroleum Corporation Ltd. (BPCL)
Kirti Service StationNo. 2, Mission Road,
Near J.C.Road, Town Hall Weigh Bridge
Phone: 9880001926 / 42148803
LIST OF LPG FILLING STATIONS

168
258 Bharat Petroleum Corporation Ltd.
(BPCL)COCO BP-6, No. 17, Ward no. 76,
Richmond Town, Hosur Road
Phone: 25572499 / 9 / 845542989
259. Bharat Petroleum Corporation
Ltd.(BPCL)Gokula Service Station, Old
Madras Road, Doorvaninagar
Phone: 080-28510402 / 28511172
260. Indian Oil Corporation Ltd (IOCL)
Venkateshwara Fuel Station.Yelahanka
Phone: 080-28460616
261. Indian Oil Corporation Ltd (IOCL)
Vardharaja Service Sattion,.596, Dr
Rajkumar Road, Rajajinagar
Phone: 080-23320762
262. Indian Oil Corporation Ltd (IOCL) Mobil
Service Station, 11 km Kanakapura Road,
Konanakunte Cross
Phone: 080-26664392 / 9845017787
263. Indian Oil Corporation Ltd (IOCL)
Lakshmamma & SonsNo.1,Narayanappa
Garden, HD Deve Gowda Road, RT
Nagar-560 032
Phone: 080-23548511 /23638432 /
9845133943
264. Indian Oil Corporation Ltd (IOCL) Engrads
Fuel Station,Opp BHEL, Mysore Road
Phone: 080-26749652
265. Indian Oil Corporation Ltd (IOCL)
Karnataka Food & Civil Supplier
Corp.Kamokpura,Main Road,Banasankari
Phone: 080-26553466 / 9845127075
266. Indian Oil Corporation Ltd (IOCL) Kaveri
Fuel Station.Near National Games
Village, Koramangla
Phone: 080-25710236
267. Indian Oil Corporation Ltd (IOCL) Anjandri
Service Station, Chamrajpet
267. Hindustan Petroleum Corporation Ltd.
(HPCL)Highway Auto Needs, 12th
Kilometer, Bellary Road, Allasandra, Opp
Jakkur Airodrome,Yelahanka, Bangalore-
560 064
Phone: 080-28462591 / 28460694
268. Hindustan Petroleum Corporation Ltd.
(HPCL)Gautam Service StationOpp to
MEI, Tumkur Road, Near RNH
Motors,Yeshwanthpur, Bangalore-560 022
Phone: 080-23371331
269. Hindustan Petroleum Corporation Ltd.
(HPCL)Bambaramaba Fuel StationC/o.
HPCL LPG Bottling Plant,
Mahadevapura,White field Road,
Bangalore-560 048
Phone: 080-28511780
270. Bharat Petroleum Corporation Ltd
(BPCL)Nagpal’s Garage, 22, Residency
Road
Phone: 080-25587715
271. Bharat Petroleum Corporation
Ltd.(BPCL)Maruti Service Station
Pantarapalaya, Mysore Road, Bangalore
Phone: 080-28600632
272. Bharat Petroleum Corporation Ltd.
(BPCL)Ramchandra Bros.Brian Square,
Mysore Road
Phone: 080-26708980
273. Bharat Petroleum Corporation Ltd.(BPCL)
Arunodaya Filling Station69/4, Ring Road,
Gangadhar Nagar, J.P. Nagar
Phone: 080-26717223
274. Elf Gas India Ltd. Dars Automobiles
Tumkur Road, Yeswantpur, Banglore- 022
Phone: 080-23377743
Mysore
275. Elf Gas India Ltd.Acme Autogas, Abba
Rd, Nazarbad Mohalla, Mysore- 570 010
Phone: 08212-440508
280. Bharat Petroleum Corporation Ltd.
(BPCL)Shree S S Saraswatipuram
Phone: 09880567272 / 08218940902
Udupi
281. Aegis Logistics Ltd. Survey no. 31/1,
Near Halima S. Auditorium, NH-17,
Udyavara, Udupi-576 118
LIST OF LPG FILLING STATIONS

169
290. Indian Oil Corporation Ltd. (IOCL),Queens
Road S/Stn.Near Vasant Vihar Bus
Depot, Outer Ring Road
Phone: 011-26146202
291. Indian Oil Corporation Ltd. (IOCL) Khyber
Service Station.Opp.Gurudwara, Moti
Bagh, Outer Ring Road
Phone: 011-24677937 / 981152225
292. Indian Oil Corporation Ltd. (IOCL), Jubliee
R/O, Near IOC LPG Bottling Plant,
Tikrikalan
Phone: 011-28351456
293. Indian Oil Corporation Ltd. (IOCL) Dalip
Service Station, Near Hotel Radisson,
NH-8, Mahipalpur
Phone: 011-25063633
294. Indian Oil Corporation Ltd. (IOCL) CM
Enterprises, Janakpuri
Phone: 011-25618762
295. Indian Oil Corporation Ltd. (IOCL) Auto
Yard, Mathura Road, Near Apollo Hospital
Phone: 011-26945135
296. Indian Oil Corporation Ltd. (IOCL)
Ahuwalia Service Station, Near Haldiram
Mathura Road
Phone: 011-26959790
297. Hindustan Petroleum Corporation Ltd.
(HPCL)Kundanlal Service Station HPC
Petrol Pump, Shahdara-ISBT Road,
Shastri Park, Delhi- 110 053
Phone: 011- 22192100 / 22193100
LIST OF LPG FILLING STATIONS
DELHI
282. Hindustan Petroleum Corporation Ltd.
(HPCL)Anand Service Station,.NH-8,
Delhi-Gurgaon Road, Rangpuri, New Delhi-
110 037
Phone: 011-25654592
283. Hindustan Petroleum Corporation Ltd.
(HPCL)Victory Service StationG.T.Road,
Near Julf-E-Bengal, Opp. Sahni Factory
Shahdara, UP Border, Delhi-110 095
Phone: 011-22116868 / 6969
284. Hindustan Petroleum Corporation Ltd.
(HPCL)HP Auto Care Centre, Najabgarh
road, Adjacent Moti Nagar Police Station,
Moti Nagar, New Delhi-110 015
Phone: 011-25918974
285. Indian Oil Corporation Ltd. (IOCL) Sethi
Service Station, Mangolpuri, Outer Ring
Road
Phone: 011-27524639
286. Indian Oil Corporation Ltd. (IOCL)
Sabharwal Service Station.Sector 5,RK
Puram
Phone: 011-26175440
287. Indian Oil Corporation Ltd. (IOCL)
Rajasthan Highways, NH-8 Kaparshera
Border
Phone: 011-51685238, 9811038654
289. Indian Oil Corporation Ltd. (IOCL)
Rajapath Motors, Geeta Colony
Phone: 011-22049223/ 22457830
ANDHRA PRADESH
Nizamabad
298. Hindustan Petroleum Corporation Ltd.
(HPCL)P.Laskshmikantha Rao & Sons,
Dichapally, Nizamabad, Nizamabad
Phone: 08462-221264 / 9848244444
Hyderabad
299. Indian Oil Corporation Ltd. (IOCL) Sivam
Auto
300. Indian Oil Corporation Ltd. (IOCL) Jubilee
Auto Services,Miyapur.
301. Indian Oil Corporation Ltd. (IOCL) National
Service Station, Opp. Erra Manjil,
Panjagutta Road- 500 082
Phone: 040-23319435 / 23329520
302. Indian Oil Corporation Ltd. (IOCL)Sita
Logistics, 82/1, Agriculture Market Yard,
Bowenpally
Phone: 040-64506775 / 9848455575
303. Hindustan Petroleum Corporation Ltd.
(HPCL)Surya Service Station, Plot Nos. 60
to 65, S.No. 310, Nagaram Village,
Keesara Mandal, Rangareddy Dist
304. Bharat Petroleum Corporation Ltd.
(BPCLMahendra Fuels, S.Nos. 108 &
109(P), Karmanghat Village, Saidabad
Mandal, Ring Road, Hyderabad,
Hyderabad Dist. - 500 079.
Phone: 24077931 / 9848562997

170
305. Company: Bharat Petroleum Corporation
Ltd. (BPCL) Kishan Service Station, S.No.
385, D.No. 41-1/ABC, Moulali Village,
Malkajgiri Mandal, Rangareddy Dist.
Phone: 27140570 / 9393033694
306. Bharat Petroleum Corporation Ltd. (BPCL)
Vamsi Fuel Point, Near Bapu Ghat,
Lungar House, Hyderabad
Phone: 040-23511332
307. Bharat Petroleum Corporation Ltd.
(BPCL)M A Filling Station, 162 / 1 & 2,
East Marebpali, Near Rail Milayan Road,
Secundrabad
Phone: 040-23240679
308. Bharat Petroleum Corporation Ltd. (BPCL)
GKTC10-1, APIIC Auto Nagar, NH-9,
Hyderabad-70
Phone: 040-24025836
309. Bharat Petroleum Corporation Ltd. (BPCL)
Pradeep Agencies“NH-9, Miyapur, RR
Dist. Hyderabad- 500 050
Phone: 040-23041536 / 23045137
310. Bharat Petroleum Corporation Ltd. (BPCL)
S.N.More 19-4-8/1, Dandlaguda,
Chandrayanguda, Hyderabad-500 005
Phone: 6594843 / 24455037
311. Indian Oil Corporation Ltd. (IOCL)
Charminar Chourasta“Opp. Auto Nagar,
S.no. 282, Vanasthlipuram, Hyderabad-
500 070
Phone: 040-24021893 / 9848010026
312. Indian Oil Corporation Ltd. (IOCL) Uppal
Industrial Auto Service“Plot no. C-1/1, Sy
no. 581/1, Uppal Khalsa Village, Uppal
Mandal, RR Dist. , Hyderabad-500 039
Phone: 040-27204455
313. Reliance Industries Ltd. (RIL)Survey no. 6/
8, Saroornagar (V) & (M), RR District,
Hyderabad-500 035
Phone: 040-32001929
314. Reliance Industries Ltd. (RIL)Survey no.
198-204, Ranga Reddy Dist., Nacharam,
Hyderabad- 500 076
Phone: 040-32903092
315. Reliance Industries Ltd. (RIL) A-9 & A-10,
AIE , Main Road, beside CITD Balanagar,
Hyderabad- 500037
Phone: 040-39253352
316. Hindustan Petroleum Corporation Ltd.
(HPCL) N.Laxmaiah & Brothers.S.No. 64,
Door No. 3-8-173,Road No. 1,
Mansoorabad Village, L.B. Nagar Ring
Road, Saroornagar Mandal, Hyderabad -
500 074
Phone: 24122292 / 24122074 /
9246539398
317. Bharat Petroleum Corporation Ltd.
(BPCL)Mehmood Filling Station, 8-3-235/
6,Yusufguda, Check-post, Hyderabad-45
Phone: 040-23544562
318. Bharat Petroleum Corporation Ltd.
(BPCL)Dayanand Auto Services. NH 7,
Shamshabad - 501 218, Dist. Ranga
Reddy.
Phone: 08413-222035"
319. Indian Oil Corporation Ltd. (IOCL)“Dealer:
Venkateshwara Fuel Station.Kompally on
Hyderabad -Nizambad Highway
320. Indian Oil Corporation Ltd. (IOCL)“Dealer:
Ravi Weighing Service Station
Goshamahal.
Phone 040-24744670
321. Indian Oil Corporation Ltd. (IOCL) Jubliee
R/O Thimapur , Thimapur on Hyderabad-
Bangalore Highway
Phone: 08548-257960
322. Indian Oil Corporation Ltd. (IOCL) Aruna
Fuel Station,Moualai, Hyderabad
Phone: 040-27122887 / 4848031096
Tirupati
323. Indian Oil Corporation Ltd. (IOCL) Korepati
Petroleum,Chandragiri Road,
Phone: 0877-2249749
324. Elf Gas India Ltd.OM Shakti Auto LPG,
Reningunta Road, Near Hotel Bliss,
Tirupati- 517 501
Phone: 0877-3206755
LIST OF LPG FILLING STATIONS

171
Vijayanagram
325. Hindustan Petroleum Corporation Ltd.
(HPCL M.Eashwar Rao HPCL Dealer, NH-
5, Maharajulapeta, Rajapulova Post, Dist.
Vijayanagram
Phone: 9989922799
Warangal
326. Vanaz Engineers Limited.Sri Vankata Sai
Enterprises, Survey no. 176/1, Hunter
Road, Shayampeth, Opp. Citizen Club,
Warangal, Andhra Pradesh
Phone: 0870-3091326 / 9866168665
Nalgonda
327. Hindustan Petroleum Corporation Ltd.
(HPCL)B.S. Filling Station HPC Dealers,
S. no. 28, Opp. Textile Park, Malkapur
village, Chowtuppal Mandal, Dist.
Nalgonda
Phone: 08694 - 270343/44/45 /
9866233737
Guntur
328. Hindustan Petroleum Corporation Ltd.
(HPCL)Bharat Service Station. HPC
Dealer, Near Medical Club, GT Road,
Guntur-522 015
Phone: 0863 - 2230943 / 9885164611
329. Hindustan Petroleum Corporation Ltd.
(HPCL) Hima Petrol & Diesel Station,
HPC Dealer, Opp. Microwave Tower, NH-
5, Bypass Road, Budampadu Junction,
Guntur-522 015
Phone: 0863-232636 / 9885268911
336. Indian Oil Corporation Ltd. (IOCL) Prince
Service Station, Anwar Shah Road
Phone: 033-24731695
337. Hindustan Petroleum Corporation Ltd.
(HPCL) Rajrani Service Station,
Mahamayatala, P.O.Garia, Kolkata-700
084
Phone: 033-24358884
338. Hindustan Petroleum Corporation Ltd.
(HPCL) ITC Ultadanga, 1, Ultadanga
Road, Ultadanga, Kolkata
Phone: 033-25557933 / 255548489"
339. Hindustan Petroleum Corporation Ltd.
(HPCL) Baranagar Service Station,131,
BT Road, Baranagar, Kolkata
Phone: 033-25773229
340. Bharat Petroleum Corporation Ltd. (BPCL)
Superway Service Station, P-527, CIT
Road, Kolkata- 700 054
Phone: 033-23528853
341. Bharat Petroleum Corporation Ltd.
(BPCL)Sreema Service Station, 11 A,
Silpara, D.H.Road, Kolkata - 700 008
Phone: 033-24533294
342. Bharat Petroleum Corporation Ltd.
(BPCL)Raibareiily Service Stn, 33,
Tollygunj Circular Rd, Kolkata - 700 053
Phone: 033-24002651
343. Bharat Petroleum Corporation Ltd. (BPCL)
Amar Service Station, 277, B.T.Road,
Kolkata- 700 036 , Phone: 033-25570196
LIST OF LPG FILLING STATIONS
Anantpur
330. Vanaz Engineers Limited,Yallamma
Matha Auto LPG“S. no. 344, Gooty-
Anantpur Road, NH no. 7, PO Anantpur,
Phone: 9848389783
Visakhapatnam
331. Hindustan Petroleum Corporation Ltd.
(HPCL) Bh.S.R.Highway Service Station,
HPC Dealer, 28-16-1, Vadalpudi, NH-5,
Gajuwaka Mandal, Vusakhapatnam, Dist.-
530 046 Phone: 9848779999
WEST BENGAL
Kolkata
332. Indian Oil Corporation Ltd. (IOCL) Bye
Pass Service Station, 3B Rash Behari
Avenue Connector, Rajganga, Nabapalli,
Kolkata-700 107
Phone: 033-24427895/ 24427112
333. Indian Oil Corporation Ltd. (IOCL)
Anderson Auto, Belvedere Road, New
Alipore, Kolkata-27
Phone: 033-24499150 / 9830415979 /
9831004444
334. Indian Oil Corporation Ltd. (IOCL) Hirji
Auto Centre“120/2, A P C Roy Road
Phone: 033-23506470
335. Indian Oil Corporation Ltd. (IOCL) Salt
Lake Service Stn, Salt Lake, Sector-1
Phone: 033-23349853 / 23581395

172
351. Vanaz Engineers Limited, Agrawal Auto
LPG Services, P.H.No.- 8, NH-84 & 85,
Mouza Parasada, PO 23, Dist. Bilaspur,
Khapari, Durg
Phone: 0788-5013261 / 9229522200
Jabalpur
352. Vanaz Engineers Limited, Sanmitra Auto
LPG Services, Village Khasra no 77/1, Set
no 360/230, Tilwara Ghat, Dist Jabalpur
Phone: 9827258690
Indore
353. Hindustan Petroleum Corporation Ltd.
(HPCL) Fazal Khan Peer Khan,
Sanyogita Ganj, Indore
Phone: 9826210201
354. Indian Oil Corporation Ltd. (IOCL), Police
Lines, RAPTC, Airport Road- 452 005
Phone: 0731-2419131
355. Indian Oil Corporation Ltd. (IOCL) Usharaj
Fuels, 10-B, Sch no. 31, Loha Mandi,
Near Navlakha Complex, Indore- 452 001
Phone: 0731-2364364, 2362888
356. Indian Oil Corporation Ltd. (IOCL)
Malaviya Fuel Station, 15-C Scheme 94,
Ring Road, Indore
Phone: 0731-2552222
Burhanpur
357. Vanaz Engineers Ltd. Surya Gas
Point,Gram Fattepur, Dist. Burhanpur
Phone: 0725-52808 / 9826337408
LIST OF LPG FILLING STATIONS
MADHYA PRADESH
Gwalior
344. Indian Oil Corporation Ltd. (IOCL)Shiv
Chand Amol Chand, Jhansi oad, Gwalior.
Phone 0751-2427747,2310972
345. Hindustan Petroleum Corporation Ltd.
(HPCL)Sudarshna Motors,Transport
Nagar, Gwalior
Phone: 0751-2490373
Bhopal
346. Reliance Industries Ltd.(RIL), Khasra No.
234/1/2, Near People General Hospital,
Berasia Road, Bhopal.
Phone: 0755-6456948
347. Indian Oil Corporation Ltd.(IOCL), Auto
House, Piplani
348. Indian Oil Corporation Ltd (IOCL)
Sawntika, Gautam Nagar, Bhel Bhopal
Phone: 0755-2581492
349. Indian Oil Corporation Ltd. (IOCL), Capital
Auto Service, Obaidullahganj Road,
Ahmedpur, Bhopal-462 026
Phone: 0755-5220632
Durg
350. Vanaz Engineers Limited, Banwarilal &
Sons“KH no. 29/1 & 31/1, Mauje-
Nakikhar, Taluka & District Korba
Phone: 9827172151
Dewas
358. Indian Oil Corporation Ltd. (IOCL) Swagat
RO, Bilawali, NH-3, AB Road.
Phone: 07272-256260 / 9425093042
PUNJAB
Ludhiana
359. Hindustan Petroleum Corporation Ltd.
(HPCL), Pathak Power Point, M Mundiya
Kalan, Ludhiana
Jalandhar
360. Indian Oil Corporation Ltd. (IOCL) Amar
Highways, G.T.Road, (Ludhiana-Jalandar),
Plot no. 225/5, Pin-144 010.
Phone: 0181-2260214 / 2413776 /
984300147
CHANDIGARH
361. Bharat Petroleum Corporation
Ltd.(BPCL)EEM PEE Motors, Sector- 22
Chandigarh
Phone: 0172-2700386
362. Indian Oil Corporation Ltd (IOCL) M/s.
Allied Service Station.Sector 34-B,
Chandigarh
Phone: 0172-2612728"

173
LIST OF LPG FILLING STATIONS
377. Indian Oil Corporation Ltd. (IOCL) Shahid
J P Yadav, Subhash Nagar
Phone: 0141-2280971
378. Indian Oil Corporation Ltd (IOCL)Shahid
Bhagwan Singh Filling Station, Heera
Path, Sector 6, Masarovar, Jaipur
Phone: 0141-2783754
379. Indian Oil Corporation Ltd. (IOCL) M/s
Shahid Basti Ram Filling Station, Baiji Ki
Kothi, Jaipur
Phone: 0141-2706803
380. Indian Oil Corporation Ltd (IOCL)
Rajasthan Highways,Transport Nagar
Phone: 0141-2642683
381. Indian Oil Corporation Ltd (IOCL) IOC
Filling Station.Sahakar Marg
Phone: 0141-5120068"
Ajmer
382. Indian Oil Corporation Ltd. (IOCL) Shyam
Balaji Filling Station, Anasagar, Circular
Road, Vaishali, Ajmer.
Phone: 0145-2643388
Kishangarh
383. Reliance Industries Ltd. (RIL), NH-8, CH-
373, 5, Jaipur-Ajmer Highway, Vill-
Madanganj, The- Kishangarh, Dist. Ajmer
Phone: 01463-325751
CHATTISGARH
Bilimora
363. Vanaz Engineers Limited. Maa Sharada
Auto LPG Pump, 3 Km Stone, Bilaspur-
Raipur Road, Mouza Parasada, PH no.
23, Dist. Bilaspur
Phone: 09425284000 / 9301315181
364. Aegis Logistics Ltd.“Plot no. 374/2,
Gandevi Road,Bilimora-396 320
Raipur
365. Hindustan Petroleum Corporation Ltd.
(HPCL)Jain Auto Petroleum“Amanaka,
Raipur, Chattisgarh
366. Vanaz Engineers Limited. OM Auto LPG
Fuels, P.H.No.- 104, K.no. 63/11,
Mahadev Ghat Road, Village Raipura,
Dist. Raipur
Phone: 0771-6536356 / 09893142114
367. Bharat Petroleum Corporation Ltd.
(BPCL)Topup Centre, Amanaka,
G.E.Road, Raipur, Chattisgarh
Phone: 2253078 / 4039682
368. Indian Oil Corporation Ltd. (IOCL) Abhay
Fuels, Pandri, Raipur
Phone: 0771-2283000 / 2282999 /
9425210100
Bilaspur
369. Indian Oil Corporation Ltd. (IOCL) Laxmi
Service Station, Manla Chowk,
Phone: 07752-320414
UTTAR PRADESH
Lucknow
370. Indian Oil Corporation Ltd. (IOCL),SSR
Filling Station, RingRoad,Jankipuram
Phone: 23615461730"
Kanpur
371. Indian Oil Corporation Ltd. (IOCL)
Engineers Service Station, 9/46, Dr.
Ambedkar Nagar, Bena Jhabar Road
Phone: 0512-2291258
Agra
372. Indian Oil Corporation Ltd (IOCL)“Shahid
Jitendra F/Stn“Kailashpuri
Phone: 0562-2605576
373. Indian Oil Corporation Ltd (IOCL) National
Highway Filling Station, Sikandara
Phone: 0562-2641228
374. Indian Oil Corporation Ltd (IOCL) M/s Auto
Energy, Runkuta, Agra Mathura Road
Phone: 05613-271283
RAJASTHAN
Jaipur
375. Reliance Industries Ltd. (RIL), NH-11, Opp.
New Chungi, Agara Road, Jaipur
Phone: 9314114913
376. Bharat Petroleum Corporation Ltd.(BPCL)
DPS Automotives, 3C, Kamani Road,
Industrial Area, Jhotwara, Jaipur-302 012
Phone: 0141-2340891

174
LIST OF LPG FILLING STATIONS
Kota
384. Reliance Industries Ltd. (RIL), Jhalwar
Road, Before Anantpur Circle,
Kota - 324 005
Phone: 0744-6451289
385. Indian Oil Corporation Ltd. (IOCL) Modern
Auto Traders, Aerodrome Circle.
Phone: 0744-2361739 / 9829036739
