Tomy 37740TX27 MicroDrive User Manual T13027 Mario EN
TOMY International, Inc. MicroDrive T13027 Mario EN
Tomy >
Manual
SAFETY PRECAUTIONS (Keep manual for future reference)
This vehicle is not recommended for children under the age of 6 years. Please read all of the instructions before operating this vehicle. Always follow
general safety rules while operating vehicle: avoid hitting pets, furniture or people. Do not pick up vehicle while it is in motion; keep hands, hair, and
clothing away from this vehicle when the power switch is turned to the “A/B/C” position. Remove batteries when vehicle is stored. Avoid tire contact on
painted or varnished surfaces.
Mario Stunt Kart is built with an automatic shut-off function if the vehicle reaches excessive temperature during operation. If the vehicle stops after a
prolonged period of operation, turn off vehicle and controller, remove batteries from vehicle and cease operation for ten (10) minutes. Reinsert batteries
and resume play.
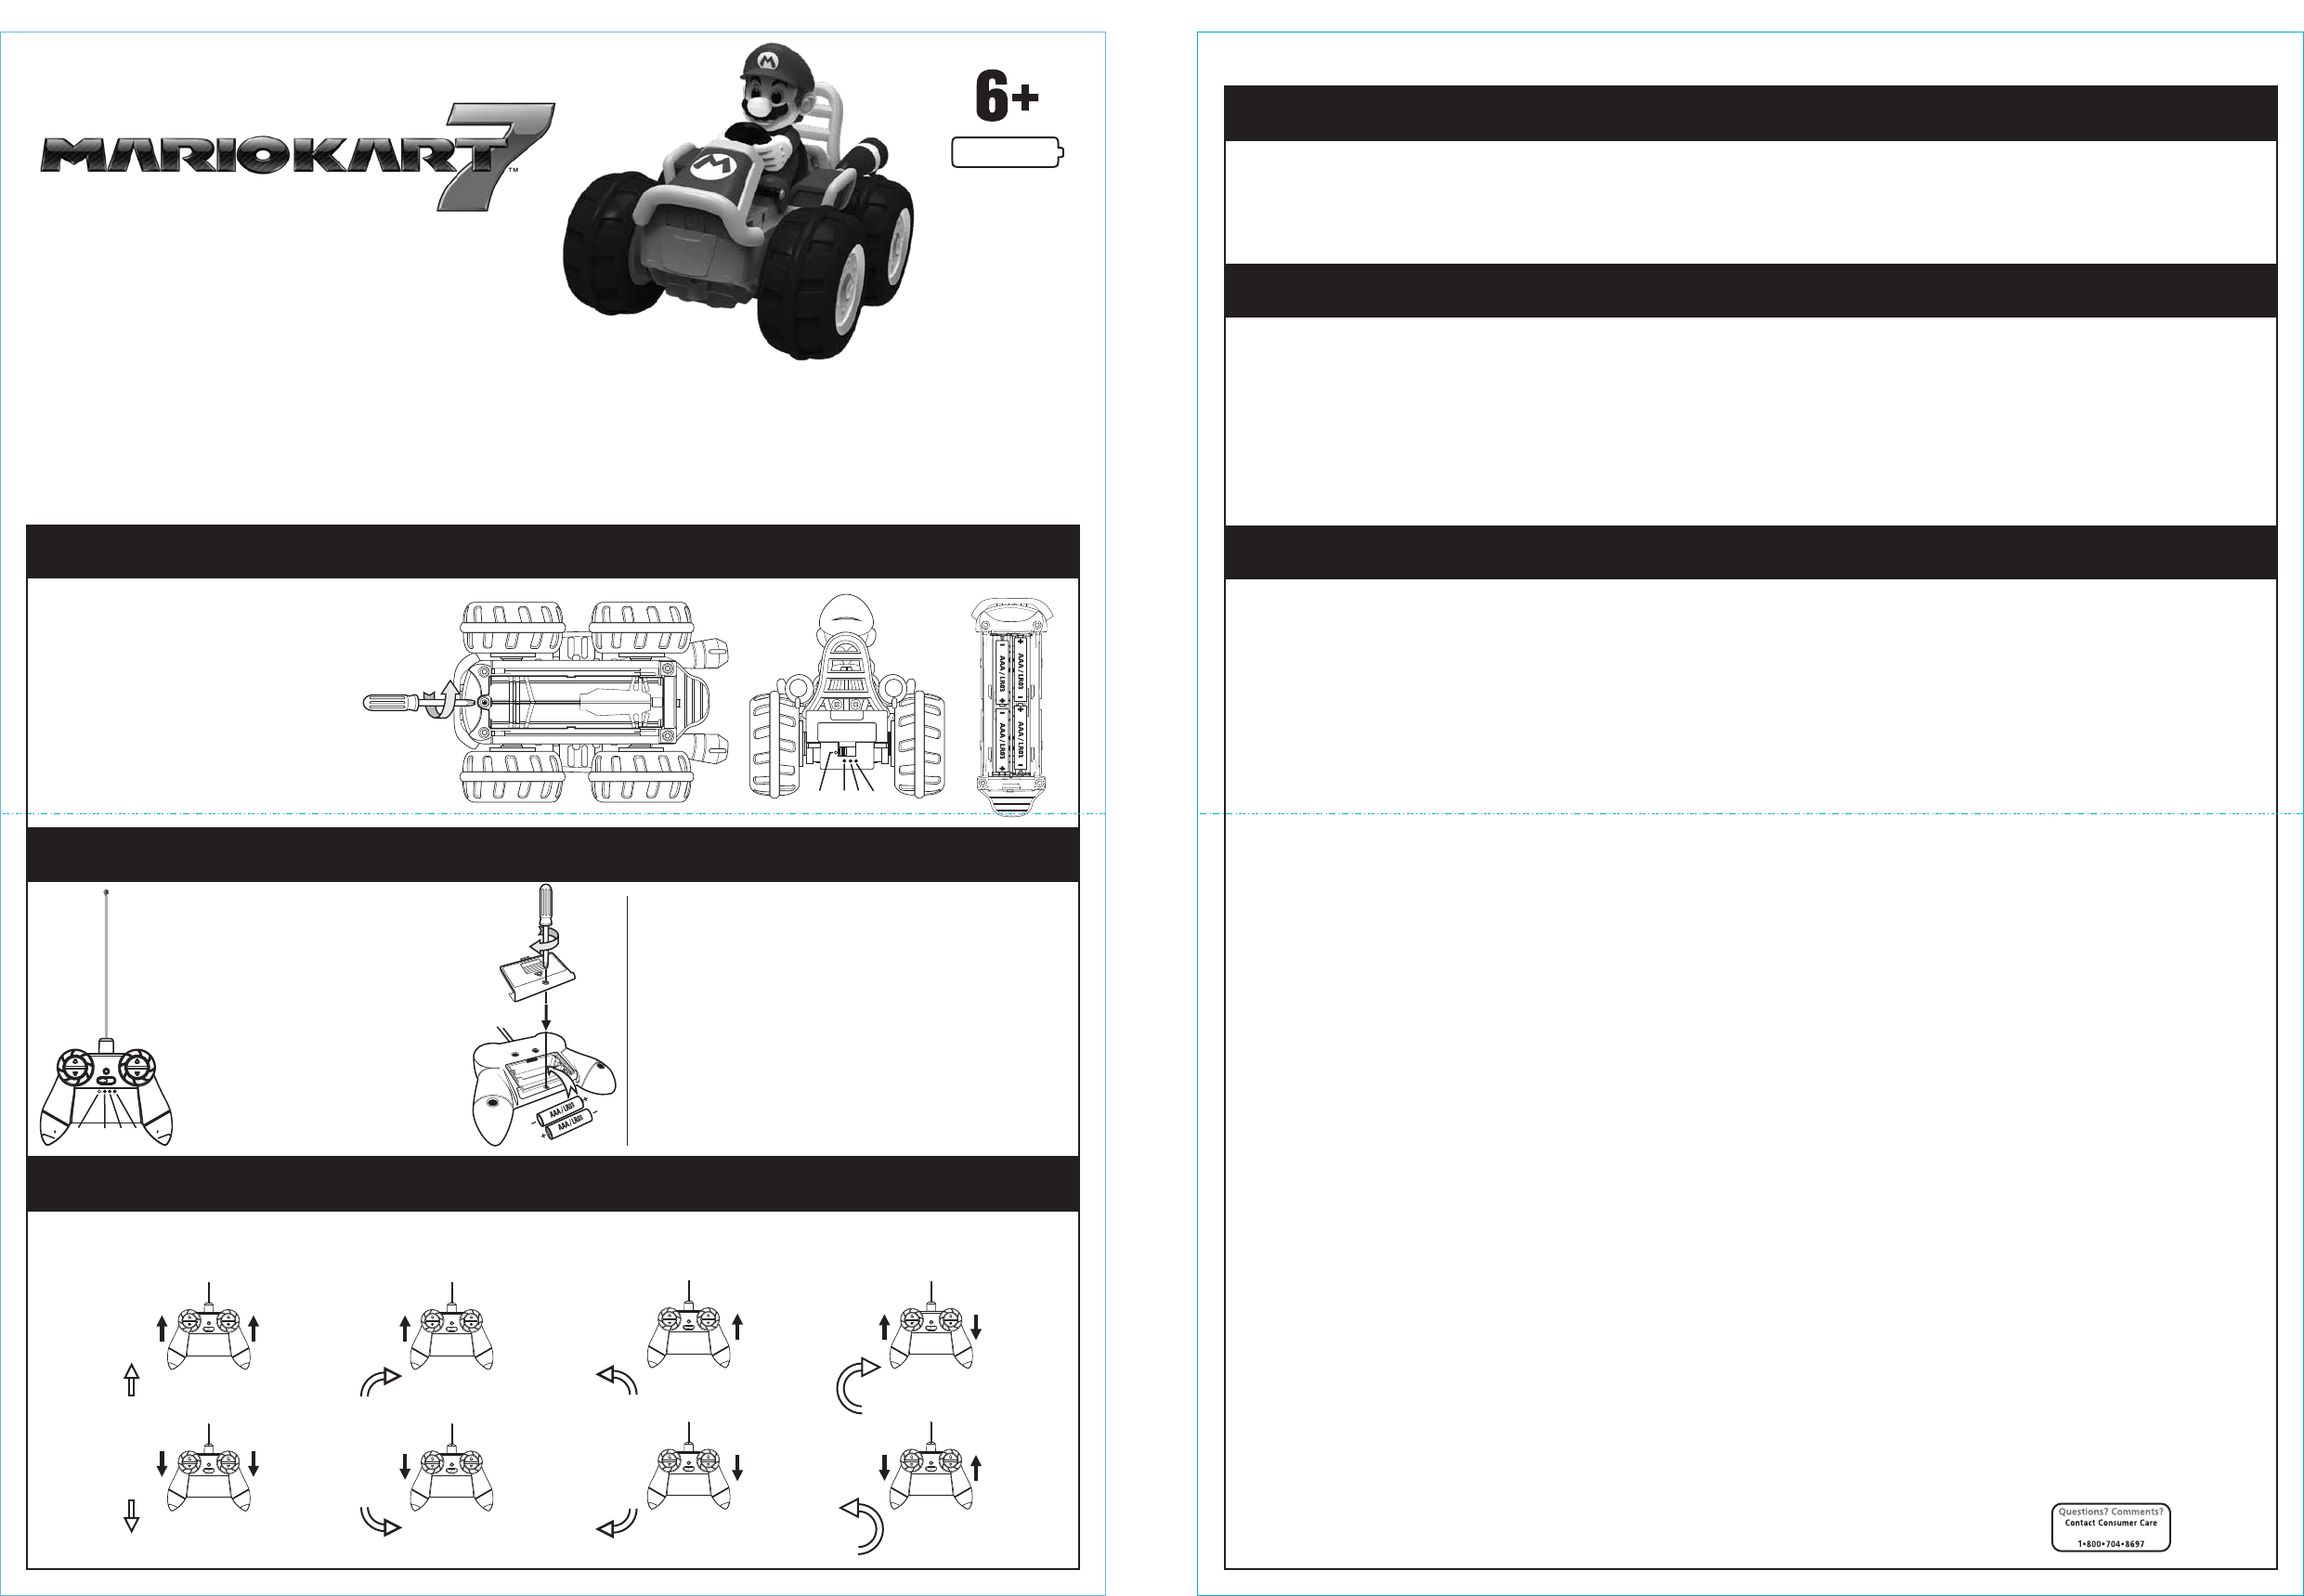
BATTERY REQUIREMENTS / INSTALLATION FOR VEHICLE
BATTERY REQUIREMENTS / INSTALLATION FOR TRANSMITTER
1. On the vehicle bottom, using a Phillips screw-
driver (not included), loosen screw and remove
the battery cover.
2. Insert 4 new AAA/LR03 batteries.(not included)
3. Replace battery cover and tighten screw.
4. Turn power switch to the “A/B/C” position.
NOTE: for best performance, use of alkaline batteries
is recommended.
• Non-rechargeable batteries are not to be recharged;
• Rechargeable batteries are only to be charged under adult supervision;
• Rechargeable batteries are to be removed from the toy before being charged;
• Different types of batteries or new and used batteries are not to be mixed;
• Batteries are to be inserted with the correct polarity (+ and -);
• Do not mix alkaline, standard (carbon-zinc), or rechargeable (nickel-cadmium)
batteries;
• Dead batteries are to be removed from the toy;
• The supply terminals are not to be short-circuited;
• Only use the batteries recommended by the manufacturer or batteries of an
equivalent type;
• Please remove batteries from the toy if it is not to be used over a long period of time.
• Protect the environment: Bring used batteries to a special collecting point!
Thank you!
5. Avoid operating around CB radios, high voltage electrical, wires and large
steel-reinforced concrete buildings.
6. Avoid running your vehicle and another vehicle on the same frequency.
7. DO NOT use in salt water.
8. Vehicle and transmitter are not waterproof. Do not immerse or use in water.
1. Best operation of vehicle is on a textured paved surface.
2. Always operate your vehicle within a 50 foot range.
3. Always operate your vehicle on dry surfaces away from cars and other full-size vehicles.
4. Always store your vehicle in a cool, dry place and off of painted or varnished surfaces.
1 . For proper operation, match the channel band on controller and vehicle (example: controller = A and vehicle = A)
2 . Move control buttons as indicated by solid arrows. Vehicle will move in direction as indicated by outlined arrow.
3 . NOTE: when traveling in reverse direction and changing quickly to forward, a wheelie trick can be performed.
CHANNEL SELECTION AND DIRECTION CONTROLS
360 spin right
360 spin left
SLOW
LEFT TURN
FORWARD
SLOW
LEFT TURN
BACKWARD
SLOW
RIGHT TURN
FORWARD
SLOW
RIGHT TURN
BACKWARD
FORWARD
REVERSE
PROPER OPERATION AND STORAGE OF YOUR VEHICLE
6 X AAA
© TOMY
Oak Brook, Illinois 60523-1940 U.S.A.
All Rights Reserved. Made in China.
099-T13027-EN(Ver# 0)
*Outside of the US,
contact your
local distributor.
www.tomy.com
TM & ©2010 Nintendo
•Do not use rechargeable batteries;
•Batteries must be removed and inserted under adult supervision;
•Non-rechargeable batteries are not to be recharged;
•Batteries are to be inserted with the correct polarity;
•Exhausted batteries are to be removed from the toy and disposed properly;
•Supply terminals are not to be short-circuited;
•Different types of batteries (e.g. alkaline, standard carbon-zinc or rechargeable) or new and used batteries are not to be mixed;
•Do not dispose of batteries in fire, may explode or leak.
This Category II radio communication device complies with Industry Canada Standard RSS-310.
Ce dispositif de radiocommunication de catégorie II respecte la norme CNR-310 d'Industrie Canada.
Please retain this information for future reference.
Please remove all packaging materials before giving to children.
An adult should periodically check this toy to ensure no damage or hazard exists, if so, remove from use.
Children should be supervised during play.
Keep addresses and phone number for future reference.
The item inside this package may vary from the photographs and/or illustrations.
BATTERY SAFETY INFORMATION
U.S. FCC Warning:
Carrier frequency and field strength
Frequency Channel: 27.145 MHz
27.145 MHz Field Strength: 74.16 dBµv/m @ 3m.
Changes or modifications to this unit not expressly approved by the party responsible for compliance could void the user’s authority to operate the
equipment.
NOTE: This equipment has been tested and found to comply with the limits for a Class B digital device, pursuant to Part 15 of the FCC Rules. These limits are
designed to provide reasonable protection against harmful interference in a residential installation. This equipment generates, uses and can radiate radio
frequency energy and, if not installed and used in accordance with the instructions, may cause harmful interference to radio communications. However,
there is no guarantee that interference will not occur in a particular installation. If this equipment does cause harmful interference to radio or television
reception, which can be determined by turning the equipment off and on, the user is encouraged to try to correct the interference by one or more of the
following measures:
- Reorient or relocate the receiving antenna.
- Increase the separation between the equipment and receiver.
- Connect the equipment into an outlet on a circuit different from that to which the receiver is connected.
- Consult the dealer or an experienced radio/TV technician for help.
This device complies with Part 15 of the FCC Rules.
Operation is subject to the following two conditions:
(1) this device may not cause harmful interference, and
(2) this device must accept any interference received,
including interference that may cause undesired operation.
1. Remove battery cover as shown and install
(2) AAA / LR03 1.5 Volt batteries. Replace
cover. Move the power button to the "A/B/C"
position and the red LED light will come on.
This will show you that the battery is good
and the transmitter is ready for operation.
PLEASE NOTE: Vehicle power switch must
be in the “A/B/C” position to receive
commands from the transmitter.
2. Change batteries when LED is dim or not on.
To operate your transmitter you will need
(2) AAA / LR03 1.5 Volt batteries (not
included). NOTE: for best performance, use
of alkaline batteries is recommended.
OFF A B C
OFF A B C
099-T13027-EN (Ver# 0)
size: 210mm(L) X 297mm(W)
Material: 100gsm + woodfree paper
Ref: Feb/28/2013 English version
BACKFRONT

SAFETY PRECAUTIONS (Keep manual for future reference)
This vehicle is not recommended for children under the age of 6 years. Please read all of the instructions before operating this
vehicle. Always follow general safety rules while operating vehicle: avoid hitting pets, furniture or people. Do not pick up vehicle
while it is in motion; keep hands, hair, and clothing away from this vehicle when the power switch is turned to the “A/B/C” position.
Remove batteries when vehicle is stored. Avoid tire contact on painted or varnished surfaces.
The JLX MICRODRIVE™ is built with an automatic shut-off function if the vehicle reaches excessive temperature during
operation. If the vehicle stops after a prolonged period of operation, turn off vehicle and controller, remove batteries from vehicle
and cease operation for ten (10) minutes. Reinsert batteries and resume play.
JLX MICRODRIVE
™
ACTION FEATURES
2-SIDED BODY DESIGN
HIDDEN INTERNAL
ANTENNA FOR
LONG RANGE
ACTION
RUBBER TIRES FOR
MASSIVE
SUPER BOUNCE
ACTION!
SUPER-GRIP TIRE
TREAD FOR
BETTER OFF-
ROAD TRACTION
DUAL AWD
MEGA TORQUE
ACTION
FCC NOTE:
This equipment has been tested and found to comply with the limits for a Class B digital device, pursuant to Part
15 of the FCC Rules. These limits are designed to provide reasonable protection against harmful interference in a
residential installation. This equipment generates, uses and can radiate radio frequency energy and, if not
installed and used in accordance with the instructions, may cause harmful interference to radio communications.
However, there is no guarantee that interference will not occur in a particular installation. If this equipment does
cause harmful interference to radio or television reception, which can be determined by turning the equipment off
and on, the user is encouraged to try to correct the interference by one or more of the following measures:
• Reorient or relocate the receiving antenna.
• Increase the space between the equipment and receiver.
• Connect the equipment into an outlet on a circuit different from that to which the receiver is connected.
• Consult the dealer or an experienced radio/TV technician for help.
U.S. FCC Warning:
Changes or modifications to this unit not expressly approved by the party responsible for compliance could void
the user’s authority to operate the equipment.
This device complies with Part 15 of the FCC Rules. Operation is subject to the following two conditions:
(1) this device may not cause harmful interference, and (2) this device must accept any interference received,
including interference that may cause undesired operation.
This Category II radio communication device complies with Industry Canada Standard RSS-310.
Ce dispositif de radiocommunication de catégorie II respecte la norme CNR-310 d'Industrie Canada.
“Operation is subject to the following two conditions: (1) this device may not cause interference, and (2) this
device must accept any interference, including interference that may cause undesired operation of the device.”
Carrier frequency and field strength
Frequency Channel: 27.145 MHz
27.145 MHz Field Strength: 74.16 dBµv/m @ 3m.
HARDENED STEEL
AXLES FOR ADDED
STRENGTH.
• FULL-THROTTLE, MAXIMUM-SPEED OPERATION
• SCALE SPEEDS OVER 300 MPH
• UP TO 50-FEET EFFECTIVE RANGE
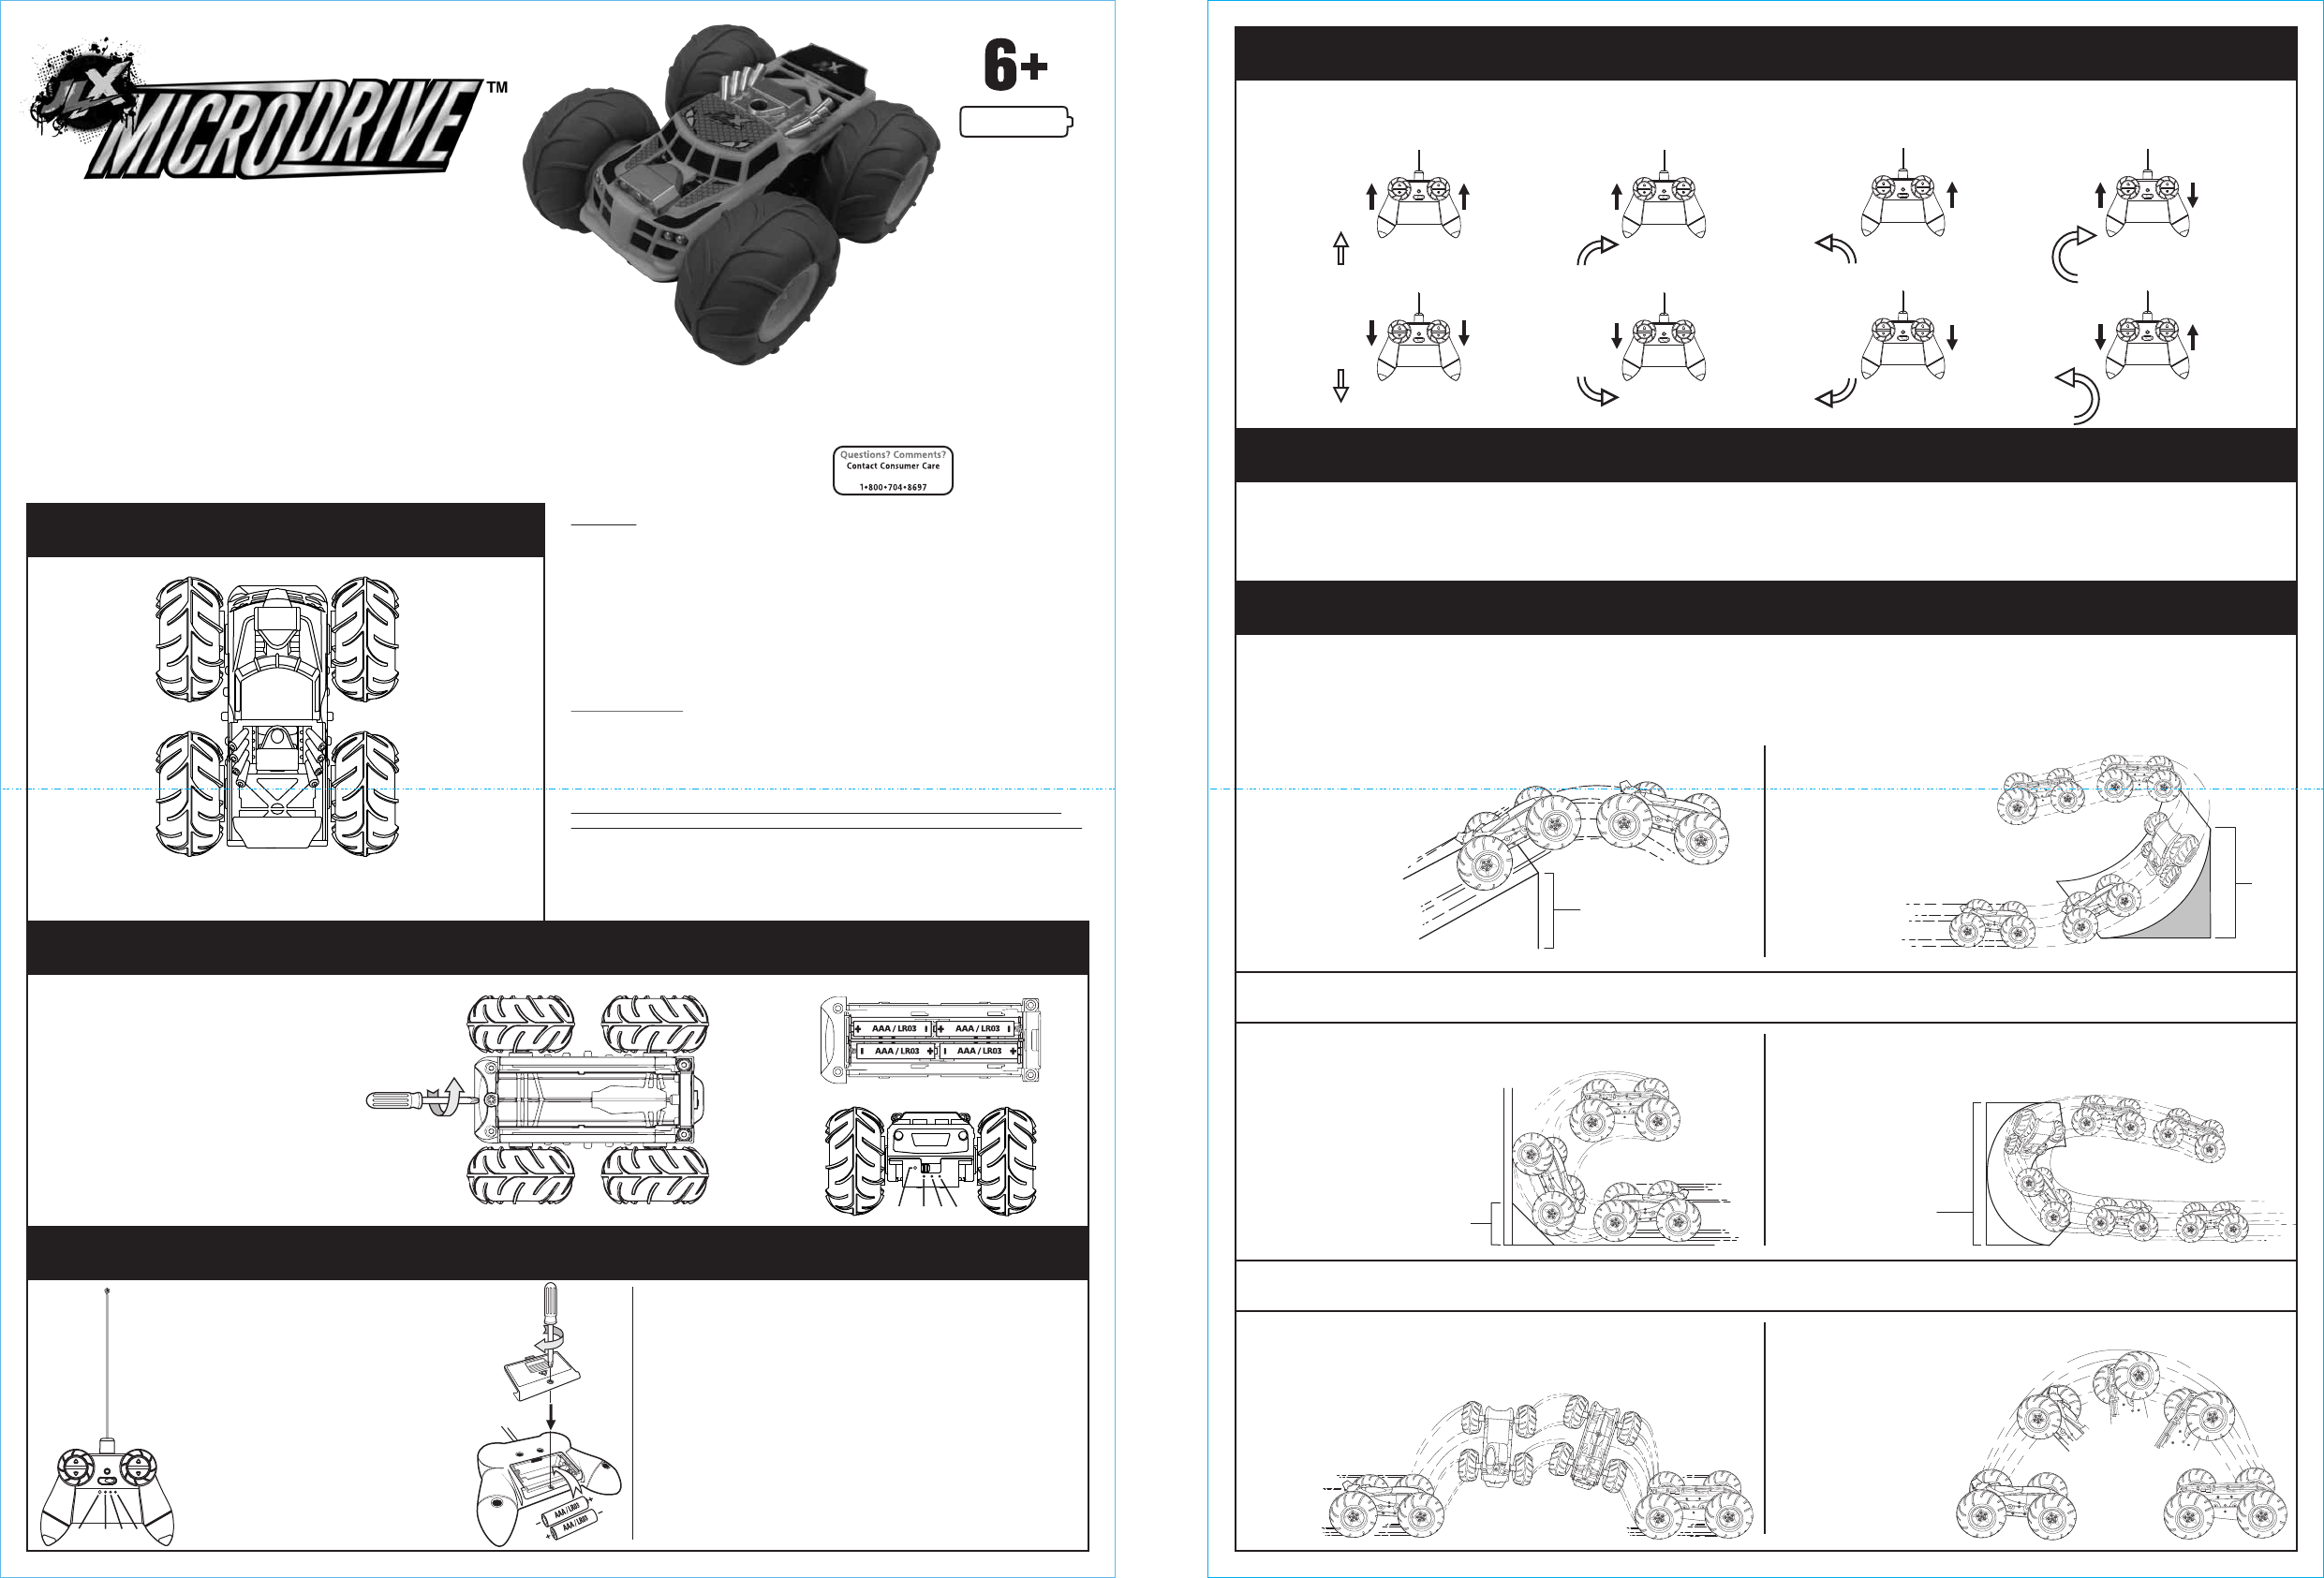
BATTERY REQUIREMENTS / INSTALLATION FOR VEHICLE
BATTERY REQUIREMENTS / INSTALLATION FOR TRANSMITTER
1. Remove battery cover as shown and install
(2) AAA / LR03 1.5 Volt batteries. Replace
cover. Move the power button to the "ON"
position and the red LED light will come on.
This will show you that the battery is good
and the transmitter is ready for operation.
PLEASE NOTE: Vehicle power switch must
be in the “A/B/C” position to receive
commands from the transmitter.
2. Change batteries when LED is dim or not on.
1. On the vehicle bottom, using a Phillips screw-
driver (not included), loosen screw and remove
the battery cover.
2. Insert 4 new AAA/LR03 batteries.(not included)
3. Replace battery cover and tighten screw.
4. Turn power switch to the “A/B/C” position.
NOTE: for best performance, use of alkaline batteries
is recommended.
• Non-rechargeable batteries are not to be recharged;
• Rechargeable batteries are only to be charged under adult supervision;
• Rechargeable batteries are to be removed from the toy before being charged;
• Different types of batteries or new and used batteries are not to be mixed;
• Batteries are to be inserted with the correct polarity (+ and -);
• Do not mix alkaline, standard (carbon-zinc), or rechargeable (nickel-cadmium)
batteries;
• Dead batteries are to be removed from the toy;
• The supply terminals are not to be short-circuited;
• Only use the batteries recommended by the manufacturer or batteries of an
equivalent type;
• Please remove batteries from the toy if it is not to be used over a long period of time.
• Protect the environment: Bring used batteries to a special collecting point!
Thank you!
To operate your transmitter you will need
(2) AAA / LR03 1.5 Volt batteries (not
included). NOTE: for best performance, use
of alkaline batteries is recommended.
EXPERT SKILL LEVEL:
MAXIMUM
RAMP HEIGHT
5”
MAXIMUM
RAMP HEIGHT
24”
WHEELIE FLIP
6. While running the car with the drive
wheels in front, quickly reverse both
control buttons. This should cause
the car to flip. (To identify drive
wheels, hold car off of ground.
Move control button and drive
wheels will spin.)
REVERSE RAMP FLIP
4. Build a semi-circular ramp
24 inches high and run the
car through it.
BARREL ROLL
5. While driving the car straight at
full speed, make a sudden turn
causing the car to roll. Too
sharp of a turn will cause
the car to spin instead
of roll.
WALL FLIP
3. Run car up a 5 inches high ramp and
onto a wall causing the car to flip.
SIMPLE SKILL LEVEL:
MODERATE SKILL LEVEL:
MAXIMUM
RAMP HEIGHT
24”
TRICKS AND STUNTS (outdoors only)
Here are a few of the exciting tricks and stunts you can do. The following tricks and stunts take practice and skill. Attempt simple skill level tricks before
going on to more advanced tricks. Remember you will need to practice to achieve these stunts.
STANDARD RAMP JUMP
1. Drive car up a ramp no
higher than 24 inches.
VERT RAMP
2. 1/4 Pipe Vertical Ramp.
5. Avoid operating around CB radios, high voltage electrical, wires and large
steel-reinforced concrete buildings.
6. Avoid running your vehicle and another vehicle on the same frequency.
7. DO NOT use in salt water.
8. Vehicle and transmitter are not waterproof. Do not immerse or use in water.
1. Best operation of vehicle is on a textured paved surface.
2. Always operate your vehicle within a 50 foot range.
3. Always operate your vehicle on dry surfaces away from cars and other full-size vehicles.
4. Always store your vehicle in a cool, dry place and off of painted or varnished surfaces.
HARD
RIGHT TURN
HARD
LEFT TURN
SLOW
LEFT TURN
FORWARD
SLOW
LEFT TURN
BACKWARD
SLOW
RIGHT TURN
FORWARD
SLOW
RIGHT TURN
BACKWARD
FORWARD
REVERSE
PROPER OPERATION AND STORAGE OF YOUR VEHICLE
18”
6 X AAA
© TOMY
Oak Brook, Illinois 60523-1940 U.S.A.
All Rights Reserved. Made in China.
099-11016-EN(Ver# 0)
*Outside of the US,
contact your
local distributor.
www.tomy.com
1 . For proper operation, match the channel band on controller and vehicle (example: controller = A and vehicle = A)
2 . Move control buttons as indicated by solid arrows. Vehicle will move in direction as indicated by outlined arrow.
3 . NOTE: when traveling in reverse direction and changing quickly to forward, a wheelie trick can be performed.
CHANNEL SELECTION AND DIRECTION CONTROLS
099-11016-EN (Ver #0)
size: 210mm(L) X 297mm(W)
Material: 100gsm + woodfree paper
Ref: Mar/01/2013 English version
BACKFRONT
OFF A B C
OFF A B C
SAFETY PRECAUTIONS (Keep manual for future reference)
This vehicle is not recommended for children under the age of 6 years. Please read all of the instructions before operating this
vehicle. Always follow general safety rules while operating vehicle: avoid hitting pets, furniture or people. Do not pick up vehicle
while it is in motion; keep hands, hair, and clothing away from this vehicle when the power switch is turned to the “A/B/C” position.
Remove batteries when vehicle is stored. Avoid tire contact on painted or varnished surfaces.
The JLX MICRODRIVE™ is built with an automatic shut-off function if the vehicle reaches excessive temperature during
operation. If the vehicle stops after a prolonged period of operation, turn off vehicle and controller, remove batteries from vehicle
and cease operation for ten (10) minutes. Reinsert batteries and resume play.
JLX MICRODRIVE
™
ACTION FEATURES
2-SIDED BODY DESIGN
HIDDEN INTERNAL
ANTENNA FOR
LONG RANGE
ACTION
RUBBER TIRES FOR
MASSIVE
SUPER BOUNCE
ACTION!
SUPER-GRIP TIRE
TREAD FOR
BETTER OFF-
ROAD TRACTION
DUAL AWD
MEGA TORQUE
ACTION
FCC NOTE:
This equipment has been tested and found to comply with the limits for a Class B digital device, pursuant to Part
15 of the FCC Rules. These limits are designed to provide reasonable protection against harmful interference in a
residential installation. This equipment generates, uses and can radiate radio frequency energy and, if not
installed and used in accordance with the instructions, may cause harmful interference to radio communications.
However, there is no guarantee that interference will not occur in a particular installation. If this equipment does
cause harmful interference to radio or television reception, which can be determined by turning the equipment off
and on, the user is encouraged to try to correct the interference by one or more of the following measures:
• Reorient or relocate the receiving antenna.
• Increase the space between the equipment and receiver.
• Connect the equipment into an outlet on a circuit different from that to which the receiver is connected.
• Consult the dealer or an experienced radio/TV technician for help.
U.S. FCC Warning:
Changes or modifications to this unit not expressly approved by the party responsible for compliance could void
the user’s authority to operate the equipment.
This device complies with Part 15 of the FCC Rules. Operation is subject to the following two conditions:
(1) this device may not cause harmful interference, and (2) this device must accept any interference received,
including interference that may cause undesired operation.
This Category II radio communication device complies with Industry Canada Standard RSS-310.
Ce dispositif de radiocommunication de catégorie II respecte la norme CNR-310 d'Industrie Canada.
“Operation is subject to the following two conditions: (1) this device may not cause interference, and (2) this
device must accept any interference, including interference that may cause undesired operation of the device.”
Carrier frequency and field strength
Frequency Channel: 27.145 MHz
27.145 MHz Field Strength: 74.16 dBµv/m @ 3m.
HARDENED STEEL
AXLES FOR ADDED
STRENGTH.
• FULL-THROTTLE, MAXIMUM-SPEED OPERATION
• SCALE SPEEDS OVER 300 MPH
• UP TO 50-FEET EFFECTIVE RANGE
BATTERY REQUIREMENTS / INSTALLATION FOR VEHICLE
BATTERY REQUIREMENTS / INSTALLATION FOR TRANSMITTER
1. Remove battery cover as shown and install
(2) AAA / LR03 1.5 Volt batteries. Replace
cover. Move the power button to the "ON"
position and the red LED light will come on.
This will show you that the battery is good
and the transmitter is ready for operation.
PLEASE NOTE: Vehicle power switch must
be in the “A/B/C” position to receive
commands from the transmitter.
2. Change batteries when LED is dim or not on.
1. On the vehicle bottom, using a Phillips screw-
driver (not included), loosen screw and remove
the battery cover.
2. Insert 4 new AAA/LR03 batteries.(not included)
3. Replace battery cover and tighten screw.
4. Turn power switch to the “A/B/C” position.
NOTE: for best performance, use of alkaline batteries
is recommended.
• Non-rechargeable batteries are not to be recharged;
• Rechargeable batteries are only to be charged under adult supervision;
• Rechargeable batteries are to be removed from the toy before being charged;
• Different types of batteries or new and used batteries are not to be mixed;
• Batteries are to be inserted with the correct polarity (+ and -);
• Do not mix alkaline, standard (carbon-zinc), or rechargeable (nickel-cadmium)
batteries;
• Dead batteries are to be removed from the toy;
• The supply terminals are not to be short-circuited;
• Only use the batteries recommended by the manufacturer or batteries of an
equivalent type;
• Please remove batteries from the toy if it is not to be used over a long period of time.
• Protect the environment: Bring used batteries to a special collecting point!
Thank you!
To operate your transmitter you will need
(2) AAA / LR03 1.5 Volt batteries (not
included). NOTE: for best performance, use
of alkaline batteries is recommended.
EXPERT SKILL LEVEL:
MAXIMUM
RAMP HEIGHT
5”
MAXIMUM
RAMP HEIGHT
24”
WHEELIE FLIP
6. While running the car with the drive
wheels in front, quickly reverse both
control buttons. This should cause
the car to flip. (To identify drive
wheels, hold car off of ground.
Move control button and drive
wheels will spin.)
REVERSE RAMP FLIP
4. Build a semi-circular ramp
24 inches high and run the
car through it.
BARREL ROLL
5. While driving the car straight at
full speed, make a sudden turn
causing the car to roll. Too
sharp of a turn will cause
the car to spin instead
of roll.
WALL FLIP
3. Run car up a 5 inches high ramp and
onto a wall causing the car to flip.
SIMPLE SKILL LEVEL:
MODERATE SKILL LEVEL:
MAXIMUM
RAMP HEIGHT
24”
TRICKS AND STUNTS (outdoors only)
Here are a few of the exciting tricks and stunts you can do. The following tricks and stunts take practice and skill. Attempt simple skill level tricks before
going on to more advanced tricks. Remember you will need to practice to achieve these stunts.
STANDARD RAMP JUMP
1. Drive car up a ramp no
higher than 24 inches.
VERT RAMP
2. 1/4 Pipe Vertical Ramp.
5. Avoid operating around CB radios, high voltage electrical, wires and large
steel-reinforced concrete buildings.
6. Avoid running your vehicle and another vehicle on the same frequency.
7. DO NOT use in salt water.
8. Vehicle and transmitter are not waterproof. Do not immerse or use in water.
1. Best operation of vehicle is on a textured paved surface.
2. Always operate your vehicle within a 50 foot range.
3. Always operate your vehicle on dry surfaces away from cars and other full-size vehicles.
4. Always store your vehicle in a cool, dry place and off of painted or varnished surfaces.
HARD
RIGHT TURN
HARD
LEFT TURN
SLOW
LEFT TURN
FORWARD
SLOW
LEFT TURN
BACKWARD
SLOW
RIGHT TURN
FORWARD
SLOW
RIGHT TURN
BACKWARD
FORWARD
REVERSE
PROPER OPERATION AND STORAGE OF YOUR VEHICLE
18”
6 X AAA
© TOMY
Oak Brook, Illinois 60523-1940 U.S.A.
All Rights Reserved. Made in China.
099-11018-EN(Ver# 0)
*Outside of the US,
contact your
local distributor.
www.tomy.com
1 . For proper operation, match the channel band on controller and vehicle (example: controller = A and vehicle = A)
2 . Move control buttons as indicated by solid arrows. Vehicle will move in direction as indicated by outlined arrow.
3 . NOTE: when traveling in reverse direction and changing quickly to forward, a wheelie trick can be performed.
CHANNEL SELECTION AND DIRECTION CONTROLS
OFF A B C
OFF A B C
099-11018-EN (Ver #0)
size: 210mm(L) X 297mm(W)
Material: 100gsm + woodfree paper
Ref: Mar/01/2013 English version
BACKFRONT